1
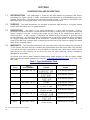
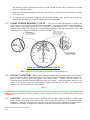
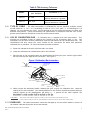
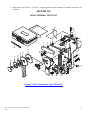
OPERATION AND SERVICE MANUAL FOR PACIFIC SCIENTIFIC© T60 DIRECT READING SERIES CABLE TENSIOMETER PART NUMBERS: T60-1001-C8-1A (NSN: 6635-00-530-1128) T60-1001-C9-1A (NSN: 6635-00-530-1129) T60-1002-C8-00 (BRITISH MODEL FOR CWT CABLES) T60-1002-C9-00 (BRITISH MODEL FOR CWT CABLES) SOP-TN-002 T60 Operations and Service Manual Rev. L TABLE OF CONTENTS SECTION I .....................................................................................................................................................2 INTRODUCTION A ND DES CRIP TION .........................................................................................................2 1-1. INTRODUCTION............................................................................................................................ 2 1-2. PURPOSE - ................................................................................................................................... 2 1-3. DESCRIP TION - ............................................................................................................................ 2 1-4. WARRANTY - ................................................................................................................................ 2 Table 1 Type Identification Table ..........................................................................................................2 Figure 1 Cable Tensiomet er, Typical .....................................................................................................3 SECTION II ....................................................................................................................................................3 SPECIAL SERV ICE TOOLS ........................................................................................................................3 2-1. SPECIAL SERV ICE TOOLS ........................................................................................................... 3 SECTION III ...................................................................................................................................................3 PREPARA TION FOR USE, STORAGE, and SHIPMENT ...............................................................................3 3-1. PREPARA TION FOR USE ............................................................................................................. 3 3-2. STORAGE ..................................................................................................................................... 3 3-3. SHIPME NT - .................................................................................................................................. 3 SECTION IV ...................................................................................................................................................4 OPERA TION INS TRUCTIONS .....................................................................................................................4 4-1. GENERA L INS TRUCTIONS ........................................................................................................... 4 4-2. OPERA TING INS TRUCTIONS -...................................................................................................... 4 4-3. MEASURING CABLE DIAME TE RS ................................................................................................. 4 Figure 2 T60 Cable Diameters ............................................................................................................. 4 4-4. TAK ING CABLE TENS ION REA DINGS, TYPE C8 ........................................................................... 5 Figure 3 Preset Instructions, Type C8 ...................................................................................................5 4-5. TAK ING TENS ION READINGS, TYPE C9 - ..................................................................................... 6 Figure 3.5 Preset Instructions, Type C9 ................................................................................................. 6 4-6. DIFFICULT LOCA TIONS ................................................................................................................ 6 4-7. ACCURA CY - ................................................................................................................................ 6 Table 2 T60 Accuracy Tolerance ...........................................................................................................7 4-8. TYPE OF CAB LE - ......................................................................................................................... 7 4-9. USE OF CALIB RA TION BAR -........................................................................................................ 7 Figure 4 Calibration Bar .......................................................................................................................7 4-10. OVERLOAD -................................................................................................................................. 7 SECTION V ....................................................................................................................................................8 PERIODIC INSPECTION, MAINTENA NCE, AND LUBRICA TION ...................................................................8 5-1. GENERA L - ................................................................................................................................... 8 Table 3 Lubrication Chart ......................................................................................................................8 SECTION V I...................................................................................................................................................8 TROUBLE SHOOTING ................................................................................................................................8 6-1. GENERA L - ................................................................................................................................... 8 6-2. SERVICE TROUBLES AND REME DIES - ....................................................................................... 8 Table 4 Trouble Shooting Chart ............................................................................................................9 SECTION V II ..................................................................................................................................................9 CALIBRA TION ............................................................................................................................................9 7-1. EQUIPMENT REQUIRED -............................................................................................................. 9 7-2. DISASSEMBLY PRIOR TO CALIBRA TION - ................................................................................... 9 7-3. CALIBRA TION - ............................................................................................................................. 9 7-4. CABLE SIZE INDICA TOR -........................................................................................................... 10 SECTION V III ...............................................................................................................................................11 GROUP ASSEMBLY PARTS LIS T .............................................................................................................11 Figure 5 Cable Tensiomet er, Type C8 and C9 .....................................................................................11 Table 5 P art List .................................................................................................................................12 SOP-TN-002 T60 Operations and Service Manual Rev. L 1 SECTION I INTRODUCTION AND DESCRIPTION 1-1. INTRODUCTION - This publication is issued as the basic Manual of Operation and Service Instructions for Types C8 and C9 Cable Tensiometers manufactured by OPTI Manufacturing Corp., Luquillo, Puerto Rico. The equipments covered are listed in table 1. Instructions contained in this publication apply to both types listed , unless specifically noted otherwise. 1-2. PURPOSE - The cable tensiometer are designed to measure cable tension in an airc raft control system while the cables are in a rigged condition. 1-3. DESCRIPTION - (See figure 1) The cable tensiometer is a hand-held instrument. A jaw is 1-4. WARRANTY - The T60 cable tensiometer has a warranty to the original customer for a period of located at the top of instrument. Actual contact on the cable is made by the riser block and the two sectors located in the jaw. A sliding yoke slides up the frame of the instrument to provide a measuring forc e. A dial indicator is located at the bottom of the instrument to give the actual tension indication. An actuating handle is pivoted at the center of the instrument and is motivated by a trigger spring within the body of the tensiometer. A pointer lock button is situated just above the dial indicator and a handle latch is located on the left side of the frame to engage the detent notch of the actuating handle. (1) one year on new units and (6) six months for repaired units from the invoice date. This warranty is to ensure the cable tensiometer is free of defects in materials and work manship under correct and normal use. The warranty can be void if the unit has been tampered, altered, dropped or damaged by an accident. All returns must have a Return Material Authorization (RMA) number. In order to obtain a RMA, please contact our Quality Department via email, [email protected], or via fax: (787) 889-2805. Table 1 Type Identification Table TYPE PART NUMBER Type C8 T60-1001-C8-1A CABLES , RANGE 10 to 200 lbs-tension 30 to 200 lbs-tension 80 to 200 lbs-tension British T60-1002-C8-00 3 CWT, 5 CWT, 10 CWT 15 CWT, 25 CWT 35 CWT, 45 CWT Type C9 T60-1001-C9-1A 1/8 10 to 200 lbs-tension 30 to 200 lbs-tension 80 to 200 lbs-tension 100 to 450 lbs-tension 100 to 450 lbs-tension British T60-1002-C9-00 SOP-TN-002 T60 Operations and Service Manual Rev. L 10 cwt, 15 cwt, 25 cwt, 35 cwt, 45 cwt 100 to 450 lbs-tension 2 UP TOP LEFT DOWN RIGHT CALIBRATION BAR BOTTOM RISER CABLE GAGE TAB POINTER LOCK BUTTON JAW BASE DIAL FACE SECTOR CABLE GAGE STOP PIN ACTUATING HANDLE POINTER UNLOCK BUTTON HANDLE LATCH PRESET ACTUATING RING Figure 1 Cable Tensiometer, Typical SECTION II SPECIAL SERVICE TOOLS 2-1. SPECIAL SERVICE TOOLS - No special tools are required for service or maintenance of the cable tensiometer. SECTION III PREPARATION FOR USE, STORAGE, and SHIPMENT 3-1. PREPARATION FOR USE - The cable tensiometer is shipped by the manufacturer in its own carrying case and is ready for us e. Each time the cable tensiometer is us ed it shall be removed from the case and the serial number stamped on the nameplate checked against t he serial number on the tab of the calibration bar. 3-2. STORAGE - When the cable tensiometer is not in us e it must be placed in its carrying case. There are no special instructions or precautions relative to storage. 3-3. SHIPMENT - If the cable tensiometer is to be shipped, it shall be placed in its carrying case and packed in such a manner as to avoid damage by common carrier. SOP-TN-002 T60 Operations and Service Manual Rev. L 3 SECTION IV OPERATION INSTRUCTIONS 4-1. GENERAL INSTRUCTIONS - Each time the instrument is removed from its case for use check the serial number on the nameplate to ascertain that it agrees with the serial number on the calibration bar. Before using the instrument check the calibration by means of the c alibration bar. (See paragraph 4-9.) WARNING Cable tensiometers should not be used for adjusting the rig load in a cable system where an autom atic cable tension regul ator i s installed. All such cable system s should be rigged by adjusting them so that the pointer on the cable tension regul ator scale indicates the correct number based on the surrounding temperature as indicated on the chart provided by the aircraft Maintenance Manual. The tensiometer may be used to check the tension so obtained, but it must be rem embered that the actual cable tension will vary from the nominal depending on the errors in the instrument itself, manufacturing tolerance of springs in the regulators, rate of the regulator spring, and condition of the control cabl e. Cable tensi on readings taken on a regulated control system therefore can be mi sleading and can result in damage through improper rigging. 4-2. OPERATING INSTRUCTIONS - Either the right- or left-hand may be used to operate this instrument. The handle latch retains the actuating handle. The latch is automatically released when the actuating handle is squeezed. To re-latch the actuating handle, the handle must be squeezed firmly against the side of the tensiometer and the handle latch pushed up from the bottom against its spring load and held in the extended position while the actuating handle is slowly released against the handle latch. The latch end will be retained in the detent socket provided in the actuating handle. NOTE When operating the instrument handle, the handle should never be allowed to snap open; it should be released gradually, allowing the unit to clamp firmly on the cable. 4-3. MEASURING CABLE DIAMETERS Figure 2 T60 Cable Diameters 1" Ø EXAMPLE 8 CABLE SIZE CABLE SIZE GAGE 1 16 1 8 INDICATOR CABLE SIZE 1 3 1 1 8 16 4 16 1 3 1 1 8 16 4 16 1 3 4 16 STOP PIN 1 3 1 1 8 16 4 16 HANDLE HANDLE LATCH 200 125 + 12 5- 10 1 16 1 8 3 32 5 32 3 16 7 32 200 125 + 12 51 4 150 10 1 16 140 1 8 3 32 5 32 3 16 7 32 200 125 + 12 51 4 150 120 PACIFIC SCIENTIFIC CABLE TENSIOMETER 30 40 POUNDS TENSION 50 60 70 100 80 a SOP-TN-002 T60 Operations and Service Manual Rev. L 1 16 1 8 3 32 5 32 3 16 7 32 1 4 150 140 130 20 120 110 90 10 140 130 20 PACIFIC SCIENTIFIC CABLE TENSIOMETER 30 40 POUNDS TENSION 50 60 b 70 130 120 110 100 90 80 20 PACIFIC SCIENTIFIC CABLE TENSIOMETER 30 40 POUNDS TENSION 50 60 70 110 100 90 80 c 4 a. With the actuating handle in the latched position, move the cable size gage to the left against the cable stop pin. See Figure 2a. b. Release handle latch by squeezing the actuating handle. Retain the actuating handle unlatched against the side of the tensiometer. Place the instrument on the cable, making certain that the cable is squarely aligned in the jaws and resting on the sectors and riser block. Care should be taken that the cable is resting flat against the jaw base. Slowly release the actuating handle, allowing the sectors to slide up and grip the cable. Remove all restraint from the actuating handle. See figure 2b. c. Remove tensiometer from the cable by returning the actuating handle to the latched position. The black line opposite the position on the cable size gage indicates the cable diameter. See figure 2c. WARNING When re-latching actuating handl e, verify that the latch i s posi tioned in the detent socket before rel easing the handle. If thi s i s not done, the handle will be allowed to snap open with possi ble personal injury. 4-4. TAKING CABLE TENSION READINGS, TYPE C8 a. Preset dial by rotating the knurled rim of the dial indicator until the poi nter is directly over the white square corres ponding to the c able diameter.(See Figure 3a) SET POINTER DIRECTLY OVER CENTER OF SQUARE CORRESPONDING TO THE CABLE DIAMETER SET POINTER HERE WHEN READING TENSION LOADS IN EXESS OF 125 POUNDS. (UPPER LEFT CORNER) 125 200 1 + 12 5- 25+ 12 5- 10 3a 1 16 3 32 1 8 5 32 3 16 7 32 1 4 20 120 PACIFIC 30 3b 140 SET POINTER HERE WHEN READING TENSION LOADS LESS THAN 125 POUNDS. (BOTTOM LEFT CORNER) CABLE TENSIOMETER 40 100 POUND TENSION 50 60 70 80 Figure 3 Preset Instructions, Type C8 Note: Shown figure is for referenc e purpose, actual dial may vary. NOTE An examination of the dial will indicate that for the larger size cables there are two rows preset squares. One row i s identified by 125-; the other row i s identified by 125+. When m easuring tensions below 125 pounds use the minus square; when measuring tensions in excess of 125 pounds use the plus square. (See Figure 3b) b. Release the handle latch by squeezing the actuating handle. Retain the actuating handle unlatched against the side of the tensiometer. Plac e the instrument on the cable, making certain that the cable is s quarely aligned in the jaws and against the jaw bas e. Slowly release SOP-TN-002 T60 Operations and Service Manual Rev. L 5 the actuating handle, allowing the s ectors to slide up and grip the cable. Remove all restraint from the actuating handle. c. With the tensiometer clamped on the cable the tension is read directly by the pointer p osition on the dial face. d. To remove the tensiometer c ompress the actuating handle firmly against the side of the tensiometer and latch the handle in position with the handle latch. 4-5. TAKING TENSION READINGS, TYPE C9 - The Type C9 cable tensiometer is us ed in the same manner as the Type C8 with the following exception: the larger size cables have two rows of pres et squares, one row identified by 250-, the other row identified by 250+. When measuring cable tensions below 250 pounds use corresponding squares in the row indicated by 250- and conversely, for the opposite condition, us e 250+.(See Fig. 3.5) SET POINTER HERE WHEN READING TENSION LOADS IN EXESS OF 250 POUNDS. (UPPER LEFT CORNER) SET POINTER DIRECTLY OVER CENTER OF SQUARE CORRESPONDING TO THE CABLE DIAMETER 250 300 300 350 1 8 5 32 250 250+ 200 2503 16 7 32 1 4 150 + 25 0SET POINTER HERE WHEN READING TENSION LOADS LESS THAN 250 POUNDS. (BOTTOM LEFT CORNER) 400 450 PACIFIC CABLE TENSIOMETER 100 POUNDS TENSION Figure 3.5 Preset Instructions, Type C9 Note: Shown figure is for referenc e purpose, actual dial may vary. 4-6. DIFFICULT LOCATIONS - When taking readings amo ng closely grouped cables or in awkward or blind locations, let the actuating handle remain open with the instrument clamped on the cable. While in this position, press the pointer lock button down. Remove the tensiometer by compressing the actuating handle against the cas e and remove. The dial indicator pointer will be locked in a position directly over the tension reading obtained on the cable. To releas e this reading, press up on the pointer unlock button. NOTE Do not attempt to take cable tension readings with the pointer lock button pressed down. If the pointer lock button i s depressed during a tensi on reading, a fal se reading will result due to the friction of the brake mechani sm. 4-7. ACCURACY - Because of the uneven surface of stranded c able, slight variations in reading may occur on the same cable at the same tension. This is especially true of 5/32-inch diameter cable and larger. To obtain the greatest possible accuracy, take three to five readings at slightly different locations on the cable. Average these readings to obtain the maximum degree of accuracy. SOP-TN-002 T60 Operations and Service Manual Rev. L 6 Table 2: T60 Accuracy Tolerance RANGE (LBS-TENSION) MODEL T60-C8 10-200 T60-C9 100-450 ACCURACY (+/-) ±5% of indicator or one minor division whichever is greater. ±5% of indicator or one minor division whichever is greater. 4-8. TYPE OF CABLE - The cable tensiometer is calibrated for use on standard, multiple-strand, aircraft cable of 7 x 7 or 7 x 19 stranding in sizes of 1/16, 3/32, and 7 x 19 stranding for 1/8 through 1/4 inch diameter on cable. Do not attempt to use the cable tensiometer on cables of a different construction. Cables construction and specification in accordance with MIL-DTL-83420, general s pecification for flexible wire rope for airc raft control cables. 4-9. USE OF CALIBRATION BAR - A Calibration bar is supplied with each tensiometer. This provides an immediate means of checking the accuracy of the instrument while in use. The calibration bar has been c arefully checked to read the load marked on the identification tab. The identification tab also carries the serial number of the instrument for which that particular calibration bar is provided. To check calibration proceed as follows: a. Preset the indicator dial to the smallest cable size listed. b. Gras p the calibration bar identification tab in the left hand. c. Place the bar in the instrument with the identification tab facing the user, and the right end of the bar flush with the edge of the instrument. See Figure 4. Figure 4 Calibration Bar Instruction TOP LEFT UP DOWN RIGHT CALIBRATION BAR FLUSH TO THIS SURFACE BOTTOM RISER (under this cover) CABLE GAGE TAB POINTER LOCK BUTTON JAW BASE DIAL FACE SECTOR CABLE GAGE STOP PIN ACTUATING HANDLE POINTER UNLOCK BUTTON HANDLE LATCH PRESET ACTUATING RING d. Slowly release the actuating handle, allowing the jaws to grip the calibration bar. Note the reading on the dial indicator. The reading obtained in this manner should correspond with the reading marked on the identification tab within +/- 2 perc ent of the value marked. The CAUTION: THE TEST BAR SHALL BE PLACED FLUSH A GAINST THE RISER FACES SUCH THAT THE FA CES OF THE RISERS ARE PA RA LLEL WITH THE TEST BAR. 4-10. OVERLOAD - The cable tensiometer cannot be damaged by use on cables loaded in excess of the amount indicated by the dial on the tensiometer. SOP-TN-002 T60 Operations and Service Manual Rev. L 7 SECTION V PERIODIC INSPECTION, MAINTENANCE, AND LUBRICATION 5-1. GENERAL - No periodic inspection, maintenance, or lubrication is required for c able tensiometers. As a matter of general practice, the instrument should be kept clean at all times. Particular attention should be paid to the two sectors and the ris er block to see that they are always free from foreign matter. The instrument as shipped by the manufacturer has been lubricated. In the event that repairs are made as outlined in Section VI, lubrication should be accomplished as listed in table 3. Method of application is a light wipe. *Explanation: D. C. #33: Dow Corning Greas e #33 fluid type or equivalent to NATO G-395 per MIL-PRF-81322. fluid type Table 3 Lubrication Chart FIG. 4 INDEX NO. LUBRICATION* LOCATION 20 23 D.C. #33 D.C. #33 26 29 32 38 40 D.C. D.C. D.C. D.C. D.C. Both sides On OD of pins and flat face ID and OD OD OD OD OD #33 #33 #33 #33 #33 SECTION VI TROUBLE SHOOTING 6-1. GENERAL - The instrument will be free from trouble such as would be caused by nominal use. 6-2. SERVICE TROUBLES AND REMEDIES - (See table 4) A listing of common troubles together The instrument, however, can be damaged by mistreatment and improper usage. If a detail part of the instrument becomes damaged or broken, disass emble the instrument in the order of the index numbers indic ated on the exploded view, figure 5. All detail parts of the instrument are so integrated that in order to perform a disassembly operation it is necessary that disassembly be started with index number 1 and continued in numerical sequenc e. The only exception to this is the latch mechanism (37 through 40, figure 5). Reassembly is the opposite of disassembly. Whenever the instrument has been disassembled, it must be rec alibrated. (See Section VII.) with their probable causes and remedies is presented as a trouble-shooting chart, table 4. SOP-TN-002 T60 Operations and Service Manual Rev. L 8 Table 4 Trouble Shooting Chart TROUBLE Tensiometer reads high PROBABLE CAUSE (See figure 5) Faulty dial indicator (35) Weak trigger spring (29) Tensiometer reads low Dirt and foreign matter between f rame (41) and sectors (24) Worn out sectors (24) or riser Block (5) Faulty dial indicator (35) Pointer lock will not function Switch spring (30) broken Handle latch will not lock handle in close position Handle latch spring (39) weak or broken REMEDY Replac e dial indicator and calibrate Replac e trigger spring and calibrate Clean and reassemble Replac e sectors and ris er block; then calibrate Replac e dial indicator and calibrate Replac e switch spring and calibrate Replac e latch spring. Do not calibrate SECTION VII CALIBRATION 7-1. EQUIPMENT REQUIRED - Calibrating the cable tensiometer it will be necessary to have aircraft cables of various sizes and a method of accurately loading these cables wit h a range of loads from 10 to 450 pounds. 7-2. DISASSEMBLY PRIOR TO CALIBRATION - (See figure 5) Disassemble the instrument 7-3. CALIBRATION - Calibrate the instrument as follows: following the order of the index numbers, starting with index number 1 down through and including index number 10. a. Move shaft post (12) up and down and check for free movement and that the pointer returns to the same position on the dial indicator each time. b. If binding or erratic indication occurs disassemble the instrument further to ascertain the cause. c. Check for free movement of sectors (24). There shall be 0.015-inch maximum clearance between sectors (24) and frame (41). This is controlled by number of washers (25) placed under the sectors (24). d. Place a washer (8) on eac h top pin of frame (42). Position mains pring (7) and sec ure with clips (6). e. Check that shaft post (12) just or almost contacts mainspring (7) and that mains pring does not deflect shaft post and consequently pointer of dial indicator (3 5). If necessary, adjust position of shaft post (12) on indicator shaft (13) by loosening setscrews (11) to obtain this condition. Be caref ul not to get a false position. This can occur if indicator shaft (13) is not bottomed in dial indicator (35). SOP-TN-002 T60 Operations and Service Manual Rev. L 9 f. Position risers block (5). The riser block should not deflect the mainspring (7). If it does, select a riser block with a low toleranc e. g. Place clips (4) on the lower pins of frame (4 1). Between the pins and the top of the clip place a 0.010-inch shim (3) on each side of the instrument. h. Drop spring (10) onto shaft (13) and secure with screw (9). i. Check for a symmetrical bite. On a pre-loaded 7/32 cable, start to take a tension reading but do not remove all restraint from handle. With the tensiometer in this position, wiggle the cable with free hand to determine that the resistance to movement is the same at both sectors (24). Add shims (3) as necessary to balance bite. Add shims to obtain lower readings and remove shims to obtain higher readings. Us e shims that are 0.003 or 0.005 inch thick and place them on the bottom of the pins. After the bite is balanced, plac e equal shim thickness on each side of the instrument for subsequent c alibration. j. Proceed with calibration by preloading the cable with a load equal to the high end of the instrument range. The high end is 200 lbs for the type C8 and 450 lbs for the type C9. Measure the tension and add or remove shim (3) as nec essary to mak e indicator read between 190-195 lbs for Type C8 and between 430-440 lbs for the Type C9. Remember, the addition of shims (3) makes lower readings. On the other hand, the remove of shims (3) makes higher readings. Try to set as close as possible to 200 lbs for type C8 and 450 lbs for type C9. k. Proceed to verify calibration by preloading the cable with a load equal to the low end of the instrument. Measure tension and add or remove shims (3) as nec essary to make indicator read between 75-80 lbs for Type C8 and between 142- 150 lbs for the type C9. l. Repeat steps i and j for cable on Type C8 and 1/8 cable on Type C9, to improve indicator accuracy to +/- 5 percent (If closest possible accuracy is desired take three to five reading at slightly different locations on the cable and average them). On step j on Type C8 the low end is 10 lbs and the desired indicator read between 9-11.Do not remove the 0.010 inch shims from the top of the frame pins. After this, the unit shall make linearity for all c ables and tension ranges. m. Replac e cover (2) and secure with screws (1). n. Drop spring (10) onto shaft (13) and secure with screw (9). o. Preset the indicator dial to the smallest cable size. Measure the load required to deflect the calibration bar. Remove the load marked on the identification tab and mark the new val ue indicated on the tensiometer. 7-4. CABLE SIZE INDICATOR - To re-establish the accuracy of the cable size indicator, proceed as follows: a. Remove existing mark on center pin washer (17) with a fine file. b. With handle in locked position, rotate cable size indicator (16) counterclockwise until it contacts stop on handle assembly (19). See figure 2 for reference. c. Clamp cable tensiometer on a cable of known diameter. d. Return handle to lock position. NOTE In next step, do not move the cable size indicator (16). SOP-TN-002 T60 Operations and Service Manual Rev. L 10 e. Mark c enter pin washer (17) with a sc ribe opposite known diameter inc rement on c able size indicator. SECTION VIII GROUP ASSEMBLY PARTS LIST G IN NS AT IO ER UCT P O TR S IN 44 46 9 10 13 4 14 43 1 7 2 8 3 6 5 12 18 42 20 18 41 18 24 25 19 11 45 32 31 17 33 16 34 29 40 15 36 22 30 39 21 23 26 27 37 28 38 35 Figure 5 Cable Tensiometer, Type C8 and C9 SOP-TN-002 T60 Operations and Service Manual Rev. L 11 Table 5 Part List FIG. & INDEX NO. 5- -1 -2 -3 -4 -5 -6 -7 -8 -9 -10 PART NUMBER T60-1001-C8-1A T60-1001-C9-1A T60-1002-C8-00 T60-1002-C9-00 COML # 0901100-55 T60012 T5033-3 T5033-5 T5033-10 T5018 T5013 T5020 T5019-1 T5019-3 T5034 T60032 T541 -11 COML # 0901100-48 -12 -13 -14 -15 -16 -17 -18 -19 -20 -21 -22 -23 -24 -25 -26 T60031 T60026 COML #0901100-99 T60018 T60022 T60058 T60019 T60068 T60014-1 T60037 T60070 T60071 T60023 T537 T60052 T60030 DESCRIPTION 1234567 TENSIOMETER ASSY, Cable TENSIOMETER ASSY, Cable TENSIOMETER ASSY, Cable-British Model TENSIOMETER ASSY, Cable-British Model . SCREW, 4-40 x ½ inch long Phillips oval head . COVER, Head . SHIM, Clip, 0.003 inch thick . SHIM, Clip, 0.005 inch thick . SHIM, Clip, 0.010 inch thick . CLIP . BLOCK, Riser . CLIP, Mainspring . MAINSPRING . MAINSPRING . WASHER . SCREW, Spring adjusting . SPRING, Follower riser . SCREW, 4-40 x 3/16 inch long hexagonal socket head cup point black oxide . POST, Shaft . SHAFT, Indicator . SCREW, 10-32 x 5/16 inch long socket head . PIN, Center . INDICATOR, Cable size . INDICATOR, Cable size-British Model . WASHER, Center pin . WASHER, Spacer . HANDLE ASSY . WASHER, Spacer . LINER, Pin . LINER, Roller . YOKE ASSY . SECTOR . WASHER . ROLLER, Guide yoke -27 AN531-4RF6 . SCREW, 4-40 X 3/8" thread cutting Phillips head 82º C sunk -28 -29 -30 -31 -32 . PLATE . SPRING, Trigger . SPRING, Switch . PIN, Switch spring . SHAFT, Switch . SCREW, Indicator, 2-64 x 1/4" long round head Phillips Recess UNF-2A T60008 T60050 T60035 T60048 T60006 -33 MS35207-203 SOP-TN-002 T60 Operations and Service Manual Rev. L UNITS PER ASSY REF. REF. REF. REF. 2 1 A/R A/R A/R 2 1 2 1 1 2 1 1 USABLE ON CODE A B C D A,C B,C 2 1 1 1 1 1 1 1 2 1 1 1 1 1 2 6 1 A,B C,D 2 1 1 1 1 1 2 12 FIG. & INDEX NO. PART NUMBER -34 AN960-3 -35 T60059 T60057 T60060 T60067 -36 COML #0908100-03 T60021 -37 COML #0913200-02 -38 -39 -40 -41 -42 -43 -44 -45 -46 . T60025 T60028 T60024 T60021 T60074 (not shown) T60011 T60033 T60054 T60053 T5036 MS20470AD2-3 T5138-60 0922100-88 T5185-51 T5184-01 WI-CU-002 WI-CU-002 (T60047) T60039 T60040 DESCRIPTION 1234567 . WASHER . INDICATOR, Dial . FACE, Dial-British Model . INDICATOR, Dial . FACE, Dial-British Model . BALL BEARING, 0.093 dia cres FRAME ASSY . PIN, Groove type # 4, 1/16 dia x 5/16 inch long . CAP, Handle lock . SPRING, Handle latch . PLUNGER, Handle lock . Frame Assy . . BEARING . . FRAME . . PIN-FRAME . TEST BAR ASSY, Calibrating . . TAG . . TEST BAR . . RIVET, 1/6 dia x 3/16 inch long . CARRYING CASE ASSY . . BLACK CASE . . INSERT CUSHION . . CUSHION, T60 . . INSTRUCTIONS SHEET, Operating . . INSTRUCTIONS SHEET, British Model . LABEL, INSTRUCTIONS . LABEL, NAMEPLATE Denotes non-subassembly or final component part. UNITS PER ASSY 2 1 1 1 1 1 1 USABLE ON CODE A A,C B B,D 1 1 1 1 1 1 1 8 1 1 1 1 1 1 2 1 1 1 1 1 A, B C, D . . Denotes subassembly parts. REVISION HISTORY Previous Revision F G H I Actual Revision G H I J J K K L Effective Da te Change Descrip tion 02/09/2006 08/26/2006 3/16/2007 07/13/07 Section VII- Calibration proc edures updated Table 1-1 & Section VII revised Section 1- 4 added Section 5- 1 & table of Figure 8-1 revised Update Figures, Table (Section 8), Change the number 4/1/2009 identification to Tables and Figures. Update Figure 3, Add Figure 3.5, Tables 2, 4, Sections 48/19/2010 3, 6-1 and 7- 2, table 5, change the Manual title. OPTI Manufacturing Corp. Road 992 Km .0.3 Luquillo Industrial Park, PO Box 559 Luquillo, PR 00773-0559 USA Phone: (787) 889-2285 / Fa x: (787) 889-2805 fax Email: [email protected] Copyright. OPTI Manufacturing Corp. All Rights Reserved. For the latest revision of this manual, refer to our website http://www.optimanufacturing.com SOP-TN-002 T60 Operations and Service Manual Rev. L 13