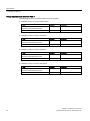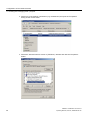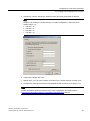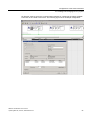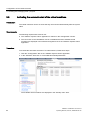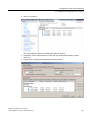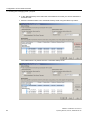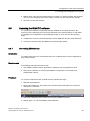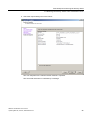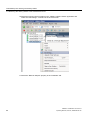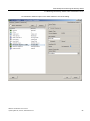
1
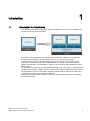
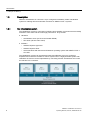
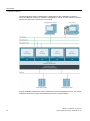
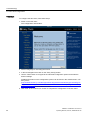
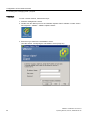
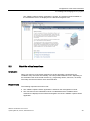
SIMATIC Virtualization as a Service
___________________
Preface
1
___________________
Introduction
SIMATIC
SIMATIC Virtualization
as a Service
Operating Manual
02/2014
A5E32529703-AA
2
___________________
Commissioning
Configuration of the virtual
3
___________________
machines
Access to the virtual
___________________
4
machines
Switch off and start the
___________________
5
whole system
Data backup and restoring
___________________
6
the delivery status
Legal information
Warning notice system
This manual contains notices you have to observe in order to ensure your personal safety, as well as to prevent
damage to property. The notices referring to your personal safety are highlighted in the manual by a safety alert
symbol, notices referring only to property damage have no safety alert symbol. These notices shown below are
graded according to the degree of danger.
DANGER
indicates that death or severe personal injury will result if proper precautions are not taken.
WARNING
indicates that death or severe personal injury may result if proper precautions are not taken.
CAUTION
indicates that minor personal injury can result if proper precautions are not taken.
NOTICE
indicates that property damage can result if proper precautions are not taken.
If more than one degree of danger is present, the warning notice representing the highest degree of danger will
be used. A notice warning of injury to persons with a safety alert symbol may also include a warning relating to
property damage.
Qualified Personnel
The product/system described in this documentation may be operated only by personnel qualified for the specific
task in accordance with the relevant documentation, in particular its warning notices and safety instructions.
Qualified personnel are those who, based on their training and experience, are capable of identifying risks and
avoiding potential hazards when working with these products/systems.
Proper use of Siemens products
Note the following:
WARNING
Siemens products may only be used for the applications described in the catalog and in the relevant technical
documentation. If products and components from other manufacturers are used, these must be recommended
or approved by Siemens. Proper transport, storage, installation, assembly, commissioning, operation and
maintenance are required to ensure that the products operate safely and without any problems. The permissible
ambient conditions must be complied with. The information in the relevant documentation must be observed.
Trademarks
All names identified by ® are registered trademarks of Siemens AG. The remaining trademarks in this publication
may be trademarks whose use by third parties for their own purposes could violate the rights of the owner.
Disclaimer of Liability
We have reviewed the contents of this publication to ensure consistency with the hardware and software
described. Since variance cannot be precluded entirely, we cannot guarantee full consistency. However, the
information in this publication is reviewed regularly and any necessary corrections are included in subsequent
editions.
Siemens AG
Industry Sector
Postfach 48 48
90026 NÜRNBERG
GERMANY
A5E32529703-AA
Ⓟ 03/2014 Subject to change
Copyright © Siemens AG 2014.
All rights reserved
Preface
Purpose of the manual
This document supports you in commissioning and configuring the virtualization system.
Core content
The following core issues are covered in this document:
● What is SIMATIC Virtualization as a Service?
● Which services are included?
● How is the virtualization system commissioned?
● How is the virtualization system configured in a PCS 7 environment?
● How can the virtualization system be extended?
● How does remote log in work on virtual machines (VMs)?
● How is the data backed up?
Required basic knowledge
General knowledge in the area of automation engineering and process control engineering is
required to understand this documentation.
Validity
This document is valid for the following components of the "SIMATIC Virtualization as a
Service V1.0" virtualization system:
● SIMATIC PCS 7 V8.0 SP1
● VMware vSphere 5.1
● HP Proliant DL380P GEN8
● HP T510 ThinClient
SIMATIC Virtualization as a Service
Operating Manual, 02/2014, A5E32529703-AA
3
Preface
SIMATIC Virtualization as a Service
4
Operating Manual, 02/2014, A5E32529703-AA
Table of contents
Preface ................................................................................................................................................... 3
1
2
3
Introduction ............................................................................................................................................. 7
1.1
Introduction to virtualization ........................................................................................................... 7
1.2
1.2.1
1.2.2
Description ..................................................................................................................................... 8
The virtualization system ............................................................................................................... 8
Service ........................................................................................................................................... 9
1.3
Function principle ........................................................................................................................... 9
1.4
Advantages ..................................................................................................................................11
1.5
1.5.1
1.5.2
Scope of delivery..........................................................................................................................12
Hardware and software components ...........................................................................................12
Services .......................................................................................................................................15
Commissioning ..................................................................................................................................... 17
2.1
2.1.1
2.1.2
2.1.3
Preparation...................................................................................................................................17
Unpack and check delivery unit ...................................................................................................17
Assemble devices ........................................................................................................................17
Additional components required ..................................................................................................18
2.2
2.2.1
2.2.2
2.2.3
2.2.4
2.2.5
2.2.6
Connecting the hardware components ........................................................................................19
Overview of the hardware components .......................................................................................19
Description of the network connections .......................................................................................20
Connect the virtualization server and management console .......................................................22
Connecting the thin client .............................................................................................................24
Connection of automation systems ..............................................................................................25
Connect a second virtualization server for redundant virtual OS servers....................................26
2.3
Configuring the virtualization server.............................................................................................27
2.4
Configuration of the management console ..................................................................................33
2.5
2.5.1
2.5.2
Thin client configuration ...............................................................................................................37
Thin clients with Windows operating system ...............................................................................37
Thin clients with HP ThinPro operating system ...........................................................................39
Configuration of the virtual machines ..................................................................................................... 41
3.1
Start the "VMware vSphere Client" application ............................................................................41
3.2
Start the virtual machines ............................................................................................................43
3.3
Setting the network connections ..................................................................................................47
3.4
Using SOFTNET-IE .....................................................................................................................50
3.5
Activating the automatic start of the virtual machines..................................................................52
SIMATIC Virtualization as a Service
Operating Manual, 02/2014, A5E32529703-AA
5
Table of contents
4
5
6
3.6
3.6.1
3.6.2
Licensing the SIMATIC software ................................................................................................. 55
Connecting USB devices ............................................................................................................ 55
Transfer the SIMATIC licenses ................................................................................................... 56
3.7
Creating and managing PCS 7 projects ...................................................................................... 56
Access to the virtual machines .............................................................................................................. 59
4.1
Access to virtual PCS 7 ES, PCS 7 OS server, and PCS 7 web server ..................................... 59
4.2
4.2.1
4.2.2
Access to virtual PCS 7 OS clients ............................................................................................. 61
Creating a remote desktop connection (RDP) ............................................................................ 61
Log off and separate the connection ........................................................................................... 72
Switch off and start the whole system.................................................................................................... 73
5.1
Start the whole virtualization system ........................................................................................... 73
5.2
Shut down the whole virtualization system ................................................................................. 74
Data backup and restoring the delivery status ....................................................................................... 77
6.1
Backing up the virtual machines ................................................................................................. 77
6.2
6.2.1
6.2.2
Restoring the delivery status of the virtual machines ................................................................. 78
Remove the virtual machines ...................................................................................................... 78
Restore delivery status of the virtual machines by importing OVF templates ............................ 79
6.3
6.3.1
6.3.2
6.3.3
Restoring the delivery status of the virtualization server ............................................................ 88
Installing the "VMware vSphere ESXi" software ......................................................................... 89
Configuration of the IP address and network adapter ................................................................ 91
Import additional configuration data ............................................................................................ 96
SIMATIC Virtualization as a Service
6
Operating Manual, 02/2014, A5E32529703-AA
Introduction
1.1
1
Introduction to virtualization
Virtualization is a method of dividing up physical hardware resources on one computer into
several logical (virtual) environments.
As a result of the virtualization the operating system and user software on a computer is
detached from its hardware and provided in the form of a virtual machine (VM).
A virtual machine refers to software that depicts a real computer and can itself execute
applications. Virtual machines have virtual hardware (e.g. graphics card, CPU, memory
(RAM), network cards, and hard disks on SCSI or IDE controllers) and standardized virtual
device drivers.
Several virtual machines can be implemented separately from each other on a real, physical
computer (host system). Isolation prevents conflicts from software dependencies and offers
the opportunity to start and stop virtual machines independently of each other. If there is a
crash only the relevant virtual machine is affected.
The physical computer (host system) can also be upgraded without affecting or modifying
the virtual machines.
SIMATIC Virtualization as a Service
Operating Manual, 02/2014, A5E32529703-AA
7
Introduction
1.5 Scope of delivery
1.2
Description
SIMATIC Virtualization as a Service is a pre-configured immediately usable virtualization
system for realizing efficient automation solutions for SIMATIC PCS 7 systems.
1.2.1
The virtualization system
The virtualization system is comprised of software and hardware components that are ideally
matched to each other and thus offer high performance. They include:
● Hardware
– Virtualization server (HP ProLiant DL380P GEN8)
– Thin client (HP t510 Thin Client)
● Software
– VMware vSphere Hypervisor
– VMware vSphere Client
– Virtual machines with the Microsoft Windows operating system and SIMATIC PCS 7
V8.0 SP1
The virtualization system can be extended easily and efficiently using pre-configured
templates and is therefore scalable to various system sizes. A highly available system with
redundant OS servers can be implemented by connecting another virtualization server with
the relevant PCS 7 software.
SIMATIC Virtualization as a Service
8
Operating Manual, 02/2014, A5E32529703-AA
Introduction
1.5 Scope of delivery
1.2.2
Service
With the purchase of "SIMATIC Virtualization as a Service" the following product groups are
supported as part of the "Product service & support" module:
● SIMATIC PCS 7 V8.0 SP1
● Hardware platform: HP ProLiant DL380P GEN8
● Virtualization software: VMware vSphere Standard 5.1
● HP ThinClient T510
The support is provided by a contact from Siemens Industry. The service and support
package offers advice and support for quickly resolved tasks (up to 2 hrs per case) by
telephone, support request, or fax. For requests that last longer than 2 hours Siemens will
submit a quotation for "extended support". The number of cases is not limited.
You can send your support requests via the Siemens Industry Online Portal
(https://support.automation.siemens.com).
1.3
Function principle
A hypervisor is installed on a high-performance server (HP Proliant DL380P GEN8) as an
additional software layer that manages the hardware resources and is dynamically
distributed across the virtual machines.
The central management, configuration, and maintenance of the virtual machines and the
virtualization server is undertaken via a management console and using the "VMware
vSphere Client" software. You can use the following hardware as a management console:
● The supplied thin client if this is equipped with a Windows operating system. In this case
the thin client must be connected with the management bus.
● Any computer that meets the requirements for the "VMware vSphere Client 5.1" software.
For additional information refer to
http://kb.vmware.com/selfservice/microsites/search.do?language=en_US&cmd=displayK
C&externalId=2005083.
The virtual machines are equipped with SIMATIC PCS 7 installations and pre-configured
depending on the automation task (e.g. engineering station, OS server, OS client, and web
server). The access to the virtual machines is provided via the "VMware vSphere Client"
software or a remote connection. The remote access by RDP is only permitted for virtual
PCS 7 OS clients and takes place via the thin client.
The communication between the virtual machines takes place via the communication buses
(management, terminal, redundancy buses) planned for this purpose.
The communication between the virtual machines and the available automation systems
takes place via the plant bus.
SIMATIC Virtualization as a Service
Operating Manual, 02/2014, A5E32529703-AA
9
Introduction
1.5 Scope of delivery
The following figure shows schematically a configuration of the virtualization system for
which an additional computer is used as a management console. The thin clients are used to
operate and observe the virtual PCS 7 OS clients.
A highly available configuration can be realized via a second virtualization server. The virtual
redundant OS servers require the redundancy bus for the synchronization.
SIMATIC Virtualization as a Service
10
Operating Manual, 02/2014, A5E32529703-AA
Introduction
1.5 Scope of delivery
1.4
Advantages
SIMATIC Virtualization as a Service offers the following advantages:
● Solution from a single source
– Life cycle services from a single source for all supplied hardware and software
components
– Perfectly matched software and hardware components
– Quick and safe integration of the system using pre-finished, configured, and tested
components
● Reduction in costs
– Reduction in life cycle costs by increasing energy efficiency
– Reduction in investment and operating costs
– Savings through the use of energy-saving and low-cost thin clients for operating and
observing the process
● Higher performance
– Optimal use and utilization of the hardware resources supplied
● Increased flexibility and system availability
– Cost-effective and quick expansion of system components using ready-to-run
templates
– Simple transfer of a virtual machine to a new hardware environment
– Lower cost for system modernization
● Reduction in time required for maintenance and support
– Reduction in the administrative costs by merging several systems onto one
virtualization server
– Reduced maintenance costs and times using centralized administration
● Increasing security
– More security using remote access with centralized rights management and reduced
attack options for thin clients
– Simple system management and extended support in cooperation with SIMATIC
remote services
SIMATIC Virtualization as a Service
Operating Manual, 02/2014, A5E32529703-AA
11
Introduction
1.5 Scope of delivery
1.5
Scope of delivery
1.5.1
Hardware and software components
The system components supplied may vary:
● Selected host system
● Number of thin clients ordered
● Number and type of ordered virtual machines
● Link for delivery approval.
Hardware
The following variants of hardware components may be supplied:
Term
Host system/configuration
HP ProLiant DL380p Gen8 8 6Cx1P HP Host:
(Technical data and hardware
• HP DL380p Gen8 Intel Xeon E5-2630
configuration depending on
(2.3 GHz/6-core/15 MB/95 W) FIO
ordered host system)
• Processor Kit
•
24 GB (3x8 GB) Dual Rank PC3L
•
10600R (DDR-1333)
•
1.2 TB 6G SAS 15K (2.5 inch) RAID 5
•
2x Ethernet 1 GB 4-port
•
2x Power Supply Kit
•
iLo Advanced
Number
Comment
1
Virtualization server
6Cx2P HP Host
•
HP DL380p Gen8 Intel Xeon E5-2630 (2x2.3
GHz/6-core/15 MB/95 W) FIO
•
Processor Kit
•
48 GB (6x8 GB) Dual Rank PC3L
•
10600R (DDR-1333)
•
1.8 TB 6G SAS 15K (2.5 inch) RAID 5
•
2x Ethernet 1 GB 4-port
•
2x Power Supply Kit
•
iLo Advanced
SIMATIC Virtualization as a Service
12
Operating Manual, 02/2014, A5E32529703-AA
Introduction
1.5 Scope of delivery
Term
Host system/configuration
Number
Comment
1
Thin client
8Cx1P HP Host:
•
HP DL380p Gen8 Intel Xeon E5-2660 (2.2
GHz/8-core/15 MB/95 W) FIO
•
Processor Kit
•
32 GB (4x8 GB) Dual Rank PC3L
•
10600R (DDR-1333)
•
1.5 TB 6G SAS 15K (2.5 inch) RAID 5
•
2x Ethernet 1 GB 4-port
•
2x Power Supply Kit
•
iLo Advanced
8Cx2P HP Host
HP t510 Flexible Thin Client
•
HP DL380p Gen8 Intel Xeon E5-2680 (2.7
GHz/8-core/15 MB/95 W) FIO
•
Processor Kit
•
64 GB (8x8 GB) Dual Rank PC3L
•
10600R (DDR-1333)
•
4.7 TB 6G SAS 15K (2.5 inch) RAID 5
•
3x Ethernet 1 GB 4-port
•
2x Power Supply Kit
•
iLo Advanced
You can find information on the HP t510 Flexible
Thin Client under
http://h18004.www1.hp.com/products/quickspecs/1
4256_div/14256_div.pdf
VMware Software
The following VMware software is supplied:
Term
Host system
Number
Comment
VMware vSphere 5.1
Standard for 1 Processor
6Cx1P HP Host,
8Cx1P HP Host
1
VMware Hypervisor incl.
licenses
6Cx2P HP Host,
8Cx2P HP Host
2
SIMATIC Virtualization as a Service
Operating Manual, 02/2014, A5E32529703-AA
13
Introduction
1.5 Scope of delivery
Virtual machines with SIMATIC PCS 7
The following variants of virtual machines may be supplied:
● SIMATIC PCS 7 V8.0 SP1 ES/OS-Client
Term
Number
Comment
Microsoft Windows Server 2008 R2
Standard x64 Embedded System
1
Operating system incl. licenses
SIMATIC PCS 7 V8.0 SP1 ES/OS-Client
1
SIMATIC PCS 7 excl. licenses
Term
Number
Comment
Microsoft Windows Server 2008 R2
Standard x64 Embedded System
1
Operating system incl. licenses
SIMATIC PCS 7 V8.0 SP1 OS-Server
1
SIMATIC PCS 7 excl. licenses
Term
Number
Comment
Microsoft Windows Server 2008 R2
Standard x64 Embedded System
1
Operating system incl. licenses
SIMATIC PCS 7 V8.0 SP1 OS-Client
1
SIMATIC PCS 7 excl. licenses
Term
Number
Comment
Microsoft Windows Server 2008 R2
Standard x64 Embedded System
1
Operating system incl. licenses
SIMATIC PCS 7 V8.0 SP1 Web Server
1
SIMATIC PCS 7 excl. licenses
● SIMATIC PCS 7 V8.0 SP1 OS-Server
● SIMATIC PCS 7 V8.0 SP1 OS-Client
● SIMATIC PCS 7 V8.0 SP1 Web Server
SIMATIC Virtualization as a Service
14
Operating Manual, 02/2014, A5E32529703-AA
Introduction
1.5 Scope of delivery
Data backup hardware
The following data backup hardware is supplied:
Term
Number
USB hard disk, 500 GB memory
1
The USB hard disk contains the following data:
Data
Description
Licenses & agreements
•
VMware software license key
•
SIMATIC Virtualization as a Service - Service agreement
Product documentation
•
"SIMATIC Virtualization as a Service" manual
Backup of host system configuration
•
Hypervisor (VMware vSphere ESXi)
•
Networks
•
HP Thin Client
•
VMware
Open Source software report
•
PDF
Backup of virtual machines
Backing up the delivery status of the ordered virtual machines as OVF files
SIMATIC software
Update: SIMATIC PCS 7 V8.0 SP1 Update 1
Backup of MAC addresses of supplied virtual
machines
List of MAC addresses of ordered virtual machines
Open Source Code
1.5.2
Services
A service agreement for at least 2 years is supplied as standard. You can find detailed
information on the services it includes in the supplied service agreement.
SIMATIC Virtualization as a Service
Operating Manual, 02/2014, A5E32529703-AA
15
Introduction
1.5 Scope of delivery
SIMATIC Virtualization as a Service
16
Operating Manual, 02/2014, A5E32529703-AA
Commissioning
2.1
Preparation
2.1.1
Unpack and check delivery unit
2
Please particularly note the following points when unpacking:
● We recommend that you do not throw away the original packaging. Store this for any new
transport.
● Store the documents provided. They are required for initial commissioning and are part of
the product.
● Check the packaging and contents for visible transport damage.
● Ensure that the delivery is complete (see section "Items Supplied").
● If you find transport damage or discrepancies please inform your sales contact.
Also observe the device-specific information and safety instructions from the manufacturer:
• HP ProLiant DL380p Gen 8-Server
http://h20565.www2.hp.com/portal/site/hpsc/public/psi/manualsResults/?sp4ts.oid=5177957
• HP t510 Flexible Thin Client
(http://h20000.www2.hp.com/bizsupport/TechSupport/DocumentIndex.jsp?contentType=Sup
portManual&lang=de&cc=de&docIndexId=65042&taskId=135&prodTypeId=12454&prodSeri
esId=5226831)
2.1.2
Assemble devices
You will find information and safety instructions for assembling the devices supplied in the
manufacturer's product documentation:
● HP ProLiant DL380p Gen 8-Server
(http://h20565.www2.hp.com/portal/site/hpsc/public/psi/manualsResults/?sp4ts.oid=5177
957)
● HP t510 Flexible Thin Client
(http://h20000.www2.hp.com/bizsupport/TechSupport/DocumentIndex.jsp?contentType=
SupportManual&lang=de&cc=de&docIndexId=65042&taskId=135&prodTypeId=12454&pr
odSeriesId=5226831)
SIMATIC Virtualization as a Service
Operating Manual, 02/2014, A5E32529703-AA
17
Commissioning
2.5 Thin client configuration
2.1.3
Additional components required
To commission the virtualization system, in addition to the delivery unit, the following
components are required:
● Hardware
– Optional: PC for use as a management console. Any PC that meets the requirements
for the "VMware vSphere Client 5.1" software can be used as a management console.
For additional information refer to
http://kb.vmware.com/selfservice/microsites/search.do?language=en_US&cmd=displa
yKC&externalId=2005083. Alternatively the supplied thin client can be used as the
management console if it is equipped with a Windows operating system.
– Optional: Switches depending on system configuration; you can find information on
the switches for the SCALANCE product range at http://www.automation.siemens.com
– Monitor for operating the virtualization server and thin client. Note the manufacturer's
information.
● Software
The SIMATIC PCS 7 components pre-installed on the virtual machines must be licensed.
The scope and type of the required licenses depend on the PCS 7 options and the
number of virtual machines. You can find information on licensing SIMATIC PCS 7 at
http://www.siemens.com/simatic-pcs7.
SIMATIC Virtualization as a Service
18
Operating Manual, 02/2014, A5E32529703-AA
Commissioning
2.5 Thin client configuration
2.2
Connecting the hardware components
2.2.1
Overview of the hardware components
The following figure shows the hardware components schematically and their network
connections:
SIMATIC Virtualization as a Service
Operating Manual, 02/2014, A5E32529703-AA
19
Commissioning
2.5 Thin client configuration
2.2.2
Description of the network connections
The virtualization server has 8 ports. Each port is assigned to one of the following bus
systems:
● Terminal bus
● Plant bus
● Redundancy bus
● Management bus
The following figure shows the assignment of the bus systems to the ports on the
virtualization server:
Note
The redundancy bus is required if an additional virtualization server is used to set up a
redundant OS server pair. With a simple system configuration with one virtualization server,
the redundancy bus is not required.
SIMATIC Virtualization as a Service
20
Operating Manual, 02/2014, A5E32529703-AA
Commissioning
2.5 Thin client configuration
The assignment of the bus systems to the ports on the virtualization server is displayed in
the "Configuration" tab in the "VMware vSphere Client" software:
SIMATIC Virtualization as a Service
Operating Manual, 02/2014, A5E32529703-AA
21
Commissioning
2.5 Thin client configuration
The virtual machines use virtual network cards. The network connections are configured as
follows:
Information on the configuration of the network connections of the virtual machines can be
found in section "Setting the network connections (Page 47)".
2.2.3
Connect the virtualization server and management console
Introduction
The virtualization server and management console are linked via the management bus. You
can connect the following hardware as a management console:
● The supplied thin client if this is equipped with a Windows operating system.
● A computer that meets the requirements for the "VMware vSphere Client 5.1" software.
SIMATIC Virtualization as a Service
22
Operating Manual, 02/2014, A5E32529703-AA
Commissioning
2.5 Thin client configuration
Procedure
To connect the virtualization server and management console, follow these steps:
1. Insert the bus connection plug on the network cable into the following port on the
virtualization server:
2. Connect the virtualization server and management console via the relevant interface on
the management console.
3. If you want the management bus to be redundant connect a second network cable to the
following port on the virtualization server and connect it (e.g. via a switch) to the
management bus.
SIMATIC Virtualization as a Service
Operating Manual, 02/2014, A5E32529703-AA
23
Commissioning
2.5 Thin client configuration
2.2.4
Connecting the thin client
Introduction
If the thin client is used exclusively to operate and observe the virtual PCS 7 OS client this is
connected with the virtualization server via the terminal bus. In contrast when being used as
the management console the thin client must be connected with
the management bus.
Procedure
To connect the thin client supplied, follow these steps:
1. Insert the bus connection plug on the network cable into the following port on the
virtualization server:
2. Connect the virtualization server and thin client with the terminal bus. Use the following
interface on the thin client to do so:
SIMATIC Virtualization as a Service
24
Operating Manual, 02/2014, A5E32529703-AA
Commissioning
2.5 Thin client configuration
3. If you want the terminal bus to be redundant connect a second network cable to the
following port on the virtualization server and connect it (e.g. via a switch) to the terminal
bus:
2.2.5
Connection of automation systems
Introduction
Automation systems are connected with the virtualization server via the plant bus.
Procedure
To connect an automation system, follow these steps:
1. Insert the bus connection plug on the network cable into the following port on the
virtualization server:
2. Connect the automation system.
Observe the information and safety instructions on the relevant automation system in the
documentation. You can find information on the Siemens automation systems at
https://support.automation.siemens.com.
SIMATIC Virtualization as a Service
Operating Manual, 02/2014, A5E32529703-AA
25
Commissioning
2.5 Thin client configuration
3. If you want the plant bus to be redundant connect a second network cable to the following
port on the virtualization server and connect it (e.g. via a switch) to the plant bus.
2.2.6
Connect a second virtualization server for redundant virtual OS servers
Introduction
When operating a redundant OS server pair that is distributed over two virtualization servers,
the redundancy bus must be connected.
Procedure
To connect a virtualization server to the redundancy bus, follow these steps:
1. Insert the bus connection plug on the network cable into the following port on the
virtualization server:
SIMATIC Virtualization as a Service
26
Operating Manual, 02/2014, A5E32529703-AA
Commissioning
2.5 Thin client configuration
2. Connect the virtualization server with the network cable on the redundancy bus.
3. If you want the redundancy bus to be double, connect a second network cable to the
following port on the virtualization server and connect it (e.g. via a switch) to the
redundancy bus:
2.3
Configuring the virtualization server
Introduction
The virtualization server (HP ProLiant DL380p Gen8) is supplied with a password and a preconfigured IP address. The password and IP address must be modified for each user. The
data set on the virtualization server must be noted and treated in confidence. It is required
for additional configuration steps.
Note
Also observe the device-specific information and safety instructions from the manufacturer:
• HP ProLiant DL380p Gen 8-Server
(http://h20565.www2.hp.com/portal/site/hpsc/public/psi/manualsResults/?sp4ts.oid=5177
957)
• HP Integrated Lights-Out 4 (iLO 4)
(http://h20565.www2.hp.com/portal/site/hpsc/public/psi/manualsResults/?sp4ts.oid=5219
994)
SIMATIC Virtualization as a Service
Operating Manual, 02/2014, A5E32529703-AA
27
Commissioning
2.5 Thin client configuration
Requirements
The following requirements must be met:
● The virtualization server is assembled and commissioned according to the manufacturer's
regulations.
● A monitor and keyboard are connected on the virtualization server.
Procedure
follow these steps to configure the virtualization server:
1. Switch the virtualization server on via the mains/standby switch.
The server's start-up application is displayed.
2. Press the F2 button.
The dialog for logging in to the virtualization server is opened.
SIMATIC Virtualization as a Service
28
Operating Manual, 02/2014, A5E32529703-AA
Commissioning
2.5 Thin client configuration
3. Enter the following log in data:
– Login Name: root
– Password: Siemens1234
4. Press Enter.
The options for modifying the system characteristics of the virtualization server are
displayed.
5. Navigate to the "Configure password" entry and press Enter.
Note
Use the <Arrow down> and <Arrow up> buttons to navigate between the individual
entries.
The password change dialog opens.
SIMATIC Virtualization as a Service
Operating Manual, 02/2014, A5E32529703-AA
29
Commissioning
2.5 Thin client configuration
6. Enter the default password "Siemens1234" for the virtualization server in the "Old
Password" line.
7. Enter a new password for the virtualization server into the "New Password" and "Confirm
Password" lines.
8. Press Enter to save the change.
Note
Using the "Esc" button you can reject the changes and leave the dialog.
SIMATIC Virtualization as a Service
30
Operating Manual, 02/2014, A5E32529703-AA
Commissioning
2.5 Thin client configuration
9. Navigate to the "Configure Management Network" entry and press Enter.
The options to change the network settings are displayed.
10.Navigate to the "IP Configuration" entry and press Enter.
The dialog to modify the IP address is opened.
SIMATIC Virtualization as a Service
Operating Manual, 02/2014, A5E32529703-AA
31
Commissioning
2.5 Thin client configuration
11.Enter the desired IP address.
12.Enter the desired subnet mask.
SIMATIC Virtualization as a Service
32
Operating Manual, 02/2014, A5E32529703-AA
Commissioning
2.5 Thin client configuration
13.Press Enter to save the change.
A summary of the settings is shown under the "IP Configuration" entry.
14.Press the <Esc> button to reach the initial dialog.
15.Press <Esc> again to log off from the system.
2.4
Configuration of the management console
Introduction
If you use a computer as a management console you must install the "VMware vSphere
Client 5.1" software on it.
You configure and manage the virtual machines that are pre-installed with the PCS 7
components and available on the virtualization server using the "VMware vSphere Client"
software.
If you want to use the supplied thin client as the management console, it is not necessary to
execute the steps described in this section. The "VMware vSphere Client 5.1" software is
pre-installed on the supplied thin clients with the Windows operating system. Thin clients
with the HP ThinPro operating system cannot be used as management consoles.
SIMATIC Virtualization as a Service
Operating Manual, 02/2014, A5E32529703-AA
33
Commissioning
2.5 Thin client configuration
Requirements
The following requirements must be met:
● The management console is operational.
● The installation application for the "VMware vSphere Client 5.1" software is available.
You can find the installation application at https://www.vmware.com.
Procedure
To install the "VMware vSphere Client" software, follow these steps:
1. Start the management console.
2. Start the installation application of the "VMware vSphere Client" software.
3. Select the desired installation language.
4. Click "Next" in the first dialog.
5. Note the patent agreements and click "Next".
SIMATIC Virtualization as a Service
34
Operating Manual, 02/2014, A5E32529703-AA
Commissioning
2.5 Thin client configuration
6. Agree to the license agreement and click "Next".
7. Enter the installation path and click "Next".
SIMATIC Virtualization as a Service
Operating Manual, 02/2014, A5E32529703-AA
35
Commissioning
2.5 Thin client configuration
8. Click the "Install" button.
The installation is started. The successful implementation of the installation is confirmed
by a notification.
9. Click "Finish" to complete the installation.
SIMATIC Virtualization as a Service
36
Operating Manual, 02/2014, A5E32529703-AA
Commissioning
2.5 Thin client configuration
2.5
Thin client configuration
2.5.1
Thin clients with Windows operating system
Introduction
When commissioning the thin client, configure the thin client to your requirements with the
aid of the "HP Easy Tools" configuration wizard.
Requirements
The following requirements must be met:
● The thin client is assembled and commissioned according to the manufacturer's
regulations.
● The thin client is connected with the management bus (for use as a management
console) or with the terminal bus (for use as an operating and observation station).
● A monitor, keyboard, and mouse are connected to the thin client.
Procedure
To configure the thin client, follow these steps:
1. Switch on the thin client.
The thin client is started in the restricted user mode. To configure the thin client, you must
switch to the administrator mode.
2. Log into the thin client as administrator. To do so use the following log in data:
– User name: Administrator
– Password: Administrator
SIMATIC Virtualization as a Service
Operating Manual, 02/2014, A5E32529703-AA
37
Commissioning
2.5 Thin client configuration
3. Start the "HP Easy Tools" configuration wizard via the "Start > Control Panel > HP Easy
Tools" command.
The configuration wizard opens.
4. In the left navigation area click on the "Easy Config" button.
5. Use the "Next" button to navigate to the individual configuration options and make the
desired settings.
Detailed information on the configuration options can be found in the manufacturer's "HP
Easy Tools"
(http://h20000.www2.hp.com/bizsupport/TechSupport/DocumentIndex.jsp?contentType=
SupportManual&lang=de&cc=de&docIndexId=65042&taskId=135&prodTypeId=12454&pr
odSeriesId=5226831) administrator manual.
6. Click “Exit” in the "Thank You" section to close the configuration wizard.
SIMATIC Virtualization as a Service
38
Operating Manual, 02/2014, A5E32529703-AA
Commissioning
2.5 Thin client configuration
7. To save the configuration settings right click on the "lock" icon in the Windows task bar
and select the "Commit EWF(C)" command:
NOTICE
If you do not explicitly save the configuration settings these are lost when the thin client
starts next.
8. Switch to the thin client's user mode.
The default log in data are:
– User name: User
– Password: User
2.5.2
Thin clients with HP ThinPro operating system
Introduction
When commissioning the thin client for the first time, the "HP Easy Tools" wizard is started
automatically. Use this wizard to configure the thin client to your requirements.
Requirements
The following requirements must be met:
● The thin client is assembled and commissioned according to the manufacturer's
regulations.
● The thin client is connected with the terminal bus.
● A monitor, keyboard, and mouse are connected to the thin client.
SIMATIC Virtualization as a Service
Operating Manual, 02/2014, A5E32529703-AA
39
Commissioning
2.5 Thin client configuration
Procedure
To configure the thin client, follow these steps:
1. Switch on the thin client.
The configuration wizard starts.
2. Select a language for executing the wizard.
3. In the left navigation area click on the "Easy Config" button.
4. Use the "Next" button to navigate to the individual configuration options and make the
desired settings.
Detailed information on the configuration options can be found in the manufacturer's "HP
Easy Tools"
(http://h20000.www2.hp.com/bizsupport/TechSupport/DocumentIndex.jsp?contentType=
SupportManual&lang=en&cc=de&docIndexId=65042&taskId=135&prodTypeId=12454&pr
odSeriesId=5226831) administrator manual.
5. Click “Exit” in the "Thank You" section to complete the configuration of the thin client.
SIMATIC Virtualization as a Service
40
Operating Manual, 02/2014, A5E32529703-AA
Configuration of the virtual machines
3.1
3
Start the "VMware vSphere Client" application
Introduction
In this section, you will learn how to start the "VMware vSphere Client" application and how
to access the virtual machines that are available on the virtualization server.
Requirements
The following requirements must be met:
● The virtualization server and management console are operational.
● The password and IP address for the virtualization server have been set and are
available.
See section "Configuring the virtualization server (Page 27)".
● The server and management console are linked via the management bus.
● The "VMware vSphere Client" application is installed on the management console.
SIMATIC Virtualization as a Service
Operating Manual, 02/2014, A5E32529703-AA
41
Configuration of the virtual machines
3.7 Creating and managing PCS 7 projects
Procedure
To start a virtual machine, follow these steps:
1. Start the management console.
2. Double-click the desktop icon for the "VMware vSphere Client" software or select "Start >
All Programs > VMware > VMware vSphere Client".
3. Enter the log in data for the virtualization server.
(See the section "Configuring the virtualization server (Page 27)".
SIMATIC Virtualization as a Service
42
Operating Manual, 02/2014, A5E32529703-AA
Configuration of the virtual machines
3.7 Creating and managing PCS 7 projects
The "VMware vSphere Client" application is opened. The virtual machines available on
the virtualization server are displayed in the left-hand navigation area.
3.2
Start the virtual machines
Introduction
When you start one of the virtual machines for the first time after commissioning an
installation setup executes automatically. The setup installs SIMATIC PCS 7 depending on
the automation task of the virtual machine (e.g. engineering station, OS server, OS client).
The setup must be executed for each virtual machine.
Requirements
The following requirements must be met:
● The "VMware vSphere Client" application is started on the management console.
● The connection to the virtualization server is established and the available virtual
machines are displayed in the left-hand navigation area of the "VMware vSphere Client"
application.
SIMATIC Virtualization as a Service
Operating Manual, 02/2014, A5E32529703-AA
43
Configuration of the virtual machines
3.7 Creating and managing PCS 7 projects
Procedure
To start a virtual machine and execute installation setup, follow these steps:
1. Select the virtual machine and click the "Power On" button.
The virtual machine starts.
2. Click the "Launch Virtual Machine Console" button to open the virtual machine in a
separate window.
The virtual machine is displayed. The installation setup opens.
SIMATIC Virtualization as a Service
44
Operating Manual, 02/2014, A5E32529703-AA
Configuration of the virtual machines
3.7 Creating and managing PCS 7 projects
3. Select the language for the installation setup.
4. Enter the computer name for the virtual machine in the "Computer name" field.
5. Select the desired language to install SIMATIC PCS 7.
SIMATIC Virtualization as a Service
Operating Manual, 02/2014, A5E32529703-AA
45
Configuration of the virtual machines
3.7 Creating and managing PCS 7 projects
6. Click the "Save settings and reboot" button.
The virtual machine restarts. After the restart the installation of the SIMATIC PCS 7
components is started automatically.
7. Wait until the installation process is complete.
After the installation the computer restarts automatically.
8. Repeat steps 1 to 7 for each virtual machine.
Note
You can also install other SIMATIC PCS 7 components on the virtual machines. The
complete installation package is available on the data drive of the virtualization server.
SIMATIC Virtualization as a Service
46
Operating Manual, 02/2014, A5E32529703-AA
Configuration of the virtual machines
3.7 Creating and managing PCS 7 projects
3.3
Setting the network connections
Introduction
Depending on the automation task the individual virtual machines have the following network
connections:
● PCS 7 ES/OS-Client
– Terminal bus
– Plant bus
– Management bus
● PCS 7 OS-Server
– Terminal bus
– Plant bus
– Redundancy bus
– Management bus
● PCS 7 OS-Client
– Terminal bus
– Management bus
● PCS 7 Web Server
– Terminal bus
– Management bus
So that the communication between the individual virtual machines can be implemented an
IP address must be set for each network connection. The configuration of the network
connections must be implemented individually for each virtual machine and network
connection.
Requirements
The following requirements must be met:
● The "VMware vSphere Client" application is started on the management console.
● The installation of the SIMATIC software was conducted without errors on all virtual
machines (see section "Start the virtual machines (Page 43)").
Procedure
To set the network connections, follow these steps:
1. Start the virtual machine.
2. Open the network connections via "Start > Control panel > Network and Internet >
Network Connections".
SIMATIC Virtualization as a Service
Operating Manual, 02/2014, A5E32529703-AA
47
Configuration of the virtual machines
3.7 Creating and managing PCS 7 projects
3. Select one of the network connections (e.g. terminal bus) and open the "Properties"
dialog via the context menu.
4. Select the "Internet Protocol Version 4 (TCP/IPv4)" element and click the "Properties"
button.
SIMATIC Virtualization as a Service
48
Operating Manual, 02/2014, A5E32529703-AA
Configuration of the virtual machines
3.7 Creating and managing PCS 7 projects
5. Activate the "Use the following IP address" option and enter the desired IP address.
Note
Assign the IP addresses corresponding to your plant configuration. Select the same
number range, e.g.:
• 192.168.1.11
• 192.168.1.12
• 192.168.1.13
• 192.168.1.14
6. Confirm the changes with "OK".
7. Repeat steps 3 to 6 for each network connection for the virtual machine currently open.
8. Configure the network connections of all available virtual machines as per Steps 1 to 7.
Note
Further information can be found in the "PCS 7 PC Configuration and Authorization"
(http://support.automation.siemens.com/WW/view/en/68157327) manual.
SIMATIC Virtualization as a Service
Operating Manual, 02/2014, A5E32529703-AA
49
Configuration of the virtual machines
3.7 Creating and managing PCS 7 projects
3.4
Using SOFTNET-IE
Introduction
The "SOFTNET-IE S7 REDCONNECT VM V8.2" software offers the option of realizing a
highly available connection to an automation system in the virtual environment. The
"SOFTNET-IE S7 REDCONNECT VM V8.2" software is part of the "SIMATIC NET V8.2"
software package. You can find information on the installation in the "PG/PC - Industrial
Ethernet / PROFIBUS SIMATIC NET PC Software V8.2
(http://support.automation.siemens.com/WW/view/en/61630923)" manual.
Requirements
The following requirements must be met:
● The license package for highly available connections (MLFB: 6GK1704-0HB08-2AA0) is
available. One license package per virtual machine is required.
● CPU firmware version is V6.0.0 or higher
Configuration in SIMATIC PCS 7
Configuring the highly available connection takes place in SIMATIC PCS 7 with the "NetPro"
engineering tool. You can find detailed information about configuration in the "PCS 7
Engineering System" (http://support.automation.siemens.com/WW/view/en/57270203)
manual.
SIMATIC Virtualization as a Service
50
Operating Manual, 02/2014, A5E32529703-AA
Configuration of the virtual machines
3.7 Creating and managing PCS 7 projects
"IE General" must be set as the communication interface for configuring the highly available
connection in the virtual environment. The following figure shows a sample configuration:
SIMATIC Virtualization as a Service
Operating Manual, 02/2014, A5E32529703-AA
51
Configuration of the virtual machines
3.7 Creating and managing PCS 7 projects
3.5
Activating the automatic start of the virtual machines
Introduction
The virtual machines can be set such that they are executed automatically after the system
starts.
Requirements
The following requirements must be met:
● The "VMware vSphere Client" application is started on the management console.
● The connection to the virtualization server is established and the available virtual
machines are displayed in the left-hand navigation area of the "VMware vSphere Client"
application.
Procedure
To activate the automatic execution of a virtual machine, follow these steps:
1. Click the "Configuration" tab on the "VMware vSphere Client" application.
2. In the "Software" area click on "Virtual Machine Startup/Shutdown".
The available virtual machines are displayed in the "Startup order" area.
SIMATIC Virtualization as a Service
52
Operating Manual, 02/2014, A5E32529703-AA
Configuration of the virtual machines
3.7 Creating and managing PCS 7 projects
3. Click on "Properties".
The "Virtual Machine Startup and Shutdown" dialog is opened.
4. Activate the "Allow virtual machines to start and stop automatically with the system"
option box.
5. Set the delay for starting and stopping the virtual machines.
SIMATIC Virtualization as a Service
Operating Manual, 02/2014, A5E32529703-AA
53
Configuration of the virtual machines
3.7 Creating and managing PCS 7 projects
6. In the "Manual Startup" area select the virtual machine for which you want to activate the
automatic start.
7. Move the virtual machine to the "Automatic Startup" area using the "Move Up" button.
The virtual machine is positioned in the "Automatic Startup" area.
SIMATIC Virtualization as a Service
54
Operating Manual, 02/2014, A5E32529703-AA
Configuration of the virtual machines
3.7 Creating and managing PCS 7 projects
8. Repeat steps 4 and 5 for all virtual machines for which you want to activate the automatic
start. You can change the start order using the "Move Up" and "Move Down" buttons.
9. Click "OK" to save the changes.
3.6
Licensing the SIMATIC software
For licensing the SIMATIC components that are installed on the virtual machines, the
licenses must be transferred from a license USB stick to the virtual machines so that these
are available for the SIMATIC License Manager (ALM). To do so, execute the following
steps:
● Configuration of the connections between a license USB stick and the virtual machines
● Transfer the licenses using the SIMATIC License Manager (ALM)
3.6.1
Connecting USB devices
Introduction
To transfer the license to a virtual machine the use of USB devices must be configured for
each virtual machine.
Requirements
The following requirements must be met:
● The "VMware vSphere Client" application is started on the management console.
● The license USB stick for licensing the SIMATIC components is connected to the
management console.
Procedure
To connect a USB device with a virtual machine, follow these steps:
1. Start the virtual machine.
2. Click on the USB icon in the toolbar of the virtual machine and select the "Connect to
USB device" command.
3. Select the USB device that contains the necessary SIMATIC licenses.
4. Repeat steps 1 to 3 for all available virtual machines.
SIMATIC Virtualization as a Service
Operating Manual, 02/2014, A5E32529703-AA
55
Configuration of the virtual machines
3.7 Creating and managing PCS 7 projects
3.6.2
Transfer the SIMATIC licenses
Introduction
The transfer of SIMATIC licenses from a license USB stick to a drive on a virtual machine
takes place with the aid of the SIMATIC Automation License Manager (ALM). The SIMATIC
Automation License Manager is pre-installed on all virtual machines.
Requirement
The following requirements must be met:
● The "VMware vSphere Client" application is started on the management console.
● The license USB stick for licensing the SIMATIC components is connected to the
management console.
● The connection to USB devices is configured on the virtual machines
(See section "Connecting USB devices (Page 55)")
Procedure
To transfer the licenses to the drive, follow these steps:
1. Start one of the virtual machines.
2. Start the SIMATIC Automation License Manager via the following desktop icon:
The SIMATIC Automation License Manager is opened.
3. Transfer all required licenses to the drive on the virtual machine.
Information on transferring licenses is found in the "SIMATIC Automation License
Manager" (http://support.automation.siemens.com/WW/view/en/56956174) manual.
4. Repeat steps 1 to 3 for all available virtual machines.
3.7
Creating and managing PCS 7 projects
Projecting and configuring PCS 7 projects is conducted in the same way as for traditional
systems. You will find detailed information on this in the following documentation "PCS 7
V8.0 SP 1 Manual Collection"
(http://support.automation.siemens.com/WW/view/en/71178283).
SIMATIC Virtualization as a Service
56
Operating Manual, 02/2014, A5E32529703-AA
Configuration of the virtual machines
3.7 Creating and managing PCS 7 projects
SIMATIC Virtualization as a Service
Operating Manual, 02/2014, A5E32529703-AA
57
Access to the virtual machines
4.1
4
Access to virtual PCS 7 ES, PCS 7 OS server, and PCS 7 web
server
Introduction
Access to the virtual PCS 7 ES, PCS 7 OS server, and PCS 7 web server is provided via the
"VMware vSphere Client" software. Access using RDP is not permitted.
Requirements
The following requirements must be met:
● The virtual machines are configured.
(See section "Configuration of the virtual machines (Page 41)".)
● The virtual machine that you want to access is activated.
● The "VMware vSphere Client" software is started.
SIMATIC Virtualization as a Service
Operating Manual, 02/2014, A5E32529703-AA
59
Access to the virtual machines
4.2 Access to virtual PCS 7 OS clients
Procedure
To access a virtual machine, follow these steps:
1. Select the virtual machine that you want to access.
2. Click the "Launch Virtual Machine Console" button to display the virtual machine.
The virtual machine is shown in a separate window.
SIMATIC Virtualization as a Service
60
Operating Manual, 02/2014, A5E32529703-AA
Access to the virtual machines
4.2 Access to virtual PCS 7 OS clients
4.2
Access to virtual PCS 7 OS clients
You have the following options for accessing virtual PCS 7 OS clients:
● Access via the "VMware vSphere Client" software
Access is provided from the thin client (Windows operating system) or the management
console and is recommended for configuring, maintaining, and managing the virtual PCS
7 OS clients. The procedure is the same as in section "Access to virtual PCS 7 ES, PCS
7 OS server, and PCS 7 web server (Page 59)".
● Access via an RDP connection
Access is from the thin client and is recommended for operating and observing the virtual
PCS 7 OS clients.
4.2.1
Creating a remote desktop connection (RDP)
Introduction
You create and configure an RDP connection on the thin client for remote access to a virtual
PCS 7 OS client.
Requirements
The following requirements must be met:
● The virtual PCS 7 OS client that you want to access is configured and activated.
(See section "Configuration of the virtual machines (Page 41)".)
● The thin client is switched on.
SIMATIC Virtualization as a Service
Operating Manual, 02/2014, A5E32529703-AA
61
Access to the virtual machines
4.2 Access to virtual PCS 7 OS clients
Procedure (Windows operating system)
In order to set up remote access on a PCS 7 OS client, follow these steps:
1. Enter the search term "Remote Desktop Connection" in the search field in the Windows
start menu.
2. Execute the "Remote Desktop Connection" application as administrator.
The application dialog opens.
SIMATIC Virtualization as a Service
62
Operating Manual, 02/2014, A5E32529703-AA
Access to the virtual machines
4.2 Access to virtual PCS 7 OS clients
3. Click the "Options" button.
4. Enter the following network data for the connection:
– Computer: <IP address of the virtual OS client> : <Port:3389> (e.g.
192.168.126.131:3389)
– User name: Username for logging in to the PCS 7 OS client
SIMATIC Virtualization as a Service
Operating Manual, 02/2014, A5E32529703-AA
63
Access to the virtual machines
4.2 Access to virtual PCS 7 OS clients
5. Click the "Save As" button and save the connection.
Ensure that the access to the connection is possible for all desired users after quitting the
administrator mode.
6. Select the "Display" tab and set the display properties for the connection.
7. Select the "Local Resources" tab and set the desired settings for playing the acoustic
signals.
Note
Via the "Settings" button in the "Remote audio" area you can set the device on which the
acoustic signals are played for messages and alarms from the PCS 7 notification system.
8. Activate the desired options under the "Programs", "Experience", and "Advanced" tab.
9. Click the "Connect" button to establish the connection to the PCS 7 OS client.
SIMATIC Virtualization as a Service
64
Operating Manual, 02/2014, A5E32529703-AA
Access to the virtual machines
4.2 Access to virtual PCS 7 OS clients
10.To save the settings right click on the "lock" icon in the Windows task bar and select the
"Commit EWF(C)" command:
NOTICE
If you do not explicitly save the configuration settings, these are lost when the thin client
starts next.
11.Switch to the thin client's user mode.
SIMATIC Virtualization as a Service
Operating Manual, 02/2014, A5E32529703-AA
65
Access to the virtual machines
4.2 Access to virtual PCS 7 OS clients
Procedure (HP ThinPro operating system)
In order to set up remote access on a PCS 7 OS client, follow these steps:
1. Switch on the administrator mode for the thin client.
2. Open the "ThinPro Control Center" application.
The application dialog opens.
SIMATIC Virtualization as a Service
66
Operating Manual, 02/2014, A5E32529703-AA
Access to the virtual machines
4.2 Access to virtual PCS 7 OS clients
3. Click on "Connections" in the left navigation area of the dialog.
4. Add a new connection.
The "RDP7 Connection Manager" dialog is opened.
SIMATIC Virtualization as a Service
Operating Manual, 02/2014, A5E32529703-AA
67
Access to the virtual machines
4.2 Access to virtual PCS 7 OS clients
5. Enter the following network data for the connection:
– Name: Name of connection, e.g. OSClient1
– Address: IP address of the virtual OS client
– Port: 3389
– Username: Username for logging in to the PCS 7 OS client
– Password: Password for logging in to the PCS 7 OS client
6. Click "Next".
SIMATIC Virtualization as a Service
68
Operating Manual, 02/2014, A5E32529703-AA
Access to the virtual machines
4.2 Access to virtual PCS 7 OS clients
7. Set the desired display properties for the connection and click on the "Next" button.
8. Activate the desired options and click "Next".
SIMATIC Virtualization as a Service
Operating Manual, 02/2014, A5E32529703-AA
69
Access to the virtual machines
4.2 Access to virtual PCS 7 OS clients
9. Set the desired settings for playing the acoustic signals and click on the "Next" button.
Note
Via the "Remote computer sound" option you can set the device on which the acoustic
signals are played for messages and alarms from the PCS 7 notification system.
10.Set the desired settings for the speed of the connection and user interface.
SIMATIC Virtualization as a Service
70
Operating Manual, 02/2014, A5E32529703-AA
Access to the virtual machines
4.2 Access to virtual PCS 7 OS clients
11.Set the desired options for activating and deactivating the connection.
12.Click "Finish" to create the new connection.
The connection is created and displayed in the "ThinPro Control Center" dialog.
13.Click the connection and click the "Connect" button to establish the connection to the
virtual PCS 7 OS client.
SIMATIC Virtualization as a Service
Operating Manual, 02/2014, A5E32529703-AA
71
Access to the virtual machines
4.2 Access to virtual PCS 7 OS clients
4.2.2
Log off and separate the connection
Introduction
The remote connection is logged off and separated from the relevant virtual machine (e.g.
PCS 7 ES, PCS 7 OS client).
Requirements
● The following requirements must be met:
● The virtual machine is switched on.
● There is a remote connection
Procedure
To disconnect a remote connection, follow these steps:
1. In the start menu of the virtual machine click on "Log off > Disconnect".
SIMATIC Virtualization as a Service
72
Operating Manual, 02/2014, A5E32529703-AA
Switch off and start the whole system
5.1
5
Start the whole virtualization system
After the initial commissioning and configuration, you can start the virtualization system as
follows:
1. Switch on the virtualization server. Please note the manufacturer's information and safety
instructions.
2. Switch on the thin client. Please note the manufacturer's information and safety
instructions.
3. Switch on the management console.
4. Start the "VMware vSphere Client" software on the management console.
You can find information on this in section "Start the "VMware vSphere Client" application
(Page 41)".
5. Close the maintenance mode on the virtualization server if this is activated. Select the
virtualization server in the "VMware vSphere Client" software and select the "Exit
Maintenance Mode" command in the context menu.
6. Start the desired virtual machines.
You can find information on this in section "Start the virtual machines (Page 43)".
SIMATIC Virtualization as a Service
Operating Manual, 02/2014, A5E32529703-AA
73
Switch off and start the whole system
5.2 Shut down the whole virtualization system
5.2
Shut down the whole virtualization system
To close the whole virtualization system, follow these steps:
1. Deactivate all PCS 7 projects that are in process operation (runtime).
You can find information on this in the "WinCC V7.2: Working with WinCC"
(http://support.automation.siemens.com/WW/view/en/73506085) manual.
2. Close all virtual machines.
To do so select the desired virtual machine and click on the "Shut down the guest" button
in the "VMware vSphere Client" application toolbar.
3. End the virtualization server via the "VMware vSphere Client" application.
– Select the virtualization server and select the "Enter Maintenance Mode" command in
the context menu.
SIMATIC Virtualization as a Service
74
Operating Manual, 02/2014, A5E32529703-AA
Switch off and start the whole system
5.2 Shut down the whole virtualization system
– Confirm the switch to the maintenance mode.
Note
Ensure that the maintenance mode of the virtualization server is not ended automatically
when closing down. After restarting the virtualization server, the maintenance mode must
be ended manually. Select the virtualization server in the "VMware vSphere Client"
software and select the "Exit Maintenance Mode" command in the context menu.
– Select the virtualization server and select the "Shut Down" command in the context
menu.
SIMATIC Virtualization as a Service
Operating Manual, 02/2014, A5E32529703-AA
75
Switch off and start the whole system
5.2 Shut down the whole virtualization system
– Enter a reason for closing the virtualization server and click on the "OK" button.
– In the following dialog click on the "No" button to end the "VMware vSphere Client"
software.
4. Switch off the management console.
5. Switch off the thin client. Please note the manufacturer's information and safety
instructions.
SIMATIC Virtualization as a Service
76
Operating Manual, 02/2014, A5E32529703-AA
Data backup and restoring the delivery status
6.1
6
Backing up the virtual machines
Introduction
You can back up the working status of a virtual machine by exporting an OVF template. You
export the OVF template with the aid of the "VMware vSphere Client" application.
Requirements
The following requirements must be met:
● The "VMware vSphere Client" application is opened.
● The process operation of the PCS 7 projects is ended (runtime is deactivated).
● The virtual machines that you want to back up are switched off.
You can find information on this in section "Shut down the whole virtualization system
(Page 74)".
Procedure
To back up a virtual machine, follow these steps:
1. Select the virtual machine for which you want to back up the working status in the
"VMware vSphere Client" application.
2. Select the "File >Export > Export OVF Template" command in the menu bar.
The "Export OVF Template" dialog box opens.
3. In the "Name" field, type a name for the backup file.
4. In the "Directory" field, enter the desired storage location for the backup file.
5. Select the "Folder of files (OVF)" option in the drop-down list in the "Format" area.
6. In the "Description" field, enter a description for the virtual machine.
7. Click "OK".
The virtual machine is exported as an OVF file.
SIMATIC Virtualization as a Service
Operating Manual, 02/2014, A5E32529703-AA
77
Data backup and restoring the delivery status
6.3 Restoring the delivery status of the virtualization server
6.2
Restoring the delivery status of the virtual machines
To restore the delivery status of the virtual machines do the following:
● Remove existing virtual machines from the hard disk of the virtualization server
NOTICE
Remove the virtual machines
Note that when deleting the virtual machines, all data on the virtual machines is
irrevocably deleted.
● Restore delivery status of the virtual machines by importing OVF templates.
6.2.1
Remove the virtual machines
Procedure
To delete a virtual machine, follow these steps:
1. Open the "VMware vSphere Client" application.
2. Select the desired virtual machine and the "Delete from Disk" command in the context
menu.
The virtual machine is deleted.
SIMATIC Virtualization as a Service
78
Operating Manual, 02/2014, A5E32529703-AA
Data backup and restoring the delivery status
6.3 Restoring the delivery status of the virtualization server
6.2.2
Restore delivery status of the virtual machines by importing OVF templates
Requirements
The following requirements must be met:
● The "VMware vSphere Client" application is opened.
● The virtual machines that are restored are removed from the hard disk of the virtualization
server.
● The USB hard disk supplied with the backup data and the MAC addresses to restore the
virtual machines is at hand.
See the section titled "Scope of delivery (Page 12)" for more information.
Procedure
To restore the delivery status of a virtual machine, follow these steps:
1. Connect the supplied USB hard disk to the management console.
2. In the "VMware vSphere Client" application menu bar select the "File > Deploy OVF
Template" command.
The "Deploy OVF Template" dialog opens.
SIMATIC Virtualization as a Service
Operating Manual, 02/2014, A5E32529703-AA
79
Data backup and restoring the delivery status
6.3 Restoring the delivery status of the virtualization server
3. Click the "Browse" button and select the OVF template for the desired virtual machine.
4. Click "Next".
SIMATIC Virtualization as a Service
80
Operating Manual, 02/2014, A5E32529703-AA
Data backup and restoring the delivery status
6.3 Restoring the delivery status of the virtualization server
5. Check the properties of the OVF template and click "Next".
SIMATIC Virtualization as a Service
Operating Manual, 02/2014, A5E32529703-AA
81
Data backup and restoring the delivery status
6.3 Restoring the delivery status of the virtualization server
6. Enter a name for the virtual machine and click "Next".
SIMATIC Virtualization as a Service
82
Operating Manual, 02/2014, A5E32529703-AA
Data backup and restoring the delivery status
6.3 Restoring the delivery status of the virtualization server
7. Make the settings for the hard disk format and click "Next".
SIMATIC Virtualization as a Service
Operating Manual, 02/2014, A5E32529703-AA
83
Data backup and restoring the delivery status
6.3 Restoring the delivery status of the virtualization server
8. Check the network assignment and click "Next".
SIMATIC Virtualization as a Service
84
Operating Manual, 02/2014, A5E32529703-AA
Data backup and restoring the delivery status
6.3 Restoring the delivery status of the virtualization server
9. Check the import settings and click "Finish".
The OVF template for the selected virtual machine is imported.
The successful execution is confirmed by a message.
SIMATIC Virtualization as a Service
Operating Manual, 02/2014, A5E32529703-AA
85
Data backup and restoring the delivery status
6.3 Restoring the delivery status of the virtualization server
10.Select the imported virtual machine in the "VMware vSphere Client" application and
select the "Edit settings" command in the shortcut menu.
11.Select the "Network adapter" property in the "Hardware" tab.
SIMATIC Virtualization as a Service
86
Operating Manual, 02/2014, A5E32529703-AA
Data backup and restoring the delivery status
6.3 Restoring the delivery status of the virtualization server
12.Activate the "Manual" option in the "MAC address" area of the dialog.
SIMATIC Virtualization as a Service
Operating Manual, 02/2014, A5E32529703-AA
87
Data backup and restoring the delivery status
6.3 Restoring the delivery status of the virtualization server
13.Enter the MAC address of the virtual machine. The MAC addresses are listed on the
supplied USB hard disk (see section "Scope of delivery (Page 12)").
6.3
Restoring the delivery status of the virtualization server
To restore the delivery status of the virtualization server do the following:
● Installation of the "VMware vSphere ESXi 5.1" software on the virtualization server
NOTICE
New installation of the virtualization server
Please note that on installation of the "VMware vSphere ESXi" software, all data and
settings on the virtualization server are irrevocably deleted.
● Setting the IP address and network adapter of the virtualization server
● Import additional configuration data
SIMATIC Virtualization as a Service
88
Operating Manual, 02/2014, A5E32529703-AA
Data backup and restoring the delivery status
6.3 Restoring the delivery status of the virtualization server
6.3.1
Installing the "VMware vSphere ESXi" software
Introduction
By installing the "VMware vSphere ESXi" software all data on the virtualization server is
deleted and a new hypervisor is installed (see section "Function principle (Page 9)").
Requirements
The following requirements must be met:
● The virtualization server is assembled and commissioned according to the manufacturer's
regulations.
● A monitor, keyboard, and mouse are connected to the virtualization server.
● The supplied CD with the installation of the "VMware vSphere ESXi 5.1" software is
available (see section "Scope of delivery (Page 12)").
Procedure
To install the "VMware vSphere ESXi" software and set the virtualization server, follow these
steps:
1. Switch the virtualization server on via the mains/standby switch. The server's start-up
application is displayed.
2. Insert the installation CD for the "VMware vSphere ESXi 5.1" software into the CD drive
of the virtualization server.
3. Open the boot menu via the F11 button
SIMATIC Virtualization as a Service
Operating Manual, 02/2014, A5E32529703-AA
89
Data backup and restoring the delivery status
6.3 Restoring the delivery status of the virtualization server
4. Make the setting to start from the CD device.
5. Select the target drive for installing the SD memory card for the virtualization server and
press Enter.
6. Select a keyboard type.
SIMATIC Virtualization as a Service
90
Operating Manual, 02/2014, A5E32529703-AA
Data backup and restoring the delivery status
6.3 Restoring the delivery status of the virtualization server
7. Enter a password for access to the virtualization server.
Note
The data set on the virtualization server must be noted and treated in confidence. It is
required for additional configuration steps.
8. Press Enter to start the installation.
9. After completing the installation remove the installation CD from the CD drive of the
virtualization server.
10.Press Enter to restart the virtualization server.
6.3.2
Configuration of the IP address and network adapter
Introduction
After installing the "VMware vSphere ESXi 5.1" software you set the IP address and network
adapter of the virtualization server.
Requirement
The following requirements must be met:
● The virtualization server is assembled and commissioned according to the manufacturer's
regulations.
● The "VMware vSphere ESXi 5.1" software is installed.
SIMATIC Virtualization as a Service
Operating Manual, 02/2014, A5E32529703-AA
91
Data backup and restoring the delivery status
6.3 Restoring the delivery status of the virtualization server
Procedure
Proceed as follows to configure the virtualization server:
1. Switch the virtualization server on via the mains/standby switch. The server's start-up
application is displayed.
2. Press the F2 button.
The dialog for logging in to the virtualization server is opened.
3. Enter the following log in data:
– Login Name: root
– Password: See section "Installing the "VMware vSphere ESXi" software (Page 89)".
4. Press Enter.
The options for configuring the system properties of the virtualization server are
displayed.
SIMATIC Virtualization as a Service
92
Operating Manual, 02/2014, A5E32529703-AA
Data backup and restoring the delivery status
6.3 Restoring the delivery status of the virtualization server
5. Navigate to the "Configure Management Network" entry and press Enter.
Note
Use the <Arrow down> and <Arrow up> buttons to navigate between the individual
entries.
The options to change the network settings are displayed.
SIMATIC Virtualization as a Service
Operating Manual, 02/2014, A5E32529703-AA
93
Data backup and restoring the delivery status
6.3 Restoring the delivery status of the virtualization server
6. Navigate to the "IP Configuration" entry and press Enter.
The dialog to modify the IP address is opened.
7. Enter the desired IP address.
SIMATIC Virtualization as a Service
94
Operating Manual, 02/2014, A5E32529703-AA
Data backup and restoring the delivery status
6.3 Restoring the delivery status of the virtualization server
8. Enter the desired subnet mask.
9. Press Enter to save the change.
Note
Using the "Esc" button you can reject the changes and leave the dialog.
A summary of the settings is shown under the "IP Configuration" entry.
10.Press the <Esc> button to reach the "Configure Management Network" initial dialog.
11.Navigate to the "Network Adapters" entry and press Enter.
SIMATIC Virtualization as a Service
Operating Manual, 02/2014, A5E32529703-AA
95
Data backup and restoring the delivery status
6.3 Restoring the delivery status of the virtualization server
12.Select the "vmnic0" and "vmnic7" interfaces.
13.Press Enter to save the settings.
14.Press the <Esc> button to reach the "System Customization" dialog.
15.Press the <Esc> button to activate the configuration.
6.3.3
Import additional configuration data
Introduction
On the supplied USB hard disk you will find additional configuration data (incl. licenses,
network settings) that you can transfer to the virtualization server with the aid of the "VMware
vSphere Command-Line Interface" software.
Requirements
● The following requirements must be met:
● The instructions described in the sections "Installing the "VMware vSphere ESXi"
software (Page 89)" and "Configuration of the IP address and network adapter (Page 91)"
have been executed.
● The supplied USB hard disk is available.
● The installation application of the "VMware vSphere Command-Line Interface 5.1 Update
1" software is available.
You can find the installation application at
http://www.vmware.com/support/developer/vcli/.
SIMATIC Virtualization as a Service
96
Operating Manual, 02/2014, A5E32529703-AA
Data backup and restoring the delivery status
6.3 Restoring the delivery status of the virtualization server
Procedure
In order to transfer the configuration data on the supplied USB hard disk to the virtualization
server, proceed as follows:
1. Install the "VMware vSphere Command-Line Interface 5.1 Update 1" software on the
management console.
Additional information on this is provided in the manufacturer's documentation
(http://www.vmware.com/support/developer/vcli/).
2. Connect the supplied USB hard disk to the management console.
3. Open the Windows command line.
4. Enter the path to the installation folder for the "VMware vSphere Command-Line Interface
V5.1 Update1" software.
5. Enter the following command:
vicfg-cfgbackup ––server <server_ip> -l <device> :\
<backup>.tgz
– <server_ip>: IP address of the virtualization server (see section "Configuration of the
IP address and network adapter (Page 91)")
– <device>: Drive for the supplied USB hard disk
6. Press Enter.
SIMATIC Virtualization as a Service
Operating Manual, 02/2014, A5E32529703-AA
97
Data backup and restoring the delivery status
6.3 Restoring the delivery status of the virtualization server
7. Enter the following data:
– User name: root
– Password: Password for the virtualization server (see section "Installing the "VMware
vSphere ESXi" software (Page 89)").
8. Press Enter.
The configuration data is transferred to the virtualization server.
9. Restart the virtualization server.
SIMATIC Virtualization as a Service
98
Operating Manual, 02/2014, A5E32529703-AA