1
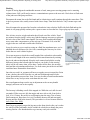
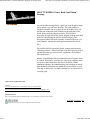
Popular Mechanics - Saturday Mechanic: Replacing A Steering Rack
1 of 4
http://hearst.corp.printthis.clickability.com/pt/cpt?action=cpt&title=Popu...
SAVE THIS | EMAIL THIS | Close
Replacing A Steering Rack
BY PAUL ZANGARI
Illustrations by Russell J. von Sauers and Ron Carboni
Published on: August 13, 2002
Click here for the Saturday Mechanic archive.
It's a crisp morning as you carefully back your car down the
driveway. A quick turn of the wheel as the front tire clears the curb
will swing your car up the street. But the steering wheel is
strangely stiff. Instead of swinging the car's nose around, you run
straight back, knocking over a trash can across the street.
Fortunately, the damage is small: a crunched $14.95 rubbish barrel
and a slimy mess to pick up in your second-best suit.
"What happened?" you wonder as you pop the hood. "The belt's
still there and the fluid's up-although it does look black. Maybe the
belt just slips until it warms up." After tidying up across the street
and tidying up yourself, you try backing out again-with both hands
on the wheel. The steering feels fine now-no groans and plenty of
power steering boost.
If the belt is 4 years old or more, go ahead and change it because
it's due anyway. But don't be shocked if the problem returns the
next chilly morning. Power steering that awakens slowly on cool
days has so-called "morning sickness." It won't go away.
It's caused by wear inside the steering assembly (aka the "rack").
The fluid's black, metallic look is a result of metal worn from the
inside of the housing. The fluid is abrasive, and the wear will
worsen with time. The rack is shot-replace it and use the
opportunity to flush the junk from the pump and lines.
Snake the old rack out of its mounting tunnel after
disconnecting the steering shaft, the tie rod ends and
the fluid hoses.
29/08/2006 12:36 PM
Popular Mechanics - Saturday Mechanic: Replacing A Steering Rack
2 of 4
http://hearst.corp.printthis.clickability.com/pt/cpt?action=cpt&title=Popu...
Can I Do It?
Swapping a rack is simple in some cars, nasty in others. For
example, a rear-drive car's rack, if bolted in front of the front
crossmember, is usually easy to change. But it's more challenging
in a front-driver with the rack bolted to the subframe behind the
powertrain or against the firewall.
Should you do it yourself? A shop manual may tell you how tough
the job will be, but not always. One General Motors manual says
you have to lower the front subframe 3 in. to get enough clearance
to slip out the rack. Maybe, maybe not. Legions of technicians just
twist and wiggle it through the existing space with no problem.
Sealing rings can wear grooves into the rack's housing,
bypassing hydraulic fluid.
But you should still check the service manual. For one thing, it'll
let you know if there are nuts and bolts that must be replaced with
new ones, for safety's sake, when changing the rack. You will also
want to know the torque values for all fasteners. Are there any
O-rings involved? They'll need replacing. The manual will tell you.
Before chickening out, look at a replacement rack. You'll see the
location of bolt holes and the fluid pressure and return line
ports-the only fluid lines you'll need to disconnect and reattach at
the rack. Safely support the car and check clearances. If you find
you can't grasp everything you need to work on from under the car
or by reaching around the engine, you may opt to send the job out.
Lastly, before deciding, talk with people who know the job, such as
the front-end pro who'll align the car after you've swapped the rack,
or a dismantler at a local salvage yard. They may know legitimate
shortcuts.
Doing It
Ready to go? It will help if you remove the front wheels for better
access to the wheel wells. Break all the lug nuts free before using
the jack. Lift the car and support it safely on stands. Then, unbolt
the clamp that connects the steering column to the pinion shaft.
Disconnect the rack's pinion shaft from
the steering column.
Detach the outer tie rod ends. You may need to use a special tie rod
end puller to get the tapered bolt to relinquish its grip on the
steering upright. If you're reusing the old outer tie rod ends, don't
take them off the knuckles with a fork-type remover-it'll wreck the
grease seals. Use a puller-type remover. Better yet, you probably
can leave them in the uprights. Just loosen the jam nuts and turn
the tie rods with a pipe wrench. The rods will unscrew from the
ends-clockwise on one side, counterclockwise on the other. Unbolt
the rack from the chassis. Now you can disconnect the fluid lines
and capture the power steering hydraulic fluid as it drains.
29/08/2006 12:36 PM
Popular Mechanics - Saturday Mechanic: Replacing A Steering Rack
3 of 4
http://hearst.corp.printthis.clickability.com/pt/cpt?action=cpt&title=Popu...
Flushing
In spite of having digested considerable amounts of crud, many power steering pumps survive morning
sickness intact. Still, you'll need to remove contamination to preserve the new rack. Here's how to flush most
of the junk out of the pump and lines.
Disconnect the return line to the fluid tank and let it drain into a small container through the return hose. This
is the low-pressure side, usually secured with a hose clamp. Then block the hole. Vinyl vacuum caps work
well.
Next, disconnect the pressure line from the rack and aim it into a bucket. Refill with fresh fluid and tap the
starter-it will pump quickly and may take a quart or more to clean the line. Cap or plug any loose ends.
Now it's time to twist, wiggle and snake the old rack out of the vehicle. Expel
any minors from the garage, as they may find the language necessary to persuade
the rack clear of the vehicle unacceptable.You may need to unbolt and slightly
move some other components to get the rack out of its tunnel. Lift, twist and
wiggle in the new rack and reconnect the fluid lines.
It may be easier to get a wrench to swing on a fluid line attachment once you've
unbolted the rack and moved it a bit. Also, reattaching the lines may be easier
before the new rack is bolted in place.
Use a tape measure to check the overall length of the rack and tie rod assembly.
Set the overall length of the new assembly to this same dimension by twisting
the tie rod ends on their threads. Keep the rack centered and split the overlap
difference between the left and right rod ends as you do this, or the steering
wheel will be off-center when you're done. Connect all the lines, the steering
shaft and the rack-attachment hardware. Use fresh cotter pins in the tie rod ends'
castellated nuts. Reattach the front wheels.
Use a special puller to remove the
tie rod end from the steering
upright.
Once the new rack's in, reconnect all hoses except the reservoir return line. Point
it into a bucket, then refill. Start the car, and run fluid through until it looks
clean. Reattach the pressure line. Note: You may be able to install an aftermarket
inline filter so any crud you miss won't harm the new rack.
Have an alignment shop reset the toe-in adjustment or the car may handle
strangely and wear out its tires rapidly.
The last step is bleeding out all of the trapped air. While the car's still elevated
on stands, fill the reservoir, idle the engine and steer side to side, from lock to
lock, 10 to 12 times. Be careful to avoid banging into the stops. Tan or foamy
fluid contains air. Shut down, let it sit 15 minutes, then top off and start again.
Repeat until the fluid looks normal. (This procedure is covered in more detail in
Auto Clinic, Dec. 2001)
Don't forget to properly torque the lug nuts on the front wheels after you've taken
the vehicle off the jackstands. And it wouldn't be a bad idea to change the power
steering fluid in a few hundred miles to get out any crud you've missed.
29/08/2006 12:36 PM
Popular Mechanics - Saturday Mechanic: Replacing A Steering Rack
4 of 4
http://hearst.corp.printthis.clickability.com/pt/cpt?action=cpt&title=Popu...
HOW IT WORKS: Power Rack-And-Pinion
Steering
As you turn the steering wheel, a spool valve on the pinion shaft
moves relative to ports in the housing. The ports connect to
chambers on either side of a piston on the rack shaft. Steer left
and the port connected to the chamber on the right side of the
piston opens while the other port closes. This lets fluid
pressurize the right side of the piston, helping push the rack shaft
to the left and pointing the wheels in that direction. (This
description assumes the rack assembly is ahead of the axle. If it
were behind it, moving the shaft right would point the wheels
left.)
Wear allows fluid to bypass the piston, wasting steering assist.
"Morning sickness" results from light wear that closes up as heat
expands the parts. As wear worsens, expansion will no longer
take up the slack.
Intense competition has driven remanufactured rack prices down.
A "reman" unit may be your best bet, since many originals wore
out because their shafts bore directly on the inside of their
aluminum housings. In remanufacturing, the housings are bored,
then hardened-steel inserts are installed in areas subject to wear.
You may be able to get a recently installed new or reman rack at
a salvage yard.
Links referenced within this article
Click here
http://www.popularmechanics.com/automotive/sub_care_sat/index.phtml
Auto Clinic, Dec. 2001
http://www.popularmechanics.com/automotive/sub_care_clinic/1272091.html?page=1&c=y
Find this article at:
http://www.popularmechanics.com/automotive/how_to_central/chassis_suspension/1272476.html
SAVE THIS | EMAIL THIS | Close
Uncheck the box to remove the list of links referenced in the article.
29/08/2006 12:36 PM