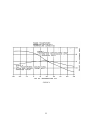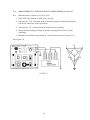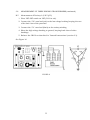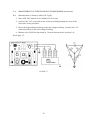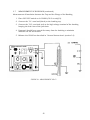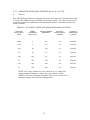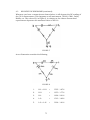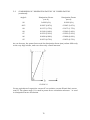
1
AVTM810130
Rev. A
April 2002
Instruction Manual AVTM810130
for
Capacitance And Dissipation Factor Bridge
Catalog No. 810130
High Voltage Equipment
Read the entire manual before operating.
Aparato de Alto Voltaje
Antes de operar este producto lea este manual enteramente.
AVO International
PO Box 9007
Valley Forge, PA 19485-1007 U.S.A.
Shipping Address:
Valley Forge Corporate Center
2621 Van Buren Avenue
Norristown, PA 19403 U.S.A
TABLE OF CONTENTS
1.0
GENERAL INFORMATION ................................................................................................... 6
1.1
GENERAL DESCRIPTION ................................................................................................. 6
1.2
CB100 FEATURES .............................................................................................................. 6
1.3
SPECIFICATIONS ............................................................................................................... 7
1.4
ACCESSORIES FURNISHED............................................................................................. 8
1.5
ACCESSORIES AVAILABLE ............................................................................................ 8
1.6
CHANGES ............................................................................................................................ 9
1.7
WARRANTY........................................................................................................................ 9
2.0
INSTALLATION.................................................................................................................... 10
2.1
UNPACKING AND INSPECTION ................................................................................... 10
2.2
PREPARATION FOR USE ................................................................................................ 10
2.3
LINE SUPPLY VOLTAGE ................................................................................................ 10
2.4
REPACKING AND SHIPMENT ....................................................................................... 10
3.0
OPERATING INSTRUCTIONS ............................................................................................ 11
3.1
PANEL CONTROLS AND OPERATING FUNCTIONS ................................................. 11
3.1
PANEL CONTROLS AND OPERATING FUNCTIONS (continued).................................. 12
3.2
SAFETY CONSIDERATIONS .......................................................................................... 13
3.3
GENERAL OPERATING INSTRUCTIONS FOR CB100................................................ 13
3.4
MEASUREMENT OF TWO WINDING TRANSFORMERS .......................................... 17
A. Preparation for Test............................................................................................................. 17
B. Measurement of Insulation Power Factor ........................................................................... 18
C. Recording of Identification and Test Data Using Test Sheet 01-100 and 02-100 ............. 20
D. Temperature Corrections..................................................................................................... 21
3.5
MEASUREMENT OF BULK OIL CIRCUIT BREAKER (O.C.B.) ................................. 26
A. Preparation for Test............................................................................................................. 26
B. Measurement of Individual Bushings & De-Ion Grids (O.C.B. Open)............................... 26
C. Measurement of Bushings and Lift Rods (O.C.B. Closed)................................................. 27
D. Recording of Identification & Test Data using Test Sheet 03-100 (O.C.B.) ...................... 27
E. Temperature Corrections..................................................................................................... 28
3.6
MEASUREMENT OF THREE WINDING TRANSFORMERS....................................... 30
A. Preparation for Test............................................................................................................. 30
B. Measurement of Insulation Power Factor ........................................................................... 31
C. Recording of Identification & Test Data using Test 04-100............................................... 37
3.7
MEASUREMENT OF BUSHINGS ................................................................................... 39
A. Preparation for Test............................................................................................................. 39
B. Measurement of Bushing Power Factor .............................................................................. 40
C. Recording of Identification & Test Data using Test Sheet 02-100 ..................................... 43
3.8
MEASUREMENT OF TRANSFORMER BUSHINGS WITH DRAW LEADS .............. 44
A. Preparation for Test............................................................................................................. 44
B. Measurement of Bushing Power Factor .............................................................................. 45
C. Recording of Identification and Test Data using Test Sheet 02-100. ................................. 46
D. Temperature Corrections..................................................................................................... 46
2
3.9
MEASUREMENT OF APPARATUS BUSHINGS AND CABLE POTHEADS BY HOT
COLLAR METHOD....................................................................................................... 50
A. Preparation for Test............................................................................................................. 50
B. Measurement by Hot Collar Method................................................................................... 50
C. Identification and Test Data Using Test Sheet 02-100 ....................................................... 52
D. Temperature Correction ...................................................................................................... 52
3.10 OPERATION WITH RANGE EXTENSION (Cat. No. 810132) ...................................... 54
A. General ................................................................................................................................ 54
B. Test Procedure..................................................................................................................... 55
3.11 OPERATION WITH CALIBRATOR, Cat. No. 810133.................................................... 56
A. General ................................................................................................................................ 56
B. Operation............................................................................................................................. 56
4.0
ANALYSIS OF RESULTS..................................................................................................... 58
4.2
BUSHINGS......................................................................................................................... 60
A. General Electric and Locke Bushings (Locke is subsidiary of General Electric and the
same types are manufactured by both companies)...................................................... 60
B. Westinghouse Bushings ...................................................................................................... 64
C. Ohio Brass Bushings ........................................................................................................... 67
D. Lapp Bushings..................................................................................................................... 70
E. Micanite and Insulators Company (Used on English Electric Company Transformers).... 71
5.0
THEORY OF OPERATION................................................................................................... 76
5.1
TRANSFORMER RATIO ARM BRIDGE PRINCIPLE................................................... 76
5.2
COMPARISON OF "DISSIPATION FACTOR" VS "POWER FACTOR"...................... 77
6.0
SERVICE AND MAINTENANCE ........................................................................................ 79
6.1
CALIBRATION.................................................................................................................. 79
A. Equipment Required............................................................................................................ 79
B. Adjustment Procedure ......................................................................................................... 79
C. Calibration Procedure.......................................................................................................... 83
7.0
ACKNOWLEDGEMENTS .................................................................................................... 85
8.0
DOCUMENTATION.............................................................................................................. 85
3
FIGURES
FIGURE 1 - PANEL CONTROLS AND OPERATING FUNCTIONS ............................................ 12
FIGURE 2 - UST-GST switch set to "L-GND" (CH-L & CH-G in red)............................................ 13
FIGURE 3 - UST-GST switch set to "L-GUARD" (CH-G in red)..................................................... 14
FIGURE 4 - UST-GST switch set to "UST" (CH-L in red)................................................................ 14
FIGURE 5 ........................................................................................................................................... 17
FIGURE 6 ........................................................................................................................................... 17
FIGURE 7 ........................................................................................................................................... 18
FIGURE 8 ........................................................................................................................................... 25
FIGURE 9 ........................................................................................................................................... 27
FIGURE 10 ......................................................................................................................................... 30
FIGURE 11 ......................................................................................................................................... 30
FIGURE 12 ......................................................................................................................................... 31
FIGURE 13 ......................................................................................................................................... 32
FIGURE 14 ......................................................................................................................................... 33
FIGURE 15 ......................................................................................................................................... 34
FIGURE 16 ......................................................................................................................................... 35
FIGURE 17 ......................................................................................................................................... 36
FIGURE 18 - MEASUREMENT OF C1............................................................................................ 40
FIGURE 19 ......................................................................................................................................... 41
FIGURE 20 - MEASUREMENT OF C2............................................................................................ 42
FIGURE 21 ......................................................................................................................................... 45
FIGURE 22 ......................................................................................................................................... 51
FIGURE 23 ......................................................................................................................................... 52
FIGURE 24 ......................................................................................................................................... 55
FIGURE 25 - UST-GST SWITCH TESTS ON ALL FIVE POSITIONS.......................................... 56
FIGURE 26 ......................................................................................................................................... 72
FIGURE 27 ......................................................................................................................................... 73
FIGURE 28 ......................................................................................................................................... 73
FIGURE 29 ......................................................................................................................................... 74
FIGURE 30 ......................................................................................................................................... 75
FIGURE 31 ......................................................................................................................................... 76
FIGURE 32 ......................................................................................................................................... 78
4
TABLES
TABLE I - SPECIFICATIONS............................................................................................................. 7
TABLE II - TEMPERATURE CORRECTION FACTOR FOR LIQUIDS, TRANSFORMERS,
AND REGULATORS......................................................................................................................... 24
TABLE III - BUSHING TEMPERATURE CORRECTION FACTORS .......................................... 47
TABLE IV - BUSHING TEMPERATURE CORRECTION FACTORS .......................................... 48
TABLE V – BUSHING TEMPERATURE CORRECTION FACTORS........................................... 49
TABLE VI - ACCURACY TABLE FOR RANGE EXTENSION ADAPTOR ................................ 54
DATA TEST SHEETS
01-100 TWO WINDING TRANSFORMERS.................................................................................... 22
02-100 BUSHING TEST .................................................................................................................... 23
03-100 OIL CIRCUIT BREAKER TEST........................................................................................... 29
04-100 THREE WINDING XFMRS .................................................................................................. 38
02-100 BUSHING TEST .................................................................................................................... 53
5
1.0
GENERAL INFORMATION
1.1
GENERAL DESCRIPTION
The Model CB100 Guarded Capacitance Bridge is a self-contained instrument
designed for the accurate measurement of capacitance and dissipation factor of
electrical insulation. The bridge is suitable for making two-terminal, or threeterminal measurements on a specimen that may be grounded or floating. In the
guarded, three-terminal, configuration the bridge is especially suitable for the
measurement of the capacitance and dissipation factor of high voltage bushings
with the aid of the capacitor tap, and for separately measuring the capacitances
associated with multi-terminal electrical equipment.
The bridge operates at a frequency of 100 Hz, with the unknown excited at 30
volts. It features a tuned, synchronous and phase sensitive detector which allows
independent and quick balancing of the capacitance and dissipation factor
controls.
The bridge frequency, 100 Hz, is close enough to the 60 Hz power frequency so that
the bridge indicates the same capacitance and dissipation factor as one would
measure using the power frequency. However, the bridge frequency is sufficiently
removed from the power frequency so that the stray power frequency currents do
not interfere with the operation of the instrument. This makes the measurement of
insulation quality possible in high voltage yards without the use of high voltage
equipment to overcome the interference, or the use of complex interference
suppressors.
1.2
CB100 FEATURES
The CB100 Capacitance Bridge is a light-weight, compact, precision instrument
designed for testing electrical insulation of power apparatus in hostile
environments. The instruments low operating voltage simplifies safety precautions,
reduces shock hazard while increasing portability. A specially designed detector
circuit allows independent balance of capacitance and dissipation factor while
overcoming power frequency interference. The CB100 is a "HOT GUARD" bridge.
The guard potential is therefore "ground" for the UST test, and at bridge voltage
(30V, 100/80Hz) for the GST test.
6
1.3
SPECIFICATIONS
The detailed specifications for this model are given in Table I below.
TABLE I - SPECIFICATIONS
25°C ±5°C, 6 mos., 50 or 60 Hz, ±2 Hz.
SPECIFICATIONS:
BRIDGE:
BRIDGE OUTPUT TEST VOLTAGE:
Transformer ratio bridge type circuit with hot
guard.
Internally generated.
28 Vnom/25 mA max, 100 Hz for 60 Hz
systems.
28 Vnom/25 mA max, 80 Hz for 50 Hz
systems.
Maximum output voltage: 30V rms.
CAPACITANCE MEASUREMENTS:
Multiplier
Resolution
Maximum Range
20 pF
50 pF
100 pF
200 pF
500 pF
0.001 µF
0.002 µF
0.005 µF
0.01 µF
0.05 µF
0.1uF
0.02 pF
0.05 pF
0.1 pF
0.2 pF
0.5 pF
1.0 pF
2.0 pF
5.0 pF
10 pF
50 pF
100 pF
240 pF
600 pF
1200 pF
2400 pF
6000 pF
0.012 µF (12000 pF)
0.024 µF (24000 pF)
0.060 µF (60000 pF)
0.12 µF
0.60 µF
1.2 µF
Accuracy:
±0.25%, Reading ±4 pF.
DISSIPATION FACTOR:
Range (D.F.)
Resolution (D.F.)
0 - 1%
0 - 10%
10 - 20%
20 - 30%
0.001
0.01
0.01
Accuracy:
±2%, Reading ±1% F.S. on all ranges.
7
OPERATION:
Environmental:
Operating:
Storage:
Temperature Coefficients:
PHYSICAL:
Sizes:
Model CB100
Transport Case
Weight:
Instrument
Shipping
1.4
0°C to 50°C; R.H. to 80%
-40°C to +65°C.
±0.02% of applicable accuracy spec. per °C of both
capacitance and dissipation factor.
Instrument and accessories supplied with portable
foam lined carrying case. Case has hinged opening
from above with a lockable latch.
290W x 240H x 175D mm
(11.5W x 9.5H x 7D in)
430W x 375H x 330D mm
(17W x 14.7H x 13D in)
5 kg (11 lbs)
11.8 kg (24 lbs)
ACCESSORIES FURNISHED
Each instrument is supplied complete with:
- two color coded leads-coaxial cable-10m long.
- one color coded ground lead cable-10m long.
- three wire line input cord.
- one instruction-service manual.
- one transport case.
1.5
ACCESSORIES AVAILABLE
810132
Range Extension Adaptor
810133
Calibrator
810200
Oil Test Cell
810210
Oil Test Cell Heater
8
1.6
CHANGES
Please note that this instrument is subject to continuous development and
improvement. This instrument may therefore incorporate minor changes in detail
from the information contained herein.
1.7
WARRANTY
Multi-Amp warrants this instrument sold by us or our authorized agents to be free
from defects in material and workmanship for a period of 12 months from date of
shipment. During the warranty period Multi-Amp will, at our option, repair or
replace the instrument or part thereof which proves to be defective providing:
1. The instrument is returned properly packed and transportation prepaid with
prior authorization from us or our appointed agent.
2. The instrument has not been altered, modified or repaired by unauthorized
personnel and
3. That our examination discloses to our satisfaction that any improper
operation or failure was not the result of improper use, negligence or
accident, exceeding environmental limits, or connecting the instrument to
incompatible equipment.
This warranty is exclusive and is given and accepted in lieu of all other warranties,
expressed or implied, and constitutes fulfillment of all our liabilities to the
purchaser. Multi-Amp specifically disclaims the implied warranties of
merchantability and fitness for a specific purpose. We assume no liability, in any
event, for consequential damages, for anticipated or lost profits, for personal injury
due to use or accident, for incidental damages or loss of time or other losses
incurred by the purchaser or any third party in connection with instruments
covered by this warranty.
9
2.0
INSTALLATION
2.1
UNPACKING AND INSPECTION
Prior to shipment this instrument was electrically tested and mechanically
inspected and found to meet specifications and be free of mechanical defects.
After unpacking the instrument, visually inspect the instrument and accessories
for damage. If evidence of damage is present, you must contact the carrier who
transported the unit and file a claim in writing. The shipping container and
packing material should be retained for inspection by the carrier's agent. Electrical
operation as per section 3 should be checked as soon as possible after receipt.
2.2
PREPARATION FOR USE
INSURE THAT THE APPARATUS TO BE TESTED IS CLEARED AND DEENERGIZED PRIOR TO TEST. It is highly recommended that the user familiarize
himself with the controls, functions and features detailed in section 3 prior to use.
2.3
LINE SUPPLY VOLTAGE
This instrument is shipped from the factory for operation on either 120V, 60 Hz
line or 220V, 50 Hz.
2.4
REPACKING AND SHIPMENT
To insure proper shipment of this instrument it is recommended that the original
reusable container and packing material be retained. If being returned for
calibration or service please attach a card to the instrument specifying the owner,
model and serial number and service required.
10
3.0
OPERATING INSTRUCTIONS
3.1
PANEL CONTROLS AND OPERATING FUNCTIONS
This section details and describes the operating features of the CB100 and is keyed
in Figure 1 (next page).
1. Line Input Socket - Standard input for line cord provided.
2. Instrument On - Flipping this switch upwards activates the instrument,
immediately sending test voltage to output BNC.
3. Power On Indicator - This red L.E.D. illuminates when instrument is
energized.
4. Detector Phasing Switch - State of bridge balance of capacitance or
dissipation factor selected. Null meter (5) is indicator for balance condition.
5. Null Meter - Indicator for balance condition of capacitance or dissipation
factor. Detector phasing switch (4) determines which is being balanced.
6. Dissipation Factor Range Switch - The approximate magnitude of dissipation
factor is first determined by this switch.
7. Dissipation Factor Dial - The precise value of dissipation factor is
determined by this setting in conjunction with the D.F. range switch.
8. Capacitance Multiplier Switch - The approximate value of the capacitance
being tested is determined with this switch.
9. Capacitance Switch - This switch determines the approximate value of
capacitance being measured.
10. Capacitance Dial - The PRECISE VALUE of capacitance measured with this
dial in conjunction with the capacitance multiplier (8) and capacitance
switch (9).
11. UST-GST Switch - Determines the type of measurement being taken. UST
stands for "Ungrounded Specimen Test". GST stands for "Grounded
Specimen Test".
12. Test Voltage Outputs, CH, CL, G - Connected to specimen via test leads
provided. CH is the bridge sensitive terminal.
11
3.1
PANEL CONTROLS AND OPERATING FUNCTIONS (continued)
FIGURE 1 - PANEL CONTROLS AND OPERATING FUNCTIONS
12
3.2
SAFETY CONSIDERATIONS
It should be noted, that, although the instrument outputs no dangerous voltage, it
could be a source of electrical shock hazard.
THIS INSTRUMENT MUST ALWAYS BE CONNECTED TO GROUND WITH THE
SUPPLIED LEAD AND FRONT PANEL GROUND BINDING POST PRIOR TO AND
DURING ALL MEASUREMENTS.
THE APPARATUS BEING TESTED MUST BE CLEARED AND CORRECTLY
GROUNDED TO AVOID ANY POSSIBILITY OF LETHAL FLOATING POTENTIAL.
3.3
GENERAL OPERATING INSTRUCTIONS FOR CB100
1. Connect the CB100 case ground terminal to station ground.
2. Select UST-GST switch position (Figure 1, 11) for required position.
3. Connect the CB100 to the specimen to be measured as outlined in the
specific instructions for apparatus under test.
4. Set detector phasing switch to "C".
5. Set dissipation factor range to 0 - 10%
6. Set capacitance multiplier to 0.1 µF.
See Figures 2, 3, and 4.
APPLICATION
Measurement taken is CH-L &
CH-G. CB100 internally
grounds CL in this
configuration, thus effectively
shorting out CL-G.
FIGURE 2 - UST-GST switch set to "L-GND" (CH-L & CH-G in red)
13
GENERAL OPERATING INSTRUCTIONS (continued)
APPLICATION
Measurement taken is CH-G.
CB100 guards out the "L" in
this configuration, thus nulling
out its effect.
FIGURE 3 - UST-GST switch set to "L-GUARD" (CH-G in red)
APPLICATION
Measurement taken is CH-L.
Ground is effectively guarded
out, nulling its effect on the
t
FIGURE 4 - UST-GST switch set to "UST" (CH-L in red)
14
3.3
GENERAL OPERATING INSTRUCTIONS FOR CB100 (continued)
7. Set capacitance switch to 5 and capacitance dial to 000.
8. Turn bridge power switch on.
9. If the detector swings to the right, turn the capacitance multiplier switch
counter-clockwise until the detector swings to the left. Allow about 1 second
for the detector to respond between switch positions.
10. Advance the capacitance switch clockwise until the detector swings to the
right. Then turn the switch back one step.
11. Adjust the multi-turn capacitance dial to bring the detector to zero.
12. Turn the detector phasing switch to D.F.
13. Bring the detector to zero by the dissipation factor range switch and
dissipation factor dial.
14. Turn the detector phasing switch to "C" and repeat step 11.
15. Repeat steps 12, 13, & 14 until no further adjustment is required.
16. The sum of the capacitance switch and dial multiplied by the capacitance
multiplier is the capacitance of the specimen.
17. Examples:
Capacitance
Multiplier
Switch
Dial
Microfarads
Picofarads
0.1 µF
6
542
0.654200
654,200
0.01 µF
11
023
0.110230
110,230
0.002 µF
10
234
0.020468
20,468
500 pF
5
050
-
2,525
Best accuracy is obtained when the capacitance switch is between 4 and 11. A
balance in such a position should always be possible except for certain low
capacitance specimens when the capacitance multiplier is 20 pF.
18. The dissipation factor dial reading, adjusted for the range switch position, is
the dissipation factor of the specimen.
15
3.3
GENERAL OPERATING INSTRUCTIONS (continued)
19. Examples:
D.F. Range
Dial
Dissipation Factor %
0-1
032
0.032
0-1
542
0.542
0 - 10
345
3.45
10 - 20
542
15.42
Best accuracy will be obtained on the lowest D.F. Range for which a balance is
possible.
20. Turn bridge power switch off before disconnecting specimen.
NOTES:
(a) When measuring a number of similar specimens it is not necessary to
reset the switches to the values in steps 5, 6 & 7.
(b) If on the basis of previous tests the approximate values of capacitance
and dissipation factor are known, these values may be pre-set on the
switches and dials.
(c) With the bridge at sub zero temperatures the operation of the null
detector may be sluggish and the sensitivity degraded. Under these
circumstances it is recommended that the bridge be kept in a warm
vehicle, or building, between tests.
(d) Periodically check the two 10 turn dials to see that the mechanical stops
coincide with "000" and "999" within several digits on the extreme right
hand decade. If a significant error is apparent, corrective action should
be taken.
(e) Periodically check continuity of all test leads with an ohmmeter on the
low ohms range.
(f) Periodically check isolation between conductor and sheath of all coaxial
cables using an ohmmeter on the high ohms range.
16
3.4
MEASUREMENT OF TWO WINDING TRANSFORMERS
A.
Preparation for Test
1. Clear transformer in the normal manner.
2. Remove risers and/or bus-bars and cables from all bushings.
3. Leave working grounds attached to the risers and/or bus-bars and cables.
4. The porcelain surface of bushings should be clean and dry. Remove any dirt
and oil with clean, dry rags.
5. Tests should not be carried out when rain is falling or when there is
condensation on the porcelain.
6. Short the high voltage bushings with a bare braided jumper. The jumper
should not be allowed to sag (Figure 5).
FIGURE 5
7. Short the low voltage bushings as in (Figure 5).
NOTE: The neutral, or starpoint bushing of a three phase transformer
winding should be connected to the other bushings of that winding by
means of the shorting jumper (Figure 6).
FIGURE 6
17
3.4
MEASUREMENT OF TWO WINDING TRANSFORMERS (continued)
8. Measure and record, on the field sheet, the ambient temperature and
relative humidity.
9. Record readings of transformer temperature gauge(s) - liquid and winding if
present (use standard test report sheet).
10. It is preferable that the transformer be tested after it has been allowed to
cool to ambient temperature and that ambient be in the range of 10 to 30°C.
11. If the transformer has an ON LOAD tap changer it should be OFF neutral,
otherwise Thyrites in the tap changer may effect results.
B.
Measurement of Insulation Power Factor
TRANSFORMER UNDER TEST
FIGURE 7
18
3.4
MEASUREMENT OF TWO WINDING TRANSFORMERS (continued)
B.1
Measurement of H-L (U.S.T.)
1. Place UST-GST switch at "UST" (CH-L in red).
2. Connect the "CH" coax lead (red) to one of the high voltage bushings,
keeping the rest of the lead clear of the porcelain.
3. Connect the "CL" coax lead (black) to one of the low voltage bushings. The
path of this lead is not important so long as it does not come close to the
high voltage bushing.
4. Personnel should keep several feet away from the high voltage bushings to
avoid any influence on the readings.
5. Balance the CB100 as described in the "General Instructions" (section 3.3).
B.2
Measurement of H-GND (G.S.T.)
1. Place UST-GST switch at "L-GUARD" (CH-G in red).
2. Connect the "CH" coax lead (red) and "CL" coax lead (black) as specified in
section B.1 parts 2 to 5 (above).
B.3
Measurement of L-GND (G.S.T.)
1. Place UST-GST switch at "H-GUARD" (CL-G in red).
2. Connect the "CH" coax lead (red) and "CL" coax lead (black) as specified in
section B.1 parts 2 to 5 (above).
B.4
Measurement of H-GND & H-L (G.S.T.)
1. Place UST-GST switch at "L-GND" (CH-L & CH-G in red). This grounds the
low side and parallels CH-G with CH-L.
2. Connect the "CH" coax lead (red) and "CL" coax lead (black) as specified in
section B.1 parts 2 to 5 (above).
19
3.4
MEASUREMENT OF TWO WINDING TRANSFORMERS (continued)
B.5
Measurement of L-GND & L-H (G.S.T.)
1. Place UST-GST switch at "H-GND" (CH-L & CL-G in red). This grounds the
high side and parallels CL-G with CL-H.
2. Connection the "CH" coax lead (red) and "CL" coax lead (black) as specified
in section B.1 parts 2 to 5 (page 19).
NOTE:
C.
For all of section B, all connections are made once and UST-GST
switch on CB100 is used to do interconnecting, thus avoiding the
trouble of sending someone up to the transformer to do interchanging
of leads.
Recording of Identification and Test Data Using Test Sheet 01-100
and 02-100
Before any testing is started it is very important that identification data of
transformer and environmental data be recorded. Without this information,
accurate translation of results cannot be made, and filing of results not possible. A
sample test sheet type 01-100 is shown on page 22.
For the "Two Winding Transformer Test", it may be required to test "Bushings"
located on the transformer. For this requirement, test sheet type 02-100 is required
and a sample sheet is shown on page 22. (For specific instructions on filling out
this sheet (02-100) see section 3.8).
C.1
Identification & Supporting Data for Type 01-100 Data Sheet
Record the following:
- Date of test.
- Equipment designation and location.
- Transformer name plate data.
- Environmental condition at test time including transformer temperature
gauge readings.
- Reason for test and work order number (if any).
- Refer to previous test (if any).
- CB100 serial number.
- Name of individual(s) performing test.
- Date of previous test (if any).
- Sheet number of last test (if any).
- Sheet number of bushing test 02-100 (if any).
20
3.4
MEASUREMENT OF TWO WINDING TRANSFORMERS (continued)
C.2
Recording Test Data
Record the following:
- Position of capacitance and dissipation factor switches and dials for each
bridge balance.
- Calculated value of capacitance in picofarads.
- Total dissipation factor value as shown in section 3.3 part 19.
- A total of up to 6 sets of readings may be required (including the oil sample).
D.
Temperature Corrections
Dissipation factor values are corrected to 20°C to facilitate comparison between
tests at different times and on different transformers.
A temperature correction factor chart for transformers is on page 24. Two
temperature correction curves are to be found on page 25.
Curve 1
This correction curve applies to:
- all oil filled power transformers manufactured prior to 1939.
- all oil filled power transformers manufactured subsequent to 1945 having
varnished coils. This may be assumed to include:
- Pioneer Electric transformers 66 kV and below, manufactured
prior to 1955.
- Pioneer Electric transformers 33 kV and below, manufactured
prior to 1965.
Curve 2
This correction curve applies to:
- power transformers insulated with oil/paper materials (no varnish impregnation
of coils), manufactured subsequent to 1945.
Application to Corrections
1. Using the appropriate curve from Figure 8 and the transformer top oil
(gauge) temperature, determine the temperature correction factor.
2. Multiply all measured values of dissipation factor by the temperature
correction factor and enter these corrected values on the field test sheet.
21
01-100 TWO WINDING TRANSFORMERS
22
02-100 BUSHING TEST
23
TABLE II - TEMPERATURE CORRECTION FACTOR FOR LIQUIDS,
TRANSFORMERS, AND REGULATORS
24
FIGURE 8
25
3.5
MEASUREMENT OF BULK OIL CIRCUIT BREAKER (O.C.B.)
A.
Preparation for Test
1. Clear the circuit breaker in the normal manner.
2. Remove risers from all bushings.
3. Leave working grounds attached to the risers.
4. The porcelain surface of bushings should be clean and dry. Remove any dirt
or oil with clean, dry rags.
5. Tests should not be carried out when rain is falling, or when there is
condensation on the porcelain.
6. Measure and record on the field test sheet the environmental conditions on
test sheet 03-100 (Bulk Oil Circuit Breaker).
7. Record the reading of the oil temperature gauge of the breaker.
B.
Measurement of Individual Bushings & De-Ion Grids (O.C.B. Open)
1. The breaker should be OPEN.
2. Place UST-GST switch in "CH-GND" position (in red).
3.
The "CL" coax lead is not required for this test.
4. Connect "CH" coax lead (red) to the high voltage bushing in position 1 (see
Figure 9-next page). Keep the rest of the lead clear of the porcelain.
5. Make sure CB100 ground is connected to system ground.
6. Personnel should keep several feet away from the high voltage bushing. This
will minimize influence of the test readings.
7. Balance the CB100 as described in the general operating instructions,
section 3.3 and record the measured values on the O.C.B. test sheet; 03100, see page 29. This measurement is for one bushing and its associated
De-Ion grid.
26
3.6
MEASUREMENT OF BULK OIL CIRCUIT BREAKER (continued)
8. Repeat steps 3-6 on each bushing in turn (Positions 2-6, Figure 9).
FIGURE 9
C.
Measurement of Bushings and Lift Rods (O.C.B. Closed)
1. The breaker should be in the CLOSED position.
2. Place the UST-GST switch in the CH-GND position (in red).
3. The CL coax lead (black) is not required for this test.
4. Connect the "CH" coax lead (red) to the high voltage bushing in position 1 or
2 (see Figure 9; both are shorted together). Keep the rest of the lead clear of
the porcelain.
5. Make sure CB100 ground is connected to system ground.
6. Personnel should keep several feet away from the high voltage bushing. This
will minimize influence of the test readings.
7. Balance the CB100 as described in the general operating instructions,
section 3.3 and record the measured values on the O.C.B. test sheet; 03100, see page 29. This measurement is for two bushings and their
associated lift rods.
8. Repeat steps 3-6 on each set of bushings and lift rods (3 sets total).
D.
Recording of Identification & Test Data using Test Sheet 03-100 (O.C.B.)
27
3.5
MEASUREMENT OF BULK OIL CIRCUIT BREAKER (continued)
Before any testing is started it is very important that identification data of oil
circuit breaker and environmental data be recorded. Without this information,
accurate translation of results cannot be made, and filing of results not possible. A
sample test sheet type 03-100 is shown on page 29.
D.1
Identification & Supporting Data for Type 03-100 Test Sheet
Record the following:
- Date of test.
- Equipment designation & location.
- O.C.B. nameplate data.
- Environmental conditions at test time including oil circuit breaker (O.C.B.)
temperature gauge readings.
- Diagram of bushing position designations.
- Bushing nameplate data.
- Reason for test and work order number (if any).
- Refer to previous test (sheet number of last test).
- Date of previous test (last test date).
- CB100 serial number.
- Name of individual(s) performing test.
- Company name and department.
D.2
Recording Test Data
Record the following:
- Position of bushing.
- Serial number of bushing.
- Nameplate power factor.
- Nameplate capacitance.
- Position of capacitance and dissipation factor switches and dials for each
bridge balance.
- Calculated value of capacitance in picofarads.
- Total dissipation factor value as shown in section 3.3, part 19.
- A total of 6 sets of readings for the bushings and 3 sets of readings for closed
breaker test (2 bushings and lift rod).
E.
Temperature Corrections
Dissipation factor values are corrected to 20°C to facilitate comparison between
tests at different times and on different bushing and oil circuit breakers.
Temperature correction factor should be followed according to the particular
bushings on the O.C.B.
This is found in section 3.8, page 44.
28
03-100 OIL CIRCUIT BREAKER TEST
29
3.6
MEASUREMENT OF THREE WINDING TRANSFORMERS
A.
Preparation for Test
1. Clear transformer in the normal manner.
2. Remove risers and/or bus-bars and cables from all bushings.
3. Leave working grounds attached to the risers and/or bus-bars and cables.
4. The porcelain surface of bushings should be clean and dry. Remove any dirt
and oil with clean, dry rags.
5. Tests should not be carried out when rain is falling, or when there is
condensation on the porcelain.
6. Short the high voltage bushings with a bare braided jumper. The jumper
should not be allowed to sag (Figure 10).
FIGURE 10
7. Short the low voltage bushings as in (6).
8. Short the tertiary bushings as in (6).
NOTE: The neutral, or starpoint bushing of a three phase transformer
winding should be connected to the other bushings of that
winding by means of the shorting jumper (Figure 11, below).
FIGURE 11
9. Measure and record on the field sheet the ambient temperature and relative
humidity.
30
3.6
MEASUREMENT OF THREE WINDING TRANSFORMERS (continued)
B.
Measurement of Insulation Power Factor
B.1
Measurement of H-L (U.S.T.)(C1)
1. Place UST-GST switch at "UST" (CH-L in red).
2. Connect the "CH" coax lead (red) to one of the high voltage bushings,
keeping the rest of the lead clear of the porcelain.
3. Connect the "CL" coax lead (black) to one of the low voltage bushings. The
path of this lead is not important so long as it does not come close to the
high voltage bushing.
4. Ground the tertiary winding, keeping lead clear of high side.
5. Personnel should keep several feet away from the high voltage bushings to
avoid any influence on the readings.
6. Balance the CB100 as described in the "General Instructions" (section 3.3).
See Figure 12.
FIGURE 12
31
3.6
MEASUREMENT OF THREE WINDING TRANSFORMERS (continued)
B.2
Measurement of H-GND (G.S.T.)(C2)
1. Place UST-GST switch at "L-GUARD" (CH-G in red).
2. Connect the "CH" coax lead (red) to one of the high voltage bushings,
keeping the rest of the lead clear of the porcelain.
3. Connect the "CL" coax lead (black) to one of the low voltage bushings and
short the tertiary bushing to the low voltage bushings.
4. Balance the CB100 as described in "General instructions" (section 3.3).
See Figure 13.
FIGURE 13
32
3.6
MEASUREMENT OF THREE WINDING TRANSFORMERS (continued)
B.3
Measurement of L-GND (G.S.T.)(C3)
1. Place UST-GST switch at H-GUARD (CL-G in red).
2. Connect the bushings keeping the rest of the lead clear of the porcelain.
3. Short the high voltage bushing to the tertiary bushings and connect "CH"
coax (red) to the high voltage bushings.
4. Connect the "CL" coax lead (black) to the low winding.
5. Balance the CB100 as described in the "General Instructions" (section 3.3).
See Figure 14.
FIGURE 14
33
3.6
MEASUREMENT OF THREE WINDING TRANSFORMERS (continued)
B.4
Measurement of Tertiary-H (U.S.T.)(C4)
1. Place UST-GST switch on UST (CH-L in red).
2. Connect the "CH" coax lead (red) to the high voltage bushing keeping the
rest of the lead clear of the porcelain.
3. Connect the "CL" coax lead (black) to the tertiary winding.
4. Short the low voltage bushing to ground, keeping leads clear of other
bushings.
5. Balance the CB100 as described in "General Instructions" (section 3.3).
See Figure 15.
FIGURE 15
34
3.6
MEASUREMENT OF THREE WINDING TRANSFORMERS (continued)
B.5
Measurement of Tertiary-L (U.S.T.)(C5)
1. Place UST-GST switch on UST (CH-L in red).
2. Connect the "CH" coax lead (red) to the low voltage bushing keeping the rest
of the lead clear of the porcelain.
3. Connect the "CL" coax lead (black) to the tertiary winding.
4. Short the high voltage bushing to ground, keeping leads clear of other
bushings.
5. Balance the CB100 as described in "General Instructions" (section 3.3).
See Figure 16.
FIGURE 16
35
3.6
MEASUREMENT OF THREE WINDING TRANSFORMERS (continued)
B.6
Measurement of Tertiary-GND (G.S.T.)(C6)
1. Place UST-GST switch on L-GUARD (CH-G in red).
2. Connect the "CH" coax (red) to the tertiary bushing keeping the rest of the
lead clear of the porcelain.
3. Short the high voltage bushing to the low voltage bushing. Connect the "CL"
coax lead (black) to the low voltage bushing.
4. Balance the CB100 as described in "General Instructions" (section 3.3).
See Figure 17.
FIGURE 17
36
3.6
MEASUREMENT OF THREE WINDING TRANSFORMERS (continued)
C.
Recording of Identification & Test Data using Test 04-100
Before any testing is started it is very important that identification data of the
three-winding transformer and environmental data be recorded.
Without this information, accurate translation of results cannot be made, and filing
of results not possible.
A sample test sheet type 04-100 is shown on page 38.
C.1
Identification & Supporting Data for Type 04-100 Data Sheet
Record the following:
C.2
Date of test.
Equipment designation and location.
Transformer nameplate data.
Environmental condition at test time including transformer temperature gauge
readings.
Reason for test and work order number (if any).
Refer to previous test number (if any).
CB100 serial number.
Name of individual(s) performing test.
Date of previous test.
Sheet number of bushing test (02-100).
Test Data
Record the following:
- Position of capacitance and dissipation factor switches and dials for each
bridge balance.
- Calculated value of capacitance in picofarads.
- Total dissipation factor value as shown in section 3.3, part 19.
- A total of 7 sets of readings may be required (including the oil sample).
D.
Temperature Corrections
Refer to "Measurement of Two Winding Transformers", section 3.4, part D. This is
identical for three winding transformers (page 21).
37
04-100 THREE WINDING XFMRS
38
3.7
MEASUREMENT OF BUSHINGS
A.
Preparation for Test
1. Clear the apparatus in the normal manner.
2. Remove risers and/or busbars and cables from all bushings.
3. Leave working ground attached to the risers and/or bus bars and cables.
4. The porcelain surface of the bushings should be clean and dry. Remove any
dirt or oil with clean, dry rags.
5. Tests should not be carried out when rain is falling, or when there is
condensation on the porcelain.
6. Remove the covers from the tap compartments except if the bushings are
Westinghouse Type 0 115 kV or higher voltage. For these latter bushings
remove only the 1/2" pipe plug from the tap compartment.
7. If the bushings to be tested are located on a transformer the terminals of the
bushings of each winding should be shorted using bare braided jumpers.
These jumpers should not be allowed to sag. Transformer windings whose
bushings are not being tested should be grounded.
8. Measure and record on the field test sheet the ambient temperature and
relative humidity.
9. Record readings of liquid (oil) temperature gauge of the associated
transformer or circuit breaker.
10. Record the nameplate data of the bushings on the field test sheet, including
the factory capacitance and power factor test data (if any). Where only one
power factor value is given, assume this to be for the C1 portion of the
bushing.
39
3.7
MEASUREMENT OF BUSHINGS (continued)
B.
Measurement of Bushing Power Factor
B.1
Bushings other than Westinghouse
1. Place UST-GST switch in U.S.T. (CH-L in red)(C1).
2. Connect the "CL" coax lead (black) to the tap of the bushing. In the case of
Westinghouse bushings follow the procedure outlined in section B.2
immediately following this procedure for bushings with capacitance taps
rated at 115 kV and up.
3. Connect the "CH" coax lead (red) to the high voltage terminal of the bushing
keeping the lead clear of the porcelain.
4. Personnel should keep several feet away from the bushing under test to
minimize influence on the readings.
5. Balance the CB100 as described in the "General Instructions" (section 3.3).
FIGURE 18 - MEASUREMENT OF C1
40
3.7
MEASUREMENT OF BUSHINGS (continued)
B.2
Westinghouse Bushings of 115 kV and Up.(Test prong for making power
tests through voltage tap).
1. Remove the pipe plug in the voltage tap cover.
2. Connect the terminal end of the test prong to ground with a flexible
connector, so an electrostatic charge left on the bushing after it has been
removed from service will be discharged to ground when the test prong is
inserted in the voltage tap.
3. Insert the prong through the hole in the cover to make contact with the
female contact in the rear of the voltage tap assembly.
4. Disconnect the test prong from ground and connect it to the proper power
factor test lead.
5. Proceed to make a power factor test in the conventional manner used for
testing ungrounded specimens.
6. After completing, the power factor tests, remove the test prong.
7. If necessary add new oil to have level even with bottom of hole in cover if
necessary.
8. Replace the pipe plug in a weatherproof manner in the cover.
FIGURE 19
41
3.7
MEASUREMENT OF BUSHINGS (continued)
Measurement of Insulation between the Tap and the Flange of the Bushing
1. Place GST-UST switch on L-GUARD (CH-G in red)(C2).
2. Connect the "CL" coax lead (black) to the bushing tap.
3. Connect the "CH" coax lead (red) to the high voltage terminal of the bushing
keeping the lead clear of the porcelain.
4. Personnel should keep several feet away from the bushing to minimize
influence on the test results.
5. Balance the CB100 as described in "General Instructions" (section 3.3).
FIGURE 20 - MEASUREMENT OF C2
42
3.7
MEASUREMENT OF BUSHINGS (continued)
C.
Recording of Identification & Test Data using Test Sheet 02-100
C.1
Identification & Supporting Data for Test Sheet 02-100
Record the following:
C.2
Date of test.
Apparatus information.
Bushing information.
Environmental conditions and transformer gauge readings.
Diagram of apparatus configuration.
Reason for test and work order number (if any).
Refer to previous test number (if any).
CB100 serial number.
Name of individual(s) performing test.
Date of previous test (if any).
Sheet number of apparatus test (type 01-100 or 03-100 or 04-100).
Test Data
Record the following:
- Position of capacitance and dissipation factor switches and dials for each
bridge balance.
- Calculated value of capacitance in picofarads.
- Total dissipation factor value as shown in section 3.3, part 19.
- A total of 7 sets of readings may be required (including the oil sample).
D.
Temperature Corrections
Dissipation factor values are corrected to 20°C to facilitate comparison between
tests at different times on the same or similar bushings.
1. If the bushing is installed in a bulk oil circuit breaker or power transformer
use the average of the ambient air temperature and the liquid (gauge)
temperature of the OCB or transformer in order to determine the
appropriate correction factor from Tables III, IV, and V, pages 47, 48 and 49.
2. Multiply all measured values of dissipation factor by the temperature
correction factor and enter these corrected values on the field test sheet.
A test report (02-100) is found on page 53.
43
3.8
MEASUREMENT OF TRANSFORMER BUSHINGS WITH DRAW LEADS
Most transformer bushings rated 69kV and above are of the draw lead type.
Certain transformer bushings rated 34.5kV and 24kV may also have draw leads
but may be rather difficult to test by this method because the draw lead terminal
must be removed and at this voltage the terminal may be below the oil level in the
conservator. The conservator can, of course, be valve off and some oil drained from
the tank to prevent loss of oil via the exposed draw lead. Newer transformer
bushings rated at 69kV and above usually have capacitance or power factor test
taps and where present, these taps should be used in testing the bushing in
preference to the draw lead method.
A.
Preparation for Test
As for power transformers, and then proceed as follows:
1. Remove the threaded draw lead terminal.
2. Secure draw lead to bushing cap by means of a length of Barbour's twine
(doubled) with about 6 inches slack.
3. Remove pin from draw lead and put it in a safe place.
4. Insert a piece of light fish paper around the draw lead terminal to insulate it
from the bushing conductor for at least 1 megohm as measured on an
ohmmeter. To accomplish this, the draw lead terminal may be raised, by
hand, to a maximum of 1 inch. Do not use leverage to raise the draw lead
and do not extend it, by hand, more than 1 inch as unseen damage may
result to internal ties, bracing, connectors, etc.
5. Using the bare braided jumpers, connect the draw lead to the terminals of
all the other bushings common to the winding involved.
6. Ground all other windings.
44
3.8
MEASUREMENT OF TRANSFORMER BUSHINGS WITH DRAW LEADS
(continued)
B.
Measurement of Bushing Power Factor
1. Place the UST-GST switch at "L-GUARD" (CH-GND in red)
2. Connect the "CH" coax lead to the cap of the bushing. Ensure that good
contact is made with the metal of the bushing cap.
3. Connect the "CL" coax lead to the other bushing on the same winding as the
bushing being tested.
4. Personnel should keep several feet away from the bushing to minimize the
influence on the reading.
5. Balance the CB100, as described in the "General Instructions" (Section 3.3).
6. If there is any difficulty in balancing the bridge, or if the results appear
incorrect, check:
- contact with bushing cap.
- isolation of draw lead with ohmmeter (CH coax lead (red) disconnected).
C1 MEASURED WHILE C2 AND C3 ARE
GUARDED
FIGURE 21
45
3.8
MEASUREMENT OF TRANSFORMER BUSHINGS WITH DRAW LEADS
(continued)
C.
Recording of Identification and Test Data using Test Sheet 02-100.
Follow the same format as per "Bushings" (Section 3.7, section C, page 43).
D.
Temperature Corrections
Dissipation factor values are corrected to 20°C to facilitate comparison between
tests at different times on the same or similar bushings.
1. To determine temperature correction factor. Obtain the average of the
transformer top oil (gauge) and ambient air temperature and use tables III,
IV and V, pages 47, 48 and 49.
2. Multiply all measured values of dissipation factor by the temperature
correction factor and enter these corrected values on the bushing power
factor test report, sheet 02-100.
Sample Test Sheet 02-100 is found on page 53.
Due to uncertainty as to the actual bushing temperature, it is best if the difference
between top oil and ambient temperature is minimal. This can best be
accomplished if the transformer is allowed to cool to ambient temperature prior to
test.
46
TABLE III - BUSHING TEMPERATURE CORRECTION FACTORS
47
TABLE IV - BUSHING TEMPERATURE CORRECTION FACTORS
48
TABLE V – BUSHING TEMPERATURE CORRECTION FACTORS
49
3.9
MEASUREMENT OF APPARATUS BUSHINGS AND CABLE POTHEADS BY
HOT COLLAR METHOD
Apparatus bushings with neither draw leads nor capacitance power factor test taps
can be tested in situ only by the use of the hot collar method. The same is true of
cable potheads. Also, dissipation factor tests on draw lead and tap equipped
bushings which indicate a deteriorated condition may be supplemented by hot
collar tests.
A.
Preparation for Test
1. Clear apparatus in the normal manner.
2. Leave working grounds attached to the risers and/or bus-bars and cables.
3. The porcelain surface of bushings should be clean and dry. Remove dirt or
oil with clean, dry rags.
4. Measure and record on the field test sheet the ambient temperature and
relative humidity.
5. Tests should definitely not be carried out when rain is falling, or when there
is condensation on the porcelain. Preferably, tests should not be carried out
when the relative humidity is in excess of 75%.
6. Record reading of apparatus oil (liquid) temperature gauge (if present).
7. Place metal collar under the uppermost petticoat or rainshed. The collar
should be snug against the surface of the porcelain.
B.
Measurement by Hot Collar Method
1. Place the UST-GST switch in L-GUARD (CH-G in red).
2. Connect the CH coax leads (red) to the "D" ring of the metal collar (see
Figure 22).
3. Keep the CH coax lead clear of the porcelain.
50
3.9
MEASUREMENT OF APPARATUS BUSHINGS AND CABLE POTHEADS BY
HOT COLLAR METHOD (continued)
4. In this test the CL coax lead need not be connected. It can be left off the
instrument.
5. Personnel should keep away from the bushing under test to avoid any
influence on the readings.
6. Balance the CB100 as described in the "General Operating Instructions"
(Section 3.3).
FIGURE 22
A breakdown of the different capacitances is shown below. In this test, all three
values shown below (C1, C2, C3) are combined. Their values represent the
following:
C1 - Capacitance between collar and high voltage conductor of bushing ACROSS
porcelain surface.
C2 - Capacitance between collar and high voltage conductor of bushing
THROUGH porcelain and other insulation surrounding the conductor.
C3 -
Capacitance ACROSS porcelain surface to ground flange.
51
3.9
MEASUREMENT OF APPARATUS BUSHINGS AND CABLE POTHEADS BY
HOT COLLAR METHOD (continued)
FIGURE 23
C.
Identification and Test Data Using Test Sheet 02-100
Follow the same format as per "Bushings", Section 3.7, part C.
NOTE: In this application, the capacitance multiplier is almost always "20 PF".
D.
Temperature Correction
For this particular test temperature correction are not applied, thus leaving part of
test sheet 02-100 unfilled.
52
02-100 BUSHING TEST
53
3.10
OPERATION WITH RANGE EXTENSION (Cat. No. 810132)
A.
General
The CB100 Range Extension Adaptor increases the capacitive measurement from
1.2uF on the highest range to 480uF on the same range. One item to note is the
accuracy change on capacitance and dissipation factor; it increases as per the
table VI below.
TABLE VI - ACCURACY TABLE FOR RANGE EXTENSION ADAPTOR
CB100 CAP
SWITCH MULT.
POS'N.
RANGE
EXTENSION
MULT. POS'N.
MULTIPLY BRIDGE
READING BY
ACCURACY
CAPACITANCE %
READING
ACCURACY
DISSIPATION
FACTOR
0.05µF
4
0.2
0.3
±0.2% D.F.
0.1µF
4
0.4
0.3
±0.3% D.F.
0.05
25
1.25
0.4
±0.4% D.F.
0.1
25
2.5
0.4
±0.4% D.F.
0.05
100
5.0
0.5
±0.5% D.F.
0.1
100
10.0
0.5
±0.5% D.F.
0.05
400
20.0
0.6
±0.6% D.F.
0.1
400
40.0
0.6
±0.6% D.F.
NOTE: D.F. range switch not to be used on 0-1%. When the
range extension adaptor is used, the guard feature of the
CB100 is lost and readings, therefore, have to be carried out in
the more simple two-terminal configuration.
54
3.10
OPERATION WITH RANGE EXTENSION (continued)
B.
Test Procedure
1. Ensure that specimen to be tested is completely DISCHARGED. Charged
capacitors can be LETHAL.
2. Connect BNC on Range Extension to "CH" on bridge using BNC - BNC lead
provided.
3. Connect binding post (black, located adjacent to BNC) on Range Extension
to "G" terminal on CB100.
4. Place UST-GST switch on "L-GUARD" (CH-G in red).
5. Connect "C" on Range Extension to specimen common.
6. Connect appropriate range of Range Extension to C high of specimen. Use
sufficient wire to ensure wire resistance does not influence reading (Typically
12 or 14 gauge wire).
7. Balance the CB100 as described in "General Instructions", Section 3.3.
NOTE: DF range switch not to be used on 0-1%. Capacitance
range switch to be used on 0.1uF or 0.05uF.
For detailed connection, see Figure 24, below.
FIGURE 24
55
3.11
OPERATION WITH CALIBRATOR, Cat. No. 810133
A.
General
The Multi-Amp Calibrator (Cat. No. 810133) gives an operator a quick reference
source for verifying the correct operation of the CB100. The calibrator ensures that
each position on the UST-GST switch functions correctly and that its accuracy is
within allowable tolerance. The calibrator fits quite conveniently in the CB100
transport case, taking up very little room.
B.
Operation
1. Connect red BNC from calibrator (marked "HI") to "CH" on bridge.
2. Connect black BNC from calibrator (marked "LO") to "CL" on bridge.
3. Connect center terminal from calibrator to ground terminal on bridge.
4. Compare the values obtained, to values on calibration report for calibrator
(see next page for sample sheet).
5. Set UST-GST switch as per each indicated position.
See Figure 25, below, for correct connection.
FIGURE 25 - UST-GST SWITCH TESTS ON ALL FIVE POSITIONS
56
NOTE: Connect the red lead to CxH; the black lead to CxL; the ground must be
connected to the bridge ground.
NOTE: This calibrator is designed as a quick check and verificator of correct
capacitance bridge operation and is not intended for absolute bridge calibration.
For this service, please return the instrument to the manufacturer or appointed
service agent.
57
4.0
ANALYSIS OF RESULTS
4.1
POWER TRANSFORMERS
- Two winding transformers, three winding transformers, regulators and
reactors.
The results from tests in Sections 3.4 and 3.6 provide valuable information
regarding the general condition of the ground and interwinding insulation of
transformers. They provide valuable information concerning the dryness of the
transformer, and are helpful in detecting undesirable operating conditions and
failure hazards resulting from:
Moisture
- Moisture can be absorbed by the paper insulation.
- Free water in the liquid state which is lying in pools on the insulation surface.
- Both the above conditions may be detected by the dissipation factor test.
However, free water in the form of ice will not be detected.
Chemical Contamination
Reaction between acids in the transformer oil and residue from materials used in
treating the core iron may result in the production of sodium soaps. These high
loss materials result in:
- high dissipation factor on winding measurements.
- high dissipation factor on testing oil samples.
While increased winding dissipation factor due to chemical contaminants in the oil
may not result in any failure hazard, it can mask more serious defects.
Core Grounds
In two winding power transformers the low voltage winding is usually next to the
core. If the dissipation factor of the low voltage winding to ground insulation
appears to increase from one test to the next and the capacitance appears to
decrease, then it is possible that the core ground circuit is discontinuous.
On Load Tap Changers
If one performs dissipation factor tests with the on load tap changer on neutral
high values of dissipation factor may result. When on the neutral position, the
regulating winding is often tied in only through a resistor. If the ohmic value of this
resistor at low voltage is high then the apparent dissipation factor of the regulating
winding will increase. Therefore it is good practice to always move an on load tap
changer off the neutral position before dissipation factor measurements are made.
58
4.1
POWER TRANSFORMERS (continued)
Bushings
The lower the capacitance to ground of a given winding the greater will be the effect
of the condition of the associated bushings on the overall winding dissipation
factor. Certain bushings such as the COB Class L may have quite high dissipation
factor without being a serious failure hazard. However when in this condition they
mask measurements on the winding. Often an oil change will significantly lower
the dissipation factor of such bushings.
1. Modern transformers insulated with oil/paper materials (no varnish
impregnation of coils) have dissipation factors of less then 1.0% and often
less than 0.5% at 20°C.
2. Transformers built prior to 1939 often have varnished coils and other high
loss insulating materials employed. Consequently dissipation factors as high
as 2 or 3% at 20°C are not uncommon for these transformers.
In each case the most important criterion is the comparison with previous test data
on the same transformer and other similar transformers. Remember also that when
testing power transformers include the transformer oil and the bushings in the
measurement. These should always be tested separately.
The following percentages are to be used in evaluating the results on ASKAREL and
OIL-FILLED (free-breathing and conservator types) transformers at 20°C.
Good
- Up to 2.0 percent power factor.
Investigate
- 2.01 to 4.0 percent power factor.
Bad
- 4.01 percent power factor and above.
The following percentages are to be used in evaluating the results on OIL-FILLED
(SEALED and GAS-BLANKETED types) transformers at 20°C.
Good
- Up to 1.5 percent power factor.
Investigate
- 1.51 to 3.0 percent power factor.
Bad
- 3.01 percent power factor and above.
Oil-Filled Reactors
Test and evaluation as on oil-filled power transformers should be used.
59
4.1
POWER TRANSFORMERS (continued)
Voltage Regulators
The following values are to be used in evaluating the results on regulators at 20°C.
Good - Up to 2.0 percent power factor.
Investigate - 2.01 to 4.0 percent power factor.
Bad
- 4.01 percent power factor and above.
4.2
BUSHINGS
A.
General Electric and Locke Bushings (Locke is subsidiary of General Electric
and the same types are manufactured by both companies).
1. Type A (Dry-Type)
Type A is a through-type porcelain bushing assembly with a support flange,
bushing cap, and terminal. Generally, bushings rated 500 Amperes and
above have a solid rod or tube for the central conductor. Below this, they
have and insulated cable for a conductor.
Bushings are to be rated as follows (no temperature corrections are to be
applied).
Voltage Rating
Good
Investigate
Bad
8.7-15 kV
0-7.0% PF
7.01-9.0% PF
9.01% PF
and above
2. Type B (Compound Filled)
Type B bushings are cable-type, and usually the cable insulation is
varnished cambric. The top half of the bushing has insulating compound
between the porcelain and the insulated conductor. The insulated cable
projects below the mounting flange. Hot-collar tests are to be made as well
as standard power factor tests.
Bushings are to be rated as follows at 20°C.
Voltage Rating
Good
Investigate
Bad
7.5-24 kV
0-10.0% PF
10.01-12.0% PF
12.01% PF and
above
60
4.2
BUSHINGS (continued)
3. Type F (Oil-Filled)
This bushing has a number of concentrically spaced Herkolite cylinders and
concentric oil ducts around a central metal tube or rod. The outer part of
the bushing consists of two one-piece porcelains assembled against the
flanges of a metal support. The bushing has a large metallic expansion
chamber with a magnetic oil gauge.
On transformers that have considerable vibration, it has been necessary to
modernize the 161 kV bushings and to install springs in the cap to hold all
parts under pressure. Normally, the bushings have a power factor around
0.5 percent after they are modernized. Experience has proved this
modification to be very dependable, and these bushings should be rated as
all other type F bushings. However, a special comparison should be made to
previous values; and any significant change should be investigated.
Bushings are to be rated as follows at 20°C.
Voltage Rating
Good
Investigate
Bad
46-69 kV
0-3.0% PF
3.01-4.5% PF
4.51% PF and above
1156-161 kV
0-2.5% PF
2.51-4.0% PF
4.01% PF and above
4. Types L, LC, LI, and LM (Oil-Filled)
These bushings have a central copper tube or rod wound with laminated
paper (herkolite) insulation which is impervious to the insulating liquid,
which may be either insulating oil or pyranol. A fairly large bushing cap
includes a sealed reservoir space to allow for thermal expansion of the
insulating liquid. A ground shield is pressed over the Herkolite core below
the support flange.
The type L bushings are built by winding paper layers impregnated with
Bakelite around a center conductor. A void can be created when the
impregnation is missing. Corona in the voids in the paper around the center
conductor causes the bushing to fail. A bushing may have a good power
factor test and fail the next day. The lowest voltage at which corona starts
on a bushing is usually above 10 kV, and any test made below this voltage
will be of little value in detecting corona.
61
4.2
BUSHINGS (continued)
A new feature has been added to the type LC bushings. These bushings now
have a floating equalizer spaced from the center conductor, such that when
or if corona deterioration progresses to this barrier a 20 to 35 percent
increase in capacitance takes place. The bushing is then to be given an
"investigate" rating.
Bushings are to be rated as follows at 20°C.
Voltage Rating
Good
Investigate
Bad
15-73 kV
0-3.50% PF
3.51-5.0% PF
5.01% PF and
above
5. Type OF, OFI, and OFM (Oil-Filled)
These bushings are oil-filled. There are a number of concentrically spaced
herkolite cylinders and concentric oil ducts around a central metal tube or
rod.
Older models have a glass oil expansion reservoir forming a part of the
bushing cap so the oil level can be visually checked. Later models have a
sealed, metallic expansion chamber with a magnetic oil gauge.
Bushings are to be rated as follows at 20°C.
Voltage Rating
Good
Investigate
Bad
46-69 kV
0-3.5% PF
3.31-6.0% PF
6.01% PF and
above
115-161 kV
0-3.0% PF
3.01-5.0% PF
5.01% PF and
above
6. Types S, SI, and SM (Compound-Filled)
These are all of the same general construction and have a maximum voltage
rating of 69 kV. The bushing embodies a rigid core consisting of a metal
tube covered with Herkolite insulation wound into cylindrical form. The
upper part of the core is encased in porcelain with the space between the
core and porcelain filled with compound. A metal ground sleeve insulated
with varnished cambric extends from the support flange far enough to be in
the oil of the apparatus to have a single hot-collar test as well as a standard
power factor test.
62
Bushings are to be rated as follows at 20°C.
Voltage
Good
Investigate
Bad
15-37 kV
0-4.0% PF
4.01-6.5% PF
6.51 PF and above
46-69 kV
0-3.5% PF
3.51-6.0% PF
6.01% PF and
above
7. Type U (Oil-Filled)
The type bushing is similar to type F, being oil-filled and hermetically
sealed, but is considerably reduced in size and weight. The principal design
feature is a combination of voltage stress equalizers and oil-impregnated
paper on a central metal tube or rod. This produces a core of high dielectric
strength and makes possible smaller over-all diameter and lighter weight. All
standard 161 kV type U bushings have a capacitance tap outlet. On oil
circuit breaker bushings this tap chamber is filled with compound, but on
transformer bushings usually no filler is used. The type U bushings were
initially designed for applications between 92 and 330 kV. They are now
being built for application from 23 through 69 kV and have a tap outlet for
power factor measurements.
Bushings are to be rated as follows at 30°C.
Voltage Rating
Good
Investigate
Bad
46-69 kV
0-2.5% PF
2.51-3.5% PF
3.51% PF and
above
92-161 kV
0-2.0% PF
2.01-3.0% PF
3.01% PF and
above
63
4.2
BUSHINGS (continued)
B.
Westinghouse Bushings
1. Condenser (Compound-Filled)-All types except D, N, and O
This is a standard voltage bushing and is used on practically all electrical
apparatus. It is made by winding alternate layers of paper and foil on a
central tube or rod. The layers are tapered to distribute the dielectric
stresses evenly. The upper part of the bushing has a porcelain shell, and a
special compound or plastic is used to fill the space between the paper-foil
core and the porcelain. Transformer bushings have a tube with a draw lead.
Circuit breaker bushings have solid rod for a conductor. Single hot-collar
tests are to be made as well as standard power factor tests.
In general, the power factor values at 20°C given below apply to all types of
condenser bushings except types D, N, and O.
Voltage Rating
Good
Investigate
Bad
15-25 kV
0-4.0% PF
4.01-6.5% PF
6.51% PF and
above
46-69 kV
0-3.5% PF
3.51-6.0% PF
6.01% PF and
above
92-161 kV
0-3.0% PF
3.01-5.0% PF
5.01% PF and
above
The capacitance of any of the above condenser bushings should not be more
than 15 percent above that of the average similar type and rated bushings. An
increase in capacitance indicates shorted condenser sections. If above 15
percent, the bushing is to be given an "investigate" rating.
2. Type D (Semicondenser)
This is a transformer bushing and consists of a heavily insulated cable
surrounded by a condenser. The condenser extends only a relatively short
distance below the mounting flange. This type has, in general, higher power
factors than full condenser bushings. A single hot-collar and also a multiple
hot-collar test should be made as well as a standard power factor test on these
bushings.
Bushings are to be rated as follows at 20°C.
Voltage Rating
Good
Investigate
Bad
33-46 kV
0-5.0% PF
5.01-7.0% PF
7.01% PF and
above
64
4.2
BUSHINGS (continued)
3. Type H (Dry-Type)
This is a bulk-type, multipiece porcelain bushing. Porcelain parts are cemented
together and the flange is cemented to the lower porcelain tube. A heavily
insulated cable is used for a conductor. The space between the tube and top
porcelain rain shed is filled with a hard-setting compound. A single hot-collar
test should be made as well as standard power factor tests on these bushings.
Bushings are to be rated as follows with no temperature corrections to be
applied.
Voltage Rating
Good
Investigate
Bad
33-46 kV
0-109.0% PF
Above 10.0% PF
12.0% PF and
above
4. Type N (Condenser, Compound-Filled)
This is a condenser bushing with a spun expansion cap and multiple coil
springs in it to maintain constant pressure on all gaskets. The space between
the porcelain rain shed and the condenser core is filled with a plastic
compound. Transformer bushings have a center tube for a draw lead. Oil circuit
breaker bushings have a center rod. Single-collar tests should be made as well
as standard power factor tests.
There have been failures of the type N bushings, and the trouble has been
determined as being caused by shorted condenser layers inside the bushing.
The condenser layers progressively short out to where there is not enough
insulation to withstand the voltage stress on the bushing. When condenser
layers short out, usually there is a slight increase in power factor. A standard
test with the bushing in the transformer cannot be made unless the winding is
disconnected from the bushing. When the bushing is in an oil circuit breaker,
the UST position eliminates the effect of the interrupters, etc., from the meter
readings.
In addition to the standard and single-collar tests, a UST and a capacitance tap
test should be made. Any bushing which has a measured capacitance value of
10 percent above the average for similar type and rated bushings is to be given
an investigate rating.
65
4.2
BUSHINGS (continued)
4. Type N (Condenser, Compound-Filled) (continued)
The standard, UST, and capacitance tap tests on the bushings are to be
rated at 20°C, using the same temperature corrections from the table at the
end of this section for all three tests. (Use table for "Condenser except type
O").
Voltage Rating
Good
Investigate
Bad
92-161 kV
0-2.5.0% PF
2.51-4.0% PF
4.01% PF and
above
5. Type O (Condenser, Oil-Filled)
This is a condenser type bushing made of oil-impregnated kraft paper and is oil
filled. All parts are held under pressure by springs in the cap. Ample expansion
space is provided in the cap for thermal expansion of the oil. There is a
magnetic oil gauge on the cap.
Bushings are to be rated as follows at 20°C.
Voltage Rating
Good
Investigate
Bad
92-161 kV
0-1.5% PF
1.51-2.5% PF
2.51% PF and
above
Any type O bushing which has a measured capacitance 10 percent above the
average for similar type and rated bushings is to be given an investigate rating.
An increase in capacitance indicates shorted condenser sections.
66
4.2
C.
BUSHINGS (continued)
Ohio Brass Bushings
Starting approximately in 1940, Ohio Brass bushing name-plates give over-all
power factor at 10 kV as measured at the factory in air. However, prior to 1943,
readings were not corrected at 20°C; and this must be taken into consideration.
Bushings tested in good oil will usually have a slightly lower power factor. Power
factor readings on bushing nameplates should be recorded on the data sheet.
The factory test data with the year should be on the bushing nameplates starting
approximately in 1940. The exception would probably be on the old type ODOF
bushings which may not have any nameplate. Practically all the type G and type L
bushings should have the year and factory test on the nameplate. If no factory test
and there is a shop tag with power factor test data, use it for a base for evaluation.
After reconditioning a bushing at the shop, the reading for a good bushing should
not be more than 2 percent above factory test, above 2.01 percent to 5.0 percent
investigate, and above 5.0 percent bad.
1. Class ODOF
These are oil-filled bushings consisting of several concentric porcelain cylinders
around the center conductor. The bushings can be identified by a pronounced
bulge of the porcelain just above the mounting flange and a smooth porcelain
stocking below the flange. They were superseded in 1932 by type G. They were
built for both transformers and oil circuit breakers.
Factory or previous test values are to be used as a base for evaluation.
Bushings are to be rated as follows at 20°C. THE FOLLOWING POWER FACTOR
READINGS ARE NUMERICAL DIFFERENCE INCREASE OVER FACTORY
VALUES.
Manufactured 1926 to 1938 inclusive - Bushings in this period will have an
initial value for a new bushing of 2 to 4 percent.
Voltage Rating
Good
Investigate
Bad
115-161 kV
0-8.0% PF
8.1-15.9% PF
16.0% PF and
above
67
4.2
BUSHINGS (continued)
Manufactured before 1926 and after 1938 - Bushings in these periods will have an
initial value for a new bushing of 1 to 12 percent.
Voltage Rating
Good
Investigate
Bad
115-161 kV
0-11.0% PF
11.1-21.9% PF
22.0% PF and
above
2. Class G
These bushings are similar to class L bushings. Bushings built between 1932
and 1938 were vented to the atmosphere. Bushings built since 1938 are
completely sealed and usually equipped with magnetic-type oil gauges. Factory
or previous test values are to be used as a base for evaluation. Bushings are to
be rated as follows at 20°C.
THE FOLLOWING POWER FACTOR READINGS ARE NUMERICAL
DIFFERENCE INCREASE OVER FACTORY VALUES.
Manufactured 1926 to 1938 inclusive - Bushings in this period will have an
initial value for a new bushing of 2 to 4 percent.
Voltage Rating
Good
Investigate
Bad
46-161 kV
0-8.0% PF
8.1-15.9% PF
16.0% PF and
above
Manufactured before 1926 and after 1938 - Bushings in these periods will have
an initial value for a new bushing of 1 to 12 percent.
Voltage Rating
Good
Investigate
Bad
46-161 kV
0-11.0% PF
11.1-21.9% PF
22.0% PF and
above
3. Class L
These are oil-filled bushings with concentric porcelain cylinders around the
center conductor. Bushings manufactured between 1932 and 1938 had a
cylindrical oil chamber which was vented to the atmosphere in fixed conductor
designs and vented down through the conductor tube in draw-lead designs. The
complete assembly is held together in compression by a top and bottom washer
and a spring with the rod conductor acting as a tie rod. Present class L
bushings are completely sealed and can be identified by a spherical oil
chamber. Factory previous test values are to used as a base for evaluation.
Bushings are to be rated as follows at 20°C.
68
4.2
BUSHINGS (continued)
THE FOLLOWING POWER FACTOR READINGS ARE NUMERICAL DIFFERENCE
INCREASE OVER FACTORY VALUES.
Manufactured 1926 to 1938 inclusive - Bushings in this period will have an initial
value for a new bushing of 2 to 4 percent.
Voltage Rating
Good
Investigate
Bad
15-69 kV
0-8.0% PF
8.1-15.9% PF
16.0% PF and
above
Manufactured before 1926 and after 1938 - Bushings in these periods will have an
initial value for a new bushing of 1 to 12 percent.
Voltage Rating
Good
Investigate
Bad
15-69 kV
0-11.0% PF
11.1-21.9% PF
22.0% PF and
above
4. Class GK
This is a condenser core-type bushing with oil-impregnated paper insulation,
and it is oil filled. The cores are completely encased with porcelain housings at
both top and bottom of the bushings, permitting full oil immersion. The
complete assembly is held together in compression by top springs with the
central conductor acting as a tie rod. Bushings are completely sealed. Oil
reservoirs are equipped with a magnetic-type oil gauge.
Bushings are to be rated at 20°C as follows (Use table at end of this section for
temperature corrections).
Voltage Rating
Good
Investigate
Bad
69-161 kV
0-1.5% PF
1.51-2.50% PF
2.51% PF and
above
69
4.2
BUSHINGS (continued)
5. Class LK
This is a condenser core-type bushing with resin paper insulation and is also oil
filled. Above the mounting flange the core is encased with porcelain and the
core is immersed in oil. On top of the bushing is an oil reservoir. Below the
flange is a ground sleeve, and at the lower end of the ground sleeve the core is
exposed. This exposed portion is protected and sealed by multiple coatings of
baked oil and moisture proof varnish. Bushings are completely sealed and
normally do not have an oil level gauge on the reservoir. The complete assembly
is held together in compression by top springs with the central conductor acting
as a tie rod.
Bushings are to be rated at 20°C as follows. (Use table at end of this section for
temperature corrections).
D.
Voltage Rating
Good
Investigate
Bad
23-69 kV
0-2.0% PF
2.01-3.0% PF
3.01% PF and
above
Lapp Bushings
1. Type POC
This type bushing, as the type designation indicates, is paper-oil, condensertype, totally enclosed. The condenser core is composed of oil-impregnated high
dielectric paper and aluminum foil layers wrapped on a solid copper conductor
for fixed stud and on a copper tubing for draw-lead bushing. The porcelain
housings, top and bottom, and metal housing form a leak-proof protective cover
over the full length of the core. The entire housing assembly is sealed, and
maintained leak-proof, by compression spring loading of gaskets. There is an oil
space the entire length of the bushing.
Bushings are to be rated at 20°C as follows.
Voltage Rating
Good
Investigate
Bad
23-69 kV
0-1.0% PF
2.01-3.0% PF
3.01% PF and
above
70
4.2
BUSHINGS (continued)
2. Type PRC
This type bushing is a paper-resin core, as the name indicates. The condenser
core is constructed of paper and epoxy resin, either on a solid conductor or on a
tube for draw-lead use. The porcelain hood and aluminum ground sleeve are
bonded to the core by a special potting compound. All units are sealed together
by epoxy sealant. The bushing construction is completely oil free.
Bushings are rated at 20°C as follows.
Voltage Rating
Good
Investigate
Bad
15-69 kV
0-2.0% PF
2.01-3.01% PF
3.01% PF and
above
E.
Micanite and Insulators Company (Used on English Electric Company
Transformers)
1. Above 69 kV Bushings, Oil-Impregnated Paper Type
These bushings are completely sealed, condenser-type with a metallic
expansion chamber and a magnetic oil gauge. The 161 kV bushings have a
capacitance tap outlet.
Bushings are to be rated as follows at 20°C.
Voltage Rating
Good
Investigate
Bad
92-161 kV
0-1.5% PF
1.51-2.5% PF
2.51% PF and
above
2. 25-69 kV Bushings, Synthetic Resin-Bonded-Paper Type
These bushings are condenser-type, completely sealed with a visible prismatic
red indication oil gauge on the 46-69 kV bushings. Below the flange the ground
shield is a wire wrapped around the insulation of the center core. Both the core
and wire are covered with varnish below the flange. These bushings have test
terminals for making ungrounded specimen tests.
Bushings are to be rated as follows at 20°C.
Voltage Rating
Good
Investigate
Bad
25-69 kV
0-2.5% PF
2.51-3.5% PF
3.51% PF and
above
71
4.2
BUSHINGS (continued)
3. 15 kV Class Bushings
The 15 kV class bushings are not a condenser type but a simple porcelain
shell type with a mounting flange. Hot-collar tests should be made as well as
standard power factor test.
Bushings are to be rated as follows (no temperature corrections are to be
applied).
4.3
Voltage Rating
Good
Investigate
Bad
15 kV
0-4.0% PF
4.01-6.0% PF
6.01% PF and
above
NEGATIVE DF SYNDROME
This section discusses the negative dissipation factor that can be measured on
certain pieces of electrical power equipment.
1. The CB100 is not capable of measuring a negative DF. When such a
condition exists, its magnitude can be only estimated based on the other
readings as readings below ZERO are not possible. The Doble set, being a
readout instrument, can easily reverse the polarity of the meter to indicate a
negative DF. It is much more difficult to generate a negative resistance in a
bridge circuit.
2. Negative readings occur when there is resistive coupling within the test
specimen.
The normal situation is:
FIGURE 26
72
4.3
NEGATIVE DF SYNDROME (continued)
Whenever you have a connection as shown below, it will depress the DF reading of
the CH-L measurement. This happens on all instruments, CB100, CB61, Doble,
Biddle, etc. The value of R, in Figure 2, in relation to the values of associated
capacitances depresses the measured value of DF H-L.
FIGURE 27
As an illustration consider the following:
FIGURE 28
1.
H-L + H-G
=
3795 1.87%
2.
H-G
=
1970 1.77%
3.
H-L
=
1826 2.01%
4.
L-G
=
1512 1.63%
5.
L-G + L-H
=
3338 1.81%
73
4.3
NEGATIVE DF SYNDROME (continued)
If the circuit is modified, as shown, the reading change to:
FIGURE 29
1.
H-L + H-G
=
3795 2.49%
2.
H-G
=
1970 3.96%
3.
H-L
=
1826 0.98%
4.
L-G
=
1512 3.82%
5.
L-G + L-H
=
3338 2.24%
The reduction in DF of test #3 (UST) is quite noticeable, as is the increase of the
DF of test #2 and #4.
3. The various mechanisms that may result in a circuit similar to Figures 2 or
4 include:
a.
Deterioration of semiconductive shields within the transformer.
b.
A floating tertiary winding, usually with a high resistance ground.
c.
High resistance connection between core and tank.
The mere presence of a NEGATIVE DF should be a warning sign for the
maintenance staff, and should be investigated. A deteriorating shield will
probably deteriorate to failure, but a high resistance connection to ground
on the core may not be a serious situation.
74
4.3 NEGATIVE DF SYNDROME (continued)
4. The CB100 is very versatile, and is capable of more measurements than the
5 functions on the switch. Some of these are useful in checking the
readings, while others can shed a light on the negative DF syndrome.
a.
Reverse the H and L leads.
This will give the operator another set of numbers, where he can
compare the "H" values of one, with the "L" values of the other.
Problems with leads, etc., will result in substantial differences and
should be checked.
b.
Short the H and L terminals on the transformer and measure (H-G) +
(L-G). Compare this value to the individual (H-G) And (L-G) readings.
c.
Operate the CB100 without a ground on the front panel, and with the
power cord ground disabled. In the UST position, the instrument will
measure (H-L), in parallel with (H-G) in series with (L-G). Compare
this value with individual readings. The NEGATIVE DF is eliminated
from this measurement.
NO GROUND ON BRIDGE!
FIGURE 30
7
75
5.0
THEORY OF OPERATION
5.1
TRANSFORMER RATIO ARM BRIDGE PRINCIPLE
A simplified diagram of the bridge is shown below. Connected to the bridge is a
three terminal capacitor with a power factor (D.F.) represented as Rx. This could
very well be a transformer with low winding (L), high winding (H) and ground (G).
FIGURE 31
The voltage supply energizes Cs (standard capacitor) and Cx (specimen under test).
Current of Cs travels through the transformer winding and returns to the voltage
supply. Current of Cx does the same, but travels in the opposite direction,
therefore generating an opposite polarity magnetic flux.
The output winding of the ratio arm transformer detect the difference in the Cs
current vs Cx current. This difference is displayed as an unbalanced null meter.
To balance the null meter, both magnetic fluxes (Cs and Cx) must cancel each
other out. To achieve this, the ratio-arm transformer has multiple taps to which
currents of Cs and Cx are directed. In the balanced condition, the following
formula applies:
Cs . Ns = Cx . Nx
where: Cs = Capacitor standard.
Cx = Specimen capacitor.
Ns = Number of turns on standard side of ratio-arm.
Nx = Number of turns on specimen side of ratio-arm.
76
5.1
TRANSFORMER RATIO ARM BRIDGE PRINCIPLE (continued)
The ratio adjustment, Ns, is shown on the face plate of the instrument as
"Capacitance Switch and Dial" and the ratio adjustment, Nx, is shown on the face
plate of the instrument as the "Capacitance Multiplier". Cs has been arranged to be
a suitable fixed value to make the instrument read directly.
The null meter is then made sensitive only to dissipation factor (P.F.) and balance
is achieved by adjusting Rs (resistance added to capacitor standard). Rs is shown
on the front plate as "Dissipation Factor Switch and Dial". Value is presented in
percent.
5.2
COMPARISON OF "DISSIPATION FACTOR" VS "POWER FACTOR"
For all practical purposes P.F. and D.F. are the same. Dissipation factor/power
factor are both expressed as a percentage, however it is how one arrives at this
number that differs. Consider the example (see Figure on this page) when voltage is
applied to a capacitor. The current which flows has two components. The larger
component (Ic) is the capacitive current which is determined by the dimensions of
the capacitor and the dielectric constant of the insulating material. The small
component (Ir) is the resistive current which is determined by the resistive losses of
the insulating material. The capacitive component (Ic) leads the test voltage (E) by
90 degrees. The resistive component (Ir) is in phase with the test voltage, we may
now determine the power factor and dissipation factor.
The power factor (PF) is defined as the cosine of 0, or as the watt component
divided by the volt-amperes.
Similarly, the dissipation factor (DF) is defined as the cotangent of 0, or as the ratio
of the loss component of current divided by the capacitive component of current.
The European term used here is the "tan delta", which is the tangent of the loss
angle "delta". It is equal to the dissipation factor summarizing:
Power Factor (PF) = W/VA = cos 0
Dissipation Factor (DF) = Ir/Ic = cot 0 = tan 6.
77
5.2
COMPARISON OF "DISSIPATION FACTOR" VS "POWER FACTOR"
(continued)
Angle 8
Dissipation Factor
(cos 8)
Dissipation Factor
(tan 6)
90
0.0000 (0%)
0.0000 (0%)
89.5
0.0087 (0.87%)
0.0087 (0.87%)
89
0.0175 (1.75%)
0.0175 (1.75%)
88
0.0349 (3.49%)
0.0349 (3.49%)
87
0.0523 (5.23%)
0.0523 (5.23%)
86
0.0698 (6.98%)
0.0698 (6.98%)
85
0.0872 (8.72%)
0.0872 (8.72%)
As can be seen, the power factor and the dissipation factor (tan) values differ only
at the very high values, and even then only a small amount.
FIGURE 32
Vector equivalent of capacitive current IC vs resistive current IR and their vector
total IT. The phase angle '8' is used in power factor calculation whereas ' ' is used
in dissipation factor calculation.
78
6.0
SERVICE AND MAINTENANCE
6.1
CALIBRATION
The adjustment of this instrument should be attempted only by a qualified
technologist, and only if the necessary equipment is available. It would be
preferable to send the instrument to the manufacturer for adjustment or repair.
A.
Equipment Required
Oscilloscope with external triggering.
Standard capacitors.
Standard resistors.
22 pin extension card.
B.
Adjustment Procedure
The purpose of the adjustment procedure is to assure that the instrument is
operating properly before any calibration adjustments are attempted.
1. Open the instrument by means of four screws on the front panel and
removing the bottom rear rubber feet.
2. Remove the oscillator (OSB PCB), detector (DTB PCB) and calibrator (CLB
PCB) boards from the instrument.
3. Set UST-GST switch to UST.
4. Connect instrument to 120V, 60Hz, and turn it on.
5. Check for presence of 15 volts on the output of the power supply at the
oscillator (OSB PCB) and detector (DTB PCB) sockets.
6. Plug in the oscillator board (OSB PCB).
7. With the scope connected to the CL terminal, adjust R16 potentiometer to
obtain an amplitude of 90 volts, peak-to-peak.
8. Should the voltage be distorted, check the operation of the oscillator, the
follower and transistor booster. A partial collapse will also cause distortion.
79
6.1
CALIBRATION (continued)
9. Synchronize the scope, in the external triggering mode to the voltage at CL
and display it as shown below.
10. The frequency of the oscillator may be checked using a counter. It should be
between 99.5 and 100.5 cycles per second. Values of R18 and C4 should be
checked (79.6 to 80.4 for 50Hz supply).
11. Check the output of the reference voltage generator (pin 14) on the oscillator
board. With the C-DF switch in the C position the amplitude of the voltage
should be 20V p-p, and in phase with CL voltage.
12. Plug in the calibrator and detector boards.
13. Set the capacitance multiplier switch to 0.1 and capacitance switch to 1 and
dial to 000.
80
6.1
CALIBRATION (continued)
14. Check the signal input to the detector on pin 6 (TP2). The signal should be
about 80 millivolts p-p, and 90 degrees behind CL voltage. The phase
position of this voltage is controlled by capacitor C5 on the Mother Board. It
is approximately 0.47uF for 60Hz operation and 1uF for 50Hz.
15. Check the output of the amplifier following the reject filter (TP3). The signal
should be about 20mV p-p and 0 degrees behind CL voltage.
16. Check the signal output of the first tuned stage (TP4). Output should be a
sine wave 0.5V p-p, and 180 degrees behind CL voltage. Adjust R23.
17. Set Capacitance Multiplier Switch to 0.1 and Capacitance Switch to 0 and
dial to 100.
81
6.1
CALIBRATION (continued)
18. Check the signal output of the second tuned stage (TPS). Output should be
a sine wave 1.2V p-p and 0 degrees behind CL voltage. Adjust R24.
19. If 14 is 5 degrees outside the specified phase relationship, change the tuning
of the ratio transformer by changing the voltage of C5. If the output is much
below specified amplitude level, check for shorted turns on the ratio
transformer.
20. If 16 or 18 are 5 degrees outside the specified phase relationship, adjust the
tuning of the stages by means of R23 and R24. Note that each tuned stage
should have a gain of about 25.
21. If any of the stages are below the specified gain, replace the integrated
circuit amplifiers.
22. Set Capacitance Range Switch to 0.1.
Set Capacitance Switch to 0.
Set Capacitance Dial to 000.
23. Put scope on P1N16 (output of detector) and Adjust the UST C & DF
trimmers on the calibrator board for null on scope (A voltage less than 0.1 pp is sufficient).
24. Adjust R26 on Detector Card to zero the DC signal. This should null the
meter.
25. Balance Bridge by means of 1000pF capacitor connected externally to
terminals CL & CH. Adjust R25 to obtain symmetrical sine wave on either
side of balance.
26. Repeat steps 23 through 25.
27. Check the overall sensitivity of the null indicator. With C & DF switch in C,
the null indicator should deflect 4 divisions for a change of 005 on the
capacitance dial.
82
6.1
CALIBRATION (continued)
C.
Calibration Procedure
NOTE: The calibration procedure must be performed with the instrument
mounted inside the case. To allow access to the trimming potentiometers,
the panel should be replaced with a piece of aluminum which has five
access holes drilled in it. The rear panel is held in place with the foot
mounting screws.
1. Set Capacitance Range Switch to 0.1uF.
Capacitance Switch to 0.
Capacitance Dial to 000.
Dissipation Factor Range to 0^X-1^Y.
Dissipation Factor Dial to 000.
UST-GST switch to UST.
All calibration potentiometers shown on following page.
2. With the C-DF switch in the C position, adjust the UST-C trimmer for zero
on null indicator.
3. With the C-DF switch in the DF position, adjust the UST-DF trimmer for
zero on null indicator.
4. Repeat 2 and 3 until zero in both C and DF positions is obtained.
5. Set UST-GST switch to GST (GST-H or GST-L).
6. Repeat steps 2, 3, and 4, adjusting the GST-C, and GST-DF trimmers for
zero on null indicator.
7. Connect a loss-free three terminal, 1000pF capacitor to the bridge using coaxial leads.
8. Balance the bridge on the 100pF range in the UST position.
9. Use the DF-O trimmer for balancing the bridge in the DF phase position,
with the DF dial set to 000.
10. The bridge should indicate the value of the loss-free capacitor within 2pF,
and 000 +20 for dissipation factor.
11. If the indicated capacitance is outside of the range the standard capacitor
(C2) needs replacing. Use only a low loss polystyrene, capacitor for C2.
83
6.1
CALIBRATION (continued)
12. Insert a 10 Kohm precision (non-inductive) resistor in series with the
1000pF loss-free capacitor (connected between CL and CH terminals).
13. Re-balance the bridge. Assuming the capacitor to be exactly 1000pF, the
bridge should now indicate a loss of 0.63%.
14. If the reading is too high, add capacitance to C1. If the reading is too low,
remove some capacitance from C1. C1 should be about 600pF.
15. Insert a 100K precision (non-inductive) resistor in series with the 1000pF
loss-free capacitor.
16. Re-balance the bridge using the 0-10 DF range. Assuming the capacitor to
be exactly 1000pF, the bridge should now indicate a loss of 6.3%.
17. Increase value of C3 if reading is too high and decrease value of C3 is
reading is too low.
18. Check the 10-20% DF range using 200K resistor (DF = 12.5%).
19. Check the 20-30% DF range using a 400K resistor (DF = 25%).
20. There are no adjustments provided for the 10-20% or the 20-30% ranges. An
overlap of about 2% is provided between the ranges so that a balance is
always obtainable. (e.g. - A loss of 9.9% may be indicated as 9.9% on the 010% range, or as a loss of about 10.1% on the 10-20% range).
84
7.0
ACKNOWLEDGEMENTS
BILL McDERMID, P. ENG.
Manitoba Hydro
Waverly S. C.
Winnipeg, Manitoba
Special thanks to Bill McDermid and Manitoba Hydro for the use of their outline on
field use of the CB100.
8.0
DOCUMENTATION
The following drawings are included for reference purposes only:
Drawing Number
Title
B10130-051
Calibration Adjustments
B10130-104
Schematic, CLB PCB
B10130-105
Schematic, DTB PCB
B10130-106
Schematic, OSB PCB
C10130-108
Schematic, Chassis-MBB PCB
B10130-109
Schematic, PWR PCB
A10132-101
Schematic, R.E.A.
85
86
87
88
89
90
91
92