1
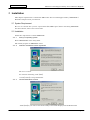
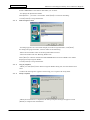
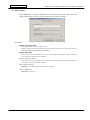
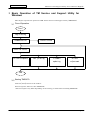
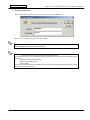
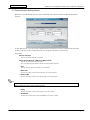
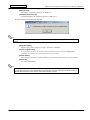
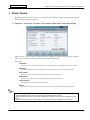
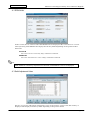
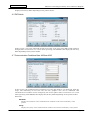
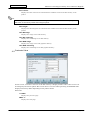
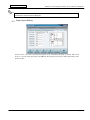
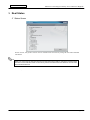
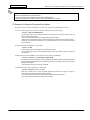
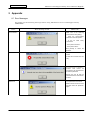
TM Printer Service and Support
Utility for Windows
Version 2.xx
User’ s Manual (English)
Rev. B
CONFIDENTIAL
TM Service and Support Utility User's Manual (English)
Table of Contents
1
Introduction . . . . . . . . . . . . . . . . . . . . . . . . . . . . . . . . . . . . . . . . . . . . . . . . . . . . . . . . . . . . . . . . . . . . . . . . . . . . . . . . . . . . . . . . . . . . . . . . . . . . . . . . . . . . 1
1.1
1.2
1.3
1.4
1.5
1.6
2
Installation . . . . . . . . . . . . . . . . . . . . . . . . . . . . . . . . . . . . . . . . . . . . . . . . . . . . . . . . . . . . . . . . . . . . . . . . . . . . . . . . . . . . . . . . . . . . . . . . . . . . . . . . . . . . . 3
2.1
2.2
2.3
2.4
3
Function Selection Screen............................................................................................................. 19
Common Screen ........................................................................................................................... 19
Convenient Usage . . . . . . . . . . . . . . . . . . . . . . . . . . . . . . . . . . . . . . . . . . . . . . . . . . . . . . . . . . . . . . . . . . . . . . . . . . . . . . . . . . . . . . . . . . . . . . . . . . 21
7.1
7.2
7.3
7.4
8
Status Screen............................................................................................................................... 18
Printer Sequence . . . . . . . . . . . . . . . . . . . . . . . . . . . . . . . . . . . . . . . . . . . . . . . . . . . . . . . . . . . . . . . . . . . . . . . . . . . . . . . . . . . . . . . . . . . . . . . . . . . 19
6.1
6.2
7
Operation: Get status, Set status, Save status, Read status, and Initial settings.............................11
EPSON NV.................................................................................................................................. 12
Solid Adjustment Value................................................................................................................. 12
Error History............................................................................................................................... 13
Memory Switch Setting ................................................................................................................ 13
DIP Switch .................................................................................................................................. 14
Communication Conditions/User NV/User NVG............................................................................ 14
Customize Value........................................................................................................................... 15
Integrating Maintenance Counter ................................................................................................. 16
Reset-Possible Maintenance Counter.......................................................................................... 16
Paper Layout Setting................................................................................................................ 17
Real Status . . . . . . . . . . . . . . . . . . . . . . . . . . . . . . . . . . . . . . . . . . . . . . . . . . . . . . . . . . . . . . . . . . . . . . . . . . . . . . . . . . . . . . . . . . . . . . . . . . . . . . . . . . . 18
5.1
6
Flow of Operation ........................................................................................................................... 7
Starting TMSSUTL ....................................................................................................................... 7
Entering Password......................................................................................................................... 8
Communication Setting Screen ....................................................................................................... 9
Printer Status. . . . . . . . . . . . . . . . . . . . . . . . . . . . . . . . . . . . . . . . . . . . . . . . . . . . . . . . . . . . . . . . . . . . . . . . . . . . . . . . . . . . . . . . . . . . . . . . . . . . . . . 11
4.1
4.2
4.3
4.4
4.5
4.6
4.7
4.8
4.9
4.10
4.11
5
System Requirement ...................................................................................................................... 3
Installation .................................................................................................................................... 3
Un-installation............................................................................................................................... 5
Web Update ................................................................................................................................... 6
Basic Operation of TM Service and Support Utility for Windows. . . . . . . . . . . . . . . . . . . . . . . . . . . . . . . . . . . . . 7
3.1
3.2
3.3
3.4
4
Purpose of This Manual and Target Users ...................................................................................... 1
Composition of This Manual ........................................................................................................... 1
Other Document ............................................................................................................................ 1
System operating environment ............................................................................................................ 1
Printer Sequence............................................................................................................................ 1
Password....................................................................................................................................... 1
Automating the Operation ............................................................................................................ 21
Starting up with the Command Line............................................................................................. 21
Command Line Options................................................................................................................ 22
Example of Using the Command Line Option ................................................................................ 23
Appendix . . . . . . . . . . . . . . . . . . . . . . . . . . . . . . . . . . . . . . . . . . . . . . . . . . . . . . . . . . . . . . . . . . . . . . . . . . . . . . . . . . . . . . . . . . . . . . . . . . . . . . . . . . . . . . 24
8.1
Error Messages ............................................................................................................................ 24
Page I
CONFIDENTIAL
TM Service and Support Utility User's Manual (English)
1 Introduction
1.1 Purpose of This Manual and Target Users
This manual explains about installation and operation of TM Printer Service and Support Utility.
This manual is for the person in charge of the TM Printer repair.
1.2 Composition of This Manual
Chapter 2 explains the method of installing the utility.
Chapter 3 to 6 explains the method of operating the utility.
Chapter 7 explains the method of mastering the utility well.
Chapter 8 explains the error messages and how to solve the problem.
1.3 Other Document
There are Service Manuals related to this manual. The Service Manual exists for each printer
model. Refer to the Service Manual for the following information:
-
Roll paper setting
-
Head replacement
-
Main board replacement
-
Autocutter replacement
1.4 System operating environment
This application operates only on the operating system below.
-
Windows 2000 SP4 or latter
-
Windows XP SP2 or latter
-
Windows VISTA SP1 or latter
1.5 Printer Sequence
TM Printer Service and Support Utility is a utility made to use with the following cases,
and it makes the operation easier.
- To know the printer status.
* The printer status is acquired.
- To print various print patterns.
* The test print is executed.
- To replace the unit and execute the relating work.
* The wizard is executed.
1.6 Password
The special user ID and the password are necessary to start TM Printer Service and Support
Utility. TM Printer Service and Support Utility has the following passwords.
- Password for general (for general)
Page 1
CONFIDENTIAL
TM Service and Support Utility User's Manual (English)
Only a basic function like the memory switch setting and the communication test, etc. can
be used.
- Password for person in charge of adjustment work (for adjustment)
A part of function cannot be used.
- Password for person in charge of repair and maintenance work (for repair)
All functions can be used.
Please refer to the release note for the function of each password that can be used.
Page 2
CONFIDENTIAL
TM Service and Support Utility User's Manual (English)
2 Installation
This chapter explains how to install the TM Printer Service and Support Utility (“TMSSUTL”).
Read this chapter when you install it.
2.1 System Requirement
Be sure to confirm the system requirement (OS, HDD space) before installing TMSSUTL.
For more details, refer to the release note.
2.2 Installation
Follow the steps below to install TMSSUTL.
2.2.1
Start your operating system.
Run "SETUP.EXE" in the setup disk.
The install program of TMSSUTL starts.
2.2.2
Welcome & Software License Agreement
Be sure to read it.
To continue installing, click [Next].
* Click [Cancel] to stop installation.
2.2.3
Choose Destination Location
- Click [Next] if you want to install the utility in the folder displayed in the Destination
Page 3
CONFIDENTIAL
TM Service and Support Utility User's Manual (English)
Folder. TMSSUTL is installed in the folder you set here.
- To change the destination folder.
Click [Browse…] to select a new folder. Click [Next] to continue installing.
* Click [Cancel] to stop installation.
2.2.4
Select Program Folder
- To add program icon to the folder displayed in the Program Folder, click [Next].
To change the program folder, execute either of the following.
- Enter the new folder name in the Program Folder text box.
- Select the folder from the Existing Folders list.
Click [Next] to continue installation. The TMSSUTL icon will be added to the folder
displayed in the Program Folder.
* Click [Cancel] to stop installation.
2.2.5
Copy of programs
- When you click [Next] in the Select Program Folder dialog box, the installation will
start.
* Follow the message if it appears instructing you to replace the setup disk.
2.2.6
Setup Complete
- When the installation is completed, the Setup Complete dialog box appears. Click
[Finish] to complete the installation.
Page 4
CONFIDENTIAL
TM Service and Support Utility User's Manual (English)
2.3 Un-installation
You can uninstall TMSSUTL using Add/Remove Programs in the Control Panel.
Follow the steps below to uninstall TMSSUTL.
2.3.1
Control Panel
Double-click the Control Panel icon.
2.3.2
Add/Remove Programs Properties
Run Add/Remove Programs that is located in the Control Panel of your operating
system.
2.3.3
Select TMSSUTL
Select TMSSUTL from the list.
2.3.4
Add /Remove
Click [Add/Remove].
2.3.5
Confirm the file deletion
If the message appears, click [Yes] to delete TMSSUTL.
* If you select [No], the uninstallation will be canceled.
2.3.6
Remove Programs From Your Computer
The program is uninstalled automatically.
Click [OK].
2.3.7
Exit
Close all open dialog boxes.
Page 5
CONFIDENTIAL
TM Service and Support Utility User's Manual (English)
2.4 Web Update
When TMSSUTL is installed, Webupdate.exe is installed together too. We release the
update module from epson-pso.com site when the program is updated.
Functions
Please select your area
Uses the epson-pos.com as update server.
Update modules are released from epson-pos.com for each area. You can specify the area
from JAPANESE, USA, EUROPE and ASIA.
Please input URL.
Uses your web server as update server. If you have update module, place update module to
your web server and specify the address.
Please input File Server
Uses your file server as update server. If you have update module, place update module to
your file server and specify the address.
[Get latest version]
TMSSUTL is updated if latest module was released.
[Start TMSSUTL]
TMSSUTL is started.
Page 6
CONFIDENTIAL
TM Service and Support Utility User's Manual (English)
3 Basic Operation of TM Service and Support Utility for
Windows
This chapter explains the operation of TM Printer Service and Support Utility (TMSSUTL)
3.1 Flow of Operation
Start
Login dialog
Communication
Status screen
Function select
Printer sequence
Test printing
Firmware
updating
Printer
adjustment
End
3.2 Starting TMSSUTL
Click the [Start] button on the taskbar.
Select Programs, Tmssutl, then TMSSUTL.
* The stored place may differ depending on the setting you made when installing TMSSUTL.
Page 7
CONFIDENTIAL
TM Service and Support Utility User's Manual (English)
3.3 Entering Password
The user ID and the password are required when you start TMSSUTL.
Enter the user ID and the password. Click [OK].
Note:
Use the alphanumeric character of normal width ( There is no distinction between the capital letter and
the small letter) for the user ID and the password.
Note:
TMSSUTL cannot be used if there is no user ID and special password.
The following functions can be used when inputting "TMSSUTL" for the user ID and "T7FO1ND" for the
password.
- Communication parameter setting
- Simple communication test
- Status display
If you want to use any other function, please contact your technical support because the special user ID
and the password are needed.
Page 8
CONFIDENTIAL
TM Service and Support Utility User's Manual (English)
3.4 Communication Setting Screen
When the user ID and the password are confirmed, the Communication conditions dialog box
appears.
In this dialog box, you can set the communication parameters used to communicate with the
printer, and execute the communication test using the parameter you have set.
Functions
Device selection
Select the model that is connected.
Serial I/F, Parallel I/F, USB I/F or Ethernet I/F
Select the I/F used with the printer.
Set the following parameters when the serial I/F is selected.
- Port
Select the port where the printer is connected.
- Baud rate
Select the same value as the baud rate set in the printer.
- Data length
Select the same value as the data length set in the printer.
Note:
Select only 8 bits to control the printer.
When the printer is set in 7 bits, change to 8 bits.
- Parity
Select the same value as the parity set in the printer.
- IP Address
Specify the same value as the IP Address set in the printer.
Page 9
CONFIDENTIAL
TM Service and Support Utility User's Manual (English)
[Refresh Port]
Search the connected printer with USB Port.
[Communication test (T)]
Confirm whether the connected printer is TM or not.
Normally the following message appears.
Note:
To execute the communication test, roll paper is inserted in the TM printer and the printer is ready to start
printing.
[Real-time status]
Display the printer status by using a real-time command.
[Printer sequence (P)]
It is possible to move to the Printer sequence selection screen only when TMSSUTL is
started by the password for the adjustment or for the repair.
[Printer status]
Execute the acquisition, setting, editing, and saving for the status set to the printer.
[Finish (F)]
Terminate TMSSUTL.
Note:
- The values set when TMSSUTL is ended can be used for the next time you start TMSSUTL.
- In this utility, the flow control of XON/XOFF is not supported. You need to set to the DTR/DSR control by
the printer's DIP switch or the memory switch when using the printer.
Page 10
CONFIDENTIAL
TM Service and Support Utility User's Manual (English)
4 Printer Status
When the [Printer status] button is selected in the Communication setting dialog box, the
Printer Status dialog box appears.
4.1 Operation: Get status, Set status, Save status, Read status, and Initial settings
In this screen, you can acquire or update the value saved in the printer and the value of switches.
Also, you can save the acquired value to the file and read that file.
Functions
Get status
Acquire the set value being saved by the connected printer and display them on the screen.
Set status
Set the value that can be updated in the value displayed on the screen to the printer.
Save status
Save a set value of the printer displayed on the screen to the file.
Read status
Read the set value saved in the file and display them on the screen.
Initial settings
The printer can be set to the default values.
Return
Terminate the Printer status screen and return to the Communication setting screen.
Note:
- When a set value is edited, "Editing" is displayed on the screen.
- When the default value is used, "Factory default" is displayed on the screen.
- When the data acquired from the printer is displayed, "Acquire from the printer" is displayed on the
screen.
- When the data read from the file is displayed, "Read from the file" is displayed on the screen.
Page 11
CONFIDENTIAL
TM Service and Support Utility User's Manual (English)
4.2 EPSON NV
In this screen, the set values saved in the EPSON NV are displayed. The screen above is a screen
when operating with TM-L90. The displayed item may differ depending on the printer model.
Functions
Printer ID
The value that was received by GS_I command is indicated.
EPSON NV
The value that affects the value of GS_I command is indicated.
Note:
Only when TMSSUTL is started by the password for the Repair, the Serial No. can be changed.
When TMSSUTL is started by the password for General, the EPSON NV screen is not displayed.
4.3 Solid Adjustment Value
On this screen the individual adjustment value of the printer saved in the NV memory is
displayed. The displayed item may differ depending on the printer model.
Page 12
CONFIDENTIAL
TM Service and Support Utility User's Manual (English)
Displays the individual adjustment value of the printer saved in the NV memory
4.4 Error History
In this screen, the Error history of the printer saved in the NV memory is displayed. The screen
above is a screen when operating with TM-L90. The displayed item may differ depending on the
printer model.
Functions
Time
Displays the value of RTC when the displayed error occurs.
Note:
When TMSSUTL is started by the password for General, the Error history screen is not displayed.
4.5 Memory Switch Setting
In this screen, the state of the memory switch set in the NV memory is displayed. A set value can
be changed by the status update. The screen above is a screen when operating with TM-L90. The
Page 13
CONFIDENTIAL
TM Service and Support Utility User's Manual (English)
displayed item may differ depending on the printer model.
4.6 DIP Switch
In this screen, a set value of the DIP switch can be read. A set value of the DIP switch cannot be
changed. The screen above is a screen when operating with TM-L90. The displayed item may
differ depending on the printer model.
4.7 Communication Conditions/User NV/User NVG
In this screen, the communication conditions set in the NV memory are displayed. And, the
usage and remaining of user NV and user NV graphics area can be confirmed. The
communication condition can be changed by the status update. The screen above is a screen
when operating with TM-L90. The displayed item may differ depending on the printer model.
Functions
Baudrate
Displays the baudrate of the communication condition saved in the NV memory of the
printer.
Parity
Displays the parity of the communication condition saved in the NV memory of the printer.
Page 14
CONFIDENTIAL
TM Service and Support Utility User's Manual (English)
Flow control
Displays the flow control of the communication condition saved in the NV memory of the
printer.
Note:
In this utility, the flow control of XON/XOFF is not supported. Set to the DTR/DSR control by the printer's
DIP switch or the memory switch when using the printer.
Data length
Displays the data length of the communication condition saved in the NV memory of the
printer.
User NV usage
Displays the usage of user NV memory.
User NV remaining
Displays the remaining of user NV memory.
User NVG usage
Displays the usage of user NV graphics memory.
User NVG remaining
Displays the remaining of user NV graphics memory.
4.8 Customize Value
In this screen, customize value set in the NV memory is displayed. The value of this screen can
be changed by the status update. The screen above is a screen when operating with TM-L90. The
displayed item may differ depending on the printer model.
Functions
<< PREV
Displays the previous page.
NEXT >>
Displays the next page.
Page 15
CONFIDENTIAL
TM Service and Support Utility User's Manual (English)
4.9 Integrating Maintenance Counter
In this screen, the counter value of the integrating counter is displayed. A check marked
integrating counter can be reset by updating the status. The screen above is a screen when
operating with TM-L90. The displayed item may differ depending on the printer model.
Note:
Only when TMSSUTL is started by the password for the Repair, the Integrating counter screen is
displayed.
4.10 Reset-Possible Maintenance Counter
In this screen, the counter value of the maintenance counter which can be reset is displayed. A
check marked maintenance counters can be reset by the Set status button. The screen above is
a screen when operating with TM-L90. The displayed item may differ depending on the printer
model.
Page 16
CONFIDENTIAL
TM Service and Support Utility User's Manual (English)
Note:
Only when TMSSUTL is started by the password for General or Repairing, the Reset-possible
maintenance counter screen is displayed.
4.11 Paper Layout Setting
In this screen, a set value of each kind of paper can be confirmed, changed, or cleared. The screen
above is a screen when operating with TM-L90. The displayed item may differ depending on the
printer model.
Page 17
CONFIDENTIAL
TM Service and Support Utility User's Manual (English)
5 Real Status
5.1 Status Screen
In this screen, the printer status can be confirmed in real time by using the real-time demand
command.
Note:
When you want to see the change in status even when the printer is offline, change the condition which
becomes "Cause of B USY status" on the memory switch or the DIP switch from Offline or receive buffer
full to Receive buffer full.
.
Page 18
CONFIDENTIAL
TM Service and Support Utility User's Manual (English)
6 Printer Sequence
TM Printer Service and Support Utility can execute the following printer sequences.
6.1 Function Selection Screen
When you click [Next] in the Communication conditions screen, the Printer sequence selection
screen appears.
You can operate all the necessary work for replacing the unit parts by following the wizard on
your screen.
In this screen, all the available functions for the printer which you have selected in the
Communication conditions screen are displayed. The screen above is a screen when operating
with TM-L90. The displayed item may differ depending on the printer model.
Return(R)
Return to the Communication setting screen.
Next (N)
Go to the selected sequence screen.
Finish (F)
Stop the operation and terminate TMSSUTL.
6.2 Common Screen
When you work on the printer sequence screen, the following screen where the operation and
notes are explained is displayed.
Page 19
CONFIDENTIAL
TM Service and Support Utility User's Manual (English)
When the above screen appears, follow the on-screen instructions to select [Quit], or [Next]. If
you want to terminate the application, select [Finish].
Functions
Quit (Q)
Return to the Printer sequence selection screen.
Next (N)
Print the test pattern.
Finish (F)
Stop the operation and terminate TMSSUTL.
The below button might appear when executing the printer sequence screen.
Function
Return (R)
Return to previous screen.
Page 20
CONFIDENTIAL
TM Service and Support Utility User's Manual (English)
7 Convenient Usage
7.1 Automating the Operation
Some operations with the keyboard input or the mouse can be automated by adding a command
line option to the command line used for starting up TM Printer Service and Support Utility
(TMSSUTL).
7.2 Starting up with the Command Line
Select one of the following to startup TMSSUTL using the command line.
・Startup from the DOS prompt
・Startup using Run in the Start menu
・Startup by the short cut icon
7.2.1
Startup from the DOS prompt
Follow the steps below to startup TMSSUTL from the DOS prompt.
1. Run the DOS prompt.
2. Move to the directory where TMSSUTL is installed.
For example: Run cd c:\Program Files\EPSON\TMSSUTL
3. Startup TMSSUTL.
For example: Run TMSSUTL
TMSSUTL is started.
7.2.2
Startup using Run in the Start menu
Follow the steps below to startup TMSSUTL using Run in the Start menu.
1. Click the [Start] button in the task bar.
2. Select Run from the Start menu.
3. Click [Browse].
4. Select the directory where TMSSUTL is installed. Select TMSSUTL and click
[Open].
5. Click [OK].
TMSSUTL is started.
7.2.3
Startup by the shortcut icon
Follow the steps below to startup TMSSUTL by creating a shortcut icon.
1. Start the Explorer.
2. Select New and then Shortcut from the File menu.
3. Click [Browse].
4. Select the directory where TMSSUTL is installed. Select TMSSUTL and click
[Open].
5. Click [OK].
6. Click [Next]. Confirm the name of the shortcut and click [Finish].
7. Double-click the shortcut icon you have created.
TMSSUTL is started.
Page 21
CONFIDENTIAL
TM Service and Support Utility User's Manual (English)
7.3 Command Line Options
7.3.1
Adding the command line option
See the following to add the command line option to the command line.
Using the DOS prompt or Run in the Start menu
The command line option is continuously added to the end of the command line.
Using the shortcut icon
Open the shortcut icon's properties, and add the command line option to the end of the
file name registered to the Link to text box.
* The command line option is divided by blanks.
* The number of characters of the command line and the command line option must be
within the 255 characters.
7.3.2
Composition of the command line option
The command line option is composed as follows.
Division
Blank (space)
Beginning of the option (minus sign) or/(slash)
Symbol of the option
Alphabet of two characters
Argument
7.3.3
Set value of option
Command line option of TMSSUTL
TMSSUTL has the following command line.
No
Symbol
Range of argument
(default value)
1
If
COM1,COM2,COM3,CO
M4,LPT1
Function
Specifies the port used.
* Only the existing port can be specified.
(COM1)
2
Br
24,48,96,192 (96)
Specifies the baud rate.
384, 576, 1152
* 100 multiplied numerical values are set as a baud rate.
3
Dl
8 : 8bit
Specifies the data length.
4
Pb
N,E,O (N)
Specifies the parity bit.
5
Sb
1,2 (1)
Specifies the stop bit.
6
Ex
T, F, M, A (none)
Execute the printer sequence automatically.
T: Test Print
F: Firmware Update
M: Main Board Exchange Wizard
A: Auto Cutter Exchange Wizard
7
Id
User ID (none)
Specifies the user ID.
8
Pw
Password (none)
Specifies the password.
Page 22
CONFIDENTIAL
TM Service and Support Utility User's Manual (English)
Note
* The command line option uses the alphanumeric character of normal width. There is no distinction
between capitals letters and small letters.
* A command line option outside the definition is disregarded.
* When the argument outside the range is used, the default value is used.
7.4 Example of Using the Command Line Option
Some operations can be automated as follows by using the command line option.
1. The user ID and the password are omitted when starting the utility.
TMSSUTL –idtmssutl /PWT7FO1ND
The password input screen is omitted when this command line is used, and it starts up with the
Communication setting screen.
* There is no distinction between the capital letter and the small letter.
* Both the minus and the slash can be used for the beginning symbol of the command line option.
* When the user ID and the password in the command line option are wrong, the password input
screen appears.
2. TM connected with LPT1 is controlled.
TMSSUTL –ifLPT1
It starts up with LPT1 selected when this command line is used.
* The password input screen is not omitted because there is no command line option of user ID and
the password.
3. TM connected with COM2 is controlled by the baudrate 19200bps.
TMSSUTL –id TMSSUTL –pw T7FO1ND –ifCOM2 –br192
By using this command line, it starts up with controlling the baudrate of COM2 by 19200bps. Because
the user ID and the password are set, the password input screen is omitted, and the Communication
setting screen appears.
* The baudrate of the printer should be 19200bps.
4. The head replacement sequence is executed.
TMSSUTL –idTMSSUTL -pw******** –exH
When this command line is used, the head replacement sequence is begun by using the
communication parameter used when starting last time.
* The communication setting of the printer and the TMSSUTL should correspond.
* The user ID and the password for Repair are necessary.
Page 23
CONFIDENTIAL
TM Service and Support Utility User's Manual (English)
8 Appendix
8.1 Error Messages
You might see the following messages while using TM Printer Service and Support Utility
(TMSSUTL) .
Class
Communication
Error message screen
What to do
Make sure of the follow ing
points and then click [Retry].
- Does the communication
parameter match the printer?
- Is the I/F
connected?
cable
surely
- Is the printer turned on?
- Is the printer online?
Click [Cancel] to cancel the
operation.
Command line
The specified command line is
invalid.
Confirm the command line and
retry.
You are trying to execute a
function
that
cannot
be
executed by the specified user
ID and the password.
Specify the user ID and the
password that can execute the
function.
Password
The password is not correct.
Make sure the user ID is correct
and then enter the password
again.
Page 24
CONFIDENTIAL
TM Service and Support Utility User's Manual (English)
The user ID is not correct.
Make sure the user ID is correct
and then enter the password
again.
If it still does not work, reinstall
TMSSUTL.
Others
The pwdchk.dll file was not
found.
Reinstall the utility.
There is no description printer ID
in the TMSSUTL.INF file.
Or, there is no TMSSUTL.INF.
Reinstall the utility.
There
is
no
description
concerning a user ID in the
TMSSUTL.INF file.
Or, there is no TMSSUTL.INF.
Reinstall the utility.
Page 25