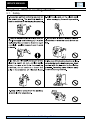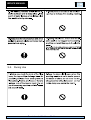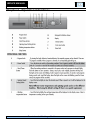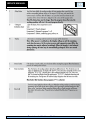
1
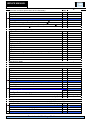
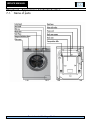
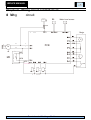
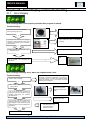
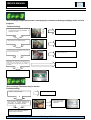
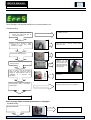
6(59,&(0$18$/ +:% 6(59,&( 0$18$/ 2UGHU1R)/69 )URQW/RDG:DVKLQJ0DFKLQH 02'(/ +:% :$51,1* 7KLVVHUYLFHLQIRUPDWLRQLVGHVLJQHGIRUH[SHULHQFHGUHSDLUWHFKQLFLDQVRQO\DQGLVQRWGHVLJQHGIRUXVHE\WKHJHQHUDOSXEOLF,WGRHVQRW FRQWDLQZDUQLQJVRUFDXWLRQVWRDGYLVHQRQWHFKQLFDOLQGLYLGXDOVRISRWHQWLDOGDQJHUVLQDWWHPSWLQJWRVHUYLFHDSURGXFW3URGXFWVSRZHUHG E\ HOHFWULFLW\ VKRXOG EH VHUYLFHG RU UHSDLUHG RQO\ E\ H[SHULHQFHG SURIHVVLRQDO WHFKQLFLDQV $Q\ DWWHPSW WR VHUYLFH RU UHSDLU WKH SURGXFW RU SURGXFWVGHDOWZLWKLQWKLVVHUYLFHLQIRUPDWLRQE\DQ\RQHHOVHFRXOGUHVXOWLQVHULRXVLQMXU\RUGHDWK )URQW/RDG+DLHU:DVKLQJ 0DFKLQH $OOULJKWVUHVHUYHG8QDXWKRUL]HGFRS\LQJ DQGGLVWULEXWLRQLVDYLRODWLRQRIODZ )URQW /RDG :DVKLQJ 0DFKLQH SERVICE MANUAL ˎ HW80-1401B Contents Chapter 1 1-1. General Information ________________________________________________ ː General Guidelines _____________________________________________________ ː 1-2. Caution and Warning symbols ____________________________________________ ː 1-3. Function indication symbols ______________________________________________ ː Chapter 2 Product Feature ___________________________________________________ ˑ 2-1. Features _____________________________________________________________ ˑ 2-2. Specification __________________________________________________________ ˒ Chapter 3 Matters needing attention ___________________________________________ ˔ 3-1. Safety _______________________________________________________________ ˔ 3-2. During Use ___________________________________________________________ ˕ Chapter 4 Operational Guidance ____________________________________________ ˍˌ Chapter 5 Program Introduction_____________________________________________ ˍˎ Chapter 6 Washing Mathods ________________________________________________ ˍˏ 6-1. Loading ____________________________________________________________ ˍˏ 6-2. Adding detergent ____________________________________________________ ˍˏ 6-3. Selecting washing program ____________________________________________ ˍˏ Chapter 7 7-1. Appearance brief introduction _____________________________________ ˍː Name of parts _______________________________________________________ ˍː 7-2. Net dimension_______________________________________________________ ˍˑ Chapter 8 Disassembly and Installation ______________________________________ ˍ˒ 8-1. Remove packing materials _____________________________________________ ˍ˒ 8-2. Dismantle packing bolts _______________________________________________ ˍ˒ Front Load Washing Machine SERVICE MANUAL ˏ HW80-1401B 8-3. Adjusting the washing machine _________________________________________ ˍ˒ 8-4. Joining the Inlet Hose to the Washing Machine _____________________________ ˍ˓ 8-5. Drainage Hose ______________________________________________________ ˍ˓ 8-6. Connecting to the Power Supply ________________________________________ ˍ˓ Chapter 9 Wiring circuit and Self check ______________________________________ ˍ˔ 9-1. Wiring circuit ________________________________________________________ ˍ˔ 9-2. Self check __________________________________________________________ ˍ˕ Chapter 10 Error Display and troubleshooting _________________________________ ˎˌ 10-1. Error Display _______________________________________________________ ˎˌ 10-2. Examination & Troubleshooting ________________________________________ ˎˑ 10-2-1. Display nothing ___________________________________________________ ˎˑ 10-2-2. No water inletting__________________________________________________ ˎˑ 10-2-3. No draining ______________________________________________________ ˎˑ 10-2-4. Abnormal noise and vibration ________________________________________ ˎ˒ 10-2-5. Water leaking_____________________________________________________ ˎ˓ Chapter 11 Maintenance ___________________________________________________ ˎ˔ Front Load Washing Machine SERVICE MANUAL ː HW80-1401B Chapter 1 General Information 1-1. General Guidelines When servicing,observe the original lead dress.If a short circuit is found, replace all parts which are overheated or damaged by the short circuit.After servicing ,see to it that all the protective devices such as insulation barriers ,insulation papers shields are properly installed .Confirm that the screws,parts and wiring which were removed in order to service are put in the original positions, or whether there are the portions which are deteriorated around the service places serviced or not. And be sure safety of that. 1-2. Caution and Warning symbols (You will see them in “Matters needing attention” ) Any instructions in this service manual with this “Warning “sign must be followed strictly. To prevent damage to the washing machine, any instructions in this manual with this “sign must be followed strictly. 1-3. Function indication symbols (You will see them in the specification table) Signify the washing machine has this function. Signify the washing machine doesn’t have this function. Front Load Washing Machine “Stop SERVICE MANUAL ˑ HW80-1401B Chapter 2 Product Feature 2-1. Features (1). 320mm diameter porthole, door may be open at a 175 degrees. Facilitate view of wash process, facilitate unloading and easy to use with large port. (2). Class A energy-saving Scientific design for tub can reduce the use of water heavy during washing, consequently upgrade the energy efficiency class to A,also use scientific washing (3). Multi-gear speed controller According to different costumingˈyou can select corresponding spin speedˈfrom 0 to 1400 rpm. (4). Unique gasket design featuring no residual water hidden inside. By the unique gasketˈwashing machine can left no residual water hidden between outer drum and front board. (5). Delay time adjustive. According to different costumingˈyou can select delay timeˈfrom 0.5h to 24h. Front Load Washing Machine SERVICE MANUAL ˒ HW80-1401B 2-2. Specification washing machines 1. Product identification Description of appliance Type of appliance(FS = standing, BI = built-in) Supplier own brand Supplier bar code˄Europe˅ Commercial Brand / Model Commercial bar code 2. Key-Features Energy efficiency class Washing performance class Spin efficiency class Programs Capacity Spin speed (max.) Noise level˄sound pressure level˅ Energy consumption per wash circle Water consumption per wash cycle Annual average energy consumption * Annual average water consumption* Residual dampness (spin result) Adjustable thermostat (water temp. adjust from - to) Drum capacity dry laundry / water Auto water level adjust (depending on volume of filled in laundry) Washing time (max.) Washing temperatures (program-controlled) Certification's (CE) Approvals (VDE/GS / TÜV/GS / IMQ) * per average 200 wash cycles (EN50242) T= COLD 3. Basics data Unit dimensions (H x W x D) Net weight Voltage/frequency Input power / main fuse (intensity) Work top / removable Control M = electromechanical, E = electronic, F = fuzzy Drum S = stainless steel / Z = zinc coated Tub P = Polyprop./ S = stainless steel Door: aesthetic (R = round, Y = big eye, Q = square) Diameter Outer door frame S= stainless steel / M = metal / P = plastic Inner door G= glass / P= plastic Detergent compartments Removable compartment for liquid detergent Delay timer (from - to) Self cleaning suds pump Water inlet hose cold water / hot water Water drain hose / -support Adjustable feet 4. Safety systems Auto door lock Motor overheating protection No heating without water Front Load Washing Machine HW80-1401B Washing machine FS HAIER EAN Supplied by HAIER HAIER EAN A A B n° 10 Kg 8 rpm 1400 dB(A) 71.5 kWh 1.2 l 59 kWh 187 l 9204 % 53% °C 90 -Ć kg / l 8/65 l AWL min 196 °C 30/40/ 60 /90 CE CE/VDE mm 850*595*650 kg 72 V/Hz 220V-240V~/50Hz W/A 2000/10 l/l E S P R cm 32 P G n° 3 h 0.5-24 z/- z/z n° 4 z ADL z MOP z NHW SERVICE MANUAL ˓ HW80-1401B Auto water cool-down (before drain 90°C boiled water) Water overflow protection Acqua Stop kit Child protection 5. Programs 1) Strong action /cotton cycles (90°C/60°C/40°C/30°C/Ć) 2) Normal action / synthetics (90°C/60°C/40°C/30°C/Ć) 3) Delicate action / wool or cashmere cycles (60°C/40°C/30°C/Ć) 4) Delicates silk (40°C/30°C/Ć) 5) Speedy (40°C/30°C/Ćˈ29min) 6) Sport 7) Hand wash 8) Underwear 9) Jeans 10) Duvet 11) Special programs Single Rinse Single Spin Single Drain Single Wash Optional function keys (additional program settings) ON/OFF Start / Pause Delay Extra Rinse Rinse Hold (or Soak) Eco Time Spin Select Temperature Select Baby Care Cold wash Super Wash Pre-wash Easy ironing 6. Packing dimensions & loadability Packing dimensions (H x W x D) Gross weight 40' Container load 7. Logistic / recicling information Packing weight Packing materials / Recycling symbols Carton (weight) Polistyren (weight) Polyetylene foil (weight) Other packing materials (weight) Wood (weight) 8. Service User instruction (languages) Max. failure rate (12 Months after sales to end customer) 9. Delivery Time of First Batch Front Load Washing Machine AWC z WRP z n° n° n° n° n° n° n° n° n° n° mm kg pcs RS kg gr gr gr gr kg RS % z -/z z/z z/z - z z 2 z z - - z z z z z z 890*650*690 75 162 3 Shrink package 2000 500 500 Available SERVICE MANUAL ˔ HW80-1401B Chapter 3 Matters needing attention 3-1. Safety Front Load Washing Machine SERVICE MANUAL ˕ HW80-1401B 3-2. During Use Front Load Washing Machine SERVICE MANUAL ˍˌ HW80-1401B Chapter 4 Operational Guidance Front Load Washing Machine SERVICE MANUAL ˍˍ HW80-1401B Front Load Washing Machine SERVICE MANUAL ˍˎ HW80-1401B Chapter 5 Program Introduction Front Load Washing Machine SERVICE MANUAL ˍˏ HW80-1401B Chapter 6 Washing Mathods 6-1. Loading 6-2. Adding detergent 6-3. Selecting washing program Front Load Washing Machine SERVICE MANUAL ˍː HW80-1401B Chapter 7 Appearance brief introduction 7-1. Name of parts Front Load Washing Machine 6(59,&(0$18$/ +:% 1HWGLPHQVLRQ KHLJKWPPZLGWKPPGHSWKPP )URQW /RDG :DVKLQJ 0DFKLQH SERVICE MANUAL ˍ˒ HW80-1401B Chapter 8 Disassembly and Installation 8-1. Remove packing materials 8-2. Dismantle packing bolts 8-3. Adjusting the washing machine Front Load Washing Machine SERVICE MANUAL ˍ˓ HW80-1401B 8-4. Joining the Inlet Hose to the Washing Machine 8-5. Drainage Hose 8-6. Connecting to the Power Supply Front Load Washing Machine SERVICE MANUAL HW80-1401B Wiring circuit and Self check circuit TC N Water level sensor 1 2 R 1 1 2 . W -1 9 iring 2 Chapter 9 FUSE Motor R G L N FA1 N FA PCB L FA3 MRL MR T MRN MRC FUSE 2 2 2 1 1 1 F V E Front P V E Load PS Washing Machine SERVICE MANUAL ˍ˕ HW80-1401B 9-2. Self check Self check 1. How to start Press the "Delay" and " intense” button at the same time, then plug on the machine, "tESt" and the model No will be displayed by turn. Press “start” button, the machine will start a self test program. At first, the model of the machine will be displayed, then the following will be performed. 2. Test item 1) When the door switch is closed for three seconds, 88:88 will be displayed. Otherwise "Err1" will be displayed 2) when the main wash valve allows water to let in for 3 seconds, when the prewash valve allows water to let in for 3 seconds, When the hot water valve allows water to let in for 3seconds, when the intenerate valve allows water to let in for 3 seconds, come into next water level, 77:77 will be displayed, If the water can not reach the level in 2 minutes, "Err5" will be displayed. If the water exceeds the overflow level,"Err8" will also be displayed. 3) When the washing machine heats water for 10 seconds, 66:66 will be displayed. 4) When the washing machine drains for 2 minutes, if no water left, 55:55 will be displayed. Otherwise "Err2" will be displayed. 5) When the inner drum runs for ten seconds with the speed of 400rpm at this time and for ten seconds with the speeds of 800rpm 44:44 will be displayed. When the self check program is completed, "End" will be displayed Model selection When the display board (on the control panel) is replaced technician need to select the correct model according with the model name on the washing machine. 1. Press the “extra rinse” button and then plug on the machine at the same time, keep extra rinse button pressed for 4 seconds. Then “1260" will be displayed on the screen 2. Press the “speed” button to choose correct speed. 1660/1460/1260/1060will be displayed by turn. Then press “rinse hold ”button to choose correct model 1480/1470/1460. Choose 1480 then press the “temperature” button to save. Take model HW80-1401 for example, the spin speed is 1400, the capacity is 8kg. So press "speed" button to choose 1460, and then press "rinse hold" button to choose 1480. You can find other model in the table below. 3. If you want to change the model again after storage, you can cut off the NTC and do the cycle adjustment. 4. Spin speed 1600 1400 1200 1000 Capacity 8KG 7KG 6KG 5KG / 1670 1660 / Front 1480 1470 1460 / Load Washing 1280 1270 1260 1250 Machine 1080 1070 1060 1050 SERVICE MANUAL ˎˌ HW80-1401B Chapter 10 Error Display and troubleshooting 10-1. Error Display Error message:Door is not properly shut 20s after program is started. Troubleshooting: Shut the door properly Pushing the door to Check Whether Door is properly shut or not N Y Cut off the power and then turn on again. Check the voltage between brown wire and blue wire of door lock, is it between AC 220-240V? Door lock is broken and need replacing, then make sure wire is connected properly. Y N Check if the wire connecting door lock and PCB is loose Connect the wire properly Y N Replace PCB Check the voltage between 12-3 and 12-12 of PCB, is it between AC 220-240V? N Error message: Drainage error, water not emptied within 4 min. Troubleshooting: Check if water is emptied Cut off power and water level pressure switch wire connection, measure the resistance of 11 and14 pin, is it infinite? If not, it is water level pressure switch failure and replaces it. If it is, then repair and check PCB and wire as followed. Y N Check if drain pump acts by touching pump position Y N Check if drain pump or drain pipe is jammed, And open the filter and clean Cut off the power and choose spin program to start ,then check the import voltage of drain pump, is it between AC 220-240 V? Y N Cut off power and pull out water level pressure switch wire connection. Set spin program to start. Check the export voltage to drain pump, is it between AC 220-240V? Y N Replace drain pump The wire between PCB and drain pump is not connected properly. Replace the wire. Replace PCB Front Load Washing Machine SERVICE MANUAL ˎˍ HW80-1401B Error message:Temperature sensor is not properly connected or damaged (display at the end of a program). Troubleshooting: Cut off power and measure the resistance of temperature sensor by multimeter, is it between 5-14kȍ ? N NTC exist open circuit. Replace it Y Check if NTC is connected properly Connect NTC well N Y Check the white wire and black wire of NTC, are they connected well? N Connect all wires well Y Disconnect the white wire and black wire from PCB, and measure if the resistance between white wire and black wire of PCB, is it infinite? Replace wire Y N Replace PCB Error message:The heater may be broken Troubleshooting: Check if overload laundry. Y Reduce the laundry N Cut off power, check the resistance of two pins of heater element by multimeter, is it between 32-35ȍ? N Heater element must be broken, please replace it Y The control wire may be broken, Otherwise the PCB must be broken; Please replace the broken. Front Load Washing Machine SERVICE MANUAL ˎˎ HW80-1401B Error message: The required waterlevel is not reachedwithin 6 min Troubleshooting: Connect it well. Check if water is leaking from washer bottom. Inlet pipe. drain pipe or other pipe connection Y N Check if tap is closed or water pressure is too low (usual between0.2 -1 MPa) Y Open the tap or wait for normal water pressure to use N Clean inlet valve Check if inlet valve is jammed Y N Draw out the dispenser and check if water is entering Y N Turn on power, and set pre-wash mode, then start. Check the import voltage of electromagnetic valve by multimeter is it between AC 220-240V? Y Observe if the height of drain pipe not reach 80 cm. If water level pressure switch and the hose is leaking gas Electromagnetic valve must be broken, please replace it. N Check if export voltage from PCB to electromagnetic valve, is it between AC 220-240V? The wire connected PCB and inlet valve is not properly. Please reconnect it or replace it. Y N Replace PCB Error message. Motor overheat protection or is damaged. Troubleshooting: Check the motor N Y Front Load Washing Machine Reconnect well SERVICE MANUAL HW80-1401B Measure if the resistance of motor binding by multimeter, is it as followed? 5 -10[1.78±8%ȍ (at 20 C)] 8 -9[1.90±8%ȍ (at 20 C)] Put the motor in normal temperature about ten minutes, and then test again. If the resistance is natural, it is caused by overheated protection. Then check and deal with overload, abnormal voltage. If not, please replace motor N ; ; ; Y Pull out the wire connection of motor and driving computer board. Then check if circuit is open by multimeter Y Repair wires Error message. Motor overheat protection or is damaged. Troubleshooting: N Cut off power and check if motor wires Reconnect well are connected well Y Measure if the resistance of motor binding by multimeter, is it as followed? 5 -10[1.78±8%ȍ (at 20 C)] 8 -9[1.90±8%ȍ (at 20 C)] Put the motor in normal temperature about ten minutes, and then test again. If the resistance is natural, it is caused by overheated protection. Then check and deal with overload, abnormal voltage. If not, please replace motor N ; ; ; Y Pull out the wire connection of motor and driving computer board. Then check if circuit is open by multimeter Y Repair wires Error message. Water level exceeds protection value. Troubleshooting: Unfold the pipe connected Check if the pipe connected to the Y to the water level sensor water level sensor is folded. N Replace water level sensor Check if the pipe connected to the Y water level sensor is jammed. N Front Load Washing Machine SERVICE MANUAL HW80-1401B Without power ,connect inlet pipe to inlet valve, then open the tap and observe if water is entering in dispenser Replace inlet valve Y N Without starting but electrifying, measure the import voltage of inlet valve, is it between AC 220-240V? Replace PCB Y Error message:Water level sensor is unnormal. Troubleshooting: Without power ,check if the line of water level sensor is not connected well? Connect the line well, make sure the machine can work. Y N Switch on the power and check if the export voltage from PCB to water level sensor is not 5V? Y Front Load Washing Change the PCB or water level sensor Machine SERVICE MANUAL ˎˑ HW80-1401B 10-2. Examination & Troubleshooting 10-2-1. Display nothing Troubleshooting: Repair power supply Measure the power supply ,is it exists 220V-240V AC voltage˛ N Y Press the power switch Is power switch on? N Y Press power switch and check the voltage between two pins of power switch. Is there 220-240V AC voltage? N Make sure power supply cable assembly is connected well and then replace power switch. N Insert the plug well and test N Replace PCB Y Cut off power and check if plugs are connected well by pulling the plug of PCB. Y Check if power plug exists 220V-240V AC voltage at the import pin 10-2-2. No water inletting Troubleshooting: Is the tap shut off or the water pressure too low? Y Open tap or wait for normal water pressure Y Reconnect inlet pipe. N Check if water is leaking from washer connection, especially between inlet pipe and tap. to make sure of no bends. N Check if filter of electromagnetic valve is jammed Clean filter Y N Choose pre-wash program and startˈ Check if there is 220-240V at import pin of electromagnetic valve Replace electromagnetic valve N Y Is there open circuit between electromagnetic valve and PCB? Reconnect the wire N Y Choose pre-wash program and startˈ then check if there is 220-240V at export pin of electromagnetic valve 10-2-3. N No draining Front Load Washing Machine Replace PCB SERVICE MANUAL ˎ˒ HW80-1401B Troubleshooting: Is the height of drain pipe too high? Adjust the height of drainpipe to 80-100 cm Y N Turn filter anticlockwise ˈ open and check if filter is jammed Clean and tighten filter clockwise. Y N Y Check if hose-connecting cylinder to pump is bent or jammed Arrange hose and clean N Turn on power and choose spin program to start. Measure if import voltage of drain pump is 220-240V N Cut off and check if the connection between drain pump and PCB is open Replace drain pump Y Replace the wire . Y N Turn on and select spin program to start, Measure export voltage of PCB to the drain pump, is it 220-240V? 10-2-4. Replace PCB N Abnormal noise and vibration Troubleshooting: Is the pack screws dismantled? N Dismantle the screws Y Clean N Adjust adjustable feet Y Is there foreign material in the washer ? N Is washer in balance? Y Replace it Is belt loose or worn? Y N Remove belt and turn belt pulley by hand, and then check if there is different noise Dismantle triangle and check the bearing. If it is broken, replace it. Y N Y Turn on power and set spin program, then startˈcheck if there is different noise from motor Front Load Washing Machine Replace motor SERVICE MANUAL ˎ˓ HW80-1401B 10-2-5. Water leaking Troubleshooting: Check if water is leaking from the inlet pipe or the tap Readjust it Y N Is drain pipe broken˛ Y Replace drainpipe N Check if there is foreign material nipped between cushion of sight window and sight window Y Remove clothes N Check if all tubes and tie-in is leaking water, including the connecting of tube and valve, dispenser, tube and dispenser, outer cylinder-cushion of sight window-hose and outer cylinder, drain pump and gas valve N Y Reassemble or repair Replace outer cylinder Is cushion of sight window broken? Y N Is water leaking from outer cylinder? Front Load Washing Machine SERVICE MANUAL ˎ˔ HW80-1401B Chapter 11 Maintenance Front Load Washing Machine SERVICE MANUAL ˎ˕ HW80-1401B Front Load Washing Machine SERVICE MANUAL ˏˌ HW80-1401B Sincere Forever Front Load Washing Machine