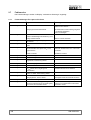
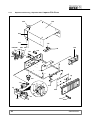
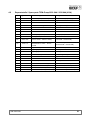
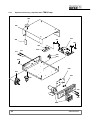
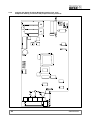
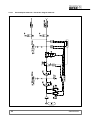
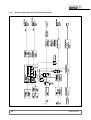
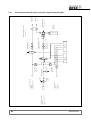
1
Service Manual
CO2
l/min
Liter
2232
LAPARO
CO2--PNEU
0
HIGH
max
CO2
2232
. UMP
TEM P
TEM--Kombinationssystem
TEM Combination System
2232.201
2232.211 (USA)
SM -- 2232.201 / /de -- en/ / Index: 02-- 03-- 2.0 / ÄM: KG 03--038
Wichtige allgemeine Anwendungshinweise
Das Produkt nur bestimmungsgemäß und unter Beachtung der Gebrauchsanweisung durch entsprechend ausgebildetes und qualifiziertes Fachpersonal einsetzen. Wartung und Reparatur nur
durch autorisierte Fachkräfte.
Das Produkt nur in den Kombinationen und mit dem Zubehör und den Ersatzteilen betreiben, die
in der Gebrauchsanweisung angegeben sind. Andere Kombinationen, Zubehör und Verschleißteile nur dann verwenden, wenn diese ausdrücklich für die vorgesehene Anwendung bestimmt
sind und Leistungsmerkmale sowie Sicherheitsanforderungen nicht beeinträchtigen.
Die Produkte vor jeder Anwendung und Rücksendung zum Schutz von Patient, Anwender und Dritten entsprechend der Gebrauchsanweisung aufbereiten.
Technische Änderungen vorbehalten!
Durch Weiterentwicklungen können Abbildungen und Technische Daten geringfügig abweichen.
Struktur der Sicherheitshinweise
Bildzeichen
Klassifizierung der Gefährdung
WARNUNG!
Das Nichtbeachten kann zum Tod oder zu schwersten Verletzungen führen.
VORSICHT!
Das Nichtbeachten kann zu leichten Verletzungen oder zu Schäden am Produkt führen.
.
.
WICHTIG!
Das Nichtbeachten kann zu Schäden am Produkt oder in der Umgebung führen.
HINWEIS!
Anwendertips für eine optimale Gerätenutzung und sonstige nützliche Informationen.
Important general instructions for use
Ensure that this product is only used as intended and described in the instruction manual by adequately trained and qualified personnel, and that maintenance and repair is only carried out by authorized specialized technicians.
Operate this product only in the combinations and with the accessories and spare parts listed in
the instruction manual. Use other combinations, accessories and spare parts only if they are expressly intended for this use and if the performance and safety requirements are met.
Reprocess the products before every application and before returning them for repair as required
by the instruction manual in order to protect the patient, user or third parties.
Subject to technical changes!
Due to continuous development of our products, illustrations and technical data may deviate slightly from the
data in this manual.
CAUTION -- USA only:
Federal law restricts this unit to be used or sold, except under the supervision of a medical doctor.
Safety instructions and levels of danger
Symbol
Level of danger
WARNING!
Failure to observe can result in death or severe injury.
CAUTION!
Failure to observe can result in slight injury or damage to the product.
.
.
SM--2232.201
IMPORTANT!
Failure to observe can result in damage to the product or surrounding.
NOTE!
Tips for optimum use and other useful information.
0
DEUTSCH
SM -- 2232.201
0
Inhalt
1
1.1
1.2
Generelles . . . . . . . . . . . . . . . . . . . . . . . . . . . . . . . . . . . . . . . . . . . . . . . . . . . . . . . . . . . . . . . .
Bestellung von Ersatzteilen . . . . . . . . . . . . . . . . . . . . . . . . . . . . . . . . . . . . . . . . . . . . . . . . . .
Demontage der Gehäuseabdeckung . . . . . . . . . . . . . . . . . . . . . . . . . . . . . . . . . . . . . . . . . .
1
1
2
2
2.1
2.2
2.3
2.4
2.5
2.6
2.7
2.7.1
2.7.2
2.7.3
2.7.4
Wartung . . . . . . . . . . . . . . . . . . . . . . . . . . . . . . . . . . . . . . . . . . . . . . . . . . . . . . . . . . . . . . . . . .
Wichtige Hinweise . . . . . . . . . . . . . . . . . . . . . . . . . . . . . . . . . . . . . . . . . . . . . . . . . . . . . . . . . .
Wartung von Gerät und Zubehör . . . . . . . . . . . . . . . . . . . . . . . . . . . . . . . . . . . . . . . . . . . . .
Sichtprüfung . . . . . . . . . . . . . . . . . . . . . . . . . . . . . . . . . . . . . . . . . . . . . . . . . . . . . . . . . . . . . . .
Elektrische Sicherheitsprüfung . . . . . . . . . . . . . . . . . . . . . . . . . . . . . . . . . . . . . . . . . . . . . . .
Mess-- und Hilfsmittel . . . . . . . . . . . . . . . . . . . . . . . . . . . . . . . . . . . . . . . . . . . . . . . . . . . . . . .
Funktionskontrolle . . . . . . . . . . . . . . . . . . . . . . . . . . . . . . . . . . . . . . . . . . . . . . . . . . . . . . . . . .
Fehlersuche . . . . . . . . . . . . . . . . . . . . . . . . . . . . . . . . . . . . . . . . . . . . . . . . . . . . . . . . . . . . . . .
Fehlermeldungen für Laparo--CO2--Pneu . . . . . . . . . . . . . . . . . . . . . . . . . . . . . . . . . . . . . .
Fehlerursachen Laparo--CO2--Pneu . . . . . . . . . . . . . . . . . . . . . . . . . . . . . . . . . . . . . . . . . . .
Fehlermeldungen für TEM--PUMP . . . . . . . . . . . . . . . . . . . . . . . . . . . . . . . . . . . . . . . . . . . .
Fehlerursachen TEM--PUMP . . . . . . . . . . . . . . . . . . . . . . . . . . . . . . . . . . . . . . . . . . . . . . . . .
3
3
3
4
4
5
6
12
12
13
14
15
3
3.1
3.2
3.2.1
3.2.2
3.3
3.3.1
3.3.2
3.3.3
3.4
3.4.1
3.4.2
3.5
3.5.1
3.6
3.6.1
Baugruppen . . . . . . . . . . . . . . . . . . . . . . . . . . . . . . . . . . . . . . . . . . . . . . . . . . . . . . . . . . . . . .
Schaltnetzteil 2232.041/.641 (Pos. 150) . . . . . . . . . . . . . . . . . . . . . . . . . . . . . . . . . . . . . . .
Bedien--E--Karte 2232.041/.641 (Pos. 200) . . . . . . . . . . . . . . . . . . . . . . . . . . . . . . . . . . . . .
Demontage und Montage der Baugruppe . . . . . . . . . . . . . . . . . . . . . . . . . . . . . . . . . . . . . .
Funktionsprüfungen . . . . . . . . . . . . . . . . . . . . . . . . . . . . . . . . . . . . . . . . . . . . . . . . . . . . . . . .
Steuer--E--Karte 2232.041/.641 (Pos. 210) . . . . . . . . . . . . . . . . . . . . . . . . . . . . . . . . . . . . .
Messpunkte und Versorgungsspannungen . . . . . . . . . . . . . . . . . . . . . . . . . . . . . . . . . . . . .
Demontage und Montage der Baugruppe . . . . . . . . . . . . . . . . . . . . . . . . . . . . . . . . . . . . . .
Funktionsprüfungen . . . . . . . . . . . . . . . . . . . . . . . . . . . . . . . . . . . . . . . . . . . . . . . . . . . . . . . .
Ventilblock 2232.041/.641 (Pos. 160) . . . . . . . . . . . . . . . . . . . . . . . . . . . . . . . . . . . . . . . . .
Demontage und Montage der Baugruppe . . . . . . . . . . . . . . . . . . . . . . . . . . . . . . . . . . . . . .
Funktionsprüfungen . . . . . . . . . . . . . . . . . . . . . . . . . . . . . . . . . . . . . . . . . . . . . . . . . . . . . . . .
Druckminderer DM2 2232.041/.641 (Pos. 170) . . . . . . . . . . . . . . . . . . . . . . . . . . . . . . . . .
Funktionsprüfungen . . . . . . . . . . . . . . . . . . . . . . . . . . . . . . . . . . . . . . . . . . . . . . . . . . . . . . . .
Druckminderer DM1 2232.244/.644 TEM--PUMP (Pos. 230) . . . . . . . . . . . . . . . . . . . . .
Funktionsprüfungen . . . . . . . . . . . . . . . . . . . . . . . . . . . . . . . . . . . . . . . . . . . . . . . . . . . . . . . .
16
16
16
16
16
16
16
16
16
17
17
17
17
18
18
18
4
4.1
4.1.1
4.2
4.2.1
4.3
4.3.1
Anhang . . . . . . . . . . . . . . . . . . . . . . . . . . . . . . . . . . . . . . . . . . . . . . . . . . . . . . . . . . . . . . . . . .
Reparaturteile / Spare parts Laparo--CO2--Pneu 2232.041 / 2232 .641 (USA) . . . . . . .
Explosionszeichnung / Exploded View Laparo--CO2--Pneu . . . . . . . . . . . . . . . . . . . . . . .
Reparaturteile / Spare parts TEM--Pump 2232.244 / 2232.644 (USA) . . . . . . . . . . . . . .
Explosionszeichnung / Exploded View TEM--Pump . . . . . . . . . . . . . . . . . . . . . . . . . . . . . .
Pläne / Diagrams Laparo CO2--Pneu 2232.041 / 2232.641 (USA) . . . . . . . . . . . . . . . . .
Lageplan des Schaltnetzteils (Pos. 150) /
Component drawing of switching power supply (item 150) . . . . . . . . . . . . . . . . . . . . . . . .
Lageplan der Bedien--E--Karte (Bestückungsseite) (Pos. 200) /
Component drawing of Operation PCB (component side) (item 200) . . . . . . . . . . . . . . .
Lageplan der Bedien--E--Karte (Lötseite) (Pos. 200) /
Component drawing of Operation PCB (solder side) (item 200) . . . . . . . . . . . . . . . . . . .
Lageplan der Steuer--E--Karte (Bestückungsseite) (Pos. 210) /
Component drawing of Control PCB (component side) (item 210) . . . . . . . . . . . . . . . . .
Lageplan Steuer--E--Karte (Lötseite) (Pos. 210) /
Component drawing Control PCB (solder side) (item 210) . . . . . . . . . . . . . . . . . . . . . . . .
19
19
20
21
22
23
4.3.2
4.3.3
4.3.4
4.3.5
SM--2232.201
23
24
25
26
27
I
4.3.6
4.4.3
4.4.4
4.4.5
4.4.6
4.4.7
Lageplan der Schnittstellen--E--Karte (Pos. 140) /
Component drawing of Interface PCB (item 140) . . . . . . . . . . . . . . . . . . . . . . . . . . . . . . .
Blockschaltplan 2232.041 / Block diagram 2232.041 . . . . . . . . . . . . . . . . . . . . . . . . . . . .
Blockschaltplan 2232.641 (USA) / Block diagram 2232.641 (USA) . . . . . . . . . . . . . . . .
Verdrahtungsplan 2232.041 /.641 / Wiring diagram 2232.041 /.641 . . . . . . . . . . . . . . . .
Pneumatikplan 2232.041 / Pneumatic diagram 2232.041 . . . . . . . . . . . . . . . . . . . . . . . .
Pneumatikplan 2232.641 (USA) / Pneumatic diagram 2232.641 (USA) . . . . . . . . . . . .
Pläne / Diagrams TEM--PUMP 2232.244 / 2232.644 (USA) . . . . . . . . . . . . . . . . . . . . . .
Lageplan der Steuer--E--Karte (Pos. 070) /
Component drawing of Control PCB (item 070) . . . . . . . . . . . . . . . . . . . . . . . . . . . . . . . . .
Lageplan der Schnittstellen--E--Karte (Pos. 030) /
Component drawing of Interface PCB (item 030) . . . . . . . . . . . . . . . . . . . . . . . . . . . . . . .
Blockschaltplan 2232.244 / Block diagram 2232.244 . . . . . . . . . . . . . . . . . . . . . . . . . . . .
Blockschaltplan 2232.644 (USA) / Block diagram 2232.644 (USA) . . . . . . . . . . . . . . . .
Verdrahtungsplan 2232.244 /.644 / Wiring diagram 2232.244 /.644 . . . . . . . . . . . . . . . .
Pneumatikplan 2232.244 / Pneumatic diagram 2232.244 . . . . . . . . . . . . . . . . . . . . . . . .
Pneumatikplan 2232.644 (USA) / Pneumatic diagram 2232.644 (USA) . . . . . . . . . . . .
5
5.1
5.2
Protokolle / Reports . . . . . . . . . . . . . . . . . . . . . . . . . . . . . . . . . . . . . . . . . . . . . . . . . . . . . . . 41
Prüfprotokoll / Test Report . . . . . . . . . . . . . . . . . . . . . . . . . . . . . . . . . . . . . . . . . . . . . . . . . . . 41
Wartungsprotokoll / Maintenance report . . . . . . . . . . . . . . . . . . . . . . . . . . . . . . . . . . . . . . . 42
4.3.7
4.3.8
4.3.9
4.3.10
4.3.11
4.4
4.4.1
4.4.2
II
28
29
30
31
32
33
34
34
35
36
37
38
39
40
SM--2232.201
1
Generelles
1.1
Bestellung von Ersatzteilen
Die zur Bestellung von Ersatzteilen erforderliche Artikelnummer ist in der
Reparaturteileliste unter der im Service Manual verwendeten Positionsnummer aufgelistet.
.
WICHTIG!
Folgende Angaben sind bei der Bestellung von Ersatzteilen anzugeben:
D Artikel--Nr. des Ersatzteiles
D Modell--Nr. des Gerätes
D Serien--Nr. des Gerätes
Beispiel
Reparaturteileliste
Pos.
Type / Model
Bezeichnung
Designation
0030
72 311.112
Kaltgeräteeinbaubuchse
Mains socket
0110
64 117.102
Rückwand
Back plate
0160
64 291.022
Gehäusedeckel beschichtet
Top cover epoxy coated
Explosionszeichnung
160
030
110
SM--2232.201
1
1.2
Demontage der Gehäuseabdeckung
Abb.1
Abb.2
1.5
1.4
1.2
1.3
Abb.3
1.0
1.9
b
a
1.8
1.1
' Benötigtes Werkzeug: Kreuzschlitz--Schraubendreher.
Z 4 Gerätefüße (1.2) abschrauben, Abb.1.
Z Blenden (1.3) von der Halteschiene (1.4) schieben, Abb.2.
Z Die 4 untersten Kreuzschrauben (1.5) entfernen, Abb.2.
Z Gehäuseabdeckung (1.0) in Pfeilrichtung (a) ziehen, bis die Federn
(1.8) aus ihrer Halterung der Frontplatte (1.1) entnommen sind, Abb. 3.
Z Gehäuseabdeckung (1.0) in Pfeilrichtung (b) abheben, Abb. 3.
Z Erdungskabel (1.9) lösen, Abb. 3.
2
SM--2232.201
2
Wartung
2.1
Wichtige Hinweise
Das Service Manual beschreibt die für das Produkt festgelegten
externen Servicemaßnahmen.
.
2.2
WICHTIG!
Zur Durchführung der Servicemaßnahmen ist die Gebrauchsanweisung
des Produktes unbedingt zu beachten.
Wartung von Gerät und Zubehör
Die Wartung und die Prüfung am Gerät soll zum Schutz des Prüfenden in
der angegebenen Reihenfolge durchgeführt werden.
Z Sichtprüfung
Z Elektrische Sicherheitsprüfung
Z Funktionskontrolle
Die im Abschnitt ”Elektrische Sicherheitsprüfung” angegebenen Prüf-und Meßverfahren beziehen sich auf die Prüfung nach EN / IEC 60601--1
Alternativ kann nach DIN VDE 751 geprüft werden.
Für Grenzwerte und die Erfassung / Dokumentation von erstgemessenen
Werten ist der Betreiber selbst verantwortlich.
Nach einer Reparatur müssen alle Meßwerte (Ausgangswerte) des Geräts anhand der Angaben im Service Manual geprüft und bei Abweichungen neu eingestellt werden.
VORSICHT!
Das Produkt darf nicht betrieben werden, wenn die vorgegebenen
Messwerte nicht erreicht oder die Funktionen nicht erfüllt werden.
.
SM--2232.201
HINWEIS!
Alle Wartungs-- und Prüfarbeiten an Gerät oder Zubehör müssen dokumentiert werden.
3
2.3
Sichtprüfung
Benennung
Durchzuführende Kontrollen
Gerät und Zubehör
' Sicherheitsgefährdende Verschmutzung und allgemeine Sauberkeit
' Mechanische Beschädigung
' Lose oder fehlende Teile
Bedienelemente
' Mechanische Funktion und Freigängigkeit
Beschriftung / Symbolik
' Vollständig und gut lesbar
Sicherheitsrelevante Aufschriften
(z.B. Warnhinweise)
' Vollständig und gut lesbar
Sicherungseinsätze
' Auf die vom Hersteller auf dem Typenschild angegebenen Werte
(Nennstrom und Abschmelzcharakteristik)
Verkabelung
' Auf einwandfreien Zustand (Sitz, Isolation und Brüchigkeit)
E--Karten
' Korrosion oder andere Beschädigungen
Schutzleiterverbindung
' Zwischen LAPARO--CO2 --PNEU und TEM--PUMP
' Beschädigte Teile sofort austauschen!
2.4
Elektrische Sicherheitsprüfung
Benennung
Durchzuführende Kontrollen
Schutzleiteranschluß
nach EN / IEC 60601--1
Meßwerte:
' Ohne Netzanschlußleitung: ± 0,1 Ohm
' Mit nicht abnehmbarer Netzanschlußleitung: ± 0,2 Ohm
Prüfbedingung:
Imess 25 A ¦ 10% , V0 ± 6 V , tprüf 5 s bis 10 s , 50 Hz / 60 Hz
Geprüft werden:
Der Widerstand zwischen Schutzleiterkontakt bzw. Schutzleiterstift im Netzstecker und jedem anderen Schutzleiterverbundenen berührbaren metallischen Teil.
Ableitstrom
nach EN / IEC 60601--1
Meßwerte:
' Erdableitstrom: ± 170 µA
Grenzwert nach EN / IEC 60601--1, Normalzustand: ± 500 µA
' Patientenableitstrom: ± 10 µA
Grenzwerte nach EN / IEC 60601--1:
Normalzustand Typ BF: ± 100 µA
Normalzustand Typ CF: ± 10 µA
Prüfbedingung:
Meßanordnung (MD) und Meßaufbau nach EN / IEC 60601--1
Meßpunkte:
Insufflationsanschluß, Pumpenkopf; Anschluß Druckmessung und Spülflasche
Geprüft werden:
Der Ableitstrom, der von jedem Pol des Netzteils durch oder über die Isolierung durch den Schutzleiter oder vom Anwendungsteil über den Patienten zur
Erde fließen kann.
Zusätzliche Hinweise
4
Die Video--Verbindungskabel müssen vor der Messung entfernt werden.
SM--2232.201
2.5
Mess-- und Hilfsmittel
Für die Durchführung der in diesem Service Manual beschriebenen Wartungs--, Reparatur-- und
Testroutinen sind nachfolgend aufgeführte Hilfs-- und Messmittel unerlässlich. Vergewissern Sie
sich vor einer Reparatur, daß die Meßmittel kalibriert und in einem einwandfreien Zustand sind.
Bezeichnung
Zusätzliche Angaben
Gleichspannungsquelle
24V DC , keine besondere Anforderung an Stromstärke
Effektivwert--Multimeter
CCD--Kamera
mit Y/C(S--Video)-- und FBAS (BNC)--Ausgang
Videomonitor
mit Y/C(S--Video)-- und FBAS (BNC)--Eingang
Hygienefilter
4171.111
High--Flow--Insufflationsschlauch
8170.232 (beinhaltet Konnektor 64202.147)
CO2 --Flowröhre
Messbereich: 4--40 l /min,
z. B. von Platon Flow Management
Jays Close, Viables, Basingstoke RG22 4 BS UK
internet: www. platon.co.uk
CO2 --Flowröhre
Messbereich: 1--10 l/min
Digital--Druckmessgerät
Erforderliche Auflösung: 1 mm Hg
(im Druckbereich unterhalb von 0,5 bar)
z. B.: ”VDM 100” von Fa. ASF, München, oder ”GDH 14 AN” von
Fa. Greisinger electronic, D--93128 Regenstauf
CO2 --Flasche
0,75 kg (2046.961)
Der Flaschendruck muss bei der Prüfung im ”grünen Bereich” sein.
Die grüne LED der Flaschendruck--Anzeige leuchtet. Wechselt
während der Prüfung die Flaschendruck--Anzeige von grün auf
gelb, so kann noch ohne Flaschenwechsel die Prüfung zu Ende
geführt werden.
Hochdruckverbindungsschlauch
8170.801
Bauchmodell
muß 30 mm Hg standhalten, geeignet ist z. B. ein geleerter
3--l--Infusionsbeutel (möglichst elastisch)
Spritze
50 ml
Y--Stück
für Silikonschläuche (siehe Seite 11)
Silikonschlauch
1,0 m, 4 x 2 mm
TEM--Schlauchset
8170.841
Pumpenschlauch, komplett
8170.861
Hygienefilter
4171.112
Behälter
mit 1 Ltr. Wasser
Insufflationsschlauch 2,5 m
8170.101
Verbindungsschlauch für Spülflasche
8170.862
Verbindungskabel
2232.981
2 x Verbindungsschlauch
2232.851
Fußschalter
2030.231
SM--2232.201
5
2.6
Funktionskontrolle
.
HINWEIS!
Die Bezeichnungen mit * beziehen sich auf die Gebrauchsanweisung
GA--A 164.
Benennung
Durchzuführende Kontrollen
Vorbereitung
Es gilt der Messaufbau aus Abschnitt 2.5.
Verbindungsschläuche 2232.851 und das Verbindungskabel 2232.981 anschließen.
Ausreichend gefüllte Gasflasche anschließen und das Absperrventil öffnen.
Hygienefilter und Druckmessschlauch (A) an der TEM--PUMP nicht anschließen.
Einschaltzustand
(Selbsttest)
Der Selbsttest dauert weniger als 2 Minuten. Im Falle eines Defektes werden 2 Minuten
überschritten, dann sind alle LEDs des Balken angesteuert.
Auf der digitalen Anzeige für den Istflow wird der aktuelle Softwarestand des Insufflators
angezeigt (2 Stellen).
Auf der Digitalanzeige für den Istdruck wird der aktuelle Softwarestand der TEM--PUMP
angezeigt (2 Stellen).
Am Ende des Selbsttests erfolgt ein kurzer Ton.
Anzeige Softwarestand
TEM--PUMP:
Alle LED--Anzeigen der TEM--PUMP leuchten kurz auf. Die Schlauchpumpe läuft kurz
an und stoppt. Alle Tasten und das Pumpensymbol sind im Nachtdesign beleuchtet, alle
übrigen Anzeigen sind aus.
Nach abgeschlossenem Selbsttest:
Laparo--CO2 --Pneu:
Nach bestandenem Selbsttest erscheint auf den digitalen Anzeigen für verbrauchte
Gasmenge, Flow und intraabdominalen Druck “0.0“. Es darf an der Anzeige für verbrauchte Gasmenge keine Fehlermeldung angezeigt werden. Die Balkenanzeige für
Druck--Vorwahl und Flow--Vorwahl muss den zuletzt vorgewählten Wert anzeigen.
TEM--PUMP:
Nach bestandenem Selbsttest sind alle Taster und das Pumpensymbol im Nachtdesign
beleuchtet, das Störungssymbol ist unbeleuchtet.
Bei gestecktem Filter am Druckmesseingang wird auf der Balkenanzeige die zuletzt
vorgewählte Drehzahl angezeigt.
Nach nicht bestandenem Selbsttest erscheint auf der Digitalanzeige für verbrauchte
Gasmenge eine Fehlermeldung E01 bis E15 für den Laparo--CO2 --Pneu
bzw. E30 bis E41 an der TEM--PUMP.
Betriebsartwechsel
Hinweis:
Das TEM--Kombinationssystem kann jetzt für die Betriebsart LAPAROSKOPIE oder
TEM konfiguriert werden. Ein Wechsel von einer Betriebsart in die andere ist erst nach
Ausschalten der Geräte für länger als 30 Sekunden möglich.
Die Betriebsart LAPAROSKOPIE wird nach bestandenem Selbsttest gewählt durch Betätigen der Insufflationstaste am Laparo--CO2 --Pneu. Nach Einschalten der Insufflation
müssen an der TEM--PUMP alle LED erlöschen und in diesem Zustand verbleiben, bis
die TEM--Kombination für länger als 30 Sekunden aus-- und wieder eingeschaltet wird.
Betriebsart
LAPAROSKOPIE
6
Hygienefilter mit Insufflationsschlauch (B) an den Patientenausgang anschließen.
SM--2232.201
Benennung
Durchzuführende Kontrollen
Flowregelung
Hygienefilter mit Insufflationsschlauch an den Patientenausgang anschließen. Am Laparo--CO2 --Pneu einen Solldruck von 25 mm Hg vorwählen. Taste ”INSUFFLATION”
betätigen. Die Taste muss leuchten. Auf der Digitalanzeige aktuellen Flow ablesen.
Messwerte:
' 1.1 l/min < Aktueller Flow < 1.5 l/min
Schließen Sie die Flowröhre CO2 (Beschreibung dazu in Abschnitt 2.5) an den Insufflationsschlauch an. Die Taste ”HIGH FLOW” drücken. Die Taste muss leuchten.
Einen Sollflow von 15 l/min vorwählen. Aktuellen Flow von der Digitalanzeige und von
der Flowröhre ablesen.
Messwerte:
' 14 l / min ≤ Aktueller Flow laut Digitalanzeige ≤ 16 l / min
' 12 l / min ≤ Aktueller Flow laut Flowröhre
≤ 18 l / min
Einen Soll--Flow von 30 l/min vorwählen. Aktuellen Flow von der Digitalanzeige und von
der Flowröhre ablesen.
Meßwerte:
' 28 l/min ≤ Aktueller Flow laut Digitalanzeige ≤ 32 l/min
' 24 l/min ≤ Aktueller Flow laut Flowröhre
≤ 33 l/min
Insufflation ausschalten.
Verbrauchsanzeige
Die Taste ”RESET” betätigen.
Die Digitalanzeige für die verbrauchte Gasmenge zeigt ”00.0” an.
Druckregelung
Wählen Sie einen Solldruck von 15 mm Hg und einen Sollflow von 10 l/min vor. Schließen Sie das Druckmessgerät (vgl. Abschnitt 2.5) und den Insufflationsschlauch über
das Y--Stück am Bauchmodell an.
Erst die Taste ”INSUFFLATION” und danach die Taste ”HIGH FLOW” betätigen. Nach
kurzer Zeit stellt sich der vorgewählte Druck von 15 mm Hg im Bauchmodell ein. Ein
kurzes Überschreiten des Druckes mit anschließender Entlüftung ist zulässig.
Toleranzen:
' Balkenanzeigen für Soll-- und Ist--Druck: ± 2 Segmente
' Digitalanzeige:
± 3 mm Hg
Insufflation kurz ausschalten.
Einen Soll--Druck von 20 mm Hg vorwählen und die Taste ”INSUFFLATION” betätigen.
Nach kurzer Zeit stellt sich der vorgewählte Druck von 20 mm Hg im Bauchmodell ein.
Ein kurzes Überschreiten des Druckes mit anschließender Entlüftung ist zulässig.
Toleranzen:
' Balkenanzeigen für Soll-- und Ist--Druck: ± 2 Segmente
' Digitalanzeige:
Gasvorratsüberwachung
± 3 mm Hg
Taste ”RESET” betätigen. Das Absperrventil an der Gasflasche schließen.
Wählen Sie einen Soll--Druck von 20 mm Hg und einen Soll--Flow von 5 l/min vor. Insufflation ”HIGH FLOW” einschalten.
Nach einer kurzen Zeit wechselt die Gasvorratsanzeige von grünem Dauerlicht auf gelbes Dauerlicht. Der Alarmton* ”Low Alarm” wird ausgegeben. Danach wechselt die
Gasvorratsanzeige von gelbem Dauerlicht auf gelbes Blinklicht. Der Alarmton* ”Medium
Alarm” wird ausgegeben.
SM--2232.201
7
Benennung
Durchzuführende Kontrollen
Alarm, Überdruck,
Überdruckschalter
Auf das Druckstück (Insufflationsöffnung) an der Frontseite den Filter und den Konnektor (64202.147) des High--Flow--Insufflationsschlauches 8170.232 aufstecken, siehe
nachfolgende Zeichnung. An die Stelle des Insufflationsschlauches (vom Konnektor
abziehen), über einen Silikonschlauch (4 x 2 mm) das in Abschnitt 2.5 beschriebene
Y--Stück anschließen. Mit den übrigen Ausgängen des Y--Stückes Spritze (50 ml) und
das Digital--Druckmessgerät verbinden.
Ein Soll--Druck von 15 mm Hg vorwählen. Die Entlüftungsöffnung am Gehäuseboden
verschließen und die Taste ”INSUFFLATION” betätigen. Der Druck in der Messanordnung steigt jetzt auf 15 mm Hg an. Wird der Soll--Druck durch Betätigen der Spritze um
4 mm Hg überschritten, wird der Alarmton* ”Medium Alarm” ausgegeben.
Überschreitet der Druck in der Messanordnung 30 mm Hg, erfolgt nach 5 Sekunden
Zeitverzögerung der Alarm* ”Überdruck > 30 mm Hg”. Dabei wird der Alarmton* ”High
Alarm” ausgegeben. Die Alarm--Anzeige leuchtet ständig. Auf der Digitalanzeige für die
verbrauchte Gasmenge erscheint die Fehlermeldung E11 und die Digitalanzeige für den
Druck blinkt.
Überschreitet der Druck in der Messanordnung 45 mm Hg, spricht nach einer Verzögerungszeit der Überdruckschalter an. Dabei geht der Alarmton ”High Alarm” in einen
Dauerton über, die Alarm--Anzeige leuchtet ständig und das Ventil 2 schaltet ab (Schaltgeräusch).
Kurzzeitunterbrechung
Gerät für ca. 10 Sekunden ausschalten. Nach dem Wiedereinschalten müssen alle zuvor angewählten Funktionen und Einstellungen noch vorhanden sein.
Anordnung zur Überdrucksimulation
siehe Ende dieses Kapitels (Funktionskontrolle)
8
SM--2232.201
Benennung
Durchzuführende Kontrollen
Betriebsart TEM
Gerät für 30 Sekunden ausschalten.
Nach dem Wiedereinschalten Selbsttest ablaufen lassen.
Druckmessschlauch (A)* mit Hygienefilter an den Messeingang der TEM--PUMP anschließen.
Mit der Taste “PUMPE EIN/AUS” an der TEM--PUMP die Betriebsart TEM wählen
(HIGH FLOW--Taste am Laparo--CO2 --Pneu blinkt).
Der Insufflationsgasfluss bei TEM--Betrieb taktet nicht mehr, sondern erfolgt kontinuierlich.
Flowregelung
Am Laparo--C02 --Pneu einen Solldruck von 25 mm Hg und einen Flow von 1 l/min vorwählen.
Insufflation starten. Die Taste “HIGH FLOW” leuchtet.
Auf der Digitalanzeige muss ein aktueller Flow von 0,8 -- 1,2 l/min angezeigt werden.
Insufflation ausschalten.
Die CO2 --Flowröhre am Insufflationsschlauch (B)* anschließen, Ausgang der Flowröhre
offen.
Am Laparo--C02 --Pneu einen Sollflow von 8 l/min vorwählen.
Ein Flow größer als 8 l/min darf nicht vorwählbar sein.
' ≥ 7 l/min
aktueller Flow laut Digitalanzeige
≤ 9 l/min
' ≥ 6 l/min
aktueller Flow laut CO2 --Flowröhre
≤ 10 l/min
Es muss ein konstanter Flow in der Flowröhre erkennbar sein.
Ein Anlaufen der Schlauchpumpe trotz des offenen Systems kann toleriert werden, da
sie bereits ab 2 mm Hg angesteuert wird.
Druckregelung
Druckmessgerät, Insufflationsschlauch (B)*, Druckmesschlauch (A)* und den Pumpenschlauch (Absaugung D und Y)* am Bauchmodell und an den Geräten anschließen.
Es wird die Verwendung eines VERZWEIGUNSSTÜCKES empfohlen, das die
Schlauchgarnitur mit dem Bauchmodell verbindet (Art hängt vom Aufbau des Bauch--/
Volumen--Modells ab).
Am Laparo--CO2 --Pneu einen Solldruck von 15 mm Hg und einen Sollflow von 4 l/min
vorwählen.
TEM--PUMP auf minimale Leistung einstellen und starten.
Insufflation starten.
Im TEM--Betrieb erfolgt die Druckmessung über den Messschlauch (A)* der TEM-PUMP, da der Insufflator einen konstanten Flow produziert (im Laparoskopiebetrieb
erfolgt die Druckmessung direkt im Insufflationsstrom).
Ab 2--5 mm Hg muss die Schlauchpumpe zu laufen beginnen.
Nach einer Ausregelphase stellt sich der vorgewählte Druck von
15 mm Hg ein.
'
Toleranz der Balkenanzeige Soll-- und Istdruck:
15 mm Hg +/-- 2 Segmente
'
Toleranz der Digitalanzeige Istdruck:
15 mm Hg +/-- 3mmHg
'
Toleranz der Anzeige des Druckmessgerätes:
15 mm Hg +/-- 3 mmHg
Solldruck von 20 mm Hg und Sollflow von 8 l/min vorwählen.
TEM--PUMP auf maximale Leistung einstellen.
Insufflation starten. Nach einer Ausregelphase stellt sich der vorgewählte Druck von 20
mm Hg ein.
'
Toleranz der Balkenanzeige Soll-- und Istdruck:
20 mm Hg +/-- 2 Segmente
'
Toleranz der Digitalanzeige Istdruck:
20 mm Hg +/-- 3 mmHg
'
Toleranz der Anzeige des Digitalmultimeters:
20 mm Hg +/-- 3 mmHg
Insufflation stoppen.
SM--2232.201
9
Benennung
Durchzuführende Kontrollen
Schlauchpumpe
Messaufbau wie bei Druckregelung (Druckmessgerät nicht nötig).
An der TEM--PUMP die minimale Drehzahl für die Schlauchpumpe wählen.
Schlauchpumpe starten mit Taste “PUMPE EIN/AUS”.
Insufflation starten.
Ab ca. 2--5 mm Hg beginnt die Pumpe zu laufen.
Den Pumpen--Ablaufschlauch (Y)* etwa 30 cm nach der Rollenpumpe durch abknicken
verschließen.
Es wird ein Überdruck im Schlauch erzeugt, gegen den die Rollenpumpe arbeiten
muss, die Schlauchpumpe darf nicht stehen bleiben.
Schlauch wieder frei geben.
Fußschalter kurz betätigen.
Die Drehzahl der Schlauchpumpe muss auf maximalen Wert steigen.
Sobald der Fußschalter erneut betätigt oder eine der Tasten UP, DOWN betätigt wird,
muss sich wieder die vorgewählte Drehzahl einstellen.
Deckel der Rollenpumpe öffnen. Die Störungs--Anzeige muss aufleuchten. Die Pumpe
stoppt bzw. darf nicht anlaufen.
Deckel wieder schließen. Störungs--Anzeige erlischt.
Schlauch aus Rollenpumpe entfernen.
Mit einem Werkzeug durch die vordere Öffnung den Pumpenkopf blockieren, dann Dekkel schließen.
Schlauchpumpe mit “PUMPE EIN/AUS“ starten.
Die Störungs--Anzeige muss blinken.
Nach ca. 5 Sekunden: Pumpensymbol blinkt zusätzlich, Schlauchpumpe schaltet sich
automatisch ab, Störungs--Anzeige erlischt, Alarm ertönt.
Die Schlauchpumpe darf sich erst wieder starten lassen, nachdem der Pumpendeckel
geöffnet und wieder geschlossen wurde.
Filterschalter
Messaufbau wie zuvor.
Am Insufflator einen Solldruck von 15 mm Hg und ein Sollflow von 8 l/min wählen.
Die Taste “INSUFFLATION STARTEN” betätigen.
An der TEM--PUMP den Hygienefilter vom Messeingang (21) entfernen.
Fehlermeldung “E 38” wird angezeigt und Alarmsignal ertönt.
Der Insufflationsdruck muss auf 8 mm Hg bis 15 mm Hg zurückgehen.
Insufflation ausschalten.
Entlüftung
Messaufbau wie zuvor.
Solldruck von 20 mm Hg vorwählen und Insufflation starten.
Nach Erreichen des Solldruckes am Bauchmodell einen Überdruck zwischen 24 mm
Hg und 30 mm Hg erzeugen.
Der Laparo--CO2 --Pneu muss den anstehenden Überdruck entlüften, ohne dass ein
Alarm ausgegeben wird.
Spülfunktion
Die Spülfunktion wird mit leerer Spülflasche durchgeführt.
TEM--Pump: Am Spülausgang über den Spülschlauch (C)* die Flowröhre CO2 1--10
l/min anschließen (Ausgang der Flowröhre offen).
Fußschalter betätigen und gedrückt lassen (Dauer).
Ein Flow von 4 +/-- 0,5 l/min muss fließen.
Nach ca. 5 Sekunden wird der Flow unterbrochen und Alarm ausgelöst.
10
SM--2232.201
Anordnung zur Überdrucksimulation:
Laparo CO2--Pneu 2232
Hygienefilter
4171.151
Konnektor 64202.147
Silikonschlauch (4x2 mm)
Manomenter
Druckstück 64113.113
Spritze
Y--Stück
Silikonschlauch (4x2 mm)
SM--2232.201
11
2.7
Fehlersuche
Die Fehlermeldungen werden im Display “verbrauchte Gasmenge” angezeigt.
2.7.1
Fehlermeldungen für Laparo--CO2 --Pneu
Fehler
Mögliche Ursache
Behebung
Fehlermeldung E01
-- Gaszufuhr unterbrochen
'Gasflasche öffnen oder gefüllte
Gasflasche anschließen
-- Eingangs--Druckschalter defekt.
'Bei wiederholter Fehlermeldung mit gefüllter, geöffneter Gasflasche:
Service verständigen
-- Tastendruck beim Einschalten des Geräts
'Einschalttest wiederholen
Fehlermeldung E02
-- Falls unbeabsichtigte Fehlbedienung nicht
vorliegt: Tastatur defekt
'Bedien--E--Karte ersetzten
Fehlermeldung E03
-- Interne Spannungsversorgung außerhalb
der Toleranz
Fehlermeldung E04
-- Ventil V1 defekt; Flowmessung defekt; V3
defekt
Fehlermeldung E05
-- Insufflationsschlauch bzw. Hygienefilter
beim Einschalten des Laparo--CO2 --Pneu
angeschlossen
'Schlauch (Hygienefilter) entfernen und
Gerät nach 20 Sekunden aus-- und wieder
einschalten.
-- Ventil V2 defekt
'Ventilblock ersetzen
Fehlermeldung E06
-- Druckmessung defekt
Fehlermeldung E07
-- Flowmessung defekt
Fehlermeldung E08
-- Ventil V3 defekt; V2 defekt; Druckmessung defekt; Flowmessung defekt
'Ventilblock ersetzen
Fehlermeldung E09
-- Sollwert ungültig
'Steuer E--Karte ersetzen
Fehlermeldung E10
-- Helium
'CO2 --Gas verwenden
Fehlermeldung E11
-- Überdruckalarm:
Pakt größer 30 mm Hg länger als
5 Sekunden
'Intraabdominellen Druck abbauen
Fehlermeldung E12
-- Hardwarefehler allgemein; Druckmessung
defekt; V1 defekt; Flowmessung defekt
Fehlermeldung E13
-- Druckschalter “3 bar” oder
“Eingangsdruck, 30 bar” defekt
'Vorsorglich beide Druckschalter ersetzen
Fehlermeldung E14
-- Drucküberwachung defekt
Fehlermeldung E15
-- DIL--Schalter--Codierung (Stellung elektro- 'DIL--Schalter--Codierung ändern.
nische Drucküberwachung schnell/langsam) Abhängig von Softwarestand und Version
nicht korrekt; Druckschalter defekt
der Steuer E--Karte
12
SM--2232.201
2.7.2
Fehlerursachen Laparo--CO2 --Pneu
Fehler
Mögliche Ursache
Behebung
Gerät ohne Funktion
Netzschalter nicht eingeschaltet
Netzkabel nicht angeschlossen
Sicherung im Gerät defekt
Keine Netzspannung
'Netzschalter betätigen
'Netzkabel anschließen
'Sicherung auswechseln
'Hausnetz überprüfen
Kein Gasfluss
-- Insufflation nicht eingeschaltet
'Insufflation einschalten
-- Gasflasche leer oder nicht geöffnet
'Gasflasche austauschen oder öffnen
-- Durch Manipulation des Anwenders wird
der Druck im Abdomen erhöht
'Ursache beseitigen
-- Laparo--CO2 --Pneu defekt
'Service verständigen
--Fremdgerät bewirkt Druckerhöhung
'Ursache beseitigen
-- Schlauchsystem undicht
'Schlauch und Anschlüsse überprüfen
-- Flowvorwahl zu gering
'Flowvorwahl erhöhen
-- Instrumentenhahn geschlossen
'Instrumentenhahn öffnen
Vorgewählter Druck wird
überschritten
Druck baut sich nicht auf
SM--2232.201
13
2.7.3
Fehlermeldungen für TEM--PUMP
Fehler
Mögliche Ursache
Behebung
Fehlermeldung E30
-- Hygienefilter am Messeingang beim Einschalten angeschlossen
'Hygienefilter entfernen und Netzschalter
am Laparo--CO2 --Pneu nach 20 Sekunden
aus-- und wieder einschalten
'Stift gangbar machen oder Buchse austauschen
-- Mikroschalter am Messeingang klemmt
Fehlermeldung E31
-- Drucksensor Druckmessung defekt
'Service verständigen
Fehlermeldung E32
-- Drucksensor Druckmessung defekt
'Pneumatische Verbindungen zwischen Laparo--CO2 --Pneu und TEM--PUMP überprüfen
'Wenn Fehler nicht behoben,
Service verständigen
'V2 justieren, evtl. Ventilblock tauschen
-- Ventil V2 defekt
Fehlermeldung E33
-- Aktueller Rektaldruck hat Grenzwert überschritten
'Rektaldruck abbauen
'Wenn Fehler nicht behoben,
Service verständigen
Fehlermeldung E34
-- Tastendruck beim Einschalten
'TEM--PUMP aus-- und wieder ein--schalten
Fehlermeldung E35
-- CO2 --Versorgung TEM--PUMP fehlerhaft
'Service verständigen
Fehlermeldung E36
-- nicht belegt
Fehlermeldung E37
-- falscher Pumpenschlauch
'Original Pumpenschlauch verwenden
'Service verständigen
-- Schlauchpumpe defekt
Fehlermeldung E38
-- Notinsufflation, Messleitung mit
Hygienefilter nicht an TEM--PUMP
angeschlossen
' Messleitung mit Hygienefilter an TEM-PUMP anschließen
'Wenn Fehler nicht behoben, Service verständigen
Fehlermeldung E39
-- Druckschalter defekt
'Service verständigen
Fehlermeldung E40
-- Datenübertragung defekt
'System aus-- und nach 20 Sekunden wieder einschalten
'Wenn Fehler nicht behoben,
Service verständigen
'Verbindung der Datenleitung überprüfen
Fehlermeldung E41
-- Pneumatikfehler
-- TEM--PUMP undicht
-- Drossel in Pneu defekt
'Messleitung Rektaldruck an Geräterückseite auf Dichtigkeit prüfen
'Wenn Fehler nicht behoben,
Service verständigen
14
SM--2232.201
2.7.4
Fehlerursachen TEM--PUMP
Fehler
Mögliche Ursache
Behebung
Gerät ohne Funktion
-- Netzschalter nicht eingeschaltet
'Netzschalter betätigen
Kontrollleuchten und Hintergrundbeleuchtung bleiben nach Einschalten
dunkel
-- Netzkabel nicht angeschlossen
' Netzkabel anschließen
-- Sicherung im Gerät defekt
' Sicherung auswechseln
-- Keine Netzspannung
' Netzanschluss überprüfen
Absaugleistung lässt sich nicht vorwählen
-- Gerät defekt
' Service verständigen bzw. Gerät zur
Reparatur einsenden
Schlauchpumpe lässt sich über Taste
“Pumpe EIN/AUS” nicht aktivieren
bzw. einschalten
-- Signalleuchte “Pumpengehäusedeckel offen” leuchtet
' Pumpendeckel schließen
Balkenanzeige “gemessener Unterdruck” zeigt trotz laufender Pumpe
nichts an
-- Unterdruckmessschlauch und Hy' Schlauch und Filter auf Dichtigkeit
gienefilter nicht korrekt angeschlossen und korrekten Anschluss prüfen, ggf.
oder defekt
ersetzen
Keine bzw. schlechte Absaugung
Alarmmeldung der Durchflussüberwachung trotz vorhandenen Durchflusses
Keine Alarmmeldung der Durchfluss-überwachung bei fehlendem Durchfluss
SM--2232.201
-- Sonstige Schläuche nicht richtig angeschlossen oder defekt
' Schlauchverbindungen auf Dichtigkeit und korrekten Anschluss prüfen,
ggf. ersetzen
-- Schläuche nicht richtig angeschlossen oder defekt
' Schlauchverbindungen auf Dichtigkeit und korrekten Anschluss prüfen,
ggf. ersetzen
-- Schläuche verstopft
' Schlauchverbindungen auf Verstopfung prüfen, ggf. ersetzen
-- Instrument verstopft
' Instrument auf durchgängig freien Kanal prüfen, ggf. austauschen
-- Durchflussfühlerkabel nicht richtig
angeschlossen oder defekt
' Kabel auf korrekten Anschluss
prüfen, ggf. ersetzen
-- Durchflussfühler defekt
' Durchflussfühler austauschen
-- Durchflussfühler innen verschmutzt
' Durchflussfühler aufbereiten bzw.
austauschen
' Durchflussfühler ersetzen
-- Durchflussfühler defekt
15
3
Baugruppen
3.1
Schaltnetzteil 2232.041/.641 (Pos. 150)
Z Voreingestellte Karte einbauen und Funktion vollständig überprüfen
entsprechend GA--A 164 und Abschnitt 2.6 dieses Service Manuals.
3.2
Bedien--E--Karte 2232.041/.641 (Pos. 200)
3.2.1
3.2.2
Demontage und Montage der Baugruppe
Z Frontrahmen komplett ausbauen und E--Karte wechseln.
Funktionsprüfungen
Z Voreingestellte Karte einbauen und Funktion vollständig überprüfen
(entsprechend GA--A 164 und Abschnitt 2.6 dieses Service Manuals).
3.3
Steuer--E--Karte 2232.041/.641 (Pos. 210)
3.3.1
Messpunkte und Versorgungsspannungen
Z Stecker X1:
Pin 1 = PFD
Pin 2 = -- 12 V ± 0,4 V
Pin 3 = GND
Pin 4 = + 24 V
Pin 5 = GND
Pin 6 = + 12 V ± 0,4 V
Pin 7 = GND
Pin 8 = + 5 V
Pin 9 = NC
Pin 10 = + 5 V
3.3.2
3.3.3
16
Z Stecker X3:
Pin 1 = DS 2 (low)
Pin 2 = DS 1 (high)
Pin 3 = 12 V ± 0,4 V
Z Stecker X7:
Pin 1 = PFD
Pin 2 = -- 12 V
Pin 3 = GND
Pin 4 = + 24 V
Pin 5 = GND
Pin 6 = + 12 V
Pin 7 = GND
Pin 8 = + 5 V
Pin 9 = NC
Pin 10 = + 5 V
Demontage und Montage der Baugruppe
Z Frontrahmen komplett ausbauen und E--Karte wechseln.
Funktionsprüfungen
Z Voreingestellte Karte einbauen und Funktion vollständig überprüfen
(entsprechend GA--A 164 und Abschnitt 2.6 dieses Service--Manuals).
SM--2232.201
3.4
Ventilblock 2232.041/.641 (Pos. 160)
3.4.1
Demontage und Montage der Baugruppe
Z Überwurfmutter öffnen und Ausgangsschlauch abziehen. Zusätzliche
Verschraubung mit dem Gehäuseboden von der Geräteunterseite aus
lösen. Ventile können nicht einzeln getauscht werden.
Funktionsprüfungen
Z Funktion nach Baugruppentausch vollständig überprüfen entsprechend
GA--A 164 und Abschnitt 2.6 dieses Service--Manuals.
3.4.2
3.5
Druckminderer DM2 2232.041/.641 (Pos. 170)
Überprüfung und Einstellung:
Z Laparo CO2 --Pneu 2232 ausgeschaltet lassen. Gerät mittels Hochdruckschlauch an CO2 --Gasflasche anschließen.
Z Hauptventil der Gasflasche öffnen, sodass CO2 unter Druck zum Laparo CO2 --Pneu strömt.
Z Der Ventilblock enthält drei Ventile (von der Gerätevorderseite aus zur
Rückseite gesehen, in der Reihenfolge: V2, V3, V1). An V1 die beiden
oberen Steckverbinder lösen, das untere Kabel (Schutzleiter) kann
stecken bleiben.
Z Beide Silikonschläuche 2 x 1,5 mm für die Drucksensoren bei V3 (Anschlüsse [a]) abziehen und Digitalmanometer (vgl. 2.5) über Y--Stück
mit den frei gewordenen Anschlüssen verbinden. Das Y--Stück ist
nachfolgend skizziert:
Manometer
Silikonschlauch (4x2 mm)
Silikonschlauch (2x1,5 mm)
Y--Stück
Z Vorderen Silikonschlauch (4x2 mm) von Anschluss [b] abziehen und
sicher verschließen. Achtung: ohne Verschluss des Schlauches kann
der Flow--Sensor bei der anschließenden Prüfung defekt werden.
Z 24--V--DC aus einer Gleichspannungsquelle an die freien Steckerkontakte bei V1 anlegen (Polung ist unerheblich).
Z Den vorderen Anschluss [b] mit dem Finger verschließen.
Z Manometer ablesen. Kunststoffschraube an der Oberseite des DM 2
so lange drehen, bis 70 ±1,5 mmHg (≙ 93 ±2,0 mbar) stabil aufgebaut
sind.
Z Den vorderen Anschluss [b] mehrmals öffnen bzw. verschließen. Beobachten, ob der Druck richtig nachgeregelt wird.
Z Gleichspannung von V1 entfernen. Erst dann wieder (!) den verschlossenen Schlauch zum Flow--Sensor öffnen.
Z Alle Anschlüsse wieder in Ausgangszustand bringen.
Anschlüsse [a] und [b] siehe Kapitel 4.1.1
SM--2232.201
17
3.5.1
Funktionsprüfungen
Z Funktion nach Baugruppentausch vollständig überprüfen entsprechend
GA--A 164 und Abschnitt 2.6 dieses Service Manuals.
3.6
Druckminderer DM1 2232.244/.644 TEM--PUMP (Pos. 230)
Überprüfung und Einstellung:
Z Haube der TEM--PUMP abnehmen. Pumpe im rechten Winkel links
neben den Insufflator stellen.
TEM--Druck-- und Datenverbindungen, CO2 --Versorgung und Netzverbindung herstellen.
Z Kombination einschalten.
Nach bestandenem Selbsttest den Silikonschlauch von IC 27 entfernen und mit Druckmessgerät verbinden.
Z Druck kontrollieren und evtl. auf 1,0 bar einstellen.
Z Silikonschlauch wieder mit IC 27 verbinden.
3.6.1
Funktionsprüfungen
Z Funktionen vollständig überprüfen entsprechend GA--A 164 und Abschnitt 2.6 dieses Service Manuals.
18
SM--2232.201
ENGLISH
0
SM--2232.201
Contents
1
1.1
1.2
General information . . . . . . . . . . . . . . . . . . . . . . . . . . . . . . . . . . . . . . . . . . . . . . . . . . . . . . .
Ordering spare parts . . . . . . . . . . . . . . . . . . . . . . . . . . . . . . . . . . . . . . . . . . . . . . . . . . . . . . . .
Disassembly of housing cover . . . . . . . . . . . . . . . . . . . . . . . . . . . . . . . . . . . . . . . . . . . . . . . .
1
1
2
2
2.1
2.2
2.3
2.4
2.5
2.6
2.7
2.7.1
2.7.2
2.7.3
2.7.4
Maintenance . . . . . . . . . . . . . . . . . . . . . . . . . . . . . . . . . . . . . . . . . . . . . . . . . . . . . . . . . . . . . .
Important notes . . . . . . . . . . . . . . . . . . . . . . . . . . . . . . . . . . . . . . . . . . . . . . . . . . . . . . . . . . . .
Maintenance of device and accessories . . . . . . . . . . . . . . . . . . . . . . . . . . . . . . . . . . . . . . .
Visual check . . . . . . . . . . . . . . . . . . . . . . . . . . . . . . . . . . . . . . . . . . . . . . . . . . . . . . . . . . . . . . .
Electrical safety test . . . . . . . . . . . . . . . . . . . . . . . . . . . . . . . . . . . . . . . . . . . . . . . . . . . . . . . .
Measuring device and auxiliary equipment . . . . . . . . . . . . . . . . . . . . . . . . . . . . . . . . . . . . .
Function test . . . . . . . . . . . . . . . . . . . . . . . . . . . . . . . . . . . . . . . . . . . . . . . . . . . . . . . . . . . . . . .
Troubleshooting . . . . . . . . . . . . . . . . . . . . . . . . . . . . . . . . . . . . . . . . . . . . . . . . . . . . . . . . . . . .
Error messages for Laparo CO2 Pneu automatic insufflator . . . . . . . . . . . . . . . . . . . . . .
Troubleshooting on Laparo CO2 Pneu . . . . . . . . . . . . . . . . . . . . . . . . . . . . . . . . . . . . . . . . .
Error messages for TEM--PUMP . . . . . . . . . . . . . . . . . . . . . . . . . . . . . . . . . . . . . . . . . . . . .
Troubleshooting on TEM--PUMP . . . . . . . . . . . . . . . . . . . . . . . . . . . . . . . . . . . . . . . . . . . . .
3
3
3
4
4
5
6
12
12
13
14
15
3
3.1
3.2
3.2.1
3.2.2
3.3
3.3.1
3.3.2
3.3.3
3.4
3.4.1
3.4.2
3.5
3.5.1
3.6
3.6.1
Assemblies . . . . . . . . . . . . . . . . . . . . . . . . . . . . . . . . . . . . . . . . . . . . . . . . . . . . . . . . . . . . . . .
Switching power pack 2232.041/.641 (item 150) . . . . . . . . . . . . . . . . . . . . . . . . . . . . . . . .
Control PCB 2232.041/.641 (item 200) . . . . . . . . . . . . . . . . . . . . . . . . . . . . . . . . . . . . . . . .
Disassembly and assembly . . . . . . . . . . . . . . . . . . . . . . . . . . . . . . . . . . . . . . . . . . . . . . . . . .
Functional checks . . . . . . . . . . . . . . . . . . . . . . . . . . . . . . . . . . . . . . . . . . . . . . . . . . . . . . . . . .
Control PCB 2232.041/.641 (item 210) . . . . . . . . . . . . . . . . . . . . . . . . . . . . . . . . . . . . . . . .
Measuring points and supply voltages . . . . . . . . . . . . . . . . . . . . . . . . . . . . . . . . . . . . . . . . .
Disassembly and assembly of PCB . . . . . . . . . . . . . . . . . . . . . . . . . . . . . . . . . . . . . . . . . . .
Function tests . . . . . . . . . . . . . . . . . . . . . . . . . . . . . . . . . . . . . . . . . . . . . . . . . . . . . . . . . . . . . .
Valve assembly 2232.041/.641 (item 160) . . . . . . . . . . . . . . . . . . . . . . . . . . . . . . . . . . . . .
Disassembly and assembly . . . . . . . . . . . . . . . . . . . . . . . . . . . . . . . . . . . . . . . . . . . . . . . . . .
Function tests . . . . . . . . . . . . . . . . . . . . . . . . . . . . . . . . . . . . . . . . . . . . . . . . . . . . . . . . . . . . . .
Pressure reducing valve DM2 2232.041/.641 (item 170) . . . . . . . . . . . . . . . . . . . . . . . . .
Function tests . . . . . . . . . . . . . . . . . . . . . . . . . . . . . . . . . . . . . . . . . . . . . . . . . . . . . . . . . . . . . .
Pressure reducing valve DM1 2232.244/.644 TEM--PUMP (item 230) . . . . . . . . . . . . .
Function tests . . . . . . . . . . . . . . . . . . . . . . . . . . . . . . . . . . . . . . . . . . . . . . . . . . . . . . . . . . . . . .
16
16
16
16
16
16
16
16
16
17
17
17
17
18
18
18
4
4.1
4.1.1
4.2
4.2.1
4.3
4.3.1
Anhang . . . . . . . . . . . . . . . . . . . . . . . . . . . . . . . . . . . . . . . . . . . . . . . . . . . . . . . . . . . . . . . . . .
Reparaturteile / Spare parts Laparo--CO2--Pneu 2232.041 / 2232 .641 (USA) . . . . . . .
Explosionszeichnung / Exploded View Laparo--CO2--Pneu . . . . . . . . . . . . . . . . . . . . . . .
Reparaturteile / Spare parts TEM--Pump 2232.244 / 2232.644 (USA) . . . . . . . . . . . . . .
Explosionszeichnung / Exploded View TEM--Pump . . . . . . . . . . . . . . . . . . . . . . . . . . . . . .
Pläne / Diagrams Laparo CO2--Pneu 2232.041 / 2232.641 (USA) . . . . . . . . . . . . . . . . .
Lageplan des Schaltnetzteils (Pos. 150) /
Component drawing of switching power supply (item 150) . . . . . . . . . . . . . . . . . . . . . . . .
Lageplan der Bedien--E--Karte (Bestückungsseite) (Pos. 200) /
Component drawing of Operation PCB (component side) (item 200) . . . . . . . . . . . . . . .
Lageplan der Bedien--E--Karte (Lötseite) (Pos. 200) /
Component drawing of Operation PCB (solder side) (item 200) . . . . . . . . . . . . . . . . . . .
Lageplan der Steuer--E--Karte (Bestückungsseite) (Pos. 210) /
Component drawing of Control PCB (component side) (item 210) . . . . . . . . . . . . . . . . .
Lageplan Steuer--E--Karte (Lötseite) (Pos. 210) /
Component drawing Control PCB (solder side) (item 210) . . . . . . . . . . . . . . . . . . . . . . . .
19
19
20
21
22
23
4.3.2
4.3.3
4.3.4
4.3.5
SM--2232.201
23
24
25
26
27
I
4.3.6
4.4.3
4.4.4
4.4.5
4.4.6
4.4.7
Lageplan der Schnittstellen--E--Karte (Pos. 140) /
Component drawing of Interface PCB (item 140) . . . . . . . . . . . . . . . . . . . . . . . . . . . . . . .
Blockschaltplan 2232.041 / Block diagram 2232.041 . . . . . . . . . . . . . . . . . . . . . . . . . . . .
Blockschaltplan 2232.641 (USA) / Block diagram 2232.641 (USA) . . . . . . . . . . . . . . . .
Verdrahtungsplan 2232.041 /.641 / Wiring diagram 2232.041 /.641 . . . . . . . . . . . . . . . .
Pneumatikplan 2232.041 / Pneumatic diagram 2232.041 . . . . . . . . . . . . . . . . . . . . . . . .
Pneumatikplan 2232.641 (USA) / Pneumatic diagram 2232.641 (USA) . . . . . . . . . . . .
Pläne / Diagrams TEM--PUMP 2232.244 / 2232.644 (USA) . . . . . . . . . . . . . . . . . . . . . .
Lageplan der Steuer--E--Karte (Pos. 070) /
Component drawing of Control PCB (item 070) . . . . . . . . . . . . . . . . . . . . . . . . . . . . . . . . .
Lageplan der Schnittstellen--E--Karte (Pos. 030) /
Component drawing of Interface PCB (item 030) . . . . . . . . . . . . . . . . . . . . . . . . . . . . . . .
Blockschaltplan 2232.244 / Block diagram 2232.244 . . . . . . . . . . . . . . . . . . . . . . . . . . . .
Blockschaltplan 2232.644 (USA) / Block diagram 2232.644 (USA) . . . . . . . . . . . . . . . .
Verdrahtungsplan 2232.244 /.644 / Wiring diagram 2232.244 /.644 . . . . . . . . . . . . . . . .
Pneumatikplan 2232.244 / Pneumatic diagram 2232.244 . . . . . . . . . . . . . . . . . . . . . . . .
Pneumatikplan 2232.644 (USA) / Pneumatic diagram 2232.644 (USA) . . . . . . . . . . . .
5
5.1
5.2
Protokolle / Reports . . . . . . . . . . . . . . . . . . . . . . . . . . . . . . . . . . . . . . . . . . . . . . . . . . . . . . . 41
Prüfprotokoll / Test Report . . . . . . . . . . . . . . . . . . . . . . . . . . . . . . . . . . . . . . . . . . . . . . . . . . . 41
Wartungsprotokoll / Maintenance report . . . . . . . . . . . . . . . . . . . . . . . . . . . . . . . . . . . . . . . 42
4.3.7
4.3.8
4.3.9
4.3.10
4.3.11
4.4
4.4.1
4.4.2
II
28
29
30
31
32
33
34
34
35
36
37
38
39
40
SM--2232.201
1
General information
1.1
Ordering spare parts
The part number required for ordering a spare part is listed in the repair
parts list under the item number used in the service manual.
.
IMPORTANT!
Specify the following numbers when ordering spare parts:
D Part number of the spare part.
D Model/type number of the device.
D Serial number of the device.
Example
Repair parts list
Pos.
Type / Model
Bezeichnung
Designation
0030
72 311.112
Kaltgeräteeinbaubuchse
Mains socket
0110
64 117.102
Rückwand
Back plate
0160
64 291.022
Gehäusedeckel beschichtet
Top cover epoxy coated
Exploded view
160
030
110
SM--2232.201
1
1.2
Disassembly of housing cover
Fig.1
Fig.2
1.5
1.4
1.2
1.3
Fig.3
1.0
1.9
b
a
1.8
1.1
' Required tools: Phillips screwdriver.
Z Unscrew the 4 housing feet (1.2), fig.1.
Z Slide trim plates (1.3) from the rails (1.4), fig.2.
Z Remove the 4 bottom Phillips screws (1.5), fig.2.
Z Pull the housing cover (1.0) as indicated by the arrow (a) until the
tongues (1.8) are disengaged from the corresponding grooves in the
front plate (1.1), fig. 3.
Z Lift off the housing cover (1.0) as indicated by the arrow (b), fig. 3.
Z Disconnect the earthing/ground cable (1.9), fig. 3.
2
SM--2232.201
2
Maintenance
2.1
Important notes
This Service Manual describes the external service measures defined for
the product.
.
2.2
IMPORTANT!
For carrying out the service measures the product instruction manual
must be observed.
Maintenance of device and accessories
To protect the technician who carries out the test, the maintenance jobs
and tests must be carried out in the order specified below.
Z Visusal check
Z Electrical safety test
Z Functional check
The test and measuring procedures specified in the chapter ”Electrical
Safety Test” relate to the test in accordance with EN / IEC 60601--1.
Alternatively, the electrical safety test can be carried out in accordance
with DIN 751.
The operator shall bear responsibility for the limit values and collection /
documentation of output values measured.
After repair all measurement values (specified output values) of the device must be checked as described in the Service Manual, and readjusted
if deviations are observed.
CAUTION!
Do not use this product if the specified measuring values or
functions are not fulfilled.
.
SM--2232.201
NOTE!
Any maintenance or testing job on the device or accessories must be
documented.
3
2.3
Visual check
Item to be checked
Check for
Device and accessories
' Safety--relevant soiling / contamination and general cleanliness.
' Mechanical damage
' Loose or missing parts
Controls
' Mechanical function and easy operation
Lettering / Symbols
' Completeness and legibility
Safety--relevant labeling
(e.g warnings)
' Completeness and legibility
Device fuses
' The values specified by the manufacturer on the identification plate
(Nominal current and melting characteristics)
Cables
' for perfect condition (position, insulation and brittleness)
PCBs/cards
' Corrosion or other damage
Protective earth connection
' Between LAPARO--CO2 PNEU and TEM--PUMP
' Replace damaged parts immediately
2.4
Electrical safety test
Item to be checked
Check for
Protective earth connection
to EN / IEC 60601--1
Measured values:
' without power/mains cable: ± 0.1 Ohm
' with firmly attached power/mains cable: ± 0.2 Ohm
Test conditions:
Imeas 25 A ¦ 10% , V0 ± 6 V , ttest 5 s to 10 s , 50 Hz / 60 Hz
To be tested:
The resistance between protective earth contact or protective earth pin in the
power plug and any other exposed (bare) metal part connected to the protective earth conductor.
Leakage current
to EN / IEC 60601--1
Measured values:
' earth leakage current: ± 170 µA
limit value to EN / IEC 60601--1, normal condition: ± 500 µA
' patient leakage current: ± 10 µA
limit value to EN / IEC 60601--1:
normal condition for BF type: ± 100 µA
normal condition for CF type: ± 10 µA
Test conditions:
Measurement arrangement (MD) and measurement setup to EN/IEC 60601--1
Measuring points:
Insufflation connector, pump head; pressure measurement connector and
irrigation bottle
To be tested:
The leakage current which can flow from each pole of the power supply unit
through or via the insulation through the protective earth conductor or from the
applied part via the patient to earth.
Additional information
4
Disconnect the video connection before making the measurement.
SM--2232.201
2.5
Measuring device and auxiliary equipment
To carry out the maintenance, repair and test routines described in this service manual, the test
devices and auxiliary equipment listed below are indispensable. Before you start a repair job, make
sure that the measuring devices are properly calibrated and in perfect condition.
Designation
Additional information
DC power source
24V DC , no special current requirements
RMS multimeter
CCD camera
with Y/C(S--Video)-- and FBAS (BNC) output
Video monitor
with Y/C(S--Video)-- and FBAS (BNC) input
Hygiene filter
4171.111
High--Flow insufflation tube
8170.232 (comprises connector 64202.147)
CO2 flow tube
Measuring range: 4--40 l /min,
e.g. made by Platon Flow Management
Jays Close, Viables, Basingstoke RG22 4 BS UK
internet: www. platon.co.uk
CO2 flow tube
Measuring range: 1--10 l/min
Digital pressure gauge
Required resolution: 1 mm Hg
(in the range below 0.5 bar)
e.g.: ”VDM 100” made by ASF, Munich, or ”GDH 14 AN” made by
Greisinger electronic, D--93128 Regenstauf, Germany
CO2 cylinder
0.75 kg (2046.961)
For the tests the cylinder pressure must be in the ”green range”.
The green LED of the cylinder pressure gauge is lit. If during the
test the cylinder pressure indicator switches from green to yellow,
you may still complete the test without changing the cylinder.
High pressure connection tube
8170.801
Test bag
must be able to withstand 30 mm Hg, such as an empty 3 litre infusion bag (should be as elastic as possible)
Syringe
50 ml
Y connector
for silicone tubes (see page 11)
Silicone tube
1.0 m, 4 x 2 mm
TEM tube set
8170.841
Pump tube, complete
8170.861
Hygiene filter
4171.112
Container
with 1 litre of water
Insufflation tube 2.5 m
8170.101
Connection tube for irrigation bottle
8170.862
Connection cable
2232.981
2 x connection tube
2232.851
Foot switch
2030.231
SM--2232.201
5
2.6
Function test
.
NOTE!
The section marked * relate to instruction manual GA--A 164.
Item concerned
Required checks
Preparation
Measuring setup as in section 2.5.
Connect tube 2232.851 and connection cable 2232.981.
Connect a sufficiently filled gas cylinder and open the valve.
Do not connect the hygiene filter and pressure measuring tube (A) to the TEM--PUMP.
State after switch--on
(Self test)
The self test takes less than 2 minutes. In case of a defect, 2 minutes are exceeded
and all LEDs of the bar are triggered.
The digital display for the actual flow indicates the current software version of the insufflator (2 digits).
On the actual pressure digital display the current software of the TEM--PUMP is displayed (2 digits).
A brief signal is sounded to indicate the end of the self test.
Display software
version
TEM--PUMP:
All LED indicators of the TEM--PUMP light up briefly. The stricture pump starts operating briefly and then stops. All buttons and the pump symbol are illuminated in night
mode, all other indicators and displays are off.
Upon successful self test:
Laparo--CO2 Pneu:
Upon successfull completion of the self test, the digital displays for gas volume consumed, flow and intraabdominal pressure read “0.0“. There must be no error message on
the display for gas volume consumed. The level indicators for pressure preselection
and flow preselection must read the value preselected last.
TEM--PUMP:
Upon successful completion of the self test, all pushbuttons and the pump symbol are
illuminated in night mode, the malfunction symbol is not illuminated.
If a filter is plugged into the pressure measurement input, the level indicator reads the
speed preselected last.
If the self test could not be completed successfully, error messages E01 to E15 for the
Laparo CO2 Pneu automatic insufflator or E30 to E41 for the TEM--PUMP appear on
the digital display for the gas volume consumed.
Mode change
Note:
The TEM combination system can now be configured for LAPAROSCOPY mode or
TEM mode. To change the mode, the devices must be switched off for more than 30
seconds.
To select LAPAROSCOPY mode, actuate the insufflation button on the laparo CO2
Pneu after a successful self test. After switching on insufflation, all LEDs on the TEM-PUMP must go out and remain in this state, until the TEM combination is switched off
for more than 30 seconds and then switched on again.
LAPAROSCOPY mode
6
Connect hygiene filter with insufflation tube (B) to the patient output connector.
SM--2232.201
Item concerned
Required checks
Flow control
Connect hygiene filter with insufflation tube to patient output connector. Preselect a nominal pressure of 25 mm Hg on the Laparo CO2 Pneu. Actuate the ”INSUFFLATION”
button. The button must be lit. Read off the current flow on the digital display.
Measurement values:
' 1.1 l/min < Current flow < 1.5 l/min
Connect the CO2 flow tube (Description in section 2.5) to the insufflation tube. Push the
”HIGH FLOW” button. The button must be lit.
Preselect a nominal flow of 15 l/min. Read off the current flow on the digital display and
on the flow tube.
Measurement values:
' 14 l / min ≤ Current flow in acc. with digital display ≤ 16 l / min
' 12 l / min ≤ Current flow in acc. with flow tube
≤ 18 l / min
Preselect a nominal flow of 30 l/min. Read off the current flow on the digital display and
on the flow tube.
Measurement values:
' 28 l/min ≤ Current flow in acc. with digital display ≤ 32 l/min
' 24 l/min ≤ Current flow in acc. with flow tube
≤ 33 l/min
Switch off insufflation.
Consumption indicator
Actuate the ”RESET” button.
The digital display for gas volume consumed reads ”00.0”.
Pressure control
Select a nominal pressure of 15 mm Hg and a nominal flow of 10 l/min. Connect the
pressure measuring device/gauge (see section 2.5) and the insufflation tube to the bag
representing the abdomen, using the Y--connector.
First press the ”INSUFFLATION” button and then the ”HIGH FLOW” button. After a
short time the preselected pressure of 15 mm Hg prevails in the bag. It is admissible
that the pressure is exceeded briefly and then released.
Tolerances:
' Level indicators for nominal and actual pressure: ± 2 segments
' Digital display:
± 3 mm Hg
Switch off insufflation briefly.
Preselect a nominal pressure of 20 mm Hg and push the ”INSUFFLATION” button. After
a short time a preselected pressure of 20 mm Hg prevails in the bag. It is admissible
that the pressure is exceeded briefly and then released.
Tolerances:
' Level indicators for nominal and actual pressure: ± 2 segments
' Digital display:
Gas supply monitoring
± 3 mm Hg
Press the ”RESET” button. Close the gas cylinder valve.
Select a nominal pressure of 20 mm Hg and a nominal flow of 5 l/min. Switch on ”HIGH
FLOW” insufflation.
After a short time the gas supply indicator switches from continous green light to continous yellow light. The ”Low Alarm”* is sounded. Then the gas supply indicator switches
from continous yellow light to a flashing yellow light. ”Medium Alarm”* is sounded.
SM--2232.201
7
Item concerned
Required checks
Alarm, overpressure,
overpressure switch
Plug the filter and the connector (64202.147) of the high flow insufflation tube 8170.232
onto the pressure connector (insufflation opening) on the front panel as shown in the
figure below. Instead of the insufflation tube (which you should pull off the connector),
connect the Y--connector described in section 2.5 via a 4 x 2 mm silicone tube.
Connect the 50 ml syringe and the digital pressure measuring device/gauge to the
other ends of the Y--connector.
Preselect a nominal pressure of 15 mm Hg. Close the pressure release hole in the bottom plate of the housing and push the ”INSUFFLATION” button. The pressure in the
measuring setup rises to 15 mm Hg. If you exceed the nominal pressure by 4 mm Hg
by actuating the syringe, ”Medium Alarm”* is sounded.
If the pressure exceeds 30 mm Hg in this measuring setup, ”overpressure > 30 mm Hg”
alarm* is triggered with a 5 second delay. In this case ”High Alarm”* is sounded. The
alarm indicator remains lit. On the digital display for the gas volume consumed error
message E11 appears and the digital display for pressure blinks.
If the pressure exceeds 45 mm Hg in this measurement setup, after a delay period the
overpressure switch is triggered. This causes the ”High Alarm” to switch to continuous
sound, the alarm indicator remains lit and valve 2 switches off (switching noise).
Brief interruption
Switch off the device for approx. 10 seconds. After switching on all functions and settings previously selected must still be active.
Setup for overpressure
simulation
see end of this section (function check)
8
SM--2232.201
Item concerned
Required checks
TEM mode
Switch off the device for 30 seconds.
After switch--on, wait until the self--test is completed.
Connect the pressure measuring tube (A)* with hygiene filter to the measuring input
connector of the TEM--PUMP.
Use the “PUMP ON/OFF” button of the TEM--PUMP to select TEM mode
(HIGH FLOW button on laparo CO2 pneu blinks).
The insufflation gas flow in TEM mode is no longer cycled but continous.
Flow control
On the laparo CO2 pneu preselect a nominal pressure of 25 mm Hg and a flow
of 1 l/min.
Start insufflation. The “HIGH FLOW” button is lit.
The digital display must read a current flow of 0.8 -- 1.2 l/min.
Switch off insufflation.
Connect the CO2 flow tube to the insufflation tube (B)*, with the outlet of the flow tube
being left open.
On the Laparo C02 pneu, preselect a nominal flow of 8 l/min.
A flow of more than 8 l/min must not be preselectable.
' ≥ 7 l/min
current flow in acc. with digital display ≤ 9 l/min
' ≥ 6 l/min
current flow in acc. with CO2 flow tube ≤ 10 l/min
A constant flow must be visible in the flow tube.
A starting of the roller pump can be tolerated in spite of the open system as it is
energized at as little as 2 mm Hg.
Pressure control
Connect the pressure measuring device/gauge, insufflation tube (B)*, pressure measuring tube (A)* and the pump tube (suction D and Y)* to the bag representing the abdomen and to the devices.
We recommend using a T--CONNECTOR to connect the tube set to the bag (type and
shape depending on the structure of the abdomen model).
On the Laparo CO2 pneu preselect a nominal pressure of 15 mm Hg and a nominal flow
of 4 l/min.
Set the TEM--PUMP to minimum output and start.
Start insufflation.
In TEM mode the pressure measurement is effected via measuring tube (A)* of the
TEM--PUMP, as the insufflator generates a constant flow (in laparoscopy mode the
pressure measurement is effected directly in the insufflation flow).
At 2--5 mm Hg the displacement pump must start operating.
After a transient response phase, the preselected pressure of
15 mm Hg is reached.
'
Tolerance of the nominal and actual pressure level indicators:
15 mm Hg +/-- 2 segments
'
Tolerance of actual pressure digital display:
15 mm Hg +/-- 3mmHg
'
Tolerance of the pressure measuring device/gauge display:
15 mm Hg +/-- 3 mmHg
Preselect a nominal pressure of 20 mm Hg and a nominal flow of 8 l/min.
Set the TEM--PUMP to maximum output.
Start insufflation. After a phase of transient response, the preselected pressure
of 20 mm Hg is reached.
'
Tolerance of the nominal and actual pressure level indicators:
20 mm Hg +/-- 2 segments
'
Tolerance of actual pressure digital display:
20 mm Hg +/-- 3 mmHg
'
Tolerance of digital multimeter display:
20 mm Hg +/-- 3 mmHg
Stop insufflation.
SM--2232.201
9
Item concerned
Required checks
Displacement pump
Use the same measuring setup as for pressure control (pressure gauge not required).
On the TEM--PUMP, select minimum pump speed.
Start displacement pump with the “PUMP ON/OFF” button.
Start insufflation.
At approx. 2--5 mm Hg the pump starts operating.
Close the pump drain tube (Y)* approx. 30 cm after the displacement pump by kinking
it.
The displacement pump must now work against the overpressure in the tube; the pump
must not stop.
Let go of tube.
Briefly actuate the foot switch.
The pump speed must increase to its maximum value.
When you press the foot switch again or actuate either the UP or the DOWN button, the
pump must rotate at the preselected speed.
Open the cover of the roller pump. The malfunction/fault indicator must light up. The
pump stops and must not start again.
Close the cover. The fault indicator goes out.
Remove hose from roller pump.
Use a tool to block the pump head through the hole in the front, then close the cover.
Start the roller pump with the “PUMP ON/OFF“ button.
The fault indicator must blink.
After approx. 5 seconds: The pump symbol also starts blinking, the roller pump switches off automatically, the fault indicator goes out, an alarm is sounded.
It must not be possible to start the roller pump before the pump cover has been opened
and closed again.
Filter switch
Measuring setup as above.
Select a nominal pressure of 15 mm Hg and a nominal flow of 8 l/min on the insufflator.
Press the “START INSUFFLATION” button.
On the TEM--PUMP remove the hygiene filter from the measuring input connector (21).
Error message “E 38” is displayed and an alarm is sounded.
The insufflation pressure must drop to 8 mm Hg -- 15 mm Hg.
Switch off insufflation.
Ventilation
Use the same measuring setup as above.
Preselect a nominal pressure of 20 mm Hg and start insufflation.
When the nominal pressure is reached, exert an overpressure between 24 mm Hg and
30 mm Hg on the bag.
The Laparo CO2 pneu automatic insufflator must release the overpressure without issuing an alarm.
Irrigation function
The irrigation function is performed with an empty irrigation bottle.
TEM--Pump: Connect the CO2 1--10 l/min flow tube to the irrigation output connector via
irrigation tube (C)* (outlet of flow tube remains open).
Actuate foot switch and keep it depressed (continously).
There must be a flow of 4 +/-- 0.5 l/min.
After approx. 5 seconds the flow is interrupted and an alarm is triggered.
10
SM--2232.201
Setup for overpressure simulation:
Laparo CO2--Pneu 2232 automatic insufflator
Hygiene filter
4171.151
Connector 64202.147
Silicone tube (4x2 mm)
Pressure
gauge
Pressure output connector
64113.113
Syringe
Y--connector
Silicone tube (4x2 mm)
SM--2232.201
11
2.7
Troubleshooting
The error messages are displayed on the “gas volume consumed” display.
2.7.1
Error messages for Laparo CO2 Pneu automatic insufflator
Fault/error
Possible cause
Remedy
Error message E01
-- Gas supply interrupted
'Open gas cylinder or
connect full gas cylinder
-- Input pressure switch defective.
'In case of repeated error message with full,
open gas cylinder:
Contact service department
-- Pushbutton depressed when switching on
the device
'Repeat switch--on test
-- If there is no operator’s error: keyboard
defective
'Replace control PCB
Error message E02
Error message E03
-- Internal power supply out of tolerance
Error message E04
-- Valve V1 defective; Flow measurement
defective; V3 defective
Error message E05
-- Insufflation tube or hygiene filter connected when switching on the laparo CO2
pneu
'Remove tube (hygiene filter) and switch off
the device and switch on again after
20 seconds.
-- Valve V2 defective
'Replace valve assembly
Error message E06
-- Pressure measurement defective
Error message E07
-- Flow measurement defective
Error message E08
-- Valve V3 defective; V2 defective; Pressure 'Replace valve assembly
measurement defective; Flow measurement
defective
Error message E09
-- Nominal value invalid
'Replace control PCB
Error message E10
-- Helium
'Use
Error message E11
-- Overpressure alarm:
Pact greater than 30 mm Hg for more than
5 seconds
'Reduce intraabdominal pressure
Error message E12
-- General hardware error; Pressure measurement defective; V1 defective; Flow measurement defective
Error message E13
-- “3 bar” or
“Input pressure, 30 bar” pressure switch
defective
Error message E14
-- Pressure monitoring defective
Error message E15
-- DIL switch coding (position of electronic
pressure monitoring fast/slow) incorrect;
pressure switch defective
12
CO2 gas
'Replace both pressure switches as a precaution
'Change DIL switch coding to suit the
software and control PCB versions.
SM--2232.201
2.7.2
Troubleshooting on Laparo CO2 Pneu
Fault/error
Possible cause
Remedy
Device without function
Power switch not switched on
Power cable not connected
Fuse in device defective
No mains/line voltage
'Switch on power switch
'Connect power cable
'Replace fuse
'Check in--house power supply
No gas flow
-- Insufflation not switched on
'Switch on insufflation
-- Gas cylinder empty or closed
'Change or open the gas cylinder
-- Manipulations of the user increase the
abdominal pressure
'Eliminate cause
-- Laparo CO2 Pneu defective
'Contact the service department
--Other device causes pressure increase
'Eliminate cause
-- Tube system leaking
'Check tubes and connectors
-- Flow preselection too low
'Increase flow preselection
-- Instrument stopcock closed
'Open instrument stopcock
Preselected pressure is
exceeded
Pressure won’t build up
SM--2232.201
13
2.7.3
Error messages for TEM--PUMP
Fault/error
Possible cause
Remedy
Error message E30
-- Hygiene filter connected to the measuring
input connector during switch--on
'Remove hygiene filter and switch off the
power switch of the Laparo CO2 Pneu after
20 seconds; then switch on again
'Make sure pin moves easily or replace
socket
-- Microswitch at measuring input jammed
Error message E31
-- Pressure sensor for pressure measurement defective
'Contact the service department
Error message E32
-- Pressure sensor for pressure measurement defective
'Check pneumatic connections between
Laparo CO2 Pneu and TEM--PUMP
'If error is not eliminated,
contact the service department
'Adjust V2, replace valve assembly if necessary
-- Valve V2 defective
Error message E33
-- Current rectal value has exceeded limit
value
'Reduce rectal pressure
'If fault is not eliminated,
contact the service department
Error message E34
-- Pushbutton depressed during switch--on
'Switch off the TEM--PUMP and then on
again
Error message E35
'Contact the service department
Error message E36
-- CO2 supply TEM--PUMP faulty
-- not assigned
Error message E37
-- wrong pump tube
'Use original pump tube
'Contact the service department
-- Roller pump defective
Error message E38
-- Emergency insufflation, measuring line
with hygiene filter hasn’t been connected to
TEM--PUMP
' Connect measuring line with hygiene filter
to TEM--PUMP
'If error is not eliminated, contact the service department
Error message E39
-- Pressure switch defective
'Contact the service department
Error message E40
-- Data transmission defective
'Switch off system and switch on again after
20 seconds
'If error is not eliminated,
contact the service department
'Check connection of data lines
Error message E41
-- Pneumatic error
-- TEM--PUMP leaking
-- Throttle in pneu defective
'Check tightness of measuring line for rectal
pressure on rear panel of device
'If error cannot be eliminated,
contact the service department
14
SM--2232.201
2.7.4
Troubleshooting on TEM--PUMP
Fault/error
Possible cause
Remedy
Device without function
-- Power switch not switched on
'Actuate the power switch
Indicator lights and background illumination remain dark after switch--on
-- Power cable not connected
' Connect power supply/mains
connection
-- Device fuse defective
' Replace fuse
-- No power supply/mains
' Check mains/power supply
Suction power cannot be preselected
-- Device defective
' Contact the service department or
return the device for repair
Roller pump cannot be activated or
switched on by means of “pump ON/
OFF” button
-- “Cover of pump housing open”
indicator lamp is lit
' Close pump cover
Level indicator for “measured vacuum” does not show any reading although the pump is running
-- Vacuum tube or hygiene filter incorrectly connected or defective
' Check tube and filter for tightness
and correct connection, replace if necessary
-- Other tubes incorrectly connected or ' Check tube connections for tightness and correct connection, replace if
defective
necessary
No or poor suction
Alarm message of flow monitoring circuit despite of flow
No alarm message from flow monitoring with insufficient flow
-- Tubes incorrectly connected or defective
' Check tube connections for clogging,
replace if necessary
-- Tubes clogged
' Check if tube connections clogged,
replace if necessary
-- Instrument clogged
' Check the instrument for patency of
the channel, replace if necessary
-- Flow sensor cable incorrectly connected or defective
' Check cable for correct connection,
replace if necessary
-- Flow sensor defective
' Replace the flow sensor
-- Flow sensor soiled from the inside
' Reprocess or replace the flow
sensor
' Replace flow sensor
-- Flow sensor defective
SM--2232.201
15
3
Assemblies
3.1
Switching power pack 2232.041/.641 (item 150)
Z Install preadjusted PCB and check for function in acc. with GA--A 164
and section 2.6 of this service manual.
3.2
Control PCB 2232.041/.641 (item 200)
3.2.1
3.2.2
Disassembly and assembly
Z Remove the complete front frame and replace the PCB.
Functional checks
Z Install the preset card and check for function (in acc. with GA--A 164
and section 2.6 of this service manual).
3.3
Control PCB 2232.041/.641 (item 210)
3.3.1
Measuring points and supply voltages
Z Plug X1:
3.3.2
3.3.3
16
Pin 1 = PFD
Pin 2 = -- 12 V ± 0.4 V
Pin 3 = GND
Pin 4 = + 24 V
Pin 5 = GND
Pin 6 = + 12 V ± 0.4 V
Pin 7 = GND
Pin 8 = + 5 V
Pin 9 = NC
Pin 10 = + 5 V
Z Plug X3:
Pin 1 = DS 2 (low)
Pin 2 = DS 1 (high)
Pin 3 = 12 V ± 0.4 V
Z Plug X7:
Pin 1 = PFD
Pin 2 = -- 12 V
Pin 3 = GND
Pin 4 = + 24 V
Pin 5 = GND
Pin 6 = + 12 V
Pin 7 = GND
Pin 8 = + 5 V
Pin 9 = NC
Pin 10 = + 5 V
Disassembly and assembly of PCB
Z Remove the complete front frame and replace the PCB.
Function tests
Z Install preadjusted PCB and check for function (in acc. with GA--A 164
and section 2.6 of this service manual).
SM--2232.201
3.4
Valve assembly 2232.041/.641 (item 160)
3.4.1
Disassembly and assembly
Z Unscrew union nut and pull off output tube. Unscrew additional screw
connections in the bottom plate from the bottom of the device. The valves cannot be replaced individually.
Function tests
Z After replacement of assembly check all functions (in acc. with
GA--A 164 and section 2.6 of this service manual).
3.4.2
3.5
Pressure reducing valve DM2 2232.041/.641 (item 170)
Test and adjustment:
Z Laparo CO2 pneu 2232 is switched off. Connect the device to the CO2
cylinder using a high pressure tube.
Z Open main valve of gas cylinder, to allow pressurized CO2 to flow to
the laparo CO2 pneu.
Z The valve assembly contains 3 valves (in the following order, from the
front side of the device towards the rear: V2, V3, V1). Disconnect the
two upper plug connectors on V1, the cable at the bottom (protective
earth) remains connected.
Z Disconnect the two 2 x 1.5 mm silicone tubes for the pressure sensors
from V3 (connectors [a]) and connect the digital pressure gauge (see
2.5) to the two free connections using the Y--connector. The Y--connector is shown below:
Pressure gauge
Silicone tube (4x2 mm)
Silicone tubes (2x1.5 mm)
Y--connector
Z Disconnect the 4x2 mm silicone tube in front from connector [b] and
close securely. Caution: if you do not close the tube the flow sensor
may be damaged in the subsequent test.
Z Apply 24--V--DC from a DC power supply to the free connectors of V1
(polarity is not important).
Z Close the connector [b] in front with your finger.
Z Read the pressure gauge. Turn the plastic screw on top of DM 2 until a
stable pressure of 70 ±1.5 mmHg (≙ 93 ±2.0 mbar) is achieved.
Z Open and close the connector [b] in front several times. Check that the
pressure is controlled correctly.
Z Disconnect DC voltage from V1. Only then (!) should the closed tube to
the flow sensor be opened again.
Z Connect all connectors to their initial positions.
For connections [a] and [b] see section 4.1.1
SM--2232.201
17
3.5.1
Function tests
Z After changing the assembly perform a complete check of the function
in acc. GA--A 164 and section 2.6 of this service manual.
3.6
Pressure reducing valve DM1 2232.244/.644 TEM--PUMP (item 230)
Test and ajdustment:
Z Remove the cover of the TEM--PUMP. Place the pump at a right angle
on the left side next to the insufflator.
Establish TEM pressure and data connections, CO2 and mains/power
supply.
Z Switch on the combination.
Upon successful completion of the self test, remove the silicone tube
from IC 27 and connect to the pressure measuring device/gauge.
Z Check pressure and adjust to 1.0 bar if necessary.
Z Reconnect silicone tube to IC 27.
3.6.1
Function tests
Z Perform a complete check of the function in acc. GA--A 164 and section 2.6 of this service manual.
18
SM--2232.201
4
Anhang
4.1
Reparaturteile / Spare parts Laparo--CO2 --Pneu 2232.041 / 2232 .641 (USA)
Pos.
Type / Model
010
72 311.144
Kombi--Filter mit Sicherungshalter
Combi--Filter with fuse holder
030
64117.160
Druckminderer--Einheit, komplett
Pressure regulator assy., cpl.
040
72316.228
Membrandruckschalter 20--50 bar
(in 030/360 enthalten)
Diaphragm press. switch 20--50 bar
(included in 030/360)
050
72316.229
Membrandruckschalter 1--10 bar
(in 030/360 enthalten)
Diaphragm pressure switch 1--10 bar
(included in 030/360)
060
74002.141
Dichtung G 1/4” PA6
(in 030/360 enthalten)
Seal G 1/4 ” PA6
(included in 030/360)
070
74007.020
Mini Sicherheitsventil G1/4”
(in 030/360 enthalten)
Mini safety valve G1/4”
(included in 030/360)
080
74011.023
Siebeinsatz
(in 030/360 enthalten)
Mesh insert
(included in 030/360)
100
64074.074
Filteranschluss
Filter connector
110
64064.280
Arretierhülse
Retaining sleeve
120
R64010.054
Gehäusedeckel, komplett
Top cover, cpl.
130
64070.604
Gerätefuß, kpl. (VE 4 Stück)
Equipment foot, cpl, (4 /pkg)
140
64351.921
Schnittstellen--E--Karte 2232.041
Interface PCB 2232.041
141
72324.107
HF--Flanschdichtung Sub--D 15--pol
HF--flange shielding Sub--D 15--pol
150
72321.394
Schaltnetzteil
Switching power supply
160
72321.395
Ventilblock
Valve unit
170
64243.027
Druckminderer, komplett
Pressure regulator, cpl.
200
64351.845
Bedien--E--Karte 2232
Operating PCB 2232
210
64351.920
Steuer--E--Karte 2232.041/.641
Control PCB 2232.041/.641
211
R64073.062
CO2 --Anschluss, komplett
CO2 --connection, cpl.
212
R64073.063
Messanschluss, komplett
Measuring connection, cpl.
300
64204.165
Halteschiene
Support bar
310
64127.065
Blende
Shield
320
64010.024
Deckel, komplett
Cover, cpl.
360
64117.161
Druckminderer--Einheit, kpl. (USA)
Pressure regulator assy., cpl. (USA)
------
64226.233
Silikonschlauch 1,0 m (4,0 x 2,0 mm)
Silicon tube 1.0 m (4.0 x 2.0 mm)
------
64226.234
Silikonschlauch 1,0 m (2,0 x 1,5 mm)
Silicon tube 1.0 m (2.0 x 1.5 mm)
------
64226.235
Schlauch (PAN) 1,0 m (6,0 x 1,0 mm)
Tube (PAN) 1.0 m (6.0 x 1.0 mm)
------
64226.236
Silikonschlauch 1,0 m (8,0 x 3,0 mm)
Silicon tube 1.0 m (8.0 x 3.0 mm)
------
64226.237
Silikonschlauch 1,0 m (6,4 x 3,4 mm)
Silicon tube 1.0 m (6.4 x 3.4 mm)
SM--2232.201
Bezeichnung
Designation
19
Explosionszeichnung / Exploded View Laparo--CO2 --Pneu
4.1.1
120
320
300
310
030/360
141
050 040
070
060
150
140
010
211
080
212
130
170
a
210
V1
200
V3
b
V2
160
110
100
20
SM--2232.201
4.2
Reparaturteile / Spare parts TEM--Pump 2232.244 / 2232.644 (USA)
Pos.
Type / Model
010
64070.604
Gerätefuß, kpl. (VE 4 Stück)
Equipment foot, cpl. (4 / pkg)
020
74005.345
Steckverbinder
Plug connector
030
64351.922
Schnittstellen--E--Karte 2232.244
Interface PCB 2232.244
040
72324.107
HF--Flanschdichtung Sub--D 15--pol
HF--flange shielding Sub--D 15--pole
050
72316.318
Mikroschalter
Micro switch
060
64351.923
Front--E--Karte
Front PCB
070
64351.929
Steuer--E--Karte
Control PCB
080
64236.028
Schlauchpumpe, komplett
Roller pump, cpl.
090
74014.026
Schwingmetallpuffer 15 x 15
Resilent cushion 15 x 15
100
64321.042
Flachbandkabelbaum
(Front--E--Karte -- Steuer E--Karte)
Flat cable wiring harness
(Front PCB -- Control PCB)
110
64321.111
Flachbandkabelbaum
(Schnittstellen--E--Karte -- Steuer-E--Karte
Flat cable wiring harness
(Interface PCB -- Control PCB)
200
R64104.070
Magnetventil, kpl.
Solenoid valve, cpl.
211
R64067.007
Kupplung, kpl.
Clutch, cpl.
221
R64067.008
Kupplung, kpl.
Clutch, cpl.
230
R64234.028
Druckminderer, kpl.
Pressure regulator, cpl.
240
64204.166
Halteschiene
Support bar
250
64127.066
Blende
Shield
260
64010.024
Deckel, komplett
Cover, cpl.
300
R64108.005
Luer--Anschluss, männlich, kpl.
Luer connection, male, cpl.
310
R64108.004
Luer--Anschluss, weiblich, kpl.
Luer connection, female, cpl.
------
64226.238
Silikonschlauch 1,0 m (3,0 x 2,0 mm)
Silicon tube 1.0 m (3.0 x 2.0 mm)
------
64226.239
Silikonschlauch 1,0 m (2,0 x 2,0 mm)
Silicon tube 1.0 m (2.0 x 2.0 mm)
SM--2232.201
Bezeichnung
Designation
21
4.2.1
Explosionszeichnung / Exploded View TEM--Pump
260
240
110
250
070
100
040
030
211
221
200
090
020
060
230
050
010
300
310
080
22
SM--2232.201
4.3
Pläne / Diagrams Laparo CO2 - Pneu 2232.041 / 2232.641 (USA)
4.3.1
Lageplan des Schaltnetzteils (Pos. 150) /
Component drawing of switching power supply (item 150)
Voltage Adjustment
PIN 1
J2
T1
PIN 1
J1
C6
L1
F1
SM--2232.201
23
SU1
V1
R13
S8
S9
C10
LD23
V2
IC2
C16
C15
R20
R18
C13
R19
R10
R11
R21
V3
C12
IC8
LD19
R22
S7
LD18
S6
C24
LD20
IC4
C30
R33
R38
R14
R51
LD25
R41
C11
R17
R50
R16
R46
R53
IC6
C29
C28
Richard Wolf GmbH
64151.845 R00 BS
PCB/PE 09/96
C27
C19
LD17
LD26
LD16
IC1
C20
S5
S4
R6
R1
LD21
R34
R35
V4
R2
LD12
LD11
LD10
LD24
IC7
LD15
LD14
LD22
LD13
S1
S2
S3
IC5
RN1
IC3
ON
R45
R39
R44
LD9
LD8
LD7
LD6
LD5
LD4
LD3
R9
LD2
LD1
R37
R49
R36
R42
R32
R8
R52
R48
24
R15
OFF
S10
R5
C21
C18
C17
R4
4.3.2
Lageplan der Bedien--E--Karte (Bestückungsseite) (Pos. 200) /
Component drawing of Operation PCB (component side) (item 200)
SM--2232.201
R31
R3
R43
R54
R7
R40
Lageplan der Bedien--E--Karte (Lötseite) (Pos. 200) /
Component drawing of Operation PCB (solder side) (item 200)
C2
X1
20
C1
4.3.3
X4
X3
X5
X2
C3
SM--2232.201
25
4.3.4
26
Lageplan der Steuer--E--Karte (Bestückungsseite) (Pos. 210) /
Component drawing of Control PCB (component side) (item 210)
SM--2232.201
4.3.5
Lageplan Steuer--E--Karte (Lötseite) (Pos. 210) /
Component drawing Control PCB (solder side) (item 210)
X5
IC 16
IC 10
IC 14
flow sensor
Settings depend on
software version
X4
S1=DIL--Schalter/ DIL--switch
ON
Einstellung abhängig von
Softwarestand
pressure
sensors
X3
X1
SM--2232.201
27
4.3.6
28
Lageplan der Schnittstellen--E--Karte (Pos. 140) /
Component drawing of Interface PCB (item 140)
SM--2232.201
4.3.7
Blockschaltplan 2232.041 / Block diagram 2232.041
SM--2232.201
29
30
435 psi
30 bar
P
DS1
64 351.845
P
PCB Operation
64 351.845
EK Bedien
V1
U
P
sensor
pressure
sensoren
Druck--
from TEM--PUMP 2232.644
Flow-sensor
Q
U
ADC
to TEM--PUMP 2232.644
Out
von TEM--PUMP 2232.644
valve
proportional
ventil
Proportional--
In
uP--Controller
zur TEM--PUMP 2232.644
1,35 psi
48 psi
DM2
70 mmHg
5 bar / 73 psi
safety valve
5 bar / 73 psi
Sicherheitsventil
3,3 bar
DM1
44 psi
3 bar
DS2
Hardware--Control
Pressure Sensor
Druck-sensoren
Hardware-Ûberwachung
64 351.920
PCB Control cpl.
64 351.920
EK Steuer kpl.
U
P
72 321.394
power pack
switch over
72 321.394
Schaltnetzteil
V3
V2
I2C--Bus
+24V
exhaust
EntlÏftung
to patient
2232.644
from/to TEM--PUMP
2232.644
von/zur TEM--PUMP
2232.644
to TEM--PUMP
2232.644
zur TEM--PUMP
Type 4170.801
(single use hose set)
TEM--hose set
Type 4170.801
(Einmalgebrauch)
TEM--Schlauchset
Netzspannung
mains voltage
zum Patient
64 351.921
PCB Interface
64 351.921
stelle
EK Schnitt--
72 311.144
mains filter
72 311.144
Netzfilter
4.3.8
Blockschaltplan 2232.641 (USA) / Block diagram 2232.641 (USA)
SM--2232.201
V3
..
6
64320.611
Erdungskabel
grounding cable
64320.640
64320.606
Erdungskabel
grounding cable
64320.650
bn
bn
rd
rd
og
og
X4
1
2
3
4
5
6
7
8
72311.144
X3
X1
64351.921
SCHNITTSTELLEN--E--KARTE
10
64320.666
(1:1)
X2
X7
X1
N
bu
bk
64351.845
PE
operation--pcb
3
control--pcb cpl.
64320.604
NETZSCHALTER
main switch
X5 X2 X3 X4
X2
5
4
3
2
1
64151.844
X6
GND bk
GND bk
+24V vt
+24V vt
64320.618
STEUERKARTE kpl. 64351.920
control--pcb
STEUERKARTE
BEDIENKARTE
L
line filter with fuse
NETZFILTER MIT
SICHERUNGEN
V1
V1
V2
V2
V3
V3
64010.023/64010.051 USA
top cover
GEHAUSEDECKEL
V2
V1
64320.609
Erdungskabel
grounding cable
64225.066
1
2
3
4
5
6
7
8
9
10
..
1
2
3
4
5
6
7
8
9
10
SCL
SDA
GND
+5V
GND
GND
GND
+5V
+5V
1
2
3
4
5
6
7
8
9
10
1
2
3
4
5
6
7
8
9
10
11
12
13
14
15
16
17
18
19
20
X1
X3
+12V
64320.634
1 og
2 vt
3 rd
PFD ye
--12V gn
GND bk
+24V vt
GND bk
+12V og
GND bk
+5V rd
1
2
3
4
5
6
7
8
9
10
+5V rd
bottom cover cpl.
1
2
3
4
5
6
7
8
9
10
11
12
13
14
X5
DS1 high pressure
DS2 low pressure
pressure switch
DRUCKSCHALTER
5
bk
3
J1
72321.394
J2
switch power supply
SCHALTNETZTEIL
64320.976
+5V rd
+5V rd
GEHAUSEBODEN kpl.
GND bk
GND bk
GND bk
+12V og
bu
1
gnye
1
2
3
4
5
6
7
8
9
10
11
12
13
PFD ye
--12V gn
SM--2232.201
+24V vt
4.3.9
Verdrahtungsplan 2232.041 /.641 / Wiring diagram 2232.041 /.641
31
VENTILBLOCK
72321.395
4.3.10
32
Pneumatikplan 2232.041 / Pneumatic diagram 2232.041
SM--2232.201
SM--2232.201
CO2
DS2
3 bar
44 psi
435 psi
48 psi
3,3 bar
DS1
30 bar
DM2
V prop.
Micro
Controller
73 psi
5 bar
1,35 psi
70 mmHg
V relief
P1
Q
U
P2
P
P
Hardware
U
from TEM--PUMP 2232.644
to TEM--PUMP 2232.644
DM1
von TEM--PUMP 2232.644
zur TEM--PUMP 2232.644
U
V2
V3
Output to patient
Ausgang zum
Patienten
Exhaust
EntlÏftung
TEM--hose set
Type 4170.801
TEM--Schlauchset
Type 4170.801
4.3.11
Pneumatikplan 2232.641 (USA) / Pneumatic diagram 2232.641 (USA)
33
4.4
Pläne / Diagrams TEM--PUMP 2232.244 / 2232.644 (USA)
4.4.1
Lageplan der Steuer--E--Karte (Pos. 070) /
Component drawing of Control PCB (item 070)
X2
X4
DS 1
X5
IC 27
X3
34
X6
X1
IC 21
SM--2232.201
4.4.2
Lageplan der Schnittstellen--E--Karte (Pos. 030) /
Component drawing of Interface PCB (item 030)
SM--2232.201
35
4.4.3
36
Blockschaltplan 2232.244 / Block diagram 2232.244
SM--2232.201
SM--2232.201
hygiene filter for
measuring input
from
patient
scavenging liquid
suction hose
Absaugschlauch
MeB-Hygienefilter
Spülflüssigkeit
V2
ADC
U
P
Drucksensor
galvanic
separation
galvanische
Trennung
PCB interface
64 351.921
1 bar
14,5psi
measuring input
with switch
hose pump
Schlauchpumpe
pressure sensor
pump hose with
drainage
Pumpenschlauch
mit Ablauf
coupling
Schnellkupplung
scavenging bottle
Spülflasche
0,5l NaCl
Spülkanäle
V1
Out
rinsing channel
MeBeingang
mit Schalter
P
In
Micro--Controller
EK Schnitt-stelle
64 351.921
coupling
DM1
U
Hardware--Control
Pressure Sensor
Hardware-Ûberwachung
Druck-sensoren
PCB Control cpl.
64 351.929
EK Steuer kpl.
64 351.929
Schnellkupplung
pressure
switch
foot
switch
von
Patient
43,5psi
CO2, 3bar
Druck-schalter
Fuß-schalter
PCB Operation
64 351.923
EK Bedien
64 351.923
scavenging liquid
Spülflüssigkeit
I2C--Bus
+24V
drainage
Abfluss
from CO2--Pneu
2232.641
von CO2 --Pneu
2232.641
to patient
zum Patient
from/to CO2--Pneu
2232.641
von/zu CO2 --Pneu
2232.641
from CO2--Pneu
2232.641
von CO2 --Pneu
2232.641
4.4.4
Blockschaltplan 2232.644 (USA) / Block diagram 2232.644 (USA)
37
4.4.5
38
Verdrahtungsplan 2232.244 /.644 / Wiring diagram 2232.244 /.644
SM--2232.201
4.4.6
Pneumatikplan 2232.244 / Pneumatic diagram 2232.244
SM--2232.201
39
40
from LAPARO CO2--PNEU
2232.641
von Laparo--CO2 --Pneu
2232.641
from Footswitch
2030.231
von Fußschalter
2030.231
48 psi
3,3 bar
DM1
14,5 psi
1,0 bar
from LAPARO CO2--PNEU
2232.641
von Laparo--CO2 --Pneu
2232.641
Micro
Controller
TEM--hose set 4170.801
TEM--Schlauchset 4170.801
Pressure sensor
Hardware
Hygiene filter 4171.112
V1
18 psi
U
U
Hygienefilter 4171.112
P
P
Hygiene filter 4171.112
Hygienefilter 4171.112
1,25 bar
Drucksensor
safety valve
Sicherheitsventil
Pressure sensor
Drucksensor
V2
TEM--hose set 4170.801
to patient
zum Patient
from patient
vom Patient
Scavenging bottle
Spülflasche
Rinsing channel 8170.865
Spülkanäle 8170.865
TEM--Schlauchset 4170.801
4.4.7
Pneumatikplan 2232.644 (USA) / Pneumatic diagram 2232.644 (USA)
SM--2232.201
5
Protokolle / Reports
5.1
Prüfprotokoll / Test Report
Betreiber / User: ..................................................................... Typen Nr. / Type No.: ..............................
Anschrift / Address: ...................................................................................................................................
Durchgeführte Prüfung
Test carried out
SM--2232.201
Serien Nr.
Serial No.
Datum
Date
Name / Unterschrift
Name / Signature
41
5.2
Wartungsprotokoll / Maintenance report
Betreiber / User: .................................................................... Typen Nr. / Type No.: ..............................
Anschrift / Address: .................................................................................................................................
Wartungsmaßnahmen
Servicing check up
42
Serien Nr.
Serial No.
Datum
Date
Name / Unterschrift
Name / Signature
SM--2232.201
GERMANY
RICHARD WOLF GmbH
D--75438 Knittlingen
Pforzheimerstr. 32
Tel.: (..49)--(0)7043--35--0
Fax: (..49)--(0)7043--35300
MANUFACTURER
E--mail: [email protected]
Internet: www.richard--wolf.com
USA
RICHARD WOLF
Medical Instruments Corp.
353 Corporate Woods Parkway
Vernon Hills, Illinois 60061
Tel.: 847--913 1113
Fax: 847--913 14 88
E--mail: [email protected]
UK
RICHARD WOLF UK Ltd.
Waterside Way
Wimbledon
SW 17 0HB
Tel.: 020--8944 7447
Fax: 020--8944 1311
E--mail: [email protected]
Internet: www.richardwolf.uk.com
BELGIUM
N.V. Endoscopie
RICHARD WOLF Belgium S.A.
Industriezone Drongen
Landegemstraat 6
B--9031 Gent --Drongen
Tel.: +32 9.280.81.00
Fax: +32 9.282.92.16
E--mail: [email protected]
FRANCE
RICHARD WOLF France S.A.R.L.
Rue Daniel Berger
Z.A.C. La Neuvillette
F--51100 Reims
Tel.: +33 3.26.87.02.89
Fax: +33 3.26.87.60.33
E--mail: [email protected]
AUSTRIA
RICHARD WOLF Austria
Ges.m.b.H.
Wilhelminenstraße 93 a
A--1160 Wien
Tel.: +43 1-- 405 51 51
Fax: +43 1-- 405 51 51--45
E--mail: [email protected]
Internet: www.richard--wolf.at
SM--2232.201
43