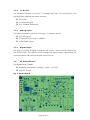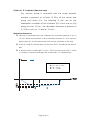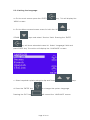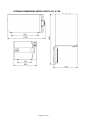
1
AZTECA AC Series
Pre-Vacuum Steam Heated Autoclave
OPERATION & SERVICE
MANUAL
Ver.1.2
Page 0 of 93
QA080017
TABLE OF CONTENTS
PARAGRAPH
1.
General
PAGE NO.
………………………………………………………….. 4
1.1
Incoming Inspection
1.2
Warranty
2.
……………………………………………..
4
………………………………..……………… . …………..
4
.……………… ….. …………………………
6
…………………………………………………….……
6
………………………………………….… .
8
...........................................................................
9
General Information
2.1
Introduction
2.2
Operating Conditions
2.3
Supply
2.4
Environment Emission Information
2.5
Electromagnetic Compatibility (EMC)
2.6
Symbol Description
2.7
Specifications
2.8
……………………… . ….… .
10
…………………….…. . .
10
…………………………………………………
11
……………………………………………………… .
12
Construction
……………………………………………… … ………
12
2.9
Water quality
...........………………………………………… …. .
13
2.10
Directives and Standards
………………………………….……
15
2.11
Storage and Transportation
………………………………… . ……
15
2.12
Safety Devices
................………………… … ………………....
16
3.
Electronic Control System (Rose)
........................
17
...........................................................................
17
3.1
General
3.2
Digital Board Rose-D
........................................................
18
3.3
Analog Board Rose-A
........................................................
19
3.4
AC Board Rose-P
..............................................................
20
3.5
AC Power Devices
............................................................
21
.......................................................
22
......................................................
22
4.
Cycles Descriptions
4.1
Cycle 1- Flash (134/3)
4.2
Cycle 2 - Unwrapped goods (134/3/2)
..............................
23
4.3
Cycle 3 - Wrapped goods (134/3.5/15)
..............................
24
4.4
Cycle 4 - Prion (134/18/20)
...............................................
25
4.5
Cycle 5 - Textiles (121/20/15)
.............................................
26
4.6
Cycle 6 - Porous (121/20/20)
.............................................
27
4.7
Cycle 7 - Slow (121/20)
.....................................................
28
4.8
Cycle 8 - "Bowie & Dick" Test
...........................................
Page 1 of 93
29
PARAGRAPH
4.9
5.
PAGE NO.
Cycle 12 - Air leakage Test
………………………………………
30
.……………… …...
31
…………………………………………………….……....
31
GUI (Graphic User Interface) description
5.1
Foreword
5.2
GUI overview
………………………………………….… ................
31
5.3
Main Screen
...................................................................
31
5.4
On Process Screen
……………………… . ….… ......................
33
5.5
System Setup
…………………….…. . .....................................
34
5.6
System messages
………………………………………………….
6.
Checking DC voltages
...................................................
7.
Preparation before Sterilization
58
.......................................
60
...........................................................................
62
7.1
Loading
7.2
Load discharge when process fails
8.
49
....................................
62
...................................................
63
.........................................................................
63
.............................................................................
63
Installation Instructions
8.1
Mounting
8.2
Piping
8.3
Drain Connections
............................................................
64
8.4
Power Connection
............................................................
64
8.5
Protective Earthing
..........................................................
65
.....................................................
71
...........................................................................
72
9.
Operating Instructions
10.
Printer
10.1
Printer Operation
10.2
Printer Output
10.3
Printer Specification and Handling
11.
..............................................................
72
...................................................................
73
Maintenance Instructions
......................................
74
................................................
76
11.1
Preventive and Periodical Maintenance
..............................
11.2
Maintenance tasks to be carried out regularly
11.3
Emergency actions using the autoclave
77
...................
79
.........................
80
................................................................
81
under steam pressure
11.4
Troubleshooting
11.5
Operating the Door
..........................................................
83
Valves Numbering
.........................................................
85
..............................................................................
87
12.
Appendixes
Page 2 of 93
Drawings:
Electrical drawings
............................................................
Piping schematic drawing
.................................................
Page 3 of 93
88
93
1.
General
The Autoclave should be used as described in this manual only.
The following are the Instruction before operating the autoclave:
1.1 Incoming Inspection
Immediately upon reception of your product, examine the packaging
material and contents for shipment damage (such as: scratched panel
surfaces, broken knobs, etc). Report any such instance to your dealer or
point of purchase.
All Celitron Medical Technologies Kft. products are tested and inspected
prior to shipment.
1.2 Warranty
Celitron Medical Technologies Kft. warrants that the equipment has been
carefully tested and inspected and has left the factory in proper working
conditions, free of visible defects. Celitron Medical Technologies Kft.
warrants the equipment to be free from defects in material and
workmanship, under normal use and operation, for a period of one (1)
year from the date of initial installation, or demonstration; or eighteen
(18) months from the date of shipment from the factory; or whichever
occurs first. Celitron Medical Technologies Kft. warrants the pressure
vessel for a 10 years period if used under Celitron Medical Technologies
Kft. instructions, found in this operation manual and under these
conditions.
: The components of equipment guaranteed will include only those
components which are not considered expendable. Door gaskets,
bulbs, heating elements, etc., will not be guaranteed by Celitron
Medical Technologies Kft.
: The liability of Celitron Medical Technologies Kft. is limited to the
replacement of the defective part or component.
: Celitron
Medical
Technologies
Kft.
cannot
guarantee
the
replacement of parts which are defective because of damage in
transit,
pilferage,
or
parts
of
improperly used or maintained.
Page 4 of 93
equipment
which
have
been
Note:
In case you meet some difficulties and you do not find the solution in the
manual:
: Contact our representative.
: Inform him with model and serial number of the autoclave
: Describe the difficulty.
For autoclave built with a printer: send a copy of the last printout.
Reparation is accepted after getting authorization from the company.
Shipment (both ways): all costs are paid by the owner.
We accept this guaranty only if the unit is purchased from an authorized
full service dealer.
DO NOT SERVICE THE UNIT BY YOURSELF
Remarks:
: The warranty does not include and does not replace routine
treatment and preventive maintenance.
: Details of our Technical Service Department:
Celitron Medical Technologies Kft.
2600 Vác
Avar utca 5
Hungary
Phone: +36 27 512 267
Fax: +36 27 512 268
[email protected]
Page 5 of 93
2. General Information
2.1 Introduction
This autoclave is a pre-vacuum sterilizer designed to cover a large field of
applications for hospitals and medical centers as well as pharmaceutical
and biotechnological industries.
This autoclave model is an electrically heated sterilizer, which operates
with saturated steam as a sterilizing agent, and has a temperature
range of up to 137°C (279ºF) and pressure up to 2.3 bars (34 psi).
The autoclave is classified as Class IIa according to MDD 93/42/EEC.
The autoclave is designed as a Large Steam Sterilizer in accordance with
EN285 and as Class I in accordance with EN60601-1, continuously
operated, ordinary equipment without applied parts and without signal
input-output parts. The device is not intended for use in the presence of
flammable mixtures.
The device is constructed of stainless steel and is heated by saturated
steam supplied by the building control source. All metal parts in the inner
surfaces are made of stainless steel.
The chamber includes 2 drains, joined on the outside, giving an
increased safety if a drain should be plugged. The chamber is mounted
on a framework with adjustable feet. Valves and other equipment are
mounted on the same frame.
The sterilizer is supplied with a cabinet or mounted recess. The cabinet is
constructed from stainless steel side panels for free standing installation.
The front panel and door panel are made of stainless steel sheet with a
polished surface.
The autoclave is equipped with one door, provided with a ring locking
mechanism, activated by the compressed air, preventing the opening of
the door by a safety pin.
Page 6 of 93
9 sterilization and test programs are available: one flash cycle, one for
unwrapped instruments, one for wrapped instruments and packages, one
Prion cycle, two textile cycles and one slow exhaust.
The two available test programs are the VACUUM TEST for checking the
tightness of the chamber and piping system and the BOWIE DICK test
enabling to check the efficiency of the sterilization process.
The control system of the sterilizer is based on state of the art
microcomputer
technology,
ensuring
a
highly
reliable
and
safe
operation. The computerized control unit ensures a fully automatic
operation through the entire cycle; hence after setting the pre-selected
data and starting the operation, no further intervention is necessary.
The selected program, the main phases of the cycle and the status of the
machine are controlled and displayed on digital readouts. For process
documentation,
the
important
information
concerning
operation
is
printed in hard copy.
For optimal control accuracy of the sterilization parameters, the system is
equipped with temperature sensors PT100 and two pressure transducers
having the following functions:
: The
temperature
sensor-
chamber
temperature
(control
and
printout).
: The pressure transducers- chamber pressure (control and printout),
and generator pressure (monitoring).
The panel located on the front panel enables the operator to start and
stop the cycle.
Only technical personnel having proper qualifications and holding
technical
documentation
(including
a
technician
manual)
and
adequate information are authorized to service the device.
Only authorized personnel should have access to select the program
and change the major parameters by using the key.
Page 7 of 93
2.2 Operating Conditions
:
This device is for indoor use only!
:
The sterilizer should be loaded only with autoclavable material!
:
The environment shall not exceed an ambient temperature of 40ºC
and a relative humidity of 85% respectively.
:
The operation altitude shall not be over 2000 meters (ambient
pressure shall not be lower than 80 kPa (11.6 psi)).
:
It is recommended to perform a B & D cycle at the beginning of
each working day.
Caution!
Waste water should be brought into the public net in accordance
with the local rules or requirements.
Only non-hazardous liquids shall be disposed in public sewage!
Page 8 of 93
2.3
Supply
Resource
Units
Details
Steam – Building supply
φ
Pipe Diameter
Supply pressure
bar
Supply capacity
Kg / h
Condition of supply
Consumption per 1 Ste
module
Min ¾”
4 to 6
40 kg at 4 bar & 15 m/s to 85kg at 6 bar & 25
m/s
Contaminants limit shall comply with Instruction
Manual
Kg / cycle
1 kg steam for Alu container contains 9 kg textile or
6 kg steam for Alu container + st.st basket + 10 sets
of instruments and textile.
Tap water supply
φ
Pipe Diameter
Supply pressure
Supply capacity
bar
0.7 at 1 m/s
°C
15-40
Condition of supply
Consumption
2 to 4
3
M / h
Supply temperature
¾”
to
1.5 at 2 m/s
Hardness value 0.7 to 2.0 mmol / l
l / cycle
120 for the pump + 40 for the heat exchanger
Mineral free water supply – for integral steam generator
φ
Pipe Diameter
Supply pressure
Supply capacity
bar
3
M / h
Condition of supply
Max. consumption
¾”
2 to 4
0.35 at 0.5 m/s
to
0.7 at 1 m/s
As per Table in the Instruction Manual
l / cycle
6 for full heavy load
Compressed air
φ
Pipe Diameter
Supply pressure
bar
Supply capacity
M 3 / min
Condition of supply
Maximum consumption
¼” (6mm)
6 to 8
0.4 to 0.6
Free of liquid water, 25μ filter, oil droplets less
than 2μ
l / cycle
> 100
Drain
φ
Pipe Diameter
Type
½"
vented
Environment
Max. ambient
temperature
°C
Max. ambient humidity
%RH
Ventilation (air exchanges per hour)
40
85
10 Min
Integrated steam generator
capacity
Kw
For AC-470 and AC-575: 9; for AC-5100: 18
Electricity – 50Hz
With generator
3x16A, 380V
Heat emission to 20°C ambient
Behind the Front Panel
kCal/h
290
To front with open door
kCal/h
875
With closed door
kCal/h
Negligible
Steam generator
kCal/h
100
Page 9 of 93
Available cycles:
Description
Ster.Temp.(°C)/Ster.Time(min)/Dry Time(min)
Flash – Flash sterilization of open
instruments
134/3/1
(2 vacuum pulses)
Unwrapped – Sterilization of Open
instruments, utensils and glassware.
134/3/2
(4 vacuum pulses)
Wrapped – Sterilization of heavy, packed
instruments.
134/3.5/15
(4 vacuum pulses)
Prion – Sterilization of heavy, packed
instruments.
134/18/20
(4 vacuum pulses)
Textiles - Sterilization of heat-sensitive
materials and textiles.
121/20/15
(4 vacuum pulses)
Porous – Sterilization of heat-sensitive
materials.
121/20/20
(4 vacuum pulses)
Slow - Sterilization of heat-sensitive
materials with slow exhaust.
121/20/0
(2 vacuum pulses)
2.4 Environment Emission Information
: The peak sound level generated by the autoclave is less than 70
db A with background noise of 60 db A.
: The total heat per hour transmitted by the autoclave is < 100 Wh.
: The Autoclave is not a source of electromagnetic emissions for
medical purposes. The level of the EMC Emissions was tested by a
certified laboratory according to the list of relevant standards (see
clause
2.10),
and
found
to
be
in
compliance
with
the
requirements.
2.5 Electromagnetic Compatibility (EMC)
The installation and the service of the sterilizer should consider special
precautions regarding EMC according to the information accompanying
in this user and service manual. (According to standard EN 60601-1-2
paragraph 6.8.2.201-Instructions for use).
: Warning- The use of cables, pumps, transducers or any other
electrical elements other than those specified by Celitron Medical
Technologies
as
replacement
parts
may
result
in
increased
EMMISIONS or decreased IMMUNITY of the sterilizer.
: Warning- the sterilizer should not be used adjacent to or stacked
with other equipments.
Page 10 of 93
: Warning-the sterilizer should not be connected to the same power
line with other equipments.
: Warning-Portable and mobile RF communications equipment such
as cellular phones can affect the operation of the sterilizer.
2.6 Symbol Description
This sign indicates the need of caution. Read accurately
all the notes beside this sign.
This sign informs about hot surface.
This sign points to the Grounding connection
This sign points Danger of High Voltage.
Page 11 of 93
2.7
Specifications
MODEL OF AZTECA
SERIES
Chamber size
(mm)
AC450
AC-470
AC-550
AC-575
AC-5100
Diam
400
400
500
500
500
D
500
700
500
700
1000
1
1.5
Stu Basket
(600x300x300
mm)
-
Chamber
volume
Ltr
65
90
100
150
200
Overall Size
mm
W
750
750
850
850
850
H
630
630
730
730
730
D
770
970
810
1050
1300
100
145
150
190
210
Weight
Kg
Door
Ring Lock Door
Sterilization
Temperature
105÷138°C
Vacuum System
Liquid Ring Pump (or Water Ejector by request only)
Steam Source
Pressure
Saturated Steam
Compressed Air
5 ÷7 Bar
Water Source
Pressure
Filtered Tap Water of 25°C Max.
Power Source
3-Ph. 380 V, 50/60 Hz
With Generator (Kw)
2.8
3.5÷5 BAR
1.0÷6.0BAR
10
10
10
10
10
Construction
The main parts of the autoclave are made of materials as indicated below:
: Chamber is built of stainless steel 316L thickness 5mm.
: Door is made of Aluminum stainless steel 304.
: Trays are made of stainless steel 304.
: Water reservoir is made of stainless steel 316L thickness 1.5mm.
Page 12 of 93
2.9
Water Quality
The mineral– free water supplied to the autoclave should have the
physical characteristics and maximum acceptable level of contaminants
indicated in the table below:
Physical characteristics and acceptable contaminants levels in water,
for sterilizers: (In compliance with ISO 11134 and ISO 13683).
Maximum values of steam contaminants
in accordance with Standard EN 285
Contaminant
Condensate
Feed water
Evaporation residue
£ 1.0 mg / kg
£ 10 mg / l
Silicium oxide, SiO2
£ 0.1 mg / kg
£ 1 mg / l
Iron
£ 0.1 mg / kg
£ 0.2 mg / l
Cadmium
£ 0.005 mg/kg
£ 0.005 mg / l
Lead
£ 0.05 mg / kg
£ 0.05 mg / l
Rest of heavy metals
except Iron, Cadmium,
Lead
£ 0.1 mg / kg
£ 0.1 mg / l
Chloride (Cl)
£ 0.1 mg / kg
£ 2 mg / l
Phosphate(P2O5)
£ 0.1 mg / kg
£ 0.5 mg / l
Conductivity
£ 3 ms /cm
£ 15 ms /cm
pH value
5 to 7
5 to 7
Hardness
£ 0.02 mmol/ l
£ 0.02 mmol/ l
Appearance
colorless clean without
sediment
colorless clean
without sediment
Compliance with the above data should be tested in accordance with
acknowledged analytical methods, by an authorized laboratory.
Attention:
The use of water for autoclaves that does not comply with the table
above may have severe impact on the working life of the sterilizer and
can invalidate the manufacturer’s guarantee.
The aforementioned requirements concerning the water supply are also
valid for steam supplied from boilers installed at the customer’s site,
which enter the sterilizer chamber and come in contact with the products
or packaging.
Page 13 of 93
2.9.1 Water for the Vacuum System and the Drain Cooling
The feed water supplied to the liquid ring ejector must meet the following
requirements:
Hardness:
0.7 - 2 mmol/l, 4-12 °(German) of CaCO 3 ,
7.2-21°(French) of CaCO 3 , 72- 215 mg/l of CaCO 3
The use of soft water is strictly forbidden!
Note:
The use of heavy scaled water for the vacuum pump cooling, can
cause blocking of the rotor and put the pump out of operation. This
invalidates the guarantee for the vacuum pump.
2.9.2 Reverse Osmosis
A Reverse Osmosis system may be used to improve the quality of the
water used to generate steam into the autoclave chamber. The use of
mineral-free water will contribute to better performance and longer life of
the autoclave.
Page 14 of 93
2.10 Directives and Standards
Technical Standards
: Pressure
Equipment
Directive
97/23/EC
(PED)
Essential
safety
requirements, Annex I, 7.4.
: Medical Device Directive 93/42/ EEC.
: EN 60601-1+ A1:93 + A2:95 +A13:96 (Dir. 93/42/EEC)
: IEC 60601-1:1998 +A1:1991
: EN 61010-1:01- Safety of electrical equipment- General requirements.
: UL 61010A-1:2002
: IEC 61010-1:2001
: EN 61010-2-041:96 (Dir 73/23/EEC)– Safety of electrical equipment.
: EN 61010-2-041:95 – Particular requirement for steam autoclaves.
: EN 61326 (Dir. 89/336/EE) – (EMC) Emission compatibility.
: EN 60601-1-2:01 (Dir.93/42/EEC) – (EMC) Immunity compatibility.
: EN 285:2006– Large Steam Sterilizers.
: ISO 17665-1 (2006)- Sterilization of health care products Moist heat
Part 1: Requirements for the development, validation and routine
control of a sterilization process for medical devices.
Quality standards
The company's quality management system meets the following quality
standards:
:
ISO 9001:2000– Quality Management System- Requirements.
:
ISO 13485:2003 – Quality systems – Medical devices – Particular
requirements for the application of ISO 9001.
: EN ISO 14971 –Risk Management for Medical device.
2.11 Storage and Transportation Conditions
: The storage environment ambient temperature should be in the
range of
0-50ºC and a relative humidity of 90% respectively.
: The storage and transportation altitude shall not be over 2000
meters (ambient pressure shall not be lower than 80 kPa (11.6 psi)).
: Equipment may be moved only with empty Water Reservoirs.
: An atmospheric pressure range should be of 700 – 1060 hPa
diapason.
Page 15 of 93
2.12 Safety Devices
: An approved ThermostatThis safety component interrupt heating element in case of the
temperature above 170ºC.
In order to precede the work, the user needs to push the reset button.
: A certified Safety ValveThis safety component releases the pressures above 2.7 BAR.
Page 16 of 93
3.
Electronic Control System (Rose)
3.1 General
The control system contains all the necessary resources for operating the
Autoclave. Inside the system there are 3 electronic boards:
Digital board (Rose-D), AC and Power board (Rose-P), Analog board (RoseA).
The boards are connected to each other according to their functions (see
drawing):
Fig. 1
: The system has an ability to operate 11 24VAC valves, 4 high AC
devices in medium power consumption (Pumps), and 1 high AC
outputs in high power consumption (Heaters), to accept 8 digital
inputs (floats, door switches, etc.), and to measure many kinds of
analog inputs (PT100 sensor, Pressure sensor, Water electrodes etc.).
: The system is equipped with a serial communication that can be
connected to personal computer & local printer.
: The System has a Graphic display and touch screen for the user
interface.
Page 17 of 93
3.2 Digital Board Rose-D.
Digital board- Rose-D- is the main processing board in the system. The
following are the basic components of this board:
: Micro Controller: the engine of the board. Its function is to run the
process and interact with the user interface (touch screen, display, PC
communication etc.).
: Memories: The Memories are an important auxiliary tool for the Micro
Controller. There are three types of memories:
1. Flash Memory: this memory is designated to save the software, all
of the tables, parameters, calibration data, languages fonts, and
a memory space for Logging.
2. RAM: this memory is designated to temporarily save all the
variables in the software.
3. Real Time Clock & Non Volatile Memory: this component provides
all of the clock's requirements and stores all required parameters.
Fig.2: Rose-D Board
: Communication: The Control System is equipped with 3 serial ports.
One is for external communication (PC, Central Controller and
Telephone Line), the second is for internal communication (Printer,
Barcode Reader, etc.) and the third is I2C for the analog board
communication.
: A Touch screen interface circuit provides the work with resistive twodimensional touch screen.
Page 18 of 93
: Graphic display interface is assigned for 240x128 blue/white
graphic
LCD,
including
contrast
adjusting
software-hardware
mechanism. The digital board provides control for LCD backlight.
3.3
3.3.1
Analog board Rose-A
General
The analog board is designated to expand the abilities of the digital
board: it contains a microprocessor for the analog and digital inputs
receiving and processing (gain & offset calculation), keeping digital
outputs status (On, Off or shoot mode). The analog board provides the
serial RS232 channel for the printer.
Fig.3: Rose-A Board
Page 19 of 93
3.3.2
12 bit A/D
The board has ability to receive 11 analog inputs with 12 bit resolution. The
following box supplies the entire solution:
: A/D 12bit.
: 16 channels MUX.
: 2.5V Voltage Reference.
3.3.3
Analog Inputs
The board enables connection through 11 different inputs:
: 3 PT100 inputs.
: 2 Pressure Sensors up to 400kPa.
: 6 Electrode inputs.
3.3.4
Digital Inputs
The board includes 8 digital inputs circuits; each is built as GND shorting for
the active state. The signal comes through an Optocoupler, separating the
microprocessor side and peripheral inputs circuit.
3.4
AC Board Rose-P
This board has 2 tasks:
: Supplying the System voltages - 5VDC, 13.5VDC.
: High AC Drivers.
Fig. 4: Rose-P Board
Page 20 of 93
3.4.1 Power Supply
The System has a switching power supply that receives 12x2 VAC from the
power transformer and converts it to 3 DC voltages 5 & 13.5 VDC stabilized
sources: 5V – 5A, 13.5 – 1A, and 12V not stabilized voltage for the fans
supplying.
The Power Supply has a self protection circuit, which protects it from possible
shorting at the output.
3.4.2 High AC device drivers
The AC board provides 5 control circuits for the high AC voltage devices
operating.
: 16A output for the heating element.
: 3A output for the vacuum pump.
: 2A output for the water pump.
: 2A output for the door solenoid.
: 3A output for the optional heating element.
3.5
AC Power Devices
The System is equipped with a number of AC Power devices:
3.5.1 Heater Elements
The Steam Generator includes 3 installed heater elements, which are
connected in a ‘Star” or “Triangle” circuit according to the configuration
of the 3-phase Power Input. The current supplied to the elements goes
through the power Contactor controlled by a Solid state relay (SSR) and
three independent circuit breakers, one per phase.
3.5.2 Water Pump
A One-phase water pump supplies the mineral-free water to the steam
generator. The Electrical Box contains the SSR controlling this AC Output
through circuit breaker of 6A.
3.5.3 Vacuum Pump
The power 3-phase Vacuum Pump is assigned for the deep vacuum
producing in the sterilization process vacuum stage. The Voltage applied
to the pump goes through the Contactor and the Overload circuit-Breaker
allocated in the Electrical Box. The contactor is controlled by a SSR.
Page 21 of 93
4. Cycles Descriptions
The autoclave offers 9 different cycles: 7 sterilization cycles and 2 test
Cycles.
The sterility of instruments processed in unwrapped cycles cannot be
maintained if exposed to non-sterile environment.
4.1
Cycle no. 1 - Flash 134°C / 3 min (Warm Up).
Sterilizing unwrapped instruments, without drying stage.
: Sterilization temperature: 134ºC (273ºF), –0°C +3°C, (–0°F +5.4°F)
: Sterilization time: 3 minutes.
: Vacuum pulses 2.
: Average cycle time: 12 minutes.
Cycle Sequence
Conditioning: two vacuum pulses to remove the air from the chamber.
Steam is introduced into the chamber until the sterilization temperature is
reached.
Sterilization stage: temperature and pressure are controlled at the required
sterilization level for the sterilization time.
Fast exhaust: steam is rapidly exhausted from the chamber; followed by a
vacuum pulse, air is introduced until pressure equalizes atmospheric
pressure.
The allowed materials for sterilizing are solid unwrapped tools.
t1 = Conditioning
t2 = Sterilization stage
t3 = Exhaust stage
P3=310 kPa
Page 22 of 93
4.2
Cycle no. 2 - Unwrapped 134°C / 3 min, 2 min dry
(Dynamic sterilizer chamber pressure).
Sterilizing unwrapped instruments.
: Sterilization temperature: 134ºC (273ºF), –0°C +3°C, (–0°F +5.4°F)
: Sterilization time: 3 minutes.
: Dry Time: 2 minutes.
: Vacuum pulses 4
: Average cycle time: 16 minutes.
Cycle Sequence
Conditioning: two vacuum pulses to remove the air from the chamber.
Steam is introduced into the chamber until the sterilization temperature is
reached.
Sterilization stage: temperature and pressure are controlled at the required
sterilization level for the sterilization time.
Fast exhaust stage: steam is rapidly exhausted from the chamber.
Drying stage: vacuum is created in the chamber for 2 min.
Air inlet phase: Filtered air enters the chamber breaking the vacuum to
enable the door to open.
The allowed materials for sterilizing are solid unwrapped tools.
t1 = Conditioning
t2 = Sterilization stage
t3 = Exhaust and dry
stage
P3=310 kPa
Page 23 of 93
4.3
Cycle no. 3 - Wrapped 134°C / 3.5 min, 15 min dry
Sterilizing unwrapped instruments, with drying stage.
: Sterilization temperature: 134ºC (273ºF), –0°C +3°C, (–0°F +5.4°F)
: Sterilization time: 3:30 minutes.
: Dry Time: 15 minutes.
: Vacuum pulses 4.
: Average cycle time: 35 minutes.
Cycle Sequence
Conditioning: two vacuum pulses to remove the air from the chamber.
Steam is introduced into the chamber until the sterilization temperature is
reached.
Sterilization stage: temperature and pressure are controlled at the required
sterilization level for the sterilization time.
Fast exhaust stage: steam is rapidly exhausted from the chamber.
Drying stage: vacuum is created in the chamber for 15 min.
Air inlet phase: Filtered air enters the chamber breaking the vacuum to
enable the door to open.
The allowed materials for sterilizing are solid wrapped tools.
t1 = Conditioning
t2 = Sterilization stage
t3 = Exhaust and dry
stage
P3=210 kPa
Page 24 of 93
4.4
Cycle no. 4 - Prion 134°C / 18 min, 20 min dry
Sterilizing Wrapped instruments, with drying stage.
: Sterilization temperature: 134ºC (273ºF), –0°C +3°C, (–0°F +5.4°F)
: Sterilization time: 18 minutes.
: Dry Time: 20 minutes.
: Vacuum pulses 4.
: Average cycle time: 50 minutes.
Cycle Sequence
Conditioning: four vacuum pulses to remove the air from the chamber.
Steam is introduced into the chamber until the sterilization temperature is
reached.
Sterilization stage: temperature and pressure are controlled at the required
sterilization level for the sterilization time.
Fast exhaust stage: steam is rapidly exhausted from the chamber.
Drying stage: vacuum is created in the chamber for 20 min.
Air inlet phase: Filtered air enters the chamber breaking the vacuum to
enable the door to open.
This type of cycle provides multi types of allowed materials for sterilization:
wrapped & unwrapped solid tools.
t1 = Conditioning
t2 = Sterilization stage
t3 = Exhaust and dry
stage
P3=310 kPa
Page 25 of 93
4.5
Cycle no. 5 - Textiles 121°C / 20 min, 15 min dry
Sterilizing of heat-sensitive materials and textiles, with drying stage.
: Sterilization temperature: 121ºC (250ºF), –0°C +3°C, (–0°F +5.4°F)
: Sterilization time 20 minutes.
: Dry Time: 15 minutes.
: Vacuum pulses 4.
: Average cycle time: 50 minutes.
Cycle Sequence
Conditioning: four vacuum pulses to remove the air from the chamber,
steam is introduced into the chamber until the sterilization temperature is
reached.
Sterilization stage: temperature and pressure are controlled at the required
sterilization level for the sterilization time.
Fast exhaust stage: steam is rapidly exhausted from the chamber.
Drying stage: vacuum is created in the chamber for 15 min.
Air inlet phase: Filtered air enters the chamber breaking the vacuum to
enable the door to open.
t1 = Conditioning
t2 = Sterilization stage
t3 = Exhaust and dry
stage
P3=210 kPa
Page 26 of 93
4.6
Cycle no. 6 - Porous 121°C / 20 min, 20 min dry
Sterilizing of heat sensitive materials and textiles, with drying stage.
: Sterilization temperature: 121ºC (250ºF), –0°C +3°C, (–0°F +5.4°F)
: Sterilization time 20 minutes.
: Dry Time: 20 minutes.
: Vacuum pulses 4.
: Average cycle time: 55 minutes.
Cycle Sequence
Conditioning: four vacuum pulses to remove the air from the chamber,
steam is introduced into the chamber until the sterilization temperature is
reached.
Sterilization stage: temperature and pressure are controlled at the required
sterilization level for the sterilization time.
Fast exhaust stage: steam is rapidly exhausted from the chamber.
Drying stage: vacuum is created in the chamber for 20 min.
Air inlet phase: Filtered air enters the chamber breaking the vacuum to
enable the door to open.
t1 = Conditioning
t2 = Sterilization stage
t3 = Exhaust and dry
stage
P3=210 kPa
Page 27 of 93
4.7
Cycle no. 7 - Slow 121°C / 20 min, no dry
Sterilizing of heat sensitive materials with slow exhaust and dry.
: Sterilization temperature: 121ºC (250ºF), –0°C +3°C, (–0°F +5.4°F)
: Sterilization time 20 minutes.
: Vacuum pulses 4.
: Average cycle time: 33 minutes.
Cycle Sequence
Conditioning: four vacuum pulses to remove the air from the chamber.
Steam is introduced into the chamber until the sterilization temperature is
reached.
Sterilization stage: temperature and pressure are controlled at the required
sterilization level for the sterilization time.
Slow exhaust stage: the exhaust valve is closed and the system is naturally
cooling down. When the temperature and pressure are low, the cycle ends.
Air inlet phase: Filtered air enters the chamber breaking the vacuum to
enable the door to open.
t1 = Conditioning
t2 = Sterilization stage
t3 = Exhaust and dry
stage
P3=210 kPa
Page 28 of 93
4.8
Cycle no. 8 – Bowie and Dick test 134°C /3.5 min, 1 min dry
(Hollow load A)
This is a test program, with fixed sterilization parameters of 134ºC and 3.5
min., drying time of 2 min., which cannot be modified by the operator.
: Sterilization temperature: 134ºC (273ºF), –0°C +3°C, (–0°F +5.4°F)
: Sterilization time: 3:30 minutes.
: Dry Time: 1 minute.
: Vacuum pulses 4.
: Average cycle time: 25 minutes.
Cycle Sequence
Conditioning: four vacuum pulses to remove the air from the chamber.
Steam is introduced into the chamber until the sterilization temperature is
reached.
Sterilization stage: temperature and pressure are controlled at the required
sterilization level for the sterilization time.
Fast exhaust stage: steam is rapidly exhausted from the chamber.
Drying stage: vacuum is created in the chamber for 15 min.
Air inlet phase: Filtered air enters the chamber breaking the vacuum to
enable the door to open.
t1 = Conditioning
t2 = Sterilization stage
t3 = Exhaust and dry
stage
P3=310 kPa
Page 29 of 93
Cycle no. 9– Leak test (Vacuum test).
The vacuum pump is activated until the under pressure
reaches a pressure of at least 15 kPa, all the valves and
pump shut down (P1). The following 5 min. are for the
stabilization condition of the chamber (P2). From now on (P2)
along the next 10 min., the allowable decrease of pressure is
0.13 kPa / min. (or 1.3 kPa for 10 min.)
Operations Sequence
: Vacuum is produced into the chamber for a preset pressure or up to
15 min. When the pressure in the chamber reaches P1, the vacuum
pump stops (P1 is the lowest level that can be reached in this test).
: A test is made 5 minutes later, at this time P2-P1 should be less than 8
kPa.
: A second test is made after 10 min.: P3-P2 must be less than 1.3 kPa
(13 mBar) to ensure a leakage rate of less than 1.3 mBar/minute.
:
:
:
:
Page 30 of 93
P2 – P1<8.5 kPa
P3 – P2< 1.3 kPa
T2 = 5 min
T3 = 10 min
5. GUI (Graphic User Interface) description
5.1 Foreword
The intent of this section is to provide information about the ROSE control
system's Graphic User Interface. This paragraph will:
: Provide a general overview of the GUI.
: Explain how to operate the control system and how to perform all
available actions using GUI.
: List all existing textual and graphic messages and indicators which
the system provides.
5.2 GUI Overview
5.2.1 The LCD display
The GUI of the Rose control system is based on two colors (Blue/White)
128/64 pixel graphic LCD.
5.2.2 Keypad
The GUI has an integrated keyboard used for user input.
5.2.3 GUI structure
The GUI is based on screens. A Screen is what is displayed on the LCD in a
given time. A Screen presents useful information such as temperature,
textual messages, icons etc. A Screen also contains required keys. Based
on the system process, the screens will be changed. In this case the GUI
will display required information and will allow required input from the
user.
5.3 Main Screen
The Main screen enables basic User-Machine interaction. The main
screen displays the data when the device is on standby mode and
displays different data when the system performs sterilization process.
Page 31 of 93
5.3.1 Standby Screen
This screen is automatically displayed after the system is started. This
screen is used to display useful information when the system is on
Standby: Ready status of the machine, Errors, Failures and other
messages are displayed. The Main screen enables setup of the system:
selecting a program, parameters setup and many other operations that
will be described later in this paragraph.
Load
Number
Chamber
Pressure
Clock
Functional Key
text
Message
Selected Cycle
5.3.1.1 Displayed data on Standby screen
Selected Cycle- the autoclave is designed to run several different cycles.
It represents the current selected cycle. This field includes the textual
cycle name.
Message – In this line the user will get informative messages, faults results
and instructions.
Clock – Current time of the control system.
Chamber Pressure – Current chamber pressure, the unit (kPa, PSI, etc.)
will be shown too.
Load Number – the total cycles counter, in every running this value will
be increased by one. The counter is used to determine the maintenance
status of the autoclave.
Page 32 of 93
5.3.1.2 Ready Status
If the device is not ready to perform sterilization process, "Stand-by"
message will be displayed instead of "Ready". Pressing on 'START'
key when system is not ready, will display the reason. When the device is
ready to perform sterilization cycle, “Ready” message is displayed and
pressing on ‘START’ key will start a new cycle.
5.3.1.3 Errors and Fails monitoring
If an error occurs, or a sterilization process fails, the reason will be
displayed in the message field. The system will not respond until it is reset.
Press ‘STOP’
key to reset Fail/Error.
5.4 On-Process Screen
During the cycle, all relevant data of the process is displayed on the
screen.
A two lines message displays process stage and describes currently
performed operation.
5.4.1 Displayed data on Process screen
Process
Status
–
two
lines
textual
indicator
which
describes
the
sterilization process.
Process Timer – Time since the process had started.
Chamber Temperature - Current chamber temperature in °C or °F.
Chamber Pressure - Current chamber pressure in kPa, BAR or PSI.
Page 33 of 93
5.5 System Setup
Pressing the 'ENTER'
key on the main screen will show the ‘MENU’
screen:
Select the required setup action by pressing the icons shown on the
screen. Pressing the ‘EXIT’
function key will go back to the
main screen.
5.5.1 Setting the system's clock
The Time is represented in HH:MM:SS format.
The Date is represented in DD/MM/YYYY format.
a. On the main screen press the 'ENTER'
key. This will display the
‘MENU’ screen.
b. On the Menu screen browse menu list with 'UP'
keys and select "Service" field. Pressing the ‘ENTER’
and 'DOWN'
key
will show extended menu list. Select "Clock" field and press the 'ENTER' key.
This action will display the ‘SET CLOCK’ screen:
Page 34 of 93
to move the cursor to the
c. Use Left and Right keys
next/previous field.
to modify the field value.
d. Use Up and Down keys
e. Press the 'ENTER' key
Pressing the 'EXIT' key
to save new clock values.
will exit the ‘SET CLOCK’ screen without
saving.
5.5.2 Selecting the Cycle
on the main screen will
Pressing UP or Down keys
select next or previous program. To select required program from the
programs list implement the following:
a. On the main screen press the 'ENTER'
‘MENU’ screen.
Page 35 of 93
key. This will display the
b. On the Menu screen browse menu list with 'UP'
and 'DOWN'
keys and select "Select Cycle" field. Pressing the ‘ENTER’
key will show the ‘SELECT CYCLE’ screen:
This screen displays a list of all available cycles of the machine.
c. Select required cycle by using the Up and Down
keys.
d. Press the ‘ENTER’ key
to select the required cycle.
Pressing the 'EXIT' key
will cancel the ‘SELECT CYCLE’ screen.
Note: Some of the cycles are protected by code.
Page 36 of 93
5.5.3 Setting the Language
a. On the main screen press the 'ENTER'
key. This will display the
‘MENU’ screen.
b. On the Menu screen browse menu list with the 'UP'
'DOWN'
and
keys and select "Service" field. Pressing the ‘ENTER’
key will show extended menu list. Select "Language" field and
press 'ENTER' key. This action will display the ‘LANGUAGE’ screen:
c. Select required cycle by using the Up and Down
d. Press the ‘ENTER’ key
to change the system language.
Pressing the 'EXIT' key
will cancel the ‘LANGUAGE’ screen.
Page 37 of 93
keys.
5.5.4 Starting the Cycle
The cycle start is performed from the 'MAIN' screen. Press the 'START' key
to start the selected cycle.
Note:
The 'START' key will be active only if the autoclave is ready and 'READY'
message is displayed.
Sometimes starting a new cycle operation is protected by a code. In
this case pressing the 'START' key will open the 'CODE' screen and will
enable inserting the code. After code verification, the cycle will start.
5.5.5 Typing the code
In order to perform protected operations, the system will display the code
screen:
To enter the code:
to select required digit
a. Use the Left and Right keys
to change.
to change the value.
b. Use the Up and Down keys
c. Press the ‘ENTER’ key
to submit.
Pressing the 'EXIT' key
will cancel the ‘ENTER CODE’ screen.
Page 38 of 93
5.5.6 Changing the parameters of a selected cycle
The system allows changing parameters of a selected program.
key. This will display the
a. On the main screen press the 'ENTER'
‘MENU’ screen.
b. On the Menu screen browse menu list using the 'UP'
'DOWN'
‘ENTER’
and
keys and select "Change Parameters". Pressing the
key will show the ‘PARAMETERS' screen:
Only submitted by user level, parameters will be displayed.
c. Browse the parameters list using the UP and DOWN keys
and select the required parameter.
d. Pressing the 'ENTER' key
will display the ‘SET PARAMETER'
screen:
Page 39 of 93
to select required digit
e. Use the Left and Right keys
to change.
to change the value.
f. Use the Up and Down keys
g. Press the ‘ENTER’ key
Pressing the 'EXIT' key
to save new value.
will cancel the ‘SET PARAMETER’ screen
without saving.
Note: Parameters are protected by Min/Max values and only allowed
values will be accepted.
5.5.7 Calibration of analog inputs
a. On the main screen press the 'ENTER'
key. This will display the
‘MENU’ screen.
b. On the Menu screen browse menu list with 'UP'
keys and select "Service" field. Pressing the ‘ENTER’
Page 40 of 93
and 'DOWN'
key
will show extended menu list. Select "Calibration" field and press 'ENTER' key.
This action will display the ‘ANALOG INPUTS’ screen:
On 'ANALOG INPUTS' screen the names and real-time values of all-analog
inputs which the system has are displayed.
c. Browse the analog inputs list using the UP and DOWN keys
and select the required input. Pressing the 'ENTER' key
will display 'CALIBRATION' screen:
d. Browse the calibration menu list using the UP and DOWN keys
and select the required operation.
Page 41 of 93
5.5.7.1 Available Calibration Operations
Change Gain & Offset – Direct typing of Gain and Offset values.
Calculate Gain & Offset – Calculating Gain and Offset by two points.
Restore Values – Restore Gain and Offset values which were set before
‘Save’ action.
5.5.7.2 Manual Changing Gain and Offset
a. To change the Gain and the Offset, use 'UP' and 'DOWN' keys
and select 'Change GainOffset' option from the calibration list.
Press the ‘ENTER’ key
to submit. ‘SET GAIN OFFSET’ screen will be
displayed:
to move the cursor the
b. Use the Left and Right keys
next/previous field.
to modify the field
c. Use the Up and Down keys
value.
d. Press the 'ENTER' key
to submit.
Page 42 of 93
Press ‘EXIT’ key
to cancel.
key, the system saves new values
Note: By pressing the ‘ENTER’
to the system’s RAM, meaning that if power-off happens at this time,
new values will be reset to previous. The system saves Gain and Offset
values permanently to the flash only when going to the ‘MENU’ screen.
5.5.7.3 Calculating Gain and Offset by two points
a. Use the 'UP' and 'DOWN' keys
and select 'Calc.
GainOffset' option from the ‘CALIBRATION’ list. Press the ‘ENTER’ key
to submit. ‘CALC.GAIN OFFSET’ screen will be displayed:
b. Use Left and Right keys
to move the cursor the
next/previous field.
to modify the field value.
c. Use Up and Down keys
Page 43 of 93
d. By pressing the 'ENTER' key
the system will calculate new gain
and offset and will save the results automatically.
will replace current selected field value
Pressing the ‘START’ key
with the value of the analog input.
Press the ‘EXIT’ key
to cancel.
key, the system saves new values
Note: By pressing the ‘ENTER’
to the system’s RAM, meaning that if power-off happens at this time,
new values will be reset to previous. The system saves Gain and Offset
values permanently to the flash only when going to the ‘OPTIONS’
screen.
5.5.7.3.1 Calculation explanation
The
Calculation
of
the
calibration
values
for
the
analog
inputs
(temperature, pressure) is performed in a digital way and not by
adjustment of trimmer pots.
The temperature and pressure measuring circuits are designed with
components having a 1-% precision. The temperature circuit is linear and
has an output of 100mV÷2400 mV for a temperature range 20÷150 °C.
The pressure circuit is also linear and has an output of 100mV÷2400 for a
pressure range 0 to 400 kPa.
The measuring at the A/D is void for values higher than 2400mV or lower
than 100mV.
It is clear that even though the precision of the components of the circuit
is 1%, the accumulated error can reach ± 5%, therefore the calibration is
necessary.
The system is provided with non-erasable memory in which the offset and
gain data of the sensors are stored.
Page 44 of 93
This data may be fed to the system through programming or through the
autoclave.
This paragraph describes the calibration of temperature and pressure
through
the
autoclave,
the
programming
calibration
procedure
is
altogether identical.
The autoclave is based on the calculation of offset and gain from two
points, for example if the actual pressure is 100kPa and the system
measures and displays 90kPa and if the actual pressure is 300kPa and the
system measure and displays 310kPa, the graph of the actual and
measured values will look like this:
The calibration method enables to introduce this data into the system in
order to perform the automatic correction of the OFFSET and GAIN.
It is recommended to find the two points, which have to be fed to the
system, before performing the calibration.
1. Browse the calibration list using the UP and DOWN keys and select the
required:
a. Read.H: Read high value of the analog input.
b. Act. H: Actual high value of the analog input.
c. Read.L: Read low value of the analog input.
d. Act. L: Actual low value of the analog input.
Page 45 of 93
5.5.8 Monitoring System’s I/O
The GUI enables to view system’s I/O. The system has analog inputs,
digital inputs and digital outputs.
5.5.8.1 Analog Inputs
a. On the main screen press the 'ENTER'
key. This will display the
‘MENU’ screen.
b. On the Menu screen browse menu list with 'UP'
keys and select "Service" field. Pressing the ‘ENTER’
and 'DOWN'
key
will show extended menu list. Select the "Analog Inputs" field and press
'ENTER' key. This action will display the ‘ANALOG INPUTS’ screen:
5.5.8.2 Digital Inputs
a. On the main screen press the 'ENTER'
‘MENU’ screen.
Page 46 of 93
key. This will display the
b. On the Menu screen browse menu list with 'UP'
and 'DOWN'
keys and select "Service" field. Pressing the ‘ENTER’
key
will show extended menu list. Select "Digital Inputs" field and press the
'ENTER' key. This action will display the ‘DIGITAL INPUTS’ screen:
5.5.8.3 Digital Outputs
a. On the main screen press the 'ENTER'
key. This will display the
‘MENU’ screen.
b. On the Menu screen browse menu list with 'UP'
and 'DOWN'
keys and select "Service" field. Pressing the ‘ENTER’
key
will show extended menu list. Select "Digital Outputs" field and press the
'ENTER' key. This action will display the ‘DIGITAL OUTPUTS’ screen:
Page 47 of 93
5.5.9 Process History
The system saves the last ten cycle’s printouts and enables printing of
saved cycles.
In order to print a cycle from the history:
a. On the main screen press the 'ENTER'
key. This will display the
‘MENU’ screen.
b. On the Menu screen browse menu list with 'UP'
and 'DOWN'
keys and select "Service" field. Pressing the ‘ENTER’
key
will show extended menu list. Select "Memory" field and press the 'ENTER'
key. This action will display the ‘HISTORY’ screen.
On ‘HISTORY’ screen, the list of saved logs is displayed.
c. Browse the history list using the UP and DOWN keys
'DOWN'
and select the required log.
Pressing the ‘ENTER’ key
will start printing required cycle log.
Page 48 of 93
and
5.6 System messages
5.6.1 Error Messages
System errors are displayed on the main screen. When the device is on
process, the error will fail the sterilization cycle. Reset error operation is
required in order to bring the system to the normal mode.
When an error occurs in the system, the ‘Caution’ icon
will be
displayed on the main screen.
01-Temp1 Cut.
This message is displayed when the Chamber Temperature sensor fails.
02-Low Temp.
The temperature drops for more than 5 seconds below the sterilization
temperature during ‘Sterilize’ stage.
03-High Temp.
This error occurs in one of the following cases:
Heating and Pre-vacuum Stages:
If chamber temperature is higher than ‘Limit Temperature’ for more than 10
seconds.
Sterilization Stage:
If temperature rises to 3°C (6°F) above sterilization temperature during the
sterilization stage for 10 seconds.
04-Exh Valv.Err.
This error may occur on Standby or Exhaust stages when removing pressure
from the chamber takes a long time.
06-Press2 Cut.
This message is displayed when the Generator Pressure sensor fails.
07-High Pressure
This message is displayed if the Chamber Pressure raises 40 kPa above
sterilization pressure during the sterilization stage.
Page 49 of 93
08-Low Pressure
This message is displayed if the Chamber Pressure drops 10 kPa below
sterilization pressure during the sterilization stage.
09-Ring Sw. Err.
This message is displayed if the Lock Door mechanism fails.
10-Door SW. Err.
This message is displayed if the Door closed switch is in wrong position.
11-Door Open
This message is displayed if during the sterilization process the system
detects that the door is not closed.
12-Manual Stop
This message is displayed if the sterilization cycle is aborted after the 'STOP'
key is pressed.
13-Air Error
This message is displayed on Standby when the system fails to break the
vacuum in the chamber.
14-Low Vacuum
This message is displayed if the system can't create required vacuum
conditions in the chamber after 20 minutes.
15-Low Heat
This message is displayed if the system can't create required pressure
conditions in the chamber after 20 minutes during the Pre vacuum and
Heating stages.
16-Press1 Cut
This message is displayed when the Chamber Pressure sensor fails.
Page 50 of 93
17-No Gen.Source
This message is displayed when the Water supply to the Steam Generator
fails.
18-Doors Sw Err
This message is displayed when the door switches are in an abnormal
position.
19-Ring Open Err
This message is displayed if the Door's Ring Unlock process fails.
20-Err Water Pump
This message is displayed when the Water Pump which supplies water to
steam generator fails.
21-Test Fail
This message is displayed when Leak Test cycle or BD-Test cycle fails.
22-No I2C Com.
This message is displayed when the communication between the main
electrical board and I/O board fails.
23-Coil Temp Cut.
This message is displayed when the Coil Temperature sensor fails.
Page 51 of 93
5.6.2 Information process and system status Messages
'Not ready' messages indicate the device's status on standby. If one of
the ‘Stand-by’ messages is displayed, the ‘START’ button is unavailable
and it is not possible to start a new cycle.
'Status messages' are displayed in order to monitor the device's status
and cycle progress.
Fill Water
Fill the clean water reservoir. This message is displayed if there is no water
in the mineral free water chamber. The message disappears when there
is enough water in the reservoir.
Door Open
The message is displayed when the Door is not closed.
Coil is Cold
The coil temperature is too cold and not ready for the cycle. The message
disappears when coil temperature is above required temperature.
No Steam
This message is displayed if the generator pressure is too low. The message
disappears when the pressure is above required pressure.
5.6.2.1 Status Messages
Status messages are displayed in order to monitor the device's status and
cycle progress.
Ready
This message is displayed on standby stage when the device is ready to
start a new cycle.
FAIL
This message is displayed on standby stage when sterilization cycle fails.
Page 52 of 93
Door Open
This message is displayed on standby stage when the door is open.
Opening Door
This message is displayed on standby stage when the door is on unlocking
process.
Creating Vacuum
This message is displayed on Pre vacuum stage when the system creates
vacuum in the chamber.
Vacuum Stay
This message is displayed on Pre vacuum stage when the system holds
required vacuum in the chamber.
Steam On
This message is displayed on Pre vacuum stage when the system creates
pressure in the chamber.
Exhaust On
This message is displayed on Pre vacuum stage when system removes
pressure from the chamber.
Heating to Ster.
This message is displayed on Heating stage when the system creates
sterilization conditions.
Sterilizing
This message is displayed on Sterilization stage.
Exhaust
This message is displayed on Exhaust stage.
Dry
This message is displayed on Dry stage.
Page 53 of 93
CYCLE END
This message is displayed on standby stage when the sterilization cycle
successfully ends.
TEST ENDED
The message is displayed when Leak Test is finished.
Page 54 of 93
5.6.3 Autoclave Parameters
No.
Parameter
Description
Access
Unit
Range
Level
1
SterTemp
Sterilization temperature, setting enabled in steps of 0.1°
1
0.1°C
60-150
2
SterTime
Sterilization time in minutes
1
Min
0-99.9
3
DryTime
Drying time
1
Min
0-99.9
4
Vac Pulses
No. of steam/vacuum impulses during the pre-vacuum phase.
3
No.
0-5
0.1kPa
0- 100
0.1°C
30-150
The number of steam impulses can also be set for fractionated
heat-up.
5
SterPressAdd
Additional pressure to corresponding steam pressure according to 4
the sterilization temperature during the sterilization phase.
6
EndTemp
Withdrawal temperature; the door remains closed as long as the 2
temperature at the sensor is higher than the set value.
7
ATMPressure
Entry of atmospheric pressure at location.
4
0,1kPa
50-104
8
PulseVac1
Vacuum value of first vacuum impulse.
3
0.1kPa
0-150
9
PulseVacT1
Follow-up time subsequent to first vacuum impulse.
3
Sec
0-60000
10
PulsePress1
Level of steam pressure of first steam impulse.
3
0.1kPa
90-300
11
PulseVac2
Vacuum value of 2nd and following vacuum impulses.
3
0.1kPa
0-150
12
PulseVacT2
Follow-up time of 2nd and subsequent impulses.
3
Sec
0-60000
13
PulsePress2
Steam pressure for 2nd and subsequent impulses.
3
0.1kPa
90-300
14
PulseVac3
Vacuum value for final impulse.
3
0.1kPa
0-150
15
PulseVacT3
Vacuum time for final impulse.
3
Sec
0-60000
Page 55 of 93
No.
Parameter
Description
Access
Unit
Range
0.1kPa
90-300
Level
16
PulsePress3
Steam pressure for final impulse.
3
17
Heat Exh On
These allow a tact sequence for exhaust via the emptying valve 3
1/10sec
0-100
18
Heat Exh Off
during the Heating stage.
3
1/10sec
0-100
19
Ster Exh On
These allow a tact sequence for exhaust via the emptying valve 3
1/10sec
0-100
20
Ster Exh Off
during the Sterilization stage.
3
1/10sec
0-100
21
Exh Shoot On
These allow a tact sequence for exhaust via the emptying valve 3
1/10sec
0-100
22
Exh ShootOff
during the Exhaust stage.
3
1/10sec
0-100
23
Dry Air pres
Define the pressure that will close the air valve during the Dry stage.
4
Function 0,1,2
24
Dry Vac pres
Defiance the pressure that will open the air valve during the Dry
4
Function 0,1,2
stage.
25
Coil Temp
Defines required temperature level at the coil ends.
4
°C
0-50
26
SterPrintT
Define interval time of the printer during the sterilization phase.
4
Sec
0-3600
27
Print Rate
Define interval time of the printer for the remainder of the rest of the 4
Sec
0-600
process.
28
Heat Ster Time
Define minimum time to heat to sterilization.
4
Sec
0-600
29
WaterGenTime
Define time to add water to generator.
4
Sec
0-600
30
GenPressFactor
Define required pressure in generator to hold during the process.
4
Sec
0-600
31
SterLimPrsAdd
Maximum additional pressure during the sterilization phase. Once 4
0.1kPa
0-100
this value is attained, the steam feed is interrupted.
Page 56 of 93
No.
Parameter
Description
Access
Unit
Range
Level
32
HeatTimeErr
Max. Heat-up time for attainment of sterilization temperature.
4
Min
0-60000
33
VacTimeErr
Possible allowed time to create vacuum.
4
Min
0-60000
34
WaterTimeErr
Possible allowed time to add water to generator.
4
Min
0-60000
35
Sleep Power
Define "go to sleep" time.
4
0,1kPa
0-100
36
TempInF
Define temperature presentation units (°C or °F)
4
0.1°C
30-150
37
PressInPSI
Define pressure presentation units kPa or PSI)
4
0.1°C
30-150
Page 57 of 93
6. Checking DC Voltages
Checking of grounding
: This
testing
procedure
must
be
implemented
before
Power
supplying to the system and the Controller back cover should be
open.
: Connect the negative probe of the Multimeter to the Main GND
clamp (upper right) and with the positive probe touch the screw on
the controller. Short circuit is a correct result.
: Touch with the positive probe at +5V, 24V, 24VAC clamps with the
negative probe connected to the Main GND clamp. Resistance
lower than 50 Ω is an incorrect result.
: Check the resistance between the power clamps R, S, T, N, and
GND using a Multimeter. A value less than 50 Ω is an incorrect
result.
Checking of AC voltages
: Connect the input cable to the electrical box- See Electrical Wiring
Diagram (the main switch must be in an off state).
: Set the Multimeter on the AC voltage measuring range.
: Connect the probes of the Multimeter- one to R, S, T and the other
to N. Turn on the power, the indication of the instrument must be
the same as the power network voltage.
Checking of 24VDC
: Connect the negative probe of the Multimeter to the Main GND
clamp.
: Connect the positive probe of the Multimeter to 24VDC clamp; the
indication of the instrument must be 22-25V.
: Check the voltage on the Controller Rose-A Board JP10/3 (you can
touch at the screw on the up side of the connector).
Page 58 of 93
Checking of 5VDC
: Connect the negative probe of the Multimeter to the Main GND
clamp.
: Connect the positive probe of the Multimeter to 24VDC clamp; the
indication of the instrument must be 5.2 ÷5.3V.
Checking of 24AC voltage
: Connect the negative probe of the Multimeter to 24VAC clamp.
: Connect the positive probe of the Multimeter to the Controller
Rose-A Board JP10/2 (you can touch at the screw on the up side of
the connector). The indication of the instrument must be 22
÷26VAC.
Page 59 of 93
7. Preparation before Sterilization
Instruments to be sterilized must be clean, free from any residual matter,
such as debris, blood, pads or any other material. Such substances may
cause damage to the contents being sterilized and to the sterilizer.
The Manufacturer's recommendations concerning the sterilization of
each type of material/ item shall be taken into consideration.
9 Clean and rinse instruments to dispose any residue, using
appropriate cleaning machines such as an ultrasonic cleaner,
washer, etc. (Follow manufacturer's instructions on the use of
products for cleaning and lubricating instruments after using the
ultrasonic cleaner).
9 Use materials for inner wraps which are compatible with the item
being
packed
and
with
the
selected
sterilization
method
(autoclaveable in 121ºC / 134ºC).
9 Do not mix between instruments which are not of the same metal
(such as stainless steel, carbon steel, etc.). Make sure to separate
and place on different trays.
9 Check manufacturer's instructions for the sterilization of each item.
In case of unwrapped material, place a towel or a paper wrap on
the trays, under the instruments, to prevent corrosion.
9 Open
all
instruments
and
disassemble
as
possible
before
sterilization. Place instruments with ratchets opened and unlocked
or clipped on the first ratchet position.
9 Empty canisters should be placed upside-down, in order to prevent
accumulation of condensed water.
9 Use single-use wraps once only and discard after use.
9 Keep distance between instruments on the tray (Do not overload
the trays and do not pack in layers!).
9 Allow a distance of approximately 2 cm (0.8") between trays to
permit steam circulation.
9 Recommendation: once a week, use a biological spore test
indicator in any load to make sure sterilization is performed.
Page 60 of 93
Packs
9 Place packs upright on trays, side by side.
9 Packs should not touch the chamber walls.
9 Pack instruments sets in a manner that prevents damage to
delicate items.
9 Pack hollowware sets so that all the openings face the same
direction and so that the contents cannot move inside the pack.
9 Load packs of folded operating room drapes with layers vertically,
allowing air to be removed from the packs rapidly.
9 Do not place packs of hollowware and trays of instruments above
textile packs or soft goods in order to avoid wetting caused by
condensation from items above.
9 Load items packed in flexible packaging materials on the edge
with paper to laminate, or flat with paper surface downwards.
Tubing
9 When placing in a tray, Make sure that both ends are open,
without sharp bends or twists.
Wrapped Instruments
9 Wrapped instruments should be packed in material that promotes
drying such as autoclave bag, autoclave paper, and muslin
towels.
9 This rack allows the operator to place pouches on their side, thus
increasing
the
capacity
of
the
autoclave
significantly
and
promoting better drying of the instruments. Contact your dealer for
details.
9 Verify that the packaging method is in accordance with good
practice
approach
and
the
packaging
materials
are
in
accordance with the applicable standards (e.g. EN868 series).We
recommend to use plastic-plastic or plastic-paper pouches.
Page 61 of 93
Sterilization of Liquids
9 Use only heat-proof glass, filled 2/3 full.
9 Ensure that the glass container is covered but not sealed to
prevent pressure build-up.
7.1 Loading
Every machine is supplied either with two stainless steel shelves, or with a
loading car and carriage.
The loading car is made of stainless steel and comes with adjustable
shelves. It is designed to slide smoothly off the carriage into the
sterilization chamber.
The carriage moves on four heavy-duty castors, which are mounted on its
base.
When loading the materials to be sterilized into the chamber, observe the
rules described in this chapter.
Do not overload the car or the trays as this can have adverse effects on
the results of the sterilization and drying programs.
Leave space between the packs or wrapped instruments to allow
complete removal of air pockets in the conditioning stage, and for free
circulation of steam in the heating and sterilization stages.
During loading and unloading use safety gloves and glasses in
accordance with local safety regulations and good practice.
7.2 Load discharge when process fails
In case of process fail, in order to exit the process, implement the steps
below:
9 Wait until the "RUN" led will turn off. (It may take a few minutes due
to
exhaust
of
the
chamber
pressure,
inner
temperature
decreasing).
9 Press on the "RESET" button (lower left button on the touch screen).
9 Type the operator code in order to complete the RESET process by
alphanumeric table.
9 Go back to the Main screen and open the door.
Page 62 of 93
8.
Installation Instructions
Only qualified and authorized personnel are allowed to install,
check, test, maintain and serve the autoclave.
8.1 Mounting
After unpacking the autoclave, check that the Serial Number (S/N) on its
nameplate corresponds with the package number.
9 Place the autoclave on a level surface, leaving adequate space
around it for operation and service requirements. (Also see
drawings).
9 The ambient temperature around the autoclave must not exceed
40ºC and 80% humidity.
9 Do not use the autoclave in presence of dangerous gases and
vapors.
9 The floor in the autoclave area must be Waterproof and non
flammable, with working temperature 150°C or higher.
9 The floor construction should contain drain hole in the lowest place
of floor. All autoclave area floor construction have to provide
incline toward the drain hole, in order that the rest of the water will
be able to flow out through the drain without obstacles.
9 The ceiling above the autoclave should be Waterproof and non
flammable with working temperature 150°C or higher. The space
between ceiling and top level of the autoclave is designated to
prevent the steam concentration in the emergency cases.
9 The access to technician service area should be only for qualified
and authorized personnel.
8.2 Piping
Utilities
9 Connect the water reservoir container to a free mineral water
supply source using a 1/2” pipe.
9 Connect the feed water inlet to the vacuum pump and the water
reservoir, using a 1/2” pipe, 3-4 atmospheric bars.
Page 63 of 93
9 Connect the air connector from the autoclave to the building's
air source using a 1/2” pipe, 6-8 atmospheric bars. If there is no
external air source use an independent small air compressor.
8.3 Drain connections
Connect the following to the open draining funnel or collector pipe of 2":
9 The jacket steam trap 1/2”.
9 The water ring vacuum pump 1”.
9 The steam generator drainage pipe 3/4”.
9 The drain cooling, pipe 1/2”.
8.4 Power connection
The sterilizer must be connected to the Power with a safety
approved Power cord in accordance with local and national
regulations and/or rules, including all required connection: R, S, T,
N, and GND! The minimum allowable current should be 38A, or
8AWG square section.
(Illustration only!)
The Maximum Length- 2.5m with the Square of cross
section at least # 16 AWG.
Page 64 of 93
8.5 Protective Earthing
The Wall fuse box for the Autoclave power supply (220V/60Hz, 40A
or 380V/50Hz, 26.5A) should be equipped with a matching earthing
clamp (or Earthing screw) at least 8AWG (10mm).
Preliminary check-up
After installation and prior to putting the machine into operation, the
following preparing and check-out procedure is to be fulfilled:
9 Check that the water and drain inlets are correctly connected to
the utilities and the manual taps on the external lines and on the
autoclave piping are open.
9 Check all the manual bypass screws (on the base of the pilot
solenoid valves), are set in neutral position, i.e. the slit on the
head of the screw is set in horizontal position.
9 Search for leaks and fix piping joints if necessary.
9 Check at the electrical network switchboard, that the circuit of
the autoclave is switched on and fuses or circuit breakers are
not interrupted, and that the correct voltages are present in the
autoclave's
generator
control
box,
according
to
the
specifications.
9 Check that circuit breakers in the control box are switched on.
If the results of the above checkouts are positive, the autoclave is
ready for operation.
Page 65 of 93
EXTERNAL DIMENSIONS MODEL AZTECA AC-450
Page 66 of 93
EXTERNAL DIMENSIONS MODEL AZTECA AC-470
Page 67 of 93
EXTERNAL DIMENSIONS MODEL AZTECA AC-550
Page 68 of 93
EXTERNAL DIMENSIONS MODEL AZTECA AC-575
Page 69 of 93
EXTERNAL DIMENSIONS MODEL AZTECA AC-5100
Page 70 of 93
9.
Operating Instructions
9 Open the feed water manual valve.
9 Open the manual valve of the compressed air inlet and set the air
pressure at 6 bars.
9 Turn on the main power switch, to power the electric system of the
machine.
9 Watch the jacket pressure gauge, indicating the rising of steam
pressure in the jacket. When the jacket pressure reaches 2.2 bars
the sterilization cycle can be started.
9 Open the door.
9 Load
the
sterilizer,
keeping
in
mind
the
recommendations
described in ‘Preparation before Sterilization' (Para. 8).
9 Close the door, the word OK appears in the first row, indicating that
the autoclave is ready to start operation.
9
Press the START key to operate the cycle. The entire sterilization
process automatically proceeds. The LED 'START' on the control
panel is light.
9 At the end of the cycle a buzzer sound will be heard continuously,
and the word END will be displayed. Open the door by pressing the
F3 function key (OPEN is displayed above this key). Press the STOP
key to cancel the alarm.
Note: In case of failed cycle or manual stop by operator, the
two LED's RUN and FAIL are light. The reason for failure is
displayed on the screen. At the end of the cycle an interrupted
sound is heard. Press the STOP key to cancel the alarm.
9 Take out the sterilized material from the chamber.
Warning!
Loading or unloading of material from the chamber can be
done only when the door is open and in the lowest position. It is
forbidden to put a hand or any other part of the body inside the
chamber while the door is closing. In order to avoid any possible
accident, during the door closing, a safety switch is mounted on
the upper side of the door. Touching this switch, while the door is
lifting will stop the door and motion will be reversed downward.
Page 71 of 93
10.
Printer
10.1 Printer Operation
The autoclave is equipped with a character printer, which prints a
detailed history of each cycle performed by the instrument (for the record
or for subsequent consideration).
The printing is made on impact/thermal paper with 24 characters per line
and contains the following information:
: Software version (is printed only on Power Off)
: Real time
: Selected program
: Sterilization pressure
: Sterilization temperature
: Sterilization time
: Summary of performed cycle and identification hints.
When the sterilization cycle begins the printer starts printing the above
data.
After
the
sequence
preliminary
of
printing,
operations
of
the
the
autoclave
cycle.
The
starts
performing
measured
values
the
of
temperature and pressure are printed at fixed time intervals, according to
the phase of the process, as shown in the table below.
The data is printed from the bottom up, beginning with the date and
ending with “O.K.” for a complete cycle or “FAIL” for an aborted cycle.
For an example of a typical printout, see next page.
Page 72 of 93
10.2 Printer Output
Description
Autoclave: 2007063
Autoclave serial no.
Name : ________________
Name of the operator to be filled in.
Load #: 0030
Useful to determine when to clean the autoclave. To be filled
in manually by the operator.
14/08/2001 13:45:16
Date and time the cycle ended
E13: 31
099.7ºC 049.5k
The time, temperature and pressure during exhaust
F11:30
134.2ºC
If cycle fails, conditions at time of failure.
306.8k
CYCLE FAILED! ! !
Message displayed if cycle fails.
Manual Stop - 03
If operator presses the manual stop button.
S11:28
099.9ºC
049.6k
The time, temperature and pressure during sterilization.
H10:08
134.3ºC
315.1k
The time, temperature and pressure during the heating stage.
H06:04
132.3ºC
304.1k
The time, temperature and pressure during the heating stage.
H02:00
116.2ºC
217.3k
The time, temperature and pressure during the heating stage.
H03:00
080.6ºC
023.1k
The time, temperature and pressure during the heating stage.
V00:27
078.3ºC
048.7k
The
time,
temperature
and
pressure
during
air
removal
ends
without
(vacuum).
Exhaust mode: 1
Exhaust
mode:
fast
exhaust
and
process
pressure.
Dry time : 001 min
Drying time of the selected program
Ster time: 003.0 min.
Preset sterilization time of the selected program.
Ster Temp: 134ºC
Sterilization temperature in chamber for selected program.
Cycle: 01 Unwrap
Selected program: Unwrapped Instruments.
14/02/2000
Date/month/year time/min /sec
13:29:31
Version = Rose-D 1.1
Number and version of the software program.
* S above is not part of this cycle and has been added on for an explanation of future
reference to S - sterilization.
Legend
V - Vacuum stage, S - Sterilization stage, E - Exhaust stage
H - Heating stage, F-Fail
The printer is driven and controlled automatically by the control unit, while
the autoclave performs a sterilization program.
Page 73 of 93
10.3 Printer Specification and Handling
MODEL
PN10-180X
• Printing method.
Shuttle impact dot system
• Printing mechanism.
EPSON M-180
• Data input interfaces.
8 bit parallel CENTRONICS / serial RS232C
• Dot composition/line.
144
• Printing speed (lines/sec).
1,7
• Paper width (mm).
57,5
• Printing width (mm).
46
• Character dot matrix.
5 x 7
• Characters/line.
24
5VDC +/- 5%
• Operating voltage range.
3A peak max.
Ribbon Cassette
EPSON- ERC-09/22
• Dimensions W x D x H (mm). 110 x 56 x 126
10.3.1 To ensure a reliable operation of the printer perform the
following:
: Turn the main switch to the OFF position.
: Turn the main switch to the ON position and press the feed
switch at the same time.
: Verify that the printer performs an operation test by printing
all the built-in characters
The following precautions have to be taken ensuring the proper operation
of the printer:
: Do not pull out the paper roll from the paper insertion opening.
: Use only the 57,5mm. wide paper rolls, supplied by your dealer.
Page 74 of 93
10.3.2
Loading Paper
Follow the next steps to load the paper roll:
1- Pull out the frontal cover and place the paper roll in its receptacle in
the position shown in the picture.
2- Insert the end of the paper roll in the slit of the printer marked as PAPER
LOAD in the picture.
3- Press the FEED button until a few centimeters come out of the printer.
4- Make sure that the paper roll remains in its receptacle in the right
position shown in the picture, and put the frontal cover back in its place.
Cut paper to load:
Page 75 of 93
10.3.3 Ribbon Cassette handling
9 Before mounting the ribbon cassette, it is required to remove the
paper.
9 The ribbon cassette can be easily installed by pushing it down
softly.
If ribbon is tucked up or if it sags while mounting, it can be
tightened and fixed to its proper position by rotating the roller after
inserting the cassette frame.
9 To remove the ribbon cassette, push the portion marked PUSH with
a finger. The other side of the cassette will go up (See picture).
Removing the ribbon cassette:
Page 76 of 93
11. Maintenance Instructions
11.1 Preventive and Periodical Maintenance
Before each
Verify that the door gasket and the surface that the gasket is pressed
cycle
on are clean.
After 100 cycles
Replace 2μ air filter.
1. In case the autoclave is used to sterilize liquids, it is imperative to
clean the chamber every day. Clean the chamber while the
autoclave is cold.
2. Clean the gasket with a soft cloth.
daily
3. Clean the bearing faces (collar on which the door closes, door)
with a soft cloth.
4. Drain the generator as follows: Under pressure condition of
approximately 0.5 bar, disconnect electricity and open the drainage
valve for a few seconds, then close the valve.
1. Clean the filter at the bottom of the chamber. Operate the
autoclave without load and open the ½” manual valve located
adjacent to the strainer.
2. Clean cabinet and door parts, the inside of the autoclave, the
shelves and the shelf rails with a soft cloth and detergent. Clean the
chamber while the autoclave is cold.
3. Place a few drops of oil on a cloth and spread all the outer metal
parts. Place several drops of oil on all the door spindles and pins.
4. Remove the baskets or other vessels from the autoclave.
Clean the interior of the autoclave and the baskets with a mild
cleaning agent and water. Use only a soft cloth or a sponge.
weekly
•
Caution! Do not use steel wool or steel brush as this can damage
the chamber!
•
Clean the water level electrode!
To prevent incorrect measurement results, pay particular attention
to the cleaning of the water level electrode in the sterilization
chamber.
Location of the water level electrode:
Page 77 of 93
Allow the safety valves to blow off by lifting the handle up for a few
monthly
seconds.
1. Clean water strainers on drain pipes while autoclave is not
operated (idle).
2. Clean the non-return valves.
3. Clean the exhaust pipes: verify sewage pipe from the autoclave to
the main sewage pipe is clean. It is important to prevent the overflow
of the sewage liquids.
3 months
4. Clean the steam traps: disassemble the steam trap and clean it.
Cleaning should include the filter.
5. Check and tighten the piping connections where necessary to
avoid leakage.
6. Check and tighten all fasteners and parts of the door locking
device where necessary.
Clean water strainers on steam and feed water inlet pipes while
6 months
autoclave does not operate (idle).
Check and tighten the electrical connections in the electrical board,
yearly
connection box, motors, electrical valves and instrumentation where
necessary.
Perform an overall check of the locking system and replace worn
5 years
parts.
Notes:
9 Keeping the inside of the autoclave clean will lengthen its life
and its proper operation.
9 Use only mineral-free water as detailed in par. 2.9: 'Water
quality'.
Periodical Tests
Check all safety devices from time to time and re-regulate if necessary.
Once a year, calibrate and validate the autoclave. Periodical safety tests
derived
from
local
rules,
regulations
compliance with the law.
Page 78 of 93
or
law
shall
be
applied
in
11.2 Maintenance tasks to be carried out regularly
9 Always carry out the sterilization cycles in accordance with the
operating manual.
9 Test the condition of the supply lines of the autoclave at regular
intervals for cracks or possible mechanical damage. After the end
of a sterilization cycle, close all the valves and taps of the supply
cables, such as those for cooling water and compressed air.
The autoclave is equipped with a safety valve, located at the
steam generator. As long as the autoclave is regularly inspected
(at least once a year) by an authorized customer service agent,
the preventive relieving of the valve is not necessary. To check the
operation of the safety valve, remove the cover from the clean
water reservoir. Turn the pressure relief nut clockwise for 2 seconds.
Verify steam escapes from the valve. Attention: Use protective
gloves in order not to burn your hands with the hot steam. Press the
STOP key to interrupt the operation, and exhaust steam from the
chamber.
9 All autoclaves have a dirt strainer in the interior of the sterilization
chamber. This is located in the middle of the floor and can be
taken out without using tools and then cleaned. The condition of
the strainer should be inspected regularly (ideally once a week)
and any dirt should be immediately cleaned off.
FIG 5.
Page 79 of 93
11.3 Emergency actions using the autoclave under steam pressure
In case of an emergency situation push the "STOP" emergency
button and disconnect the main 3 phase switch (left side of the
electrical box).
Important: the aforementioned tasks should be implemented by
qualified personnel.
Supervise the chamber steam pressure value at the chamber
manometer until the pressure level will drop to the atmospheric
pressure.
At this point you can start door opening process.
If the chamber manometer is not working properly, wait at least 2
hours after power disconnection.
Page 80 of 93
11.4 Troubleshooting
Symptoms
Possible causes check-ups
Corrections
and tests
1. Control unit is not
energized. No displays and
lights on the front panel.
2. Low pressure or no steam
pressure from the external
source.
3. Steam pressure goes up
beyond the control point.
4. The conditioning phase
(prevacuum) does not
work. Vacuum is not
produced in the chamber
or vacuum level
insufficient.
1.1The control circuit breaker
is switched off.
1.1Check the circuit breaker
and turn the switch on.
2.1 Low pressure on the steam
supply line.
2.2 Pressure reducer is faulty
or set too low.
3.1 The electronic pressure
transducers or measuring
circuits are faulty or out of
calibration.
3.2 Leakage through the
steam to coil valve.
4.1 The vacuum Pump is stuck
or damaged.
4.2 The exhaust to Vacuum
valve is stuck or damaged.
4.3 The door is not properly
closed; gasket is damaged or
incorrectly set.
4.4 Leakage at the vacuum or
exhaust piping.
2.1 Fix pressure on the steam
supply line.
2.2 Set correctly or replace the
pressure reducer.
3.1 Check and calibrate
pressure measuring circuits or
replace transducers.
4.5 Control system problem.
5. No steam inlet or low
steam pressure.
5.1 Steam inlet valve is
blocked or damaged.
5.2 Low pressure at the steam
supply line.
6. Prevacuum phase is
completed but the
temperature and pressure
are low and the sterilization
point is not reached or
takes a long time to do so.
7. Temperature rises above
the pre-set sterilization
value.
6.1 Steam inlet valve is
blocked or damaged.
6.2 Low pressure at the steam
supply line.
6.3 Control system problem.
7.1 Steam pressure is too
high.
7.2 Steam valve leaks.
7.3 Control system problem.
Page 81 of 93
3.2 Check, fix or replace the
steam to coil valve.
4.1 Check, repair or replace
the vacuum Pump.
4.2 Check, repair or replace
the exhaust to Vacuum.
4.3 Close the door, fix or
replace the gasket.
4.4 Check and tighten fitting
joints, replace the defective
piping.
4.5 Replace the control
boards.
5.1 Fix or replace the steam
valve.
5.2 Check the steam supply
pressure as described in clause
2 above.
6.1 Fix or replace the steam
valve.
6.2 Check the steam supply
pressure as described in clause
2 above.
6.3 Replace the control system.
7.1 Check and set the steam
pressure from the building
source and the pressure
reducer correctly.
7.2 Fix or replace the steam
valve.
7.3 Replace the control
boards.
Symptoms
8. Fast or slow exhaust
phases do not function;
chamber pressure remains
high or exhaust takes too
long.
9. Drying stage does not
work.
Possible causes check-ups
and tests
8.1 The fast or slow exhaust
valves is stuck or damaged.
8.2 Steam valve leaks.
8.3 Control system problem.
9.1 Problems with the vacuum
system.
9.2 Steam valve leaks.
9.3 Control system problem.
10. The air inlet does not
work.
11. Unsatisfactory results of
sterilization process.
12. Drying incompletepacks remain wet.
10.1 Air inlet valve is clogged
or damaged.
10.2 Air filter is jammed.
11.1 Incomplete removal of
air pockets.
11.2 Sterilization conditions of
improper temperature or
pressure too low, ster. time
too short.
11.3 Incorrect loading of the
autoclave, air trapped in the
load.
12.1 Insufficient steam
pressure to jacket.
12.2 Insufficient vacuum.
12.3 Steam trap does not
eliminate the condensate.
12.4 Incorrect loading of the
autoclave.
Page 82 of 93
Corrections
8.1 Repair or replace the
damaged valve.
8.2 Repair or replace the
steam valve.
8.3 Replace the control
boards.
9.1 See clause 4 above.
9.2 Repair or replace the
steam valve.
9.3 Replace the control
boards.
10.1 Repair or replace the air
valve.
10.2 Replace the air filter.
11.1 See problem related to
vacuum system in clause 4.
11.2 Set the temp. and time
correctly according to the sort
and quantity of material.
11.3 See para. 7 "Preparation
before Sterilization".
12.1 Set or fix the pressure
switch.
12.2 See problems related to
vacuum in clause 4 above.
12.3 Clean or repair the steam
trap.
12.4 Reload the autoclave
correctly.
Symptoms
13. Problems related to
the control system.
The keypad or display
is out of order.
No response when
pressing any key on
the keyboard.
Disordered response to
manual controls.
Pressing one key gives
the effect of pressing a
different key. Cycle
does not start when
pressing the START key.
Printer does not work or
printing is incoherent.
While pressing the STOP
key, the system does
not react.
While switching the
device on, initialization
is not correct.
Possible causes check-ups and
tests
13.1 Check if the flat cable or
MOLEX connectors between the
control boards and keyboard are
well plugged in.
13.2 Power supply out of order.
13.3 Control boards or keyboard
faulty.
13.4 Printer Paper is missing or
quality is unsuitable.
13.5 Flat cable connection
between control board and printer
is not plugged in correctly.
There are interruptions or loose
contacts.
13.6 Printer damaged.
13.7 Temperature sensor is
disconnected or loosely
connected. Sensor damaged.
13.8 Pressure transducer is bad.
Mechanical or electrical
connections or transducer
damaged.
Page 83 of 93
Corrections
13.1 Firmly plug in the MOLEX
connectors.
13.2 Fix the power supply.
13.3 Replace the defective
board of the microcomputer
unit.
13.4 Insert a paper roll inside the
printer. Make sure you use the
correct type of paper.
13.5 Plug in the connection or
replace it.
13.6 Fix connection or replace
the printer.
13.7 Fix connection or replace
the sensor.
13.8 Fix connection or replace
the transducer.
11.5 Operating the door
Automatic door locking!
The Azteca Series is equipped with an automatic door lock.
A lock ring grips the door and locks it securely.
To facilitate the locking process for you, a partial vacuum is created
when closing the door which holds the door down while it is being closed,
until the safety ring has mechanically locked the door.
11.5.1 Closing the door:
• Press the door in and hold it in briefly until the door locking device has
clearly locked.
11.5.2 Opening the door:
• Press the OPEN display key. The door is unlocked and automatically
opens 3 to 4 cm. To open the door completely, use the grip handle.
A locking device prevents the door from being opened accidentally.
The door lock can only be unlocked if the unloading temperature has
been reached and the sterilization chamber is in a depressurized state.
Page 84 of 93
12.
Valves Numbering
The valves in the drawing and this manual are numbered according to its
function. The following list includes all the valve numbers that are in use
in Celitron Medical Technologies.
0.
1.
DOOR
COMPRESSED AIR
01.
Change-over : steam / electricity
02.
Locking door cylinder (front door)
03.
Locking door cylinder (Rear door)
04-1.
Open door 1
04-2.
Open door 2
05-1.
Close door 1
05-2
Close door 2
06
Door Ring
11.
Air inlet
12.
Air inlet - to chamber
13.
To splash cooling pipe
14 – 1. To door 1 seal
14 – 2. To door 2 seal
2.
3.
4.
VACUUM
MINERAL FREE WATER
FEED WATER
21.
Vacuum - break
22.
Vacuum - to pump
23-1.
Vacuum - from door 1 seal
23-2.
Vacuum - from door 2 seal
31.
Mineral free water - inlet
32.
Detergent
33.
To spry
34.
Recycling inlet
35.
Recycling outlet
41.
Feed water – cool jacket
42.
Feed water – cool heat exchanger
43.
Feed water – cool fast exhaust
44.
Feed water – to water reservoir
45.
feed water – to vacuum pump
46.
Water outlet
47.
Feed water – to vacuum reservoir
48.
Feed water – to ejector
Page 85 of 93
5.
6.
7.
8.
AIR
DRAIN
STEAM
EXHAUST
51.
ChamberATM N.C
52.
ChamberATM N.O.
53.
Filtered air - inlet
54.
Air Inlet
55.
Aeration
61.
Drain – from reservoir
62.
Drain – from jacket overflow
63.
Drain – from vacuum pump / ejector
64.
Drain – from chamber
65.
Drain – from cooler
66.
Drain – from sanitary filter
67.
Drain – from steam generator
68.
Drain – jacket
69.
Drain – condense from seal
70.
Steam – from building source
71.
Steam – to jacket (From outer source)
72.
Steam – inlet
73.
Steam – to chamber
74 – 1.
Steam – to door 1 seal
74 – 2.
Steam – to door 2 seal
75.
Steam – to heat exchanger
76.
Steam – to sanitary filter
77.
Steam – from steam generator
78.
Steam – to activate ejector
79.
Release coil
80.
Exhaust – from chamber
81.
Exhaust – to reservoir
82.
Exhaust – to drain
83.
Fast exhaust
84.
Slow exhaust
85.
Exhaust to ejector / to vacuum pump
86.
Exhaust – from heat exchanger
87.
Exhaust – from steam generator
88.
Exhaust through heat exchanger (pre-vacuum
stage only)
9.
GAS
89.
Jacket steam trap
91.
Inlet
92.
Main inlet
93.
Inlet through humidifier
Page 86 of 93
Appendixes:
Page 87 of 93
Electrical Schematic diagram of the Autoclave- AZTECA AC-450
D-65
Page 88 of 93
Electrical Schematic diagram of the Autoclave- AZTECA AC-470, AZTECA AC-550 and AZTECA AC-575
D-90, D-100 & D-150
Page 89 of 93
Electrical Schematic diagram of the Autoclave- AZTECA AC-5100
Page 90 of 93
Page 91 of 93
Page 92 of 93
Piping Schematics diagram of the Autoclave
Page 93 of 93