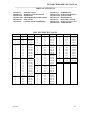
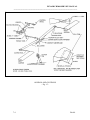
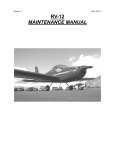
1
CH2000 TRAINER
with LYCOMING 0-235-N2C
SERVICE MANUAL
ZENAIR Ltd.
Huronia Airport
Midland, Ontario
Canada L4R 4K8
(705) 526-2871
November 2002
ZENAIR CH2000 SERVICE MANUAL
_______________________________________________________________________
TABLE OF CONTENTS
SECTION I
SECTION II
SECTION III
SECTION IIIA
SECTION IV
SECTION V
INTRODUCTION
HANDLING AND SERVICING
INSPECTION
AIRWORTHINESS LIMITATIONS
STRUCTURE
LANDING GEAR AND BRAKES
SECTION VI
SECTION VII
SECTION VIII
SECTION IX
SECTION X
SECTION XI
SECTION XII
POWERPLANT
SURFACE CONTROLS
FUEL SYSTEM
INSTRUMENTS
ELECTRIC SYSTEM
HEATER /VENTILATION
CABIN DOORS
LIST OF EFFECTIVE PAGES
Section
Page
Date
Section
Page
Date
Section
Page
Date
0
0
1
1
1
2
2
2
2
2
2
2
2
2
3
3
3
3
3
3
3
3
3
3
3
4
4
4
4
4
0.1
0.2
1.1
1.2
1.3
2.1
2.2
2.3
2.4
2.5
2.6
2.7
2.8
2.9
3A
3.1
3.2
3.3
3.4
3.5
3.6
3.7
3.8
3.9
3.10
4.1
4.2
4.3
4.4
4.5
Nov-02
Nov-02
Nov-02
Apr 96
Apr 95
Apr 95
Oct-00
Nov-02
Nov-02
Oct-00
Feb-00
Apr 96
Feb-00
Feb-00
1 Sep 95
Nov-02
Oct-00
Nov-02
Nov-02
Nov-02
Nov-02
Nov-02
Nov-02
Nov-02
Nov-02
Nov-02
Apr 95
Nov-02
Oct-00
Oct-00
5
5
5
5
5
5
6
6
6
6
6
7
7
7
7
7
7
7
8
8
8
8
8
9
9
9
9
9
9
9
5.1
5.2
5.3
5.4
5.5
5.6
6.1
6.2
6.3
6.4
6.5
7.1
7.2
7.3
7.4
7.5
7.6
7.7
8.1
8.2
8.3
8.4
8.5
9.1
9.2
9.3
9.4
9.5
9.6
9.7
Nov-02
Nov-02
Nov-02
Apr 95
Nov-02
Nov-02
Feb-00
Nov-02
Apr 96
Feb-00
Feb-00
Feb-00
Nov-02
Nov-02
Feb-00
Feb-00
Oct-00
Nov-02
Feb-00
Apr 95
Nov-02
Apr 96
Apr 96
Apr 95
Oct-00
Jul 95
Apr 96
Apr 95
Nov-02
Apr 95
9
9
9
9
9
9
10
10
10
10
10
10
10
10
11
11
12
9.8
9.9
9.10
9.11
9.12
9.13
10.1
10.2
10.3
10.4
10.5
10.6
10.7
10.8
11.1
11.2
12-1
Apr 95
Apr 95
Apr 95
Apr 95
Apr 95
Apr 95
Apr 95
Oct-00
Oct-00
Apr 96
Sep 95
Apr 95
Apr 95
Oct-00
Nov-02
Nov-02
Nov-02
Nov-02
0.1
ZENAIR CH2000 SERVICE MANUAL
_______________________________________________________________________
SERVICE MANUAL UPDATE LOG
REV. NO.
DATE ISSUED
DATE
INCORPORATED
1 to 8
Nov. 2002
AT ISSUE
INSERTED BY
Note: 0.1 and 0.2 with Update sheet(s) are replaced for each new update.
0.2
Nov-02
ZENAIR CH2000 SERVICE MANUAL
________________________________________________________________________
SECTION 1
INTRODUCTION
GENERAL
This manual contains service and maintenance instructions for the Zenair CH2000,
designed and manufactured as a versatile two-seat aircraft in the personal and training
aviation field.
SCOPE OF MANUAL
Sections II and III comprise the service part of this manual, whereas Sections IV through
XI comprise the maintenance instructions. The service instructions include ground
handling, servicing, and inspection periods. The maintenance instructions for each system
include troubleshooting, removal and installation of components, and corrective
maintenance and testing; each major system of the aircraft is covered in a separate section.
Only qualified personnel should perform the operations described in this manual.
In the text, reference is made to the following publications:
- General: Owner’s Manual or Aircraft Flight Manual CH2000 - ZENAIR
Parts Catalogue CH2000 - ZENAIR
- Engine: Operator’s Manual and overhaul manual Series O-235 engines - Textron Lycoming
- Propeller: Prop. Logbook (instructions for use and care) - Sensenich Prop. Co.
AC-43.13.1B Aircraft Inspection, Repair and Alteration
is a useful handbook published by the FAA.
“Aircraft Powerplants”, published by McGraw-Hill
(ISBN #0-07-035569-X) is the standard reference for the mechanic
working on the engine.
The description of the aircraft included in this section is limited to general information;
however, the figure gives specific external dimensions.
Nov-02
1.1
ZENAIR CH2000 SERVICE MANUAL
________________________________________________________________________
DESCRIPTION - Fig. 1
The Zenair CH2000 is a single engine, two-seat, low-wing monoplane of all-metal
construction.
WING: The wing is of all-metal stressed-skin, full cantilever, low-wing design,
consisting of two wing panels bolted to a spar box assembly in the fuselage. The ailerons
are cable and push rod controlled. The wing trailing edge split flaps are electrically
operated.
EMPENNAGE: The empennage consists of the rudder, stabilator, and stabilator trim
tabs. The stabilator is dynamically balanced.
FUSELAGE: The fuselage consists of three basic sections: the engine section, the cabin
section, and the sheet-metal tail cone.
LANDING GEAR: The tricycle landing gear is of the fixed type, consisting of a nose
wheel and two main wheels.
HYDRAULIC SYSTEMS: The dual brake system is operated by master cylinders.
ENGINE: The aircraft is powered by one horizontally opposed Lycoming Model 0-235N2C four-cylinder air-cooled engine. The engine employs a wet sump oil system with oil
temperature and pressure indicators.
PROPELLER: The propeller used is a Sensenich fixed pitch, all metal, aluminum alloy,
Model 72-CK series.
FUEL SYSTEM: The fuel system on the Zenair CH2000 consists of one rear aluminum
tank or tanks in the wings, one engine-driven pump, and one electrical auxiliary pump.
FLIGHT CONTROLS: The flight controls are conventional equipment, consisting of a
control wheel which operates the ailerons and stabilator, and pedals which operate the
rudder. Duplicate controls are provided for the co-pilot.
RADIO: Provisions for radio installations consist of microphone and headset jacks and
mounting brackets, necessary wiring, and panel space for extra radios.
CABIN HEATER, DEFROSTER, AND FRESH AIR SYSTEM: Heated air for the cabin
and defroster is obtained directly from the exhaust system muffler shroud. Fresh air is
supplied to the cabin through two individual and orientable air inlet vents in the right and
left door window.
INSTRUMENTS: Provisions for optional instruments are provided, including full IFR
equipment.
1.2
3 Apr 96
ZENAIR CH2000 SERVICE MANUAL
________________________________________________________________________
CH 2000 GENERAL DIMENSIONS
- Fig. 1 3 Apr 95
1.3
ZENAIR CH2000 SERVICE MANUAL
________________________________________________________________________
SECTION II
HANDLING AND SERVICING
GENERAL
This section provides ground handling and servicing instructions.
Recommended ground handling procedures, and recommended methods of servicing
are provided in following paragraphs. If trouble or damage to the aircraft is discovered
during ground handling or servicing, refer to the appropriate section for the system
concerned. Lubrication is treated as a separate function.
ACCESS PROVISIONS - Fig. 2
The figure shows the location and identity of the access doors and panels that provide
access for purposes of service and maintenance.
GROUND HANDLING
GENERAL. The aircraft must not be pushed, pulled, or lifted by any other means than
those described. Procedures are given for the proper execution of all necessary handling
operations and, if the instructions are followed, damage to the aircraft or its equipment
will be prevented.
Caution: Use the utmost care at all times during ground handling operations.
STEP, HANDHOLD, AND WALKWAYS
A fixed step is located on each side, below and aft of the inboard end of the wing trailing
edge and fixed handholds are located on the sides of the fuselage, above the aft upper
corner of the rear window. The walkway is made up of a non-skid compound applied to
the wing surface.
Caution: Walk on the walkways only, to avoid damage to the wings.
3 Apr 95
2.1
ZENAIR CH2000 SERVICE MANUAL
________________________________________________________________________
CH2000 ACCESS PANELS
- Fig. 2 2.2
Oct-00
ZENAIR CH 2000 SERVICE MANUAL
________________________________________________________________________
HOISTING - Fig. 3
Nose Gear Hoisting - Remove the cowl and lift the aircraft with a hoist attached to the
metal loop on top of the engine.
Main Gear Hoisting - Lift the aircraft one side at a time and insert a padded sawhorse or
equivalent under wing at main wing spar and rib rivet line.
LEVELING - Fig. 4
The aircraft may be leveled while the wheels are on the ground or during the weighing
procedure while the wheels are on scales. Leveling the aircraft for purposes of
reweighing or rigging is accomplished as follows:
Position the level on the door sill (upper fuselage longeron)
To put the airplane in a longitudinally level position, either on scales or on the
floor, deflate the nose wheel tire until the proper position is reached (or add
shims under the two main wheels ).
To level the airplane laterally, place a level across the cabin on the right and
left longerons, shim one main wheel as required. (repeat longitudinal leveling).
WEIGHING PROCEDURE - See Owner's Manual or Aircraft Flight Manual Chapter 6
TIEING DOWN
Secure tie-down ropes to the wing tie-down rings and the tail skid at approximately 45°
angles to the ground. Leave sufficient slack to avoid damage to the aircraft when the
ropes contract due to moisture.
TOWING
Move the aircraft using the nose wheel optional tow bar hooked into the nose gear strut
rings.
Caution: Remove the tow bar when not in use as the propeller may hit it when engine is
started.
Nov-02
2.3
ZENAIR CH2000 SERVICE MANUAL
________________________________________________________________________
LOCKING AIRCRAFT
The cabin doors are provided with key locks on the outside.
MAIN GEAR / WHEEL HOISTING
NOSE GEAR / WHEEL HOISTING
2.4
Nov 02
ZENAIR CH2000 SERVICE MANUAL
________________________________________________________________________
AIRCRAFT LEVELING
- Fig. 4 –
Oct-00
2.5
ZENAIR CH2000 SERVICE MANUAL
________________________________________________________________________
SERVICING
FUEL SYSTEM
FILLING FUEL TANKS
Observe all required precautions for handling gasoline. Fill the fuel tanks with the fuel
specified in the engine Operator’s Manual.
DRAINING FUEL VALVE AND STRAINER - Fig. 5
The Gascolator is located under the fuselage near the left wing leading edge. It has a
Curtis type easy drain valve and can be opened to clean the fuel filter. Note: fuel shut-off
valve should be in the "OFF" position when opening the Gascolator.
The Gascolator should be drained regularly to check for water.
REAR FUEL TANK SYSTEM
The fuel tank and sump are drained through the Curtis valve beside the Gascolator.
The fuel strainer at the tank outlet is accessed for removal and cleaning through the large
access door under the fuselage. (see page 7-9 of Owner’s Manual or AFM)
WING TANKS OPTION
The fuel tanks and sumps are drained through the Curtis valves under the wings just rear
of the wheels.
The fuel strainers at the tank outlets are accessed for removal and cleaning through the
access panels beside the Curtis valves. (see next page F.5. Also page 9.6 of Owner’s
Manual or AFM)
2.6
Feb-00
ZENAIR CH2000 SERVICE MANUAL
________________________________________________________________________
FUEL DRAINS
- Fig. 5 -
3 Apr 96
2.7
ZENAIR CH2000 SERVICE MANUAL
________________________________________________________________________
LUBE OIL SYSTEM
FILLING ENGINE SUMP
Fill the engine sump with the specified lubricating oil. (See Owner’s Manual or Engine
Manual.) Access door on right top cowl.(Fig. 2)
DRAINING ENGINE SUMP
Remove the cowl.
Drain the engine sump by means of the oil drain plugs at the bottom of the oil sump.
BRAKE SYSTEM - Fig. 11 on page 5.6
FILLING BRAKE CYLINDER RESERVOIRS
The brake cylinder reservoirs are an integral part of the master cylinders on pilot side.
They must be checked at every 50-hour inspection and replenished when necessary. No
adjustment of brake clearance is necessary on the brakes.
DRAINING BRAKE SYSTEM
To drain the brake system, disconnect the hydraulic brake lines from the brake assembly
of the main gear, and place the end of each line in a suitable container. Slowly pump the
brakes until fluid ceases to flow. To clean the brake system, flush with denatured alcohol.
LUBRICATION - Fig. 6
See the chart for lubrication instructions regarding the locations, time intervals, and types
of lubricant used. Where light lubricating oil is specified, but unavailable, clean engine
oil is a satisfactory substitute. Avoid excess application of lubricants. Excess lubricant
on exterior surfaces of bearings tends to attract dirt and grit, and may lead to malfunction
of the unit.
2.8
Feb-00
ZENAIR CH2000 SERVICE MANUAL
________________________________________________________________________
LUBRICATION CHART
- Fig. 6 -
Feb-00
2.9
ZENAIR CH2000 SERVICE MANUAL
________________________________________________________________________
SECTION IIIA
AIRWORTHINESS LIMITATIONS
GENERAL
This Airworthiness Limitation section is accepted by the FAA. It can only be revised
with
prior FAA approval.
LIFE LIMITED PARTS
Following is the list of the parts which must be replaced at the frequencies indicated.
- Fuel line hoses rear of firewall (5 years or 2400 hours, whichever occurs first.)
- Brake lines (7 years)
- Pitot static lines (7 years)
- Electric Trim actuator (2400 hours)
3A.
1 Sep 95
ZENAIR CH2000 SERVICE MANUAL
________________________________________________________________________
SECTION III
INSPECTION
GENERAL
This section provides instructions for conducting scheduled inspections, unscheduled inspections,
replacement of time limited parts and corrosion control. Repair or replacement instructions for those
components found to be unserviceable are in the sections covering the applicable aircraft system.
Refer to Section II for lubrication and servicing instructions. Lubrication and servicing intervals should be
adjusted to take into account the aircraft operating conditions.
Refer to Section IIIA for Airworthiness Limitations.
All of the inspections are general visual inspections unless otherwise specified. They are to be performed
by trained and qualified personnel using appropriate tools and adequate lighting.
Prior to commencing the scheduled inspections listed in Table 1:
a. Thoroughly clean the aircraft and engine;
b. Remove or open the necessary inspection and access panels, the engine cowlings, the spinner and the
optional wheel fairings; and
c. Review the aircraft records for outstanding Airworthiness Directives (AD’s) ,
Airworthiness Limitations (AWLs), Service Bulletins (SBs) or other maintenance requirements (pitot
static system, ELT, fire extinguisher, etc.). Contact the manufacturer for latest AD, SB and Service
Letters.
Note: In addition to the tasks specified in Table 1, do the preflight inspections described in the
Owner’s Manual.
SCHEDULED INSPECTIONS
Scheduled inspections include the items listed in Table 1 Inspection Form, the overhaul
requirements for the engine and propeller, the calendar time inspections and the one-time inspections done
following specified tasks. Do the following:
Inspection Form Requirements
Perform the tasks in Table 1 at the intervals shown. (Refer to Paragraph 6).
Overhaul Requirements
a. Overhaul the engine (Lycoming 0-235) every 2400 flight hours in accordance with Lycoming Direct
Drive Engine Overhaul Manual P/N 602947.
b. Overhaul the propeller (Sensenich Model 72-CK Series) every 2,000 flight hours in accordance with
Sensenich overhaul instructions (Ref. SPRM #590).
c. Overhaul the magnetos every 2,400 flight hours in accordance with the manufacturer’s instructions.
(Ref. Unison Industries - Slick manual # L-1363 sect. 4).
d. Overhaul the horizontal stabilator trim (electric) actuator every 2400 flight hrs. in accordance with the
manufacturer’s overhaul instructions.
Replacement of Time Limited Parts
The following parts are subject to the effects of aging and environmental deterioration and must be
replaced at the time indicated:
Fuel Line Hoses ( rear of firewall) - 5 years or 2400 hours, whichever comes first.
Brake Lines - 7 years
Pitot Static Lines - 7 years
Nov-02
3.1
ZENAIR CH2000 SERVICE MANUAL
________________________________________________________________________
Calendar Inspection Requirements
a Perform a visual inspection of the pitot-static system connection Tygon splice at the
wing root, for security and condition, every 12 months.
b. Perform a visual inspection of the wing fuel tank compartments (if wing fuel tanks are
installed) for corrosion, cracking, etc every 5 years.
UNSCHEDULED INSPECTIONS
Unscheduled inspections must be performed anytime that unusual operating conditions are
encountered which may affect the integrity or airworthiness of the aircraft. Actions to be taken following
the reporting of such events are as follows:
a) Check ELT for inadvertent activation.
Hard Landing
b) Check main gear spring for deformation.
c) Check nose gear and firewall for damage.
Propeller Strike
a) Check propeller for damages.
b) Check prop flange re crankshaft damage.
Lightning Strike
a) Check ELT for inadvertent activation.
b) Check skins for damages.
c) Check control connections for damages.
Bird Strike
Check the area for damages
Exceedence of Operational Limits
Refer to applicable manuals
INSPECTION AFTER SPECIFIED MAINTENANCE ACTIONS
Inspections are to be performed one time only, following the performance of the following tasks:
Installation of new alternator Check belt for condition and tension at 25 hours of belt
drive belt.
operation. (Ref. Lycoming Service Instruction #114)
Installation of new,
re-manufactured or overhauled engine.
Perform a 50-hour engine inspection (Ref. Section 4 of
Lycoming Operator’s Manual).
CORROSION CONTROL
To avoid the deterioration of the CH2000 aircraft due to the effects of corrosion, monitor the
condition of protective coatings on exterior and interior surfaces. If damage to coatings is found, restore
surfaces prior to the occurrence of damage caused by environmental effects.
INSPECTION SCHEDULE
The required inspection tasks and their intervals are listed in Table 1. The tasks are placed in
seven groups: Propeller, Engine, Cabin, Landing Gear, Wing, Fuselage and Empennage.
The first column of Table 1 states the task to be performed, the second column states the applicable
references(s). The third column is divided into four sub-columns, each of which corresponds to an
inspection interval. The last column may be used to verify that a task has been completed. Perform the
stated tasks at the intervals shown when a plus (+) symbol is shown in an interval column. A minus (-)
symbol indicates no maintenance action is required. Tasks may be performed sooner but not later than the
stated intervals. If done sooner, tasks must next be performed at the stated interval (e.g. at 790 flight hours
airframe time, a 100 hour task is performed 10 flight hours before it is due. It must next be performed 100
hours later, at 890 flight hours (or sooner).
Operational checks are tasks that determine that an item is fulfilling its intended purpose. No
verification of meeting tolerances is required.
Functional checks are tasks which determine if one or more functions of an item are performing
within specified limits. Quantitative checks must be performed.
Useful Note: The 50 hour inspection has a tolerance of + 16% (ie between 42 and 58 hours)
Oct-00
3.2
TABLE 1 – ZENAIR INSPECTION FORM
Make / Model
ZENAIR CH2000
Symbols:
+
Serial No.
Registration No:
Indicates perform task,
Task
Airframe Hours
Type of Inspection
(Circle One)
50 100 500 1000
Engine Hours
- Indicates do not perform task
Intervals
(Flight Hours)
Refer to
50
100 500 1000
Propeller Group
1. Check propeller bolts for torque and
safeties.
Sensenich Prop,
Manual
+
+
+
+
2. Inspect blades and hub for cracks,
corrosion, damage, etc.
Sensenich Prop,
Manual
+
+
+
+
+
+
+
+
+
+
+
+
3. Inspect spinner and backing plate.
Engine Group
Danger
Ground magneto primary circuit before
working on engine.
Section X
1. Check for oil/fuel leaks.
2. Check for particles on oil suction screen
and sump drain plug.
Lycoming Operator’s
Manual Section 7
+
+
+
+
3. Drain oil and refill.
Lycoming Operator’s
Manual Section 7
+
+
+
+
4. Perform cylinder compression test.
-
+
+
+
5. Clean the spark plugs. Adjust gap at
.018” to .022”.
-
+
+
+
Lycoming Operator’s
Manual Section 5
Lycoming Operator’s
Manual Section 4
-
+
+
+
-
+
+
+
Lycoming Operator’s
Manual Section 4
Section VI
+
+
+
+
+
+
+
+
+
+
+
+
-
+
+
+
+
+
+
+
+
+
+
+
6. Check and set magneto timing at 200.
7. Check magneto breaker points and
lubricate breaker point felt.
8. Clean oil suction and oil pressure
screens
9. Inspect the wet type foam air filer.
10. Inspect the exhaust manifold for cracks
(carb and cabin heat shroud removed).
150 HR INTERVALS (Ref. AD-CF-9003R2)
Section XI
11. Inspect the heat shrouds for cracks,
etc.
12. Inspect the motor mount fuselage and
engine attachment points and braces.
13. Inspect the rubber engine vibration
isolating mounts for cracks damage, etc.
3.3
Section VI
Nov-02
Initials
TABLE 1 – ZENAIR INSPECTION FORM
Make / Model
ZENAIR CH2000
Symbols:
+
Serial No.
Registration No:
Indicates perform task,
Task
Airframe Hours
Type of Inspection
(Circle One)
50 100 500 1000
Engine Hours
- Indicates do not perform task
Intervals
(Flight Hours)
Refer to
50
100 500 1000
14. Inspect engine for security of all
attaching hardware (nuts, bolts, screw,
etc.)
-
+
+
+
-
+
+
+
16. Inspect the ignition harnesses for
general condition.
+
+
+
+
17. Inspect the carburetor air intake box for
leaks.
+
+
+
+
15. Perform valve clearance check (0.010”)
Lycoming Operator’s
Manual Section 5
18. Drain carburetor and clean carburetor
fuel strainer and strainer bowl.
Section VI
-
+
+
+
19. Inspect engine cowlings for cracks,
damage, loose rivets, etc.
Section VI
+
+
+
+
20. Inspect the vacuum pump, lines and
separator,
Section VI
-
+
+
+
21. Change the Oil filter.
Section VI
+
+
+
+
+
+
+
+
-
-
+
+
-
+
+
+
22. Inspect the oil radiator, oil lines and
attaching brackets.
23. Clean and flush oil radiator.
Section VI
24. Inspect engine, firewall and firewall
seals for deterioration, cracking, etc.
25. Inspect cabin heat control box for
cracks, condition, etc.
Section XI
+
+
+
+
26. Inspect engine controls for defects,
safeties, etc. Check control travels.
Section VI
-
+
+
+
27. Check starter, alternator, fuel pump
and vacuum pump for proper mounting,
security and defects
Section VI
-
+
+
+
28. Perform operational checks of all
systems (fuel, oil, heating, etc.)
Section VI
-
+
+
+
3.4
Nov-02
Initials
TABLE 1 – ZENAIR INSPECTION FORM
Make / Model
ZENAIR CH2000
Symbols:
+
Serial No.
Registration No:
Indicates perform task,
Task
Airframe Hours
Type of Inspection
(Circle One)
50 100 500 1000
Engine Hours
- Indicates do not perform task
Intervals
(Flight Hours)
Refer to
50
100 500 1000
CABIN GROUP
1. Inspect the control wheels, linkages,
column and torque tube assemblies
for cracks, distortion, etc.
Section VII
-
+
+
+
2. Check controls for ease of operation
and correct travel.
Section VII
+
+
+
+
3. Check operation cockpit lights and
external lights.
Section X
+
+
+
+
4. Check operation of all circuit breakers
and switches.
Section X
+
+
+
+
5. Check flight control cables for routing,
fraying, corrosion and tension.
Section VII
-
+
+
+
Inspect flight control turnbuckles,
pulleys and guides for wear, damage
and safeties.
Section VII
-
+
+
+
6. Check stabilator trim tab indicator for
correct operation.
Section VII
+
+
+
+
7. Inspect the flap motor, actuator,
extension tube, actuator lever,
interconnect tubes, control levers and
control rods for cracks, distortion,
security, etc.
Section VII
-
+
+
+
7a
Inspect flap indicator cable and
indicator for security and correct
operation.
Section VII
-
+
+
+
8. Perform functional check of the flap
system.
Section VII
+
+
+
+
9. Inspect all windows for cracks,
cleanliness, etc.
+
+
+
+
10. Check cabin finish for damage,
deterioration, etc.
-
+
+
+
5a
11. Perform operational check of the fuel
selector valve and safety lock.
Section VIII
+
+
+
+
12. Inspect door fit and latching
mechanisms.
Section XII
+
+
+
+
+
+
+
+
13. Check upholstery for condition
Nov-02
3.5
Initials
TABLE 1 – ZENAIR INSPECTION FORM
Make / Model
ZENAIR CH2000
Symbols:
+
Serial No.
Registration No:
Indicates perform task,
Task
Airframe Hours
Type of Inspection
(Circle One)
50 100 500 1000
Engine Hours
- Indicates do not perform task
Intervals
(Flight Hours)
Refer to
50
100 500 1000
14. Inspect safety belts, attaching
hardware, etc. for condition security.
+
+
+
+
15. Verify appropriate compass correction
card is in aircraft.
-
+
+
+
16. Clean or replace filters in the gyro
vacuum system (if installed).
Section IX
-
+
-
+
17. Inspect radio installations and
mounting hardware for security,
condition. etc.
Section IX
-
+
+
+
18. Inspect electrical wiring for condition,
security, routing, damage, etc.
-
+
-
+
19. Check condition and security of all
bonding wires.
-
+
-
+
20. Inspect antenna installations for
condition, security, etc.
-
+
+
+
21. Inspect instruments for security,
markings, condition and perform
operational check.
Section IX
-
+
+
+
22. Inspect fuel sender unit for security,
leaks, etc.
Section VIII
-
-
-
+
23. Inspect fuel primer (if installed) for
security, condition, leaks, etc.
+
+
-
+
24. Check brake fluid level section V.
+
+
+
+
25. Inspect the aft side of the firewall from
inside the cabin for cracks around any
rivets. In case of repair, see Zenair
Service bulletin No. 00-03, section B
and C.
-
+
+
+
-
+
+
+
Landing Gear Group
1. Inspect the main landing gear
mainspring attachment bolts for proper
torque, safeties, etc.
3.6
Section V
Nov-02
Initials
TABLE 1 – ZENAIR INSPECTION FORM
Make / Model
ZENAIR CH2000
Symbols:
+
Serial No.
Registration No:
Indicates perform task,
Task
Airframe Hours
Type of Inspection
(Circle One)
50 100 500 1000
Engine Hours
- Indicates do not perform task
Intervals
(Flight Hours)
Refer to
50
100 500 1000
2.
Check security, condition, etc., of lateral
stop and bolts and axle bolts.
Section V
-
+
+
+
3.
When removing wheels, inspect the
brake assemblies, axles, pins and
spacers for security, condition, leaks,
etc.
Section II, Section V
+
+
+
+
4.
Check the brake pads and brake discs
for excessive wear.
Section V
-
+
+
+
5.
Inspect the main wheels for cracks,
corrosion, etc.
-
+
+
+
6.
When removing wheels re-pack wheel
bearings.
Section V
+
+
+
+
7.
Inspect the master and slave brake
cylinders, brake lines, connections for
damage, corrosion, leaks, etc. Service
the master brake cylinders.
Section V
+
+
+
+
7a
Inspect the rubbers at the main landing
gear attachments for condition and
abrasion damage, and position
Section V
-
+
+
+
8.
When removing wheel, the airplane
hoisted remove the nose wheel and
inspect wheel for cracks, corrosion, etc.
Section V
+
+
+
+
9.
Inspect the nose gear lower front
bearing plate, cam centering, steering
connections strut, strut supports and
stop plate for cracks, distortion,
corrosion, etc.
-
+
+
+
-
+
+
+
10. Inspect the steering rods for security,
distortion, etc.
11. Inspect the shock cord for damaged
threads and weakness.
Section V
-
+
+
+
12. Inspect the lower shock ring support for
cracks, distortion, etc.
Section V
-
+
+
+
13. Check tire pressure. (30 PSI)
Section V
+
+
+
+
14. When removing wheel, inspect the nose
wheel axle bolt, spacers and axle for
wear, damage, corrosion, etc.
Section V
+
+
+
+
Nov-02
3-7
Initials
TABLE 1 – ZENAIR INSPECTION FORM
Make / Model
ZENAIR CH2000
Symbols:
+
Serial No.
Registration No:
Indicates perform task,
Task
Airframe Hours
Type of Inspection
(Circle One)
50 100 500 1000
Engine Hours
- Indicates do not perform task
Intervals
(Flight Hours)
Refer to
50
100 500 1000
Wing Group
1. Check the torque and safeties of the
front spar, main spar and rear spar
wing to fuselage attachment bolts.
Section IV
2. Inspect the external surfaces of the
ailerons and flaps for cracks,
deformation, etc.
-
+
+
+
+
+
+
+
3. Inspect the aileron and flap hinge pins
for corrosion, wear, safeties and
adequate lubrication.
Section II
-
+
+
+
4. Inspect flap and aileron rods and rod
attachment bolts for wear, damage
safeties, etc.
Section VII
-
+
+
+
5. Inspect aileron bellcranks, stops,
cable ends and pulley assembly for
cracks, damage, corrosion safeties,
etc.
Section VII
-
+
+
+
+
+
+
+
+
+
+
+
+
+
+
+
+
+
+
+
+
+
+
+
-
+
+
+
6. Inspect upper and lower wing skins
and leading edges for cracks, loose
fasteners, damage, etc.
Section II
7. Lubricate the aileron and flap hinges,
control rod ends, bellcranks, etc.
8. Inspect the dual landing/taxi lights for
security, clean lenses, etc.
Section II
9. Drain water from wing fuel tanks (if
applicable) using sump drains. Check
sump drains for leaks. Clean fuel
strainers.
10. Check fuel tank filler caps (if installed)
for security, condition, etc.
11. Perform an operational check of the
stall warning system.
3-8
Nov-02
Initials
TABLE 1 – ZENAIR INSPECTION FORM
Make / Model
ZENAIR CH2000
Symbols:
+
Serial No.
Registration No:
Indicates perform task,
Task
12. Perform operational check of the pitot
static heater (if installed).
Airframe Hours
Type of Inspection
(Circle One)
50 100 500 1000
Engine Hours
- Indicates do not perform task
Intervals
(Flight Hours)
Refer to
50
100 500 1000
+
+
+
Section IX
-
+
+
+
+
+
+
+
-
+
+
+
-
+
+
+
4. Inspect flight control turnbuckles,
pulleys and guides for wear, damage
and safeties.
-
+
+
+
5. Check flight control torque tube
bearings for wear.
-
+
+
+
6. Inspect electrical wiring for condition,
security, routing, damage, etc.
-
+
+
+
7. Inspect fuel lines for security, damage,
and leaks.
-
+
+
+
8. Inspect the battery for condition, fluid
level and clean terminals. Inspect the
battery box.
-
+
+
+
+
+
+
+
+
+
+
+
-
+
+
+
13. Perform operational check of fuel
quantity indicating system.
Fuselage Group
1. Inspect the outer fuselage skin for
cracks, corrosion, loose rivets,
damage, etc.
2. Inspect fuselage bulkheads, stiffeners
and internal structure for cracks,
corrosion, damaged fasteners, etc.
3. Inspect flight control cables for routing,
fraying, corrosion and tension.
9. Drain water from fuselage fuel tank
using sump drain (if applicable).
Check sump drain for leaks. Clean
gascolator fuel filter.
10. Check fuel tank filler cap (if installed)
for security, condition, etc.
Section VII
Section II
Empennage Group
1. Inspect the vertical stabilizer, rudder,
stabilator and trim tab skins for cracks,
loose fasteners, damage, etc.
Nov-02
3-9
Initials
TABLE 1 – ZENAIR INSPECTION FORM
Make / Model
ZENAIR CH2000
Symbols:
+
Serial No.
Registration No:
Indicates perform task,
Task
Airframe Hours
Type of Inspection
(Circle One)
50 100 500 1000
Engine Hours
- Indicates do not perform task
Intervals
(Flight Hours)
Refer to
50
100 500 1000
2. Inspect stabilator trim actuator wheel
for security, wear, damage, etc.
-
+
+
+
3. Perform operational check of stabilator
trim system.
Section VII
-
+
+
+
4. Inspect rudder, stabilator and trim tab
hinges for wear and excessive play.
Section VII
-
+
+
+
5. Lubricate the rudder and stabilaor trim
tab hinges, the stabilator hinge points
and the trim actuator.
Section II
+
+
+
+
6. Inspect the stabilator balance weight,
stops and grounding strap for security,
condition, damage, etc.
Section VII
-
+
+
+
3-10
Nov-02
Initials
ZENAIR CH2000 SERVICE MANUAL
________________________________________________________________________
SECTION IV
STRUCTURE
GENERAL
Figure 7 identifies the type and thickness of skin used in the construction of the CH2000.
No structural repairs are recommended without contacting the manufacturer, however,
minor repairs such as patching the skin, welding, etc., may be made in accordance with
the regulations. It may be necessary to cut access holes to make skin repairs in some
areas of the aircraft.
Caution: Skin repairs must result in a surface which is as strong as, or stronger than, the
original skin. However, flexibility must be retained so that the surrounding areas will not
receive extra stress.
The rivets used on most parts are of the blind rivet type, Zenair reference #A-4 (1/8” dia.)
or A-5 (5/32” dia.); to be set with the hand tool, Zenair reference #HP-A4-A5. Aircraft
quality aluminum “Cherry” rivets are an approved substitute. Standard MS20470 rivets
may be used where access is possible.
Repair Carbon Fiber and Fiberglass parts with standard / typical Fiberglass type resin and
woven Fiberglass cloth. Using the Aircraft Inspection and Repair manual AC43. 13-1B
Chapter 3 is also acceptable.
When nylon Locknuts are removed, the installation of new Locknuts is highly
recommended.
Bolt torque valves are given in AC-43-13-1B.
NOTE: Modifications to the fuselage are permissible if they do not involve alterations to
its main structure. The manufacturer must be contacted for approval regarding specific
alterations proposed in accordance with approved data.
Following list gives the “primary structural” parts:
- Wing Spars
- Spar box assembly in fuselage
- Stabilator spar and mass balance attachment
- Rudder spar.
Nov-02
4.1
ZENAIR CH2000 SERVICE MANUAL
________________________________________________________________________
REPLACEMENT OF WING ASSEMBLY
REMOVAL
1.
2.
3.
4.
5.
6.
7.
8.
9.
Drain the gas. (wing tank option only)
Disconnect the flap push rod.
Remove the seat bottoms.
Disconnect the aileron balance cables and aileron control cables (center of fuselage).
Disconnect the fuel lines (center of fuselage--wing tank option only).
Disconnect the pitot and static lines (left wing only).
Disconnect the electric wirings.
Remove the bolts on front and rear spar, and the six main spar bolts.
Pull the wing out.
REINSTALL the wing in reverse order of removal.
REPLACEMENT OF FLAPS
REMOVAL
1. Disconnect the flap push rod.
2. Remove the hinge pins and the flap will be loose.
REINSTALL the flap in reverse order of removal, safety the hinge pins and bolt.
REPLACEMENT OF AILERON
REMOVAL
1. Disconnect the aileron push rod at the inboard end of the aileron.
2. Remove the hinge pin and the aileron will be loose.
REINSTALL the aileron in reverse order of removal, safety the hinge pin and
bolts.
4.2
3 Apr 95
ZENAIR CH2000 SERVICE MANUAL
________________________________________________________________________
NO.
1
2
3
4
5
6
9
10
11
12
13
14
15
16
17
18
19
20
MATERIAL
FIBERGLASS
6061-T6
6061-T6
6061-T6
CARBON
FIBRE
CARBON
FIBRE
FIBERGLASS
FIBERGLASS
6061-T6
6061-T6
6061-T6
6061-T6
6061-T6
6061-T6
6061-T6
6061-T6
6061-T6
6061-T6
THICKNESS
0.025
0.025
0.025
FIRE RESISTANT
FIRE RESISTANT
0.025
0.025
0.025
0.025
0.025
0.025
0.025
0.025
0.025
0.025
NO.
21
22
23
24
25
MATERIAL
6061-T6
6061-T6
6061-T6
6061-T6
6061-T6
THICKNESS
0.025
0.016
0.025
0.040
0.025
26
6061-T6
0.025
27
28
29
30
31
32
33
34
35
36
37
38
39
40
6061-T6
6061-T6
FIBERGLASS
6061-T6
6061-T6
6061-T6
6061-T6
6061-T6
6061-T6
FIBERGLASS
6061-T6
FIBERGLASS
FIBERGLASS
6061-T6
0.025
0.025
0.016
0.016
0.032
0.032
0.025
0.016
0.016
OPTIONAL
OPTIONAL
0.016
CH2000 SKIN SPECIFICATIONS
- Fig. 7 Nov-02
4.3
ZENAIR CH2000 SERVICE MANUAL
________________________________________________________________________
STRUCTURE (cont’d).
REPLACEMENT OF RUDDER - Fig. 8
REMOVAL
1.
2.
3.
4.
Disconnect the two control cables from the rudder horn.
Disconnect the grounding cable and the tail light wiring.
Remove the lower hinge bolt.
Remove the upper hinge bolt and remove the rudder.
Caution: Do not lose the hinge bushings.
REINSTALL the rudder in reverse order of removal. Check all bolts for safety.
REPLACEMENT OF STABILATOR - Fig. 8
REMOVAL
1.
2.
3.
4.
5.
6.
Remove the rudder.
Remove the side panels. (See (1) Fig. 8)
Remove the gap filler (See (2) Fig. 8)
Remove the bolt at trim actuator and fork. (See (3) Fig. 8)
Disconnect the electric wiring if aircraft equipped with electric trim.
Remove the upper and lower trim actuator support screws and remove the trim
actuator assembly.
7. Disconnect the grounding cable.
8. Disconnect the control cables from the horn.
Note: Attach the cables to the fuselage for easy reinstallation.
9. Remove the right and left hinge bolts and remove the complete stabilator.
Caution: Do not lose the hinge bushings.
REINSTALL the stabilator in reverse order of removal.
4.4
Oct-00
ZENAIR CH2000 SERVICE MANUAL
_______________________________________________________________________
TAIL REMOVAL
- Fig. 8 -
Oct-00
4.5
ZENAIR CH2000 SERVICE MANUAL
________________________________________________________________________
SECTION V
LANDING GEAR AND BRAKE SYSTEM
GENERAL
The landing gear incorporated on the CH2000 is a fixed, tricycle type of gear, fitted with three
Cleveland 500-5 wheels, using four ply tires with tubes. The nose gear is steerable through the
rudder pedals. The fixed cam automatically centers the nose wheel and rudder in the shock
extended position. (See Fig. 9) The main gear shock absorber is a mono leaf metal spring. The
two main gear wheels are equipped with single disc hydraulic brake assemblies which are actuated
by the brake pedals connected to the brake master cylinders located forward of the rudder pedals.
The brake fluid reservoirs are an integral part of the pilot side master cylinders.
INSPECTION OF WHEELS:
When removing the wheel(s) perform Table 1 inspections “Landing Gear Group” #3, 6, 8, and 14
or annually, whichever comes first. There is no set inspection interval period for this between
inspection annuals.
REPLACEMENT OF NOSE GEAR - Fig. 9
1.
2.
3.
4.
5.
6.
7.
Remove upper and lower engine cowl.
Hoist the airplane. (See Section II)
Remove the upper stop plate.
Disconnect the steering.
Remove the shock ring from the forward upper support.
Remove the lower front bearing.
Remove the whole nose gear assembly.
REINSTALL the nose gear assembly in reverse order of removal. Safety all connections.
Note: If for any reason the steering rod length was changed, the alignment of the nose wheel must
be checked as follows:
ALIGNMENT OF NOSE GEAR
1. Hoist the airplane. (See Section II)
2. Locate the center line of the fuselage directly behind the nose wheel assembly and
attach a plumb bob, also attach a plumb bob to the tail skid. Using the two plumb bobs
as a guide, snap a chalk line, extending several feet beyond each bob on the ground.
3. Stand in front of the nose wheel and orient the tire with the chalk line. Sight along the
center rib of the tire.
4. Adjust both rod ends at the end of the nose gear steering rod assemblies to align the
cockpit rudder pedals. Do not attempt to make the adjustment by means of one rod
end but divide the adjustment between the two rod ends. A 3/8” (10mm) minimum
thread engagement must be maintained.
5. Check the nose gear steering for travel by measuring the maximum deflection each side
from the center of the chalk line. (Fig. 18)
Nov-02
5.1
ZENAIR CH2000 SERVICE MANUAL
________________________________________________________________________
REPLACEMENT OF NOSE WHEEL - Fig. 9
1. Hoist aircraft up.
2. Remove the axle bolt and remove the wheel and tire.
Caution: Do not lose the spacers.
Check wheel as indicated for the main wheels, and grease the wheel bearings.
REINSTALL in reverse order of removal.
REPLACEMENT OF MAIN GEAR - Fig. 10
1 Hoist the airplane.
2. Drain the fluid from the brake system (see Fig. 11) and disconnect the brake lines from
gear assembly.
3. Remove the four bolts which attach the spring to the fuselage.
4. Remove the gear assembly.
REINSTALL the main gear in reverse order of removal, safety the bolts.
Note: Torque value on the four bolts – Tighten snug (approximately 110 LB. IN.).
Do not bend bracket 20-L-3-3 when tightening. Make sure that the rubber padding
HH-16 top/bottom are in place before tightening the four bolts.
REPLACEMENT OF MAIN WHEEL - Fig. 10
1. Hoist aircraft up.
2. Remove the axle nut, disassemble the brake assembly and remove the wheel
and tire.
Check the wheel casting for visible signs of cracks, corrosions, loose or broken bolts,
and any defects which may impair its operation.
Note: If there are any indications of defects, deflate the tire, remove the three
wheel bolts, remove the tire and tube and perform a thorough inspection of the
suspicious area..
Remove wheel bearings from the wheel hub and clean thoroughly with a suitable
solvent. When repacking with grease, be sure the lubricant enters the space between the
rollers in the retainer ring. Do not pack the grease into the wheel hub.
REINSTALL in reverse order, using the shims to prevent lateral floppiness. Safetie the
nut.
Note: Bolt torque values are given in AC-43-13-1B.
5.2
Nov-02
ZENAIR CH2000 SERVICE MANUAL
________________________________________________________________________
NOSE GEAR
- Fig. 9 -
Nov-02
5.3
ZENAIR CH2000 SERVICE MANUAL
________________________________________________________________________
BRAKE MAINTENANCE
REPLACEMENT OF BRAKE MASTER CYLINDER - Fig. 11
1. Remove the master cylinder from the mounting bracket by removing the brake lever
pivot bolt and the master cylinder pivot pin, and disconnect.
2. Remove the cylinder from the airplane.
REINSTALL the master cylinder in reverse of removal instructions. Check all connections for security and
leaks.
REPLACEMENT OF "O" RINGS IN MASTER CYLINDER - Fig. 11
1. Remove the brake master cylinder.
2. Disassemble the master cylinder by removing the snap ring and extracting the plunger
assembly from the cylinder housing.
3. Thoroughly clean the cylinder housing and component parts with a suitable solvent.
After inspecting the parts for any defects, replace the "O" rings.
Note: Use a small amount of hydraulic fluid on the "O" rings and component parts to prevent damage
during reassembly.
REASSEMBLE the master cylinder in the reverse order given for disassembly, being careful not to damage
the "O" rings.
Reinstall the master cylinder and bleed the brake system.
BLEEDING PROCEDURE
If the brake line has been disconnected for any reason, it will be necessary to bleed the brake and line as
described below.
Connect the bleeding unit hose to the fitting at the bottom of the brake unit and pressure fill the brake
system with MIL-H-5606 fluid.
Remove the bleeding unit hose after tightening the fitting.
Repeat the bleeding procedure on the other gear.
BRAKE PADS REPLACEMENT
When the brake pads become worn excessively (1/16” pad thickness), they are replaced with new pads.
REMOVAL
Remove the wheel (see page 5.2 - Replacement of main wheel).
Remove the two bolts holding the pads.
Remove the pads.
REINSTALL in reverse order. Check for safeties and operation.
Note: - No adjustment of brake clearance is necessary on the brakes.
- The brake disc should not necessarily be replaced because of circumferential
grooving.
5.4
3 Apr 95
ZENAIR CH2000 SERVICE MANUAL
________________________________________________________________________
MAIN GEAR
- Fig. 10 -
Older
Style
Main Gear
Nov-02
5.5
ZENAIR CH2000 SERVICE MANUAL
________________________________________________________________________
BRAKE SYSTEM
- Fig. 11 -
5.6
Nov-02
ZENAIR CH2000 SERVICE MANUAL
________________________________________________________________________
SECTION VI
POWER PLANT
GENERAL
The CH2000 is powered by a Lycoming engine Model O-235-N2C rated at 116 BHP at 2800
RPM. The engine has a compression ratio of 8.1 to 1 and requires 100/100LL octane fuel. The
engine has a light weight starter, 60 amp 12 volt alternator, voltage regulator, shielded ignition,
vacuum pump drive, fuel pump and a carburetor with air intake box and filter. The exhaust
system is stainless steel with heater shrouds to supply heat for both the cabin and carburetor. The
engine is equipped with a Sensenich fixed pitch, all metal propeller, Model 72-CK-0-46 or 48.
TROUBLESHOOTING
Troubles peculiar to the power plant are listed in the Lycoming manual (See Section I) along with
their probable causes and suggested remedies. When troubleshooting the engine, ground the
magneto primary circuits before performing any checks on the engine by connecting an electric
wire from magneto terminal to the screw marked GD (Ground) on the magneto. Refer to
following paragraphs for procedures for removal and replacement of engine components.
REMOVAL OF PROPELLER - Fig.12
1. (Optional) Remove the screws and remove the spinner.
2. Remove the six propeller bolts and remove the propeller.
3. (Optional) Remove the spinner mounting plate.
REINSTALL the propeller with the plate between the propeller and crankshaft flange.
(See Fig. 12)
Tighten the six propeller bolts. (See Sensenich manual for torque.)
Before installing the spinner, check the propeller for track..
Safety the propeller bolts.
Screw the optional spinner to its plate.
PROPELLER TRACKING CHECK
1. Place a box or other fixed object at the lower tip while the propeller is vertical.
2. Mark the line of one tip on the box.
3. Rotate the propeller 180 degrees and compare the location of the other tip with respect
to the first.
4. They must pass within ± 1/16 inch or 2mm of the same line. If they are further apart, loosen
and tighten the propeller bolts until the tracking is satisfactory.
Feb-00
6.1
ZENAIR CH2000 SERVICE MANUAL
________________________________________________________________________
POWERPLANT
- Fig. 12 6.2
Nov-02
ZENAIR CH2000 SERVICE MANUAL
________________________________________________________________________
REMOVAL OF ENGINE - Fig. 12
1.
2.
3.
4.
5.
6.
7.
8.
9.
Remove the propeller.
Remove top and bottom cowl.
Disconnect the heat hose from the muffler and front baffle.
Disconnect the mechanical fuel pump inlet line.
Disconnect the fuel inlet line at the carburetor.
Disconnect the starter lead.
Disconnect the alternator leads.
Disconnect the grounding wire.
Disconnect the control cables from the engine components.(throttle mixture, carb.
heat)
10.Disconnect the tachometer cable from the rear of the engine.
11.Disconnect the hoses from the vacuum pump. (option)
12.Disconnect the magneto "P" leads. Insert a protective cover over the connection.
13.Disconnect the oil pressure wire. Disconnect manifold pressure line from the left rear
cylinder of the engine. (option)
14.Attach a 1,500 Lbs. (minimum) hoist to the hoisting hook and relieve the tension on
the engine mount.
15.Place a tail stand under the tail of the aircraft before removing the engine.
16.Check the engine for any attachments remaining to obstruct its removal.
17.Remove the cotter pins, nuts, washers, rear rubber mount and bolt from each engine
mounting. Swing the engine free, being careful not to damage any attached parts.
REINSTALLATION OF ENGINE
Attach a one-half ton hoist to the hoisting hook and lift the engine. Position the mounting
lugs of the engine so that they align with the engine mount attaching points.
Insert the front rubber mounts and the spacers between engine and engine mount.
Position the rear rubber mounts and insert the bolts.
Install a washer and castellated nut on each mounting bolt. Tighten the nuts until the
inner spacer is tight, then align castle nut with cotter pin hole in the bolt (approx. 40-inch
pounds) and install cotter pins..
Reconnect all engine connections in the reverse order they were removed. See reverse of
removal, items 13 to 1 above.
Note: Adjust all controls to provide full travel in particular when the throttle control is
full forward, it must contact the stop on the carburetor before it bottoms.
3 Apr 96
6.3
ZENAIR CH2000 SERVICE MANUAL
________________________________________________________________________
CARBURETOR
- Fig. 13 6.4
Feb-00
ZENAIR CH2000 SERVICE MANUAL
________________________________________________________________________
ENGINE MAINTENANCE PROCEDURES:
See Lycoming Manual. In particular:
- LUBRICATION:
See Lycoming Manual pages 4.3, 4.4 and 5.8
- MAGNETO TIMING:
If timing is required: see Lycoming Manual pages 4.4 and 5.1.
- IDLE SPEED and MIXTURE ADJUSTMENT:
If idle RPM needs adjustment: see Lycoming Manual page 5.7 for the
procedure and Fig. 13 in the present Manual for the location of the
adjusting screws.
ENGINE TROUBLE SHOOTING
See Lycoming Manual, Section 6.
NOTE: The magneto wiring is shown in the Lycoming Manual on Fig. 5.1.
Feb-00
6.5
ZENAIR CH2000 SERVICE MANUAL
________________________________________________________________________
SECTION VII
FLIGHT CONTROL SYSTEM
GENERAL - Fig. 15 through 18
The CH2000 is controlled in flight by the use of the three standard primary flight control surfaces,
consisting of the ailerons, stabilator and the rudder. Operation of these controls is through the movement of
the control wheel and rudder pedals. The individual surfaces are connected to their control components by
the use of cables and push-pull rods. Provision for longitudinal trim control is provided by an anti-servo
trim tab. The flaps are electrically operated through an interconnecting tube and adjustable rods.
This section describes the replacement and rigging of the control cables.
See Section IV for the control surface replacement. The movable surfaces have stops as well as adjustments
on their cable or control rod connections, so that their range of movement can be altered. The positions and
travel as well as cable tension of the various surfaces are shown in the figures.
Perform a functional check (control rigging) of the affected flight control system whenever re-connection of
the cables is completed (Ref. Figure 15, 17 or 18)
REMOVAL / INSTALLATION OF AILERON CONTROL CABLES - Fig. 15
REMOVAL
1
2.
3.
4.
5.
6.
7.
Open fuselage access panel. (Fig. 2)
Remove the balance cable pulley. (Fig. 15)
Remove aileron bellcrank inspection plate. (Fig. 2)
Disconnect cables from bellcrank (at S, Fig. 15)
Attach “Fish line” to cable ends to facilitate reinstallation.
Remove the cables.
To remove the bellcrank: disconnect the rod from the bellcrank and remove the nut and bolt,
remove the bellcrank.
REINSTALL in reverse order of removal and check the rigging as follows:
AILERON CONTROL RIGGING - Fig. 15
1. With control wheel in neutral, adjust cable length (turnbuckles) so that the bellcranks are
neutral (parallel to the wing rib).
2. Adjust the aileron rods so that both aileron trailing edges are 3/8" lower than the inboard wing
trailing edge.
3. Adjust cable tension to 32 lbs.
4. Safetie all turnbuckles.
5. Verify that when the bellcrank hits the stops, the control wheel arms in front of the instrument
panel have a minimum of 1/8" (3mm) clearance with the structure.
6. Check all components and connections for condition, proper installation, operation and safety.
Feb-00
7.1
ZENAIR CH2000 SERVICE MANUAL
________________________________________________________________________
FIXED AILERON TRIM TAB - Fig. 15
For the purpose of changing the lateral trim, a fixed tab may be installed on one aileron (length as
required). See Fig. 15.
REMOVAL/INSTALLATION OF STABILATOR CONTROL CABLES AND TRIM TAB - Fig. 17
REMOVAL
1.
2.
3.
4.
5.
6.
Remove the trim motor access plates. (Fig. 2)
Disconnect the cables at the stabilator horn by removing the two bolts.
Disconnect the cables at the control column by removing the bolts.
Open the fuselage access panel. (Fig. 2)
Remove the two pulleys and remove the cables.
Remove the cables.
REINSTALL in reverse order of removal and check the rigging as follows:
STABILATOR CONTROL RIGGING - Fig. 17
1. Adjust cable tension to 40 lbs +/-5.
2. With the stabilator trailing edge up (on the stop) - check deflection limit 12°(±.5°)
3. With the stabilator trailing edge down (on the stop) - check deflection limit 9.5°(±.5°)
Note: Stabilator neutral: parallel to upper fuselage longeron. (See Fig. 17).
4. Check that when stabilator hits the stops, there is 1/2” (12mm) minimum
clearance to any item forward of the instrument panel.
5. Check all components and connections for condition, proper installation, operation and
safety.
ANTISERVO TRIM TAB ADJUSTMENT
With the stabilator in neutral position (see Fig. 17), the trim tab travel is adjusted with the
adjustable fork ends so that it deflects l0° up for full nose down trim, and 5° down for full nose up
trim.
Caution: Ensure that the rod is engaged with 1/4" (6mm) minimum in the forks. Check all
components and connections for condition, proper operation and safety.
7.2
Nov-02
ZENAIR CH2000 SERVICE MANUAL
________________________________________________________________________
REMOVAL/INSTALLATION OF RUDDER CONTROL CABLES - Fig. 18
REMOVAL
1. Disconnect both rudder control cables by removing the nuts and bolts at the rudder horn and rudder pedals.
2. Open the fuselage access panel. (Fig. 2)
3. Remove the fairleads.
4. Remove the cables.
REINSTALL the controls in reverse order of removal. Check the rigging:
RUDDER CONTROL RIGGING - Fig. 18
1. Adjust cable tension to 22 lbs.
2. With the nose wheel centered and pedals in line at 170mm from Firewall (Fig. 18 - see also nose wheel alignment
in Section V).
3. The rudder is centered.
4. Check travel limits 21.5° (± 1.5°) left and right. (For non spinable airplanes see Fig. 18)
5. Check all components and connections for condition, proper installation, operation and safety.
6. Rudder Turnbuckles can be adjusted for level flight.
FLAP CONTROLS - Fig. 16
REMOVAL
1. Lower the flaps.
2. Remove the fairings.
3. Disconnect the control rods.
4. Open the fuselage access panel (Fig. 2).
5. Disconnect the actuator lever by removing the four bolts on the interconnecting tubes
and indicator cable, liberating the actuator lever.
6. Pull the interconnecting tubes out.
REINSTALL in reverse order of removal.
FLAP CONTROL RIGGING
The relative position of the control levers and the actuator lever is shown on Fig. 16.
1. Adjust the rod length for flaps up.
2. Check the full flaps down travel limit 50° (±3°).
3. Check all components and connections for condition, proper installation ,operation and safety.
FLAP ACTUATOR UNIT
REMOVAL
1. Open the fuselage access panel.
2. Disconnect the electric connector.
3. Remove the bolts at bottom and top of actuator.
4. Remove the actuator.
REINSTALL in reverse order of removal.
Check all connections for proper condition, installation and safety.
Check for proper operation.
CONTROL SYSTEM - WEAR OF JOINTS
- The wear tolerance on hinges, etc. is maximum .5mm (.020”) which is easily measured.
- In particular:
±5mm (3/32”) “floppiness” maximum at the stabilator tip.
±3mm (1/8”) “floppiness” maximum at rudder tip.
- When the wear reaches above limits, replace the bushings. (See Section IV)
Nov-02
7.3
ZENAIR CH2000 SERVICE MANUAL
________________________________________________________________________
AILERON AND CONTROLS
- Fig. 15 -
7.4
Feb-00
ZENAIR CH2000 SERVICE MANUAL
________________________________________________________________________
FLAPS CONTROL SYSTEM
- Fig. 16 -
Feb-00
7.5
ZENAIR CH2000 SERVICE MANUAL
STABILATOR CONTROL SYSTEM
- Fig. 17 7.6
Oct-00
ZENAIR CH2000 SERVICE MANUAL
________________________________________________________________________
RUDDER CONTROL SYSTEM
- Fig. 18 –
Nov-02
7.7
ZENAIR CH 2000 SERVICE MANUAL
________________________________________________________________________
SECTION VIII
FUEL SYSTEM
GENERAL
The CH2000 has two fuel tank options:
- one rear tank - Fig. 19
- two wing tanks - Fig. 20
The Figures show the line routing and accessories.
When work is performed on the fuel system, assure good ventilation, no smoking, ready
availability of fire fighting equipment
TROUBLE SHOOTING
See Table p. 8.3.
REAR TANK SYSTEM - Fig. 19
The rear tank is held in place under the baggage shelf by two straps. A rubber hose with
hose clamps connects the filler to the tank. Vent is through the cap. The strainer (finger
screen) is at the tank outlet. The larger fuel hose connected to the easy drain (beside the
gascolator under the fuselage, left side near the wing leading edge) is the fuel tank
"sump". The fuel valve is of the ON/OFF position type.
REPLACEMENT OF REAR TANK
1.
2.
3.
4.
5.
6.
Drain the fuel from tank.
Disconnect the filler neck.
Disconnect the wiring from sender unit. (See Fig. 19 and Fig. 2)
Disconnect the fuel lines at the tank outlet (bottom of tank).
Disconnect the grounding (left side, bottom of tank).
Disconnect the straps (bolts) and remove the tank.
REINSTALL in the reverse order, after checking the cork padding for damage and proper
position. (All upper edges, top and sides, and under the straps: adhesive - “3M Scotch
Grip 847”.
Check all connections for condition, leaks and safety.
FUEL SENDER UNIT (under the fuel gauge cover plate: see Fig. 2)
REMOVE the sender after removing the five screws.
REINSTALL with the cork seal ring and the five screws.
Feb-00
8.1
ZENAIR CH2000 SERVICE MANUAL
________________________________________________________________________
WING TANK SYSTEM - Fig. 20
The wing tanks are installed behind the wing spar, outside the walkway, and held in place by the bottom wing panels. The filler neck
and vent tube are integral parts of the tank. Each tank has a sump easy drain. The finger screen is at the tank outlet and accessible
through the small inspection plate. See Fig. 20. Each tank feeds the selector shut off valve.
REPLACEMENT OF WING TANK - Fig. 20
CAUTION: Do not loosen tank support panel unless tanks have been defueled.
1. Drain fuel from tank
2. Disconnect the fuel line at tank outlet.
CAUTION: Removing the tank support panel will allow the tank to drop: be careful to let the tank
down slowly to prevent ripping off the wiring.
3. Remove tank cover plate.
4. Remove the fuel sender and the ground wires.
5. Remove the tank.
INSTALLATION
1 Verify that the cork padding is not damaged and is in proper position (all edges - adhesive “3M-Scotch Grip 847”.)
2. Follow the steps for removal in inverse order.
3. Seal with sealer 3M ref. 847, the filler neck to wing skin joint.
4. Check all connections for conditions, leaks and safety.
CAUTION: With wing tanks option, verify that the fuel lines cross over behind the spar as illustrated on Fig. 20.
FINGER SCREENS - Fig. 19 and Fig. 20
The finger screens are easily accessible at the tank outlet.
1. Drain the tank.
2. Disconnect the fuel lines.
3. Unscrew the finger screen fitting.
REINSTALL in reverse order after inspection and cleaning.
Check the connection for condition, leaks and safety.
FUEL VALVE - Fig. 19 and Fig. 20
The fuel valve is situated between the seats and is attached with two bolts to the underside of the seat panel.
REMOVAL
1. Drain fuel from rear tank (if installed).
2. Disconnect fuel lines from fuel valve.
3. Remove bolts securing the fuel valve.
REINSTALL in reverse order of removal and check all connections for conditions, leaks, operation and safety.
NOTE: To gain access to the fuel sender unit, the wing tanks must be removed. (For sender removal see page 8.1).
AUXILIARY FUEL PUMP - Fig. 19 and Fig. 20
The auxiliary fuel pump is bolted to the front of the firewall.
REMOVAL
1.
2.
3.
4.
Ensure fuel valve is in OFF position.
Disconnect fuel lines from pump.
Disconnect electrical wiring from pump.
Remove pump attachment bolts.
REINSTALL in the reverse order of removal and check all connections for conditions and safety.
Open the fuel valve and run the pump: check for leaks.
CAUTION: Verify the pump will operate in the correct direction. (Flow direction is indicated by arrow stamped on pump.)
8.2
3 Apr 95
ZENAIR CH2000 SERVICE MANUAL
________________________________________________________________________
FUEL SYSTEM TROUBLESHOOTING
Trouble
Fuel gauge fails to indicate
Cause
Broken wiring
Remedy
Check and repair
Gauge not operating
Replace
Float partially or
completely filled with fuel
Replace float
Float touching tank
Bend float arm
Circuit breaker out
Reset and check
Fuel gauge indicates full
when tanks are not full
Incomplete ground
Check ground connections
at fuel transmitter
No fuel pressure
indication
Fuel valve stuck
Check valve
No fuel in tanks
Check fuel, fill
Defective fuel pump
Check pump for pressure
buildup. Check diaphragm
and relief valves in engine
pump. Check for
obstruction
Air leak in intake lines
Defective gauge
Replace gauge
Obstruction in inlet side of
pump
Trace lines and locate
obstruction
Faulty diaphragm
Replace or rebuild pump
Unidentified leak
Fuel lines damaged or
improperly installed
Locate and repair or
tighten
Fuel valve leaks
Worn parts
Replace valve
Pressure low or pressure
surges
Nov 02
8.3
ZENAIR CH2000 SERVICE MANUAL
________________________________________________________________________
STANDARD FUEL SYSTEM (REAR TANK)
- Fig. 19 8.4
3 Apr 96
ZENAIR CH2000 SERVICE MANUAL
OPTIONAL FUEL SYSTEM (WING TANKS)
- Fig. 20 3 Apr 96
8.5
ZENAIR CH2000 SERVICE MANUAL
_______________________________________________________________________
SECTION IX
INSTRUMENTS
GENERAL
The instrumentation in the CH2000 is designed to give a quick and actual indication of the
attitude, performance and condition of the airplane. The instrument panel has been
arranged to accommodate all the advanced flight instruments in front of the pilot. (Fig.
21)
The two types of instruments installed in the CH2000 have been classified in this section
as standard and optional. The first part of this section will pertain to maintenance and
troubleshooting of all the standard instruments and their systems. The remaining portion
of this section is directed to maintenance and troubleshooting of optional instruments.
STANDARD INSTRUMENTS - Fig. 21
•
AIRSPEED INDICATOR
GENERAL
The airspeed indicator provides a means of indicating the speed of the airplane passing
through the air. The airspeed indication is the differential pressure reading between
dynamic air pressure and static air pressure. This instrument has the diaphragm vented to
the dynamic air source and the case is vented to the static air system. As the airplane
increases speed, the dynamic air pressure increases, causing the diaphragm to expand. A
mechanical linkage picks up this motion and moves the instrument pointer to the indicated
speed. The instrument dial is calibrated in knots, and also has the necessary operating
range markings for safe operation of the airplane.
TROUBLESHOOTING See following table:
Trouble
AIRSPEED TUBES AND INDICATOR
Cause
Pointers of static
instruments do not indicate
properly.
Pointer of instrument
oscillates.
3 Apr 95
Remedy
Leak in instrument case or
in lines.
Check for leak and seal.
Leak in instrument case.
Check for leak and seal.
9.1
ZENAIR CH2000 SERVICE MANUAL
INSTRUMENT PANEL
Note: Position of optional instruments may vary according to owner’s specifications.
- Fig. 21 -
9.2
Oct-00
ZENAIR CH2000 SERVICE MANUAL
_______________________________________________________________________
• ALTIMETER
TROUBLESHOOTING See following table:
Trouble
Excessive scale error.
Excessive pointer oscillation.
High reading.
Setting knob is hard to turn.
Inner reference marked fails to
move when setting knob is rotated.
Setting knob set screw loose or
missing.
Cracked or loose cover glass.
Dull or discolored markings.
Barometric scale and reference
markers out of synchronism.
Barometric scale and reference
markers out of synchronism with
pointers.
•
ALTIMETER
Cause
Improper calibration adjustment.
Defective mechanism.
Improper venting.
Wrong lubrication or lack of
lubrication.
Out of engagement.
Excessive vibration.
Remedy
Replace instrument.
Replace instrument.
Eliminate leak in static pressure
system and check alignment of
airspeed tube.
Replace instrument.
Replace instrument.
Excessive vibration.
Age.
Slippage of mating parts.
Tighten instrument screw, if
loose. Replace instrument, if
screw is missing.
Replace instrument.
Replace instrument.
Replace instrument.
Drift in mechanism.
Reset pointers.
PITOT STATIC SYSTEM: See Owner’s Manual, Section 7
REMOVAL OF PITOT STATIC
1. Remove the three retaining screws.
2. Remove the lines from the barbed fittings.
REINSTALL in reverse order. - Check for leaks, proper installation, operation and safety.
- Tygon splice for pitot static connection at wing root must be replaced
with new material whenever removed.
7 Jul 95
9.3
ZENAIR CH2000 SERVICE MANUAL
_______________________________________________________________________
•
MAGNETIC COMPASS
GENERAL
The magnetic compass installed in the CH2000 is a self-contained instrument and is
mounted at the windshield top. The compass correction card is located in the card holder
mounted on the instrument panel.
TROUBLESHOOTING See following table:
Trouble
Excessive card error.
Excessive oscillation.
Sluggish.
Liquid leakage.
Discolored markings.
9.4
MAGNETIC COMPASS
Cause
Remedy
Compass not properly
compensated.
Compensate instrument.
External magnetic
interference.
Improper mounting on
instrument panel.
Locate magnetic interference
and eliminate if possible.
Align instrument.
Insufficient liquid.
Weak card magnet.
Replace instrument.
Replace instrument.
Excessive pivot friction or
broken jewel.
Replace instrument.
Instrument too heavily
compensated.
Loose bezel screws.
Remove excess
compensation.
Replace instrument.
Broken cover glass.
Replace instrument.
Defective sealing gaskets.
Age.
Replace instrument.
Replace instrument.
3 Apr 96
•
ZENAIR CH2000 SERVICE MANUAL
_______________________________________________________________________
TACHOMETER
GENERAL
The tachometer is connected to the engine accessory by a flexible cable, and provides an
indication of crankshaft speed in revolutions per minute. The instrument has a recording
mechanism for recording the time that the engine is in actual operation.
TROUBLESHOOTING See following table:
TACHOMETER
Cause
Trouble
No reading on indicator, either
permanent or intermittent.
Pointer oscillates excessively.
•
Remedy
Broken shaft.
Replace.
Weak spring.
Rough spot on, or sharp bend
in shaft.
Replace instrument.
Repair or replace.
Excess friction in instrument.
Replace instrument.
ENGINE OIL PRESSURE GAUGE
GENERAL
The oil pressure gauge is mounted in the cluster on the instrument panel. This gauge will indicate
the amount of oil pressure in PSI available at the pressurized engine oil passage.
TROUBLESHOOTING
ENGINE OIL PRESSURE GAUGE
Cause
Remedy
Pointer loose on shaft.
Replace instrument.
Overpressure or seasoning of
bourdon tube.
Excessive scale error.
Improper calibration
Replace instrument.
adjustment.
Excessive pointer oscillation.
Improper damping or rough
Disconnect line and drain.
engine relief valve.
Check for leaks. If trouble
persists, clean and adjust relief
valve.
Sluggish operation or pointer
Engine relief valve open.
Check and clean.
or pressure fails to build up.
Trouble
Excessive error at zero.
3 Apr 95
9.5
ZENAIR CH2000 SERVICE MANUAL
________________________________________________________________________
• ENGINE OIL TEMPERATURE INDICATOR
GENERAL
The oil temperature indicator is mounted in the instrument cluster on the instrument panel. This
instrument will provide a temperature indication of the engine oil in degrees Fahrenheit. The
instrument has a temperature sender located on the engine accessory section.
TROUBLESHOOTING See following table:
ENGINE OIL TEMPERATURE INDICATORS
Trouble
Cause
Remedy
Instrument fails to show any
Broken or damaged capillary.
Check engine unit and wiring
reading.
Wiring open.
to instrument.
Excessive scale error.
Improper calibration
Repair or replace.
adjustment.
Pointer fails to move as engine Broken or damaged capillary
Check engine unit and wiring.
is warmed up.
or open wiring.
Dull or discolored luminous
Age.
Replace instrument.
marking.
•
FUEL QUANTITY INDICATOR
GENERAL
The fuel quantity gauge(s) used on the CH2000 is(are) mounted in the cluster on the instrument
panel. These instruments are calibrated in fractional divisions of one fourth, one half, three
fourths and full. A transmitter unit is installed in each fuel tank. This unit contains a resistance
strip and a movable control arm. The position of this arm is controlled by a float in the fuel tank
and this position is transmitted electrically to the indicator gauge to show the amount of fuel in the
tank.
TROUBLESHOOTING See following table:
Trouble
Fuel gauge fails to indicate.
Fuel gauge indicates full when
tanks are not full.
9.6
FUEL QUANTITY INDICATORS
Cause
Remedy
Broken wiring.
Check and repair.
Gauge not operating.
Replace.
Float partially or completely
Replace float.
filled with fuel.
Circuit breaker out.
Reset and check.
Float touching tank
Incomplete ground.
Bend float arm
Check ground connections at
fuel transmitter.
Nov 02
ZENAIR CH2000 SERVICE MANUAL
________________________________________________________________________
• FUEL PRESSURE GAUGE
GENERAL
The fuel pressure gauge instrument is mounted in the cluster on the instrument panel.
This gauge is connected to the sender at the carburetor fuel inlet fitting.
TROUBLESHOOTING See following table:
Trouble
No fuel pressure indication.
Pressure low or pressure
surges.
Needle fluctuation.
•
FUEL PRESSURE GAUGE
Cause
Remedy
Fuel valve stuck.
Check valve.
No fuel in tanks.
Check fuel, fill.
Defective fuel pump.
Check pump for pressure
build up. Check diaphragm
and relief valves in engine
pump. Check for
obstruction in electric
pump.
Defective gauge/sender.
Replace gauge/sender.
Obstruction in inlet side of
Trace lines and locate
pump.
obstruction.
Faulty bypass valve.
Replace.
Faulty diaphragm.
Replace or rebuild pump.
Surge dome on pump filled Remove and empty.
with fuel.
AMMETER
GENERAL
The ammeter is mounted in the instrument cluster located on the instrument panel. This
instrument measures the amount of current received and the amount of current drain on
the battery.
•
VOLTMETER
GENERAL
The Voltmeter is mounted in the instrument cluster located on the instrument panel. This
instrument measures the level of the battery or Alternator output.
3 Apr 95
9.7
ZENAIR CH2000 SERVICE MANUAL
________________________________________________________________________
OPTIONAL INSTRUMENTS - Fig. 21
•
RATE OF CLIMB INDICATOR
GENERAL
The rate of climb indicator measures the rate of change in static pressure when the airplane is
climbing or descending. By means of a pointer and dial, this instrument will indicate the rate of
ascent or descent of the airplane in feet per minute.
TROUBLESHOOTING See following table:
Trouble
Pointer does not set on zero.
Pointer fails to respond.
Pointer oscillates.
•
RATE OF CLIMB INDICATOR
Cause
Remedy
Aging of diaphragm.
Reset pointer to zero by means
of setting screw. Tap
instrument while resetting.
Obstruction in static line.
Disconnect all instruments
connected to the static line.
Check individual instruments
for obstruction in lines.
Leaks in static lines.
Disconnect all instruments
connected to the static line.
Check individual instruments
for leaks. Reconnect
instruments to static line and
test installation for leaks.
Replace instrument.
Defective mechanism.
VACUUM SYSTEM - Fig. 21 and Fig. 22
GENERAL
The vacuum system employed to operate the gyro instruments is comprised of an engine driven
dry vacuum pump, vacuum regulator valve, and the necessary tubing to complete the system.
VACUUM GAUGE
The vacuum gauge is mounted above the gyro instruments. This gauge is calibrated in inches of
mercury and indicates the amount of vacuum created by the engine driven vacuum pump.
9.8
3 Apr 95
ZENAIR CH2000 SERVICE MANUAL
________________________________________________________________________
VACUUM REGULATOR VALVE - Fig. 22
One vacuum regulator valve is incorporated in the system to control vacuum pressure to
the gyro instruments. The regulator valve is located under the instrument panel, access to
the valve for maintenance and adjustment is gained from below the instrument panel.
ADJUSTMENTS OF VACUUM REGULATOR VALVE
Unlock the nut under the Regulator valve, and turn the adjusting screw to obtain the
proper vacuum. Safety after adjustment.
TROUBLE SHOOTING OF VACUUM SYSTEM See following table:
Trouble
No vacuum pressure gauge
indication.
No vacuum pressure gauge
indication at instrument.
No vacuum suction gauge
indication at either
instrument or source.
VACUUM SYSTEM
Cause
Pump inoperative.
Disconnected. Broken or
restricted lines.
Hose from instrument to
gauge leaking or restricted.
Faulty gauge.
Malfunctioning, regulator
valve, or vacuum pump.
Low vacuum system
pressure.
Vacuum regulator valve
incorrectly adjusted.
Leaking of the system lines
or fitting.
Normal pressure indication,
but sluggish operation of
instruments.
High system pressure.
Instruments air filter
elements dirty.
Vacuum regulator valve
incorrectly adjusted.
Vacuum regulator valve
sticking or dirty screen.
3 Apr 95
Remedy
Replace pump. Locate
trouble and correct.
Check all lines and
connections.
Check operation of
instruments. If operation is
normal, replace gauge. If
instruments are inoperative,
check operation of vacuum
pump or regulator valve.
Adjust regulator valves in
accordance with
(Adjustments) of this
section.
Check all lines and fittings.
Remove and clean or
replace.
Adjust in accordance with
“Adjustments” as per
above.
Clean and check operation
of regulator valve.
9.9
ZENAIR CH2000 SERVICE MANUAL
________________________________________________________________________
DIRECTIONAL GYRO INDICATOR - Fig. 22
GENERAL
The directional gyro is a flight instrument incorporating an air driven gyro stabilized in
the vertical plane. The gyro is rotated at high speed by lowering the pressure in the
airtight case and simultaneously allowing atmospheric air pressure to enter the instrument
against the gyro buckets. Due to gyroscopic inertia, the spin axis continues to point in the
same direction even though the aircraft yaws to the right or left. This relative motion
between the gyro and the instrument case is shown on the instrument dial which is similar
to a compass card. The dial, when set to agree with the airplane magnetic compass
provides a positive indication free from swing and turning error.
TROUBLESHOOTING See following table:
DIRECTIONAL GYRO INDICATOR
Trouble
Excess drift in either
direction.
Cause
Excessive vibration with
amplitude more than 0.006
inch.
Insufficient vacuum.
If vacuum below 3.75 inch
Hg, check for the following:
a. Regulator improperly
adjusted.
b. Incorrect gauge reading.
c. pump failure
d. Vacuum line kinked or
leaking.
Dial spins continuously.
9.10
Defective instrument.
Defective mechanism.
Remedy
Check shock mounts.
a. Adjust - see Fig. 22.
b. Recalibrate.
c. Repair or replace.
d. Check and repair.
Check for collapsed inner
wall of hose.
Replace instrument.
Replace.
3 Apr 95
ZENAIR CH2000 SERVICE MANUAL
________________________________________________________________________
GYRO SYSTEM (OPTIONAL)
- Fig. 22 -
3 Apr 95
9.11
ZENAIR CH2000 SERVICE MANUAL
_______________________________________________________________________
GYRO HORIZON INDICATOR
GENERAL
The gyro horizon is essentially an air driven gyroscope rotating in an horizontal plane and is operated by the
same principal as the directional gyro. Due to the gyroscopic inertia, the spin axis continues to point in the
vertical direction, providing a constant visual reference to the altitude of the airplane relative to pitch and
roll axis. A bar across the face of the indicator represents the horizon. A miniature adjustable airplane is
mounted to the case and aligning the miniature airplane to the horizon bar simulates the alignment of the
airplane to the actual horizon. Any deviation simulates the deviation of the airplane from the true horizon.
The gyro horizon is marked for different degrees of bank.
TROUBLESHOOTING See following table:
Trouble
Bar fails to respond.
Bar does not settle.
GYRO HORIZON INDICATOR
Cause
Insufficient vacuum.
Excessive vibration.
Insufficient vacuum.
Bar oscillates or shimmies
continuously.
Defective instrument.
Excessive vibration.
Vacuum too high.
Defective mechanism.
Remedy
Check pump and tubing.
Check shock mounts.
(Replace if necessary.)
Check line and pump.
Adjust regulator.
Replace.
Check shock mounts.
(Replace if necessary.)
Adjust regulator.
Replace instrument.
ELECTRIC TURN AND BANK INDICATOR
GENERAL
The turn and bank indicator is an electric instrument used for making correctly controlled turns. The turn
portion of the indicator is an electrically driven gyroscope, while the bank portion is a ball sealed in a
curved glass tube filled with damping fluid.
TROUBLESHOOTING
Trouble
Pointer fails to respond.
Incorrect sensitivity.
9.12
ELECTRIC TURN AND BANK INDICATOR
Cause
Remedy
Foreign matter lodged in
Replace instrument.
instrument.
Misadjustment of sensitivity
Adjust by means of sensitivity
spring.
spring screw. If this pulls the
pointer from zero, replace
instrument.
3 Apr 95
ZENAIR CH2000 SERVICE MANUAL
________________________________________________________________________
MANIFOLD PRESSURE GAUGE
GENERAL
The manifold pressure gauge is a vapor proof, absolute pressure type instrument. Pressure
from the intake manifold of the engine is transmitted to the instrument through a line. A
pointer indicates the manifold pressure available at the engine in inches of mercury.
TROUBLESHOOTING
MANIFOLD PRESSURE GAUGE
Trouble
Cause
Remedy
Excessive error at existing
Pointer shifted.
Replace instrument.
barometric pressure.
Excessive error when
Line leaking.
Tighten line connections.
engine is running.
Sluggish or jerky pointer
Improper damping
Adjust damping screw.
movement.
adjustment.
Broken or loose cover glass. Vibration or excessive
Replace glass and reseat
pressure.
case.
Dull or discolored luminous Age.
Replace instrument.
markings.
Incorrect reading.
Moisture or oil in line.
Disconnect lines and blow
out.
REPLACEMENT OF INSTRUMENTS - Fig. 21
GENERAL
Since all instruments are mounted in a similar manner, a description of a typical removal and
installation is provided as a guide for the removal and installation of the instruments. Special care
should be taken when any operation pertaining to the instruments is performed.
Remove the connections to the instrument and remove the mounting screws of the instrument.
Note: Tag connections for ease of reinstallation.
Installation of the instruments will be in the reverse order given for removal. After the installation
is completed, check all components for clearance of the control column, condition, proper
operation and safety.
3 Apr 95
9.13
ZENAIR CH2000 SERVICE MANUAL
________________________________________________________________________
SECTION X
ELECTRICAL SYSTEM
GENERAL - Fig. 23 and Fig. 24
The electrical system of the CH2000 is a 12 volt, direct current, single wire, negative
ground system. All electrical equipment is grounded to the metal structure of the airplane,
therefore the structure takes the place of the second wire. A 12 volt battery is
incorporated in the system to furnish power for starting and as a reserve power source in
case of alternator failure. The battery and alternator are both connected to the bus bar;
from which all the electrical equipment is powered, with the exception of the starter which
receives its power from the load side of the battery. The master switch, located on the
switch panel below the instruments, controls the battery relay. The master switch must be
on before any electrical equipment will operate. The CH2000 can be equipped with the
standard navigation lights, strobes, and dual landing lights located in the wing leading
edge.
TROUBLESHOOTING
Troubles peculiar to the CH2000 electrical system are listed in a Table at the end of this
section along with their probable causes and suggested remedies. Fig. 23 is a schematic of
the different electrical circuits used in this airplane and Fig. 24 shows the wiring.
After the trouble has been corrected, check the entire electrical system for security and
operation of its components.
ELECTRICAL POWER SUPPLY
The electrical power is supplied by one 12 volt battery and one 12 volt direct current
alternator. The alternator is located on the front lower right side of the engine and utilizes
a belt drive from the engine crankshaft. A voltage regulator is incorporated to prevent
overloading of the battery and electrical circuits.
3 Apr 95
10.1
ZENAIR CH2000 SERVICE MANUAL
_______________________________________________________________________
ELECTRIC SCHEMATICS
- Fig. 23 10.2
Oct-00
ZENAIR CH2000 SERVICE MANUAL
________________________________________________________________________
ELECTRIC WIRING
- Fig. 24 Oct-00
10.3
ZENAIR CH2000 SERVICE MANUAL
________________________________________________________________________
REPLACEMENT OF THE BATTERY
1. Remove the rear fuselage side access panel. (See Fig. 2)
2. Remove the bolts holding the battery tie down brackets.
Caution: Always remove the ground cable first (and install it last), to prevent
accidental short circuit.
3. Remove the two battery terminals from the battery post.
4. Remove the battery with its container from the aircraft.
5. Remove battery from container.
REINSTALL in reverse order.
SERVICING THE BATTERY
The battery should be checked for proper fluid level, but must not be filled above the
baffle plates. A hydrometer check should be performed to determine the specific gravity
of the electrolyte (1.268 standard, and 1.285 for better cold-weather cranking capacity).
All connections must be clean and tight. If battery is not up to normal charge, recharge
starting with a charging rate of 4 amperes and finishing with 2 amperes. The normal
charged battery will indicate 11.5 Volts or more.
CHARGING SYSTEM
The charging system consists of a 3 phase, delta connected alternator with integral
silicone diode rectifiers rated 14V D.C. at 60 amp continuous output; and a voltage
regulator which delivers a constant frequency, pulse with modulated field power control
to maintain the alternator output voltage.
The over voltage protection is provided within the regulator: it will trip off the regulated
output after the regulator fails to maintain the correct level.
Note: the regulator will remain locked off until the power is momentarily removed and
reinstated.
The regulator is internally protected against damage to the output stage in the event of a
ground fault to the field wire. It will be locked off until the power is momentarily
removed and reinstated.
The alternator and regulator are easily checked individually.
10.4
3 Apr 96
ZENAIR CH2000 SERVICE MANUAL
________________________________________________________________________
CHARGING SYSTEM (cont’d)
If the battery is fully charged and the charging rate remains high, disconnect the lead from
"F" terminal of the regulator: if charging rate is high with engine at medium speed (1200
R.P.M.), the alternator field or field wire is grounded; if the output drops off, the
regulator is faulty, and should be checked for high voltage setting or internal grounding.
If the battery is low, and the charging rate is low, ground "F" terminal of the alternator
momentarily and increase speed: if output does not increase, alternator to regulator wiring
is faulty; if output increases the alternator is operating properly.
If the ammeter indicates a heavy discharge with engine off, or the alternator breaker off
when the master is on: the diodes in the alternator are shorted (repair or replace the
alternator).
For procedures and specifications concerning testing and adjustment of the alternator and
voltage regulator, refer to manufacturer’s service manual.
CAUTION: If the battery terminals have been reversed, the alternator diodes have
shorted and need replacement.
VOLTMETER - Fig. 23
The voltmeter indicates the level of the battery (11.5 or more volts, engine off and master
on).
AMPMETER - Fig. 23
The amp meter is mounted in series with the battery and bus bar(s). It shows in (positive)
or out (negative) current to/from the battery.
With a charged battery, the ammeter should read near zero when the engine is running and
has recharged (3 to 5 minutes) the battery previously discharged by the starter current, and
no other loads are applied. (lights, radios, etc....off)
1 Sep 95
10.5
ZENAIR CH2000 SERVICE MANUAL
________________________________________________________________________
STALL WARNING - Right bottom of Fig. 23
The stall warning system consists of an electric buzzer located behind the roll over bar on
the cabin ceiling, and activated by the airflow closing the contact on the right wing
leading edge when the aircraft operates at a high angle of attack near the stall of the wing.
If the buzzer does not operate when lifting the contact: check the contact, the buzzer and
the breaker for proper operation.
The contact element on the wing leading edge is replaced by removing the blind rivets and
pulling it out. Reinstall with blind rivets at the same location to obtain the warning
(buzzer) 5 kts above the stall speed.
LANDING LIGHT REPLACEMENT - Located in the right wing Leading edge, near the
wing tip.
1.
2.
3.
4.
Remove the polycarbonate cover.
Remove the four screws of the retaining ring.
Change light bulb (GE #4509).
Reassemble and install in reverse order.
10.6
3 Apr 95
ZENAIR CH2000 SERVICE MANUAL
________________________________________________________________________
TABLE - ELECTRICAL SYSTEM TROUBLESHOOTING
Trouble
BATTERY
Discharged battery.
Battery life is short.
Cracked cell jars.
Excessive corrosion inside
container.
Battery freezes.
Cause
Battery worn out.
Charging rate not set right.
Standing too long.
Equipment left on
accidentally.
Impurities in electrolyte.
Short circuit (ground) in
wiring.
Broken cell partitions.
Overcharge due to level of
electrolyte being below top
of plates.
Sulfation due to disuse.
Impurities in electrolyte.
Hold-down bracket loose.
Frozen battery.
Spillage from overfilling.
Discharged battery.
Water added and battery
not charged immediately.
Leaking battery jar.
Battery polarity reversed.
Frozen.
Connected backwards on
airplane or charger.
Battery consumes
excessive water.
Cracked jar (one cell only).
3 Apr 95
Remedy
Replace battery.
Reset.
Remove and recharge
battery if left in unused
airplane for too long.
Remove and recharge.
Replace electrolyte.
Check wiring.
Replace battery.
Maintain electrolyte.
Replace battery.
Replace battery.
Replace battery and
tighten.
Replace battery.
Use care in adding water.
Replace battery.
Always recharge battery
for 1/2 hour following
addition of water in
freezing weather.
Replace battery.
Battery should be slowly
discharged completely and
then charged correctly and
tested.
Replace battery.
10.7
ZENAIR CH2000 SERVICE MANUAL
________________________________________________________________________
TABLE. ELECTRICAL SYSTEM TROUBLESHOOTING (cont'd)
Trouble
Cause
Remedy
STARTER
Check and recharge if
Motor fails to operate.
Low battery charge.
necessary.
Refer to electrical wiring
Defective or improper
diagram and check all
wiring or loose
wiring.
connections.
Replace faulty unit.
Defective starter solenoid
or control switch.
Low motor and cranking
Worn, rough, or
Disassemble, clean,
speed.
improperly lubricated
inspect, and relubricate,
motor or starter gearing.
replacing ball bearings if
Same electrical causes as
worn.
listed under "Motor fails to Same remedies listed for
operate".
these troubles.
ELECTRICAL LOADS (AMPS)
Equipment
Battery solenoid
Voltage Regulator
Clock
Hour meter
Fuel Gauge
Fuel Pressure
Oil Temperature
Voltmeter
Ammeter
Aux. fuel pump
Flap Actuator
Trim Actuator (if applicable)
Stall Warning
Options
Turn and Bank
Position Lights
Strobes
Instrument Lights
Landing Lights
Pitot Heat
10.8
Continuous
.65
3.0
.1
.1
.1 (ea)
.1
.1
.1
.1
Intermittent
5.0
5.0
1.0
.1
.1
2.0 (ea)
7.0
.33 (ea)
7.0 (ea)
10.0
Oct-00
ZENAIR CH2000 SERVICE MANUAL
_______________________________________________________________________
SECTION XI
CABIN HEATER AND VENTILATION SYSTEM
GENERAL - Fig. 25
Heat for the cabin of the CH2000 is provided by an air heater installed on the exhaust
manifold. Fresh air enters the engine compartment through the nose cowling and is
vented to the heater muff through a flexible hose located on the baffling at the front of the
engine. The air is then heated and vented into the cabin area through a valve which can be
controlled from the instrument panel. When the valve is completely closed off, the heated
air is vented back into the engine compartment. The heater outlet in the cabin is located
in front of the pilot’s feet. The windshield is kept clear of frost, by a defroster system
which operates from the heater.
Fresh air is supplied to the cabin by adjustable vents in the right and left door windows.
HEATER MAINTENANCE
1. Disconnect the hoses of the cabin heat shroud.
2. Remove the heat shroud and inspect the outer surface of the inner core (exhaust pipe)
for signs of combustion products.
3. Thoroughly clean the exhaust pipe of all dirt and corrosion.
4. Carefully inspect the exhaust pipe, using a hand-held magnifying glass and light /
mirror, for signs of cracks and pinholes. Pay particular attention to welds, seams, and
their adjacent areas.
5. Any suspect areas are to be further evaluated by a pressure test or other means.
6. Repair or replace, before further flight, exhaust pipe containing cracks or holes.
REINSTALL the heat shroud and hoses in reverse order of removal.
CABIN HEAT CONTROL
Check the operation of the push-pull control to insure the valve door functions properly:
when the control is pulled out, the door should be completely open to permit full air flow;
when the control is pushed in, the valves should close off all air passage.
HOT WEATHER USE
The slat hose from the engine baffle to muffler heat shroud to cabin can be replaced with a
one piece scat hose from engine baffle to cabin. This will give additional fresh air in
cabin area.
Nov-02
11.1
ZENAIR CH2000 SERVICE MANUAL
_______________________________________________________________________
CABIN HEAT AND VENTILATION
- Fig. 25 11.2
Nov-02
ZENAIR CH2000 SERVICE MANUAL
_______________________________________________________________________
SECTION XII
CABIN DOORS
DOOR HANDLE
Fig. 26
-
-
-
From inside the aircraft, with the “gull wing doors” closed, the door handle is
parallel with the arm rest. Label 20-E-2-20 with the “closed line”, is lined up with
the handle.
Inspect the bearing in 20-F-32-3 and make sure that it is not worn-through, that it
rotates freely and that it is greased.
The schematic shows a 10-32 rivnut located front + rear of each door, with
washers and countersunk screw. When the door handle is in the closed position,
the front + rear countersunk screws must be tight against 20-M-82-3 (channel on
top of Upper Longeron).
Make sure that the door handle position is as per schematic in the “closed”
position and that it has “positive locking pressure”.
Make sure that handles crew MS24693-S274 is tight and that “locktite” has been
applied.
Nov-02
12-1