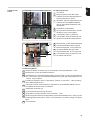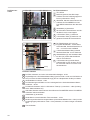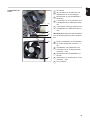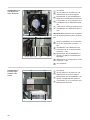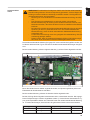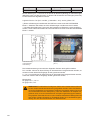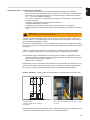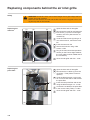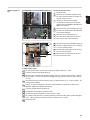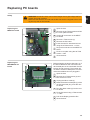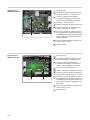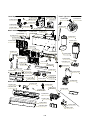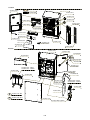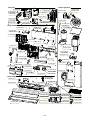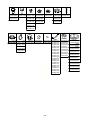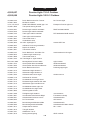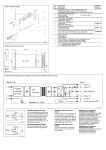
1
/ Perfect Charging / Perfect Welding / Solar Energy EN DE Fronius Agilo 42,0410,1908 009-02122014 Serviceanleitung Ersatzteilliste Netzgekoppelter Wechselrichter Service manual Spare parts list Grid-connected inverter 0 DE Inhaltsverzeichnis Allgemeine Informationen Vorwort und Sicherheitshinweise ............................................................................................................... Sicherheit .............................................................................................................................................. Fronius Technical Support .................................................................................................................... Bestellung von Ersatzteilen................................................................................................................... Inhalte der Serviceanleitung ................................................................................................................. Werkzeug und Messgeräte ................................................................................................................... Fehler-Suchhilfe.................................................................................................................................... Komponenten austauschen .................................................................................................................. Sicherheitstechnische Überprüfung ...................................................................................................... Anhang.................................................................................................................................................. Werkzeug und Messgeräte ........................................................................................................................ Allgemeines .......................................................................................................................................... Erforderliche Werkzeuge ...................................................................................................................... Erforderliche Messgeräte...................................................................................................................... Fehlersuchhilfe Service-Codes ........................................................................................................................................... Allgemeines .......................................................................................................................................... Serviceklasse 1..................................................................................................................................... Serviceklasse 3..................................................................................................................................... Serviceklasse 4..................................................................................................................................... Serviceklasse 5..................................................................................................................................... Serviceklasse 7..................................................................................................................................... Fehler-Suchbaum ...................................................................................................................................... Allgemein .............................................................................................................................................. Komponenten austauschen Komponenten austauschen ....................................................................................................................... Sicherheit .............................................................................................................................................. Zuluftgitter / Oberes Abdeckblech öffnen.............................................................................................. Zuluftgitter Fronius Agilo Outdoor öffnen .............................................................................................. Übersicht............................................................................................................................................... Komponenten hinter Zuluftgitter tauschen ................................................................................................. Sicherheit .............................................................................................................................................. Hauptlüfter tauschen............................................................................................................................. Taktfilter tauschen................................................................................................................................. AC-Schütz tauschen ............................................................................................................................. AC-Filter /Stromsensoren tauschen...................................................................................................... Komponenten hinter Türe tauschen........................................................................................................... Sicherheit .............................................................................................................................................. DC-Hauptschalter tauschen................................................................................................................. Leistungsteil tauschen .......................................................................................................................... DC-Relais tauschen .............................................................................................................................. DC-Filter tauschen ................................................................................................................................ Umwälzlüfter tauschen.......................................................................................................................... Umwälzlüfter Fronius Agilo Outdoor tauschen..................................................................................... Umwälzlüfter 2 Fronius Agilo Outdoor tauschen.................................................................................. Wärmetauscher tauschen .................................................................................................................... Prints tauschen .......................................................................................................................................... Sicherheit .............................................................................................................................................. Print MENT tauschen............................................................................................................................ Print MECERCAP tauschen................................................................................................................. Print MEREG tauschen......................................................................................................................... Print MEWU tauschen........................................................................................................................... Print MEDC tauschen ........................................................................................................................... 3 5 5 5 5 5 5 5 6 6 6 7 7 7 7 9 11 11 11 13 16 25 28 32 32 33 35 35 35 36 37 38 38 38 38 39 40 41 41 41 42 43 44 45 46 46 48 49 49 49 49 50 50 51 1 Sicherheitstechnische Überprüfung Sicherheitstechnische Überprüfung ........................................................................................................... Sicherheitstechnische Überprüfung ...................................................................................................... Verantwortlichkeit.................................................................................................................................. Anwendungsbereich ............................................................................................................................. Qualifikation des Prüfpersonals ............................................................................................................ Messinstrumente................................................................................................................................... Sichtprüfungen........................................................................................................................................... Allgemeines .......................................................................................................................................... Netzversorgung und Anschlussleitungen.............................................................................................. Gehäuse und Abdeckungen ................................................................................................................. Stellteile und Anzeigegeräte ................................................................................................................. Leistungsschild und Warnaufkleber ...................................................................................................... Elektrische Prüfungen................................................................................................................................ Schutzleiterwiderstand.......................................................................................................................... Isolationswiderstand ............................................................................................................................. Schutzleiterstrom .................................................................................................................................. Funktionsprüfungen ................................................................................................................................... Funktion ................................................................................................................................................ Netz - Ein/Ausschalt-Vorrichtungen ...................................................................................................... Anzeigen und Bedienelemente ............................................................................................................. Dokumentation........................................................................................................................................... Dokumentation...................................................................................................................................... Appendix 53 55 55 55 55 55 55 57 57 57 57 57 57 58 58 59 61 63 63 63 63 64 64 129 Spare parts list: Fronius Agilo .................................................................................................................... 130 Spare parts list: Fronius Agilo Outdoor ...................................................................................................... 142 Circuit diagrams: Fronius Agilo, Fronius Agilo Outdoor ............................................................................. 156 2 Allgemeine Informationen DE Vorwort und Sicherheitshinweise Sicherheit WARNUNG! Fehlerhaft durchgeführte Arbeiten können schwerwiegende Personen- und Sachschäden verursachen. Alle in der Serviceanleitung beschriebenen Tätigkeiten dürfen nur von Fronius-geschultem Servicepersonal durchgeführt werden. Beachten Sie das Kapitel „Sicherheitsvorschriften“ in der Bedienungsanleitung des Wechselrichters. WARNUNG! Ein elektrischer Schlag kann tödlich sein. Vor Öffnen des Gerätes Netzschalter in Stellung - O - schalten Gerät vom Netz trennen ein verständliches Warnschild gegen Wiedereinschalten anbringen mit Hilfe eines geeigneten Messgerätes sicherstellen, dass elektrisch geladene Bauteile (z.B. Kondensatoren) entladen sind. WARNUNG! Ein elektrischer Schlag kann tödlich sein. Wird das Gerät zu Testzwecken bei geöffnetem Gehäuse kurzzeitig eingeschaltet, die Teile im Gehäuseinneren nicht anfassen nur mit geeigneten Mess-Sonden oder Prüfspitzen berühren WARNUNG! Unzureichende Schutzleiter-Verbindung kann schwerwiegende Personen- und Sachschäden verursachen. Die Gehäuseschrauben stellen eine geeignete Schutzleiter-Verbindung für die Erdung des Gehäuses dar und dürfen keinesfalls durch andere Schrauben ohne zuverlässige Schutzleiter-Verbindung ersetzt werden. Fronius Technical Support Sollten Sie bei der Fehleranalyse Fragen haben, wenden Sie sich direkt an Ihren nationalen TechSupport Bestellung von Ersatzteilen Benötigen Sie Ersatzteile oder haben Sie Fragen bei der Fehleranalyse, steht Ihnen Ihr nationaler TechSupport als Ansprechpartner zur Verfügung. Inhalte der Serviceanleitung Die Kapitel der Serviceanleitung behandeln in sich geschlossene Themen. Nutzen Sie jedes Kapitel als eigenständige Informationsquelle. Nachfolgend eine kurze Beschreibung der einzelnen Kapitel: Werkzeug und Messgeräte Hier finden Sie eine Übersicht und Beschreibung aller Hilfsmittel, welche für ein fachgerechtes Service des Gerätes erforderlich sind. Dazu zählen folgende Hilfsmittel: Erforderliches Werkzeug Mess- und Prüfmittel Fehler-Suchhilfe Dient dem systematischen Auffinden und Beheben von Fehlerursachen und enthält folgende Elemente: Den Fehler-Suchbaum, für die Behandlung von Fehlern, welche nicht durch einen Servicecode dargestellt werden können Tabelle Service-Codes für die Behandlung von Fehlern in Zusammenhang mit Service-Codes, welche am Bedienpanel erscheinen 5 Komponenten austauschen Im Kapitel „Komponenten austauschen“ erfolgt eine Beschreibung des Austausches von Komponenten, welche über keine beiliegende Anleitung für den Austausch verfügen und eine komplette Beschreibung des Austausches erfordern Sicherheitstechnische Überprüfung Dieses Kapitel beschreibt die sicherheitstechnische Überprüfung des in dieser Serviceanleitung beschriebenen Geräts. Dieses Kapitel wurde gemäß der Norm „DIN VDE 07010702“ und ÖVE/ÖNORM E8701-1“ erstellt. Bitte beachten Sie zudem die entsprechenden Anforderungen und Normen Ihres Landes, ggf. kann es zu Abweichungen der Messwerte oder der Prüfschritte kommen. Sollte es in Ihrem Land keine entsprechenden Anforderungen und Normen geben, empfiehlt Fronius diese Prüfung dennoch durchzuführen. Anhang 6 Das Kapitel „Anhang“ enthält die komplette Ersatzteilliste und den Schaltplan des Geräts. Der Schaltplan liegt dem Gerät auch bei der Auslieferung bei. DE Werkzeug und Messgeräte Allgemeines „Werkzeug und Messgeräte“ bietet eine Übersicht und Beschreibung aller Hilfsmittel, die für ein fachgerechtes Service des Gerätes erforderlich sind. Dazu zählen folgende Hilfsmittel: Erforderliches Werkzeug Mess- und Prüfmittel Erforderliche Werkzeuge - Torx Schraubendreher TX 20 Torx Schraubendreher TX 25 Torx Schraubendreher TX 30 Flach-Schraubendreher 3,5 mm Kreuz-Schraubendreher PH 2 Innensechskant-Schlüssel SW 4 mm Innensechskant-Schlüssel SW 5 mm Innensechskant-Schlüssel SW 6 mm Steckschlüssel-Einsatz SW 7 mm Steckschlüssel-Einsatz SW 10 mm Steckschlüssel-Einsatz SW 13 mm Steckschlüssel-Einsatz SW 15 mm Steckschlüssel-Einsatz SW 17 mm Steckschlüssel-Einsatz SW 18 mm Gabelschlüssel SW 20 mm Gabelschlüssel SW 27 mm Gabelschlüssel SW 30 mm Gabelschlüssel SW 34 mm Gabelschlüssel SW 36 mm Gabelschlüssel SW 41 mm Gabelschlüssel SW 51 mm Seitenschneider Molexzieher Drehmoment-Schrauber mit Bit-Einsatz Erforderliche Messgeräte - Multimeter Equipment für die sicherheitstechnische Überprüfung 7 8 Fehlersuchhilfe DE Service-Codes Allgemeines Diese Service-Codes sollen helfen, eventuell auftretende Fehler zu lokalisieren und - soweit möglich - direkt vor Ort zu beheben. WICHTIG! Ein Software-Update darf erst nach Absprache mit der Hotline für Solarelektronik erfolgen. Vorab wird - abhängig von Seriennummer und Firmware-Stand - die Notwendigkeit des Updates geklärt. Serviceklasse 1 Diese Fehler treten meist nur vorübergehend auf und werden vom öffentlichen Stromnetz verursacht. Der Wechselrichter reagiert mit einer Netztrennung und versucht nach dem vorgeschriebenen Netz-Überwachungs-Zeitraum wieder zuzuschalten, sofern während dieser Periode kein Fehler mehr auftritt. Der Fehlercode wird während der Netzprüfung angezeigt. 102 Netzspannung über der zulässigen Grenze Ursache: Netzspannungs-Fehler Behebung: Netzspannung überprüfen Ursache: Werte im Service Menü Behebung: Werte im Service Menü anpassen Ursache: Fehler in AC-Verkabelung Behebung: Neutralleiter kontrollieren Behebung: AC-Verkabelung / AC-Klemmen kontrollieren Ursache: Messfehler am Print MEREG Behebung: Print MEREG tauschen 103 Netzspannung unter der zulässigen Grenze Ursache: Netzspannungs-Fehler Behebung: Netzspannung überprüfen Ursache: Werte im Service Menü Behebung: Werte im Service Menü anpassen Ursache: Fehler in AC-Verkabelung Behebung: Neutralleiter kontrollieren Behebung: AC-Verkabelung / AC-Klemmen kontrollieren Ursache: Messfehler am Print MEREG Behebung: Print MEREG tauschen 11 105 Netzfrequenz über der zulässigen Grenze Ursache: Netzfrequenz-Fehler Behebung: Netzfrequenz überprüfen Ursache: Werte im Service Menü Behebung: Werte im Service Menü anpassen Ursache: Fehler in AC-Verkabelung Behebung: Neutralleiter kontrollieren Behebung: AC-Verkabelung / AC-Klemmen kontrollieren Ursache: Messfehler am Print MEREG Behebung: Print MEREG tauschen 106 Netzfrequenz unter der zulässigen Grenze Ursache: Netzfrequenz-Fehler Behebung: Netzfrequenz überprüfen Ursache: Werte im Service Menü Behebung: Werte im Service Menü anpassen Ursache: Fehler in AC-Verkabelung Behebung: Neutralleiter kontrollieren Behebung: AC-Verkabelung / AC-Klemmen kontrollieren Ursache: Messfehler am Print MEREG Behebung: Print MEREG tauschen 107 Synchronisation mit dem öffentlichen Netz nicht möglich Ursache: öffentliches Netz nicht angeschlossen Behebung: Netzkabel anschließen Ursache: Fehler in AC-Verkabelung Behebung: AC-Verkabelung / AC-Klemmen kontrollieren Ursache: Messfehler am Print MEREG Behebung: Print MEREG tauschen 12 DE 108 Inselbildung wurde erkannt Ursache: Inselbildung wurde erkannt Behebung: automatische Behebung Ursache: starke Störungen am öffentlichen Netz Behebung: automatische Behebung Ursache: Fehler in AC-Verkabelung Behebung: AC-Verkabelung / AC-Klemmen kontrollieren Ursache: Messfehler am Print MEREG Behebung: Print MEREG tauschen Serviceklasse 3 In dieser Gruppe sind die Service-Codes zusammengefasst, die während des Einspeisebetriebes auftreten können. Diese Service-Codes führen zu keiner groben Beschädigung der Elektronik und zu keiner dauerhaften Unterbrechung des Einspeisebetriebes. Nach der Abschaltung und dem Ablauf des Netzüberwachungs-Zeitraumes versucht der Wechselrichter, den Einspeisebetrieb wieder aufzunehmen. Bei Übertemperatur wird zusätzlich eine Abkühlphase eingehalten. 301 Schutzbeschaltung erkannte eine gefährliche Stromspitze auf der Netzseite Ursache: Spannungseinbruch am öffentlichen Netz Behebung: automatische Behebung Ursache: Messfehler am Print MEREG Behebung: Print MEREG tauschen Ursache: AC-Messfehler Behebung: AC-Stromsensor tauschen Ursache: Messfehler am Leistungsteil Behebung: Leistungsteil tauschen 13 303 Übertemperatur Leistungsteil Ursache: Luftzufuhr verlegt Behebung: Luftzufuhr kontrollieren und falls nötig freimachen Ursache: erhöhte Umgebungstemperatur Behebung: Montageort ändern / Externe Kühlung einbauen Ursache: Abstand zwischen den Wechselrichtern zu klein Behebung: Abstand zwischen den Wechselrichtern erhöhen Ursache: Lüfterkabel nicht angeschlossen Behebung: Lüfterkabel anschließen Ursache: Hauptlüfter defekt Behebung: Hauptlüfter tauschen Ursache: Messfehler am Leistungsteil Behebung: Leistungsteil tauschen Ursache: Messfehler am Print MEREG Behebung: Print MEREG tauschen 304 Innentemperatur zu hoch Ursache: Luftzufuhr verlegt Behebung: Luftzufuhr kontrollieren und falls nötig freimachen Ursache: erhöhte Umgebungstemperatur Behebung: Montageort ändern / Externe Kühlung einbauen Ursache: Abstand zwischen den Wechselrichtern zu klein Behebung: Abstand zwischen den Wechselrichtern erhöhen Ursache: Lüfterkabel nicht angeschlossen Behebung: Lüfterkabel anschließen Ursache: Hauptlüfter defekt Behebung: Hauptlüfter tauschen Ursache: Print MEWU defekt Behebung: Print MEWU tauschen 305 Energiefluss ins öffentliche Netz nicht möglich, obwohl dieses in Ordnung ist Ursache: Wackelkontakt an den Netzleitungen Behebung: Netzleitungen anschließen Ursache: Leistungsteil defekt Behebung: Leistungsteil tauschen 14 DE 307 DC LOW Ursache: Die DC-Eingangsspannung ist für den Einspeisebetrieb zu gering Behebung: Solarmodule prüfen Ursache: DC-Leitungen falsch angeschlossen Behebung: DC-Leitungen prüfen Ursache: DC-Hauptschalter ausgeschaltet oder defekt Behebung: DC-Hauptschalter prüfen / tauschen Ursache: Fehlerhafte DC-Sicherung im Verpolungsschutz Behebung: Sicherung tauschen Ursache: Messfehler am Print MEREG Behebung: Print MEREG tauschen 309 DC-Eingangsspannung zu hoch Ursache: DC-Eingangsspannung zu hoch Behebung: Solarmodule prüfen Ursache: Messfehler am Print MEREG Behebung: Print MEREG tauschen Ursache: Leistungsteil defekt Behebung: Leistungsteil tauschen 321 Überstrom (AC) Ursache: Fehler am Stromnetz Behebung: Anschluss ans Stromnetz prüfen Ursache: Fehler in AC-Verkabelung Behebung: AC-Verkabelung / AC-Klemmen kontrollieren Ursache: Messfehler am Print MEREG Behebung: Print MEREG tauschen Ursache: Defekter AC-Stromsensor Behebung: AC-Stromsensor tauschen Ursache: Leistungsteil defekt Behebung: Leistungsteil tauschen 15 322 Übertemperatur am Zuluftsensor Ursache: erhöhte Umgebungstemperatur Behebung: Montageort ändern / Externe Kühlung einbauen Ursache: Zuluftsensor defekt Behebung: Zuluftsensor tauschen Ursache: Fehlerhafte Temperaturmessung am Print MEREG Behebung: Print MEREG tauschen Ursache: Messfehler am Print MEWU Behebung: Print MEWU tauschen Serviceklasse 4 Aus dieser Klasse auftretende Fehler erfordern zur Beseitigung einen Eingriff von außen. Sie sind entweder temporär oder dauerhaft und werden von einer defekten Hardware oder einem Software-Problem ausgelöst. 401 Die Steuereinheit konnte keine Verbindung mit einem Leistungsteil herstellen Ursache: Verbindung zu Print MECERCAP fehlerhaft Behebung: Print MECERCAP tauschen Ursache: Firmware-Update fehlgeschlagen Behebung: Firmware-Update erneut durchführen Behebung: Print MECERCAP tauschen Ursache: Print MEREG defekt Behebung: Print MEREG tauschen 406 Temperatursensor des Leistungsteils defekt Ursache: Temperatursensor des Leistungsteils defekt Behebung: Leistungsteil tauschen 407 Innen-Temperatursensor defekt Ursache: Innen-Temperatursensor defekt Behebung: Innen-Temperatursensor tauschen 16 Ursache: Fixspannung ist zu hoch oder zu niedrig eingestellt Behebung: Fixspannung im Service-Menu auf richtigen Wert stellen Ursache: DC-Spannung ist höher als erlaubt Behebung: Verschaltung der Solarmodule ändern Ursache: DC-Messfehler am Print MEREG Behebung: Print MEREG tauschen 415 Externe Not-Aus-Leitung ist blockiert Ursache: Aktives Signal am ext. Shutdown-Signaleingang Behebung: Komponente überprüfen die am ext. Shutdown-Signaleingang angeschlossen ist Ursache: Print MEWU defekt Behebung: Print MEWU tauschen 416 Kommunikation zwischen Leistungsteil und Steuerung nicht möglich Ursache: Einmalig - Kommunikationsfehler Behebung: automatische Behebung Behebung: Wechselrichter neu starten Ursache: Verbindung zum Print MECERCAP geschädigt oder defekt Behebung: Flachband-Kabel prüfen und gegebenenfalls tauschen Ursache: Print MECERCAP defekt Behebung: Print MECERCAP tauschen Ursache: Print MEREG defekt Behebung: Print MEREG tauschen 425 Kommunikation mit dem Leistungsteil ist nicht möglich Ursache: Einmalig - Kommunikationsfehler Behebung: automatische Behebung Behebung: Wechselrichter neu starten Ursache: Verbindung zum Print MECERCAP geschädigt oder defekt Behebung: Flachband-Kabel prüfen und gegebenenfalls tauschen Ursache: Print MECERCAP defekt Behebung: Print MECERCAP tauschen Ursache: Print MEREG defekt Behebung: Print MEREG tauschen 17 DE 412 Eingestellte Fixspannung ist wesentlich höher als die Leerlauf-Spannung der Solarmodule 426 Leistungsteil Timeout-Error - Zwischenkreisladung dauert zu lange Ursache: Zwischenkreis-Spannung ist unter den zulässigen Schwellwert für den Einspeisebetrieb gesunken Behebung: Solarmodule prüfen Ursache: Messfehler am Leistungsteil Behebung: Leistungsteil tauschen 427 Leistungsteil Timeout-Error - Netzsynchronistation dauert zu lange Ursache: Keine Verbindung zum AC-Netz Behebung: AC-Spannung prüfen Ursache: Messfehler am Leistungsteil Behebung: Leistungsteil tauschen 431 Leistungsteil befindet sich im Bootmodus Ursache: Leistungsteil befindet sich im Bootmodus Behebung: automatische Behebung Ursache: Fehler am Leistungsteil Behebung: Firmware-Update durchführen Ursache: Firmware-Update wurde unterbrochen Behebung: Firmware-Update erneut durchführen Ursache: Leistungsteil defekt Behebung: Leistungsteil tauschen Ursache: Print MECERCAP defekt Behebung: Print MECERCAP tauschen 432 Konsistenzfehler in der Leistungsteil-Verwaltung Ursache: Verbindung zwischen Leistungsteil und Print MECERCAP nicht möglich Behebung: Wechselrichter neu starten Behebung: Firmware-Update durchführen Ursache: Leistungsteil defekt Behebung: Leistungsteil tauschen Ursache: Print MECERCAP defekt Behebung: Print MECERCAP tauschen 18 DE 433 Fehler bei Zuweisung der dynamischen Adressen Ursache: Verbindung zwischen Leistungsteil und Print MECERCAP nicht möglich Behebung: Wechselrichter neu starten Behebung: Firmware-Update durchführen Ursache: Leistungsteil defekt Behebung: Leistungsteil tauschen Ursache: Print MECERCAP defekt Behebung: Print MECERCAP tauschen 436 Problem bei der Fehlerübertragung Ursache: Verbindung zwischen Leistungsteil und Print MECERCAP nicht möglich Behebung: Wechselrichter neu starten Behebung: Firmware-Update durchführen Ursache: Leistungsteil defekt Behebung: Leistungsteil tauschen Ursache: Print MECERCAP defekt Behebung: Print MECERCAP tauschen 437 Problem bei der internen Fehlerbehandlung Ursache: Verbindung zwischen Leistungsteil und Print MECERCAP nicht möglich Behebung: Wechselrichter neu starten Behebung: Firmware-Update durchführen Ursache: Leistungsteil defekt Behebung: Leistungsteil tauschen Ursache: Print MECERCAP defekt Behebung: Print MECERCAP tauschen 438 Problem bei der Anzeige von Leistungsteil-Fehlern am Display-Print Ursache: Verbindung zwischen Leistungsteil und Print MECERCAP nicht möglich Behebung: Wechselrichter neu starten Behebung: Firmware-Update durchführen Ursache: Leistungsteil defekt Behebung: Leistungsteil tauschen Ursache: Print MECERCAP defekt Behebung: Print MECERCAP tauschen 19 445 Falsche Leistungsteil Konfiguration Ursache: Fehlerhafte Ländersetup-Einstellung Behebung: Ländersetup-Einstellungen kontrollieren Behebung: Firmware-Update durchführen Ursache: Print MECERCAP defekt Behebung: Print MECERCAP tauschen 457 Netz-Relais öffnet trotz Einschaltsignal nicht Ursache: Messfehler am Wechselrichter Behebung: Wechselrichter neu starten Ursache: Fehler in AC-Verkabelung Behebung: AC-Verkabelung / AC-Klemmen kontrollieren Ursache: AC-Schütz defekt Behebung: AC-Schütz tauschen Ursache: Messfehler am Print MEREG Behebung: Print MEREG tauschen 459 Fehler bei der Erfassung des Mess-Signals für den Isolationstest Ursache: Fehler bei der Erfassung des Mess-Signals für den Isolationstest Behebung: Wechselrichter neu starten Ursache: Signalleitungen sind nicht verbunden Behebung: Verbindungen am Print MEREG prüfen Ursache: Messfehler am Print MEDC Behebung: Print MEDC tauschen Ursache: Print MEWU defekt Behebung: Print MEWU tauschen 460 Referenz-Spannungsquelle für den digitalen Signalprozessor (DSP) arbeitet außerhalb der tolerierten Grenzen Ursache: Messfehler am Print MEREG Behebung: Signalleitungen am Print MEREG prüfen Behebung: Print MEREG tauschen Ursache: Keine Stromversorgung am Print MEREG, verursacht durch Print MEWU Behebung: Verbindung zwischen Print MEWU und Print MEREG prüfen 20 DE 461 Fehler im DSP-Datenspeicher Ursache: DSP-Fehler am Print MEREG Behebung: Wechselrichter neu starten Behebung: Print MEREG tauschen 463 AC-Polarität vertauscht Ursache: AC-Polarität vertauscht Behebung: Prüfen, ob Phasen- und Neutral-Leiter richtig angeschlossen sind Ursache: Fehler bei AC-Messung Behebung: Firmware-Update durchführen Ursache: Keine Mess-Signale am Print MEREG Behebung: Kabelverbindung am Print MEREG prüfen Ursache: Print MEREG defekt Behebung: Print MEREG tauschen 471 Sicherung für Solarmodul-Erdung ist defekt Ursache: Sicherung für Solarmodul-Erdung defekt Behebung: Sicherung für Solarmodul-Erdung tauschen Ursache: Print MEWU defekt Behebung: Print MEWU tauschen 472 Sicherung für Solarmodul-Erdung ist defekt (betrifft nur US-Geräte) Ursache: Sicherung für Solarmodul-Erdung defekt Behebung: Sicherung für Solarmodul-Erdung tauschen Ursache: Print MEWU defekt Behebung: Print MEWU tauschen 475 Solarmodul-Erdung, Isolationsfehler (Verbindung zwischen Solarmodul und Erdung) Ursache: zu geringer Isolationswiderstand Behebung: Solarmodule prüfen Ursache: Isolationswiderstand-Messfehler Behebung: Print MEWU tauschen Ursache: GND-Mode für die Modulerdung ist nicht aktiviert Behebung: GND-Mode im Installer Menu Basic für die Modulerdung aktivieren 21 486 externer Schließerkontakt ist offen, optionales Mess- und Überwachungsrelais hat ausgelöst Ursache: externer Schließerkontakt ist offen, optionales Mess- und Überwachungsrelais hat ausgelöst Behebung: externen Schließerkontakt schließen, Mess- und Überwachungsrelais prüfen Ursache: Messfehler am Print MEWU Behebung: Print MEWU tauschen Ursache: Print MECERCAP defekt Behebung: Print MECERCAP tauschen 487 Zuluft-Temperatursensor ist defekt Ursache: Zuluft-Temperatursensor ist defekt Behebung: Anschluss des Zuluft-Temperatursensors prüfen Behebung: Zuluft-Temperatursensor tauschen Ursache: Print MEREG defekt Behebung: Print MEREG tauschen Ursache: Print MEWU defekt Behebung: Print MEWU tauschen 488 AC-Stromsensor ist defekt Ursache: AC-Stromsensor ist defekt Behebung: Anschluss des AC-Stromsensors prüfen Behebung: AC-Stromsensor tauschen Ursache: Print MEREG defekt Behebung: Print MEREG tauschen Ursache: Print MEWU defekt Behebung: Print MEWU tauschen 490 Interner Kommunikationsfehler Ursache: Kommunikationsfehler am Print MEREG Behebung: Wechselrichter neu starten Ursache: Print MEREG defekt Behebung: Print MEREG tauschen 22 DE 491 Interner Kommunikationsfehler Ursache: Kommunikationsfehler am Print MEREG Behebung: Wechselrichter neu starten Ursache: Print MEREG defekt Behebung: Print MEREG tauschen 492 DC-Hauptschalter ist ausgeschaltet Ursache: DC-Hauptschalter ist ausgeschaltet Behebung: DC-Hauptschalter einschalten Ursache: Messfehler am Print MEREG Behebung: Print MEREG tauschen 493 DC-Relais ist defekt Ursache: Messfehler am DC-Relais Behebung: Wechselrichter neu starten / Anschlüsse am DC-Relais prüfen Ursache: DC-Relais defekt Behebung: DC-Relais tauschen Ursache: DC-Hauptschalter ausgeschaltet oder defekt Behebung: DC-Hauptschalter prüfen / tauschen Ursache: Messfehler am Print MEWU Behebung: Print MEWU tauschen 494 Erdungsfehler am Print MEREG Ursache: Erdungsfehler am Print MEREG Behebung: Verbindung der Metall-Distanzhülsen zu Print MEREG prüfen Ursache: Erdungs-Messfehler am Print MEREG Behebung: Print MEREG tauschen 495 Versorgungsspannung 3,3 V fehlerhaft am Print MEREG Ursache: Keine Verbindung zum Print MENT Behebung: Anschlüsse am Print MEREG prüfen Ursache: Print MEREG defekt Behebung: Print MEREG tauschen 23 496 Versorgungsspannung 5 V fehlerhaft am Print MEREG Ursache: Keine Verbindung zum Print MENT Behebung: Anschlüsse am Print MEREG prüfen Ursache: Print MEREG defekt Behebung: Print MEREG tauschen Ursache: Loses Kabel am Print MENT Behebung: Anschlüsse am Print MENT prüfen Ursache: Print MENT defekt Behebung: Print MENT tauschen 497 Die Versorgungsspannung 14 V oder 22 V für den PWM-Treiber ist fehlerhaft Ursache: Keine Verbindung zum Print MENT Behebung: Anschlüsse am Print MEREG prüfen Ursache: Print MEREG defekt Behebung: Print MEREG tauschen 498 Die Versorgungsspannung 24 V für das Leistungsteil ist fehlerhaft Ursache: Keine Verbindung zwischen Print MEREG und Print MENT Behebung: Anschlüsse am Print MEREG und am Print MENT prüfen Ursache: Print MEREG defekt Behebung: Print MEREG tauschen Ursache: Print MENT defekt Behebung: Print MENT tauschen 499 Versorgungsspannung 24 V fehlerhaft am Print MEREG Ursache: Keine Verbindung zum Print MENT Behebung: Anschlüsse am Print MEREG prüfen Ursache: Print MEREG defekt Behebung: Print MEREG tauschen Ursache: Loses Kabel am Print MENT Behebung: Anschlüsse am Print MENT prüfen Ursache: Print MENT defekt Behebung: Print MENT tauschen 24 Meldungen dieser Klasse behindern den Einspeisebetrieb des Wechselrichters nicht generell. Sie erscheinen nur so lange, bis die Meldung per Tastendruck am Wechselrichter quittiert wird (der Wechselrichter läuft während dieser Zeit im Einspeisebetrieb weiter). 502 Ein Isolationsfehler zwischen DC+ oder DC- gegen Erde wurde erkannt Ursache: Isolationsfehler am Solarmodul Behebung: Leitungen und Solarmodule prüfen Ursache: Messfehler auf Leistungsteil Behebung: Leistungsteil tauschen Ursache: GND-Mode für die Modulerdung ist nicht aktiviert Behebung: GND-Mode im Installer Menu Basic für die Modulerdung aktivieren 509 Keine Einspeisung innerhalb der letzten 24 Stunden Ursache: Keine AC-Versorgung am Wechselrichter Behebung: AC-Verbindung prüfen Ursache: Print MENT defekt Behebung: Print MENT tauschen 516 Kommunikation mit der Speichereinheit nicht möglich Ursache: bei einmaligem Auftreten Behebung: Wechselrichter neu starten Ursache: Print MEREG defekt Behebung: Print MEREG tauschen 25 DE Serviceklasse 5 517 Leistungs-Derating auf Grund zu hoher Temperatur Ursache: erhöhte Umgebungstemperatur Behebung: Montageort ändern / Externe Kühlung einbauen Ursache: Abstand zwischen den Wechselrichtern zu klein Behebung: Abstand zwischen den Wechselrichtern erhöhen Ursache: Lüfterkabel nicht angeschlossen Behebung: Lüfterkabel anschließen Ursache: Hauptlüfter defekt Behebung: Hauptlüfter tauschen Ursache: Messfehler am Print MEREG Behebung: Print MEREG tauschen Ursache: Messfehler am Leistungsteil Behebung: Leistungsteil tauschen 518 Interne DSP-Fehlfunktion Ursache: bei einmaligem Auftreten Behebung: automatische Behebung / Wechselrichter neu starten Ursache: Print MEREG defekt Behebung: Print MEREG tauschen 535 Fehler beim Selbsttest der Lüfter Ursache: Lüfterkabel nicht angeschlossen Behebung: Lüfterkabel anschließen Ursache: Hauptlüfter / Umwälzlüfter defekt Behebung: Hauptlüfter / Umwälzlüfter tauschen Ursache: Lüftersteuerung am Print MEWU defekt Behebung: Print MEWU tauschen 536 Fehler beim Hauptlüfter Ursache: Lüfterkabel nicht angeschlossen Behebung: Lüfterkabel anschließen Ursache: Hauptlüfter defekt Behebung: Hauptlüfter tauschen Ursache: Lüftersteuerung am Print MEWU defekt Behebung: Print MEWU tauschen 26 DE 551 Sicherung für die Solarmodul-Erdung ist defekt Ursache: Sicherung für die Solarmodul-Erdung ist defekt Behebung: Sicherung für die Solarmodul-Erdung tauschen Ursache: Messfehler am Print MEDC Behebung: Print MEDC tauschen Ursache: Messfehler am Print MEREG Behebung: Print MEREG tauschen 555 Fehler beim Umwälzlüfter Ursache: Lüfterkabel nicht angeschlossen Behebung: Lüfterkabel anschließen Ursache: Umwälzlüfter defekt Behebung: Umwälzlüfter tauschen Ursache: Lüftersteuerung am Print MEWU defekt Behebung: Print MEWU tauschen 558 Funktions-Inkompatibilität (einer oder mehrere Prints im Wechselrichter sind nicht kompabel zueinander, z.B. nach einem Print-Austausch) Ursache: Neuer Print unterstützt eine Gerätefunktion nicht Behebung: Firmware-Update durchführen 559 LVRT-Fehler Ursache: Störungen am öffentlichen Netz Behebung: Netzspannung prüfen Ursache: Fehler am Print MENT Behebung: Print MENT tauschen Ursache: Messfehler am Print MEREG Behebung: Print MEREG tauschen 560 Leistungs-Derating wegen Überfrequenz Ursache: Störungen am öffentlichen Netz Behebung: Netzspannung prüfen Ursache: Netzfrequenz außerhalb des erlaubten Bereichs Behebung: Netzfrequenz prüfen Ursache: Messfehler am Print MEREG Behebung: Print MEREG tauschen 27 597 externer Überspannungsschutz hat ausgelöst (angeschlossen an den Anschlussklemmen Schließer-/Melderkontakt „IN1“) Ursache: Aktives Signal am Eingang „IN1“ Behebung: Komponente prüfen, die am Eingang „IN1“ angeschlossen ist Ursache: Messfehler am Print MEWU Behebung: Print MEWU tauschen Ursache: Print MECERCAP defekt Behebung: Print MECERCAP tauschen 598 externer Überspannungsschutz hat ausgelöst (angeschlossen an den Anschlussklemmen Schließer-/Melderkontakt „IN2“) Ursache: Aktives Signal am Eingang „IN2“ Behebung: Komponente prüfen, die am Eingang „IN2“ angeschlossen ist Ursache: Messfehler am Print MEWU Behebung: Print MEWU tauschen Ursache: Print MECERCAP defekt Behebung: Print MECERCAP tauschen 599 externer Überspannungsschutz hat ausgelöst (angeschlossen an den Anschlussklemmen Schließer-/Melderkontakt „IN3“) Ursache: Aktives Signal am Eingang „IN3“ Behebung: Komponente prüfen, die am Eingang „IN3“ angeschlossen ist Ursache: Messfehler am Print MEWU Behebung: Print MEWU tauschen Ursache: Print MECERCAP defekt Behebung: Print MECERCAP tauschen Serviceklasse 7 Statusmeldungen der Klasse 7 betreffen die Steuerung, die Konfiguration und das Datenaufzeichnen des Wechselrichters und können den Einspeisebetrieb direkt oder indirekt beeinflussen. 721 Fehler beim Beschreiben des EEPROMs Ursache: bei einmaligem Auftreten Behebung: automatische Behebung / Wechselrichter neu starten Ursache: Print MECERCAP defekt Behebung: Print MECERCAP tauschen 28 DE 751 Uhrzeit verloren Ursache: Wechselrichter hatte länger als 5 Tage keine Netzverbindung Behebung: Zeit und Datum neu einstellen Ursache: Firmware-Fehler des Wechselrichters Behebung: Firmware-Update durchführen Ursache: Speicher am Print MECERCAP defekt Behebung: Print MECERCAP tauschen 752 Real Time Clock Modul defekt Ursache: Print MECERCAP defekt Behebung: Print MECERCAP tauschen 753 Uhrzeit über längeren Zeitraum nicht eingestellt Ursache: Uhrzeit wurde über einen längeren Zeitraum nicht eingestellt (Meldung erscheint alle 6 Monate) Behebung: Datum und Uhrzeit einstellen Ursache: Firmware-Fehler Behebung: Firmware-Update durchführen Ursache: Speicherfehler am Print MECERCAP Behebung: Print MECERCAP tauschen 756 Uhrzeit falsch eingestellt Ursache: Reset der Uhrzeit Behebung: Datum und Uhrzeit neu einstellen Ursache: Speicherfehler am Print MECERCAP Behebung: Print MECERCAP tauschen 757 Hardware-Fehler im Real Time Clock Modul Ursache: Hardware-Fehler im Real Time Clock Modul Behebung: automatische Behebung / Wechselrichter neu starten Ursache: Print MECERCAP defekt Behebung: Print MECERCAP tauschen 29 766 Notfall-Leistungsbegrenzung wurde nicht gefunden Ursache: Notfall-Leistungsbegrenzung kann nicht ausgelesen werden Behebung: automatische Behebung Ursache: Print MECERCAP defekt Behebung: Print MECERCAP tauschen 768 Gibt Auskunft über den internen Prozessor-Programmstatus Ursache: Fehler in der Firmware (Print MECERCAP) Behebung: automatische Behebung / Wechselrichter neu starten Behebung: Print MECERCAP tauschen 771 - 773 Problem mit dem Speicher am Print MECERCAP Ursache: Speicherproblem am Print MECERCAP Behebung: automatische Behebung / Wechselrichter neu starten Ursache: Speicherfehler Behebung: Ländersetup neu einstellen Ursache: Defekter Speicher am Print MECERCAP Behebung: Print MECERCAP tauschen 775 Leistungsteil-Fehler Ursache: Leistungsteil-Fehler Behebung: Leistungsteil tauschen Ursache: Firmware-Fehler Behebung: Firmware-Update durchführen 776 Decice-Typ ungültig Ursache: Device-Typ ungültig Behebung: Wechselrichter neu starten Behebung: Ländersetup neu einstellen Ursache: Firmware-Fehler Behebung: Firmware-Update durchführen Ursache: Defekter Speicher am Print MECERCAP Behebung: Print MECERCAP tauschen 30 DE 799 Keine Kommunikation zwischen Steuerungs-Print und Überwachungs-Print Ursache: Keine Kommunikation zwischen Print MECERCAP und Print MEDC Behebung: Anschlüsse bei beiden Prints prüfen Ursache: Print MEDC defekt Behebung: Print MEDC tauschen Ursache: Print MECERCAP defekt Behebung: Print MECERCAP tauschen 31 Fehler-Suchbaum Allgemein 32 Notwendige Anlagendaten: Wechselrichter-Typ Seriennummer der installierten Wechselrichter Am Display angezeigter Service Code (STATE PS Menü / STATE FAN Menü) Name der PV-Anlage (Name des Anlagenbetreibers) Betriebsdauer der Anlage Standort der Anlage Anzahl der installierten Wechselrichter im System (Type, Seriennummer) DC- und AC-Spannung Komponenten austauschen DE Komponenten austauschen Sicherheit WARNUNG! Ein elektrischer Schlag kann tödlich sein. Vor Öffnen des Gerätes Netzschalter in Stellung - O - schalten Gerät vom Netz trennen ein verständliches Warnschild gegen Wiedereinschalten anbringen mit Hilfe eines geeigneten Messgerätes sicherstellen, dass elektrisch geladene Bauteile (z.B. Kondensatoren) entladen sind WARNUNG! Ein elektrischer Schlag kann tödlich sein. Gefahr durch Restspannung von Kondensatoren. Entladezeit der Kondensatoren abwarten. Die Entladezeit beträgt 10 Minuten. Weitere Informationen zur Entladezeit finden Sie in der Bedienungsanleitung und auf den Sicherheitshinweisen am Wechselrichter. HINWEIS! Die Anforderungen an Elektroinstallationen können nationalen Normen und Bestimmungen unterliegen und müssen diesen entsprechend ausgeführt werden. Nach dem Austausch, der Änderung, Wartung oder Reparatur einer Komponente muss eine sicherheitstechnische Überprüfung durchgeführt werden (siehe Abschnitt „Sicherheitstechnische Überprüfung“). Zuluftgitter / Oberes Abdeckblech öffnen (1) (2) (3) Türe (1) öffnen 1 DC-Hauptschalter auf - OFF - stellen 2 Türe mit Türgriff öffnen (Entladezeit des Wechselrichters beachten - siehe Bedienungsanleitung und Sicherheitshinweise am Gerät) Oberes Abdeckblech (2) öffnen (4) 1 Türe (1) öffnen 2 20 Schrauben TX25 lösen (beim Fronius Agilo Outdoor 16 Schrauben) 3 Abdeckblech nach vorne klappen 4 Falls nötig, kann das Abdeckblech auch ausgehängt werden: Berührschutz der Print-Baugruppe entfernen Display-Flachbandkabel abstecken 2 Molexstecker am Print MENT abstecken Beim Fronius Agilo Outdoor: Molexstecker des Umwälzlüfters abstecken Abdeckblech entfernen Zuluftgitter (3) öffnen 1 Türe (1) öffnen 2 5 Schrauben TX25 beim Zuluftgitter lösen 3 Zuluftgitter nach rechts öffnen 35 Zuluftgitter schließen 1 Zuluftgitter schließen und mit 5 Schrauben TX25 befestigen - 3 Nm 2 Türe schließen Oberes Abdeckblech schließen 1 Falls das Abdeckblech ausgehängt wurde, Abdeckblech einhängen, Kabel anschließen und Berührschutz montieren - 3 Nm 2 Abdeckblech nach oben klappen und mit 20 Schrauben TX25 befestigen (beim Fronius Agilo Outdoor 16 Schrauben) - 3 Nm 3 Türe schließen Türe schließen 1 Verriegelung (4) entriegeln 2 Türe schließen und DC-Hauptschalter auf - ON - stellen Zuluftgitter Fronius Agilo Outdoor öffnen Zuluftgitter (3) öffnen 1 Türe öffnen 2 4 Schrauben TX30 beim Zuluftgitter lösen 3 Zuluftgitter (3) nach rechts öffnen Abdeckbleche entfernen (1) 1 3 Schrauben TX25 vom oberen Abdeckblech (1) lösen und Abdeckblech entfernen 2 6 Schrauben TX25 vom unteren Abdeckblech (2) lösen und Abdeckblech entfernen (2) Abdeckbleche montieren (3) 1 Unteres Abdeckblech mit 6 Schrauben TX25 montieren - 2,8 Nm 2 Oberes Abdeckblech mit 3 Schrauben TX25 montieren - 2,8 Nm Zuluftgitter schließen 36 1 Zuluftgitter schließen und mit 4 Schrauben TX30 befestigen - 3 Nm 2 Türe schließen (1) (2) (3) (4*) DE Übersicht (5) (6) (17) (16) (15) (7) (8) (9) (14) (13) (12) (10) (11) Bei einigen Komponenten ist das Öffnen des Zuluftgitters oder des oberen Abdeckblechs hinter der Türe erforderlich. Der DC-Hauptschalter und die Prints sind durch einen Berührschutz (13) und (17) geschützt. „Komponenten austauschen“ ist unterteilt in folgende Abschnitte und Kapitel: Komponenten hinter Zuluftgitter tauschen Hauptlüfter tauschen (5) Taktfilter tauschen (9) AC-Schütz tauschen (11) AC-Filter / Stromsensoren tauschen (10) Komponenten hinter Türe tauschen DC-Hauptschalter tauschen (14) Leistungsteil tauschen (2) DC-Relais tauschen (12) DC-Filter tauschen (7) Umwälzlüfter tauschen (1) Nur bei Fronius Agilo Outdoor: Wärmetauscher (4*) Prints tauschen Print MENT tauschen (6) Print MECERCAP tauschen (3) Print MEREG tauschen (16) Print MEWU tauschen (15) Print MEDC tauschen (8) 37 Komponenten hinter Zuluftgitter tauschen Sicherheit WARNUNG! Ein elektrischer Schlag kann tödlich sein. Gefahr durch Netzspannung und DC-Spannung von den Solarmodulen. Vor sämtlichen Arbeiten am Wechselrichter dafür sorgen, dass AC- und DC-Seite spannungsfrei sind. Hauptlüfter tauschen (1) (2) (2) (2) (1) (1) 38 Türe und Zuluftgitter öffnen 2 Hauptlüfter und Temperatursensor (1) abstecken (beim Fronius Agilo Outdoor muss zuvor das Abdeckblech demontiert werden) 3 4 Schrauben M6 (2) mittels Steckschlüssel SW 10 mm lösen, Hauptlüfter abnehmen 4 Neuen Hauptlüfter einsetzen 5 Hauptlüfter mit 4 Schrauben M6 befestigen - 8 Nm 6 Hauptlüfter und Temperatursensor anstecken (beim Fronius Agilo Outdoor muss das Abdeckblech über den Steckern wieder montiert werden) 7 Zuluftgitter und Türe schließen - 3 Nm 1 Türe und Zuluftgitter öffnen 2 6 Kabel (1) vom Taktfilter abschließen - TX 20 (Reihenfolge merken!) 3 Sechskant-Mutter M12 (2) mittels Steckschlüssel SW 18 mm lösen und Taktfilter entnehmen 4 Neuen Taktfilter einsetzen und mit Sechskant-Mutter M12 befestigen - 15 Nm 5 6 Kabel in der richtigen Reihenfolge am Taktfilter anschließen (TX20) - 2,5 Nm 6 Zuluftgitter und Türe schließen - 3 Nm (2) Taktfilter tauschen (2) 1 (1) (2) (1)(2) (1) (3) 1 Türe und Zuluftgitter öffnen 2 6 x Phase (1) vom AC-Schütz abschließen - mit InnensechskantSchlüssel 4 mm 3 2 x Kabel von Hilfskontakt (6), 2 x Spule (2) vom AC-Schütz abschließen mit Schlitz-Schraubendreher 3,5 mm 4 2 Schrauben M6 (3) mittels Steckschlüssel SW 10 mm lösen 5 2 Schrauben M6 (4) mittels Steckschlüssel SW 10 mm lockern und ACSchütz entfernen 6 Neuen AC-Schütz einsetzen und mit 4 Sechskant-Schrauben M6 befestigen 8 Nm (3) (5) (5) (4) (4) (1) (1) (1) DE AC-Schütz tauschen WICHTIG! Phasen müssen in der richtigen Reihenfolge angeschlossen werden (1 auf 1, ...)! WICHTIG! Beim Hilfskontakt die unteren Klemmen benutzen! Unbenutzte Klemmen mit Schlitz-Schraubendreher 3,5 mm - 1 Nm festziehen! 7 2 x Hilfskontakt, 2 x Spule anschließen - 1 Nm 8 6 x Phase (1) anschließen - Agilo Indoor: 12 Nm, Agilo Outdoor: 14 Nm) 9 Zuluftgitter und Türe schließen - 3 Nm 39 AC-Filter /Stromsensoren tauschen (1) (1) (1) (2) (2) (6) (3) (5) (6) (3) (4) (4) 1 Türe und Zuluftgitter öffnen 2 3 Kabel (1) vom AC-Filter abschließen -Innensechskant-Schlüssel 6 mm 3 3 Kabel (4) vom AC-Schütz abschließen -Innensechskant-Schlüssel 4 mm 4 Molexstecker (5) der Stromsensoren abstecken 5 2 Schrauben M6 (2) mittels Steckschlüssel SW 10 mm lösen 6 2 Schrauben M6 (3) mittels Steckschlüssel SW 10 mm lockern, AC-Filter nach oben schieben und entfernen 7 4 Schrauben TX 25 (6) lösen und Stromsensoren entfernen (4) red S1 S2 4 black S1 S2 1 S3 5 6 S3 2 3 Muss ein einzelner Stromsensor getauscht werden: Kabelbinder durchtrennen Die Leitungen des betroffenen Stromsensors mittels Molexzieher aus dem Molexkontakt ziehen Stromsensor aus der Halterung entfernen (der Einbau erfolgt in der umgekehrten Reihenfolge) 8 Stromsensoren einfädeln und mit 4 Schrauben TX 25 auf AC-Filter montieren - 3 Nm 9 AC-Filter einsetzen und mit 4 Sechskant-Schrauben M6 (SW 10 mm) befestigen - 8 Nm 10 3 Kabel am AC-Filter anschließen (SW 6 mm) - 18 Nm (Reihenfolge beachten!) 11 3 Kabel am AC-Schütz anschließen (SW 4 mm) - 12 Nm (Reihenfolge beachten!) 12 Molexstecker der Stromsensoren anstecken WICHTIG! Kontrollieren, ob der Überspannungs-Ableiter am AC-Filter angesteckt ist! 13 Zuluftgitter und Türe schließen - 3 Nm 40 DE Komponenten hinter Türe tauschen Sicherheit DC-Hauptschalter tauschen WARNUNG! Ein elektrischer Schlag kann tödlich sein. Gefahr durch Netzspannung und DC-Spannung von den Solarmodulen. Vor sämtlichen Arbeiten am Wechselrichter dafür sorgen, dass AC- und DC-Seite spannungsfrei sind. (1) (2) (2) (1) (2)(4+2) (2) (3) (2) (5) (4+2) (2) (2) (2) (2)(1) (2)(1) (6) (7) (7) DC-Hauptschalter ausbauen: 1 Türe öffnen 2 2 Sechskant-Muttern M10 über Abstandshalter (4) mittels Steckschlüssel SW 15 mm lösen und Berührungsschutz des DC-Hauptschalters entfernen 3 Schlitz-Schraube 3,5 mm bei Welle lockern und Welle (3) entfernen 4 Die beiden Abstandshalter (4) entfernen 5 Abdeckungen (5) des DC-Hauptschalters entfernen 6 Hilfskontakt (6) ausbauen und ausfädeln 7 12 Sechskant-Muttern M10 (2) mittels Steckschlüssel SW 15 mm lösen und die 4 Kupferbügel entfernen 8 4 Schrauben TX25 (1) lösen und DCHauptschalter entfernen DC-Hauptschalter einbauen 1 4 Kupferbügel mit 8 Sechskant-Muttern M10 (SW 15 mm) auf neuen DCHauptschalter montieren - 30 Nm (selbe Position wie am alten DC-Hauptschalter) 2 4 Befestigungslaschen (7) lockern und laut Bild ausrichten - 45° (TX20) 3 Befestigungslaschen in diesem Winkel festschrauben - 1,6 Nm (7) (7) 4 DC-Hauptschalter einsetzen und mit 4 Schrauben TX25 befestigen - 3 Nm 5 4 Sechskant-Muttern M10 bei den DC-Zuleitungsbügeln montieren (SW 15 mm) - 30 Nm 6 Abdeckungen entfernen und Hilfskontakt einbauen 7 Abdeckungen montieren 8 Die beiden Abstandshalter montieren - 2 Nm 9 Welle montieren 41 10 Berührungsschutz einsetzen, in Position bringen und mit 2 Sechskant-Schrauben M10 befestigen (SW 15 mm) - 4 Nm 11 Türe schließen Leistungsteil tauschen (1) (1) (2) (3) (2) (3) (2) (1) (1) Leistungsteil ausbauen: 1 Türe öffnen 2 20 Schrauben TX25 (16 Schrauben TX25 bei Fronius Agilo Outdoor) lösen und Abdeckblech nach vorne klappen (ggf. aushängen) 3 AC-Leitungen (2) vom Leistungsteil abschließen (Sechskant-Mutter M8 - Steckschlüssel SW 13 mm) 4 DC-Leitungen (3) abschließen (Sechskant-Mutter M8 - Steckschlüssel SW 13 mm) 5 4 Schrauben M6 (1) mittels Steckschlüssel SW 10 mm lösen und Leistungsteil entnehmen Leistungsteil einbauen: 6 Neues Leistungsteil einsetzen und mit 4 Schrauben M6 montieren - 8 Nm 7 DC-Leitungen anschließen (Sechskant-Mutter M8) - 18 Nm 8 AC-Leitungen anschließen (Sechskant-Mutter M8) - 18 Nm 9 Abdeckblech mit 20 Schrauben TX 25 (16 Schrauben TX25 bei Fronius Agilo Outdoor) montieren - 3 Nm 10 Türe schließen 42 (1) (2) (1) (1) (2) DC-Relais ausbauen: (1) 1 Türe öffnen 2 Berührungsschutz des DC-Hauptschalters und der Printbaugruppe entfernen (8 Schrauben TX25) 3 Alle Kabel, Stecker sowie externen Anschlüsse am Print MEREG, MEWU und am Print MEDC abstecken oder abschließen 4 Gasableiter (3) abstecken 5 20 Schrauben TX25 entfernen und Abdeckblech nach vorne klappen 6 4 Schrauben TX25 (1) entfernen 7 3 Schrauben TX25 (2) entfernen und gesamte Printeinheit herausnehmen (6) 8 Molexstecker (7) DC-Relais abstecken 9 3 Sechskant-Muttern M8 (4) mittels Steckschlüssel SW 13 mm entfernen (6) 10 Sechskant-Mutter M10 (5) mittels Steckschlüssel SW 15 mm entfernen (2) (3) (4) (4) (4) DE DC-Relais tauschen (7) 11 2 Schrauben TX25 (6) entfernen und DC-Relais entnehmen (5) DC-Relais einbauen 1 Neues DC-Relais einsetzen und mit 2 Schrauben TX25 (6) befestigen - 3 Nm 2 Molexstecker (7) des DC-Relais anstecken 3 Kupferbügel mit 3 Sechskant-Muttern M8 (4) (am DC-Filter 14 Nm, am DC-Relais 10 Nm - SW 13 mm) und einer Sechskant-Mutter M10 (5) (am DC-Hauptschalter 30 Nm - SW 15 mm) montieren 4 Printeinheit einsetzen und mit 7 Schrauben TX25 (2+1) montieren - 3 Nm (Achtung Keine Kabel einklemmen!) 5 Alle Kabel, Stecker sowie externen Anschlüsse am Print MEREG, MEWU und am Print MEDC anstecken oder anschließen 6 Gasableiter anstecken (3) 7 30 A Verpolschutz-Sicherung tauschen 8 Abdeckblech mit 20 Schrauben TX25 montieren - 3 Nm 9 Berührungsschutz des DC-Hauptschalters (2 Sechskant-Muttern M10 - 4 Nm) und der Printbaugruppe (8 Schrauben TX25 - 3 Nm) einsetzen, in Position bringen und befestigen 10 Türe schließen 43 DC-Filter tauschen (1) (2) (1) DC-Filter ausbauen: (1) (8) (1) (2) 1 Türe öffnen 2 Berührungsschutz des DC-Hauptschalters und der Printbaugruppe entfernen (8 Schrauben TX25) 3 Alle Kabel, Stecker sowie externen Anschlüsse am Print MEREG und am Print MEWU abstecken oder abschließen 4 Gasableiter (3) abstecken 5 20 Schrauben TX25 entfernen und Abdeckblech nach vorne klappen 6 4 Schrauben TX25 (1) entfernen 7 3 Schrauben TX25 (2) entfernen und gesamte Printeinheit herausnehmen 8 DC-Filterleitungen (8) vom Leistungsteil abschließen - 2 SechskantSchrauben M8, Steckschlüssel SW 13 mm - und nach unten ausfädeln 9 3 Sechskant-Muttern M8 (5) mittels Steckschlüssel SW 13 mm entfernen (2) (3) (4) (5) (4) (5) (4) (4) (5) (6+7) 10 Abstandhalter (6) und Sechskant-Mutter M10 (10) mittels Steckschlüssel SW 15 mm entfernen 11 4 Schrauben M6 (4) mittels Steckschlüssel SW 10 mm lockern, DC-Filter nach oben heben und nach vorne herausnehmen DC-Filter einbauen 1 DC-Filter einsetzen und mit 4 Schrauben M6 befestigen - 8 Nm 2 Kupferbügel mit 3 Sechskant-Muttern M8 (5) (am DC-Filter 14 Nm, am DC-Relais 10 Nm) und einer Sechskant-Mutter M10 (6) (am DC-Hauptschalter 30 Nm) montieren 3 Abstandhalter montieren - 2 Nm 4 DC-Filterleitungen einfädeln und am Leistungsteil mit 2 Sechskant-Muttern M8 anschließen - 18 Nm 5 Printeinheit einsetzen und mit 7 Schrauben TX25 (2+1) montieren - 3 Nm (Achtung Keine Kabel einklemmen!) 6 Alle Kabel, Stecker sowie externen Anschlüsse am Print MEREG und am Print MEWU anstecken oder anschließen 7 Gasableiter (3) anstecken 8 Abdeckblech mit 20 Schrauben TX25 montieren - 3 Nm 9 Berührungsschutz des DC-Hauptschalters (2 Sechskant-Muttern M10 - 4 Nm) und der Printbaugruppe (8 Schrauben TX25 - 3 Nm) einsetzen, in Position bringen und befestigen 10 Türe schließen 44 1 Türe öffnen 2 20 Schrauben TX 25 entfernen und Abdeckblech nach vorne klappen 3 Molexstecker (2) des Umwälzlüfters abstecken 4 2 Schrauben TX 25 (1) entfernen und Umwälzlüfter samt Haltewinkel entfernen 5 2 Schrauben TX 25 (3) entfernen und Umwälzlüfter vom Haltewinkel abnehmen (1) (1) (2) (3) (3) DE Umwälzlüfter tauschen WICHTIG! Beim Montieren des Umwälzlüfters die Strömungsrichtung der Luft beachten! 5 Neuen Umwälzlüfter mit 2 Schrauben TX 25 auf Haltewinkel montieren - 2 Nm 6 Umwälzlüfter und Haltewinkel mit 2 Schrauben TX 25 im Wechselrichter montieren - 3 Nm 7 Molexstecker des Umwälzlüfters anstecken 8 Abdeckblech mit 20 Schrauben TX 25 montieren - 3 Nm 9 Türe schließen 45 Umwälzlüfter Fronius Agilo Outdoor tauschen (1) (1) (2) (2) (2) (2) (3) Umwälzlüfter 2 Fronius Agilo Outdoor tauschen (1) (1) 46 (3) 1 Türe öffnen 2 16 Schrauben TX 25 entfernen und Abdeckblech nach vorne klappen 3 Molexstecker (4) des Umwälzlüfters abstecken und Kabelbinder entfernen 4 2 Schrauben TX 25 (1) entfernen und Umwälzlüfter samt Haltewinkel entfernen 5 4 Schrauben TX 25 (2) entfernen und Umwälzlüfter vom Haltewinkel abnehmen WICHTIG! Beim Montieren des Umwälzlüfters die Strömungsrichtung der Luft beachten! 5 Neuen Umwälzlüfter mit 4 Schrauben TX 25 auf Haltewinkel montieren - 5 Nm 6 Umwälzlüfter und Haltewinkel mit 2 Schrauben TX 25 im Wechselrichter montieren - 3 Nm 7 Molexstecker des Umwälzlüfters anstecken und Kabel mit Kabelbindern befestigen 8 Abdeckblech mit 16 Schrauben TX 25 montieren - 3 Nm 9 Türe schließen 1 Türe öffnen 2 16 Schrauben TX 25 entfernen und Abdeckblech nach vorne klappen 3 Molexstecker des Umwälzlüfters 2 abstecken und Kabelbinder entfernen 4 4 Schrauben TX 25 (1) entfernen und Abdeckblech entfernen (4) (1) (1) (2) (2) (2) (3) (3) (3) (3) 4 Schrauben TX 25 (2) entfernen und Umwälzlüfter 2 samt Haltewinkel entfernen 6 4 Schrauben TX 25 (3) entfernen und Umwälzlüfter vom Haltewinkel abnehmen WICHTIG! Beim Montieren des Umwälzlüfters die Strömungsrichtung der Luft beachten! 7 Neuen Umwälzlüfter mit 4 Schrauben TX 25 auf Haltewinkel montieren - 5 Nm 8 Umwälzlüfter und Haltewinkel mit 4 Schrauben TX 25 im Wechselrichter montieren 3 Nm 9 Abdeckblech mit 4 Schrauben TX 25 montieren - 3 Nm 10 Molexstecker des Umwälzlüfters anstecken und Kabel mit Kabelbindern befestigen 11 Abdeckblech mit 16 Schrauben TX 25 montieren - 3 Nm 12 Türe schließen 47 DE (2) 5 Wärmetauscher tauschen (1) (1) (1) Türe öffnen 2 16 Schrauben TX 25 entfernen und Abdeckblech nach vorne klappen 3 Molexstecker des Umwälzlüfters 2 abstecken und Kabelbinder entfernen 4 4 Schrauben TX 25 (1) entfernen und Abdeckblech entfernen 5 4 Schrauben TX 25 (2) entfernen und Umwälzlüfter 2 samt Haltewinkel entfernen 6 4 Schrauben TX 25 (3) entfernen und Wärmetauscher entfernen (1) (2) (2) (2) (2) (3) (3) 1 (3) (3) 7 Neuen Wärmetauscher mit 4 Schrauben TX 25 montieren - 3 Nm 8 Umwälzlüfter und Haltewinkel mit 4 Schrauben TX 25 montieren - 3 Nm 9 Abdeckblech mit 4 Schrauben TX 25 montieren - 3 Nm 10 Molexstecker des Umwälzlüfters anstecken und Kabel mit Kabelbindern befestigen 11 Abdeckblech mit 16 Schrauben TX 25 montieren - 3 Nm 12 Türe schließen 48 DE Prints tauschen Sicherheit WARNUNG! Ein elektrischer Schlag kann tödlich sein. Gefahr durch Netzspannung und DC-Spannung von den Solarmodulen. Vor sämtlichen Arbeiten am Wechselrichter dafür sorgen, dass AC- und DC-Seite spannungsfrei sind. Print MENT tauschen (1) (1) (1) (1) Print MECERCAP tauschen (1) (1) Türe öffnen 2 20 Schrauben TX 25 entfernen und Abdeckblech nach vorne klappen 3 Alle Stecker am Print MENT abstecken 4 5 Schraube TX 20 (1) entfernen 5 Print entfernen 6 Neuen Print einsetzen und mit 6 Schrauben TX 20 montieren - 1,6 Nm 7 Alle Stecker am Print MENT anstecken 8 Abdeckblech mit 20 Schrauben TX 25 montieren - 3 Nm 9 Türe schließen Bevor der Abbrechprint (1) des alten Prints am neuen Print angesteckt wird, muss der Abbrechprint des neuen Prints abgebrochen und entfernt werden. Wird der Abbrechprint nicht entfernt und ein weiterer eingesteckt funktioniert der Wechselrichter nicht. (2) (2) (2) (3) 1 1 Türe öffnen 2 4 Schrauben (2) TX 20 entfernen und Print abnehmen 3 Flachband-Kabel (3) abstecken 4 Abbrechprint (1) des alten Prints abbrechen und bei neuem Print anstecken 5 Flachband-Kabel (3) am neuen Print anstecken 6 Print mit 4 Schrauben TX 20 montieren - 1,6 Nm 7 Display-Schutzfolie abziehen 8 Türe schließen (2) 49 Print MEREG tauschen (1) Print MEWU tauschen (1) 50 (1) 1 Türe öffnen 2 Berührschutz der Print-Baugruppe entfernen - 8 Schrauben TX 25 3 Alle Kabel, Stecker und externen Anschlüsse am Print MEREG abstecken oder abschließen 4 1 Schraube TX 20 (1) entfernen 5 Print nach rechts schieben und entfernen 6 Neuen Print einsetzen, nach links schieben und mit 1 Schraube TX 20 montieren - 1,6 Nm 7 Alle Kabel, Stecker und externen Anschlüsse am Print MEREG anstecken oder anschließen (beim schwarzen Stecker auf das Einrasten der roten Verriegelung achten, auch bei den Flachbandkabeln) 8 Berührschutz mit 8 Schrauben TX25 montieren - 3 Nm 9 Türe schließen 1 Türe öffnen 2 Berührschutz der Print-Baugruppe entfernen - 8 Schrauben TX 25 3 Alle Kabel, Stecker und externen Anschlüsse am Print MEWU abstecken oder abschließen 4 2 Schrauben TX 20 (1) entfernen 5 Print nach rechts schieben und entfernen 6 Neuen Print einsetzen, nach links schieben und mit 2 Schrauben TX 20 montieren - 1,4 Nm 7 Alle Kabel, Stecker und externen Anschlüsse am Print MEWU anstecken oder anschließen (auch Jumper kontrollieren, beim Flachbandkabel auf das Einrasten der Verriegelung achten) 8 Berührschutz mit 8 Schrauben TX25 montieren - 3 Nm 9 Türe schließen (1) (2) (1) 1 Print MEWU ausbauen (siehe Kapitel „Print MEWU tauschen“) 2 Alle Kabel, Stecker und externen Anschlüsse am Print MEDC abstecken oder abschließen 3 2 Metalldistanzen (1) mit Steckschlüssel SW 7 mm lösen 4 2 Schrauben TX 20 (2) entfernen 5 Print nach rechts schieben und entfernen 6 Neuen Print einsetzen, nach links schieben und mit 2 Schrauben TX 20 montieren - 1,6 Nm 7 2 Metalldistanzen montieren (SW 7 mm) - 1 Nm 8 Alle Kabel, Stecker und externen Anschlüsse am Print MEDC anstecken oder anschließen (beim schwarzen Stecker auf das Einrasten der roten Verriegelung achten, auch bei den Flachbandkabeln) 9 Print MEWU einbauen (siehe Kapitel „Print MEWU tauschen“) (2) 51 DE Print MEDC tauschen 52 Sicherheitstechnische Überprüfung DE Sicherheitstechnische Überprüfung Sicherheitstechnische Überprüfung Dieses Kapitel beschreibt die sicherheitstechnische Überprüfung des in dieser Serviceanleitung beschriebenen Geräts. Dieses Kapitel wurde gemäß der Norm „DIN VDE 07010702“ und ÖVE/ÖNORM E8701-1“ erstellt. Bitte beachten Sie zudem die entsprechenden Anforderungen und Normen Ihres Landes, ggf. kann es zu Abweichungen der Messwerte oder der Prüfschritte kommen. Sollte es in Ihrem Land keine entsprechenden Anforderungen und Normen geben, empfiehlt Fronius diese Prüfung dennoch durchzuführen. Verantwortlichkeit Der Reparaturtechniker ist für die ordnungsgemäße Durchführung und Dokumentation der sicherheitstechnischen Überprüfung, sowie für den korrekten Prüfentscheid verantwortlich. Fronius übernimmt dafür keine Haftung. Werden während der Prüfung Mängel festgestellt, ist die sicherheitstechnische Überprüfung nach Behebung der Mängel zu wiederholen. Die folgenden Prüfungen sind in der angegebenen Reihenfolge durchzuführen. Jede der Prüfungen muss bestanden sein, bevor mit der nächsten Prüfung begonnen wird. Kann eine der Prüfungen nicht durchgeführt werden, so ist vom Prüfer zu entscheiden und es obliegt seiner Verantwortung und Haftung, ob die Sicherheit des Gerätes trotzdem bestätigt werden kann. Die Entscheidung ist zu begründen und im Prüfprotokoll unter Bemerkungen anzuführen. Anwendungsbereich Eine sicherheitstechnische Überprüfung muss grundsätzlich nach einer Reparatur, Instandsetzung, Änderung oder entsprechend den Normanforderungen des jeweiligen Landes durchgeführt werden. Qualifikation des Prüfpersonals Die sicherheitstechnische Überprüfung darf nur von einer dazu befähigten Elektrofachkraft durchgeführt werden. Dies sind Personen, welche auf Grund ihrer fachlichen Ausbildung, Kenntnisse und Erfahrungen, sowie Kenntnis der einschlägigen Bestimmungen, die ihnen übertragenen Arbeiten beurteilen sowie elektrotechnische und mögliche andere Gefahren erkennen und vermeiden können. Messinstrumente Folgende Anforderungen an die Messmittel sind laut DIN VDE 0701-0702 und ÖVE/ ÖNORM E8701-1 einzuhalten. Beachten Sie auch die Anforderungen und Normen Ihres Landes: Schutzleiterwiderstand Die Mess-Spannung darf eine Gleich- oder Wechselspannung sein Die Leerlaufspannung darf 24 V nicht überschreiten und 4 V nicht unterschreiten Der Mess-Strom innerhalb des Messbereichs zwischen 0,2 und 1,99 darf 0,2 A nicht unterschreiten 55 Isolationswiderstand Der Wert der Mess-Spannung der Messeinrichtung muss mindestens der Bemessungsspannung des zu prüfenden Gerätes gegen Erde entsprechen, jedoch nicht weniger als 500 V Gleichspannung Der Mess-Strom muss mindestens 1 mA betragen (dies entspricht einem Lastwiderstand von 0,5 M). Schutzleiterstrom Der Innenwiderstand der Schutzleiterstom-Messeinrichtung darf höchstens 5 betragen. Bei höheren Widerständen sind Maßnahmen zu treffen, die das Auftreten von gefährlichen Berührungsspannungen vermeiden. Der Messbereich muss mindestens die Werte von 0,25 mA bis 19 mA umfassen. Die Prüfeinrichtung muss den gemessenen Strom unabhängig von der Kurvenform als Effektivwert bewerten. 56 DE Sichtprüfungen Allgemeines Bei der Sichtprüfung sind die nachfolgend beschriebenen Prüfungen ohne weiteres Zerlegen des Geräts durchzuführen. Zur Sicherheit beitragende Teile dürfen keine offensichtlichen Mängel aufweisen. Des weiteren sind Mängel anzuführen, welche bei der Sichtprüfung zu einer Gefährdung führen können. Erkennbare Mängel, die Anlass anderer Gefährdungen sein können, müssen eine sofortige Instandsetzung oder Einschränkung der weiteren Verwendung bis zur Mängelbehebung nach sich ziehen. Netzversorgung und Anschlussleitungen - Anschlussleitungen und äußere Leitungen dürfen nicht beschädigt oder defekt sein Isolierungen dürfen nicht schadhaft sein (keine Isolier- oder Klebebänder zum Ausbessern von Beschädigungen verwenden) Stecker und Steckverbindungen dürfen nicht schadhaft oder defomiert sein Zugentlastung, Biegeschutz-Vorrichtung, Leitungsführungen oder Befestigungen müssen wirksam sein Leitungen / Stecker müssen für den Einsatzbereich und die Leistung geeignet sein Sicherungseinsätze und Gerätesicherungshalter dürfen nicht defekt sein WICHTIG! Zur Ermittlung von Querschnitt und Strombelastbarkeit von Netzkabeln die Norm IEC 60364-5-52 beachten. Da auf Grund der Verlegungsart der Kabel und deren Isolierung, der unterschiedlichen Umgebungstemperatur die Strombelastbarkeit variieren kann, beim Tausch der Netzzuleitung die Anforderungen der Norm IEC 60364-5-52 einhalten. Beachten Sie auch die Anforderungen und Normen Ihres Landes! Gehäuse und Abdeckungen - - Gehäuseteile, Isolierteile und Schutzabdeckungen dürfen nicht fehlen oder beschädigt sein Unzulässige Änderungen dürfen nicht vorhanden sein, z.B.: Ein-, Umbauten welche nicht vom Hersteller frei gegeben sind Kühlöffnungen dürfen nicht verschmutzt oder verstopft sein, Luftfilter muss vorhanden sein Sicherheitsbeeinträchtigende Verschmutzung, Korrosion oder Alterung darf nicht sichtbar sein Anzeichen von Überlastung und unsachgemäßen Gebrauch dürfen nicht vorhanden sein Leitfähige Gegenstände dürfen nicht im Gehäuse sein Stellteile und Anzeigegeräte - Bedienelemente und Anzeigen dürfen nicht defekt sein Sicherungen die außerhalb des Gehäuses zugänglich sind dürfen nicht fehlerhaft sein Leistungsschild und Warnaufkleber - Aufschriften, die der Sicherheit dienen (z.B.: Warnhinweise, Erdungssymbole, Leistungsschilder...) müssen vorhanden sein. Die Aufschriften gegebenenfalls in geeigneter Form erneuern, ergänzen oder berichtigen Lesbarkeit aller der Sicherheit dienenden Aufschriften oder Symbole, der Bemessungsdaten und Stellungsanzeigen sicherstellen - - 57 Elektrische Prüfungen Schutzleiterwiderstand Die Schutzleiterwiderstands-Prüfung ist bei geöffneten Schranktüren durchzuführen Auf eine sichere Trennung des zu prüfenden Gerätes vom AC-Netz ist zu achten. Netzzuleitung (L1, L2, L3, N) darf nicht angeschlossen sein. Sicherheitsvorschriften beachten! Auf eine sichere Trennung des zu prüfenden Gerätes vom DC-Netz ist zu achten. DCLeitungen dürfen nicht angeschlossen sein. DC-Spannung liegt möglicherweise an den Leitungen an, Sicherheitsvorkehrungen treffen! Während der Messung müssen alle Schalter, Regler... geschlossen sein AC-Schütz und DC-Hauptschalter sind zu betätigen Beim Wechselrichter muss die Modulerdung, falls vorhanden, während der Prüfung entfernt werden Trennung vom SolarNet und dem Datcom-Ring ist erforderlich (2) (1) 1 Messeinrichtung 2 Wechselrichter 9 Messleitung - Beispiel: Messung des Schutzleiterwiderstandes (1) Erd-Anschlussklemme (2) Beispiel Messpunkt Gemessen wird zwischen der Erd-Anschlussklemme (1) des Gerätes und jedem mit dem Schutzleiter verbundenen berührbaren leitfähigen Teil (zum Beispiel (2)) Der Widerstand darf 0,3 nicht überschreiten *) *) Diese Anforderungen betreffen die DIN VDE 0701-0702 sowie die ÖVE/ÖNORM E8701-1. Beachten Sie zudem auch die Anforderungen und Normen Ihres Landes! 58 WARNUNG! Ein elektrischer Schlag kann tödlich sein! Bei der Isolationswiderstands-Prüfung wird zum Teil mit Hochspannung gemessen. Vor dem Beginn der Prüfung muss das Verfahren vollständig verstanden werden. Die folgenden Sicherheitsmaßnahmen sind einzuhalten: Messung nur nach bestandener Schutzleiterwiderstands-Prüfung durchführen Den Zugang zum Arbeitsbereich so weit wie möglich einschränken Bei der Durchführung der Prüfung keine anderen Personen berühren und Maßnahmen treffen, dass keine anderen Personen metallische Oberflächen berühren Bei jedem Einschalten der Isolationswiderstands-Messeinrichtung steht eine Spannung an dem zu prüfenden Bereich an. Die IsolationswiderstandsMesseinrichtung muss mit einer automatischen Selbstentladeeinrichtung ausgerüstet sein. Für die Dauer der Prüfung muss eine geeignete Schutzbekleidung / Schutzausrüstung getragen werden. Darauf achten, dass die Isolationswiderstands-Prüfung Polrichtig durchgeführt wird, da es ansonsten zu falschen Messergebnissen kommt Die Isolationswiderstands-Messung DC gegen PE muss zweimal durchgeführt werden, da bei diesen Wechselrichter-Typen zwei interne Isolationswiderstands-Messungen integriert sind. Bei der ersten Messung müssen folgende Stecker (1) auf den Prints abgesteckt werden: (1) (1) Bevor die beiden Stecker wieder angesteckt werden, auf Spannungsfreiheit prüfen und Entladezeit der Kondensatoren einhalten! Bei der zweiten Messung müssen die Stecker wieder angesteckt sein. Bei der Prüfung dürfen folgende Isolationswerte nicht unterschritten werden. Die angegebenen Prüfspannungen müssen eingehalten werden *). Da bei diesen Wechselrichter-Typen große Kapazitäten verbaut sind, sollte die Dauer der Isolationswiderstands-Messung ca. 10 Sekunden betragen, da ansonsten die geforderten Werte nicht erreicht werden: Messung Info Prüfspannung Grenzwert DC -> PE Messung 1 = 1000 V >= 1 M DC -> PE Messung 2 = 1000 V >= 0,15 M 59 DE Isolationswiderstand Messung Info AC -> PE Prüfspannung Grenzwert = 500 V >= 1 M Bei der Messung AC -> PE kann es auf Grund der Netzform (Nullung) zu Fehlmessungen (Messwert rund 0,01 M) kommen. In diesem Fall müssen die AC-Leitungen (außer PE) am Wechselrichter abgeklemmt werden. Legende: Primär = DC (DC+ und DC-) | Sekundär = AC (L und N) | Erde = PE *) Diese Anforderungen betreffen die DIN VDE 0701-0702 sowie die ÖVE/ÖNORM E8701-1. Beachten Sie zudem auch die Anforderungen und Normen Ihres Landes! **) Da diese Wechselrichter-Typen nach der Produktnorm IEC62109-1:2010 zertifiziert wurden, ist ein anderer Grenzwert als in der DIN VDE 0701-0702 sowie die ÖVE/ÖNORM E8701-1 erlaubt. 1 Messeinrichtung 2 Wechselrichter 9 Messleitung Beispiel: Messung des Isolationswiderstandes (PE gegen L1) Die Isolationsmessung muss zwischen folgenden Punkten durchgeführt werden: DC+ und DC- können für diese Prüfung am Wechselrichter kurzgeschlossen werden, ansonsten müssen beide DC-Eingänge einzeln gemessen werden. L1, L2, L3 und N können für diese Prüfung am Wechselrichter kurzgeschlossen werden, ansonsten müssen alle AC-Eingänge einzeln gemessen werden. Messpunkte: PE gegen N, L1, L2, L3 PE gegen DC+, DCWARNUNG! Ein elektrischer Schlag kann tödlich sein! Kondensatoren können bei der Isolationswiderstands-Messung aufgeladen werden. Nach der Messung muss eine Entladezeit von mindestens 10 Minuten eingehalten werden. Bevor mit der sicherheitstechnischen Überprüfung oder dem Abstecken der Adapter fortgefahren wird, muss der Wechselrichter auf Spannungsfreiheit geprüft werden. Die geprüften Potentiale können mit dem Isolationswiderstands-Messgerät entladen werden. Weitere Hinweise zur Entladezeit finden Sie in der Bedienungsanleitung oder auf den Warnhinweisen am Wechselrichter. 60 Vorbereitende Tätigkeiten Messung nur nach bestandener Isolationswiderstands-Prüfung durchführen Wechselrichter muss gegenüber Erde isoliert sein. Es dürfen keine zusätzlichen Verbindungen zum Erdpotential bestehen (z.B. Datenleitungen, Erdsicherung, Montage...) -> nur beim direkten Verfahren! AC- und DC-Leitungen am Wechselrichter montieren und zuschalten - Sicherheitsvorschriften beachten! Leitfähige Gegenstände aus dem Gehäuse entfernen Fehlende Gehäuseteile montieren Zuluftgitter mit 5 Schrauben TX 25 (3 Nm) montieren und Türe schließen Gegebenenfalls die Türe geöffnet lassen, wenn die Messung im Gerät durchgeführt wird WARNUNG! Ein elektrischer Schlag kann tödlich sein. Während der Messung liegen Spannungen am Wechselrichter an. Nachdem der Wechselrichter angeschlossen wurde, muss dieser wieder in Betrieb genommen werden. Für die Messung muss der Wechselrichter einspeisen, da es sonst zu einem falschen Messergebnis kommt. Es dürfen nur die Ableitströme, welche bei Netzfrequenz auftreten, herangezogen werden (50 - 60 Hz Funktion der Stromzange). Hochfrequente Ableitströme verfälschen das Messergebnis *). *) Diese Anforderungen betreffen die DIN VDE 0701-0702 sowie die ÖVE/ÖNORM E8701-1. Beachten Sie zudem auch die Anforderungen und Normen Ihres Landes! Für die Messung des Schutzleiterstromes können zwei Verfahren angewendet werden: Direktes Verfahren: Gerät muss isoliert aufgebaut werden und darf keinen Bezug zu einem anderen Erdpotential aufweisen Differenzstrom-Verfahren Die Messung kann am Wechselrichter (Schleife im oder außerhalb des Gerätes) oder im Verteiler durchgeführt werden. Bei der Messung im Verteiler muss darauf geachtet werden, dass sich keine stromdurchflossenen Leiter in unmittelbarer Nähe befinden. Direktes Verfahren - Messung des Schutzleiterstroms mit Stromzange über PE-Leiter PE N L1 1 mA 9 PE 9 L1 9 N 2 8 1 Messeinrichtung 2 Wechselrichter 8 Isolierte Aufstellung des Prüflings 9 Messleitung Beispiel: Messung des Schutzleiterstroms über PELeiter direkt am Wechselrichter (links) oder im Verteiler (rechts) Angezeigt wird die Summe der Ströme, welche über die Isolierung eines Gerätes oder verursacht durch die Beschaltungen im Gerät, zum Schutzleiter fließen. 61 DE Schutzleiterstrom Der Schutzleiter-Ableitstrom darf bei der durchgeführten Messung den Grenzwert von 3,5 mA nicht überschreiten **). Differenzstrom-Verfahren - Messung des Schutzleiterstroms mit Stromzange über Nund L-Leiter PE L1 N mA 9 PE 9 L1 1 9 N 2 1 Messeinrichtung 2 Wechselrichter 9 Messleitung Beispiel: Messung des Schutzleiterstroms mittels Differenzstrom-Verfahren direkt am Wechselrichter (links) oder im Verteiler (rechts) Wie bei einem FI-Schalter werden über einen Wandler die Ströme zwischen dem / den Außenleiter(n) (L1, L2, L3) und dem Neutralleiter (N) verglichen. Die Differenz wird angezeigt. Der Schutzleiter-Ableitstrom darf bei der durchgeführten Messung den Grenzwert von 3,5 mA nicht überschreiten **). **) Diese Anforderungen betreffen die DIN VDE 0701-0702 sowie die ÖVE/ÖNORM E8701-1. Beachten Sie zudem auch die Anforderungen und Normen Ihres Landes! Beim Fronius Agilo wird ebenfalls die Produktnorm IEC62109-1:2010 angewendet. Durch diese Produktnorm darf der Grenzwert des Schutzleiter-Ableitstromes von 3,5 mA überschritten werden. Abschließende Tätigkeiten Wechselrichter im lastfreien Zustand vom AC-Netz und der DC-Versorgung trennen Auf Spannungsfreiheit prüfen Entladezeit einhalten Alle entfernten Leitungen, DatCom-Komponenten oder Erdsicherungen wieder anbringen (Zustand des Wechselrichters vor der Reparatur oder der sicherheitstechnischen Überprüfung wieder herstellen) Alle fehlenden Gehäuseteile montieren - Gehäuseteile, Isolierteile und Schutzabdeckungen dürfen nicht fehlen oder beschädigt sein Zuluftgitter mit 5 Schrauben TX25 montieren - 3 Nm Türe schließen 62 DE Funktionsprüfungen Funktion Wechselrichter wieder in Betrieb nehmen. AC und DC zuschalten Funktionen, die vom Prüfpersonal als relevant bewertet werden, müssen auf einwandfreien Betrieb geprüft werden. Zuschaltung und Einspeisung des Wechselrichters Netz - Ein/Ausschalt-Vorrichtungen Nachweis der Funktion ist durch Messen oder Sichtprüfung zu erbringen. Überprüfung AC-Schütz und DC-Hauptschalter (Lastfrei oder bei minimaler Last durchführen, jedoch nicht im Standby-Modus) DC-Hauptschalter ausschalten -> Wechselrichter muss auf Störung gehen und die Einspeisung unterbrechen AC-Hauptschalter ausschalten -> Wechselrichter schaltet ab und Display erlischt AC-Hauptschalter und DC-Hauptschalter einschalten Der Wechselrichter muss automatisch einen Lüftertest durchführen. Anzeigen und Bedienelemente - Anzeige auf Funktion prüfen Funktion der Bedienelemente ist gemäß Bedienungsanleitung zu überprüfen 63 Dokumentation Dokumentation - Für eine ordnungsgemäße Dokumentation ist die Elektrofachkraft verantwortlich, die die Prüfung durchgeführt hat Alle durchgeführten Prüfungen in einem Prüfprotokoll dokumentieren. Sowohl die Messwerte als auch die verwendenten Prüfmittel und Kalibrierdaten angeben Kann eine Einzelprüfung nicht durchgeführt werden, ist diese Entscheidung vom Prüfer zu begründen und zu dokumentieren Gilt die Prüfung als nicht bestanden, das betreffende Gerät deutlich als unsicher markieren und den Betreiber informieren. Das Gerät darf nicht mehr in Betrieb genommen werden. Das Prüfprotokoll für die „Sicherheitstechnische Überprüfung“ ist am Fronius-Partnerweb zu finden. 64 Contents Foreword and safety instructions ............................................................................................................... Safety.................................................................................................................................................... Fronius Technical Support .................................................................................................................... Ordering spare parts ............................................................................................................................. Service manual contents....................................................................................................................... Tools and measuring devices ............................................................................................................... Error search aid .................................................................................................................................... Replacing components ......................................................................................................................... Safety inspection................................................................................................................................... Appendix ............................................................................................................................................... Tools and measuring devices .................................................................................................................... General ................................................................................................................................................. Tools required ....................................................................................................................................... Measuring devices required.................................................................................................................. Error location aid Service codes ............................................................................................................................................ General ................................................................................................................................................. Service class 1...................................................................................................................................... Service class 3...................................................................................................................................... Service class 4...................................................................................................................................... Service class 5...................................................................................................................................... Service class 7...................................................................................................................................... Error flowchart............................................................................................................................................ General ................................................................................................................................................. Changing components Changing components ............................................................................................................................... Safety.................................................................................................................................................... Opening air inlet grille / upper cover plate ............................................................................................ Opening the air inlet grille on the Fronius Agilo Outdoor ...................................................................... Overview ............................................................................................................................................... Replacing components behind the air inlet grille ....................................................................................... Safety.................................................................................................................................................... Replacing the main fan ......................................................................................................................... Replacing the pulse filter....................................................................................................................... Replacing the AC contactor .................................................................................................................. Replacing the AC filter / current sensors .............................................................................................. Replacing components behind the door .................................................................................................... Safety.................................................................................................................................................... Replacing the DC main switch .............................................................................................................. Replacing a power stage set................................................................................................................. Replacing DC relay ............................................................................................................................... Replacing the DC filter .......................................................................................................................... Replacing the circulating fan................................................................................................................. Replacing the Fronius Agilo Outdoor ventilating fan............................................................................. Replacing the Fronius Agilo Outdoor ventilating fan 2.......................................................................... Replacing the heat exchanger .............................................................................................................. Replacing PC boards ................................................................................................................................. Safety.................................................................................................................................................... Replacing the MENT PC board............................................................................................................. Replacing the MECERCAP PC board .................................................................................................. Replacing the MEREG PC board.......................................................................................................... Replacing the MEWU PC board ........................................................................................................... Replacing the MEDC PC board ............................................................................................................ 67 69 69 69 69 69 69 69 70 70 70 71 71 71 71 73 75 75 75 77 80 89 92 96 96 97 99 99 99 100 101 102 102 102 102 103 103 105 105 105 106 107 108 109 110 110 112 113 113 113 113 114 114 115 65 EN General information Safety Inspections Safety Inspections...................................................................................................................................... Safety inspection................................................................................................................................... Responsibility........................................................................................................................................ Area of application ................................................................................................................................ Inspection staff qualifications ................................................................................................................ Measuring instruments.......................................................................................................................... Visual inspections ...................................................................................................................................... General ................................................................................................................................................. Mains supply and connecting lines ....................................................................................................... Housing and covers .............................................................................................................................. Adjustment and display devices............................................................................................................ Rating plate and warning stickers ......................................................................................................... Electrical tests............................................................................................................................................ Ground conductor resistance................................................................................................................ Insulation resistance ............................................................................................................................. Ground conductor current ..................................................................................................................... Function tests............................................................................................................................................. Function ................................................................................................................................................ Grid power on/off equipment................................................................................................................. Indicators and controls.......................................................................................................................... Documentation........................................................................................................................................... Documentation...................................................................................................................................... Appendix 117 119 119 119 119 119 119 121 121 121 121 121 121 122 122 122 124 127 127 127 127 128 128 129 Spare parts list: Fronius Agilo .................................................................................................................... 130 Spare parts list: Fronius Agilo Outdoor ...................................................................................................... 142 Circuit diagrams: Fronius Agilo, Fronius Agilo Outdoor ............................................................................. 156 66 General information Safety WARNING! Work that is carried out incorrectly can cause serious injury and damage. All activities described in the service manual must only be carried out by Fronius-trained service technicians. Take note of the "Safety rules" section in the inverter operating instructions. WARNING! An electric shock can be fatal. Before opening the device: Move the mains switch to the O position Unplug the device from the mains Put up an easy-to-understand warning sign to stop anybody inadvertently switching it back on again Using a suitable measuring instrument, check to make sure that electrically charged components (e.g. capacitors) have been discharged. WARNING! An electric shock can be fatal. If the device needs to be switched on briefly for testing while the housing is open: Do not touch any parts inside the housing Only touch using suitable measuring or test probes WARNING! An inadequate ground conductor connection can cause serious injury or damage. The housing screws provide a suitable ground conductor connection for earthing (grounding) the housing and must NOT be replaced by any other screws which do not provide a reliable ground conductor connection. Fronius Technical Support Please contact your national Fronius Technical Support team with any fault analysis queries. Ordering spare parts Please contact your national Fronius Technical Support team to order spare parts or to consult on fault analysis queries. Service manual contents Each chapter in the service manual deals with one complete topic. Use each chapter as a self-contained source of information. A short description of each chapter follows: Tools and measuring devices This provides an overview and description of all equipment required for servicing the device professionally. This equipment includes: Tools required Measuring and testing equipment Error search aid Serves to systematically locate and rectify the source of errors, and contains the following elements: the error search tree for dealing with errors that cannot be displayed using a service code service codes table for dealing with errors associated with service codes that appear on the control panel 69 EN Foreword and safety instructions Replacing components The "Replacing components" chapter describes how to replace components that have no instructions of their own for replacement and require detailed replacement instructions Safety inspection This section outlines the safety inspection for the device described in this service manual. It has been structured in compliance with "DIN VDE 0701-0702" and "ÖVE/ÖNORM E8701-1". Please also be aware of the requirements and standards relevant to your country, as the measured values or steps taken during the tests may vary. Should there be no relevant requirements and standards in your country, Fronius recommends that this test should still be carried out. Appendix 70 The Appendix contains the complete spare parts list and circuit diagram for the device. The circuit diagram is also supplied with the device. General "Tools and measuring devices" offers an overview and description of all equipment needed to service the device professionally. This equipment includes: Tools required Measuring and testing equipment Tools required - Torx screwdriver TX20 Torx screwdriver TX25 Torx screwdriver TX30 Flat-head screwdriver 3.5 mm Cross-head screwdriver PH 2 Allen key 4 mm Allen key 5 mm Allen key 6 mm Socket wrench insert 7 mm Socket wrench insert 10 mm Socket wrench insert 13 mm Socket wrench insert 15 mm Socket wrench insert 17 mm Socket wrench insert 18 mm Flat spanner 20 mm Flat spanner 27 mm Flat spanner 30 mm Flat spanner 34 mm Flat spanner 36 mm Flat spanner 41 mm Flat spanner 51 mm Diagonal cutting pliers Molex extractor tool Torque screwdriver with bit insert Measuring devices required - Multimeter Safety inspection equipment 71 EN Tools and measuring devices 72 Error location aid Service codes These service codes help to localise and - where possible - rectify faults with the device on-site. EN General IMPORTANT! Software may only be updated after consulting the Solar Electronics hotline. The necessity of the update will be clarified in advance depending on the serial number and firmware version. Service class 1 These faults generally only arise momentarily and are caused by the public grid. The inverter responds by disconnecting from the grid and attempts to reconnect after a defined grid monitoring period (provided no further faults arise during this period). The error code is displayed during the grid check. 102 Mains voltage exceeding permitted limit Cause: Remedy: Mains voltage fault Check the mains voltage Cause: Remedy: Values in Service menu Change values in Service menu Cause: Remedy: Remedy: Fault in AC cabling Check neutral conductor Check AC cabling / AC terminals Cause: Remedy: Measurement fault on MEREG PC board Replace MEREG PC board 103 Mains voltage under permitted limit Cause: Remedy: Mains voltage fault Check the mains voltage Cause: Remedy: Values in Service menu Change values in Service menu Cause: Remedy: Remedy: Fault in AC cabling Check neutral conductor Check AC cabling / AC terminals Cause: Remedy: Measurement fault on MEREG PC board Replace MEREG PC board 75 105 Grid frequency exceeding permitted limit Cause: Remedy: Grid frequency fault Check grid frequency Cause: Remedy: Values in Service menu Change values in Service menu Cause: Remedy: Remedy: Fault in AC cabling Check neutral conductor Check AC cabling / AC terminals Cause: Remedy: Measurement fault on MEREG PC board Replace MEREG PC board 106 Grid frequency below permitted limit Cause: Remedy: Grid frequency fault Check grid frequency Cause: Remedy: Values in Service menu Change values in Service menu Cause: Remedy: Remedy: Fault in AC cabling Check neutral conductor Check AC cabling / AC terminals Cause: Remedy: Measurement fault on MEREG PC board Replace MEREG PC board 107 Synchronisation with the public grid not possible 76 Cause: Remedy: Public grid not connected Connecting the mains cable Cause: Remedy: Fault in AC cabling Check AC cabling / AC terminals Cause: Remedy: Measurement fault on MEREG PC board Replace MEREG PC board Service class 3 Cause: Remedy: Islanding was detected Fault rectified automatically Cause: Remedy: Strong interference on the public grid Fault rectified automatically Cause: Remedy: Fault in AC cabling Check AC cabling / AC terminals Cause: Remedy: Measurement fault on MEREG PC board Replace MEREG PC board EN 108 Islanding was detected This group contains the service codes that can occur while feeding energy into the grid. These service codes do not cause any significant damage to the electronics, nor do they cause any extended interruptions to the grid power feed operation. After disconnecting from the grid and waiting for the grid monitoring period, the inverter attempts to resume feeding energy into the grid. An additional cooling phase is observed in the event of overtemperature. 301 Protective circuit detected a dangerous current peak on the grid Cause: Remedy: Voltage drop in the public grid Fault rectified automatically Cause: Remedy: Measurement fault on MEREG PC board Replace MEREG PC board Cause: Remedy: AC measurement fault Replace AC current sensor Cause: Remedy: Measurement fault on power stage set Replacing a power stage set 77 303 Power stage set overtemperature Cause: Remedy: Air supply problem Check air supply and clear if necessary Cause: Remedy: Increased ambient temperature Change installation location / install external cooling system Cause: Remedy: Insufficient distance between inverters Increase distance between inverters Cause: Remedy: Fan cable not connected Connect fan cable Cause: Remedy: Main fan faulty Replace main fan Cause: Remedy: Measurement fault on power stage set Replacing a power stage set Cause: Remedy: Measurement fault on MEREG PC board Replace MEREG PC board 304 Internal temperature too high Cause: Remedy: Air supply problem Check air supply and clear if necessary Cause: Remedy: Increased ambient temperature Change installation location / install external cooling system Cause: Remedy: Insufficient distance between inverters Increase distance between inverters Cause: Remedy: Fan cable not connected Connect fan cable Cause: Remedy: Main fan faulty Replace main fan Cause: Remedy: MEWU PC board faulty Replace the MEWU PC board 305 Energy flow to public grid not possible despite no obvious error 78 Cause: Remedy: Loose contact on mains cables Connect mains cables Cause: Remedy: Power stage set faulty Replacing a power stage set Cause: Remedy: The DC input voltage is too low for grid power feed operation Check solar modules Cause: Remedy: DC cables are connected incorrectly Check DC cables Cause: Remedy: DC main switch is switched off or faulty Check/replace DC main switch Cause: Remedy: Faulty DC fuse in the reverse polarity protection Replace fuse Cause: Remedy: Measurement fault on MEREG PC board Replace MEREG PC board EN 307 DC LOW 309 DC input voltage too high Cause: Remedy: DC input voltage too high Check solar modules Cause: Remedy: Measurement fault on MEREG PC board Replace MEREG PC board Cause: Remedy: Power stage set faulty Replacing a power stage set 321 Overcurrent (AC) Cause: Remedy: Fault on grid Check connection to grid Cause: Remedy: Fault in AC cabling Check AC cabling / AC terminals Cause: Remedy: Measurement fault on MEREG PC board Replace MEREG PC board Cause: Remedy: Faulty AC current sensor Replace AC current sensor Cause: Remedy: Power stage set faulty Replacing a power stage set 79 322 Overtemperature on the air inlet sensor Service class 4 Cause: Remedy: Increased ambient temperature Change installation location / install external cooling system Cause: Remedy: Air inlet sensor faulty Replace air inlet sensor Cause: Remedy: Incorrect temperature measurement on MEREG PC board Replace MEREG PC board Cause: Remedy: Measurement fault on MEWU PC board Replace the MEWU PC board Faults of this class can only be remedied through external intervention. They may be temporary or continuous faults and are caused by faulty hardware or a software problem. 401 The control unit could not establish a link to a power stage set Cause: Remedy: Faulty connection to MECERCAP PC board Replace MECERCAP PC board Cause: Remedy: Remedy: Firmware update failed Repeat firmware update Replace MECERCAP PC board Cause: Remedy: MEREG PC board faulty Replace MEREG PC board 406 Power stage set temperature sensor faulty Cause: Remedy: Power stage set temperature sensor faulty Replacing a power stage set 407 Internal temperature sensor faulty Cause: Remedy: 80 Internal temperature sensor faulty Replace internal temperature sensor Cause: Remedy: Fixed voltage has been set too high or too low Set fixed voltage to the correct value in the Service menu Cause: Remedy: DC voltage is higher than permitted Change the solar module wiring Cause: Remedy: DC measurement fault on MEREG PC board Replace MEREG PC board EN 412 Set fixed voltage is considerably higher than the open circuit voltage of the solar modules 415 External Emergency Stop line is blocked Cause: Remedy: Active signal on external shutdown signal input Check the component connected to the external shutdown signal input Cause: Remedy: MEWU PC board faulty Replace the MEWU PC board 416 No communication possible between power stage set and control system Cause: Remedy: Remedy: On-off communication fault Fault rectified automatically Restart the inverter Cause: Remedy: Connection to MECERCAP PC board damaged or faulty Check ribbon cable and replace if necessary Cause: Remedy: MECERCAP PC board faulty Replace MECERCAP PC board Cause: Remedy: MEREG PC board faulty Replace MEREG PC board 425 No communication possible with the power stage set Cause: Remedy: Remedy: On-off communication fault Fault rectified automatically Restart the inverter Cause: Remedy: Connection to MECERCAP PC board damaged or faulty Check ribbon cable and replace if necessary Cause: Remedy: MECERCAP PC board faulty Replace MECERCAP PC board Cause: Remedy: MEREG PC board faulty Replace MEREG PC board 81 426 Power stage set timeout error - intermediate circuit charging takes too long Cause: Remedy: Intermediate circuit voltage has fallen below the permitted limit value for grid power feed operation Check solar modules Cause: Remedy: Measurement fault on power stage set Replacing a power stage set 427 Power stage set timeout error - grid synchronisation takes too long Cause: Remedy: No connection to the AC grid Check AC voltage Cause: Remedy: Measurement fault on power stage set Replacing a power stage set 431 Power stage set is in boot mode Cause: Remedy: Power stage set is in boot mode Fault rectified automatically Cause: Remedy: Fault on the power stage set Run firmware update Cause: Remedy: Firmware update interrupted Repeat firmware update Cause: Remedy: Power stage set faulty Replacing a power stage set Cause: Remedy: MECERCAP PC board faulty Replace MECERCAP PC board 432 Consistency fault in the power stage set management Cause: 82 Remedy: Remedy: Connection between power stage set and MECERCAP PC board not possible Restart the inverter Run firmware update Cause: Remedy: Power stage set faulty Replacing a power stage set Cause: Remedy: MECERCAP PC board faulty Replace MECERCAP PC board Cause: Remedy: Remedy: Connection between power stage set and MECERCAP PC board not possible Restart the inverter Run firmware update Cause: Remedy: Power stage set faulty Replacing a power stage set Cause: Remedy: MECERCAP PC board faulty Replace MECERCAP PC board 436 Error communication problem Cause: Remedy: Remedy: Connection between power stage set and MECERCAP PC board not possible Restart the inverter Run firmware update Cause: Remedy: Power stage set faulty Replacing a power stage set Cause: Remedy: MECERCAP PC board faulty Replace MECERCAP PC board 437 Internal error handling problem Cause: Remedy: Remedy: Connection between power stage set and MECERCAP PC board not possible Restart the inverter Run firmware update Cause: Remedy: Power stage set faulty Replacing a power stage set Cause: Remedy: MECERCAP PC board faulty Replace MECERCAP PC board 83 EN 433 Error while assigning dynamic addresses 438 Problem when displaying power stage set errors on the display PC board Cause: Remedy: Remedy: Connection between power stage set and MECERCAP PC board not possible Restart the inverter Run firmware update Cause: Remedy: Power stage set faulty Replacing a power stage set Cause: Remedy: MECERCAP PC board faulty Replace MECERCAP PC board 445 Incorrect power stage set configuration Cause: Remedy: Remedy: Incorrect country setup setting Check country setup settings Run firmware update Cause: Remedy: MECERCAP PC board faulty Replace MECERCAP PC board 457 Mains relay does not open despite switch-on signal Cause: Remedy: Measurement fault on inverter Restart the inverter Cause: Remedy: Fault in AC cabling Check AC cabling / AC terminals Cause: Remedy: AC contactor faulty Replace AC contactor Cause: Remedy: Measurement fault on MEREG PC board Replace MEREG PC board 459 Error when recording the measuring signal for the insulation test 84 Cause: Remedy: Error when recording the measuring signal for the insulation test Restart the inverter Cause: Remedy: Signal lines are not connected Check connections on MEREG PC board Cause: Remedy: Measurement fault on MEDC PC board Replace MEDC PC board Cause: Remedy: MEWU PC board faulty Replace the MEWU PC board 460 Reference voltage source for the digital signal processor (DSP) is working out of tolerance Measurement fault on MEREG PC board Check signal lines on MEREG PC board Replace MEREG PC board Cause: Remedy: No power supply to the MEREG PC board, fault lies with the MEWU PC board Check connection between MEWU and MEREG PC boards EN Cause: Remedy: Remedy: 461 Fault in the DSP data memory Cause: Remedy: Remedy: DSP fault on MEREG PC board Restart the inverter Replace MEREG PC board 463 AC polarity reversed Cause: Remedy: AC polarity reversed Check whether the phase and neutral conductors have been connected properly Cause: Remedy: Error during AC measurement Run firmware update Cause: Remedy: No measuring signals on MEREG PC board Check cable connection on MEREG PC board Cause: Remedy: MEREG PC board faulty Replace MEREG PC board 471 Fuse for solar module grounding is faulty Cause: Remedy: Fuse for solar module grounding is faulty Replace fuse for solar module grounding Cause: Remedy: MEWU PC board faulty Replace the MEWU PC board 472 Fuse for solar module grounding is faulty (US devices only) Cause: Remedy: Fuse for solar module grounding is faulty Replace fuse for solar module grounding Cause: Remedy: MEWU PC board faulty Replace the MEWU PC board 85 475 Solar module grounding, insulation fault (connection between solar module and ground) Cause: Remedy: Insulation resistance too low Check solar modules Cause: Remedy: Insulation resistance measurement fault Replace the MEWU PC board Cause: Remedy: GND mode for the module grounding has not been activated Activate GND mode for module grounding in the Installer Basic menu 486 External NO contact is open, optional measuring and monitoring relay has tripped Cause: Remedy: External NO contact is open, optional measuring and monitoring relay has tripped Close external NO contact, check measuring and monitoring relay Cause: Remedy: Measurement fault on MEWU PC board Replace the MEWU PC board Cause: Remedy: MECERCAP PC board faulty Replace MECERCAP PC board 487 Air inlet temperature sensor is faulty Cause: Remedy: Remedy: Air inlet temperature sensor is faulty Check connection socket of air inlet temperature sensor Replace air inlet temperature sensor Cause: Remedy: MEREG PC board faulty Replace MEREG PC board Cause: Remedy: MEWU PC board faulty Replace the MEWU PC board 488 AC current sensor is faulty 86 Cause: Remedy: Remedy: AC current sensor is faulty Check connection socket of AC current sensor Replace AC current sensor Cause: Remedy: MEREG PC board faulty Replace MEREG PC board Cause: Remedy: MEWU PC board faulty Replace the MEWU PC board Cause: Remedy: Communication error on MEREG PC board Restart the inverter Cause: Remedy: MEREG PC board faulty Replace MEREG PC board EN 490 Internal communication error 491 Internal communication error Cause: Remedy: Communication error on MEREG PC board Restart the inverter Cause: Remedy: MEREG PC board faulty Replace MEREG PC board 492 DC main switch is switched off Cause: Remedy: DC main switch is switched off Switch on DC main switch Cause: Remedy: Measurement fault on MEREG PC board Replace MEREG PC board 493 DC relay is faulty Cause: Remedy: Measurement fault on DC relay Restart inverter / check connection sockets on DC relay Cause: Remedy: DC relay is faulty Replace DC relay Cause: Remedy: DC main switch is switched off or faulty Check/replace DC main switch Cause: Remedy: Measurement fault on MEWU PC board Replace the MEWU PC board 494 Grounding fault on MEREG PC board Cause: Remedy: Grounding fault on MEREG PC board Check the connection between the metal spacers and the MEREG PC board Cause: Remedy: Grounding measurement fault on MEREG PC board Replace MEREG PC board 87 495 3.3 V supply voltage faulty on MEREG PC board Cause: Remedy: No connection to MENT PC board Check connection sockets on MEREG PC board Cause: Remedy: MEREG PC board faulty Replace MEREG PC board 496 5 V supply voltage faulty on MEREG PC board Cause: Remedy: No connection to MENT PC board Check connection sockets on MEREG PC board Cause: Remedy: MEREG PC board faulty Replace MEREG PC board Cause: Remedy: Loose cable on MENT PC board Check connection sockets on MENT PC board Cause: Remedy: MENT PC board faulty Replace MENT PC board 497 The 14 V or 22 V supply voltage for the PWM driver is faulty Cause: Remedy: No connection to MENT PC board Check connection sockets on MEREG PC board Cause: Remedy: MEREG PC board faulty Replace MEREG PC board 498 The 24 V supply voltage for the power stage set is faulty 88 Cause: Remedy: No connection between the MEREG and MENT PC boards Check connection sockets on the MEREG and MENT PC boards Cause: Remedy: MEREG PC board faulty Replace MEREG PC board Cause: Remedy: MENT PC board faulty Replace MENT PC board Service class 5 Cause: Remedy: No connection to MENT PC board Check connection sockets on MEREG PC board Cause: Remedy: MEREG PC board faulty Replace MEREG PC board Cause: Remedy: Loose cable on MENT PC board Check connection sockets on MENT PC board Cause: Remedy: MENT PC board faulty Replace MENT PC board EN 499 24 V supply voltage faulty on MEREG PC board Messages in this class do not generally hinder the inverter grid power feed operation. They are only displayed until the message is acknowledged by pressing a button on the inverter (the inverter continues feeding energy into the grid during this time). 502 An insulation fault between DC+ or DC- to ground was detected Cause: Remedy: Insulation fault on the solar module Check cables and solar modules Cause: Remedy: Measurement fault on power stage set Replacing a power stage set Cause: Remedy: GND mode for the module grounding has not been activated Activate GND mode for module grounding in the Installer Basic menu 509 No energy fed into the grid in the past 24 hours Cause: Remedy: No AC supply to inverter Check AC connection Cause: Remedy: MENT PC board faulty Replace MENT PC board 516 No communication possible with the storage unit Cause: Remedy: One-off Restart the inverter Cause: Remedy: MEREG PC board faulty Replace MEREG PC board 89 517 Power derating caused by too high a temperature Cause: Remedy: Increased ambient temperature Change installation location / install external cooling system Cause: Remedy: Insufficient distance between inverters Increase distance between inverters Cause: Remedy: Fan cable not connected Connect fan cable Cause: Remedy: Main fan faulty Replace main fan Cause: Remedy: Measurement fault on MEREG PC board Replace MEREG PC board Cause: Remedy: Measurement fault on power stage set Replacing a power stage set 518 Internal DSP malfunction Cause: Remedy: One-off Fault rectified automatically / restart inverter Cause: Remedy: MEREG PC board faulty Replace MEREG PC board 535 Error during fan self-test Cause: Remedy: Fan cable not connected Connect fan cable Cause: Remedy: Main fan / circulating fan faulty Replace main fan / circulating fan Cause: Remedy: Fan controller on MEWU PC board faulty Replace the MEWU PC board 536 Main fan error 90 Cause: Remedy: Fan cable not connected Connect fan cable Cause: Remedy: Main fan faulty Replace main fan Cause: Remedy: Fan controller on MEWU PC board faulty Replace the MEWU PC board Cause: Remedy: Fuse for solar module grounding is faulty Replace fuse for solar module grounding Cause: Remedy: Measurement fault on MEDC PC board Replace MEDC PC board Cause: Remedy: Measurement fault on MEREG PC board Replace MEREG PC board EN 551 Fuse for solar module grounding is faulty 555 Circulating fan error Cause: Remedy: Fan cable not connected Connect fan cable Cause: Remedy: Circulating fan faulty Replace circulating fan Cause: Remedy: Fan controller on MEWU PC board faulty Replace the MEWU PC board 558 Functional incompatibility (one or more PC boards in the inverter are not compatible with each other, e.g. after a PC board has been replaced) Cause: Remedy: New PC board does not support a device function Run firmware update 559 LVRT error Cause: Remedy: Interference on the public grid Check grid voltage Cause: Remedy: Fault on MENT PC board Replace MENT PC board Cause: Remedy: Measurement fault on MEREG PC board Replace MEREG PC board 560 Power derating caused by overfrequency Cause: Remedy: Interference on the public grid Check grid voltage Cause: Remedy: Grid frequency outside permissible range Check grid frequency Cause: Remedy: Measurement fault on MEREG PC board Replace MEREG PC board 91 597 External overvoltage protection has tripped (connected to the "IN1" NO/alarm contact terminals) Cause: Remedy: Active signal on "IN1" input Check the component connected to the "IN1" input Cause: Remedy: Measurement fault on MEWU PC board Replace the MEWU PC board Cause: Remedy: MECERCAP PC board faulty Replace MECERCAP PC board 598 External overvoltage protection has tripped (connected to the "IN2" NO/alarm contact terminals) Cause: Remedy: Active signal on "IN2" input Check the component connected to the "IN2" input Cause: Remedy: Measurement fault on MEWU PC board Replace the MEWU PC board Cause: Remedy: MECERCAP PC board faulty Replace MECERCAP PC board 599 External overvoltage protection has tripped (connected to the "IN3" NO/alarm contact terminals) Service class 7 Cause: Remedy: Active signal on "IN3" input Check the component connected to the "IN3" input Cause: Remedy: Measurement fault on MEWU PC board Replace the MEWU PC board Cause: Remedy: MECERCAP PC board faulty Replace MECERCAP PC board Class 7 status codes relate to the control system, the configuration and inverter data recording, and may directly or indirectly affect the process of feeding energy into the grid. 721 Error writing EEPROM 92 Cause: Remedy: One-off Fault rectified automatically / restart inverter Cause: Remedy: MECERCAP PC board faulty Replace MECERCAP PC board 751 Time lost Inverter has not been able to establish grid connection for more than 5 days Reset time and date Cause: Remedy: Inverter firmware error Run firmware update Cause: Remedy: Memory on MECERCAP PC board faulty Replace MECERCAP PC board EN Cause: Remedy: 752 Real Time Clock module faulty Cause: Remedy: MECERCAP PC board faulty Replace MECERCAP PC board 753 Time not set for extended period Cause: Remedy: Time has not been set for an extended period (message appears every 6 months) Set date and time Cause: Remedy: Firmware error Run firmware update Cause: Remedy: Memory fault on MECERCAP PC board Replace MECERCAP PC board 756 Time incorrectly set Cause: Remedy: Time reset Set date and time again Cause: Remedy: Memory fault on MECERCAP PC board Replace MECERCAP PC board 757 Hardware error in the Real Time Clock module Cause: Remedy: Hardware error in the Real Time Clock module Fault rectified automatically / restart inverter Cause: Remedy: MECERCAP PC board faulty Replace MECERCAP PC board 93 766 Emergency derating not found Cause: Remedy: Emergency derating could not be read Fault rectified automatically Cause: Remedy: MECERCAP PC board faulty Replace MECERCAP PC board 768 Provides information about the internal processor program status Cause: Remedy: Remedy: Errors in the firmware (MECERCAP PC board) Fault rectified automatically / restart inverter Replace MECERCAP PC board 771 - 773 Problem with the memory on the MECERCAP PC board Cause: Remedy: Memory problem on MECERCAP PC board Fault rectified automatically / restart inverter Cause: Remedy: Memory fault Adjust the country setup Cause: Remedy: Faulty memory on MECERCAP PC board Replace MECERCAP PC board 775 Power stage set error Cause: Remedy: Power stage set error Replacing a power stage set Cause: Remedy: Firmware error Run firmware update 776 Invalid device-type 94 Cause: Remedy: Remedy: Invalid device-type Restart the inverter Adjust the country setup Cause: Remedy: Firmware error Run firmware update Cause: Remedy: Faulty memory on MECERCAP PC board Replace MECERCAP PC board Cause: Remedy: No connection between the MECERCAP and MEDC PC boards Check the connection sockets on both PC boards Cause: Remedy: MEDC PC board faulty Replace MEDC PC board Cause: Remedy: MECERCAP PC board faulty Replace MECERCAP PC board EN 799 No communication between the control board and the monitoring board 95 Error flowchart General 96 Essential system data: Inverter type Serial number of installed inverter Service code shown on the display (STATE PS menu / STATE FAN menu) Name of photovoltaic system (name of system operator) System operating period Location of system Number of inverters in system (type, serial number) DC and AC voltage Changing components Safety WARNING! An electric shock can be fatal. Before opening the device: Move the mains switch to the O position Unplug the device from the mains Put up an easy-to-understand warning sign to stop anybody inadvertently switching it back on again Using a suitable measuring instrument, ensure that electrically charged parts (e.g. capacitors) have been discharged WARNING! An electric shock can be fatal. Danger due to residual voltage in capacitors. Wait for the capacitors to discharge. Discharge time is 10 minutes. See the operating instructions and the safety notices on the inverter for more details on discharge time. NOTE! Requirements concerning electrical installations may be subject to national standards and directives that must be observed. A safety inspection must be carried out after any component replacement, maintenance or repair work (see "Safety inspection"). Opening air inlet grille / upper cover plate (1) (2) (3) Open the door (1) 1 Turn DC main switch to - OFF - 2 Open door using handle (note inverter discharge time - see operating instructions and safety notices on device) Open upper cover plate (2) 1 Open the door (1) 2 Undo the 20 TX25 screws (16 screws on Fronius Agilo Outdoor) 3 Fold the cover plate forwards 4 If necessary the cover plate can also be detached: Remove the contact protection from the PC board module Unplug the display ribbon cable Unplug the 2 Molex plugs from the MENT PC board On Fronius Agilo Outdoor: disconnect the Molex plug of the ventilating fan Remove the cover plate (4) Open the air inlet grille (3) 1 Open the door (1) 2 Undo the 5 TX25 screws on the air inlet grille 3 Open the air inlet grille to the right Close the air inlet grille 99 EN Changing components 1 Close the air inlet grille and secure using the 5 TX25 screws - 3 Nm 2 Close the door Close the cover plate 1 If the cover plate has been detached: refit the cover plate, connect the cables and fit the contact protection - 3 Nm 2 Fold up the cover plate and secure using the 20 TX25 screws (16 screws on the Fronius Agilo Outdoor) - 3 Nm 3 Close the door Close the door 1 Release the lock (4) 2 Close the door and turn the DC main switch to - ON - Opening the air inlet grille on the Fronius Agilo Outdoor Open the air inlet grille (3) 1 Open the door 2 Undo the 4 TX30 screws on the air inlet grille 3 Open the air inlet grille (3) to the right Remove the cover plates (1) 1 Remove the 3 TX25 screws from the upper cover plate (1) and remove the cover plate 2 Remove the 6 TX25 screws from the lower cover plate (2) and remove the cover plate (2) Fit the cover plates (3) 1 Fit the lower cover plate using 6 TX25 screws - 2.8 Nm 2 Fit the upper cover plate using 3 TX25 screws - 2.8 Nm Close the air inlet grille 100 1 Close the air inlet grille and secure using 4 TX30 screws - 3 Nm 2 Close the door Overview (1) (2) (3) (4*) (5) EN (6) (17) (16) (15) (7) (8) (9) (14) (13) (12) (10) (11) For some components it is necessary to open the air inlet grille or the upper cover plate behind the door. The DC main switch and the PC boards are protected by contact protection (13) and (17). "Replacing components" is divided into the following sections and chapters: Replacing components behind the air inlet grille Replacing the main fan (5) Replacing the pulse filter (9) Replacing the AC contactor (11) Replacing the AC filter / current sensors (10) Replacing components behind the door Replacing the DC main switch (14) Replacing a power stage set (2) Replacing the DC relay (12) Replacing the DC filter (7) Replacing the ventilating fan (1) Only applies to Fronius Agilo Outdoor: Heat exchanger (4*) Replacing PC boards Replacing the MENT PC board (6) Replacing the MECERCAP PC board (3) Replacing the MEREG PC board (16) Replacing the MEWU PC board (15) Replacing the MEDC PC board (8) 101 Replacing components behind the air inlet grille Safety WARNING! An electric shock can be fatal. Danger due to grid voltage and DC voltage from solar modules. Make sure that both the AC side and the DC side are de-energised before carrying out any work on the inverter. Replacing the main fan (1) (2) (2) (2) 1 Open the door and air inlet grille 2 Disconnect the main fan and temperature sensor (1) (on the Fronius Agilo Outdoor, the cover plate must be removed first) 3 Undo the 4 M6 screws (2) using a 10 mm socket wrench, remove the main fan 4 Insert the new main fan 5 Secure the main fan using 4 M6 screws - 8 Nm 6 Plug in the main fan and temperature sensor (on the Fronius Agilo Outdoor, the cover plate must be refitted above the connectors) 7 Close air inlet grille and door - 3 Nm 1 Open the door and air inlet grille 2 Disconnect the 6 cables (1) from the clock filter - TX20 (follow correct sequence!) 3 Undo the M12 hexagon nut (2) using an 18 mm socket wrench and remove the pulse filter 4 Insert the new pulse filter and secure using the M12 hexagon nut - 15 Nm 5 Connect the 6 cables to the pulse filter in the correct order (TX20) - 2.5 Nm 6 Close air inlet grille and door - 3 Nm (2) Replacing the pulse filter (1) (1) (2) 102 (1) (2) (1)(2) (1) (3) 1 Open the door and air inlet grille 2 Disconnect the 6 phase wires (1) from the AC contactor using a 4 mm Allen key 3 Disconnect the 2 cables from the auxiliary contact (6) and 2 coils (2) from the AC contactor using a 3.5 mm slotted screwdriver 4 Undo the 2 M6 screws (3) using a 10 mm socket wrench 5 Slacken the 2 M6 screws (4) using a 10 mm socket wrench and remove the AC contactor 6 Insert the new AC contactor and secure using 4 M6 hexagonal bolts - 8 Nm (3) (5) (5) (4) (4) (1) Replacing the AC filter / current sensors (1) IMPORTANT! Use the lower terminals for the auxiliary contact. Tighten unused terminals using a 3.5 mm slotted screwdriver - 1 Nm. (1) (1) (1) (1) (2) (2) (6) (3) (5) (6) (3) (4) (4) IMPORTANT! Phase wires must be connected in the correct order (1 to 1, etc.). 7 Connect 2 auxiliary contacts and 2 coils - 1 Nm 8 Connect 6 phase wires (1) - Agilo Indoor: 12 Nm, Agilo Outdoor: 14 Nm 9 Close air inlet grille and door - 3 Nm 1 Open the door and air inlet grille 2 Disconnect the 3 cables (1) from the AC filter using a 6 mm Allen key 3 Disconnect the 3 cables (4) from the AC contactor using a 4 mm Allen key 4 Disconnect the Molex plug (5) for the current sensors 5 Undo the 2 M6 screws (2) using a 10 mm socket wrench 6 Slacken the 2 M6 screws (3) using a 10 mm socket wrench and remove the AC filter by sliding it upwards 7 Undo the 4 TX25 screws (6) and remove the current sensors (4) 103 EN Replacing the AC contactor red S1 S2 4 black S1 S2 1 S3 5 6 S3 2 3 If just a single current sensor has to be replaced: Cut through the cable ties Pull the lines of the current sensor in question out of the Molex contact using a Molex extractor tool Remove the current sensor from the holder (sensors are fitted in the reverse order) 8 Feed through the current sensors and use the 4 TX25 screws to fit to the AC filter - 3 Nm 9 Insert the new AC filter and secure using the 4 M6 hexagonal bolts (10 mm) - 8 Nm 10 Connect 3 cables to the AC filter (6 mm) - 18 Nm (follow correct sequence!) 11 Connect 3 cables to the AC contactor (4 mm) - 12 Nm (follow correct sequence!) 12 Connect the Molex plug for the current sensors IMPORTANT! Check whether the overvoltage arrester is connected to the AC filter. 13 Close air inlet grille and door - 3 Nm 104 Safety Replacing the DC main switch WARNING! An electric shock can be fatal. Danger due to grid voltage and DC voltage from solar modules. Make sure that both the AC side and the DC side are de-energised before carrying out any work on the inverter. (1) (2) (2) (1) (2)(4+2) (2) (3) (2) (5) (4+2) (2) (2) (2) (2)(1) (7) (7) 1 Open the door 2 Undo the two M10 hexagon nuts above the spacer (4) using a 15 mm socket wrench and remove the contact protection of the DC main switch 3 Release and remove shaft (3) using a 3.5 mm slotted screwdriver 4 Remove both spacers (4) 5 Remove the cover (5) of the DC main switch 6 Remove and thread out auxiliary contact (6) 7 Undo the 12 M10 hexagon nuts (2) using a 15 mm socket wrench and remove the 4 copper brackets 8 Undo the 4 TX25 screws (1) and remove the DC main switch (2)(1) (6) (7) Removing the DC main switch: (7) Fitting the DC main switch: 1 Fit the 4 copper brackets to the new DC main switch using 8 M10 hexagon nuts (15 mm) - 30 Nm (same position as on the old DC main switch) 2 Loosen 4 securing tabs (7) and align as shown - 45° (TX20) 3 Tighten the securing tabs at this angle - 1.6 Nm 4 Fit the air inlet grille and secure using the 4 TX25 screws - 3 Nm 5 Fit the 4 M10 hexagon nuts to the DC cable brackets (15 mm) - 30 Nm 6 Remove the covers and fit the auxiliary contact 7 Fit the covers 8 Fit both spacers - 2 Nm 9 Fit the shaft 10 Fit the contact protection, position correctly and secure using 2 M10 hexagon bolts (15 mm) - 4 Nm 105 EN Replacing components behind the door 11 Close the door Replacing a power stage set (1) (1) (2) (3) (2) (3) (2) (1) (1) Removing a power stage set: 1 Open the door 2 Undo the 20 TX25 screws (16 TX25 screws on the Fronius Agilo Outdoor) and fold the cover plate forwards (detach if necessary) 3 Unplug the AC cables (2) from the power stage set (M8 hexagon nut - 13 mm socket wrench) 4 Unplug the DC cables (3) (M8 hexagon nut - 13 mm socket wrench) 5 Undo the 4 M6 screws (1) using a 10 mm socket wrench and remove the power stage set Fitting a power stage set: 6 Insert the new power stage set and secure using 4 M6 screws - 8 Nm 7 Connect the DC cables (M8 hexagon nut) - 18 Nm 8 Connect the AC cables (M8 hexagon nut) - 18 Nm 9 Fit the cover plate using 20 TX25 screws (16 TX25 screws on the Fronius Agilo Outdoor) - 3 Nm 10 Close the door 106 (1) (2) (1) (1) (2) Removing the DC relay: (1) 1 Open the door 2 Remove the contact protection of the DC main switch and the PC board module (8 TX25 screws) 3 Unplug or disconnect all cables, connectors and external connection sockets from the MEREG, MEWU and MEDC PC boards 4 Disconnect the gas discharge plug (3) 5 Undo the 20 TX25 screws and fold the cover plate forwards 6 Remove the 4 TX25 screws (1) 7 Remove the 3 TX25 screws (2) and take out the entire PC board unit (6) 8 Disconnect the DC relay Molex plug (7) 9 Undo the 3 M8 hexagon nuts (4) using a 13 mm socket wrench (6) 10 Undo the M10 hexagon nut (5) using a 15 mm socket wrench (2) (3) (4) (4) (4) (7) 11 Remove the 2 TX25 screws (6) and take out the DC relay (5) Fitting the DC relay: 1 Fit the new DC relay and secure using the 2 TX25 screws (6) - 3 Nm 2 Connect the DC relay Molex plug (7) 3 Fit the copper brackets using 3 M8 hexagon nuts (4) (14 Nm to the DC filter, 10 Nm to the DC relay - 13 mm) and one M10 hexagon nut (5) (30 Nm to the DC main switch 15 mm) 4 Insert the PC board unit and secure using 7 TX25 screws (2+1) - 3 Nm (caution - do not pinch any cables) 5 Plug in or connect all cables, connectors and external connection sockets to the MEREG, MEWU and MEDC PC boards 6 Connect the gas discharge plug (3) 7 Change the 30 A polarity protection fuse 8 Fit the cover plate using the 20 TX25 screws - 3 Nm 9 Fit, position and secure the contact protection of the DC main switch (2 M10 hexagon nuts - 4 Nm) and the PC board module (8 TX25 screws - 3 Nm) 10 Close the door 107 EN Replacing DC relay Replacing the DC filter (1) (2) (1) Removing the DC filter: (1) (8) (1) (2) 1 Open the door 2 Remove the contact protection of the DC main switch and the PC board module (8 TX25 screws) 3 Unplug or disconnect all cables, connectors and external connection sockets from the MEREG and MEWU PC boards 4 Disconnect the gas discharge plug (3) 5 Undo the 20 TX25 screws and fold the cover plate forwards 6 Remove the 4 TX25 screws (1) 7 Remove the 3 TX25 screws (2) and take out the entire PC board unit 8 Disconnect the DC filter cables (8) from the power stage set - 2 M8 hexagon bolts, 13 mm socket wrench - and thread out in a downwards direction 9 Remove the 3 M8 hexagon nuts (5) using a 13 mm socket wrench (2) (3) (4) (5) (4) (5) (4) (4) (5) (6+7) 10 Remove the spacers (6) and M10 hexagon nuts (10) using a 15 mm socket wrench 11 Slacken the 4 M6 screws (4) using a 10 mm socket wrench and remove the DC filter by lifting it up and out from the front Fitting the DC filter: 1 Fit the DC filter and secure using the 4 M6 screws - 8 Nm 2 Fit the copper brackets using 3 M8 hexagon nuts (5) (14 Nm to the DC filter, 10 Nm to the DC relay) and one M10 hexagon nut (6) (30 Nm to the DC main switch) 3 Fit the spacers - 2 Nm 4 Thread in the DC filter cables and connect to the power stage set using the 2 M8 hexagon nuts - 18 Nm 5 Insert the PC board unit and secure using 7 TX25 screws (2+1) - 3 Nm (caution - do not pinch any cables) 6 Plug in or connect all cables, connectors and external connection sockets to the MEREG and MEWU PC boards 7 Connect the gas discharge plug (3) 8 Fit the cover plate using the 20 TX25 screws - 3 Nm 9 Fit, position and secure the contact protection of the DC main switch (2 M10 hexagon nuts - 4 Nm) and the PC board module (8 TX25 screws - 3 Nm) 10 Close the door 108 1 Open the door 2 Remove the 20 TX25 screws and fold the cover plate forwards 3 Disconnect the Molex plug (2) of the circulating pump 4 Remove the 2 TX25 screws (1) and remove the circulating pump complete with retaining bracket 5 Remove the 2 TX25 screws (3) and take the circulating pump out of the retaining bracket (1) (1) (2) (3) (3) IMPORTANT! When fitting the circulating pump note the air flow direction. 5 Fit the new circulating pump to the retaining bracket using the 2 TX25 screws - 2 Nm 6 Fit the circulating pump and retaining bracket into the inverter using the 2 TX25 screws - 3 Nm 7 Connect the Molex plug of the circulating pump 8 Fit the cover plate using the 20 TX25 screws - 3 Nm 9 Close the door 109 EN Replacing the circulating fan Replacing the Fronius Agilo Outdoor ventilating fan (1) (1) (2) (2) (2) (2) (3) Replacing the Fronius Agilo Outdoor ventilating fan 2 (1) (1) 110 (3) 1 Open the door 2 Remove the 16 TX25 screws and fold the cover plate forwards 3 Disconnect the Molex plug (4) of the ventilating fan and remove the cable ties 4 Remove the 2 TX25 screws (1) and remove the ventilating fan complete with mounting bracket 5 Remove the 4 TX25 screws (2) and take the ventilating fan off the mounting bracket IMPORTANT! When fitting the ventilating fan note the air flow direction. 5 Fit the new ventilating fan to the mounting bracket using 4 TX25 screws - 5 Nm 6 Fit the ventilating fan and mounting bracket in the inverter using 2 TX25 screws - 3 Nm 7 Connect the Molex plug of the ventilating fan and secure the cables with cable ties 8 Fit the cover plate using 16 TX25 screws - 3 Nm 9 Close the door 1 Open the door 2 Remove the 16 TX25 screws and fold the cover plate forwards 3 Disconnect the Molex plug of ventilating fan 2 and remove the cable ties 4 Undo the 4 TX25 screws (1) and remove the cover plate (4) (1) (1) (2) (2) (2) Remove the 4 TX25 screws (2) and remove ventilating fan 2 complete with mounting bracket 6 Remove the 4 TX25 screws (3) and take the ventilating fan off the mounting bracket EN (2) 5 (3) (3) (3) (3) IMPORTANT! When fitting the ventilating fan note the air flow direction. 7 Fit the new ventilating fan to the mounting bracket using 4 TX25 screws - 5 Nm 8 Fit the ventilating fan and mounting bracket in the inverter using 4 TX25 screws - 3 Nm 9 Fit the cover plate using 4 TX25 screws - 3 Nm 10 Connect the Molex plug of the ventilating fan and secure the cables with cable ties 11 Fit the cover plate using 16 TX25 screws - 3 Nm 12 Close the door 111 Replacing the heat exchanger (1) (1) (1) Open the door 2 Remove the 16 TX25 screws and fold the cover plate forwards 3 Disconnect the Molex plug of ventilating fan 2 and remove the cable ties 4 Undo the 4 TX25 screws (1) and remove the cover plate 5 Remove the 4 TX25 screws (2) and remove ventilating fan 2 complete with mounting bracket 6 Undo the 4 TX25 screws (3) and remove the heat exchanger (1) (2) (2) (2) (2) (3) (3) 1 (3) (3) 7 Fit the new heat exchanger using 4 TX25 screws - 3 Nm 8 Fit the ventilating fan and mounting bracket using 4 TX25 screws - 3 Nm 9 Fit the cover plate using 4 TX25 screws - 3 Nm 10 Connect the Molex plug of the ventilating fan and secure the cables with cable ties 11 Fit the cover plate using 16 TX25 screws - 3 Nm 12 Close the door 112 Safety WARNING! An electric shock can be fatal. Danger due to grid voltage and DC voltage from solar modules. Make sure that both the AC side and the DC side are de-energised before carrying out any work on the inverter. Replacing the MENT PC board (1) (1) (1) (1) Replacing the MECERCAP PC board (1) (1) Open the door 2 Remove the 20 TX25 screws and fold the cover plate forwards 3 Unplug all connectors on the MENT PC board 4 Remove 5 TX20 screws (1) 5 Remove the PC board 6 Insert the new PC board and secure using the 6 TX20 screws - 1.6 Nm 7 Plug in all connectors on the MENT PC board 8 Fit the cover plate using the 20 TX25 screws - 3 Nm 9 Close the door Before plugging the device data part (1) of the old PC board into the new board, the device data part on the new board must be broken off and removed. The inverter will not work if the device data part is not removed and an additional one is plugged in. (2) (2) (2) (3) 1 (2) 1 Open the door 2 Remove the 4 TX20 screws (2) and take off the PC board 3 Unplug the ribbon cable (3) 4 Break off the device data part (1) of the old PC board and plug it into the new PC board 5 Plug the ribbon cable (3) into the new PC board 6 Fit the PC board using 4 TX20 screws - 1.6 Nm 7 Pull off the display protective film 8 Close the door 113 EN Replacing PC boards Replacing the MEREG PC board 1 Open the door 2 Remove the contact protection of the PC board module - 8 TX25 screws 3 Unplug or disconnect all cables, connectors and external connection sockets from the MEREG PC board 4 Remove 1 TX20 screw (1) 5 Slide PC board to the right and remove 6 Insert the new PC board and secure using 1 TX20 screw - 1.6 Nm 7 Plug in or connect all cables, connectors and external connection sockets to the MEREG PC board (ensure the red latch on black connectors and ribbon cables engages) 8 Fit the contact protection using the 8 TX25 screws - 3 Nm 9 Close the door 1 Open the door 2 Remove the contact protection of the PC board module - 8 TX25 screws 3 Unplug or disconnect all cables, connectors and external connection sockets from the MEWU PC board 4 Remove the 2 TX20 screws (1) 5 Slide PC board to the right and remove 6 Insert the new PC board, slide left and secure using 2 TX20 screws - 1.4 Nm 7 Plug in or connect all cables, connectors and external connection sockets to the MEWU PC board (also check jumpers and ensure latch engages on ribbon cable) 8 Fit the contact protection using the 8 TX25 screws - 3 Nm 9 Close the door (1) Replacing the MEWU PC board (1) 114 (1) (1) (2) (1) (2) 1 Remove the MEWU PC board (see "Replacing the MEWU PC board") 2 Unplug or disconnect all cables, connectors and external connection sockets from the MEDC PC board 3 Loosen the two metal spacers (1) using a 7 mm socket wrench 4 Remove the 2 TX20 screws (2) 5 Slide PC board to the right and remove 6 Insert the new PC board, slide left and secure using 2 TX20 screws - 1.6 Nm 7 Fit the 2 metal spacers (7 mm) - 1 Nm 8 Plug in or connect all cables, connectors and external connection sockets to the MEDC PC board (ensure the red latch on black connectors and ribbon cables engages) 9 Install the MEWU PC board (see "Replacing the MEWU PC board") 115 EN Replacing the MEDC PC board 116 Safety Inspections Safety inspection This section outlines the safety inspection for the device described in this service manual. It has been structured in compliance with "DIN VDE 0701-0702" and "ÖVE/ÖNORM E8701-1". Please also be aware of the requirements and standards relevant to your country, as the measured values or steps taken during the tests may vary. Should there be no relevant requirements and standards in your country, Fronius recommends that this test should still be carried out. Responsibility The repair engineer is responsible for carrying out and documenting the safety inspection properly and for making the correct decision regarding the outcome of the inspection. Fronius accepts no liability in this respect. Should any defects be identified during the test, then the entire safety inspection must be repeated once such defects have been rectified. The following tests must be performed in the prescribed sequence. Each test must be passed before the next test is started. If it is not possible to perform a particular test, the examiner must decide whether the safety of the device can nevertheless still be verified. The examiner bears full responsibility and liability for this decision. Justifications for the resulting decision must be documented in the test record under "Comments". Area of application A safety inspection must be performed after any repair, maintenance or modification work, or if stipulated by applicable national standards. Inspection staff qualifications The safety inspection may only be performed by an appropriately qualified electrician. These are persons who due to their specialist training, knowledge and experience of the relevant regulations are able to evaluate the tasks they are assigned as well as to identify and avoid electrical and other possible hazards. Measuring instruments The following requirements concerning measuring equipment as defined by DIN VDE 0701-0702 and ÖVE/ÖNORM E8701-1 must be observed. Also note the applicable requirements and standards in your country. Ground conductor resistance The measuring voltage may by a direct or alternating voltage The open circuit voltage must remain within a range of 4 V to 24 V The measuring current within the measuring range of 0.2 to 1.99 must not drop below 0.2 A Insulation resistance The measuring voltage value shown on the measuring device must be at least the same as the rated voltage to earth of the device to be tested, however it must be no less than 500 V DC voltage. The measuring current must be at least 1 mA (this corresponds to a load resistance of 0.5 M). 119 EN Safety Inspections Ground conductor current The effective inner resistance of the ground conductor measuring device must not exceed 5 . In the event of higher resistances, measures must be adopted to prevent dangerous contact voltages. The measuring range must cover at least 0.25 mA to 19 mA. The testing equipment must evaluate the measured current as an effective value regardless of the curve form. 120 General The following must be visually inspected without any further dismantling of the device. Obvious defects in any safety-related device components are unacceptable. Defects that could pose a risk during the visual inspection must also be recorded. Any defects that could cause other hazards must be repaired immediately or restrictions placed on the further use of the system until repairs have been effected. Mains supply and connecting lines - Connecting lines and other cables must not be damaged or defective Insulation must not be damaged (do not use insulating or adhesive tapes to repair damage) Connectors and plug connections must not be damaged or deformed Strain-relief devices, bending-protection devices, line routings or mountings must all be effective Lines/plugs must be suitable for the application and the power level Fuse cartridges and device fuse holders must not be faulty IMPORTANT! IEC 60364-5-52 serves as the basis for determining the cross-section and current capacity of mains cables. As the way the cables are laid and insulated, the ambient temperature and the current capacity can vary, the requirements set out in IEC 60364-552 are to be observed when changing mains leads. Also refer to the applicable requirements and standards in your country. Housing and covers - - All housing components, insulation components and protective covers must be present and undamaged No unauthorised modifications must have been made (e.g. installations, conversions that have not been approved by the manufacturer) Cooling openings must not be dirty or blocked and an air filter must be present Any dirt, corrosion or degradation that impairs safety must not be visible There must be no signs of overloading or improper use There must not be any conductive objects in the housing Adjustment and display devices - Controls and indicators must not be faulty Fuses that are accessible from outside the housing must not be defective Rating plate and warning stickers - Safety-related labels (e.g. warning notices, earthing symbols, rating plates, etc.) must be present. Replace, update or correct the labels as required The legibility of all safety-related labels or symbols, measurement data and positioning indicators must be ensured - - 121 EN Visual inspections Electrical tests Ground conductor resistance The ground conductor resistance test must be performed with the cabinet doors open. The device to be tested must be safely isolated from the AC grid. Mains cables (L1, L2, L3, N) must not be connected. Follow the safety rules. The device to be tested must be safely isolated from the DC grid. DC cables must not be connected. Safety precautions must be adopted to guard against the risk of live DC voltage in the cables. All switches, controllers, etc. must be closed during the measurement Both the AC contactor and the DC main switch must be actuated If present, the inverter module grounding must be removed for the duration of the test The inverter must be disconnected from Fronius Solar Net and from the Datcom ring (2) (1) 1 Measuring device 2 Inverter 9 Measuring line - Example: Measuring the ground conductor resistance (1) Ground terminal (2) Example measuring point The measurement is taken between the ground terminal (1) of the device and any touchable conductive part connected to the ground conductor (e.g. (2)) The resistance must not exceed 0.3 *) *) These requirements comply with DIN VDE 0701-0702 and ÖVE/ÖNORM E8701-1. Also refer to the applicable requirements and standards in your country. Insulation resistance 122 WARNING! An electric shock can be fatal. Some of the insulation resistance measurements are taken under high voltage. The process must be completely understood before starting the test. The following safety measures must be observed: Only perform the measurement if a ground conductor resistance test has been carried out successfully Restrict access to the work area as far as possible Do not touch any other person while performing the test and take measures to prevent other people touching any metallic parts A voltage is applied to the area to be tested each time that the insulation resistance measuring device is switched on. The insulation resistance measuring device must be fitted with an automatic self-discharge device. Suitable protective clothing / protective equipment must be worn while conducting the test. Ensure that the polarity is correct while conducting the insulation resistance test to avoid unreliable test results. The DC to PE insulation resistance measurement must be taken twice as two internal insulation resistance measurements are included in these inverter types. During the first measurement, the following plugs (1) must be disconnected from the PC board: EN (1) (1) Before these two plugs are reconnected, ensure that there is no live voltage present and observe the discharge time for the capacitors. The plugs must be reconnected for the second measurement. The following minimum insulation values apply. The test voltages specified must be observed *). As these inverter types are large-capacity devices, the insulation resistance measurement should last for approx. 10 seconds to ensure the required values are achieved: Measurement Info Test voltage Limit value DC -> PE Measurement 1 = 1000 V >= 1 M DC -> PE Measurement 2 = 1000 V >= 0.15 M = 500 V >= 1 M AC -> PE In the case of the AC -> PE measurement, the system configuration (grounding) can cause erroneous measurements (measured value approx. 0.01 M). In this case the AC cables (except PE) have to be disconnected from the inverter. Legend: Primary = DC (DC+ and DC-) | Secondary = AC (L and N) | Ground = PE *) These requirements comply with DIN VDE 0701-0702 and ÖVE/ÖNORM E8701-1. Also refer to the applicable requirements and standards in your country. **) As these inverter types have been certified to product standard IEC62109-1:2010, a different limit value to that specified in DIN VDE 0701-0702 and ÖVE/ÖNORM E8701-1 is permitted. 123 1 Measuring device 2 Inverter 9 Measuring line Example: Measuring the insulation resistance (PE to L1) The insulation measurement must be taken between the following points: DC+ and DC- can be short-circuited for this inverter test, otherwise both DC inputs have to be measured separately. L1, L2, L3 and N can be short-circuited for this inverter test, otherwise all AC inputs have to be measured separately. Measuring points: PE to N, L1, L2, L3 PE to DC+, DCWARNING! An electric shock can be fatal. Capacitors can charge during the insulation resistance measurement. Observe a mandatory discharge time of at least 10 minutes after taking the measurement. Check that the inverter is de-energised before continuing with the safety inspection or unplugging the adapter. The potentials checked can be discharged using the insulation resistance measuring device. See the operating instructions or the warning notices on the inverter for more details on discharge time. Ground conductor current Preparations Only perform the measurement if an insulation resistance test has been carried out successfully The inverter must be isolated from earth. No other connections to the earth potential are permitted (e.g. data lines, earthing fuse, mounting, etc.) -> for direct process only. Fit AC and DC cables to the inverter and switch on - observe the safety rules. Remove conductive objects from the housing Fit any missing housing parts Fit air inlet grille using 5 TX25 screws (3 Nm) and close the door The door may be left open if the measurement is being taken in the device WARNING! An electric shock can be fatal. The inverter is live during the measurement. The inverter must be started up after it is connected. The inverter must be feeding energy during the measurement to avoid unreliable results. Only the leakage currents arising at grid frequency are valid (50 - 60 Hz function of ammeter). High-frequency leakage currents distort the measurement result *). 124 There are two methods that may be used to measure the ground conductor current: Direct method: Device must be completely isolated and must not exhibit any links to another earth potential Differential method: The measurement can be taken on the inverter (loop in or outside the device) or in the distributor. If taking the measurement in the distributor, ensure that there are no live cables in the immediate vicinity. Direct method - Ground conductor current measured using ammeter on the ground conductor PE N L1 1 mA 9 PE 9 L1 9 N 2 8 1 Measuring device 2 Inverter 8 Isolated setup of test piece 9 Measuring line Example: Ground conductor current through ground conductor measured directly on the inverter (left) or in the distributor (right) The sum of the currents flowing to the ground conductor through the device insulation or caused by the circuits in the device is displayed. The ground conductor leakage current must not exceed 3.5 mA during this measurement **). Differential method - Ground conductor current measured using an ammeter on the N and L cables PE L1 N mA 9 PE 9 L1 1 9 N 2 1 Measuring device 2 Inverter 9 Measuring line Example: Ground conductor current is measured directly on the inverter (left) or in the distributor (right) using the differential method 125 EN *) These requirements comply with DIN VDE 0701-0702 and ÖVE/ÖNORM E8701-1. Also refer to the applicable requirements and standards in your country. Like with an RCD, the currents between the outer cable(s) (L1, L2, L3) and the neutral conductor (N) are compared using a converter. The difference is displayed. The ground conductor leakage current must not exceed 3.5 mA during this measurement **). **) These requirements comply with DIN VDE 0701-0702 and ÖVE/ÖNORM E8701-1. Also refer to the applicable requirements and standards in your country. Product standard IEC62109-1:2010 is also applied to the Fronius Agilo. This product standard limits the ground conductor leakage current to a maximum of 3.5 mA. And finally... Disconnect the inverter when not under load from the AC grid and DC supply Check that the system is de-energised Observe the discharge time Re-attach all removed cables, DatCom components or earthing fuses (restore condition or inverter prior to repair or safety inspection) Fit all missing housing components - all housing components, insulation components and protective covers must be present and undamaged Fit the air inlet grille using 5 TX25 screws - 3 Nm Close the door 126 Function tests Start up the inverter. Switch on AC and DC Functions that the testing personnel consider to be relevant must be tested for correct operation. Energising and energy feeding of inverter Grid power on/off equipment Evidence of proper operation must be provided by measurement or visual inspection. AC contactor and DC main switch check (perform when under no or minimal load, however not in standby mode) Switch off DC main switch -> inverter must switch to error and stop feeding energy Switch off AC main switch -> inverter switches off and display goes out Switch on AC main switch and DC main switch The inverter must run a fan test automatically. Indicators and controls - Check display for correct function Check that controls work in line with the operating instructions 127 EN Function Documentation Documentation - The electrician who performed the tests is responsible for compiling the proper documentation Document all completed tests in a test record. Enter both the measured values and the equipment/calibration data used If an individual test cannot be performed, the resulting decision must be justified and documented by the examiner Any device that fails a test must be clearly marked as unsafe and the operator informed. The device may no longer be used. The test record for the "Safety inspection" is available on the Fronius Partnerweb. 128 Appendix Spare parts list: Fronius Agilo $JLOR,QGRRU $JLOR,QGRRU %DFNVLGH 'HWDLO ULJKWGRRU 'HWDLOXS H 'HWDLOPLGGO )URQWVLGH 'HWDLOGRZQ 130 )URQWVLGH )521,86$*,/2 = = %DFNVLGH 0DLQ6ZLWFK .9$ .9$ .9$ .9$ 0 0 .9$ .9$ 131 'HWDLO8S = = 'HWDLOULJKWGRRU 'HWDLOPLGGOH = = %< = 'HWDLOGRZQ &$ &$ 132 0[ 0[ 7DSWLWH0[ 0 0 3$0[ 0[ [ 0 3$0[ [ 0 3$0[ [ 725;37[ 725;[ FDEOH 1/ 0[ 0[PP PP 0[PP 0[ PP 0[PP 0[PP 0[PP 133 SDFNLQJ PDQXDO JHUPDQ '( ( HQJOLVK (1 JUHHN (/ IUHQFK )5 VSDQLVK (6 LWDOLDQ ,7 GXWFK 1/ GDQLVK '$ SROLVK 3/ UXVVLDQ 58 WXUNLVK 75 DE 4,200,505 4,200,506 Fronius Agilo 100.0-3 Fronius Agilo 75.0-3 4,071,235,Z PRINT MENT geprüft Ersatzprint Fronius Agilo 43,0006,0267 Axiallüfter 24V 4W 184m³/h Ventilator 42,0201,3855 Durchfuehrungschiene 120mm² 42,0201,3854 Durchfuehrungschiene 75mm² 42,0201,3688 Montageblech Umwälzlüfter 42,0201,4006 Verdrehsicherung 4,071,316,Z PRINT MEREG geprüft 42,0405,0884 Printhalterung 4,071,234,Z PRINT MEDC geprüft Ersatzprint Fronius Agilo 4,071,315,Z PRINT MEWU geprüft Ersatzprint Fronius Agilo 42,0201,3702 CuSchiene 3x40 DC- Trenner zu Filter 42,0201,3670 Hutschiene 200mm 42,0201,3700 CuSchiene 3x40 DC+ 42,0201,7266 Klemmvb. VL50/3/10,5/S-WFF120 42,0201,3669 Zugentlastung und Erdungsblech 42,0300,2861 Durchführungstülle Nylon ø34,9 Gehäuseanbauteil 43,0006,0276 Hauptlüfter Fronius Agilo Ersatzteil Fronius Agilo 41,0005,0376 KONFOL 100μF 450V 5 P 41,0009,0290 Klemmleiste 10mm² 1polig 41,0007,0202 SICHAUTOM 10 400 4POL. 'D' 41,0007,0192 Sicherungsautomat AC 16A 480V 2pol. 41,0007,0260 Sicherungshalter 30A 1kV 5106305.1DC 43,0002,0467 DC-Lasttrennschalter OT315 E33 Schutzschalter 42,0201,3671 Hutschiene 350mm 42,0407,0747 Verdrahtungskanal 40x40x310 mm 42,0201,3668 AC Schuetz Adapter 42,0201,3689 Montageblech Taktfilter unten BY2,0201,3711 Aufnahme Stromsensor 43,0010,0320 Stromwandler IE 0,5% 150A 3KV 42,0201,3698 Abdeckblech Kabeleinführung 42,0201,7249 Anschlussschiene DC+/- 41,0009,0297 KLEMMPRINT 4pol 269A 120mm² 1V 42,0201,3682 Abdeckblech Boden 42,0402,0294 Dichtungsband PU 690x55x40mm Dichtung 42,0201,7252 Stromschiene VB-2x50/2-K20° Erdungsklemme 43,0008,0186 Schütz 160A 690V 3polig 24V Schütz 41,0007,0228 Sicherungshalter 30A 1kV 5106304.DC 42,0201,3057 Stromschiene Trennerbruecke EU Stromschiene Fronius CL 2.0060 42,0201,3680 Montageblech Printbaugruppe 43,0001,1412 Netzfilter AC 152A 400V 42,0201,3752 Hutschiene_50mm 42,0201,3685 Montagebl.Kurzschlusssicherung Ersatzprint Fronius Agilo Trenner zu Relais Klemmverbinder BY E-Cu 4mm Cu/Sn 5b 134 43,0006,0267 Axiallüfter 24V 4W 184m³/h 41,0007,0241 SICHERUNG 30 1000 F SPF030 42,0401,1187 Distanzhalter St M10/M10-12 Distanzhalter 43,0001,1084 Temperatursensor NTC 105°C Minifit 42,0201,3678 Haltewinkel 6-4-2 polig Molex 43,0001,3417 Relais Agilo 42,0300,3001 Abstandsisolator PA6/6 RMS-01 Isolationsklasse -20/60 42,0300,2977 Druckausgleichselem. PA6/18mm Zugentlastungszubehör 43,0003,0557 STIFTGEHÄUSE 41,0003,0335,Z Ventilator C 6 M.F.JR. F 42,0402,1022 O-Ring Iø39x2mm NBR70 42,0201,7272 Klemmvb. AL25/3/10,5 WFF120 43,0002,0453 Hilfskontakt Schließer OT125 42,0201,3681 Zugentlastung AC/DC 42,0201,3701 CuSchiene 3x40 DC+ Relais zu 43,0004,4538 Kabelkonfektion Agilo 43,0004,4536 Masseband SE XL 70mm² Cu-Geflecht 700x,0,10 42,0300,2978 Flachbandkabelhalter TFCCA-50 77,20x10,20x13,70mm 43,0001,1413 DC-Filter 245A 1000V +/- 42,0402,1022 O-Ring Iø39x2mm NBR70 42,0401,1115 Schraube PT 5x14 Torx Gr 42,0401,0208 6-KANT-SCHRAUBE 933 10x16 VZ C 42,0401,1238 SK-Sicherungsschraube M6x16 St 42,0401,1012 TAPTITE2000 M 5X25-Kopf sw 42,0400,0394 Sicherungsmutter St M12 B53012 vz 42,0400,0266 6-KANT-MUTTER DIN53012 M8WVZ C TENSILOCK 42,0400,0348 MUTTER-GEGEN 25x1,5 PA6GF lichtgrau RAL7035 42,0401,1174 Sechskantschraube M8x20 C Schraube [Metrisch] Stahl 8.8 42,0401,1024 LINSENSCHRAUBE 7045 5x10 42,0400,0395 Sicherungsmutter St M10 B53012 42,0400,0355 MUTTER-GEGEN 32x1,5 PA 42,0401,1030 LINSENSCHRAUBE 4042 4x9 42,0407,0474 SPERRZAHNMUTTER DIN6923 M6VZ C 42,0407,0712 Printdistanz Messing 4x50mm Distanzhalter 42,0401,1118 Schraube 5x12 Torx Gr Schraube [Gewindeformend] 42,0407,0624 Schraubensicherung NL 10 C 42,0407,0624 Schraubensicherung NL 10 C 42,0407,0099 KABELBINDER 102 42,0407,0101 Kabelbinder PA6.6 200mm 42,0407,0440 KABELBINDER 109 M. SPREIZNIET 42,0407,0741 Kabelbinder PA66HS 150mm Kabelzubehör 42,0400,0381 Sechkantmutter PA M20mm Schraube [Metrisch] 42,0407,0590 Zugentlastung M32 x1,5 42,0300,2675 VERSCHRAUBUNG M25x1,5 42,0402,0283 Dichtungseinsatz NBR M32 2x8mm Zugentlastungszubehoer 42,0402,0284 Dichtungseinsatz NBR M32 4x6mm Zugentlastungszubehoer 42,0402,0231 DICHTUNG PROFIL M25 2x6 mm Schalterzubehör Filter Kunststoffschraube B53085 vz vz Kabelzubehör PA 135 42,0402,0282 Dichtungseinsatz NBR M25 3x6mm Zugentlastungszubehoer 42,0300,2982 Verschlussstopfen ø8x14mm Verschlussstopfen 43,0012,0018 Zubehörset Agilo 43,0012,0017 Anschlussset Agilo 42,0300,3038 Tuergriff komplett 160x35mm 40,0006,1178 Schlüssel für Schrank 43,0002,0483 Schaltnock 32A 500V E/A 3pol 43,0004,4538 Kabelkonfektion Agilo 42,0300,2567 O-Ring Iø40,0x2,0 NBR70 42,0201,7272 Klemmvb. AL25/3/10,5 WFF120 43,0004,4077 Kabelz. Brücke ext. Schalter 43,0004,4445 Flachbandkabel 34pol 145mm 43,0004,4458 Kz. Brücke Eigenversorgung 43,0004,4460 Kz. Eigenversorgung 43,0004,4444 Flachbandkabel 40pol 245mm Kabelbaum 43,0004,4446 Flachbandkabel 50pol 105mm Kabelbaum 43,0004,4459 Kz. Versorg. Anschlusskl./LSS 43,0004,4462 Kz. Messltg. Stack Trafo/Csin 43,0004,4467 Kb. MeWu/MeReg 24V 43,0004,4469 Kb. MeWu/MeNT AC 43,0004,4461 Kz.Messltg. Netz Anschl.kl/LSS 43,0004,4466 Kb. MeWu/Umwälzlüfter 43,0004,4468 Kb. Versorgung LSS/MeWu 43,0004,4471 Kz. Erdung Schranktür Agilo 43,0004,4473 Kz. Kurzschl.Si/DC Relais 43,0004,4475 Kz. Drossel/Trafo 43,0004,4470 Kb. MeWu/Hauptlüfter 43,0004,4472 Kz. Grounding 43,0004,4474 Kz. LT/Drossel 43,0004,4477 Kz. Anschl.kl/AC-Schütz 43,0004,5306 Flachbandkabel 340mm-34polig 43,0004,4476 Kz. Trafo/AC-Flter 43,0004,4479 Kb. MeNT/MeWu 43,0004,5269 Spannungsumsch.Stecker VE34C 40,0006,3235 Etikett AGILO 100.0 3 3M/7872 Leistungsschild 43,0013,0018 DRUCKLUFT REGLER 0-10 BAR ALTE NR.43.0013.0017 42,0410,1597 BB Brandverhütung WR Beiblatt 40,0006,2617 Dokumententasche A4 quer tr. mit Druckknopf-Verschluss 42,0006,3278 Fronius Agilo VS32 1103A8 V NSC FR Laser Hybrid Kabelbaum F 43,0013,0017 N Ers.d. 43,0013,0018 42,0006,3277 F 42,0410,1553 BB LändersetupÜberpr/Einstell. E4,200,505 E-Plan Fronius Agilo 100.0-3 42,0426,0127,EL BA Fronius Agilo Bedienungsanleitung 42,0426,0127,ES BA Fronius Agilo Bedienungsanleitung 42,0426,0127,IT BA Fronius Agilo Bedienungsanleitung 42,0426,0127,DE BA Fronius Agilo Bedienungsanleitung 136 Beiblatt 42,0426,0127,EN BA Fronius Agilo Bedienungsanleitung 42,0426,0127,FR BA Fronius Agilo Bedienungsanleitung 42,0426,0127,NL BA Fronius Agilo Bedienungsanleitung 42,0426,0127,DA BA Fronius Agilo Bedienungsanleitung 42,0426,0127,PL BA Fronius Agilo Bedienungsanleitung 42,0426,0127,RU BA Fronius Agilo Bedienungsanleitung 42,0426,0127,TR BA Fronius Agilo Bedienungsanleitung 137 EN 4,200,505 4,200,506 Fronius Agilo 100.0-3 Fronius Agilo 75.0-3 4,071,235,Z Print MENT tested Replacem. print Fronius Agilo 43,0006,0267 Axial fan 24V 4W 184m³/h Ventilator 42,0201,3855 Bushing bar 120mm² 42,0201,3854 Bushing bar 75mm² 42,0201,3688 Mount. plate circul. fan 42,0201,4006 Anti-twist device 4,071,316,Z Print MEREG tested 42,0405,0884 Print holder 4,071,234,Z Print MEDC tested Replacem. print Fronius Agilo 4,071,315,Z Print MEWU tested Replacem. print Fronius Agilo 42,0201,3702 Cu rail 3x40 DC-disc. to Filter 42,0201,3670 DIN rail 200mm 42,0201,3700 Cu rail 3x40 DC+ 42,0201,7266 Clamp con.VL50/3/10.5/S-WFF120 42,0201,3669 Str.-rel. dev. & earth. plate 42,0300,2861 Bushing sleeve nylon ø34.9 Frame attachment 43,0006,0276 Fronius Agilo main fan Fronius Agilo spare part 41,0005,0376 FILM CAP. 100μF 450V 5 P 41,0009,0290 Terminal strip 10mm² 1pin 41,0007,0202 M.C.B. 10 400 4-PIN ''D'' 41,0007,0192 Circuit breaker AC 16A 480V 2pol. 43,0002,0467 DC isolator OT315 E33 Protective switch 42,0201,3671 DIN rail 350mm 42,0407,0747 Wiring duct 40x40x310 m 42,0201,3668 AC contactor adapter 42,0201,3689 Mount. plate clock filter lwr BY2,0201,3711 Current sensor holder BY 43,0010,0320 Current conv. IE 0.5% 150A 3KV 42,0201,3698 Cover plate cable inlet 42,0201,7249 Terminal bar DC+/- 41,0009,0297 Term. PCB 4pin 269A 120mm² 1V 42,0201,3682 Cover plate base 42,0402,0294 Sealing tape PU 690x55x40mm Seal 42,0201,7252 Power rail VB-2x50/2-K20° Earthing terminal 43,0008,0186 Contactor 160A 690V 3-pin 24V Contactor 41,0007,0228 Fuse holder 30A 1kV 5106304.DC 42,0201,3057 Busbar isolator bridge EU Busbar Fronius CL 2.0060 42,0201,3680 Print module mounting plate 43,0001,1412 Mains filter AC 152A 400V 42,0201,3752 DIN rail_50mm 42,0201,3685 Mount.plate short circ.prot. Replacem. print Fronius Agilo Disconnector to relay Terminal connector 41,0007,0260 E-Cu 4mm Cu/Sn 5b 138 43,0006,0267 Axial fan 24V 4W 184m³/h 41,0007,0241 FUSE 30 1000 F 42,0401,1187 Spacer St M10/M10-12 43,0001,1084 THERMOSTAT TP1400 42,0201,3678 Hold. bracket 6-4-2-pin Molex 43,0001,3417 Relay Agilo 42,0300,3001 Distance insul. PA6/6 RMS-01 Insulation class -20/60 42,0300,2977 Pressure compen.elem.PA6/18mm Pull relief accessories 43,0003,0557 PIN-CASE C 6 M.F.JR. 41,0003,0335,Z Ventilator SPF030 Spacer F 42,0402,1022 42,0201,7272 Clamp con. AL25/3/10.5 WFF120 43,0002,0453 Aux. contact NO switch OT125 42,0201,3681 Strain relief AC/DC 42,0201,3701 Cu rail 3x40 DC+relay to 43,0004,4538 Agilo manufactured cable 43,0004,4536 Earth strap SE XL 70mm² Cu plaited 700x, 0.10 42,0300,2978 Ribbon cable holder TFCCA-50 77.20x10.20x13.70mm 43,0001,1413 DC filter 245A 1000V +/- Switch accessories Filter 42,0402,1022 42,0401,1115 Screw PT 5x14 Torx Gr Plastic screw 42,0401,0208 Hexagon screw GVZ.933 M10x16 42,0401,1238 Cntrsk. locking screw M6x16 St 42,0401,1012 TAPTITE2000 M 5X25-head sw 42,0400,0394 Locking nut St M12 B53012 42,0400,0266 HEXAGON NUT TENSILOCK M8 W.GAL 42,0400,0348 Nut lock M25x1,5 PA6GF 42,0401,1174 Hexagon head screw M8x20 C 42,0401,1024 CHEESE-HEAD SCREW 7045 5x10 42,0400,0395 Locking nut St M10 B53012 42,0400,0355 Nut 32x1,5 PA 42,0401,1030 CHEESE-HEAD SCREW 4042 4x9 42,0407,0474 NUT M6 42,0407,0712 PC board spacer brass 4x50mm Spacer 42,0401,1118 Screw 5x12 Torx Gr Screw [self-tapping] 42,0407,0624 Lockwasher NL 10 C 42,0407,0624 Lockwasher NL 10 C 42,0407,0099 CABLE FIXING 102 42,0407,0101 CABLE FIXING 204 42,0407,0440 Cable tie 109w.expansion piece 42,0407,0741 Cable tie PA66HS 150mm Cable accessories 42,0400,0381 Hexagon nut PA M20mm Screw [metric] 42,0407,0590 Pull relief M32 x1,5 42,0300,2675 Fitting M25x1,5 PA 42,0402,0283 NBR sealing insert M32 2x8mm Strain-relief accessories 42,0402,0284 NBR sealing insert M32 4x6mm Strain-relief accessories 42,0402,0231 Sealing Profil M25 2x6 mm B53085 galvanised Galvanised Screw [metric] steel 8.8 Galvanised 139 42,0402,0282 NBR sealing insert M25 3x6mm Strain-relief accessories 42,0300,2982 Plug ø8x14mm Plug 43,0012,0018 Agilo accessory kit 43,0012,0017 Agilo connection set 42,0300,3038 Handle complete 160x35mm 40,0006,1178 Key for CL cabinet 43,0002,0483 Cam 32A 500V I/O 3pin 43,0004,4538 Agilo manufactured cable Fronius Agilo VS32 1103A8 V NSC FR 42,0300,2567 42,0201,7272 Clamp con. AL25/3/10.5 WFF120 43,0004,4077 Cab. cut. bridge ext. switch 43,0004,4445 Ribbon cable 34-pin 145mm 43,0004,4458 Cab. cut. bridge int. pwr sup. 43,0004,4460 Cab. cut. internal pwr supp. 43,0004,4444 Ribbon cable 40-pin 245mm Cable harness 43,0004,4446 Ribbon cable 50-pin 105mm Cable harness 43,0004,4459 Cab. cut. supp. terminal/LSS 43,0004,4462 Cb.ct.meas.line stack tr./Csin 43,0004,4467 Cab.har. MeWu/MeReg 24V 43,0004,4469 Cab.har. MeWu/MeNT AC 43,0004,4461 Cb.ct.meas.l. mains term./LSS 43,0004,4466 Cab.har. MeWu/ventilating fan 43,0004,4468 Cab.har. supply LSS/MeWu 43,0004,4471 Cab. cut. grnd cab. door Agilo 43,0004,4473 Cb.ct. shrt circ.fuse/DC relay 43,0004,4475 Cab. cut. choke/transformer 43,0004,4470 Cab.har. MeWu/main fan 43,0004,4472 Cab. cut. grounding 43,0004,4474 Cab. cut. LT/choke 43,0004,4477 Cab. cut. termin./AC contactor 43,0004,5306 Ribbon cable 340mm-34-pin 43,0004,4476 Cab. cut. transformer/AC filt. 43,0004,4479 Cab.har. MeNT/MeWu 43,0004,5269 Volt. changeover plug VE34C 40,0006,3235 Label AGILO 100.0 3 3M/7872 43,0013,0018 COMPRESSED-AIR-UNITY 0-10 BAR 42,0006,3278 Cable harness Rating plate F 42,0410,1597 BB fire prevention inverter Extra information 40,0006,2617 Portfolio bag A4 quer tr. with velcro fastening 43,0013,0017 N replaced by 43,0013,0018 42,0006,3277 F 42,0410,1553 EI country setup check/setting Extra information E4,200,505 Cir.dia. Fronius Agilo 100.0-3 42,0426,0127,EL OI Fronius Agilo Operating instructions 42,0426,0127,ES OI Fronius Agilo Operating instructions 42,0426,0127,IT OI Fronius Agilo Operating instructions 42,0426,0127,DE OI Fronius Agilo Operating instructions 140 42,0426,0127,EN OI Fronius Agilo Operating instructions 42,0426,0127,FR OI Fronius Agilo Operating instructions 42,0426,0127,NL OI Fronius Agilo Operating instructions 42,0426,0127,DA OI Fronius Agilo Operating instructions 42,0426,0127,PL OI Fronius Agilo Operating instructions 42,0426,0127,RU OI Fronius Agilo Operating instructions 42,0426,0127,TR OI Fronius Agilo Operating instructions 141 Spare parts list: Fronius Agilo Outdoor $JLOR2XWGRRU $JLOR2XWGRRU ( %$&.6,' 'HWDLO 5,*+7 '225 'HWDLO83 '/( 'HWDLO0,' ( )52176,' :1 'HWDLO'2 142 )URQWVLGH = )521,86$*,/2 = %DFNVLGH 0DLQ6ZLWFK .9$ .9$ .9$ .9$ 0 0 %< .9$ 143 'HWDLO8S 'HWDLOULJKWGRRU = 'HWDLOPLGGOH = = = %< = 'HWDLOGRZQ &$ &$ 144 &$ 0[ 0[ 7DSWLWH0[ 0 0 3$0[ 0[ [ 0 3$0[ [ 0 3$0[ [ 725;37[ 725;[ FDEOH 1/ 0[ PP PP 0[PP 0[PP 145 SDFNLQJ PDQXDO ( JHUPDQ '( JUHHN (/ HQJOLVK (1 IUHQFK )5 VSDQLVK (6 LWDOLDQ ,7 GXWFK 1/ '$ '$ LWDOLDQ 58 GXWFK 75 DE 4,200,607 4,200,606 Fronius Agilo 75.0-3 Outdoor Fronius Agilo 100.0-3 Outdoor 42,0409,5155 Druck Berührschutz DC-Trenner 42,0201,3902 MV Blech Outdoor 4,071,319,100,Z PRINT MECERCAP 100kW gepr. Ind 42,0201,3896 Transportsicherung Drossel 33,0010,0397 Drossel Agilo 100kVA-400/300A 33,0010,0429 Drossel Agilo 75kVA-620/280A 33,0005,4155 Trafo Agilo 100kVA-400/300 33,0005,4156 Trafo Agilo 75kVA-400/300 42,0201,3897 Trennwand hinten 1 42,0201,3736 Umlenkblech oben 42,0409,3600 Ersatzprint Fronius Agilo Ind. DDGF400/300/400/6/B DTF400/300/50Yd5/B 100kVA N Aufkl. Agilo/Agilo TL Autotex-XE-F150 40,0006,3224 Aufkleber FroniusLogo 200x55,5 42,0201,3893 Displ.Aufn.Outdoor 42,0201,3901 Trennblech Outdoor 42,0409,5154 Druck Berührsch. Anschlber. DC 44,0500,0042 Luftkanal Agilo outdoor kpl. 42,0201,3898 Trennwand hinten 2 42,0201,7302 DC-Trenner Agilo Anschlussbereich DC Agilo N Tuerfluegel re. Agilo Outdoor BY2,0201,3899 Montageblech Drossel 100kw Agilo Outdoor 42,0201,3743 Gummipuffer NK55 40x25xM8 Gehäuseanbauteil 42,0201,3590 Gummipuffer St37 M12x15/M12x37 Gehäuseanbauteil 42,0409,5156 Druck Berührschutz Print Printbaugruppe Agilo 42,0201,7315 Seitenwand Agilo Outdoor li. 42,0201,7314 Seitenwand Agilo Outdoor re. 44,0001,3402 Schaltschrank-Fronius Agilo 40,0006,1178 Schlüssel für Schrank 42,0201,7316 Sockelblende vorne Agilo Outd. 42,0201,7313 Rückwand Agilo Outdoor RAL7035 42,0201,7319 Ablufthutze Agilo Outd.RAL7016 42,0201,7317 Sockelblende hinten Agilo Out. 42,0201,7318 Sockelblende li/re Agilo Outd. 42,0201,3895 Sicherungsblech Trafo 42,0201,7288 Zuluftgitter Agilo Outdoor 412x192x3mm 42,0201,3691 Anschlussbruecke Dreieck-Bügel E-Cu20x3mm Sn5gl 42,0406,0351 Schalterknebel schwarz 12mm Schalterzubehör 42,0300,2502 DC Trennerwelle OXP12x272 42,0406,0361 Beschriftungsschildhalter OPB3 Schalterzubehör 42,0406,0360 Beschriftungsschild OPX3EN1 Schalterzubehör''Main Switch'' 42,0201,4514 Hauptscharier Outdoor Niro 1.4301 42,0201,4515 Tuergriff Outdoor 42,0404,1391 Gasdämfer Tuer LI 42,0201,4516 Druckgussverrigelung Outdoor100.0-3 GDZn verzinkt 146 42,0201,7301,Z Türe Fronius Agilo Outdoor Ersatzteil Fronius Agilo OD 4,071,235,Z PRINT MENT geprüft Ersatzprint Fronius Agilo 42,0201,3855 Durchfuehrungschiene 120mm² 42,0201,3854 Durchfuehrungschiene 75mm² 42,0201,4006 Verdrehsicherung 4,071,316,Z PRINT MEREG geprüft 42,0405,0884 Printhalterung 4,071,234,Z PRINT MEDC geprüft Ersatzprint Fronius Agilo 4,071,315,Z PRINT MEWU geprüft Ersatzprint Fronius Agilo 42,0201,3702 CuSchiene 3x40 DC- Trenner zu Filter 42,0201,3670 Hutschiene 200mm 42,0201,3700 CuSchiene 3x40 DC+ 42,0201,7266 Klemmvb. VL50/3/10,5/S-WFF120 42,0201,3669 Zugentlastung und Erdungsblech 42,0300,2861 Durchführungstülle Nylon ø34,9 Gehäuseanbauteil 43,0006,0276 Hauptlüfter Fronius Agilo Ersatzteil Fronius Agilo 41,0005,0376 KONFOL 100μF 450V 5 P 41,0009,0290 Klemmleiste 10mm² 1polig 41,0007,0202 SICHAUTOM 10 400 4POL. 'D' 41,0007,0192 Sicherungsautomat AC 16A 480V 2pol. 41,0007,0260 Sicherungshalter 30A 1kV 5106305.1DC 43,0002,0473 DC-Trennschalter OT400 E33 Schutzschalter 42,0201,3671 Hutschiene 350mm 42,0407,0747 Verdrahtungskanal 40x40x310 mm 42,0201,3668 AC Schuetz Adapter 42,0201,4022 Montageblech Taktfilter BY2,0201,3711 Aufnahme Stromsensor 43,0010,0320 Stromwandler IE 0,5% 150A 3KV 42,0201,7249 Anschlussschiene DC+/- 41,0009,0297 KLEMMPRINT 4pol 269A 120mm² 1V 42,0402,0294 Dichtungsband PU 690x55x40mm Dichtung 42,0201,7252 Stromschiene VB-2x50/2-K20° Erdungsklemme 43,0008,0192 Schütz DILM170(RDC24) 41,0007,0228 Sicherungshalter 30A 1kV 5106304.DC 42,0201,3057 Stromschiene Trennerbruecke EU Stromschiene Fronius CL 2.0060 42,0201,3680 Montageblech Printbaugruppe 43,0001,1412 Netzfilter AC 152A 400V 42,0201,3752 Hutschiene_50mm 42,0201,3685 Montagebl.Kurzschlusssicherung 41,0007,0241 SICHERUNG 30 1000 F SPF030 42,0401,1187 Distanzhalter St M10/M10-12 Distanzhalter 43,0001,1084 Temperatursensor NTC 105°C Minifit 43,0001,3417 Relais Agilo 42,0300,3001 Abstandsisolator PA6/6 RMS-01 Isolationsklasse -20/60 42,0300,2977 Druckausgleichselem. PA6/18mm Zugentlastungszubehör 43,0003,0557 STIFTGEHÄUSE 41,0003,0335 IGBT-Modul SemiKube 1/2 Ersatzprint Fronius Agilo Trenner zu Relais Klemmverbinder BY E-Cu 4mm Cu/Sn 5b C 6 M.F.JR. Leistungsteil Agilo 100/75 kW 147 42,0300,2567 O-Ring Iø40,0x2,0 NBR70 42,0201,7272 Klemmvb. AL25/3/10,5 WFF120 43,0002,0453 Hilfskontakt Schließer OT125 Schalterzubehör 42,0201,3701 CuSchiene 3x40 DC+ Relais zu Filter 43,0004,4700 Kabelkonfektion Agilo Outdoor 43,0006,0289 Axiallüfter 4114 N/2 H3R-312 42,0201,4059 Vent. Aufnahme MV-Blech 42,0201,4018 Abschirmblech oben 42,0201,4019 Abschirmblech unten 42,0201,3682 Abdeckblech Boden 42,0201,3894 Bodenblech rechts 42,0201,4064 Steckereinhausung 42,0201,4080 Haltewinkel Molex outdoor 42,0201,4079 Deckel Steckereinhausung 42,0201,4060 Ansaugkanal Wärmetauscher 44,0500,0043 Luftumlenkung 3-teilig kompl. 42,0201,7284 Kühlkörper Luft/Luft WT 340x292x163mm 42,0300,2978 Flachbandkabelhalter TFCCA-50 77,20x10,20x13,70mm 42,0402,1012 Flachdichtung L/L-WT 40x163x5 43,0004,4536 Masseband SE XL 70mm² Cu-Geflecht 700x,0,10 42,0300,2567 O-Ring Iø40,0x2,0 NBR70 Laser Hybrid CA2,0201,3681 Zugentlastung AC/DC 42,0201,3903 43,0001,1413 CA2,0201,4219 Laser Hybrid CA N Bodenblech links DC-Filter 245A 1000V +/N Halteblech AC-Schienen Agilo Outdoor 42,0401,4227 Distanzhalter St M8/M810 Distanzhalter 42,0201,4281 N AC-Schiene Agilo75/100 OD 42,0201,4243 N Verdrehsich. Anschlussbereich 41,0009,0315 Klemmverbinder VL240/3/12,5 41,0009,0313 V-Klemme 240mm² 1pol V CA2,0201,3900 Spannblech CA 42,0401,1115 Schraube PT 5x14 Torx Gr 42,0401,0208 6-KANT-SCHRAUBE 933 10x16 VZ C 42,0401,1238 SK-Sicherungsschraube M6x16 St 42,0401,1012 TAPTITE2000 M 5X25-Kopf sw 42,0400,0394 Sicherungsmutter St M12 B53012 vz 42,0400,0266 6-KANT-MUTTER DIN53012 M8WVZ C TENSILOCK 42,0400,0348 MUTTER-GEGEN 25x1,5 PA6GF lichtgrau RAL7035 42,0401,1174 Sechskantschraube M8x20 C Schraube [Metrisch] Stahl 8.8 42,0401,1024 LINSENSCHRAUBE 7045 5x10 42,0400,0395 Sicherungsmutter St M10 B53012 42,0400,0355 MUTTER-GEGEN 32x1,5 PA 42,0401,1030 LINSENSCHRAUBE 4042 4x9 42,0407,0474 SPERRZAHNMUTTER DIN6923 M6VZ C 42,0407,0712 Printdistanz Messing 4x50mm Distanzhalter 42,0401,1118 Schraube 5x12 Torx Gr Schraube [Gewindeformend] 42,0407,0624 Schraubensicherung NL 10 Cu ETP E-Cu20x3mm Sn5gl Kunststoffschraube C 148 B53085 vz vz 42,0407,0624 Schraubensicherung NL 10 C 42,0407,0099 KABELBINDER 102 42,0407,0101 Kabelbinder PA6.6 200mm 42,0407,0440 KABELBINDER 109 M. SPREIZNIET 42,0407,0741 Kabelbinder PA66HS 150mm Kabelzubehör 42,0400,0381 Sechkantmutter PA M20mm Schraube [Metrisch] 42,0407,0590 Zugentlastung M32 x1,5 42,0402,0283 Dichtungseinsatz NBR M32 2x8mm Zugentlastungszubehoer 42,0300,2982 Verschlussstopfen ø8x14mm Verschlussstopfen 43,0004,4077 Kabelz. Brücke ext. Schalter 43,0004,4445 Flachbandkabel 34pol 145mm 43,0004,4458 Kz. Brücke Eigenversorgung 43,0004,4460 Kz. Eigenversorgung 43,0004,4444 Flachbandkabel 40pol 245mm Kabelbaum 43,0004,4446 Flachbandkabel 50pol 105mm Kabelbaum 43,0004,4459 Kz. Versorg. Anschlusskl./LSS 43,0004,4462 Kz. Messltg. Stack Trafo/Csin 43,0004,4467 Kb. MeWu/MeReg 24V 43,0004,4469 Kb. MeWu/MeNT AC 43,0004,4461 Kz.Messltg. Netz Anschl.kl/LSS 43,0004,4466 Kb. MeWu/Umwälzlüfter 43,0004,4468 Kb. Versorgung LSS/MeWu 43,0004,4471 Kz. Erdung Schranktür Agilo 43,0004,4473 Kz. Kurzschl.Si/DC Relais 43,0004,4475 Kz. Drossel/Trafo 43,0004,4472 Kz. Grounding 43,0004,4474 Kz. LT/Drossel 43,0004,4477 Kz. Anschl.kl/AC-Schütz 43,0004,5306 Flachbandkabel 340mm-34polig 43,0004,4476 Kz. Trafo/AC-Flter 43,0004,4479 Kb. MeNT/MeWu 43,0004,5269 Spannungsumsch.Stecker VE34C 40,0006,3235 Etikett AGILO 100.0 3 3M/7872 Leistungsschild 42,0410,1597 BB Brandverhütung WR Beiblatt 40,0006,2617 Dokumententasche A4 quer tr. mit Druckknopf-Verschluss 42,0410,1553 BB LändersetupÜberpr/Einstell. Beiblatt E4,200,505 E-Plan Fronius Agilo 100.0-3 42,0426,0163,EL BA Fronius Agilo Outdoor Bedienungsanleitung 42,0426,0163,ES BA Fronius Agilo Outdoor Bedienungsanleitung 42,0426,0163,IT BA Fronius Agilo Outdoor Bedienungsanleitung 42,0426,0163,DE BA Fronius Agilo Outdoor Bedienungsanleitung 42,0426,0163,EN BA Fronius Agilo Outdoor Bedienungsanleitung 42,0426,0163,FR BA Fronius Agilo Outdoor Bedienungsanleitung 42,0426,0163,NL BA Fronius Agilo Outdoor Bedienungsanleitung 42,0426,0163,DA BA Fronius Agilo Outdoor Bedienungsanleitung 42,0426,0163,RU BA Fronius Agilo Outdoor Bedienungsanleitung 42,0426,0163,TR BA Fronius Agilo Outdoor Bedienungsanleitung Kabelzubehör Kabelbaum 149 40,0006,3301 Deckel Agilo 1227x896x223mm 40,0006,3302 Faltriller Agilo 1700x240x79mm 40,0006,3303 Kartoneinlage Deckel 1200x883m 40,0006,3304 Seitenteil Agilo 2869x1770mm 43,0012,0017 Anschlussset Agilo 43,0012,0018 Zubehörset Agilo 43,0012,0018 Zubehörset Agilo 43,0012,0017 Anschlussset Agilo 42,0300,3038 Tuergriff komplett 160x35mm 40,0006,1178 Schlüssel für Schrank 43,0002,0483 Schaltnock 32A 500V E/A 3pol 43,0004,4538 Kabelkonfektion Agilo 42,0300,2567 O-Ring Iø40,0x2,0 NBR70 42,0201,7272 Klemmvb. AL25/3/10,5 WFF120 Fronius Agilo VS32 1103A8 V NSC FR Laser Hybrid 150 EN 4,200,607 4,200,606 Fronius Agilo 75.0-3 Outdoor Fronius Agilo 100.0-3 Outdoor 42,0409,5155 Pr. contact prot. DC discon. 42,0201,3902 MV plate outdoor 4,071,319,100,Z Print MECERCAP 100kW tested 42,0201,3896 Transp. securing device choke 33,0010,0397 Choke Agilo 100kVA-400/300A 33,0010,0429 Choke Agilo 75kVA-620/280A 33,0005,4155 Transfor. Agilo 100kVA-400/300 33,0005,4156 Transf. Agilo 75kVA-400/300 42,0201,3897 Divider rear 1 42,0201,3736 Baffle, upper 42,0409,3600 Replacem. print Fronius Agilo DDGF400/300/400/6/B DTF400/300/50Yd5/B 100kVA N 40,0006,3224 Fronius logo sticker 200x55.5 42,0201,3893 Display mounting outdoor 42,0201,3901 Divider outdoor 42,0409,5154 Pr. contact prot. con. area DC 44,0500,0042 Air duct Agilo Outdoor cpl. 42,0201,3898 Divider rear 2 42,0201,7302 DC disconnector Agilo Connection area DC Agilo N Door wing right Agilo Outdoor BY2,0201,3899 Mounting plate choke 100kw Agilo Outdoor 42,0201,3743 Rubber pads NK55 40x25xM8 Housing attachment 42,0201,3590 Rubber pads St37 M12x15/M12x37 Housing attachment 42,0409,5156 PCB contact protect. prt PCB module Agilo 44,0001,3402 Switch box Fronius Agilo Outdoor 100.0-3 40,0006,1178 Key for CL cabinet 42,0201,7315 42,0201,7314 42,0201,7316 42,0201,7313 42,0201,7319 42,0201,7317 42,0201,7318 42,0201,3895 Locking plate transf. 42,0201,7288 Air inlet grille Agilo Outdoor 412x192x3mm 42,0201,3691 Conn. jumper triang. bow E-Cu20x3mm Sn5gl 42,0406,0351 Control knob black 12mm Switch accessories 42,0300,2502 DC disconnector shaft OXP12x272 42,0406,0361 Label plate holder OPB3 Switch accessories 42,0406,0360 Label plate OPX3EN1 Switch accessor. 'Main Switch' 151 42,0201,4514 42,0201,4515 42,0404,1391 42,0201,4516 42,0201,7301,Z Door Fronius Agilo Outdoor Spare part Fronius Agilo OD 4,071,235,Z Print MENT tested Replacem. print Fronius Agilo 42,0201,3855 Bushing bar 120mm² 42,0201,3854 Bushing bar 75mm² 42,0201,4006 Anti-twist device 4,071,316,Z Print MEREG tested 42,0405,0884 Print holder 4,071,234,Z Print MEDC tested Replacem. print Fronius Agilo 4,071,315,Z Print MEWU tested Replacem. print Fronius Agilo 42,0201,3702 Cu rail 3x40 DC-disc. to Filter 42,0201,3670 DIN rail 200mm 42,0201,3700 Cu rail 3x40 DC+ 42,0201,7266 Clamp con.VL50/3/10.5/S-WFF120 42,0201,3669 Str.-rel. dev. & earth. plate 42,0300,2861 Bushing sleeve nylon ø34.9 Frame attachment 43,0006,0276 Fronius Agilo main fan Fronius Agilo spare part 41,0005,0376 FILM CAP. 100μF 450V 5 P 41,0009,0290 Terminal strip 10mm² 1pin 41,0007,0202 M.C.B. 10 400 4-PIN ''D'' 41,0007,0192 Circuit breaker AC 16A 480V 2pol. 43,0002,0473 DC isolator OT400 E33 Protective switch 42,0201,3671 DIN rail 350mm 42,0407,0747 Wiring duct 40x40x310 m 42,0201,3668 AC contactor adapter 42,0201,4022 Mounting plate clock filter BY2,0201,3711 Current sensor holder BY 43,0010,0320 Current conv. IE 0.5% 150A 3KV 42,0201,7249 Terminal bar DC+/- 41,0009,0297 Term. PCB 4pin 269A 120mm² 1V 42,0402,0294 Sealing tape PU 690x55x40mm Seal 42,0201,7252 Power rail VB-2x50/2-K20° Earthing terminal 43,0008,0192 Contactor DILM170(RDC24) 41,0007,0228 Fuse holder 30A 1kV 5106304.DC 42,0201,3057 Busbar isolator bridge EU Busbar Fronius CL 2.0060 42,0201,3680 Print module mounting plate 43,0001,1412 Mains filter AC 152A 400V 42,0201,3752 DIN rail_50mm 42,0201,3685 Mount.plate short circ.prot. 41,0007,0241 FUSE 30 1000 F Replacem. print Fronius Agilo Disconnector to relay Terminal connector 41,0007,0260 E-Cu 4mm Cu/Sn 5b SPF030 152 42,0401,1187 Spacer St M10/M10-12 Spacer 43,0001,1084 THERMOSTAT TP1400 43,0001,3417 Relay Agilo 42,0300,3001 Distance insul. PA6/6 RMS-01 Insulation class -20/60 42,0300,2977 Pressure compen.elem.PA6/18mm Pull relief accessories 43,0003,0557 PIN-CASE C 6 M.F.JR. 41,0003,0335 IGBT-Modul SemiKube 1/2 Agilo power stage set 42,0300,2567 42,0201,7272 Clamp con. AL25/3/10.5 WFF120 43,0002,0453 Aux. contact NO switch OT125 Switch accessories 42,0201,3701 Cu rail 3x40 DC+relay to Filter 43,0004,4700 Manufact. cable Agilo Outdoor 43,0006,0289 Axial fan 4114 N/2 H3R-312 42,0201,4059 Vent. mounting MV sheet. 42,0201,4018 Shielding plate, upper 42,0201,4019 Shielding plate, lower 42,0201,3682 Cover plate base 42,0201,3894 Base plate right 42,0201,4064 Plug housing 42,0201,4080 Holding bracket Molex outdoor 42,0201,4079 Cover plug housing 42,0201,4060 Intake duct heat exchanger 44,0500,0043 Air guide 3-part compl. 42,0201,7284 Heat sink air/air WT 340x292x163mm 42,0300,2978 Ribbon cable holder TFCCA-50 77.20x10.20x13.70mm 42,0402,1012 Flat seal L/L-WT 40x163x5 43,0004,4536 Earth strap SE XL 70mm² Cu plaited 700x, 0.10 42,0300,2567 CA2,0201,3681 42,0201,3903 Strain relief device AC/DC CA N Base plate left 43,0001,1413 CA2,0201,4219 DC filter 245A 1000V +/N Holding plate AC rails 42,0401,4227 Agilo Outdoor Spacer St M8/M810 42,0201,4281 N 42,0201,4243 N Anti-twist connection area Spacer 41,0009,0315 Terminal connect. VL240/3/12.5 41,0009,0313 V-type terminal 240mm² 1pin V CA2,0201,3900 Clamping plate CA 42,0401,1115 Screw PT 5x14 Torx Gr 42,0401,0208 Hexagon screw GVZ.933 M10x16 42,0401,1238 Cntrsk. locking screw M6x16 St 42,0401,1012 TAPTITE2000 M 5X25-head sw 42,0400,0394 Locking nut St M12 B53012 42,0400,0266 HEXAGON NUT TENSILOCK M8 W.GAL E-Cu20x3mm Sn5gl Plastic screw B53085 galvanised Galvanised 153 42,0400,0348 Nut lock M25x1,5 PA6GF 42,0401,1174 Hexagon head screw M8x20 C 42,0401,1024 CHEESE-HEAD SCREW 7045 5x10 42,0400,0395 Locking nut St M10 B53012 42,0400,0355 Nut 32x1,5 PA 42,0401,1030 CHEESE-HEAD SCREW 4042 4x9 42,0407,0474 NUT M6 42,0407,0712 PC board spacer brass 4x50mm Spacer 42,0401,1118 Screw 5x12 Torx Gr Screw [self-tapping] 42,0407,0624 Lockwasher NL 10 C 42,0407,0624 Lockwasher NL 10 C 42,0407,0099 CABLE FIXING 102 42,0407,0101 CABLE FIXING 204 42,0407,0440 Cable tie 109w.expansion piece 42,0407,0741 Cable tie PA66HS 150mm Cable accessories 42,0400,0381 Hexagon nut PA M20mm Screw [metric] 42,0407,0590 Pull relief M32 x1,5 42,0402,0283 NBR sealing insert M32 2x8mm Strain-relief accessories 42,0300,2982 Plug ø8x14mm Plug 43,0004,4077 Cab. cut. bridge ext. switch 43,0004,4445 Ribbon cable 34-pin 145mm 43,0004,4458 Cab. cut. bridge int. pwr sup. 43,0004,4460 Cab. cut. internal pwr supp. 43,0004,4444 Ribbon cable 40-pin 245mm Cable harness 43,0004,4446 Ribbon cable 50-pin 105mm Cable harness 43,0004,4459 Cab. cut. supp. terminal/LSS 43,0004,4462 Cb.ct.meas.line stack tr./Csin 43,0004,4467 Cab.har. MeWu/MeReg 24V 43,0004,4469 Cab.har. MeWu/MeNT AC 43,0004,4461 Cb.ct.meas.l. mains term./LSS 43,0004,4466 Cab.har. MeWu/ventilating fan 43,0004,4468 Cab.har. supply LSS/MeWu 43,0004,4471 Cab. cut. grnd cab. door Agilo 43,0004,4473 Cb.ct. shrt circ.fuse/DC relay 43,0004,4475 Cab. cut. choke/transformer 43,0004,4472 Cab. cut. grounding 43,0004,4474 Cab. cut. LT/choke 43,0004,4477 Cab. cut. termin./AC contactor 43,0004,5306 Ribbon cable 340mm-34-pin 43,0004,4476 Cab. cut. transformer/AC filt. 43,0004,4479 Cab.har. MeNT/MeWu 43,0004,5269 Volt. changeover plug VE34C 40,0006,3235 Label AGILO 100.0 3 3M/7872 Rating plate 42,0410,1597 BB fire prevention inverter Extra information 40,0006,2617 Portfolio bag A4 quer tr. with velcro fastening 42,0410,1553 EI country setup check/setting Extra information E4,200,505 Cir.dia. Fronius Agilo 100.0-3 Screw [metric] steel 8.8 Galvanised Cable harness 154 42,0426,0163,EL OI Fronius Agilo Outdoor Operating instructions 42,0426,0163,ES OI Fronius Agilo Outdoor Operating instructions 42,0426,0163,IT OI Fronius Agilo Outdoor Operating instructions 42,0426,0163,DE OI Fronius Agilo Outdoor Operating instructions 42,0426,0163,EN OI Fronius Agilo Outdoor Operating instructions 42,0426,0163,FR OI Fronius Agilo Outdoor Operating instructions 42,0426,0163,NL OI Fronius Agilo Outdoor Operating instructions 42,0426,0163,DA OI Fronius Agilo Outdoor Operating instructions 42,0426,0163,RU OI Fronius Agilo Outdoor Operating instructions 42,0426,0163,TR OI Fronius Agilo Outdoor Operating instructions 40,0006,3301 Agilo lid 1227x896x223mm 40,0006,3302 Fld cdb sl Agilo 1700x240x79mm 40,0006,3303 Carton insert lid 1200x883m 40,0006,3304 Agilo side panel 2869x1770mm 43,0012,0017 Agilo connection set 43,0012,0018 Agilo accessory kit 43,0012,0018 Agilo accessory kit 43,0012,0017 Agilo connection set 42,0300,3038 Handle complete 160x35mm 40,0006,1178 Key for CL cabinet 43,0002,0483 Cam 32A 500V I/O 3pin 43,0004,4538 Agilo manufactured cable Fronius Agilo VS32 1103A8 V NSC FR 42,0300,2567 42,0201,7272 Clamp con. AL25/3/10.5 WFF120 155 AC - OUT -M2 156 +24V GND SPD 1 RD BL WH 4f 2 (4POL) 4 3 4 3 2 1 4 3 2 1 -X17 4f 3f 2f 1f -X18 4f 3f 2f 1f 4 3 2 4m 3m 2m 1m -X14 2m 1m -X11 4m 2 +A5-X11:4 +A5-X11:3 +A5-X11:2 +A5-X11:1 (4POL) 4 3 2 1 -W9 (7POL) 6 5 4 3 2 1 -W7 SWITCH SWITCH IN 1 IN 1 IN 2 IN 2 IN 3 IN 3 6m 5m 4m 6m 5m 4m 3m 2m 1m 4 3 2 1 CAN T4A +A5-F2 LN_OUT +A5-X4 LN_IN CAN +A5-X3 +A5-X2 +A5-X1 4m 3m 2m 1m +A5-X11 6 5 4 3 2 1 +A5-X12 6 5 4 3m 2m 1m +A5-X8 3 2 1 CAN-BUS +24V GND SPD 4 3f 2f 1f RD BL WH 1 2 BK (2POL) 1 BK -W16 -W9 1 4 RD 3m 2m 3 3 -X14 +24V GND SPD 3 YE (4POL) 2 BL 1m -X12 2 YG (3POL) INPUT EXTERNAL SIGNAL CONTACT 2 1 1 1 External Switch WH 5m 4m 3m 6m 1 2 3 4 5 6 7 8 T4A +A5-F1 +A5 RD BL WH -M1 -M2 -R1 3 NC1 SC1 NO1 NC2 SC2 NO2 1m 12 2 1 8 7 6 5 4 3 2 1 2 1 2 1 +A5-X23 +A5-X21 1m +A5-X15 2m 1m +A5-X24 2m 1m +A5-X5 8m 7m 6m 5m 4m 3m 2m 1m +A5-X13 2m 1m +A5-X9 40POL 3 10 9 11 +A5-X18 34POL 12m 11m 10m 9m 8m 8 DC_HK4 HS_HK4 DC_REL4 DC_ID4 DR_A2 DC_HK3 HS_HK3 DC_REL_3 -K1 2 (7POL) 5 5 1 8m 7m 6m 5m 4m 3m 2m 1m 40POL +A4-X2 4m 3m 2m 1m 1m +A3-X1 8 7 6 3 4 2 6 3 4 1 4 2 -W13 (3POL) 3 -W4 2 A2 1 - RED - BLK - 2 l 1 K k -W12 +A4-X1 1m 34POL +A6-X4 +A6-X7 +A6-X1 +A4 MENT -M3 AC -IN - EXT 6 4 -W17 -S1 4 1 5 CUSTOMER RELAY (3POL) -F1 +A5-X6 1 2 3 4 5 6 +A1 MEREG 2m 4 +A5-X7 3m 2m 7m 7 6 5 4 DC_ID3 DR_A1 1 1 3 2 1m 1 3 2 A1 1m C16A 1 6m 5m 4m 3m 2m 1m +A5-X14 +A6 MEDC 2 3 -W8 2m 1m +A5-X10 2 1 1m +A11-X5 -X13 50POL +A5-X16 1m 4 6 5 4 3 - RED - BLK - +A5-X17 1m 4m +A1-X23 34POL 6m 5m 4m 3m 2m 2 1 l PE 50POL 37POL 3 2 1 (7POL) 6 5 4 3 1m -X15 K k (3POL) 1m +A1-X29 +A1-X41 3m 2m 1m +A1-X5 6 5 4 3 2 1 -W3 - RED - BLK - 2 2m 1m +A4-X11 2 1 6m 5m 4m 3m 2m 2 1 l 1 4m 3m +A1-X42 4 3 1m +A1-X1 K k -W14 (3POL) 2 1 -W10 (4POL) 4 3 2m 1m 1 N 1m +A1-X28 +A11-X4 BK BL YG 5 +A4-X4 4m 3m 2m 1m 4 3 2 1 +A6-X3 DC- DC+ +A10:3 +A10:2 +A10:1 DR_A1 DC_ID3 DC_REL4 DC_ID4 DR_A2 DC_REL_3 (6POL) 2 6 4 1 5 3 -W2 6m 5m 4m 3m 2m 1m -X16 2 1 6 5 4 3 Option Gigavac 1m 14 -W18 3 N4 13 - 2 L N PE 1 6 + A2 DC- DC+ DC_HK3 DC_HK4 -F4 PWM GND SPD +10V 2 2 -K3 A1 1 PE -X4 -F3 1 -X8 -X20 2 C10A 43 1 +A9-X6 2 32 44 -W5 31 22 9 21 14 1a 3 13 6 PE -T4 8 +A8 EMC-Filter DC N -K1 5 4 -T3 (4POL) L HS_HK4 HS_HK3 -T2 7 +A11 EMC-Filter AC 6 +A8-X3 1´ PE -X33 (3POL) 1 2 -W1 1 Neg. Grounding 3A/1000VDC -F2 2 14 5 +A9:3 -X30 -X31 12 8a +A9:W +A8-X1 8 7a 1W +A9:1 6 6a 2W +A9:V 13 5a -X1 N 2W 1V +A9:U 11 3 -W4 1W +A11-X3 2V 1U 7 3 9 L 4 4 N 1 PE 2V -L1 -Q1 5 10 PE 1V +A11-X2 2U -X2 4a 3 2 2 9 L L3 1 2U 4 2a -T1 1 L2 L1 1U +A11-X1 2 3a L -X1 DC- IN 2 DC- IN 1 DC+ IN 2 DC+ IN 1 Circuit diagrams: Fronius Agilo, Fronius Agilo Outdoor DC - IN -X3 -X32 -X21 30A/1000VDC 2 +A8-X6 +A9 Stack 100kW +A9-X5 1m 34POL +A10 Filter Capacitor +A3 MECERCAP (4POL) OPTION VSR MEWU SOLARNET Option Agilo Outdoor 2 157 Fronius Worldwide - www.fronius.com/addresses Fronius International GmbH 4600 Wels, Froniusplatz 1, Austria E-Mail: [email protected] http://www.fronius.com Fronius USA LLC Solar Electronics Division 6797 Fronius Drive, Portage, IN 46368 E-Mail: [email protected] http://www.fronius-usa.com Under http://www.fronius.com/addresses you will find all addresses of our sales branches and partner firms! 158