1
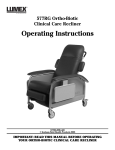
574G Ortho-Biotic
3-Position Recliner
Operating Instructions
574G-INS-LAB RevB06
© Graham-Field Health Products 2006
IMPORTANT: READ THIS MANUAL BEFORE OPERATING
YOUR ORTHO-BIOTIC 3-POSITION RECLINER
WARNINGS
Warning: Periodically inspect all parts and
replace as needed.
Warning: Occupant weight should not
exceed 250 lbs.
Warning: Do not use near an open flame, as
the chair may be a "combustion source".
Warning: Caster wheels should be locked
during occupant transfer.
CARE & MAINTENANCE
Every three months:
• Check and clean casters • tighten nuts • check brakes on casters •
• check and clean lock recline mechanism •
For upholstery maintenance and stain removal, the following hints will be helpful:
Ordinary Dirt: Wash with warm water and a mild Paint, Shoe Polish, Heel Marks: Remove
immediately! Use a white cloth dampened in
soap or detergent.
kerosene, naphtha or turpentine. Do not use
Stubborn Dirt: Using a soft bristle brush, follow paint remover or liquid brush cleaners.
directions above.
Tars, Asphalt, Creosote: Remove to prevent
Ground-in Dirt: Scrub with powdered cleanser or staining. Clean area with kerosene or naphtha.
similar detergent.
Caution: When using kerosene or naphtha, do so
in a well ventilated area and keep away
Chewing Gum: Scrape carefully; remove with
from fire and flame.
kerosene or naphtha.
Waxing and Refinishing: Improves wearability.
Nail Polish and Remover: Blot immediately to Use any quality paste wax.
prevent damage.
A diluted solution of 10% (or less) of bleach or
Ball Point Pen: Blot immediately with a white Clorox may be used when cleaning this chair.
cloth dampened in water or mineral oil.
2
574G 3-Position Ortho-Biotic Recliners Operating Instructions
ASSEMBLY INSTRUCTIONS
Figure 1
Upholstered Back
Back Assembly
Padded Push Handle
Holes in Back Rest
Holes with Screws
Table Storage
Lock Release Pull Button
Holes in Horizontal Brace
Label Specifying Date of
Manufacture
Locking Pins
1. Remove back assembly from unassembled
chair and put aside momentarily.
Lower Frame
Recliner Lock Bar
positively engages middle slot on lock bar
link when chair is in storage position.
2. Slide the 1 piece back assembly into the 4. Insert screws through holes of the horizontal
square tubes of the lower frame assembly so
brace and tighten all screws with
that the holes in the back rest line up with the
screwdriver.
holes located on the horizontal brace of the
lower frame assembly.
NOTE: Make sure that the top screw on both sides
of the coated square tubing from the back
3. Raise recliner lock bar and adjust position of
assembly are sufficiently secure before
back assembly until lock release button
using recliner.
574G 3-Position Ortho-Biotic Recliners Operating Instructions
3
CASTER ASSEMBLY INSTRUCTIONS
Figure 2
Figure 3
1. Set the 574G unit upside down with the frame 3. Insert locking caster assemblies into rear legs
legs facing up.
of recliner frame until spring buttons pop out
of the openings of each side (Fig. 3).
2. Insert front caster assemblies into front legs
of recliner frame until spring buttons pop out
of the openings of both sides (Fig. 2).
OPERATING INSTRUCTIONS
To place unit in reclining positions:
Recliner Lock Operation
By Occupant:
To Lock Recliner:
1. Place hands on armrests and push against 1. Place recliner into desired position.
seat back. Legrest will automatically adjust to
2. Pull out Lock-Release Pull Button to release
each recline position.
Lock bar from stored position.
Note: The table can only be used in upright sitting
3. Rotate recliner Lock Bar down until notches
position. Patient should be transported in
are fully engaged over Locking Pins.
TV position with recliner lock set.
To Unlock Recliner:
By Attendant:
1. Ensure that recliner lock bar is in stored
position.
1. Lift recliner Lock Bar up to disengage from
Locking Pins.
2. While holding Lock-Release Pull Button out,
rotate recliner Lock Bar all the way up until
completely against seat back.
3. Grasp armrest with one hand, and Padded
Push Handle.
3. Release Lock-Release Pull Button to hold
recliner Lock Bar in stored position.
4. Push down on push bar to recline the back to
the first recline position, to achieve second
Note: Do not attempt to change position of chair
recline position, push on push bar again.
with recliner lock bar engaged. This could
cause damage to mechanism.
5. To raise upright, pull forward on push bar.
2. Stand at either side of recliner.
6. Set recliner Lock Bar.
4
574G 3-Position Ortho-Biotic Recliners Operating Instructions
OPERATING INSTRUCTIONS
Articulating Headrest
Padded Push Handle
Figure 4
Table
Pull buttons
Articulating headrest may be adjusted to desired 3. Table can slide on and off by keeping lock/
position by pulling forward or pushing back.
lockout key forward.
Operating Instructions for Molded Table
4. Table can be locked into one of five positions.
Pull down the pull button, hold the pull
button and slide the key backwards. Proceed
to the other arm and move that key
backwards. Table will now be locked.
To Operate:
1. Underneath each arm, pull down and hold the
pull button until it holds into place (Fig. 4)
and slide lockout keys forward on both sides. Storage:
The molded table stores in the small round tube
2. Pick up table by circular table arm and slide underneath the left armrest, leaving the table
into receiving tubes in front of each arm.
top facing out.
574G 3-Position Ortho-Biotic Recliners Operating Instructions
5
U.S.A., Corporate Headquarters:
Graham-Field Health Products
2935 Northeast Parkway
Atlanta, Georgia 30360
telephone: 800-347-5678, 770-447-1609
fax: 800-726-0601, 678-291-3232
http://www.grahamfield.com