1
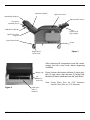
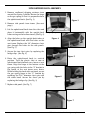
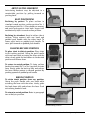
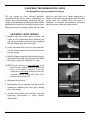
577RG Ortho-Biotic
Clinical Care Recliner
Operating Instructions
577RG-INS-LAB
© Graham-Field Health Products 2005
IMPORTANT: READ THIS MANUAL BEFORE OPERATING
YOUR ORTHO-BIOTIC CLINICAL CARE RECLINER
WARNINGS
Warning: Periodically Inspect all parts and
replace as needed.
Warning: Occupant weight should not
exceed 290 lbs.
Warning: Do not use near an open flame, as
the chair may be a "combustion source".
Warning: Caster wheels should be locked
during occupant transfer.
CARE & MAINTENANCE
Every three months:
• Check and clean casters • tighten nuts • check brakes on casters •
• check and clean lock recline mechanism •
Check recliner mechanism for operation in all positions with assistant seated in recliner.
For upholstery maintenance and stain removal, the following hints will be helpful:
Ordinary Dirt: Wash with warm water and a Paint, Shoe Polish, Heel Marks: Remove
mild soap or detergent.
immediately! Use a white cloth dampened in
kerosene, naphtha or turpentine. Do not use
Stubborn Dirt: Using a soft bristle brush, follow paint remover or liquid brush cleaners.
directions above.
Tars, Asphalt, Creosote: Remove to prevent
Ground-in Dirt: Scrub with powdered cleanser staining. Clean area with kerosene or naphtha.
or similar detergent.
Caution: When using kerosene or naphtha, do so
in a well ventilated area and keep away
from fire and flame.
Chewing Gum: Scrape carefully; remove with
kerosene or naphtha.
Waxing and Refinishing: Improves wearability.
Nail Polish and Remover: Blot immediately to Use any quality paste wax.
prevent damage.
Excrement: Remove immediately! Clean with a
Ball Point Pen: Blot immediately with a white diluted solution of 10% (or less) of bleach
cloth dampened in water or mineral oil.
or Clorox.
2
577RG Clinical Care® Recliner Operating Instructions
Upholstered Back
Upholstered Seat
Articulating Headrest
Upholstered Footrest
Gas Spring
Actuating Lever
Padded Push Handle
Upholstered
Legrest/Skirt
Upholstered Arm
Support
Caster Brake Pedal
Frame
Single Wheel
Swivel Lock
Figure 1
After removing all components from the carton,
engage the two caster locks before beginning
assembly.
Bridge Clip
3/8"
Diameter
Clevis Pin
Figure 2 shows the location of three (3) clevis pins,
two (2) ring cotter clips and one (1) bridge clip.
Remove all above hardware from the back brace.
Note: Center Clevis Pins are 5/16" diameter:
outside Clevis Pins are 3/8" diameter.
Figure 2
Back brace
with "U"
Brackets
577RG Clinical Care® Recliner Operating Instructions
3
UPHOLSTERED BACK ASSEMBLY
1. Remove cardboard shipping retainers from
around Gas Spring Cylinder. Rotate the hinge
on the gas spring so that it is perpendicular to
the upholstered back. (See Fig. 3)
Figure 3
2. Remove side panels from frame. (See next
page.)
3. Lift the upholstered back from the sides and
place it horizontally with the upright back Gas Spring Hinge
tubes resting on the recliner frame. (See Fig. 4)
4. Align the holes on the upright back tubes of
the upholstered back with the holes on the
seat frame. Replace the 3/8" diameter clevis
pins through the holes on the side panels.
(See Fig. 5)
Figure 4
5. Secure the two clevis pins by replacing the
bridge clips. (See Fig. 6)
Figure 5
6. Raise the upholstered back to vertical
position. Tuck the plastic skirt at rear of
upholstered back behind cross brace of seat
frame. Align the hinge at the bottom of the
gas spring with the holes in the “U” bracket in
the center of the seat frame cross brace.
While holding the back with one hand, secure
the gas spring hinge to the “U” bracket by
replacing the 5/16" diameter clevis pin with
the other hand. Secure the clevis pin by
replacing the bridge clip. (See Fig. 3)
Figure 6
7. Replace side panel. (See Fig. 7)
Figure 7
4
577RG Clinical Care® Recliner Operating Instructions
4
Panel Tabs
Side Panel
SIDE PANEL REMOVAL
To Remove: Depress push buttons located on
the lower sides of frame. Pull side panel gently
away and down from frame.
To Install: Insert side panel into chair frame by
reversing above procedure.
Push Button
CASTER OPERATION
NOTE: This chair is equipped with four swivel
caster for improved maneuverability. The
rear casters are also equipped with
locking features.
To unlock
To lock swivel
and wheel
Lock: To prevent the rear casters from swiveling
and wheel turning, step on the rear pedal of the
caster until it latches.
Unlock: Step on middle button to unlatch.
To lock swivel
SWIVEL LOCK PEDAL OPERATION
NOTE: The swivel lock feature will aid the chair in
rolling straight.
Lock: To engage, push down on black swivel lock
pedal and roll the recliner forward.
Unlock: Lift on the side of the pedal.
577RG Clinical Care® Recliner Operating Instructions
5
ARTICULATING HEADREST
Articulating headrest may be adjusted to a
comfortable position by pulling forward or
pushing back.
SEAT POSITIONING
Reclining by patient To place recliner in
standard seated position, recline position No. 1,
or recline position No. 2. Place hands on armrest
and push body against chair back. Legrest will Upright Position
automatically adjust to each recline position.
Reclining by attendant: Stand at either side of
recliner. Grasp armrest with one hand and
padded push handle with the other hand. To
lower, push back on padded push handle. To
raise, pull forward on padded push handle.
TV Position
DIALYSIS RECLINE POSITION
To place chair in dialysis position: Place chair
in first recline position. Grasp the push handle
with one hand while actuating the lever with the
other, slowly guide the back down to the desired
position and release lever.
To return to seated position: To bring recliner
back to the seated, No. 1 or No. 2 position: Actuate
lever. Slowly guide the back up fully and release
the lever. Return patient to desired position by
pushing upward on padded push handle.
SHOCK POSITION
To attain shock position from any position:
Grasp the push handle with one hand while
actuating the lever with the other, slowly guide
the back down fully and release the lever. Push
articulating headrest back.
Full Recline
To return to seated position: Refer to paragraph
two of dialysis position.
Trendelenburg Position
6
577RG Clinical Care® Recliner Operating Instructions
GAS SPRING TROUBLESHOOTING GUIDE
Gas Springs have been preadjusted at factory
The gas spring on your recliner provides
counterbalancing forces, and is self-locking for
infinite, precise positioning. Unlocking the gas
spring is controlled by actuating the lever on the
padded push handle on the back of the recliner.
When the lever is actuated it pulls on the cable
which in turn pulls on a hinge, depressing a
button at the end of the gas spring rod. If the gas
spring does not unlock when the lever is
actuated, or remains permanently unlocked
when the lever, cable must be adjusted.
ADJUSTING CABLE TENSION:
1. Remove the one screw which secures the
cable to the upholstered back. Remove the
gas spring from the recliner by disassembling
the two bridge pins and clevis pins.
2. Lower the back until it rests on the stop bars
on the recliner frame. Loosen the lock nut on
the gas spring.
3. Hold the hinge assembly while turning the gas
spring until the cable just becomes taut. Back
off the gas spring an additional 1/2 turn.
NOTE: If the gas spring was not unlocking when
the lever was actuated, the gas spring will
have to be turned clockwise If the gas
spring was not locking when the lever was
released, the gas spring will have to be
turned counter-clockwise
4. Retighten the lock nut.
5. Reassemble the gas spring to the back of the
recliner by replacing the clevis pins, bridge
pins, and screw.
6. Actuate the recliner in accordance with the
operating instructions to verify correct
adjustment.
577RG Clinical Care® Recliner Operating Instructions
7
U.S.A., Corporate Headquarters:
Graham-Field Health Products
2935 Northeast Parkway
Atlanta, Georgia 30360
telephone: 800-347-5678, 770-447-1609
fax: 800-726-0601, 678-291-3232
http://www.grahamfield.com