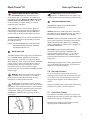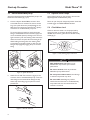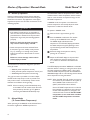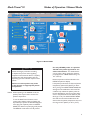
1
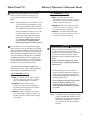
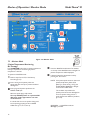
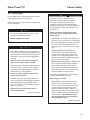
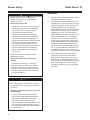
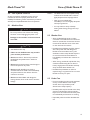
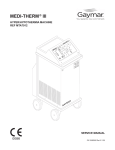
Medi-Therm® III Hyper/Hypothermia Machine MTA7900 ® Manual Mode Automatic Mode Monitor Mode TEM ® War ming Cooli SEL T CHEC TER K WA CHEC FLO W. K PAT IEN ADD T PR OBE. R. WATE M ECT ODE re: peratu tem TER WA ket(s) button trol ban To con onnect NUAL ient •C s MA pat •Pres t desired re re: •Se preatu peratu tem tem NT (s) PATIE ket trol ectban t probe NUAL MA To con •Conn t patien button ect TO ser •In s AU in to sel N •Pres ss aga L OPTIO ient Pre RO pat CONT desired re t •Se preatu tem OK Flow- ALER TURE PERA Patie ng AUTO NOW. USE . OM DOWN VE FR SHUT REMOCHINE MA To mo MO NIT nito er Wat °C/°F Set Po nt int re: peratu tem Y) be TIENT AP pro ton r PA THER patient OR but (NO ser t NIT •In ss MO •Pre OR ENCE SIL ARM AL S HT LIG M TEST D ALAR AN LISTED 303L R STANDARD [NORME] C22.2 No. 125 RISK CLASS [CATEGORIE DE RISQUES] NO. 2G U.S. PATENT NO. 6,517,510 CANADIAN PATENT NO. 2,411,539 Operator's Manual P/N 100311000 8/07 Before you begin . . . Table of Contents Section 1.0 2.0 3.0 4.0 5.0 6.0 7.0 8.0 9.0 10.0 11.0 12.0 13.0 Description Page Safety Precautions ..................................1 Description ..............................................2 Features ....................................................3 Operator Control Panel .......................4 Start-up Procedure ................................5 Shutdown Procedure .............................7 Modes of Operations ............................8 Manual Mode ...........................................8 Automatic Mode .................................. 10 Monitor Mode ...................................... 12 Patient Safety ........................................ 13 Care of Medi-Therm III ...................... 15 Alerts/Troubleshooting ...................... 17 Blankets/Accessories .......................... 19 Customer Training ............................... 19 Warranty ............................................... 19 Illustrations Figure 1 2 3 4 5 6 7 8 9 10 11 Description Page Medi-Therm III System .........................2 Medi-Therm III Features ......................3 Medi-Therm III Control Panel ............4 Pinch Clamps ..........................................5 Quick-disconnects.................................6 Clik-Tite Connector .............................6 Float ..........................................................6 Manual Mode ..........................................9 Automatic Mode................................. 10 Monitor Mode ..................................... 12 Probe Check Well .............................. 16 Medi-Therm and Clik-Tite are registered trademarks of Gaymar Industries, Inc. © 2007. Gaymar Industries, Inc. All rights reserved. www.gaymar.com 2 Medi-Therm® III Important Read and understand this Medi-Therm III Operating Manual and all Safety Precautions (see page 1, section 1.0 and pp. 13–14, section 8.0) prior to using the Medi-Therm III Hyper/Hypothermia Machine. Receiving Inspection Refer to the Medi-Therm III Service Manual for Receiving Inspection and Check-out Procedures. If you have any questions, contact Gaymar's Technical Service Department for assistance. Telephone: 1 800 828-7341 (716) 662-2551 Fax: (716) 662-8795 CAUTION U. S. Federal law restricts this device to sale by or on the order of a physician. Medi-Therm® III Safety Precautions 1.0 Safety Precautions WARNING Read and understand this operating manual and all precautions listed below prior to using the Medi-Therm III Hyper/Hypothermia Machine. DANGER Do not use the Medi-Therm III machine in the presence of flammable anesthetics. Risk of explosion can result. WARNING • If the patient’s temperature is not responding or does not reach the prescribed temperature in the prescribed time or deviates from the prescribed temperature range, notify the attending physician promptly. Failure to notify the physician promptly may result in serious injury or death. • Power interruption will cause the Medi-Therm III machine to go into a standby mode, resulting in no therapy to the patient. Follow instructions for desired mode to resume operation. Failure to resume therapy could result in serious injury or death. • When performing the PROBE CHECK (p. 17, 10.1.2, item 4), use a protective sheath on the probe. Failure to use a sheath could result in cross-contamination. • A physician’s order is required for use of equipment. Check the integrity of the skin according to department protocol when regulating temperature with external devices. Frequency of assesment and documentation will vary depending upon the individual response of the patient. Failure to monitor patient may result in skin damage or inappropriate patient temperature. • Avoid placing additional heat sources between the patient and blanket/body wrap. Skin damage may result. • Prevent excessive and/or prolonged tissue pressure and shearing forces, especially over boney prominences. Skin damage may result. (continued next column) • Keep the area between the patient and the blanket/body wrap dry. Excessive moisture may result in skin damage. • Do not tip machine over without first draining the water out and unplugging the power cord. Damage to the machine or electrical shock can result. • Repairs should be performed by qualified personnel such as certified biomedical electronics technicians or certified clinical engineers familiar with repair practices for servicing medical devices, and in accordance with the Medi-Therm III Service Manual. Do not attempt repairs to Gaymar medical equipment unless you possess these skills. Damage to the machine or malfunction may otherwise result. • All wire-lead, patient-connected transducer assemblies are subject to reading error, local heating, and possible damage from high-intensity sources of RF energy. Inadequately grounded electrosurgical equipment represents one such source, since capacitively-coupled currents may seek alternate paths to ground through probe cables and associated instruments. Patient burns may result. If possible, remove the probe from patient contact before activating the surgical unit or other RF source. If probes must be used simultaneously with electrosurgical apparatus, hazards can be reduced by selecting a temperature monitoring point which is remote from the expected RF current path to the ground return pad. CAUTION • Fill with distilled water only. Failure to use distilled water may result in poor machine performance. Do not use alcohol. Alcohol may accelerate blanket/body wrap deterioration. Do not operate without water, since damage to internal components may result. Do not overfill. Overfilling may result in overflow because the water in the blanket/body wrap drains back into the machine when the machine is turned off. • Place a dry absorbent sheet between the patient and the blanket when using the plastic-like side of any blanket. Moisture may accumulate which may result in skin damage. 1 Medi-Therm® III Description Figure 1—Medi-Therm III Hyper/Hypothermia System 2.0 Description This manual describes the operation of the Medi-Therm III Hyper/Hypothermia machine. The Medi-Therm III Hyper/Hypothermia machine provides a means of regulating patient temperature by supplying temperature-controlled water through a connector hose to a Gaymar Hyper/Hypothermia blanket/body wrap. The companion blanket/body wrap provides the interface for heating or cooling the patient. A patient probe senses patient temperature. 2 The Medi-Therm III machine, Hyper/Hypothermia blanket/body wrap, connector hose, and patient probe comprise the Medi-Therm III system (fig. 1). Please read and understand the precautions on page 1 and the following operating instructions before attempting to use the Medi-Therm III system. In addition, we recommend you request in-service training from your Gaymar representative. Features Medi-Therm® III 3.0 Features Please familiarize yourself with the location and purpose of the features (fig. 2) before reading the start-up procedures or attempting to operate the Medi-Therm III Machine. Water Fill Opening Lift cover. Fill unit with distilled water until green band on float is fully visible (p. 6) ® TEM ® Flow ALE War m ing Cool SEL ECT To co RT TE K WA . OW R FL CHEC TIENT K PA ADD MA PROB R. WATE PER R ATU E Patie ing -OK CHEC Operating Instructions & Precautions Condensed instructions are located on the cover of the water fill opening and on the rear-facing side of the Operator Control Panel's sloped surface. Operator Control Panel Identifies displays, indicators, and controls used in Medi-Therm III operation (pp. 4-5). E. MO ER tem perat er Wat ure: n t(s) WAT anke butto nectb NUAL nt •Con s MA ed patie •Pres t desir ture ure: •Se prea perat tem tem NT ) PATIE ket(s e ntrol ctban nt prob n To co •Conne t patie butto t lec er TO •Ins s AU ain to se N •Pres ess ag L OPTIO nt Pr RO patie CONT desired e t tur •Se prea tem ntrol NUAL DE AUTO NOW. USE OM DOWN. VE FR SHUT REMOCHINE MA To mo MO NITO nitor °C/° nt F Set ure: perat tem NT APY) obe n PATIEO THER tient pr R butto (N er t pa NITO •Ins ess MO •Pr R NCE SILE ARM AL TS LIGH M TEST D ALAR AN Poin t Patient Probe Jack Accepts patient probe plug connecting patient probe to machine (pp. 10, 12). Use only Gaymar probes or equivilent YSI 400 series probes approved for use with medical devices. Dual Blanket/Body Wrap Connections & Probe Check Well Quick-disconnects facilitate connection to water supply (p. 6). PROBE CHECK well verifies patient probe (p. 17). ON/OFF Switch (Circuit Breaker) Controls power to Medi-Therm III. Figure 2—Medi-Therm III features 3 Medi-Therm® III Operator Control Panel � � ����� ������� ������� ������� ������� ���� ����������� ��� �������� ������ ������������ ������ ������ ����� � �������� ����������� � ������ ������� ������� � ���� �������� ������ ������������� ������ �������� ������ ������ ���� ������ ����� ��� �������� �������� ������������ ����� � �������� ����������� � ������� �������� ������ � ������ ����� �������� ������ ������ ��� ������� �������� ������� � ���� �������� �������� ������������ ������� ����� ���� ���� �������� ����� ����� ���� ������� ���� ����� ��� �������� �������� ������������ ��� ���� ����� � ������� �������� ������ � ������ �������� ������� ����� ������ ���� ����� 4.0 ������� ����� �������� �������� ����� ������� ����������� ��� �������� ���� ��������� Operator Control ������� Figure 3—Medi-Therm III Control Panel Panel The control panel is divided into sections according to function and use. The principal panel sections are identified in figure 3. STATUS SECTION STATUS displays light to indicate both the machine’s flow status and how the water temperature is being controlled to reach the desired temperature setting. STATUS displays function in both MANUAL and AUTO modes. FLOW-OK indicates water is flowing adequately. WARMING indicates water is being heated. The maximum water temperature is 42°C (107.6°F). COOLING indicates water is being cooled. Minimum water temperature is 4°C (39.2°F). ALERT SECTION indicators light when some form of ALERT operator action is required. In addition to the visual indicator, an audible alarm may sound. ALERT controls allow the Medi-Therm III operator to test panel lights or to silence the audible alarm. CHECK WATER FLOW indicates the flow of water to the blanket/body wrap has been restricted. NOTE: When two gray hose sets are in use, the Check Water Flow alarm will only sound if the flow through BOTH gray hose sets is occluded. (See page 7, section 5.7) CHECK PATIENT PROBE indicates the patient probe is sensing an abnormal patient temperature (below 29°C [84.2°F] or above 45°C [113°F]). It may indicate the patient probe has become dislodged, an incorrect probe is being used, or a probe has become defective. An audible alarm accompanies this alert. ADD WATER indicates the water reservoir is filled to less than the recommended level. 4 Start-up Procedure Medi-Therm® III REMOVE FROM USE NOW / MACHINE SHUTDOWN indicates the Medi-Therm III has shut down due to a malfunction. An audible alarm accompanies this alert. Remove the Medi-Therm III machine from use immediately. (Refer to Section 6.0 for shutdown procedure). Notify your medical equipment repair department. TEST LIGHTS confirms that all indicator lights and digital displays are working, and that the audible alarm is functioning. The displays flash and the audible alarm sounds as long as the TEST LIGHTS button is pressed. SILENCE ALARM temporarily silences the audible alarm. The alarm will reactivate in approximately 5 minutes if the condition persists. NOTE: The SILENCE ALARM button will not function if the REMOVE FROM USE NOW / MACHINE SHUTDOWN indicator is lit. MODE SECTION The SELECT MODE indicator lights when the Medi Therm III is in STANDBY MODE. MODE buttons select the desired operating mode. Patient therapy is provided in either MANUAL or AUTO mode. A third mode, MONITOR, may be used to monitor patient temperature without providing therapy. After the mode button is pressed, the window at the top of the mode button lights. In AUTO mode, one of three additional CONTROL OPTION indicators light. MANUAL selects the manual mode of operation. In MANUAL mode, the operator must observe patient temperature and adjust the water set point temperature to obtain the desired results. AUTO selects the automatic mode of operation. In AUTOMATIC mode, the operator sets the desired temperature and the patient temperature is automatically regulated to the operator specified set point. Automatic cooling and/or warming can be adjusted to RAPID, MODERATE, or GRADUAL rates by pressing the AUTO button again. MONITOR selects the monitor mode of operation. In MONITOR mode, the operator may monitor patient temperature without providing therapy. TEMPERATURE SECTION TEMPERATURE displays identify WATER, PATIENT, and SET POINT temperatures. WATER indicates the actual temperature of the water being delivered to the blanket/body wrap. This display is illuminated only when MODE is set to MANUAL. PATIENT indicates actual patient temperature as sensed by the probe connected to the patient probe jack. This display is illuminated when MODE is set to MANUAL, AUTO, or MONITOR and a patient probe is plugged into the PATIENT PROBE jack. SET POINT indicates the desired SET POINT temperature. When operating in MANUAL mode, pressing the SET POINT button (“∇” or “∆”) sets the desired water temperature. When in AUTO mode, pressing the SET POINT button sets the desired patient temperature. °C/°F displays the temperature in either degrees Celsius (°C) or Fahrenheit (°F). Pressing the °C/°F button will display the corresponding indicator. 5.0 Start-up Procedure For your convenience, condensed versions of the following instructions have been permanently mounted on the cover of the water fill opening and on the rearfacing side of the Operator Control Panel's sloped surface. Perform the following start-up procedure each time the Medi-Therm III system is placed in operation: 5.1 Close Pinch Clamps Pinch clamps are provided on both the connector and blanket/body wrap hoses to prevent water spillage when blankets/body wraps are changed (fig. 4). Close the pinch clamps on the connector hose and Hyper/Hypothermia blanket/body wrap. Figure 4—Pinch Clamps 5 Start-up Procedure Medi-Therm® III 5.2 Attach Blanket/Body Wrap 5.3 Open All Pinch Clamps Attach the Hyper/Hypothermia blanket/body wrap to the Medi-Therm III machine (fig. 1, p. 2): Open all pinch clamps on the connector hose and the Hyper/Hypothermia blanket/body wrap. a. Failure to open the pinch clamps will prevent water flow and will trigger the CHECK WATER FLOW alert. Connect a Gaymar Model DBK9 connector hose to the Medi-Therm III machine. The hose is ten feet long. It has quick-disconnect (metal) fittings for the Medi-Therm III machine end and Clik-Tite® (plastic) connectors for the blanket/body wrap end. To connect the hose, attach one quick-disconnect fitting to the RETURN machine connection (top) and one to the SUPPLY (bottom). See figure 5. To insure a tight connection, push the retaining collar toward the cabinet and insert the quick-disconnect fitting firmly. While holding the fitting, allow the retaining collar to snap back into position. Check to make sure the fitting is fully engaged by tugging firmly on the hose fitting. 5.4 Check Water Level Check to make sure water is at the proper level by raising the cover on the water fill opening. Fill with distilled water until the green band on the float is fully visible (fig. 7). Return Figure 7—Float, showing proper water level T RE T RE SU N UR S N UR T RE Y PL UP T RE LY PP SU N UR N UR LY SU PP LY PP Supply Figure 5—Quick-disconnects b. Attach the two Clik-Tite connectors (fig. 6) on the connector hose to the blanket/body wrap. Insert the male fitting into the female. When fittings are fully seated, snap the locking ring into place to assure a positive lock. Figure 6—Clik-Tite Connector 6 CAUTION Add distilled water only. Failure to use distilled water may result in poor machine performance. Do not use alcohol, which may accelerate blanket/body wrap deterioration. Do not operate without water, since damage to internal components may result. Do not overfill. Overfilling may result in overflow because the water in the blanket/body wrap drains back into the machine when the machine is turned off. Medi-Therm® III Start-up Procedure / Shutdown Procedure 5.5 Connect Power/Turn Machine On If the machine is not already plugged in, insert the power cord plug into a properly grounded AC receptacle at this time. Press the ON/OFF Switch to the ON position. When first turned on, the Medi-Therm III enters its standby mode: • the ON/OFF switch will light; • the machine will beep once; • the SELECT heading will light; • the WATER, PATIENT, and SET POINT temperature displays will show dashes; and • the °C or °F indicator will light, depending on the scale last selected. NOTE: If the ADD WATER indicator lights, add distilled water until the green band on the float is visible. 5.6 Perform Indicator Light Test 5.7 Perform Check Flow Procedure (when using two gray hose sets) When two gray hose sets are in use, the CHECK WATER FLOW alarm will only sound if the flow through both gray hoses is occluded. To check the flow through the wraps: • Disconnect one gray hose set from the machine connection. If the flow path is patent, the alarm will not sound. • Reconnect the hose to the machine • Disconnect the second gray hose set from the machine connection. If the flow path is patent, the alarm will not sound. • Reconnect the hose to the machine • See p.6, section 5.2, part a for instructions on properly connecting the hoses to the Medi Therm III. Since machine indicators are essential to proper machine operation, you should test the indicator lights each time the machine is placed in operation. Perform this test by pressing and holding the TEST LIGHTS button. This completes the start-up procedures for the Medi-Therm III machine. Please proceed to sections 7.0 through 7.3 for the operating instructions for MANUAL, AUTO and MONITOR modes. While holding the TEST LIGHTS button down, verify the following occurs: 6.0 Shutdown Procedure • the right and left halves of the display panel light alternately; • the three status legends (FLOW-OK,WARMING, and COOLING light; When therapy is completed, turn off the Medi-Therm III machine. Allow water in blanket/body wrap to drain back into machine. Close pinch clamps before disconnecting the blanket/body wrap. • the ALERT legend and its four (triangular) indicators light; • the three mode legends, SELECT heading, and three AUTO/CONTROL OPTION legends light; • the three temperature displays (WATER, PATIENT, and SET POINT) indicate 888, 888.8, and 888.8, respectively; • the two temperature control legends (°C and °F) and the two lines connecting SET POINT to both the WATER and PATIENT display light; • the audible alarm toggles. If any indicator does not light, or the alarm does not sound, remove the machine from use. 7 Modes of Operation / Manual Mode 7.0 Modes of Operation Read and understand the contents of these Operating Instructions and associated precautions before using the Medi-Therm III machine. Any application of the Hyper/ Hypothermia System must be under the direction of the attending physician. WARNING • If the patient's temperature is not responding or does not reach the prescribed temperature in the prescribed time or deviates from the prescribed temperature range, notify the attending physician promptly. Failure to notify the physician promptly may result in serious injury or death. • Power interruption will cause the Medi-Therm III machine to go into a standby mode (see item 5.5, p. 7), resulting in no therapy to the patient. Follow instructions for desired mode to resume operation. Failure to resume therapy could result in serious injury or death. The Medi-Therm III machine is designed to operate in three (3) modes: • MANUAL (water temperature control), • AUTO (automatic patient temperature control), and • MONITOR (patient temperature monitoring). Two gray hose sets are provided to connect multiple blankets and/or body wraps in order to provide more body surface contact. Increased body surface contact facilitates more efficient warming/cooling. NOTE: When connecting a second blanket/body wrap to the Medi-Therm III machine, check the water level (see Start-up Procedure, pp. 5-7) prior to connecting the additional blanket/body wrap. 7.1 Manual Mode (To Control Water Temperature) When operating in the MANUAL mode, the Medi-Therm III machine regulates the WATER temperature to 8 Medi-Therm® III the selected SET POINT. A temperature sensor within the machine monitors water temperature, and the machine heats or cools the water as required to bring it to the SET POINT temperature. In MANUAL mode, the operator must observe the patient’s temperature and manually adjust the water temperature to obtain the desired results. To operate in MANUAL mode: Perform all start-up procedures (pp. 5-7). Press the MANUAL mode button. The window on the top of the MANUAL button will light. The WATER display will indicate water temperature. The SET POINT display will indicate the default temperature (32°C [89.6°F]) at startup, until selecting the SET POINT temperature in step 4 below. desired, change the temperature scale by Ifpressing the °C/°F button. Adjust the SET POINT display to the prescribed water temperature setting by pressing the “∇” or “∆” button to decrease or increase the SET POINT. The STATUS display will indicate WARMING or COOLING while the machine is heating or cooling the water. When the water temperature stabilizes (within 1.0°C [1.8°F] of the SET POINT temperature), both the COOLING and WARMING displays will turn off indicating that the desired water temperature is being maintained. NOTE: When the Medi-Therm III machine is turned on, the machine set point defaults to 32°C (89.6°F) when MANUAL mode is selected, or 37°C (98.6°F) when AUTO mode is selected. Once a SET POINT temperature for a mode has been selected, it is retained for that mode until the SET POINT temperature is changed or the machine has been turned off. The SET POINT temperature in one mode does not affect the SET POINT temperature in another mode. Medi-Therm® III Modes of Operation / Manual Mode � � ������� ������� ������� ������� ���� ����� ����������� ��� �������� ������ ������������ ������ ������ ����� ������ �������� ������ ������ ���� ������ � �������� ����������� � ������ ������� ������� � ���� �������� ������ ������������� ����� ��� �������� �������� ������������ ������� ����� ���� ���� �������� ����� ����� ���� ���� ����� � ������� �������� ������ � ������ �������� ������� ������� ����� ������� �������� �������� ����� ������� ����������� ��� �������� ���� ��������� Figure 8—Manual Mode WARNING ������� ����� � �������� ����������� � ������� �������� ������ � ������ ����� �������� ������ ������ ��� ������� �������� ������� � ���� �������� �������� ������������ ��� �������� �������� ������������ ��� ���� ����� ����� ������ ���� ����� Check the integrity of the skin according to department protocol when regulating temperature with external devices. Frequency of assessment and documentation will vary depending upon the individual response of the patient. Failure to monitor patient may result in skin damage or inappropriate patient temperature. NOTE: While operating in the MANUAL mode, the patient probe may be used to monitor the patient’s temperature. To use this Medi-Therm III feature, insert sensing end of patient probe into patient and tape securely to prevent accidental dislodgment. Insert plug end of patient probe into PATIENT PROBE jack. Make sure probe plug is fully seated. The MANUAL mode switch must be pressed. Use only GAYMAR probes or equivalent YSI 400 series probes approved for use with medical devices. If in doubt that the correct probe is being used and is operating properly, perform a PROBE CHECK test (p. 17, 10.1.2, item 4). Patient temperature will be indicated on the PATIENT temperature display. If the patient probe senses an abnormal patient temperature (below 29°C [84.2°F] or above 45°C [113°F]), the CHECK PATIENT PROBE alert will light and an audible alarm will sound. This condition may indicate the patient probe has become dislodged, an incorrect probe is being used, or the probe has become defective (see Alerts, pp. 17-18). The CHECK PATIENT PROBE alert will turn off and the audible alarm will silence when the patient temperature returns to the range of 29°C (84.2°F) to 45°C (113°F). 9 Medi-Therm® III Modes of Operation / Automatic Mode � � ������� ������� ������� ����������� ������� ���� ����� ��� �������� ������ ������������ ������ ������ ����� � �������� ����������� � ������ ������� ������� � ���� �������� ������ ������������� ������ �������� ������ ������ ���� ������ ����� ��� �������� �������� ������������ ������� ����� ���� ���� �������� ����� ����� ���� � �������� ����������� � ������� �������� ������ � ������ ����� �������� ������ ������ ��� ������� �������� ������� � ���� �������� �������� ������������ ��� �������� �������� ������������ ��� ���� ����� 7.2 ������� ����� �������� �������� ����� ������� ����������� ��� �������� ���� ���������Mode Automatic ���� ����� ������� Figure 9—Automatic Mode (To Control Patient Temperature) When operating in the AUTO mode, the Medi-Therm III automatically regulates the patient’s temperature to the selected SET POINT. The machine constantly compares actual patient temperature with the SET POINT value, and automatically adjusts the water temperature so that the desired patient temperature is achieved. To operate in AUTO mode: Perform all start-up procedures (pp. 5-7). sensing end of patient probe into Insert patient and tape securely to prevent accidental dislodgment. plug end of patient probe into PATIENT Insert PROBE jack. NOTE: Make sure probe plug is fully seated. Use only GAYMAR probes or equivalent YSI 400 series probes approved for use with medical devices. If in doubt that the correct probe is being used and is operating properly, perform a PROBE CHECK test (p. 17, 10.1.2, item 4). 10 ����� � ������� �������� ������ � ������ �������� ������� ����� ������ ���� ����� ������� the AUTO mode button. The window Press on the top of the AUTO button will light. The CONTROL OPTION/RAPID will light. NOTE: To prevent accidental triggering of the CHECK PATIENT PROBE alert, place probe in patient and wait for patient temperature to stabilize before pressing AUTO mode button. The WATER display will be blank when operating the Medi Therm III in AUTO mode. The PATIENT display will indicate patient temperature. The SET POINT temperature will indicate the default temperature (37°C [98.6°F]) at start-up, until selecting the SET POINT temperature in step 6 (p. 11). desired, change the temperature scale by Ifpressing the °C/°F button. Medi-Therm® III Modes of Operation / Automatic Mode Adjust the SET POINT display to the prescribed patient temperature setting by pressing the “∇” When WARMING the patient: or “∆” button to decrease or increase the SET POINT. RAPID - the highest allowable water temperature is used for warming - as high as 42°C (107.6°F). This is the fastest warming mode the machine can provide. NOTE: When the Medi-Therm III machine is turned on, the machine set point defaults to 32°C (89.6°F) when MANUAL mode is selected or 37°C (98.6°F) when AUTO mode is selected. MODERATE - The patient temperature will increase at a rate of 1°C (1.8°F) in a period of 3 hours (0.33°C/Hr [0.6°F/Hr]). Once a SET POINT temperature for a mode has been selected, it is retained for that mode until the SET POINT temperature is changed or the machine has been turned off. The SET POINT temperature in one mode does not affect the SET POINT temperature in another mode. unit will heat or cool as required to bring the The patient temperature to the SET POINT. The STATUS display will indicate WARMING or COOLING while the machine is heating or cooling the patient. When the patient temperature stabilizes (within 0.5°C [0.9°F] of the SET POINT temperature), both the COOLING and WARMING displays will turn off indicating that the desired patient temperature is being maintained. The rate of cooling and warming is user adjustable through the use of the CONTROL OPTION. The CONTROL OPTION defaults to RAPID when AUTO mode is entered. Select a different CONTROL OPTION by pressing the AUTO button again. When COOLING the patient: RAPID - the coldest water is used for cooling - as low as 4°C (39°F). This may not be the most comfortable setting for the patient. MODERATE - Water temperature is limited to 15°C (27°F) below the patient's temperature. This will provide an improved comfort setting to the patient. GRADUAL - Water temperature is limited to 10°C (18°F) below the patient's temperature. This will provide the optimal comfort setting to the patient. GRADUAL - The patient temperature will increase at a rate of 1°C (1.8°F) in a period of 6 hours (0.17°C/Hr [0.3°F/Hr]). WARNING Check the integrity of the skin according to department protocol when regulating temperature with external devices. Frequency of assessment and documentation will vary depending upon the individual response of the patient. Failure to monitor patient may result in skin damage or inappropriate patient temperature. • If the patient probe senses an abnormal patient temperature (below 29°C [84.2°F] or above 45°C [113°F]), therapy will stop, the CHECK PATIENT PROBE alert will light and an audible alarm will sound. This condition may indicate the patient probe has become dislodged, an incorrect probe is being used, or the probe has become defective (see Alerts, pp. 17-18). NOTE: The PATIENT temperature display will begin to flash, the ALERT LED will flash and the audible alarm will toggle when the patient's temperature deviates by 1.0°C (1.8°F) or more from the desired warming rate selected. 11 Modes of Operation / Monitor Mode Medi-Therm® III � � ������� ������� ������� ������� ���� ����� ����������� ��� �������� ������ ������������ ������ ������ ����� � �������� ����������� � ������ ������� ������� � ���� �������� ������ ������������� ������ �������� ������ ������ ���� ������ ����� ��� �������� �������� ������������ ����� � �������� ����������� � ������� �������� ������ � ������ ����� �������� ������ ������ ��� ������� �������� ������� � ���� �������� �������� ������������ ������� ����� ���� ���� �������� ����� ����� ���� ������� ���� ����� ��� �������� �������� ������������ ��� ���� ����� � ������� �������� ������ � ������ �������� ������� ����� ������ ���� ����� ������� ����� ������� �������� �������� ����� ������� ����������� ��� �������� Monitor Mode ���� ��������� Figure 10—Monitor Mode 7.3 (Patient Temperature Monitoring, No Therapy) Press MONITOR mode when no patient temperature therapy is required, but monitoring of patient temperature is desired. Press the MONITOR mode button. The window on the top of the MONITOR button will light. The patient’s temperature will be displayed. To operate in MONITOR mode: If desired, change the temperature scale by pressing the °C/°F button. steps 5.4 and 5.5, of the Start-up Perform Procedure (pp. 6-7). Insert sensing end of patient probe into patient and tape securely to prevent accidental dislodgment. plug end of patient probe into the Insert PATIENT PROBE jack. Make sure probe plug is fully seated. Use only GAYMAR probes or equivalent YSI 400 series probes approved for use with medical devices. If in doubt that the correct probe is being used and is operating properly, perform a PROBE CHECK test (p. 17, 10.1.2, item 4). 12 NOTE: If the patient probe senses an abnormal patient temperature (below 29°C [84.2°F] or above 45°C [113°F]), the CHECK PATIENT PROBE alert will light and sound an audible alarm. This condition may indicate the patient probe has become dislodged, an incorrect probe is being used, or a probe has become defective (see Alerts, pp. 17-18). REMEMBER . . . in MONITOR mode, no therapy is provided. Medi-Therm® III Patient Safety 8.0 Patient Safety WARNING Use the Medi-Therm III Hyper/Hypothermia machine only under the direction of a physician. Review the following precautions and procedures prior to each application: DANGER Do not use the Medi-Therm III machine in the presence of flammable anesthetics. Risk of explosion can result. WARNING • If the patient’s temperature is not responding or does not reach the prescribed temperature in the prescribed time or deviates from the prescribed temperature range, notify the attending physician promptly. Failure to notify the physician promptly may result in serious injury or death. • Power interruption will cause the Medi-Therm III machine to go into a standby mode, resulting in no therapy to the patient. Follow instructions for desired mode to resume operation. Failure to resume therapy could result in serious injury or death. • The Medi-Therm III machine is provided with a means of checking rectal/esophageal temperature probes. When performing the PROBE CHECK (p. 17, 10.1.2, item 4), use a disposable protective sheath on the probe. Failure to use a sheath could result in cross-contamination. (continued next column) • A physician’s order is required for use of equipment. Check the integrity of the skin according to department protocol when regulating temperature with external devices. Frequency of assessment and documentation will vary depending upon the individual response of the patient. Failure to monitor patient may result in skin damage or inappropriate patient temperature. PEDIATRICS - The temperatures of infants and children are more responsive to surface heating and cooling than adults. The smaller the patient, the more pronounced the effect because of their higher ratio of skin contact area to body mass. TEMPERATURE-SENSITIVE PATIENTS - Patients with impaired peripheral blood circulation caused by vascular diseases and patients who are incapacitated may be more sensitive to temperature changes than patients with more normal circulation. OPERATING ROOM PATIENTS - Patients with poor circulation associated with inadequate heart function, reduction in blood volume, and constriction of peripheral blood vessels may deviate from the normal response to the external application of heat and cold. • Avoid placing additional heat sources between the patient and blanket/body wrap. Skin damage can result. Heat applied by the blanket/body wrap can result in a rise in skin temperature at the areas of contact. The additional heat rise due to electrosurgical currents flowing to the dispersive electrode could be sufficient to cause tissue injury. Each thermal effect by itself may be completely safe, but the additive effect may be injurious.1 Keep additional heat sources from between the patient and the blanket/body wrap. (continued next page) 13 Medi-Therm® III Patient Safety WARNING • Prevent excessive and/or prolonged tissue pressure and shearing forces, especially over boney prominences. REFERENCES 1 Gendron, F. G. Unexplained Patient Burns. Chap. 5, p. 87, Quest Publishing Co., 1988. 2 Scott, Stewart M. Thermal Blanket Injury in the Operating Room. Arch. Surg.,Vol. 94, p. 181, Feb. 1967; Crino, Marjanne H. Thermal Burns Caused by Warming Blankets in the Operating Room. Clinical Workshop,Vol. 29, pp. 149-150, Jan-Feb 1980; Gendron, Francis G. Journal of Clinical Engineering.Vol. 5, No. 1, pp. 19-26, JanuaryMarch 1980; Moritz, A.R. and Henriques, Jr., "F.C. Studies of Thermal Injury II." In The Relative Importance of Time and Surface Temperature in the Causation of Cutaneous Burns. Am. J. Path., 23:695, 1947; Stoll, Alice M. and Chianta, Maria A. Method and Rating System for Evaluation of Thermal Protection. Aerospace Medicine,Vol. 40, No. 11, pp. 1232-1238, Nov. 1969; Stewart, T. P. and Magnano, S. Burns or Pressure Ulcers in the Surgical Patient. Decubitus,Vol. 1, pp. 36-40, 1988. 3 Llorens, Alfred S. Reaction to Povidone-Iodine Surgical Scrub, Scrub Associated with Radical Pelvic Operation. Am. J. Obstet. Gynecol., pp. 834-835, Nov. 14, 1974; Hodgkinson, Darryl J., Irons, George B. and Williams, Tiffany J. Chemical Burns and Skin Preparation Solutions. Surgery, Gynecology & Obstetrics,Vol. 17, pp. 534-536, Oct. 1978. Skin damage may result. Localized skin injury due to tissue compressed between boney prominences and fluid filled channels has occurred during prolonged cardiovascular procedures at water temperatures well below the scientifically established epidermal burn injury threshold.2 Local ischemia can follow the application of pressures exceeding capillary pressure resulting in tissue necrosis. This local effect may be enhanced by generalized impairment of the circulation, local shearing forces and increased metabolic demand because of temperature elevation. Pathological changes may begin in two (2) hours. • Keep the area between the patient and the blanket/body wrap dry. Excessive moisture may result in skin damage. The application of heating or cooling may affect the toxicity of solutions. Prep solutions have been reported to injure the skin when allowed to remain between patients and water circulating heating blankets/body wraps during prolonged procedures.3 CAUTION • Place a dry absorbent sheet between the patient and the blanket when using the plastic-like side of any blanket. Moisture may accumulate which may result in skin damage. A dry absorbent sheet placed between the patient and the Hyper/Hypothermia Blanket will provide a sanitary barrier and absorb perspiration. It will also promote more uniform distribution of heat.Vinyl blankets with nonwoven fabric surfaces and body wraps do not require an absorbent sheet when using the nonwoven side. 14 Medi-Therm® III 9.0 Care of Medi-Therm III As with any precision equipment, proper care and maintenance will insure proper performance and reliability. The following routine maintenance procedures will help insure dependable Medi-Therm III operation. 9.1 Machine Care WARNING Do not tip machine over without first draining the water out and unplugging the power cord. Damage to the machine or electrical shock can result. CAUTION • Add distilled water only. • Failure to use distilled water may result in poor machine performance. • Do not use alcohol. Alcohol may accelerate blanket/body wrap deterioration. Alcohol is flammable. Care of Medi-Therm III NOTE: • The Medi-Therm III control panel and top surfaces can be cleaned with a soft cloth lightly dampened with isopropyl alcohol. • Clean up any accidental spills immediately—use a cloth lightly dampened with isopropyl alcohol. • You may check for clarity of fluid by viewing water flowing through clear vinyl blanket. 9.2 Blanket Care • Allow the blanket/body wrap to remain connected to the Medi-Therm III machine for about 10 minutes after the machine has been turned off. This will allow most of the water to drain back into the machine. • Reusable all vinyl blankets should be cleaned with a damp cloth and mild detergent. If blankets must be sterilized, use any cold sterilization means, except alcohol. Exposure to harsh chemicals will cause blankets to lose flexibility and reduce their resistance to cracking. • Do not operate without water, since damage to internal components may result. • When storing reusable all vinyl blankets, they should be rolled loosely. (Do not allow to freeze.) Single-patient use blankets and body wraps should be discarded after use. • Do not overfill. Overfilling may result in overflow because the water in the blanket/body wrap drains back into the machine when the machine is turned off. • Reusable all vinyl blankets can often be repaired using a vinyl patch kit. Do not return blankets to factory for repair. • Do not use bleach. Bleach will damage the heating element, which could result in excessive leakage. 9.3 Probe Care • Do not autoclave. If probe must be sterilized, use any cold sterilization means except alcohol, which may accelerate probe deterioration. Always wipe dry. • Reusable probes may be cleaned with a damp cloth and mild detergent. Always wipe dry. Exposure to harsh chemicals will cause probe to lose flexibility and resistance to cracking. • Disposable probes should be discarded after use. 15 Care of Medi-Therm III Medi-Therm® III 9.4 Probe Check Well Care 9.6 Quick Disconnects The PROBE CHECK WELL should be cleaned with a small tubular brush and detergent, and then wiped with a commercial disinfectant. The quick-disconnects joining the connector hose to the machine may become difficult to engage. This problem can be eliminated by applying a silicone base or light machine oil to the outside of the male connector prior to engagement. DANGER When performing the PROBE CHECK, use a protective sheath on the probe. (Becton-Dickinson catalog 3700 oral sheath or equivalent. Failure to use a sheath could result in cross-contamination. 9.7 Draining Machine It is not necessary to drain the Medi-Therm III machine after each use. However, periodic draining is recommended at least once a month. To lower the water level, close both pinch clamps on the connector hose. Place the end with both Clik-Tite connectors into a sink or pail. Open the pinch clamps. Press the ON/OFF switch to ON and press MANUAL mode button. The machine will pump the water reservoir empty. Press ON/OFF button to OFF when CHECK WATER FLOW lights. After the water is pumped out, do not leave the machine on or it may overheat. Preventive maintenance and service procedures are described in the Medi-Therm III Service Manual. These procedures should be performed by qualified personnel such as certified biomedical electronics technicians or certified clinical engineers. Figure 11—Probe Check Well 9.5 Connector Hose Care The reusable connector hoses should be cleaned with a damp cloth and mild detergent. Always wipe dry. 16 Medi-Therm® III Alerts / Troubleshooting 10.0 Alerts/ Troubleshooting 4. Confirm that water supply is at proper level. Most Medi-Therm III operating problems are minor and can be corrected by the operator. The following are alerts and troubleshooting details. 5. Turn off machine. Close all pinch clamps. Disconnect blanket/body wrap from connector hose. Direct connector hoses into water fill opening, start machine, and select MANUAL or AUTO mode. Open connector pinch clamps. If there is still no flow, turn machine off and remove from use. WARNING Repairs should be performed by qualified personnel such as certified biomedical electronics technicians or certified clinical engineers familiar with repair practices for servicing medical devices, in accordance with the Medi-Therm III Service Manual. Do not attempt repairs to the Medi-Therm III machine unless you possess these skills. 10.1.2 Check Patient Probe Indicates that the patient probe is sensing below 29°C (84.2°F) or above 45°C (113°F), and is not a normal patient temperature. WARNING Damage to the machine, malfunction, or electrical shock may otherwise result. If CHECK PATIENT PROBE light comes on, therapy will stop (in AUTO mode only), status lights will go out, and no additional heating or cooling will occur until the problem is corrected. 10.1 Alerts The Medi-Therm III machine has both visual and audible alert indicators to help you identify machine or operator caused problems. An explanation of these signals and their probable causes follow. Perform corrective action in the sequence listed. 1. CHECK PATIENT PROBE audible alarm can be silenced for five minutes while diagnosing problem by pressing SILENCE ALARM. 2. CHECK PATIENT PROBE alert may sound if machine is placed in MANUAL, AUTO, or MONITOR mode before patient probe has been inserted in patient, since probe will be sensing room temperature. Place probe in patient and wait for patient temperature to stabilize before pressing MANUAL, AUTO, or MONITOR mode button. 3. Check probe to make sure it has not become dislodged from patient. Reinsert and tape securely if required. Wait for patient temperature to stabilize before pressing AUTO mode button. 4. Perform PROBE CHECK: 10.1.1 Check Water Flow Circulation of water through the blanket/body wrap has been restricted. Air bubbles in the blanket/body wrap may remain stationary although water is flowing; a few bubbles do not adversely affect operation of the blanket/ body wrap. To locate and correct the source of low flow: NOTE: When two gray hose sets are in use, the CHECK WATER FLOW alarm will only sound if the flow through BOTH gray hose sets is occluded. See p. 7, section 5.7 for instructions on checking flow path when two gray hose sets are in use. 1. Check that hoses are fully inserted and seated into one RETURN (top) and one SUPPLY (bottom) connector on the machine. (See Start-up Procedure, p. 6.) 2. Check that all pinch clamps are fully open. 3. Check that hoses are not kinked or pinched off. Make sure blanket/body wrap is not kinked or creased. If a blanket/body wrap is used with patient in sitting position, flow may be pinched off. a. Insert probe into protective sheath and then into PROBE CHECK WELL on front of machine base (fig. 11, p. 16). WARNING When performing the PROBE CHECK, use a protective sheath on the probe. Failure to use a sheath could result in cross-contamination. 17 Medi-Therm® III Alerts / Troubleshooting b. Operate machine in MANUAL mode with a blanket/body wrap connected. Adjust SET POINT temperature to between 33°C (91.4°F) and 37°C (98.6°F). Wait until machine temperature stabilizes (Both the WARMING and COOLING lights are off and patient temperature display stabilizes). Water and patient temperature displays should read within 2°C (3.6°F) of each other. If not, patient probe may be defective or incorrect probe is being used. Use only GAYMAR probes or equivalent YSI 400 Series probes approved for use with medical devices. c. If probe appears defective, try another probe and repeat PROBE CHECK. If a new, correct probe does not meet this test, remove machine from use and notify your medical equipment repair department. 10.2 10.2.1 Blanket/Body Wrap Will Not Heat 1. Check that water is circulating through the blanket/ body wrap. If there is no circulation, the CHECK WATER FLOW alert should light. If CHECK WATER FLOW is lit, refer to Alerts section (pp. 17-18) for corrective measures. Do not fold blankets/body wraps. 2. Check that the temperature control is operating by pressing the MANUAL mode button and then adjusting the SET POINT temperature to at least 2°C (3.6°F) above the indicated water temperature. This should cause the WARMING indicator to light. 10.2.2 Blanket/Body Wrap Will Not Cool 1. Check to see if water is circulating through the blanket/body wrap. If there is no circulation, the CHECK WATER FLOW alert should light. If CHECK WATER FLOW is lit, refer to Alerts section (pp. 17-18) for corrective measures. Do not fold blankets/ body wraps. 2. Check that rear and side air vents are not blocked. Inlet and exhaust grills should be kept clear and clean to allow air to circulate freely. 3. Check that the temperature control is operating by changing the SET POINT temperature to at least 2°C (3.6°F) below the indicated water temperature. This should cause the COOLING indicator to light. 10.1.3 Add Water Check to make sure water is at the proper level by raising the cover on the water fill opening. If green band on float is not visible, fill with distilled water until the green band is visible (fig. 7, p. 6). If green band on float is visible, do not add water—remove machine from use and notify your medical equipment repair department. CAUTION • Add distilled water only. Failure to use distilled water may result in poor machine performance. • Do not use alcohol. Alcohol may accelerate blanket/body wrap deterioration. • Do not operate without water. Damage to internal components may result. • Do not overfill. Overfilling may result in overflow because the water in the blanket/body wrap drains back into the machine when the machine is turned off. 10.1.4 Remove From Use Now / Machine Shutdown This alert indicates that the machine has shut down due to a malfunction. See Section 6.0 for shutdown procedure. Remove machine from use immediately. Notify your medical equipment repair department. 18 Troubleshooting 10.2.3 Machine Will Not Turn On 1. Make sure the power cord is plugged in. 2. Reset the ON/OFF switch (circuit breaker) by turning it first off, then on. 3. If the machine still does not turn on, remove machine from service and notify your medical equipment repair department. 10.2.4 On/Off Switch Is Turned On, But Control Panel Is Dark And No Operating Sound Is Coming From Machine Remove machine from use and notify your medical equipment repair department. Medi-Therm® III Blankets / Body Wraps / Accessories / Training / Warranty 11.0 Blankets/Body Wraps/Accessories ACCESSORIES All Gaymar products are latex free. DBK9 Adult and pediatric size blankets are available in all vinyl or vinyl with nonwoven fabric surfaces. Adult body wraps are available in vinyl with nonwoven fabric surfaces only. Connector Hose 10' HBX8 Hose Extension 10' SINGLE PATIENT USE BLANKETS, PLASTIC WITH NONWOVEN FABRIC PAT101 Adult Reusable Probe (YSI 400 series) DHP810 O.R. Table and General Use 25" x 64" PAT102 Pediatric Reusable Probe (YSI 400 series) DHP812 Pediatric General Use 22" x 33" DP400CE Disposable Probe, Adult and Pediatric (YSI 400 series) DHP813 Adult General Use 30" x 64" ADP10CE Reusable Probe Adaptor MTA33 Germicide/Algaecide SINGLE PATIENT USE BLANKETS, ALL VINYL DHP901 Adult General Use 25" x 69" DHP902 Pediatric General Use 25" x 36" REUSABLE BLANKETS, HEAVY DUTY VINYL HP7010 Adult General Use 25" x 69" HP7020 Pediatric General Use 25" x 36" SINGLE PATIENT USE TORSO WRAPS, POLYMER WITH NONWOVEN FABRIC DHV530 DHV535 Small/Medium Large SINGLE PATIENT USE LEG WRAPS, POLYMER WITH NONWOVEN FABRIC DHL540 12.0 Customer Training In-service training is recommended and can be arranged through your Gaymar Representative. Comprehensive repair and maintenance training is also available through Gaymar Technical Services (for telephone numbers, see back cover). 13.0 Warranty The Medi-Therm III Hyper/Hypothermia machine is warranted free of defects in material and workmanship for a period of two (2) years under the terms and conditions of the Gaymar warranty in place at the time of purchase. The compressor portion of the machine carries a five (5) year prorated warranty. Contact Gaymar Technical Service if you have questions about warranty or repair. One size fits all All blankets and body wraps require reusable DBK9 connector hoses. Products with Colder style connectors are available for the Medi Therm III. Contact Gaymar customer services for availability. 19 Medi-Therm® III This page intentionally left blank 20 Medi-Therm® III 21 Medi-Therm® III Gaymar Industries, Inc. 10 Centre Dr. Orchard Park, New York 14127-2295 Phone: 1-800-828-7341 Fax: 1-800-993-7890 In Canada Contact: Waterloo Bedding Company, Ltd. 825 Trillium Dr. Kitchner, Ontario N2R 1J9 Phone: 1-800-203-4293 Fax: 1-591-742-3699 22