1
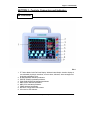
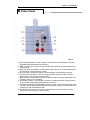
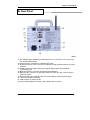
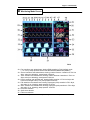
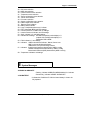
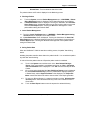
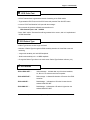
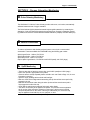
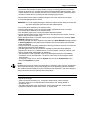
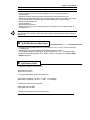
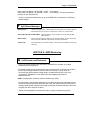
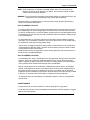
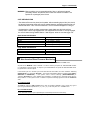
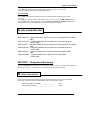
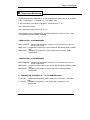
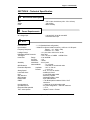
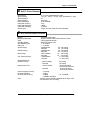
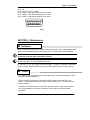
Table of Contents Section 1 - Introduction A. About this Manual ................................ B. Manufacture's Responsibility ................ C. Warranty .............................................. D. Unpacking and Accessories .. ................ E. General Safety ...................................... F. SpO2 alarm messages ......................... 22 2 2 2 3 3 Section 2 - Controls, Connectors and Indicators A. Front Panel .......................................... 5 B. Patient Panel ........................................... 6 C. Rear Panel .....................…………………7 D. Monitoring Mode Screen.......................... 8 E. System Messages ........................……... 9 Section 3 - Operation Instructions A. Initial Operation ..................................... 10 B. Patient Management…………………….. 10 C. Date and Time.......................................... 12 D. Sound and Setting.................................... 12 E. Traces Setting....................………………. 12 F. Trends ..........................…………………. 12 G. Battery Operation .........................……… 13 H. Printer……………………………………….13 I. Power-OFF..........................……………. 14 Section 4 - ECG Monitoring A. Introduction ......................................... 14 B. Patient Connections............……………… 14 C. ECG Scale ............................................. 16 D. Lead Selection.................................... 16 E. ECG Filter…… ............................... 17 F. Heart Rate Limits.................................. 17 G. ECG Seep Speed.......... .......................... 17 H. ECG Pulse Test................................. 18 I. ECG Patient Type.................................... 18 J. ECG Alarms.................................... 18 Section 5 - Oxygen Saturation Monitoring A. Pulse Oximetry Monitoring...................... 19 B. Patient connections ................................ 19 C. SpO2 monitoring .................................. 19 D. SpO2 Waveform and Bar-graph................21 E. SpO2 alarm limits ................................. 21 Section 6- NIBP Monitoring A. Cuff Selection and Placement...........……22 B. NIBP Monitoring.......................................24 C. NIBP Alarm Messages.………………… 25 Section 7- Temperature Monitoring A. Patient Connections................................. 25 B. Temperature Monitoring.......................... 26 C. Temperature Alarm Messages................. 26 Section 8 - Technical Specification A. Mechanical Description ......................... 27 B. Power Requirements ........................... 27 C. ECG ................................................... 27 D. SpO2 Pulse Oximeter .......................... 28 E. Non-Invasive Blood Pressure.................. 28 F. Temperature………………............. 29 G. Display ………..............................………. 29 H. Environment Specifications .................. 29 I. Trends ................................................ 29 J. Auxiliary Output (Rear Panel) .................. 29 Section 9- Maintenance A. The Monitor ........................................... 30 B. Probes .................................................. 30 C. Patient Cables ......................................... 31 D. Battery ........................................... ....... 31 Warranty Terms & Conditions ................ 32 Rev1 Nov 08 Operators Manual Multi-parameter veterinary monitor " LifeWindow LW8 Lite " 1 Digicare Animal Health SECTION 1 – Introduction A . About This Manual This operator’s manual has been prepared to provide information on the correct use of the DIGICARE BIOMEDICAL TECHNOLOGY INC. LifeWindow LW8 Lite multi-parameter veterinary monitor. It contains performance specifications and installation, operation and maintenance information. It is intended for trained animal -care professionals. Follow each chapter in the manual sequentially, (specially) if the monitor is being used for the first time. B . Manufacturer's Responsibility -The manufacturer of this equipment is responsible for the effects on safety, reliability, and performance of the equipment only if: -The equipment is used in accordance with the instructions in this manual. -The electrical installation complies with all applicable regulations. -Assembly operations, extensions, re-adjustments, or repairs are carried out by person’s authorized by the manufacturer. -It is up to the user to ensure that any applicable regulations respecting the installation and operation of the monitor be observed. The operator should read this manual carefully and thoroughly before attempting to use the monitor. Incorrect operation or failure of the user to maintain the monitor in accordance with proper maintenance procedures relieves the manufacturer or his agent from all consequent non-compliance, damage or injury. C . Warranty All products manufactured by Digicare Biomedical Technology Inc. are warranted to be free from defects in material and workmanship and to operate within published specifications, under normal use, for a period of one year from date of original shipment. The warr anty on accessories is ninety (90) days. If an examination by Digicare, discloses such products or component parts be been defective, then our obligation is limited to repair or replacement (at our option). Operators Manual Multi-parameter patient monitor " LifeWindow LW8 Lite " 2 Digicare Animal Health D . Unpacking and Accessories Carefully remove the monitor and its accessories form the shipping carton. Save the packing materials in case the monitor must be shipped or stored. Ensure your LifeWindow LW8 Lite has the items listed in the SHIPPING LIST inside the carton. E . General Safety 1 - INDICATIONS The LifeWindow LW8 Lite series is a device designed for continuous operation, specifically for veterinary use. The device MUST BE connected to the external protective conductor to be operated with the external MAINS LINE. The LifeWindow™ LW8 Lite series is intended for use by person’s trained in professional animal care. The operator must be thoroughly familiar with the instructions in this manual before using the instrument. The LifeWindow™ LW8 Lite series is a configurable multi -parameter monitor, intended for use in animal hospital / clinic environment. The unit is configured to measure and monitor the following available parameters: - ECG Waveform ( 3 and 5 leads ); Heart Rate (HR) from ECG ; ECG arrhythmia and ST segment analysis; Blood oxygen saturation (SpO 2 or pulse oximetry); SpO2 waveform (Plethysmogram); Two Temperature channels; Two Invasive Pressure channels; Pulse (from SpO2 ,NIBP, IP1 or IP2) rate; NIBP Systolic, Diastolic and mean arterial pressure; End-tidal CO2 concentration (EtCO2) – Mainstream or Sidestream; Inspired CO2 concentration (inCO2) – Mainstream or Sidestream; Respiration rate (from EtCO2 waveform); Inspired Fraction of O2 ( FIO2 ); 2 - CAUTIONS - Indicates a condition that may lead to equipment malfunction. - The LifeWindow™ LW8 Lite was designed and tested accordingly to the ELECTRO-MAGNETIC COMPATIBILITY Standard IEC601-1-2. However, the operator is responsible to verify if the monitor is been affected or affecting others electrical equipment. Equipments like electrocautery and image scanners can generate interference and cause degradation of the LifeWindow™ LW8 Lite performance. To avoid this situation, it should be installed as far as possible of those equipment. Operators Manual Multi-parameter patient monitor " LifeWindow LW8 Lite " 3 Digicare Animal Health - The LifeWindow™ LW8 Lite series is NOT intended to be used during MRI (magnetic resonance imaging). 3- CONTRAINDICATIONS - Situations where risks associated with the use of the monitor are greater than the benefits. - The LifeWindow™ LW8 Lite series is NOT intended to be used during MRI (magnetic resonance imaging). - The LifeWindow™ LW8 Lite is NOT suitable for use in the presence of a flammable anaesthetic mixture with air or with oxygen or nitrous oxide. 4 - ABOUT THE MONITOR CONFIGURATION The LifeWindow™ LW8 Lite series is a Multi-parameter configurable vital sign monitor. The physiological paramet er are the following: CODE Electrocardiogram – 3 Lead ECG........................................................................................ E Pulse Oximeter and Plethysmogram ................................................ .......................... S FIO2 – Inspired Fraction of Oxygen ................................................................................. F CO2 DualCap – Mainstream and Sidestream Capnography .............................................. D CO2 - Mainstream Capnography ............................................................................. M CO2 - Sidestream Capnography ................................................................................. C Non-invasive Blood Pressure - NIBP .......................................................................... N Invasive Pressure (up to two channels) ......................................................................... #P Temperature (up to two channels) ................................... ................................................... #T Recorder – 4 channel waveform strip chart recorder........................................................... sc The standard configuration models are listed in the following table. The parameters can be afterward installed in the initial model, to upgrade the monitor to another standard configuration. Operators Manual Multi-parameter patient monitor " LifeWindow LW8 Lite " 4 Digicare Animal Health SECTION 2 - Controls, Connectors and Indicators A. Front Panel FIG.1 1- TFT Active Matrix Color Flat Panel Display: Windows based Graphic Interface displays 6 user selectable physiologic waveforms, numeric values, indicators, alarm messages and physiologic parameters menu. 2- ALARM DISABLE dedicated pushbutton. 3- FREEZE TRACES dedicated pushbutton. 4- ECG LEAD SELECTION dedicated pushbutton. 5- NIBP START dedicated pushbutton. 6- NIBP STOP dedicated pushbutton. 7- PRINT dedicated pushbutton. 8- BATTERY charge status LED indicator. 9- AC mains line LED indicator. Operators Manual Multi-parameter patient monitor " LifeWindow LW8 Lite " 5 Digicare Animal Health B. Patient Panel FIG. 2 10- Internal CO2 Sidestream module receptacle. Accept sample line to Sidestream CO2 and Respiration Rate determination and monitoring. 11- NIBP hose receptacle. Accept cuff to Non Invasive Blood Pressure and Pulse determination and monitoring. 12- SpO2 connector. Accepts pulse oximetry patient sensor cable to non -invasive determination and monitoring of the blood oxygen content. 13- ECG connector. Accepts ECG cable for electrocardiogram and Heart Rate monitoring. 14- Invasive Pressure Channel 1 connector. Accepts pressure transducer cable to invasive determination and monit oring of blood pressure. 15- FIO2 connector. Accept cable and sensor to Inspired Fraction of Oxygen determination and monitoring, using an air way adaptor. 16- Temperature Channel 1 and Channel 2 connectors. Accepts temperature cable and sensor for non-invasive Temperature determination and monitoring. 17- CO2 External Sidestream or Mainstream module connector. Accepts CO2 mainstream cable connector. Also accepts External Sidestream module cable connector, for determination and monitoring of CO2 and Respiration Rate. 18- Invasive Pressure Channel 2 connector. Accepts pressure transducer cable to invasive determination and monitoring of blood pressure. Operators Manual Multi-parameter patient monitor " LifeWindow LW8 Lite " 6 Digicare Animal Health C. Rear Panel FIG.3 19- On / Standby switch. Momentary contact switch to turn -on and off the unit. To turn-on the unit, double click this switch. 20- Video Connector. Connection to a standard CRT video. 21- Keyboard Connector. PS2 connection to a standard AT type keyboard used only to service purposes. 22- Auxiliary Connector. Supply analog output signals, trigger signals and one RS232 communication port. 23- Ethernet Connector. Connection to ethernet network standard. 24- Mains Line IEC connector. Acc epts power cable from mains line. Has 1 main fuse and 1 spare fuse inside . 25- General Power switch. Interrupt power from internal battery and mains power supply. 26- Antenna for wireless networking. 27- USB connector for external printer. 28- Internal CO2 Sidestream Vent port. Keep it always open to room air. Operators Manual Multi-parameter patient monitor " LifeWindow LW8 Lite " 7 Digicare Animal Health D. Monitoring Mode Screen FIG.4 29 – First waveform user selected area, showing ECG waveform in Thin Line Style, scale (-1 to +1mV), sweep speed of 25mm/s and QRS detected INDICATOR (HEART). 30 – Second waveform user selected area, showing Invasive Pressure 1 waveform in Thin Line Style, scale (0 to 180mmHg), sweep speed of 25mm/s. 31 – Third waveform user selected area, showing Invasive Pressure 2 waveform in Thin Line Style, scale (0 to 180mmHg), sweep speed of 25mm/s. 32 – Fourth waveform user selected area, showing SpO2 waveform in Thin Line Style, with Pulse Level strength scale (1 to 8), sweep speed of 25mm/s. 33 – Fifth waveform user selected area, showing Capnogram (CO2) waveform in Fill In Style, with scale (10 to 50mmHg), sweep speed of 12.5mm/s. 34 – Sixth waveform user selected area, showing Capnogram (CO2) waveform in Fill In Style, with scale (10 to 50mmHg), sweep speed of 12.5mm/s . 35 – ECG menu selection. 36 – SpO2 menu selection. 37 – FIO2 menu selection. Operators Manual Multi-parameter patient monitor " LifeWindow LW8 Lite " 8 Digicare Animal Health 38 – CO2 menu selection. 39 – NIBP menu selection. 40 – Invasive Pressure menu selection. 41 – Temperature menu selection. 42 – Traces configuration menu selection. 43 – Trends menu selection. 44 – Print menu selection. 45 – System configuration menu selection. 46 – Patient Name and ID indicator 47- Date and Time indicators. 48 – Battery Status Indicator. 49 – Large / Small Mode selector and indicator. 50 – ECG Heart Rate (BPM) and ECG settings . 50 – Invasive Pressure 1 Indicator and IP1 settings. 51 – Invasive Pressure 2 Indicator and IP2 settings. 53 – SpO2 Indicator in % and SpO2 settings . 54 – Indicators and settings: End tidal CO2 (EtCO2) value display in %. Inspired CO2 (InsCO2) value display in %. Respiration Rate in RPM. 55 – FIO2 Indicator in % and settings : 56 – Indicators: NIBP mode selected indicator : Manual, Stat or Auto. NIBP cycle interval selected indicator. NIBP time to next cycle remaining indicator. 57 – Indicators: Systolic arterial pressure determined by NIBP in mmHg. Diastolic arterial pressure determined by NIBP in mmHg. Mean Arterial Pressure (MAP) determined by NIBP in mmHg. 58 – Temperature Indicators and settings E. System Messages “AUDIBLE ALARMS OFF” – Flashing, indicates AUDIBLE ALARMS disabled for 2 minutes. – Permanently, indicates AUDIBLE ALARMS OFF. “LOW BATTERY” – Indicates the LifeWindow™ LW8 Lite internal battery is close to be fully depleted. Operators Manual Multi-parameter patient monitor " LifeWindow LW8 Lite " 9 Digicare Animal Health SECTION 3 - Operation Instructions A. Initial Operation CAUTION: Read this manual completely before initiate the monitor’s installation and operation. 1- Plug the AC power cord in AC MAINS receptac le at rear panel and in the AC outlet. The LifeWindow™ LW8 Lite accepts 110 or 220 VAC with automatic selection by the power supply. 2- The electrical installation of the room must have three pin outlets with earth connection for protection of patient, users and equipment. 3- The AC-ON LED indicator will light green and the BATTERY status indicator will light green If the battery is fully charged or yellow if charging. 4- Power-on the unit by double-clicking the ON switch ( 19 ) on the rear panel. 5- The monitor will then perform a “boot” sequence (approx. 1.5 min.) to load functions. B. Patient Management The Patient Management screen is displayed always after the monitor is turned-on. 1- Admit a New Patient 1.1- To admit a patient, touch on the Admit New Patient button. The Patient Admission screen is displayed. 1.2While the cursor is at the Patient Name field, touch in the patient’s name. If necessary, use the Backspace key to delete wrong typed characters. 1.3Touch the Patient Control ID field to move the cursor to this area. Touch the patient’s ID code. If necessary, use the Backspace key to delete wrong typed characters. 1.4- Touch the Admit Patient & Start Monitoring. If more then 5 minutes has passed since the monitor started monitoring, a Vital Signs Data Buffer screen asks what you want to do with the patient’s data in the buffer, with three options: - Keep for the new patient Touch to save the data to the new patient. - Save as differe nt patient: Open the Save Memory Buffer Under Different Patient Name screen . Enter patient’s name and ID and touch the Save Memory Buffer Data button. The Save Vital Signs Report screen is displayed. Make sure the link for saving data is correct and touch the Save Report button. Operators Manual Multi-parameter patient monitor " LifeWindow LW8 Lite " 10 Digicare Animal Health - Discard Data: Touch to delete the data in the buffer. The patient’s Name and ID code is displayed on the Monitoring screen. 2- Discharge Patient 2.12.2- Touch the System menu and Patient Management menu. A WARNING – Patient Being Discharged screen is displayed. Touch Yes to Discharge current Patient. A Save Patient Data screen is displayed. Touching the Yes button, the Save Vital Signs Report screen is displayed. Make sure the link for saving data is correct and touch the Save Report button. Touching the No button discharges the current patient without saving the Patient’s Data. 3- Cancel Patient Management 3.1 - Touch the Cancel Pat Mangmt button. A WARNING – Patient Management being canceled screen is displayed. Touch Yes to confirm. 3.2- A Save Patient Data screen is displayed. Touching the Yes button, the Save Vital Signs Report screen is displayed. Make sure the link for saving data is correct and touch the Save Report button. Touching the No button discharges the current patient without saving the Patient’s Data. 4- Saving Patient Data When the LifeWindow™ LW8 Lite start the monitoring screen, the patient’ data is being stored. Admitting the patient, transfers these data to the patient’s buffer . You can admit the patient any time after start monitoring. In order to Save the patient’s data to a Report the patient need to be admitted. 4.1- 4.2- 4.34.4- Touch in the System menu and then touch in the Save Patient Vital Signs Report. If the current patient is not admitted at this time, an Error – No Patient has been admitted screen is displayed. Touch OK and follow the steps to Admit Patient. If the current patient is admitted the Save Vital Signs Report screen is displayed. the Current Selected Directory to save the patient data is displayed (default is c:\Patient Data), and the Report File Name is also displayed. The Report File Name contains the Patient’s ID and the date and time of the Report generation. To save to a different directory in a network computer, touch the Select Another Directory button. Select the desired directory in the Look in field and touch the Done button. Touch the Save Report button to save the report to the selected directory. Operators Manual Multi-parameter patient monitor " LifeWindow LW8 Lite " 11 Digicare Animal Health C. Date and Time 1 – The current Date and Time are displayed in the Indicator ( 47 ). 2 – Touch the SYSTEM menu and touch Date/Time Settings. 3 – Set current location Date and Tim e. D. Sound Setting 1 – Touch the SYSTEM menu icone. 2 – Set Pulse Volume level. The Pulse Volume can be disable d lowering the volume level. 3 – Set Alarm Volume Level. The Alarm Volume level can NOT be disabled by this procedure. 4 – When the unit turns-on, the Alarm sound is disabled by 2 minutes. To disable the Alarm sound by 2 minutes press quick the Alarm Sound Disable dedicate pushbutton ( 2 ) in the front panel. The ALARM OFF message flashes in screen. To permanently disable the ALARM SOUND press and hold 4 seconds the Alarm Sound disable dedicated pushbutton ( 2 ). The ALARM OFF message is displayed steady on screen. E. Traces Setting You can select any physiological waveform from one to six of the available traces. You can also cascade the traces up to 3 individual loops. 1 – Move the Pointer to TRACES icon and press the Select pushbutton. 2 – Select TRACE waveform source (ECG, SpO2 Plethysmogram, Capnogram, or No Selection). 3 – Select TRACE sweep speed (6. 25mm/s, 12.5mm/s, 25mm/s, 50mm/s or 100mm/s). 4 – Select TRACE color. 5 – Select TRACE style (Thin line or Fill In). 6 – Press the Cascade Traces button if you want to cascade two or more traces. You can create until 3 cascade loops: Loop 1, Loop 2 and Loop 3. Select the Loop waveform Source. Each trace in the same Loop can have different Sweep Speed, Color and Style. 7 – Press the Done button to finish. F. Trends 1 – Touch the TRENDS icon. 2 – Select the desired TREND period: 15min, 1H, 4H,12H, 24H, 48H and 72H. 1- All physiological variables trends are displayed at same time. Operators Manual Multi-parameter patient monitor " LifeWindow LW8 Lite " 12 Digicare Animal Health G. Battery Operation -The LifeWIndow LW8 Lite internal battery has autonomy to approximately 45 minutes of operation when fully charged. -The CHARGE STATUS LED indicator ( 8 ) stays yellow when battery is recharging, green when the battery is fully charged and Off when the battery is disconnected or during battery operation. - With the monitor ON, the battery status indicator ( 48 ) displays the battery charge status of the battery. - In battery operation, the LOW BATTERY alarm message is triggered when there is charge to approximately 10 minutes of operation. After 5 minutes with LOW BATTERY message, the unit shut-down. H. Printer - The LifeWindow LW8 Lite can be connected to any external windows based printer , connected to the rear panel of the unit using it’s own USB connector, or to a network printer. - The Epson C88 Plus is installed as default printer. - It also prints to a PDF virtual printer creating PDF print reports. - To Print and change Print settings, go to the Print Menu and Select Printer and PDF. - Set the Print DPI. Default is set to 360 DPI (Epson). Other manufacturer uses 300 DPI. Check your printer documentation to verify correct DPI. - Set Charting Speed. Options are: 6.25, 12.5, 25 (default), 50, 100 and 200 mm/s. - Set Scale. Changing scale will change the amplitude of the ECG in the print out. Options are: 2.5, 5 (default), 10, 20, 40, 80 and 160 mm/mV. As you increase the Scale it will increase the size of the ECG in the printout. - Set Grid On (default) or Off. - Click on the “Print ECG to Printer” to start printing to the connected printer. The printout will have the last 10 seconds of ECG followed by current time ECG. - Click on the “Print ECG to PDF” button to create a PDF printout of the ECG. - Set Interval Between Measurements (minutes), default is 1 minute, For Tabular Reports printout. - Set Numbers of Pages to Print. The default is 1 page. Each page has 45 measurements. - Click in the “Print Report to Printer” to print the Tabular Report in the connected printer. - Click in the “Print Report to PDF” to create a PDF Tabular Report. Strip Chart Recorder (Optional) - Pressing the Print dedicated button in the Front Panel Overlay, starts a printing on the Strip Chart Recorder. - Change the settings for the Strip Chart Recorder in the Print Menu, selecting the Strip Chart. - Select the charting speed to the ECG trace: 6.25mm/s, 12.5mm/s, 25mm/s or 50mm/s. - Select the Grid ON or OFF to be printed with the ECG waveform. - Select the ECG scale: 2.5mm/mV, 5mm/mV, 10mm/mV, 20mm/mV, 40mm/mV, 80mm/mV or 160mm/mV. - Activate or disable the Triggering events to autom atically start printing the ECG in case of an ECG alarm. Operators Manual Multi-parameter patient monitor " LifeWindow LW8 Lite " 13 Digicare Animal Health TABULAR REPORTS - Select the Interval time between the data acquisition in minutes. - Select the numbers of pages to print (8 measurements by page). - Press the Print Report button to start printing the report. - Press the Stop Recorder to stop printing any time. I. Power-Off 1 – To Shut down the unit just press and release the ON / Standby (19) pushbutton on the rear panel or touch the Shutdown option in the system menu. A screen asking to confirm if you want to shutdown the unit is displayed. 2 – If any problem occurs with the shutdown function, the user can shut -off the unit by pressing and hold the ON / Standby (19) pushbutton for 15 seconds. In this option the patient data will be lost. SECTION 4 - ECG Monitoring A. Introduction The LifeWindow LW8 Lite continuously monitors the ECG waveform and Heart Rate (HR). The screen displays the electrocardiogram, the Mean Heart Rate, the High and Low Heart Rate alarm limits, the selected lead (I,II or III), the QRS detected ( ♠ ) and the alarm messages; • LEADS OFF, ASSYSTOLE, LOW HR and HIGH HR. B. Patient Connections To ensure conformance with all safety and performance specifications, use only the recommended accessories. These are available from DIGICARE using the following part number: ECG ACCESSORIES * ECG shielded patient cable (10’ length), PN: EC001 * ECG leads with alligator clip (24” length) – 3 Leads, PN: EC002 * ECG leads with alligator clip (40” length) – 3 Leads, PN: EC003 * ECG leads Snap- In (40” length) – 3 Leads, PN: EC004 * ECG esophageal sensor with Temperature 24” / 2”, PN: EC005 * ECG esophageal sensor with Temperature 24” / 3”, PN: EC006 * ECG esophageal sensor with Temperature 40” / 3”, PN: EC007 * Patient cable for ECG / Temp esophageal sensors, PN: EC010 * ECG electrode 141003 (set of 3), PN: EC008 * ECG electrode 141003 (box with 192 sets of 3), PN: EC009 * ECG leads with smooth clip (40” length) – 3 Leads, EC014 Operators Manual Multi-parameter patient monitor " LifeWindow LW8 Lite " 14 Digicare Animal Health The ECG patient circuit and connections are electrically isolated type CF. The monitor is protected against damage from defibrillator discharge. Do not let patient connections contact other conductive parts including earth. 1 - Prepare the electrode sites in the standard configuration for RA (Right Arm), LA (Left Arm) and LL (Left Leg). Application sites should be clean and dry. Shave or clip excess hair if necessary. Use conductive ECG gel if necess ary. Alcohol can also be used in anesthetized patients to improve ECG site conductivity. 2 - Connect the 3 Leadwires to the ECG cable. 3 - Connect the ECG cable to the receptacle in the patient panel. 4 - Install the electrodes as following: 1 - WHITE (RA) 2 - BLACK (LA) 3 - RED (LL) A sound beep and the indicator (♠ ) indicates the QRS detection. Leakage current is limited internally by this monitor to less than 10uA. However, always consider additional leakage current that can be caused by other equipment used on the patient at the same time as this monitor. Avoid electro-surgery burns at monitoring sites by ensuring proper connection of the electro surgery return circuit. If improperly connected, some electro-surgery units might allow energy to return through the electrodes. Operators Manual Multi-parameter patient monitor " LifeWindow LW8 Lite " 15 Digicare Animal Health C. ECG Scale Note: The QRS detection and Heart Rate determination do not rely on the ECG scale selected. It only rely in the ECG amplitude and the mode selected. • To change ECG scale, touch the ECG menu and select the desired scale in the ECG SCALES menu. The ECG scales options are: -0.05 mV -0.1 mV -0.25 mV -0.5 mV -1 mV -1.5 mV - 0.1 mV - 0.2 mV - 0.5 mV - 1 mV - 2 mV - 3 mV to to to to to to to to to to to to +0.1 mV +0.2 mV +0.5 mV +1 mV +2 mV +3 mV +0.1 mV +0.2 mV +0.5 mV +1 mV +2 mV +3 mV (factory default) D. Lead Selection The LifeWindow™ LW8 Lite operates with three leads ECG: I, II and III. RA I LA II III LL FIG.7 The LEAD selection enable a proper Heart Rate detection when the ECG has low amplitude and poor quality. To change the LEAD, press the dedicated ECG LEADS pushbutton on the front panel or in the ECG menu. • Large mode sensitivity is 0.3mV QRS amplitude. • Small mode sensitivity is 0.1 mV QRS amplitude. Operators Manual Multi-parameter patient monitor " LifeWindow LW8 Lite " 16 Digicare Animal Health E. ECG Filter • The LifeWindow™ LW8 Lite has two filters to decrease mains line and other interference. • The Mains Notch filter when activated reduces the ECG waveform frequency response from 40Hz (diagnostic mode) to 25Hz (monitoring mode). It improve the QRS detection and Heart Rate count. • The Digital filter when activated reduces the noise present in the ECG waveform that is displayed on the screen. It does NOT improve the QRS detection and Heart Rate count. • To enable or disable the Mains Notch and Digital Filter, touch the ECG menu and select the ECG Filters on or off. • The Mains Notch and Digital Filters are set ON by default. F. Heart Rate Limits • Heart Rate Limits are set by default to: High Heart Rate Limit: 140 BPM. Low Heart Rate Limit: 60 BPM. • Change the Heart Rate Limits in the ECG menu. High Heart Rate Limit Range: 5 to 300 BPM – or OFF - non overlaping. Low Heart Rate Limit Range: 0 to 295 BPM – or OFF - non overlaping. • The values selected are stored by the unit after power-off. • To return to the factory default values, go to the SYSTEM menu and select the Load Factory Default Settings. G. ECG Sweep Speed . • There are 5 sweep speeds for the ECG waveform in the display : 6.25, 12.5, 25, 50 and 100mm/sec. • To change the sweep speed, touch the TRACE menu and select the sweep speed for the desired trace. Operators Manual Multi-parameter patient monitor " LifeWindow LW8 Lite " 17 Digicare Animal Health H. ECG Pulse Test • A ECG Test waveform is generated to test the functioning of the ECG module. • To generate the ECG Test, touch the ECG menu and press the Test ON-OFF button. • A screen “ECG Test Waveform” will open with the message: “This command will generate calibration test waveforms for: ECG Channel input > 1mV / 70 BPM. • Press “Yes” and the Test waveform will be generated in the screen, with 1mV amplitude and 70 BPM Heart Rate. I. ECG Patient Type • Patient Type has two modes: Large and Small. • Selection of Patient Type changes the ECG sensitivity detection for Heart Rate count and monitoring. • Large mode sensitivity is 0.3mV QRS ampl itude. • Small mode sensitivity is 0.1 mV QRS amplitude. • Change the Patient Type direct in the main screen Patient Type Selector Indicator ( 49 ). J. ECG Alarms “ECG LEADS OFF” – Yellow message - indicates that any of the three leadwires, LA, RA or LL are disconnected from the patient. “ECG ASYSTOLE” – Red message - indicates NO detection of R waves from ECG waveform. “ECG LOW HR” – Red Message - indicates that HR value is lower than the selected LOW HR LIMIT. “ECG HIGH HR” – Red Message - indicates that HR value is higher than the selected HIGH HR LIMIT. Operators Manual Multi-parameter patient monitor " LifeWindow LW8 Lite " 18 Digicare Animal Health SECTION 5 - Oxygen Saturation Monitoring A. Pulse Oximetry Monitoring The LifeWindow™ LW8 Lite Pulse Oximetry provide continuous, non-invasive, automatically calibrated measurements of oxygen saturation. The Pulse Oximeter (SpO2) determines arterial oxyhemoglobin saturation by measuring the absorption of red and infrared light passing through the tissue. Changes in absorption caused by pulsations of blood are used to determine Arterial Saturation (%SpO2) and Pulse Rate (PR). B. Patient Connections To ensure conformance with all safety and performance, use only the recommended accessories. These are available from DIGICARE using the following part number: SpO2 Lingual Probe – Nellcor, PN: PO733 SpO2 Patient Cable – Nellcor, PN: PO734 SpO2 Wrap Probe – Nellcor, PN: PO735 Clip for SpO2 Lingual Sensor, PN: PO736 model VSCS (small), and VSCL (large). C. SpO2 Monitoring • There are two sizes of veterinary sensor clips model VSCS (small) and VSCL (large). • Select the clip that is appropriate for the patient. • Clean the sensor and clip separately before and after each use. Refer to Page 113, for more information in cleaning. • Open the clip by pressing with the thumb and forefinger. • Slide one of the sensor’s alignment buttons along the clip slot until the sensor pad is fully engaged in the clip. • Slide the second sensor button along the other clip slot until the second sensor pad is fully engaged in its side of the clip. • Check that the optical sensor pads are facing each other directly. • The sensor is now ready to be applied to the patient. The prefe rred sensor application site for canine, feline and equine animals is on the tongue, with the sensor’s optical components positioned on the center of the tongue. Alternatively, the sensor and clip may be applied to the animal’s lip, toe, ear, prepuce, or vulva. Operators Manual Multi-parameter patient monitor " LifeWindow LW8 Lite " 19 Digicare Animal Health • If the sensor does not track the pulse reliably, it may be incorrectly positioned -or the sensor site may be too thick, thin, or deeply pigmented to permit appropriate light transmission. If any of these situations occurs, reposition the sensor or try another sensor site. If the sensor site is one that is covered with fur, try shaving the site and reapplying the sensor. • Be sure that the sensor cable is positioned along the side of the animal’s face and body to avoid entanglement with the animal. WARNING: Do not use supplemental tape to adhere the clip and sensor directly to the site; this can restrict blood flow and cause inaccurate measurements. • • • • • Connect the sensor assembly to the Interface Cable: Place the plastic hinged cover in the unlocked position (perpendicular to the connector). Connect the sensor assembly to the Interface Cable. Lock the plastic hinged cover to prevent accidental cable disconnection. Plug the Interface Cable into the SpO2 connector on the side panel of the monitor. Push the cable in until you hear an audible “click”. • Before the patient cable is connected and the probe is placed in patient, the message SpO2 SENSOR is displayed on screen. • A few seconds after the sensor is placed in the patient, the SpO2 SENSOR message changes to Searching SpO2, the Bar-graph shows the SpO2 Pulse Level and SpO2 and Pulse Rate values are displayed. • Verify that the sensor is properly positioned by observing at least ten seconds of a continuous plethysmogram waveform being displayed. • If the Bar-graph Pulse Level is at a low level, message of weak pulse will be displayed. Reposition the sensor or try a different sensor. If normal operation cannot be achieved, c all a Digicare Animal Health representative for assistance. • The LifeWindow™ LW8 Lite audible “beep” is by default generated by the ECG detection, modulated in tone by the SpO2 value. The source of the “beep” can be changed to SpO2 pulse detection. • To change the “beep” source, touch the System menu and touch Sound Volume menu. Select the Beep Source to SpO2. NOTE: Reusable sensors may be used on the same site for a maximum of four (4) hours, provided the site is inspected routinely to ensure skin integrity and correct posit ioning. Because individual skin condition affects the ability of the skin to tolerate sensor placement, it may be necessary to change the sensor site more frequently with some patients. Loss of pulse can occur if: • The sensor is to tight. • There is excessive illumination (e.g., a surgical or bilirubin lamp or direct sunlight). • The sensor is placed on an extremity with a blood pressure cuff, arterial catheter or intravascular line. • The patient experiences shock, hypertension, severe vasoconstriction, severe anemia, hypothermia, arterial occlusion to the sensor, or cardiac arrest. Operators Manual Multi-parameter patient monitor " LifeWindow LW8 Lite " 20 Digicare Animal Health Inaccurate measurements may be caused by: • Incorrect application of dysfunctional hemoglobin’s, such as carboxyhemoglobin or methemoglobin. • Significant, levels of indocyanine green, ethylene blue or other intravascular dyes. • Exposure to excessive illumination, such as surgical lamps, especially ones with a xenon light source; bilirubin lamps, fluorescent lights; infrared heating lamps; or dire ct sunlight. • Excessive patient movement. • Venous pulsation’s. • Electrosurgical interference. • Placement of the sensor on an extremity that has a blood pressure cuff, arterial catheter or intravascular line. Do not attach a probe to the same limb with a blood pressure cuff. The data received will not be valid when the cuff is inflated. Attach the probe to the limb opposite the site used for the blood pressure cuff. D. SpO2 Waveform and Bar Graph • The SpO2 waveform sweep speed can be selected from: 6.25, 12.5, 25, 50 and 100 mm/sec in TRACE menu. • The amplitude of the pulse waveform is automatically adjusted in screen. • The Bar graph indicates the pulse signal height and varies from 1 to 8. Increasing the signal amplitude increases the Bar graph value. Bellow number 2 in bar graph, the message WEAK PULSE is displayed. E. SpO2 Alarm Limits • SpO2 Alarm Limits are set by default to: SpO2 Upper Limit: OFF SpO2 Lower Limit: 88 % • Change the SpO2 Alarm Limits in the SpO2 menu. SpO2 Upper Limit Range: 1 to 100 % – or OFF - non overlaping. SpO2 Lower Limit Range: 0 to 99 % – or OFF - non overlaping. • Pulse Alarm Limits are set by default to: Pulse Upper Limit: 140 PPM Pulse Lower Limit: 60 PPM • Change the Pulse Alarm Limits in the SpO2 menu. Operators Manual Multi-parameter patient monitor " LifeWindow LW8 Lite " 21 Digicare Animal Health Pulse Upper Limit Range: 5 to 450 PPM – or OFF - non overlaping. Pulse Lower Limit Range: 0 to 445 PPM – or OFF - non overlaping.• The values selected are stored by the unit after power-off. • To return to the factory default values, go to the SYSTEM menu and select the Load Factory Default Settings. F. SpO2 Alarm Messages SENSOR SpO2- Indicate that SpO2 probe is disconnected from the patient or the patient cable is disconnected from the monitor or a malfunction in sensor or in patient cable. SpO2 LOW AND HIGH ALARM LIMITS - Indicate that SpO2 value overlap the LOW or HIGH ALARM LIMIT selected. WEAK PULSE - Indicate the pulse signal amplitude is low causing instability in SpO2 monitoring. Check the probe installation, site perfusion and body temperature. CHECK SITE - Indicate instability in the SpO2 readings . Verify the probe installation and cha nge probe site. SECTION 6 - NIBP Monitoring A. Cuff Selection and Placement • The use of properly designed and sized cuffs is essential for the accurate non -invasive measurement of blood pressure. • The widest cuff that can be placed around the limb should be used. A cuff that is too small for the limb will not supply sufficient occlusion pressure to the artery. This can cause an erroneously high blood pressure reading. Ideally, cuff width should be 40% of the limb circumference. Substitution of a cuff different from that supplied might result in a measurement error. NOTE: Overlapping the cuff will not affect the measurement results. • For best results, a cuff should be wrapped for a snug fit and be pos itioned reasonably close to heart level. Measurements made above the level of the heart will give reduced blood pressure readings. Measurements made below the heart level will give increased readings. These errors are mainly due to the weight of the blood. • The fully encircling bladder ensures that the artery is properly compressed every time. Operators Manual Multi-parameter patient monitor " LifeWindow LW8 Lite " 22 Digicare Animal Health NOTE: Avoid compression or restriction of the NIBP Inflation Hose. The hose must not be kinked or pinched. It can be placed in any position, but it should be kept off the table surface to avoid equipment vibrations. WARNING: The cuff should not be applied on a limb being used for an intravenous infusion. Do not place the cuff on any extremity being used for SpO2 monitoring. • Place the patient on a padded surface or chair to provide comfort. Shivering will inhibit the monitor from making a determination. CUFF PLACEMENT FOR A CAT • A cat may be left in its owner’s lap to keep it calm. Measurements are be st done in an area of the hospital away from noise and bright lights. The animal may be held so that the front limbs are free for cuff placement. In conscious patients, the tail may be the most appropriate location for placement of the cuff. Cats may be most comfortable in sternal recumbency making the tail a more preferable site. • For the median artery on the foreleg, place the cuff around the forelimb, between the elbow and carpus. It is not necessary to center the cuff over the artery which is on the medial side of the leg because of the fully encircling bladder design. • Hair need not be clipped except when heavily matted. In cats less than five (5) pounds when measurements are difficult to obtain, place the cuff around the leg above the elbow to obtain measurements from the brachial artery. • Measurements from the coccygeal artery may be used by placing the cuff around the base of the tail but not in anesthetized patients. CUFF PLACEMENT FOR A DOG • For measurements in dogs, it is preferable to use the right lateral, sternal or dorsal recumbent positions. That is not a problem in anesthetized patients, but it may be difficult to get large dogs to cooperate for proper positioning. If the dog is in a sitting positio n, place the front paw on the operator’s knee and take measurements from the metacarpus. • Sites for cuff placement are the metacarpus, metatarsus and anterior tibial. In anesthetized patients, most surgeries are done on the posterior part of the body so the metacarpal area of the forelimb is most convenient. In situations where this is not possible, the cuff should be wrapped around the metatarsus just proximal to the tarsal pad or around the hind leg just distal to the hock. The tail site should not be used for cuff placement during anesthesia. • To achieve the most accurate readings, it is important to keep the cuff on a horizontal plane with the heart. LARGER ANIMALS • A large animal such as a horse should be in a stock, standin g still, or lying down. • For horses and cows, the cuff can be wrapped around the base of the tail using the coccygeal artery on the ventral surface. Operators Manual Multi-parameter patient monitor " LifeWindow LW8 Lite " 23 Digicare Animal Health WARNING: When monitoring over an extended period of time, or at frequent intervals, periodically observe the patient’s limb to make sure that the circulation is not impaired for a prolonged period of time. CUFF SIZE SELECTION • The widest cuff that can be placed on the patient, without extending beyond the joint, should be selected. Appropriate sized cuffs may be selected based on published guidelines that cuff width should be 40 – 60% of limb circumference. The cuff should be wrapped for a snug fit. • Overlapping the cuff will not affect measurement results. Make sure the hook and loop sections of the cuff are fully engaged when it is wrapped around the limb. If not fully engaged, the cuff will detach during bladder inflation. If that happens, select the next size bigger cuff. Small Animal Cuff Selection BP006 BP007 BP005 BP009 BP010 3 - 6 cm (1. 2 – 2.4 in) 4 - 8 cm (1.6 – 3.2 in) 6 – 11 cm (2.4 – 4.3 in) 7 – 13 cm (2.7 – 5.1 in) 8 – 15 cm (3.2 – 5.9 in) Large Animal Cuff Selection BP003 BP002 BP001 12 - 19 cm (4.7 – 7.5 in) 21 - 30 cm (8.3 – 11.8 in) 28 – 42 cm (11.0 – 16.5 in) B. Non-Invasive Blood Pressure Monitoring The NIBP monitor have three modes of operation: MANUAL, AUTOMATIC and STAT mode. At power-on the MANUAL mode is selected. To start a manual cycle press the dedicated NIBP START ( 5 ) pushbutton in the front panel. To stop the cycle and deflate the cuff, press the dedicated NIBP STOP ( 6 ) pushbutton in the front panel. In the manual cycle or in the first cycle of the automatic and stat modes, the cuff is inflated to 180mmHg (Adult/Pediatric) or 120mmHg (Neonatal). The monitor automatically detects the patient type (ADULT, PEDIATRIC or NEONATAL). If the systolic value is above 170mmHg ( ADULT/PEDIATRIC) or 110mmHg (Neonatal) the cuff is deflated and re-inflated to a pressure 20 to 30mmHg higher than the initial pressure. In next cycles the cuff is inflated to a pressure 30mmHg higher than the last SYSTOLIC value. B.1 - MANUAL MODE The MANUAL mode is a ONE CYCLE function. User can START a MANUAL cycle or STOP any type of cycle using the dedicated pushbu ttons ( 5 ) and ( 6 ) in the front panel or in the NIBP menu. B.2 - AUTOMATIC MODE - In the Automatic mode a cycle is repeated upon a selected period of time continuously. Operators Manual Multi-parameter patient monitor " LifeWindow LW8 Lite " 24 Digicare Animal Health - In the NIBP menu select the AUTO mode and the cycle interval from 1 to 99 minutes. - Press the START button to start the NIBP determinations. B.3 - STAT MODE -In the STAT mode a cycle is repeated many times as possible during a selected period of time (1 to 4min). -In the NIBP menu select the STAT mode and the cycle (1 to 4 min). Press the NIBP START button to start the STAT cycle. At the end of each cycle the SYSTOLIC, DIASTOLIC, MEAN and Pulse values are displayed and the time to STAT total cycle finish is decremented in display. C. NIBP ALARM MESSAGES “NIBP LOW SYS” – Indicates that Systolic value is lower than the selected SYSTOLIC LOWER LIMIT. “NIBP HIGH SYS” – Indicates that Systolic value is higher than the selected SYSTOLIC UPPER LIMIT. “NIBP LOW DIA” – Indicates that Diastolic value is lower than the selected DIASTOLIC LOWER LIMIT. “NIBP HIGH DIA” – Indicates that Diastolic value is higher than the selected DIASTOLIC UPPER LIMIT. “NIBP LOW MAP” – Indicates that MAP value is lower than the selected MAP LOWER LIMIT. “NIBP HIGH MAP” – Indicates that MAP value is higher than the selected MAP UPPER LIMIT. SECTION 7 - Temperature Monitoring The The LifeWindow™ LW8 Lite has two temperature channel and one Indicator to the difference between T1 and T2 (T1 – T2) temperature. The probes are YSI 400 series compatible. A. Patient Connections To ensure conformance with all safety and performance specifications, use only the recommended accessories. These are available from DIGICARE using the following part number: ESOPHAGEAL/RECTAL PROBE __________________ SKIN SURFACE PROBE _________________________ TP- 001 TP- 002 Operators Manual Multi-parameter patient monitor " LifeWindow LW8 Lite " 25 Digicare Animal Health B. Temperature Monitoring - To start the temperature determination connect the temperature patient cable to the receptacle ( 16 ) to Temperature 1 or Temperature 2, in the patient panel. - In the Temperature menu select Temperature1, Temperature2 or T1 -T2. - Select Temperature Limites. - Select Temperature measurement unit: °F or °C. - The temperature value is displayed when the probe temperature is in the 10 to 50°C, range otherwise the temperature display is blanked. – TEMPERATURE 1 ALARM MESSAGES “TEMP1 SENSOR” – Indicates that Temperature 1 sensor is not connected to the unit or the sensor is not working. “TEMP1 LOW” – Indicates that Temperature 1 value is lower than the selected TEMP1 LOWER LIMIT. “TEMP1 HIGH” – Indicates that Temperature 1 value is higher than the selected TEMP1 UPPER LIMIT. – TEMPERATURE 2 ALARM MESSAGES “TEMP2 SENSOR” – Indicates that Temperature 2 sensor is not connected to the unit or the sensor is not working. “TEMP2 LOW” – Indicates that Temperature 2 value is lower than the selected TEMP2 LOWER LIMIT. “TEMP2 HIGH” – Indicates that Temperature 2 value is higher than the selected TEMP2 UPPER LIMIT. 13 – TEMPERATURE DIFFERENCE (T1 – T2) 1 ALARM MESSAGES. “T1-T2 LOW” – Indicates that Temperature value is lower than the selected T1 -T2 LOWER LIMIT. “T1-T2 HIGH” – Indicates that Temperature value is higher than the selected T1 -T2 UPPER LIMIT. Operators Manual Multi-parameter patient monitor " LifeWindow LW8 Lite " 26 Digicare Animal Health SECTION 8 - Technical Specification A . Mechanical Description Size Weight Color : 9.25 x 6.89 x 6.49 inches (235 x 175 x 165 mm) : 10lb (4.5Kg) : White and Gray B . Power Requirements AC voltage Input : 100-240 VAC / 50-60 Hz max 80W Universal Power Input C. ECG Lead Selection Input Isolation Frequency Res ponse : I, II, III (Standard lead configuration) : Isolated from Ground related circuits by ≥ 4KV rms / 5.5 KV peak Filtered : 0.5 - 25Hz ( ±3db) Unfiltered: 0.5 – 40Hz Leakage Current : < 10 µA at 120 to 240 Vac 50 / 60 Hz Defibrillator & ESU Protection : Max. 360J Test Signal : 1 mV / 100 ms at 70 BPM ± 2 BPM Pulse Heart Rate Range : 15 to 300 BPM Accuracy : ± 1% Resolution : 1 BPM Sensibility Adult Mode : 0.3 mV peak Neonatal Mode : 0.1 mV peak QRS Detection : Automatic in the selected mode Pacemaker Rejection Amplitude : 2mV to 700 mV Duration : 0.1 to 2 ms Sweep Speed : 6.25, 12.5, 25, 50 mm/sec Lead Fault Alarm : Audible and visual Input : 3 Lead ECG patient cable Gain Selection : Manual by operator QRS Indicator : Adjustable audible, visual Patient Cable : 6 pin AAMI standard CMRR : ≥ 90 dB with patient cable and 51K Ω / 47nF imbalance Input impedance : ≥ 20 MΩ at 10 Hz with patient cable Input Bias Current : Any lead configuration < 200 nAdc maximum Electrode Offset potential : ± 0.5 V Tall T wave rejection : Rejects T waves ≤ R wave Operators Manual Multi-parameter patient monitor " LifeWindow LW8 Lite " 27 Digicare Animal Health D. SpO2 - Pulse Oximeter SpO2 Range SpO2 Accuracy SpO2 Resolution SpO2 averaging Pulse Rate Range Pulse Rate Accuracy Pulse Rate Resolution Pulse Rate Averaging Sensor Types : 35 to 100% adult/pediatric/neonate : ± 2% (70 - 100%), ± 3% (50 - 69%) unspecified (0 - 49%) : 1% : 8 seconds : 30 to 250 BPM : ± 2% : 1 BPM : 16 pulses : Finger, Universal, Wrap, Ear and Disposable E. Non-Invasive Blood Pressure Method Measured Parameters Scale Operating Modes Auto Repeat Cycles Stat Cycle Systolic Range Diastolic Range Mean Range Cuff Pressure Range Absolute Maximum Inflation Pressure Measurement Time : Automatic Oscillometric : Systolic, Diastolic, Mean Arterial Pressure, Pulse. : mmHg (Kpascal optional) : Manual, Automatic, Stat : 1 - 99 minutes : 1 - 4 minutes : Adult/Pediatric 60 - 250 mmHg : Neonatal 40 - 130 mmHg : Adult/Pediatric 40 - 220 mmHg : Neonatal 20 - 90 mmHg : Adult / Pediatric 45 - 235 mmHg : Neonatal 35 - 105 mmHg : Adult/Pediatric 0 - 330 mmHg : Neonatal 0 - 160 mmHg : Adult / Pediatric : Neonatal : Adult / Pediatric : Neonatal Pressure Display Accuracy Pressure Resolution BP Pulse Rate Accuracy Cuffs 300 mmHg 160 mmHg 30 seconds typical 100 seconds maximum 30 seconds typical 80 seconds m aximum : ± 3 mmHg : 1mmHg : ± 3 BPM 40 - 200 BPM : ± 5 BPM to 255 BPM : Neonate, Infant, Pediatric, Standard Adult, Large Adult, : Air Hose with Lure Lock Fitting Operators Manual Multi-parameter patient monitor " LifeWindow LW8 Lite " 28 Digicare Animal Health F. Temperature : 50 - 130 0F (10 – 50 0C) : YSI - 400 Compatible, Skin or Rectal / esophageal and disposable : Degrees C (Fahrenheit optional) : ± 0.1 °F from 77 to 103 °F (: ± 0.1 0C from 25 – 45 0C) : 0.1 °F ( 0.1 0C ) Range Probe Scale Accuracy Resolution G. Display Type Effective Display Area : 8.4” TFT – Active Matrix Color Flat Panel Display : 170.4(H) x 127.8(V) mm. H. Environment Specifications Temperature Relative Humidity Atmospheric Pressure : Operating 5°C to 45°C : Transport and Storage 5°C to 55°C : Operating 30 - 75% (Non-Condensing) : Transport and Storage 30 - 75% (Non-Condensing) : Operating 700 – 1060hpa : Transport and Storage 700 – 1060hpa I. Trends GRAPHICAL TRENDS: Present all physiologic variables trend waveforms for a passed period of time selected by the operator: 15 min, 1, 4, 12, 24, 48 and 72 hours. TABULAR TRENDS: Present all physiologic variables trend in tabular data format since the patient was admitted until the present time. J. Auxiliary Output -Auxiliary Output Pin 1 Pin 2 Pin 3 Pin 4 Pin 5 Pin 6 Pin 7 - NA ECGx1000 analog waveform. ECG Trigger Pulses: +12V positive pulses to defibrillator synchronism. NA Invasive Pressure 1 analog waveform. Invasive Pressure 2 analog waveform. NA Operators Manual Multi-parameter patient monitor " LifeWindow LW8 Lite " 29 Digicare Animal Health Pin 8 – NA Pin 9, Pin10, Pin11, Pin12 - GND Pin13 - RS232 – RXD optional depends on the model. Pin14 - RS232 – TXD optional depends on the model. Pin15 - RS232 – GND optional depends on the model. 8 7 6 5 4 3 2 15 14 13 12 11 10 1 9 DB15 SECTION 9 - Maintenance A. The Monitor When necessary, clean the exterior surfaces of the moni tor with a cloth or swab dampened with warm and a mild detergent solution. Do not allow fluids to enter the interior of the instrument. WARNING: Electrical shock and flammability hazard - always turn the monitor off and disconnect it from AC mains power before cleaning. CAUTION: Do not autoclave or pressure sterilize this monitor. Do not stack or immerse this monitor in any liquid. Do not gas sterilize this monitor. Do not touch, or rub the dis play panel with abrasive cleaning compounds, instruments, brushes, rough surfaced materials or make contact with anything that can scratch the panel. B. Probes - The probes are the only surfaces of this monitor that come in contact with the patien t. Clean the probes after each patient use. - Clean the monitor’s probes with a commercial cleaning solution before attaching a new patient. Probes should be cleaned until signs of wear or splitting occur. At this time a new probe is required. - If disinfection is required, wipe the surfaces with Isopropyl alcohol or cider and use a water rinse. When sterilization is required, use ethylene oxide and be sure to follow hospital procedures. Operators Manual Multi-parameter patient monitor " LifeWindow LW8 Lite " 30 Digicare Animal Health - Inspect the probe for wear or splitting after every disinfecting/sterilization process is complete. - If wearing or splitting of the probe is found upon visual inspection, a new probe should be used C. Patient cables - Do not autoclave the patient cables. - Wipe the cables using soap and water or alcohol. Never submerge the cables in any liquid or allow liquids to enter the electrical connections. D. BATTERY - The LifeWindow LW8 LITE series monitor has one battery 12V / 2.9AH SEALED ACID. To ensure long life and proper operation follow the instructions: - Use the LW8 LITE powered by its internal batteries at least once time a month until the “LO BATTERY” message appears on display. - If the LW8 LITE is stored for long period without use, connect the LW8 LITE to the AC line to recharge the batteries for at least 18 hours once for each month period. - In case you need to replace the battery refer to the service manual. Operators Manual Multi-parameter patient monitor " LifeWindow LW8 Lite " 31 Digicare Animal Health WARRANTY TERMS & CONDITIONS DIGICARE BIOMEDICAL TECHNOLOG Y, INC. covers all of their monitors with a 1 year warranty: Monitors 1 year parts and labor Accessories: 90 days on accessories only DIGICARE BIOMEDICAL TECHNOLOGY, INC. will provide the necessary parts and labor to maintain the monitor (s) listed on the Warranty Certificate in a usable condition during the covered period. DIGICARE BIOMEDICAL TECHNOLOGY, INC. will, at its option, repair or replace any product which proves to be defective during the warranty period, if returned to the factory with prior authorization, transportation prepaid. Not covered by this agreement are repairs necessitated by any of the following conditions: 1 - Inadequate power or power failure. 2 - Neglect, abuse or misuse of equipment. 3 - Servicing of equipment by person’s other than DIGICARE INC. 4 - Any unit opened or tampered with, without prior authorization. When returning a monitor for extended warranty repair, you must first contact DIGICARE BIOMEDICAL TECHNOLOGY, INC. to receive a Returned Goods Authorization Num ber (RGA #) that is to be clearly marked on top of the shipping carton. Please make sure that your company name, shipping address, area code and telephone number and person to contact is located in and/or on the box. ANY UNIT THAT IS RETURNED TO THE FACTORY WITHOUT AN RGA# WILL BE REFUSED. FOR YOUR RECORDS Model # __________________________ Serial # _____________________ Dealer Name: ________________________________________________ Date Equip. Purch.: ________________________ Expiration Date: ___________________ DIGICARE BIOMEDICAL TECHNOLOGY INC. 107 Commerce Road Boynton Beach, FL 33426 Operators Manual Multi-parameter patient monitor " LifeWindow LW8 Lite " 32