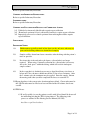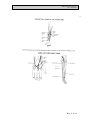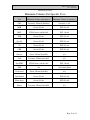
1
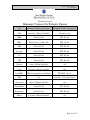
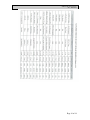
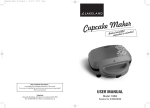
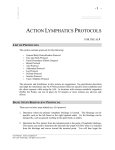
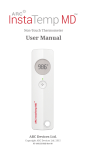
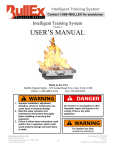
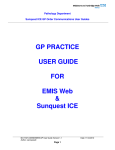
Ministry Saint Michael’s Hospital Laboratory
LABORATORY POLICY AND PROCEDURE
TITLE/SUBJECT:
FILE NUMBER:
ASSIGNED MANUAL:
ORIGINATION DATE:
EFFECTIVE DATE:
DISTRIBUTION:
Venipuncture
PH001.05
Phlebotomy/Specimen Procurement
6-6-2007
June 26, 2014
All Saint Michaels Hospital Laboratories
PRINCIPLE/PURPOSE:
To obtain proper blood specimens for Laboratory analysis in the area of Hematology,
Chemistry, Coagulation, and Bacteriology for the purpose of aiding in the diagnosis and
treatment of illnesses and disorders, monitoring progress and following results of
treatment.
PATIENT PREPARATION:
Some tests may require that the patient fast 8 to 10 hours. Other tests may need to be
drawn at a specific time, such as post-dose drug levels or timed glucose testing. See
corresponding in-house procedure or reference manual specimen requirements for
specific sample requirements
SPECIMEN/HANDLING:
As determined by tests ordered. Serum, plasma, or whole blood may be required.
Refer to SMH blood collection requirements - evacuated tube collection information and
specific department/test collection procedures, and recommended order of draw.
MATERIALS:
No expired supplies are used. Latex free supplies are used whenever possible. Protective
safety devices are not removed from equipment.
Equipment
•
•
•
•
•
Evacuated tubes and bottles
Sterile needles/holders
Syringes
Transfer devices
Winged infusion sets
Reagents
Supplies
•
•
•
•
•
•
•
Alcohol wipes
Non-alcohol wipes (if
medical alcohol is ordered)
Bandages/Tape
Disposable gloves
Gauze
Personal Protective
equipment
Tourniquet
PH-001.05 Venipuncture
Rev. 1/02/2013
STANDARDS:
Saint Michael’s Hospital hand washing and safety policies are monitored for use.
CALIBRATION:
NA
QUALITY CONTROL:
NA
PROCEDURE:
1.0
Greet patient and explain procedure to be performed.
1.1
Initiate the Five Fundamentals of Service.
1.2
Reassure the patient. The phlebotomist must gain the patient’s confidence
and assure the patient that, although the venipuncture will be slightly
painful, it will be of short duration.
1.3
Never tell a patient, “This won’t hurt.”
2.0
Check identification band, and the patient labels. Refer to the patient
identification policy.
2.1
Identification of the patient is crucial to insuring that the blood specimen
is being drawn from the individual designated on the registration form.
3.0
Verify patient fasting or non-fasting status and therapeutic drug dosage time, if
applicable.
3.1
Document information on tube label.
4.0
Review paperwork and select appropriate tubes
4.1
If paperwork or labels are not available at the time of the collection, label
all tubes following guidelines of identification policy.
5.0
Position the patient comfortably
5.1
Seated
5.2
Lying down
5.3
Never standing
5.4
Arm supported and extended straight from shoulder to wrist
6.0
Wash and glove hands.
6.1
Use non-latex gloves.
6.2
Clean pair of gloves for each patient.
7.0
Assemble supplies:
7.1
Evacuated Tubes
7.2
Tourniquet
Page 2 of 14
PH-001.05 Venipuncture
Rev. 1/02/2013
7.3
7.4
7.5
8.0
9.0
Alcohol wipes (or non-alcohol wipe if medical alcohol ordered)
Gauze
The appropriate type and size of needle and system to be used is
based on the patient’s physical characteristics and the amount of
blood to be drawn.
Bandage/tape
7.6
.
Apply tourniquet and select Venipuncture site.
8.1
Apply at least 3 inches from puncture site.
8.2
Apply no longer than 1 minute, longer may result in erroneous results.
8.3
Release and reapply after two minutes if additional time is needed.
8.4
Apply over clothing to prevent pinching or irritating skin.
8.5
Disconnect or remove auto blood pressure cuff if placed on arm being
used for venipuncture.
Suitable site selection
9.1
Veins of the antecubital fossa suitable for venipuncture:
9.1.1 Median cubital vein – MCV
9.1.2 Cephalic vein – CV
9.1.3 Basilic vein – BV
(see subsequent pictures)
9.2
The larger and fuller median cubital, cephalic, and basilica veins are used
most frequently, wrist and hand veins are also acceptable for
venipuncture.
9.3
Sites to avoid:
9.3.1 Burned or scarred areas
9.3.2 Mastectomy patients – avoid side of body of mastectomy surgery.
9.3.3 Double mastectomy-avoid arm with lymphedema.
9.3.4 IV sites:
9.3.5
9.3.6
10.0
11.0
Palpate
10.1
10.2
9.3.4.1 Use opposite arm, when possible.
9.3.4.2 If necessary, draw below IV line site. Ask nursing staff to
turn off IV two minutes before drawing.
Arteries:
9.3.5.1 Arteries pulsate, are more elastic and have a thick wall
Thrombosed veins:
9.3.6.1 Thrombosed veins lack resilience, feel cord-like, and
roll easily.
Trace vein path several times
Vein will feel elastic/ resilient
Prepare Equipment
11.1.
Evacuated system
11.1.2
Securely thread needle/butterfly into adaptor
Page 3 of 14
PH-001.05 Venipuncture
Rev. 1/02/2013
11.2
12.0
13.0
Needle /syringe
11.2.1
Sterile needle /butterfly
11.2.2
Select appropriate size needle / syringe combination.
11.2.3
Move plunger to ensure freedom of movement and
syringe / needle patency.
Order of Draw
12.1
Blood Cultures – mix 3-5 times
12.3
Citrate Tube – invert 3-4 times
12.4
SST gel separator tube, plain red top – invert 5 times
12.5
Heparin Tube, PST gel separator tube – invert 8 to 10 times
12.6
EDTA Tube – invert 8 to 10 times
12.7
Oxalate /Fluoride Tube - invert 8-10 times
12.8
Any other additive tubes—see manufacturer instructions
Cleanse venipuncture site
13.1 Cleanse with alcohol
13.1.1 Cleanse with a non-alcohol wipe if a medical alcohol level
is ordered.
13.2
13.3
Allow site to thoroughly dry to prevent hemolysis.
Re-cleanse if site is re-palpated .
14.0
Uncap needle
14.1
Inspect the tip of the needle for burrs / obstructions.
15.0
Anchor Vein
15.1 Grasp the arm firmly, using your thumb to draw the skin taut.
15.2 Make sure the venipuncture site is in a downward position to prevent
reflux.
16.0
Perform the Venipuncture
16.1 Evacuated System
16.1.1
16.1.2
16.1.3
16.1.4
16.1.5
16.1.6
16.1.7
With the bevel up, line up needle with the vein at about a
15 degree angle to the skin.
Use a clean smooth motion.
Grasp the flange of the needle holder and push the tube
forward until the needle punctures the stopper.
Using correct order of draw (refer to Procedure Notes), fill
tubes until vacuum is exhausted and blood flow stops.
Remove tube.
Mix immediately after drawing any tube containing an
additive, and any plastic tube, by gently inverting 5-10
times.
Insert next tube and repeat procedure.
Page 4 of 14
PH-001.05 Venipuncture
Rev. 1/02/2013
16.1.8
16.1.9
16.1.10
16.1.11
16.1.12
16.1.13
16.1.14
16.2
Remove last tube.
Release the tourniquet.
Cover the needle with gauze.
Remove the needle.
Apply pressure to the site.
Engage needle safety device.
Dispose in biohazardous waste container.
Syringe and Needle System
16.2.1
16.2.2
16.2.3
16.2.4
16.2.5
16.2.6
16.2.7
16.2.8
With the bevel up, line up needle with the vein at about
a 15 degree angle to the skin.
Use a clean smooth motion.
Withdraw the desired amount of blood by pulling back on
the plunger while maintaining equal pressure with the hand
holding the syringe barrel.
Change syringes if additional volume is needed.
Release the tourniquet.
Remove the needle.
Apply pressure.
Engage needle safety device.
16.2.8.1
16.2.8.2
Use transfer device to fill evacuated tubes.
Dispose in biohazardous waste container.
17.0
Label the Specimen
17.1 Refer to patient labeling policy.
18.0
Bandage patient’s arm
18.1
Check to insure blood flow has stopped. Be alert to excess
bleeding lasting longer than 5 minutes. Notify nursing staff and
continue pressure.
18.1.1 Use appropriate bandage.
18.1.2 Advise patient to keep bandage on for 15 minutes.
18.1.3 Pediatric patients – advise caregiver regarding choking
hazards.
19.0
Deliver specimens to Laboratory for Processing
19.1
Place labeled tubes in a biohazard bag with the labels and send to
the Laboratory via the pneumatic tube system, or take directly to the
laboratory.
19.2 All temperature specific samples must be taken directly to the lab.
Page 5 of 14
PH-001.05 Venipuncture
Rev. 1/02/2013
20.0 Adverse reactions to phlebotomy procedure
20.1
Syncope (fainting): Release the tourniquet and withdraw the
needle. Dispose of the needle properly. Keep gauze on the
puncture site, or bandage right away.
20.1.1
20.1.2
20.1.3
20.1.4
20.1.5 .
20.1.6
20.1.7
20.1.8
20.1.9
20.2
20.2.4
20.2.5
Make the patient as comfortable as possible.
Instruct the patient to take slow deep breaths.
Give the patient an emesis basin or bag, and have tissues
available.
Apply cold compresses to the patient’s forehead (if they
desire).
Offer the patient water to rinse out his/her mouth.
Convulsions
20.3.1
20.3.2
20.4
Offer sips of cold water or juice.
Have an emesis basin or bag available. If patient has lost
consciousness, dial 911 and state:
“First Responder Alert”. Then give the location.
Do not allow a patient to leave the area before they feel
better.
In-patients: Notify nursing personnel.
Nausea / Vomiting
20.2.1
20.2.2
20.2.3
20.3
If the patient is sitting, lower their head and arms.
Loosen tight clothing.
Instruct the patient to take slow, deep breaths.
If possible, escort the patient to a reclining chair, and place
a pillow under legs to help return blood flow to the head.
Prevent the patient from injuring him/herself. DO NOT
restrain the movements of the patient’s extremities
completely, but try to prevent injury.
Dial 911 and state:
“First Responder Alert” then give the location.
Patient Refusal
20.4.1
20.4.2
20.4.3
20.4.4
20.4.5
Do not argue with the patient.
Try to reassure the patient.
Talk in a calm, direct manner.
Emphasize that the doctor ordered the tests.
Notify the patient’s nurse of all refusals.
Page 6 of 14
PH-001.05 Venipuncture
Rev. 1/02/2013
20.5
Locating a Vein
20.5.1
20.5.2
20.5.3
20.5.4
20.6
Unable to obtain a specimen
20.6.1
20.6.2
20.6.3
20.6.4
20.6.5
20.7
Carefully re-position the needle.
Do Not probe.
Try another tube.
Loosen the tourniquet.
DO NOT attempt a venipuncture more than twice.
Hematoma prevention
20.7.1
20.7.2
20.7.3
20.7.4
20.7.5
20.8
Massage the arm if not readily apparent.
Tap vein site.
Apply heat pack.
Lower the extremity.
Puncture only the upper most wall of the vein.
Remove the tourniquet before needle.
Apply pressure when bandaging.
If a hematoma occurs, suggest that the patient apply ice
to reduce swelling.
Increased pain and redness should be followed up by a
physician.
Hemolysis Prevention
20.8.1
20.8.2
20.8.3
20.8.4
20.8.5
20.8.6
20.8.7
20.8.8
Mix specimens gently but thoroughly – invert 5-10
times.
Avoid drawing from a hematoma.
Avoid extreme pressure on the syringe plunger.
Avoid using small gauge needles.
Avoid frothing.
Thoroughly allow alcohol to dry before proceeding
Slow “start and stop’ draws may cause hemolysis.
Repeat collection with smaller needle, if needed.
DERIVATION OF RESULTS:
Refer to specific Laboratory Procedure
REPORTING:
Refer to specific Laboratory Procedure
NORMAL VALUES:
Page 7 of 14
PH-001.05 Venipuncture
Rev. 1/02/2013
Refer to specific Laboratory Procedure
CRITERIA FOR IMMEDIATE NOTIFICATION:
Refer to specific Laboratory Procedure
INTERPRETATION:
Refer to specific Laboratory Procedure
CRITERIA FOR UNACCEPTABLE RESULTS AND CORRECTIVE ACTION:
1.0 Unlabeled or incorrectly labeled tubes require repeat collection
2.0 Hemolyzed specimens if test is affected by hemolysis, require repeat collection
3.0 Improperly processed or clotted specimens from anticoagulated tubes require
repeat collection.
LIMITATIONS:
PROCEDURE NOTES:
1.0
Phlebotomists specially trained in line draws are the only ones who may use
ports and indwelling catheters to obtain blood samples.
2.0
Samples will be drawn from lower extremities after checking with the patient’s
nurse or provider.
3.0
If a citrate tube is the only tube to be drawn, a discard tube is no longer
required. When using a “butterfly collection kit, a discard tube is necessary
due to the “dead space” within the tubing, which will result in inadequate
sample volume.
4.0
In the event that it is absolutely necessary to draw blood from a site above or
below an IV line, the nurse should turn off the IV for at least 2 minutes. After
the 2- minute wait, the tourniquet may be applied. Draw the sample. Inform
the nursing staff when you have completed the draw, to restart the IV
5.0 Ensure that there is the correct ratio of anticoagulant to blood. Citrate tubes must be
full. EDTA tubes must be filled to at least one third of the fill volume, but do not
overfill.
6.0 TPN Draws
6.1 If at all possible (to save the patient a needle stick) blood should be drawn off
the indwelling line that the TPN is being infused. The following is the
process as outlined in The Nursing Service Manual (NS-550)
Any labs except blood cultures.
Page 8 of 14
PH-001.05 Venipuncture
Rev. 1/02/2013
a) Stop IV infusions. When drawing from a central line with TPN
running through a lumen, turn off the TPN for 15 minutes prior to the
lab draw.
b) Attach 10-mL syringe to lumen and discard waste according to chart
below. To assist with blood return, may flush with 10 –mL saline prior
to waste.
c) Draw amount of blood needed for test as indicated by laboratory
personnel.
d) Flush with prefilled saline syringe as needed to clear tubing of all
blood using a pulsing method to create a turbulence that results in an
effective clearance of blood from the line.
e) Resume IV infusions.
Flush and Waste Chart for central lines:
a)
Adults
Flush in mL
Waste in mL
b)
Pediatrics
Flush in mL
Waste in mL
Maintenance IV
10
5
Maintenance IV
10
5
TPN & lipids
10
10
TPN & lipids
10
10
Coag Studies
10
10
Coag Studies
10
10
If it is not possible to get the blood specimen off the TPN line, do a venipuncture
from the opposite side from which the infusion is occurring. In these cases it
should not be necessary to stop the TPN infusion and a waste tube would not be
necessary.
If the venipuncture needs to be drawn off the same side as the TPN infusion, staff
needs to follow the same process as if drawing were done where there was an IV.
SAFETY PRECAUTIONS:
Safety devices are always used.
Needles are not recapped, or clipped.
Contaminated waste is disposed into biohazard containers.
Follow procedures and precautions described in the Saint Michael's Hospital Infection
Control and Hazard Communication manuals, as well as the Saint Michael's Hospital
Chemical Hygiene Plan. Refer to the MSDS for reagent-specific handling guidelines.
ATTACHMENTS:
1-SUPERFICIAL VEINS OF UPPER ARM
2-HAND, FOOT, AND ANKLE VIEWS
3-Vacutainers Used By Saint Michael's Hospital Laboratory
4-Minimum Volumes for Pediatric Patients
5-Minimum Volumes for Specific Tests
Page 9 of 14
PH-001.05 Venipuncture
Rev. 1/02/2013
REFERENCES:
Procedures for the Collection of Diagnostic Blood Specimens by Venipuncture, Second
Edition, NCCLS Vol. 18, No. 7.
PHLEBOTOMY HANDBOOK Blood collection essentials Fifth Edition, Diana Garza &
Kathleen Becan-McBride 1999
ORIGINATING DEPARTMENT/SECTION:
Phlebotomy Services, Saint Michael’s Hospital
AUTHOR AND DATE:
Peggy A Carlson, Phlebotomy Coordinator
REVISED BY AND DATE:
Chad Moertl, Phlebotomy Coordinator, 3/30/09
Michelle O’Connell, MT (ASCP) Quality Improvement Coordinator - October 11, 2012
Mary West MT (ASCP) 1-15-2013
Joseph Teddy, MT(ASCP) 06/26/14
Changed Procedure Note #1 from Phlebotomists do not draw off of ports or I
ndwelling catheters to only phlebotomists specially trained in line draws may
draw off of ports and indwelling lines.
Deleted “When performing the venipuncture, draw off a 5 ml discard tube before
drawing the required tubes.” From procedure note 4.0
APPROVAL:
___________________________________________________________
Dawn Finch, MT (ASCP) – Director of Laboratory Services
___________________________________________________________
Jason Heese, MD – Medical Director of Laboratory Services
H:\Lab\LabManuals\Phlebotomy\CurrentPhlebotomy Policies\PH-001.04 Venipuncture
2-21-2013.doc
Page 10 of 14
PH-001.05 Venipuncture
Rev. 1/02/2013
Page 11 of 14
PH-001.05 Venipuncture
Rev. 1/02/2013
Laboratory Services
Minimum Volumes For Specific Tests
Test
Minimum Volume (microtainer)
Minimum Volume (Vacutainer)
CBC
Lavender, 250 mcL (half full)
Lavender, 1 mL
MPB
Green, 0.5 mL
PST, 0.5 mL
MPC
TWO Greens, each 0.5 mL
PST, 1.0 mL
TSH
Green, 0.5 mL
PST, 0.5 mL
Free T4
TSH & Free
T4
Green, 0.5 mL
PST, 0.5 mL
Green, 0.5 mL
PST, 0.5 mL
CRP
Green, 0.5 mL
PST, 0.5 mL
Glucose
Green, 250 mcl (half full)
n/a
Lead
Lavender, 250 mcl (half full)
n/a
Iron/TIBC
TWO Greens, each 0.5 mL
PST, 1.0 mL
ESR
n/a
1 mL whole blood
Cholesterol
Green, 250 mcl (half full)
n/a
Lipid Profile
Green, 0.5 mL
PST, 0.5 mL
Electrolytes
Green, 0.5 mL
PST, 0.5 mL
Mono
Lavender, 250 mcl (half full)
n/a
Page 12 of 14
PH-001.05 Venipuncture
Rev. 1/02/2013
Laboratory Services
Minimum Volumes For Pediatric Patients
Test
Minimum Volume (microtainer)
Minimum Volume (Vacutainer)
CBC
Lavender, 250 mcL (half full)
Lavender, 1 mL
MPB
Green, 0.5 mL
PST, 0.5 mL
MPC
TWO Greens, each 0.5 mL
PST, 1.0 mL
TSH
Green, 0.5 mL
PST, 0.5 mL
Free T4
TSH & Free
T4
Green, 0.5 mL
PST, 0.5 mL
Green, 0.5 mL
PST, 0.5 mL
CRP
Green, 0.5 mL
PST, 0.5 mL
Glucose
Green, 250 mcl (half full)
n/a
Lead
Lavender, 250 mcl (half full)
n/a
Iron/TIBC
TWO Serum/Amber, each 0.5mL
RTT/SST, 1.0 mL
ESR
n/a
Lavender, 1 mL whole blood
Cholesterol
Green, 250 mcl (half full)
n/a
Lipid Profile
Green, 0.5 mL
PST, 0.5 mL
Electrolytes
Green, 0.5 mL
PST, 0.5 mL
Mono
Lavender, 250 mcl (half full)
n/a
Page 13 of 14
PH-001.05 Venipuncture
Rev. 1/02/2013
Page 14 of 14