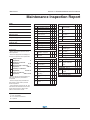
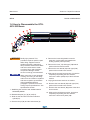
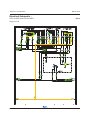
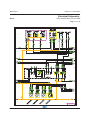
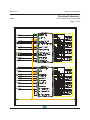
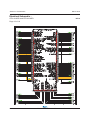
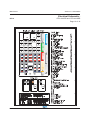
1
Service Manual Serial number range GTH-4016 SR GTH-4018 SR From serial n.: 20094 From serial n.: 19785 Part. No. 57.4400.9203 Rev A March 2010 English March 2010 Introduction Introduction Important Contact us: Read, understand and obey the safety rules and operating instructions in the appropriate Operator's Manual on your machine before attempting any maintenance or repair procedure. Genie Service Dept: This manual provides detailed scheduled maintenance information for the machine owner and user. It also provides troubleshooting and repair procedures for qualified service professionals. Basic mechanical, hydraulic and electrical skills are required to perform most procedures. However ,several procedures require specialized skills, tools, lifting equipment and a suitable workshop. In these instances, we strongly recommend that maintenance and repair be performed at an authorized Genie dealer service center. Area UK France Germany Italy Iberica Scandinavia Middle East All other locations Phone +44 1476 584 345 +33 237 260 986 +49 420 288 5232 +39 075 941 8175 +34 935 725 380 +46 3157 5113 +97 143 391 800 +97 150 459 7937 +39 075 941 811 Technical Publications Genie Industries has endeavored to deliver the highest degree of accuracy possible. However, continuous improvement of our products is a Genie policy. Therefore, product specifications are subject to change without notice. Readers are encouraged to notify Genie of errors and send in suggestions for improvement. All communications will be carefully considered for future printings of this and all other manuals. © Copyright 2010 TEREXLIFT srl - All rights reserved Produced by: TEREXLIFT Technical Literature Dept. Umbertide (PG) Italy 57.4400.9203 Rev A March 2010 First Edition, First Printing For the electronic version of this manual visit http://www.genielift.com/parts_service_manuals.asp ii GTH-4016SR • GTH-4018SR Part No. 57.4400.9203 March 2010 INTRODUCTION Machine Identification Chassis Serial Number The chassis serial number is punched on the front right part of the chassis side member. GTH-4016 P 10 20000 MODEL ENGINE TYPE SERIAL NUMBER YEAR OF MANUFACTURER Machine Data Plate The identification plate contains the main identification data of the machine like model, serial number and year of manufacture. Model: MMMMMMMMMMMMMMMMMMMMMMMMMMMMMM Model Year: AAAA Designation: MMMMMMMMMMMMMMMMMMMMMMMMMMMMMM MMMMMMMMMMMMMMMMMMMMMMMMMMMMMM AAAAAAAAAA Serial Number: Manufacture Year: AAAA Mass with Forks (Kg): AAAAAAAAA Rated Capacity (Kg): AAAAAAAAA Nominal Power (kW): AAAAAAAAA Max drawbar pull provided for at the coupling hook (N): AAAAAAAAA Max vertical load provided for on the coupling hook (N): AAAAAAAAA Country of Manufacture: ITALY Manufacturer: Terexlift srl z.i.Buzzacchero 06019 Umbertide, Italy Identification Plates Of The Main Parts The plates of the main components, not directly manufactured by TEREXLIFT srl (for instance, engines, pumps, etc.), are located where originally applied by the manufacturers. Part No. 57.4400.9203 GTH-4016SR • GTH-4018SR iii March 2010 Intentionally blank page iv GTH-4016SR • GTH-4018SR Part No. 57.4400.9203 March 2010 Section 1 • Safety Rules Safety Rules Danger Failure to obey the instructions and safety rules in this manual and the appropriate Operator's Manual on your machine will result in death or serious injury. Many of the hazards identified in the Operator's Manual are also safety hazards when maintenace and repair procedures are performed.. Do Not Perform Maintenace Unless: You are trained and qualified to perform maintenace on this machine. You read, understand and obey: - manufacturer's instructions and safety rules - employer's safety rules and worksite regulations - applicable governmental regulations You have the appropriate tools, lifting equipment and a suitable workshop. Part No. 57.4400.9203 GTH-4016SR • GTH-4018SR v Section 1 • Safety Rules March 2010 SAFETY RULES Personal Safety Be sure to wear protective eye wear and other protective clothing if the situation warrants it. Any person working on or around a machine must be aware of all known safety hazards. Personal safety and the continued safe operation of the machine should be your top priority. Be aware of potential crushing hazards such as moving parts, free swinging or unsecured components when lifting or placing loads. Always wear approved steel-toed shoes. Read each procedure thoroughly. This manual and the decals on the machine, use signal words to identify the following: Safety alert symbol: used to alert you to potential personal injury hazards. Obey all safety messages that follow this symbol to avoid possible injury or death DANGER Workplace Safety Red: indicates a hazardous situation which, if not avoided, will result in death or serious injury. WARNING Orange: indicates a hazardous situation which, if not avoided, could result in death or serious injury. CAUTION NOTICE Yellow : indicates a hazardous situation which, if not avoided, could result in minor or moderate injury. Blue: indicates a property damage message. PROTECT THE ENVIRONMENT Green: used to draw the attention to important information on environment protection. Be sure to keep sparks, flames and lighted tobacco away from flammable and combustible materials like battery gases and engine fuels. Always have an approved fire extinguisher within easy reach. Be sure that all tools and working areas are properly maintained and ready for use. Keep work surfaces clean and free of debris that could get into machine components and cause damage. Be sure any forklift, overhead crane or other lifting or supporting device is fully capable of supporting and stabilizing the weight to be lifted. Use only chains or straps that are in good condition and of ample capacity. Be sure that fasteners intended for one time use (i.e., cotter pins and self-locking nuts) are not reused. These components may fail if they are used a second time. Be sure to properly dispose of old oil or other fluids. Use an approved container. Please be environmentally safe. Be sure that your workshop or work area is properly ventilated and well lit. vi GTH-4016SR • GTH-4018SR Part No. 57.4400.9203 March 2010 Table of Contents Introduction Important Information........................................................................................... ii Machine Identification ..........................................................................................iii Section 1 Safety Rules Personal Safety Rules ......................................................................................... v Section 2 Rev A Specifications Operation Description ......................................................................................... 1 Performance Specifications ................................................................................. 8 Hydraulic Specifications....................................................................................... 9 Perkins 1104C-44T Engine................................................................................ 10 Carraro 2632M FR Drive Axle ........................................................................... 10 Hydraulic Hose and Fitting Torque Specifications ............................................. 11 Metric Fasteners Torque Charts ........................................................................ 12 Section 3 Rev A Scheduled Maintenance Procedures Introduction ........................................................................................................ 13 Pre-delivery Preparation Report ........................................................................ 15 Maintenance Inspection Report ......................................................................... 17 A Checklist A Procedures A-1 Inspect the Manuals and Decals ................................................................ 18 A-2 Perform Pre-operation Inspection .............................................................. 19 A-3 Perform Function Test................................................................................ 19 A-4 Machine Greasing ...................................................................................... 20 A-5 Epicyclic Reduction Gears Oil Level .......................................................... 21 A-6 Axles Oil Level ........................................................................................... 21 A-7 Tyre Inflation .............................................................................................. 22 A-8 Engine Oil Level ......................................................................................... 22 A-9 Engine Cooling System .............................................................................. 23 A-10 Lighting System......................................................................................... 23 A-11 Clean Engine Air Filter .............................................................................. 24 A-12 Safety Devices .......................................................................................... 24 Part No. 57.4400.9203 GTH-4016SR • GTH-4018SR vii March 2010 TABLE OF CONTENTS Section 3 Rev Scheduled Maintenance Procedures, continued A-13 Emergency Pump Operation, if present .................................................... 25 A-14 Hydraulic Oil Level In The Tank ................................................................ 25 A Checklist B Procedures B-1 Gear Box Oil Level ..................................................................................... 26 B-2 Turntable Reduction Gear Oil Level ........................................................... 26 B-3 Cylinder Rods............................................................................................. 27 B-4 Inspect the Electrical Wiring ....................................................................... 27 B-5 Boom Sliding Pads Adjusting ..................................................................... 28 B-6 Battery Electrolyte Level ............................................................................ 28 B-7 Block Valves............................................................................................... 29 B-8 Tensioning The Boom Chains (Only for GTH-4018 SR) ............................ 29 A Checklist C Procedures C-1 Smoke From the Exaust Muffler ................................................................ 30 C-2 Change Engine Oil and Filter ..................................................................... 30 C-3 Change Engine Air Outer Filter .................................................................. 31 C-4 Change Hydraulic Oil Filter ........................................................................ 31 C-5 Clean Cabin Air Filter ................................................................................. 32 A Checklist D Procedures D-1 Change Gear Box Oil ................................................................................. 33 D-2 Change Oil in the Turntable Gear .............................................................. 33 D-3 Change Engine Air Inner Filter................................................................... 34 D-4 Change Hydraulic Oil ................................................................................. 34 D-5 Change Cabin Air Filter.............................................................................. 35 D-6 Change Oil in the Axles ............................................................................. 35 D-7 Change Oil in the Epicyclic Reduction Gears ............................................ 36 A Checklist E Procedures E-1 Change Engine Coolant ............................................................................. 37 E-2 Machine Structure ...................................................................................... 37 viii GTH-4016SR • GTH-4018SR Part No. 57.4400.9203 March 2010 TABLE OF CONTENTS Section 4 Rev Repair Procedures Introduction ........................................................................................................ 39 A Boom Components 1-1 How to Replace the Boom Wear Pads ....................................................... 40 1-2 How to Remove the Lifting Fork Frame ....................................................... 40 1-3 How to Remove the Boom........................................................................... 41 1-4 How to Disassemble the GTH-4018 SR Boom............................................ 42 1-5 How to Assemble the GTH-4018 SR Boom ................................................ 43 1-6 How to Disassemble the GTH-4016 SR Boom............................................ 45 1-7 How to Assemble the GTH-4016 SR Boom ................................................ 46 1-8 How to Remove a Lift Cylinder .................................................................... 47 1-9 How to Remove the Second Boom Section Extension Cylinder ................. 48 1-10 How to Remove the Third Boom Section Extension Cylinder (only for GTH4016 SR)............................................................................................................ 48 1-11 How to Remove the Fork Level Cylinder ................................................... 49 1-12 How to Replace the Fork Level Cylinder Hoses (only for GTH-4016 SR) . 50 A Operator’s Compartment 2-1 How to Remove the Operator’s Compartment ............................................ 51 2-2 How to Remove the Steering Column ......................................................... 52 2-3 How to Test the Steering Column................................................................ 52 2-4 How to Remove the Steering Selector ........................................................ 53 2-5 How to Remove the Joystick ....................................................................... 53 2-6 How to Test the Brake Pedal ....................................................................... 54 2-7 How to Remove the Brake Pedal ................................................................ 54 A Fuel and Hydraulic Tanks 3-1 How to Remove the Fuel Tank and the Hydraulic Tank .............................. 55 A Transmission 4-1 How to Remove the Transmission Pump .................................................... 56 Part No. 57.4400.9203 GTH-4016SR • GTH-4018SR ix March 2010 TABLE OF CONTENTS Section 4 Rev A Repair Procedures, continued Hydraulic Tanks 5-1 How to Test and Adjust the Function Pump ................................................ 57 5-2 How to Remove the Boom Gear Function Pump ........................................ 57 5-3 How to Test the Boom Function Gear Pump ............................................... 58 5-4 How to Remove the Auxiliary Gear Pump ................................................... 58 5-5 How to Test the Auxiliary Gear Pump ......................................................... 59 A Main Valve 6-1 How to Remove the Main Valve .................................................................. 60 6-2 How to Test the Main Valve......................................................................... 60 A Outriggers 7-1 How to Remove the Outriggers Valves Block.............................................. 61 7-2 How to Test the Pressure on the Outriggers Valves Block.......................... 61 7-3 How to Test the Outriggers Retracion Valve (only for GTH-4018 SR) ........ 62 A Sensors 8-1 How to Remove the Boom Lenght and Angle Sensor ................................. 63 8-2 How to Test the Boom Lenght and Angle Sensor ....................................... 63 8-3 How to Remove the Trasducer Pressure Switches ..................................... 64 8-4 How to Test the Trasducer Pressure Switches ........................................... 64 8-5 How to Test the Turret Proximity Switches.................................................. 65 8-6 How to Test the Chassis Proximity Switches .............................................. 65 8-7 How to Remove the Outriggers Load Pins .................................................. 66 A Miscellaneaous 9-1 How to Test the Emergency Pump .............................................................. 67 9-2 How to Test the Differential Lock Pressure Reducing Valve ....................... 67 9-3 How to Check the Engine RPM ................................................................... 68 Section 5 Rev A Settings Introduction ....................................................................................................... 69 How to Read the Overload Warning System Display ........................................ 70 How to Set the Overload Warning System ........................................................ 72 How to Set the Machine Functions .................................................................... 74 x GTH-4016SR • GTH-4018SR Part No. 57.4400.9203 March 2010 TABLE OF CONTENTS Section 6 Rev A Troubleshooting Introduction ....................................................................................................... 81 Overload Warning System Fault Codes ............................................................ 82 How to Troubleshoot the Boom Movements...................................................... 84 How to Troubleshoot the Transmission ............................................................. 85 How to Troubleshoot the Mechanical Gear ....................................................... 86 Section 6 Rev Troubleshooting, continued How to Troubleshoot the Jobsite Position ........................................................ 86 How to Troubleshoot the Outriggers Movements .............................................. 87 How to Troubleshoot the Working Mode Selecting............................................ 88 Section 7 Rev A Schematics Introduction ....................................................................................................... 89 Electrical Component Legend............................................................................ 90 Hydraulic Component Legend ........................................................................... 92 Electrical Schematic .......................................................................................... 94 Hydraulic Schematic (GTH-4016 SR) .............................................................. 110 Hydraulic Schematic (GTH-4018 SR) .............................................................. 111 Part No. 57.4400.9203 GTH-4016SR • GTH-4018SR xi March 2010 Intentionally blank page xii GTH-4016SR • GTH-4018SR Part No. 57.4400.9203 March 2010 Section 2 • Specification Specification REV A GTH-4016SR & GTH-4018SR Operation Description The system layout of this machine consists of two main sections: an undercarriage and a slewing turret; these two main subassemblies incorporate all the components of the machine. The source of mechanical power of this machine is a Perkins turbocharged diesel engine (1), model 1104D-44T without intercooler, which supplies a power of 74 kW at 2300 rev/min and is capable of a max torque of 392 Nm at 1400 rpm. On the flywheel housing of the engine, and linked to its flywheel through a PTO (gear ratio 1:1) provided with an elastic joint, is installed a Rexroth closedloop hydrostatic transmission pump (2), model A4VG71, equipped with a DA hydraulic automotive control valve. The max displacement of this swash-plate pistons type pump is 71 cm3 and its max working pressure is 430 bar. This pump transforms most of the mechanical power (torque*rotational speed) received from the diesel engine into hydraulic power (pressure*flow rate) of the hydraulic fluid contained in the transmission closed loop. This power is then used to move the machine. This piston pump is equipped with an internal gear pump acting as a charge pump for the transmission closed circuit, to generate pressure for the pump piloting lines and for other external purposes. In particular in this machine, the low pressure generated by this charge pump is used to power, through the port G, the low pressure circuits which will be described later. The standard setting pressure for this circuit is 25 bar. The transmission pump is provide with a passing through PTO on its back side which is used to drive an open circuit type gear pump (3), having a displacement of 43 cm3. The function of this pump is to provide hydraulic power to most of the functional subsystems of the machine: the steering, the telescopic boom, the turret slewing and the stabilizers. Another open circuit type gear pump (4), having a displacement of 14 cm3, is installed on the PTO provided on the diesel engine distribution side. Part No. 57.4400.9203 The function of this pump is to provide hydraulic power to the braking systems (service and parking) and to the air conditioning system compressor (optional). When the work platform attachment (optional) is installed, the additional emergency powerpack (5) is provided with the aim to allow the work platform recovery in case of failure on the main power generation system and controls. This powerpack mainly consists of a 12 VDC electrical motor, powered by the machine battery, and of a small gear pump, having a displacement of 2.6 cm3 and driven by the electrical motor directly. The maximum pressure on the emergency hydraulic line is controlled by the pressure relief valve (6) which is set to 150 bar. The two check valves (7) having a cracking pressure of 0.5 bar, are installed on the open circuit main and emergency pressure lines, to prevent any interference between these two lines and any flow loss to the tank, considering that these pumps normally work separately. All the pumps described before receive oil from a steel tank (8) installed on the left side of the undercarriage and having a nominal capacity of 220 liters. In particular, the gear pumps (3), (4) and (5) receive oil from a dedicated suction line provided with a mechanical shutoff valve (9), installed immediately downstream of the tank and used during the maintenance operations on the hydraulic system. Inside the tank and on the same suction line, a dedicated hydraulic screen (10) is installed with the aim reduce the contamination level of the oil before it enters into the suction line. The transmission pump (2) receives oil from the special filter (11) which has a double function: to filter most of the return oil of all the open type circuits of the machine and to provide a filtered, cooled and pressurized suction line for any pump requiring a good level of oil filtration on the suction line. In particular the minimum pressure of 0.5 bar guaranteed on the suction line for the transmission pump, reduce the risk of oil cavitation during the engine starting phase at very low ambient GTH-4016SR • GTH-4018SR 1 Section 2 • Specification March 2010 SPECIFICATION REV A temperatures. This filter package, which is flanged directly on the top side of the tank, is provided with a electrical pressure switch (12) indicating when the filter cartridge is clogged and then has to be replaced. The maximum pressure on the brake circuit line is controlled by the pressure relief valve (13) which is set to 180 bar. The mechanical shutoff valve (14) when closed, allows the pressure relief valve setting pressure can be checked and adjusted as necessary. In the normal machine working conditions this shutoff valve must be placed in its fully open position. The hydrostatic pump (2) hydraulically powers the Rexroth hydrostatic motor closed loop, piston bent axis type (15), model A6VM80 which transforms the hydraulic power (pressure*flow rate) of the oil contained in the hydrostatic transmission closed loop circuit into mechanical power (torque*rotational speed) to be used for the machine displacement. The low pressure line, which is part of the hydrostatic transmission, is also used to cool the hydrostatic pump a motor through a drain case line routed between the pump and the motor and finally connected to the tank where the warm oil is finally sent. This drain case flow rate is controlled by the check valve (16) having a cracking pressure of 2.5 bar. When the pressure in the drain case line exceeds 2.5 bar, the flow rate in excess can be directly discharged to the tank so preventing any damage at the pump and motor sealing gaskets. The hydrostatic motor is directly flanged on a Carraro two-speed gear box (17) installed on the central part of the undercarriage. The speed shifting phase is activated by the hydraulic actuator (18), which is part of the gearbox itself, and controlled by the 4 ways/3 positions electrical selector valve (19). This selector valve is powered by the low pressure generated by the hydrostatic transmission charge pump. The gearbox is mechanically linked, through two distinct drive shafts, to the front axle (20) and to the 2 rear axle (21), both manufactured by Carraro, so transmitting to the wheels the torque generated by the hydrostatic motor. The front axle, provided with an embedded steering cylinder (22) and articulation, is rigidly secured on the front area of the undercarriage whilst the rear axle, provided with an embedded steering cylinder (23) and articulation, is floating around its pivoting axle in most of the machine displacement conditions. The floating condition of the rear axle is controlled by the single effect right and left rear axle pivoting cylinders (24) and (25) which, when the rear axle is floating, are completely free to extend/retract exchanging oil between their piston chambers and giving a negligible resistance to the rear axle floating movement. The free flow between the two cylinder is allowed by the two 2 ways/2 positions electrical rear axle pivoting lockout valves (26) which are energized when the rear axle is floating free. These valves are directly embedded in the cylinder body and, when not energized, close the line between the two cylinders piston chamber so locking the floating movement of the rear axle. The two air bleeding valves (27), embedded one for each cylinder, are used to eliminate air from the cylinders after the first machine installation or in occasion of maintenance operations. The oil used to fill the rear axle pivoting cylinders is provided by the low pressure line, powered by the hydrostatic transmission charge pump, and is controlled through the rear axle lockout cylinders control valve (28). The scope of this valve is to provide a free flow of oil when this is requested by the rear axle pivoting cylinders (check valve opens) and to prevent any pressure surges and peaks on the low pressure line when the quantity of oil in the rear axle pivoting cylinders is in excess (damping effect due to the calibrated restrictor). The machine open circuits are linked to the tank through the heat exchanger (29) which cools the oil before it is filtered through the special filter package (11) already described. GTH-4016SR • GTH-4018SR Part No. 57.4400.9203 March 2010 Section 2 • Specification REV A SPECIFICATION When the pressure upstream of the heat exchanger exceeds 8 bar, the flow rate in excess is directly discharged to the tank through the check valve (30) having a cracking pressure of 8 bar indeed. The scope of this valve is to prevent any risk of heat exchanger damage due to excessive pressure (machine start-up at very low temperatures). This heat exchanger is part of the main machine radiator (cooling also the engine) and is installed inside the engine compartment. The gear pump (4) feeds the hydraulically powered service/emergency brakes pedal pump (31) which is installed underneath the cabin bottom in such a way the operator can easily control the service brake circuit by a mechanical pedal which is a part of the pump itself. The main function of this pump is to use the pressurized oil available from the gear pump (4) to maintain two hydraulic accumulators (32) and (33) charged at a pressure not exceeding 150 bar. The first accumulator (32), having a capacity of 0.5 liters and a nitrogen pre-charge pressure of 50 bar, feeds the service brake line whilst the second one (33), having a capacity of 1.5 liters and a nitrogen pre-charge pressure of 35 bar, feeds the parking brake line. The electrical pressure switch (34), installed on the service brake pressure line, signals when the pressure is applied to the service brake line. The electrical pressure switch (35), installed on the parking brake pressure line, signals when the pressure charging the accumulators is too low and then the pump (31) is expected to recharge them using the flow coming from the gear pump (4). The service brake output line is linked, through the electrical 3 ways/2 positions selector valve (36), to the wet type brake disks packages, which are installed inside the axles. When the selector valve (36) is not energized, the brake pump (31) is directly linked to the brakes disks so producing the requested braking effect when the operator in the cabin pushes on the brake pedal. When the selector valve (36) is energized, the service brakes ports of the front axle, receive a Part No. 57.4400.9203 pressure of 10 bar which makes stronger the effect of the anti-slipping device, device which is installed inside the front axle. This low pressure is generated by a pressure reducing valve (37) fed by the low pressure generated by the transmission charge pump. The brakes pedal pump (31) is also linked, through the port “R”, to the parking brake handle selector valve (38) controlling the parking brake function. When the handle of this valve, which is located in the cabin on left of the operator’s seat, is placed in the parking brake “on” position, the parking brake hydraulic line, connected to the front axle (20), is vented to the tank. This condition allows the parking brake package, installed inside the axle, to be self-activated, through an internal mechanism energized by disk springs, so maintaining the machine in the parking condition. On the other position of the lever, the parking brake hydraulic line is pressurized at 30 bar so maintaining the parking brake disks released and then allowing the machine to move without any braking effect. Two electrical pressure switches (39) signals when the parking brake is activated. After the flow rate generated by the gear pump (4) and used by the brakes pedal pump (31) to maintain the accumulators (32) and (33) charged, leaves the brakes pedal pump itself, this is available to power the air condition compressor hydraulic gear motor (40) which can be installed on the machine as an option. The gear pump (3) powers two distinct and separated circuits: the steering circuit (priority circuit) and the circuit driving the boom functions, the slewing turret and the stabilizers operations (secondary circuit). The flow rate coming from this pump is controlled by the load sensing priority valve (41) which is controlled by the steering load sense line “LS”. The principle of this valve is to ensure that all the necessary flow rate is available to the steering circuit when requested by the steering operation and to give the exceeding flow rate to the secondary GTH-4016SR • GTH-4018SR 3 Section 2 • Specification March 2010 SPECIFICATION REV A circuit. Off course, when the steering is not used, most of the flow rate is available for the secondary circuit. The priority line of the valve (41) powers the steering rotating actuator (42) which is mechanically linked to the steering wheel. The scope of this actuator is to send a flow rate to the steering cylinders which is proportional, in addition to the actuator displacement, also to the steering wheel rotational speed. The actuator is also provided with a pressure relief valve, which is adjusted to 190 bar, and two antishock relief valves, which are adjusted to 260 bar. The machine is provide with 3 distinct steering modes (2 wheel, 4 wheels and crab steering) which are implemented in the circuit by the 4 ways/3 positions electrical selector valve (43). When the valve is not energized the 2 wheels steering mode is selected, when one solenoid of the valve is energized the 4 wheels is selected and when the other solenoid is energized the crab steering model is selected. The secondary line of the valve (41) is linked to the telescopic boom, turret and undercarriage main valve (44). This valve is a pressure compensated, modular, flow sharing type valve controlling the boom and attachments functions, the slewing turret and the stabilizers operations. It mainly consists of one inlet manifold, containing the main 3 ways pressure compensator, the maximum pressure relief valve, adjusted to 280 bar, the pressure reducing valve feeding the spools actuators and the 2 enabling function electrical valves, of 5 modules having electro-proportional controls and of one module having electrical on/off type control. The first section of the valve, pressure compensated, controls the boom up/down functions and is linked to the telescopic boom lift cylinder (45) through the single over-center safety valve (46). The hydraulic accumulator (47), having a capacity of 0.5 liters and a nitrogen pre-charge pressure of 35 bar, is installed on the boom down hydraulic line to prevent any oscillation of the boom during the boom-down movement. 4 The second section of the valve, not pressure compensated, controls the forks tilt up/down functions and is linked to the forks tilt cylinder (48) through the double over-center safety valve (49). On the same line of the forks tilt cylinder (48) is installed, in parallel, the forks self-leveling articulation slave cylinder (50) provided with a double over-center safety valve (51). This cylinder, which is linked to the boom and to the turret, works as a pump and maintain leveled the forks articulation when the boom is moved up and down. The output lines of the valve second section are protected by 2 pressure relief valves, adjusted to 320 bar. The third section of the valve, pressure compensated, controls the boom telescoping in/out functions and is linked to the second section boom telescopic cylinder (52) through the double overcenter safety valve (53). On the GTH-4016 SR only, the second section boom telescopic cylinder (52) is linked to the third section boom telescopic cylinder (70), provided with a single over-center safety valve (71). The fourth section of the valve, not pressure compensated, controls the attachment quick coupling device (optional) and is used to power optional attachments requiring an hydraulic flow to work. This section is linked to the forks attachment quick coupling cylinder (56) through the double piloted safety valve (57) and the quick coupling hydraulic ports (58). The fifth section of the valve, pressure compensated, controls the turret slewing functions and is linked to the turret rotation hydraulic motor (54) through the special double over-center safety valve (55). The hydraulic motor is installed on a planetary type gear, for the turret slewing, provided by an internal negative type brake which is capable to maintain the turret locked when no pressure is applied to the hydraulic motor. The sixth section of the valve, provided by an electrical on/off type control, drives the stabilizers through the stabilizers electrical selector valves GTH-4016SR • GTH-4018SR Part No. 57.4400.9203 March 2010 Section 2 • Specification REV A SPECIFICATION block (59). The four valves of the block (59) are linked to the four stabilizer cylinder (60, 62, 64 and 66) which are equipped with hydraulically piloted double check valves (61, 63, 65 and 67) preventing any movement of the cylinders when they are not pressurized. On the GTH-4018 SR only, the four valves of the block (59) feed in parallel the four stabilizers telescope lockout cylinders (73) through the four stabilizers electrical lockout valve 2 ways/2 positions (72). On the stabilizers selector valves block (59) inlet line, linked to the stabilizers up movements, a pressure relief valve (74), adjusted to 100 bar, is installed. The scope of this relief valve is to limit the loads against the stabilizers telescope lockout mechanisms, in case of failure of the stabilizers telescope arm and rotating foot sequence control. The scope of this additional circuit, which is installed on the GTH-4018 SR only, is to give the right functioning sequence to the stabilizers telescope arms and rotating feet, since each of them is moved by the same cylinder. In order to reduce the number of hoses linking the undercarriage and the turret sections of the hydraulic circuit, a tank lines collector (68) is installed on the turret receiving a number of tank lines coming from several valves installed on the turret itself. In order to improve the life of the hoses passing through the slewing ring and connecting the undercarriage and turret sections of the machine, hydraulic circuit, single rotating joints (69) are installed on each of these hoses and grouped together on a single panel mounted on the central section of the machine undercarriage. Part No. 57.4400.9203 GTH-4016SR • GTH-4018SR 5 Section 2 • Specification March 2010 SPECIFICATION REV A GTH-4016SR Hydraulic Schematic Double overcenter safety valve piloting ratio: 4/1 cracking pressure: 350 bar HYDRAULIC CIRCUIT COLORS LEGENDA Third section boom telescoping cylinder Hydraulically piloted double check valve Quick coupling hydraulic ports piloting ratio: 4/1 58 71 Forks tilt cylinder Open circuits pressure lines 57 Single overcenter safety valve piloting ratio: 4/1 cracking pressure: 350 bar 70 49 48 Closed circuits high pressure lines Stabilizers A6 Functions lines Forks attachment quick coupling cylinder (optional) Low pressure lines Load sensing and piloting lines 54 Suction lines V2 Turret Unlocking pressure 15/50 bar Tank lines Double overcenter safety valve piloting ratio: 7.6/1 cracking pressure: 350 bar C3 C2 Turret rotation hydraulic motor B6 56 51 A5 Turret rotation hydraulic motor double overcenter safety valve piloting ratio: 3/1 cracking pressure: 150 bar Forks self-levelling 50 articulation slave cylinder capacity: 0.5 Litri precharge pressure 35 bar 47 B5 C1 55 V1 T Attachments Double overcenter safety valve piloting ratio: 4/1 cracking pressure: 350 bar B4 A4 53 Telescoping A3 Telescopic boom, turret and undercarriage functions main valve B3 44 74 46 Single overcenter safety valve 45 Telescopic boom lift cylinder Pressure switch activating pressure 70 bar R F R Parking brake handle selector precharge valve pressure 38 34 50 bar Pressure switch N’ activating pressure 2-10 bar T1’ R1 T1 P B Boom lift 26 Rear axle pivoting 21 lockout valves Rear axle 2 ways/2 positions 27 A P B T T Pp LS2 42 L 190 bar P Tp1 Telescopic boom, turret and undercarriage functions hydraulic circuit test port 260 bar R LS1 69 Y Rotating joint Outriggers selector valves block 59 P B 20 Front axle 25 280 bar P T TURRET -UNDERCARRIAGE BOUNDAR Rotating joint T Air bleeding valve LS 68 Y Steering modes 43 selector valve Differential lock 4 ways / 3 positions selector valve 3 ways / 2 positions Rear axle pivoting cylinder (left) B1 Pressure switch activating Steering rotating pressure actuator 10-20 bar displacement: 200 cc/rev 30 bar T TURRET -UNDERCARRIAGE BOUNDAR A1 39 Tank lines collector 69 320 bar LS C 150 bar N Rotating joint Priority valve 41 load sensing type N Hydraulically powered 31 service/emergency brakes pedal pump Air condition compressor 40 hydraulic motor displacement 16 cc/rev (optional) 35 Forks tilt A2 B2 piloting ratio: 4/1 cracking pressure: 350 bar 32 Capacity: 0.5 litres Capacity: 33 1.5 litres precharge pressure 35 bar 320 bar Second section boom telescoping cylinder 52 Anticavitation valve cracking pressure 5 bar A 36 P B 62 A C Front left outrigger cylinder 60 Front right outrigger cylinder T Test port Tp7 B Front axle 22 steering cylinder PR B A Rear axle steering cylinder Rear axle pivoting cylinder (right) 24 27 37 65 A Pressure reducing valve setting pressure: 10 bar 23 Air bleeding valve Hydraulically piloted double check valve piloting ratio: 4/1 67 T P Rear left outrigger cylinder 28 Check valve cracking pressure: 0.5 bar (optional) Tp6 Emergency line test port (optional) Emergency electrical motor driven pump set 2.6 cc/rev (optional) 7 Hydrostatic transmission high pressure test port Tp3 Check valve cracking pressure: 2.5 bar 16 Shutoff valve Auxiliary circuit pressure test port 180 bar Tp4 R T1 T2 Ev1 Ev2 PS Fa Fa1 Fe 63 150 bar 450 bar Hydraulically piloted double check valve piloting ratio: 4/1 6 5 61 Pressure switch activating pressure 5 bar 12 64 Emergency line max pressure relief valve (optional) 29 Heat exchanger MB T P B Ev6 Ev5 U B X2 X1 M1 19 M 450 bar 430 bar 18 25 bar 1 A Diesel engine X2 Auxiliary gear pump 4 brakes circuit displacement: 14 cc/rev Hydrostatic transmission pump max displacement: 71 cc/rev Auxiliary circuit max pressure relief valve 2 13 6 Hydraulically piloted double check valve piloting ratio: 4/1 Rear right outrigger cylinder 66 Rear axle lockout cylinders control valve orifice dia.: 2 mm cracking pressure: 0.5 bar 14 Hydraulically piloted double check valve piloting ratio: 4/1 X1 G Hydrostatic transmission Tp2 boost pressure test port MH S FS MA B A Mechanical gear speed selector valve 4 ways/3 positions Mechanical gear speed selector actuator 30 Boom functions gear pump displacement: 43 cc/rev 3 Mechanical gear (2 speeds) 9 Shutoff valve Suction screen 17 15 T2 A G Hydrostatic transmission motor max displacement: 80 cc/rev 10 GTH-4016SR • GTH-4018SR Check valve cracking pressure: 8 bar T Flushing valve 11 Return filter with suction line pressurized at 0,5 bar Oil tank capacity 220 liters 8 Part No. 57.4400.9203 March 2010 Section 2 • Specification REV A SPECIFICATION GTH-4018SR Hydraulic Schematic Double overcenter safety valve piloting ratio: 4/1 cracking pressure: 350 bar Forks tilt cylinder HYDRAULIC CIRCUIT COLORS LEGENDA Open circuits pressure lines 57 Hydraulically piloted Forks attachment quick coupling cylinder (optional) 49 Quick coupling hydraulic ports double check valve piloting ratio: 4/1 56 58 48 Closed circuits high pressure lines Functions lines A6 Low pressure lines B6 54 Load sensing and piloting lines C3 C2 Turret rotation hydraulic motor Suction lines V2 Turret Unlocking pressure 15/50 bar Tank lines 51 Double overcenter safety valve A5 B5 Turret rotation hydraulic motor 55 double overcenter safety valve piloting ratio: 7.6/1 cracking pressure: 350 bar piloting ratio: 3/1 cracking pressure: 150 bar Forks self-levelling 50 articulation slave cylinder capacity: 0.5 Litri precharge pressure 47 35 bar Stabilizers C1 V1 T Attachments Double overcenter safety valve piloting ratio: 4/1 cracking pressure: 350 bar 53 B4 A4 Telescoping A3 Telescopic boom, turret and undercarriage functions main valve B3 44 45 Single overcenter safety valve piloting ratio: 4/1 Telescopic boom lift cylinder cracking pressure: 350 bar Capacity: 1.5 litres precharge pressure 35 bar 33 F R R1 35 Pressure switch activating pressure 70 bar T1 B Boom lift C Rotating joint 69 21 Rear axle pivoting lockout valves Rear axle 2 ways/2 positions A P B1 Pressure switch activating Steering rotating pressure actuator 10-20 bar displacement: 200 cc/rev Pp LS2 42 L 190 bar P Tp1 B T T R LS Y Outriggers retraction line test port Tp5 Outriggers selector valves block 59 P B Outriggers telescope lockout cylinder A 25 P Outriggers retraction line max pressure relief valve 72 62 A B PR Pressure reducing valve setting pressure: 10 bar 23 37 A Hydraulically piloted double check valve piloting ratio: 4/1 67 Outriggers telescope lockout cylinder T 73 P Check valve cracking pressure: 0.5 bar (option) 7 14 T1 T2 Ev1 Ev2 PS Fa Fa1 Fe Hydraulically piloted double check valve piloting ratio: 4/1 63 Rear right outrigger cylinder Tp6 Emergency line test port (optional) Emergency electrical motor driven pump set 2.6 cc/rev (option) M Hydrostatic transmission high pressure test port Tp2 R Hydraulically piloted double check valve piloting ratio: 4/1 Rear left outrigger cylinder Rear axle lockout cylinders control valve orifice dia.: 2 mm - cracking pressure: 0.5 bar Check valve cracking pressure: 2.5 bar 16 Shutoff valve Auxiliary circuit pressure test port 180 bar Tp4 65 66 28 150 bar 450 bar Hydraulically piloted double check valve piloting ratio: 4/1 Pressure switch activating pressure 5 bar 6 5 12 61 64 Emergency line max pressure relief valve (optional) 29 Heat exchanger MB T P B Ev6 Ev5 U B X2 X1 M1 19 M 450 bar B A Mechanical gear speed selector valve 4 ways/3 positions Mechanical gear speed 18 selector actuator 430 bar 25 bar 30 Boom functions gear pump Diesel engine 60 Front right outrigger cylinder B Front axle 22 steering cylinder Rear axle steering cylinder Front left outrigger cylinder T Test port Tp7 24 74 100 bar 73 A Air bleeding valve Y Outriggers lockout valve 2 ways/2 positions B C Rear axle pivoting cylinder (right) LS1 TURRET -UNDERCARRIAGE BOUNDAR Rotating joint 69 T 27 P T Rotating joint 20 Front axle Rear axle pivoting cylinder (left) 280 bar Telescopic boom, turret and undercarriage functions hydraulic circuit test port 260 bar Steering modes 43 36 selector valve Differential lock 4 ways / 3 positions selector valve 3 ways / 2 positions Air bleeding valve A1 39 Tank lines collector TURRET -UNDERCARRIAGE BOUNDAR 27 320 bar LS 68 150 bar N 26 Priority valve load sensing type 41 service/emergency brakes pedal pump Air condition compressor 40 hydraulic motor displacement 16 cc/rev (optional) P Forks tilt A2 B2 R N Capacity: Parking brake 0.5 litres handle selector precharge 38 valve pressure 50 bar 30 bar Pressure switch N’ T activating pressure 34 2-10 bar T1’ Hydraulically powered 31 32 320 bar Second section boom telescoping cylinder 52 Anticavitation valve cracking pressure 5 bar 74 46 1 4 A X2 Auxiliary gear pump brakes circuit displacement: 14 cc/rev 2 Hydrostatic transmission pump max displacement: 71 cc/rev Auxiliary circuit max pressure relief valve 13 Part No. 57.4400.9203 X1 G Hydrostatic transmission Tp3 boost pressure test port MH S FS Check valve cracking pressure: 8 bar 3 displacement: 43 cc/rev MA Mechanical gear (2 speeds) 9 Shutoff valve Suction screen 17 T2 A G transmission motor 15 Hydrostatic max displacement: 80 cc/rev 10 GTH-4016SR • GTH-4018SR T Flushing valve 11 Return filter with suction line pressurized at 0,5 bar Oil tank capacity 220 liters 8 7 Section 2 • Specification March 2010 SPECIFICATION REV A Performance Specifications Fluid capacities Fuel tank Hydraulic tank 205 L 220 L Drive speed, maximum GTH-4016SR & GTH-4018SR 35 km/h Towing capacity at dinamometer Tires and wheels Tire size 18-19.5 Tire pressure 5.5 bar Tire ply rating 16 Wheel diameter 1104 mm Wheel width 460 mm Lug pattern 14x19.5 Lug nut torque, dry 630 Nm max load without load 7,000 kg 6,900 kg Lift capacity, maximum GTH-4016SR & GTH-4018SR 4,000 kg Continuous improvement of our products is a Genie policy. Product specifications are subject to change without notice. 8 GTH-4016SR • GTH-4018SR Part No. 57.4400.9203 March 2010 Section 2 • Specification REV A SPECIFICATION Hydraulic Specifications Hydraulic Oil Specifications (all models) Main Valve Hydraulic oil type System relief valve pressure, maximum 280 bar Forks tilt section relief valves pressure, max. 320 bar SHELL TELLUS 46 DENISON HF-1 DIN51524 part2&3 46 147 ISO viscosity grade Viscosity index Steering Circuit Steer relief valve pressure, maximum 190 bar Optional Fluids Biodegradable Petro Canada Environ MV46 Statoil Hydra Way Bio Pa 32 Fire resistant UCON Hydrolube HP-5046 Quintolubric 822 Extreme Cold Oils Chevron Oil 5606A Function Pump Type: Fixed displacement gear pump Flow rate @ 2300 rpm Pump pressure (measured at test port TP7) 100 L/min 193 bar Braking Circuit Brake pump relief valve pressure, max. 150 bar Hydrostatic Transmission Pumps Setting relief valve pressure, max. 450 bar Cutting relief valve pressure, max. 430 bar Charge pump relief valve pressure, max. 25 bar Auxiliary circuit relief valve pressure, max. 180 bar Outriggers retraction line relief valve P, max. 100 bar Continuous improvement of our products is a Genie policy. Product specifications are subject to change without notice. Part No. 57.4400.9203 GTH-4016SR • GTH-4018SR 9 Section 2 • Specification March 2010 SPECIFICATION REV A Perkins 1104D-44T Engine Displacement Carraro 2632M FR Drive Axle 4400cc Number of cylinders Bore and stroke 4 105 x 127 mm Horsepower 74.5 kW @ 2300 rpm Firing order 1-3-4-2 Compression ratio 18.2:1 Low idle 900 rpm High idle 2300 rpm Steering Joints 11.5 liters Intergrated steer cylinder Heavy duty double U-joints Steering angle, maximum 40° Front Axle Lubrication Front differential Axle planetary end (each) 8 liters 1.3 liters Rear Axle Lubrication Rear differential Lubrication system Oil capacity (including filter) GTH-4016SR and GTH-4018SR Axle planetary end (each) Oil viscosity requirements Oil viscosity requirements Units ship with 15W-40. Extreme operating temperatures may require the use of alternative engine oils. For oil requirements, refer to the Engine Operation and Maintenance Manual on your machine. Differential Planet ends 8 liters 1.3 liters API GL4 API GL4 Continuous improvement of our products is a Genie policy. Product specifications are subject to change without notice. Fuel requirement For fuel requirements, refer to the engine Operation Manual on your machine. Engine coolant Capacity 15 liters Alternator Output 100 A, 12V DC Battery Type 12V DC Quantity Cranking ampere 1 1200 EN Continuous improvement of our products is a Genie policy. Product specifications are subject to change without notice. 10 GTH-4016SR • GTH-4018SR Part No. 57.4400.9203 March 2010 Section 2 • Specification REV A SPECIFICATION Hydraulic Hose and Fitting Torque Specifications Your machine is equipped with ORFS type fittings and hose ends. Genie specifications require that fittings and hose ends be torqued to specification when they are removed and installed or when new hoses or fittings are installed. 3 Working clockwise on the body hex fitting, make a second mark with a permanent ink marker to indicate the proper tightening position. NOTICE Torque Procedure 1 Align the tube flare (hex nut) against the nose of the fitting body (body hex fitting) and tighten the hex nut to the body hex fitting to hand-tight, approximately 3.4 Nm. 2 Make a reference mark on one of the flats of the hex nut, and continue it on to the body hex fitting with a permanent ink marker. a b c d hydraulic hose hex nut reference mark body hex fitting b a c b a b d Part No. 57.4400.9203 The marks indicate that the correct tightening positions have been determined. Use the second mark on the body hex fitting to properly tighten the joint after it has been loosened. c a b c body hex fitting reference mark second mark 4 Tighten the hex nut until the mark on the hex nut is aligned with the second mark on the body hex fitting. 5 Operate all machine functions and inspect the hoses and fittings and related components to confirm that there are no leaks. GTH-4016SR • GTH-4018SR 11 Section 2 • Specification March 2010 SPECIFICATION REV A METRIC FASTENER TORQUE CHART • This chart is to be used as a guide only unless noted elsewhere in this manual • Class 4.6 Size (m m ) 5 6 7 LUBED 12 DRY LUBED Class 10.9 8.8 DRY LUBED Class 12.9 10.9 DRY LUBED 12.9 DRY in- lbs Nm in-lbs Nm in- lbs Nm in- lbs Nm in- lbs Nm in- lbs Nm in- lbs Nm in- lbs Nm 16 19 45 1.8 3.05 5.12 21 36 60 2.4 4.07 6.83 41 69 116 4.63 7.87 13.2 54 93 155 6.18 10.5 17.6 58 100 167 6.63 11.3 18.9 78 132 223 8.84 15 25.2 68 116 1.95 7.75 13.2 22.1 91 155 260 10.3 17.6 29.4 LUBED 8 10 12 14 16 18 20 22 24 Class 8.8 4.6 DRY LUBED DRY LUBED DRY LUBED DRY f t - lbs Nm f t -lbs Nm f t - lbs Nm f t - lbs Nm f t - lbs Nm ft - lbs Nm f t - lbs Nm f t - lbs Nm 5.4 10.8 18.9 30.1 46.9 64.5 91 124 157 7.41 14.7 25.6 40.8 63.6 87.5 124 169 214 7.2 14.4 25.1 40 62.5 86.2 121 166 210 9.88 19.6 34.1 54.3 84.8 117 165 225 285 14 27.9 48.6 77.4 125 171 243 331 420 19.1 37.8 66 105 170 233 330 450 570 18.8 37.2 64.9 103 166 229 325 442 562 25.5 50.5 88 140 226 311 441 600 762 20.1 39.9 69.7 110 173 238 337 458 583 27.3 54.1 94.5 150 235 323 458 622 791 26.9 53.2 92.2 147 230 317 450 612 778 36.5 72.2 125 200 313 430 610 830 1055 23.6 46.7 81 129 202 278 394 536 682 32 63.3 110 175 274 377 535 727 925 31.4 62.3 108 172 269 371 525 715 909 42.6 84.4 147 234 365 503 713 970 1233 GTH-4016SR • GTH-4018SR Part No. 57.4400.9203 March 2010 Section 3 • Scheduled Maintenance Procedures Scheduled Maintenance Procedures About This Section This section contains detailed procedures for each scheduled maintenance inspection. Each procedure includes a description, safety warnings and step-by-step instructions. Observe and Obey: Symbols Legend Maintenance inspections shall be completed by a person trained and qualified on the maintenance of this machine. Scheduled maintenance inspections shall be completed daily, quarterly, semi-annually, annually and every 2 years as specified on the Maintenance Inspection Report. WARNING Failure to perform each procedure as presented and scheduled could result in death, serious injury or substantial damage. Immediately tag and remove from service a damaged or malfunctioning machine. Repair any machine damage or malfunction before operating the machine. Keep records on all inspections for three years. Machines that have been out of service for a period longer than 3 months must complete the quarterly inspection. Unless otherwise specified, perform each maintenance procedure with the machine in the following configuration: - Machine parked on a firm, level surface - Boom in the stowed position DANGER WARNING CAUTION NOTICE Safety alert symbol—used to alert personnel to potential personal injury hazards. Obey all safety messages that follow this symbol to avoid possible injury or death. Used to indicate the presence of an imminently hazardous situation which, if not avoided, will result in death or serious injury. Used to indicate the presence of a potentially hazardous situation which, if not avoided, could result in death or serious injury. Used to indicate the presence of a potentially hazardous situation which, if not avoided, may cause minor or moderate injury. Used to indicate the presence of a potentially hazardous situation which, if not avoided, may result in property damage. Indicates that a specific result is expected after performing a series of steps. Indicates that an incorrect result has occurred after performing a series of steps. - Key switch in the off position with the key removed - Wheels chocked Part No. 57.4400.9203 GTH-4016SR • GTH-4018SR 13 Section 3 • Scheduled Maintenance Procedures March 2010 SCHEDULED MAINTENANCE PROCEDURES Maintenance Symbols Legend NOTICE Pre-delivery Preparation Report The following symbols have been used in this manual to help communicate the intent of the instructions. When one or more of the symbols appear at the beginning of a maintenance procedure, it conveys the meaning below. Indicates that tools will be required to perform this procedure. Indicates that new parts will be required to perform this procedure. The pre-delivery preparation report contains checklists for each type of scheduled inspection. Make copies of the Pre-delivery Preparation report to use for each inspection. Store completed forms as required. Maintenance Schedule There are five types of maintenance inspections that must be performed according to a schedule— daily, quarterly, semi-annually, annually, and two year. The Scheduled Maintenance Procedures Section and the Maintenance Inspection Report have been divided into five subsections—A, B, C, D, and E. Use the following chart to determine which group(s) of procedures are required to perform a scheduled inspection. Inspection Indicates that a cold engine will be required to perform this procedure. Checklist Daily or every 8 hours A Quarterly or every 250 hours A+B Semi-annually or every 500 hours Indicates that a warm engine will be required to perform this procedure. A+B+C Annually or every 1000 hours A+B+C+D Two year or every 2000 hours A+B+C+D+E Maintenance Inspection Report Indicates that dealer service will be required to perform this procedure. The maintenance inspection report contains checklists for each type of scheduled inspection. Make copies of the Maintenance Inspection Report to use for each inspection. Store completed forms for three years. 14 GTH-4016SR • GTH-4018SR Part No. 57.4400.9203 Pre-Delivery Preparation Fundamentals Instructions It is the responsibility of the dealer to perform the Pre-delivery Preparation. Use the operator’s manual on your machine. The Pre-delivery Preparation is performed prior to each delivery. The inspection is designed to discover if anything is apparently wrong with a machine before it is put into service. A damaged or modified machine must never be used. If damage or any variation from factory delivered condition is discovered, the machine must be tagged and removed from service. Repairs to the machine may only be made by a qualified service technician, according to the manufacturer's specifications. Scheduled maintenance inspections shall be performed by qualified service technicians, according to the manufacturer's specifications and the requirements listed in the responsibilities manual. The Pre-delivery Preparation consists of completing the Pre-operation Inspection, the Maintenance items and the Function Tests. Use this form to record the results. Place a check in the appropriate box after each part is completed. Follow the instructions in the operator’s manual. If any inspection receives an N, remove the machine from service, repair and re-inspect it. After repair, place a check in the R box. Legend Y = yes, completed N = no, unable to complete R = repaired Comments Pre-Delivery Preparation Pre-operation inspection completed Maintenance items completed Function tests completed Model Serial number Date Machine owner Inspected by (print) Inspector signature Inspector title Inspector company Terexlift Zona Industriale I 06019 Umbertide (Pg) Italy Y N R Section 3 • Scheduled Maintenance Procedures March 2010 Intentionally blank page 16 GTH-4016SR • GTH-4018SR Part No. 57.4400.9203 March 2010 Section 3 • Scheduled Maintenance Procedures Maintenance Inspection Report Model Checklist A - Rev A Serial number A-1 Manuals and decals Date A-3 Function tests Hour meter A-4 Machine greasing A-5 Epicyclic reduction gears oil level A-6 Axles oil level Inspected by (print) A-7 Tyre inflation Inspector signature Checklist C - Rev A Y N R Smoke from the C-1 exaust muffler A-2 Pre-operation inspect Machine owner C-2 Change engine oil and filter C-3 Change engine air outer filter C-4 Change hydraulic oil filter C-5 Clean cabin air filter A-8 Engine oil level A-9 Engine cooling system Inspector title Inspector company - Select the appropriate checklist(s) for the type of inspection to be performed. Daily or 8 hour Inspection: A-10 Lighting system Checklist D - Rev A A-11 Clean engine air filters D-1 Change gear box oil A-12 Safety devices D-2 Change oil in the turntable gear D-3 Change engine air inner filter Perform after 50 hours: Instructions - Make copies of this report to use for each inspection. Quarterly or 250 hour Inspection: Y N R A-13 Emergency pump operation, if presen A-14 Hydraulic oil level in the tank D-4 Change hydr. oil D-5 Change cabin air filter Perform every 1500 hours: A A+B Semi-annually or 500 hour Inspection: A+B+C Checklist B - Rev A Y N R B-1 Gearbox oil level Turntable reduction B-2 gear oil level D-6 Change oil in the axles Change oil in the D-7 epicyclic reduction gears B-3 Cylinder rods Inspect the electrical wiring Annually or 1000 hour Inspection: A+B+C+D B-4 2 Year or 2000 hour Inspection: A+B+C+D+E Boom sliding pads B-5 adjusting - Place a check in the appropriate box after each inspection procedure is completed. - Use the step-by-step procedures in this section to learn how to perform these inspections. Y N R Battery electrolyte B-6 level Checklist E - Rev A E-1 Y N R Change engine coolant Perform every 6000 hours: E-2 Structure status B-7 Block Valves B-6 Tensioning the boom chains - If any inspection receives an “N”, tag and remove the machine from service, repair and re-inspect it. After repair, place a check in the “R” box. Legend Y = yes, acceptable N = no, remove from service R = repaired Part No. 57.4400.9203 GTH-4016SR • GTH-4018SR 17 Section 3 • Scheduled Maintenance Procedures March 2010 Checklist A Procedures REV A A-1 Inspect the Manuals and Decals Maintaining the operator’s manual in good condition is essential to safe machine operation. Manual is included with each machine and should be stored in the container provided in the operator's compartment. An illegible or missing manual will not provide safety and operational information necessary for a safe operating condition. 3 Open the operator's manual to the decals inspection section. Carefully and thoroughly inspect all decals on the machine for legibility and damage. In addition, maintaining all of the safety and instructional decals in good condition is mandatory for safe machine operation. Decals alert operators and personnel to the many possible hazards associated with using this machine. They also provide users with operation and maintenance information. An illegible decal will fail to alert personnel of a procedure or hazard and could result in unsafe operating conditions. Result: The machine is not equipped with all Result: The machine is equipped with all required decals, and all decals are legible and in good condition. required decals, or one or more decals are illegible or in poor condition. Remove the machine from service until the decals are replaced. 4 Always return the manual to the storage container after use. NOTICE 1 Check to make sure that the operator's manual is present and complete in the storage container in the operator's compartment. Contact your authorized Genie distributor or Genie Industries if replacement manual or decals are needed. 2 Examine the pages of the manual to be sure that it is legible and in good condition. Result: The operator's manual is appropriate for the machine and it is legible and in good condition. Result: The operator's manual is not appropriate for the machine or it is not in good condition or is illegible. Remove the machine from service until the manual is replaced. 18 GTH-4016SR • GTH-4018SR Part No. 57.4400.9203 March 2010 Section 3 • Scheduled Maintenance Procedures CHECKLIST A PROCEDURES REV A A-2 Perform Pre-operation Inspection A-3 Perform Function Tests Completing a Pre-operation Inspection is essential to safe machine operation. The Pre-operation Inspection is a visual inspection performed by the operator prior to each work shift. The inspection is designed to discover if anything is apparently wrong with a machine before the operator performs the function tests. The Pre-operation Inspection also serves to determine if routine maintenance procedures are required. Completing the function tests is essential to safe machine operation. Function tests are designed to discover any malfunctions before the machine is put into service. A malfunctioning machine must never be used. If malfunctions are discovered, the machine must be tagged and removed from service. Complete information to perform this procedure is available in the appropriate operator's manual. Refer to the Operator's Manual on your machine. Part No. 57.4400.9203 Complete information to perform this procedure is available in the appropriate operator's manual. Refer to the Operator's Manual on your machine. GTH-4016SR • GTH-4018SR 19 Section 3 • Scheduled Maintenance Procedures March 2010 CHECKLIST A PROCEDURES REV A A-4 Machine Greasing 5 Return the boom to the stowed position. 6 Locate a grease fitting at one of the locations shown in the illustration. NOTICE Genie specifications require that this procedure be performed every 8 hours or daily, whichever comes first. Greasing the specified locations is essential for good machine performance and service life. Operating the machine with little or no grease may cause the machine to perform poorly and continued use may cause component damage. 1 Fully extend the boom. Raise the boom as needed. 2 Locate the grease fittings at both sides of all boom tubes except the innermost tube. Refer to the illustration. 7 Pump grease into the fitting until the joint is thoroughly lubricated. 8 Repeat this procedure, beginning with step 6, for each remaining grease fitting shown in the illustration. 9 Locate the grease fittings on the stabilizer frame at the front of the machine. 10 Pump grease into each fitting until the joints are thoroughly lubricated. 11 Locate the grease fittings on the outriggers at the front of the machine. 12 Pump grease into each fitting until the joints are thoroughly lubricated. 3 Pump grease into the fittings until the inner boom rollers are thoroughly lubricated. 4 Lubricate the top boom tube wear pads. NOTICE 20 Do not lubricate the side wear pads at the boom rollers, if equipped. Grease Specification PTFE INTERFLON FIN GREASE LS 2 GTH-4016SR • GTH-4018SR Part No. 57.4400.9203 March 2010 Section 3 • Scheduled Maintenance Procedures CHECKLIST A PROCEDURES REV A A-5 Epicyclic Reduction Gears Oil Level A-6 Axles Oil Level 1. Stop the machine on a level ground and engage the parking brake. 1. Stop the machine on a level ground and ensure the parking brake is engaged and plug finds on the horizontal axis. 2. Loosen level plug and check if oil is level with the hole. 3. If necessary, top-up through the same hole. 4. Refit and tighten plug . 2. Clean the plug all around, then remove it and check if oil is level with the hole. 3. If necessary, add new oil through hole until it is level. 4. Refit the plug. Part No. 57.4400.9203 GTH-4016SR • GTH-4018SR 21 Section 3 • Scheduled Maintenance Procedures March 2010 CHECKLIST A PROCEDURES REV A A-8 Engine Oil Level A-7 Tyre Inflation 1. Put on protective clothing and eye wear 2. Rotate the wheel until the tire stem is at the 12 o’clock position. 3. Check the air pressure in the tire. NOTICE Result - models with air-filled tires: The air pressure meets specification. The tire is at the correctly filled level. Result - models with air-filled tires: The air pressure does not meet specification. Add air until the air pressure meets specification. Engine specifications require that this procedure be performed daily. Required maintenance procedures and additional engine information is available in the Perkins 1104D Operation and Maintenance Manual 4. Repeat this procedure for each remaining tire. 22 GTH-4016SR • GTH-4018SR Part No. 57.4400.9203 March 2010 Section 3 • Scheduled Maintenance Procedures CHECKLIST A PROCEDURES REV A A-9 Engine Cooling System A-10 Lighting System 1. Stop the machine on a level ground and ensure the parking brake is engaged. NOTICE Engine specifications require that this procedure be performed daily. Required maintenance procedures and additional engine information is available in the Perkins 1104D Operation and Maintenance Manual Part No. 57.4400.9203 2. Switch on the different traffic and work lights and check the inside cabin warning lights are on order. 3. Leave the cabin and check if the lamps are working properly. GTH-4016SR • GTH-4018SR 23 Section 3 • Scheduled Maintenance Procedures March 2010 CHECKLIST A PROCEDURES REV A A-11 Clean Engine Air Filter A-12 Safety Devices 1. Cleaning the External Element - Shut the engine down and put the parking brake. - Open the four latches A. - Remove the protection cap B. - Extract the external cartridge C. - Clean the filter bowl. - Beat the cartridge against a piece of wood surface to eliminate any dust. - Dry clean the cartridge (max. pressure: 6 bar). - Check for cracks in the filtering element. - Before refitting the cleaned cartridge smear its seal with a thin coat of grease; fit the cartridge and make sure it is properly positioned. - Refit cap A. 1. Moment Limiting System - Load a weight of 1000 kg. - Raise the boom about 30 cm above the ground. - Extend the telescope and check if the system enters the alarm mode once reached the distance indicated in the load charts for the attachment fitted to the machine. NOTICE As soon as the warning lamp 40 on the cab dashboard switches on, replace the outer element. Never wash the cartridge with water or solvents. Joystick Enabling Function Switch - Attempt to operate the joystick without pressing this button:in this condition, the joystick shall not activate any movement. 3. Emergency Stop Pushbutton - To check the efficiency of this pushbutton, simply press it down during a movement. The pressure of the pushbutton shall cause the movement to stop and the engine to shut down. 4. Seat Switch - Attempt to make the machine to move without sitting on the drive seat. In this condition, the machine shall not move. 5. Outriggers Sensors - Lower or raise all the outriggers. - The display of the moment limiter will change the scale of the admissible payloads accordingly. 24 2. 6. Pressure Switch On The Parking Brake - Engage the parking brake and start the engine. - The warning light 41 should come on. - Attempt to move with the machine. The machine must not move. GTH-4016SR • GTH-4018SR Part No. 57.4400.9203 March 2010 Section 3 • Scheduled Maintenance Procedures CHECKLIST A PROCEDURES REV A A-13 Emergency Pump Operation, if present A-14 Hydraulic Oil Level In The Tank WARNING 1. stop the engine, 2. press the on-off button for some seconds 3. check that the pump works regularly. Fine jets of hydraulic oil under pressure can penetrate the skin. Do not use your fingers, but a piece of cardboard to detect oil leaks. 1. Check the hydraulic oil level (visually) through the special level fitted into the tank and placed on the cabin access steps. 2. If necessary, add new oil through the dedicated filler placed under the cover. 3. Unscrew knobs and remove the cover. 4. Add new oil. Part No. 57.4400.9203 GTH-4016SR • GTH-4018SR 25 Section 3 • Scheduled Maintenance Procedures March 2010 Checklist B Procedures B-1 Gear Box Oil Level REV A B-2 Turntable Reduction Gear Oil Level 1. Stop the machine on a level ground and make sure the parking brake is engaged. 2. Clean level plug all around. 3. Remove the plug and check if oil is level with the hole. 4. When necessary, add new oil through plug until it is level with the hole. 5. Refit and tighten the plug. 1. Stop the machine on a level ground and engage the parking brake. 2. Clean level plug A all around. 3. Loosen level plug A and check if oil is level with the hole. 4. If necessary, unscrew the filling plug B and pour new oil through the hole until it starts flowing out of hole A. 5. Refit and tighten plugs A and B. 1 2 1 Filling plug 2 Drain plug 26 GTH-4016SR • GTH-4018SR Part No. 57.4400.9203 March 2010 Section 3 • Scheduled Maintenance Procedures CHECKLIST B PROCEDURES REV A B-3 Cylinder Rods NOTICE B-4 Inspect the Electrical Wiring Genie requires that this procedure be performed every 250 hours or quarterly, whichever comes first. 1. Visually check the cylinder rods for scoring 2. For this operation, fully extend all of the cylinders and check that their rods are intact. NOTICE Genie requires that this procedure be performed every 250 hours or quarterly, whichever comes first. Maintaining electrical wiring in good condition is essential to safe operation and good machine performance. Failure to find and replace burnt, chafed, corroded or pinched wires could result in unsafe operating conditions and may cause component damage. WARNING Electrocution hazard. Contact with hot or live circuits could result in death or serious injury. Remove all rings, watches and other jewelry. 1. Inspect the following areas for burnt, chafed, corroded and loose wires: - Inside of the operator’s compartment Underside of the chassis Boom assembly 2. Inspect for a liberal coating of dielectric grease in the following locations: - All harness connectors 3. Start the engine and raise the boom so there is enough room to access and remove all the covers attached to the chassis. Part No. 57.4400.9203 GTH-4016SR • GTH-4018SR 27 Section 3 • Scheduled Maintenance Procedures March 2010 CHECKLIST B PROCEDURES REV A B-5 Boom Sliding Pads Adjusting Any boom section is fitted with adjustable pads located on the four sides of the profile. These pads are secured to both fixed and mobile part of every section. All pads can be adjusted by the special shims supplied by TEREXLIFT upon demand. Adjusting the pads: 1. Remove or loosen the screws fixing the pads in relation to type of shims used (with or without slots). B-6 Battery Electrolyte Level 1. Check the electrolyte level every 250 working hours; if necessary, add distilled water. 2. Ensure the fluid is 5÷6 mm above the plates and the cell levels are correct. 3. Check the cable clips are well secured to the battery terminals. To tighten the clips, always use a box wrench, never pliers. 4. Protect the terminals smearing them with pure vaseline. WARNING 2. Fit the necessary amount of shims. 3. If the residual thickness of the pad is insufficient or near the maximum wearing limit, renew the pad. 4. Tighten the screws fixing the pads at the recommended torque (see below). Use a dynamometric wrench. Tightening torques of the pad screws in relation to the screw diameter Screws M10 Nm 30 Screws M14 NOTICE 28 WARNING Nm 50 Tightening torques higher than those recommended can cause the break of the pad or of the locking threaded bush. WARNING GTH-4016SR • GTH-4018SR Battery electrolyte contains sulphuric acid. It can burn you if it touches your skin and eyes. Always wear goggles and protective gloves, and handle the battery with caution to prevent spillage. Keep metal objects (watch straps, rings, necklaces) clear of the battery leads, since they can short the terminals and burn you. Because the electrolyte is highly corrosive, it must never come in contact with the frame of the handler or electric/electronic parts. If the electrolyte comes in contact with these parts, contact the nearest authorised assistance centre. Do not add sulphuric acid; add only distilled water. Part No. 57.4400.9203 March 2010 Section 3 • Scheduled Maintenance Procedures CHECKLIST B PROCEDURES REV A B-7 Block Valves NOTICE Genie requires that this procedure be performed every 250 hours or quarterly, whichever comes first. The piloted blocking valves allow to held the load in position in case of burst of a flexible hose. 1. Load a weight near the maximum payload onto the boom. 2. Raise the load some centimetres above the ground (max 10 cm). To check the valve on the telescope extension cylinder move the boom to maximum height and extend it some centimetres. 3. Loosen the oil hoses to the cylinder of which you are checking the valve with caution. 4. To check the efficiency of the block valves of the outriggers, lower them to the ground and unload the weight of the tyres without raising them. Loosen the cylinder hoses to check the efficiency of the valve. B-8 Tensioning The Boom Chains (Only for GTH-4018 SR) To tighten the boom chains, follow the instructions below: 1. Fully extend the boom 2. Retract the boom by some 20/30 cm. 3. Tighten the chain up to a maximum tension value of 50 Nm 4. Check that all chains have been equally tensioned. If not, repeat the operation described above 5. Lock the chain tensioners by means of a counternut and locknut. During the check, the oil will flow out of the hoses and the load shall remain blocked in position. Part No. 57.4400.9203 GTH-4016SR • GTH-4018SR 29 Section 3 • Scheduled Maintenance Procedures March 2010 Checklist C Procedures C-1 Smoke From the Exaust Muffler REV A C-2 Change Engine Oil and Filter To check the quantity of smoke evacuated from the engine exhaust, proceed as follows: 1. Start the engine of the machine. 2. Wait for a few minutes so the engine can warm up correctly. 3. Visually check that the amount of smoke coming out of the exhaust is normal; repeat the check while accelerating the engine. CAUTION CAUTION 30 Do this check outdoors or use an adequate smoke extraction system. NOTICE Engine specifications require that this procedure be performed semi-annually or after 500 hours, whichever comes first. Required maintenance procedures and additional engine information is available in the Perkins 1104D Operation and Maintenance Manual In case of excess smoke, strictly obey the instructions provided in the relevant Use and maintenance manual enclosed with the technical literature of the machine. GTH-4016SR • GTH-4018SR Part No. 57.4400.9203 March 2010 Section 3 • Scheduled Maintenance Procedures CHECKLIST C PROCEDURES REV A C-3 Change Engine Air Outer Filter NOTICE Engine specifications require that this procedure be performed semi-annually or after 500 hours, whichever comes first. Required maintenance procedures and additional engine information is available in the Perkins 1104D Operation and Maintenance Manual C-4 Change Hydraulic Oil Filter 1. Stop the machine on a level ground and engage the parking brake. 2. Place a container of suitable size under the filter to collect any oil leaks. 3. Remove the filter cover to get access to the filter element A. 4. Change the filter element, then, before fitting a new one, thoroughly clean and grease both seat and gasket. 5. Refit and tighten the filter cover. NOTICE NOTICE PROTECT THE ENVIRONMENT Part No. 57.4400.9203 GTH-4016SR • GTH-4018SR The hydraulic oil filter cartridge shall be replaced as soon as the relative warning light comes on. Hydraulic oil filter canisters cannot be cleaned or washed and refitted. They must be replaced with new ones of the type recommended by the manufacturer. The handling and disposing of used oils may be ruled by local or national regulations. Address to authorised centres. 31 Section 3 • Scheduled Maintenance Procedures CHECKLIST C PROCEDURES March 2010 REV A C-5 Clean Cabin Air Filter 1. Shut the engine down and engage the parking brake. 2. Pull filter out of the housing accessible from the outside of the cab. 3. Clean the filter bowl. 4. Clean the filter cartridge by beating it against a piece of wood. NOTICE 32 Paper filters must never be cleaned using compressed air or washed with water and/or solvents. GTH-4016SR • GTH-4018SR Part No. 57.4400.9203 March 2010 Section 3 • Scheduled Maintenance Procedures Checklist D Procedures REV A D-1 Change Gear Box Oil D-2 Change Oil in the Turntable Gear 1. Place a container of suitable size under the drain plug. 2. Remove the plug . 3. Remove the drain plug and empty the gearbox. 4. Refit and tighten the drain plug . 5. Pour in new oil through the filler placed at the top of the reduction gear of the power divider. Stop when oil is level with hole . 6. Refit and tighten plug . 1. Stop the machine on a level ground and engage the parking brake. 2. Place a container of suitable size under drain plug C. 3. Remove drain plug C and let oil flow out of the reduction gear. 4. Unscrew the filling plug B. 5. Clean level plug A all around. 6. Loosen level plug A. 7. Refit and tighten drain plug C. 8. Pour new oil through the hole of plug B until it starts flowing out of hole A. 9. Refit and tighten plugs A and B. 1 2 1 Filling plug 2 Drain plug Part No. 57.4400.9203 GTH-4016SR • GTH-4018SR 33 Section 3 • Scheduled Maintenance Procedures March 2010 CHECKLIST D PROCEDURES REV A D-3 Change Engine Air Inner Filter NOTICE Engine specifications require that this procedure be performed annually or after 1000 hours, whichever comes first. Required maintenance procedures and additional engine information is available in the Perkins 1104D Operation and Maintenance Manual D-4 Change Hydraulic Oil 1. Stop the machine on a level ground and make sure the parking brake is engaged. 2. Release the pressure from the hydraulic circuit. 3. Place a container of suitable size under the drain plug, placed in the lower part of the reservoir, and collect any oil leaks. 4. Remove the drain plug and allow oil to flow out into the container. 5. Refit the drain plug. 6. Add new oil by making sure that it matches the recommended type until it is level with the sight glass. PROTECT THE ENVIRONMENT 34 GTH-4016SR • GTH-4018SR Handling and disposal of exhausted oils may be ruled by local or national regulations. Dispose of the exhausted oils through the special authorised centres. Part No. 57.4400.9203 March 2010 Section 3 • Scheduled Maintenance Procedures CHECKLIST D PROCEDURES REV A D-5 Change Cabin Air Filter D-6 Change Oil in the Axles 1. Shut the engine down and engage the parking brake. 2. Pull filter out of the housing accessible from the outside of the cab. 3. Replace the cartridge. 1. Place a container of suitable size under drain plug . 2. To drain the oil remove one the two level plugs and the drain plug . 3. Drain all oil. 4. Clean the plug torque. and tighten it to a 60Nm 5. Unscrew the oil fill plug and fill to the bottom of the level plug hole with the specified oil. 6. Wait to allow the oil to flow through the axle. Check oil level and fill to the specified level if necessary. 7. Screw the plug to a 60Nm torque. Part No. 57.4400.9203 GTH-4016SR • GTH-4018SR 35 Section 3 • Scheduled Maintenance Procedures CHECKLIST D PROCEDURES March 2010 REV A D-7 Change Oil in the Epicyclic Reduction Gears 1. Before draining the oil from wheel end rotate the wheel end so that the plug is at the highest position [pos.A] and partially unscrew to release possible pressure. 2. Rotate the wheel end so that the plug is toward the ground [pos.B]. 3. Remove the plug and drain the oil. 4. Rotate the wheel end so that the hole is in the position as shown in beside fig. 5. Fill to the bottom of the fill plug hole with specified oil. 6. Tighten the plug to a 60Nm torque. 36 GTH-4016SR • GTH-4018SR Part No. 57.4400.9203 March 2010 Section 3 • Scheduled Maintenance Procedures Checklist E Procedures REV A E-1 Change Engine Coolant E-2 Machine Structure NOTICE NOTICE Engine specifications require that this procedure be performed after 2 years or after 2000 hours, whichever comes first. Required maintenance procedures and additional engine information is available in the Perkins 1104D Operation and Maintenance Manual Part No. 57.4400.9203 Terexlift require that this procedure be performed after 5 years or after 6000 hours, whichever comes first Check the state of the structure paying attention to the welded supporting joints, the boom pins, the platform and all attachment (if installed). DANGER GTH-4016SR • GTH-4018SR After the first 5 years, repeat this check every 2 years. 37 Section 3 • Scheduled Maintenance Procedures March 2010 REV A Intentionally blank page 38 GTH-4016SR • GTH-4018SR Part No. 57.4400.9203 March 2010 Section 4 • Repair Procedures Repair Procedures About This Section Observe and Obey: Repair procedures shall be completed by a person trained and qualified on the repair of this machine. Most of the procedures in this section should only be performed by a trained service professional in a suitably equipped workshop. Select the appropriate repair procedure after troubleshooting the problem. Perform disassembly procedures to the point where repairs can be completed. To re-assemble, perform the disassembly steps in reverse order. Symbols Legend Immediately tag and remove from service a damaged or malfunctioning machine. Repair any machine damage or malfunction before operating the machine. Before Repairs Start: Read, understand and obey the safety rules and operating instructions in the appropriate operator’s manual on your machine. DANGER WARNING Be sure that all necessary tools and parts are available and ready for use. Read each procedure completely and adhere to the instructions. Attempting shortcuts may produce hazardous conditions. Unless otherwise specified, perform each maintenance procedure with the machine in the following configuration: CAUTION NOTICE - Machine parked on a firm, level surface - Boom in the stowed position - Key switch in the off position with the key removed - Wheels chocked Part No. 57.4400.9203 Safety alert symbol—used to alert personnel to potential personal injury hazards. Obey all safety messages that follow this symbol to avoid possible injury or death. Used to indicate the presence of an imminently hazardous situation which, if not avoided, will result in death or serious injury. Used to indicate the presence of a potentially hazardous situation which, if not avoided, could result in death or serious injury. Used to indicate the presence of a potentially hazardous situation which, if not avoided, may cause minor or moderate injury. Used to indicate the presence of a potentially hazardous situation which, if not avoided, may result in property damage. Indicates that a specific result is expected after performing a series of steps. Indicates that an incorrect result has occurred after performing a series of steps. GTH-4016SR • GTH-4018SR 39 Section 4 • Repair Procedures March 2010 Boom Components REV A 1-1 How to Replace the Boom Wear Pads 1-2 How to Remove the Lifting Fork Frame 1. Extend the boom until the wear pads are accessible. 1. With the boom in the stowed position, attach a lifting strap from an overhead crane to the top of the lifting fork frame at the front of the boom. Support the frame. Do not apply any lifting pressure. 2. Lower wear pads: Attach a lifting strap from an overhead crane to the fork end of the boom. Lift the boom just enough to remove the weight from the pads and allow the pad to be replaced. 3. Remove the wear pad mounting fasteners and remove the wear pads from the boom. 4. Lubricate the wear surface of the new pads with interflon grease. 5. Install the new wear pads. Install and securely 2. If the machine is equipped with the lifting fork frame locking cylinder, disconnect the locking cylinder hoses from the boom. 3. Remove the screw securing the fork level cylinder pivot pin to the lifting fork. 4. Use a soft metal drift to remove the pivot pin. 5. Remove the screw securing the fork frame pivot pin to the boom. 6. Use a soft metal drift to remove the pivot pin. WARNING Crushing hazard. The fork frame could fall if not properly supported when the pivot pin is removed from the machine. 7. Remove the fork frame from the boom. 40 GTH-4016SR • GTH-4018SR Part No. 57.4400.9203 March 2010 Section 4 • Repair Procedures BOOM COMPONENTS REV A 1-3 How to Remove the Boom WARNING NOTICE 8. Using a punch and a hammer, remove the rod end pivot pin from the lifting cylinder. Keep attention to choose a punch smaller than the pivot pin! Bodily injury hazard. This procedure requires specific repair skills, lifting equipment and a suitable workshop. Attempting this procedure without these skills and tools could result in death or serious injury and significant component damage. Dealer service is strongly recommended. 9. Using a punch and a hammer, remove the rod end pivot pin from the slave cylinder. Keep attention to choose a punch smaller than the pivot pin! When removing a hose assembly or fitting, the O-ring on the fitting and/or hose end must be replaced and then torqued to specification during installation. Refer to paragraph “Hydraulic Hose and Fitting Torque Specifications” into Specification Section 11. Using the crane, raise the boom and lay it on a dedicated place. 10. Using a punch and a hammer, remove the rod end pivot pin from the bottom boom end. Keep attention to choose a punch smaller than the pivot pin! 1. Remove the lifting fork (see “How to Remove the Lifting Fork Frame” paragraph) 2. Tag and disconnect the cable reel plug placed at the top of the boom and remove the plastic clamps which secure the harness to the boom iron hoses. 3. Lift the boom up to when the rod end pivot pin is higher then the top of the cabin. 4. Place a support under the lifting cylinder. 5. Tag, disconnect and plug the two hydraulic hoses from the main valve of the extension cylinder. 6. Tag, disconnect and plug the four hydraulic hoses from the main valve to the boom iron hoses (two for tilting function and two for the attachmenty lock/unlock cylinder, when fitted). 7. Attach four lifting straps to the dedicated lifting points, from a total overhead 10 ton crane to the boom. Part No. 57.4400.9203 GTH-4016SR • GTH-4018SR 41 Section 4 • Repair Procedures March 2010 BOOM COMPONENTS REV A 1-4 How to Disassemble the GTH4018 SR Boom 5. Extend the boom for making accesible the inspection holes on inner section of boom. WARNING NOTICE Bodily injury hazard. This procedure requires specific repair skills, lifting equipment and a suitable workshop. Attempting this procedure without these skills and tools could result in death or serious injury and significant component damage. Dealer service is strongly recommended. When removing a hose assembly or fitting, the O-ring on the fitting and/or hose end must be replaced and then torqued to specification during installation.Refer to paragraph “Hydraulic Hose and Fitting Torque Specifications” into Specification Section NOTICE Place the telehandler with enought room for stabilizing the machine and totally extended the boom. 1. Using a punch and a hammer, remove the rod end pivot pin from the tilting cylinder. Keep attention to choose a punch smaller than the pivot pin! 2. Remove the bottom end carter of the boom. 3. Tag, disconnect and plug the four hydraulic hoses from bracket 3. 4. Remove the two brackets 2 with the relative pulleys. 6. Inserting a spanner through the inspection holes, remove the screws which fix the hoses holder block and disconnect the hydraulic hoses on the upper boom side. 7. Completely retract the boom. 8. Pull-out the internal steel hoses assembly. 9. Using a punch and a hammer, remove the rod end pivot pin from the extension cylinder. Keep attention to choose a punch smaller than the pivot pin! 10. In the lower part of the boom, tag and disconnect the chains from the chain tensioner. 11. Same for the upper part. 12. Tag and disconnect the chains placed in the rear part of the boom 13. Remove all the pads present inside the boom but the ones in the lower side 14. With a textile bridle connected to the bridge crane, sling the second, the third and fourth boom out of the first one. 15. Laying those boom sections on trestles. 16. Let the third boom section slide out of the second one. 17. Laying those boom sections on trestles. 42 18. Let the fourth boom section slide out of the third one. GTH-4016SR • GTH-4018SR Part No. 57.4400.9203 March 2010 Section 4 • Repair Procedures BOOM COMPONENTS REV A 1-5 How to Assemble the GTH4018 SR Boom 7 17 4 15 3 16 21 2 8 11 10 6 19 5 14 1 12 13 18 20 9 1. Fit the two brackets with the relative pulleys (7) in the boom rear part; 2. Fit the chain bracket (6) with the relative chains (4) in the rear upper part of the fourth boom section; hook up a rope to the end of the chain for pulling it inside the boom; 3. Fit the chain bracket (2) with the relative chains (5) in the rear lower part of the fourth boom section; 12. Slide in the third boom section into the second boom section, pull the rope hooked up to the chains (3) and make them pass on the pulley (11); 13. Fit the rear upper paths of the third boom section and all the ones of the second boom section; 14. Fit the rear lower paths of the second boom section and the rear lateral ones; 4. Fit the rear lateral paths of the fourth boom section and the two lower ones; 15. Fit the chain bracket (12) with the relative pin make the chains pass on the pulley; 5. Slide in the fourth boom section into the third boom section, pull the rope hooked up to the chains and make them pass on the pulley (7); 16. Slide in the second boom section into the first boom section; 6. Fit the rear upper paths of the fourth boom section and all the ones of the third boom section; 7. Fit the pulley with the relative bracket (8); 8. Fit the two brackets with the relative pulleys (11); 9. Fit the chain bracket (10) with the relative chains (3) in the rear upper part of the third boom section; hook up a rope to the end of the chain for pulling it inside the boom; 10. Fit the chain bracket (9) with the relative chains (11) in the rear lower part of the third boom section; 11. Fit the rear lateral paths of the third boom section; Part No. 57.4400.9203 17. Fit all the paths of the first boom section; 18. Install the extension cylinder (16); 19. Install the boom on the machine and connect the hoses of the boom controls; 20. Retract the boom up to when chains (3) reach their anchoring point (17) and then fix them with the screws; 21. Fix the chains to the dedicated chain tentionairs (13), (14), (15) 22. Fit the steel pipes between the first and the second boom sections (18); 23. Fit internal steel hoses assembly (19) and the two lateral pulleys with the relative brackets (20); 24. Extend the boom for making accesible the inspection holes on the fourth boom section; GTH-4016SR • GTH-4018SR 43 Section 4 • Repair Procedures March 2010 BOOM COMPONENTS REV A 25. fix the hydraulic hoses to the hoses holder block (20); 26. Follow these instructions to register the chains: • for the lower side chains, completely extend the boom and then retract it of 1 meter. Torque the chain tentionair to 50N/m; • for the upper side chains, completely retract the boom and then extend it of 1 meter. Torque the chain tentionair to 50N/m. WARNING NOTICE 44 Bodily injury hazard. This procedure requires specific repair skills, lifting equipment and a suitable workshop. Attempting this procedure without these skills and tools could result in death or serious injury and significant component damage. Dealer service is strongly recommended. When removing a hose assembly or fitting, the O-ring on the fitting and/or hose end must be replaced and then torqued to specification during installation.Refer to paragraph “Hydraulic Hose and Fitting Torque Specifications” into Specification Section GTH-4016SR • GTH-4018SR Part No. 57.4400.9203 March 2010 Section 4 • Repair Procedures BOOM COMPONENTS REV A 1-6 How to Disassemble the GTH4016 SR Boom 12 17 18 2 14 4 13 5 6 1 11 7 15 16 3 WARNING NOTICE Bodily injury hazard. This procedure requires specific repair skills, lifting equipment and a suitable workshop. Attempting this procedure without these skills and tools could result in death or serious injury and significant component damage. Dealer service is strongly recommended. When removing a hose assembly or fitting, the O-ring on the fitting and/or hose end must be replaced and then torqued to specification during installation.Refer to paragraph “Hydraulic Hose and Fitting Torque Specifications” into Specification Section 1. Stabilizing the machine and set the boom to horizontal position. 2. Remove the pins (1), (2), (3) and (4). 3. Slide out the third boom section extension cylinder (5). 5. Remove the internal hydraulic hoses for extension, fork levelling and attachment locking cylinder (when present). 6. Remove the front (11) and upper (12) lateral paths of the first boom section. 7. Remove the rear lateral (13) and upper (14) paths of the second boom section. 8. Slide out the second boom section: just before completely separating the two sections, remove the lower paths (15) of the first boom section. 9. Laying those boom sections on trestles. 10. Remove the front lateral (16) and upper (17) paths of the second boom section. 11. Remove the rear lateral (18) paths of the third boom section. 12. Slide out the third boom section: just before completely separating the two sections, remove the front lower paths (19). 4. Remove the pin (6) and the forks frame (7). Part No. 57.4400.9203 GTH-4016SR • GTH-4018SR 45 Section 4 • Repair Procedures March 2010 BOOM COMPONENTS REV A 1-7 How to Assemble the GTH4016 SR Boom 15 6 4 17 9 12 8 18 10 20 21 7 22 13 2 D 1 14 C A 5 B 16 11 E 19 1. Insert the cylinder (1) inside the third boom section and fit the pin; 13. Insert the pins (18-19-21), the fork levelling cylinder (20) and the fork frame (22); 2. Fix the cylinder to the boom; 14. Fit the hoses of the extension cylinder as follow: 3. Fit the rear lateral paths of the third boom section (4) and the lower ones (5); • 4. Slide the third boom section into the second one; slide in the hoses through the opening under the boom (A); • 5. Fit the rear upper paths of the third boom section (6); push the hoses towards the rear part of the boom; • connect the hoses between the safety valve (B) and the steel hoses (C); 6. In the second boom section, fit all the paths: front lower (7), lateral (8), upper (9); 7. Fit the rear lateral paths of the second boom section (10) and the lower ones (11); 8. Slide the second boom section into the first one; 9. Fit the upper paths of the second boom section (12); 15. Follow the same procedure for the other two hoses couples making them pass inside the conduit (D); 16. Connect the left two hoses to the safety valve of the fork levelling cylinder (E) and the right two hoses to the fitting bracket placed on the right side of the top boom end. 10. In the first boom section, fit all the paths: front lateral (13), lower (14), upper (15); 11. Insert the cylinder pin (16); 12. Insert the extention cylinder pin (17); 46 GTH-4016SR • GTH-4018SR Part No. 57.4400.9203 March 2010 Section 4 • Repair Procedures BOOM COMPONENTS REV A 1-8 How to Remove a Lift Cylinder 8. Remove the screw fixing the pitching cylinder pin. 9. Knock out and extract the pin using a plug of soft material (aluminium, copper, wood, etc.). WARNING Bodily injury hazard. This procedure requires specific repair skills, lifting equipment and a suitable workshop. Attempting this procedure without these skills and tools could result in death or serious injury and significant component damage. Dealer service is strongly recommended. 1. Release the attachment. 2. Anchor the attachment holding frame to the hooks of the slinging chain. 3. Raise the boom to max. height (the hinging pin of the cylinder rod must be over the driving cabin) operating alternately the bridge crane and the hydraulic boom raising control of the machine. 10. Fix the balance cylinder to the cabin with a sling and ensure it does not hinder the movement of the boom. 11. Secure the raising cylinder to the boom with a sling. 12. Remove the screw which fixes the rod pin to the boom. 13. Knock out and extract the pin using a plug of soft material (aluminium, copper, wood, etc.). 14. Put two wooden plugs, each 100mm high, on the oil tank to support the raising cylinder. 15. Lower the boom until the cylinder rests on the supporting plugs previously positioned. 16. Untie the sling fixing the cylinder to the boom, then raise the boom with the bridge crane to go on working. 4. Stop raising when the slinging chains are slightly under tension. 17. Remove the screw which fixes the bottom-side pin of the cylinder. 5. Place a container of suitable size under the hydraulic piping before disconnecting. 18. Knock out the pin using a plug of soft material (aluminium, copper, wood, etc.) and extract it through the hole on the frame. PROTECT THE ENVIRONMENT Used oils must be handled and disposed of according to local regulations. Address to legally authorised centres. 6. Disconnect two hydraulic hoses from the blocking valve, then plug the disconnected connectors to prevent dust and impurities from entering the circuit. 19. Lower the boom onto the adjustable stand to remove the slinging chains. 20. Sling the cylinder with a textile bridle and remove it from the machine using the bridge crane. CAUTION 7. To move the boom using the up/down controls of the bridge crane, previously disconnect the rod of the fork balance cylinder. Part No. 57.4400.9203 GTH-4016SR • GTH-4018SR To reassemble the cylinder, repeat the steps above in reversed order. Remember to set the circuit under pressure before releasing the bridge crane. 47 Section 4 • Repair Procedures March 2010 BOOM COMPONENTS REV A 1-9 How to Remove the Second Boom Section Extension Cylinder WARNING Bodily injury hazard. This procedure requires specific repair skills, lifting equipment and a suitable workshop. Attempting this procedure without these skills and tools could result in death or serious injury and significant component damage. Dealer service is strongly recommended. 1. Set the boom to horizontal position with the telescope slightly extended to work on the cylinder connecting pin (rod side). 2. Remove the screw fixing the pin to the boom section. 3. Extract out and knock the pin using a plug of soft material (aluminium, copper, wood, etc.). 4. Remove the two screws of the cylider holder. 5. Place a container of suitable size under the hydraulic piping before disconnecting PROTECT THE ENVIRONMENT Used oils must be handled and disposed of according to local regulations. Address to legally authorised centres 6. Disconnect the hydraulic hoses of the cylinder, then plug the disconnected connectors to prevent dust and impurities from entering the circuit. 7. Loosen and remove the screw fixing the cylinder pin (bottom side). 8. Extract out and knock the pin using a plug of soft material (aluminium, copper, wood, etc.). 9. Pull out the cylinder from the boom section and sling it with the textile bridles connected to the bridge crane. 48 1-10 How to Remove the Third Boom Section Extension Cylinder (only for GTH-4016 SR) WARNING Bodily injury hazard. This procedure requires specific repair skills, lifting equipment and a suitable workshop. Attempting this procedure without these skills and tools could result in death or serious injury and significant component damage. Dealer service is strongly recommended. 1. Set the boom to horizontal position and extend it until the pin of the rod side is on the 3rd boom section. 2. Remove the screw fixing the pin to the 3rd boom section. 3. Extract out and knock the pin using a plug of soft material (aluminium, copper, wood, etc.). If necessary, lift the cylinder using a jack under the boom, corrisponding to the hole inside the 3rd boom section. 4. Retract the boom entirely, remove the screw that locks the pin (bottom side). Extract out and knock the pin using a plug of soft material (aluminium, copper, wood, etc.). 5. Place a container of suitable size under the hydraulic piping before disconnecting. PROTECT THE ENVIRONMENT Used oils must be handled and disposed of according to local regulations. Address to legally authorised centres 6. Disconnect the two hydraulic hoses from the blocking valve, then plug the disconnected connectors to prevent dust and impurities from entering the circuit. GTH-4016SR • GTH-4018SR Part No. 57.4400.9203 March 2010 Section 4 • Repair Procedures BOOM COMPONENTS REV A 1-11 How to Remove the Fork Level Cylinder 7. Remove the four screws fixing the cylinder to the 3dr section boom. 8. Pull out the cylinder from the boom section and sling it with the textile bridles connected to the bridge crane. When half cylinder is out, sling it in the center so it can be in horizontal position. 9. Extract the cylinder from the boom entirely and place it on to a bench. 10. Lock the cylinder to avoid damnage for people and things. 1. Release the attachment. 2. Remove the screw fixing the rod pin. 3. Knock out and extract the pin using a plug of soft material (aluminium, copper, wood, etc.). 4. Fix the cylinder with a textile bridle connected to the bridge crane to support its weight. 5. Place a container of suitable size under the hydraulic piping before disconnecting PROTECT THE ENVIRONMENT Used oils must be handled and disposed of according to local regulations. Address to legally authorised centres 6. Disconnect three hydraulic hoses from the blocking valve, then plug the disconnected connectors to prevent dust and impurities from entering the circuit. 7. Drive out the lower pin. 8. Unscrew and extract the screw fixing the pin. 9. Knock out the pin using a plug of soft material (aluminium, copper, wood, etc.) and extract it through the hole on the frame. 10. Remove the cylinder from the machine using the bridge crane. Part No. 57.4400.9203 GTH-4016SR • GTH-4018SR 49 Section 4 • Repair Procedures March 2010 BOOM COMPONENTS REV A 1-12 How to Replace the Fork Level Cylinder Hoses (only for GTH-4016 SR) WARNING Bodily injury hazard. This procedure requires specific repair skills, lifting equipment and a suitable workshop. Attempting this procedure without these skills and tools could result in death or serious injury and significant component damage. Dealer service is strongly recommended. 1. Before disconnecting or refitting a flexible hose, carefully clean the area all around. 2. Blow some compressed air to remove any impurity. 3. For an easier renewal of the hoses, whose run is not clearly visible, proceed as follows: • disconnect the hose to be replaced from both sides • attach a cord to the side of the hose which reaches the boom tip • disconnect the hose from the rear side of the boom • remove the hose frome the hole under the first section boom until it comes out completely • disconnect the cord and reconnect the same to the end of the new flexible hose making sure the hose has been previously plugged to prevent dirt from entering the circuit • proceed in reverse order and reassemble the hose. 50 GTH-4016SR • GTH-4018SR Part No. 57.4400.9203 March 2010 Section 4 • Repair Procedures Operator’s Compartment REV A 2-1 How to Remove the Operator’s Compartment 5. Disconnect the wire of the manual throttle: The operator’s compartment is used to activate machine functions while sitting in the operator’s drivers seat. • Disconnect the wire of the manual accelerator. • Remove the screws fixing the throttle bracket. 6. Disconnect the power cables of the horn. Within the operator’s compartment there is a transmission column shifter, steering selector, 4-way controller, accelerator pedal, brake pedal and a differential lock switch. All of these components are replaceable. 7. Disconnect the ground wire. For further information or assistance, consult the Genie Industries Service Department. 10. Fix a two-leg chain connected to the bridge crane, to the cabin. Raise slowly after having checked that all electrical and hydraulic connections have been disconnected. Avoid crashing against parts of the machine. Lower the cabin to the ground in a site where it can not hinder other maintenance operations. WARNING Bodily injury hazard. This procedure requires specific repair skills, lifting equipment and a suitable workshop. Attempting this procedure without these skills and tools could result in death or serious injury and significant component damage. Dealer service is required. 8. Remove the 4 fixing screws of the cabin. 9. Fit and screw down two eyebolts to the top the cabin in the special seats. 1. Cut the plastic fasteners fixing the electrical cables, then disconnect all of the electrical wires. 2. Disconnect the hydraulic lines of the power steering unit and of the heater. 3. Disconnect the electrical and hydraulic connections of the brake pump. 4. Disconnect the wire of the throttle pedal: • Remove the locking clip; • Remove the screws fixing the throttle rope. Part No. 57.4400.9203 GTH-4016SR • GTH-4018SR 51 Section 4 • Repair Procedures March 2010 OPERATOR’S COMPARTMENT REV A 2-2 How to Remove the Steering Column 2-3 How to Test the Steering Column 1. Remove the lower part of the dashboard 2. Tag the hoses. 1. Completly raise the boom. 3. Remove the hoses 2. Apply the maintenance collar to the lifting cylinder. 4. Cap the steering column holes and hoses holes. 5. Remove the screws which fix the steering to the frame 6. Remove the steering column 3. Disconnect the hose fitted in the “CF” position of the priority valve. 4. Insert a “T” fitting between the priority valve and the hose and then apply a testing port. 5. Install a 600 bar pressure gauge into the testing port 6. Start the engine, completly turn the steering wheel and check the reading on the pressure gauge: it must be 190 bar. 7. If not, set the valve fixed on the steering device up to when the reading on the pressure gauge will be 190 bar. 52 GTH-4016SR • GTH-4018SR Part No. 57.4400.9203 March 2010 Section 4 • Repair Procedures OPERATOR’S COMPARTMENT REV A 2-4 How to Remove the Steering Selector 2-5 How to Remove the Joystick 1. Locate and open the battery access door. 1. Locate and open the battery access door. 2. Disconnect the battery from the machine. WARNING Electrocution hazard. Contact with electrically charged circuits could result in death or serious injury. Remove all rings, watches and other jewelry. 2. Disconnect the battery from the machine. WARNING Electrocution hazard. Contact with electrically charged circuits could result in death or serious injury. Remove all rings, watches and other jewelry. 3. Remove the dashboard. 3. Remove the screws which fix the joystick to the harmrest. 4. Slip off the steering plug. 4. Slip off the joystick. 5. Remove the upper plastic part of the steering selector. 5. Disconnect the joystick plug. 6. Remove all the screws that fix it in place. 7. Slip off the selector. Part No. 57.4400.9203 GTH-4016SR • GTH-4018SR 53 Section 4 • Repair Procedures March 2010 OPERATOR’S COMPARTMENT REV A 2-6 How to Test the Brake Pedal 1. Disconnect the hose which goes to the accumulator. WARNING Bodily injury hazard. Spraying hydraulic oil can penetrate and burn skin. Loosen hydraulic connections very slowly to allow the oil pressure to dissipate gradually. Do not allow oil to squirt or spray. 2-7 How to Remove the Brake Pedal 1. Set the ignition switch in position 1 2. Fully press and release the brake pedal up to when the low brake pressure warning light comes on. 3. Set the ignition switch in position 0 4. Remove all the electrical connections 5. Tag the hoses 6. Remove the screws securing the brake pedal in place. 2. Apply a testing port on the accumulator fitting. 3. Riconnect the hose. 4. Install a pressure gauge into testing port 5. Start the engine and allow the enigne to idle after warming the engine to operating temperature. 6. Observe the reading on the pressure gauge: it must be 150 bar. 7. Fully press and release the brake pedal. 8. The reading on the pressure gauge starts to decrease. 9. Once it reaches the 70 bar, the automatic accumulator filling starts pumping the oil into the two accumulators up to when the reading on the pressure gauge reaches 150 bar. 10. If not, set the valve. 54 GTH-4016SR • GTH-4018SR Part No. 57.4400.9203 March 2010 Section 4 • Repair Procedures Fuel and Hydraulic Tanks REV A 3-1 How to Remove the Fuel Tank and the Hydraulic Tank. WARNING Bodily injury hazard. This procedure requires specific repair skills, lifting equipment and a suitable workshop. Attempting this procedure without these skills and tools could result in death or serious injury and significant component damage. Dealer service is strongly recommended. 1. 2. 3. 4. 5. 6. Close the oil intake valve. Empty the tanks. Remove all the screws. Loosen all the clamps and pull out the hoses. Disconnect the electrical wire. Remove the electrical wire from bulb on the hydraulic filter. 7. Place a container of suitable size under the hydraulic piping before disconnecting PROTECT THE ENVIRONMENT Used oils must be handled and disposed of according to local regulations. Address to legally authorised centres 8. Disconnect all flexible hoses. 9. Remove the screws fixing the tanks to the turret of the machine. 10. Fix the tanks assy firmly using some textile bridles connected to the bridge crane, check that all parts have been loosened, then raise and lower the assy to the ground in a site where it cannot hinder other operations. Part No. 57.4400.9203 GTH-4016SR • GTH-4018SR 55 Section 4 • Repair Procedures March 2010 Transmission REV A 4-1 How to Remove the Transmission Pump WARNING NOTICE NOTICE WARNING Bodily injury hazard. This procedure requires specific repair skills, lifting equipment and a suitable workshop. Attempting this procedure without these skills and tools could result in death or serious injury and significant component damage. Dealer service is strongly recommended. When removing a hose assembly or fitting, the O-ring on the fitting and/or hose end must be replaced and then torqued to specification during installation. Refer to paragraph “Hydraulic Hose and Fitting Torque Specifications” into Specification Section Bodily injury hazard. Spraying hydraulic oil can penetrate and burn skin. Loosen hydraulic connections very slowly to allow the oil pressure to dissipate gradually. Do not allow oil to squirt or spray. 11. Tag and disconnect the harness from the transmission. 12. Support and secure the rear of the engine to a lifting device of suitable capacity. Do not apply any lifting pressure. 13. Remove the hydrostatic transmission pump. Perform this procedure with the engine off and cool. 1. Completly open the engine hood. 2. Remove the front cover of the engine housing. 3. Remove the cover that is under engine. 4. Using the cut-off battery switch, disconnect the battery. 5. Remove the screws that fix the cut-off battery switch support. 6. Remove the hydrostatic transmission pump. 7. Remove the two connectors. 8. Tag, disconnect and plug the hoses. 9. Cap the hydrostatic transmission pump’s holes. 10. Remove the hydrostatic trasmission pump’s screws . 56 GTH-4016SR • GTH-4018SR Part No. 57.4400.9203 March 2010 Section 4 • Repair Procedures Hydraulic Pumps REV A 5-1 How to Test and Adjust the Function Pump NOTICE When removing a hose assembly or fitting, the O-ring on the fitting and/or hose end must be replaced and then torqued to specification during installation. Refer to paragraph “Hydraulic Hose and Fitting Torque Specifications” into Specification Section. 1. Insert the 600bar manometer in the TP2 port. 2. Insert the 600bar manometer on the TP3 port. 5-2 How to Remove the Boom Gear Function Pump 1. Closed the valve of the main hydraulic line. It is behind the cabin steps. 2. Tag the hoses. 3. Remove the hoses screws. 4. Remove the hoses. WARNING 3. Start the engine. 4. Verify that 2nd gear is inserted. 5. Using the manual accelerator, increase the engine up to 1100rpm (see How to Check the Engine RPM paragraph). Bodily injury hazard. Spraying hydraulic oil can penetrate and burn skin. Loosen hydraulic connections very slowly to allow the oil pressure to dissipate gradually. Do not allow oil to squirt or spray. 6. Using the brake pedal, keep the machine stoped. 5. Cap the boom function gear pump holes and the hoses holes. 7. Engage the forward or backward and check that the manometer, on the port TP3 (0600psi), reads a value of 50psi. 6. Remove the boom function gear pump screws. 7. Remove the boom function gear pump. 8. If not, set the valve under the pump. 9. With the machine at the maximum rpm check that, in the port TP3, the pressure gauge reads 450psi. 10. If not, set the valve on the right side of the pump. Part No. 57.4400.9203 GTH-4016SR • GTH-4018SR 57 Section 4 • Repair Procedures March 2010 HYDRAULIC PUMPS REV A 5-3 How to Test the Boom Function Gear Pump 5-4 How to Remove the Auxiliary Gear Pump 1. Insert the 600 bar manometer in the TP1 port above the main valve 1. Closed the valve of the main hydraulic line. It is behind the cabin steps. 2. Start the engine. 2. Tag the hoses 3. Completly retract the boom 3. Remove the connectors. 4. Without releasing the joystick, keep pushing the throttle pedal. 4. Remove the hoses 5. Check the pressure in the manometer. It must be 280 bar. WARNING 6. If not, set the pressure of the relief valve. Bodily injury hazard. Spraying hydraulic oil can penetrate and burn skin. Loosen hydraulic connections very slowly to allow the oil pressure to dissipate gradually. Do not allow oil to squirt or spray. 5. Cap the auxiliary gear pump holes and the hoses ones. 6. Remove the auxiliary gear pump screws 7. Remove the auxiliary gear pump. 58 GTH-4016SR • GTH-4018SR Part No. 57.4400.9203 March 2010 Section 4 • Repair Procedures HYDRAULIC PUMPS REV A 5-5 How to Test the Auxiliary Gear Pump 1. Insert the 0-60psi manometer in the TP4 port 2. Start the engine. 3. Increase the engine up to 2000rpm 4. Close the valve placed near to the relief valve. 5. Check the pressure in the manometer. It must be 180psi. 6. If not, set the relief valve. 7. Open the valve. Part No. 57.4400.9203 GTH-4016SR • GTH-4018SR 59 Section 4 • Repair Procedures March 2010 Main Valve REV A 6-1 How to Remove the Main Valve 6-2 How to Test the Main Valve 1. Closed the valve of the main hydraulic line. It is behind the stair for the cabin. 1. Insert the 600 bar manometer in the TP1 port, above the main valve 2. Tag the hoses. 2. Start the engine. 3. Remove the connectors. 3. Press the throttle pedal and let the engine increases up to 2000 rpm. 4. Remove the hoses WARNING Bodily injury hazard. Spraying hydraulic oil can penetrate and burn skin. Loosen hydraulic connections very slowly to allow the oil pressure to dissipate gradually. Do not allow oil to squirt or spray. 4. Moving the joystick, retract the boom and check that the manometer reads 280 bar 5. If not, set the valve placed above the main valve. 5. Cap the main valve holes and the hoses holes 6. Remove the main valve screws 7. Support and secure the main valve to a lifting device of suitable capacity. Do not apply any lifting pressure. 8. Raise the main valve and laying it on the floor. 60 GTH-4016SR • GTH-4018SR Part No. 57.4400.9203 March 2010 Section 4 • Repair Procedures Outriggers REV A 7-1 How to Remove the Outriggers Valves Block 7-2 How to Test the Pressure on the Outriggers Valves Block 1. Tag all the hoses connected to the outriggers valves block placed in the front part of the chassis 2. Remove the connectors. 1. Insert a 600 bar pressure gauge in the TP1 port of the main valve. 2. Start the engine and lower the outriggers. 3. Remove the hoses. 4. Cap the outriggers valves block holes and the hoses holes. 5. Remove the screws that fix the valves block. 6. Remove the outrigger valves block. 3. Press the throttle pedal and make the engine increases up to maximum of rpm. 4. Pushing the dedicated buttons, keep lower the outriggers and check that the manometer reads 280 bar 5. If not, procceed with the procedure of paragraph 7-1. Part No. 57.4400.9203 GTH-4016SR • GTH-4018SR 61 Section 4 • Repair Procedures March 2010 OUTRIGGERS REV A 7-3 How to Test the Outriggers Retracion Valve (only for GTH-4018 SR) 1. Insert a 600 bar pressure gauge in the TP5 port placed into the engine compartment. 2. Start the engine and completly retract (or extend) the outriggers. 3. Keep the outriggers in this position and check that the manometer reads 100 bar. 4. If not, set the valve placed in the front part of the chassis, on a support in front of the slewing ring. 5. Keeping the outriggers completly retracted (or extended), check that the manometer reads 100 bar. 62 GTH-4016SR • GTH-4018SR Part No. 57.4400.9203 March 2010 Section 4 • Repair Procedures Sensors REV A 8-1 How to Remove the Boom Lenght and Angle Sensor 8-2 How to Test the Boom Lenght and Angle Sensor 1. Disconnect the connector 2. Remove the retainer on the cable keeping a lot of attention. 1. See paragraph “Overload Warning System Fault Codes” from point 5 to point 10. 3. Remove the screws. 4. Remove the boom lenght and angle sensor. NOTICE After reinstalling the sensors, follow the “How to Set the Overload Warning System” paragraph. Part No. 57.4400.9203 GTH-4016SR • GTH-4018SR 63 Section 4 • Repair Procedures March 2010 SENSORS REV A 8-3 How to Remove the Trasducer Pressure Switches 8-4 How to Test the Trasducer Pressure Switches 1. Lift the boom up to 50°. 1. See paragraph “Overload Warning System Fault Codes”, point 11 and 12. 2. Support and secure the boom to a lifting device of suitable capacity. 3. Remove the connector. 4. Slowly remove the trasducer pressure switch. WARNING Bodily injury hazard. Spraying hydraulic oil can penetrate and burn skin. Loosen hydraulic connections very slowly to allow the oil pressure to dissipate gradually. Do not allow oil to squirt or spray. 5. Cap the valve hoses. 64 GTH-4016SR • GTH-4018SR Part No. 57.4400.9203 March 2010 Section 4 • Repair Procedures SENSORS REV A 8-5 How to Test the Turret Proximity Switches 8-6 How to Test the Chassis Proximity Switches 1. Align the turret to the chassis. 1. Remove the outriggers steel guards. 2. Insert the turret locking pin. 2. Raise the outriggers and verify that the yellow LED placed on the proximity switch is on 3. Check that, on the overload system display, the writing “TURRET ALIGNED” appears on the 8th row. 4. Check that, on the overload system display, the writing “TYRES FRONTAL” (or “OUTRIGGERS FRONTAL” if the machine is on stabilizers) appears on the 2th row. 5. Remove the turret locking pin. 6. Turn the turret more then 10° (refers to the decal applied on the chassis) 7. Check that, on the overload system display, the writing “TYRES LATERAL” (or “OUTRIGGERS LATERAL” if the machine is on stabilizers) appears on the 2th row. 3. Check that the machine can move. 4. Lower the outriggers. 5. Remove the turret locking pin. 6. On the overload system display, simultaneously press the two buttons PLUS (+) and MINUS (-) to access the Diagnostic Screen Pages. 7. Using the ARROW buttons, reach the page “STABILIZERS SENSOR” to verify that: all the “safety switch” values correspond to 1 all the “stab down” values correspond to 1 8. Using the selector dedicated, set the steering mode to four-wheel steering and completly turn the steering wheel. 9. Using the dedicated selector, set the steering mode to two-wheel steering andslowly turn the steering wheel in the opposite direction than above. 10. Check that, on the overload system display, the writing “REAR TIRES ALIGNED” appears on the 8th row. Part No. 57.4400.9203 GTH-4016SR • GTH-4018SR 65 Section 4 • Repair Procedures March 2010 SENSORS REV A 8-7 How to Remove the Outriggers Load Pins 1. Lower the outriggers. 2. Remove the connectors. 3. Remove the screws. 4. Using a teflon punch and a hammer, pull out the load cell pin. 5. Reassemble the load cell pin making sure the arrow is directed towards the external part of the machine. 66 GTH-4016SR • GTH-4018SR Part No. 57.4400.9203 March 2010 Section 4 • Repair Procedures Miscellaneous REV A 9-1 How to Test the Emergency Pump 9-2 How to Test the Differential Lock Pressure Reducing Valve 1. Set the ignition switch in position 1. 2. Press the emergency stop button. 3. Press the emergency pump switch in the cab and, using the joystick, retract the boom. 4. Insert the 600 bar pressure gauge in the TP6 port placed into the engine compartment. 5. Keep doing the retraction movement and check the pressure: it must be 150 bar 1. In the valve placed on the front right side of the chassis, install a 60 bar pressure gauge connected to the TP7 2. Start the engine and check the pressure: it must be 10 bar. 3. If not, set the valve up to get 10 bar pressure. 6. If not, set the valve placed above the emergency pump. Part No. 57.4400.9203 GTH-4016SR • GTH-4018SR 67 Section 4 • Repair Procedures March 2010 MISCELLANEOUS REV A 9-3 How to Check the Engine RPM 1. Take a multimeter and set it on “freq or Hrz” 2. Connect the negative prod to the ground 3. Connect the positive prod to the “W” pin of the alternator 4. Start the engine 5. Using the manual accelerator, increase the engine up to 1100rpm (which on the multimeter corresponds to a reading of 0.40) 68 GTH-4016SR • GTH-4018SR Part No. 57.4400.9203 March 2010 Section 5 • Settings Settings Observe and Obey: Before Repairs Start: Repair procedures shall be completed by a person trained and qualified on the repair of this machine. Read, understand and obey the safety rules and operating instructions in the appropriate operator’s manual on your machine. Immediately tag and remove from service a damaged or malfunctioning machine. Be sure that all necessary tools and parts are available and ready for use. Repair any machine damage or malfunction before operating the machine. Read each procedure completely and adhere to the instructions. Attempting shortcuts may produce hazardous conditions. Unless otherwise specified, perform each maintenance procedure with the machine in the following configuration: - Machine parked on a firm, level surface - Boom in the stowed position - Key switch in the off position with the key removed - Wheels chocked Part No. 57.4400.9203 GTH-4016SR • GTH-4018SR 69 Section 5 • Settings March 2010 SETTINGS REV A How to Read the Overload Warning System Display 10. Press button ARROW UP 1. Start the engine 2. Select “Forks” 3. ENTER 4. Simultaneously press the two buttons PLUS (+) and MINUS (-) 5. Page 1 - SENSOR PAGE : • frontal turret when the value is 1 it indicates the turret is between -10° and +10°; • aligned turret when the value is 1 it indicates the turret is perfectly aligned for inserting the Lock Turret Pin; • rear tires aligned when the value is 1 it indicates the rear tires are perfectly aligned; • boom plug connected when the value is 1 it indicates the manplatform plug is connected and the controls from the cabin are disabled. 6. Press button ARROW UP 7. Page 2 - “STABILIZERS SENSOR” • stab down when the value is 1 it indicates the outrigger is on the ground. It’s connected to the load cell pin • safety switch when the value is 1 it indicates the outrigger is down. 8. Press button ARROW UP 9. Page 3 - “STABILIZERS SENSOR” • stab down when the value is 1 it indicates the outrigger is on the ground. It’s connected to the load cell pin • bit is the signal that the load cell pin sent. If the value is lower than 82 bit the cell is broken or disconnected. If the value if higher than 940 bit the cell is broken. In both situation the warning system will enter in alarm mode and the writing “err stab fw/bw left/righ open” will appear on the bottom row of the main page. If the load cell seized up, the displayed warning will be “err stab fw/bw left/righ vbat”. 70 11. Page 4 - “TILT SENSOR” • it represents (in bit) the electronic levelling sensor and it ranges between ± 2,5°. When the value it registers is besides that range, it is not possible to use the controls from the man-platform and machine levelling warning light placed on the instrument dashboard starts flashing. 12. Press button ARROW UP 13. Page 5 - “MOTION SENSORS” • raised stab when the value is 1 it indicates the outrigger is in storage position, so the machine can move • parking brake when the value is 1 it indicates the parking brake is not engage 14. Press button ARROW UP 15. Page 6 - “STABILIZERS PUSHBUTT” • when the value is 1 it indicates the outriggers pushbutton is active. 16. Press button ARROW UP 17. Page 7 - “SWITCHES/PUSHBUTTON” this screen includes the following pushbutton: • jobsite, platform, 2nd hydr line, mixing bucket, load limiter bypass, coordinate steering, crab steering: for each of them, when the value is 1 it indicates the pushbutton is active. 18. Press button ARROW UP 19. Page 8 - “MAX SPEED TUR ROT POT” it indicates the % value of the turret rotation speed potentiometer • Environment temperat it indicates the environment temperature, joystick doesn’t work under -20°. • Dump valve status when the value is 1 it indicates the dump valve status is active GTH-4016SR • GTH-4018SR Part No. 57.4400.9203 March 2010 Section 5 • Settings SETTINGS REV A 20. Press button ARROW UP 26. Press button ARROW UP 21. Page 9 - “RIGHT JOYSTICK” it indicates the right joystick movement values • y raise/lower • x forks rotation/attachment hydraulic locking % • fpry extention/retraction % • fprx turret rotation % • aut.Funct.Button when the value is 1 it indicates the white pushbutton placed on the joystick is active • enabling button when the value is 1 it indicates the enabling control switch placed on the joystick is active • function button not active 27. Page 10 - “MAIN VALVE DRIVER” indicates the INPUT values to the control unit from the main valve and from the joystick. • pwm is the value in bit from the joystick • pos is the value in bit from the main valve. This value can be visualized only with the engine on. 22. Press button ARROW UP 23. Page 10 - “LEFT JOYSTICK” it indicates the left joystick movement values • y lower/recover the winch rope • x turret rotation % • enabling button when the value is 1 it indicates the enabling control switch placed on the joystick is active 24. Press button ARROW UP 25. Page 10 - “PRESSURE SENSORS” it represents the pressure value (in bar and bit) for the pressure switches of the lifting and levelling cylinders • Psp pressure switch value for lifting cylinder rod chamber • psr pressure switch value for lifting cylinder piston chamber • pep pressure switch value for levelling cylinder rod chamber • per pressure switch value for levelling cylinder piston chamber Part No. 57.4400.9203 GTH-4016SR • GTH-4018SR 71 Section 5 • Settings March 2010 SETTINGS REV A How to Set the Overload Warning System 22. ENTER 23. By using PLUS (+) and MINUS (-) pushbuttons, select “MIN” 1. Start the engine. 2. Stabilize the machine on a level ground. 3. Align the turret to the chassis. 24. ENTER 4. Insert the turret locking pin. 25. By using PLUS (+) and MINUS (-) pushbuttons, select “SAVE” 5. Turn off the engine 26. ENTER 6. Start the engine again. 27. Completly extend the boom. 7. Press “ENTER” and then simultaneously press the two buttons PLUS (+) and MINUS (-) up to the request of password. 28. By using PLUS (+) and MINUS (-) pushbuttons, select “MAX” 8. To dial the password (contact the Service), keep in mind that pressing button PLUS (+) figures increase and pressing button MINUS (-) figures decrease. 9. Conferm each figure pressing “ENTER” 10. Once the password has been completed, the writing “2nd LEVEL ACCESS” appears. 29. ENTER 30. By using PLUS (+) and MINUS (-) pushbuttons, select “SAVE” 31. ENTER 32. By using PLUS (+) and MINUS (-) pushbuttons, select “EXIT” 33. ENTER 11. Keep the button PLUS (+) pressed to make the setting options appear. 34. By using ARROW UP or ARROW DOWN pushbuttons, select “ANGLE” 12. Language 35. ENTER 13. ENTER 36. Put the boom in horizontal position helping you by a tilt device. 14. Once entered, use ARROW UP or ARROW DOWN pushbuttons to select the language 15. ENTER 38. ENTER 16. By using PLUS (+) and MINUS (-) pushbuttons, select “SAVE” 39. By using PLUS (+) and MINUS (-) pushbuttons, select “SAVE” 17. ENTER 40. ENTER 18. By using PLUS (+) and MINUS (-) pushbuttons, select “EXIT” 41. By using PLUS (+) and MINUS (-) pushbuttons, select “EXIT” 19. ENTER 20. By using ARROW UP or ARROW DOWN pushbuttons, select “LENGHT” 21. Completly retract the boom. 72 37. By using PLUS (+) and MINUS (-) pushbuttons, select “ZERO” 42. ENTER 43. TILT SENSOR (if present) 44. ENTER GTH-4016SR • GTH-4018SR Part No. 57.4400.9203 March 2010 Section 5 • Settings SETTINGS REV A 45. By using PLUS (+) and MINUS (-) pushbuttons, select “ZERO” 46. ENTER 47. By using PLUS (+) and MINUS (-) pushbuttons, select “SAVE” 48. ENTER 49. By using PLUS (+) and MINUS (-) pushbuttons, select “EXIT” 50. Check that the Machine Levelled Warning Light is on. 51. CLOCK 52. ENTER 53. By using PLUS (+) and MINUS (-) pushbuttons, select “MODIF” 54. ENTER 55. Blinking cursor pass to year field: by using PLUS (+) and MINUS (-) pushbuttons set the right year 65. ENTER 66. By using ARROW UP or ARROW DOWN pushbuttons, select the attachment that have to be modified 67. ENTER 68. By using PLUS (+) and MINUS (-) pushbuttons, select “MODIF” 69. ENTER 70. By using PLUS (+) and MINUS (-) pushbuttons, select “0” when the attachment is not present, or select “1” when the attachment is present 71. By using PLUS (+) and MINUS (-) pushbuttons, select “SAVE” 72. ENTER 73. By using PLUS (+) and MINUS (-) pushbuttons, select “EXIT” 74. ENTER 75. ESC 56. ENTER 57. Blinking cursor pass to month field: by using PLUS (+) and MINUS (-) pushbuttons set the right month 76. Turn off the engine and then start it again. 58. ENTER 59. Blinking cursor pass to day field: by using PLUS (+) and MINUS (-) pushbuttons set the right day 60. By using PLUS (+) and MINUS (-) pushbuttons, select “SAVE” 61. ENTER 62. By using PLUS (+) and MINUS (-) pushbuttons, select “EXIT” 63. ENTER 64. By using ARROW UP or ARROW DOWN pushbuttons, select “ENABLING IMPLEMENTS” Part No. 57.4400.9203 GTH-4016SR • GTH-4018SR 73 Section 5 • Settings March 2010 SETTINGS REV A How to Set the Machine Functions PARAMETERS - SETTING 1. Open the dashboard and find the connector X941 behind the fuses board. 2. Install the cable 55.0602.0203 from the connector X941 to the computer. 3. In the computer the program “MTGTH40XX-R. exe” has to be installed. If not, contact the Genie Service dept. By means of each one of parameter setting menu is possible to: • Open file reading parameter data • Save file with parameter data (only when parameters data have been read form display unit or when a file has been opened) • Read data from disply unit (only when COM is selected, serial adapter connected to PC and telehandler harness and telehandler has power switched on) • Write data to display unit (only when COM is selected, serial adapter connected to PC and telehandler harness and telehandler has power switched on) 4. Switch on the instrument panel. 5. Make the program run. 6. Select the right “COM” 7. Click on Parameters menu and then select one of the options by clicking on it 8. Setting allows to select a parameter group: • Function: speed and ramp time for each function • Slowing: reduction speed of some functions depending on telehandler geometrical and current mass value and contemporary operations When a file is both opened and saved all parameters (functions, slowing and general) are read and saved then the file can be used to download all parameters thruogh Parameter-Download. But, by pressing on write data button, for example after a modification of some parameters, ONLY parameters related to the window (functions, slowing or general) are written to display unit. When a window is activated no parameters are shown until either a read from display unit or a file opening are done; once parameters have been read passing to another window will show you parameters either read or opened from a file. 74 GTH-4016SR • GTH-4018SR Part No. 57.4400.9203 March 2010 Section 5 • Settings SETTINGS REV A Once clicked on Parameters - Setting- Functions, following window will be displayed: READ DATA is enabled only if COM port has been selected WRITE DATA is enabled only if COM port has been selected AND a FILE OPEN or a READ DATA are executed Descending menu selecting the place where function are operated Jobsite Platform Radio Short description of parameters MI N MAX Ramp Ramp up down Part No. 57.4400.9203 GTH-4016SR • GTH-4018SR 75 Section 5 • Settings March 2010 SETTINGS REV A After opening a file or reading from display unit, all function parameters available for the place where functions are operated will be displayed 76 GTH-4016SR • GTH-4018SR Part No. 57.4400.9203 March 2010 Section 5 • Settings SETTINGS REV A Now it is possible to change parameters by clicking on arrow in the box of the parameter, arrow up to increase the value and arrow down to decrease it. When the system detect that parameter is different form the initial value the box will become orange. In order to write data to the unit, WRITE DATA button MUST be pressed, parameters will be soon used by the unit, but if a function is activated parameters just written will be used when joystick pass through neutral. • • • • Minimum (MIN) driving value is the command voltage that system uses when a function is operated and joystick is put just outside central neutral zone Maximum (MAX) driving value is the command voltage that system uses when a function is operated and joystick is put at its maximum stroke in one direction. Ramp-up parameter is the speed at which the proportional command voltage follows joystick analog signal when it is increased (it goes away from neutral position) Ramp-down parameter is the speed at which the proportional command voltage follows input analog signal when it is decreased (it goes towards neutral position). Part No. 57.4400.9203 GTH-4016SR • GTH-4018SR 77 Section 5 • Settings March 2010 SETTINGS REV A Once clicked on Parameters - Setting- Slowing, following window will be displayed: READ DATA is enabled only if COM port has been selected WRITE DATA is enabled only if COM port has been selected AND a FILE OPEN or a READ DATA are executed Short description of parameters 78 GTH-4016SR • GTH-4018SR Part No. 57.4400.9203 March 2010 Section 5 • Settings SETTINGS REV A After opening a file or reading from display unit, all slowing parameters will be displayed Part No. 57.4400.9203 GTH-4016SR • GTH-4018SR 79 Section 5 • Settings March 2010 REV A Intentionally blank page 80 GTH-4016SR • GTH-4018SR Part No. 57.4400.9203 March 2010 Section 6 • Troubleshooting Troubleshooting DANGER Observe and Obey: Troubleshooting and repair procedures shall be completed by a person trained and qualified on the repair of this machine. Immediately tag and remove from service a damaged or malfunctioning machine. Repair any machine damage or malfunction before operating the machine. WARNING WARNING Before Troubleshooting: Read, understand and obey the safety rules and operating instructions in the appropriate operator’s manual on your machine. Be sure that all necessary tools and parts are available and ready for use. Crushing hazard. When testing or replacing any hydraulic component, always support the structure and secure it from movement Electrocution hazard. Contact with electrically charged circuits could result in death or serious injury. Remove all rings, watches and other jewelry. Bodily injury hazard. Spraying hydraulic oil can penetrate and burn skin. Loosen hydraulic connections very slowly to allow the oil pressure to dissipate gradually. Do not allow oil to squirt or spray. General Repair Process Be aware of the following hazards and follow generally accepted safe workshop practices. Identify symptoms Malfunction discovered Troubleshoot problem still exists Return to service Part No. 57.4400.9203 problem solved GTH-4016SR • GTH-4018SR Inspect and test Perform repair 81 Section 6 • Troubleshooting March 2010 TROUBLESHOOTING REV A Overload Warning System Fault Codes 1. CAN ERROR display unit does not receive correct CAN messages or does not receive at all CAN messages from Control unit or Platform unit in case platform is selected, telehandler can not work 2. LOAD TABLE ERROR load table data read from EEPROM are corrupted then telehandler can not work 3. MACHINE DATA ERROR telehandler data read from EEPROM are corrupted then telehandler can not work 4. CB0 TABLE ERROR Cb0 table data read from EEPROM are corrupted then telehandler can not work 5. ERR LEN SENS 1 VBAT / ERR LEN SENS 2 VBAT Length sensor 1 or 2 signal is larger than MAX1/MIN2 stored value then telehandler can not work. Sensor has not yet been calibrated or potentiometer is broken or wire is connected to +5Vdc or +12Vdc voltage 6. ERR LEN SENS 1 OPEN / ERR LEN SENS 2 OPEN Length sensor 1 or 2 signal is less than MIN1 stored value then telehandler can not work. Sensor has not yet been calibrated or potentiometer is broken or wire is connected to ground or wire cut or sensor is not correctly connected to power supply 7. ERR LEN SENS DIFF Length sensor 1 and 2 does not give the same length value then telehandler can not work. Sensor has not yet been calibrated or potentiometers are broken or there is some wire wrong connections 82 8. ERR ANG SENS 1 VBAT / ERR ANG SENS 2 VBAT Angle sensor 1 or 2 signal is larger than maximum possible (4.5V or 920 BIT) then telehandler can not work. Sensor is broken or wire is connected to +5Vdc or +12Vdc voltage or sensor is not correctly connected to power supply 9. ERR ANG SENS 1 OPEN / ERR ANG SENS 2 OPEN Angle sensor 1 or 2 signal is less than minimum possible (0.5V or 102 BIT) then telehandler can not work. Sensor is broken or wire is connected to ground or wire is cut or sensor is not correctly connected to power supply 10. ERR ANG SENS DIFF Angle sensor 1 and 2 does not give the same angle value then telehandler can not work. Sensor are broken or there is some wires wrong connection 11. ERR SENS PSP VBAT / ERR SENS PSR VBAT / ERR SENS PEP VBAT / ERR SENS PER VBAT Pressure sensor signal is larger than maximum possible (4.5V or 920 BIT) then telehandler can not work. Sensor is broken or wire is connected to +5Vdc or +12Vdc voltage or sensor is not correctly connected to power supply 12. ERR SENS PSP OPEN / ERR SENS PSR OPEN / ERR SENS PEP OPEN / ERR SENS PER OPEN Pressure sensor signal is less than minimum possible (0.5V or 102 BIT) then telehandler can not work. Sensor is broken or wire is connected to ground or wire is cut or sensor is not correctly connected to power supply 13. ONLY IMPLEMENTS Platform/Road/Jobsite switch is on Jobsite position but a platform is selected therefore telehandler can not work GTH-4016SR • GTH-4018SR Part No. 57.4400.9203 March 2010 Section 6 • Troubleshooting TROUBLESHOOTING REV A 14. ONLY PLATFORMS Platform/Road/Jobsite switch is on Platform position but an implement is selected therefore telehandler can not work 15. ERR MODE SELECTOR Both jobsite signal and platform signal are at +12Vdc, it is not a possible configuration then telehandler can not work. The Platform/Road/Jobsite switch is broken or some wiring connection is wrong. Red LED is switched on and buzzer is not activated. Part No. 57.4400.9203 GTH-4016SR • GTH-4018SR 83 Section 6 • Troubleshooting March 2010 TROUBLESHOOTING REV A How to Troubleshoot the Boom Movements 1. Check if the display is in alarm. 2. Check the main valve values show on the display (see “How to Read the Overload Warning System Display” paragraph, point 27) 3. After that, it’s possible to understand if the problem has an electric or hydraulic cause If there are 12V, move the joystick and simultaneously make the same movements using the main valve manual controls: if the boom works, replace the solenoids, if not check the pressures of the main valve (see paragraph “How to test the main valve” into Repair Procedure Section) 4. If the problem is electrical (PWM doesn’t change), check the following items: • • 84 Check the joystick screen page (see “How to Read the Overload Warning System Display” paragraph, point 21). If the values shown don’t correspond to the relatives joystick movements verify the following items: a. Check the Jobsite/Road/Platform Selector S21 is set on jobsite position; b. If there are some anomalies, check the F13 fuse; c. Check the Jobsite/Road/Platform Selector connections; d. Check the joystick harness; e. If all these conditions are present, replace the joystick. Check the joystick screen page (see “How to Read the Overload Warning System Display” paragraph, point 21). If the values shown correspond to the relatives joystick movements, verify the following items: a. Check the harnesses and the connections of the main unit (placed behind the seat) and of the main valve; b. If the harness is damaged, replace it. c. If the harness is not damaged, use a tester to make the following check: - Move the joystick and verify with the tester there are 12V on main valve solenoids EV103 and EV102. GTH-4016SR • GTH-4018SR Part No. 57.4400.9203 March 2010 Section 6 • Troubleshooting TROUBLESHOOTING REV A How to Troubleshoot the Transmission MOTION SENSOR 1 RAISED STAB 1 RAISED STAB PARKING BRAKE 1 1 .0 - 1. Start from the above screen page. 2. If one or more values are 0, the transmission doesn’t work (ex: parking brake engaged, outriggers not in storage position). 3. If all the values shown in this screen page are 1, then check the following items: - check there are 12V on connector X910 pin 18 (seat switch - operator not seated) and connector X208 pin 17; - check fuse F14-10A integrity; - check connector X182 (Gear Selector); - check connector X16 pin 2 (gear selector input), pin 12 (gear selector input), pin 11 and 9 (solenoids output); - check connector X170 pin 5 and pin 6; - engaging the relative gear, check there are 12V on connector X179 (forward gear) and connector X180 (reverse gear); If all listed above is confirmed, check pin 48 (L-rear) and pin 49 (L-front) of the connector X935 (main unit, behind the seat), and pin 50 (R-rear) and pin 51 (R-front) of the connector X934; If all listed above is confirmed, the problem comes from the Software and/or Hardware. Contact Genie Service. 5. If at least one of the PARKING BRAKE value shown in this screen page is 0, then check the following items: - the parking brake is engaged. If it is not engaged and the value is 1, check pressure switch X113 (placed on the parking brake lever). Using a multimeter, verify that the pressure switch X113 is NO (normal open). - If all listed above is confirmed, check the hydraulic system (see paragraph “How to test the brake pedal” into Repair Procedure Section). 4. If at least one of the RAISED STAB values shown in this screen page is 0, then check the following items: - check fuse F20-10A integrity; - check there are 12V on pin A of the connectors X140 (R-front outrigger), X143 (L-front outrigger), X147 (L-rear outrigger), X148 (R-rear outrigger). If the outirigger is in storage position and the relative LED lights on, on pin C there should be 12V; - If all listed above is confirmed, check pin 1 (R-rear) and pin 2 (L-rear) of the connector X129, and pin 3 (R-front) and pin 6 (L-front) of the connector X130; Part No. 57.4400.9203 GTH-4016SR • GTH-4018SR 85 Section 6 • Troubleshooting March 2010 TROUBLESHOOTING REV A How to Troubleshoot the Mechanical Gear How to Troubleshoot the Jobsite Position 1. Check if the gear selector is in neutral position. 1. Check if the Jobsite/Road/Platform selector is in Jobsite position. 2. Check fuse F14-10A integrity. 3. Check the mechanical gear selector connector S14. 2. Check fuse F13-10A integrity. 4. Check connector X16 pin 6 and pin 7 (fuses board) for verifing K5 relay. 3. Check if there are 12V on connector X231/3 (steering selection); if not, verify connector X180.2; if not, verify connector X180.1. If not, replace the connector. 5. Check connector X162 (speed sensor B162): if it’s disconnected the main unit doesn’t allowed shifting. 4. Verify there are 12V on pin 41 or pin 42 of the connectors X934 (main control unit), placed behind the seat. 6. Check pin 13 of the connector X16 (speed sensor input), placed in the fuses board. 5. If not, verify there are 12V on pin 24 or pin 25. If not, the problem comes from the Software and/or Hardware. Contact Genie Service. 7. If all listed above is confirmed, replace the shift control unit K24, otherwise: • Verify there are 12V on one of the two shifting valve connectors: X131 (first gear) and X132 (second gear). 8. If all listed above is confirmed, check the hydraulic system. Keep particular attention for the overcharged pressure which must be about 25 bar. 86 6. If all listed above is confirmed, check pin 24 and pin 23 of the connector X130 7. If all listed above is confirmed, verify that, according to the selected steering mode, there are 12V on one of the two valve connectors: EV137 and EV138. 8. If all listed above is confirmed, check the hydraulic system. GTH-4016SR • GTH-4018SR Part No. 57.4400.9203 March 2010 Section 6 • Troubleshooting TROUBLESHOOTING REV A How to Troubleshoot the Outriggers Movements 1. Verify the boom is under 20° and that the machine is not in alarm. 2. Verify the Jobsite/Road/Platform selector is in Jobsite position. 3. Check fuse F13-10A integrity. STABILIZERS PUSHBUTT 0 0 EXTENSION RETRACT 0 0 0 0 EXTENSION RETRACT 0 0 4. Using the screen page above, test the four outrigger pushbuttons. When the pushbutton is active, the value shown on the display goes from 0 to 1; if, pressing the button, this doesn’t happen, verify the button connector: X171, X172, X173, X174. Replace it if necessary. 5. If all listed above is confirmed, check pin 1,2,3,4,5,6,7,8 of the connector X201. 6. If all listed above is confirmed, check pin 9,10,11,12,29,38,39,40 of the connector X935. 7. If all listed above is confirmed, check pin 42 (L-front), pin 19 (R-front), pin 12 (L-rear) and pin 16 (R-rear) of the connector X935. If there aren’t 12V the problem comes from the Software and/or Hardware. Contact Genie Service. 8. If all listed above is confirmed, check pin 19,20,21,22 of the connector X130. 9. If all listed above is confirmed, verify that, each time the dedicated button is pressed, there are 12V on one of the following valve connectors: EV133 (L-front), EV134 (R-front), EV135 (L-rear), EV136 (R-rear). 10. If all listed above is confirmed, check the hydraulic system. Part No. 57.4400.9203 GTH-4016SR • GTH-4018SR 87 Section 6 • Troubleshooting March 2010 TROUBLESHOOTING REV A How to Troubleshoot the Working Mode Selecting • 1. Set the machine on stabilizers. 2. Using the screen page below, verify the value of each of the four SAFETY SWITCH sensors is 1. Verify the value of the four load cells, STAB DOWN, is 1. 0 0 0 0 STABILIZERS SENSOR STAB DOWN 0 SAFETY SWITCH 0 STAB DOWN 0 SAFETY SWITCH 0 STATUS 3. If all listed above is confirmed but the system doesn’t change scale then the problem comes from the Software and/or Hardware. Contact Genie Service. 4. If one or more of the value listed on item 2 is 0, check the following items: • 88 If the value of one of the load cell, STAB DOWN, is 0, verify, using the screen page STABILIZER SENSOR, the value of the cell: if this is above 940 bit the cell is broken, if not do as follow: a. Check the fuse F20-10A integrity; b. Check there are 12V on pin A (power) of the connectors X900 (R-front), X903 (L-front), X904 (L-rear), X906 (R-rear); c. If all listed above is confirmed, verify there are 12V on pin 9 (L-rear) and pin 11 (R-rear), pin 18 (L-front), pin 16 (R-front) of connector X130; d. If all listed above is confirmed, verify there are 12V on pin A6 (L-rear) and pin B5 (R-rear), pin A2 (L-front), pin B6 (R-front) of connector X933 of the display; e. If all listed above is confirmed, the problem comes from the Software and/or Hardware. Contact Genie Service. If the value of one of the four SAFETY SWITCH sensors is 0: a. Check that the specific sensor and the target are lined up; b. Check the fuse F20-10A integrity; c. Check there are 12V on pin 1 (power) and pin 2 (signal) of the connectors X901 (R-front), X902 (L-front), X905 (L-rear), X907 (R-rear); d. If all listed above is confirmed, check pin 3,6,8,10,15,17,25,26 of the connector X130; e. If all listed above is confirmed, verify there are 12V on pin 38 of the connectors X935 (L-rear) and pin 43 (R-rear), pin 48 (L-front), pin 19 (R-front) of connector X934; f. If all listed above is confirmed, the problem comes from the Software and/or Hardware. Contact Genie Service. GTH-4016SR • GTH-4018SR Part No. 57.4400.9203 March 2010 Section 7 • Schematics Schematics REV A About This Section There are two groups of schematics in this section. An illustration legend precedes each group of drawings. Electrical Schematics WARNING Observe and Obey: Troubleshooting and repair procedures shall be completed by a person trained and qualified on the repair of this machine. Immediately tag and remove from service a damaged or malfunctioning machine. Repair any machine damage or malfunction before operating the machine. Hydraulic Schematics WARNING Before Troubleshooting: Read, understand and obey the safety rules and operating instructions in the appropriate operator's manual on your machine. Be sure that all necessary tools and test equipment are available and ready for use. Electrocution hazard. Contact with electrically charged circuits could result in death or serious injury. Remove all rings, watches and other jewelry. Bodily injury hazard. Spraying hydraulic oil can penetrate and burn skin. Loosen hydraulic connections very slowly to allow the oil pressure to dissipate gradually. Do not allow oil to squirt or spray. General Repair Process Identify symptoms Malfunction discovered Troubleshoot problem still exists Return to service Part No. 57.4400.9203 GTH-4016SR • GTH-4018SR problem solved Inspect and test Perform repair 89 Section 7 • Schematics March 2010 Electrical Component Legend REV A ACTUATORS ACCUMULATORS Emergency controls Battery Pushbutton control Thermocouple Rotary control Element Pedal control DYNAMIC APPLICATIONS M Motor G Generator M As_3p_motor TERMINALS AND GROUNDS Ring Proximity control Ground 3 Lever control Terminal ELECTRONIC PARTS Timed control Ground to frame - + Rectifier Mechanical/manual control Knot Key control RESISTANCES Protection ground Light-emitting diode Frame ground 2 Diode COILS Condenser Resistance Resistor Coil PUSHBUTTONS Potentiometer Mechanical coupling coil Variable resistance Manual NC contact Winding Manual NO contact SIGNALS Intermittent lamp A/C coil NC mushroom-head pushbutton Whistle Coil with diode NO mushroom-head pushbutton Lamp NC level Buzzer Winding with diode Siren CONNECTORS NO level Connector Bell Pushbutton with NC return STATIC APPLICATIONS Horn Auto-transformer NC tie-rod FUSES AND RELAYS Horizontal fuse Pushbutton with NO return Transformer NO tie-rod Relay 90 GTH-4016SR • GTH-4018SR Part No. 57.4400.9203 March 2010 Section 7 • Schematics ELECTRICAL COMPONENT LEGEND REV A CONTACTS Thermal Normally open (NO) Normally closed (NC) NO limit switch NC limit switch Contactor Magneto-thermal closure Magneto-thermal opening Thermal closure Thermal opening Exchange NC proximity NO proximity NO mechanical NC mechanical Selector Selector2 Part No. 57.4400.9203 GTH-4016SR • GTH-4018SR 91 Section 7 • Schematics March 2010 Hydraulic Component Legend REV A MOTORS Fixed motor with one direction of flow Mechanical control with roller Combined non-return and throttle valve Fixed motor with two directions of flow Electro-magnetic control with winding (solendoid) Switching valve Control with electric motor Pressure relief valve with direct control Direct pressure control Pressure relief valve with hydraulic control Fixed displacement pump with one direction of flow Indirect (piloted) pressure control Pressure reducing valve Fixed displacement pump with two directions of flow Control with electromagnet and piloted distributor Sequence valve PIPES AND CONNECTIONS Adjustable throttle valve Variable motor with two directions of flow Reversible fixed motor with two directions of flow M PUMP Variable displacement pump with one direction of flow Induction and return pipe Variable displacement pump with flow regulator Two-way flow regulator Piloting pipe Cut-out cock CYLINDERS Single-acting cylinder POWER SOURCES Blow-by pipe M Single-acting cylinder with spring return Flexible hose Thermal engine OTHER EQUIPMENT Double-acting cylinder Double-acting cylinder with bilateral rod Electric motor Connecting point Accumulator Pipe cross without connection Water tank Telescopic cylinder Breather Compressor COMMANDS AND CONTROLS Shaft rotating in one direction Closed pressure fitting Filter Shaft rotating in two directions Pressure fitting with connected pipe Cooler Hand-operated control Hand-operated control with pushbutton Hand-operated control with lever Hand-operated control with pedal Quick fitting Pressure gauge Quick fitting with check valves DISTRIBUTION - SETTING ELEMENTS Thermometer Non-return valve Flowmeter Calibrated non-return valve Pressure switch Unlockable non-return valve Drain to tank indication Mechanical control with pushbutton Mechanical control with spring 92 GTH-4016SR • GTH-4018SR Part No. 57.4400.9203 March 2010 Section 7 • Schematics HYDRAULIC COMPONENT LEGEND REV A DISTRIBUTION - SETTING ELEMENTS Two-position and two-way distributor, with manual lever control and spring return Three-way and two-position distributor, with hydraulic control Two-position, three-way distributor, with electro-magnetic control and spring return Distributor with mechanical control and span proportional to the action of the same control Two-position, three-way distributor, with representation of transient connection during passage phase Electro-hydraulic single-acting servo valve Part No. 57.4400.9203 GTH-4016SR • GTH-4018SR 93 Section 7 • Schematics March 2010 Electrical Schematic - GTH-4016SR and GTH-4018SR REV A Page 1 of 16 94 GTH-4016SR • GTH-4018SR Part No. 57.4400.9203 March 2010 Section 7 • Schematics Electrical Schematic - GTH-4016SR and GTH-4018SR REV A Page 2 of 16 Part No. 57.4400.9203 GTH-4016SR • GTH-4018SR 95 Section 7 • Schematics March 2010 Electrical Schematic - GTH-4016SR and GTH-4018SR REV A Page 3 of 16 96 GTH-4016SR • GTH-4018SR Part No. 57.4400.9203 March 2010 Section 7 • Schematics Electrical Schematic - GTH-4016SR and GTH-4018SR REV A Page 4 of 16 Part No. 57.4400.9203 GTH-4016SR • GTH-4018SR 97 Section 7 • Schematics March 2010 Electrical Schematic - GTH-4016SR and GTH-4018SR REV A Page 5 of 16 98 GTH-4016SR • GTH-4018SR Part No. 57.4400.9203 March 2010 Section 7 • Schematics Electrical Schematic - GTH-4016SR and GTH-4018SR REV A Page 6 of 16 Part No. 57.4400.9203 GTH-4016SR • GTH-4018SR 99 Section 7 • Schematics March 2010 Electrical Schematic - GTH-4016SR and GTH-4018SR REV A Page 7 of 16 100 GTH-4016SR • GTH-4018SR Part No. 57.4400.9203 March 2010 Section 7 • Schematics Electrical Schematic - GTH-4016SR and GTH-4018SR REV A Page 8 of 16 Part No. 57.4400.9203 GTH-4016SR • GTH-4018SR 101 Section 7 • Schematics March 2010 Electrical Schematic - GTH-4016SR and GTH-4018SR REV A Page 9 of 16 102 GTH-4016SR • GTH-4018SR Part No. 57.4400.9203 March 2010 Section 7 • Schematics Electrical Schematic - GTH-4016SR and GTH-4018SR REV A Page 10 of 16 Part No. 57.4400.9203 GTH-4016SR • GTH-4018SR 103 Section 7 • Schematics March 2010 Electrical Schematic - GTH-4016SR and GTH-4018SR REV A Page 11 of 16 104 GTH-4016SR • GTH-4018SR Part No. 57.4400.9203 March 2010 Section 7 • Schematics Electrical Schematic - GTH-4016SR and GTH-4018SR REV A Page 12 of 16 Part No. 57.4400.9203 GTH-4016SR • GTH-4018SR 105 Section 7 • Schematics March 2010 Electrical Schematic - GTH-4016SR and GTH-4018SR REV A Page 13 of 16 106 GTH-4016SR • GTH-4018SR Part No. 57.4400.9203 March 2010 Section 7 • Schematics Electrical Schematic - GTH-4016SR and GTH-4018SR REV A Page 14 of 16 Part No. 57.4400.9203 GTH-4016SR • GTH-4018SR 107 Section 7 • Schematics March 2010 Electrical Schematic - GTH-4016SR and GTH-4018SR REV A Page 15 of 16 108 GTH-4016SR • GTH-4018SR Part No. 57.4400.9203 March 2010 Section 7 • Schematics Electrical Schematic - GTH-4016SR and GTH-4018SR REV A Page 16 of 16 Part No. 57.4400.9203 GTH-4016SR • GTH-4018SR 109 Section 7 • Schematics March 2010 Hydraulic Schematic GTH-4016 SR REV A Double overcenter safety valve piloting ratio: 4/1 cracking pressure: 350 bar HYDRAULIC CIRCUIT COLORS LEGENDA Third section boom telescoping cylinder Hydraulically piloted double check valve Quick coupling hydraulic ports piloting ratio: 4/1 Single overcenter safety valve piloting ratio: 4/1 cracking pressure: 350 bar Forks tilt cylinder Open circuits pressure lines Closed circuits high pressure lines B6 Forks attachment quick coupling cylinder (optional) Load sensing and piloting lines C3 V2 C2 Turret rotation hydraulic motor Suction lines Turret Unlocking pressure 15/50 bar Tank lines Double overcenter safety valve piloting ratio: 7.6/1 cracking pressure: 350 bar A5 B5 Turret rotation hydraulic motor double overcenter safety valve piloting ratio: 3/1 cracking pressure: 150 bar C1 Forks self-levelling articulation slave cylinder capacity: 0.5 Litri precharge pressure 35 bar T V1 Attachments Double overcenter safety valve piloting ratio: 4/1 cracking pressure: 350 bar B4 A4 Telescoping A3 Telescopic boom, turret and undercarriage functions main valve F R Pressure switch activating pressure 70 bar T1 B Boom lift A1 B1 Pressure switch activating Steering rotating pressure actuator 10-20 bar displacement: 200 cc/rev Pp LS2 L 190 bar P Tp1 Telescopic boom, turret and undercarriage functions hydraulic circuit test port 260 bar T C 150 bar N Forks tilt 320 bar LS service/emergency brakes pedal pump Air condition compressor hydraulic motor displacement 16 cc/rev (optional) P 320 bar A2 B2 Priority valve load sensing type R N Capacity: Parking brake 0.5 litres handle selector precharge valve pressure 50 bar 30 bar Pressure switch N’ T activating pressure 2-10 bar T1’ Hydraulically powered R1 B3 Second section boom telescoping cylinder Anticavitation valve cracking pressure 5 bar Single overcenter safety valve piloting ratio: 4/1 Telescopic boom lift cylinder cracking pressure: 350 bar Capacity: 1.5 litres precharge pressure 35 bar Stabilizers A6 Functions lines Low pressure lines R LS 280 bar T LS1 P Tank lines collector TURRET-UNDERCARRIAGE BOUNDARY Rotating joint Rear axle pivoting lockout valves Rear axle 2 ways/2 positions A P B T TURRET-UNDERCARRIAGE BOUNDARY Rotating joint Steering modes selector valve Differential lock 4 ways / 3 positions selector valve 3 ways / 2 positions Rotating joint Outriggers selector valves block P B T Air bleeding valve Rear axle pivoting cylinder (left) Front axle A P B A C A Front axle steering cylinder Rear axle steering cylinder B PR Pressure reducing valve setting pressure: 10 bar A Hydraulically piloted double check valve piloting ratio: 4/1 T Air bleeding valve P Check valve cracking pressure: 0.5 bar (optional) R T1 T2 Ev2 M PS Fa Fa1 Fe 430 bar A Diesel engine G Hydrostatic transmission Tp2 boost pressure test port MH B X2 X1 M1 Boom functions gear pump displacement: 43 cc/rev T2 Auxiliary gear pump brakes circuit displacement: 14 cc/rev Hydrostatic transmission pump max displacement: 71 cc/rev Auxiliary circuit max pressure relief valve 110 Ev6 U B A Mechanical gear speed selector valve 4 ways/3 positions Mechanical gear speed selector actuator 25 bar X1 Pressure switch activating pressure 5 bar Emergency line max pressure relief valve (optional) P Ev5 X2 Hydraulically piloted double check valve piloting ratio: 4/1 Heat exchanger T B 450 bar 150 bar MB 450 bar M Hydraulically piloted double check valve piloting ratio: 4/1 Rear right outrigger cylinder Tp6 Emergency line test port (optional) Emergency electrical motor driven pump set 2.6 cc/rev (optional) Hydrostatic transmission high pressure test port Tp3 Ev1 Hydraulically piloted double check valve piloting ratio: 4/1 Rear left outrigger cylinder Rear axle lockout cylinders control valve orifice dia.: 2 mm cracking pressure: 0.5 bar Check valve cracking pressure: 2.5 bar Shutoff valve Auxiliary circuit pressure test port 180 bar Tp4 Front right outrigger cylinder B Test port Tp7 Rear axle pivoting cylinder (right) Front left outrigger cylinder T S FS MA A G Mechanical gear (2 speeds) Shutoff valve Suction screen Check valve cracking pressure: 8 bar T Flushing valve Hydrostatic transmission motor max displacement: 80 cc/rev GTH-4016SR • GTH-4018SR Return filter with suction line pressurized at 0,5 bar Oil tank capacity 220 liters Part No. 57.4400.9203 March 2010 Section 7 • Schematics Hydraulic Schematic GTH-4018 SR REV A Double overcenter safety valve piloting ratio: 4/1 cracking pressure: 350 bar Forks tilt cylinder HYDRAULIC CIRCUIT COLORS LEGENDA Open circuits pressure lines Hydraulically piloted double check valve Quick coupling hydraulic ports piloting ratio: 4/1 Forks attachment quick coupling cylinder (optional) Closed circuits high pressure lines Functions lines A6 Low pressure lines B6 Load sensing and piloting lines C3 V2 C2 Turret rotation hydraulic motor Suction lines Turret Unlocking pressure 15/50 bar Tank lines Double overcenter safety valve piloting ratio: 7.6/1 cracking pressure: 350 bar A5 B5 Turret rotation hydraulic motor double overcenter safety valve piloting ratio: 3/1 cracking pressure: 150 bar C1 Forks self-levelling articulation slave cylinder capacity: 0.5 Litri precharge pressure 35 bar V1 T Attachments Double overcenter safety valve piloting ratio: 4/1 cracking pressure: 350 bar B4 A4 Telescoping A3 Telescopic boom, turret and undercarriage functions main valve F R Pressure switch activating pressure 70 bar Priority valve load sensing type T1 B Boom lift A1 B1 Pressure switch activating Steering rotating pressure actuator 10-20 bar displacement: 200 cc/rev Pp LS2 L 190 bar P Tp1 T Telescopic boom, turret and undercarriage functions hydraulic circuit test port 260 bar Tank lines collector C 150 bar N R LS TURRET-UNDERCARRIAGE BOUNDARY Rotating joint Rear axle pivoting lockout valves Rear axle 2 ways/2 positions A P B T Tp5 Front axle Outriggers retraction line max pressure relief valve Outriggers lockout valve 2 ways/2 positions B A C Front left outrigger cylinder Front right outrigger cylinder T B Test port Tp7 A Front axle steering cylinder B PR Pressure reducing valve setting pressure: 10 bar A Hydraulically piloted double check valve piloting ratio: 4/1 Outriggers telescope lockout cylinder T Air bleeding valve P Check valve cracking pressure: 0.5 bar (option) Ev1 Ev2 PS Fa Fa1 Fe M 430 bar A Diesel engine G Hydrostatic transmission Tp3 boost pressure test port MH B X2 X1 M1 Boom functions gear pump displacement: 43 cc/rev T2 Auxiliary gear pump brakes circuit displacement: 14 cc/rev Hydrostatic transmission pump max displacement: 71 cc/rev Auxiliary circuit max pressure relief valve Part No. 57.4400.9203 Ev6 U B A Mechanical gear speed selector valve 4 ways/3 positions Mechanical gear speed selector actuator 25 bar X1 Pressure switch activating pressure 5 bar Emergency line max pressure relief valve (optional) P Ev5 X2 Hydraulically piloted double check valve piloting ratio: 4/1 Heat exchanger T B 450 bar 150 bar MB 450 bar M Hydraulically piloted double check valve piloting ratio: 4/1 Rear right outrigger cylinder Tp6 Emergency line test port (optional) Emergency electrical motor driven pump set 2.6 cc/rev (option) Hydrostatic transmission high pressure test port Tp2 T1 T2 Hydraulically piloted double check valve piloting ratio: 4/1 Rear left outrigger cylinder Rear axle lockout cylinders control valve orifice dia.: 2 mm - cracking pressure: 0.5 bar R 100 bar Outriggers telescope lockout cylinder A P Check valve cracking pressure: 2.5 bar Shutoff valve Auxiliary circuit pressure test port 180 bar Tp4 LS1 Outriggers retraction line test port Outriggers selector valves block P B T Rear axle steering cylinder P TURRET-UNDERCARRIAGE BOUNDARY Rotating joint Air bleeding valve Rear axle pivoting cylinder (right) 280 bar T Rotating joint Steering modes selector valve Differential lock 4 ways / 3 positions selector valve 3 ways / 2 positions Rear axle pivoting cylinder (left) Forks tilt 320 bar LS service/emergency brakes pedal pump Air condition compressor hydraulic motor displacement 16 cc/rev (optional) P 320 bar A2 B2 R N Capacity: Parking brake 0.5 litres handle selector precharge valve pressure 50 bar 30 bar Pressure switch N’ T activating pressure 2-10 bar T1’ Hydraulically powered R1 B3 Second section boom telescoping cylinder Anticavitation valve cracking pressure 5 bar Single overcenter safety valve piloting ratio: 4/1 Telescopic boom lift cylinder cracking pressure: 350 bar Capacity: 1.5 litres precharge pressure 35 bar Stabilizers S FS MA A G Mechanical gear (2 speeds) Shutoff valve Suction screen Check valve cracking pressure: 8 bar T Flushing valve Hydrostatic transmission motor max displacement: 80 cc/rev GTH-4016SR • GTH-4018SR Return filter with suction line pressurized at 0,5 bar Oil tank capacity 220 liters 111