1
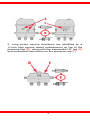
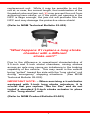
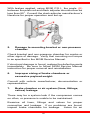
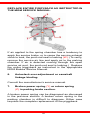
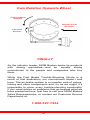
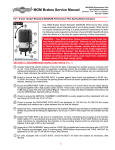
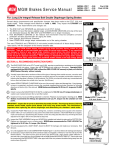
FAST BRAKE
trouble-shooting guide
INDEX
INTRODUCTION3
PRECAUTIONS3
INSPECTION4
Q&A
• “Why does my spring brake have square
air-inlet ports?”
4
• “Why is the yoke welded to the service
push-rod?”
6
• “What do I do for a replacement?”
6
• “What happens if I replace a long stroke chamber with a different stroke unit?”
7
• “What’s the readjustment limit for 3-inch
long stroke chambers?
8
• “Is the service side diaphragm different for a 3-inch long stroke brake?”
8
• “The service brake is not applying adequate force.”
8
• “The parking brake is not holding. There is insufficient parking force.”
11
• “The parking brake will not stay released (dragging brakes).”
12
• “Service brakes apply or the service exhaust
valve leaks when air is applied to the
parking brake.”
15
• “What is reverse cam rotation?”
15
PUBLICATIONS
NOTES
18
19
2
MGM BRAKES
WANTS TO HELP YOU KEEP YOUR
TRUCKS AND TRAILERS ON THE ROAD.
At MGM Brakes we know how important it is to keep
your trucks on the road, and out of the garage, so the
whole idea behind this booklet is to answer questions
you might have and help you get to the bottom of brake
problems fast.
But first, here are a few common-sense precautions to
take before you start.
PRECAUTIONS
1. Always turn-off the engine before you work under
any vehicle.
2. Always chock the wheels. Depleting air system
pressure may allow the vehicle to roll. Keep your hands
away from actuator push rods and slack adjusters; they
may apply as the system pressure drops.
3. Never connect or disconnect a hose or line that
contains air pressure. It may whip as air escapes.
Never remove a component or pipe plug unless you’re
sure that all system pressure has been depleted.
4. Never exceed recommended air pressure, and
always wear safety glasses while working with air
pressure. Never look directly into air lines or fittings,
and never direct them at anyone.
5. Never try to dismantle a component until you have
read and understand the recommended procedures.
Some units contain powerful springs and injury is
possible if they are not properly dismantled. Use only
the correct tools, and observe all precautions relative to
the use of those tools.
3
INSPECTION
Before you begin testing the air brake system, it’s
important to perform the following checks:
1. Examine all tubing and/or hoses for signs of kinks or
dents.
2. Check all tubing and/or hoses for signs of wear, drying
out or damage due to excessive heat.
3. Check the suspension of all tubing and/or hoses. They
should be supported and should not vibrate. Position
them so they will not be subject to excessive heat or
wear against another part.
4. Determine the brand name, model and/or part number
of the spring brake.
Q&A
Now, you’re ready to start. Here’s a list of commonly
asked questions and complaints (in red), along with
possible causes and recommendations on how to
correct them.
“Why does my spring brake have square
air-inlet ports?”
Trucks, tractors and trailers are being manufactured with
both standard 2.5-inch stroke and 3-inch long stroke
spring brakes and service chambers, so it is important
to know how to identify what is on your equipment.
1. All 3-inch “long stroke” chambers can be easily
identified by their square air-inlet ports (A), trapezoidal
I.D. tags (B) and servicing instructions embossed into
the aluminum center case (C).
4
2. Long stroke service chambers are identified by a
½-inch high square raised embossment on top of the
pressure cap (D), along with the trapezoidal I.D. tag (E)
and embossed instructions on the pressure cap (F).
5
“Why is the yoke welded to the
service push rod?”
Many 3-inch “long stroke” spring brakes and service
chambers are equipped with “welded” yokes (G), which
are permanently attached to the service push rod,
making removal and reuse virtually impossible.
“What do I do for a replacement?”
Unless the non-pressure housing (mounting base) (H),
push rod (I), and/or the yoke (J) have been damaged, or
are severely worn, replacement of the single/piggyback
unit only is recommended.
(Refer to MGM Product Bulletin 03-003)
If replacement of the combination/tandem unit is
required, it should be replaced with a “welded yoke”
replacement unit only.
(Refer to MGM Product Bulletin 03-003)
Do not attempt to replace a “welded yoke” actuator
with a universal “cut to fit” aftermarket all-threaded rod
6
replacement unit. While it may be possible to cut the
rod at, or near, the correct length, the combination of the
threaded yoke and jam nut (K) may prevent the unit from
achieving zero-stroke, or, if the push rod opening in the
NPC is large enough, the jam nut will protrude into the
NPC and may damage the protective stone shield.
(Refer to MGM Technical Bulletin 03-002)
“What happens if I replace a long stroke
chamber with a different
stroke unit?”
Due to the difference in operational characteristics of
2.5-inch and 3-inch stroke chambers, mixing strokes
across an axle may cause an imbalance in the braking
capability of the vehicle. This may result in the vehicle
being “pulled” toward the side with the “long stroke” unit
during “emergency” stopping situations. (See MGM
Technical Bulletin 02-002)
IMPORTANT NOTE: – When servicing a truck/trailer
equipped with 3-inch long stroke actuators, it is
crucial that you replace “like for like” and do not
install a standard 2.5-inch stroke actuator in place
of the “long stroke” unit.
(Refer to MGM Product Bulletin 02-002)
7
“What’s the readjustment limit for
3-inch long stroke chambers?”
The readjustment limit has been set at 2.50-inches for
3-inch long stroke actuators.
“Is the service side diaphragm different
for a 3-inch long stroke brake?”
Yes. When replacing the service diaphragm of a 3-inch
“long stroke” chamber, you MUST replace with a 3-inch
“long stroke” diaphragm. Installation of an incorrect
diaphragm will change the performance characteristics of
the actuator, adversely affecting its operating efficiency,
and may result in a catastrophic failure.
“The service brake is not applying
adequate force.”
1.
Improper brake adjustment.
With brakes applied, check the brake chamber piston rod
to see if the orange MGM Stroke Alert stripe is showing
(L). If so, readjust the slack adjuster in accordance
with its manufacturer’s instructions. Be certain that the
spring parking brake chamber is fully released during
this adjustment.
NOTE: Automatic slack adjusters (ASAs) should not
need to be manually adjusted in service. ASAs should
not have to be adjusted to correct excessive push rod
stroke. The excessive stroke may be an indication that
a problem exists with the foundation brake, ASA, brake
actuator or other system components. Troubleshoot
the problem, replacing suspect components and then
confirming proper brake operation prior to returning
the vehicle into service. In the event that a manual
adjustment must be made (although not a common
practice), a service appointment and full foundation
8
brake, ASA, and other system component inspection
should be conducted as soon as possible to ensure
integrity of the overall brake system.
2.
Available air pressure to brake chamber
insufficient (M).
Is the system air pressure gage reading normal? If it’s
reading low, check compressor for proper operation.
Look for kinked or blocked air lines. Check for defective
valves.
3. Excessive brake lining or drum wear.
Handle in accordance with the manufacturer’s inspection
instructions. Check for incompatibility of truck and trailer
brake chambers. Check brake chambers to insure they
are fully released when brakes are not applied.
4.
Improper slack adjuster operation or set-up.
The angle made by the brake actuator push rod with
respect to the mounting surface should be perpendicular
within +3° from zero to full stroke. The rod clearance
hole (N) in the non-pressure chamber (mounting base)
for the brake actuator push rod should not be elongated
or show evidence of rubbing from the rod.
9
With brakes applied, using 80/90 P.S.I., the angle (O)
between the push rod and slack adjuster should never be
less than 90°. Consult the slack adjuster manufacturer’s
literature for proper operation and set-up.
5. Damage to mounting bracket or non-pressure chamber.
Check bracket and non-pressure chamber for cracks or
other signs of damage. Verify that mounting nut torque
is as specified in the MGM Service Manual.
If structural damage is found, replace the defective parts
immediately. Be sure to follow MGM Service Manual
instruction for proper removal and reinstallation.
6.
Improper sizing of brake chambers or excessive payload weight.
Consult with vehicle manufacturer, documentation or
representative.
7.
Brake chamber or air system (lines, fittings, valves) leakage.
There may be a system leak if the compressor comes
on often, or pressure is unable to be maintained.
Examine all lines, fittings and valves for proper
connection and leakage. If no problems are found,
inspect brake chambers for leakage. Listen for an
10
audible sound, or spray the clamp bands with a soap/
water solution.
If leakage is found at the service side clamp area, check
the torque on clamp band ears and verify it is adequate
per the MGM Service Manual. If the leakage persists,
replace the diaphragm and clamp bands per instructions
in the MGM Service Manual.
CAUTION:
If leakage is found at....
a.
b.
c.
spring side clamp area,
end plug,
first valve in air line ahead of the spring brake (emergency release),
....replace the valve if required OR the entire piggyback
per instructions in the appropriate MGM Brakes Service
Manual. Be sure to install the release bolt and cage
the spring per MGM Brakes Service Manual prior to
removal. Never attempt to open or disassemble any
spring brake single/piggyback chamber.
8.
Improper push-rod length.
This may be the problem if proper rod angularity is
difficult to achieve, and/or frequent readjustment is
necessary. Consult the vehicle manufacturer for proper
rod length.
“The parking brake is not holding. There
is insufficient parking force.”
1.
Refer to the possible causes just discussed
under “Service brake not applying adequate force.”
11
2.
Broken power spring.
Remove the end plug from
the release bolt access
hole of the brake chamber
(P). Use a flashlight to
check for evidence of spring
breakage.
Brake chamber stroke (Q)
can also be checked while
applying and releasing
the parking brake. If the
expected range of motion
is not observed, the spring
may be broken. Also, the
contents will rattle if the
piggyback
is
removed
and shaken, indicating a
probable broken spring.
Replace with appropriate MGM piggyback.
“The parking brake will not stay
released” (Dragging brakes)
1. Available air pressure to the brake chamber insufficient.
Is the system air pressure gauge reading normal? If it’s
low, check the compressor for proper operation. Look for
kinked or blocked air lines. Check for defective valves.
2. Service application air is not exhausting properly.
Apply and release service brakes while listening to
exhaust. If the sound is not normal, check for kinked or
blocked air lines or defective valves.
12
3.
The spring brake piston (R) is binding before the piston is fully retracted.
Release the parking brake. (Remove the end plug (P)
and apply 90-100 P.S.I. air pressure.) Look into the end
plug hole to see if the top of the piston is approximately
.200 inches from the head. If not, replace the single/
piggyback with a MGM piggyback or piggyback plus kit.
4. Broken return spring in the service chamber (T).
Remove piggyback and service diaphragm (U) and
inspect the return spring (T). If broken, replace with
a new return spring and new diaphragm. Order only
genuine MGM brand replacement parts and install in
accordance with the appropriate MGM Brakes Service
Manual instructions.
5.
Ruptured diaphragm (V) or damaged push-rod seal (W).
Check for leakage at the parking chamber vent holes or
through the release bolt hole. Remove the release bolt
access hole end cap (X) and apply air to spring brakes
(release). If you feel or hear air escaping in these areas,
the diaphragm is defective.
13
REPLACE ENTIRE PIGGYBACK AS INSTRUCTED IN
THE MGM SERVICE MANUAL.
If air applied to the spring chamber has a tendency to
apply the service brake, or to cause the service exhaust
valve to leak, the push rod seal is leaking (W). (To verify,
remove the service air line and apply air to the parking
chamber. If air is detected coming through the open
service air port, the push-rod seal is leaking.) Replace
the entire piggyback as instructed in the appropriate
MGM Brakes Service Manual.
6.
Autoslack over-adjustment or camshaft linkage binding.
Consult the manufacturer’s service manual.
7.
Broken power spring (Y) or return spring (Z) in parking brake section.
A broken power spring can be diagnosed as discussed
in the previous section. A broken return spring in the
parking chamber is difficult to diagnose. Either case
requires the complete replacement of the piggyback.
14
“Service brakes apply or the service
exhaust valve leaks when air is
applied to the parking brake.”
1.
Air is leaking through the push-rod seal (W).
Replace the entire piggyback as instructed in the MGM
Service Manual.
“Why do my brakes exhibit some, or all,
of the following symptoms?”
•
•
•
•
•
•
Excessive Noise When Braking
Loose or Broken Brake Spider Bolts
Parking Brake Center Seal Leaks
Loose or Broken Chamber Mounting Bolts
Brakes That Grab
Broken Piggyback Center Push Rod Plate Screw
These “symptoms” are usually associated with “reverse”
cam rotation, or s-cam rotation opposite of the forward
rotation of the wheel. The “vibration” generated by
this foundation brake arrangement is most noticeable
in the leading shoe, which, due to the rotation of the
wheel away from the drum, forces the cam to rotate
backwards, resulting in a “chattering” sound. This
rapid back and forth movement of the cam is amplified
when the “natural” frequency (vibration) of the complete
system: i.e. foundation brake, push rod, brake actuator
and suspension; is at, or near, its resonate frequency.
If the linings, camshaft bushings and other component
parts are worn, replacement may temporally correct, or
quiet, the problem.
15
Cam Rotation Opposite Wheel
Forward Wheel
Rotation
Vertical Travel
Direction
Camshaft
Rotation
FINALLY
As the industry leader, MGM Brakes backs its products
with strong warranties—and an equally strong
commitment to the people and companies who buy
them.
While the Fast Brake Trouble-Shooting Guide is a
result of that dedication, our commitment doesn’t end
here. The air-brake system is a complex web of valves,
tubing and other components and, try as we might, it’s
impossible to cover every trouble-shooting eventuality.
If you need advice on problems that go beyond what we
have presented here, feel free to call your MGM Brakes
Sales Representative, or contact our Customer Service
Department at:
1-800-527-1534
16
Or go on line to www.MGMBrakes.com to reference
technical bulletins, product brochures and general
catalog information.
Also, keep in mind that most heavy-duty truck/trailer
parts dealers and fleet specialists can provide MGM
Brakes product information and genuine OEM service
replacement assemblies for all other makes of spring
brakes.
At MGM Brakes, our commitment doesn’t stop when
you buy our products.
The way we see it, it’s just beginning.
17
PUBLICATIONS
The following publications have been referenced in this
guide. All can be downloaded from the MGM Brakes
web site where ‘hard copies’ can also be requested.
Please visit our web site or contact your local/regional
MGM Brakes representative for more information.
•
MGM Brakes Product Bulletin (03-003)
Replacement Units for MGM Brakes 3-Inch
Long Stroke Chambers with Welded Yokes
•
MGM Brakes Technical Bulletin (03-002)
Field Replacement of MGM Brakes Chambers Equipped with Welded Yokes
•
MGM Brakes Technical Bulletin (02-002)
Mixing Standard & Long Stroke Chambers
•
MGM Brakes Model TR-Series Service Manual (Form No. 5011)
•
MGM Brakes Model LTR-Series Service Manual (Form No. 5042)
•
MGM Brakes Model MAGNUM Performance Plus (MJ-Series) Service Manual (Form No. 5044)
•
MGM Brakes BrakeTECH Service Self-Study Training Program (Form No. 5043)
18
NOTES
19