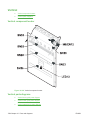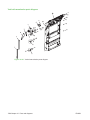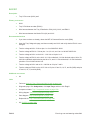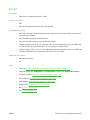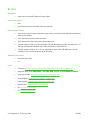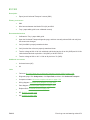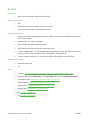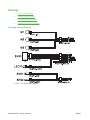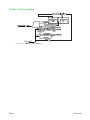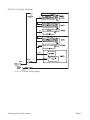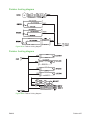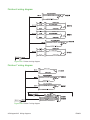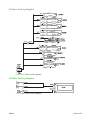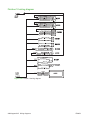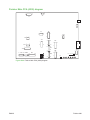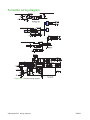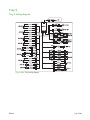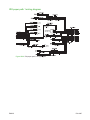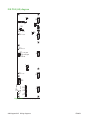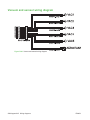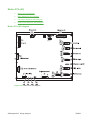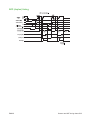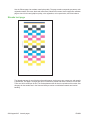
1
Trays 2, 3, and 4
ł
Trays 2, 3, and 4 component locator
ł
Trays 2, 3, and 4 parts diagrams
Trays 2, 3, and 4 component locator
Figure 10-129 Trays 2, 3, and 4 component locator
Trays 2, 3, and 4 parts diagrams
ł
Trays 2, 3, and 4 drawer parts diagram
ł
Trays 2, 3, and 4 main assembly parts diagram
ł
Trays 2, 3, and 4 paper path parts diagram
ł
Trays 2, 3, and 4 drive parts diagram
ł
Trays 2, 3, and 4 separation unit parts diagram
1778 Chapter 10 Parts and diagrams
ENWW
Trays 2, 3, and 4 drawer parts diagram
Figure 10-130 Trays 2, 3, and 4 parts drawer diagram
ENWW
Trays 2, 3, and 4 1779
Ref
Description
Part number
1
Paper tray assembly (SVC ASSY-DRAWER)
C5956-67422
2
Paper-width guide assembly (SVC-GUIDE, PAPER, REAR,
CPL)
C5956-67757
3
Paper length sensor lever (SVC-SENSOR, LEVER, PAPER,
WIDTH)
C5956-67397
4
Separation guide (SVC-STRIP, SEPARATION)
C5956-67396
5
Drawer rail (SVC-BEARING, LINEAR)
C5956-67769
6
Tray drawer (SVC-DRAWER, SIT)
C5956-67392
1780 Chapter 10 Parts and diagrams
Qty
ENWW
Trays 2, 3, and 4 main assembly parts diagram
Figure 10-131 Trays 2, 3, and 4 main assembly parts diagram
ENWW
Trays 2, 3, and 4 1781
Ref
Description
Part number
1
Tray 2, 3, and 4 assembly (SVC ASSY-MEDIA TRAYS)
C5956-67724
2
Tray 2, 3, and 4 assembly cover plate (SVC COVER, PLATE,
TOP)
C5956-67400
3
Trays 2, 3, and 4 Controller PCA (A23) (SVC-PCA,
CONTROLLER, CONDOR, INPUT)
C5956-67416
4
A33/A33/A33 (SVC-PCA, DISTRIBUTIONBOARD)
C5956-67417
5
Paper tray assembly (SVC ASSY-DRAWER)
C5956-67422
6
Right-side lower panel (SVC ASSY-PAPER, PATH)
C5956-67389
7
Tray 2 LED (LED15)/Tray 3 LED (LED16)/Tray 4 LED (LED17)
(SVC-HOLDER LED)
C5956-67406
Qty
Trays 2, 3, and 4 paper path parts diagram
Figure 10-132 Trays 2, 3, and 4 paper path parts diagram
1782 Chapter 10 Parts and diagrams
ENWW
Ref
Description
Part number
1
Right-side lower panel assembly (SVC ASSY-PAPER, PATH)
C5956-67389
2
Roller pressure spring (SVC-PRESSURE, SPRING, ROLLER)
C5956-67398
3
Paper roller (SVC-ROLL)
C5956-67388
Qty
Trays 2, 3, and 4 drive parts diagram
Figure 10-133 Trays 2, 3, and 4 drive parts diagram
ENWW
Trays 2, 3, and 4 1783
Ref
Description
Part number
1
Pick arm assembly (SVC-SEPARATION, UNIT)
C5956-67419
2
Trays 2, 3, and 4 Transport motor (M18) (SVC-MOTOR,
STEPPER, CPL.)
C5956-67414
3
Tray exit roller shaft (SVC-SHAFT, EXIT, CPL)
C5956-67384
4
Tray exit roller shaft clutch (SVC ASSY-MEDIA TRAY CLUTCH)
C5956-67436
5
Tray exit roller belt (SVC-BELT, SYNCHRONUS, T=2.032)
C5956-67407
6
Motor belt (SVC-BELT, SYNCHRONOUS, MOTOR, T=2.032)
C5956-67408
7
Tray closed sensor actuator foil (SVC ASSY-MEDIA TRAY
ACTUATOR FOIL)
C5956-67434
8
Tray exit roller belt tensioner (SVC ASSY-MEDIA TRAY BELT
TENSION)
C5956-67435
9
Tray 2, 3, and 4 Humidity sensor (SN42) and Tray 2, 3, and 4
Ambient Temperature sensor (SN41) unit (SVC-PCA, SENSOR,
HUMIREL)
C5956-67418
10
Right-side Lower Panel Open sensor (SN43) (SVC ASSY-MEDIA
TRAY PAPER PATH SENSOR)
C5956-67437
11
Tray 2 Exit sensor (SN47)/Tray 3 Exit sensor (SN51)/Tray 4 Exit
sensor (SN55) (SVC-PHOTOINTERRUPTER WITH
CONNECTOR)
C5956-67770
12
Tray exit sensor flag shaft (SVC-FLAG, SENSOR, PAPER, EXIT)
C5956-67385
13
Gearwheel flange (SVC-FLANGE, GEARWHEEL, 22, MXL)
C5956-67393
14
Right-side lower panel hinge (SVC-HINGE, PAPER, PATH)
C5956-67390
15
Front mounting bearing (SVC-MOUNTING, BEARING, FRONT)
C5956-67402
16
Tray exit sensor holder (SVC-HOLDER PHOTO INT PEX)
C5956-67401
17
Angled bracket (SVC-BRACKET, ANGLE)
C5956-67759
18
Angled bracket (SVC-BRACKET, ANGLE)
C5956-67759
19
Paper size sensor cam (SVC-CAM, SIZE SENSING)
C5956-67387
20
Paper tray closed sensor cam (SVC-CAM, TRAY PRESENT)
C5956-67391
1784 Chapter 10 Parts and diagrams
Qty
ENWW
Trays 2, 3, and 4 separation unit parts diagram
Figure 10-134 Trays 2, 3, and 4 separation unit parts diagram
ENWW
Trays 2, 3, and 4 1785
Ref
Description
Part number
1
Pick arm assembly (SVC-SEPARATION, UNIT)
C5956-67419
2
Pick arm roller (SVC-TRAY 2-4 PICK ROLLER )
C5956-67420
1786 Chapter 10 Parts and diagrams
Qty
ENWW
ENWW
Trays 2, 3, and 4 1787
Single output bin
1
2
4
3
Figure 10-135 Single output bin parts diagram
1788 Chapter 10 Parts and diagrams
ENWW
ENWW
Ref
Description
Part number
1
Single output bin (SVC-BIN-SINGLE OUTPUT)
C5963-67003
2
Single output bin front bracket (SVC-BRACKET-FRONT SOB)
C5963-67001
3
Single output bin rear bracket (SVC-BRACKET-REAR SOB)
C5963-67002
4
Output Bin Full sensor (SN17) (SVC-SENSOR-SOB FULL)
C5963-67004
Qty
Single output bin 1789
Vacuum
ł
Vacuum component locator
ł
Vacuum parts diagrams
Vacuum component locator
Figure 10-136 Vacuum component locator
Vacuum parts diagrams
ł
Vacuum supply assembly parts diagram
1790 Chapter 10 Parts and diagrams
ENWW
Vacuum supply assembly parts diagram
Figure 10-137 Vacuum supply assembly parts diagram
ENWW
Vacuum 1791
Ref
Description
Part number
1
Screw (SVC-SCR-MACH M3X0.5 10MM-LG PAN HD ROHS)
C5956-67004
2
Vacuum blower muffler (SVC ASSY-MUFFLER, VACUUM
BLOWER)
C5956-67322
3
Vacuum blower (SVC-BLOWER-VACUUM)
C5956-67666
4
O-ring (SVC-ORING-VACUUM SUPPLY)
C5956-67814
5
Screw (SVC-SCREW-MACH M4 X 0.7 9.5MM-LG ROHS)
C5956-67011
6
Screw (SVC-SCREW-TPG M4X0.7 8MM-LG PAN HD ROHS)
C5956-67003
7
Vacuum supply housing (SVC ASSY-VACUUM SUPPLY
HOUSING)
C5956-67272
8
Vacuum housing tube (SVC-TUBE-RUBBER-VACUUM SENSE
SHORT)
C5956-67205
9
Vacuum housing gasket (SVC-GASKET-VACUUM DUCTMOLDED)
C5956-67241
1792 Chapter 10 Parts and diagrams
Qty
ENWW
ENWW
Vacuum 1793
Vertical
ł
Vertical component locator
ł
Vertical parts diagrams
Vertical component locator
Figure 10-138 Vertical component locator
Vertical parts diagrams
ł
Vertical outer guide parts diagram
ł
Vertical inner guide parts diagram
ł
Vertical transmission parts diagram
1794 Chapter 10 Parts and diagrams
ENWW
Vertical outer guide parts diagram
Figure 10-139 Vertical outer guide parts diagram
ENWW
Vertical 1795
Ref
Description
Part number
1
Vertical outer guide (SVC ASSY-GUIDE VERTICAL OUTER)
C5956-67448
2
Vertical path door (SVC ASSY-VERTICAL PATH DOOR)
C5956-67453
3
Tensioner spring (SVC-SPRING-TENSIONER)
C5956-67113
4
Latch (SVC-LATCH-VERTICAL DOOR)
C5956-67109
5
Pinch roller (SVC-ROLLER-PINCH)
C5956-67257
6
Pinch roller holder (SVC-HOLDER-PINCH ROLLER-SMALL)
C5956-67258
7
Pinch roller spring (SVC-SPRING-EXTENSION-PINCH
ROLLER-SMALL)
C5956-67086
8
Pinch roller datum (SVC-DATUM-PINCH ROLLER-SMALL)
C5956-67087
9
Vertical outer guide (SVC ASSY-GUIDE OUTER VERTICAL)
C5956-67461
10
Screw (SVC-SCREW-TPG 4-20X7.94MM 10IP ROHS)
C5956-67012
Qty
Vertical inner guide parts diagram
Figure 10-140 Vertical inner guide parts diagram
1796 Chapter 10 Parts and diagrams
ENWW
ENWW
Ref
Description
Part number
1
Vertical inner guide (SVC ASSY-VERTICAL PATH INNER)
C5956-67789
2
Door open limit strap (SVC-STRAP-DOOR OPEN LIMIT)
C5956-67084
3
Bypass upper guide (SVC ASSY-GUIDE BYPASS UPPER)
C5956-67332
4
Screw (SVC-SCREW-TPG M3X0.5 6MM-LG PAN HD ROHS)
C5956-67001
5
Screw (SVC-SCREW-MACH M3X0.5 6MM-LG PAN HD ROHS)
C5956-67005
6
Bearing yoke (SVC ASSY-BEARING YOKE LARGE)
C5956-67329
7
Driver roller (SVC ASSY-DRIVE ROLLER CLUSTER BYPASS)
C5956-67323
8
Drive roller (SVC ASSY-DRIVE ROLLER PULLEY IDO DBL)
C5956-67287
9
Drive roller (SVC ASSY-DRV RLLR PULLEY VERTICAL
TRIPLE)
C5956-67338
10
Vertical Transport 3 sensor (SN25) (SVC-SENSOR, MEDIA
PRESENCE)
C5956-67255
11
Vertical transport 4 sensor (SN26) (SVC-SENSOR, MEDIA
PRESENCE)
C5956-67255
12
Vertical Transport 2 sensor (SN28) (SVC-SENSOR, MEDIA
PRESENCE)
C5956-67255
13
Vertical Transport 1 sensor (SN35) (SVC-SENSOR, MEDIA
PRESENCE)
C5956-67255
14
Tray 1 Door Open sensor (SN30) (SVC-SENSOR, MEDIA
PRESENCE)
C5956-67255
15
Right-side Middle Panel sensor (SN23) (SVC-SENSOR, MEDIA
PRESENCE)
C5956-67255
Qty
Vertical 1797
Vertical transmission parts diagram
Figure 10-141 Vertical transmission parts diagram
1798 Chapter 10 Parts and diagrams
ENWW
ENWW
Ref
Description
Part number
1
Belt (SVC-BELT-GT2-177T, 2MM PITCH X 4MM)
C5956-67657
2
Belt (SVC-BELT-DRIVE, 144T, GT2, 2X4)
C5956-67661
3
Belt (SVC-BELT-GT2-2MM PITCH X 4MM, 85T)
C5956-67656
4
Gear bypass idlers (SVC KIT-GEAR-BYPASS)
C5956-67672
5
Screw (SVC-SCREW-TPG M3X0.5 6MM-LG PAN HD ROHS)
C5956-67001
6
Tensioner (SVC ASSY-MEDIAPATH TENSIONER)
C5956-67297
7
Tensioner standoff (SVC KIT-STANDOFFS, TENSIONER)
C5956-67711
8
Pitch bypass wheel (SVC-WHEEL-PITCH BYPASS)
C5956-67114
9
Bypass drive swingarm (SVC-SWINGARM-BYPASS DRIVE)
C5956-67295
10
Screw (SVC-SCREW-TPG M3X0.5 6MM-LG PAN HD ROHS)
C5956-67001
11
Wire saddles (SVC KIT-WIRE MANAGEMENT 2)
C5956-67649
12
Motor (SVC-MOTOR, MEDIAPATH)
C5956-67742
Qty
Vertical 1799
Web wipe
ł
Web wipe component locator
ł
Web wipe parts diagram
Web wipe component locator
Figure 10-142 Web wipe component locator
Web wipe parts diagram
Figure 10-143 Web wipe parts diagram
1800 Chapter 10 Parts and diagrams
ENWW
ENWW
Ref
Description
Part number
1
Web wipe (SVC KIT PM-WEB WIPE)
C5956-67837
2
Web wipe cartridge (SVC-CASE CARTRIDGE)
C5956-67202
3
Feed spool cover and take-up spool cover (SVC-COVERSPOOL CARTRIDGE)
C5956-67085
4
Web wipe guide assembly (SVC ASSY-GUIDE WEB)
C5956-67628
5
Web wipe encoder roller assembly (SVC ASSY-ENCODER WEB
ROLLER)
C5956-67260
6
Web wipe bias spring assembly (SVC KIT-WEB BIAS SPRING)
C5956-67276
Qty
Web wipe 1801
1878 Chapter 10 Parts and diagrams
ENWW
A
ENWW
Event Log codes
ł
Event Log code format
ł
Event Log error and warning codes
1879
Event Log code format
Event Log codes have the following format: XX.YYZZ. Otherwise, the code indicates an error.
ł
XX indicates the subsystem in which the error or warning occurred
ł
YY indicates the type of error or warning
ł
ZZ represents the number of the error or warning.
NOTE: If this part of the code starts with an A or a B (XX.YYAZ or XX.YYBZ), then the
code is a warning code.
Table A-1 Event Log code prefixes (XX)
Code
Subsystem or function
00
Covers and interlocks
30
Scanner
31
ADF
99
RFU
A0
Tray 1
A1
Trays 2, 3, and 4
A2
Tray 5
A3
Finisher
B0
Vertical transport
B1
Horizontal transport
B2
IDO
C0
Vacuum and drum vacuum
C1
Drum drive and drum encoder
C2
Dryer
C3
Image quality
C4
Service Station and Web wipe
C5
Aerosol
C6
Drum spittoon
C7
IDS
D0
Power electronics
D1/D2
Imaging electronics
D3
Formatter electronics
D4
Run control electronics
D5
Coprocessor and Digital Send
Ex
System firmware
1880 Appendix A Event Log codes
ENWW
Table A-2 Event Log code event type abbreviations (YY)
Code
Type of event
0A
Pen
0B
Ink
0C
Heater
0D
Vacuum
01
Motor
02
Sensor or switch
03
Solenoid
04
Clutch
05
Encoder
06
LED
07
Non-formatter PCA
08
Power supply
09
Fan or blower
10
Digital send
11
Formatter real-time clock
13
Paper jam
20
Memory
21/22
Image-quality
38
Firmware
00
Other
Table A-3 Event Log code event number descriptions (ZZ)
ENWW
Code
Event description
Ax/Bx
Warning
0x-9x
Error
Ex-Fx
System message
Cx-Dx
Condition
Event Log code format 1881
Event Log error and warning codes
ł
00.02E2
ł
00.0301
ł
30.0701
ł
30.0702
ł
30.0703
ł
30.0704
ł
30.0705
ł
30.0706
ł
30.0707
ł
30.0708
ł
30.0709
ł
30.0710
ł
30.0711
ł
30.0712
ł
30.0713
ł
30.0714
ł
30.0715
ł
30.0716
ł
30.0717
ł
30.0718
ł
30.0719
ł
30.0720
ł
30.0721
ł
30.0722
ł
30.0723
ł
30.0724
ł
30.0725
ł
30.0726
ł
31.1301
ł
31.1302
1882 Appendix A Event Log codes
ENWW
ENWW
ł
31.1303
ł
31.1308
ł
31.1311
ł
31.1312
ł
32.0B03
ł
32.0C00
ł
32.0C01
ł
32.1C03
ł
32.1C04
ł
32.1C05
ł
32.1C06
ł
32.1C07
ł
32.1C08
ł
32.1C09
ł
32.1C0A
ł
32.1C0B
ł
32.1C0C
ł
32.1C0D
ł
32.1C0E
ł
32.1C0F
ł
32.1C10
ł
32.1C11
ł
32.1C12
ł
32.1C13
ł
32.1800
ł
32.1801
ł
32.1802
ł
32.1803
ł
32.1804
ł
32.1805
ł
32.1900
Event Log error and warning codes 1883
ł
32.1902
ł
32.1904
ł
32.1905
ł
32.1906
ł
32.2100
ł
32.2301
ł
32.2302
ł
32.2600
ł
32.4400
ł
32.4401
ł
32.4402
ł
32.4403
ł
32.0500
ł
32.5C00
ł
49.0B01
ł
49.yyzz
ł
67.yyzz
ł
68.8001
ł
68.8002
ł
68.8003
ł
79.yyzz
ł
80.0180
ł
80.0181
ł
80.0182
ł
80.018B
ł
80.018C
ł
80.0301
ł
80.0302
ł
80.0303
ł
80.0304
ł
80.0305
1884 Appendix A Event Log codes
ENWW
ENWW
ł
80.0306
ł
80.0307
ł
80.0308
ł
80.0309
ł
80.0310
ł
80.0312
ł
80.0313
ł
80.0314
ł
80.0315
ł
80.0316
ł
80.0317
ł
80.0318
ł
81.yyzz
ł
85.yyzz
ł
86.yyzz
ł
99.000A
ł
99.000C
ł
99.000D
ł
99.000E
ł
99.000F
ł
99.0001
ł
99.0002
ł
99.0004
ł
99.0006
ł
99.0007
ł
99.0009
ł
99.0013
ł
99.0014
ł
99.0015
ł
99.0016
ł
99.0017
Event Log error and warning codes 1885
ł
99.0018
ł
A0.03A1
ł
A0.1301
ł
A1.0102
ł
A1.0103
ł
A1.0104
ł
A1.01A2
ł
A1.01A3
ł
A1.01A4
ł
A1.01C1
ł
A1.02C1
ł
A1.02C3
ł
A1.0701
ł
A1.07A1
ł
A1.1302
ł
A1.1304
ł
A2.0101
ł
A2.0102
ł
A2.0201
ł
A2.0202
ł
A2.03A1
ł
A2.04A1
ł
A2.04A2
ł
A2.04A3
ł
A2.04A4
ł
A2.04A5
ł
A2.04A6
ł
A2.05A1
ł
A2.1301
ł
A2.1302
ł
A3.0101
1886 Appendix A Event Log codes
ENWW
ENWW
ł
A3.0102
ł
A3.0103
ł
A3.0104
ł
A3.0122
ł
A3.0123
ł
A3.0124
ł
A3.0125
ł
A3.0126
ł
A3.0140
ł
A3.0141
ł
A3.0142
ł
A3.0143
ł
A3.01A9
ł
A3.0160
ł
A3.01A1
ł
A3.01A2
ł
A3.01A3
ł
A3.01A4
ł
A3.01A5
ł
A3.01A6
ł
A3.01A7
ł
A3.01A8
ł
A3.01C1
ł
A3.01C2
ł
A3.01E1
ł
A3.0200
ł
A3.0201
ł
A3.0202
ł
A3.0203
ł
A3.0204
ł
A3.0205
Event Log error and warning codes 1887
ł
A3.0206
ł
A3.0207
ł
A3.0208
ł
A3.0210
ł
A3.0211
ł
A3.0212
ł
A3.0213
ł
A3.0214
ł
A3.0215
ł
A3.0220
ł
A3.0226
ł
A3.0227
ł
A3.0232
ł
A3.0233
ł
A3.0240
ł
A3.0241
ł
A3.0242
ł
A3.0243
ł
A3.0244
ł
A3.0260
ł
A3.0261
ł
A3.0263
ł
A3.0264
ł
A3.02A0
ł
A3.02A1
ł
A3.02A2
ł
A3.02A3
ł
A3.02A4
ł
A3.02A5
ł
A3.02A6
ł
A3.02A7
1888 Appendix A Event Log codes
ENWW
ENWW
ł
A3.02A8
ł
A3.02A9
ł
A3.0301
ł
A3.06A0
ł
A3.06A1
ł
A3.06A2
ł
A3.06A3
ł
A3.06A4
ł
A3.06A6
ł
A3.0702
ł
A3.0703
ł
A3.0704
ł
A3.0705
ł
A3.0706
ł
A3.0707
ł
A3.0708
ł
A3.0709
ł
A3.0710
ł
A3.07A1
ł
A3.07A2
ł
A3.07A3
ł
A3.1300
ł
A3.1301
ł
A3.1302
ł
A3.1303
ł
A3.1304
ł
A3.1305
ł
A3.1306
ł
A3.1307
ł
A3.1308
ł
A3.1320
Event Log error and warning codes 1889
ł
A3.1321
ł
A3.1322
ł
A3.1323
ł
A3.1324
ł
A3.1325
ł
A3.1360
ł
A3.38zz
ł
B0.0101
ł
B0.1301
ł
B0.1302
ł
B0.1303
ł
B0.1304
ł
B1.0101
ł
B1.0201
ł
B1.1301
ł
B1.1302
ł
B1.1303
ł
B1.1304
ł
B2.0101
ł
B2.0102
ł
B2.0103
ł
B2.0104
ł
B2.0105
ł
B2.0106
ł
B2.01A1
ł
B2.01A2
ł
B2.0201
ł
B2.0301
ł
B2.03C1
ł
B2.1301
ł
B2.1302
1890 Appendix A Event Log codes
ENWW
ENWW
ł
B2.1303
ł
B2.1304
ł
B2.1305
ł
B2.1306
ł
B2.1307
ł
B2.1308
ł
B2.1309
ł
C0.0101
ł
C0.0102
ł
C0.0103
ł
C0.0104
ł
C0.0105
ł
C0.0106
ł
C0.0107
ł
C0.0108
ł
C0.01A1
ł
C0.01A2
ł
C0.01A3
ł
C0.01A4
ł
C0.01A5
ł
C0.01A6
ł
C0.01A7
ł
C0.01A8
ł
C0.01AA
ł
C0.01AB
ł
C0.01AC
ł
C0.01AD
ł
C0.01AE
ł
C0.01AF
ł
C0.0DC2
ł
C1.0101
Event Log error and warning codes 1891
ł
C1.0102
ł
C1.01A1
ł
C1.0203
ł
C1.0204
ł
C1.02A1
ł
C1.02A2
ł
C1.02A3
ł
C1.02A4
ł
C1.02A5
ł
C1.0501
ł
C1.0503
ł
C1.05A2
ł
C1.1301
ł
C1.1302
ł
C1.1303
ł
C1.131A
ł
C1.132A
ł
C2.0201
ł
C2.0901
ł
C2.09A1
ł
C2.0C01
ł
C3.22A0
ł
C3.22A1
ł
C3.22A2
ł
C3.22A3
ł
C3.22A4
ł
C3.22A5
ł
C3.22A6
ł
C3.22A7
ł
C3.22A8
ł
C4.0101
1892 Appendix A Event Log codes
ENWW
ENWW
ł
C4.0102
ł
C4.0201
ł
C4.0202
ł
C4.0203
ł
C4.02A1
ł
C4.0501
ł
C6.0B01
ł
C7.0701
ł
C7.0B06
ł
C7.0B07
ł
C7.0B08
ł
C7.0B10
ł
C7.0B11
ł
C7.0B12
ł
C7.0B13
ł
C7.0B20
ł
C7.0B21
ł
C7.0B22
ł
C7.0B23
ł
C7.0B30
ł
C7.0B31
ł
C7.0B32
ł
C7.0B33
ł
C7.0B40
ł
C7.0B41
ł
C7.0B42
ł
C7.0B43
ł
C7.0B50
ł
C7.0B51
ł
C7.0B52
ł
C7.0B53
Event Log error and warning codes 1893
ł
C7.0BA0
ł
C7.0BA1
ł
C7.0BA2
ł
C7.0BA3
ł
C7.0BA4
ł
C7.0BA5
ł
C7.0BA6
ł
C7.0BA7
ł
C7.0BA8
ł
C7.0BA9
ł
D0.0801
ł
D0.0802
ł
D0.08A1
ł
D0.08A2
ł
D0.08A3
ł
D1.0101
ł
D1.0102
ł
D1.0201
ł
D1.02A1
ł
D1.02A2
ł
D1.0700
ł
D1.0701
ł
D1.0702
ł
D1.071A
ł
D1.071B
ł
D1.071C
ł
D1.071D
ł
D1.072A
ł
D1.072B
ł
D1.072C
ł
D1.072D
1894 Appendix A Event Log codes
ENWW
ENWW
ł
D1.073A
ł
D1.073B
ł
D1.073C
ł
D1.073D
ł
D1.074A
ł
D1.074B
ł
D1.074C
ł
D1.074D
ł
D1.075A
ł
D1.075B
ł
D1.075C
ł
D1.075D
ł
D1.076A
ł
D1.076B
ł
D1.076C
ł
D1.076D
ł
D1.0900
ł
D1.0A07
ł
D1.0A08
ł
D1.0A1A
ł
D1.0A1B
ł
D1.0A2A
ł
D1.0A2B
ł
D1.0A3A
ł
D1.0A3B
ł
D1.0A4A
ł
D1.0A4B
ł
D1.0A5A
ł
D1.0A5B
ł
D1.0A6A
ł
D1.0A6B
Event Log error and warning codes 1895
ł
D2.01A0
ł
D2.01A1
ł
D2.01A2
ł
D2.01A3
ł
D2.01A4
ł
D2.01A5
ł
D2.01A6
ł
D2.01A7
ł
D2.02A1
ł
D2.0701
ł
D2.0703
ł
D2.0704
ł
D2.0705
ł
D2.0707
ł
D2.0708
ł
D2.0709
ł
D2.0710
ł
D2.0711
ł
D2.0712
ł
D2.0713
ł
D2.0714
ł
D2.0715
ł
D2.0716
ł
D2.0723
ł
D2.0724
ł
D2.0901
ł
D2.09A1
ł
D2.09A2
ł
D2.0AA1
ł
D2.0AA2
ł
D2.0AA3
1896 Appendix A Event Log codes
ENWW
ENWW
ł
D2.0AA4
ł
D2.0AA5
ł
D2.0AA6
ł
D2.2001
ł
D2.2002
ł
D2.2003
ł
D2.2004
ł
D2.2005
ł
D3.1101
ł
D3.1102
ł
D3.2301
ł
D3.3700
ł
D3.4400
ł
D4.0701
ł
D4.0702
ł
D4.0703
ł
D4.0704
ł
D4.0705
ł
D4.0706
ł
D4.0707
ł
D4.0708
ł
D4.0711
ł
D4.0712
ł
D4.0713
ł
D4.0714
ł
D4.0715
ł
D4.0716
ł
D4.0717
ł
D4.07C1
ł
D4.07C2
ł
D4.09A1
Event Log error and warning codes 1897
ł
D4.09A2
ł
D5.1000
ł
D5.1001
ł
D5.1002
ł
D5.1003
ł
D5.1004
ł
D5.1005
ł
D5.1006
ł
D5.1007
ł
D5.1008
ł
D5.1009
ł
D5.1010
ł
D5.1011
ł
D5.1012
ł
D5.1013
ł
D5.1014
ł
D5.1015
ł
D5.1016
ł
D5.1017
ł
D5.1018
ł
D5.1019
ł
D5.1020
ł
D5.1021
ł
D5.1022
ł
D5.1023
ł
D5.1024
ł
D5.1025
ł
D5.1026
ł
D5.1029
ł
D5.1030
ł
D5.1031
1898 Appendix A Event Log codes
ENWW
ENWW
ł
D5.1032
ł
D5.1035
ł
D5.1036
ł
D5.1037
ł
D5.1038
ł
D5.1039
ł
D5.1040
ł
D5.3801
ł
D5.3802
ł
D5.3803
ł
D5.3804
ł
D5.3805
ł
D5.3806
ł
D5.3807
ł
D5.3808
ł
D5.3809
ł
D5.380A
ł
D5.380B
ł
D5.380C
ł
D5.380D
ł
D5.380E
ł
D5.380F
ł
Ex.yyzz
Event Log error and warning codes 1899
00.02E2
Description
ł
Close lower-left door
Primary root causes
ł
Lower-left Door sensor (SN18)
ł
Lower-left door alignment
ł
Wire harness between SOL4 and the Motion PCA (A2)
Recommended actions
1.
If you have not done so already, reboot the MFP in Protected Service mode (PSM).
2.
Open the Covers diagnostic page, and then test SN18.
3.
Check the alignment and the hinges of the lower-left door.
4.
Check the wire harness between SN18 and A2.
5.
Clean SN18.
6.
Test the voltage at SN18: 3.26 Vdc blocked, 0.15 Vdc unblocked at pins 18A to 17A and 1.18 Vdc
both blocked and unblocked at pins 16A to 17A onW32P9-W34J9.
7.
Replace the lower-left door assembly.
Additional root causes
ł
A2
ł
Diagnostic page: Click Subsystems, and then click Covers.
ł
Component locator: Covers component locator on page 1620
ł
Wiring diagram: Drum wiring diagram on page 2471
ł
Parts diagram: Covers parts diagrams on page 1620
ł
Replace SN18: IDS sensors on page 544
ł
A2: D4.0705 on page 2392
Links
1900 Appendix A Event Log codes
ENWW
00.0301
Description
ł
Able to open the front door when it is locked
Primary root causes
ł
SOL4
ł
Front door alignment
ł
Front door lock mechanism
ł
Wire harness between SOL4 and the Motion PCA (A2)
Recommended actions
1.
If you have not done so already, reboot the MFP in Protected Service mode (PSM).
2.
Check the front door, front door lock mechanism, and SOL4 for the correct alignment and
engagement.
3.
Open the Covers diagnostic page, and then activate and deactivate SOL4.
4.
Cycle SOL4 and listen for a consistent rhythm.
5.
Verify that the front door is correctly aligned with the Front Door Open switch (SW3).
6.
Check the wire harness between SOL4 and A2.
7.
Test the voltage at SOL4: 5 Vdc at pins 1 and 2 (GND) on W100P4-SOL4.
8.
Test the voltage to SOL4 on A2: 5 Vdc at J2 pins 4 and 11 (GND).
Additional root causes
ł
A2
ł
Diagnostic page: Click Subsystems, and then click Covers.
ł
Component locator: Covers component locator on page 1620
ł
Wiring diagram: Drum wiring diagram on page 2471
ł
Parts diagram: Covers parts diagrams on page 1620
ł
Replace SOL4: Front Door Lock solenoid (SOL4) on page 169
ł
A2: D4.0705 on page 2392
Links
ENWW
Event Log error and warning codes 1901
30.0701
Description
ł
Scanner Control PCA (A501) backup memory data error
Primary root causes
ł
Failure when reading EEPROM data to flash memory in A501, A501 EEPROM IC, and A501
Recommended actions
1.
Turn off the MFP, reseat U11 IC on A501, and then turn on the MFP.
2.
Replace A501.
ł
Diagnostic page: Click Subsystems, and then click Scanner.
ł
Component locator: Scanner component locator on page 1770
ł
Wiring diagram: Scanner wiring diagram on page 2493
ł
Parts diagram: Scanner parts diagram on page 1771
ł
Replace A501: Scanner Control PCA (A501) on page 242
Links
1902 Appendix A Event Log codes
ENWW
30.0702
Description
ł
Scanner Control PCA (A501) memory R/W error
Primary root causes
ł
A501
Recommended actions
1.
Turn off the MFP, reseat the connectors on A501, and then turn on the MFP.
2.
Replace A501.
ł
Diagnostic page: Click Subsystems, and then click Scanner.
ł
Component locator: Scanner component locator on page 1770
ł
Wiring diagram: Scanner wiring diagram on page 2493
ł
Parts diagram: Scanner parts diagram on page 1771
ł
Replace A501: Scanner Control PCA (A501) on page 242
Links
ENWW
Event Log error and warning codes 1903
30.0703
Description
ł
Scanner main data transfer error
Primary root causes
ł
Wire harness between the AFE PCA (A502), the Scanner Control PCA (A501), and the Copy
Processing PCA (A27)
ł
A502
ł
A501
ł
A27
Recommended actions
1.
Turn off the MFP, check the wire harness between A502, A501, and A27. Reseat the connectors
on each PCA, and then turn on the MFP.
2.
Replace A501.
3.
Replace A502.
4.
Replace A27.
ł
Diagnostic page: Click Subsystems, and then click Scanner.
ł
Component locator: Scanner component locator on page 1770
ł
Wiring diagram: Scanner wiring diagram on page 2493
ł
Parts diagram: Scanner parts diagram on page 1771
ł
Replace A501: Scanner Control PCA (A501) on page 242
ł
Replace A502: AFE PCA (A502) on page 245
ł
Replace A27: Copy Processing PCA (A27) on page 620
Links
1904 Appendix A Event Log codes
ENWW
30.0704
Description
ł
ADF Control PCA (A401) data transfer error
Primary root causes
ł
Wire harness between the A401 and the Scanner Control PCA (A501)
ł
A401
ł
A501
Recommended actions
1.
Verify that the ADF cable is undamaged and securely connected to the MFP.
2.
Turn off the MFP, check the wire harness between A401 and A501, reseat the connectors on A401
and A501, and then turn on the MFP.
3.
Verify that the 5 V and 24 V LEDs on A401 and A501 are lit.
4.
Check the heartbeat LED on A401. If the LED is not lit, replace A401.
5.
Check the heartbeat LED on A501. If the LED is not lit, replace A501.
ł
Diagnostic page: Click Subsystems, and then click Scanner.
ł
Component locator: Scanner component locator on page 1770
ł
Wiring diagram: Scanner wiring diagram on page 2493
ł
Parts diagram: Scanner parts diagram on page 1771
ł
Replace A501: Scanner Control PCA (A501) on page 242
ł
Replace A401: ADF Control PCA (A401) on page 200
Links
ENWW
Event Log error and warning codes 1905
30.0705
Description
ł
ADF EEPROM error
Primary root causes
ł
ADF Control PCA (A401)
Recommended actions
1.
Turn off the MFP, check the wire harness between A401 and the Scanner Control PCA (A501),
reseat the connectors on A401, and then turn on the MFP.
2.
Verify that the 5 V and 24 V LEDs on A401 and A501 are lit.
3.
Verify that the heartbeat LED on A401 is lit.
4.
Replace A401.
ł
Diagnostic page: Click Subsystems, and then click Scanner.
ł
Component locator: Scanner component locator on page 1770
ł
Wiring diagram: Scanner wiring diagram on page 2493
ł
Parts diagram: Scanner parts diagram on page 1771
ł
Replace A401: ADF Control PCA (A401) on page 200
Links
1906 Appendix A Event Log codes
ENWW
30.0706
Description
ł
Shading correction data transfer error
Primary root causes
ł
A502 or Copy Processing PCA (A27)
ł
Scanner Control PCA (A501)
Recommended actions
1.
Turn off the MFP, check the wire harness between A502 and A501 and between A502 and Copy
Processing PCA (A27), reseat the connectors on each PCA, and then turn on the MFP.
2.
Replace A501. If the problem persists, replace A502.
3.
Replace the A27.
ł
Diagnostic page: Click Subsystems, and then click Scanner.
ł
Component locator: Scanner component locator on page 1770
ł
Wiring diagram: Scanner wiring diagram on page 2493
ł
Parts diagram: Scanner parts diagram on page 1771
ł
Replace A502: AFE PCA (A502) on page 245
ł
Replace A27: Copy Processing PCA (A27) on page 620
Links
ENWW
Event Log error and warning codes 1907
30.0707
Description
ł
Scanner motor (M501) stalled, scanner position cannot be found after M501 is turned on
Primary root causes
ł
Wire harness between the Scanner Control PCA (A501) and M501
ł
A501
ł
M501
ł
M501 timing belt
ł
Scanner carriages
ł
Wire harness between A501 and the Scanner Home Position sensor (SN503)
ł
SN503
Recommended actions
1.
Open the Scanner diagnostic page, and then run a Cycle - Lamp Off test to test M501.
2.
Verify that the 5 V, 5 V CCD, 5 V standby, and 24 V LEDs on A501 are lit. If M501 ran in step 1,
skip to step 7.
3.
Check the wire harness between A501 and M501.
4.
Disconnect M501, and then test the continuity at the following pins: pins 1 to 2 and 3, 4 to 5 and 6
5.
Test the voltage to M501 on A501: 24 V at YC11 pins 1 to 6.
6.
Run the Cycle - Lamp Off and test the signal to M501 on A501 at the following location: YC11 pins
3 to 6. If the signal does not go low, replace M501.
7.
Check the wire harness between A501 and SN503.
8.
Test the voltage to SN503 on A501: 5 V at YC2 pins 3 and 5.
9.
Activate SN503 and test the signal to SN503 on A501 at the following location: 5 to 0 V at YC2 pin
4.
10. If a scanner wire has recently been installed, reinstall the scanner wire.
11. Manually move the scanner carriage in order to verify that the rails are smooth and lubricated.
12. Replace A501.
Links
ł
Diagnostic page: Click Subsystems, and then click Scanner.
ł
Component locator: Scanner component locator on page 1770
ł
Wiring diagram: Scanner wiring diagram on page 2493
ł
Parts diagram: Scanner parts diagram on page 1771
1908 Appendix A Event Log codes
ENWW
ENWW
ł
Replace SN503: Scanner sensors on page 239
ł
Replace A501: Scanner Control PCA (A501) on page 242
ł
Replace M501: Scanner motor (M501) on page 237
Event Log error and warning codes 1909
30.0708
Description
ł
Scanner CCD PCA (A503) detects no light from the scanner exposure lamp
Primary root causes
ł
Scanner exposure lamp
ł
Scanner Inverter PCA (A504)
ł
Wire harness between the scanner exposure lamp, A504, and the Scanner Control PCA (A501)
ł
Wire harness between the Scanner CCD PCA (A503), AFE PCA (A502), and A501
ł
A503
ł
A502
ł
A501
Recommended actions
1.
Lift the ADF, and then close it and verify that the scanner exposure lamp turns on. If the scanner
exposure lamp turns on, skip to step 8.
2.
Check the wire harness between the scanner exposure lamp and A504.
3.
Check the wire harness between A504 and A501. Reseat the connectors on both A504 and A501.
4.
Test the voltage at the scanner exposure lamp: 24 V at pins 1 and 6 on CN YC3.
5.
Open the Scanner diagnostic page, and then run the Cycle - Lamp On test while testing the signal
to the scanner exposure lamp on A501 at the following location: YC3 pin 3. If the voltage does not
drop, then replace A501.
6.
Replace the scanner exposure lamp.
7.
Replace A504.
8.
Check the scanner exposure lamp PM counter. Replace the scanner exposure lamp if it is expired.
9.
Check and clean the shading correction plate and SN503.
10. Check the wire harness between A502 and A501. Reseat the connectors on A502 and A501.
11. Check the wire harness between A502 and A503. Reseat the connectors on A502 and A503.
12. Replace A502.
Links
ł
Diagnostic page: Click Subsystems, and then click Scanner.
ł
Component locator: Scanner component locator on page 1770
ł
Wiring diagram: Scanner wiring diagram on page 2493
ł
Parts diagram: Scanner parts diagram on page 1771
1910 Appendix A Event Log codes
ENWW
ENWW
ł
Replace the scanner exposure lamp: Scanner exposure lamp on page 229
ł
Replace scanner PCAs: Scanner PCAs on page 242
Event Log error and warning codes 1911
30.0709
Description
ł
CCD readings are out of range during shading correction or auto gain-control adjustment
Primary root causes
ł
Scanner exposure lamp
ł
Scanner Inverter PCA (A504)
ł
Wire harness between the scanner exposure lamp, A504, and the Scanner Control PCA (A501)
ł
Wire harness between the Scanner CCD PCA (A503), AFE PCA (A502), and A501
ł
A504 or A501
ł
Shading correction plate
ł
Scanner home position or shading position
ł
A502
Recommended actions
1.
Lift the ADF or platen cover, and then close it to turn the scanner exposure lamp on. Skip to step
5 if lamp turns on.
2.
Check the wire harness between the scanner exposure lamp and A504 and between A504 and
A501. Reseat the connectors on each PCA.
3.
Test for 24 V at YC3 pin 1 (GND) to pin 4. Test for 24 V at YC3 pin 1 (GND) to pin 5. Run the
Carriage Cycle-lamp on routine and verify that the voltage at YC3 pin 3 on A501 goes low. If not,
replace A501.
4.
Replace the scanner exposure lamp. If the problem persists, replace A502.
5.
Check the PM counter for the scanner exposure lamp. Check and clean the shading correction
plate and SN503. Check the wire harness between A502, A503, and A501. Reseat the connectors
on each PCA. If the problem persists, replace A502.
ł
Diagnostic page: Click Subsystems, and then click Scanner.
ł
Component locator: Scanner component locator on page 1770
ł
Wiring diagram: Scanner wiring diagram on page 2493
ł
Parts diagram: Scanner parts diagram on page 1771
ł
Replace scanner PCAs: Scanner PCAs on page 242
ł
Replace the scanner exposure lamp: Scanner exposure lamp on page 229
ł
Replace the scanner assembly: Scanner assembly on page 225
Links
1912 Appendix A Event Log codes
ENWW
30.0710
Description
ł
Failed to connect to scanner
Primary root causes
ł
Firmware
ł
Data error during scanner flash
ł
Scanner Control PCA (A501)
Recommended actions
1.
Reboot the MFP.
2.
Check the wire harness between the AFE PCA (A502) and the print engine.
3.
Check the wire harness between the A501 and the print engine.
4.
Reseat the connectors on A502 and A501.
5.
Check the voltage to A502 on A501: 5.1 V at pins 4, 5, 6, and 2 on CN-YC3.
6.
Replace A502.
7.
Replace A501.
8.
Replace Copy Processing PCA (A27).
ł
Diagnostic page: Click Subsystems, and then click Scanner.
ł
Component locator: Scanner component locator on page 1770
ł
Wiring diagram: Scanner wiring diagram on page 2493
ł
Parts diagram: Scanner parts diagram on page 1771
ł
Replace scanner PCAs: Scanner PCAs on page 242
ł
Replace A27: Copy Processing PCA (A27) on page 620
Links
ENWW
Event Log error and warning codes 1913
30.0711
Description
ł
Byte parity error
Primary root causes
ł
Data corruption and poor communication between the scanner and the Copy Processing PCA
(A27)
ł
Corrupted NVRAM on A27 or the Scanner Control PCA (A501)
ł
AFE PCA (A502)
ł
A27
Recommended actions
1.
Turn off the MFP.
2.
Check the wire harness and continuity between A502 and A27.
3.
Check the wire harness and continuity between A501 and A502.
4.
Reseat the connectors on A502 and A501.
5.
Check the wire harness between A501 and the print engine.
6.
Turn on the MFP.
7.
Replace A501.
8.
Replace A502.
9.
Replace A27.
ł
Diagnostic page: Click Subsystems, and then click Scanner.
ł
Component locator: Scanner component locator on page 1770
ł
Wiring diagram: Scanner wiring diagram on page 2493
ł
Parts diagram: Scanner parts diagram on page 1771
ł
Replace scanner PCAs: Scanner PCAs on page 242
ł
Replace A27: Copy Processing PCA (A27) on page 620
Links
1914 Appendix A Event Log codes
ENWW
30.0712
Description
ł
Message parity error
Primary root causes
ł
Data corruption between the scanner and the Copy Processing PCA (A27)
ł
Data corruption and poor communication between the AFE PCA (A502) and A27
ł
Data corruption in the NVRAM for A502 and A27
ł
A502
ł
A27
Recommended actions
1.
Turn off the MFP.
2.
Check the wire harness and continuity between A502 and A27.
3.
Check the wire harness and continuity between A501 and A502.
4.
Reseat the connectors on A502 and A501.
5.
Check the wire harness between A501 and the print engine.
6.
Turn on the MFP.
7.
Replace A501.
8.
Replace A502.
9.
Replace A27.
ł
Diagnostic page: Click Subsystems, and then click Scanner.
ł
Component locator: Scanner component locator on page 1770
ł
Wiring diagram: Scanner wiring diagram on page 2493
ł
Parts diagram: Scanner parts diagram on page 1771
ł
Replace scanner PCAs: Scanner PCAs on page 242
ł
Replace A27: Copy Processing PCA (A27) on page 620
Links
ENWW
Event Log error and warning codes 1915
30.0713
Description
ł
Scanner detected unknown operation code
Primary root causes
ł
Data corruption between the scanner and the Copy Processing PCA (A27)
ł
Data corruption in the NVRAM for A502 and A27
ł
A502
ł
A27
Recommended actions
1.
Turn off the MFP.
2.
Check the wire harness and continuity between A502 and A27.
3.
Check the wire harness and continuity between A501 and A502.
4.
Reseat the connectors on A502 and A501.
5.
Check the wire harness between A501 and the print engine.
6.
Turn on the MFP.
7.
Replace A501.
8.
Replace A502.
9.
Replace A27.
ł
Diagnostic page: Click Subsystems, and then click Scanner.
ł
Component locator: Scanner component locator on page 1770
ł
Wiring diagram: Scanner wiring diagram on page 2493
ł
Parts diagram: Scanner parts diagram on page 1771
ł
Replace scanner PCAs: Scanner PCAs on page 242
ł
Replace A27: Copy Processing PCA (A27) on page 620
Links
1916 Appendix A Event Log codes
ENWW
30.0714
Description
ł
Scanner detect message format error
Primary root causes
ł
Data corruption between the scanner and the Copy Processing PCA (A27)
ł
Data corruption in the NVRAM for A502 and A27
ł
A502
ł
A27
Recommended actions
1.
Turn off the MFP.
2.
Check the wire harness and continuity between A502 and A27.
3.
Check the wire harness and continuity between A501 and A502.
4.
Reseat the connectors on A502 and A501.
5.
Check the wire harness between A501 and the print engine.
6.
Turn on the MFP.
7.
Replace A501.
8.
Replace A502.
9.
Replace A27.
ł
Diagnostic page: Click Subsystems, and then click Scanner.
ł
Component locator: Scanner component locator on page 1770
ł
Wiring diagram: Scanner wiring diagram on page 2493
ł
Parts diagram: Scanner parts diagram on page 1771
ł
Replace A502: AFE PCA (A502) on page 245
ł
Replace A27: Copy Processing PCA (A27) on page 620
Links
ENWW
Event Log error and warning codes 1917
30.0715
Description
ł
Scanner detected memory address error
Primary root causes
ł
Data corruption in the Scanner Control PCA (A501) NVRAM
ł
AFE PCA (A502)
ł
A501
Recommended actions
1.
Turn off the MFP.
2.
Replace A501.
3.
Check the wire harness and continuity between A501 and A502.
4.
Reseat the wire connectors on A501 and A502.
5.
Turn on the MFP.
6.
Replace A502.
ł
Diagnostic page: Click Subsystems, and then click Scanner.
ł
Component locator: Scanner component locator on page 1770
ł
Wiring diagram: Scanner wiring diagram on page 2493
ł
Parts diagram: Scanner parts diagram on page 1771
ł
Replace A501: Scanner Control PCA (A501) on page 242
ł
Replace A502: AFE PCA (A502) on page 245
Links
1918 Appendix A Event Log codes
ENWW
30.0716
Description
ł
Scanner detected data frame error
Primary root causes
ł
Data corruption and poor communication between the scanner and the Copy Processing PCA
(A27)
ł
Data corruption in the NVRAM for A502 and A27
ł
A502
ł
A27
Recommended actions
1.
Turn off the MFP.
2.
Check the wire harness and continuity between A502 and A27.
3.
Check the wire harness and continuity between A501 and A502.
4.
Reseat the connectors on A502 and A501.
5.
Check the wire harness between A501 and the print engine.
6.
Turn on the MFP.
7.
Replace A501.
8.
Replace A502.
9.
Replace A27.
ł
Diagnostic page: Click Subsystems, and then click Scanner.
ł
Component locator: Scanner component locator on page 1770
ł
Wiring diagram: Scanner wiring diagram on page 2493
ł
Parts diagram: Scanner parts diagram on page 1771
ł
Replace scanner PCAs: Scanner PCAs on page 242
ł
Replace A27: Copy Processing PCA (A27) on page 620
Links
ENWW
Event Log error and warning codes 1919
30.0717
Description
ł
Scanner detected command overrun error
Primary root causes
ł
Data corruption and poor communication between the scanner and the Copy Processing PCA
(A27)
ł
A27
Recommended actions
1.
Turn off the MFP.
2.
Check the wire harness and continuity between A502 and A27.
3.
Check the wire harness and continuity between A501 and A502.
4.
Reseat the connectors on A502 and A501.
5.
Check the wire harness between A501 and the print engine.
6.
Turn on the MFP.
7.
Replace A501.
8.
Replace A502.
9.
Replace A27.
ł
Diagnostic page: Click Subsystems, and then click Scanner.
ł
Component locator: Scanner component locator on page 1770
ł
Wiring diagram: Scanner wiring diagram on page 2493
ł
Parts diagram: Scanner parts diagram on page 1771
ł
Replace A502: AFE PCA (A502) on page 245
ł
Replace A27: Copy Processing PCA (A27) on page 620
Links
1920 Appendix A Event Log codes
ENWW
30.0718
Description
ł
Scanner detected data overrun error
Primary root causes
ł
Data corruption and poor communication between the scanner and the Copy Processing PCA
(A27)
ł
A27
Recommended actions
1.
Turn off the MFP.
2.
Check the wire harness and continuity between A502 and A27.
3.
Check the wire harness and continuity between A501 and A502.
4.
Reseat the connectors on A502 and A501.
5.
Check the wire harness between A501 and the print engine.
6.
Turn on the MFP.
7.
Replace A501.
8.
Replace A502.
9.
Replace A27.
ł
Diagnostic page: Click Subsystems, and then click Scanner.
ł
Component locator: Scanner component locator on page 1770
ł
Wiring diagram: Scanner wiring diagram on page 2493
ł
Parts diagram: Scanner parts diagram on page 1771
ł
Replace A27: Copy Processing PCA (A27) on page 620
Links
ENWW
Event Log error and warning codes 1921
30.0719
Description
ł
Scanner timeout
Primary root causes
ł
Data corruption and poor communication between the scanner and the Copy Processing PCA
(A27)
ł
Scanner Control PCA (A501)
ł
A27
Recommended actions
1.
Turn off the MFP.
2.
Check the wire harness and continuity between A502 and A27.
3.
Check the wire harness and continuity between A501 and A502.
4.
Reseat the connectors on A502 and A501.
5.
Check the wire harness between A501 and the print engine.
6.
Turn on the MFP.
7.
Replace A501.
8.
Replace A502.
9.
Replace A27.
ł
Diagnostic page: Click Subsystems, and then click Scanner.
ł
Component locator: Scanner component locator on page 1770
ł
Wiring diagram: Scanner wiring diagram on page 2493
ł
Parts diagram: Scanner parts diagram on page 1771
ł
Replace A502: AFE PCA (A502) on page 245
ł
Replace A27: Copy Processing PCA (A27) on page 620
Links
1922 Appendix A Event Log codes
ENWW
30.0720
Description
ł
UART overrun error
Primary root causes
ł
Data corruption in NVRAM for the Scanner Control PCA (A501) and the Copy Processing PCA
(A27)
ł
AFE PCA (A502)
ł
A27
Recommended actions
1.
Turn off the MFP.
2.
Check the wire harness and continuity between A502 and A27.
3.
Check the wire harness and continuity between A501 and A502.
4.
Reseat the connectors on A502 and A501.
5.
Check the wire harness between A501 and the print engine.
6.
Turn on the MFP.
7.
Replace A501.
8.
Replace A502.
9.
Replace A27.
ł
Diagnostic page: Click Subsystems, and then click Scanner.
ł
Component locator: Scanner component locator on page 1770
ł
Wiring diagram: Scanner wiring diagram on page 2493
ł
Parts diagram: Scanner parts diagram on page 1771
ł
Replace scanner PCAs: Scanner PCAs on page 242
ł
Replace A27: Copy Processing PCA (A27) on page 620
Links
ENWW
Event Log error and warning codes 1923
30.0721
Description
ł
UART frame error
Primary root causes
ł
Data corruption in NVRAM for the Scanner Control PCA (A501) and the Copy Processing PCA
(A27)
ł
AFE PCA (A502)
ł
A27
Recommended actions
1.
Turn off the MFP.
2.
Check the wire harness and continuity between A502 and A27.
3.
Check the wire harness and continuity between A501 and A502.
4.
Reseat the connectors on A502 and A501.
5.
Check the wire harness between A501 and the print engine.
6.
Turn on the MFP.
7.
Replace A501.
8.
Replace A502.
9.
Replace A27.
ł
Diagnostic page: Click Subsystems, and then click Scanner.
ł
Component locator: Scanner component locator on page 1770
ł
Wiring diagram: Scanner wiring diagram on page 2493
ł
Parts diagram: Scanner parts diagram on page 1771
ł
Replace scanner PCAs: Scanner PCAs on page 242
ł
Replace A27: Copy Processing PCA (A27) on page 620
Links
1924 Appendix A Event Log codes
ENWW
30.0722
Description
ł
UART parity error
Primary root causes
ł
Data corruption in NVRAM for the Scanner Control PCA (A501) and the Copy Processing PCA
(A27)
ł
AFE PCA (A502)
ł
A27
Recommended actions
1.
Turn off the MFP.
2.
Check the wire harness and continuity between A502 and A27.
3.
Check the wire harness and continuity between A501 and A502.
4.
Reseat the connectors on A502 and A501.
5.
Check the wire harness between A501 and the print engine.
6.
Turn on the MFP.
7.
Replace A501.
8.
Replace A502.
9.
Replace A27.
ł
Diagnostic page: Click Subsystems, and then click Scanner.
ł
Component locator: Scanner component locator on page 1770
ł
Wiring diagram: Scanner wiring diagram on page 2493
ł
Parts diagram: Scanner parts diagram on page 1771
ł
Replace scanner PCAs: Scanner PCAs on page 242
ł
Replace A27: Copy Processing PCA (A27) on page 620
Links
ENWW
Event Log error and warning codes 1925
30.0723
Description
ł
Copy Processing PCA (A27) detected message parity error
Primary root causes
ł
Data corruption between the scanner and the A27
ł
Data corruption in NVRAM for Scanner Control PCA (A501) and the A27
ł
AFE PCA (A502)
ł
A27
Recommended actions
1.
Turn off the MFP.
2.
Check the wire harness and continuity between A502 and A27.
3.
Check the wire harness and continuity between A501 and A502.
4.
Reseat the connectors on A502 and A501.
5.
Check the wire harness between A501 and the print engine.
6.
Turn on the MFP.
7.
Replace A501.
8.
Replace A502.
9.
Replace A27.
ł
Diagnostic page: Click Subsystems, and then click Scanner.
ł
Component locator: Scanner component locator on page 1770
ł
Wiring diagram: Scanner wiring diagram on page 2493
ł
Parts diagram: Scanner parts diagram on page 1771
ł
Replace scanner PCAs: Scanner PCAs on page 242
ł
Replace A27: Copy Processing PCA (A27) on page 620
Links
1926 Appendix A Event Log codes
ENWW
30.0724
Description
ł
Unknown operation code
Primary root causes
ł
Data corruption or poor communication between the scanner and the Copy Processing PCA (A27)
ł
Data corruption in the NVRAM for A502 and A27
ł
AFE PCA (A502)
ł
A27
Recommended actions
1.
Turn off the MFP.
2.
Check the wire harness and continuity between A502 and A27.
3.
Check the wire harness and continuity between A501 and A502.
4.
Reseat the connectors on A502 and A501.
5.
Check the wire harness between A501 and the print engine.
6.
Turn on the MFP.
7.
Replace A501.
8.
Replace A502.
9.
Replace A27.
ł
Diagnostic page: Click Subsystems, and then click Scanner.
ł
Component locator: Scanner component locator on page 1770
ł
Wiring diagram: Scanner wiring diagram on page 2493
ł
Parts diagram: Scanner parts diagram on page 1771
ł
Replace scanner PCAs: Scanner PCAs on page 242
ł
Replace A27: Copy Processing PCA (A27) on page 620
Links
ENWW
Event Log error and warning codes 1927
30.0725
Description
ł
Scanner detected an error during initialization routine, AGC, scanner carriage homing, or Scanner
motor (M501) movement
Primary root causes
ł
Power supply wire harness between the Power Distribution PCA (A1) and the Scanner Control
PCA (A501)
ł
Power supply to A501
ł
Data wire harness between the Copy Processing PCA (A27) and the AFE PCA (A502)
ł
A501
ł
A502
ł
A27
Recommended actions
1.
Verify that the 5 V, 5 V standby, and 24 V LEDs are lit on A501.
2.
Check the wire harness between A1 and A501.
3.
Check the fuses to the scanner on A1.
4.
Check the wire harness and continuity between A502 and A27.
5.
Check the wire harness and continuity between A502 and A501.
6.
Reseat the connectors on A502 and A501.
7.
Check the wire harness between A501 and the print engine.
8.
Replace A501.
9.
Replace A502.
10. Replace A27.
Links
ł
Diagnostic page: Click Subsystems, and then click Scanner.
ł
Component locator: Scanner component locator on page 1770
ł
Wiring diagram: Scanner wiring diagram on page 2493
ł
Parts diagram: Scanner parts diagram on page 1771
ł
Replace A501: Scanner Control PCA (A501) on page 242
ł
Replace A401: ADF Control PCA (A401) on page 200
1928 Appendix A Event Log codes
ENWW
30.0726
Description
ł
Copy Processing PCA (A27) detected an internal operation error
Primary root causes
ł
A27
ł
Corrupted A27 NVM RAM
ł
Firmware
Recommended actions
1.
Turn off the MFP.
2.
Check the wire harness and continuity between A502 and A27.
3.
Check the wire harness and continuity between A501 and A502.
4.
Reseat the connectors on A502 and A501.
5.
Check the wire harness between A501 and the Power Distribution PCA (A1).
6.
Turn on the MFP.
7.
Replace A27.
ł
Diagnostic page: Click Subsystems, and then click Scanner.
ł
Component locator: Scanner component locator on page 1770
ł
Wiring diagram: Scanner wiring diagram on page 2493
ł
Parts diagram: Scanner parts diagram on page 1771
ł
Replace A27: Copy Processing PCA (A27) on page 620
Links
ENWW
Event Log error and warning codes 1929
31.1301
Description
ł
Original document mispick
Primary root causes
ł
ADF Original Lift solenoid (SOL401)
ł
ADF Feed clutch (CL401)
ł
ADF Feed motor (M401)
ł
ADF Conveying motor (M402)
ł
ADF Feed sensor (SN404)
ł
Original feed roller
ł
ADF Duplex Pressure solenoid (SOL403)
ł
ADF Eject Shift solenoid (SOL404)
ł
Separation pad
ł
One-way clutch
ł
ADF Control PCA (A401)
Recommended actions
1.
Open the ADF diagnostic page, and then test each device. Replace any device that does not
function. Verify that ADF Open Safety switch (SW401) is closed before you test motors and
solenoids.
2.
Verify that the 5 V, 5 V standby, and 24 V LEDs are lit on A401.
3.
Check the wire harness between SOL401, CL401, and A401.
4.
Disconnect SOL401 and CL401, and then test the continuity on each wire connector. Replace the
solenoid if the continuity is open.
5.
Test the voltage to SOL401 on A401: 24 V at YC2 pin 14.
6.
Test the voltage to CL401 on A401: 24 V at YC4 pin 2.
7.
Check the wire harness between M401, M402, and A401.
8.
Disconnect M401, and then test the continuity between the following pins on the wire
connector:pins 1 to 2, 1 to 3, 4 to 5, and 4 to 6. Replace the motor if the continuity is open.
9.
Disconnect M402, and then test the continuity between the following pins on the wire
connector:pins 1 to 2, 1 to 3, 4 to 5, and 4 to 6. Replace the motor if the continuity is open.
10. Test the voltage to M401 on A401: 24 V at YC2 pins 1 to 6.
11. Activate M401, and then test the signal to M401 on A401 at the following location: YC2 pins 3 to
6. If the signal does not go low, replace A401.
1930 Appendix A Event Log codes
ENWW
12. Test the voltage to M402 on A401: YC2 pins 7 to 12.
13. Activate M402, and then test the signal to M402 on A401 at the following location: YC2 pins 9 to
12. If the signal does not go low, replace A401.
14. Check the wire harness between SN404 and A401.
15. Test the voltage at SN404: 5 V at pins 1 and 3 on the connector.
16. Check the original feed roller and separation pad for wear and contamination.
17. Check the feed shaft one-way clutch.
18. Check the wire harness between SOL403, SOL404, and A401.
19. Disconnect SOL403 and SOL404, and then test the continuity on each wire connector. Replace
the solenoid if the continuity is open.
Links
ENWW
ł
Diagnostic page: Click Subsystems, and then click ADF.
ł
Component locator: ADF component locator on page 1582
ł
Wiring diagram: ADF wiring diagram on page 2464
ł
Parts diagram: ADF parts diagrams on page 1582
ł
Replace ADF components: Automatic document feeder (ADF) on page 182
Event Log error and warning codes 1931
31.1302
Description
ł
Jam at ADF Feed sensor (SN404)
Primary root causes
ł
ADF Feed motor (M401)
ł
SN404
ł
ADF Feed clutch (CL401)
ł
Original feed roller
ł
Separation pad
ł
One-way clutch
ł
ADF Control PCA (A401)
Recommended actions
1.
Close the ADF and then remove all paper from the ADF. Open the ADF diagnostic page, and then
test each device. Replace any device that does not function.
2.
Verify that the 5 V, 5 V standby, and 24 V LEDs on A401 are lit.
3.
Check the wire harness between SOL401, CL401, and A401.
4.
Disconnect SOL401, CL401, and then test the continuity on each connector. Replace either
component if the continuity is open.
5.
Test the signal to SOL401 on A401: YC2 pin 14. Replace A401 if the signal does not go low.
6.
Test the signal to CL401 on A401: YC4 pin 2. Replace A401 if the signal does not go low.
7.
Check the wire harness between M401, M402, and A401.
8.
Test the continuity on the M402 coils at the following pins: pins 1 to 2, 1 to 3, 4 to 5, and 4 to 6.
Replace the motor if the continuity is open.
9.
Test the continuity on the M401 coils at the following pins: pins 1 to 2, 1 to 3, 4 to 5, and 4 to 6.
Replace the motor if the continuity is open.
10. Test the voltage to M401 on A401: 24 V at YC2 pins 1 to 6.
11. Test the voltage to M402 on A401: YC2 pins 7 to 12.
12. Test the signal to M401 on A401: YC2 pins 3 to 6. Replace A401 if the signal does not go low.
13. Test the signal to M402 on A401: YC2 pins 9 to 12. Replace A401 if the signal does not go low.
14. Check the wire harness between SN404 and A401.
15. Test the voltage at SN404: 5 V at pins 1 and 3 on the connector.
16. Check the original feed roller and separation pad for wear and contamination.
17. Check the feed shaft one-way clutch.
1932 Appendix A Event Log codes
ENWW
Links
ENWW
ł
Diagnostic page: Click Subsystems, and then click ADF.
ł
Component locator: ADF component locator on page 1582
ł
Wiring diagram: ADF wiring diagram on page 2464
ł
Parts diagram: ADF parts diagrams on page 1582
ł
Replace ADF components: Automatic document feeder (ADF) on page 182
Event Log error and warning codes 1933
31.1303
Description
ł
Jam at ADF Timing sensor (SN406)
Primary root causes
ł
Paper dust on the black surface in front of SN406
ł
Paper path obstructions
ł
Conveying rollers and pulleys
ł
ADF Control PCA (A401)
Recommended actions
1.
Open the ADF diagnostic page, and then test each device. Perform a paper pick test for simplex
printing with paper. Replace any device that does not function.
2.
Verify that the 5 V, 5 V standby, and 24 V LEDs are lit on A401.
3.
Check the wire harness between SN406 and A401.
4.
Clean SN406 and the black surface in front of it.
5.
Test the voltage at SN406: 5 V at pins 1 and 3 (GND) on the sensor connector.
6.
Check the paper path conveying rollers and pulleys for wear and contamination.
7.
Verify that the ADF top cover spring presses the registration guide when the ADF is closed.
8.
Check the registration rollers and pulleys for wear and contamination.
9.
Verify that the ADF conveyance guide is installed correctly.
10. Activate SN406, and then test the signal to SN406 on A401 at the following pins: 0 to 5 V at YC4
pin 7. If the signal does not change replace A401.
Links
ł
Diagnostic page: Click Subsystems, and then click ADF.
ł
Component locator: ADF component locator on page 1582
ł
Wiring diagram: ADF wiring diagram on page 2464
ł
Parts diagram: ADF parts diagrams on page 1582
ł
Replace ADF components: Automatic document feeder (ADF) on page 182
1934 Appendix A Event Log codes
ENWW
31.1308
Description
ł
Jam detected between the ADF Feed sensor (SN404) and the ADF Reverse sensor (SN405) during
duplex copying
Primary root causes
ł
ADF Duplex Shift solenoid (SOL402)
ł
SN405
ł
ADF Control PCA (A401)
Recommended actions
1.
Open the ADF diagnostic page, and then test each device. Perform a paper pick test for duplex
copying with paper. Replace any device that does not function.
2.
Clear all paper from the ADF, close the ADF, and then verify that all sensors indicate that paper is
not present.
3.
Check the paper path for obstructions.
4.
Check the diverter fingers for binding.
5.
Check the wire harness between SOL402 and A401.
6.
Test the continuity on the SOL402 coil. Replace SOL402 if the continuity is open.
7.
Test the voltage to SOL402 on A401: 24 V at YC3 pin 2.
8.
Activate SOL402, and then test the signal to SOL402 on A401. If the signal does not go down,
replace A401.
9.
Verify that the SN405 actuator moves freely.
10. Check the wire harness between SN405 and A401.
11. Test the voltage at SN405: 5 V at pins 1 to 3 on the sensor connector.
12. Replace SN405.
13. Activate SN405, and then test the signal to SN405 on A401 at the following location: 0 to 5 V at
YC4 pin 4. If the signal does not go low, replace A401.
Links
ENWW
ł
Diagnostic page: Click Subsystems, and then click ADF.
ł
Component locator: ADF component locator on page 1582
ł
Wiring diagram: ADF wiring diagram on page 2464
ł
Parts diagram: ADF parts diagrams on page 1582
ł
Replace ADF components: Automatic document feeder (ADF) on page 182
Event Log error and warning codes 1935
31.1311
Description
ł
Jam detected between the ADF Timing sensor (SN406) and the ADF Reverse sensor (SN405)
Primary root causes
ł
ADF Conveying motor (M402)
ł
SN405
ł
SN406
ł
ADF Duplex Shift solenoid (SOL402)
ł
Conveying rollers and pulleys
ł
Original sheet guides
ł
ADF Control PCA (A401)
Recommended actions
1.
Open the ADF diagnostic page, and then test each device. Perform a paper pick test for duplex
printing with paper. Verify that the ADF Open Safety switch (SW401) is closed before you test
motors and solenoids. Replace any device that does not function.
2.
Check the wire harness between M402, SN405, and A401.
3.
Check the paper path, the lower conveying rollers, and the registration rollers for wear and
contamination.
4.
Check the original sheet guides in the reading area for damage.
5.
Test the voltage at SN406: 5 V at pins 1 and 3 (GND) on the sensor connector.
6.
Clean or replace SN406.
7.
Check the wire harness between SOL402 and A401.
8.
Clean or replace the eject guide rollers.
9.
Replace A401.
ł
Diagnostic page: Click Subsystems, and then click ADF.
ł
Component locator: ADF component locator on page 1582
ł
Wiring diagram: ADF wiring diagram on page 2464
ł
Parts diagram: ADF parts diagrams on page 1582
ł
Replace ADF components: Automatic document feeder (ADF) on page 182
Links
1936 Appendix A Event Log codes
ENWW
31.1312
Description
ł
Jam detected at ADF Timing sensor (SN406) during conveying
Primary root causes
ł
Eject guides
ł
ADF alignment
ł
SN406
ł
SOL404
ł
ADF Control PCA (A401)
Recommended actions
1.
Open the ADF diagnostic page, and then test each device. Perform a paper pick test for duplex
printing with paper. Verify that the ADF Open Safety switch (SW401) is closed before you test
motors and solenoids. Replace any device that does not function.
2.
Check the eject guide for damage.
3.
Check the leading edge of the original for damage or skew.
4.
Check the copies for skew or image deformation near the top of the page. If these defects are
present, adjust the ADF alignment screw at the rear of the right hinge.
5.
Check the wire harness between SN406 and A401.
6.
Test the voltage at SN406: 5 V at pins 1 and 3 (GND) on the sensor connector.
7.
Replace SN406.
8.
Replace A401.
ł
Diagnostic page: Click Subsystems, and then click ADF.
ł
Component locator: ADF component locator on page 1582
ł
Wiring diagram: ADF wiring diagram on page 2464
ł
Parts diagram: ADF parts diagrams on page 1582
ł
Replace ADF components: Automatic document feeder (ADF) on page 182
Links
ENWW
Event Log error and warning codes 1937
32.0B03
Description
ł
The control panel is not present
Primary root causes
ł
Control panel
ł
Wire harness between the control panel and the MFP
ł
Formatter Main PCA (A26)
Recommended actions
1.
Check the wire harness between the control panel and A26.
2.
Validate that the control panel is calibrated and functional.
3.
Replace the control panel.
4.
Replace A26.
ł
Wiring diagram: Control panel wiring diagram on page 2470
ł
Parts diagram: Control panel parts diagram on page 1617
ł
Replace the control panel: Control panel assembly on page 259
ł
Replace A26: Formatter Main PCA (A26) on page 621
Links
1938 Appendix A Event Log codes
ENWW
32.0C00
Description
ł
Restore Factory Settings succeeded
Primary root causes
ł
N/A
Recommended actions
䦱
ENWW
N/A
Event Log error and warning codes 1939
32.0C01
Description
ł
Restore Factory Settings failed
Primary root causes
ł
Failed formatter NVRAM
Recommended actions
䦱
Replace the Formatter Main PCA (A26).
ł
Component locator: Formatter component locator on page 1702
ł
Wiring diagram: Formatter wiring diagram on page 2482
ł
Parts diagram: Formatter parts diagram on page 1702
ł
Replace A26: Formatter Main PCA (A26) on page 621
Links
1940 Appendix A Event Log codes
ENWW
32.1C03
Description
ł
NVM B/R machine restore started
Primary root causes
ł
N/A
Recommended actions
䦱
ENWW
N/A
Event Log error and warning codes 1941
32.1C04
Description
ł
NVM B/R customer backup started (backup/restore operation was started)
Primary root causes
ł
N/A
Recommended actions
䦱
N/A
1942 Appendix A Event Log codes
ENWW
32.1C05
Description
ł
NVM B/R restore backup started (backup/restore operation was started)
Primary root causes
ł
N/A
Recommended actions
䦱
ENWW
N/A
Event Log error and warning codes 1943
32.1C06
Description
ł
NVM B/R bad parameters error (invalid parameters passed to BackupMachineData or
RestoreMachineData)
Primary root causes
ł
Invalid entry
Recommended actions
䦱
Verify the settings, and then re-enter them.
1944 Appendix A Event Log codes
ENWW
32.1C07
Description
ł
NVM B/R file permissions error (unable to access destination)
Primary root causes
ł
The customer-specified drive is either not writable or not readable by the MFP
Recommended actions
䦱
ENWW
Check the destination location and the permissions of the specified destination path. Permissions
could be either on the directories or the files.
Event Log error and warning codes 1945
32.1C08
Description
ł
NVM B/R file error (Disk full or other file access errors)
Primary root causes
ł
There is not enough space on the destination location to complete the operation
Recommended actions
䦱
Check the destination location for available space. Free up space, if possible.
1946 Appendix A Event Log codes
ENWW
32.1C09
Description
ł
NVM B/R wrong machine error (tried to restore machine data to the wrong machine or the backup
file being restored was created on a different machine)
Primary root causes
ł
The serial number in the file does not match the MFP serial number. The file specified was created
on a different.
Recommended actions
䦱
ENWW
Validate the machine serial number, and then upload the file that was created on this MFP.
Event Log error and warning codes 1947
32.1C0A
Description
ł
NVM B/R data integrity error (data corrupt, or other encryption/decryption errors)
Primary root causes
ł
Corrupt file
ł
Wrong encryption key
Recommended actions
1.
Verify that the encryption key is correct.
2.
If the error persists, try a different file.
1948 Appendix A Event Log codes
ENWW
32.1C0B
Description
ł
NVM B/R firmware version error. Tried to restore firmware backup from a different firmware version.
Primary root causes
ł
Firmware on the MFP is new or older than the firmware you are trying to restore
Recommended actions
䦱
ENWW
Verify that the MFP is running the same firmware version that was used when creating the backup
file. Do not upgrade the MFP firmware before doing the firmware restore.
Event Log error and warning codes 1949
32.1C0C
Description
ł
NVM B/R aborted
Primary root causes
ł
The user aborted the operation from the embedded Web server (EWS)
Recommended actions
䦱
N/A
1950 Appendix A Event Log codes
ENWW
32.1C0D
Description
ł
NVM B/R unknown error
Primary root causes
ł
Unknown
Recommended actions
䦱
ENWW
Retry the backup.
Event Log error and warning codes 1951
32.1C0E
Description
ł
NVM B/R formatter timeout
Primary root causes
ł
Unknown firmware condition prevented the operation from completing
Recommended actions
1.
Retry the backup.
2.
If the error persists, perform an RFU upgrade.
1952 Appendix A Event Log codes
ENWW
32.1C0F
Description
ł
NVM B/R Coprocessor timeout
Primary root causes
ł
Unknown firmware condition prevented the operation from completing
Recommended actions
ENWW
1.
Retry the backup.
2.
If the error persists, perform an RFU upgrade.
Event Log error and warning codes 1953
32.1C10
Description
ł
NVM B/R Coprocessor timeout
Primary root causes
ł
Unknown firmware condition prevented the operation from completing
Recommended actions
1.
Retry the backup.
2.
If the error persists, perform an RFU upgrade.
1954 Appendix A Event Log codes
ENWW
32.1C11
Description
ł
NVM B/R engine timeout
Primary root causes
ł
Unknown firmware condition prevented the operation from completing
Recommended actions
ENWW
1.
Retry the backup.
2.
If the error persists, perform an RFU upgrade.
Event Log error and warning codes 1955
32.1C12
Description
ł
NVM B/R disk timeout
Primary root causes
ł
Unknown firmware condition prevented the operation from completing
Recommended actions
1.
Retry the backup.
2.
If the error persists, perform an RFU upgrade.
1956 Appendix A Event Log codes
ENWW
32.1C13
Description
ł
NVM B/R auto backup timeout
Primary root causes
ł
Unknown firmware condition prevented the operation from completing
Recommended actions
ENWW
1.
Retry the backup.
2.
If the error persists, perform an RFU upgrade.
Event Log error and warning codes 1957
32.1800
Description
ł
Parallel port buffer overflow
Primary root causes
ł
MFP firmware
ł
Parallel cable
ł
Host PC
Recommended actions
1.
Reboot the MFP.
2.
Reboot the host PC.
3.
Update the MFP firmware.
4.
Replace the parallel cable.
5.
Replace the EIO Riser PCA (A31).
ł
Component locator: Formatter component locator on page 1702
ł
Wiring diagram: Formatter wiring diagram on page 2482
ł
Parts diagram: Formatter parts diagram on page 1702
ł
Replace A31: EIO Riser PCA (A31) on page 617
Links
1958 Appendix A Event Log codes
ENWW
32.1801
Description
ł
Serial port buffer overflow
Primary root causes
ł
MFP firmware
ł
Copy Processing PCA (A27)
Recommended actions
1.
Reboot the MFP.
2.
Reinstall A27.
3.
Replace A27.
ł
Component locator: Formatter component locator on page 1702
ł
Wiring diagram: Formatter wiring diagram on page 2482
ł
Parts diagram: Formatter parts diagram on page 1702
ł
Replace A27: Copy Processing PCA (A27) on page 620
Links
ENWW
Event Log error and warning codes 1959
32.1802
Description
ł
USB buffer overflow
Primary root causes
ł
MFP firmware
ł
USB cable
ł
Host PC
Recommended actions
1.
Reboot the MFP.
2.
Reboot the host PC.
3.
Replace the USB cable.
4.
Reinstall the Copy Processing PCA (A27).
5.
Replace A27.
ł
Component locator: Formatter component locator on page 1702
ł
Wiring diagram: Formatter wiring diagram on page 2482
ł
Parts diagram: Formatter parts diagram on page 1702
ł
Replace A27: Copy Processing PCA (A27) on page 620
Links
1960 Appendix A Event Log codes
ENWW
32.1803
Description
ł
EIO X buffer overflow. Third-party PCA might be attached to the host PC.
Primary root causes
ł
MFP firmware
ł
Network cable between host PC and the MFP
ł
Copy Processing PCA (A27)
Recommended actions
1.
Reboot the MFP.
2.
Reboot the host PC, switch, or hub.
3.
Replace the network cable.
4.
Reinstall A27.
5.
Replace A27.
ł
Component locator: Formatter component locator on page 1702
ł
Wiring diagram: Formatter wiring diagram on page 2482
ł
Parts diagram: Formatter parts diagram on page 1702
ł
Replace A27: Copy Processing PCA (A27) on page 620
Links
ENWW
Event Log error and warning codes 1961
32.1804
Description
ł
EIO bad transition. Third-party PCA might be attached to the host PC.
Primary root causes
ł
MFP firmware
ł
Network cable between host PC and the MFP
ł
Copy Processing PCA (A27)
Recommended actions
1.
Reboot the MFP.
2.
Reboot the host PC, switch, or hub.
3.
Replace the network cable.
4.
Reinstall A27.
5.
Replace A27.
ł
Component locator: Formatter component locator on page 1702
ł
Wiring diagram: Formatter wiring diagram on page 2482
ł
Parts diagram: Formatter parts diagram on page 1702
ł
Replace A27: Copy Processing PCA (A27) on page 620
Links
1962 Appendix A Event Log codes
ENWW
32.1805
Description
ł
Bad serial port transition
Primary root causes
ł
Cable between host PC and the MFP
ł
Copy Processing PCA (A27)
Recommended actions
1.
Reboot the MFP.
2.
Reboot the host PC.
3.
Replace the cable.
4.
Reinstall A27.
5.
Replace A27.
ł
Component locator: Formatter component locator on page 1702
ł
Wiring diagram: Formatter wiring diagram on page 2482
ł
Parts diagram: Formatter parts diagram on page 1702
ł
Replace A27: Copy Processing PCA (A27) on page 620
Links
ENWW
Event Log error and warning codes 1963
32.1900
Description
ł
File operation failed
Primary root causes
ł
USB device has been removed
ł
Hard disk problem
ł
File not found
ł
No free file descriptors
ł
Invalid number of bits
ł
File with the same name exists
ł
Illegal field name
ł
Incorrect permissions to delete a file or a directory
ł
Trying to perform file operations on an item that is not a file
ł
Trying to perform directory operations on an item that is not a directory
ł
Directory is full
ł
File is write-only
ł
Corrupt system file
ł
No available RAM on formatter main PCA
Recommended actions
1.
Reinstall a removed USB device.
2.
Delete unnecessary files.
3.
Reboot the MFP.
4.
Perform a hard disk initialization procedure.
5.
Use the reformat option to download and reinstall firmware.
6.
Replace the hard disk.
ł
Component locator: Formatter component locator on page 1702
ł
Wiring diagram: Formatter wiring diagram on page 2482
ł
Parts diagram: Formatter parts diagram on page 1702
ł
Replace the hard disk: Formatter hard drive on page 611
Links
1964 Appendix A Event Log codes
ENWW
32.1902
Description
ł
Disk is write-protected
Primary root causes
ł
The hard disk or USB drive is write-protected. The file is protected by a PML command or writeprotected from the USB or hard disk.
Recommended actions
ENWW
1.
Unprotect the USB drive or the hard disk.
2.
Perform a disk initialization procedure.
Event Log error and warning codes 1965
32.1904
Description
ł
Unable to copy job
Primary root causes
ł
Too many customer jobs on the hard drive
Recommended actions
䦱
Delete the customer jobs from the hard drive.
1966 Appendix A Event Log codes
ENWW
32.1905
Description
ł
Unable to store job
Primary root causes
ł
Too many customer jobs on the hard drive
Recommended actions
䦱
ENWW
Delete the customer jobs from the hard drive.
Event Log error and warning codes 1967
32.1906
Description
ł
Formatter hard disk is full
Primary root causes
ł
The MFP hard disk does not have enough space to process additional jobs.
Recommended actions
䦱
Delete jobs on the hard disk. If necessary, contact the system administrator.
1968 Appendix A Event Log codes
ENWW
32.2100
Description
ł
Corrupt firmware in external accessory
Primary root causes
ł
Corrupt finisher firmware
ł
Finisher Main PCA (A200)
Recommended actions
1.
Reboot the MFP.
2.
Update the MFP firmware.
3.
Check the voltages on A200 at the 3.3, 5, 32, 42, and 52 Vdc test points.
4.
Replace A200.
ł
Wiring diagram: Finisher Main PCA (A200) diagram on page 2481.
ł
Replace A200: Finisher Main PCA (A200) on page 859.
Links
ENWW
Event Log error and warning codes 1969
32.2301
Description
ł
ENGCOM (engine communication) unknown configuration from Main Engine PCA (A5). The NVM
value returned from A5 does not match the NVM value in the Formatter Main PCA (A26).
Primary root causes
ł
A5 was replaced but the NVM was not set for the current product configuration
ł
No communication between A5 and A26
ł
A5 NVM is corrupted
Recommended actions
1.
If A5 was replaced, restore NVM.
2.
Check the wire harness between A5 and A26.
ł
Component locator: Formatter component locator on page 1702.
ł
Wiring diagram: Formatter wiring diagram on page 2482.
ł
Parts diagram: Formatter parts diagram on page 1702.
Links
1970 Appendix A Event Log codes
ENWW
32.2302
Description
ł
ENGCOM (engine communication) configuration changed. The Formatter Main PCA (A26) EFI
(extensible firmware interface) NVM value does not match the Main Engine PCA (A5) NVM value.
Primary root causes
ł
A5 or A26 was replaced but the NVM was not set for the current product configuration
Recommended actions
䦱
This is normal behavior. The A26 EFI (extensible firmware interface) NVM value and the A5 NVM
value resolve after the MFP is booted up. No action is required.
ł
Component locator: Formatter component locator on page 1702.
ł
Wiring diagram: Formatter wiring diagram on page 2482.
ł
Parts diagram: Formatter parts diagram on page 1702.
Links
ENWW
Event Log error and warning codes 1971
32.2600
Description
ł
Not enough memory to print current page or page is too complex
Primary root causes
ł
Memory leak is causing previous jobs to consume too much memory
ł
Memory leak in current job
ł
Previous pages in this job have fragmented the memory too much for this page to print
ł
Other software is consuming memory
ł
Corrupted RAM
Recommended actions
1.
Print the Configuration page, and then check the available RAM against the RAM available on the
MFP.
2.
Reboot the MFP.
3.
Uninstall other systems that consume RAM, such as compact flash, third-party software, and extra
DIMMS.
4.
Install more RAM.
5.
Print only the page that failed to print.
6.
Try another PDL driver and select less complex device options.
7.
Try a different PDL (XL to PS, PS to XL, PCL2, PDF).
8.
Update the MFP firmware and printer driver.
ł
Configuration page: Click Settings/Procedures, and then click Print Information Pages.
Links
1972 Appendix A Event Log codes
ENWW
32.4400
Description
ł
File operation failed
Primary root causes
ł
USB device has been removed
ł
Hard disk problem
ł
File not found
ł
No free file descriptors
ł
Invalid number of bits
ł
File with the same name exists
ł
Illegal field name
ł
Incorrect permissions to delete a file or a directory
ł
Trying to perform file operations on an item that is not a file
ł
Trying to perform directory operations on an item that is not a directory
ł
Directory is full
ł
File is write-only
ł
Corrupt system file
ł
No available RAM on formatter main PCA
Recommended actions
1.
Reinstall a removed USB device.
2.
Delete unnecessary files.
3.
Reboot the MFP.
4.
Perform a hard disk initialization procedure.
5.
Use the reformat option to download and reinstall firmware.
6.
Replace the hard disk.
ł
Component locator: Formatter component locator on page 1702.
ł
Wiring diagram: Formatter wiring diagram on page 2482.
ł
Parts diagram: Formatter parts diagram on page 1702.
ł
Replace the hard disk: Formatter hard drive on page 611
Links
ENWW
Event Log error and warning codes 1973
32.4401
Description
ł
File system is full
Primary root causes
ł
Hard disk is full
Recommended actions
1.
Delete user files.
2.
Delete user stored files.
1974 Appendix A Event Log codes
ENWW
32.4402
Description
ł
Disk is write-protected
Primary root causes
ł
The hard disk or USB drive is write-protected. The file is protected by a PML command or writeprotected from the USB or hard disk.
Recommended actions
ENWW
1.
Unprotect the USB drive or the hard disk.
2.
Perform a disk initialization procedure.
Event Log error and warning codes 1975
32.4403
Description
ł
Disk is not initialized
Primary root causes
ł
USB drive is not initialized
Recommended actions
䦱
Reformat the USB drive.
1976 Appendix A Event Log codes
ENWW
32.0500
Description
ł
Insufficient memory to load fonts and data
Primary root causes
ł
Too many fonts are installed on the hard disk to load into RAM
ł
Corrupt font file
ł
Corrupt RAM
Recommended actions
1.
Print the Configuration page, and then check the available RAM against the RAM available on the
MFP.
2.
Reboot the MFP.
3.
Uninstall any third-party software that consumes RAM.
4.
Install more RAM.
5.
Remove and reinstall some or all of the fonts on the hard disk.
6.
Install the latest driver and RFU firmware.
7.
Check the health of the hard disk.
ł
Configuration page: Click Settings/Procedures, and then click Print Information Pages.
Links
ENWW
Event Log error and warning codes 1977
32.5C00
Description
ł
Failure reading color table from disk
Primary root causes
ł
Not enough RAM to load color tables
ł
Corrupted color file
ł
Too many color files on the hard disk
ł
Corrupted RAM
Recommended actions
1.
Print the Configuration page, and then check the available RAM against the RAM available on the
MFP.
2.
Reboot the MFP.
3.
Uninstall other systems that consume RAM, such as compact flash, third-party software, and extra
DIMMS.
4.
Install more RAM.
5.
Reinstall the standard or custom color tables.
6.
Uninstall the custom color tables.
7.
Remake the custom color tables for the appropriate firmware version.
8.
Update the MFP firmware and printer driver.
9.
Check the health of the hard disk.
ł
Configuration page: Click Settings/Procedures, and then click Print Information Pages.
Links
1978 Appendix A Event Log codes
ENWW
49.0B01
Description
ł
Formatter cannot communicate with Coprocessor. Error occurred in the communication path
between Coprocessor Windows Service and Coprocessor State Manager.
Primary root causes
ł
Coprocessor network problem
ł
Coprocessor software problem
ł
Coprocessor hardware problem
Recommended actions
ENWW
1.
Check the wire harness between the Coprocessor and the Formatter Main PCA (A26).
2.
Reboot the MFP, and then watch the Coprocessor LEDs for an error message. Troubleshoot the
Coprocessor accordingly.
Event Log error and warning codes 1979
49.yyzz
Description
ł
Formatter firmware fault
Primary root causes
ł
This code has many possible root causes
Recommended actions
1.
Reboot the MFP.
2.
Restore NVM, and then reboot the MFP.
3.
Reload the system firmware.
1980 Appendix A Event Log codes
ENWW
67.yyzz
Description
ł
Printer error
Primary root causes
ł
Corrupted NVRAM permanent storage
Recommended actions
ENWW
1.
Reboot the MFP.
2.
Reset the MFP to the factory settings. For more informations, see the system administrator guide.
Event Log error and warning codes 1981
68.8001
Description
ł
Formatter NVRAM storage error settings changed
Primary root causes
ł
System power turned off while NVM data was being written to the NVRAM
ł
Corrupted NVM, version, or size in the permanent storage block has changed
ł
Formatter Main PCA (A26)
Recommended actions
1.
Restore NVRAM.
2.
Reboot the MFP.
ł
Restore NVM: Click Settings/Procedures, click NVM, and then click Manual NVM Restore.
Links
1982 Appendix A Event Log codes
ENWW
68.8002
Description
ł
NVRAM permanent storage is full
Primary root causes
ł
Formatter Main PCA (A26)
Recommended actions
1.
Restore NVM.
2.
Replace A26.
ł
Restore NVM: Click Settings/Procedures, click NVM, and then click Manual NVM Restore.
ł
Component locator: Formatter component locator on page 1702
ł
Wiring diagram: Formatter wiring diagram on page 2482
ł
Parts diagram: Formatter parts diagram on page 1702
ł
Replace A26: Formatter Main PCA (A26) on page 621
Links
ENWW
Event Log error and warning codes 1983
68.8003
Description
ł
Formatter NVRAM write failed. This problem indicates a hardware failure. On the next power cycle,
the NVRAM permanent storage block with the offending location will be ignored by the firmware.
Primary root causes
ł
Formatter Main PCA (A26)
Recommended actions
1.
Reboot the MFP.
2.
Replace A26.
ł
Restore NVM: Click Settings/Procedures, click NVM, and then click Manual NVM Restore.
ł
Component locator: Formatter component locator on page 1702
ł
Wiring diagram: Formatter wiring diagram on page 2482
ł
Parts diagram: Formatter parts diagram on page 1702
ł
Replace A26: Formatter Main PCA (A26) on page 621
Links
1984 Appendix A Event Log codes
ENWW
79.yyzz
Description
ł
Printer error
Primary root causes
ł
This code has many possible root causes
Recommended actions
1.
Reboot the MFP.
2.
Restore NVM, and then reboot the MFP.
3.
Reload the system firmware.
ł
Restore NVM: Click Settings/Procedures, click NVM, and then click Manual NVM Restore.
Links
ENWW
Event Log error and warning codes 1985
80.0180
Description
ł
No heartbeat
Primary root causes
ł
Network configuration
ł
Corrupt firmware
ł
Corrupt NVM
ł
Copy Processing PCA (A27)
Recommended actions
1.
Reboot the MFP.
2.
Verify that the network configuration is correct. See the system administrator guide for help.
3.
Restore NVM, and then reboot the MFP.
4.
Reload the system firmware.
5.
Replace A27.
ł
Restore NVM: Click Settings/Procedures, click NVM, and then click Manual NVM Restore.
ł
Component locator: Formatter component locator on page 1702
ł
Wiring diagram: Formatter wiring diagram on page 2482
ł
Parts diagram: Formatter parts diagram on page 1702
ł
Replace A27: Copy Processing PCA (A27) on page 620
Links
1986 Appendix A Event Log codes
ENWW
80.0181
Description
ł
Reclaim timeout
Primary root causes
ł
Network configuration
ł
Corrupt firmware
ł
Corrupt NVM
ł
Copy Processing PCA (A27)
Recommended actions
1.
Reboot the MFP.
2.
Verify that the network configuration is correct. See the system administrator guide for help.
3.
Restore NVM, and then reboot the MFP.
4.
Reload the system firmware.
5.
Replace A27.
ł
Restore NVM: Click Settings/Procedures, click NVM, and then click Manual NVM Restore.
ł
Component locator: Formatter component locator on page 1702
ł
Wiring diagram: Formatter wiring diagram on page 2482
ł
Parts diagram: Formatter parts diagram on page 1702
ł
Replace A27: Copy Processing PCA (A27) on page 620
Links
ENWW
Event Log error and warning codes 1987
80.0182
Description
ł
Invalid data length
Primary root causes
ł
Network configuration
ł
Corrupt firmware
ł
Corrupt NVM
ł
Copy Processing PCA (A27)
Recommended actions
1.
Reboot the MFP.
2.
Verify that the network configuration is correct. See the system administrator guide for help.
3.
Restore NVM, and then reboot the MFP.
4.
Reload the system firmware.
5.
Replace A27.
ł
Restore NVM: Click Settings/Procedures, click NVM, and then click Manual NVM Restore.
ł
Component locator: Formatter component locator on page 1702
ł
Wiring diagram: Formatter wiring diagram on page 2482
ł
Parts diagram: Formatter parts diagram on page 1702
ł
Replace A27: Copy Processing PCA (A27) on page 620
Links
1988 Appendix A Event Log codes
ENWW
80.018B
Description
ł
Invalid maximum outstanding packet header field
Primary root causes
ł
Network configuration
ł
Corrupt firmware
ł
Corrupt NVM
ł
Copy Processing PCA (A27)
Recommended actions
1.
Reboot the MFP.
2.
Verify that the network configuration is correct. See the system administrator guide for help.
3.
Restore NVM, and then reboot the MFP.
4.
Reload the system firmware.
5.
Replace A27.
ł
Restore NVM: Click Settings/Procedures, click NVM, and then click Manual NVM Restore.
ł
Component locator: Formatter component locator on page 1702
ł
Wiring diagram: Formatter wiring diagram on page 2482
ł
Parts diagram: Formatter parts diagram on page 1702
ł
Replace A27: Copy Processing PCA (A27) on page 620
Links
ENWW
Event Log error and warning codes 1989
80.018C
Description
ł
Invalid channel mapping response
Primary root causes
ł
Network configuration
ł
Corrupt firmware
ł
Corrupt NVM
ł
Copy Processing PCA (A27)
Recommended actions
1.
Reboot the MFP.
2.
Verify that the network configuration is correct. See the system administrator guide for help.
3.
Restore NVM, and then reboot the MFP.
4.
Reload the system firmware.
5.
Replace A27.
ł
Restore NVM: Click Settings/Procedures, click NVM, and then click Manual NVM Restore.
ł
Component locator: Formatter component locator on page 1702
ł
Wiring diagram: Formatter wiring diagram on page 2482
ł
Parts diagram: Formatter parts diagram on page 1702
ł
Replace A27: Copy Processing PCA (A27) on page 620
Links
1990 Appendix A Event Log codes
ENWW
80.0301
Description
ł
No PGP buffers
Primary root causes
ł
Network configuration
ł
Corrupt firmware
ł
Corrupt NVM
ł
Copy Processing PCA (A27)
Recommended actions
1.
Reboot the MFP.
2.
Verify that the network configuration is correct. See the system administrator guide for help.
3.
Restore NVM, and then reboot the MFP.
4.
Reload the system firmware.
5.
Replace A27.
ł
Restore NVM: Click Settings/Procedures, click NVM, and then click Manual NVM Restore.
ł
Component locator: Formatter component locator on page 1702
ł
Wiring diagram: Formatter wiring diagram on page 2482
ł
Parts diagram: Formatter parts diagram on page 1702
ł
Replace A27: Copy Processing PCA (A27) on page 620
Links
ENWW
Event Log error and warning codes 1991
80.0302
Description
ł
Channel table full
Primary root causes
ł
Network configuration
ł
Corrupt firmware
ł
Corrupt NVM
ł
Copy Processing PCA (A27)
Recommended actions
1.
Reboot the MFP.
2.
Verify that the network configuration is correct. See the system administrator guide for help.
3.
Restore NVM, and then reboot the MFP.
4.
Reload the system firmware.
5.
Replace A27.
ł
Restore NVM: Click Settings/Procedures, click NVM, and then click Manual NVM Restore.
ł
Component locator: Formatter component locator on page 1702
ł
Wiring diagram: Formatter wiring diagram on page 2482
ł
Parts diagram: Formatter parts diagram on page 1702
ł
Replace A27: Copy Processing PCA (A27) on page 620
Links
1992 Appendix A Event Log codes
ENWW
80.0303
Description
ł
Producer index not reset
Primary root causes
ł
Network configuration
ł
Corrupt firmware
ł
Corrupt NVM
ł
Copy Processing PCA (A27)
Recommended actions
1.
Reboot the MFP.
2.
Verify that the network configuration is correct. See the system administrator guide for help.
3.
Restore NVM, and then reboot the MFP.
4.
Reload the system firmware.
5.
Replace A27.
ł
Restore NVM: Click Settings/Procedures, click NVM, and then click Manual NVM Restore.
ł
Component locator: Formatter component locator on page 1702
ł
Wiring diagram: Formatter wiring diagram on page 2482
ł
Parts diagram: Formatter parts diagram on page 1702
ł
Replace A27: Copy Processing PCA (A27) on page 620
Links
ENWW
Event Log error and warning codes 1993
80.0304
Description
ł
Consumer index not reset
Primary root causes
ł
Network configuration
ł
Corrupt firmware
ł
Corrupt NVM
ł
Copy Processing PCA (A27)
Recommended actions
1.
Reboot the MFP.
2.
Verify that the network configuration is correct. See the system administrator guide for help.
3.
Restore NVM, and then reboot the MFP.
4.
Reload the system firmware.
5.
Replace A27.
ł
Restore NVM: Click Settings/Procedures, click NVM, and then click Manual NVM Restore.
ł
Component locator: Formatter component locator on page 1702
ł
Wiring diagram: Formatter wiring diagram on page 2482
ł
Parts diagram: Formatter parts diagram on page 1702
ł
Replace A27: Copy Processing PCA (A27) on page 620
Links
1994 Appendix A Event Log codes
ENWW
80.0305
Description
ł
Queue position size too small
Primary root causes
ł
Network configuration
ł
Corrupt firmware
ł
Corrupt NVM
ł
Copy Processing PCA (A27)
Recommended actions
1.
Reboot the MFP.
2.
Verify that the network configuration is correct. See the system administrator guide for help.
3.
Restore NVM, and then reboot the MFP.
4.
Reload the system firmware.
5.
Replace A27.
ł
Restore NVM: Click Settings/Procedures, click NVM, and then click Manual NVM Restore.
ł
Component locator: Formatter component locator on page 1702
ł
Wiring diagram: Formatter wiring diagram on page 2482
ł
Parts diagram: Formatter parts diagram on page 1702
ł
Replace A27: Copy Processing PCA (A27) on page 620
Links
ENWW
Event Log error and warning codes 1995
80.0306
Description
ł
Transport overflow
Primary root causes
ł
Network configuration
ł
Corrupt firmware
ł
Corrupt NVM
ł
Copy Processing PCA (A27)
Recommended actions
1.
Reboot the MFP.
2.
Verify that the network configuration is correct. See the system administrator guide for help.
3.
Restore NVM, and then reboot the MFP.
4.
Reload the system firmware.
5.
Replace A27.
ł
Restore NVM: Click Settings/Procedures, click NVM, and then click Manual NVM Restore.
ł
Component locator: Formatter component locator on page 1702
ł
Wiring diagram: Formatter wiring diagram on page 2482
ł
Parts diagram: Formatter parts diagram on page 1702
ł
Replace A27: Copy Processing PCA (A27) on page 620
Links
1996 Appendix A Event Log codes
ENWW
80.0307
Description
ł
No overflow packets
Primary root causes
ł
Network configuration
ł
Corrupt firmware
ł
Corrupt NVM
ł
Copy Processing PCA (A27)
Recommended actions
1.
Reboot the MFP.
2.
Verify that the network configuration is correct. See the system administrator guide for help.
3.
Restore NVM, and then reboot the MFP.
4.
Reload the system firmware.
5.
Replace A27.
ł
Restore NVM: Click Settings/Procedures, click NVM, and then click Manual NVM Restore.
ł
Component locator: Formatter component locator on page 1702
ł
Wiring diagram: Formatter wiring diagram on page 2482
ł
Parts diagram: Formatter parts diagram on page 1702
ł
Replace A27: Copy Processing PCA (A27) on page 620
Links
ENWW
Event Log error and warning codes 1997
80.0308
Description
ł
Invalid identify response
Primary root causes
ł
Network configuration
ł
Corrupt firmware
ł
Corrupt NVM
ł
Copy Processing PCA (A27)
Recommended actions
1.
Reboot the MFP.
2.
Verify that the network configuration is correct. See the system administrator guide for help.
3.
Restore NVM, and then reboot the MFP.
4.
Reload the system firmware.
5.
Replace A27.
ł
Restore NVM: Click Settings/Procedures, click NVM, and then click Manual NVM Restore.
ł
Component locator: Formatter component locator on page 1702
ł
Wiring diagram: Formatter wiring diagram on page 2482
ł
Parts diagram: Formatter parts diagram on page 1702
ł
Replace A27: Copy Processing PCA (A27) on page 620
Links
1998 Appendix A Event Log codes
ENWW
80.0309
Description
ł
Invalid channel map return status
Primary root causes
ł
Network configuration
ł
Corrupt firmware
ł
Corrupt NVM
ł
Copy Processing PCA (A27)
Recommended actions
1.
Reboot the MFP.
2.
Verify that the network configuration is correct. See the system administrator guide for help.
3.
Restore NVM, and then reboot the MFP.
4.
Reload the system firmware.
5.
Replace A27.
ł
Restore NVM: Click Settings/Procedures, click NVM, and then click Manual NVM Restore.
ł
Component locator: Formatter component locator on page 1702
ł
Wiring diagram: Formatter wiring diagram on page 2482
ł
Parts diagram: Formatter parts diagram on page 1702
ł
Replace A27: Copy Processing PCA (A27) on page 620
Links
ENWW
Event Log error and warning codes 1999
80.0310
Description
ł
Invalid reclaim return status
Primary root causes
ł
Network configuration
ł
Corrupt firmware
ł
Corrupt NVM
ł
Copy Processing PCA (A27)
Recommended actions
1.
Reboot the MFP.
2.
Verify that the network configuration is correct. See the system administrator guide for help.
3.
Restore NVM, and then reboot the MFP.
4.
Reload the system firmware.
5.
Replace A27.
ł
Restore NVM: Click Settings/Procedures, click NVM, and then click Manual NVM Restore.
ł
Component locator: Formatter component locator on page 1702
ł
Wiring diagram: Formatter wiring diagram on page 2482
ł
Parts diagram: Formatter parts diagram on page 1702
ł
Replace A27: Copy Processing PCA (A27) on page 620
Links
2000 Appendix A Event Log codes
ENWW
80.0312
Description
ł
Datagram invalid buffer
Primary root causes
ł
Network configuration
ł
Corrupt firmware
ł
Corrupt NVM
ł
Copy Processing PCA (A27)
Recommended actions
1.
Reboot the MFP.
2.
Verify that the network configuration is correct. See the system administrator guide for help.
3.
Restore NVM, and then reboot the MFP.
4.
Reload the system firmware.
5.
Replace A27.
ł
Restore NVM: Click Settings/Procedures, click NVM, and then click Manual NVM Restore.
ł
Component locator: Formatter component locator on page 1702
ł
Wiring diagram: Formatter wiring diagram on page 2482
ł
Parts diagram: Formatter parts diagram on page 1702
ł
Replace A27: Copy Processing PCA (A27) on page 620
Links
ENWW
Event Log error and warning codes 2001
80.0313
Description
ł
Max stream channels
Primary root causes
ł
Network configuration
ł
Corrupt firmware
ł
Corrupt NVM
ł
Copy Processing PCA (A27)
Recommended actions
1.
Reboot the MFP.
2.
Verify that the network configuration is correct. See the system administrator guide for help.
3.
Restore NVM, and then reboot the MFP.
4.
Reload the system firmware.
5.
Replace A27.
ł
Restore NVM: Click Settings/Procedures, click NVM, and then click Manual NVM Restore.
ł
Component locator: Formatter component locator on page 1702
ł
Wiring diagram: Formatter wiring diagram on page 2482
ł
Parts diagram: Formatter parts diagram on page 1702
ł
Replace A27: Copy Processing PCA (A27) on page 620
Links
2002 Appendix A Event Log codes
ENWW
80.0314
Description
ł
Max datagram channels
Primary root causes
ł
Network configuration
ł
Corrupt firmware
ł
Corrupt NVM
ł
Copy Processing PCA (A27)
Recommended actions
1.
Reboot the MFP.
2.
Verify that the network configuration is correct. See the system administrator guide for help.
3.
Restore NVM, and then reboot the MFP.
4.
Reload the system firmware.
5.
Replace A27.
ł
Restore NVM: Click Settings/Procedures, click NVM, and then click Manual NVM Restore.
ł
Component locator: Formatter component locator on page 1702
ł
Wiring diagram: Formatter wiring diagram on page 2482
ł
Parts diagram: Formatter parts diagram on page 1702
ł
Replace A27: Copy Processing PCA (A27) on page 620
Links
ENWW
Event Log error and warning codes 2003
80.0315
Description
ł
Card reset failed
Primary root causes
ł
Network configuration
ł
Corrupt firmware
ł
Corrupt NVM
ł
Copy Processing PCA (A27)
Recommended actions
1.
Reboot the MFP.
2.
Verify that the network configuration is correct. See the system administrator guide for help.
3.
Restore NVM, and then reboot the MFP.
4.
Reload the system firmware.
5.
Replace A27.
ł
Restore NVM: Click Settings/Procedures, click NVM, and then click Manual NVM Restore.
ł
Component locator: Formatter component locator on page 1702
ł
Wiring diagram: Formatter wiring diagram on page 2482
ł
Parts diagram: Formatter parts diagram on page 1702
ł
Replace A27: Copy Processing PCA (A27) on page 620
Links
2004 Appendix A Event Log codes
ENWW
80.0316
Description
ł
Self-test failure
Primary root causes
ł
Network configuration
ł
Corrupt firmware
ł
Corrupt NVM
ł
Copy Processing PCA (A27)
Recommended actions
1.
Reboot the MFP.
2.
Verify that the network configuration is correct. See the system administrator guide for help.
3.
Restore NVM, and then reboot the MFP.
4.
Reload the system firmware.
5.
Replace A27.
ł
Restore NVM: Click Settings/Procedures, click NVM, and then click Manual NVM Restore.
ł
Component locator: Formatter component locator on page 1702
ł
Wiring diagram: Formatter wiring diagram on page 2482
ł
Parts diagram: Formatter parts diagram on page 1702
ł
Replace A27: Copy Processing PCA (A27) on page 620
Links
ENWW
Event Log error and warning codes 2005
80.0317
Description
ł
Unknown PGP packet
Primary root causes
ł
Network configuration
ł
Corrupt firmware
ł
Corrupt NVM
ł
Copy Processing PCA (A27)
Recommended actions
1.
Reboot the MFP.
2.
Verify that the network configuration is correct. See the system administrator guide for help.
3.
Restore NVM, and then reboot the MFP.
4.
Reload the system firmware.
5.
Replace A27.
ł
Restore NVM: Click Settings/Procedures, click NVM, and then click Manual NVM Restore.
ł
Component locator: Formatter component locator on page 1702
ł
Wiring diagram: Formatter wiring diagram on page 2482
ł
Parts diagram: Formatter parts diagram on page 1702
ł
Replace A27: Copy Processing PCA (A27) on page 620
Links
2006 Appendix A Event Log codes
ENWW
80.0318
Description
ł
Duplicate I/O channel
Primary root causes
ł
Network configuration
ł
Corrupt firmware
ł
Corrupt NVM
ł
Copy Processing PCA (A27)
Recommended actions
1.
Reboot the MFP.
2.
Verify that the network configuration is correct. See the system administrator guide for help.
3.
Restore NVM, and then reboot the MFP.
4.
Reload the system firmware.
5.
Replace A27.
ł
Restore NVM: Click Settings/Procedures, click NVM, and then click Manual NVM Restore.
ł
Component locator: Formatter component locator on page 1702
ł
Wiring diagram: Formatter wiring diagram on page 2482
ł
Parts diagram: Formatter parts diagram on page 1702
ł
Replace A27: Copy Processing PCA (A27) on page 620
Links
ENWW
Event Log error and warning codes 2007
81.yyzz
Description
ł
Undefined networking problem
Primary root causes
ł
Network configuration
ł
Corrupt firmware
ł
Corrupt NVM
Recommended actions
1.
Reboot the MFP.
2.
Verify that the network configuration is correct. See the system administrator guide for help.
3.
Restore NVM, and then reboot the MFP.
4.
Reload the system firmware.
ł
Restore NVM: Click Settings/Procedures, click NVM, and then click Manual NVM Restore.
Links
2008 Appendix A Event Log codes
ENWW
85.yyzz
Description
ł
Undefined networking problem
Primary root causes
ł
Network configuration
ł
Corrupt firmware
ł
Corrupt NVM
ł
Copy Processing PCA (A27)
Recommended actions
1.
Reboot the MFP.
2.
Verify that the network configuration is correct. See the system administrator guide for help.
3.
Restore NVM, and then reboot the MFP.
4.
Reload the system firmware.
5.
Replace A27.
ł
Restore NVM: Click Settings/Procedures, click NVM, and then click Manual NVM Restore.
ł
Component locator: Formatter component locator on page 1702
ł
Wiring diagram: Formatter wiring diagram on page 2482
ł
Parts diagram: Formatter parts diagram on page 1702
ł
Replace A27: Copy Processing PCA (A27) on page 620
Links
ENWW
Event Log error and warning codes 2009
86.yyzz
Description
ł
Undefined networking problem
Primary root causes
ł
Network configuration
ł
Corrupt firmware
ł
Corrupt NVM
Recommended actions
1.
Reboot the MFP.
2.
Verify that the network configuration is correct. See the system administrator guide for help.
3.
Restore NVM, and then reboot the MFP.
4.
Reload the system firmware.
ł
Restore NVM: Click Settings/Procedures, click NVM, and then click Manual NVM Restore.
Links
2010 Appendix A Event Log codes
ENWW
99.000A
Description
ł
Job cancel detected during the reading of the second part of the RFU header
Primary root causes
ł
Job was cancelled
Recommended actions
䦱
ENWW
If job cancel was intended, no action is needed. Otherwise, resend the RFU file.
Event Log error and warning codes 2011
99.000C
Description
ł
Header size mismatch for version 1 header
Primary root causes
ł
Corrupt or incorrectly generated RFU file
Recommended actions
䦱
Resend the RFU file.
2012 Appendix A Event Log codes
ENWW
99.000D
Description
ł
Header size mismatch for version 2 header
Primary root causes
ł
Corrupt or incorrectly generated RFU file
Recommended actions
䦱
ENWW
Resend the RFU file.
Event Log error and warning codes 2013
99.000E
Description
ł
Header size mismatch for version 3 header
Primary root causes
ł
Corrupt or incorrectly generated RFU file
Recommended actions
䦱
Resend the RFU file.
2014 Appendix A Event Log codes
ENWW
99.000F
Description
ł
Failure detected when preparing the media for upgrade
Primary root causes
ł
Bad media
Recommended actions
䦱
ENWW
Check the cables and reseat the hardware as appropriate.
Event Log error and warning codes 2015
99.0001
Description
ł
Bad image received
Primary root causes
ł
Error detected in the image received
Recommended actions
䦱
Resend file or send a new image.
2016 Appendix A Event Log codes
ENWW
99.0002
Description
ł
I/O timeout when receiving the RFU file
Primary root causes
ł
Bad I/O connection between the host and the MFP
ł
Congested network
Recommended actions
ENWW
1.
Verify that the host has not crashed while sending the RFU file.
2.
Check the physical connection between the host and the MFP.
3.
Verify that the RFU file is not truncated.
4.
Resend the RFU file.
Event Log error and warning codes 2017
99.0004
Description
ł
I/O timeout occurred when receiving the RFU header
Primary root causes
ł
Bad I/O connection between the host and the MFP
ł
Congested network
Recommended actions
1.
Verify that the host has not crashed while sending the RFU file.
2.
Check the physical connection between the host and the MFP.
3.
Verify that the RFU file is not truncated.
4.
Resend the RFU file.
2018 Appendix A Event Log codes
ENWW
99.0006
Description
ł
Read error during the reading of the first part of the RFU header
Primary root causes
ł
Unknown
Recommended actions
䦱
ENWW
Resend the RFU file.
Event Log error and warning codes 2019
99.0007
Description
ł
Read byte error during the reading of the second part of the RFU header
Primary root causes
ł
Unknown
Recommended actions
䦱
Resend the RFU file.
2020 Appendix A Event Log codes
ENWW
99.0009
Description
ł
Job cancel detected during the reading of the first part of the RFU header
Primary root causes
ł
Job was cancelled
Recommended actions
䦱
ENWW
If job cancel was intended, no action is needed. Otherwise, resend the RFU file.
Event Log error and warning codes 2021
99.0013
Description
ł
Failed to get image buffer during writing of the media
Primary root causes
ł
Bad media
Recommended actions
䦱
Check the cables and reseat the hardware as appropriate.
2022 Appendix A Event Log codes
ENWW
99.0014
Description
ł
Write error detected during the write of the boot area
Primary root causes
ł
Bad media
Recommended actions
䦱
ENWW
Check the cables and reseat the hardware as appropriate.
Event Log error and warning codes 2023
99.0015
Description
ł
Write error detected during the write of the main part of the code
Primary root causes
ł
Bad media
Recommended actions
䦱
Check the cables and reseat the hardware as appropriate.
2024 Appendix A Event Log codes
ENWW
99.0016
Description
ł
Write error detected during the writing of the end of the code
Primary root causes
ł
Bad media
Recommended actions
䦱
ENWW
Check the cables and reseat the hardware as appropriate.
Event Log error and warning codes 2025
99.0017
Description
ł
Image size too big
Primary root causes
ł
RFU image receive is too big for the hard disk partition
Recommended actions
䦱
Verify that the RFU file received is correct for this product.
2026 Appendix A Event Log codes
ENWW
99.0018
Description
ł
No media access
Primary root causes
ł
Media cannot be opened
Recommended actions
䦱
ENWW
Check the cables and reseat the hardware as appropriate.
Event Log error and warning codes 2027
A0.03A1
Description
ł
Failed to pick from Tray 1, and then recovered
Primary root causes
ł
Preventive maintenance is due
ł
Pick roller
ł
Separation pad
Recommended actions
1.
Check the preventive maintenance counter for the Tray 1 pick roller.
2.
Load fresh paper into Tray 1.
3.
Verify that the paper-width guide touches the edge of the paper stack.
4.
Verify that the paper is within the product specifications.
5.
Clean the pick roller and separation pad.
Additional root causes
ł
Tray 1 Pick solenoid (SOL1)
ł
Fault tree: A0.03A1: Failed to pick from Tray 1, and then recovered on page 1054
ł
Diagnostic page: Click Subsystems, click Input Trays, and then click Tray 1.
ł
Component locator: Tray 1 component locator on page 1598
ł
Wiring diagram: Tray 1 wiring diagram on page 2465
ł
Parts diagram: Tray 1 parts diagram on page 1599
ł
SOL1: A0.1301 on page 2029
Links
2028 Appendix A Event Log codes
ENWW
A0.1301
Description
ł
No pick Tray 1
Primary root causes
ł
Tray 1 Pick solenoid (SOL1)
ł
Wire harness between the Motion PCA (A2) and SOL1
Recommended actions
1.
Open the Tray 1 diagnostic page, and then activate SOL1 and verify that the pick roller rotates.
2.
Cycle SOL1.
3.
Check the wire harness between SOL1 and A2.
4.
Check SOL1 for contamination.
5.
Activate SOL1 and then test the voltage at the solenoid connector: 20 Vdc at pins 1 to 2 (GND) on
W20P1-SOL1.
6.
Activate SOL1 and then test the voltage to SOL1 on A2: 3.8 Vdc at J2 pins 2 to 9 (GND).
Additional root causes
ł
A2
ł
Fault tree: A0.1301: No pick Tray 1 on page 1057
ł
Diagnostic page: Click Subsystems, click Input Trays, and then click Tray 1.
ł
Component locator: Tray 1 component locator on page 1598
ł
Wiring diagram: Tray 1 wiring diagram on page 2465
ł
Parts diagram: Tray 1 parts diagram on page 1599
ł
Replace SOL1: Tray 1 Pick solenoid (SOL1) on page 302
ł
A2: D4.0705 on page 2392
Links
ENWW
Event Log error and warning codes 2029
A1.0102
Description
ł
Tray 2 Pick motor (M19) stall
Primary root causes
ł
Pick roller
ł
Media condition
ł
M19
ł
Tray 2 Distribution PCA (A33)
ł
Wire harness between A33 and the Trays 2, 3, and 4 Controller PCA (A23)
Recommended actions
1.
If you have not done so already, reboot the MFP in Protected Service mode (PSM).
2.
Open the Trays 2, 3, 4 diagnostic page, pull out Tray 2, and then turn on M19 to see if the motor
runs.
3.
Verify that the pick arm moves up and down freely and that it is aligned correctly.
4.
Test the voltage on the wire harness to A33 from A23: 24 Vdc at J1 pins 8 to 7 (GND) and 9 to 7
(GND).
5.
Test the voltage to M19 on A33: 24 Vdc at J4 pins 1 to 4 (GND).
6.
Test the voltage to M19 on A23: 24 Vdc at J6 pins 9 to 7 (GND).
Additional root causes
ł
A23
ł
Fault tree: A1.0102: Tray 2 Pick motor (M19) stall on page 1059
ł
Diagnostic page: Click Subsystems, click Input Trays, and then click Trays 2, 3, 4.
ł
Component locator: Trays 2, 3, and 4 component locator on page 1778
ł
Wiring diagram: Tray 2 wiring diagram on page 2497
ł
Parts diagram: Trays 2, 3, and 4 parts diagrams on page 1778
ł
Replace M19: Pick arm assembly on page 279
ł
A23: A1.0701 on page 2039
Links
2030 Appendix A Event Log codes
ENWW
A1.0103
Description
ł
Tray 3 Pick motor (M20) stall
Primary root causes
ł
Pick roller
ł
Media condition
ł
M20
ł
Tray 3 Distribution PCA (A33)
ł
Wire harness between the A33 and the Trays 2, 3, and 4 Controller PCA (A23)
Recommended actions
1.
If you have not done so already, reboot the MFP in Protected Service mode (PSM).
2.
Open the Trays 2, 3, 4 diagnostic page, pull out Tray 3, and then turn on M20 to see if the motor
runs.
3.
Verify that the pick arm moves up and down freely and that it is aligned correctly.
4.
Test the voltage on the wire harness to A33 from A23: 24 Vdc at J1 pins 8 to 7 (GND) and 9 to 7
(GND).
5.
Test the voltage to M20 on A33: 24 Vdc at J4 pins 1 to 4 (GND).
6.
Test the voltage to M20 on A23: 24 Vdc at J7 pins 9 to 7 (GND).
Additional root causes
ł
A23
ł
Fault tree: A1.0103: Tray 3 Pick motor (M20) stall on page 1063
ł
Diagnostic page: Click Subsystems, click Input Trays, and then click Trays 2, 3, 4.
ł
Component locator: Trays 2, 3, and 4 component locator on page 1778
ł
Wiring diagram: Tray 3 wiring diagram on page 2497
ł
Parts diagram: Trays 2, 3, and 4 parts diagrams on page 1778
ł
Replace M20: Pick arm assembly on page 279
ł
A23: A1.0701 on page 2039
Links
ENWW
Event Log error and warning codes 2031
A1.0104
Description
ł
Tray 4 Pick motor (M21) stall
Primary root causes
ł
Pick roller
ł
Media condition
ł
M21
ł
Tray 4 Distribution PCA (A33)
ł
Wire harness between A33 and the Trays 2, 3, and 4 Controller PCA (A23)
Recommended actions
1.
If you have not done so already, reboot the MFP in Protected Service mode (PSM).
2.
Open the Trays 2, 3, 4 diagnostic page, pull out Tray 4, and then turn on M21 to see if the motor
runs.
3.
Verify that the pick arm moves up and down freely and that it is aligned correctly.
4.
Test the voltage on the wire harness to A33 from A23: 24 Vdc at J1 pins 8 to 7 (GND) and 9 to 7
(GND).
5.
Test the voltage to M21 on A33: 24 Vdc at J4 pins 1 to 4 (GND).
6.
Test the voltage to M21 on A23: 24 Vdc at J10 pins 9 to 7 (GND).
Additional root causes
ł
A23
ł
Fault tree: A1.0104: Tray 4 Pick motor (M21) stall on page 1067
ł
Diagnostic page: Click Subsystems, click Input Trays, and then click Trays 2, 3, 4.
ł
Component locator: Trays 2, 3, and 4 component locator on page 1778
ł
Wiring diagram: Tray 4 wiring diagram on page 2497
ł
Parts diagram: Trays 2, 3, and 4 parts diagrams on page 1778
ł
Replace M21: Pick arm assembly on page 279
ł
A23: A1.0701 on page 2039
Links
2032 Appendix A Event Log codes
ENWW
A1.01A2
Description
ł
Failed to pick from Tray 2, and then recovered
Primary root causes
ł
Media condition
ł
Paper jam
ł
Pick rollers
Recommended actions
1.
Manually toggle the Tray 2 Exit sensor (SN47). If the fingers do not return to the extended position,
check the spring on the end of the plastic shaft.
2.
Verify that the drive rollers turn freely in one direction and have some resistance in the other
direction. Turn the rollers back and forth multiple times, looking for a spot that slips.
3.
Check the pick rollers for contamination and wear.
ł
Fault tree: A1.01A2: Failed to pick from Tray 2, and then recovered on page 1071
ł
Diagnostic page: Click Subsystems, click Input Trays, and then click Trays 2, 3, 4.
ł
Component locator: Trays 2, 3, and 4 component locator on page 1778
ł
Wiring diagram: Tray 2 wiring diagram on page 2497
ł
Parts diagram: Trays 2, 3, and 4 parts diagrams on page 1778
ł
Replace SN47: Trays 2, 3, and 4 sensors on page 292
Links
ENWW
Event Log error and warning codes 2033
A1.01A3
Description
ł
Failed to pick from Tray 3, and then recovered
Primary root causes
ł
Media condition
ł
Paper jam
ł
Pick rollers
Recommended actions
1.
Open the Trays 2, 3, 4 diagnostic page, and then manually toggle the Tray 3 Exit sensor (SN51).
If the fingers do not return to the extended position, check the spring on the end of the plastic shaft.
2.
Verify that the drive rollers turn freely in one direction and have some resistance in the other
direction. Turn the rollers back and forth multiple times, looking for a spot that slips.
3.
Check the pick rollers for contamination and wear.
ł
Fault tree: A1.01A3: Failed to pick from Tray 3, and then recovered on page 1073
ł
Diagnostic page: Click Subsystems, click Input Trays, and then click Trays 2, 3, 4.
ł
Component locator: Trays 2, 3, and 4 component locator on page 1778
ł
Wiring diagram: Tray 3 wiring diagram on page 2497
ł
Parts diagram: Trays 2, 3, and 4 parts diagrams on page 1778
ł
Replace SN51: Trays 2, 3, and 4 sensors on page 292
Links
2034 Appendix A Event Log codes
ENWW
A1.01A4
Description
ł
Failed to pick from Tray 4, and then recovered
Primary root causes
ł
Media condition
ł
Paper jam
ł
Pick rollers
Recommended actions
1.
Open the Trays 2, 3, 4 diagnostic page, and then manually toggle the Tray 4 Exit sensor (SN55).
If the fingers do not return to the extended position, check the spring on the end of the plastic shaft.
2.
Verify that the drive rollers turn freely in one direction and have some resistance in the other
direction. Turn the rollers back and forth multiple times, looking for a spot that slips.
3.
Check the pick rollers for contamination and wear.
ł
Fault tree: A1.01A4: Failed to pick from Tray 4, and then recovered on page 1075
ł
Diagnostic page: Click Subsystems, click Input Trays, and then click Trays 2, 3, 4.
ł
Component locator: Trays 2, 3, and 4 component locator on page 1778
ł
Wiring diagram: Tray 4 wiring diagram on page 2497
ł
Parts diagram: Trays 2, 3, and 4 parts diagrams on page 1778
ł
Replace SN55: Trays 2, 3, and 4 sensors on page 292
Links
ENWW
Event Log error and warning codes 2035
A1.01C1
ł
Trays 2, 3, and 4 Transport motor (M18) problem
Primary root causes
ł
M18
ł
Trays 2, 3, and 4 Controller PCA (A23)
ł
Wire harness between M18 and A23
ł
Wire harness between A23 and the Power Distribution PCA (A1)
ł
A1
Recommended actions
1.
Open the Trays 2, 3, 4 diagnostic page, and then test M18.
2.
Check the wire harness between M18 and A23.
3.
Test the voltage at M18.
4.
Test the voltage to M18 on A23.
5.
Verify that the 32 Vdc LED on A23 is lit.
6.
Check the wire harness between A23 and A1.
7.
Test the input voltage to A23: 5 Vdc at J1 pins 3 to 2 (GND).
8.
Test the voltage to A23 on A1: 32 Vdc at J8 pins 8 to 5.
ł
Fault tree: A1.01C1: Trays 2, 3, and 4 Transport motor (M18) on page 1077
ł
Diagnostic page: Click Subsystems, click Input Trays, and then click Trays 2, 3, 4.
ł
Component locator: Trays 2, 3, and 4 component locator on page 1778
ł
Wiring diagram: Trays 2, 3, and 4 assembly wiring diagram on page 2496
ł
Parts diagram: Trays 2, 3, and 4 parts diagrams on page 1778
ł
Replace M18: Trays 2, 3, and 4 Transport motor (M18) on page 282
ł
Replace A23: Trays 2, 3, and 4 Controller PCA (A23) on page 290
ł
Replace A1: Power Distribution PCA (A1) on page 630
Links
2036 Appendix A Event Log codes
ENWW
A1.02C1
Description
ł
Tray 2, 3, and 4 Ambient Temperature sensor (SN41) problem
Root causes
ł
SN41
ł
Trays 2, 3, and 4 Controller PCA (A23)
ł
Wire harness between SN41 and A23
ł
Wire harness between A23 and the Power Distribution PCA (A1)
ł
A1
Recommended actions
1.
Open the Trays 2, 3, 4 diagnostic page, and check the SN41 reading.
2.
Check the resistance at SN41.
3.
Check the wire harness between A23 and A1.
4.
Verify that the input voltage LEDs on A23 are lit.
5.
Test the input voltage to A23: 5 Vdc at J1 pins 3 to 2 (GND).
6.
Test the voltage to A23 on A1: 32 Vdc at J8 pins 8 to 5.
ł
Fault tree: A1.02C1:Tray 2, 3, and 4 Ambient Temperature sensor (SN41) on page 1079
ł
Diagnostic page: Click Subsystems, click Input Trays, and then click Trays 2, 3, 4.
ł
Component locator: Trays 2, 3, and 4 component locator on page 1778
ł
Wiring diagram: Trays 2, 3, and 4 assembly wiring diagram on page 2496
ł
Parts diagram: Trays 2, 3, and 4 parts diagrams on page 1778
ł
Replace SN41: Trays 2, 3, and 4 sensors on page 292
ł
Replace A23: Trays 2, 3, and 4 Controller PCA (A23) on page 290
ł
Replace A1: Power Distribution PCA (A1) on page 630
Links
ENWW
Event Log error and warning codes 2037
A1.02C3
Description
ł
Tray 2, 3, and 4 Humidity sensor (SN42) problem
Root causes
ł
SN42
ł
Trays 2, 3, and 4 Controller PCA (A23)
ł
Wire harness between SN42 and A23
ł
Wire harness between A23 and the Power Distribution PCA (A1)
ł
A1
Recommended actions
1.
Open the Trays 2, 3, 4 diagnostic page, and check the SN42 reading.
2.
Check the resistance at SN42.
3.
Check the wire harness between A23 and A1.
4.
Verify that the input voltage LEDs on A23 are lit.
5.
Test the input voltage to A23: 5 Vdc at J1 pins 3 to 2 (GND).
6.
Test the voltage to A23 on A1: 32 Vdc at J8 pins 8 to 5.
ł
Fault tree: A1.02C3: Tray 2, 3, and 4 Humidity sensor (SN42) on page 1084
ł
Diagnostic page: Click Subsystems, click Input Trays, and then click Trays 2, 3, 4.
ł
Component locator: Trays 2, 3, and 4 component locator on page 1778
ł
Wiring diagram: Trays 2, 3, and 4 assembly wiring diagram on page 2496
ł
Parts diagram: Trays 2, 3, and 4 parts diagrams on page 1778
ł
Replace SN42: Trays 2, 3, and 4 sensors on page 292
ł
Replace A23: Trays 2, 3, and 4 Controller PCA (A23) on page 290
ł
Replace A1: Power Distribution PCA (A1) on page 630
Links
2038 Appendix A Event Log codes
ENWW
A1.0701
Description
ł
Trays 2, 3, and 4 Controller PCA (A23) failure
Primary root causes
ł
Wire harness between the Power Distribution PCA (A1) and A23
ł
A23
ł
A1
ł
Power supply
Recommended actions
1.
If you have not done so already, reboot the MFP in Protected Service mode (PSM).
2.
Verify that the 3.3, 5, 12, 24, 32, and 52 Vdc LEDs on A1 are lit.
3.
Check the voltage at the 32 Vdc and 5 Vdc test points on A23.
4.
Check the voltage at the 32 Vdc and 5 Vdc test points on A1.
5.
Verify that the 5, 24, and 32 Vdc LEDs on the A23 are lit.
6.
Check the voltage at J3 and J6 on A1.
ł
Fault tree: A1.0701: Trays 2, 3, and 4 Controller PCA (A23) failure on page 1116
ł
Diagnostic page: Click Subsystems, click Input Trays, and then click Trays 2, 3, 4.
ł
Component locator: Trays 2, 3, and 4 component locator on page 1778
ł
Wiring diagram: Trays 2, 3, and 4 assembly wiring diagram on page 2496
ł
Parts diagram: Trays 2, 3, and 4 parts diagrams on page 1778
ł
Replace A23: Trays 2, 3, and 4 Controller PCA (A23) on page 290
Links
ENWW
Event Log error and warning codes 2039
A1.07A1
Description
ł
Trays 2, 3, and 4 Controller PCA (A23) voltage out of range
Primary root causes
ł
Trays 2, 3, and 4 Controller PCA (A23)
Recommended actions
䦱
Check the electrical connections between A23 and the Power Distribution PCA (A1).
ł
Fault tree: A1.07A1: Trays 2, 3, and 4 Controller PCA (A23) voltage out-of-range on page 1119
ł
Diagnostic page: Click Subsystems, click Input Trays, and then click Trays 2, 3, 4.
ł
Component locator: Trays 2, 3, and 4 component locator on page 1778
ł
Wiring diagram: Trays 2, 3, and 4 assembly wiring diagram on page 2496
ł
Parts diagram: Trays 2, 3, and 4 parts diagrams on page 1778
ł
Replace A23: Trays 2, 3, and 4 Controller PCA (A23) on page 290
Links
2040 Appendix A Event Log codes
ENWW
A1.1302
Description
ł
Paper jam at Tray 2
Primary root causes
ł
Pick rollers and drive belt
ł
Tray 2 Exit sensor (SN47)
ł
Tray 2 Pick motor (M19)
ł
Wire harness between the Tray 2 Distribution PCA (A33) and the Trays 2, 3, and 4 Controller PCA
(A23)
ł
A33
Recommended actions
1.
Open the Trays 2, 3, 4 diagnostic page, and then manually toggle SN47. If the fingers do not return
to the extended position, check the spring on the end of the plastic shaft.
2.
Check the pick rollers and drive belt for wear.
3.
Turn the rollers back and forth multiple times, looking for a spot that slips.
4.
Test SN47 and M19.
5.
Test the voltage to SN47 on A33: 5 Vdc at J3 pins 1 to 2 (GND).
6.
Test the voltage to M19 on A33: 24 Vdc at J4 pins 1 to 4 (GND).
7.
Test the voltage to A33 on A23 : 5 Vdc at J6 pins 3 to 7 (GND).
Additional root causes
ł
A23
ł
Fault tree: A1.1302: Paper jam at Tray 2 on page 1120
ł
Diagnostic page: Click Subsystems, click Input Trays, and then click Trays 2, 3, 4.
ł
Component locator: Trays 2, 3, and 4 component locator on page 1778
ł
Wiring diagram: Tray 2 wiring diagram on page 2497
ł
Parts diagram: Trays 2, 3, and 4 parts diagrams on page 1778
ł
Replace M19: Pick arm assembly on page 279
ł
Replace SN47: Trays 2, 3, and 4 sensors on page 292
ł
A23: A1.0701 on page 2039
Links
ENWW
Event Log error and warning codes 2041
A1.1304
Description
ł
Paper jam at Tray 4
Primary root causes
ł
Pick rollers and drive belt
ł
Tray 4 Exit sensor (SN55)
ł
Tray 4 Pick motor (M21)
ł
Wire harness between the Tray 4 Distribution PCA (A33) and the Trays 2, 3, and 4 Controller PCA
(A23)
ł
A33
Recommended actions
1.
Open the Trays 2, 3, 4 diagnostic page, and then manually toggle SN55. If the fingers do not return
to the extended position, check the spring on the end of the plastic shaft.
2.
Check the pick rollers and drive belt for wear.
3.
Turn the rollers back and forth multiple times, looking for a spot that slips.
4.
Test SN55 and M21.
5.
Test the voltage to SN55 on A33: 5 Vdc at J3 pins 1 to 2 (GND).
6.
Test the voltage to M21 on A33: 24 Vdc at J4 pins 1 to 4 (GND).
7.
Test the voltage to A33 on A23: 5 Vdc at J10 pins 3 to 7 (GND).
Additional root causes
ł
A23
ł
Fault tree: A1.1304: Paper jam at Tray 4 on page 1123
ł
Diagnostic page: Click Subsystems, click Input Trays, and then click Trays 2, 3, 4.
ł
Component locator: Trays 2, 3, and 4 component locator on page 1778
ł
Wiring diagram: Tray 4 wiring diagram on page 2497
ł
Parts diagram: Trays 2, 3, and 4 parts diagrams on page 1778
ł
Replace M21: Pick arm assembly on page 279
ł
Replace SN55: Trays 2, 3, and 4 sensors on page 292
ł
A23: A1.0701 on page 2039
Links
2042 Appendix A Event Log codes
ENWW
A2.0101
Description
ł
Tray 5 Pick motor (M101) stall
Primary root causes
ł
M101
ł
Tray 5 Pick Motor encoder (EN101)
ł
Wire harness between the Tray 5 Distribution PCA (A101), M101, and EN101
ł
Wire harness between the Motion PCA (A2) and A101
Recommended actions
1.
If you have not done so already, reboot the MFP in Protected Service mode (PSM).
2.
Open the Tray 5 diagnostic page, and then manually turn M101 and verify that the EN101 count
changes.
3.
Test the voltage at M101: 5 Vdc at pins 1 to 2 on W104P101-M101.
4.
Test the voltage at EN101: 5 Vdc at pins 1 to 4, 2 to 4, and 3 to 4 on W102P105-EN101.
5.
Test the voltage to M101 on the A101 : -12.9 Vdc at J4 pins 1 to 2.
6.
Test the voltage to EN101 on the A101: 0.11 Vdc unblocked, 2.18 Vdc blocked at pins 10A to 7A,
4.92 Vdc unblocked and blocked at pins 9A to 7A, and 0.11 Vdc unblocked, 2.12 Vdc blocked at
pins 8A to 7A on W102P102-A101J2.
7.
Test the voltage to M101 and on A2: -4.89 Vdc at J13 pins 7 and 8.
8.
Test the voltage to EN101 on the A2: 5 Vdc at J13 pins 15 and 13, 14, 37, and 38 (GND) and pins
27 and 13, 14, 37, and 38 (GND).
Additional root causes
ł
A2
ł
Fault tree: A2.0101: Tray 5 Pick motor (M101) stall on page 1126
ł
Diagnostic page: Click Subsystems, click Input Trays, and then click Tray 5.
ł
Component locator: Tray 5 component locator on page 1708
ł
Wiring diagram: Tray 5 wiring diagram on page 2483
ł
Parts diagram: Tray 5 parts diagrams on page 1708
ł
Replace M101: Tray 5 Pick motor (M101) on page 696
ł
A2: D4.0705 on page 2392
Links
ENWW
Event Log error and warning codes 2043
A2.0102
Description
ł
Tray 5 Elevator motor (M102) stall
Primary root causes
ł
M102
ł
Tray 5 Elevator Motor encoder (EN102)
ł
Tray 5 Media Door Open sensor (SN107)
ł
Wire harness between the Tray 5 Distribution PCA (A101), M102, and EN102
ł
Wire harness between the Motion PCA (A2) and the A101
Recommended actions
1.
If you have not done so already, reboot the MFP in Protected Service mode (PSM).
2.
Open the Tray 5 diagnostic page, and then test SN107.
3.
Check the movement of the elevator tray.
4.
Manually turn M102 and verify that the encoder count changes.
5.
Check the movement of the elevator while holding down the Tray 5 Load Media sensor (SN109).
6.
Test the voltage at M102: -12.9 Vdc at pins 1 to 2 on W4P102-M102.
7.
Test the voltage at EN102: 5 Vdc at J3 pins 2 to 1, 4 to 1, and 3 to 1 on W103P108-EN102.
8.
Test the voltage to M102 on A101: -12.9 Vdc at J4 pins 7 to 8.
9.
Test the voltage to EN102 on A101: 4.9 Vdc at pins 14A to 12A on W103P103-A101J3.
10. Test the voltage to M102 and on A2: -12.9 Vdc at J13 pins 1 to 2.
11. Test the voltage to EN102 on A2: 5 Vdc at J13 pins 15 and 13, 14, 37, and 38 (GND).
Additional root causes
ł
A2
ł
Fault tree: A2.0102: Tray 5 Elevator motor (M102) stall on page 1129
ł
Diagnostic page: Click Subsystems, click Input Trays, and then click Tray 5.
ł
Component locator: Tray 5 component locator on page 1708
ł
Wiring diagram: Tray 5 wiring diagram on page 2483
ł
Parts diagram: Tray 5 parts diagrams on page 1708
ł
Replace M102: Tray 5 Elevator motor (M102) on page 699
ł
A2: D4.0705 on page 2392
Links
2044 Appendix A Event Log codes
ENWW
A2.0201
Description
ł
Tray 5 Elevator Upper Limit sensor (SN108) failed
Primary root causes
ł
SN108
ł
Wire harness between the Tray 5 Distribution PCA (A101) and SN108
ł
Wire harness between the A101 and the Motion PCA (A2)
Recommended actions
1.
If you have not done so already, reboot the MFP in Protected Service mode (PSM).
2.
Open the Tray 5 diagnostic page, and then manually activate SN108 and verify that the sensor
state changes.
3.
Verify that SN108 is correctly seated and clean.
4.
Test the voltage at SN108: 5 Vdc on pins 3 to 2 and 1 to 2 on W103P104-SN108.
5.
Test the voltage to SN108 from the A101: 4.91 Vdc blocked and unblocked at 103P103-A101J3
pins 1A to 3A and 0.01 Vdc unblocked, 4.91 Vdc blocked at pins 2A to 3A.
6.
Test the voltage to SN108 from A2: 5 Vdc on pins 28 to 13, 14, 37, and 38 (GND) and pins 15 to
13, 14, 37, and 38 (GND).
Additional root causes
ł
A2
ł
Tray 5 Elevator motor (M102)
ł
Fault tree: A2.0201: Tray 5 Elevator Upper Limit sensor (SN108) failed on page 1134
ł
Diagnostic page: Click Subsystems, click Input Trays, and then click Tray 5.
ł
Component locator: Tray 5 component locator on page 1708
ł
Wiring diagram: Tray 5 wiring diagram on page 2483
ł
Parts diagram: Tray 5 parts diagrams on page 1708
ł
Replace SN108: Sensors on page 688
ł
M102: A2.0102 on page 2044
ł
A2: D4.0705 on page 2392
Links
ENWW
Event Log error and warning codes 2045
A2.0202
Description
ł
Tray 5 Stack Height sensor (SN104) failed
Primary root causes
ł
SN104
ł
Wire harness between the Tray 5 Distribution PCA (A101) and SN104
ł
Wire harness between the A101 and the Motion PCA (A2)
Recommended actions
1.
If you have not done so already, reboot the MFP in Protected Service mode (PSM).
2.
Open the Tray 5 diagnostic page, and then manually activate SN104 and verify that the sensor
state changes.
3.
Verify that SN104 is correctly seated and clean.
4.
Verify that the Tray 5 pick arm moves freely up and down.
5.
Test the voltage at SN104: 5 Vdc on pins 1 to 2 and 3 to 2 on W103P113-SN104.
6.
Test the voltage to SN104 on the A101: 0.13 Vdc unblocked, 4.92 Vdc blocked at 103P103-A101J3
pins 4B to 3B and 1.16 Vdc blocked and unblocked at pins 5B to 3B.
7.
Test the voltage to SN104 on A2: 5 Vdc on pins 35 to 13, 14, 37, and 38 (GND) and on pins 15 to
13, 14, 37, and 38 (GND)
Additional root causes
ł
Tray 5 Elevator motor (M102)
ł
A2
ł
Fault tree: A2.0202: Tray 5 Stack Height sensor (SN104) failed on page 1137
ł
Diagnostic page: Click Subsystems, click Input Trays, and then click Tray 5.
ł
Component locator: Tray 5 component locator on page 1708
ł
Wiring diagram: Tray 5 wiring diagram on page 2483
ł
Parts diagram: Tray 5 parts diagrams on page 1708
ł
M102: A2.0102 on page 2044
ł
A2: D4.0705 on page 2392
Links
2046 Appendix A Event Log codes
ENWW
A2.03A1
Description
ł
Tray 5 separator worn
Primary root causes
ł
Pick roller assembly
Recommended actions
䦱
Replace the pick roller assembly.
ł
Diagnostic page: Click Subsystems, click Input Trays, and then click Tray 5.
ł
Component locator: Tray 5 component locator on page 1708
ł
Wiring diagram: Tray 5 wiring diagram on page 2483
ł
Parts diagram: Tray 5 parts diagrams on page 1708
Links
ENWW
Event Log error and warning codes 2047
A2.04A1
Description
ł
Tray 5 Pick clutch (CL101) failed
Primary root causes
ł
CL101
Recommended actions
䦱
Replace CL101.
ł
Diagnostic page: Click Subsystems, click Input Trays, and then click Tray 5.
ł
Component locator: Tray 5 component locator on page 1708
ł
Wiring diagram: Tray 5 wiring diagram on page 2483
ł
Parts diagram: Tray 5 parts diagrams on page 1708
ł
Replace CL101: Tray 5 Pick clutch (CL101) on page 683
Links
2048 Appendix A Event Log codes
ENWW
A2.04A2
Description
ł
Tray 5 lower separator tension too low
Primary root causes
ł
Tray 5 lower separator spring
Recommended actions
䦱
Adjust or replace the Tray 5 lower separator spring.
ł
Diagnostic page: Click Subsystems, click Input Trays, and then click Tray 5.
ł
Component locator: Tray 5 component locator on page 1708
ł
Wiring diagram: Tray 5 wiring diagram on page 2483
ł
Parts diagram: Tray 5 parts diagrams on page 1708
Links
ENWW
Event Log error and warning codes 2049
A2.04A3
Description
ł
Tray 5 one-way clutch failed
Primary root causes
ł
Upper separator roller shaft
ł
Upper separator one-way clutch assembly
Recommended actions
䦱
Replace the upper separator roller shaft and upper separator one-way clutch assembly.
ł
Diagnostic page: Click Subsystems, click Input Trays, and then click Tray 5.
ł
Component locator: Tray 5 component locator on page 1708
ł
Wiring diagram: Tray 5 wiring diagram on page 2483
ł
Parts diagram: Tray 5 parts diagrams on page 1708
Links
2050 Appendix A Event Log codes
ENWW
A2.04A4
Description
ł
Tray 5 separator failed
Primary root causes
ł
85T drive belt
ł
Lower separator spring
ł
48T gear pick roller assembly
ł
Separator pivot shaft assembly
ł
Lower separator roller shaft
ł
48T one-way clutch
ł
48T D drive pulley
ł
Media Release button
ł
Ball bearing idler assembly
ł
Media Release button push rod
ł
85T tensioner mount
ł
Tensioner clamp
ł
Adjuster bracket
ł
Media Release button spring
ł
Welded carrier assembly
Recommended actions
䦱
Inspect each part listed under the primary root causes heading. Replace parts as needed.
ł
Diagnostic page: Click Subsystems, click Input Trays, and then click Tray 5.
ł
Component locator: Tray 5 component locator on page 1708
ł
Wiring diagram: Tray 5 wiring diagram on page 2483
ł
Parts diagram: Tray 5 parts diagrams on page 1708
Links
ENWW
Event Log error and warning codes 2051
A2.04A5
Description
ł
Tray 5 slip clutch drive failed
Primary root causes
ł
54 tooth gear
ł
48 tooth gear
ł
Slip clutch
ł
Feed roller module assembly
ł
Separator transfer shaft assembly
Recommended actions
䦱
Inspect each part listed under the primary root causes heading. Replace parts as needed.
ł
Diagnostic page: Click Subsystems, click Input Trays, and then click Tray 5.
ł
Component locator: Tray 5 component locator on page 1708
ł
Wiring diagram: Tray 5 wiring diagram on page 2483
ł
Parts diagram: Tray 5 parts diagrams on page 1708
Links
2052 Appendix A Event Log codes
ENWW
A2.04A6
Description
ł
Tray 5 Separator clutch (CL102) failed
Primary root causes
ł
145T drive belt
ł
116T drive belt
ł
Power harness
ł
CL102
ł
Media path tensioner assembly
ł
Upper separator roller drive shaft
ł
Pick arm pivot shaft
ł
48T one-way clutch
ł
48T D drive pulley
ł
Ball bearing idler assembly
ł
Clutch restraint plate
ł
Belt area cover
ł
Tensioner clamp
ł
Lower separator mount assembly
ł
177T drive belt
ł
Separator wire harness
ł
Lower separator encoder assembly
ł
Gear cluster assembly
ł
Lower separator slip clutch shaft
ł
Encoder clamp
ł
Tray 5 Pick motor (M101) mount plate
ł
Motor bracket
ł
Lower separator encoder clamp
Recommended actions
ENWW
1.
If you have not done so already, reboot the MFP in Protected Service mode (PSM).
2.
Press and hold down the Jam Release button, and then close the Tray 5 media door.
Event Log error and warning codes 2053
3.
If an A2.04A6 code is displayed, inspect each of the following parts: 177T drive belt, separator
harness, lower separator encoder assembly, gear cluster assembly, lower separator slip clutch
shaft, encoder clamp, paper motor mount plate, motor bracket, and the lower separator encoder
clamp.
4.
If an A2.04A4 code is displayed, inspect each of the following parts: media path tensioner
assembly, upper separator transfer shaft, pick arm pivot shaft, 48T one-way clutch, 48T D drive
pulley, ball bearing idler assembly, clutch restraint plate, belt area cover, tensioner clamp, and the
lower separator mount assembly.
ł
Diagnostic page: Click Subsystems, click Input Trays, and then click Tray 5.
ł
Component locator: Tray 5 component locator on page 1708
ł
Wiring diagram: Tray 5 wiring diagram on page 2483
ł
Parts diagram: Tray 5 parts diagrams on page 1708
Links
2054 Appendix A Event Log codes
ENWW
A2.05A1
Description
ł
No signal from Tray 5 Lower Separator encoder (EN103)
Primary root causes
ł
Tray 5 Lower Separator encoder (EN103)
ł
Wire harness between EN103, the Tray 5 Distribution PCA (A101), and the Motion PCA (A2)
ł
Tray 5 Separator clutch (CL102)
ł
Tray 5 Pick motor (M101)
Recommended actions
1.
If you have not done so already, reboot the MFP in Protected Service mode (PSM).
2.
Check to see if maintenance is due.
3.
Clean the upper and lower separator rollers and check the drive path for loose belt idlers, damaged
belts, and damaged gears.
4.
Open the Tray 5 diagnostic page, and then manually turn the separator rollers and verify that the
EN103 count changes.
5.
Manually turn EN103 and verify that the encoder count changes.
6.
With CL101 cycling, verify that the M10 runs and that the separator rollers turn.
7.
Test the voltage at EN103: 5 Vdc at pins 3 to 1, 4 to 1, and 2 to 1 on W102P104-EN103.
8.
Test the voltage to EN103 from the A101: 5 Vdc on W102P102-A101J2 at pins 7B to 10B, 8B to
10B, and 9B to 10B.
9.
Test the voltage to EN103 from A2: 5 Vdc at pins 15 to 13, 14, 37, and 38 (GND) and 31 to 13, 14,
37, and 38 (GND).
Additional root causes
ł
A2
ł
Diagnostic page: Click Subsystems, click Input Trays, and then click Tray 5.
ł
Component locator: Tray 5 component locator on page 1708
ł
Wiring diagram: Tray 5 wiring diagram on page 2483
ł
Parts diagram: Tray 5 parts diagrams on page 1708
ł
Replace EN103: Lower separator encoder PCA on page 666
ł
A2: D4.0705 on page 2392
Links
ENWW
Event Log error and warning codes 2055
A2.1301
Description
ł
Paper jam at Tray 5 Media 1 sensor (SN101)
Primary root causes
ł
SN101
ł
Tray 5 Pick clutch (CL101)
ł
Wire harness between SN101, the Tray 5 Distribution PCA (A101), and the Motion PCA (A2)
Recommended actions
1.
Open the Tray 5 diagnostic page, and then manually activate SN101 and verify that the sensor
state changes.
2.
Verify that SN101 is correctly seated and clean.
3.
Verify that the idler rollers are correctly seated and clean.
4.
Test the voltage at SN101: 5 Vdc at pins 1 to 3 and pins 2 to 3 on W102P103-SN101.
5.
Test the voltage to SN101 from the A101: 1.19 Vdc unblocked and blocked at pins 1A to 3A and
4.90 vdc unblocked, 0.12 vdc blocked at pins 2A to 3A on W102P102-A101J2.
6.
Test the voltage to SN101 from A2: 5 Vdc on pins 32 to 13, 14, 37, and 38 (GND) and pins 15 to
13, 14, 37, and 38 (GND).
Additional root causes
ł
A2
ł
Fault tree: A2.1301: Paper jam at Tray 5 Media 1 sensor (SN101) on page 1164
ł
Diagnostic page: Click Subsystems, click Input Trays, and then click Tray 5.
ł
Component locator: Tray 5 component locator on page 1708
ł
Wiring diagram: Tray 5 wiring diagram on page 2483
ł
Parts diagram: Tray 5 parts diagrams on page 1708
ł
Replace SN101: Sensors on page 688
ł
A2: D4.0705 on page 2392
Links
2056 Appendix A Event Log codes
ENWW
A2.1302
Description
ł
Paper jam at Tray 5 Media 2 sensor (SN103)
Primary root causes
ł
SN103
ł
Wire harness between SN101, the Tray 5 Distribution PCA (A101) and the Motion PCA (A2)
Recommended actions
1.
Open the Tray 5 diagnostic page, and then manually activate SN103 and verify that the sensor
state changes.
2.
Verify that SN103 is correctly seated and clean.
3.
Verify that the idler rollers are correctly seated and clean.
4.
Test the voltage at SN103: 5 Vdc on pins 1 to 3 and pins 2 to 3 on W102P104-SN103.
5.
Test the voltage to SN103 on the A101: 4.91 Vdc unblocked, 0.09 Vdc blocked at pins 5A to 6A
and 1.19 Vdc unblocked at pins 4A to 6A on W102P102-A101J2.
6.
Test the voltage to SN103 from A2: 5 Vdc on pins 36 to 13, 14, 37, and 38 (GND) and on pins 15
to 13, 14, 37, and 38 (GND).
Additional root causes
ł
A2
ł
Fault tree: A2.1302: Paper jam at Tray 5 Media 2 sensor (SN103) on page 1167
ł
Diagnostic page: Click Subsystems, click Input Trays, and then click Tray 5.
ł
Component locator: Tray 5 component locator on page 1708
ł
Wiring diagram: Tray 5 wiring diagram on page 2483
ł
Parts diagram: Tray 5 parts diagrams on page 1708
ł
Replace SN101: Sensors on page 688
ł
A2: D4.0705 on page 2392
Links
ENWW
Event Log error and warning codes 2057
A3.0101
Description
ł
Finisher Input Paper Path motor (M210) stall
Primary root causes
ł
M210
ł
Finisher Input Paper Path Motor encoder (EN210)
ł
Drive roller bearings and idlers
ł
Wire harness between the Finisher Main PCA (A200) and M210
ł
A200
ł
Transport drive belts
Recommended actions
1.
Open the Finisher Paper Path diagnostic page, and then run M210 to verify that the motor turns
and that the EN210 count changes.
2.
Manually turn M210 and verify that the drive system does not bind.
3.
Check the belt tension.
4.
Check the wire harness between M210 and A200.
5.
Test the voltage at M210: 1.0 Vdc at pins 1 to 4 on W210P1-W200J210.
6.
Test the voltage at EN210: 5.0 Vdc at pins 6A to 4A, 5A to 4A, and 7A to 4A on W211P1-W201J211.
7.
Replace A200.
ł
Diagnostic page: Click Subsystems, click Finisher, and then click Finisher Paper Path.
ł
Component locator: Finisher component locator on page 1668
ł
Wiring diagram: Finisher 5 wiring diagram on page 2477
ł
Parts diagram: Finisher parts diagrams on page 1668
ł
Replace M210: Finisher Input Paper Path motor (M210) on page 816
ł
Replace A200: Finisher Main PCA (A200) on page 859
Links
2058 Appendix A Event Log codes
ENWW
A3.0102
Description
ł
Finisher Upper Paper Path motor (M230) stall
Primary root causes
ł
M230
ł
Finisher Upper Paper Path Motor encoder (EN230)
ł
Drive roller bearings and idlers
ł
Wire harness between the Finisher Main PCA (A200) and M230
ł
A200
ł
Transport drive belts
Recommended actions
1.
Open the Finisher Paper Path diagnostic page, and then run M230 to verify that the motor turns
and that the EN230 count changes.
2.
Manually turn M230 and verify that the drive system does not bind.
3.
Check the belt tension.
4.
Check the wire harness between M230 and A200.
5.
Test the voltage at M230: 1.0 Vdc at pins 2 to 1 on the motor connector.
6.
Test the voltage at EN230: 5.0 Vdc at pins 5A to 4A, 6A to 4A, and 7A to 4A on W231P1-W201J231.
7.
Replace A200.
ł
Diagnostic page: Click Subsystems, click Finisher, and then click Finisher Paper Path.
ł
Component locator: Finisher component locator on page 1668
ł
Wiring diagram: Finisher 8 wiring diagram on page 2479
ł
Parts diagram: Finisher parts diagrams on page 1668
ł
Replace M230: Finisher Upper Paper Path motor (M230) on page 819
ł
Replace A200: Finisher Main PCA (A200) on page 859
Links
ENWW
Event Log error and warning codes 2059
A3.0103
Description
ł
Finisher Separator Input motor (M268) stall
Primary root causes
ł
M268
ł
Finisher Separator Input Motor encoder (EN268)
ł
Drive roller bearings and idlers
ł
Wire harness between the Finisher Main PCA (A200) and M268
ł
A200
ł
Transport drive belts
Recommended actions
1.
Open the Finisher Separator diagnostic page, and then run M268 to verify that the motor turns and
that the EN268 count changes.
2.
Manually turn M268 and verify that the drive system does not bind.
3.
Check the belt tension.
4.
Check the wire harness between M268 and A200.
5.
Test the voltage at M268: 1.0 Vdc at pins 2 to 1 on the motor connector.
6.
Test the voltage at EN268: 5.0 Vdc at pins 3 to 1, 2 to 1, and 4 to 1 on the encoder connector.
7.
Replace A200.
ł
Diagnostic page: Click Subsystems, click Finisher, and then click Finisher Separator.
ł
Component locator: Finisher component locator on page 1668
ł
Wiring diagram: Finisher 3 wiring diagram on page 2476
ł
Parts diagram: Finisher parts diagrams on page 1668
ł
Replace M268: Finisher Separator Input motor (M268) on page 835
ł
Replace A200: Finisher Main PCA (A200) on page 859
Links
2060 Appendix A Event Log codes
ENWW
A3.0104
Description
ł
Finisher Lower Paper Path motor (M220) stall
Primary root causes
ł
M220
ł
Finisher Lower Paper Path Motor encoder (EN220)
ł
Drive roller bearings and idlers
ł
Wire harness between the Finisher Main PCA (A200) and M220
ł
A200
ł
Transport drive belts
Recommended actions
1.
Open the Finisher Paper Path diagnostic page, and then run M220 to verify that the motor turns
and that the EN220 count changes.
2.
Manually turn M220 and verify that the drive system does not bind.
3.
Check the belt tension.
4.
Check the wire harness between M220 and A200.
5.
Test the voltage at M220: 1.0 Vdc at pins 2 to 1 on the motor connector.
6.
Test the voltage at EN220: 5.0 Vdc at pins 4A to 3A, 5A to 3A, and 6A to 3A on W221P1-W201J221.
7.
Replace A200.
ł
Diagnostic page: Click Subsystems, click Finisher, and then click Finisher Paper Path.
ł
Component locator: Finisher component locator on page 1668
ł
Wiring diagram: Finisher 7 wiring diagram on page 2478
ł
Parts diagram: Finisher parts diagrams on page 1668
ł
Replace M220: Finisher Lower Paper Path motor (M220) on page 818
ł
Replace A200: Finisher Main PCA (A200) on page 859
Links
ENWW
Event Log error and warning codes 2061
A3.0122
Description
ł
Accumulator Offset 1 motor (M244) failed connect test
Primary root causes
ł
M244
ł
Wire harness between the Finisher Main PCA (A200), Accumulator Distribution PCA (A240), and
M244
ł
A200
ł
A240
Recommended actions
1.
Open the Finisher Accumulator diagnostic page, and then run M244 and verify that the motor turns.
2.
Check the wire harness between M244 and A200.
3.
Using the stepper motor test procedure, test the voltage to M244 on A240: CN4 pins 1 to 2 and 3
to 4.
4.
Replace A200.
5.
Replace A240.
ł
Diagnostic page: Click Subsystems, click Finisher, and then click Finisher Accumulator.
ł
Component locator: Finisher component locator on page 1668
ł
Wiring diagram: Finisher 9 wiring diagram on page 2479
ł
Parts diagram: Finisher parts diagrams on page 1668
ł
Stepper motor procedure: How to test a stepper motor on page 865
ł
Replace M244: Accumulator Offset 1 motor (M244) on page 825
ł
Replace A200: Finisher Main PCA (A200) on page 859
ł
Replace A240: Accumulator Distribution PCA (A240) on page 778
Links
2062 Appendix A Event Log codes
ENWW
A3.0123
Description
ł
Accumulator Offset 2 motor (M245) failed connect test
Primary root causes
ł
M245
ł
Wire harness between the Finisher Main PCA (A200), Accumulator Distribution PCA (A240), and
M245
ł
A200
ł
A240
Recommended actions
1.
Open the Finisher Accumulator diagnostic page, and then run M245 and verify that the motor turns.
2.
Check the wire harness between M245 and A240.
3.
Using the stepper motor test procedure, test the voltage to M245 on A240: CN3 pins 1 to 2 and 3
to 4.
4.
Replace A200.
5.
Replace A240.
ł
Diagnostic page: Click Subsystems, click Finisher, and then click Finisher Accumulator.
ł
Component locator: Finisher component locator on page 1668
ł
Wiring diagram: Finisher 9 wiring diagram on page 2479
ł
Parts diagram: Finisher parts diagrams on page 1668
ł
Stepper motor procedure: How to test a stepper motor on page 865
ł
Replace M245: Accumulator Offset 2 motor (M245) on page 826
ł
Replace A200: Finisher Main PCA (A200) on page 859
ł
Replace A240: Accumulator Distribution PCA (A240) on page 778
Links
ENWW
Event Log error and warning codes 2063
A3.0124
Description
ł
Accumulator Guide Bar motor (M243) failed connect test
Primary root causes
ł
M243
ł
Wire harness between the Finisher Main PCA (A200), Accumulator Distribution PCA (A240), and
M243
ł
A200
ł
A240
Recommended actions
1.
Open the Finisher Accumulator diagnostic page, and then run M243 normally and verify that the
motor turns.
2.
Check the wire harness between M243 and A240.
3.
Using the stepper motor test procedure, test the voltage to M243 on A240: CN8 pins 1 to 2 and 3
to 4.
4.
Replace A200.
5.
Replace A240.
ł
Diagnostic page: Click Subsystems, click Finisher, and then click Finisher Accumulator.
ł
Component locator: Finisher component locator on page 1668
ł
Wiring diagram: Finisher 9 wiring diagram on page 2479
ł
Parts diagram: Finisher parts diagrams on page 1668
ł
Stepper motor procedure: How to test a stepper motor on page 865
ł
Replace M243: Accumulator Guide Bar motor (M243) on page 824
ł
Replace A200: Finisher Main PCA (A200) on page 859
ł
Replace A240: Accumulator Distribution PCA (A240) on page 778
Links
2064 Appendix A Event Log codes
ENWW
A3.0125
Description
ł
Accumulator Bearing Bracket motor (M242) failed connect test
Primary root causes
ł
M242
ł
Wire harness between the Finisher Main PCA (A200), Accumulator Distribution PCA (A240), and
M242
ł
A200
ł
A240
Recommended actions
1.
Open the Finisher Accumulator diagnostic page, and then run M242 and verify that the motor turns.
2.
Check the wire harness between M242 and A240.
3.
Using the stepper motor test procedure, test the voltage to M242 on A240: CN7 on pins 1 to 2 and
3 to 4.
4.
Replace A200.
5.
Replace A240.
ł
Diagnostic page: Click Subsystems, click Finisher, and then click Finisher Accumulator.
ł
Component locator: Finisher component locator on page 1668
ł
Wiring diagram: Finisher 9 wiring diagram on page 2479
ł
Parts diagram: Finisher parts diagrams on page 1668
ł
Stepper motor procedure: How to test a stepper motor on page 865
ł
Replace M242: Accumulator Bearing Bracket motor (M242) on page 822
ł
Replace A200: Finisher Main PCA (A200) on page 859
ł
Replace A240: Accumulator Distribution PCA (A240) on page 778
Links
ENWW
Event Log error and warning codes 2065
A3.0126
Description
ł
Accumulator Retainer Finger motor (M246) failed connect test
Primary root causes
ł
M246
ł
Wire harness between the Finisher Main PCA (A200), Accumulator Distribution PCA (A240), and
M246
ł
A200
ł
A240
Recommended actions
1.
Open the Finisher Accumulator diagnostic page, and then run M246 and verify that the motor turns.
2.
Check the wire harness between M246 and A240.
3.
Using the stepper motor test procedure, test the voltage to M246 on A240: CN4 pins 1 to 2 and 3
to 4.
4.
Replace A200.
5.
Replace A240.
ł
Diagnostic page: Click Subsystems, click Finisher, and then click Finisher Accumulator.
ł
Component locator: Finisher component locator on page 1668
ł
Wiring diagram: Finisher 9 wiring diagram on page 2479
ł
Parts diagram: Finisher parts diagrams on page 1668
ł
Stepper motor procedure: How to test a stepper motor on page 865
ł
Replace M246: Accumulator Retainer Finger motor (M246) on page 827
ł
Replace A200: Finisher Main PCA (A200) on page 859
ł
Replace A240: Accumulator Distribution PCA (A240) on page 778
Links
2066 Appendix A Event Log codes
ENWW
A3.0140
Description
ł
Finisher Separator Drive motor (M260) stall
Primary root causes
ł
Finisher top bin overloaded
ł
Finisher Job Separator Lower Limit sensor (SN260)
ł
Separator mechanical assembly and structure
ł
M260
ł
Finisher Separator Drive Motor encoder (EN260)
ł
Wire harness between the Finisher Main PCA (A200) and M260
ł
A200
Recommended actions
1.
Check the finisher top bin for damage.
2.
Check the wire harness between M260 and A200.
3.
Open the Finisher Separator diagnostic page, and then test SN260.
4.
Run M260, look for binding, and verify that the EN260 count changes.
5.
Test the voltage at M260: 1.25 Vdc at pins 1 to 2 on the motor connector.
6.
Test the voltage at EN260: 5.0 Vdc at pins 2A to 1A, 3A to 1A, and 4A to 1A on W263P1-W260J263.
7.
Replace M260.
8.
Replace A200.
ł
Diagnostic page: Click Subsystems, click Finisher, and then click Finisher Separator.
ł
Component locator: Finisher component locator on page 1668
ł
Wiring diagram: Finisher 2 wiring diagram on page 2475
ł
Parts diagram: Finisher parts diagrams on page 1668
ł
Replace M260: Finisher Separator Drive motor (M260) on page 833
ł
Replace A200: Finisher Main PCA (A200) on page 859
Links
ENWW
Event Log error and warning codes 2067
A3.0141
Description
ł
Finisher Job Separator Gate motor (M262) stall
Primary root causes
ł
Finisher Job Separator Gate Open sensor (SN262)
ł
M262 assembly
ł
Finisher Separator Gate Motor encoder (EN262)
ł
Finisher Separator Input motor (M268)
ł
Wire harness between the Finisher Main PCA (A200) and M262, SN262, and M268.
ł
A200
Recommended actions
1.
Check the separator paper path for obstructions and damage.
2.
Open the Finisher Separator diagnostic page, and then test SN262.
3.
Run M262 and verify that the EN262 count changes.
4.
Run M268 and verify that the EN268 count changes.
5.
Check M262 and M268 for binding and damage.
6.
Test the voltage at M262: 33.0 Vdc at pins 2 to 1 on the motor connector.
7.
Test the voltage at EN262: 3.3 Vdc at pins 9B to 10B and 11B to 10B on W267P1-W260J267.
8.
Test the voltage at M268: 33.0 Vdc at pins 1 to 2 on the motor connector.
9.
Test the voltage at EN268: 5.0 Vdc at pins 3 to 1, 2 to 1, and 4 to 1 on the encoder connector.
10. Test the voltage at SN262: 3.3 Vdc at pins 3A to 1A and 2A to 1A on W267P1-W260J267.
11. Check the wire harnesses between A200, M262, SN262, and M268.
12. Replace M262.
13. Replace M268.
14. Replace A200.
Links
ł
Diagnostic page: Click Subsystems, click Finisher, and then click Finisher Separator.
ł
Component locator: Finisher component locator on page 1668
ł
Wiring diagram: Finisher 3 wiring diagram on page 2476
ł
Parts diagram: Finisher parts diagrams on page 1668
ł
Replace M262: Finisher Job Separator Gate motor (M262) on page 834
2068 Appendix A Event Log codes
ENWW
ENWW
ł
Replace M268: Finisher Separator Input motor (M268) on page 835
ł
Replace A200: Finisher Main PCA (A200) on page 859
Event Log error and warning codes 2069
A3.0142
Description
ł
Finisher Separator Drive motor (M260) stalls while moving down
Primary root causes
ł
Finisher top bin overloaded
ł
Finisher Job Separator Lower Limit sensor (SN260)
ł
Separator mechanical assembly and structure
ł
M260
ł
Finisher Separator Drive Motor encoder (EN260)
ł
Wire harness between the Finisher Main PCA (A200) and M260
ł
A200
Recommended actions
1.
Check the finisher top bin for damage.
2.
Check the wire harness between M260 and A200.
3.
Open the Finisher Separator diagnostic page, and then test SN260.
4.
Run M260, look for binding, and verify that the EN260 count changes.
5.
Replace M260.
6.
Replace A200.
ł
Diagnostic page: Click Subsystems, click Finisher, and then click Finisher Separator.
ł
Component locator: Finisher component locator on page 1668
ł
Wiring diagram: Finisher 2 wiring diagram on page 2475
ł
Parts diagram: Finisher parts diagrams on page 1668
ł
Replace M260: Finisher Separator Drive motor (M260) on page 833
ł
Replace A200: Finisher Main PCA (A200) on page 859
Links
2070 Appendix A Event Log codes
ENWW
A3.0143
Description
ł
Finisher Separator Drive motor (M260) stalls while moving up
Primary root causes
ł
Finisher top bin overloaded
ł
Finisher Job Separator Lower Limit sensor (SN260)
ł
Separator mechanical assembly and structure
ł
M260
ł
Finisher Separator Drive Motor encoder (EN260)
ł
Wire harness between the Finisher Main PCA (A200) and M260
ł
A200
Recommended actions
1.
Check the Event Log for an A3.0140 code. If such an entry exists, SN260 is probably
malfunctioning.
2.
Check the finisher top bin for damage.
3.
Check the wire harness between M260 and A200.
4.
Open the Finisher Separator diagnostic page, and then test SN260.
5.
Run M260, look for binding, and verify that the EN260 count changes.
6.
Test the voltage at M260: 1.25 Vdc at pins 1 to 2 on the motor connector.
7.
Test the voltage at EN260: 5.0 Vdc at pins 2A to 1A, 3A to 1A, and 4A to 1A on W263P1-W260J263.
8.
Replace A200.
ł
Diagnostic page: Click Subsystems, click Finisher, and then click Finisher Separator.
ł
Component locator: Finisher component locator on page 1668
ł
Wiring diagram: Finisher 2 wiring diagram on page 2475
ł
Parts diagram: Finisher parts diagrams on page 1668
ł
Replace M260: Finisher Separator Drive motor (M260) on page 833
ł
Replace A200: Finisher Main PCA (A200) on page 859
Links
ENWW
Event Log error and warning codes 2071
A3.01A9
Description
ł
Finisher Separator Offset motor (M264) stall
Primary root causes
ł
Finisher Job Separator Offset Back sensor (SN265)
ł
Finisher Separator Offset Motor encoder (EN264)
ł
M264 assembly
ł
Wire harness between the Finisher Main PCA (A200) and M264
ł
A200
Recommended actions
1.
Open the Finisher Separator diagnostic page, run M264, look for binding, and verify that the EN264
count changes.
2.
Test and clean SN265.
3.
Check the M264 assembly for damage.
4.
Test the voltage at M264: 3.44 Vdc at pins 1 to 2 on the motor connector.
5.
Test the voltage at EN264: 5.0 Vdc at pins 8A to 10A and 9A to 10A on W267P1-W260J267.
6.
Test the voltage at SN265: 3.3 Vdc at pins 6B to 8B and 7B to 8B on W267P1-W260J267.
7.
Check the wire harness between M264, EN264, SN265, and A200.
8.
Replace SN265.
9.
Replace M264.
10. Replace A200.
Links
ł
Diagnostic page: Click Subsystems, click Finisher, and then click Finisher Separator.
ł
Component locator: Finisher component locator on page 1668
ł
Wiring diagram: Finisher 3 wiring diagram on page 2476
ł
Parts diagram: Finisher parts diagrams on page 1668
ł
Replace SN265: Sensors on page 788
ł
Replace M264: Finisher Separator Offset motor (M264) on page 835
ł
Replace A200: Finisher Main PCA (A200) on page 859
2072 Appendix A Event Log codes
ENWW
A3.0160
Description
ł
Finisher Stack Holder motor (M252) failed connect test
Primary root causes
ł
M252
ł
Finisher Stack Holder sensor (SN252)
ł
Lower stack holder assembly
ł
Wire harness between the Finisher Main PCA (A200) and M252.
ł
A200
Recommended actions
1.
Open the Finisher Lower Elevator diagnostic page, run M252, look for binding, and verify that the
SN252 count changes. SN252 serves as an encoder for M252.
2.
Check the wire harness between M252 and A200.
3.
Using the stepper motor test procedure, test the voltage at M252: Pins 1 to 2 and 3 to 4 on the
motor connector.
4.
Replace SN252.
5.
Replace M252
6.
Replace A200.
ł
Diagnostic page: Click Subsystems, click Finisher, and then click Finisher Lower Elevator.
ł
Component locator: Finisher component locator on page 1668
ł
Wiring diagram: Finisher 4 wiring diagram on page 2476
ł
Parts diagram: Finisher parts diagrams on page 1668
ł
Stepper motor procedure: How to test a stepper motor on page 865
ł
Replace M252: Finisher Stack Holder motor (M252) on page 829
ł
Replace SN252: Sensors on page 788
ł
Replace A200: Finisher Main PCA (A200) on page 859
Links
ENWW
Event Log error and warning codes 2073
A3.01A1
Description
ł
Finisher motor driver 1 temperature is warm
Primary root causes
ł
Finisher Separator Drive motor (M260)
ł
Finisher Diverter solenoid (SOL211)
ł
Finisher Separator Offset motor (M264)
ł
Finisher Job Separator Gate motor (M262)
ł
Finisher Main PCA (A200)
Recommended actions
1.
Open the Event Log and look for one of the following codes: A3.0140, A3.0141, A3.0142, A3.0143,
A3.0144, or A3.0301. Follow the troubleshooting procedures for the code.
2.
Replace A200.
ł
Event Log: Click View Log and Troubleshoot.
ł
Component locator: Finisher component locator on page 1668
ł
Wiring diagram: Finisher Main PCA (A200) diagram on page 2481
ł
Parts diagram: Finisher parts diagrams on page 1668
ł
Replace A200: Finisher Main PCA (A200) on page 859
Links
2074 Appendix A Event Log codes
ENWW
A3.01A2
Description
ł
Finisher motor driver 2 temperature is warm
Primary root causes
ł
Finisher Separator Drive motor (M260)
ł
Finisher Main PCA (A200)
Recommended actions
1.
Open the Event Log and look for one of the following codes: A3.0140, A3.0142, A3.0143, or
A3.0241. Follow the troubleshooting procedures for the code.
2.
Replace A200.
ł
Event Log: Click View Log and Troubleshoot.
ł
Component locator: Finisher component locator on page 1668
ł
Wiring diagram: Finisher Main PCA (A200) diagram on page 2481
ł
Parts diagram: Finisher parts diagrams on page 1668
ł
Replace A200: Finisher Main PCA (A200) on page 859
Links
ENWW
Event Log error and warning codes 2075
A3.01A3
Description
ł
Finisher motor driver 3 temperature is warm
Primary root causes
ł
Stapler 1 motor (M272)
ł
Stapler 2 motor (M281)
ł
Finisher Lower Elevator motor (M250)
ł
Finisher Main PCA (A200)
Recommended actions
1.
Open the Event Log and look for one of the following codes: A3.01E1, A3.01E2, A3.01C1 or
A3.01C2. Follow the troubleshooting procedures for the code.
2.
Replace A200.
ł
Event Log: Click View Log and Troubleshoot.
ł
Component locator: Finisher component locator on page 1668
ł
Wiring diagram: Finisher Main PCA (A200) diagram on page 2481
ł
Parts diagram: Finisher parts diagrams on page 1668
ł
Replace A200: Finisher Main PCA (A200) on page 859
Links
2076 Appendix A Event Log codes
ENWW
A3.01A4
Description
ł
Finisher motor driver 4 temperature is warm
Primary root causes
ł
Finisher Lower Paper Path motor (M220)
ł
Stapler 2 Safety motor (M280)
ł
Finisher Main PCA (A200)
Recommended actions
1.
Open the Event Log and look for one of the following codes: A3.0104, A3.0232 or A3.0233. Follow
the troubleshooting procedures for the code.
2.
Replace A200.
ł
Event Log: Click View Log and Troubleshoot.
ł
Component locator: Finisher component locator on page 1668
ł
Wiring diagram: Finisher Main PCA (A200) diagram on page 2481
ł
Parts diagram: Finisher parts diagrams on page 1668
ł
Replace A200: Finisher Main PCA (A200) on page 859
Links
ENWW
Event Log error and warning codes 2077
A3.01A5
Description
ł
Finisher motor driver 5 temperature is warm
Primary root causes
ł
Finisher Upper Paper Path motor (M230)
ł
Stapler 1 Rotate motor (M271)
ł
Finisher Main PCA (A200)
Recommended actions
1.
Open the Event Log and look for one of the following codes: A3.0102, A3.0103, A3.01C1, A3.0229,
and A3.0230. Follow the troubleshooting procedures for the code.
2.
Replace A200.
ł
Event Log: Click View Log and Troubleshoot.
ł
Component locator: Finisher component locator on page 1668
ł
Wiring diagram: Finisher Main PCA (A200) diagram on page 2481
ł
Parts diagram: Finisher parts diagrams on page 1668
ł
Replace A200: Finisher Main PCA (A200) on page 859
Links
2078 Appendix A Event Log codes
ENWW
A3.01A6
Description
ł
Finisher motor driver 6 temperature is warm
Primary root causes
ł
Finisher Input Paper Path motor (M210)
ł
Finisher Separator Input motor (M268)
ł
Finisher Main PCA (A200)
Recommended actions
1.
Open the Event Log and look for one of the following codes: A3.0101 and A3.1360. Follow the
troubleshooting procedures for the code.
2.
Replace A200.
ł
Event Log: Click View Log and Troubleshoot.
ł
Component locator: Finisher component locator on page 1668
ł
Wiring diagram: Finisher Main PCA (A200) diagram on page 2481
ł
Parts diagram: Finisher parts diagrams on page 1668
ł
Replace A200: Finisher Main PCA (A200) on page 859
Links
ENWW
Event Log error and warning codes 2079
A3.01A7
Description
ł
Finisher motor driver 7 temperature is warm
Primary root causes
ł
Finisher Separator Drive motor (M260)
ł
Finisher Main PCA (A200)
Recommended actions
1.
Open the Event Log and look for one of the following codes: A3.0140, A3.0142, A3.0143, or
A3.0241. Follow the troubleshooting procedures for the code.
2.
Replace A200.
ł
Event Log: Click View Log and Troubleshoot.
ł
Component locator: Finisher component locator on page 1668
ł
Wiring diagram: Finisher Main PCA (A200) diagram on page 2481
ł
Parts diagram: Finisher parts diagrams on page 1668
ł
Replace A200: Finisher Main PCA (A200) on page 859
Links
2080 Appendix A Event Log codes
ENWW
A3.01A8
Description
ł
Finisher motor driver 8 temperature is warm
Primary root causes
ł
Accumulator Open motor (M256)
ł
Finisher Main PCA (A200)
Recommended actions
1.
Open the Event Log and look for an A3.0227 entry. Follow the troubleshooting procedures for the
code.
2.
Replace A200.
ł
Event Log: Click View Log and Troubleshoot.
ł
Component locator: Finisher component locator on page 1668
ł
Wiring diagram: Finisher Main PCA (A200) diagram on page 2481
ł
Parts diagram: Finisher parts diagrams on page 1668
ł
Replace A200: Finisher Main PCA (A200) on page 859
Links
ENWW
Event Log error and warning codes 2081
A3.01C1
Description
ł
Stapler 1 motor (M272) problem
Primary root causes
ł
Worn or damaged clincher assembly
ł
M272
ł
Wire harness between the Finisher Main PCA (A200) and M272
ł
Bent stapler bracket
ł
A200
Recommended actions
1.
Load fresh paper in the paper trays, and then try to recreate the problem.
2.
Remove the staple cartridge from the stapler, open the Finisher Stapler diagnostic page, and then
cycle M272.
3.
Print a Paper Path Foot Print test page, and then verify that the stapler alignment and location are
correct.
4.
Run the M271.
5.
Check the link between the pivot gear and the stapler.
6.
Insert two sheets of paper in the Stapler 1 assembly, cycle M272, and then check the quality of the
stapling job.
7.
Check the Stapler 1 assembly for correct mounting and damage.
8.
Check the wire harness between A200 and M272.
9.
Test the voltage at M272: 1.56 Vcd at pins 1 or 2 to 3 or 4 on the motor connector.
10. Replace A200.
Links
ł
Diagnostic page: Click Subsystems, click Finisher, and then click Finisher Stapler.
ł
Component locator: Finisher component locator on page 1668
ł
Wiring diagram: Finisher 1 wiring diagram on page 2474
ł
Parts diagram: Finisher parts diagrams on page 1668
ł
Replace M271: Stapler 1 motor (M272) on page 838
ł
Replace A200: Finisher Main PCA (A200) on page 859
2082 Appendix A Event Log codes
ENWW
A3.01C2
Description
ł
Stapler 2 motor (M281) problem
Primary root causes
ł
Worn or damaged clincher assembly
ł
M281
ł
Wire harness between the Finisher Main PCA (A200) and M281
ł
Missing or damaged rubber grommets
ł
Bent stapler bracket
ł
A200
Recommended actions
1.
Load fresh paper in the paper trays, and then try to recreate the problem.
2.
If the problem occurs with the middle staple, remove any obstructions from the accumulator
assembly, and check the accumulator eject rollers for damage.
3.
Remove the staple cartridge from the stapler, open the Finisher Stapler diagnostic page, and then
cycle M281.
4.
Print a Paper Path Foot Print test page, and then verify that the stapler alignment and location are
correct.
5.
Insert two sheets of paper in the Stapler 2 assembly, run M281, and then check the quality of the
stapling job.
6.
Check the Stapler 2 assembly for correct mounting and damage.
7.
Check the wire harness between A200 and M281.
8.
Test the voltage at M281: 1.56 Vcd at pins 1 or 2 to 3 or 4 on the motor connector.
9.
Replace A200.
ł
Diagnostic page: Click Subsystems, click Finisher, and then click Finisher Stapler.
ł
Component locator: Finisher component locator on page 1668
ł
Wiring diagram: Finisher 1 wiring diagram on page 2474
ł
Parts diagram: Finisher parts diagrams on page 1668
ł
Replace M281: Stapler 2 motor (M281) on page 842
ł
Replace A200: Finisher Main PCA (A200) on page 859
Links
ENWW
Event Log error and warning codes 2083
A3.01E1
Description
ł
Output Bin 5 is overloaded
Root causes
ł
Lower elevator
ł
M250
ł
Lower elevator lift assembly
ł
Finisher Lower Elevator Stack Height sensor (SN257)
ł
Wire harness between M250 and the Finisher Main PCA (A200)
ł
A200
Recommended actions
1.
Remove any paper from the lower elevator, and then check for obstructions underneath the
elevator.
2.
Open the Finisher Lower Elevator diagnostic page, and then run M250 and check for binding.
3.
Verify that the SN257 spring and the M250 bracket are not damaged.
4.
Check the voltage at M250.
5.
Check the voltage to M250 from A200.
6.
Replace A200.
ł
Diagnostic page: Click Subsystems, click Finisher, and then click Finisher Lower Elevator.
ł
Component locator: Finisher component locator on page 1668
ł
Wiring diagram: Finisher 10 wiring diagram on page 2480
ł
Parts diagram: Finisher parts diagrams on page 1668
Links
2084 Appendix A Event Log codes
ENWW
A3.0200
Description
ł
Finisher Input 0 sensor (SN211) failed connect test
Primary root causes
ł
SN211
ł
Wire harness between SN211 and the Finisher Main PCA (A200)
ł
A200
Recommended actions
1.
Open the Finisher Paper Path diagnostic page, and then test SN211.
2.
Check the wire harness between SN211 and A200.
3.
Check the voltage at SN211: 3.3 Vdc at pins 8A to 10A and 9A to 10A on W211P1-W201J211.
4.
Replace A200.
ł
Diagnostic page: Click Subsystems, click Finisher, and then click Finisher Paper Path.
ł
Component locator: Finisher component locator on page 1668
ł
Wiring diagram: Finisher Main PCA (A200) diagram on page 2481
ł
Parts diagram: Finisher parts diagrams on page 1668
ł
Replace SN211: Sensors on page 788
ł
Replace A200: Finisher Main PCA (A200) on page 859
Links
ENWW
Event Log error and warning codes 2085
A3.0201
Description
ł
Finisher Input 1 sensor (SN212) failed connect test
Primary root causes
ł
SN212
ł
Wire harness between SN212 and the Finisher Main PCA (A200)
ł
A200
Recommended actions
1.
Open the Finisher Paper Path diagnostic page, and then test SN212.
2.
Check the wire harness between SN212 and A200.
3.
Check the voltage at SN212: 3.3 Vdc at pins 2B to 11A and 1B to 11A on W211P1-W201J211.
4.
Replace A200.
ł
Diagnostic page: Click Subsystems, click Finisher, and then click Finisher Paper Path.
ł
Component locator: Finisher component locator on page 1668
ł
Wiring diagram: Finisher 6 wiring diagram on page 2478
ł
Parts diagram: Finisher parts diagrams on page 1668
ł
Replace SN212: Sensors on page 788
ł
Replace A200: Finisher Main PCA (A200) on page 859
Links
2086 Appendix A Event Log codes
ENWW
A3.0202
Description
ł
Finisher Input 2 sensor (SN213) failed connect test
Primary root causes
ł
SN213
ł
Wire harness between SN213 and the Finisher Main PCA (A200)
ł
A200
Recommended actions
1.
Open the Finisher Paper Path diagnostic page, and then test SN213.
2.
Check the wire harness between SN213 and A200.
3.
Check the voltage at SN213: 3.3 Vdc at pins 4B to 5B and 3B to 5B on W211P1-W201J211.
4.
Replace A200.
ł
Diagnostic page: Click Subsystems, click Finisher, and then click Finisher Paper Path.
ł
Component locator: Finisher component locator on page 1668
ł
Wiring diagram: Finisher 6 wiring diagram on page 2478
ł
Parts diagram: Finisher parts diagrams on page 1668
ł
Replace SN213: Sensors on page 788
ł
Replace A200: Finisher Main PCA (A200) on page 859
Links
ENWW
Event Log error and warning codes 2087
A3.0203
Description
ł
Finisher Input 3 sensor (SN214) failed connect test
Primary root causes
ł
SN214
ł
Wire harness between SN214 and the Finisher Main PCA (A200)
ł
A200
Recommended actions
1.
Open the Finisher Paper Path diagnostic page, and then test SN214.
2.
Check the wire harness between SN214 and A200.
3.
Check the voltage at SN214: 3.3 Vdc at pins 8B to 6B and 7B to 6B on W211P1-W201J211.
4.
Replace A200.
ł
Diagnostic page: Click Subsystems, click Finisher, and then click Finisher Paper Path.
ł
Component locator: Finisher component locator on page 1668
ł
Wiring diagram: Finisher 6 wiring diagram on page 2478
ł
Parts diagram: Finisher parts diagrams on page 1668
ł
Replace SN214: Sensors on page 788
ł
Replace A200: Finisher Main PCA (A200) on page 859
Links
2088 Appendix A Event Log codes
ENWW
A3.0204
Description
ł
Finisher Upper 1 sensor (SN231) failed connect test
Primary root causes
ł
SN231
ł
Wire harness between SN231 and the Finisher Main PCA (A200)
ł
A200
Recommended actions
1.
Open the Finisher Paper Path diagnostic page, and then test SN231.
2.
Check the wire harness between SN231 and A200.
3.
Check the voltage at SN231: 3.3 Vdc at pins 1B to 8A and 2B to 8A on W231P1-W201J231.
4.
Replace A200.
ł
Diagnostic page: Click Subsystems, click Finisher, and then click Finisher Paper Path.
ł
Component locator: Finisher component locator on page 1668
ł
Wiring diagram: Finisher 8 wiring diagram on page 2479
ł
Parts diagram: Finisher parts diagrams on page 1668
ł
Replace SN231: Sensors on page 788
ł
Replace A200: Finisher Main PCA (A200) on page 859
Links
ENWW
Event Log error and warning codes 2089
A3.0205
Description
ł
Finisher Upper 2 sensor (SN232) failed connect test
Primary root causes
ł
SN232
ł
Wire harness between SN232 and the Finisher Main PCA (A200)
ł
A200
Recommended actions
1.
Open the Finisher Paper Path diagnostic page, and then test SN232.
2.
Check the wire harness between SN232 and A200.
3.
Check the voltage at SN232: 3.3 Vdc at pins 4B to 5B and 3B to 5B on W231P1-W201J231.
4.
Replace A200.
ł
Diagnostic page: Click Subsystems, click Finisher, and then click Finisher Paper Path.
ł
Component locator: Finisher component locator on page 1668
ł
Wiring diagram: Finisher 8 wiring diagram on page 2479
ł
Parts diagram: Finisher parts diagrams on page 1668
ł
Replace SN232: Sensors on page 788
ł
Replace A200: Finisher Main PCA (A200) on page 859
Links
2090 Appendix A Event Log codes
ENWW
A3.0206
Description
ł
Finisher Upper 3 sensor (SN233) failed connect test
Primary root causes
ł
SN233
ł
Wire harness between SN233 and the Finisher Main PCA (A200)
ł
A200
Recommended actions
1.
Open the Finisher Paper Path diagnostic page, and then test SN233.
2.
Check the wire harness between SN233 and A200.
3.
Check the voltage at SN233: 3.3 Vdc at pins 7B to 6B and 8B to 6B on W231P1-W201J231.
4.
Replace A200.
ł
Diagnostic page: Click Subsystems, click Finisher, and then click Finisher Paper Path.
ł
Component locator: Finisher component locator on page 1668
ł
Wiring diagram: Finisher 8 wiring diagram on page 2479
ł
Parts diagram: Finisher parts diagrams on page 1668
ł
Replace SN233: Sensors on page 788
ł
Replace A200: Finisher Main PCA (A200) on page 859
Links
ENWW
Event Log error and warning codes 2091
A3.0207
Description
ł
Finisher Lower 1 sensor (SN215) failed connect test
Primary root causes
ł
SN215
ł
Wire harness between SN215 and the Finisher Main PCA (A200)
ł
A200
Recommended actions
1.
Open the Finisher Paper Path diagnostic page, and then test SN215.
2.
Check the wire harness between SN215 and A200.
3.
Check the voltage at SN215: 3.3 Vdc at pins 9B to 11B and 10B to 11B on W211P1-W201J211.
4.
Replace A200.
ł
Diagnostic page: Click Subsystems, click Finisher, and then click Finisher Paper Path.
ł
Component locator: Finisher component locator on page 1668
ł
Wiring diagram: Finisher 6 wiring diagram on page 2478
ł
Parts diagram: Finisher parts diagrams on page 1668
ł
Replace SN215: Sensors on page 788
ł
Replace A200: Finisher Main PCA (A200) on page 859
Links
2092 Appendix A Event Log codes
ENWW
A3.0208
Description
ł
Finisher Lower 2 sensor (SN221) failed connect test
Primary root causes
ł
SN221
ł
Wire harness between SN221 and the Finisher Main PCA (A200)
ł
A200
Recommended actions
1.
Open the Finisher Paper Path diagnostic page, and then test SN221.
2.
Check the wire harness between SN221 and A200.
3.
Check the voltage at SN221: 3.3 Vdc at pins 1 to 2 and 3 to 2 on W221P1-W201J221.
4.
Replace A200.
ł
Diagnostic page: Click Subsystems, click Finisher, and then click Finisher Paper Path.
ł
Component locator: Finisher component locator on page 1668
ł
Wiring diagram: Finisher 7 wiring diagram on page 2478
ł
Parts diagram: Finisher parts diagrams on page 1668
ł
Replace SN221: Sensors on page 788
ł
Replace A200: Finisher Main PCA (A200) on page 859
Links
ENWW
Event Log error and warning codes 2093
A3.0210
Description
ł
Finisher Front Latch sensor (SN204) failed connect test
Primary root causes
ł
SN204
ł
Wire harness between SN204 and the Finisher Main PCA (A200)
ł
A200
Recommended actions
1.
Open the Finisher Paper Path diagnostic page, and then test SN204.
2.
Check the wire harness between SN204 and A200.
3.
Check the voltage at SN204: 3.3 Vdc at pins 1 to 3 and 5.0 Vdc at pins 2 to 3 on W252P4-SN204.
4.
Replace A200.
ł
Diagnostic page: Click Subsystems, click Finisher, and then click Finisher Paper Path.
ł
Component locator: Finisher component locator on page 1668
ł
Wiring diagram: Finisher 4 wiring diagram on page 2476
ł
Parts diagram: Finisher parts diagrams on page 1668
ł
Replace SN204: Sensors on page 788
ł
Replace A200: Finisher Main PCA (A200) on page 859
Links
2094 Appendix A Event Log codes
ENWW
A3.0211
Description
ł
Finisher Back Latch sensor (SN200) failed connect test
Primary root causes
ł
SN200
ł
Wire harness between SN200 and the Finisher Main PCA (A200)
ł
A200
Recommended actions
1.
Open the Finisher Paper Path diagnostic page, and then test SN200.
2.
Check the wire harness between SN200 and A200.
3.
Check the voltage at SN200: 3.3 Vdc at pins 1 to 3 and 5.0 Vdc at pins 2 to 3 on W201P1-SN200.
4.
Replace A200.
ł
Diagnostic page: Click Subsystems, click Finisher, and then click Finisher Paper Path.
ł
Component locator: Finisher component locator on page 1668
ł
Wiring diagram: Finisher 8 wiring diagram on page 2479
ł
Parts diagram: Finisher parts diagrams on page 1668
ł
Replace SN200: Sensors on page 788
ł
Replace A200: Finisher Main PCA (A200) on page 859
Links
ENWW
Event Log error and warning codes 2095
A3.0212
Description
ł
Finisher Right Side Panel sensor (SN216) failed connect test
Primary root causes
ł
SN216
ł
Finisher right-side door latch and hinges
ł
Wire harness between SN216 and the Finisher Main PCA (A200)
ł
A200
Recommended actions
1.
Open the Finisher Paper Path diagnostic page, and then test SN216.
2.
Check the Finisher right-side door latch and hinges.
3.
Check the wire harness between SN216 and A200.
4.
Check the voltage at SN216: 5 Vdc at pins 2A to 1A and 3.3 Vdc at pins 3A to 1A on W211P1W201J211.
5.
Replace A200.
ł
Diagnostic page: Click Subsystems, click Finisher, and then click Finisher Paper Path.
ł
Component locator: Finisher component locator on page 1668
ł
Wiring diagram: Finisher 6 wiring diagram on page 2478
ł
Parts diagram: Finisher parts diagrams on page 1668
ł
Replace SN216: Sensors on page 788
ł
Replace A200: Finisher Main PCA (A200) on page 859
Links
2096 Appendix A Event Log codes
ENWW
A3.0213
Description
ł
Finisher Handle 1 Front sensor (SN206) failed connect test
Primary root causes
ł
SN206
ł
Finisher right-side door latch and hinges
ł
Wire harness between SN206 and the Finisher Main PCA (A200)
ł
A200
Recommended actions
1.
Open the Finisher Paper Path diagnostic page, and then test SN206.
2.
Check the Finisher right-side door latch and hinges.
3.
Check the wire harness between SN206 and A200.
4.
Replace A200.
ł
Diagnostic page: Click Subsystems, click Finisher, and then click Finisher Paper Path.
ł
Component locator: Finisher component locator on page 1668
ł
Wiring diagram: Finisher 5 wiring diagram on page 2477
ł
Parts diagram: Finisher parts diagrams on page 1668
ł
Replace SN206: Sensors on page 788
ł
Replace A200: Finisher Main PCA (A200) on page 859
Links
ENWW
Event Log error and warning codes 2097
A3.0214
Description
ł
Finisher Handle 1 Back sensor (SN202) failed connect test
Primary root causes
ł
SN202
ł
Finisher Door 2 latch and hinges
ł
Wire harness between SN202 and the Finisher Main PCA (A200)
ł
A200
Recommended actions
1.
Open the Finisher Paper Path diagnostic page, and then test SN202.
2.
Check the Finisher Door 2 latch and hinges.
3.
Check the wire harness between SN202 and A200.
4.
Check the voltage at SN202: 3.3 Vdc at pins 2 to 3 and 5.0 Vdc at pins 1 to 2 on W201P3-SN202.
5.
Replace A200.
ł
Diagnostic page: Click Subsystems, click Finisher, and then click Finisher Paper Path.
ł
Component locator: Finisher component locator on page 1668
ł
Wiring diagram: Finisher 8 wiring diagram on page 2479
ł
Parts diagram: Finisher parts diagrams on page 1668
ł
Replace SN202: Sensors on page 788
ł
Replace A200: Finisher Main PCA (A200) on page 859
Links
2098 Appendix A Event Log codes
ENWW
A3.0215
Description
ł
Finisher Handle 3 sensor (SN222) failed connect test
Primary root causes
ł
SN222
ł
Finisher Door 4 latch and hinges
ł
Wire harness between SN222 and the Finisher Main PCA (A200)
ł
A200
Recommended actions
1.
Open the Finisher Paper Path diagnostic page, and then test SN222.
2.
Check the Finisher Door 4 latch and hinges.
3.
Check the wire harness between SN222 and A200.
4.
Check the voltage at SN222: 5 Vdc pins 5B to 6B and 3.3 Vdc 4B to 6B on W221P1-W201J221.
5.
Replace A200.
ł
Diagnostic page: Click Subsystems, click Finisher, and then click Finisher Paper Path.
ł
Component locator: Finisher component locator on page 1668
ł
Wiring diagram: Finisher 7 wiring diagram on page 2478
ł
Parts diagram: Finisher parts diagrams on page 1668
ł
Replace SN222: Sensors on page 788
ł
Replace A200: Finisher Main PCA (A200) on page 859
Links
ENWW
Event Log error and warning codes 2099
A3.0220
Description
ł
Accumulator Open sensor (SN255) failed
Primary root causes
ł
Accumulator door mechanical linkage
ł
Accumulator Open motor (M256)
ł
Accumulator Open Motor encoder (EN256)
ł
SN255
ł
Wire harness between SN255 and the Finisher Main PCA (A200)
ł
Wire harness between M256, EN256, the Accumulator Distribution PCA (A240) and A200
ł
A240
ł
A200
Recommended actions
1.
Open the Finisher Accumulator diagnostic page, and then test SN255.
2.
Check the accumulator door mechanical linkage for damage.
3.
Check the wire harness between SN255 and A200.
4.
Check the voltage at SN255: 3.3 Vdc at pins 1 to 2 and 3 to 2 on W251P10-SN255.
5.
Run M256.
6.
Run M256 and verify that the EN256 count changes.
7.
Check the wire harness between M256, EN256, A240, and A200.
8.
Check the voltage at M256: 33 Vdc at pins 1 to 2 on the motor connector
9.
Check the voltage at EN256: 3.3 Vdc at pins 3 to 4 and 0 Vdc at pin 5 to 4 on W251P9-EN256
10. Replace A200.
11. Replace A240.
Links
ł
Diagnostic page: Click Subsystems, click Finisher, and then click Finisher Accumulator.
ł
Component locator: Finisher component locator on page 1668
ł
Wiring diagram: Finisher 10 wiring diagram on page 2480
ł
Parts diagram: Finisher parts diagrams on page 1668
ł
Replace SN255: Sensors on page 788
2100 Appendix A Event Log codes
ENWW
ENWW
ł
Replace A200: Finisher Main PCA (A200) on page 859
ł
M243: A3.0124 on page 2064
Event Log error and warning codes 2101
A3.0226
Description
ł
Accumulator Open sensor (SN255) failed connect test
Primary root causes
ł
SN255
ł
Accumulator door mechanical linkage
ł
Wire harness between SN255 and the Finisher Main PCA (A200)
ł
A200
Recommended actions
1.
Open the Finisher Accumulator diagnostic page, and then test SN255.
2.
Check the accumulator door mechanical linkage.
3.
Check the wire harness between SN255 and A200.
4.
Check the voltage at SN255: 3.3 Vdc at pins 1 to 2 and 3 to 2 on W251P10-SN255.
5.
Replace A200.
ł
Diagnostic page: Click Subsystems, click Finisher, and then click Finisher Accumulator.
ł
Component locator: Finisher component locator on page 1668
ł
Wiring diagram: Finisher 10 wiring diagram on page 2480
ł
Parts diagram: Finisher parts diagrams on page 1668
ł
Replace SN255: Sensors on page 788
ł
Replace A200: Finisher Main PCA (A200) on page 859
Links
2102 Appendix A Event Log codes
ENWW
A3.0227
Description
ł
Accumulator Closed switch (SW256) failed
Primary root causes
ł
SW256
ł
Accumulator door mechanism
ł
Wire harness between SW256 and the Finisher Main PCA (A200)
ł
Accumulator Open motor (M256)
ł
Accumulator Open Motor encoder (EN256)
ł
Wire harness between M256, EN256, the Accumulator Distribution PCA (A240) and A200
ł
A240
ł
A200
Recommended actions
1.
Open the Finisher Accumulator diagnostic page, and then test SW256.
2.
Check the accumulator door mechanism for damage.
3.
Check the wire harness between SW256 and A200.
4.
Check the voltage at SW256: 33 Vdc between W251P4 and W251P5 and 5.0 Vdc between
W251P12 and W251P11.
5.
Run M256.
6.
Run M256 and verify that the EN256 count changes.
7.
Check the wire harness between M256, EN256, A240, and A200.
8.
Check the voltage at M256: 33 Vdc at pins 1 to 2 on the motor connector
9.
Check the voltage at EN256: 3.3 Vdc at pins 3 to 4 and 0 Vdc at pin 5 to 4 on W251P9-EN256
10. Replace A200.
11. Replace A240.
Links
ENWW
ł
Diagnostic page: Click Subsystems, click Finisher, and then click Finisher Accumulator.
ł
Component locator: Finisher component locator on page 1668
ł
Wiring diagram: Finisher 10 wiring diagram on page 2480
ł
Parts diagram: Finisher parts diagrams on page 1668
Event Log error and warning codes 2103
ł
Replace SW256: Switches on page 849
ł
Replace A200: Finisher Main PCA (A200) on page 859
2104 Appendix A Event Log codes
ENWW
A3.0232
Description
ł
Stapler 2 Guard Position 1 sensor (SN280) failed
Primary root causes
ł
SN280
ł
Stapler 1 assembly
ł
Wire harness between SN280 and the Finisher Main PCA (A200)
ł
A200
Recommended actions
1.
Open the Finisher Stapler diagnostic page, and then test SN280.
2.
Check the mechanical pivot link in the Stapler 1 assembly.
3.
Check the wire harness between SN280 and A200.
4.
Check the voltage at SN280: 3.3 Vdc at pins 7B to 9B on W270J280-W280P1.
5.
Replace A200.
ł
Diagnostic page: Click Subsystems, click Finisher, and then click Finisher Stapler.
ł
Component locator: Finisher component locator on page 1668
ł
Wiring diagram: Finisher 1 wiring diagram on page 2474
ł
Parts diagram: Finisher parts diagrams on page 1668
ł
Replace SN280: Sensors on page 788
ł
Replace A200: Finisher Main PCA (A200) on page 859
Links
ENWW
Event Log error and warning codes 2105
A3.0233
Description
ł
Stapler 2 Guard Position 2 sensor (SN281) failed
Primary root causes
ł
SN281
ł
Stapler 1 assembly
ł
Wire harness between SN281 and the Finisher Main PCA (A200)
ł
A200
Recommended actions
1.
Open the Finisher Stapler diagnostic page, and then test SN281.
2.
Check the mechanical pivot link in the Stapler 1 assembly.
3.
Check the wire harness between SN281 and A200.
4.
Check the voltage at SN281: 3.3 Vdc at pins 8B to 9B on W270J280-W280P1.
5.
Replace A200.
ł
Diagnostic page: Click Subsystems, click Finisher, and then click Finisher Stapler.
ł
Component locator: Finisher component locator on page 1668
ł
Wiring diagram: Finisher 1 wiring diagram on page 2474
ł
Parts diagram: Finisher parts diagrams on page 1668
ł
Replace SN281: Sensors on page 788
ł
Replace A200: Finisher Main PCA (A200) on page 859
Links
2106 Appendix A Event Log codes
ENWW
A3.0240
Description
ł
Finisher Job Separator Lower Limit sensor (SN260) failed test
Primary root causes
ł
SN260
ł
Wire harness between SN260 and the Finisher Main PCA (A200)
ł
A200
Recommended actions
1.
Open the Finisher Separator diagnostic page, and then test SN260.
2.
Check the wire harness between SN260 and A200.
3.
Check the voltage at SN260: 3.3 Vdc at pins 3B to 1B and 2B to 1B on W263P1-W260J263.
4.
Replace A200.
ł
Diagnostic page: Click Subsystems, click Finisher, and then click Finisher Separator.
ł
Component locator: Finisher component locator on page 1668
ł
Wiring diagram: Finisher 2 wiring diagram on page 2475
ł
Parts diagram: Finisher parts diagrams on page 1668
ł
Replace SN260: Sensors on page 788
ł
Replace A200: Finisher Main PCA (A200) on page 859
Links
ENWW
Event Log error and warning codes 2107
A3.0241
Description
ł
Separator does not move down when full
Primary root causes
ł
Finisher Job Separator Stack Height sensor (SN267)
ł
Wire harness between SN267 and the Finisher Main PCA (A200)
ł
A200
Recommended actions
1.
Clean SN267, and then verify that it is correctly seated.
2.
Open the Finisher Separator diagnostic page, and then test SN267.
3.
Check the wire harness between SN267 and A200.
4.
Replace A200.
ł
Diagnostic page: Click Subsystems, click Finisher, and then click Finisher Separator.
ł
Component locator: Finisher component locator on page 1668
ł
Wiring diagram: Finisher 3 wiring diagram on page 2476
ł
Parts diagram: Finisher parts diagrams on page 1668
ł
Replace SN267: Sensors on page 788
ł
Replace A200: Finisher Main PCA (A200) on page 859
Links
2108 Appendix A Event Log codes
ENWW
A3.0242
Description
ł
Problem with the Finisher Separator safety sensors
Primary root causes
ł
Finisher Separator Safety 1 sensor (SW261)
ł
Finisher Separator Safety 2 sensor (SW264)
ł
Mechanical binding in the separator assembly or safety assembly
ł
Wire harness between SW261, SW264, and the Finisher Main PCA (A200)
ł
A200
Recommended actions
1.
Check the Event Log for the following codes: A3.0241 and A3.0142. Follow the troubleshooting
procedures for the code.
2.
Open the Finisher Separator diagnostic page, and then test SW261 and SW264.
3.
Verify that the separator assembly and the safety assembly are functioning correctly.
4.
Check the wire harness between SW261, SW264, and A200.
5.
Replace A200.
Additional root causes
ł
Finisher Separator Drive motor (M260)
ł
Diagnostic page: Click Subsystems, click Finisher, and then click Finisher Separator.
ł
Component locator: Finisher component locator on page 1668
ł
Wiring diagram: Finisher 2 wiring diagram on page 2475
ł
Parts diagram: Finisher parts diagrams on page 1668
ł
Replace SW261: Sensors on page 788
ł
Replace SW264: Sensors on page 788
ł
Replace A200: Finisher Main PCA (A200) on page 859
ł
M260: A3.0142 on page 2070
Links
ENWW
Event Log error and warning codes 2109
A3.0243
Description
ł
Finisher Job Separator Gate Open sensor (SN262) sensor connect test
Primary root causes
ł
SN262
ł
Wire harness between SN262 and the Finisher Main PCA (A200)
ł
A200
Recommended actions
1.
Open the Finisher Separator diagnostic page, and then test SN262.
2.
Check the wire harness between SN262 and the A200.
3.
Test the voltage at SN262: 3.3 Vdc at pins 3A to 1A and 2A to 1A on W267P1-W260J267.
4.
Replace A200.
ł
Diagnostic page: Click Subsystems, click Finisher, and then click Finisher Separator.
ł
Component locator: Finisher component locator on page 1668
ł
Wiring diagram: Finisher 3 wiring diagram on page 2476
ł
Parts diagram: Finisher parts diagrams on page 1668
ł
Replace SN262: Sensors on page 788
ł
Replace A200: Finisher Main PCA (A200) on page 859
Links
2110 Appendix A Event Log codes
ENWW
A3.0244
Description
ł
Finisher Job Separator Offset Back sensor (SN265) sensor connect test
Primary root causes
ł
SN265
ł
Wire harness between SN265 and the Finisher Main PCA (A200)
ł
A200
Recommended actions
1.
Open the Finisher Separator diagnostic page, and then test SN265.
2.
Check the wire harness between SN265 and the A200.
3.
Test the voltage at SN265: 3.3 Vdc at pins 6B to 8B and 7B to 8B on W267P1-W260J267.
4.
Replace A200.
ł
Diagnostic page: Click Subsystems, click Finisher, and then click Finisher Separator.
ł
Component locator: Finisher component locator on page 1668
ł
Wiring diagram: Finisher 3 wiring diagram on page 2476
ł
Parts diagram: Finisher parts diagrams on page 1668
ł
Replace SN265: Sensors on page 788
ł
Replace A200: Finisher Main PCA (A200) on page 859
Links
ENWW
Event Log error and warning codes 2111
A3.0260
Description
ł
Finisher Lower Elevator Stack Height sensor (SN257) failed
Primary root causes
ł
SN257
ł
Wire harness between SN257 and the Finisher Main PCA (A200)
ł
A200
Recommended actions
1.
Verify that there is no light shining on SN257.
2.
Open the Finisher Lower Elevator diagnostic page, and then test SN257.
3.
Check the wire harness between SN257 and A200.
4.
Check the voltage at SN257: 5.0 Vdc at pins 1 to 3 and 3.3 Vdc at pins 2 to 3 on W251P6-SN257.
5.
Replace A200.
ł
Diagnostic page: Click Subsystems, click Finisher, and then click Finisher Lower Elevator.
ł
Component locator: Finisher component locator on page 1668
ł
Wiring diagram: Finisher 10 wiring diagram on page 2480
ł
Parts diagram: Finisher parts diagrams on page 1668
ł
Replace SN257: Sensors on page 788
ł
Replace A200: Finisher Main PCA (A200) on page 859
Links
2112 Appendix A Event Log codes
ENWW
A3.0261
Description
ł
Finisher Lower Elevator Paper Present sensor (SN258) failed
Primary root causes
ł
SN258
ł
Wire harness between SN258 and the Finisher Main PCA (A200)
ł
A200
Recommended actions
1.
Verify that there is no light shining on SN258.
2.
Open the Finisher Lower Elevator diagnostic page, and then test SN258.
3.
Check the wire harness between SN258 and A200.
4.
Check the voltage at SN258: 5.0 Vdc at pins 1 to 3 and 3.3 Vdc at pins 2 to 3 on W252P1-SN258.
5.
Replace A200.
ł
Diagnostic page: Click Subsystems, click Finisher, and then click Finisher Lower Elevator.
ł
Component locator: Finisher component locator on page 1668
ł
Wiring diagram: Finisher 4 wiring diagram on page 2476
ł
Parts diagram: Finisher parts diagrams on page 1668
ł
Replace SN258: Sensors on page 788
ł
Replace A200: Finisher Main PCA (A200) on page 859
Links
ENWW
Event Log error and warning codes 2113
A3.0263
Description
ł
Finisher Job Support Pivot Position 1 sensor (SN253) failed
Primary root causes
ł
SN253
ł
Finisher job support arm assembly
ł
Wire harness between SN253 and the Finisher Main PCA (A200)
ł
A200
Recommended actions
1.
Open the Finisher Lower Elevator diagnostic page, and then run Finisher Job Support Arm motor
(M253) and verify that SN253 activates.
2.
Check the Finisher job support arm assembly for binding and damage.
3.
Check the wire harness between SN253 and A200.
4.
Test the voltage at SN253: 3.3 Vdc at pins 2 to 4, 3 to 4 on W251P8-A253.
5.
Replace A200.
ł
Diagnostic page: Click Subsystems, click Finisher, and then click Finisher Lower Elevator.
ł
Component locator: Finisher component locator on page 1668
ł
Wiring diagram: Finisher 3 wiring diagram on page 2476
ł
Parts diagram: Finisher parts diagrams on page 1668
ł
Replace SN253: Sensors on page 788
ł
Replace A200: Finisher Main PCA (A200) on page 859
Links
2114 Appendix A Event Log codes
ENWW
A3.0264
Description
ł
Finisher Job Support Pivot Position 2 sensor (SN254) failed
Primary root causes
ł
SN254
ł
Finisher job support arm assembly
ł
Wire harness between SN254 and the Finisher Main PCA (A200)
ł
A200
Recommended actions
1.
Open the Finisher Lower Elevator diagnostic page, and then run Finisher Job Support Arm motor
(M253) and verify that SN254 activates.
2.
Check the Finisher job support arm assembly for binding and damage.
3.
Check the wire harness between SN254 and A200.
4.
Test the voltage at SN254: 3.3 Vdc at pins 2 to 4, 3 to 4 on W251P8-A253.
5.
Replace A200.
ł
Diagnostic page: Click Subsystems, click Finisher, and then click Finisher Lower Elevator.
ł
Component locator: Finisher component locator on page 1668
ł
Wiring diagram: Finisher 3 wiring diagram on page 2476
ł
Parts diagram: Finisher parts diagrams on page 1668
ł
Replace SN254: Sensors on page 788
ł
Replace A200: Finisher Main PCA (A200) on page 859
Links
ENWW
Event Log error and warning codes 2115
A3.02A0
Description
ł
Accumulator Guide sensor (SN243) late
Primary root causes
ł
SN243
ł
Wire harness between SN243 and the Finisher Main PCA (A200)
ł
Accumulator guide bar assembly
ł
Accumulator Distribution PCA (A240)
ł
A200
Recommended actions
1.
Open the Finisher Accumulator diagnostic page, and then test SN243.
2.
Check the accumulator guide bar assembly for damage.
3.
Check the wire harness between SN243 and A200.
4.
Check the voltage at SN243: 5.0 Vdc at pins 1 to 3 and 3.3 Vdc at pins 2 to 3 on the sensor
connector.
5.
Replace A200.
6.
Replace A240.
Additional root causes
ł
Accumulator Guide Bar motor (M243)
ł
Diagnostic page: Click Subsystems, click Finisher, and then click Finisher Accumulator.
ł
Component locator: Finisher component locator on page 1668
ł
Wiring diagram: Finisher 9 wiring diagram on page 2479
ł
Parts diagram: Finisher parts diagrams on page 1668
ł
Replace SN243: Sensors on page 788
ł
Replace A200: Finisher Main PCA (A200) on page 859
ł
Replace A240: Accumulator Distribution PCA (A240) on page 778
ł
M243: A3.0124 on page 2064
Links
2116 Appendix A Event Log codes
ENWW
A3.02A1
Description
ł
Accumulator Guide Bar Home sensor (SN245) late
Primary root causes
ł
SN245
ł
Wire harness between SN245 and the Finisher Main PCA (A200)
ł
Accumulator guide bar assembly
ł
Accumulator Distribution PCA (A240)
ł
A200
Recommended actions
1.
Open the Finisher Accumulator diagnostic page, and then test SN245.
2.
Check the accumulator guide bar assembly for damage.
3.
Check the wire harness between SN245 and A200.
4.
Check the voltage at SN245: 5.0 Vdc at pins 1 to 3 and 3.3 Vdc at pins 2 to 3 on the sensor
connector.
5.
Replace A200.
6.
Replace A240.
Additional root causes
ł
Accumulator Guide Bar motor (M243)
ł
Diagnostic page: Click Subsystems, click Finisher, and then click Finisher Accumulator.
ł
Component locator: Finisher component locator on page 1668
ł
Wiring diagram: Finisher 9 wiring diagram on page 2479
ł
Parts diagram: Finisher parts diagrams on page 1668
ł
Replace SN245: Sensors on page 788
ł
Replace A200: Finisher Main PCA (A200) on page 859
ł
Replace A240: Accumulator Distribution PCA (A240) on page 778
ł
M243: A3.0124 on page 2064
Links
ENWW
Event Log error and warning codes 2117
A3.02A2
Description
ł
Accumulator Retainer Finger Shaft sensor (SN244) is late
Primary root causes
ł
SN244
ł
Drive gear assembly
ł
Wire harness between SN244 and the Finisher Main PCA (A200)
ł
Retainer finger shaft assembly
ł
A200
Recommended actions
1.
Remove any obstruction from the accumulator.
2.
Open the Finisher Accumulator diagnostic page, and then run the Accumulator Retainer Finger
motor (M246) in order to test SN244.
3.
Check the wire harness between SN244 and A200.
4.
Check the voltage at SN244: 5.0 Vdc at pins 1 to 3 and 3.3 Vdc at pins 2 to 3 on the sensor
connector.
5.
Replace A200.
Additional root causes
ł
M246
ł
Diagnostic page: Click Subsystems, click Finisher, and then click Finisher Accumulator.
ł
Component locator: Finisher component locator on page 1668
ł
Wiring diagram: Finisher 9 wiring diagram on page 2479
ł
Parts diagram: Finisher parts diagrams on page 1668
ł
Replace SN244: Sensors on page 788
ł
Replace A200: Finisher Main PCA (A200) on page 859
ł
M246: A3.0126 on page 2066
Links
2118 Appendix A Event Log codes
ENWW
A3.02A3
Description
ł
Accumulator Job Height sensor (SN240) late
Primary root causes
ł
SN240
ł
Accumulator springs
ł
Bearing bracket assembly and drive gear
ł
Wire harness between SN240 and the Finisher Main PCA (A200)
ł
A200
Recommended actions
1.
Open the Finisher Accumulator diagnostic page, and then test SN240.
2.
Check the SN240 actuator, springs, and drive gear.
3.
Check the wire harness between SN240 and A200.
4.
Check the voltage at SN240: 5.0 Vdc at pins 1 to 3 and 3.3 Vdc at pins 2 to 3 on the sensor
connector.
5.
Replace A200.
Additional root causes
ł
Accumulator Bearing Bracket motor (M242)
ł
Accumulator Bearing Bracket Home sensor (SN248)
ł
Diagnostic page: Click Subsystems, click Finisher, and then click Finisher Accumulator.
ł
Component locator: Finisher component locator on page 1668
ł
Wiring diagram: Finisher 9 wiring diagram on page 2479
ł
Parts diagram: Finisher parts diagrams on page 1668
ł
Replace SN240: Sensors on page 788
ł
Replace A200: Finisher Main PCA (A200) on page 859
ł
M242: A3.0125 on page 2065
ł
SN248: A3.02A5 on page 2121
Links
ENWW
Event Log error and warning codes 2119
A3.02A4
Description
ł
Accumulator Wheel sensor (SN241) late
Primary root causes
ł
Accumulator wheel
ł
SN241
ł
Accumulator springs
ł
Bearing bracket assembly and drive gear
ł
Wire harness between SN241 and the Finisher Main PCA (A200)
ł
A200
Recommended actions
1.
Verify that the accumulator wheel has free movement.
2.
Open the Finisher Accumulator diagnostic page, and then test SN241.
3.
Check the SN241 actuator, springs, and drive gear.
4.
Check the wire harness between SN241 and A200.
5.
Check the voltage at SN241: 5.0 Vdc at pins 1 to 3 and 3.3 Vdc at pins 2 to 3 on the sensor
connector.
6.
Replace A200.
Additional root causes
ł
Accumulator Bearing Bracket motor (M242)
ł
Diagnostic page: Click Subsystems, click Finisher, and then click Finisher Accumulator.
ł
Component locator: Finisher component locator on page 1668
ł
Wiring diagram: Finisher 9 wiring diagram on page 2479
ł
Parts diagram: Finisher parts diagrams on page 1668
ł
Replace SN241: Sensors on page 788
ł
Replace A200: Finisher Main PCA (A200) on page 859
ł
M242: A3.0125 on page 2065
Links
2120 Appendix A Event Log codes
ENWW
A3.02A5
Description
ł
Accumulator Bearing Bracket Home sensor (SN248) late
Primary root causes
ł
SN248
ł
Accumulator springs
ł
Bearing bracket bushing
ł
Bearing bracket assembly and drive gear
ł
Wire harness between SN248 and the Finisher Main PCA (A200)
ł
A200
Recommended actions
1.
Open the Finisher Accumulator diagnostic page, and then test SN248.
2.
Check the SN248 actuator, springs, and drive gear.
3.
Check the wire harness between SN248 and A200.
4.
Verify that flat section on the bearing bracket bushing is correctly aligned with the flat section on
the accumulator.
5.
Check the voltage at SN248: 5.0 Vdc at pins 1 to 3 and 3.3 Vdc at pins 2 to 3 on the sensor
connector.
6.
Replace A200.
Additional root causes
ł
Accumulator Bearing Bracket motor (M242)
ł
Accumulator Job Height sensor (SN240)
ł
Diagnostic page: Click Subsystems, click Finisher, and then click Finisher Accumulator.
ł
Component locator: Finisher component locator on page 1668
ł
Wiring diagram: Finisher 9 wiring diagram on page 2479
ł
Parts diagram: Finisher parts diagrams on page 1668
ł
Replace SN248: Sensors on page 788
ł
Replace A200: Finisher Main PCA (A200) on page 859
ł
M242: A3.0125 on page 2065
ł
SN240: A3.02A3 on page 2119
Links
ENWW
Event Log error and warning codes 2121
A3.02A6
Description
ł
Accumulator Entry sensor (SN246) activated too long
Primary root causes
ł
SN246
ł
Wire harness between SN246 and the Finisher Main PCA (A200)
ł
A200
Recommended actions
1.
Check the sensor actuator for damage.
2.
Open the Finisher Accumulator diagnostic page, and then test SN246.
3.
Check the wire harness between SN246 and A200.
4.
Check the voltage at SN246: 5.0 Vdc at pins 1 to 3 and 3.3 Vdc at pins 2 to 3 on the sensor
connector.
5.
Replace A200.
ł
Diagnostic page: Click Subsystems, click Finisher, and then click Finisher Accumulator.
ł
Component locator: Finisher component locator on page 1668
ł
Wiring diagram: Finisher 9 wiring diagram on page 2479
ł
Parts diagram: Finisher parts diagrams on page 1668
ł
Replace SN246: Sensors on page 788
ł
Replace A200: Finisher Main PCA (A200) on page 859
Links
2122 Appendix A Event Log codes
ENWW
A3.02A7
Description
ł
Stapler 1 Pivot Position 1 sensor (SN271) failed
Primary root causes
ł
SN271
ł
Stapler 1 assembly
ł
Wire harness between SN271 and the Finisher Main PCA (A200)
ł
A200
Recommended actions
1.
Open the Finisher Stapler diagnostic page, and then run the Stapler 1 motor (M272) and verify that
SN271 activates.
2.
Check the mechanical pivot link in the Stapler 1 assembly.
3.
Check the wire harness between SN271 and A200.
4.
Check the voltage at SN271: 3.3 Vdc at pins 7B to 9B on W270J271-W271P1.
5.
Replace A200.
ł
Diagnostic page: Click Subsystems, click Finisher, and then click Finisher Stapler.
ł
Component locator: Finisher component locator on page 1668
ł
Wiring diagram: Finisher 1 wiring diagram on page 2474
ł
Parts diagram: Finisher parts diagrams on page 1668
ł
Replace SN271: Sensors on page 788
ł
Replace A200: Finisher Main PCA (A200) on page 859
Links
ENWW
Event Log error and warning codes 2123
A3.02A8
Description
ł
Stapler 1 Pivot Position 2 sensor (SN272) failed
Primary root causes
ł
SN272
ł
Stapler 1 assembly
ł
Wire harness between SN272 and the Finisher Main PCA (A200)
ł
A200
Recommended actions
1.
Open the Finisher Stapler diagnostic page, and then run the Stapler 1 motor (M272) and verify that
SN272 activates.
2.
Check the mechanical pivot link in the Stapler 1 assembly.
3.
Check the wire harness between SN272 and A200.
4.
Check the voltage at SN272: 3.3 Vdc at pins 8B to 9B on W270J271-W271P1.
5.
Replace A200.
ł
Diagnostic page: Click Subsystems, click Finisher, and then click Finisher Stapler.
ł
Component locator: Finisher component locator on page 1668
ł
Wiring diagram: Finisher 1 wiring diagram on page 2474
ł
Parts diagram: Finisher parts diagrams on page 1668
ł
Replace SN272: Sensors on page 788
ł
Replace A200: Finisher Main PCA (A200) on page 859
Links
2124 Appendix A Event Log codes
ENWW
A3.02A9
Description
ł
Finisher Stack Holder sensor (SN252) failed
Primary root causes
ł
Stack holder tab
ł
SN252
ł
Finisher Stack Holder motor (M252)
ł
Stack holder assembly
ł
Wire harness between SN252 and the Finisher Main PCA (A200)
ł
A200
Recommended actions
1.
Check the stack holder tab for damage.
2.
Open the Finisher Lower Elevator diagnostic page, and then run M252 and verify that SN252
activates.
3.
Run M252 and verify that the SN252 count changes and that there is no binding.
4.
Check the wire harness between SN252 and A200.
5.
Check the voltage at SN252: 5.0 Vdc at pins 1 to 3 and 3.3 Vdc at pins 2 to 3 on W252P3-SN252.
6.
Replace A200.
ł
Diagnostic page: Click Subsystems, click Finisher, and then click Finisher Lower Elevator.
ł
Component locator: Finisher component locator on page 1668
ł
Wiring diagram: Finisher 4 wiring diagram on page 2476
ł
Parts diagram: Finisher parts diagrams on page 1668
ł
Replace SN252: Sensors on page 788
ł
Replace A200: Finisher Main PCA (A200) on page 859
Links
ENWW
Event Log error and warning codes 2125
A3.0301
Description
ł
Finisher Diverter solenoid (SOL211) failed connectivity test
Primary root causes
ł
SOL211
ł
Wire harness between SOL211 and the Finisher Main PCA (A200)
ł
A200
Recommended actions
1.
Open the Finisher Paper Path diagnostic page, and then activate SOL211. If the error is reported
intermittently, cycle SOL211 and listen for a constant rhythm.
2.
Check the Finisher top door and hinges for correct operation and alignment.
3.
Check the wire harness between SOL211 and A200.
4.
Check the voltage at SOL211: 33.0 Vdc at pins 2 to 1 on the solenoid connector.
5.
Replace A200.
ł
Diagnostic page: Click Subsystems, click Finisher, and then click Finisher Paper Path.
ł
Component locator: Finisher component locator on page 1668
ł
Wiring diagram: Finisher 5 wiring diagram on page 2477
ł
Parts diagram: Finisher parts diagrams on page 1668
ł
Replace SOL211: Finisher Diverter solenoid (SOL211) on page 857
ł
Replace A200: Finisher Main PCA (A200) on page 859
Links
2126 Appendix A Event Log codes
ENWW
A3.06A0
Description
ł
Finisher Right-Side Panel LED (LED201) failure
Primary root causes
ł
LED201
ł
Wire harness between LED201 and the Finisher Main PCA (A200)
ł
A200
Recommended actions
1.
Open the Finisher Paper Path diagnostic page, and then activate LED201.
2.
Check the wire harness between LED201 and A200.
3.
Replace LED201.
4.
Replace A200.
ł
Diagnostic page: Click Subsystems, click Finisher, and then click Finisher Paper Path.
ł
Component locator: Finisher component locator on page 1668
ł
Wiring diagram: Finisher 8 wiring diagram on page 2479
ł
Parts diagram: Finisher parts diagrams on page 1668
ł
Replace LED201: LEDs on page 846
ł
Replace A200: Finisher Main PCA (A200) on page 859
Links
ENWW
Event Log error and warning codes 2127
A3.06A1
Description
ł
Finisher Top-Door LED (LED205) failure
Primary root causes
ł
LED205
ł
Wire harness between LED205 and the Finisher Main PCA (A200)
ł
A200
Recommended actions
1.
Open the Finisher Paper Path diagnostic page, and then activate LED205.
2.
Check the wire harness between LED205 and A200.
3.
Replace LED205.
4.
Replace A200.
ł
Diagnostic page: Click Subsystems, click Finisher, and then click Finisher Paper Path.
ł
Component locator: Finisher component locator on page 1668
ł
Wiring diagram: Finisher 5 wiring diagram on page 2477
ł
Parts diagram: Finisher parts diagrams on page 1668
ł
Replace LED205: LEDs on page 846
ł
Replace A200: Finisher Main PCA (A200) on page 859
Links
2128 Appendix A Event Log codes
ENWW
A3.06A2
Description
ł
Finisher Handle 1 LED (LED234) failure
Primary root causes
ł
LED234
ł
Wire harness between LED234 and the Finisher Main PCA (A200)
ł
A200
Recommended actions
1.
Open the Finisher Paper Path diagnostic page, and then activate LED234.
2.
Check the wire harness between LED234 and A200.
3.
Replace LED234.
4.
Replace A200.
ł
Diagnostic page: Click Subsystems, click Finisher, and then click Finisher Paper Path.
ł
Component locator: Finisher component locator on page 1668
ł
Wiring diagram: Finisher 8 wiring diagram on page 2479
ł
Parts diagram: Finisher parts diagrams on page 1668
ł
Replace LED234: LEDs on page 846
ł
Replace A200: Finisher Main PCA (A200) on page 859
Links
ENWW
Event Log error and warning codes 2129
A3.06A3
Description
ł
Finisher Handle 2 LED (LED203) failure
Primary root causes
ł
LED203
ł
Wire harness between LED203 and the Finisher Main PCA (A200)
ł
A200
Recommended actions
1.
Open the Finisher Paper Path diagnostic page, and then activate LED203.
2.
Check the wire harness between LED203 and A200.
3.
Replace LED203.
4.
Replace A200.
ł
Diagnostic page: Click Subsystems, click Finisher, and then click Finisher Paper Path.
ł
Component locator: Finisher component locator on page 1668
ł
Wiring diagram: Finisher 5 wiring diagram on page 2477
ł
Parts diagram: Finisher parts diagrams on page 1668
ł
Replace LED203: LEDs on page 846
ł
Replace A200: Finisher Main PCA (A200) on page 859
Links
2130 Appendix A Event Log codes
ENWW
A3.06A4
Description
ł
Finisher Handle 3 LED (LED223) failure
Primary root causes
ł
LED223
ł
Wire harness between LED223 and the Finisher Main PCA (A200)
ł
A200
Recommended actions
1.
Open the Finisher Paper Path diagnostic page, and then activate LED223.
2.
Check the wire harness between LED223 and A200.
3.
Replace LED223.
4.
Replace A200.
ł
Diagnostic page: Click Subsystems, click Finisher, and then click Finisher Paper Path.
ł
Component locator: Finisher component locator on page 1668
ł
Wiring diagram: Finisher 7 wiring diagram on page 2478
ł
Parts diagram: Finisher parts diagrams on page 1668
ł
Replace LED223: LEDs on page 846
ł
Replace A200: Finisher Main PCA (A200) on page 859
Links
ENWW
Event Log error and warning codes 2131
A3.06A6
Description
ł
Finisher Latch LED (LED204) failure
Primary root causes
ł
LED204
ł
Wire harness between LED204 and the Finisher Main PCA (A200)
ł
A200
Recommended actions
1.
Open the Finisher Paper Path diagnostic page, and then activate LED204.
2.
Check the wire harness between LED204 and A200.
3.
Replace LED204.
4.
Replace A200.
ł
Diagnostic page: Click Subsystems, click Finisher, and then click Finisher Paper Path.
ł
Component locator: Finisher component locator on page 1668
ł
Wiring diagram: Finisher 5 wiring diagram on page 2477
ł
Parts diagram: Finisher parts diagrams on page 1668
ł
Replace LED204: LEDs on page 846
ł
Replace A200: Finisher Main PCA (A200) on page 859
Links
2132 Appendix A Event Log codes
ENWW
A3.0702
Description
ł
No communication between the Finisher Main PCA (A200) and the formatter
Primary root causes
ł
Wire harness between A200 and the formatter
ł
A200
Recommended actions
1.
Verify that the power LEDs on A200 are lit.
2.
Test the voltage at each of the test points on A200.
3.
Check the wire harness between the MFP formatter and the MFP bulkhead.
4.
Replace the wire harness between A200 and the MFP.
5.
Replace A200.
ł
Component locator: Finisher component locator on page 1668
ł
Wiring diagram: Finisher Main PCA (A200) diagram on page 2481
ł
Parts diagram: Finisher parts diagrams on page 1668
ł
Replace A200: Finisher Main PCA (A200) on page 859
Links
ENWW
Event Log error and warning codes 2133
A3.0703
Description
ł
Finisher Main PCA (A200) motor driver 1 over temperature
Primary root causes
ł
A200
Recommended actions
1.
Open the Event Log and look for one of the following codes: A3.0140, A3.0141, A3.0142, A3.0143,
A3.0144, or A3.0301. Follow the troubleshooting procedures for the code.
2.
Replace A200.
Additional root causes
ł
Finisher Separator Drive motor (M260)
ł
Finisher Diverter solenoid (SOL211)
ł
Finisher Separator Offset motor (M264)
ł
Finisher Job Separator Gate motor (M262)
ł
Event Log: Click View Log and Troubleshoot.
ł
Component locator: Finisher component locator on page 1668
ł
Wiring diagram: Finisher Main PCA (A200) diagram on page 2481
ł
Parts diagram: Finisher parts diagrams on page 1668
ł
Replace A200: Finisher Main PCA (A200) on page 859
ł
M260: A3.0103 on page 2060
ł
SOL211: A3.0301 on page 2126
ł
M264:A3.01A9 on page 2072
ł
M262: A3.0141 on page 2068
Links
2134 Appendix A Event Log codes
ENWW
A3.0704
Description
ł
Finisher Main PCA (A200) motor driver 2 over temperature
Primary root causes
ł
A200
Recommended actions
1.
Open the Event Log and look for one of the following codes: A3.0140, A3.0142, or A3.0143. Follow
the troubleshooting procedures for the code.
2.
Replace A200.
Additional root causes
ł
Finisher Separator Drive motor (M260)
ł
Event Log: Click View Log and Troubleshoot.
ł
Component locator: Finisher component locator on page 1668
ł
Wiring diagram: Finisher Main PCA (A200) diagram on page 2481
ł
Parts diagram: Finisher parts diagrams on page 1668
ł
Replace A200: Finisher Main PCA (A200) on page 859
ł
M260: A3.0140 on page 2067
Links
ENWW
Event Log error and warning codes 2135
A3.0705
Description
ł
Finisher Main PCA (A200) motor driver 3 over temperature
Primary root causes
ł
A200
Recommended actions
1.
Open the Event Log and look for one of the following codes: A3.01E1, A3.01E2, A3.01C1 or
A3.01C2. Follow the troubleshooting procedures for the code.
2.
Replace A200.
Additional root causes
ł
Stapler 1 motor (M272)
ł
Stapler 2 motor (M281)
ł
Finisher Lower Elevator motor (M250)
ł
Event Log: Click View Log and Troubleshoot.
ł
Component locator: Finisher component locator on page 1668
ł
Wiring diagram: Finisher Main PCA (A200) diagram on page 2481
ł
Parts diagram: Finisher parts diagrams on page 1668
ł
Replace A200: Finisher Main PCA (A200) on page 859
ł
M272: A3.01C1 on page 2082
ł
M281: A3.01C2 on page 2083
ł
M250:Output Bin 5 is overloaded on page 1036
Links
2136 Appendix A Event Log codes
ENWW
A3.0706
Description
ł
Finisher Main PCA (A200) motor driver 4 over temperature
Primary root causes
ł
A200
Recommended actions
1.
Open the Event Log and look for one of the following codes: A3.0104, A3.0232 or A3.0233. Follow
the troubleshooting procedures for the code.
2.
Replace A200.
Additional root causes
ł
Finisher Lower Paper Path motor (M220)
ł
Stapler 2 Safety motor (M280)
ł
Event Log: Click View Log and Troubleshoot.
ł
Component locator: Finisher component locator on page 1668
ł
Wiring diagram: Finisher Main PCA (A200) diagram on page 2481
ł
Parts diagram: Finisher parts diagrams on page 1668
ł
Replace A200: Finisher Main PCA (A200) on page 859
ł
M220: A3.0104 on page 2061
ł
M280: A3.0232 on page 2105
Links
ENWW
Event Log error and warning codes 2137
A3.0707
Description
ł
Finisher Main PCA (A200) motor driver 5 over temperature
Primary root causes
ł
A200
Recommended actions
1.
Open the Event Log and look for one of the following codes: A3.0102, A3.0103, A3.01C1, A3.0229,
or A3.0230. Follow the troubleshooting procedures for the code.
2.
Replace A200.
Additional root causes
ł
Finisher Upper Paper Path motor (M230)
ł
Stapler 1 Rotate motor (M271)
ł
Event Log: Click View Log and Troubleshoot.
ł
Component locator: Finisher component locator on page 1668
ł
Wiring diagram: Finisher Main PCA (A200) diagram on page 2481
ł
Parts diagram: Finisher parts diagrams on page 1668
ł
Replace A200: Finisher Main PCA (A200) on page 859
ł
M230: A3.0102 on page 2059
ł
M271: A3.01C1 on page 2082
Links
2138 Appendix A Event Log codes
ENWW
A3.0708
Description
ł
Finisher Main PCA (A200) motor driver 6 over temperature
Primary root causes
ł
A200
Recommended actions
1.
Open the Event Log and look for one of the following codes: A3.0101 or A3.1360. Follow the
troubleshooting procedures for the code.
2.
Replace A200.
Additional root causes
ł
Finisher Input Paper Path motor (M210)
ł
Finisher Job Support Arm motor (M253)
ł
Event Log: Click View Log and Troubleshoot.
ł
Component locator: Finisher component locator on page 1668
ł
Wiring diagram: Finisher Main PCA (A200) diagram on page 2481
ł
Parts diagram: Finisher parts diagrams on page 1668
ł
Replace A200: Finisher Main PCA (A200) on page 859
ł
M210: A3.0101 on page 2058
ł
M253: A3.1360 on page 2162
Links
ENWW
Event Log error and warning codes 2139
A3.0709
Description
ł
Finisher Main PCA (A200) motor driver 7 over temperature
Primary root causes
ł
A200
Recommended actions
1.
Open the Event Log and look for one of the following codes: A3.0140, A3.0142, or A3.0143. Follow
the troubleshooting procedures for the code.
2.
Replace A200.
Additional root causes
ł
Finisher Separator Drive motor (M260)
ł
Event Log: Click View Log and Troubleshoot.
ł
Component locator: Finisher component locator on page 1668
ł
Wiring diagram: Finisher Main PCA (A200) diagram on page 2481
ł
Parts diagram: Finisher parts diagrams on page 1668
ł
Replace A200: Finisher Main PCA (A200) on page 859
ł
M260: A3.0140 on page 2067
Links
2140 Appendix A Event Log codes
ENWW
A3.0710
Description
ł
Finisher Main PCA (A200) motor driver 8 over temperature
Primary root causes
ł
A200
Recommended actions
1.
Open the Event Log and look for an A3.0227 error code. Follow the troubleshooting procedures
for the code.
2.
Replace A200.
ł
Event Log: Click View Log and Troubleshoot.
ł
Component locator: Finisher component locator on page 1668
ł
Wiring diagram: Finisher Main PCA (A200) diagram on page 2481
ł
Parts diagram: Finisher parts diagrams on page 1668
ł
Replace A200: Finisher Main PCA (A200) on page 859
Links
ENWW
Event Log error and warning codes 2141
A3.07A1
Description
ł
Finisher Main PCA (A200) 32 Vdc is out of specification
Primary root causes
ł
A200
Recommended actions
1.
Verify that the power and firmware heartbeat LEDs on A200 are lit.
2.
Verify that the voltage on each of the A200 test points is within specification.
3.
Replace A200.
ł
Event Log: Click View Log and Troubleshoot.
ł
Component locator: Finisher component locator on page 1668
ł
Wiring diagram: Finisher Main PCA (A200) diagram on page 2481
ł
Parts diagram: Finisher parts diagrams on page 1668
ł
Replace A200: Finisher Main PCA (A200) on page 859
Links
2142 Appendix A Event Log codes
ENWW
A3.07A2
Description
ł
Finisher Main PCA (A200) 3.3 Vdc is out of specification
Primary root causes
ł
A200
Recommended actions
1.
Verify that the power LEDs on A200 are lit.
2.
Verify that the voltage on each of the A200 test points is within specification.
3.
Replace A200.
ł
Event Log: Click View Log and Troubleshoot.
ł
Component locator: Finisher component locator on page 1668
ł
Wiring diagram: Finisher Main PCA (A200) diagram on page 2481
ł
Parts diagram: Finisher parts diagrams on page 1668
ł
Replace A200: Finisher Main PCA (A200) on page 859
Links
ENWW
Event Log error and warning codes 2143
A3.07A3
Description
ł
Finisher Main PCA (A200) 42 Vdc is out of specification
Primary root causes
ł
Accumulator Entry motor (M240)
ł
Accumulator Exit motor (M241)
ł
Wire harness between A200, M240, and M241
ł
A200
Recommended actions
1.
Verify that the 42 Vdc LED on A200 is lit.
2.
Test the voltage at the 42 Vdc test point on A200.
3.
Open the Finisher Accumulator diagnostic page, and then run M240 and M241.
4.
Perform the stepper motor checkout procedure.
5.
Check the wire harness between A200, M240, and M241.
6.
Replace A200.
ł
Diagnostic page: Click Subsystems, click Finisher, and then click Finisher Accumulator.
ł
Component locator: Finisher component locator on page 1668
ł
Wiring diagram: Finisher Main PCA (A200) diagram on page 2481
ł
Parts diagram: Finisher parts diagrams on page 1668
ł
Replace A200: Finisher Main PCA (A200) on page 859
Links
2144 Appendix A Event Log codes
ENWW
A3.1300
Description
ł
Finisher Input 0 sensor (SN211) problem
Primary root causes
ł
SN211
ł
Transport drive belt damage and tension
ł
Transport drive rollers and idler rollers
ł
Right-door latch and hinges
ł
Wire harness between the Finisher Main PCA (A200) and SN211
ł
A200
Recommended actions
1.
Clean SN211, and then verify that SN211 is correctly installed.
2.
Verify that the door latch and hinges operate correctly.
3.
Open the Finisher Paper Path diagnostic page, and then test SN211.
4.
Check the transport drive belts, drive rollers, and idlers for damage, contamination, and correct
tension.
5.
Check the wire harness between A200 and SN211.
6.
Check the voltage at SN211: 3.3 Vdc at pins 8A to 10A and 9A to 10A on W211P1-W201J211.
7.
Replace A200.
Additional root causes
ł
Finisher Input Paper Path motor (M210)
ł
Diagnostic page: Click Subsystems, click Finisher, and then click Finisher Paper Path.
ł
Component locator: Finisher component locator on page 1668
ł
Wiring diagram: Finisher Main PCA (A200) diagram on page 2481
ł
Parts diagram: Finisher parts diagrams on page 1668
ł
Replace SN211: Sensors on page 788
ł
Replace A200: Finisher Main PCA (A200) on page 859
ł
M210: A3.0101 on page 2058
Links
ENWW
Event Log error and warning codes 2145
A3.1301
Description
ł
Finisher Input 1 sensor (SN212)
Primary root causes
ł
SN212
ł
Transport drive belt damage and tension
ł
Transport drive rollers and idler rollers
ł
Right-door latch and hinges
ł
Wire harness between the Finisher Main PCA (A200) and SN212
ł
A200
Recommended actions
1.
Clean SN212, and then verify that SN212 is correctly installed.
2.
Verify that the door latch and hinges operate correctly.
3.
Open the Finisher Paper Path diagnostic page, and then test SN212.
4.
Check the transport drive belts, drive rollers, and idlers for damage, contamination, and correct
tension.
5.
Check the wire harness between A200 and SN212.
6.
Check the voltage at SN212: 3.3 Vdc at pins 2B to 11A and 1B to 11A on W211P1-W201J211.
7.
Replace A200.
Additional root causes
ł
Finisher Input Paper Path motor (M210)
ł
Diagnostic page: Click Subsystems, click Finisher, and then click Finisher Paper Path.
ł
Component locator: Finisher component locator on page 1668
ł
Wiring diagram: Finisher 6 wiring diagram on page 2478
ł
Parts diagram: Finisher parts diagrams on page 1668
ł
Replace SN212: Sensors on page 788
ł
Replace A200: Finisher Main PCA (A200) on page 859
ł
M210: A3.0101 on page 2058
Links
2146 Appendix A Event Log codes
ENWW
A3.1302
Description
ł
Finisher Input 2 sensor (SN213)
Primary root causes
ł
SN213
ł
Transport drive belt damage and tension
ł
Transport drive rollers and idler rollers
ł
Right-door latch and hinges
ł
Wire harness between Finisher Main PCA (A200) and SN213
ł
A200
Recommended actions
1.
Clean SN213, and then verify that SN213 is correctly installed.
2.
Verify the door latch and hinges operate correctly.
3.
Open the Finisher Paper Path diagnostic page, and then test SN213.
4.
Check the transport drive belts, drive rollers, and idlers for damage, contamination, and correct
tension.
5.
Check the wire harness between the A200 and the SN213.
6.
Test the voltage at SN213: 3.3 Vdc at pins 4B to 5B and 3B to 5B on W211P1-W201J211.
7.
Replace A200.
Additional root causes
ł
Finisher Input Paper Path motor (M210)
ł
Diagnostic page: Click Subsystems, click Finisher, and then click Finisher Paper Path.
ł
Component locator: Finisher component locator on page 1668
ł
Wiring diagram: Finisher 6 wiring diagram on page 2478
ł
Parts diagram: Finisher parts diagrams on page 1668
ł
Replace SN213: Sensors on page 788
ł
Replace A200: Finisher Main PCA (A200) on page 859
ł
M210: A3.0101 on page 2058
Links
ENWW
Event Log error and warning codes 2147
A3.1303
Description
ł
Finisher Input 3 sensor (SN214)
Primary root causes
ł
SN214
ł
Transport drive belt damage and tension
ł
Transport drive rollers and idler rollers
ł
Right-door latch and hinges
ł
Wire harness between Finisher Main PCA (A200) and SN214
ł
A200
Recommended actions
1.
Clean SN214, and then verify that SN214 is correctly installed.
2.
Verify the door latch and hinges operate correctly.
3.
Open the Finisher Paper Path diagnostic page, and then test SN214.
4.
Check the transport drive belts, drive rollers, and idlers for damage, contamination, and correct
tension.
5.
Check the wire harness between A200 and SN214.
6.
Test the voltage at SN214: 3.3 Vdc at pins 8B to 6B and 7B to 6B on W211P1-W201J211.
7.
Replace A200.
Additional root causes
ł
Finisher Input Paper Path motor (M210)
ł
Diagnostic page: Click Subsystems, click Finisher, and then click Finisher Paper Path.
ł
Component locator: Finisher component locator on page 1668
ł
Wiring diagram: Finisher 6 wiring diagram on page 2478
ł
Parts diagram: Finisher parts diagrams on page 1668
ł
Replace SN214: Sensors on page 788
ł
Replace A200: Finisher Main PCA (A200) on page 859
ł
M210: A3.0101 on page 2058
Links
2148 Appendix A Event Log codes
ENWW
A3.1304
Description
ł
Finisher Upper 1 sensor (SN231)
Primary root causes
ł
SN231
ł
Transport drive belt damage and tension
ł
Transport drive rollers and idler rollers
ł
Top-door latch and hinges
ł
Wire harness between Finisher Main PCA (A200) and the SN231
ł
A200
Recommended actions
1.
Clean SN231, and then verify that SN231 is correctly installed.
2.
Verify the door latch and hinges operate correctly.
3.
Open the Finisher Paper Path diagnostic page, and then test SN231.
4.
Check the transport drive belts, drive rollers, and idlers for damage, contamination, and correct
tension.
5.
Check the wire harness between the A200 and SN231.
6.
Check the voltage at SN231: 3.3 Vdc at pins 1B to 8A and 2B to 8A on W231P1-W201J231.
7.
Replace A200.
Additional root causes
ł
Finisher Upper Paper Path motor (M230)
ł
Diagnostic page: Click Subsystems, click Finisher, and then click Finisher Paper Path.
ł
Component locator: Finisher component locator on page 1668
ł
Wiring diagram: Finisher 8 wiring diagram on page 2479
ł
Parts diagram: Finisher parts diagrams on page 1668
ł
Replace SN231: Sensors on page 788
ł
Replace A200: Finisher Main PCA (A200) on page 859
ł
M230: A3.0102 on page 2059
Links
ENWW
Event Log error and warning codes 2149
A3.1305
Description
ł
Finisher Upper 2 sensor (SN232)
Primary root causes
ł
SN232
ł
Transport drive belt damage and tension
ł
Transport drive rollers and idler rollers
ł
Top-door latch and hinges
ł
Wire harness between Finisher Main PCA (A200) and SN232
ł
A200
Recommended actions
1.
Clean SN232, and then verify that SN232 is correctly installed.
2.
Verify the door latch and hinges operate correctly.
3.
Open the Finisher Paper Path diagnostic page, and then test SN232.
4.
Check the transport drive belts, drive rollers, and idlers for damage, contamination, and correct
tension.
5.
Check the wire harness between A200 and SN232.
6.
Test the voltage at SN232: 3.3 Vdc at pins 4B to 5B and 3B to 5B on W231P1-W201J231.
7.
Replace A200.
Additional root causes
ł
Finisher Upper Paper Path motor (M230)
ł
Diagnostic page: Click Subsystems, click Finisher, and then click Finisher Paper Path.
ł
Component locator: Finisher component locator on page 1668
ł
Wiring diagram: Finisher 8 wiring diagram on page 2479
ł
Parts diagram: Finisher parts diagrams on page 1668
ł
Replace SN232: Sensors on page 788
ł
Replace A200: Finisher Main PCA (A200) on page 859
ł
M230: A3.0102 on page 2059
Links
2150 Appendix A Event Log codes
ENWW
A3.1306
Description
ł
Finisher Upper 3 sensor (SN233)
Primary root causes
ł
SN233
ł
Transport drive belt damage and tension
ł
Transport drive rollers and idler rollers
ł
Top-door latch and hinges
ł
Wire harness between Finisher Main PCA (A200) and the SN233
ł
A200
Recommended actions
1.
Clean SN233, and then verify that SN233 is correctly installed.
2.
Verify the door latch and hinges operate correctly.
3.
Open the Finisher Paper Path diagnostic page, and then test SN233.
4.
Check the transport drive belts, drive rollers, and idlers for damage, contamination, and correct
tension.
5.
Check the wire harness between A200 and SN233.
6.
Test the voltage at SN233: 3.3 Vdc at pins 7B to 6B and 8B to 6B on W231P1-W201J231.
7.
Replace A200.
Additional root causes
ł
Finisher Upper Paper Path motor (M230)
ł
Finisher Job Separator Gate Open sensor (SN262)
ł
Diagnostic page: Click Subsystems, click Finisher, and then click Finisher Paper Path.
ł
Component locator: Finisher component locator on page 1668
ł
Wiring diagram: Finisher 8 wiring diagram on page 2479
ł
Parts diagram: Finisher parts diagrams on page 1668
ł
Replace SN233: Sensors on page 788
ł
Replace A200: Finisher Main PCA (A200) on page 859
ł
M230: A3.0102 on page 2059
ł
SN262: A3.0141 on page 2068
Links
ENWW
Event Log error and warning codes 2151
A3.1307
Description
ł
Finisher Lower 1 sensor (SN215)
Primary root causes
ł
SN215
ł
Transport drive belt damage and tension
ł
Transport drive rollers and idler rollers
ł
Top-door latch and hinges
ł
Wire harness between the Finisher Main PCA (A200) and SN215
ł
A200
ł
Finisher Diverter solenoid (SOL211)
Recommended actions
1.
Clean SN215, and then verify that SN215 is correctly installed.
2.
Verify that the door latch and hinges operate correctly.
3.
Open the Finisher Paper Path diagnostic page, and then test SN215 and SOL211 using the
diagnostics.
4.
Check the transport drive belts, drive rollers, and idlers for damage, contamination, and correct
tension.
5.
Check the wire harness between A200 and SN215.
6.
Test the voltage at SN215: 3.3 Vdc at pins 9B to 11B and 10B to 11B on W211P1-W201J211.
7.
Replace A200.
Additional root causes
ł
Finisher Lower Paper Path motor (M220)
ł
Diagnostic page: Click Subsystems, click Finisher, and then click Finisher Paper Path.
ł
Component locator: Finisher component locator on page 1668
ł
Wiring diagram: Finisher 6 wiring diagram on page 2478
ł
Parts diagram: Finisher parts diagrams on page 1668
ł
Replace SN215: Sensors on page 788
ł
Replace A200: Finisher Main PCA (A200) on page 859
ł
M220: A3.0104 on page 2061
Links
2152 Appendix A Event Log codes
ENWW
A3.1308
Description
ł
Finisher Lower 2 sensor (SN221)
Primary root causes
ł
SN221
ł
Transport drive belt damage and tension
ł
Transport drive rollers and idler rollers
ł
Top-door latch and hinges
ł
Bearing bracket bushing
ł
Wire harness between Finisher Main PCA (A200) and SN221
ł
Accumulator Entry motor (M240)
ł
Wire harness between M240, the Accumulator Distribution PCA (A240), and A200
ł
A200
ł
A240
Recommended actions
1.
Clean SN221, and then verify that SN221 is correctly installed.
2.
Verify that the door latch and hinges operate correctly.
3.
Open the Finisher Paper Path diagnostic page, and then test SN221 using the diagnostics.
4.
Check the transport drive belts, drive rollers, and idlers for damage, contamination, and correct
tension.
5.
Verify that flat section on the bearing bracket bushing is correctly aligned with the flat section on
the accumulator.
6.
Check the wire harness between A200 and SN221.
7.
Test the voltage at SN221: 3.3 Vdc at pins 1 to 2 and 3 to 2 on W221P1-W201J221.
8.
Run Accumulator Entry motor (M240).
9.
Check the wire harness between M240, A240, and A200.
10. Use the stepper motor test procedure to test M240.
11. Replace M240.
12. Replace A240.
13. Replace A200.
ENWW
Event Log error and warning codes 2153
Links
ł
Diagnostic page: Click Subsystems, click Finisher, and then click Finisher Paper Path.
ł
Component locator: Finisher component locator on page 1668
ł
Wiring diagram: Finisher 7 wiring diagram on page 2478
ł
Parts diagram: Finisher parts diagrams on page 1668
ł
Replace SN221: Sensors on page 788
ł
Replace M240: Accumulator Entry motor (M240) on page 820
ł
Replace A200: Finisher Main PCA (A200) on page 859
ł
Replace A240: Accumulator Distribution PCA (A240) on page 778
2154 Appendix A Event Log codes
ENWW
A3.1320
Description
ł
Accumulator Entry sensor (SN246)
Primary root causes
ł
SN246
ł
Accumulator Entry motor (M240)
ł
Bearing bracket bushing
ł
Wire harness between SN246, M240, the Accumulator Distribution PCA (A240), and the Finisher
Main PCA (A200) and
ł
A200
ł
A240
Recommended actions
1.
Open the Finisher Accumulator diagnostic page, and then test SN246.
2.
Verify that flat section on the bearing bracket bushing is correctly aligned with the flat section on
the accumulator.
3.
Check the wire harness between A200, M240, and SN246.
4.
Test the voltage at SN246: 5.0 Vdc at pins 1 to 3 and 3.3 Vdc at pins 2 to 3 on the sensor connector.
5.
Using the stepper motor test procedure, test the voltage to M240 on A200: CN1 pins 1 to 2 and 3
to 4.
6.
Replace M240.
7.
Replace A200.
8.
Replace A240.
ł
Diagnostic page: Click Subsystems, click Finisher, and then click Finisher Accumulator.
ł
Component locator: Finisher component locator on page 1668
ł
Wiring diagram: Finisher 9 wiring diagram on page 2479
ł
Parts diagram: Finisher parts diagrams on page 1668
ł
Replace SN246: Sensors on page 788
ł
Replace A200: Finisher Main PCA (A200) on page 859
ł
Replace M240: Accumulator Entry motor (M240) on page 820
ł
Replace M240: Accumulator Entry motor (M240) on page 820
Links
ENWW
Event Log error and warning codes 2155
A3.1321
Description
ł
General accumulator paper jam
Primary root causes
ł
Media obstruction
ł
Bearing bracket bushing
ł
Accumulator Bearing Bracket Home sensor (SN248)
ł
Accumulator springs
ł
Bearing bracket assembly or bearing bracket to paper lever gear timing
ł
Wire harness between SN248 and the Finisher Main PCA (A200)
Recommended actions
1.
Clear any obstruction in the accumulator area.
2.
Verify that flat section on the bearing bracket bushing is correctly aligned with the flat section on
the accumulator. Using the bearing bracket to paper lever alignment pins, align the two gears.
3.
Open the Event Log and look for one of the following codes: A3.0125, A3.0126, A3.02A0, A3.02A1,
A3.02A2, A3.02A3, A3.02A4, and A3.02A5. Follow the troubleshooting procedures for the code.
4.
Open the Finisher Accumulator diagnostic page, and then test SN248.
5.
Check the wire harness between SN248 and A200.
6.
Replace A200.
Additional root causes
ł
M242
ł
SN240
ł
SN241
ł
Diagnostic page: Click Subsystems, click Finisher, and then click Finisher Accumulator.
ł
Component locator: Finisher component locator on page 1668
ł
Wiring diagram: Finisher 9 wiring diagram on page 2479
ł
Parts diagram: Finisher parts diagrams on page 1668
ł
Replace A200: Finisher Main PCA (A200) on page 859
ł
M242: A3.0125 on page 2065
Links
2156 Appendix A Event Log codes
ENWW
ENWW
ł
SN240: A3.02A3 on page 2119
ł
SN241: A3.02A4 on page 2120
Event Log error and warning codes 2157
A3.1322
Description
ł
Accumulator Exit sensor (SN242)
Primary root causes
ł
SN242
ł
Accumulator Exit motor (M241)
ł
Accumulator gears, eject shaft
ł
Damaged bearing bracket
ł
Wire harness between the Finisher Main PCA (A200), M241, and SN242
ł
A200
ł
Accumulator Distribution PCA (A240)
Recommended actions
1.
Open the Finisher Accumulator diagnostic page, and then test SN242.
2.
Check the bearing bracket for damage.
3.
Check the wire harness between A200, M241, and SN242.
4.
Test the voltage at SN242: 5.0 Vdc at pins 1 to 3 and 3.3 Vdc at pins 2 to 3 on the sensor connector.
5.
Using the stepper motor test procedure, test the voltage to M241 on A200: CN2 pins 1 to 2 and 3
to 4.
6.
Replace M241.
7.
Replace A200.
8.
Replace A240.
ł
Diagnostic page: Click Subsystems, click Finisher, and then click Finisher Accumulator.
ł
Component locator: Finisher component locator on page 1668
ł
Wiring diagram: Finisher 9 wiring diagram on page 2479
ł
Parts diagram: Finisher parts diagrams on page 1668
ł
Replace SN242: Sensors on page 788
ł
Replace A200: Finisher Main PCA (A200) on page 859
ł
Replace M241: Accumulator Exit motor (M241) on page 821
Links
2158 Appendix A Event Log codes
ENWW
A3.1323
Description
ł
Stapler 1 paper jam
Primary root causes
ł
Media curl
ł
Stapler 1 Home sensor (SN276)
ł
Wire harness between SN276 and the Finisher Main PCA (A200)
ł
A200
Recommended actions
1.
Verify that the media curl is out of specifications.
2.
Remove any paper from the Stapler 1 area.
3.
Open the Finisher Stapler diagnostic page, and then run the Stapler 1 motor (M272) and verify that
SN276 activates.
4.
Check the wire harness between SN276 and A200.
5.
Test the voltage at SN276: 3.3 Vdc at pins 4B to 9B and 5.0 Vdc at pins 5B to 9B on W270J271W271P1.
6.
Replace A200.
Additional root causes
ł
M272
ł
Accumulator Open sensor (SN255)
ł
Diagnostic page: Click Subsystems, click Finisher, and then click Finisher Stapler.
ł
Component locator: Finisher component locator on page 1668
ł
Wiring diagram: Finisher 1 wiring diagram on page 2474
ł
Parts diagram: Finisher parts diagrams on page 1668
ł
Replace A200: Finisher Main PCA (A200) on page 859
ł
SN255: A3.0226 on page 2102
ł
M272: A3.01C1 on page 2082
Links
ENWW
Event Log error and warning codes 2159
A3.1324
Description
ł
Stapler 2 paper jam
Primary root causes
ł
Media curl
ł
Stapler 2 Home sensor (SN284)
ł
Wire harness between SN284 and the Finisher Main PCA (A200)
ł
A200
Recommended actions
1.
Verify that the media curl is out of specifications.
2.
Remove any paper from the Stapler 2 area.
3.
Open the Finisher Stapler diagnostic page, and then test SN284.
4.
Check the wire harness between SN284 and A200.
5.
Test the voltage at SN284: 3.3 Vdc at pins 4B to 9B and 5 Vdc at pins 5B to 9B on W270J280W280P1.
6.
Replace A200.
Additional root causes
ł
Stapler 2 motor (M281)
ł
Diagnostic page: Click Subsystems, click Finisher, and then click Finisher Stapler.
ł
Component locator: Finisher component locator on page 1668
ł
Wiring diagram: Finisher 1 wiring diagram on page 2474
ł
Parts diagram: Finisher parts diagrams on page 1668
ł
Replace A200: Finisher Main PCA (A200) on page 859
ł
M281: A3.01C2 on page 2083
Links
2160 Appendix A Event Log codes
ENWW
A3.1325
Description
ł
Finisher Separator does not move up
Primary root causes
ł
SW287
ł
Wire harness between the Finisher Main PCA (A200) and SW287
ł
A200
Recommended actions
1.
Open the Finisher Stapler diagnostic page, and then test SW287.
2.
Check the wire harness between the A200 and SW287.
3.
Test the voltage at SW287: 5.0 Vdc at pins 1A to 2A on W270J280-W280P1.
4.
Replace A200.
Additional root causes
ł
Finisher Lower Elevator motor (M250)
ł
Diagnostic page: Click Subsystems, click Finisher, and then click Finisher Stapler.
ł
Component locator: Finisher component locator on page 1668
ł
Wiring diagram: Finisher 1 wiring diagram on page 2474
ł
Parts diagram: Finisher parts diagrams on page 1668
ł
Replace SW287: Switches on page 849
ł
Replace A200: Finisher Main PCA (A200) on page 859
ł
M250: Output Bin 5 is overloaded on page 1036
Links
ENWW
Event Log error and warning codes 2161
A3.1360
Description
ł
Job support assembly arm failed to move
Primary root causes
ł
M253
ł
Finisher Job Support Arm motor encoder (EN253)
ł
Job support arm assembly
ł
Wire harness between the Finisher Main PCA (A200), M253, and EN253
ł
A200
Recommended actions
1.
Open the Finisher Separator diagnostic page, and then run M253 and verify that the EN253 count
changes.
2.
Check the Finisher job support arm assembly for binding and damage.
3.
Check the wire harness between the A200, M253, and EN253.
4.
Test the voltage at M253: 33.0 Vdc at pins 2 to 1 on the motor connector.
5.
Test the voltage at EN253: 3.3 Vdc at pins 3 to 4 and 5 to 4 on W251p7-EN253.
6.
Replace A200.
Additional root causes
ł
Stapler 2 Home sensor (SN284)
ł
Diagnostic page: Click Subsystems, click Finisher, and then click Finisher Separator.
ł
Component locator: Finisher component locator on page 1668
ł
Wiring diagram: Finisher 10 wiring diagram on page 2480
ł
Parts diagram: Finisher parts diagrams on page 1668
ł
Replace M253: Finisher Job Support Arm motor (M253) on page 830
ł
Replace A200: Finisher Main PCA (A200) on page 859
ł
SN284: A3.1324 on page 2160
Links
2162 Appendix A Event Log codes
ENWW
A3.38zz
Description
ł
Finisher firmware fault
Primary root causes
ł
Corrupt finisher firmware or the wire harness between the finisher and the MFP
Recommended actions
䦱
ENWW
Check the wire harness between the finisher and the MFP, and then reboot the MFP.
Event Log error and warning codes 2163
B0.0101
Description
ł
Vertical motor (M6) stall
Primary root causes
ł
Drive belt
ł
M6
ł
Vertical Motor encoder (EN12)
ł
Wire harness between M6, EN12, and the Motion PCA (A2)
Recommended actions
1.
If you have not done so already, reboot the MFP in Protected Service mode (PSM).
2.
Manually turn M6 and verify that the drive rollers turn.
3.
Open the Vertical Transport diagnostic page, and then manually turn the drive roller and verify that
the EN12 count changes.
4.
Run M6.
5.
Test the voltage at M6: 12 Vdc at pins 1 to 2 on W20P6-M6.
6.
Test the voltage at EN12: 5 Vdc at pins 3A to 1A (GND) on W14P6-W36J6.
7.
Test the voltage to M6 on A2: 12 Vdc at J2 pins 1 to 8.
8.
Test the voltage to EN12 on A2: 5 Vdc at J10 pins 16A to 18A (GND).
Additional root causes
ł
A2
ł
Fault tree: B0.0101: Vertical motor (M6) stall on page 1170
ł
Diagnostic page: Click Subsystems, click Paper Path, and then click Vertical Transport.
ł
Component locator: Vertical component locator on page 1794
ł
Wiring diagram: Vertical wiring diagram on page 2501
ł
Replace M6: Vertical motor (M6) on page 332
ł
Parts diagram: Vertical parts diagrams on page 1794
ł
A2: D4.0705 on page 2392
Links
2164 Appendix A Event Log codes
ENWW
B0.1301
Description
ł
Paper jam at Vertical Transport 1 sensor (SN35)
Primary root causes
ł
SN35
ł
Wire harness between the Motion PCA (A2) and SN35
Recommended actions
1.
Open the Vertical Transport diagnostic page, and then manually activate SN35 and verify that the
sensor state changes.
2.
Verify that SN35 is properly seated and clean.
3.
Verify that the idler rollers are properly seated and clean.
4.
Test the voltage at SN35: 3.3 Vdc at pins 14B to 13B (GND) and 15B to 13B (GND) on W14P6W36J6.
5.
Test the voltage to SN35 on A2: 3.3 Vdc at J10 pins 5B to 6B (GND) and 4B to 6B (GND).
Additional root causes
ł
Vertical motor (M6)
ł
A2
ł
Fault tree: B0.1301: Paper jam at Vertical Transport 1 sensor (SN35) on page 1179
ł
Diagnostic page: Click Subsystems, click Paper Path, and then click Vertical Transport.
ł
Component locator: Vertical component locator on page 1794
ł
Wiring diagram: Vertical wiring diagram on page 2501
ł
Parts diagram: Vertical parts diagrams on page 1794
ł
Replace SN35: Vertical sensors on page 335
ł
M6: B0.0101 on page 2164
ł
A2: D4.0705 on page 2392
Links
ENWW
Event Log error and warning codes 2165
B0.1302
Description
ł
Paper jam at Vertical Transport 2 sensor (SN28)
Primary root causes
ł
SN28
ł
Wire harness between the Motion PCA (A2) and SN28
Recommended actions
1.
Open the Vertical Transport diagnostic page, and then manually activate SN28 and verify that the
sensor state changes.
2.
Verify that SN28 is properly seated and clean.
3.
Verify that the idler rollers are properly seated and clean.
4.
Test the voltage at SN28: 3.3 Vdc at pins 2 to 3 (GND) and 1 to 3 (GND) on W36P28-SN28.
5.
Test the voltage to SN28 on A2: 3.3 Vdc at J10 pins 7B to 9B (GND) and 8B to 9B (GND).
Additional root causes
ł
Vertical motor (M6)
ł
A2
ł
Fault tree: B0.1302: Paper jam at Vertical Transport 2 sensor (SN28) on page 1181
ł
Diagnostic page: Click Subsystems, click Paper Path, and then click Vertical Transport.
ł
Component locator: Vertical component locator on page 1794
ł
Wiring diagram: Vertical wiring diagram on page 2501
ł
Parts diagram: Vertical parts diagrams on page 1794
ł
Replace SN28: Vertical sensors on page 335
ł
M6: B0.0101 on page 2164
ł
A2: D4.0705 on page 2392
Links
2166 Appendix A Event Log codes
ENWW
B0.1303
Description
ł
Paper jam at Vertical Transport 3 sensor (SN25)
Primary root causes
ł
SN25
ł
Wire harness between the Motion PCA (A2) and SN25
Recommended actions
1.
Open the Vertical Transport diagnostic page, and then manually activate SN25 and verify that the
sensor state changes.
2.
Verify that SN25 is properly seated and clean.
3.
Verify that the idler rollers are properly seated and clean.
4.
Test the voltage at SN25: 3.3 Vdc at pins 9A to 10A (GND) and 8A to 10A (GND) on W14P6-W36J6.
5.
Test the voltage to SN25 on A2: 3.3 Vdc at J10 pins 11A to 9A (GND) and 10A to 9A (GND).
Additional root causes
ł
Vertical motor (M6)
ł
A2
ł
Fault tree: B0.1303: Paper jam at Vertical Transport 3 sensor (SN25) on page 1183
ł
Diagnostic page: Click Subsystems, click Paper Path, and then click Vertical Transport.
ł
Component locator: Vertical component locator on page 1794
ł
Wiring diagram: Vertical wiring diagram on page 2501
ł
Parts diagram: Vertical parts diagrams on page 1794
ł
Replace SN25: Vertical sensors on page 335
ł
M6: B0.0101 on page 2164
ł
A2: D4.0705 on page 2392
Links
ENWW
Event Log error and warning codes 2167
B0.1304
Description
ł
Paper jam at Vertical transport 4 sensor (SN26)
Primary root causes
ł
SN26
ł
Wire harness between the Motion PCA (A2) and SN26
Recommended actions
1.
Open the Vertical Transport diagnostic page, and then manually activate SN26 and verify that the
sensor state changes.
2.
Verify that SN26 is properly seated and clean.
3.
Verify that the idler rollers are properly seated and clean.
4.
Test the voltage at SN26: 3.3 Vdc at pins 6A to 7A (GND) and 5A to 7A (GND) on W14P6-W36J6.
5.
Test the voltage to SN26 on A2: 3.3 Vdc at J10 pins 13A to 12A (GND) and 14A to 12A (GND).
Additional root causes
ł
Vertical motor (M6)
ł
A2
ł
Diagnostic page: Click Subsystems, click Paper Path, and then click Vertical Transport.
ł
Component locator: Vertical component locator on page 1794
ł
Wiring diagram: Vertical wiring diagram on page 2501
ł
Parts diagram: Vertical parts diagrams on page 1794
ł
Replace SN26: Vertical sensors on page 335
ł
M6: B0.0101 on page 2164
ł
A2: D4.0705 on page 2392
Links
2168 Appendix A Event Log codes
ENWW
B1.0101
Description
ł
Horizontal motor (M7) stall
Primary root causes
ł
Drive belts
ł
M7
ł
Horizontal Motor encoder (EN3)
ł
Wire harness between M7, EN3, and the Motion PCA (A2)
Recommended actions
1.
If you have not done so already, reboot the MFP in Protected Service mode (PSM).
2.
Open the Horizontal Transport diagnostic page, and then manually turn M7 with Tray 1 engaged
and verify that the rollers turn.
3.
Run M7.
4.
Manually turn the drive roller and verify that the EN3 count changes.
5.
Check the rollers and belts for damage and wear.
6.
Test the voltage at M7: 12 Vdc at pins 1 to 2 on W18P7-M7.
7.
Test the voltage at EN3: 5 Vdc at pins 8A to 10A (GND) on W15P5-W37J5.
8.
Test the voltage to M7 on A2: 12 Vdc at J2 pins 3 to 10 .
9.
Test the voltage to EN3 on A2: 5 Vdc at J9 pins 5A to 3A (GND).
Additional root causes
ł
A2
ł
Fault tree: B1.0101: Horizontal motor (M7) stall on page 1187
ł
Diagnostic page: Click Subsystems, click Paper Path, and then click Horizontal Transport.
ł
Component locator: Horizontal component locator on page 1720
ł
Wiring diagram: Horizontal wiring diagram on page 2485
ł
Parts diagram: Horizontal parts diagrams on page 1720
ł
Replace M7: Horizontal motor (M7) on page 341
ł
A2: D4.0705 on page 2392
Links
ENWW
Event Log error and warning codes 2169
B1.0201
Description
ł
Transparency sensor 1 (SN1) failed calibration
Primary root causes
ł
SN1
ł
Wire harness between the Motion PCA (A2) and SN1
Recommended actions
1.
If you have not done so already, reboot the MFP in Protected Service mode (PSM).
2.
Open the Horizontal Transport diagnostic page, and then manually activate SN1 and verify that
the sensor state changes.
3.
Verify that SN1 is properly seated and clean.
4.
Verify that the idler rollers are properly seated and clean.
5.
Test the voltage at SN1: 0.45 Vdc unblocked and 2.78 Vdc blocked at pins 3A to 2A (GND) and
1.14 Vdc blocked and unblocked at pins 1A to 2A (GND) on W15P5-W37J5.
6.
Test the voltage to SN1 on A2: 1.15 Vdc unblocked and blocked at J9 pins 12A to 11A (GND) and
0.45VDC unblocked and 2.81VDC blocked at pins 10A to 11A (GND).
Additional root causes
ł
Horizontal motor (M7)
ł
A2
ł
Diagnostic page: Click Subsystems, click Paper Path, and then click Horizontal Transport.
ł
Component locator: Horizontal component locator on page 1720
ł
Wiring diagram: Horizontal wiring diagram on page 2485
ł
Parts diagram: Horizontal parts diagrams on page 1720
ł
Replace SN1: Horizontal sensors on page 345
ł
M7: B1.0101 on page 2169
ł
A2: D4.0705 on page 2392
Links
2170 Appendix A Event Log codes
ENWW
B1.1301
Description
ł
Paper jam at Transparency sensor 1 (SN1)
Primary root causes
ł
SN1
ł
Wire harness between the Motion PCA (A2) and SN1
Recommended actions
1.
Open the Horizontal Transport diagnostic page, and then manually activate SN1 and verify that
the sensor state changes.
2.
Verify that SN1 is properly seated and clean.
3.
Verify that the idler rollers are properly seated and clean.
4.
Test the voltage at SN1: 0.45 Vdc unblocked and 2.78 Vdc blocked at pins 3A to 2A (GND) and
1.14 Vdc blocked and unblocked at pins 1A to 2A (GND) on W15P5-W37J5.
5.
Test the voltage to SN1 on A2: 1.15 Vdc unblocked and blocked at J9 pins 12A to 11A (GND) and
0.45VDC unblocked and 2.81VDC blocked at pins 10A to 11A (GND).
Additional root causes
ł
Horizontal motor (M7)
ł
A2
ł
Fault tree: B1.1301: Paper jam at Transparency sensor 1 (SN1) on page 1195
ł
Diagnostic page: Click Subsystems, click Paper Path, and then click Horizontal Transport.
ł
Component locator: Horizontal component locator on page 1720
ł
Wiring diagram: Horizontal wiring diagram on page 2485
ł
Parts diagram: Horizontal parts diagrams on page 1720
ł
Replace SN1: Horizontal sensors on page 345
ł
M7: B1.0101 on page 2169
ł
A2: D4.0705 on page 2392
Links
ENWW
Event Log error and warning codes 2171
B1.1302
Description
ł
Paper jam at Horizontal Transport 2 sensor (SN3)
Primary root causes
ł
SN3
ł
Wire harness between the Motion PCA (A2) and SN3
Recommended actions
1.
Open the Horizontal Transport diagnostic page, and then manually actuate SN3 and verify that the
sensor state changes.
2.
Verify that SN3 is properly seated and clean.
3.
Verify that the idler rollers are properly seated and clean.
4.
Test the voltage at SN3: 3.24 Vdc unblocked, 0.09 Vdc blocked at pins 5B to 4B (GND) and 1.17
Vdc both unblocked and blocked at pins 6B to 4B (GND) on W15P5-W37J5 .
5.
Test the voltage to SN3 on A2: 1.18 Vdc unblocked at J9 pins 7B to 9B (GND) and 3.25 Vdc
unblocked, 0.10 Vdc blocked at pins 8B to 9B (GND).
Additional root causes
ł
Horizontal motor (M7)
ł
A2
ł
Fault tree: B1.1302: Paper jam at Horizontal Transport 2 sensor (SN3) on page 1197
ł
Diagnostic page: Click Subsystems, click Paper Path, and then click Horizontal Transport.
ł
Component locator: Horizontal component locator on page 1720
ł
Wiring diagram: Horizontal wiring diagram on page 2485
ł
Parts diagram: Horizontal parts diagrams on page 1720
ł
Replace SN3: Horizontal sensors on page 345
ł
M7: B1.0101 on page 2169
ł
A2: D4.0705 on page 2392
Links
2172 Appendix A Event Log codes
ENWW
B1.1303
Description
ł
Paper jam at Horizontal Transport 3 sensor (SN2)
Primary root causes
ł
SN2
ł
Wire harness between the Motion PCA (A2) and SN2
ł
Tray 1 paper-width guide is not calibrated correctly
Recommended actions
1.
Calibrate the Tray 1 paper-width guide.
2.
Open the Horizontal Transport diagnostic page, and then manually activate SN2 and verify that
the sensor state changes.
3.
Verify that SN2 is properly seated and clean.
4.
Verify that the idler rollers are properly seated and clean.
5.
Test the voltage at SN2: 4.96 Vdc unblocked and blocked at pins 8A to 10A (GND) and 0.12 Vdc
unblocked and blocked at pins 9A to 10A (GND) on W15P5-W37J5.
6.
Test the voltage to SN2 on A2: 3.3 Vdc at J9 pins 8A to 7A (GND).
Additional root causes
ł
Horizontal motor (M7)
ł
A2
ł
Fault tree: B1.1303: Paper jam at Horizontal Transport 3 sensor (SN2) on page 1199
ł
Diagnostic page: Click Subsystems, click Paper Path, and then click Horizontal Transport.
ł
Component locator: Horizontal component locator on page 1720
ł
Wiring diagram: Horizontal wiring diagram on page 2485
ł
Parts diagram: Horizontal parts diagrams on page 1720
ł
Replace SN2: Horizontal sensors on page 345
ł
M7: B1.0101 on page 2169
ł
A2: D4.0705 on page 2392
Links
ENWW
Event Log error and warning codes 2173
B1.1304
Description
ł
Paper jam at Horizontal Transport 4 sensor (SN5)
Primary root causes
ł
SN5
ł
Wire harness between the Motion PCA (A2) and SN5
ł
Tray 1 paper-width guide is not calibrated correctly
Recommended actions
1.
Open the Horizontal Transport diagnostic page, and then manually actuate SN5 and verify that the
sensor state changes.
2.
Calibrate the Tray 1 paper-width guide.
3.
Verify that SN5 is properly seated and clean.
4.
Verify that the idler rollers are properly seated and clean.
5.
Test the voltage at SN5: 1.18 Vdc blocked and unblocked at pins 12B to 10B (GND) and 3.25 Vdc
unblocked, 0.09 Vdc blocked at pins 11B to 10B (GND) on W15P5-W37J5.
6.
Test the voltage to SN5 on A2: 3.3 Vdc at J9 pins 2B to 3B (GND) and 1B to 3B (GND).
Additional root causes
ł
Horizontal motor (M7)
ł
A2
ł
Fault tree: B1.1304: Paper jam at Horizontal Transport 4 sensor (SN5) on page 1201
ł
Diagnostic page: Click Subsystems, click Paper Path, and then click Horizontal Transport.
ł
Component locator: Horizontal component locator on page 1720
ł
Wiring diagram: Horizontal wiring diagram on page 2485
ł
Parts diagram: Horizontal parts diagrams on page 1720
ł
Replace SN5: Horizontal sensors on page 345
ł
M7: B1.0101 on page 2169
ł
A2: D4.0705 on page 2392
Links
2174 Appendix A Event Log codes
ENWW
B2.0101
Description
ł
IDO Input 1 motor (M8) stall
Primary root causes
ł
Drive belt
ł
M8
ł
IDO Input 1 Motor encoder (EN9)
ł
Wire harness between M8, EN9, and the Motion PCA (A2)
Recommended actions
1.
If you have not done so already, reboot the MFP in Protected Service mode (PSM).
2.
Manually turn M8 with Tray 1 engaged and verify that the rollers turn.
3.
Open the IDO Motors diagnostic page, and then run M8.
4.
Manually turn the drive roller and verify that the EN9 count changes.
5.
Check the rollers and belts for damage and wear.
6.
Test the voltage at M8: 5 Vdc at pins 1 to 2 on W19P8-M8.
7.
Test the voltage at EN9: 5 Vdc at pins 2B to 4B on W97P7-W44J7.
8.
Test the voltage to M8 on A2: 17.88 Vdc (not using voltage test routine) at J14 pins 7 to 16.
9.
Test the voltage to EN9 on A2: 5 Vdc at pins 2B to 4B on W97P7-W44J7.
Additional root causes
ł
A2
ł
Fault tree: B2.0101: IDO Input 1 motor (M8) stall on page 1203
ł
Diagnostic page: Click Subsystems, click Paper Path, and then click IDO Motors.
ł
Component locator: IDO component locator on page 1729
ł
Wiring diagram: IDO motors and encoders wiring diagram on page 2486
ł
Parts diagram: IDO parts diagrams on page 1729
ł
Replace M8: IDO Input 1 motor (M8) on page 364
ł
A2: D4.0705 on page 2392
Links
ENWW
Event Log error and warning codes 2175
B2.0102
Description
ł
IDO Input 2 motor (M10) stall
Primary root causes
ł
Drive belt
ł
M10 problem
ł
IDO Input 2 Motor encoder (EN5)
ł
Wire harness between M10, EN5, and the Motion PCA (A2)
Recommended actions
1.
If you have not done so already, reboot the MFP in Protected Service mode (PSM).
2.
Manually turn M10 and verify that the rollers turn.
3.
Open the IDO Motors diagnostic page, and then run M10.
4.
Manually turn the drive roller and verify that the EN5 count changes.
5.
Check the rollers and belts for damage and wear.
6.
Test the voltage at M10: 5.23 Vdc at pins 1 to 2 on W19P10-M10.
7.
Test the voltage at EN5: 5 Vdc at pins 6B to 8B on W97P7-W44J7.
8.
Test the voltage to M10 on A2: 5.23 Vdc at pins 1 to 2 on W19P10-M10.
9.
Test the voltage to EN5 on A2: 5 Vdc at pins 6B to 8B on W97P7-W44J7.
Additional root causes
ł
A2
ł
Fault tree: B2.0102: IDO Input 2 motor (M10) stall on page 1206
ł
Diagnostic page: Click Subsystems, click Paper Path, and then click IDO Motors.
ł
Component locator: IDO component locator on page 1729
ł
Wiring diagram: IDO motors and encoders wiring diagram on page 2486
ł
Parts diagram: IDO parts diagrams on page 1729
ł
Replace M10: IDO Input 2 motor (M10) on page 365
ł
A2: D4.0705 on page 2392
Links
2176 Appendix A Event Log codes
ENWW
B2.0103
Description
ł
IDO Curler motor (M15) stall
Primary root causes
ł
Drive belt
ł
M15
ł
IDO Curler Motor encoder (EN15)
ł
Wire harness between the M15, EN15, and the Motion PCA (A2)
Recommended actions
1.
If you have not done so already, reboot the MFP in Protected Service mode (PSM).
2.
Manually turn M15 and verify that the rollers turn.
3.
Open the IDO Motors diagnostic page, and then run M15.
4.
Manually turn the drive roller and verify that the EN15 count changes.
5.
Check the rollers and belts for damage and wear.
6.
Test the voltage at M15: 5.23 Vdc at pins 1 to 2 on W88P1-M15.
7.
Test the voltage at EN15: 5 Vdc at pins 13A to 15A on W96P6-W45J6.
8.
Test the voltage to M15 on A2: 17.75 Vdc at J14 pins 1 to 10.
9.
Test the voltage at EN15: 5 Vdc at J5 pins 3A to 1A.
Additional root causes
ł
A2
ł
Fault tree: B2.0103: IDO Curler motor (M15) stall on page 1209
ł
Diagnostic page: Click Subsystems, click Paper Path, and then click IDO Motors.
ł
Component locator: IDO component locator on page 1729
ł
Wiring diagram: IDO paper path 1 wiring diagram on page 2487
ł
Parts diagram: IDO parts diagrams on page 1729
ł
Replace M15: IDO Curler motor (M15) on page 370
ł
A2: D4.0705 on page 2392
Links
ENWW
Event Log error and warning codes 2177
B2.0104
Description
ł
IDO Media Eject motor (M13) stall
Primary root causes
ł
Media eject mechanism
ł
M13
ł
IDO Media Eject Motor encoder (EN17)
ł
Wire harness between M13, EN17, and the Motion PCA (A2)
Recommended actions
1.
If you have not done so already, reboot the MFP in Protected Service mode (PSM).
2.
Open the IDO Motors diagnostic page, and then run M13 and verify that the media-eject fingers
cycle in and out.
3.
Perform a voltage test on M13 and verify that the EN17 count changes.
4.
Check the media-eject mechanism for damage and wear.
5.
Test the voltage at M13: 5 Vdc at pins 1 to 2 on W44P17-EN17/M3.
6.
Test the voltage at EN17: 1.2 Vdc at pins 15A to 16A on W97P7-W44J7.
7.
Test the voltage to M13 on A2: 5 Vdc at J14 pins 5 to 14.
8.
Test the voltage to EN17 on A2: 1.2 Vdc at J4 pins 4A to 3A.
Additional root causes
ł
A2
ł
Fault tree: B2.0104: IDO Media Eject motor (M13) stall on page 1212
ł
Diagnostic page: Click Subsystems, click Paper Path, and then click IDO Motors.
ł
Component locator: IDO component locator on page 1729
ł
Wiring diagram: IDO motors and encoders wiring diagram on page 2486
ł
Parts diagram: IDO parts diagrams on page 1729
ł
Replace M13: IDO Media Eject motor (M13) on page 369
ł
A2: D4.0705 on page 2392
Links
2178 Appendix A Event Log codes
ENWW
B2.0105
Description
ł
IDO Duplex motor (M12) stall
Primary root causes
ł
Drive belt
ł
M12
ł
IDO Duplex Motor encoder (EN7)
ł
Wire harness between M12, EN7, and the Motion PCA (A2)
Recommended actions
1.
If you have not done so already, reboot the MFP in Protected Service mode (PSM).
2.
Manually turn M12 and verify that the rollers turn.
3.
Open the IDO Motors diagnostic page, and then manually turn the drive roller and verify that the
EN7 count changes.
4.
Turn on M12 in both the forward and reverse directions and verify that the EN7 count changes.
5.
Check the rollers and belts for damage and wear.
6.
Test the voltage at M12 for both the forward and reverse directions: -5 Vdc in the forward direction
and 5 Vdc in the reverse direction at pins 1 to 2 on W19P12-M12.
7.
Test the voltage at EN7: 5 Vdc at pins 13A to 11A on W97P7-W44J7.
8.
Test the voltage to M12 on A2: 3.2 Vdc at J14 pins 4 to 13.
9.
Test the voltage to EN7 on A2: 5 Vdc at J4 pins 6A to 8A.
Additional root causes
ł
A2
ł
Fault tree: B2.0105: IDO Duplex motor (M12) stall on page 1215
ł
Diagnostic page: Click Subsystems, click Paper Path, and then click IDO Motors.
ł
Component locator: IDO component locator on page 1729
ł
Wiring diagram: IDO motors and encoders wiring diagram on page 2486
ł
Parts diagram: IDO parts diagrams on page 1729
ł
Replace M12: IDO Duplex motor (M12) on page 368
ł
A2: D4.0705 on page 2392
Links
ENWW
Event Log error and warning codes 2179
B2.0106
Description
ł
IDO Output motor (M11) stall
Primary root causes
ł
Drive belt
ł
M11
ł
IDO Ouput Motor encoder (EN4)
ł
Wire harness between M11, EN4, and the Motion PCA (A2)
Recommended actions
1.
If you have not done so already, reboot the MFP in Protected Service mode (PSM).
2.
Manually turn M11 with Tray 1 engaged and verify that the rollers turn.
3.
Open the IDO Motors diagnostic page, and then run M11.
4.
Manually turn the drive roller and verify that the EN4 count changes.
5.
Check the rollers and belts for damage and wear.
6.
Test the voltage at M11: 5.23 Vdc at pins 1 to 2 on W19P11-M11.
7.
Test the voltage at EN4: 5 Vdc at pins 9A to 7A on W97P7-W44J7.
8.
Test the voltage to M11 on A2: 5 Vdc at J14 pins 3 to 12.
9.
Test the voltage to EN4 on A2: 5 Vdc at J4 pins 10A to 12A.
Additional root causes
ł
A2
ł
Fault tree: B2.0106: IDO Output motor (M11) stall on page 1219
ł
Diagnostic page: Click Subsystems, click Paper Path, and then click IDO Motors.
ł
Component locator: IDO component locator on page 1729
ł
Wiring diagram: IDO motors and encoders wiring diagram on page 2486
ł
Parts diagram: IDO parts diagrams on page 1729
ł
Replace M11: IDO Output motor (M11) on page 367
ł
A2: D4.0705 on page 2392
Links
2180 Appendix A Event Log codes
ENWW
B2.01A1
Description
ł
Active decurler failure
Primary root causes
ł
M17
ł
IDO Decurler Motor encoder (EN16)
ł
Wire harness between M17, EN16, and the Motion PCA (A2)
Recommended actions
1.
Open the IDO Motors diagnostic page, and then run M17 and verify that the active decurler moves.
2.
Perform a voltage test on M17 and verify that the EN16 count changes.
3.
Check the decurler mechanism for damage and wear.
4.
Test the voltage at M17: 5 Vdc at pins 5 to 6 on W45P16-M17.
5.
Test the voltage at EN16: 3.3 Vdc at pins 1 to 4, 3 to 4, 2 to 4 on W45P16-EN16.
6.
Test the voltage to M17 on A2: 5 Vdc at pins 8 to 17 on W43P14-A2J14.
7.
Test the voltage to EN16 on A2: 3.3 Vdc at pins 8A to 5A, 7A to 5A, 6A to 5A on W16P5-A2 J5.
Additional root causes
ł
A2
ł
Diagnostic page: Click Subsystems, click Paper Path, and then click IDO Motors.
ł
Component locator: IDO component locator on page 1729
ł
Wiring diagram: IDO paper path 1 wiring diagram on page 2487
ł
Parts diagram: IDO parts diagrams on page 1729
ł
Replace M17: IDO Media Eject motor (M13) on page 369
ł
A2: D4.0705 on page 2392
Links
ENWW
Event Log error and warning codes 2181
B2.01A2
Description
ł
IDO curler speed has changed
Primary root causes
ł
Drive belt
ł
M15
ł
IDO Curler Motor encoder (EN15)
ł
Wire harness between the M15, EN15, and the Motion PCA (A2)
Recommended actions
1.
If you have not done so already, reboot the MFP in Protected Service mode (PSM).
2.
Manually turn M15 and verify that the rollers turn.
3.
Open the IDO Motors diagnostic page, and then run M15.
4.
Manually turn the drive roller and verify that the EN15 count changes.
5.
Check the rollers and belts for damage and wear.
6.
Test the voltage at M15: 5.23 Vdc at pins 1 to 2 on W88P1-M15.
7.
Test the voltage at EN15: 5 Vdc at pins 13A to 15A on W96P6-W45J6.
8.
Test the voltage to M15 on A2: 17.75 Vdc at J14 pins 1 to 10.
9.
Test the voltage at EN15: 5 Vdc at J5 pins 3A to 1A.
Additional root causes
ł
A2
ł
Diagnostic page: Click Subsystems, click Paper Path, and then click IDO Motors.
ł
Component locator: IDO component locator on page 1729
ł
Wiring diagram: IDO paper path 1 wiring diagram on page 2487
ł
Parts diagram: IDO parts diagrams on page 1729
ł
Replace M15: IDO Curler motor (M15) on page 370
ł
A2: D4.0705 on page 2392
Links
2182 Appendix A Event Log codes
ENWW
B2.0201
Description
ł
IDO Media Thickness encoder (EN14) calibration failed
Primary root causes
ł
EN14
ł
Wire harness between EN14 and the Motion PCA (A2)
Recommended actions
1.
If you have not done so already, reboot the MFP in Protected Service mode (PSM).
2.
Open and close the IDO assembly to recalibrate EN14.
3.
Open the IDO Sensors, Solenoids, LEDs diagnostic page, and then open the IDO and push on the
EN14 roller and verify that the sensor state changes.
4.
Test the voltage at EN14: 3.3 Vdc at pins 1 to 6, 2 to 6, and 5 to 6 on W32P10-W50J10.
5.
Test the voltage to EN14 on A2: 3.13 Vdc unblocked at J8 pins 2B to 1B, 3.26 Vdc unblocked at
pins 3B to 1B, and 3.13 Vdc unblocked at pins 4B to 1B.
Additional root causes
ł
IDO Input 2 motor (M10)
ł
A2
ł
Diagnostic page: Click Subsystems, click Paper Path, and then click IDO Sensors, Solenoids,
LEDs.
ł
Component locator: IDO component locator on page 1729
ł
Wiring diagram: Motion PCA (A2) diagram on page 2508
ł
Parts diagram: IDO parts diagrams on page 1729
ł
Replace EN14: IDO Media Thickness encoder (EN14) on page 424
ł
M10: B2.0102 on page 2176
ł
A2: D4.0705 on page 2392
Links
ENWW
Event Log error and warning codes 2183
B2.0301
Description
ł
Able to open locked left-side upper panel
Primary root causes
ł
Misaligned IDO door
ł
IDO Interlock solenoid (SOL3)
ł
Bad wire harness between the Motion PCA (A2) and SOL3
Recommended actions
1.
If you have not done so already, reboot the MFP in Protected Service mode (PSM).
2.
Check the alignment of the IDO door.
3.
Open the IDO Sensors, Solenoids, LEDs diagnostic page, and then activate SOL3.
4.
Check the voltage at SOL3: 20 Vdc at pins 1 to 2 on W98P3-SOL3.
5.
Check the voltage to SOL3 on A2: 20 Vdc at J14 pins 9 to 18.
Additional root causes
ł
A2
ł
Fault tree: B2.0301: Able to open locked left-side upper panel on page 1228
ł
Diagnostic page: Click Subsystems, click Paper Path, and then click IDO Sensors, Solenoids,
LEDs.
ł
Component locator: IDO component locator on page 1729
ł
Wiring diagram: IDO H-bar wiring diagram on page 2489
ł
Parts diagram: IDO parts diagrams on page 1729
ł
A2: D4.0705 on page 2392
Links
2184 Appendix A Event Log codes
ENWW
B2.03C1
Description
ł
IDO Diverter solenoid (SOL2)
Primary root causes
ł
IDO Diverter solenoid (SOL2)
ł
Wire harness between SOL2 and the Motion PCA (A2)
Recommended actions
1.
Open the IDO Sensors, Solenoids, LEDs diagnostic page, and then activate and deactivate SOL2.
2.
Check SOL2 for mechanical binding, contamination, excessive wear, and correct installation.
3.
Test the voltage at SOL2: 20 Vdc at pins 1 to 2 on W19P2-SOL2.
4.
Test the voltage to SOL2 on A2: 20 Vdc at J14 pins 6 to 15.
Additional root causes
ł
A2
ł
Fault tree: B2.03C1: IDO Diverter solenoid (SOL2) on page 1230
ł
Diagnostic page: Click Subsystems, click Paper Path, and then click IDO Sensors, Solenoids,
LEDs.
ł
Component locator: IDO component locator on page 1729
ł
Wiring diagram: IDO paper path 1 wiring diagram on page 2487
ł
Parts diagram: IDO parts diagrams on page 1729
ł
Replace SOL2: IDO Diverter solenoid (SOL2) on page 405
ł
A2: D4.0705 on page 2392
Links
ENWW
Event Log error and warning codes 2185
B2.1301
Description
ł
Paper jam at IDO Input Staging 2 sensor (SN10)
Primary root causes
ł
SN10
ł
Wire harness between SN10 and the Motion PCA (A2)
Recommended actions
1.
Open the IDO Sensors, Solenoids, LEDs diagnostic page, and then manually activate SN10 and
verify that the sensor state changes.
2.
Verify that SN10 is correctly seated and clean.
3.
Verify that the idler rollers are correctly seated and clean.
4.
Test the voltage at SN10: 3.25 Vdc at pins 17B to 16B and 1.18 Vdc at pins15B to 16B on W97P7W44J7.
5.
Test the voltage to SN10 on A2: 1.19 Vdc unblocked and blocked at J4 pins 4B to 3B and 0.15 vdc
unblocked, 3.25 vdc blocked at pins 2B to 3B.
Additional root causes
ł
M10
ł
A2
ł
Fault tree: B2.1301: Paper jam at IDO Input Staging 2 sensor (SN10) on page 1242
ł
Diagnostic page: Click Subsystems, click Paper Path, and then click IDO Sensors, Solenoids,
LEDs.
ł
Component locator: IDO component locator on page 1729
ł
Wiring diagram: IDO paper path 2 wiring diagram on page 2488
ł
Parts diagram: IDO parts diagrams on page 1729
ł
Replace SN10: IDO sensors on page 424
ł
M10: B2.0102 on page 2176
ł
A2: D4.0705 on page 2392
Links
2186 Appendix A Event Log codes
ENWW
B2.1302
Description
ł
Paper jam at IDO Media Thickness encoder (EN14)
Primary root causes
ł
EN14
ł
Wire harness between EN14 and the Motion PCA (A2)
Recommended actions
1.
Open and close the IDO assembly to recalibrate EN14.
2.
Open the IDO Sensors, Solenoids, LEDs diagnostic page, and then open the IDO and push on the
EN14 roller and verify that the sensor state changes.
3.
Test the voltage at EN14: 3.3 Vdc at pins 1 to 6, 2 to 6, and 5 to 6 on W32P10-W50J10.
4.
Test the voltage to EN14 on A2: 3.13 Vdc unblocked at J8 pins 2B to 1B, 3.26 Vdc unblocked at
pins 3B to 1B, and 3.13 Vdc unblocked at pins 4B to 1B.
Additional root causes
ł
IDO Input 2 motor (M10)
ł
A2
ł
Fault tree: B2.1302: Paper jam at IDO Media Thickness encoder (EN14) on page 1244
ł
Diagnostic page: Click Subsystems, click Paper Path, and then click IDO Sensors, Solenoids,
LEDs.
ł
Component locator: IDO component locator on page 1729
ł
Wiring diagram: Motion PCA (A2) diagram on page 2508
ł
Parts diagram: IDO parts diagrams on page 1729
ł
Replace EN14: IDO Media Thickness encoder (EN14) on page 424
ł
M10: B2.0102 on page 2176
ł
A2: D4.0705 on page 2392
Links
ENWW
Event Log error and warning codes 2187
B2.1303
Description
ł
Paper jam at IDO Input Staging 1 sensor (SN7)
Primary root causes
ł
SN7
ł
Wire harness between SN7 and the Motion PCA (A2)
Recommended actions
1.
Open the IDO Sensors, Solenoids, LEDs diagnostic page, and then manually activate SN7 and
verify that the sensor state changes.
2.
Verify that SN7 is correctly seated and clean.
3.
Verify that the idler rollers are correctly seated and clean.
4.
Test the voltage at SN7: 1.18 Vdc unblocked, 3.25 Vdc blocked at pins 14B to 13B and 1.18 Vdc
blocked and unblocked at pins 12B to 13B on W97P7-W44J7.
5.
Test the voltage to SN7 on A2: 1.18 Vdc blocked and unblocked at J8 pins 7B to 6B and 0.19 Vdc,
unblocked 3.25 Vdc blocked at pins 5B to 6B.
Additional root causes
ł
M10
ł
A2
ł
Fault tree: B2.1303: Paper jam at IDO Input Staging 1 sensor (SN7) on page 1246
ł
Diagnostic page: Click Subsystems, click Paper Path, and then click IDO Sensors, Solenoids,
LEDs.
ł
Component locator: IDO component locator on page 1729
ł
Wiring diagram: IDO paper path 2 wiring diagram on page 2488
ł
Parts diagram: IDO parts diagrams on page 1729
ł
Replace SN7: IDO sensors on page 424
ł
M10: B2.0102 on page 2176
ł
A2: D4.0705 on page 2392
Links
2188 Appendix A Event Log codes
ENWW
B2.1304
Description
ł
Paper jam at IDO Input Media sensor (SN8)
Primary root causes
ł
SN8
ł
Wire harness between SN8 and the Motion PCA (A2)
Recommended actions
1.
Open the IDO Sensors, Solenoids, LEDs diagnostic page, and then manually activate SN8 and
verify that the sensor state changes.
2.
Verify that SN8 is correctly seated and clean.
3.
Verify that the idler rollers are correctly seated and clean.
4.
Test the voltage at SN8: 0 Vdc blocked and unblocked at pins 10B to 11B and -5 Vdc blocked and
unblocked at pins 12B to 11B on W96P6-W45J6.
5.
Test the voltage toSN8 on A2: 3.3 Vdc at J5 pins 6B to 5B and 4B to 5B.
Additional root causes
ł
M15
ł
A2
ł
Fault tree: B2.1304: Paper jam at IDO Input Media sensor (SN8) on page 1248
ł
Diagnostic page: Click Subsystems, click Paper Path, and then click IDO Sensors, Solenoids,
LEDs.
ł
Component locator: IDO component locator on page 1729
ł
Wiring diagram: IDO paper path 1 wiring diagram on page 2487
ł
Parts diagram: IDO parts diagrams on page 1729
ł
Replace SN8: IDO sensors on page 424
ł
M15: B2.0103 on page 2177
ł
A2: D4.0705 on page 2392
Links
ENWW
Event Log error and warning codes 2189
B2.1305
Description
ł
Paper jam at IDO Output Media sensor (SN9)
Primary root causes
ł
SN9
ł
Wire harness between SN9 and the Motion PCA (A2)
Recommended actions
1.
Open the IDO Sensors, Solenoids, LEDs diagnostic page, and then manually activate SN9 and
verify that the sensor state changes.
2.
Verify that SN9 is correctly seated and clean.
3.
Verify that the idler rollers are correctly seated and clean.
4.
Test the voltage at SN9: 5 Vdc unblocked, 0 Vdc blocked at pins 2B to 1B and 5 Vdc unblocked,
5 Vdc blocked at pins 3B to 1B on W96P6-W45J6.
5.
Test the voltage to SN9 on A2: 5 Vdc unblocked, 0 Vdc blocked at J4 pins 14B to 15B and 5 Vdc
unblocked and blocked at pins 13B to 15B.
Additional root causes
ł
M11
ł
M13
ł
A2
ł
Fault tree: B2.1305: Paper jam at IDO Output Media sensor (SN9) on page 1250
ł
Diagnostic page: Click Subsystems, click Paper Path, and then click IDO Sensors, Solenoids,
LEDs.
ł
Component locator: IDO component locator on page 1729
ł
Wiring diagram: IDO paper path 1 wiring diagram on page 2487
ł
Parts diagram: IDO parts diagrams on page 1729
ł
Replace SN9: IDO sensors on page 424
ł
M11: B2.0106 on page 2180
ł
M13: B2.0104 on page 2178
ł
A2: D4.0705 on page 2392
Links
2190 Appendix A Event Log codes
ENWW
B2.1306
Description
ł
Paper jam at IDO Output 1 sensor (SN15)
Primary root causes
ł
SN15
ł
Wire harness between SN15 and the Motion PCA (A2)
Recommended actions
1.
Open the IDO Sensors, Solenoids, LEDs diagnostic page, and then manually activate SN15 and
verify that the sensor state changes.
2.
Verify that SN15 is correctly seated and clean.
3.
Verify that the idler rollers are correctly seated and clean.
4.
Test the voltage at SN15: 5 Vdc unblocked, 0 Vdc blocked at pins 8B to 7B and 5 Vdc unblocked
at pins 9B to 7B on W96P6-W45J6.
5.
Test the voltage to SN15 on A2: 5 Vdc unblocked and blocked at J5 pins 7B to 9B and 5 Vdc
unblocked, 0 Vdc blocked at pins 8B to 9B.
Additional root causes
ł
M11
ł
M13
ł
A2
ł
Fault tree: B2.1306: Paper jam at IDO Output 1 sensor (SN15) on page 1252
ł
Diagnostic page: Click Subsystems, click Paper Path, and then click IDO Sensors, Solenoids,
LEDs.
ł
Component locator: IDO component locator on page 1729
ł
Wiring diagram: IDO paper path 1 wiring diagram on page 2487
ł
Parts diagram: IDO parts diagrams on page 1729
ł
Replace SN15: IDO sensors on page 424
ł
M11: B2.0106 on page 2180
ł
M13: B2.0104 on page 2178
ł
A2: D4.0705 on page 2392
Links
ENWW
Event Log error and warning codes 2191
B2.1307
Description
ł
Paper jam at IDO Output 2 sensor (SN12)
Primary root causes
ł
SN12
ł
Wire harness between SN12 and the Motion PCA (A2)
Recommended actions
1.
Open the IDO Sensors, Solenoids, LEDs diagnostic page, and then manually activate SN12 and
verify that the sensor state changes.
2.
Verify that SN12 is correctly seated and clean.
3.
Verify that the idler rollers are correctly seated and clean.
4.
Test the voltage at SN12: 5 Vdc blocked or unblocked at pins 6B to 4B and 5 Vdc unblocked, 0
Vdc blocked at pins 5B to 4B on W96P6-W45J6.
5.
Test the voltage to SN12 from A2: 5 Vdc blocked and unblocked at J5 pins 11B to 12B and 10B to
12B.
Additional root causes
ł
M11
ł
SOL2
ł
A2
ł
Fault tree: B2.1307: Paper jam at IDO Output 2 sensor (SN12) on page 1254
ł
Diagnostic page: Click Subsystems, click Paper Path, and then click IDO Sensors, Solenoids,
LEDs.
ł
Component locator: IDO component locator on page 1729
ł
Wiring diagram: IDO paper path 1 wiring diagram on page 2487
ł
Parts diagram: IDO parts diagrams on page 1729
ł
Replace SN12: IDO sensors on page 424
ł
M11: B2.0106 on page 2180
ł
SOL2: B2.03C1 on page 2185
ł
A2: D4.0705 on page 2392
Links
2192 Appendix A Event Log codes
ENWW
B2.1308
Description
ł
Paper jam at IDO Duplex Staging sensor (SN11)
Primary root causes
ł
SN11
ł
Wire harness between SN11 and the Motion PCA (A2)
Recommended actions
1.
Open the IDO Sensors, Solenoids, LEDs diagnostic page, and then manually activate SN11 and
verify that the sensor state changes.
2.
Verify that SN11 is correctly seated and clean.
3.
Verify that the idler rollers are correctly seated and clean.
4.
Test the voltage at SN11: 1.18 Vdc unblocked and blocked at pins 6A to 5A and 0.15 Vdc
unblocked, 3.23 Vdc blocked at pins 4A to 5A on W97P7-W44J7.
5.
Test the voltage to SN11 on A2: 1.18 Vdc for blocked and unblocked at J4 pins 13A to 14A and
0.15 Vdc unblocked, 3.24 Vdc blocked at pins 15A to 14A.
Additional root causes
ł
SOL2
ł
M12
ł
A2
ł
Fault tree: B2.1308: Paper jam at IDO Duplex Staging sensor (SN11) on page 1256
ł
Diagnostic page: Click Subsystems, click Paper Path, and then click IDO Sensors, Solenoids,
LEDs.
ł
Component locator: IDO component locator on page 1729
ł
Wiring diagram: IDO paper path 2 wiring diagram on page 2488
ł
Parts diagram: IDO parts diagrams on page 1729
ł
Replace SN11: IDO sensors on page 424
ł
SOL2: B2.03C1 on page 2185
ł
M12: B2.0105 on page 2179
ł
A2: D4.0705 on page 2392
Links
ENWW
Event Log error and warning codes 2193
B2.1309
Description
ł
Paper jam at IDO Duplex Media sensor (SN16)
Primary root causes
ł
SN16
ł
Wire harness between SN16 and the Motion PCA (A2)
Recommended actions
1.
Open the IDO Sensors, Solenoids, LEDs diagnostic page, and then manually activate SN16 and
verify that the sensor state changes.
2.
Verify that SN16 is correctly seated and clean.
3.
Verify that the idler rollers are correctly seated and clean.
4.
Test the voltage at SN16: 3.24 Vdc unblocked, 0.08 Vdc blocked at pins 10B to 9B and 1.18 Vdc
unblocked or blocked at pins 11B to 9B on W97P7-W44J7.
5.
Test the voltage to SN16 from A2: 3.25 Vdc unblocked, 0.08 Vdc blocked at J4 pins 9B to 10B and
1.18 Vdc unblocked and blocked at pins 8B to 10B.
Additional root causes
ł
M12
ł
A2
ł
Fault tree: B2.1309: Paper jam at IDO Duplex Media sensor (SN16) on page 1258
ł
Diagnostic page: Click Subsystems, click Paper Path, and then click IDO Sensors, Solenoids,
LEDs.
ł
Component locator: IDO component locator on page 1729
ł
Wiring diagram: IDO paper path 2 wiring diagram on page 2488
ł
Parts diagram: IDO parts diagrams on page 1729
ł
Replace SN16: IDO sensors on page 424
ł
M12: B2.0105 on page 2179
ł
A2: D4.0705 on page 2392
Links
2194 Appendix A Event Log codes
ENWW
C0.0101
Description
ł
Vacuum 1 motor (VAC1) failed to start after three attempts
Primary root causes
ł
VAC1
ł
Wire harness between VAC1, the Ink Assist PCA (A3), and the Main Engine PCA (A5)
Recommended actions
1.
If you have not done so already, reboot the MFP in Protected Service mode (PSM).
2.
Test the voltage at VAC1: 2 to 5 Vac on VAC1 pins 1 to 2, 1 to 3, and 2 to 3.
3.
Test the voltage to VAC1 from A3: 2 to 5 Vac at J5 pins 1 to 2, 1 to 3, 2 to 3.
Additional root causes
ł
A3
ł
A5
ł
Fault tree: C0.0101: Vacuum 1 motor (VAC1) failed to start after three attempts on page 1260
ł
Diagnostic page: Click Subsystems, and then click Vacuum.
ł
Component locator: Vacuum component locator on page 1790
ł
Wiring diagram: Vacuum and aerosol wiring diagram on page 2500
ł
Parts diagram: Vacuum parts diagrams on page 1790
ł
A3: D4.0703 on page 2390
ł
A5: D4.0702 on page 2389
Links
ENWW
Event Log error and warning codes 2195
C0.0102
Description
ł
Vacuum 2 motor (VAC2) failed to start after three attempts
Primary root causes
ł
VAC2
ł
Wire harness between VAC2, the Ink Assist PCA (A3), and the Main Engine PCA (A5)
Recommended actions
1.
If you have not done so already, reboot the MFP in Protected Service mode (PSM).
2.
Test the voltage at VAC2: 2 to 5 Vac on VAC2 pins 1 to 2, 1 to 3, and 2 to 3.
3.
Test the voltage to VAC2 on A3: 2 to 5 Vac at J5 pins 4 to 5, 4 to 6, and 5 to 6.
Additional root causes
ł
A3
ł
A5
ł
Fault tree: C0.0102: Vacuum 2 motor (VAC2) failed to start after three attempts on page 1262
ł
Diagnostic page: Click Subsystems, and then click Vacuum.
ł
Component locator: Vacuum component locator on page 1790
ł
Wiring diagram: Vacuum and aerosol wiring diagram on page 2500
ł
Parts diagram: Vacuum parts diagrams on page 1790
ł
A3: D4.0703 on page 2390
ł
A5: D4.0702 on page 2389
Links
2196 Appendix A Event Log codes
ENWW
C0.0103
Description
ł
Vacuum 3 motor (VAC3) failed to start after three attempts
Primary root causes
ł
VAC3
ł
Wire harness between VAC3, the Ink Assist PCA (A3), and the Main Engine PCA (A5)
Recommended actions
1.
If you have not done so already, reboot the MFP in Protected Service mode (PSM).
2.
Test the voltage at VAC3: 2 to 5 Vac on VAC3 pins 1 to 2, 1 to 3, and 2 to 3.
3.
Test the voltage to VAC3 on A3: 2 to 5 Vac at J5 pins 7 to 8, 7 to 9, and 8 to 9.
Additional root causes
ł
A3
ł
A5
ł
Fault tree: C0.0103: Vacuum 3 motor (VAC3) failed to start after three attempts on page 1264
ł
Diagnostic page: Click Subsystems, and then click Vacuum.
ł
Component locator: Vacuum component locator on page 1790
ł
Wiring diagram: Vacuum and aerosol wiring diagram on page 2500
ł
Parts diagram: Vacuum parts diagrams on page 1790
ł
A3: D4.0703 on page 2390
ł
A5: D4.0702 on page 2389
Links
ENWW
Event Log error and warning codes 2197
C0.0104
Description
ł
Vacuum 4 motor (VAC4) failed to start after three attempts
Primary root causes
ł
VAC4
ł
Wire harness between VAC4, the Ink Assist PCA (A3), and the Main Engine PCA (A5)
Recommended actions
1.
If you have not done so already, reboot the MFP in Protected Service mode (PSM).
2.
Test the voltage at VAC4: 2 to 5 Vac on VAC4 pins 1 to 2, 1 to 3, and 2 to 3.
3.
Test the voltage to VAC4 from A3: 2 to 5 Vac at J5 pins 12 to 13, 12 to 14, and 13 to 14.
Additional root causes
ł
A3
ł
A5
ł
Fault tree: C0.0104: Vacuum 4 motor (VAC4) failed to start after three attempts on page 1266
ł
Diagnostic page: Click Subsystems, and then click Vacuum.
ł
Component locator: Vacuum component locator on page 1790
ł
Wiring diagram: Vacuum and aerosol wiring diagram on page 2500
ł
Parts diagram: Vacuum parts diagrams on page 1790
ł
A3: D4.0703 on page 2390
ł
A5: D4.0702 on page 2389
Links
2198 Appendix A Event Log codes
ENWW
C0.0105
Description
ł
Vacuum 5 motor (VAC5) failed to start after three attempts
Primary root causes
ł
VAC5
ł
Wire harness between VAC5, the Ink Assist PCA (A3), and the Main Engine PCA (A5)
Recommended actions
1.
If you have not done so already, reboot the MFP in Protected Service mode (PSM).
2.
Test the voltage at VAC5: 2 to 5 Vac on VAC5 pins 1 to 2, 1 to 3, and 2 to 3.
3.
Test the voltage to VAC5 on A3: 2 to 5 Vac at J5 pins 15 to 16, 15 to 17, and 16 to 17.
Additional root causes
ł
A3
ł
A5
ł
Fault tree: C0.0105: Vacuum 5 motor (VAC5) failed to start after three attempts on page 1268
ł
Diagnostic page: Click Subsystems, and then click Vacuum.
ł
Component locator: Vacuum component locator on page 1790
ł
Wiring diagram: Vacuum and aerosol wiring diagram on page 2500
ł
Parts diagram: Vacuum parts diagrams on page 1790
ł
A3: D4.0703 on page 2390
ł
A5: D4.0702 on page 2389
Links
ENWW
Event Log error and warning codes 2199
C0.0106
Description
ł
Aerosol fan (AERO) failed to start after three attempts
Primary root causes
ł
AERO
ł
Wire harness between AERO, the Ink Assist PCA (A3), and the Main Engine PCA (A5)
Recommended actions
1.
If you have not done so already, reboot the MFP in Protected Service mode (PSM).
2.
Test the voltage at AERO: 2 to 5 Vac on AERO pins 1 to 2, 1 to 3, and 2 to 3.
3.
Test the voltage to AERO on A3: 2 to 5 Vac at J5 pins 18 to 19, 18 to 20, and 19 to 20.
Additional root causes
ł
A3
ł
A5
ł
Fault tree: C0.0106: Aerosol fan (AERO) failed to start after three attempts on page 1270
ł
Diagnostic page: Click Subsystems, and then click Vacuum.
ł
Component locator: Aerosol component locator on page 1590
ł
Wiring diagram: Vacuum and aerosol wiring diagram on page 2500
ł
Parts diagram: Aerosol parts diagram on page 1591
ł
A3: D4.0703 on page 2390
ł
A5: D4.0702 on page 2389
Links
2200 Appendix A Event Log codes
ENWW
C0.0107
Description
ł
Low vacuum pressure
Primary root causes
ł
Web wipe cartridge
ł
Loose or disconnected tubing between the vacuum motor housing and A3
ł
Ink Assist PCA (A3)
ł
Vacuum motor housing
ł
Vacuum motors
ł
Poppet valves
ł
MFP altitude above 2438.4 m (8000 ft.)
Recommended actions
1.
Reboot the MFP. Open the Vacuum diagnostic page, and then click Run All Motors. Verify that
the vacuum motors deliver 2.4 kPa (10 inches of water). You might need to adjust the RPM value
to attain correct pressure.
2.
Verify that the vacuum motors run at approximately the same RPM. Replace any motor that runs
abnormally.
3.
Verify that the SN40 tubing to A3 is not damaged, blocked, or disconnected.
4.
Check the Web wipe cartridge gaskets for leaks.
5.
Test SN40. Disconnect the tubing to the vacuum motor housing and use the tubing like a straw to
apply a vacuum pressure. If the sensor is faulty, replace A3.
6.
Check for a drum zone that leaks.
7.
Check the vacuum motor housing for leaks by sealing off the drum with sheets of paper.
ł
Diagnostic page: Click Subsystems, and then click Vacuum.
ł
Component locator: Vacuum component locator on page 1790
ł
Wiring diagram: Vacuum and aerosol wiring diagram on page 2500
ł
Parts diagram: Vacuum parts diagrams on page 1790
ł
Replace A3: Ink Assist PCA (A3) on page 540
Links
ENWW
Event Log error and warning codes 2201
C0.0108
Description
ł
Vacuum motors were shut down for protection because a watchdog timer on the Ink Assist PCA
(A3) tripped after a 15 second signal loss
Primary root causes
ł
Other system error conditions
Recommended actions
䦱
Fix any errors or warnings recorded in the Event Log.
ł
Event Log: Click View Log and Troubleshoot.
ł
Component locator: Vacuum component locator on page 1790
ł
Wiring diagram: Vacuum and aerosol wiring diagram on page 2500
ł
Parts diagram: Vacuum parts diagrams on page 1790
Links
2202 Appendix A Event Log codes
ENWW
C0.01A1
Description
ł
Vacuum 1 motor (VAC1) failed to start on the first or second attempt but started by the third attempt
Primary root causes
ł
VAC1 wire harness
ł
VAC1
Recommended actions
1.
Open the Vacuum diagnostic page, and then run VAC1 multiple times, looking for startup problems.
2.
Check the error and warning logs for all vacuum-related entries.
3.
Check the VAC1 wire connector.
ł
Fault tree: C0.01A1: Vacuum 1 motor (VAC1) failed to start on the first or second attempt but started
by the third attempt on page 1272
ł
Diagnostic page: Click Subsystems, and then click Vacuum.
ł
Component locator: Vacuum component locator on page 1790
ł
Wiring diagram: Vacuum and aerosol wiring diagram on page 2500
ł
Parts diagram: Vacuum parts diagrams on page 1790
Links
ENWW
Event Log error and warning codes 2203
C0.01A2
Description
ł
Vacuum 2 motor (VAC2) failed to start on the first or second attempt but started by the third attempt
Primary root causes
ł
VAC2 wire harness
ł
VAC2
Recommended actions
1.
Open the Vacuum diagnostic page, and then run VAC2 multiple times, looking for startup problems.
2.
Check the error and warning logs for all vacuum-related entries.
3.
Check the VAC2 wire connector.
ł
Fault tree: C0.01A2: Vacuum 2 motor (VAC2) failed to start on the first or second attempt but started
by the third attempt on page 1273
ł
Diagnostic page: Click Subsystems, and then click Vacuum.
ł
Component locator: Vacuum component locator on page 1790
ł
Wiring diagram: Vacuum and aerosol wiring diagram on page 2500
ł
Parts diagram: Vacuum parts diagrams on page 1790
Links
2204 Appendix A Event Log codes
ENWW
C0.01A3
Description
ł
Vacuum 3 motor (VAC3) failed to start on the first or second attempt but started by the third attempt
Primary root causes
ł
VAC3 wire harness
ł
VAC3
Recommended actions
1.
Open the Vacuum diagnostic page, and then run VAC3 multiple times, looking for startup problems.
2.
Check the error and warning logs for all vacuum-related entries.
3.
Check the VAC3 wire connector.
ł
Fault tree: C0.01A3: Vacuum 3 motor (VAC3) failed to start on the first or second attempt but started
by the third attempt on page 1274
ł
Diagnostic page: Click Subsystems, and then click Vacuum.
ł
Component locator: Vacuum component locator on page 1790
ł
Wiring diagram: Vacuum and aerosol wiring diagram on page 2500
ł
Parts diagram: Vacuum parts diagrams on page 1790
Links
ENWW
Event Log error and warning codes 2205
C0.01A4
Description
ł
Vacuum 4 motor (VAC4) failed to start on the first or second attempt but started by the third attempt
Primary root causes
ł
VAC4 wire harness
ł
VAC4
Recommended actions
1.
Open the Vacuum diagnostic page, and then run VAC4 multiple times, looking for startup problems.
2.
Check the error and warning logs for all vacuum-related entries.
3.
Check the VAC4 wire connector.
ł
Fault tree: C0.01A4: Vacuum 4 motor (VAC4) failed to start on the first or second attempt but started
by the third attempt on page 1275
ł
Diagnostic page: Click Subsystems, and then click Vacuum.
ł
Component locator: Vacuum component locator on page 1790
ł
Wiring diagram: Vacuum and aerosol wiring diagram on page 2500
ł
Parts diagram: Vacuum parts diagrams on page 1790
Links
2206 Appendix A Event Log codes
ENWW
C0.01A5
Description
ł
Vacuum 5 motor (VAC5) failed to start on the first or second attempt but started by the third attempt
Primary root causes
ł
VAC5 wire harness
ł
VAC5
Recommended actions
1.
Open the Vacuum diagnostic page, and then run VAC5 multiple times, looking for startup problems.
2.
Check the error and warning logs for all vacuum-related entries.
3.
Check the VAC5 wire connector.
ł
Fault tree: C0.01A5: Vacuum 5 motor (VAC5) failed to start on the first or second attempt but started
by the third attempt on page 1276
ł
Diagnostic page: Click Subsystems, and then click Vacuum.
ł
Component locator: Vacuum component locator on page 1790
ł
Wiring diagram: Vacuum and aerosol wiring diagram on page 2500
ł
Parts diagram: Vacuum parts diagrams on page 1790
Links
ENWW
Event Log error and warning codes 2207
C0.01A6
Description
ł
Aerosol fan (AERO) failed to start on the first or second attempt but started by the third attempt
Primary root causes
ł
AERO wire harness
ł
AERO
Recommended actions
1.
Open the Vacuum diagnostic page, and then run AERO multiple times, looking for startup
problems.
2.
Check the error and warning logs for all aerosol-related entries.
3.
Check the AERO wire connector.
ł
Fault tree: C0.01A6: Aerosol fan (AERO) failed to start on the first or second attempt but started
by the third attempt on page 1277
ł
Diagnostic page: Click Subsystems, and then click Vacuum.
ł
Component locator: Aerosol component locator on page 1590
ł
Wiring diagram: Vacuum and aerosol wiring diagram on page 2500
ł
Parts diagram: Aerosol parts diagram on page 1591
Links
2208 Appendix A Event Log codes
ENWW
C0.01A7
Description
ł
Total power needed to operate the vacuum motors (VAC1 to VAC5) and the Aerosol fan (AERO)
exceeded 400 watts
Primary root causes
ł
VAC1, VAC2, VAC3, VAC4, and VAC5,
ł
AERO
ł
MFP altitude above 2438.4 m (8000 ft.)
ł
Vacuum leak
ł
Ink Assist PCA (A3)
Recommended actions
1.
Open the Vacuum diagnostic page, and then click Run All Motors. Verify that the vacuum motors
deliver 2.4 kPa (10 inches of water). You might need to adjust the RPM value to attain correct
pressure.
2.
Verify that VAC1 to VAC5 and AERO consume approximately the same amount of power. AERO
normally consumes less power because it runs at a fixed rate of approximately 13,000 RPM.
Replace any motor that consumes too much power.
3.
Check the Web wipe cartridge gasket for leaks.
4.
Check for a drum zone that leaks.
5.
Check the vacuum motor housing for leaks.
6.
Replace A3.
ł
Diagnostic page: Click Subsystems, and then click Vacuum.
ł
Component locator: Vacuum component locator on page 1790
ł
Wiring diagram: Vacuum and aerosol wiring diagram on page 2500
ł
Parts diagram: Vacuum parts diagrams on page 1790
ł
Replace A3: Ink Assist PCA (A3) on page 540
Links
ENWW
Event Log error and warning codes 2209
C0.01A8
Description
ł
Vacuum: Analog to Digital conversion bad
Primary root causes
ł
Ink Assist PCA (A3)
Recommended actions
䦱
Replace A3.
ł
Diagnostic page: Click Subsystems, and then click Vacuum.
ł
Component locator: Vacuum component locator on page 1790
ł
Wiring diagram: Vacuum and aerosol wiring diagram on page 2500
ł
Parts diagram: Vacuum parts diagrams on page 1790
ł
Replace A3: Ink Assist PCA (A3) on page 540
Links
2210 Appendix A Event Log codes
ENWW
C0.01AA
Description
ł
Vacuum 1 motor (VAC1) stalls during printing
Primary root causes
ł
VAC1
ł
Wire harness between VAC1, the Ink Assist PCA (A3), and the Main Engine PCA (A5)
Recommended actions
1.
Open the Vacuum diagnostic page, and then run VAC1.
2.
Test the voltage at VAC1: 2 to 5 Vac on VAC1 pins 1 to 2, 1 to 3, and 2 to 3.
3.
Test the voltage to VAC1 from A3: 2 to 5 Vac at J5 pins 1 to 2, 1 to 3, 2 to 3.
Additional root causes
ł
A3
ł
A5
ł
Diagnostic page: Click Subsystems, and then click Vacuum.
ł
Component locator: Vacuum component locator on page 1790
ł
Wiring diagram: Vacuum and aerosol wiring diagram on page 2500
ł
Parts diagram: Vacuum parts diagrams on page 1790
ł
A3: D4.0703 on page 2390
ł
A5: D4.0702 on page 2389
Links
ENWW
Event Log error and warning codes 2211
C0.01AB
Description
ł
Warning Vacuum 2 motor (VAC2) stalls during printing
Primary root causes
ł
VAC2
ł
Wire harness between VAC2, the Ink Assist PCA (A3), and the Main Engine PCA (A5)
Recommended actions
1.
Open the Vacuum diagnostic page, and then run VAC2.
2.
Test the voltage at VAC2: 2 to 5 Vac on VAC2 pins 1 to 2, 1 to 3, and 2 to 3.
3.
Test the voltage to VAC2 on A3: 2 to 5 Vac at J5 pins 4 to 5, 4 to 6, and 5 to 6.
Additional root causes
ł
A3
ł
A5
ł
Diagnostic page: Click Subsystems, and then click Vacuum.
ł
Component locator: Vacuum component locator on page 1790
ł
Wiring diagram: Vacuum and aerosol wiring diagram on page 2500
ł
Parts diagram: Vacuum parts diagrams on page 1790
ł
A3: D4.0703 on page 2390
ł
A5: D4.0702 on page 2389
Links
2212 Appendix A Event Log codes
ENWW
C0.01AC
Description
ł
Vacuum 3 motor (VAC3) stalls during printing
Primary root causes
ł
VAC3
ł
Wire harness between VAC3, the Ink Assist PCA (A3), and the Main Engine PCA (A5)
Recommended actions
1.
Open the Vacuum diagnostic page, and then run VAC3.
2.
Test the voltage at VAC3: 2 to 5 Vac on VAC3 pins 1 to 2, 1 to 3, and 2 to 3.
3.
Test the voltage to VAC3 on A3: 2 to 5 Vac at J5 pins 7 to 8, 7 to 9, and 8 to 9.
Additional root causes
ł
A3
ł
A5
ł
Diagnostic page: Click Subsystems, and then click Vacuum.
ł
Component locator: Vacuum component locator on page 1790
ł
Wiring diagram: Vacuum and aerosol wiring diagram on page 2500
ł
Parts diagram: Vacuum parts diagrams on page 1790
ł
A3: D4.0703 on page 2390
ł
A5: D4.0702 on page 2389
Links
ENWW
Event Log error and warning codes 2213
C0.01AD
Description
ł
Vacuum 4 motor (VAC4) stalls during printing
Primary root causes
ł
VAC4
ł
Wire harness between VAC4, the Ink Assist PCA (A3), and the Main Engine PCA (A5)
Recommended actions
1.
Open the Vacuum diagnostic page, and then run VAC4.
2.
Test the voltage at VAC4: 2 to 5 Vac on VAC4 pins 1 to 2, 1 to 3, and 2 to 3.
3.
Test the voltage to VAC4 from A3: 2 to 5 Vac at J5 pins 12 to 13, 12 to 14, and 13 to 14.
Additional root causes
ł
A3
ł
A5
ł
Diagnostic page: Click Subsystems, and then click Vacuum.
ł
Component locator: Vacuum component locator on page 1790
ł
Wiring diagram: Vacuum and aerosol wiring diagram on page 2500
ł
Parts diagram: Vacuum parts diagrams on page 1790
ł
A3: D4.0703 on page 2390
ł
A5: D4.0702 on page 2389
Links
2214 Appendix A Event Log codes
ENWW
C0.01AE
Description
ł
Vacuum 5 motor (VAC5) stalls during printing
Primary root causes
ł
VAC5
ł
Wire harness between VAC5, the Ink Assist PCA (A3), and the Main Engine PCA (A5)
Recommended actions
1.
Open the Vacuum diagnostic page, and then run VAC5.
2.
Test the voltage at VAC5: 2 to 5 Vac on VAC5 pins 1 to 2, 1 to 3, and 2 to 3.
3.
Test the voltage to VAC5 on A3: 2 to 5 Vac at J5 pins 15 to 16, 15 to 17, and 16 to 17.
Additional root causes
ł
A3
ł
A5
ł
Diagnostic page: Click Subsystems, and then click Vacuum.
ł
Component locator: Vacuum component locator on page 1790
ł
Wiring diagram: Vacuum and aerosol wiring diagram on page 2500
ł
Parts diagram: Vacuum parts diagrams on page 1790
ł
A3: D4.0703 on page 2390
ł
A5: D4.0702 on page 2389
Links
ENWW
Event Log error and warning codes 2215
C0.01AF
Description
ł
Aerosol fan (AERO) stalls during printing
Primary root causes
ł
AERO
ł
Wire harness between AERO, the Ink Assist PCA (A3), and the Main Engine PCA (A5)
Recommended actions
1.
Open the Vacuum diagnostic page, and then run AERO.
2.
Test the voltage at AERO: 2 to 5 Vac on AERO pins 1 to 2, 1 to 3, and 2 to 3.
3.
Test the voltage to AERO on A3: 2 to 5 Vac at J5 pins 18 to 19, 18 to 20, and 19 to 20.
Additional root causes
ł
A3
ł
A5
ł
Diagnostic page: Click Subsystems, and then click Vacuum.
ł
Component locator: Aerosol component locator on page 1590
ł
Wiring diagram: Vacuum and aerosol wiring diagram on page 2500
ł
Parts diagram: Aerosol parts diagram on page 1591
ł
A3: D4.0703 on page 2390
ł
A5: D4.0702 on page 2389
Links
2216 Appendix A Event Log codes
ENWW
C0.0DC2
Description
ł
The media placement on the drum varies, resulting in margin variation
Primary root causes
ł
Media condition
ł
Dirty drum screen
Recommended actions
1.
Verify that the media being used meets product specifications.
2.
Clean the drum screen.
Additional root causes
ł
Top-of-form sensor (SN22)
ł
Low vacuum pressure
ł
Diagnostic page: Click Subsystems, and then click Drum.
ł
Component locator: Drum component locator on page 1641
ł
Wiring diagram: Drum wiring diagram on page 2471
ł
Parts diagram: Drum parts diagram on page 1642
ł
SN22: C1.0203 on page 2221
ł
Low vacuum pressure: C0.0107 on page 2201
Links
ENWW
Event Log error and warning codes 2217
C1.0101
Description
ł
Drum motor (M3) stall
Primary root causes
ł
Drive belt and pulley
ł
M3
ł
Drum Encoder PCA (EN2)
ł
Wire harness between M3, Drum Encoder PCA (EN2), and the Motion PCA (A2)
Recommended actions
1.
If you have not done so already, reboot the MFP in Protected Service mode (PSM).
2.
Turn the drum by hand and check for binding.
3.
Open the Drum diagnostic page, and then turn the drum by hand and verify that the EN1 count
changes.
4.
Run M3.
5.
Test the voltage at M3: 5 Vdc at pins 1 to 2 on W35P3-M3.
6.
Test the voltage to M3 on A2: 5 Vdc at J15 pins 3 to 8.
Additional root causes
ł
A2
ł
Diagnostic page: Click Subsystems, and then click Drum.
ł
Component locator: Drum component locator on page 1641
ł
Wiring diagram: Carriage wiring diagram on page 2466
ł
Parts diagram: Drum parts diagram on page 1642
ł
A2: D4.0705 on page 2392
Links
2218 Appendix A Event Log codes
ENWW
C1.0102
Description
ł
Drum Guide motor (M22) stall
Primary root causes
ł
M22
ł
Wire harness between M22 and the Motion PCA (A2)
Recommended actions
1.
If you have not done so already, reboot the MFP in Protected Service mode (PSM).
2.
Check M22 for obstructions. Clean as needed.
3.
Open the Drum diagnostic page, and then test M22.
4.
Check the M22 assembly for damage.
5.
Check the wire harness between M22 and A2.
ł
Diagnostic page: Click Subsystems, and then click Drum.
ł
Component locator: Drum component locator on page 1641
ł
Wiring diagram: Drum wiring diagram on page 2471
ł
Parts diagram: Drum parts diagram on page 1642
ł
Replace M22: Drum guide motor (M22) on page 445
Links
ENWW
Event Log error and warning codes 2219
C1.01A1
Description
ł
Drum motor (M3) requires higher than normal power (PWM) to operate
Primary root causes
ł
Drive belt
ł
M3
ł
Wire harness between M3 and the Motion PCA (A2)
Recommended actions
1.
Turn the drum by hand to check for binding.
2.
Open the Drum diagnostic page, and then run M3 and verify that the drum turns.
3.
Test the voltage at M3: 5 Vdc at pins 1 to 2 on W35P3-M3.
4.
Test the voltage to M3 on A2: 5 Vdc at J15 pins 3 to 8.
Additional root causes
ł
A2
ł
Diagnostic page: Click Subsystems, and then click Drum.
ł
Component locator: Drum component locator on page 1641
ł
Wiring diagram: Carriage wiring diagram on page 2466
ł
Parts diagram: Drum parts diagram on page 1642
ł
A2: D4.0705 on page 2392
Links
2220 Appendix A Event Log codes
ENWW
C1.0203
Description
ł
Top-of-form sensor (SN22) problem
Primary root causes
ł
SN22
ł
Wire harness between SN22, the Main Engine Backplane PCA (A4), Image Processing PCA (A6),
and the Motion PCA (A2)
Recommended actions
1.
If you have not done so already, reboot the MFP in Protected Service mode (PSM).
2.
Open the Drum diagnostic page, and then check that each of the LEDs operates.
3.
Verify that the gloss measurement is works.
4.
Test the voltage at SN22: 3 Vdc at pins 2 to 3 on W84P2-SN22.
5.
Test the voltage to SN22 on A6: 3 Vdc at J5 pins 16 to 17.
6.
Test the voltage to SN22 on A2: 3 Vdc at J7 pins 13A to 14A.
Additional root causes
ł
A2
ł
A6
ł
Diagnostic page: Click Subsystems, and then click Drum.
ł
Component locator: Carriage component locator on page 1602
ł
Wiring diagram: Carriage wiring diagram on page 2466
ł
Parts diagram: Carriage parts diagrams on page 1602
ł
A2: D4.0705 on page 2392
ł
A6: D2.0703 on page 2354
Links
ENWW
Event Log error and warning codes 2221
C1.0204
Description
ł
Top-of-form sensor (SN22) calibration failed
Primary root causes
ł
SN22
Recommended actions
1.
If you have not done so already, reboot the MFP in Protected Service mode (PSM).
2.
Open the Drum diagnostic page, and then check that the gloss measurement works.
3.
Check the drum surface for shiny spots where the sensor shines during bootup. Clean the drum
surface, and then reboot the MFP.
ł
Diagnostic page: Click Subsystems, and then click Drum.
ł
Component locator: Carriage component locator on page 1602
ł
Wiring diagram: Carriage wiring diagram on page 2466
ł
Parts diagram: Carriage parts diagrams on page 1602
Links
2222 Appendix A Event Log codes
ENWW
C1.02A1
Description
ł
The LED voltage needed to operate the Drop Detect sensors is higher than normal.
Primary root causes
ł
Drop detect assembly
Recommended actions
1.
Open the Drum page, and then check all six Drop Detect channel values to identify which channel
has the highest value.
2.
Clean the Drop Detect sensor and LED lenses.
3.
Replace the Drop Detect assembly.
ł
Diagnostic page: Click Subsystems, and then click Drum.
ł
Component locator: Drop Detect PCA (A22) diagram on page 2503
ł
Wiring diagram: Drum wiring diagram on page 2471
ł
Parts diagram: Drum parts diagram on page 1642
Links
ENWW
Event Log error and warning codes 2223
C1.02A2
Description
ł
Drop Detect failed self-test
Primary root causes
ł
Drop Detect assembly
ł
Wire harness between the Drop Detect and the Main Engine Backplane PCA (A4)
Recommended actions
1.
Open the Drum diagnostic page, and then examine the six Drop Detect channels in order to identify
a problem channel.
2.
Test the voltage at the Drop Detect assembly: 3.3 Vdc at pins 9 to 11 on W1P1-A22J1.
3.
Test the voltage to the Drop Detect assembly from A4: 3.3 Vdc at J2 pins 9 to 11.
Primary root causes
ł
Main Engine PCA (A5)
ł
Diagnostic page: Click Subsystems, and then click Drum.
ł
Component locator: Drum component locator on page 1641
ł
Wiring diagram: Drop Detect PCA (A22) diagram on page 2503
ł
Parts diagram: Drum parts diagram on page 1642
ł
A5: D4.0702 on page 2389
Links
2224 Appendix A Event Log codes
ENWW
C1.02A3
Description
ł
One or more of the six Drop Detect channels has an occluded sensor
Primary root causes
ł
Drop Detect assembly
Recommended actions
1.
Open the Drum diagnostic page, and then examine the six Drop Detect channels in order to identify
a problem channel.
2.
Clean the Drop Detect sensor and LED lenses of the problem channel.
3.
Replace the Drop Detect assembly.
ł
Diagnostic page: Click Subsystems, and then click Drum.
ł
Component locator: Drum component locator on page 1641
ł
Wiring diagram: Drop Detect PCA (A22) diagram on page 2503
ł
Parts diagram: Drum parts diagram on page 1642
Links
ENWW
Event Log error and warning codes 2225
C1.02A4
Description
ł
Drop Detect Beam calibration failed
Primary root causes
ł
Drop Detect assembly
Recommended actions
1.
Open the Drum diagnostic page, and then examine the six Drop Detect channels in order to identify
a problem channel.
2.
Open the Engine Calibrations 1 page, and then run the Drop Detect Beam calibration.
ł
Diagnostic page: Click Subsystems, and then click Drum.
ł
Component locator: Drum component locator on page 1641
ł
Wiring diagram: Drop Detect PCA (A22) diagram on page 2503
ł
Parts diagram: Drum parts diagram on page 1642
Links
2226 Appendix A Event Log codes
ENWW
C1.02A5
Description
ł
The Drop Detect nozzle testing procedure was unable to complete successfully. The Drop Detect
NVM value has been set to an uncalibrated condition. A recalibration of the Drop Detect Beam
cetner will be automatically triggered to run the next time that the Drop Detect nozzle test is
performed.
Primary root causes
ł
Temperature or humidity changes
ł
Pens
Recommended actions
1.
Open the Engine Calibrations 1 page, and then run the Drop Detect Beam calibration. Doing this
will resolve a failure due to a temperature or humidity change.
2.
Print one copy of the Nozzle Health plot with error hiding on and one copy with error hiding off.
Look for missing nozzles on the edges of each die.
3.
Run a Pen Cleaning routine.
4.
Open the Carriage Mechanism diagnostic page, and then test the carriage positioning behavior.
ł
Calibration page: Click Settings/Procedures, click Calibrations, and then click Engine
Calibrations 1.
Links
ENWW
Event Log error and warning codes 2227
C1.0501
Description
ł
Wrong drum drive encoder count
Primary root causes
ł
Drum Encoder PCA (EN2)
ł
Drum encoder disk
ł
Wire harness between EN2 and the Drum Encoder Averager PCA (EN1)
Recommended actions
1.
If you have not done so already, reboot the MFP in Protected Service mode (PSM).
2.
Remove the cheater plug from the Front Door Open switch (SW3). Open the Drum diagnostic page,
and then turn the drum one revolution by hand and verify that the drum encoder counts change by
22,880.
3.
Check the drum encoder disk for contamination. Clean as needed.
4.
Reseat the wire connectors on EN2.
Additional root causes
ł
Motion PCA (A2)
ł
Diagnostic page: Click Subsystems, and then click Drum.
ł
Component locator: Drum component locator on page 1641
ł
Wiring diagram: Drum wiring diagram on page 2471
ł
Parts diagram: Drum parts diagram on page 1642
ł
Replace the drum encoder disk: Drum encoder disk on page 449
ł
A2: D4.0705 on page 2392
Links
2228 Appendix A Event Log codes
ENWW
C1.0503
Description
ł
Wrong drum encoder averager count
Primary root causes
ł
Drum Encoder Averager PCA (EN1)
ł
Drum Encoder PCA (EN2)
ł
Drum encoder disk
ł
Wire harness between EN2 and EN1
Recommended actions
1.
If you have not done so already, reboot the MFP in Protected Service mode (PSM).
2.
Remove the cheater plug from the Front Door Open switch (SW3). Open the Drum diagnostic page,
and then turn the drum one revolution by hand and verify that the drum encoder at the Image
Processing PCA (A6) count changes by 11,438.
3.
On the EN1, verify that the DS6 LED is lit to indicate that 12, 5, and 3.3 volts are present.
4.
Rotate the drum by hand, and on the EN1, verify that the DS10 amber LED flashes.
5.
Rotate the drum by hand, and on the EN1, verify that the DS8 and DS9 LEDs flash to indicate that
a signal is being sent to A6.
6.
Rotate the drum by hand, and on EN1, verify that the DS3 and DS4 LEDs flash to indicate that
Drum 1 encoder (EN1) on EN1 is working.
7.
Rotate the drum by hand, and on EN1, verify that the DS1 and DS2 LEDs flash to indicate that
Drum 2 encoder (EN2) on EN1 is working.
8.
Rotate the drum by hand, and on EN2, verify that the DS5 and DS7 LEDs flash to indicate that
Drum 0 encoder (EN1) is working.
9.
Check the drum encoder disk for contamination. Clean as needed.
10. Reseat the wire connectors on EN2 and EN1.
Additional root causes
ł
A6
ł
Main Engine PCA (A5)
ł
Diagnostic page: Click Subsystems, and then click Drum.
ł
Component locator: Drum component locator on page 1641
ł
Wiring diagram: Drum wiring diagram on page 2471
ł
Parts diagram: Drum parts diagram on page 1642
Links
ENWW
Event Log error and warning codes 2229
ł
A5: D4.0702 on page 2389
ł
A6: D2.0703 on page 2354
2230 Appendix A Event Log codes
ENWW
C1.05A2
Description
ł
Drum Encoder PCA (EN2) signal amplitude is low
Primary root causes
ł
EN2
ł
Drum encoder disk
ł
EN2 wire harness
Recommended actions
1.
Open the Drum diagnostic page, and then turn the drum one revolution by hand and verify that the
drum encoder counts change by 22,880.
2.
Check the drum encoder disk for contamination. Clean with a dry, lint-free cloth as needed.
3.
Reseat the EN2 wire connectors.
ł
Diagnostic page: Click Subsystems, and then click Drum.
ł
Component locator: Drum component locator on page 1641
ł
Wiring diagram: Drum wiring diagram on page 2471
ł
Parts diagram: Drum parts diagram on page 1642
Links
ENWW
Event Log error and warning codes 2231
C1.1301
Description
ł
Clear paper jam at Top-of-form sensor (SN22)
Primary root causes
ł
SN22 or the wire harness between SN22 and the Motion PCA (A2)
ł
Curler drive assembly
Recommended actions
1.
Check the input trays for damaged paper.
2.
Verify that the paper meets product specifications.
3.
Open the Drum diagnostic page, and then test SN22.
4.
Open the IDO Motors diagnostic page, and then check the Curler drive operation.
Additional root cause
ł
A2
ł
Diagnostic page: Click Subsystems, and then click Drum.
ł
Component locator: Carriage component locator on page 1602
ł
Wiring diagram: Carriage wiring diagram on page 2466
ł
Parts diagram: Carriage parts diagrams on page 1602
ł
A2: D4.0705 on page 2392
Links
2232 Appendix A Event Log codes
ENWW
C1.1302
Description
ł
Clear paper jam at Drum 1 sensor (SN33)
Primary root causes
ł
SN33
ł
Wire harness between SN33 and the Motion PCA (A2)
Recommended actions
1.
Check the input trays for damaged paper.
2.
Verify that the paper meets product specifications.
3.
Open the Dryer diagnostic page, and then open and close the dryer lever and verify that the sensor
state changes.
4.
Test the voltage at SN33: 5 Vdc at pins 2 to 1 and 3 to 1 on W85P1-W34J1 or 5 Vdc at pins 11A
to 10A and 12A to 10A on W32P9-W34J9.
5.
Test the voltage to SN33 on A2: 5 Vdc at J8 pins 7A and 9A.
Additional root cause
ł
A2
ł
Diagnostic page: Click Subsystems, and then click Dryer.
ł
Component locator: Dryer component locator on page 1662
ł
Wiring diagram: Drum sensors wiring diagram on page 2472
ł
Parts diagram: Dryer parts diagrams on page 1662
ł
A2: D4.0705 on page 2392
Links
ENWW
Event Log error and warning codes 2233
C1.1303
Description
ł
Clear paper jam at Drum 2 sensor (SN34)
Primary root causes
ł
SN34
ł
Wire harness between SN34 and the Motion PCA (A2)
Recommended actions
1.
Check the input trays for damaged paper.
2.
Verify that the paper meets product specifications.
3.
Open the Dryer diagnostic page, and then open and close the dryer lever and verify that the sensor
state changes.
4.
Test the voltage at SN34: 5 Vdc at pins 5 to 4 and 6 to 4 on W85P1-W34J1 or 5 Vdc at pins 5A to
6A and 4A to 6A on W32P9-W34J9.
5.
Test the voltage to SN34 on A2: 5 Vdc at J8 pins 4A and 6A.
Additional root cause
ł
A2
ł
Diagnostic page: Click Subsystems, and then click Dryer.
ł
Component locator: Dryer component locator on page 1662
ł
Wiring diagram: Drum sensors wiring diagram on page 2472
ł
Parts diagram: Dryer parts diagrams on page 1662
ł
A2: D4.0705 on page 2392
Links
2234 Appendix A Event Log codes
ENWW
C1.131A
Description
ł
Clear paper jam at Carriage 1 Pen Protection sensor (SN56)
Primary root causes
ł
SN56 or a carriage stall
Recommended actions
1.
Check the input trays for damaged paper.
2.
Verify that the paper meets product specifications.
3.
Check the sensor plastic actuator for damage and contamination.
4.
Open the Carriage Mechanism diagnostic page, and then push the sensor actuator in the direction
of drum rotation and verify that the sensor state changes.
Additional root cause
ł
Pen Pocket 1 PCA (A16)
ł
Diagnostic page: Click Subsystems, and then click Carriage Mechanism.
ł
Component locator: Carriage component locator on page 1602
ł
Wiring diagram: Carriage pocket PCA diagram on page 2467
ł
Parts diagram: Carriage parts diagrams on page 1602
ł
A16: D2.0701 on page 2353
Links
ENWW
Event Log error and warning codes 2235
C1.132A
Description
ł
Clear paper jam at Carriage 2 Pen Protection sensor (SN57)
Primary root causes
ł
SN57 or a carriage stall
Recommended actions
1.
Check the input trays for damaged paper.
2.
Verify that the paper meets product specifications.
3.
Check the sensor plastic actuator for damage and contamination.
4.
Open the Carriage Mechanism diagnostic page, and then push the sensor actuator in the direction
of drum rotation and verify that the sensor state changes.
Additional root cause
ł
Pen Pocket 4 PCA (A19)
ł
Diagnostic page: Click Subsystems, and then click Carriage Mechanism.
ł
Component locator: Carriage component locator on page 1602
ł
Wiring diagram: Carriage pocket PCA diagram on page 2467
ł
Parts diagram: Carriage parts diagrams on page 1602
ł
Pen Pocket 4 PCA (A19): D2.0704 on page 2355
Links
2236 Appendix A Event Log codes
ENWW
C2.0201
Description
ł
Dryer Temperature sensor (SN36) problem
Primary root causes
ł
SN36
ł
Wire harness between the SN36, Ink Assist PCA (A3), and Power Distribution PCA (A1)
Recommended actions
1.
If you have not done so already, reboot the MFP in Protected Service mode (PSM).
2.
Open the Dryer diagnostic page, and then check the temperature reading.
3.
Check the resistance at SN36: 3,000 to 18,000 ohms at J36 pins 1 and 2.
4.
Test the voltage at SN36: 1.8 to 2.5 Vdc at J36 pins 1 to 2.
5.
Test the voltage to SN36 on A3: 1.8 to 2.5 Vdc at J4 pins 6 to 8.
Additional root causes
ł
A3
ł
Fault tree: C2.0201: Dryer Temperature sensor (SN36) problem on page 1290
ł
Diagnostic page: Click Subsystems, and then click Dryer.
ł
Component locator: Dryer component locator on page 1662
ł
Wiring diagram: Dryer wiring diagram on page 2473
ł
Parts diagram: Dryer parts diagrams on page 1662
ł
Replace SN36: Dryer sensors on page 573
ł
A3: D4.0703 on page 2390
Links
ENWW
Event Log error and warning codes 2237
C2.0901
Description
ł
Dryer fan (FAN5) problem
Primary root causes
ł
FAN5
ł
Wire harness between FAN5 and the Ink Assist PCA (A3)
Recommended actions
1.
If you have not done so already, reboot the MFP in Protected Service mode (PSM).
2.
Open the Dryer diagnostic page, and then check the FAN5 RPM.
3.
Test the voltage at FAN5: 24 to 32 Vdc at J14 pins 1 to 2 (GND) and approximately 3.3 Vdc at J14
pins 3 to 2 (GND).
4.
Test the voltage to FAN5 on A3: 24 to 32 Vdc at J5 pins 11 to 10 (GND) and approximately 3.3
Vdc at pins 22 to 10 (GND).
Additional root causes
ł
A3
ł
Fault tree: C2.0901: Dryer fan (FAN5) problem on page 1295
ł
Diagnostic page: Click Subsystems, and then click Dryer.
ł
Component locator: Dryer component locator on page 1662
ł
Wiring diagram: Dryer wiring diagram on page 2473
ł
Parts diagram: Dryer parts diagrams on page 1662
ł
Replace FAN5: Dryer fan (FAN5) on page 568
ł
A3: D4.0703 on page 2390
Links
2238 Appendix A Event Log codes
ENWW
C2.09A1
Description
ł
Dryer fan (FAN5) RPM too low
Primary root causes
ł
FAN5
ł
Wire harness between FAN5 and the Ink Assist PCA (A3)
Recommended actions
1.
Open the Dryer diagnostic page, and then check the FAN5 RPM.
2.
Test the voltage at FAN5: 24 to 32 Vdc at J14 pins 1 to 2 (GND) and approximately 3.3 Vdc at J14
pins 3 to 2 (GND).
3.
Test the voltage to FAN5 on A3: 24 to 32 Vdc at J5 pins 11 to 10 (GND) and approximately 3.3
Vdc at pins 22 to 10 (GND).
Additional root causes
ł
A3
ł
Fault tree: C2.09A1: Dryer fan (FAN5) RPM too low on page 1297
ł
Diagnostic page: Click Subsystems, and then click Dryer.
ł
Component locator: Dryer component locator on page 1662
ł
Wiring diagram: Dryer wiring diagram on page 2473
ł
Parts diagram: Dryer parts diagrams on page 1662
ł
Replace FAN5: Dryer fan (FAN5) on page 568
ł
A3: D4.0703 on page 2390
Links
ENWW
Event Log error and warning codes 2239
C2.0C01
Description
ł
Dryer heater problem
Primary root causes
ł
Low incoming power from the wall socket
ł
Dryer coil assembly
ł
Wire harness between the dryer assembly, Power Distribution PCA (A1), and the Power supply
(PS1)
ł
PS1
Recommended actions
1.
Verify that the incoming power line voltage is correct. The dryer is tested during a normal boot up.
If the dryer fails during normal boot, then boot into PSM for various tests and to check power line
voltage. If the dryer passes during normal boot (no error), then you can run the heater checks as
listed and check the power line voltage.
2.
Open the Dryer diagnostic page, and then check the power line consumption wattage reading. The
wattage is the sum of the normal power line consumption, the Dryer fan (FAN5) power, and HTR1
power (400 watts). The total should vary between 550 and 650 watts.
3.
Measure the resistance of the four dryer coils: 28 (+/- .5) ohms at pins 1 to 2, 2 to 3, 4 to 5, and 5
to 6 on W22P1-PS1.
4.
Measure the two dryer signals on the Main Engine PCA (A5).
Additional root causes
ł
A1
ł
Fault tree: C2.0C01: Dryer heater (HTR1) problem on page 1299
ł
Diagnostic page: Click Subsystems, and then click Dryer.
ł
Component locator: Dryer component locator on page 1662
ł
Wiring diagram: Dryer wiring diagram on page 2473
ł
Parts diagram: Dryer parts diagrams on page 1662
ł
Replace HTR1: Dryer heater assembly on page 566
ł
A1: D4.0702 on page 2389
Links
2240 Appendix A Event Log codes
ENWW
C3.22A0
Description
ł
Density out of range during an Automatic Pen Alignment (APA)
Primary root causes
ł
Pen nozzles
ł
Colored paper
Recommended actions
1.
Verify that the paper in the source tray is not colored. Use only 20 lb multipurpose paper.
2.
Open the Engine Calibrations 1 page, and then perform a Drop Detect calibration. Verify that the
pen health gauge reading for each pen is green. Fix any nozzle health problem.
3.
Run the APA.
ł
Calibration page: Click Settings/Procedures, click Calibrations, and then click Engine
Calibrations 1.
Links
ENWW
Event Log error and warning codes 2241
C3.22A1
Description
ł
Carriage 1 to Carriage 2 alignment out-of-range during an Automatic Pen Alignment (APA)
Primary root causes
ł
Alignment values are out-of-range
ł
Carriage stopping accuracy is bad
Recommended actions
1.
Clean each carriage encoder strip.
2.
Open the Engine Calibrations 2 page, and then perform the Carriage Stopping Accuracy
calibration.
3.
Run the APA.
ł
Calibration page: Click Settings/Procedures, click Calibrations, and then click Engine
Calibrations 2.
Links
2242 Appendix A Event Log codes
ENWW
C3.22A2
Description
ł
Pen-to-pen alignment out-of-range during an Automatic Pen Alignment (APA)
Primary root causes
ł
Alignment values are out-of-range
ł
Carriage stopping accuracy is bad
Recommended actions
1.
Reseat the pen.
2.
Open the Engine Calibrations 1 page, and then run the APA.
ł
Calibration page: Click Settings/Procedures, click Calibrations, and then click Engine
Calibrations 1.
Links
ENWW
Event Log error and warning codes 2243
C3.22A3
Description
ł
Acumen alignment values out-of-range
Primary root causes
ł
Alignment values in acumen are out of expected range
ł
Defective pen
Recommended actions
䦱
Open the Engine Calibrations 1 page, and then repeat the APA. The APA will be non-acumen
based.
ł
Calibration page: Click Settings/Procedures, click Calibrations, and then click Engine
Calibrations 1.
Links
2244 Appendix A Event Log codes
ENWW
C3.22A4
Description
ł
Media thickness out-of-range during an Automatic Pen Alignment (APA)
Primary root causes
ł
Paper is the wrong type, size, or weight for the APA
Recommended actions
1.
Verify that the paper in the source tray is Letter or A4, 20 lb multipurpose paper. Do not use glossy
media.
2.
Verify that the media setting in the control panel is set for plain paper.
3.
Verify that the paper guides in the source tray are touching the edge of the paper.
4.
Verify that the media setting in the control panel is set for plain paper.
Additional root causes
ł
IDO Media Thickness encoder (EN14)
ł
Top-of-form sensor (SN22)
ł
Calibration page: Click Settings/Procedures, click Calibrations, and then click Engine
Calibrations 1.
ł
EN14: B2.0201 on page 2183
ł
SN22: C1.0203 on page 2221
Links
ENWW
Event Log error and warning codes 2245
C3.22A5
Description
ł
Engine calibration failed. This warning is used to capture calibration failures associated with the
following calibrations: Top-of-Form, Media Side Edge, First Nozzle, Drum Position, and Media
Gloss.
Primary root causes
ł
Media
ł
Contaminated drum calibration holes
ł
Top-of-form sensor (SN22)
ł
Tetris sensor (SN58)
Recommended actions
1.
Verify that Letter or A4 plain paper is loaded in the source tray. Verify that the paper meets product
specifications.
2.
Check the Event Log for Top-of-form sensor (SN22) and Tetris sensor (SN58) error codes.
3.
Clean the drum edge where the drum calibration holes are located. Clean out any debris in the
holes. The holes in the drum edge are used by SN22 during the Drum Position calibration.
4.
Open the Carriage Mechanism diagnostic page, and then test SN58.
5.
Open the Drum diagnostic page, and then test the SN22 LEDs and the gloss measurement
capabilities.
6.
Clean SN22 and SN58.
7.
Adjust the position of SN22 or replace SN22 as needed. If SN22 is moved or replaced, you must
run all of the calibrations associated with this warning code.
8.
Adjust the position of SN58 or replace SN58 as needed. If SN58 is moved or replaced, you must
run the SN58 calibration procedure and all of the calibrations associated with this warning code.
ł
Diagnostic page: Click Subsystems, and then click Drum.
ł
Component locator: Carriage component locator on page 1602
ł
Wiring diagram: Carriage wiring diagram on page 2466
ł
Parts diagram: Carriage parts diagrams on page 1602
ł
SN22: Top-of-form sensor (SN22) on page 520
ł
SN58: Tetris sensor (SN58) on page 517
Links
2246 Appendix A Event Log codes
ENWW
C3.22A6
Description
ł
Pen Density Compensation calibration black point reference failure
Primary root causes
ł
Tetris sensor (SN58)
ł
Carriage stopping accuracy is at the maximum position
Recommended actions
1.
Open the Engine Calibrations 1 page, and then run the Pen Density Compensation calibration.
2.
Calibrate SN58.
3.
Clean SN58.
4.
Verify that SN58 is correctly aligned.
5.
Run the carriage movement characterization.
6.
Replace SN58.
ł
Calibration page: Click Settings/Procedures, click Calibrations, and then click Engine
Calibrations 1.
ł
Component locator: Carriage component locator on page 1602
ł
Wiring diagram: Carriage pocket PCA diagram on page 2467
ł
Parts diagram: Carriage parts diagrams on page 1602
ł
Replace SN58: Tetris sensor (SN58) on page 517
Links
ENWW
Event Log error and warning codes 2247
C3.22A7
Description
ł
Pen Density Compensation calibration scan failure
Primary root causes
ł
Pen nozzles
ł
Readings area out-of-range
ł
Paper jam
ł
Obsolete color table values
Recommended actions
1.
Check the control panel for a paper-jam error code. Clear any reported paper jams.
2.
Check the Engine Calibrations 1 page for print-quality issues. Resolve any print-quality or media
damage issues.
3.
Open the Engine Calibrations 1 page, and then run the Pen Density Compensation calibration.
4.
Calibrate the Tetris sensor (SN58).
ł
Calibration page: Click Settings/Procedures, click Calibrations, and then click Engine
Calibrations 1.
ł
Component locator: Carriage component locator on page 1602
ł
Wiring diagram: Carriage pocket PCA diagram on page 2467
ł
Parts diagram: Carriage parts diagrams on page 1602
Links
2248 Appendix A Event Log codes
ENWW
C3.22A8
Description
ł
Pen Density Compensation calibration bow-compensation overflow
Primary root causes
ł
Pen Density Compensation calibration data processing error
Recommended actions
䦱
Open the Engine Calibrations 1 page, and then run the Pen Density Compensation calibration.
ł
Calibration page: Click Settings/Procedures, click Calibrations, and then click Engine
Calibrations 1.
Links
ENWW
Event Log error and warning codes 2249
C4.0101
Description
ł
Web Drive motor (M5) stall
Primary root causes
ł
Web wipe cartridge
ł
M5
ł
Web Drive Motor encoder (EN10)
ł
Wire harness between M5, EN10, and the Motion PCA (A2)
ł
A2
Recommended actions
1.
If you have not done so already, reboot the MFP in Protected Service mode (PSM).
2.
Check the Web wipe cartridge installation.
3.
Open the Web Wipe diagnostic page. Manually turn M5 and verify that the EN10 count changes.
4.
Test the voltage at M5 in the forward direction: 12 Vdc at pins 1 to 2 (GND) on W41P5-M5.
5.
Test the voltage at EN10: 5 Vdc at pins 3 to 1 (GND) on W33P12-W47J12.
6.
Test the voltage to M5 on A2 in the forward direction: 12 Vdc at J15 pins 5 to 10 (GND).
7.
Test the voltage to EN10 on A2: 5 Vdc at J7 pins 3B to 1B (GND).
Additional root causes
ł
A2
ł
Fault tree: C4.0101: Web Drive motor (M5) stall on page 1301
ł
Diagnostic page: Click Subsystems, and then click Web Wipe.
ł
Component locator: Web wipe component locator on page 1800
ł
Wiring diagram: Web wipe wiring diagram on page 2502
ł
Parts diagram: Service station parts diagrams on page 1774
ł
Replace M5: Web Drive motor (M5) on page 583
ł
A2: D4.0705 on page 2392
Links
2250 Appendix A Event Log codes
ENWW
C4.0102
Description
ł
Web Wipe Material Lift motor (M4) stall
Primary root causes
ł
Web wipe cartridge
ł
M4
ł
Web Backer Motor encoder (EN13)
ł
Wire harness between M4, EN13, and the Motion PCA (A2)
Recommended actions
1.
If you have not done so already, reboot the MFP in Protected Service mode (PSM).
2.
Check the Web wipe cartridge installation.
3.
Open the Web Wipe diagnostic page, and then run M4.
4.
Turn M4 and verify that the EN13 count changes.
5.
Test the voltage at M4 in the up direction: 5 Vdc at pins 1 to 2 (GND) on W41P2-W10J2.
6.
Test the voltage at EN13: 5 Vdc at pins 13 to 14 (GND) and 15 to 14 (GND) on W33P12-W47J12.
7.
Test the voltage to M4 on A2 in the up direction: 5 Vdc at J15 pins 4 to 9 (GND).
8.
Test the voltage to EN13 on A2: 5 Vdc at J7 pins 13B to 14B (GND) and 13B to 15B (GND).
Additional root causes
ł
A2
ł
Fault tree: C4.0102: Web Wipe Material Lift motor (M4) stall on page 1306
ł
Diagnostic page: Click Subsystems, and then click Web Wipe.
ł
Component locator: Web wipe component locator on page 1800
ł
Wiring diagram: Web wipe wiring diagram on page 2502
ł
Parts diagram: Service station parts diagrams on page 1774
ł
Replace M4: Web Wipe Material Lift motor (M4) on page 586
ł
A2: D4.0705 on page 2392
Links
ENWW
Event Log error and warning codes 2251
C4.0201
Description
ł
Spit web not detected
Primary root causes
ł
Web wipe cartridge
Recommended actions
1.
If you have not done so already, reboot the MFP in Protected Service mode (PSM).
2.
Check the Web wipe cartridge for correct installation.
3.
Check the installation of the web material.
4.
Open the Event Log and look for one of the following codes: C4.0501 and D1.0201.
Additional root causes
ł
Web Drive motor (M5)
ł
Tetris sensor (SN58)
ł
Fault tree: C4.0201: Spit web not detected on page 1309
ł
Diagnostic page: Click Subsystems, and then click Web Wipe.
ł
Component locator: Web wipe component locator on page 1800
ł
Wiring diagram: Web wipe wiring diagram on page 2502
ł
Parts diagram: Service station parts diagrams on page 1774
ł
SN58: D1.02A1 on page 2300
ł
M5: C4.0501 on page 2256
Links
2252 Appendix A Event Log codes
ENWW
C4.0202
Description
ł
Change Web wipe supply
Primary root causes
ł
Web wipe cartridge
ł
Web Low sensor (SN21)
ł
Wire harness between SN21 and the Motion PCA (A2)
Recommended actions
1.
If you have not done so already, reboot the MFP in Protected Service mode (PSM).
2.
Check the Web wipe cartridge installation.
3.
Open the Web Wipe diagnostic page, and then test SN21.
4.
Test the voltage at SN21: 0.18 Vdc blocked, 2.91 Vdc unblocked at pins 5 to 6 and 1.21 Vdc blocked
and unblocked at pins 7 to 6 on W33P12-W47J12.
5.
Test the voltage to SN21 on A2: 1.22 Vdc blocked and unblocked on J7 at pins 7B to 6B and 0.18
Vdc blocked, 3.19 Vdc unblocked at pins 5B to 6B.
Additional root causes
ł
A2
ł
Fault tree: C4.0202: Change web wipe supply on page 1310
ł
Diagnostic page: Click Subsystems, and then click Web Wipe.
ł
Component locator: Web wipe component locator on page 1800
ł
Wiring diagram: Web wipe wiring diagram on page 2502
ł
Parts diagram: Service station parts diagrams on page 1774
ł
Replace A2: Service station sensors on page 589
ł
A2: D4.0705 on page 2392
Links
ENWW
Event Log error and warning codes 2253
C4.0203
Description
ł
Service station latch open
Primary root causes
ł
Service station latch
ł
Service Station Latch sensor (SN60)
Recommended actions
1.
If you have not done so already, reboot the MFP in Protected Service mode (PSM).
2.
Verify that the service station latch is closed.
3.
Open the Web Wipe diagnostic page, and then test SN60. If the sensor does not work, replace the
sensor.
ł
Diagnostic page: Click Subsystems, and then click Web Wipe.
ł
Component locator: Service Station component locator on page 1774
ł
Wiring diagram: Service station wiring diagram on page 2495
ł
Parts diagram: Service station parts diagrams on page 1774
ł
Replace SN60: Service station sensors on page 589
Links
2254 Appendix A Event Log codes
ENWW
C4.02A1
Description
ł
Low Web wipe supply
Primary root causes
ł
Web Low sensor (SN21)
ł
Web Advance encoder (EN11)
ł
Wire harness between EN11, SN21, and the Motion PCA (A2)
ł
Web wipe cartridge
Recommended actions
1.
Check the Web wipe cartridge.
2.
Open the Web Wipe diagnostic page, and then test SN21.
3.
Check the electrical connections to SN21 and EN11.
4.
Test the voltage at SN21: 0.18 Vdc blocked, 2.91 Vdc unblocked at pins 5 to 6 and 1.21 Vdc blocked
and unblocked at pins 7 to 6 on W33P12-W47J12.
5.
Test the voltage at EN11: 3.24 Vdc at pins 9 to 11 on W33P12-W47J12.
6.
Test the voltage to SN21 on A2: 1.22 Vdc blocked and unblocked on J7 at pins 7B to 6B and 0.18
Vdc blocked, 3.19 Vdc unblocked at pins 5B to 6B.
7.
Test the voltage to EN11 on A2: 3.26 Vdc on J7 at pins 9B to 11B (GND).
Additional root causes
ł
A2
ł
Fault tree: C4.02A1: Low Web wipe supply on page 1313
ł
Diagnostic page: Click Subsystems, and then click Web Wipe.
ł
Component locator: Web wipe component locator on page 1800
ł
Wiring diagram: Web wipe wiring diagram on page 2502
ł
Parts diagram: Service station parts diagrams on page 1774
ł
Replace SN21: Service station sensors on page 589
ł
Replace EN11: Web Advance encoder (EN11) on page 586
ł
A2: D4.0705 on page 2392
Links
ENWW
Event Log error and warning codes 2255
C4.0501
Description
ł
Web advance stall
Primary root causes
ł
Web wipe cartridge
ł
Web Advance encoder (EN11)
ł
Wire harness between EN11 and the Motion PCA (A2)
Recommended actions
1.
If you have not done so already, reboot the MFP in Protected Service mode (PSM).
2.
Check the Web wipe cartridge installation.
3.
Open the Web Wipe diagnostic page, and then test EN11.
4.
Test the voltage at EN11: 3.24 Vdc at pins 9 to 11 on W33P12-W47J12.
5.
Test the voltage to EN11 on A2: 3.26 Vdc on J7 at pins 9B to 11B (GND).
Additional root causes
ł
A2
ł
Fault tree: C4.0501: Web Advance encoder (EN11) stall on page 1316
ł
Diagnostic page: Click Subsystems, and then click Web Wipe.
ł
Component locator: Web wipe component locator on page 1800
ł
Wiring diagram: Web wipe wiring diagram on page 2502
ł
Parts diagram: Service station parts diagrams on page 1774
ł
Replace EN11: Web Advance encoder (EN11) on page 586
ł
A2: D4.0705 on page 2392
Links
2256 Appendix A Event Log codes
ENWW
C6.0B01
Description
ł
Change the drum spittoon
Primary root causes
ł
Drum spittoon
Recommended actions
䦱
Replace the drum spittoon.
ł
Parts diagram: Drum parts diagram on page 1642
ł
Replace the drum spittoon: Drum spittoon on page 86
Links
ENWW
Event Log error and warning codes 2257
C7.0701
Description
ł
ISS internal diagnostic failure
Primary root causes
ł
ISS PCA (A8)
Recommended actions
䦱
Replace A8.
ł
Component locator: IDS component locator on page 1754
ł
Wiring diagram: ISS PCA (A8) diagram on page 2492
ł
Parts diagram: IDS parts diagrams on page 1754
ł
Replace A8: ISS PCA (A8) on page 541
Links
2258 Appendix A Event Log codes
ENWW
C7.0B06
Description
ł
IDS system will not pressurize
Primary root causes
ł
Lower-left door
ł
ink supply
ł
Relief valve
ł
Air pressure system (APS)
ł
ISS air pumps
ł
IDS Pressure sensor (SN39)
ł
ISS PCA (A8)
Recommended actions
1.
Look for a Close lower-left door message on the control panel. If the message is displayed, verify
that the door is closed. Follow the troubleshooting steps for a 00.02E2 message.
2.
Open the Ink Status diagnostic page, and then verify that none of the ink supplies have a broken
bag.
3.
Open the Ink Delivery diagnostic page, and then test the air pumps and the relief valve.
4.
Check the wire harnesses to the air pumps and the relief valve.
5.
Check the hoses to the air pumps.
6.
Check the air hoses to the relief valve.
7.
Test SN39.
8.
Replace A8.
ł
Fault tree: C7.0B06: IDS system will not pressurize on page 1319
ł
Diagnostic page: Click Subsystems, and then click IDS.
ł
Component locator: IDS component locator on page 1754
ł
Wiring diagram: IDS wiring diagram on page 2491
ł
Parts diagram: IDS parts diagrams on page 1754
ł
Replace A8: ISS PCA (A8) on page 541
ł
00.02E2: Close lower-left door on page 999
Links
ENWW
Event Log error and warning codes 2259
C7.0B07
Description
ł
IDS system will not depressurize
Primary root causes
ł
Relief valve
ł
Wire harness between the relief valve and the ISS PCA (A8)
ł
A8
ł
Air hoses and connectors
ł
Air pump
Recommended actions
1.
Look for a Close lower-left door message on the control panel. If the message is displayed, verify
that the door is closed. Follow the troubleshooting steps for a 00.02E2 message.
2.
Open the Ink Status diagnostic page, and then verify that none of the ink supplies have a broken
bag.
3.
Open the Ink Delivery diagnostic page, and test the relief valve.
4.
Check the air hoses to the relief valve for kinks and damage.
5.
Check the wire harness between the relief valve and A8.
6.
Replace A8.
ł
Fault tree: C7.0B07: IDS system will not depressurize on page 1322
ł
Diagnostic page: Click Subsystems, and then click IDS.
ł
Component locator: IDS component locator on page 1754
ł
Wiring diagram: IDS wiring diagram on page 2491
ł
Parts diagram: IDS parts diagrams on page 1754
ł
Replace A8: ISS PCA (A8) on page 541
ł
00.02E2: Close lower-left door on page 999
Links
2260 Appendix A Event Log codes
ENWW
C7.0B08
Description
ł
ISS pressure leak detected
Primary root causes
ł
Ink cartridges
ł
Relief valve
ł
IDS hoses
ł
ISS air pumps
Recommended actions
1.
Check the IDS and surrounding area for ink leaks.
2.
Open the Ink Status diagnostic page, and then verify that none of the ink cartridges have a broken
bag.
3.
Open the Ink Delivery diagnostic page. One-by-one, replace each ink supply with a new ink supply,
pressurize the system, and note how much time it takes for the pressure to drop. If after replacing
an ink supply, the pressure drops dramatically more slowly, the ink supply that you replaced was
the problem.
4.
Replace the relief valve.
5.
Replace the air pressure system (APS).
6.
Check the IDS back plate assembly for leaks. If it is leaking, replace the IDS.
ł
Fault tree: C7.0B08: IDS leak detected on page 1324
ł
Diagnostic page: Click Subsystems, and then click IDS.
ł
Component locator: IDS component locator on page 1754
ł
Wiring diagram: IDS wiring diagram on page 2491
ł
Parts diagram: IDS parts diagrams on page 1754
ł
Replace the relief valve: IDS relief valve on page 538
ł
Replace the IDS: IDS assembly on page 525
Links
ENWW
Event Log error and warning codes 2261
C7.0B10
Description
ł
Black ink supply is empty
Primary root causes
ł
Ink supply
ł
Administrator settings
Recommended actions
1.
Replace the ink supply.
2.
If the ink supply is a non-HP brand, verify that the administrator settings allow non-HP ink.
3.
Clean the ink supply and the cartridge connector.
4.
Check the ink supply connector for bent pins.
ł
Fault tree: C7.0B10: Black ink supply is empty on page 1327
ł
Diagnostic page: Click Subsystems, and then click IDS.
ł
Component locator: IDS component locator on page 1754
ł
Wiring diagram: IDS wiring diagram on page 2491
ł
Parts diagram: IDS parts diagrams on page 1754
Links
2262 Appendix A Event Log codes
ENWW
C7.0B11
Description
ł
Black ink supply has failed
Primary root causes
ł
Ink supply
Recommended actions
1.
Replace the ink supply.
2.
Check the power LEDs on the ISS PCA (A8).
3.
Clean the ink supply connections. The center connection should have some ink. The others should
not.
4.
Check for bent pins on the ink supply connector.
5.
Check the resistance on the bottom of the ink supply and verify that it is greater than 500 MEG
ohms.
Additional root causes
ł
A8
ł
Fault tree: C7.0B11: Black ink supply has failed on page 1328
ł
Diagnostic page: Click Subsystems, and then click IDS.
ł
Component locator: IDS component locator on page 1754
ł
Wiring diagram: IDS wiring diagram on page 2491
ł
Parts diagram: IDS parts diagrams on page 1754
ł
A8: D4.0707 on page 2394
Links
ENWW
Event Log error and warning codes 2263
C7.0B12
Description
ł
Black ink supply is missing
Primary root causes
ł
Ink supply
Recommended actions
1.
Reinstall the ink supply.
2.
Replace the ink supply.
3.
Clean the ink supply connections.
4.
Check the ink supply connections for bent pins.
ł
Fault tree: C7.0B12: Black ink supply is missing on page 1329
ł
Diagnostic page: Click Subsystems, and then click IDS.
ł
Component locator: IDS component locator on page 1754
ł
Wiring diagram: IDS wiring diagram on page 2491
ł
Parts diagram: IDS parts diagrams on page 1754
Links
2264 Appendix A Event Log codes
ENWW
C7.0B13
Description
ł
Black ink supply is non-HP
Primary root causes
ł
Ink supply
ł
Administrator settings
Recommended actions
䦱
If the ink supply is a non-HP brand, verify that the administrator settings allow non-HP ink.
ł
Fault tree: C7.0B13: Black ink supply is non-HP on page 1330
ł
Diagnostic page: Click Subsystems, and then click IDS.
ł
Component locator: IDS component locator on page 1754
ł
Wiring diagram: IDS wiring diagram on page 2491
ł
Parts diagram: IDS parts diagrams on page 1754
Links
ENWW
Event Log error and warning codes 2265
C7.0B20
Description
ł
Cyan ink supply is empty
Primary root causes
ł
Ink supply
ł
Administrator settings
Recommended actions
1.
Replace the ink supply.
2.
If the ink supply is a non-HP brand, verify that the administrator settings allow non-HP ink.
3.
Clean the ink supply and the cartridge connector.
4.
Check the ink supply connector for bent pins.
ł
Fault tree: C7.0B20: Cyan ink supply is empty on page 1331
ł
Diagnostic page: Click Subsystems, and then click IDS.
ł
Component locator: IDS component locator on page 1754
ł
Wiring diagram: IDS wiring diagram on page 2491
ł
Parts diagram: IDS parts diagrams on page 1754
Links
2266 Appendix A Event Log codes
ENWW
C7.0B21
Description
ł
Cyan ink supply has failed
Primary root causes
ł
Ink supply
Recommended actions
1.
Replace the ink supply.
2.
Check the power LEDs on the ISS PCA (A8).
3.
Clean the ink supply connections. The center connection should have some ink. The others should
not.
4.
Check for bent pins on the ink supply connector.
5.
Check the resistance on the bottom of the ink supply and verify that it is greater than 500 MEG
ohms.
Additional root causes
ł
A8
ł
Fault tree: C7.0B21: Cyan ink supply has failed on page 1332
ł
Diagnostic page: Click Subsystems, and then click IDS.
ł
Component locator: IDS component locator on page 1754
ł
Wiring diagram: IDS wiring diagram on page 2491
ł
Parts diagram: IDS parts diagrams on page 1754
ł
A8: D4.0707 on page 2394
Links
ENWW
Event Log error and warning codes 2267
C7.0B22
Description
ł
Cyan ink supply is missing
Primary root causes
ł
Ink supply
Recommended actions
1.
Reinstall the ink supply.
2.
Replace the ink supply.
3.
Clean the ink supply connections.
4.
Check the ink supply connections for bent pins.
ł
Fault tree: C7.0B22: Cyan ink supply is missing on page 1333
ł
Diagnostic page: Click Subsystems, and then click IDS.
ł
Component locator: IDS component locator on page 1754
ł
Wiring diagram: IDS wiring diagram on page 2491
ł
Parts diagram: IDS parts diagrams on page 1754
Links
2268 Appendix A Event Log codes
ENWW
C7.0B23
Description
ł
Cyan ink supply is non-HP
Primary root causes
ł
Ink supply
ł
Administrator settings
Recommended actions
䦱
If the ink supply is a non-HP brand, verify that the administrator settings allow non-HP ink.
ł
Fault tree: C7.0B23: Cyan ink supply is non-HP on page 1334
ł
Diagnostic page: Click Subsystems, and then click IDS.
ł
Component locator: IDS component locator on page 1754
ł
Wiring diagram: IDS wiring diagram on page 2491
ł
Parts diagram: IDS parts diagrams on page 1754
Links
ENWW
Event Log error and warning codes 2269
C7.0B30
Description
ł
Magenta ink supply is empty
Primary root causes
ł
Ink supply
ł
Administrator settings
Recommended actions
1.
Replace the ink supply.
2.
If the ink supply is a non-HP brand, verify that the administrator settings allow non-HP ink.
3.
Clean the ink supply and the cartridge connector.
4.
Check the ink supply connector for bent pins.
ł
Fault tree: C7.0B30: Magenta ink supply is empty on page 1335
ł
Diagnostic page: Click Subsystems, and then click IDS.
ł
Component locator: IDS component locator on page 1754
ł
Wiring diagram: IDS wiring diagram on page 2491
ł
Parts diagram: IDS parts diagrams on page 1754
Links
2270 Appendix A Event Log codes
ENWW
C7.0B31
Description
ł
Magenta ink supply has failed
Primary root causes
ł
ink supply
Recommended actions
1.
Replace the ink supply.
2.
Check the power LEDs on the ISS PCA (A8).
3.
Clean the ink supply connections. The center connection should have some ink. The others should
not.
4.
Check for bent pins on the ink supply connector.
5.
Check the resistance on the bottom of the ink supply and verify that it is greater than 500 MEG
ohms.
Additional root causes
ł
A8
ł
Fault tree: C7.0B31: Magenta ink supply has failed on page 1336
ł
Diagnostic page: Click Subsystems, and then click IDS.
ł
Component locator: IDS component locator on page 1754
ł
Wiring diagram: IDS wiring diagram on page 2491
ł
Parts diagram: IDS parts diagrams on page 1754
ł
A8: D4.0707 on page 2394
Links
ENWW
Event Log error and warning codes 2271
C7.0B32
Description
ł
Magenta ink supply is missing
Primary root causes
ł
Ink supply
Recommended actions
1.
Reinstall the ink supply.
2.
Replace the ink supply.
3.
Clean the ink supply connections.
4.
Check the ink supply connections for bent pins.
ł
Fault tree: C7.0B32: Magenta ink supply is missing on page 1337
ł
Diagnostic page: Click Subsystems, and then click IDS.
ł
Component locator: IDS component locator on page 1754
ł
Wiring diagram: IDS wiring diagram on page 2491
ł
Parts diagram: IDS parts diagrams on page 1754
Links
2272 Appendix A Event Log codes
ENWW
C7.0B33
Description
ł
Magenta ink supply is non-HP
Primary root causes
ł
Ink supply
ł
Administrator settings
Recommended actions
䦱
If the ink supply is a non-HP brand, verify that the administrator settings allow non-HP ink.
ł
Fault tree: C7.0B33: Magenta ink supply is non-HP on page 1338
ł
Diagnostic page: Click Subsystems, and then click IDS.
ł
Component locator: IDS component locator on page 1754
ł
Wiring diagram: IDS wiring diagram on page 2491
ł
Parts diagram: IDS parts diagrams on page 1754
Links
ENWW
Event Log error and warning codes 2273
C7.0B40
Description
ł
Yellow ink supply is empty
Primary root causes
ł
Ink supply
ł
Administrator settings
Recommended actions
1.
Replace the ink supply.
2.
If the ink supply is a non-HP brand, verify that the administrator settings allow non-HP ink.
3.
Clean the ink supply and the cartridge connector.
4.
Check the ink supply connector for bent pins.
ł
Fault tree: C7.0B40: Yellow ink supply is empty on page 1339
ł
Diagnostic page: Click Subsystems, and then click IDS.
ł
Component locator: IDS component locator on page 1754
ł
Wiring diagram: IDS wiring diagram on page 2491
ł
Parts diagram: IDS parts diagrams on page 1754
Links
2274 Appendix A Event Log codes
ENWW
C7.0B41
Description
ł
Yellow ink supply has failed
Primary root causes
ł
Ink supply
Recommended actions
1.
Replace the ink supply.
2.
Check the power LEDs on the ISS PCA (A8).
3.
Clean the ink supply connections. The center connection should have some ink. The others should
not.
4.
Check for bent pins on the ink supply connector.
5.
Check the resistance on the bottom of the ink supply and verify that it is greater than 500 MEG
ohms.
Additional root causes
ł
A8
ł
Fault tree: C7.0B41: Yellow ink supply has failed on page 1340
ł
Diagnostic page: Click Subsystems, and then click IDS.
ł
Component locator: IDS component locator on page 1754
ł
Wiring diagram: IDS wiring diagram on page 2491
ł
Parts diagram: IDS parts diagrams on page 1754
ł
A8: D4.0707 on page 2394
Links
ENWW
Event Log error and warning codes 2275
C7.0B42
Description
ł
Yellow ink supply is missing
Primary root causes
ł
Ink supply
Recommended actions
1.
Reinstall the ink supply.
2.
Replace the ink supply.
3.
Clean the ink supply connections.
4.
Check the ink supply connections for bent pins.
ł
Fault tree: C7.0B42: Yellow ink supply is missing on page 1341
ł
Diagnostic page: Click Subsystems, and then click IDS.
ł
Component locator: IDS component locator on page 1754
ł
Wiring diagram: IDS wiring diagram on page 2491
ł
Parts diagram: IDS parts diagrams on page 1754
Links
2276 Appendix A Event Log codes
ENWW
C7.0B43
Description
ł
Yellow ink supply is non-HP
Primary root causes
ł
Ink supply
ł
Administrator settings
Recommended actions
䦱
If the ink supply is a non-HP brand, verify that the administrator settings allow non-HP ink.
ł
Fault tree: C7.0B43: Yellow ink supply is non-HP on page 1342
ł
Diagnostic page: Click Subsystems, and then click IDS.
ł
Component locator: IDS component locator on page 1754
ł
Wiring diagram: IDS wiring diagram on page 2491
ł
Parts diagram: IDS parts diagrams on page 1754
Links
ENWW
Event Log error and warning codes 2277
C7.0B50
Description
ł
Bonding Agent supply is empty
Primary root causes
ł
Bonding Agent supply
ł
Administrator settings
Recommended actions
1.
Replace the Bonding Agent supply.
2.
If the Bonding Agent supply is a non-HP brand, verify that the administrator settings allow non-HP
ink.
3.
Clean the Bonding Agent supply and the cartridge connector.
4.
Check the Bonding Agent supply connector for bent pins.
ł
Fault tree: C7.0B50: Bonding Agent supply is empty on page 1343
ł
Diagnostic page: Click Subsystems, and then click IDS.
ł
Component locator: IDS component locator on page 1754
ł
Wiring diagram: IDS wiring diagram on page 2491
ł
Parts diagram: IDS parts diagrams on page 1754
Links
2278 Appendix A Event Log codes
ENWW
C7.0B51
Description
ł
Bonding Agent supply has failed
Primary root causes
ł
Bonding Agent supply
Recommended actions
1.
Replace the Bonding Agent supply.
2.
Check the power LEDs on the ISS PCA (A8).
3.
Clean the Bonding Agent supply connections. The center connection should have some ink. The
others should not.
4.
Check for bent pins on the Bonding Agent supply connector.
5.
Check the resistance on the bottom of the Bonding Agent supply and verify that it is greater than
500 MEG ohms.
Additional root causes
ł
A8
ł
Fault tree: C7.0B51: Bonding Agent supply has failed on page 1344
ł
Diagnostic page: Click Subsystems, and then click IDS.
ł
Component locator: IDS component locator on page 1754
ł
Wiring diagram: IDS wiring diagram on page 2491
ł
Parts diagram: IDS parts diagrams on page 1754
ł
A8: D4.0707 on page 2394
Links
ENWW
Event Log error and warning codes 2279
C7.0B52
Description
ł
Bonding Agent supply is missing
Primary root causes
ł
Bonding Agent supply
Recommended actions
1.
Reinstall the Bonding Agent supply.
2.
Replace the Bonding Agent supply.
3.
Clean the Bonding Agent supply connections.
4.
Check the Bonding Agent supply connections for bent pins.
ł
Fault tree: C7.0B52: Bonding Agent supply is missing on page 1345
ł
Diagnostic page: Click Subsystems, and then click IDS.
ł
Component locator: IDS component locator on page 1754
ł
Wiring diagram: IDS wiring diagram on page 2491
ł
Parts diagram: IDS parts diagrams on page 1754
Links
2280 Appendix A Event Log codes
ENWW
C7.0B53
Description
ł
Bonding Agent supply is non-HP
Primary root causes
ł
Bonding Agent supply
ł
Administrator settings
Recommended actions
䦱
If the Bonding Agent supply is a non-HP brand, verify that the administrator settings allow non-HP
supplies.
ł
Fault tree: C7.0B53: Bonding Agent supply is non-HP on page 1346
ł
Diagnostic page: Click Subsystems, and then click IDS.
ł
Component locator: IDS component locator on page 1754
ł
Wiring diagram: IDS wiring diagram on page 2491
ł
Parts diagram: IDS parts diagrams on page 1754
Links
ENWW
Event Log error and warning codes 2281
C7.0BA0
Description
ł
Magenta ink supply has expired
Primary root causes
ł
Incorrect system date
ł
Expired ink supply
Recommended actions
1.
Validate that the system date is correct.
2.
Check the ink supply expiration date.
ł
Fault tree: C7.0BA0: Magenta ink supply has expired on page 1347
ł
Diagnostic page: Click Subsystems, and then click IDS.
ł
Component locator: IDS component locator on page 1754
ł
Wiring diagram: IDS wiring diagram on page 2491
ł
Parts diagram: IDS parts diagrams on page 1754
Links
2282 Appendix A Event Log codes
ENWW
C7.0BA1
Description
ł
Black ink supply is low
Primary root causes
ł
Ink supply
ł
Administrator settings
Recommended actions
1.
Replace the ink supply and verify that the low ink message is not displayed.
2.
Verify that the administrator settings are not set to stop printing when an ink supply is low.
ł
Fault tree: C7.0BA1: Black ink supply is low on page 1348
ł
Diagnostic page: Click Subsystems, and then click IDS.
ł
Component locator: IDS component locator on page 1754
ł
Wiring diagram: IDS wiring diagram on page 2491
ł
Parts diagram: IDS parts diagrams on page 1754
Links
ENWW
Event Log error and warning codes 2283
C7.0BA2
Description
ł
Black ink supply has expired
Primary root causes
ł
Incorrect system date
ł
Expired ink supply
Recommended actions
1.
Validate that the system date is correct.
2.
Check the ink supply expiration date.
ł
Fault tree: C7.0BA2: Black ink supply has expired on page 1349
ł
Diagnostic page: Click Subsystems, and then click IDS.
ł
Component locator: IDS component locator on page 1754
ł
Wiring diagram: IDS wiring diagram on page 2491
ł
Parts diagram: IDS parts diagrams on page 1754
Links
2284 Appendix A Event Log codes
ENWW
C7.0BA3
Description
ł
Bonding Agent supply has expired
Primary root causes
ł
Incorrect system date
ł
Expired Bonding Agent supply
Recommended actions
1.
Validate that the system date is correct.
2.
Check the expiration date for the Bonding Agent supply.
ł
Fault tree: C7.0BA3: Bonding Agent supply has expired on page 1350
ł
Diagnostic page: Click Subsystems, and then click IDS.
ł
Component locator: IDS component locator on page 1754
ł
Wiring diagram: IDS wiring diagram on page 2491
ł
Parts diagram: IDS parts diagrams on page 1754
Links
ENWW
Event Log error and warning codes 2285
C7.0BA4
Description
ł
Bonding Agent supply is low
Primary root causes
ł
Bonding Agent supply
ł
Administrator settings
Recommended actions
1.
Replace the Bonding Agent supply and verify that the low ink message is not displayed.
2.
Verify that the administrator settings are not set to stop printing when an ink supply is low.
ł
Fault tree: C7.0BA4: Bonding Agent supply is low on page 1351
ł
Diagnostic page: Click Subsystems, and then click IDS.
ł
Component locator: IDS component locator on page 1754
ł
Wiring diagram: IDS wiring diagram on page 2491
ł
Parts diagram: IDS parts diagrams on page 1754
Links
2286 Appendix A Event Log codes
ENWW
C7.0BA5
Description
ł
Yellow ink supply is low
Primary root causes
ł
Ink supply
ł
Administrator settings
Recommended actions
1.
Replace the ink supply and verify that the low ink message is not displayed.
2.
Verify that the administrator settings are not set to stop printing when an ink supply is low.
ł
Fault tree: C7.0BA5: Yellow cartridge low warning on page 1352
ł
Diagnostic page: Click Subsystems, and then click IDS.
ł
Component locator: IDS component locator on page 1754
ł
Wiring diagram: IDS wiring diagram on page 2491
ł
Parts diagram: IDS parts diagrams on page 1754
Links
ENWW
Event Log error and warning codes 2287
C7.0BA6
Description
ł
Yellow ink supply has expired
Primary root causes
ł
Incorrect system date
ł
Expired ink supply
Recommended actions
1.
Validate that the system date is correct.
2.
Check the ink supply expiration date.
ł
Fault tree: C7.0BA6: Yellow ink supply has expired on page 1353
ł
Diagnostic page: Click Subsystems, and then click IDS.
ł
Component locator: IDS component locator on page 1754
ł
Wiring diagram: IDS wiring diagram on page 2491
ł
Parts diagram: IDS parts diagrams on page 1754
Links
2288 Appendix A Event Log codes
ENWW
C7.0BA7
Description
ł
Cyan ink supply is low
Primary root causes
ł
Ink supply
ł
Administrator settings
Recommended actions
1.
Replace the ink supply and verify that the low ink message is not displayed.
2.
Verify that the administrator settings are not set to stop printing when an ink supply is low.
ł
Fault tree: C7.0BA7: Cyan ink supply is low on page 1354
ł
Diagnostic page: Click Subsystems, and then click IDS.
ł
Component locator: IDS component locator on page 1754
ł
Wiring diagram: IDS wiring diagram on page 2491
ł
Parts diagram: IDS parts diagrams on page 1754
Links
ENWW
Event Log error and warning codes 2289
C7.0BA8
Description
ł
Cyan ink supply has expired
Primary root causes
ł
Incorrect system date
ł
Expired ink supply
Recommended actions
1.
Validate that the system date is correct.
2.
Check the ink supply expiration date.
ł
Fault tree: C7.0BA8: Cyan ink supply has expired on page 1355
ł
Diagnostic page: Click Subsystems, and then click IDS.
ł
Component locator: IDS component locator on page 1754
ł
Wiring diagram: IDS wiring diagram on page 2491
ł
Parts diagram: IDS parts diagrams on page 1754
Links
2290 Appendix A Event Log codes
ENWW
C7.0BA9
Description
ł
Magenta ink supply is low
Primary root causes
ł
Ink supply
ł
Administrator settings
Recommended actions
1.
Replace the ink supply and verify that the low ink message is not displayed.
2.
Verify that the administrator settings are not set to stop printing when an ink supply is low.
ł
Fault tree: C7.0BA9: Magenta ink supply is low on page 1356
ł
Diagnostic page: Click Subsystems, and then click IDS.
ł
Component locator: IDS component locator on page 1754
ł
Wiring diagram: IDS wiring diagram on page 2491
ł
Parts diagram: IDS parts diagrams on page 1754
Links
ENWW
Event Log error and warning codes 2291
D0.0801
Description
ł
No communication between the Main Engine PCA (A5) and the Power supply (PS1)
Primary root causes
ł
A5
ł
PS1
ł
Wire harness between A5, the Power Distribution PCA (A1), the Main Engine Backplane PCA (A4),
and PS1
Recommended actions
1.
Reseat A5.
2.
Check the power LEDs on A5.
3.
Check the wire harness between A5, A1, A4, and PS1.
4.
Check power LEDs on A1.
5.
Replace PS1.
6.
Replace A1.
7.
Replace A4.
ł
Component locator: Electronics component locator on page 1760
ł
Wiring diagram: Main Engine PCA (A5) diagram on page 2507
ł
Parts diagram: Electronics parts diagrams on page 1760
ł
Replace PS1: Power supply assembly on page 625
ł
Replace A1: Power Distribution PCA (A1) on page 630
ł
Replace A4: Main Engine Backplane PCA (A4) on page 633
Links
2292 Appendix A Event Log codes
ENWW
D0.0802
Description
ł
Power supply (PS1) EEPROM failure
Primary root causes
ł
PS1
Recommended actions
䦱
Replace PS1.
ł
Component locator: Electronics component locator on page 1760
ł
Wiring diagram: Power Distribution PCA (A1) diagram on page 2511
ł
Parts diagram: Electronics parts diagrams on page 1760
ł
Replace PS1: Power supply assembly on page 625
Links
ENWW
Event Log error and warning codes 2293
D0.08A1
Description
ł
Power supply (PS1) temperature too high
Primary root causes
ł
PS1
Recommended actions
1.
Clear any debris from the PS1 fan airflow.
2.
Check the Event Log for PS1 over-temperature warnings.
3.
Verify that the PS1 fan functions. If the fan does not function, replace PS1.
ł
Diagnostic page: Click Subsystems, and then click Power Supply.
ł
Component locator: Electronics component locator on page 1760
ł
Wiring diagram: Power Distribution PCA (A1) diagram on page 2511
ł
Parts diagram: Electronics parts diagrams on page 1760
ł
Replace PS1: Power supply assembly on page 625
Links
2294 Appendix A Event Log codes
ENWW
D0.08A2
Description
ł
Power line voltage sag was detected. This occurs when operating in the 120 Vac range and the
voltage drops to 90 Vac +/- 2 Vac or when operating in the 230 Vac range and the voltage drops
to 160 Vac +/- 2 Vac.
Primary root causes
ł
Power line
Recommended actions
1.
Verify that the power line voltage is correct.
2.
Verify that the MFP is connected to a dedicated power line and that no other devices are connected
to the power line.
ł
Diagnostic page: Click Subsystems, and then click Power Supply.
ł
Component locator: Electronics component locator on page 1760
ł
Wiring diagram: Power Distribution PCA (A1) diagram on page 2511
ł
Parts diagram: Electronics parts diagrams on page 1760
Links
ENWW
Event Log error and warning codes 2295
D0.08A3
Description
ł
Power line voltage surge was detected. This occurs when operating in the 120 Vac range and the
voltage rises to 145 Vac +/- 2 Vac or when operating in the 230 Vac range and the voltage rises
to 288 Vac +/- 2 Vac.
Primary root causes
ł
Power line
Recommended actions
1.
Verify that the power line voltage is correct.
2.
Verify that the MFP is connected to a dedicated power line and that no other devices are connected
to the power line.
ł
Diagnostic page: Click Subsystems, and then click Power Supply.
ł
Component locator: Electronics component locator on page 1760
ł
Wiring diagram: Power Distribution PCA (A1) diagram on page 2511
ł
Parts diagram: Electronics parts diagrams on page 1760
Links
2296 Appendix A Event Log codes
ENWW
D1.0101
Description
ł
Carriage 1 motor (M1) stall
Primary root causes
ł
Wire harness between M1 and the Motion PCA (A2)
ł
M1
ł
A2
ł
Carriage 1 Encoder PCA (A9)
ł
Pen Pocket 1 PCA (A16)
ł
Carriage 1 encoder strip
Recommended actions
1.
Check the wire harness between M1 and A2.
2.
Repair or replace the wire harness between M1 and A2.
3.
Check electrical connections on A2 at J15. If you measure the voltage between the two motor
connectors, the measurement will be 0 Vdc. If you measure the voltage between one motor
connector and the MFP frame, the voltage will be 32 Vdc.
4.
Replace M1.
5.
Replace A2.
6.
Replace A9.
7.
Replace A16.
8.
Replace the Carriage 1 encoder strip.
ł
Diagnostic page: Click Subsystems, and then click Carriage Mechanism.
ł
Component locator: Carriage component locator on page 1602
ł
Wiring diagram: Carriage wiring diagram on page 2466
ł
Parts diagram: Carriage parts diagrams on page 1602
ł
Replace M1: Carriage 1 motor (M1) and Carriage 2 motor (M2) on page 492
ł
Replace A2: Motion PCA (A2) on page 628
ł
Replace A9: Carriage encoder PCAs (A16 and A19) on page 506
ł
Replace A16: Carriage pen pocket PCAs (A17, A18, A20, and A21) on page 505
ł
Replace the Carriage 1 encoder strip: Carriage encoder strip on page 474
Links
ENWW
Event Log error and warning codes 2297
D1.0102
Description
ł
Carriage 2 motor (M2) stall
Primary root causes
ł
Wire harness between M2 and the Motion PCA (A2)
ł
M2
ł
A2
ł
Carriage 2 Encoder PCA (A24)
ł
Pen Pocket 4 PCA (A19)
ł
Carriage 2 encoder strip
Recommended actions
1.
Check the wire harness between M2 and A2.
2.
Repair or replace the wire harness between M2 and A2.
3.
Check electrical connections on A2 at J15. If you measure the voltage between the two motor
connectors, the measurement will be 0 Vdc. If you measure the voltage between one motor
connector and the MFP frame, the voltage will be 32 Vdc.
4.
Replace M2.
5.
Replace A2.
6.
Replace A24.
7.
Replace A19.
8.
Replace the Carriage 2 encoder strip.
ł
Diagnostic page: Click Subsystems, and then click Carriage Mechanism.
ł
Component locator: Carriage component locator on page 1602
ł
Wiring diagram: Carriage wiring diagram on page 2466
ł
Parts diagram: Carriage parts diagrams on page 1602
ł
Replace M2: Carriage 1 motor (M1) and Carriage 2 motor (M2) on page 492
ł
Replace A2: Motion PCA (A2) on page 628
ł
Replace A24: Carriage encoder PCAs (A16 and A19) on page 506
ł
Replace A19: Carriage pen pocket PCAs (A17, A18, A20, and A21) on page 505
ł
Replace the Carriage 2 encoder strip: Carriage encoder strip on page 474
Links
2298 Appendix A Event Log codes
ENWW
D1.0201
Description
ł
Carriage latch down when using interlock
Primary root causes
ł
Wire harness between the Carriage Open sensor (SN19) and the Motion PCA (A2)
ł
SN19
Recommended actions
1.
Open the Carriage Mechanism diagnostic page, and test SN19.
2.
Check the wire harness between SN19 and A2.
3.
Test the voltage to SN19 on A2: 5 Vdc at J8 pins 12A to 11A and 10A to 11A.
4.
Replace SN19.
Additional root causes
ł
A2
ł
Diagnostic page: Click Subsystems, and then click Carriage Mechanism.
ł
Component locator: Carriage component locator on page 1602
ł
Wiring diagram: Drum wiring diagram on page 2471
ł
Parts diagram: Carriage parts diagrams on page 1602
Links
ENWW
Event Log error and warning codes 2299
D1.02A1
Description
ł
Tetris sensor (SN58) failure
Primary root causes
ł
SN58
ł
Wire harness between SN58 and the Pen Pocket 1 PCA (A16)
ł
A16
Recommended actions
1.
Open the Carriage Mechanism diagnostic page, and then verify that all four SN58 LEDs work.
2.
Check the wire harness between SN58 and A16.
ł
Diagnostic page: Click Subsystems, and then click Carriage Mechanism.
ł
Component locator: Carriage component locator on page 1602
ł
Wiring diagram: Carriage pocket PCA diagram on page 2467
ł
Parts diagram: Carriage parts diagrams on page 1602
Links
2300 Appendix A Event Log codes
ENWW
D1.02A2
Description
ł
Tetris sensor (SN58) calibration failed
Primary root causes
ł
SN58
ł
Wire harness between SN58 and the Pen Pocket 1 PCA (A16)
ł
A16
Recommended actions
1.
Open the Carriage Mechanism diagnostic page, and then verify that all four SN58 LEDs work.
2.
Check the wire harness between SN58 and the A16.
3.
Clean the SN58 LEDs, and then verify that they work.
ł
Diagnostic page: Click Subsystems, and then click Carriage Mechanism.
ł
Component locator: Carriage component locator on page 1602
ł
Wiring diagram: Carriage pocket PCA diagram on page 2467
ł
Parts diagram: Carriage parts diagrams on page 1602
Links
ENWW
Event Log error and warning codes 2301
D1.0700
Description
ł
Carriage Power Supply Unit (CPSU) clock failed
Primary root causes
ł
Carriage PSU PCA (A7)
Recommended actions
䦱
Replace A7.
ł
Diagnostic page: Click Subsystems, and then click Carriage Mechanism.
ł
Component locator: Electronics component locator on page 1760
ł
Wiring diagram: Carriage PSU PCA (A7) diagram on page 2468
ł
Parts diagram: Electronics parts diagrams on page 1760
ł
Replace A7: Carriage PSU PCA (A7) on page 510
Links
2302 Appendix A Event Log codes
ENWW
D1.0701
Description
ł
Carriage Power Supply Unit (CPSU) parity bit failed
Primary root causes
ł
Carriage PSU PCA (A7)
ł
All of the pen pocket PCAs: A16 , A17, A18, A19, A20, and A21
ł
Carriage 1 e-chain and the Carriage 2 e-chain
Recommended actions
1.
Replace A7.
2.
Replace all of the pen pocket PCAs: A16 , A17, A18, A19, A20, and A21.
3.
Replace the Carriage 1 e-chain and the Carriage 2 e-chain.
ł
Diagnostic page: Click Subsystems, and then click Carriage Mechanism.
ł
Component locator: Electronics component locator on page 1760
ł
Wiring diagram: Carriage PSU PCA (A7) diagram on page 2468
ł
Parts diagram: Electronics parts diagrams on page 1760
ł
Replace A7: Carriage PSU PCA (A7) on page 510
ł
Replace the pen pocket PCAs: Carriage pen pocket PCAs (A17, A18, A20, and A21)
on page 505
ł
Replace the e-chains: E-chain on page 480
Links
ENWW
Event Log error and warning codes 2303
D1.0702
Description
ł
Carriage Power Supply Unit (CPSU) is in reset
Primary root causes
ł
Wire harness between the Carriage PSU PCA (A7) and the Image Processing PCA (A6)
ł
A7
ł
A6
Recommended actions
1.
Check the wire harness between A7 and A6.
2.
Replace A7.
3.
Replace A6.
ł
Component locator: Electronics component locator on page 1760
ł
Wiring diagram: Carriage PSU PCA (A7) diagram on page 2468
ł
Parts diagram: Electronics parts diagrams on page 1760
ł
Replace A7: Carriage PSU PCA (A7) on page 510
ł
Replace A6: Image Processing PCA assembly on page 513
Links
2304 Appendix A Event Log codes
ENWW
D1.071A
Description
ł
Communication test between the Image Processing PCA (A6) and Pen Pocket 1 PCA (A16) failed
Primary root causes
ł
A16
ł
A6
ł
Carriage 1 e-chain wire harness
Recommended actions
1.
Replace A16.
2.
Replace A6.
3.
Replace the Carriage 1 e-chain wire harness.
ł
Component locator: Carriage component locator on page 1602
ł
Wiring diagram: Image Processing PCA (A6) diagram on page 2504
ł
Parts diagram: Carriage parts diagrams on page 1602
ł
Replace A16: Carriage pen pocket PCAs (A17, A18, A20, and A21) on page 505
ł
Replace A6: Image Processing PCA assembly on page 513
ł
Replace the Carriage 1 e-chain: E-chain on page 480
Links
ENWW
Event Log error and warning codes 2305
D1.071B
Description
ł
Communication test between the Pen Pocket 1 PCA (A16) and Pen 1 failed
Primary root causes
ł
Pen 1
ł
A16
Recommended actions
1.
Reseat Pen 1.
2.
Replace Pen 1.
3.
Replace A16.
ł
Component locator: Carriage component locator on page 1602
ł
Wiring diagram: Carriage pocket PCA diagram on page 2467
ł
Parts diagram: Carriage parts diagrams on page 1602
ł
Replace A16: Carriage pen pocket PCAs (A17, A18, A20, and A21) on page 505
ł
Replace Pen 1: Pens on page 471
Links
2306 Appendix A Event Log codes
ENWW
D1.071C
Description
ł
The Carriage PSU PCA (A7) detected a high current leak on Pen 1
Primary root causes
ł
Pen 1
ł
A16
ł
Carriage 1 e-chain wire harness
ł
A7
Recommended actions
1.
Replace Pen 1.
2.
Replace A16.
3.
Replace the Carriage 1 e-chain wire harness.
4.
Replace A7.
ł
Component locator: Carriage component locator on page 1602
ł
Wiring diagram: Carriage pocket PCA diagram on page 2467
ł
Parts diagram: Carriage parts diagrams on page 1602
ł
Replace Pen 1: Pens on page 471
ł
Replace A16: Carriage pen pocket PCAs (A17, A18, A20, and A21) on page 505
ł
Replace the Carriage 1 e-chain: E-chain on page 480
ł
Replace A7: Carriage PSU PCA (A7) on page 510
Links
ENWW
Event Log error and warning codes 2307
D1.071D
Description
ł
Pen Pocket 1 PCA (A16) failure
Primary root causes
ł
A16
ł
Carriage 1 e-chain wire harness
Recommended actions
1.
Replace the A16.
2.
Replace the Carriage 1 e-chain wire harness.
ł
Component locator: Carriage component locator on page 1602
ł
Wiring diagram: Carriage pocket PCA diagram on page 2467
ł
Parts diagram: Carriage parts diagrams on page 1602
ł
Replace A16: Carriage pen pocket PCAs (A17, A18, A20, and A21) on page 505
ł
Replace the Carriage 1 e-chain: E-chain on page 480
Links
2308 Appendix A Event Log codes
ENWW
D1.072A
Description
ł
Communication test between the Image Processing PCA (A6) and Pen Pocket 2 PCA (A17) failed
Primary root causes
ł
A17
ł
A6
ł
Carriage 1 e-chain wire harness
Recommended actions
1.
Replace A17.
2.
Replace the A6.
3.
Replace the Carriage 1 e-chain wire harness.
ł
Component locator: Electronics component locator on page 1760
ł
Wiring diagram: Image Processing PCA (A6) diagram on page 2504
ł
Parts diagram: Electronics parts diagrams on page 1760
ł
Replace A17: Carriage pen pocket PCAs (A17, A18, A20, and A21) on page 505
ł
Replace A6: Image Processing PCA assembly on page 513
ł
Replace the Carriage 1 e-chain: E-chain on page 480
Links
ENWW
Event Log error and warning codes 2309
D1.072B
Description
ł
Communication test between the Pen Pocket 2 PCA (A17) and Pen 2 failed
Primary root causes
ł
Pen 2
ł
A17
Recommended actions
1.
Reseat Pen 2.
2.
Replace Pen 2.
3.
Replace A17.
ł
Component locator: Carriage component locator on page 1602
ł
Wiring diagram: Carriage pocket PCA diagram on page 2467
ł
Parts diagram: Carriage parts diagrams on page 1602
ł
Replace A17: Carriage pen pocket PCAs (A17, A18, A20, and A21) on page 505
ł
Replace Pen 2: Pens on page 471
Links
2310 Appendix A Event Log codes
ENWW
D1.072C
Description
ł
The Carriage PSU PCA (A7) detected a high current leak on Pen 2
Primary root causes
ł
Pen 2
ł
A17
ł
Carriage 1 e-chain wire harness
ł
A7
Recommended actions
1.
Replace Pen 2.
2.
Replace A17.
3.
Replace the Carriage 1 e-chain wire harness.
4.
Replace A7.
ł
Component locator: Carriage component locator on page 1602
ł
Wiring diagram: Carriage pocket PCA diagram on page 2467
ł
Parts diagram: Carriage parts diagrams on page 1602
ł
Replace Pen 2: Pens on page 471
ł
Replace A17: Carriage pen pocket PCAs (A17, A18, A20, and A21) on page 505
ł
Replace the Carriage 1 e-chain: E-chain on page 480
ł
Replace A7: Carriage PSU PCA (A7) on page 510
Links
ENWW
Event Log error and warning codes 2311
D1.072D
Description
ł
Pen Pocket 2 PCA (A17) failure
Primary root causes
ł
A17
ł
Carriage 1 e-chain wire harness
Recommended actions
1.
Replace A17.
2.
Replace the Carriage 1 e-chain wire harness.
ł
Component locator: Carriage component locator on page 1602
ł
Wiring diagram: Carriage pocket PCA diagram on page 2467
ł
Parts diagram: Carriage parts diagrams on page 1602
ł
Replace A17: Carriage pen pocket PCAs (A17, A18, A20, and A21) on page 505
ł
Replace the Carriage 1 e-chain: E-chain on page 480
Links
2312 Appendix A Event Log codes
ENWW
D1.073A
Description
ł
Communication test between the Image Processing PCA (A6) and Pen Pocket 3 PCA (A18) failed
Primary root causes
ł
A18
ł
A6
ł
Carriage 1 e-chain wire harness
Recommended actions
1.
Replace A18.
2.
Replace A6.
3.
Replace the Carriage 1 e-chain wire harness.
ł
Component locator: Carriage component locator on page 1602
ł
Wiring diagram: Image Processing PCA (A6) diagram on page 2504
ł
Parts diagram: Carriage parts diagrams on page 1602
ł
Replace A18: Carriage pen pocket PCAs (A17, A18, A20, and A21) on page 505
ł
Replace A6: Image Processing PCA assembly on page 513
ł
Replace the Carriage 1 e-chain: E-chain on page 480
Links
ENWW
Event Log error and warning codes 2313
D1.073B
Description
ł
Communication test between the Pen Pocket 3 PCA (A18) and Pen 3 failed
Primary root causes
ł
Pen 3
ł
A18
Recommended actions
1.
Reseat Pen 3.
2.
Replace Pen 3.
3.
Replace A18.
ł
Component locator: Carriage component locator on page 1602
ł
Wiring diagram: Carriage pocket PCA diagram on page 2467
ł
Parts diagram: Carriage parts diagrams on page 1602
ł
Replace A18: Carriage pen pocket PCAs (A17, A18, A20, and A21) on page 505
ł
Replace Pen 3: Pens on page 471
Links
2314 Appendix A Event Log codes
ENWW
D1.073C
Description
ł
The Carriage PSU PCA (A7) detected a high current leak on Pen 3
Primary root causes
ł
Pen 3
ł
A18
ł
Carriage 1 e-chain wire harness
ł
A7
Recommended actions
1.
Replace Pen 3.
2.
Replace A18.
3.
Replace the Carriage 1 e-chain wire harness.
4.
Replace A7.
ł
Component locator: Carriage component locator on page 1602
ł
Wiring diagram: Carriage pocket PCA diagram on page 2467
ł
Parts diagram: Carriage parts diagrams on page 1602
ł
Replace Pen 3: Pens on page 471
ł
Replace A18: Carriage pen pocket PCAs (A17, A18, A20, and A21) on page 505
ł
Replace the Carriage 1 e-chain: E-chain on page 480
ł
Replace A7: Carriage PSU PCA (A7) on page 510
Links
ENWW
Event Log error and warning codes 2315
D1.073D
Description
ł
Pen Pocket 3 PCA (A18) failure
Primary root causes
ł
A18
ł
Carriage 1 e-chain wire harness
Recommended actions
1.
Replace A18.
2.
Replace the Carriage 1 e-chain wire harness.
ł
Component locator: Carriage component locator on page 1602
ł
Wiring diagram: Carriage pocket PCA diagram on page 2467
ł
Parts diagram: Carriage parts diagrams on page 1602
ł
Replace A18: Carriage pen pocket PCAs (A17, A18, A20, and A21) on page 505
ł
Replace the Carriage 1 e-chain: E-chain on page 480
Links
2316 Appendix A Event Log codes
ENWW
D1.074A
Description
ł
Communication test between the Image Processing PCA (A6) and Pen Pocket 4 PCA (A19) failed
Primary root causes
ł
A19
ł
A6
ł
Carriage 2 e-chain wire harness
Recommended actions
1.
Replace A19.
2.
Replace A6.
3.
Replace the Carriage 2 e-chain wire harness.
ł
Component locator: Carriage component locator on page 1602
ł
Wiring diagram: Image Processing PCA (A6) diagram on page 2504
ł
Parts diagram: Carriage parts diagrams on page 1602
ł
Replace A19: Carriage pen pocket PCAs (A17, A18, A20, and A21) on page 505
ł
Replace A6: Image Processing PCA assembly on page 513
ł
Replace the Carriage 2 e-chain: E-chain on page 480
Links
ENWW
Event Log error and warning codes 2317
D1.074B
Description
ł
Communication test between the Pen Pocket 4 PCA (A19) and Pen 4 failed
Primary root causes
ł
Pen 4
ł
A19
Recommended actions
1.
Reseat Pen 4.
2.
Replace Pen 4.
3.
Replace A19.
ł
Component locator: Carriage component locator on page 1602
ł
Wiring diagram: Carriage pocket PCA diagram on page 2467
ł
Parts diagram: Carriage parts diagrams on page 1602
ł
Replace A19: Carriage pen pocket PCAs (A17, A18, A20, and A21) on page 505
ł
Replace Pen 4: Pens on page 471
Links
2318 Appendix A Event Log codes
ENWW
D1.074C
Description
ł
The Carriage PSU PCA (A7) detected a high current leak on Pen 4
Primary root causes
ł
Pen 4
ł
A19
ł
Carriage 2 e-chain wire harness
ł
A7
Recommended actions
1.
Replace Pen 4.
2.
Replace A19.
3.
Replace the Carriage 2 e-chain wire harness.
4.
Replace A7.
ł
Component locator: Carriage component locator on page 1602
ł
Wiring diagram: Carriage pocket PCA diagram on page 2467
ł
Parts diagram: Carriage parts diagrams on page 1602
ł
Replace Pen 4: Pens on page 471
ł
Replace A19: Carriage pen pocket PCAs (A17, A18, A20, and A21) on page 505
ł
Replace the Carriage 2 e-chain: E-chain on page 480
ł
Replace A7: Carriage PSU PCA (A7) on page 510
Links
ENWW
Event Log error and warning codes 2319
D1.074D
Description
ł
Pen Pocket 4 PCA (A19) failure
Primary root causes
ł
A19
ł
Carriage 2 e-chain wire harness
Recommended actions
1.
Replace A19.
2.
Replace the Carriage 2 e-chain wire harness.
ł
Component locator: Carriage component locator on page 1602
ł
Wiring diagram: Carriage pocket PCA diagram on page 2467
ł
Parts diagram: Carriage parts diagrams on page 1602
ł
Replace A19: Carriage pen pocket PCAs (A17, A18, A20, and A21) on page 505
ł
Replace the Carriage 2 e-chain: E-chain on page 480
Links
2320 Appendix A Event Log codes
ENWW
D1.075A
Description
ł
Communication test between the Image Processing PCA (A6) and Pen Pocket 5 PCA (A20) failed
Primary root causes
ł
A20
ł
A6
ł
Carriage 2 e-chain wire harness
Recommended actions
1.
Replace A20.
2.
Replace A6.
3.
Replace the Carriage 2 e-chain wire harness.
ł
Component locator: Carriage component locator on page 1602
ł
Wiring diagram: Image Processing PCA (A6) diagram on page 2504
ł
Parts diagram: Carriage parts diagrams on page 1602
ł
Replace A20: Carriage pen pocket PCAs (A17, A18, A20, and A21) on page 505
ł
Replace A6: Image Processing PCA assembly on page 513
ł
Replace the Carriage 2 e-chain: E-chain on page 480
Links
ENWW
Event Log error and warning codes 2321
D1.075B
Description
ł
Communication test between the Pen Pocket 5 PCA (A20) and Pen 5 failed
Primary root causes
ł
Pen 5
ł
A20
Recommended actions
1.
Reseat Pen 5.
2.
Replace Pen 5.
3.
Replace A20.
ł
Component locator: Carriage component locator on page 1602
ł
Wiring diagram: Carriage pocket PCA diagram on page 2467
ł
Parts diagram: Carriage parts diagrams on page 1602
ł
Replace A20: Carriage pen pocket PCAs (A17, A18, A20, and A21) on page 505
ł
Replace Pen 5: Pens on page 471
Links
2322 Appendix A Event Log codes
ENWW
D1.075C
Description
ł
The Carriage PSU PCA (A7) detected a high current leak on Pen 5
Primary root causes
ł
Pen 5
ł
A20
ł
Carriage 2 e-chain wire harness
ł
A7
Recommended actions
1.
Replace Pen 5.
2.
Replace A20.
3.
Replace the Carriage 2 e-chain wire harness.
4.
Replace A7.
ł
Component locator: Carriage component locator on page 1602
ł
Wiring diagram: Carriage pocket PCA diagram on page 2467
ł
Parts diagram: Carriage parts diagrams on page 1602
ł
Replace Pen 5: Pens on page 471
ł
Replace A20: Carriage pen pocket PCAs (A17, A18, A20, and A21) on page 505
ł
Replace the Carriage 2 e-chain: E-chain on page 480
ł
Replace A7: Carriage PSU PCA (A7) on page 510
Links
ENWW
Event Log error and warning codes 2323
D1.075D
Description
ł
Pen Pocket 5 PCA (A20) failure
Primary root causes
ł
A20
ł
Carriage 2 e-chain wire harness
Recommended actions
1.
Replace A20.
2.
Replace the Carriage 2 e-chain wire harness.
ł
Component locator: Carriage component locator on page 1602
ł
Wiring diagram: Carriage pocket PCA diagram on page 2467
ł
Parts diagram: Carriage parts diagrams on page 1602
ł
Replace A20: Carriage pen pocket PCAs (A17, A18, A20, and A21) on page 505
ł
Replace the Carriage 2 e-chain: E-chain on page 480
Links
2324 Appendix A Event Log codes
ENWW
D1.076A
Description
ł
Communication test between the Image Processing PCA (A6) and Pen Pocket 6 PCA (A21) failed
Primary root causes
ł
A21
ł
A6
ł
Carriage 2 e-chain wire harness
Recommended actions
1.
Replace A21.
2.
Replace A6.
3.
Replace the Carriage 2 e-chain wire harness.
ł
Component locator: Carriage component locator on page 1602
ł
Wiring diagram: Image Processing PCA (A6) diagram on page 2504
ł
Parts diagram: Carriage parts diagrams on page 1602
ł
Replace A21: Carriage pen pocket PCAs (A17, A18, A20, and A21) on page 505
ł
Replace A6: Image Processing PCA assembly on page 513
ł
Replace the Carriage 2 e-chain: E-chain on page 480
Links
ENWW
Event Log error and warning codes 2325
D1.076B
Description
ł
Communication test between the Pen Pocket 6 PCA (A21) and Pen 6 failed
Primary root causes
ł
Pen 6
ł
A21
Recommended actions
1.
Reseat Pen 6.
2.
Replace Pen 6.
3.
Replace A21.
ł
Component locator: Carriage component locator on page 1602
ł
Wiring diagram: Carriage pocket PCA diagram on page 2467
ł
Parts diagram: Carriage parts diagrams on page 1602
ł
Replace A21: Carriage pen pocket PCAs (A17, A18, A20, and A21) on page 505
ł
Replace Pen 6: Pens on page 471
Links
2326 Appendix A Event Log codes
ENWW
D1.076C
Description
ł
The Carriage PSU PCA (A7) detected a high current leak on Pen 6
Primary root causes
ł
Pen 6
ł
A21
ł
Carriage 2 e-chain wire harness
ł
A7
Recommended actions
1.
Replace Pen 6.
2.
Replace A21.
3.
Replace the Carriage 2 e-chain wire harness.
4.
Replace A7.
ł
Component locator: Carriage component locator on page 1602
ł
Wiring diagram: Carriage pocket PCA diagram on page 2467
ł
Parts diagram: Carriage parts diagrams on page 1602
ł
Replace Pen 6: Pens on page 471
ł
Replace A21: Carriage pen pocket PCAs (A17, A18, A20, and A21) on page 505
ł
Replace the Carriage 2 e-chain: E-chain on page 480
ł
Replace A7: Carriage PSU PCA (A7) on page 510
Links
ENWW
Event Log error and warning codes 2327
D1.076D
Description
ł
Pen Pocket 6 PCA (A21) failure
Primary root causes
ł
A21
ł
Carriage 2 e-chain wire harness
Recommended actions
1.
Replace A21.
2.
Replace the Carriage 2 e-chain wire harness.
ł
Component locator: Carriage component locator on page 1602
ł
Wiring diagram: Carriage pocket PCA diagram on page 2467
ł
Parts diagram: Carriage parts diagrams on page 1602
ł
Replace A21: Carriage pen pocket PCAs (A17, A18, A20, and A21) on page 505
ł
Replace the Carriage 2 e-chain: E-chain on page 480
Links
2328 Appendix A Event Log codes
ENWW
D1.0900
Description
ł
CPSU Cooling fan (FAN3) failed
Primary root causes
ł
FAN3
ł
Wire harness between FAN3 and the Carriage PSU PCA (A7)
ł
A7
Recommended actions
1.
Check the wire harness between FAN3 and A7.
2.
Replace FAN3.
3.
Replace A7.
ł
Component locator: Electronics component locator on page 1760
ł
Wiring diagram: Carriage PSU PCA (A7) diagram on page 2468
ł
Parts diagram: Electronics parts diagrams on page 1760
Links
ENWW
Event Log error and warning codes 2329
D1.0A07
Description
ł
Carriage 1 PPS 1 functionality
Primary root causes
ł
Carriage 1 PPS assembly
ł
Pen Pocket 1 PCA (A16)
ł
PPS wire harness
ł
Carriage 1 bearings
Recommended actions
1.
Replace the PPS assembly.
2.
Replace A16.
3.
Replace the PPS wire harness.
4.
Replace the Carriage 1 bearings.
ł
Component locator: Carriage component locator on page 1602
ł
Wiring diagram: Carriage pocket PCA diagram on page 2467
ł
Parts diagram: Carriage parts diagrams on page 1602
ł
Replace the PPS: PPS assembly on page 502
ł
Replace A16: Carriage pen pocket PCAs (A17, A18, A20, and A21) on page 505
Links
2330 Appendix A Event Log codes
ENWW
D1.0A08
Description
ł
Carriage 2 PPS 2 functionality
Primary root causes
ł
Carriage 2 PPS assembly
ł
Pen Pocket 4 PCA (A19)
ł
PPS wire harness
ł
Carriage 2 bearings
Recommended actions
1.
Replace the PPS assembly.
2.
Replace A19.
3.
Replace the PPS wire harness.
4.
Replace the Carriage 2 bearings.
ł
Component locator: Carriage component locator on page 1602
ł
Wiring diagram: Carriage pocket PCA diagram on page 2467
ł
Parts diagram: Carriage parts diagrams on page 1602
ł
Replace the PPS: PPS assembly on page 502
ł
Replace A19: Carriage pen pocket PCAs (A17, A18, A20, and A21) on page 505
Links
ENWW
Event Log error and warning codes 2331
D1.0A1A
Description
ł
Pen 1 (Bonding Agent) failure (missing, shorted, too many nozzles out, or bad acumen)
Primary root causes
ł
Incorrectly connected trailing cables on the Image Processing PCA (A6)
ł
Pen 1
ł
Pen Pocket 1 PCA (A16)
Recommended actions
1.
Verify that the trailing cables are securely connected to the correct location on A6.
2.
Replace Pen 1.
3.
Replace A16.
ł
Component locator: Carriage component locator on page 1602
ł
Wiring diagram: Carriage pocket PCA diagram on page 2467
ł
Parts diagram: Carriage parts diagrams on page 1602
ł
Replace Pen 1: Pens on page 471
ł
Replace A16: Carriage pen pocket PCAs (A17, A18, A20, and A21) on page 505
Links
2332 Appendix A Event Log codes
ENWW
D1.0A1B
Description
ł
Pen 1 (Bonding Agent) thermal failure
Primary root causes
ł
Pen 1
ł
Pen Pocket 1 PCA (A16)
Recommended actions
1.
Replace Pen 1.
2.
Replace A16.
ł
Component locator: Carriage component locator on page 1602
ł
Wiring diagram: Carriage pocket PCA diagram on page 2467
ł
Parts diagram: Carriage parts diagrams on page 1602
ł
Replace Pen 1: Pens on page 471
ł
Replace A16: Carriage pen pocket PCAs (A17, A18, A20, and A21) on page 505
Links
ENWW
Event Log error and warning codes 2333
D1.0A2A
Description
ł
Pen 2 (Black/Yellow) failure (missing, shorted, too many nozzles out, or bad acumen)
Primary root causes
ł
Incorrectly connected trailing cables on the Image Processing PCA (A6)
ł
Pen 2
ł
Pen Pocket 2 PCA (A17)
Recommended actions
1.
Verify that the trailing cables are securely connected to the correct location on A6.
2.
Replace Pen 2.
3.
Replace A17.
ł
Component locator: Carriage component locator on page 1602
ł
Wiring diagram: Carriage pocket PCA diagram on page 2467
ł
Parts diagram: Carriage parts diagrams on page 1602
ł
Replace Pen 2: Pens on page 471
ł
Replace A17: Carriage pen pocket PCAs (A17, A18, A20, and A21) on page 505
Links
2334 Appendix A Event Log codes
ENWW
D1.0A2B
Description
ł
Pen 2 (Black/Yellow) thermal failure
Primary root causes
ł
Pen 2
ł
Pen Pocket 2 PCA (A17)
Recommended actions
1.
Replace Pen 2.
2.
Replace A17.
ł
Component locator: Carriage component locator on page 1602
ł
Wiring diagram: Carriage pocket PCA diagram on page 2467
ł
Parts diagram: Carriage parts diagrams on page 1602
ł
Replace Pen 2: Pens on page 471
ł
Replace A17: Carriage pen pocket PCAs (A17, A18, A20, and A21) on page 505
Links
ENWW
Event Log error and warning codes 2335
D1.0A3A
Description
ł
Pen 3 (Cyan/Magenta) failure (missing, shorted, too many nozzles out, or bad acumen)
Primary root causes
ł
Incorrectly connected trailing cables on the Image Processing PCA (A6)
ł
Pen 3
ł
Pen Pocket 3 PCA (A18)
Recommended actions
1.
Verify that the trailing cables are securely connected to the correct location on A6.
2.
Replace Pen 3.
3.
Replace A18.
ł
Component locator: Carriage component locator on page 1602
ł
Wiring diagram: Carriage pocket PCA diagram on page 2467
ł
Parts diagram: Carriage parts diagrams on page 1602
ł
Replace Pen 3: Pens on page 471
ł
Replace A18: Carriage pen pocket PCAs (A17, A18, A20, and A21) on page 505
Links
2336 Appendix A Event Log codes
ENWW
D1.0A3B
Description
ł
Pen 3 (Cyan/Magenta) thermal failure
Primary root causes
ł
Pen 3
ł
Pen Pocket 3 PCA (A18)
Recommended actions
1.
Replace Pen 3.
2.
Replace A18.
ł
Component locator: Carriage component locator on page 1602
ł
Wiring diagram: Carriage pocket PCA diagram on page 2467
ł
Parts diagram: Carriage parts diagrams on page 1602
ł
Replace Pen 3: Pens on page 471
ł
Replace A18: Carriage pen pocket PCAs (A17, A18, A20, and A21) on page 505
Links
ENWW
Event Log error and warning codes 2337
D1.0A4A
Description
ł
Pen 4 (Bonding Agent) failure (missing, shorted, too many nozzles out, or bad acumen)
Primary root causes
ł
Incorrectly connected trailing cables on the Image Processing PCA (A6)
ł
Pen 4
ł
Pen Pocket 4 PCA (A19)
Recommended actions
1.
Verify that the trailing cables are securely connected to the correct location on A6.
2.
Replace Pen 4.
3.
Replace A19.
ł
Diagnostic page: Click Subsystems, click Carriage, and then click Carriage Mechanism.
ł
Component locator: Carriage component locator on page 1602
ł
Wiring diagram: Carriage pocket PCA diagram on page 2467
ł
Parts diagram: Carriage parts diagrams on page 1602
ł
Replace Pen 4: Pens on page 471
ł
Replace A19: Carriage pen pocket PCAs (A17, A18, A20, and A21) on page 505
Links
2338 Appendix A Event Log codes
ENWW
D1.0A4B
Description
ł
Pen 4 (Bonding Agent) thermal failure
Primary root causes
ł
Pen 4
ł
Pen Pocket 4 PCA (A19)
Recommended actions
1.
Replace Pen 4.
2.
Replace A19.
ł
Component locator: Carriage component locator on page 1602
ł
Wiring diagram: Carriage pocket PCA diagram on page 2467
ł
Parts diagram: Carriage parts diagrams on page 1602
ł
Replace Pen 4: Pens on page 471
ł
Replace A19: Carriage pen pocket PCAs (A17, A18, A20, and A21) on page 505
Links
ENWW
Event Log error and warning codes 2339
D1.0A5A
Description
ł
Pen 5 (Black/Yellow) failure (missing, shorted, too many nozzles out, or bad acumen)
Primary root causes
ł
Incorrectly connected trailing cables on the Image Processing PCA (A6)
ł
Pen 5
ł
Pen Pocket 5 PCA (A20)
Recommended actions
1.
Verify that the trailing cables are securely connected to the correct location on A6.
2.
Replace Pen 5.
3.
Replace A20.
ł
Component locator: Carriage component locator on page 1602
ł
Wiring diagram: Carriage pocket PCA diagram on page 2467
ł
Parts diagram: Carriage parts diagrams on page 1602
ł
Replace Pen 5: Pens on page 471
ł
Replace A20: Carriage pen pocket PCAs (A17, A18, A20, and A21) on page 505
Links
2340 Appendix A Event Log codes
ENWW
D1.0A5B
Description
ł
Pen 5 (Black/Yellow) thermal failure
Primary root causes
ł
Pen 5
ł
Pen Pocket 5 PCA (A20)
Recommended actions
1.
Replace Pen 5.
2.
Replace A20.
ł
Component locator: Carriage component locator on page 1602
ł
Wiring diagram: Carriage pocket PCA diagram on page 2467
ł
Parts diagram: Carriage parts diagrams on page 1602
ł
Replace Pen 5: Pens on page 471
ł
Replace A20: Carriage pen pocket PCAs (A17, A18, A20, and A21) on page 505
Links
ENWW
Event Log error and warning codes 2341
D1.0A6A
Description
ł
Pen 6 (Cyan/Magenta) failure (missing, shorted, too many nozzles out, or bad acumen)
Primary root causes
ł
Incorrectly connected trailing cables on the Image Processing PCA (A6)
ł
Pen 6
ł
Pen Pocket 6 PCA (A21)
Recommended actions
1.
Verify that the trailing cables are securely connected to the correct location on A6.
2.
Replace Pen 6.
3.
Replace A21.
ł
Component locator: Carriage component locator on page 1602
ł
Wiring diagram: Carriage pocket PCA diagram on page 2467
ł
Parts diagram: Carriage parts diagrams on page 1602
ł
Replace Pen 6: Pens on page 471
ł
Replace A21: Carriage pen pocket PCAs (A17, A18, A20, and A21) on page 505
Links
2342 Appendix A Event Log codes
ENWW
D1.0A6B
Description
ł
Pen 6 (Cyan/Magenta) thermal failure
Primary root causes
ł
Pen 6
ł
Pen Pocket 6 PCA (A21)
Recommended actions
1.
Replace Pen 6.
2.
Replace A21.
ł
Component locator: Carriage component locator on page 1602
ł
Wiring diagram: Carriage pocket PCA diagram on page 2467
ł
Parts diagram: Carriage parts diagrams on page 1602
ł
Replace Pen 6: Pens on page 471
ł
Replace A21: Carriage pen pocket PCAs (A17, A18, A20, and A21) on page 505
Links
ENWW
Event Log error and warning codes 2343
D2.01A0
Description
ł
Carriage 1 accuracy monitor alert
Primary root causes
ł
Carriage 1 rod
Recommended actions
1.
Use a lint-free cloth to clean the Carriage 1 rod.
2.
Lubricate the Carriage 1 rod.
3.
Open the Engine Calibrations 2 page, and then run the Carriage Stopping Accuracy calibration.
ł
Calibration page: Click Settings/Procedures, click Calibrations, and then click Engine
Calibrations 2.
ł
Component locator: Carriage component locator on page 1602
ł
Wiring diagram: Carriage wiring diagram on page 2466
ł
Parts diagram: Carriage parts diagrams on page 1602
Links
2344 Appendix A Event Log codes
ENWW
D2.01A1
Description
ł
Carriage 2 accuracy monitor alert
Primary root causes
ł
Carriage 2 rod
Recommended actions
1.
Use a lint-free cloth to clean the Carriage 2 rod.
2.
Lubricate the Carriage 2 rod.
3.
Open the Engine Calibrations 2 page, and then run the Carriage Stopping Accuracy calibration.
ł
Calibration page: Click Settings/Procedures, click Calibrations, and then click Engine
Calibrations 2.
ł
Component locator: Carriage component locator on page 1602
ł
Wiring diagram: Carriage wiring diagram on page 2466
ł
Parts diagram: Carriage parts diagrams on page 1602
Links
ENWW
Event Log error and warning codes 2345
D2.01A2
Description
ł
Passed carriage accuracy diagnostic
Primary root causes
ł
None
Recommended actions
䦱
No action required. The carriage passed the accuracy diagnostics.
2346 Appendix A Event Log codes
ENWW
D2.01A3
Description
ł
Failed Carriage 1 accuracy diagnostic
Primary root causes
ł
Carriage 1 rod
ł
Carriage 1 bearings
ł
Wire harness between the Carriage 1 motor (M1) and the Motion PCA (A2)
ł
A2
ł
Carriage 1 encoder strip
ł
Carriage 1 drive belts
ł
Carriage 1 e-chain and the Carriage 2 e-chain
Recommended actions
1.
Use a lint-free cloth to clean the Carriage 1 rod.
2.
Lubricate the Carriage 1 rod.
3.
Open the Engine Calibrations 2 page, and then run the Carriage Stopping Accuracy calibration.
4.
Check the wire harness between M1 and A2.
5.
Check and reseat the Carriage 1 e-chain and the Carriage 2 e-chain.
6.
Replace the Carriage 1 bearing and felt.
7.
Clean the Carriage 1 encoder strip.
8.
Check the Carriage 1 drive belts.
9.
Test M1.
10. Replace A2.
Links
ENWW
ł
Calibration page: Click Settings/Procedures, click Calibrations, and then click Engine
Calibrations 2.
ł
Component locator: Carriage component locator on page 1602
ł
Wiring diagram: Carriage wiring diagram on page 2466
ł
Parts diagram: Carriage parts diagrams on page 1602
ł
Replace A2: Motion PCA (A2) on page 628
Event Log error and warning codes 2347
D2.01A4
Description
ł
Failed Carriage 2 accuracy diagnostic
Primary root causes
ł
Carriage 2 rod
ł
Carriage 2 bearings
ł
Wire harness between the Carriage 2 motor (M2) and the Motion PCA (A2)
ł
A2
ł
Carriage 2 encoder strip
ł
Carriage 2 drive belts
ł
Carriage 1 e-chain and the Carriage 2 e-chain
Recommended actions
1.
Use a lint-free cloth to clean the Carriage 2 rod.
2.
Lubricate the Carriage 2 rod.
3.
Open the Engine Calibrations 2 page, and then run the Carriage Stopping Accuracy calibration.
4.
Check the wire harness between M2 and A2.
5.
Check and reseat the Carriage 1 e-chain and the Carriage 2 e-chain.
6.
Replace the Carriage 2 bearing and felt.
7.
Clean the Carriage 2 encoder strip.
8.
Check the Carriage 2 drive belts.
9.
Test M2.
10. Replace A2.
Links
ł
Calibration page: Click Settings/Procedures, click Calibrations, and then click Engine
Calibrations 2.
ł
Component locator: Carriage component locator on page 1602
ł
Wiring diagram: Carriage wiring diagram on page 2466
ł
Parts diagram: Carriage parts diagrams on page 1602
ł
Replace A2: Motion PCA (A2) on page 628
2348 Appendix A Event Log codes
ENWW
D2.01A5
Description
ł
Passed carriage accuracy calibration
Primary root causes
ł
None
Recommended actions
䦱
ENWW
No action required. The carriage passed the accuracy calibration.
Event Log error and warning codes 2349
D2.01A6
Description
ł
Failed carriage 1 accuracy calibration
Primary root causes
ł
Carriage 1 motor (M1)
ł
Carriage 1 encoder (EN18)
ł
Wire harness between M1 and the Motion PCA (A2)
ł
A2
Recommended actions
1.
Check the wire harness between M1 and A2.
2.
Open the Engine Calibrations 2 page, and then run the Carriage Stopping Accuracy calibration.
3.
Replace M1. Run the Carriage Stopping Accuracy calibration.
4.
Replace the Carriage 1 encoder strip. Run the Carriage Stopping Accuracy calibration.
5.
Replace A2. Run the Carriage Stopping Accuracy calibration.
ł
Calibration page: Click Settings/Procedures, click Calibrations, and then click Engine
Calibrations 2.
ł
Component locator: Carriage component locator on page 1602
ł
Wiring diagram: Carriage wiring diagram on page 2466
ł
Parts diagram: Carriage parts diagrams on page 1602
ł
Replace M1: Carriage 1 motor (M1) and Carriage 2 motor (M2) on page 492
ł
Replace the Carriage 1 encoder strip: Carriage encoder strip on page 474
ł
Replace A2: Motion PCA (A2) on page 628
Links
2350 Appendix A Event Log codes
ENWW
D2.01A7
Description
ł
Failed Carriage 2 accuracy calibration
Primary root causes
ł
Carriage 2 motor (M2)
ł
Carriage 2 encoder (EN19)
ł
Wire harness between M2 and the Motion PCA (A2)
ł
A2
Recommended actions
1.
Open the Engine Calibrations 2 page, and then run the Carriage Stopping Accuracy calibration.
2.
Check the wire harness between M2 and A2. Open the Engine Calibrations 2 page, and then run
the Carriage Stopping Accuracy calibration.
3.
Replace M2. Run the Carriage Stopping Accuracy calibration.
4.
Replace the Carriage 2 encoder strip. Run the Carriage Stopping Accuracy calibration.
5.
Replace A2. Run the Carriage Stopping Accuracy calibration.
ł
Calibration page: Click Settings/Procedures, click Calibrations, and then click Engine
Calibrations 2.
ł
Component locator: Carriage component locator on page 1602
ł
Wiring diagram: Carriage wiring diagram on page 2466
ł
Parts diagram: Carriage parts diagrams on page 1602
ł
Replace M1: Carriage 1 motor (M1) and Carriage 2 motor (M2) on page 492
ł
Replace the Carriage 1 encoder strip: Carriage encoder strip on page 474
ł
Replace A2: Motion PCA (A2) on page 628
Links
ENWW
Event Log error and warning codes 2351
D2.02A1
Description
ł
Carriage thermistor reading difference
Primary root causes
ł
Carriage Front thermistor (SN61)
ł
Carriage Back thermistor (SN62)
ł
Wire harness between carriage thermistors and the Ink Assist PCA (A3)
ł
A3
Recommended actions
1.
Check SN61 and SN62 for damage.
2.
Open the Carriage Mechanism diagnostic page, and then verify that the SN61 temperature reading
is within +/- 5 degrees C (9 degrees F) of the SN62 temperature reading.
3.
Test the resistance at SN61 and SN62: approximately 10 ohms at ambient temperature.
4.
Test both SN61 and SN62. Replace any thermistor with a temperature reading above 65 degrees
C (149 degrees F) or below 8 degrees C (46.4 degrees F). The temperature reading should not
spike but show a gradual change. Replace any thermistor with a reading that fluctuates widely
(more than 20 degrees) or that shows no temperature difference between idle (at least 15 minutes
of no use) and printing.
5.
Check the wire harness between carriage thermistors and A3.
ł
Diagnostic page: Click Subsystems, and then click Carriage Mechanism.
ł
Component locator: Carriage component locator on page 1602
ł
Wiring diagram: Carriage wiring diagram on page 2466
ł
Parts diagram: Carriage parts diagrams on page 1602
Links
2352 Appendix A Event Log codes
ENWW
D2.0701
Description
ł
Carriage PSU PCA (A7) reported power bad
Primary root causes
ł
Fuses on A7
ł
Wire harness between A7 and the Image Processing PCA (A6)
ł
Wire harness between A7 and the Power Distribution PCA (A1)
ł
Power supply (PS1)
Recommended actions
1.
Check the power LEDs on A7.
2.
Check or replace the fuses on A7.
3.
Replace A7.
4.
Check or reseat the wire harness between A7 and A6.
5.
Check or reseat the wire harness between A7 and A1.
6.
Check the input power supply LEDs on the carriage power supply unit (CPSU).
ł
Component locator: Electronics component locator on page 1760
ł
Wiring diagram: Carriage PSU PCA (A7) diagram on page 2468
ł
Parts diagram: Electronics parts diagrams on page 1760
ł
Replace A7: Carriage PSU PCA (A7) on page 510
Links
ENWW
Event Log error and warning codes 2353
D2.0703
Description
ł
Synchronization error between the Main Engine PCA (A5) and the Image Processing PCA (A6)
Primary root causes
ł
Gigablaze data cable between A6 and A5
ł
Wire harness between A6 and Main Engine Backplane PCA (A4)
ł
A4
ł
A6
ł
A5
Recommended actions
1.
If you have not done so already, reboot the MFP in Protected Service mode (PSM).
2.
Check or reseat the Gigablaze data cable between A6 and A5.
3.
Check or reseat the wire harness between A6 and A4.
4.
Open the Communication diagnostic page, and then run the A6 communication test.
5.
Replace A4.
6.
Replace A6.
7.
Replace A5.
ł
Diagnostic page: Click Subsystems, and then click Communication.
ł
Component locator: Electronics component locator on page 1760
ł
Wiring diagram: Image Processing PCA (A6) diagram on page 2504
ł
Parts diagram: Electronics parts diagrams on page 1760
ł
Replace A6: Image Processing PCA assembly on page 513
ł
Replace A4: Main Engine Backplane PCA (A4) on page 633
ł
Replace A5: Main Engine PCA (A5) on page 631
Links
2354 Appendix A Event Log codes
ENWW
D2.0704
Description
ł
Gigablaze lost link between the Image Processing PCA (A6) and the Main Engine PCA (A5)
Primary root causes
ł
Gigablaze data cable between A6 andA5
ł
Wire harness between A6 and Main Engine Backplane PCA (A4)
ł
A4
ł
A6
ł
A5
Recommended actions
1.
If you have not done so already, reboot the MFP in Protected Service mode (PSM).
2.
Check or reseat the Gigablaze data cable between A6 and A5.
3.
Check or reseat the wire harness between A6 and A4.
4.
Open the Communication diagnostic page, and then run the A6 communication test.
5.
Replace A4.
6.
Replace A6.
7.
Replace A5.
ł
Diagnostic page: Click Subsystems, and then click Communication.
ł
Component locator: Electronics component locator on page 1760
ł
Wiring diagram: Image Processing PCA (A6) diagram on page 2504
ł
Parts diagram: Electronics parts diagrams on page 1760
ł
Replace A6: Image Processing PCA assembly on page 513
ł
Replace A4: Main Engine Backplane PCA (A4) on page 633
ł
Replace A5: Main Engine PCA (A5) on page 631
Links
ENWW
Event Log error and warning codes 2355
D2.0705
Description
ł
Serial interface communications error between the Main Engine PCA (A5) and the Image
Processing PCA (A6)
Primary root causes
ł
Fuses on A6
ł
Wire harness between A6 and Main Engine PCA (A5)
ł
Wire harness between the A6 and the Power Distribution PCA (A1)
ł
Main Engine Backplane PCA (A4)
ł
A6
ł
Power supply (PS1)
Recommended actions
1.
If you have not done so already, reboot the MFP in Protected Service mode (PSM).
2.
Check the power LEDs on A6.
3.
Check or replace the fuses on A6.
4.
Check or reseat the wire harness between A6 and A5.
5.
Check or reseat the wire harness between A6 and A1.
6.
Open the Communication diagnostic page, and then run the A6 communication test.
7.
Replace A6.
8.
Replace A4.
ł
Diagnostic page: Click Subsystems, and then click Communication.
ł
Component locator: Electronics component locator on page 1760
ł
Wiring diagram: Image Processing PCA (A6) diagram on page 2504
ł
Parts diagram: Electronics parts diagrams on page 1760
ł
Replace A6: Image Processing PCA assembly on page 513
ł
Replace A4: Main Engine Backplane PCA (A4) on page 633
Links
2356 Appendix A Event Log codes
ENWW
D2.0707
Description
ł
Pen Pocket 1 PCA (A16) to pen voltage regulator (PVR) on the Carriage PSU PCA (A7) drive signal
failed
Primary root causes
ł
A16
ł
A7
ł
Carriage 1 e-chain
Recommended actions
1.
Reseat or replace A16.
2.
Replace A7.
3.
Reseat or replace the Carriage 1 e-chain.
ł
Component locator: Carriage component locator on page 1602
ł
Wiring diagram: Carriage pocket PCA diagram on page 2467
ł
Parts diagram: Carriage parts diagrams on page 1602
ł
Replace A7: Carriage PSU PCA (A7) on page 510
ł
Replace A16: Carriage pen pocket PCAs (A17, A18, A20, and A21) on page 505
ł
Replace the e-chain: E-chain on page 480
Links
ENWW
Event Log error and warning codes 2357
D2.0708
Description
ł
Pen Pocket 2 PCA (A17) to pen voltage regulator (PVR) on the Carriage PSU PCA (A7) drive signal
failed
Primary root causes
ł
A17
ł
A7
ł
Carriage 1 e-chain
Recommended actions
1.
Reseat or replace A17.
2.
Replace A7.
3.
Reseat or replace the Carriage 1 e-chain.
ł
Component locator: Carriage component locator on page 1602
ł
Wiring diagram: Carriage pocket PCA diagram on page 2467
ł
Parts diagram: Carriage parts diagrams on page 1602
ł
Replace A7: Carriage PSU PCA (A7) on page 510
ł
Replace A17: Carriage pen pocket PCAs (A17, A18, A20, and A21) on page 505
ł
Replace the e-chain: E-chain on page 480
Links
2358 Appendix A Event Log codes
ENWW
D2.0709
Description
ł
Pen Pocket 3 PCA (A18) to pen voltage regulator (PVR) on the Carriage PSU PCA (A7) drive signal
failed
Primary root causes
ł
A18
ł
A7
ł
Carriage 1 e-chain
Recommended actions
1.
Reseat or replace A18.
2.
Replace A7.
3.
Reseat or replace the Carriage 1 e-chain.
ł
Component locator: Carriage component locator on page 1602
ł
Wiring diagram: Carriage pocket PCA diagram on page 2467
ł
Parts diagram: Carriage parts diagrams on page 1602
ł
Replace A7: Carriage PSU PCA (A7) on page 510
ł
Replace A18: Carriage pen pocket PCAs (A17, A18, A20, and A21) on page 505
ł
Replace the e-chain: E-chain on page 480
Links
ENWW
Event Log error and warning codes 2359
D2.0710
Description
ł
Pen Pocket 4 PCA (A19) to pen voltage regulator (PVR) on the Carriage PSU PCA (A7) drive signal
failed
Primary root causes
ł
A19
ł
A7
ł
Carriage 2 e-chain
Recommended actions
1.
Reseat or replace A19.
2.
Replace A7.
3.
Reseat or replace the Carriage 2 e-chain.
ł
Component locator: Carriage component locator on page 1602
ł
Wiring diagram: Carriage pocket PCA diagram on page 2467
ł
Parts diagram: Carriage parts diagrams on page 1602
ł
Replace A7: Carriage PSU PCA (A7) on page 510
ł
Replace A19: Carriage pen pocket PCAs (A17, A18, A20, and A21) on page 505
ł
Replace the e-chain: E-chain on page 480
Links
2360 Appendix A Event Log codes
ENWW
D2.0711
Description
ł
Pen Pocket 5 PCA (A20) to pen voltage regulator (PVR) on the Carriage PSU PCA (A7) drive signal
failed
Primary root causes
ł
A20
ł
A7
ł
Carriage 2 e-chain
Recommended actions
1.
Reseat or replace A20.
2.
Replace A7.
3.
Reseat or replace the Carriage 2 e-chain.
ł
Component locator: Carriage component locator on page 1602
ł
Wiring diagram: Carriage pocket PCA diagram on page 2467
ł
Parts diagram: Carriage parts diagrams on page 1602
ł
Replace A7: Carriage PSU PCA (A7) on page 510
ł
Replace A20: Carriage pen pocket PCAs (A17, A18, A20, and A21) on page 505
ł
Replace the e-chain: E-chain on page 480
Links
ENWW
Event Log error and warning codes 2361
D2.0712
Description
ł
Pen Pocket 6 PCA (A21) to pen voltage regulator (PVR) on the Carriage PSU PCA (A7) drive signal
failed
Primary root causes
ł
A21
ł
A7
ł
Carriage 2 e-chain
Recommended actions
1.
Reseat or replace A21.
2.
Replace A7.
3.
Reseat or replace the Carriage 2 e-chain.
ł
Component locator: Carriage component locator on page 1602
ł
Wiring diagram: Carriage pocket PCA diagram on page 2467
ł
Parts diagram: Carriage parts diagrams on page 1602
ł
Replace A7: Carriage PSU PCA (A7) on page 510
ł
Replace A21: Carriage pen pocket PCAs (A17, A18, A20, and A21) on page 505
ł
Replace the e-chain: E-chain on page 480
Links
2362 Appendix A Event Log codes
ENWW
D2.0713
Description
ł
The Image Processing PCA (A6) power failed
Primary root causes
ł
Fuses on A6
ł
Wire harness between A6 and the Main Engine Backplane PCA (A4)
ł
Wire harness between the A6 and the Power Distribution PCA (A1)
ł
A4
ł
A6
ł
Power supply (PS1)
Recommended actions
1.
Check the power LEDs on A6.
2.
Check or replace the fuses on A6. If the fuses are blown, replace A6 and both e-chains.
3.
Replace A6.
4.
Reseat or replace both e-chains.
ł
Component locator: Electronics component locator on page 1760
ł
Wiring diagram: Image Processing PCA (A6) diagram on page 2504
ł
Parts diagram: Electronics parts diagrams on page 1760
ł
Replace : Image Processing PCA assembly on page 513
ł
Replace the e-chain: E-chain on page 480
Links
ENWW
Event Log error and warning codes 2363
D2.0714
Description
ł
Carriage 1 Encoder PCA (A9) failed
Primary root causes
ł
Carriage 1 e-chain
ł
Pen Pocket 1 PCA (A16)
ł
A9
ł
Carriage 1 PPS PCA (A25)
ł
A25 wire harness
ł
Image Processing PCA (A6)
Recommended actions
1.
Reseat or replace the Carriage 2 e-chain.
2.
Reseat or replace A16.
3.
Replace A9.
4.
Replace A25.
5.
Check or reseat A25 wire harness.
6.
Replace A6.
ł
Component locator: Carriage component locator on page 1602
ł
Wiring diagram: Carriage encoder diagram on page 2467
ł
Parts diagram: Carriage parts diagrams on page 1602
ł
Replace A16: Carriage pen pocket PCAs (A17, A18, A20, and A21) on page 505
ł
Replace A9: Carriage encoder PCAs (A16 and A19) on page 506
ł
Replace A25: Carriage PPS PCAs (A25 and A34) on page 508
ł
Replace A6: Image Processing PCA assembly on page 513
ł
Replace the e-chain: E-chain on page 480
Links
2364 Appendix A Event Log codes
ENWW
D2.0715
Description
ł
Carriage 2 Encoder PCA (A24) failed
Primary root causes
ł
Carriage 2 e-chain
ł
Pen Pocket 4 PCA (A19)
ł
Carriage 2 Encoder PCA (A24)
ł
Carriage 2 PPS PCA (A34)
ł
A34 wire harness
ł
Image Processing PCA (A6)
Recommended actions
1.
Reseat or replace the Carriage 2 e-chain.
2.
Reseat or replace A19.
3.
Replace A24.
4.
Replace A34.
5.
Check or reseat the A34 wire harness.
6.
Replace A6.
ł
Component locator: Carriage component locator on page 1602
ł
Wiring diagram: Carriage encoder diagram on page 2467
ł
Parts diagram: Carriage parts diagrams on page 1602
ł
Replace A19: Carriage pen pocket PCAs (A17, A18, A20, and A21) on page 505
ł
Replace A24: Carriage encoder PCAs (A16 and A19) on page 506
ł
Replace A34: Carriage PPS PCAs (A25 and A34) on page 508
ł
Replace A6: Image Processing PCA assembly on page 513
ł
Replace the e-chain: E-chain on page 480
Links
ENWW
Event Log error and warning codes 2365
D2.0716
Description
ł
Carriage 1 Encoder PCA (A9) and Carriage 2 Encoder PCA (A24) failed
Primary root causes
ł
Fuses on the Image Processing PCA (A6)
ł
A6
ł
Carriage 1 e-chain and the Carriage 2 e-chain
ł
Power supply (PS1)
Recommended actions
1.
If you have not done so already, reboot the MFP in Protected Service mode (PSM).
2.
Check the power LEDs on A6.
3.
Check or replace the fuses on A6.
4.
Check or reseat the wire harness between A6 and the Main Engine Backplane PCA (A4).
5.
Check or reseat the wire harness between A6 and the Power Distribution PCA (A1).
6.
Open the Communication diagnostic page, and then run the A6 communication test.
7.
Replace A6.
8.
Replace A4.
ł
Diagnostic page: Click Subsystems, and then click Communication.
ł
Component locator: Carriage component locator on page 1602
ł
Wiring diagram: Carriage encoder diagram on page 2467
ł
Parts diagram: Carriage parts diagrams on page 1602
ł
Replace A6: Image Processing PCA assembly on page 513
ł
Replace A4: Main Engine Backplane PCA (A4) on page 633
Links
2366 Appendix A Event Log codes
ENWW
D2.0723
Description
ł
Multiple Pen Pocket PCAs have failed
Primary root causes
ł
All pen pocket PCAs
ł
Carriage PSU PCA (A7)
ł
Carriage 1 e-chain and the Carriage 2 e-chain
ł
Image Processing PCA (A6)
ł
Wire harness between A6 and the Power Distribution PCA (A1)
ł
Wire harness between A7 and A1
Recommended actions
1.
Check or reseat the wire harness between A6, A7, and A1.
2.
Replace all of the pen pocket PCAs.
3.
Replace A7.
4.
Reseat or replace the Carriage 1 e-chain and the Carriage 2 e-chain.
5.
Replace A6.
ł
Component locator: Carriage component locator on page 1602
ł
Wiring diagram: Carriage pocket PCA diagram on page 2467
ł
Parts diagram: Carriage parts diagrams on page 1602
ł
Replace the pen pocket PCAs: Carriage pen pocket PCAs (A17, A18, A20, and A21)
on page 505
ł
Replace A7: Carriage PSU PCA (A7) on page 510
ł
Replace A6: Image Processing PCA assembly on page 513
ł
Replace the e-chain: E-chain on page 480
Links
ENWW
Event Log error and warning codes 2367
D2.0724
Description
ł
Carriage 1 encoder (EN18) or Carriage 2 encoder (EN19) failed in addition to one or more Pen
Pocket PCA failures
Primary root causes
ł
Fuses on the Image Processing PCA (A6)
ł
A6
ł
Carriage 1 e-chain and the Carriage 2 e-chain
ł
Power supply (PS1)
Recommended actions
1.
Check the power LEDs on A6.
2.
Check or replace the fuses on A6. If the fuses are blown, replace A6 and both e-chains.
3.
Replace A6.
4.
Replace the Carriage 1 e-chain and the Carriage 2 e-chain.
ł
Component locator: Carriage component locator on page 1602
ł
Wiring diagram: Image Processing PCA (A6) diagram on page 2504
ł
Parts diagram: Carriage parts diagrams on page 1602
ł
Replace A6: Image Processing PCA assembly on page 513
ł
Replace the e-chain: E-chain on page 480
Links
2368 Appendix A Event Log codes
ENWW
D2.0901
Description
ł
Image Processing PCA Cooling fan (FAN9) failed
Primary root causes
ł
FAN9
ł
Image Processing PCA (A6)
Recommended actions
1.
Replace FAN9.
2.
Replace A6.
ł
Component locator: Electronics component locator on page 1760
ł
Wiring diagram: Image Processing PCA (A6) diagram on page 2504
ł
Parts diagram: Electronics parts diagrams on page 1760
ł
Replace A6: Image Processing PCA assembly on page 513
Links
ENWW
Event Log error and warning codes 2369
D2.09A1
Description
ł
Carriage 1 Cooling fan (FAN7) stall
Primary root causes
ł
Wire harness between the Ink Assist PCA (A3) and FAN7
ł
FAN7
ł
A3
Recommended actions
1.
Check the wire harness between A3 and FAN7.
2.
Open the Carriage Mechanism diagnostic page, and then test the voltage to FAN7.
3.
Replace A3.
ł
Diagnostic page: Click Subsystems, click Carriage, and then click Carriage Mechanism.
ł
Component locator: Service Station component locator on page 1774
ł
Wiring diagram: Carriage wiring diagram on page 2466
ł
Parts diagram: Carriage parts diagrams on page 1602
Links
2370 Appendix A Event Log codes
ENWW
D2.09A2
Description
ł
Carriage 2 Cooling fan (FAN8) stall
Primary root causes
ł
Wire harness between the Ink Assist PCA (A3) and FAN8
ł
FAN8
ł
A3
Recommended actions
1.
Check the wire harness between A3 and FAN8.
2.
Open the Carriage Mechanism diagnostic page, and then test the voltage to FAN8.
3.
Replace A3.
ł
Diagnostic page: Click Subsystems, click Carriage, and then click Carriage Mechanism.
ł
Component locator: Service Station component locator on page 1774
ł
Wiring diagram: Carriage wiring diagram on page 2466
ł
Parts diagram: Carriage parts diagrams on page 1602
Links
ENWW
Event Log error and warning codes 2371
D2.0AA1
Description
ł
Pen 1 (Bonding Agent) ink drop speed out-of-range
Primary root causes
ł
Pen 1
ł
Pen Pocket 1 PCA (A16)
Recommended actions
1.
Replace Pen 1.
2.
Replace A16.
ł
Component locator: Carriage component locator on page 1602
ł
Wiring diagram: Carriage pocket PCA diagram on page 2467
ł
Parts diagram: Carriage parts diagrams on page 1602
ł
Replace Pen 1: Pens on page 471
ł
Replace A16: Carriage pen pocket PCAs (A17, A18, A20, and A21) on page 505
Links
2372 Appendix A Event Log codes
ENWW
D2.0AA2
Description
ł
Pen 2 (Black/Yellow) ink drop speed out-of-range
Primary root causes
ł
Pen 2
ł
Pen Pocket 2 PCA (A17)
Recommended actions
1.
Replace Pen 2.
2.
Replace A17.
ł
Component locator: Carriage component locator on page 1602
ł
Wiring diagram: Carriage pocket PCA diagram on page 2467
ł
Parts diagram: Carriage parts diagrams on page 1602
ł
Replace Pen 2: Pens on page 471
ł
Replace A17: Carriage pen pocket PCAs (A17, A18, A20, and A21) on page 505
Links
ENWW
Event Log error and warning codes 2373
D2.0AA3
Description
ł
Pen 3 (Cyan/Magenta) ink drop speed out-of-range
Primary root causes
ł
Pen 3
ł
Pen Pocket 3 PCA (A18)
Recommended actions
1.
Replace Pen 3.
2.
Replace A18.
ł
Component locator: Carriage component locator on page 1602
ł
Wiring diagram: Carriage pocket PCA diagram on page 2467
ł
Part diagram: Carriage parts diagrams on page 1602
ł
Replace Pen 3: Pens on page 471
ł
Replace A18: Carriage pen pocket PCAs (A17, A18, A20, and A21) on page 505
Links
2374 Appendix A Event Log codes
ENWW
D2.0AA4
Description
ł
Pen 4 (Bonding Agent) ink drop speed out-of-range
Primary root causes
ł
Pen 4
ł
Pen Pocket 4 PCA (A19)
Recommended actions
1.
Replace Pen 4.
2.
Replace A19.
ł
Component locator: Carriage component locator on page 1602
ł
Wiring diagram: Carriage pocket PCA diagram on page 2467
ł
Parts diagram: Carriage parts diagrams on page 1602
ł
Replace Pen 4: Pens on page 471
ł
Replace A19: Carriage pen pocket PCAs (A17, A18, A20, and A21) on page 505
Links
ENWW
Event Log error and warning codes 2375
D2.0AA5
Description
ł
Pen 5 (Black/Yellow) ink drop speed out-of-range
Primary root causes
ł
Pen 5
ł
Pen Pocket 5 PCA (A20)
Recommended actions
1.
Replace Pen 5.
2.
Replace A20.
ł
Component locator: Carriage component locator on page 1602
ł
Wiring diagram: Carriage pocket PCA diagram on page 2467
ł
Parts diagram: Carriage parts diagrams on page 1602
ł
Replace Pen 5: Pens on page 471
ł
Replace A20: Carriage pen pocket PCAs (A17, A18, A20, and A21) on page 505
Links
2376 Appendix A Event Log codes
ENWW
D2.0AA6
Description
ł
Pen 6 (Cyan/Magenta) ink drop speed out-of-range
Primary root causes
ł
Pen 6
ł
Pen Pocket 6 PCA (A21)
Recommended actions
1.
Replace Pen 6.
2.
Replace A21.
ł
Component locator: Carriage component locator on page 1602
ł
Wiring diagram: Carriage pocket PCA diagram on page 2467
ł
Parts diagram: Carriage parts diagrams on page 1602
ł
Replace Pen 6: Pens on page 471
ł
Replace A21: Carriage pen pocket PCAs (A17, A18, A20, and A21) on page 505
Links
ENWW
Event Log error and warning codes 2377
D2.2001
Description
ł
Image Processing PCA (A6) DRAM 1 problem
Primary root causes
ł
A6 DIMM 1
Recommended actions
䦱
Reseat or replace A6 DIMM 1.
ł
Component locator: Electronics component locator on page 1760
ł
Wiring diagram: Image Processing PCA (A6) diagram on page 2504
ł
Parts diagram: Electronics parts diagrams on page 1760
ł
Replace A6 DIMM 1: Image Processing PCA DIMMs on page 515
Links
2378 Appendix A Event Log codes
ENWW
D2.2002
Description
ł
Image Processing PCA (A6) DRAM 1 wrong size
Primary root causes
ł
A6 DIMM 1 not installed correctly
Recommended actions
䦱
Verify that the A6 DIMM 1 is installed in the correct location.
ł
Component locator: Electronics component locator on page 1760
ł
Wiring diagram: Image Processing PCA (A6) diagram on page 2504
ł
Parts diagram: Electronics parts diagrams on page 1760
ł
Replace A6 DIMM 1: Image Processing PCA DIMMs on page 515
Links
ENWW
Event Log error and warning codes 2379
D2.2003
Description
ł
Image Processing PCA (A6) DRAM 2 problem
Primary root causes
ł
A6 DIMM 2
Recommended actions
䦱
Reseat or replace the A6 DIMM 2.
ł
Component locator: Electronics component locator on page 1760
ł
Wiring diagram: Image Processing PCA (A6) diagram on page 2504
ł
Parts diagram: Electronics parts diagrams on page 1760
ł
Replace A6 DIMM 2: Image Processing PCA DIMMs on page 515
Links
2380 Appendix A Event Log codes
ENWW
D2.2004
Description
ł
Image Processing PCA (A6) DRAM 2 wrong size
Primary root causes
ł
A6 DIMM 2 not installed correctly
Recommended actions
䦱
Verify that the A6 DIMM 2 is installed in the correct location.
ł
Component locator: Electronics component locator on page 1760
ł
Wiring diagram: Image Processing PCA (A6) diagram on page 2504
ł
Parts diagram: Electronics parts diagrams on page 1760
ł
Replace A6 DIMM 2: Image Processing PCA DIMMs on page 515
Links
ENWW
Event Log error and warning codes 2381
D2.2005
Description
ł
Image Processing PCA (A6) internal SRAM problem
Primary root causes
ł
A6
Recommended actions
䦱
Replace A6.
ł
Component locator: Electronics component locator on page 1760
ł
Wiring diagram: Image Processing PCA (A6) diagram on page 2504
ł
Parts diagram: Electronics parts diagrams on page 1760
ł
Replace A6: Image Processing PCA assembly on page 513
Links
2382 Appendix A Event Log codes
ENWW
D3.1101
Description
ł
Formatter internal clock battery is dead
Primary root causes
ł
Formatter battery
ł
Formatter Main PCA (A26)
Recommended actions
1.
Reboot the MFP. Look for a BIOS POST code. If a BIOS POST code appears, follow the BIOS
POST code troubleshooting information in the service manual.
2.
Replace the formatter battery.
3.
Replace A26.
ł
Component locator: Formatter component locator on page 1702
ł
Wiring diagram: Formatter wiring diagram on page 2482
ł
Parts diagram: Formatter parts diagram on page 1702
ł
Replace A26: Formatter Main PCA (A26) on page 621
Links
ENWW
Event Log error and warning codes 2383
D3.1102
Description
ł
Formatter internal clock is dead
Primary root causes
ł
Formatter battery
ł
Formatter Main PCA (A26)
Recommended actions
1.
Reboot the MFP. Look for a BIOS POST code. If a BIOS POST code appears, follow the BIOS
POST code troubleshooting information in the service manual.
2.
Replace the formatter battery.
3.
Replace A26.
ł
Component locator: Formatter component locator on page 1702
ł
Wiring diagram: Formatter wiring diagram on page 2482
ł
Parts diagram: Formatter parts diagram on page 1702
ł
ReplaceA26: Formatter Main PCA (A26) on page 621
Links
2384 Appendix A Event Log codes
ENWW
D3.2301
Description
ł
ENGCOM (engine communication) unable to store configuration
Primary root causes
ł
A write error occurred from EFI NVRAM
ł
Formatter Main PCA (A26)
Recommended actions
䦱
Replace A26.
ł
Component locator: Formatter component locator on page 1702
ł
Wiring diagram: Formatter wiring diagram on page 2482
ł
Parts diagram: Formatter parts diagram on page 1702
ł
Replace A26: Finisher Main PCA (A200) on page 859
Links
ENWW
Event Log error and warning codes 2385
D3.3700
Description
ł
Internal hard disk not functional
Primary root causes
ł
Hard drive data and power wiring
ł
Hard drive
ł
Formatter Main PCA (A26)
Recommended actions
1.
Check the hard drive activity LED.
2.
Reboot the MFP. Look for a BIOS POST code. If a BIOS POST code appears, follow the BIOS
POST code deductive information in the service manual.
3.
Check the hard drive data and power wiring for a loose connection or damage.
4.
Replace the hard drive.
5.
Replace A26.
ł
Component locator: Formatter component locator on page 1702
ł
Wiring diagram: Formatter wiring diagram on page 2482
ł
Parts diagram: Formatter parts diagram on page 1702
ł
Replace the hard drive: Formatter hard drive on page 611
ł
Replace A26: Formatter Main PCA (A26) on page 621
Links
2386 Appendix A Event Log codes
ENWW
D3.4400
Description
ł
USB accessory over current. Power requirements for the USB accessory attached to the MFP are
beyond supported limits.
Primary root causes
ł
External USB device malfunction
Recommended actions
ENWW
1.
Disconnect the external USB device from the MFP, and then reboot the MFP.
2.
Connect another USB device to the MFP to see if the error recurs.
Event Log error and warning codes 2387
D4.0701
Description
ł
Communication loss between the Formatter Main PCA (A26) and the Main Engine PCA (A5)
Primary root causes
ł
Wire harness between A26 and A5
ł
A26
ł
Main Engine Backplane PCA (A4)
Recommended actions
䦱
Check the wire harness between A26 and A5.
ł
Diagnostic page: Click Subsystems, and then click Communication.
ł
Component locator: Electronics component locator on page 1760
ł
Wiring diagram: Formatter wiring diagram on page 2482
ł
Parts diagram: Electronics parts diagrams on page 1760
ł
Replace A26: Formatter Main PCA (A26) on page 621
ł
Replace A4: Main Engine Backplane PCA (A4) on page 633
ł
Replace A5: Main Engine PCA (A5) on page 631
Links
2388 Appendix A Event Log codes
ENWW
D4.0702
Description
ł
Main Engine PCA (A5) power not good (logic and analog supply)
Primary root causes
ł
A5
ł
Power Distribution PCA (A1)
ł
Power supply (PS1)
ł
Main Engine Backplane PCA (A4)
Recommended actions
1.
If you have not done so already, reboot the MFP in Protected Service mode (PSM).
2.
Check the power LEDs on A5.
3.
Check power LEDs on A1.
4.
Check the wire harness between A4 (J8) and A1 (J3).
ł
Diagnostic page: Click Subsystems, and then click Communication.
ł
Component locator: Electronics component locator on page 1760
ł
Wiring diagram: Main Engine PCA (A5) diagram on page 2507
ł
Parts diagram: Electronics parts diagrams on page 1760
ł
Replace A5: Main Engine PCA (A5) on page 631
Links
ENWW
Event Log error and warning codes 2389
D4.0703
Description
ł
Ink Assist PCA (A3) power not good
Primary root causes
ł
A3
ł
Power Distribution PCA (A1)
ł
Power supply (PS1)
ł
Wire harness between the Aerosol fan (AERO), Dryer fan (FAN5), and the vacuum motor assembly
and A3
ł
Wire harness between A3, A1, and PS1
Recommended actions
1.
If you have not done so already, reboot the MFP in Protected Service mode (PSM).
2.
Check the power LEDs on A1.
3.
Check the power LEDs on A3.
4.
Verify that the voltage is 32 Vdc to A3 at the A1 test points.
5.
Verify that the voltage is 32 Vdc from the A1 at the A3 test points.
6.
Check the wire harness between AERO, FAN5, the vacuum motor assembly, and A3.
7.
Check the wire harness between A3, A1, and PS1.
ł
Diagnostic page: Click Subsystems, and then click Communication.
ł
Component locator: Electronics component locator on page 1760
ł
Wiring diagram: Ink Assist PCA (A3) diagram on page 2505
ł
Parts diagram: Electronics parts diagrams on page 1760
ł
Replace A3: Ink Assist PCA (A3) on page 540
Links
2390 Appendix A Event Log codes
ENWW
D4.0704
Description
ł
Communication problem between the Main Engine PCA (A5) and the Ink Assist PCA (A3)
Primary root causes
ł
Wire harness between A3 and A5
ł
A3
ł
A5
ł
Main Engine Backplane PCA (A4)
Recommended actions
1.
If you have not done so already, reboot the MFP in Protected Service mode (PSM).
2.
On A3, check the firmware heartbeat LED (Yellow) to A5.
3.
Open the Communication diagnostic page, and then run the A3 communication test.
4.
Reseat A5.
5.
Check the wire harness between A3 and A5.
ł
Diagnostic page: Click Subsystems, and then click Communication.
ł
Component locator: Electronics component locator on page 1760
ł
Wiring diagram: Main Engine PCA (A5) diagram on page 2507
ł
Parts diagram: Electronics parts diagrams on page 1760
ł
Replace A3: Ink Assist PCA (A3) on page 540
Links
ENWW
Event Log error and warning codes 2391
D4.0705
Description
ł
Motion PCA (A2) power not good
Primary root causes
ł
Wire harness between A2 and the Main Engine Backplane PCA (A4)
ł
Wire harness between A4 (J16) and A2 (J11)
ł
Wire harness between the Power Distribution PCA (A1) and A2
ł
A2
ł
A1
ł
Power supply (PS1)
Recommended actions
1.
If you have not done so already, reboot the MFP in Protected Service mode (PSM).
2.
Check and reseat the wire harness between A4 (J16) and A2 (J11).
3.
Check the power good and 32 Vdc LED on A2.
4.
Check the 3.3, 5, and 32 Vdc test points on A2.
5.
Check the 32 Vdc test point on A1.
6.
Check the 24, 32, and 52 Vdc LEDs on A1.
7.
Check for 32 Vdc at J3 on A1.
ł
Fault tree: D4.0705: Motion PCA (A2) power not good on page 1359
ł
Diagnostic page: Click Subsystems, and then click Communication.
ł
Component locator: Electronics component locator on page 1760
ł
Wiring diagram: Motion PCA (A2) diagram on page 2508
ł
Parts diagram: Electronics parts diagrams on page 1760
ł
Replace A2: Motion PCA (A2) on page 628
Links
2392 Appendix A Event Log codes
ENWW
D4.0706
Description
ł
Communication failure between the Main Engine PCA (A5) and Motion PCA (A2)
Primary root causes
ł
Wire harness between A2 and the main engine PCA
ł
A2
ł
A5
ł
A4
Recommended actions
1.
If you have not done so already, reboot the MFP in Protected Service mode (PSM).
2.
On A2, check the firmware heartbeat LED (Yellow) to A5.
3.
Open the Communication diagnostic page, and then run the A2 communication test.
4.
Reseat A5.
5.
Check the wire harness between A2 and A5.
ł
Diagnostic page: Click Subsystems, and then click Communication.
ł
Component locator: Electronics component locator on page 1760
ł
Wiring diagram: Motion PCA (A2) diagram on page 2508
ł
Parts diagram: Electronics parts diagrams on page 1760
ł
Replace A2: Motion PCA (A2) on page 628
Links
ENWW
Event Log error and warning codes 2393
D4.0707
Description
ł
ISS PCA (A8) power not good
Primary root causes
ł
Wire harness between A8, the Power Distribution PCA (A1), and the Power supply (PS1)
ł
A8
ł
A1
ł
PS1
Recommended actions
1.
If you have not done so already, reboot the MFP in Protected Service mode (PSM).
2.
Check the power LEDs on A8.
3.
Check power LEDs on A1.
4.
Verify that the voltage is 24 Vdc at the A1 test points on A8.
5.
Verify that the voltage is 24 Vdc at A8 test points on A1.
6.
Check the wire harness between A8, A1, and PS1.
ł
Diagnostic page: Click Subsystems, and then click Communication.
ł
Component locator: Electronics component locator on page 1760
ł
Wiring diagram: ISS PCA (A8) diagram on page 2492
ł
Parts diagram: IDS parts diagrams on page 1754
ł
Replace A8: ISS PCA (A8) on page 541
Links
2394 Appendix A Event Log codes
ENWW
D4.0708
Description
ł
Communication failure between the Main Engine PCA (A5) and the ISS PCA (A8)
Primary root causes
ł
Wire harness between A8 and A5
ł
A8
ł
A5
ł
Main Engine Backplane PCA (A4)
Recommended actions
1.
If you have not done so already, reboot the MFP in Protected Service mode (PSM).
2.
On the A8, check the firmware heartbeat LED (Yellow) to A5.
3.
Open the Communication diagnostic page, and then run the A8 communication test.
4.
Reseat A5.
5.
Check the wire harness between A8 and A5.
ł
Diagnostic page: Click Subsystems, and then click Communication.
ł
Component locator: Electronics component locator on page 1760
ł
Wiring diagram: ISS PCA (A8) diagram on page 2492
ł
Parts diagram: Electronics parts diagrams on page 1760
ł
Replace A5: Main Engine PCA (A5) on page 631
ł
Replace A8: ISS PCA (A8) on page 541
Links
ENWW
Event Log error and warning codes 2395
D4.0711
Description
ł
EEPROM failure on the Main Engine PCA (A5)
Primary root causes
ł
A5
Recommended actions
䦱
Replace A5.
ł
Component locator: Electronics component locator on page 1760
ł
Wiring diagram: Main Engine PCA (A5) diagram on page 2507
ł
Parts diagram: Electronics parts diagrams on page 1760
ł
Replace A5: Main Engine PCA (A5) on page 631
Links
2396 Appendix A Event Log codes
ENWW
D4.0712
Description
ł
Generic communications bus failure
Primary root causes
ł
Any combination of communication bus errors between the Main Engine PCA (A5), Image
Processing PCA (A6), the carriage PCAs, Motion PCA (A2), or the Ink Assist PCA (A3)
Recommended actions
䦱
ENWW
Reboot the MFP and a more specific event code should be declared. Follow the troubleshooting
information for the displayed event code.
Event Log error and warning codes 2397
D4.0713
Description
ł
Communication bus failure between the Main Engine PCA (A5), the Image Processing PCA (A6),
and the Pen Pocket 1 PCA (A16) or the Carriage 1 Encoder PCA (A9)
Primary root causes
ł
Wire harness between the A5, the A6, and A16 or A9
ł
Carriage 1 e-chain
ł
A5
ł
A6
ł
A16
ł
A9
ł
Main Engine Backplane PCA (A4)
Recommended actions
1.
If you have not done so already, reboot the MFP in Protected Service mode (PSM).
2.
On A6, check the firmware heartbeat LED (Yellow) to main engine PCA.
3.
Open the Communication diagnostic page, and then run the A6 communication test.
4.
Reseat A5.
5.
Check the wire harness between A5, A6, A16 and A9.
6.
Check the Pen Pocket 1 wire connectors.
ł
Diagnostic page: Click Subsystems, and then click Communication.
ł
Component locator: Electronics component locator on page 1760
ł
Wiring diagram: Image Processing PCA (A6) diagram on page 2504
ł
Parts diagram: Electronics parts diagrams on page 1760
ł
Replace A6: Image Processing PCA assembly on page 513
ł
Replace A16: Carriage pen pocket PCAs (A17, A18, A20, and A21) on page 505
ł
Replace A9: Carriage encoder PCAs (A16 and A19) on page 506
Links
2398 Appendix A Event Log codes
ENWW
D4.0714
Description
ł
Communication bus problem between the Pen Pocket 1 PCA (A16) or the Carriage 1 Encoder PCA
(A9) to the Carriage 1 PPS PCA (A25)
Primary root causes
ł
Wire harness between the A16, A9, and A25
ł
A16
ł
A9
ł
A25
Recommended actions
1.
If you have not done so already, reboot the MFP in Protected Service mode (PSM).
2.
Open the Communication diagnostic page, and then run the Pen to Pocket communication test.
3.
Check the wire harness between A16 or A9 and A25.
4.
Replace or swap A16.
5.
Replace or swap A9.
6.
Replace or swap A25.
ł
Diagnostic page: Click Subsystems, and then click Communication.
ł
Component locator: Carriage component locator on page 1602
ł
Wiring diagram: Carriage pocket PCA diagram on page 2467
ł
Parts diagram: Carriage parts diagrams on page 1602
ł
Replace A16: Carriage pen pocket PCAs (A17, A18, A20, and A21) on page 505
ł
Replace A9: Carriage encoder PCAs (A16 and A19) on page 506
ł
Replace A25: Carriage PPS PCAs (A25 and A34) on page 508
Links
ENWW
Event Log error and warning codes 2399
D4.0715
Description
ł
Communication bus problem between the Main Engine PCA (A5), the Image Processing PCA (A6),
and the Pen Pocket 4 PCA (A19) or the Carriage 2 Encoder PCA (A24)
Primary root causes
ł
Wire harness between A5, A6, A19 or A24
ł
Carriage 2 e-chain
ł
A5
ł
A6
ł
A19
ł
A24
ł
Main Engine Backplane PCA (A4)
Recommended actions
1.
If you have not done so already, reboot the MFP in Protected Service mode (PSM).
2.
On the A6, check the firmware heartbeat LED (Yellow) to A5.
3.
Open the Communication diagnostic page, and then run the A6 communication test.
4.
Reseat A5.
5.
Check the wire harness between A5, A6, A19, and A24.
6.
Check the Pen Pocket 4 wire connectors.
ł
Diagnostic page: Click Subsystems, and then click Communication.
ł
Component locator: Electronics component locator on page 1760
ł
Wiring diagram: Image Processing PCA (A6) diagram on page 2504
ł
Parts diagram: Electronics parts diagrams on page 1760
ł
Replace A6: Image Processing PCA assembly on page 513
Links
2400 Appendix A Event Log codes
ENWW
D4.0716
Description
ł
Communication bus problem between the Pen Pocket 4 PCA (A19) or the Carriage 2 Encoder PCA
(A24) to the Carriage 2 PPS assembly
Primary root causes
ł
Wire harness between A19 or A24 and the Carriage 2 PPS assembly
ł
A19
ł
A24
ł
Carriage 2 PPS assembly
Recommended actions
1.
If you have not done so already, reboot the MFP in Protected Service mode (PSM).
2.
Open the Communication diagnostic page, and then run the Pen to Pocket communication test.
3.
Check the wire harness between A19, A24, and the Carriage 2 PPS assembly.
4.
Replace or swap A19.
5.
Replace or swap A24.
6.
Replace or swap the Carriage 2 PPS PCA (A34).
ł
Diagnostic page: Click Subsystems, and then click Communication.
ł
Component locator: Carriage component locator on page 1602
ł
Wiring diagram: Carriage pocket PCA diagram on page 2467
ł
Parts diagram: Carriage parts diagrams on page 1602
ł
Replace A19: Carriage PCAs on page 505
ł
Replace A24: Carriage encoder PCAs (A16 and A19) on page 506
ł
Replace A34: Carriage PPS PCAs (A25 and A34) on page 508
Links
ENWW
Event Log error and warning codes 2401
D4.0717
Description
ł
AC power loss detected
Primary root causes
ł
Power cord
ł
AC voltage low or missing at the wall outlet
Recommended actions
1.
Verify that the power cord is plugged in.
2.
Replace the power cord.
3.
Contact an electrician.
2402 Appendix A Event Log codes
ENWW
D4.07C1
Description
ł
Main Engine PCA (A5) local RAM memory integrity failure
Primary root causes
ł
A5
Recommended actions
1.
Verify that the power LEDs on the Power Distribution PCA (A1) are lit.
2.
Verify that the power LEDs on A5 are lit.
3.
Check A5 LED and refer to the LED sequencer table.
4.
Reseat A5.
5.
Check the wire harness between A1, the Power supply (PS1), and the Main Engine Backplane
PCA (A4).
6.
Replace A5.
ł
Diagnostic page: Click Subsystems, and then click Communication.
ł
Component locator: Electronics component locator on page 1760
ł
Wiring diagram: Main Engine PCA (A5) diagram on page 2507
ł
Parts diagram: Electronics parts diagrams on page 1760
ł
Replace A5: Main Engine PCA (A5) on page 631
Links
ENWW
Event Log error and warning codes 2403
D4.07C2
Description
ł
Main Engine PCA (A5) ASIC communication failure
Primary root causes
ł
A5
Recommended actions
1.
Verify that the power LEDs on the Power Distribution PCA (A1) are lit.
2.
Verify that the power LEDs on A5 are lit.
3.
Check A5 LED and refer to the LED sequencer table.
4.
Reseat A5.
5.
Replace A5.
ł
Diagnostic page: Click Subsystems, and then click Communication.
ł
Component locator: Electronics component locator on page 1760
ł
Wiring diagram: Main Engine PCA (A5) diagram on page 2507
ł
Parts diagram: Electronics parts diagrams on page 1760
ł
Replace A5: Main Engine PCA (A5) on page 631
Links
2404 Appendix A Event Log codes
ENWW
D4.09A1
Description
ł
Electronics Bay Cooling fan (FAN4) stall
Primary root causes
ł
FAN4
ł
Ink Assist PCA (A3)
ł
Power Distribution PCA (A1)
ł
Power supply (PS1)
Recommended actions
1.
Check the power LED on A1.
2.
Check the power LED on A3.
3.
Check the wire harness between A3 and A1.
ł
Diagnostic page: Click Subsystems, and then click Communication.
ł
Component locator: Electronics component locator on page 1760
ł
Wiring diagram: Power Distribution PCA (A1) diagram on page 2511
ł
Parts diagram: Electronics parts diagrams on page 1760
ł
Replace FAN4: Electronics Bay Cooling fan (FAN4) on page 632
Links
ENWW
Event Log error and warning codes 2405
D4.09A2
Description
ł
Main Engine PCA Cooling fan (FAN2) stall
Primary root causes
ł
Wire harness between FAN2 and the Main Engine Backplane PCA (A4)
ł
FAN2
ł
A4
Recommended actions
1.
Verify that the power LEDs on the Power Distribution PCA (A1) are lit.
2.
Check the wire harness between FAN2 and A4.
3.
Replace FAN2.
4.
Replace A4.
ł
Component locator: Electronics component locator on page 1760
ł
Wiring diagram: Main Engine PCA (A5) diagram on page 2507
ł
Parts diagram: Electronics parts diagrams on page 1760
ł
Replace FAN2: Main Engine PCA Cooling fan (FAN2) on page 638
ł
Replace A4: Main Engine Backplane PCA (A4) on page 633
Links
2406 Appendix A Event Log codes
ENWW
D5.1000
Description
ł
Database corruption error
Primary root causes
ł
All data in the database was lost due to corruption
Recommended actions
䦱
ENWW
The database is automatically deleted and regenerated to an empty state. All previous data is lost.
Database backups are created after each reboot. You can use the embedded Web server (EWS)
to restore the database with this data. Any settings configured since the last reboot will have to be
redone. Have the system administrator restore the database. Refer to the system administrator
guide for help.
Event Log error and warning codes 2407
D5.1001
Description
ł
Database schema version mismatch error
Primary root causes
ł
All data in the database was lost due to a schema version mismatch
Recommended actions
䦱
The database is automatically deleted and regenerated to an empty state. All previous data is lost.
Database backups are created after each reboot. You can use the embedded Web server (EWS)
to restore the database with this data. Any settings configured since the last reboot will have to be
redone. Have the system administrator restore the database. Refer to the system administrator
guide for help.
2408 Appendix A Event Log codes
ENWW
D5.1002
Description
ł
General send-to e-mail error
Primary root causes
ł
A general error occurred while trying to deliver an e-mail
Recommended actions
ENWW
1.
Resend the e-mail.
2.
Reboot the MFP.
3.
Switch to another SMTP server.
4.
If the error persists, turn on e-mail job notification so that detailed error logging information will be
included in the body of the error notification e-mail. Resend the e-mail, and then use the error
logging information to diagnose the problem.
Event Log error and warning codes 2409
D5.1003
Description
ł
SMTP server unavailable
Primary root causes
ł
The SMTP server used for e-mail jobs is currently unavailable
Recommended actions
1.
Reboot the MFP.
2.
Open the EWS, select the Send to Email page, and then click Test SMTP. Verify that the SMTP
server responds.
3.
Check the MFP network connection.
4.
Try using another SMTP server.
2410 Appendix A Event Log codes
ENWW
D5.1004
Description
ł
SMTP protocol error
Primary root causes
ł
An SMTP protocol error was encountered while trying to deliver an e-mail
Recommended actions
ENWW
1.
Resend the e-mail.
2.
Reboot the MFP.
3.
Switch to another SMTP server.
4.
If the error persists, turn on e-mail job notification so that detailed error logging information will be
included in the body of the error notification e-mail. Resend the e-mail, and then use the error
logging information to diagnose the problem.
Event Log error and warning codes 2411
D5.1005
Description
ł
SMTP communication error
Primary root causes
ł
An SMTP communication error was encountered while trying to deliver an e-mail
Recommended actions
1.
Resend the e-mail.
2.
Reboot the MFP.
3.
Switch to another SMTP server.
4.
If the error persists, turn on e-mail job notification so that detailed error logging information will be
included in the body of the error notification e-mail. Resend the e-mail, and then use the error
logging information to diagnose the problem.
2412 Appendix A Event Log codes
ENWW
D5.1006
Description
ł
SMTP authentication error
Primary root causes
ł
An error occurred authenticating a user to the configured SMTP server. This error only occurs on
the back end.
Recommended actions
ENWW
1.
Open the EWS, select the Send to Email page, and then click Test SMTP. Verify that the SMTP
server responds.
2.
Verify that the user has access rights to the SMTP server that is being used.
3.
If the error persists, turn on e-mail job notification so that detailed error logging information will be
included in the body of the error notification e-mail. Resend the e-mail, and then use the error
logging information to diagnose the problem.
Event Log error and warning codes 2413
D5.1007
Description
ł
General send to digital fax error
Primary root causes
ł
A general error occurred while trying to deliver a digital fax
Recommended actions
1.
Resend the e-mail.
2.
Reboot the MFP.
3.
If the error persists, turn on e-mail job notification so that detailed error logging information will be
included in the body of the error notification e-mail. Resend the e-mail, and then use the error
logging information to diagnose the problem.
2414 Appendix A Event Log codes
ENWW
D5.1008
Description
ł
Fax server access failure
Primary root causes
ł
A general error occurred while trying to deliver a digital fax
Recommended actions
ENWW
1.
Verify that the LAN Fax server is functioning correctly.
2.
Open the embedded Web server (EWS), select the Digital Sending - Send To LAN Fax page,
and then click Verify Folder Access. Verify that the LAN Fax server folder path, the authentication
method, and credentials are set correctly.
3.
Verify that the authentication method being used is supported by the LAN Fax server.
4.
Check the MFP network connection.
5.
Resend the fax.
Event Log error and warning codes 2415
D5.1009
Description
ł
LAN Fax configuration error
Primary root causes
ł
Cannot deliver a LAN Fax job due to a configuration error
Recommended actions
1.
Open the embedded Web server (EWS), select the Digital Sending - Send To LAN Fax page,
and then click Verify Folder Access. Verify that the LAN Fax server folder path, the authentication
method and credentials are set correctly.
2.
Verify that the authentication method being used is supported by the LAN Fax server.
3.
Check the MFP network connection.
4.
Resend the fax.
5.
If the error persists, turn on e-mail job notification so that detailed error logging information will be
included in the body of the error notification e-mail. Resend the e-mail, and then use the error
logging information to diagnose the problem.
2416 Appendix A Event Log codes
ENWW
D5.1010
Description
ł
Internet fax configuration error
Primary root causes
ł
Cannot deliver an Internet fax due to a configuration error
Recommended actions
ENWW
1.
Verify that the fax provider domain and the default fax account e-mail address are set correctly.
2.
Check the MFP network connection.
3.
Resend the fax.
4.
If the error persists, turn on e-mail job notification so that detailed error logging information will be
included in the body of the error notification e-mail. Resend the e-mail, and then use the error
logging information to diagnose the problem.
Event Log error and warning codes 2417
D5.1011
Description
ł
Searchable PDF file type error
Primary root causes
ł
An error occurred while trying to generate a searchable PDF file type
Recommended actions
1.
Resend the fax.
2.
Reboot the MFP.
3.
If the error persists, turn on e-mail job notification so that detailed error logging information will be
included in the body of the error notification e-mail. Resend the e-mail, and then use the error
logging information to diagnose the problem.
2418 Appendix A Event Log codes
ENWW
D5.1012
Description
ł
RTF file type error
Primary root causes
ł
An error occurred while trying to generate a RTF file type
Recommended actions
ENWW
1.
Resend the fax.
2.
Reboot the MFP.
3.
If the error persists, turn on e-mail job notification so that detailed error logging information will be
included in the body of the error notification e-mail. Resend the e-mail, and then use the error
logging information to diagnose the problem.
Event Log error and warning codes 2419
D5.1013
Description
ł
Text file type error
Primary root causes
ł
An error occurred while trying to generate a text file type
Recommended actions
1.
Resend the fax.
2.
Reboot the MFP.
3.
If the error persists, turn on e-mail job notification so that detailed error logging information will be
included in the body of the error notification e-mail. Resend the e-mail, and then use the error
logging information to diagnose the problem.
2420 Appendix A Event Log codes
ENWW
D5.1014
Description
ł
CSV file type error
Primary root causes
ł
An error occurred while trying to generate a CSV file type
Recommended actions
ENWW
1.
Resend the fax.
2.
Reboot the MFP.
3.
If the error persists, turn on e-mail job notification so that detailed error logging information will be
included in the body of the error notification e-mail. Resend the e-mail, and then use the error
logging information to diagnose the problem.
Event Log error and warning codes 2421
D5.1015
Description
ł
HTML file type error
Primary root causes
ł
An error occurred while trying to generate an HTML file type
Recommended actions
1.
Resend the fax.
2.
Reboot the MFP.
3.
If the error persists, turn on e-mail job notification so that detailed error logging information will be
included in the body of the error notification e-mail. Resend the e-mail, and then use the error
logging information to diagnose the problem.
2422 Appendix A Event Log codes
ENWW
D5.1016
Description
ł
XML file type error
Primary root causes
ł
An error occurred while trying to generate a XML file type
Recommended actions
ENWW
1.
Resend the fax.
2.
Reboot the MFP.
3.
If the error persists, turn on e-mail job notification so that detailed error logging information will be
included in the body of the error notification e-mail. Resend the e-mail, and then use the error
logging information to diagnose the problem.
Event Log error and warning codes 2423
D5.1017
Description
ł
General address book services error
Primary root causes
ł
A general failure occurred in the address book services component
Recommended actions
䦱
Reboot the MFP.
2424 Appendix A Event Log codes
ENWW
D5.1018
Description
ł
Address book invalid argument error
Primary root causes
ł
An invalid argument was passed to the address book services component
Recommended actions
䦱
ENWW
Reboot the MFP.
Event Log error and warning codes 2425
D5.1019
Description
ł
Address book invalid operation error
Primary root causes
ł
An invalid operation occurred during execution of an address book services command
Recommended actions
䦱
Reboot the MFP.
2426 Appendix A Event Log codes
ENWW
D5.1020
Description
ł
Address book duplicate entry error
Primary root causes
ł
An attempt was made to add an entry that already exists in an address book during an address
book import
Recommended actions
䦱
ENWW
Ask the system administrator to review the CSV file for duplicates or to import the address book.
Verify that the records being imported contain valid data. See the system administrator guide for
help.
Event Log error and warning codes 2427
D5.1021
Description
ł
Address book invalid data error
Primary root causes
ł
An attempt was made to add an entry that contained invalid data during an address book import
Recommended actions
䦱
Ask the system administrator to review the CSV file for duplicates or to import the address book.
Verify that the records being imported contain valid data. See the system administrator guide for
help.
2428 Appendix A Event Log codes
ENWW
D5.1022
Description
ł
Database out of memory error
Primary root causes
ł
The database detected an out of memory condition during execution of an address book command
Recommended actions
䦱
ENWW
Reboot the MFP.
Event Log error and warning codes 2429
D5.1023
Description
ł
Database disk full error
Primary root causes
ł
The database detected a disk full condition during execution of an address book command
Recommended actions
䦱
Reboot the MFP.
2430 Appendix A Event Log codes
ENWW
D5.1024
Description
ł
Database insufficient resources error
Primary root causes
ł
The database has insufficient resources to complete the execution of an address book command
Recommended actions
䦱
ENWW
Reboot the MFP.
Event Log error and warning codes 2431
D5.1025
Description
ł
Successful address book import
Primary root causes
ł
This indicates a successful import of all the records
Recommended actions
䦱
N/A
2432 Appendix A Event Log codes
ENWW
D5.1026
Description
ł
Failed or partial address book import
Primary root causes
ł
At least one record entry failed during the address book import process
Recommended actions
ENWW
1.
Verify that the records being imported contain valid data. See the system administrator guide for
help.
2.
Reboot the MFP.
Event Log error and warning codes 2433
D5.1029
Description
ł
Local address book cleared successfully
Primary root causes
ł
The entire local address book was successfully cleared
Recommended actions
䦱
N/A
2434 Appendix A Event Log codes
ENWW
D5.1030
Description
ł
Clear local address book not completed
Primary root causes
ł
An error was encountered while clearing the local address book. The address book might not be
cleared.
Recommended actions
䦱
ENWW
Reboot the MFP.
Event Log error and warning codes 2435
D5.1031
Description
ł
Successful speed dial import
Primary root causes
ł
This code indicates a successful import of all the records
Recommended actions
䦱
N/A
2436 Appendix A Event Log codes
ENWW
D5.1032
Description
ł
Failed or partial speed dial import
Primary root causes
ł
At least one record entry failed during the address book import process
Recommended actions
ENWW
1.
Verify that the records being imported contain valid data. See the system administrator guide for
help.
2.
Reboot the MFP.
Event Log error and warning codes 2437
D5.1035
Description
ł
Speed dials cleared successfully
Primary root causes
ł
This code indicates the entire speed dial address book was successfully cleared
Recommended actions
䦱
N/A
2438 Appendix A Event Log codes
ENWW
D5.1036
Description
ł
Clear speed dials not completed
Primary root causes
ł
An error was encountered while clearing the speed dial address book. The address book might not
be cleared at this point.
Recommended actions
䦱
ENWW
Reboot the MFP.
Event Log error and warning codes 2439
D5.1037
Description
ł
Digital Send component is unavailable
Primary root causes
ł
A Digital Send job could not be delivered because the Digital Send Service component was
unavailable
Recommended actions
䦱
Reboot the MFP.
2440 Appendix A Event Log codes
ENWW
D5.1038
Description
ł
Job ticket file operation error
Primary root causes
ł
A Digital Send job could not be delivered due to a job ticket file operation error
Recommended actions
䦱
ENWW
Reboot the MFP.
Event Log error and warning codes 2441
D5.1039
Description
ł
Digital Send image processing error
Primary root causes
ł
A Digital Send job could not be delivered due to an image processing error
Recommended actions
1.
Check the Event Log for an imaging-electronics error or warning code. Follow the troubleshooting
procedures for the code.
2.
Resend the job.
3.
Reboot the MFP.
2442 Appendix A Event Log codes
ENWW
D5.1040
Description
ł
Digital Send scanner error
Primary root causes
ł
A Digital Send job could not be delivered due to a scanner failure
Recommended actions
ENWW
1.
Check the Event Log for a scanner-related error or warning code. Follow the troubleshooting
procedures for the code.
2.
Reboot the MFP.
Event Log error and warning codes 2443
D5.3801
Description
ł
Service or application failure
Primary root causes
ł
Conflict with a third-party device
Recommended actions
䦱
Reboot the MFP.
2444 Appendix A Event Log codes
ENWW
D5.3802
Description
ł
Out of memory exception. MFP does not boot up.
Primary root causes
ł
Windows does not allocate enough memory
Recommended actions
䦱
ENWW
Reboot the MFP.
Event Log error and warning codes 2445
D5.3803
Description
ł
Null reference exception
Primary root causes
ł
Conflict with a third-party device
Recommended actions
䦱
Reboot the MFP.
2446 Appendix A Event Log codes
ENWW
D5.3804
Description
ł
Stack overflow exception
Primary root causes
ł
Conflict with a third-party device
Recommended actions
䦱
ENWW
Back up the customer and service data, delete the database directory, and then reboot the MFP.
Event Log error and warning codes 2447
D5.3805
Description
ł
SW bus exception
Primary root causes
ł
Firmware issue
Recommended actions
䦱
Reboot the MFP.
2448 Appendix A Event Log codes
ENWW
D5.3806
Description
ł
Fatal error when loading dll files
Primary root causes
ł
Firmware issue
Recommended actions
䦱
ENWW
Reboot the MFP.
Event Log error and warning codes 2449
D5.3807
Description
ł
An unhandled exception other than a thread abort
Primary root causes
ł
Conflict with a third-party device
Recommended actions
䦱
Reboot the MFP.
2450 Appendix A Event Log codes
ENWW
D5.3808
Description
ł
Windows OS exception (lost communication)
Primary root causes
ł
Hardware issue
ł
Internal networking issues between PCAs
ł
Firmware connectivity issue
Recommended actions
ENWW
1.
Reboot the MFP.
2.
Refer to the Coprocessor LED troubleshooting in the service manual.
Event Log error and warning codes 2451
D5.3809
Description
ł
Cannot get or set up a particular type
Primary root causes
ł
Control panel firmware and MFP firmware are mismatched
Recommended actions
䦱
Reinstall the MFP firmware.
2452 Appendix A Event Log codes
ENWW
D5.380A
Description
ł
Fatal error when loading security component
Primary root causes
ł
MFP firmware issue
Recommended actions
ENWW
1.
Reboot the MFP.
2.
Back up the customer and service data, delete the database directory, and then reboot the MFP.
Event Log error and warning codes 2453
D5.380B
Description
ł
Application hard disk full
Primary root causes
ł
Firmware
Recommended actions
䦱
Reboot the MFP.
2454 Appendix A Event Log codes
ENWW
D5.380C
Description
ł
Application failed to create a job
Primary root causes
ł
System was in power save mode or was backing up data
ł
Product is out of resources
Recommended actions
䦱
ENWW
Wait for any jobs to complete, and then reboot the MFP.
Event Log error and warning codes 2455
D5.380D
Description
ł
Job setting database is full
Primary root causes
ł
The database is full
Recommended actions
䦱
Delete the local address book. See the administrator guide for help.
2456 Appendix A Event Log codes
ENWW
D5.380E
Description
ł
Failed to store a settings job because of a database error
Primary root causes
ł
Firmware
Recommended actions
䦱
ENWW
Reboot the MFP.
Event Log error and warning codes 2457
D5.380F
Description
ł
Failed to load third-party component
Primary root causes
ł
Unknown
Recommended actions
䦱
Reboot the MFP.
2458 Appendix A Event Log codes
ENWW
Ex.yyzz
Description
ł
Print engine firmware corrupted
Primary root causes
ł
This is a generic firmware related error code. There are many reasons why an Ex.yyzz code might
be declared.
Recommended actions
1.
If you have not done so already, reboot the MFP in Protected Service mode (PSM).
2.
Reboot the MFP.
3.
Restore NVM, and then reboot the MFP.
4.
Reload the MFP firmware.
ł
NVM page: Click Settings/Procedures, click NVM, and then click Manual NVM Restore.
Links
ENWW
Event Log error and warning codes 2459
2460 Appendix A Event Log codes
ENWW
B
ENWW
Wiring diagrams
ł
MFP wiring overview
ł
ADF wiring diagram
ł
Tray 1 wiring diagram
ł
Carriage
ł
Covers wiring diagram
ł
Control panel wiring diagram
ł
Drum
ł
Dryer wiring diagram
ł
Finisher
ł
Formatter wiring diagram
ł
Tray 5
ł
Horizontal wiring diagram
ł
IDO
ł
IDS
ł
Scanner
ł
Service station wiring diagram
ł
Trays 2, 3, and 4
ł
Vacuum and aerosol wiring diagram
ł
Vertical wiring diagram
ł
Web wipe wiring diagram
ł
PCA diagrams
2461
MFP wiring overview
ł
MFP wiring overview diagram 1
ł
MFP wiring overview diagram 2
ł
MFP wiring overview diagram 3
MFP wiring overview diagram 1
Figure B-1 MFP wiring overview diagram 1
2462 Appendix B Wiring diagrams
ENWW
MFP wiring overview diagram 2
Figure B-2 MFP wiring overview diagram 2
MFP wiring overview diagram 3
Figure B-3 MFP wiring overview diagram 3
ENWW
MFP wiring overview 2463
ADF wiring diagram
Figure B-4 ADF wiring diagram
2464 Appendix B Wiring diagrams
ENWW
Tray 1 wiring diagram
Figure B-5 Tray 1 wiring diagram
ENWW
Tray 1 wiring diagram 2465
Carriage
ł
Carriage wiring diagram
ł
Carriage encoder diagram
ł
Carriage pocket PCA diagram
ł
Carriage PSU PCA (A7) diagram
Carriage wiring diagram
Figure B-6 Carriage wiring diagram
2466 Appendix B Wiring diagrams
ENWW
Carriage encoder diagram
Figure B-7 Carriage encoder diagram
Carriage pocket PCA diagram
Figure B-8 Pocket PCA diagram
ENWW
Carriage 2467
Carriage PSU PCA (A7) diagram
Figure B-9 Carriage PSU PCA (A7) diagram
2468 Appendix B Wiring diagrams
ENWW
Covers wiring diagram
Figure B-10 Covers wiring diagram
ENWW
Covers wiring diagram 2469
Control panel wiring diagram
Figure B-11 Control panel wiring diagram
2470 Appendix B Wiring diagrams
ENWW
Drum
ł
Drum wiring diagram
ł
Drum sensors wiring diagram
ł
Drum encoder PCA diagram
Drum wiring diagram
SN19
W100J22-W34P22
W100J5-W13P5
W34P19-SN19
W34J1-W85P1
W34P22-W100J22
W100P4-SOL4
W100P5-W100J5
SOL4
W34P1-W34J1
M22/EN20
W34P9-W34J9
SN18
W34P20-EN20
W34P18-SN18
W34P1-EN1J1
EN1
EN2
W34P1-EN1J2
W34P2-EN2
W34J9-W32P9
W34P6-LED6
W34P9-LED9
LED6
LED9
W34P7-LED7
LED7
LED8
W34P8-LED8
Figure B-12 Drum wiring diagram
ENWW
Drum 2471
Drum sensors wiring diagram
Figure B-13 Drum sensors wiring diagram
Drum encoder PCA diagram
Figure B-14 Drum encoder PCA diagram
2472 Appendix B Wiring diagrams
ENWW
Dryer wiring diagram
Figure B-15 Dryer wiring diagram
ENWW
Dryer wiring diagram 2473
Finisher
ł
Finisher 1 wiring diagram
ł
Finisher 2 wiring diagram
ł
Finisher 3 wiring diagram
ł
Finisher 4 wiring diagram
ł
Finisher 5 wiring diagram
ł
Finisher 6 wiring diagram
ł
Finisher 7 wiring diagram
ł
Finisher 8 wiring diagram
ł
Finisher 9 wiring diagram
ł
Finisher 10 wiring diagram
ł
Finisher Main PCA (A200) diagram
Finisher 1 wiring diagram
Figure B-16 Finisher 1 wiring diagram
2474 Appendix B Wiring diagrams
ENWW
Finisher 2 wiring diagram
Figure B-17 Finisher 2 wiring diagram
ENWW
Finisher 2475
Finisher 3 wiring diagram
Figure B-18 Finisher 3 wiring diagram
2476 Appendix B Wiring diagrams
ENWW
Finisher 4 wiring diagram
Figure B-19 Finisher 4 wiring diagram
Finisher 5 wiring diagram
Figure B-20 Finisher 5 wiring diagram
ENWW
Finisher 2477
Finisher 6 wiring diagram
Figure B-21 Finisher 6 wiring diagram
Finisher 7 wiring diagram
Figure B-22 Finisher 7 wiring diagram
2478 Appendix B Wiring diagrams
ENWW
Finisher 8 wiring diagram
Figure B-23 Finisher 8 wiring diagram
Finisher 9 wiring diagram
Figure B-24 Finisher 9 wiring diagram
ENWW
Finisher 2479
Finisher 10 wiring diagram
Figure B-25 Finisher 10 wiring diagram
2480 Appendix B Wiring diagrams
ENWW
Finisher Main PCA (A200) diagram
8
7
2
10A
9A
1B
1A
2A
9B
1
J2
J1
J3
1
J4
J8
J7
1
2B
6B
7A
1A
4
38
37
2
1
J10
J6
37
14A
2B
38
2A
14B
12A
1
12A
J19
12B 1B
1A
1
J13
2B
38
37
2
1
J14
J17
J16
1B
2
2
5
1
J15
6
J12
J11
1
10
6A
J20
6B
1B
1A
20A
J21
2A
12B
14A
2B
38
20B
1A
J24
J23
1
37
J22
2A
14B
+3.3V +5V
2
1
+32V +52V
+42V
+42V GND +3.3V +5V
+32V +52V
Test points
Figure B-26 Finisher Main PCA (A200) diagram
ENWW
Finisher 2481
Formatter wiring diagram
Figure B-27 Formatter wiring diagram
2482 Appendix B Wiring diagrams
ENWW
Tray 5
Tray 5 wiring diagram
Figure B-28 Tray 5 wiring diagram
ENWW
Tray 5 2483
Tray 5 distribution PCA diagram
J1
1
Test points
GND
+5V
+5V standby
J4
J3
J2
1
1
1
Figure B-29 Tray 5 Distribution PCA diagram
2484 Appendix B Wiring diagrams
ENWW
Horizontal wiring diagram
Figure B-30 Horizontal wiring diagram
ENWW
Horizontal wiring diagram 2485
IDO
IDO motors and encoders wiring diagram
Figure B-31 IDO motors and encoders wiring diagram
2486 Appendix B Wiring diagrams
ENWW
IDO paper path 1 wiring diagram
Figure B-32 IDO paper path 1 wiring diagram
ENWW
IDO 2487
IDO paper path 2 wiring diagram
Figure B-33 IDO paper path 2 wiring diagram
2488 Appendix B Wiring diagrams
ENWW
IDO H-bar wiring diagram
Figure B-34 IDO H-bar wiring diagram
ENWW
IDO 2489
IDO system wiring diagram
Figure B-35 IDO system
2490 Appendix B Wiring diagrams
ENWW
IDS
ł
IDS wiring diagram
ł
ISS PCA (A8) diagram
IDS wiring diagram
Assy
Header Pin
J19
2
ISS Control PCA
1
(A8)
J18
2
1
J17
3
J1
J2
J3
J4
J5
2
1
2
3
4
5
6
7
8
1
2
3
4
5
6
7
8
1
2
3
4
5
6
7
8
1
2
3
4
5
6
7
8
1
2
3
4
5
6
7
8
Sig. Name
24VDC
ISS Pump Control
24VDC
ISS Pump Control
24VDC
Valve Control
MAG_P
MAG_N
ACUMEN_SDATA
+5Va
ACUMEN_SCLK
GND
MAG_BB
GND
YEL_P
YEL_N
ACUMEN_SDATA
+5Va
ACUMEN_SCLK
GND
YEL_BB
GND
FIX_P
FIX_N
ACUMEN_SDATA
+5Va
ACUMEN_SCLK
GND
FIX_BB
GND
CYN_P
CYN_N
ACUMEN_SDATA
+5Va
ACUMEN_SCLK
GND
CYN_BB
GND
BLK_P
BLK_N
ACUMEN_SDATA
+5Va
ACUMEN_SCLK
GND
BLK_BB
GND
Device
Pump Assy 1
Designator
PMP1
Pump Assy 2
PMP2
Relief Valve Assy
SOL5
MAG Narwhal
INK-M
YEL Narwhal
INK-Y
FIX Narwhal
INK-F
CYN Narwhal
INK-C
BLK Narwhal
INK-K
Figure B-36 IDS wiring diagram
ENWW
IDS 2491
ISS PCA (A8) diagram
1
1
J9
1
1
1
1
J6
J5
1
J8 J7
J10
1
D11 J11
1
TP4–+5VA
J20
1
J4
TP5–3.3V
D7—VIN_GD
D14–VAUX_GD
D15–HB
6
2
1
J3
5
1
3
1
1
TP3–12V
J2
TP1–24V
TP1–GND
J15
J19
1
J18
1
J17
1
1
J1
Figure B-37 ISS PCA (A8) diagram
2492 Appendix B Wiring diagrams
ENWW
Scanner
ł
Scanner wiring diagram
ł
Scanner CCD PCA (A503) diagram
ł
AFE PCA (A502) diagram
ł
Scanner Control PCA (A501) diagram
Scanner wiring diagram
Figure B-38 Scanner wiring diagram
Scanner CCD PCA (A503) diagram
Figure B-39 Scanner CCD PCA (A503) diagram
ENWW
Scanner 2493
AFE PCA (A502) diagram
Figure B-40 AFE PCA (A502) diagram
Scanner Control PCA (A501) diagram
Figure B-41 Scanner Control PCA (A501) diagram
2494 Appendix B Wiring diagrams
ENWW
Service station wiring diagram
W33P14-EN13M4
M4/EN13
SN60
5
4
3
2
1
1
2
3
W33P20-SN60
W14J13-W33P13
1
2
1
2
M2_DCM3__WEB_DRIVE_DCMB
M2_DCM2__WEB_DRIVE_DCMA
W33P13-W14J13
EN11
SN21
18
17
16
15
14
13
12
11
10
9
8
7
6
5
4
3
2
1
4
3
2
1
W33P11-EN11
3
2
1
SS_LATCH_DETECT
SS_LATCH_GND
SS_LATCH_3.3V
WEB_BACKER_ENC_A
WEB_BACKER_ENC_GND
WEB_BACKER_ENC_5V
WEB_BACKER_ENC_B
WEB_ADV_ENC_GND
WEB_ADV_ENC_A
WEB_ADV_ENC_3.3V
WEB_ADV_ENC_B
OOWEB_3.3V
OOWEB_GND
OOWEB_SENSE
WEB_DRIVE_ENC_B
WEB_DRIVE_ENC_5V
WEB_DRIVE_ENC_A
WEB_DRIVE_ENC_GND
W33P12-W47J12
W33P21-SN21
M5/
EN10
4
3
2
1
2
1
W33P10-EN10
W41P5-M5
1
2
3
4
5
6
M2_DCM0__WIPER_LIFT_DCMA
M2_DCM1__WIPER_LIFT_DCMB
M2_DCM2__WEB_DRIVE_DCMA
M2_DCM3__WEB_DRIVE_DCMB
W41P1-W10J2
FAN7
FAN8
W38J1-W99P2
3
2
1
W99P7-FAN7
3
2
1
PEN_FAN_1_12V
PEN_FAN_1_GND
PEN_FAN_1_GOOD
PEN_FAN_2_12V
PEN_FAN_2_GND
PEN_FAN_2_GOOD
1
2
3
4
5
6
W99P2-W38J1
6
5
4
3
2
1
6
5
4
3
2
1
PEN_FAN_1_12V
PEN_FAN_1_GND
PEN_FAN_1_GOOD
PEN_FAN_2_12V
PEN_FAN_2_GND
PEN_FAN_2_GOOD
W38P1-W38J1
1
2
3
4
5
6
W38P3-A3J3
W99P8-FAN8
Figure B-42 Service station wiring diagram
ENWW
Service station wiring diagram 2495
Trays 2, 3, and 4
ł
Trays 2, 3, and 4 assembly wiring diagram
ł
Tray 2 wiring diagram
ł
Tray 3 wiring diagram
ł
Tray 4 wiring diagram
ł
Trays 2, 3, and 4 controller PCA diagram
ł
Trays 2, 3, and 4 distribution PCA (A33) diagram
Trays 2, 3, and 4 assembly wiring diagram
Figure B-43 Trays 2, 3, and 4 assembly wiring diagram
2496 Appendix B Wiring diagrams
ENWW
Tray 2 wiring diagram
Figure B-44 Tray 2 wiring diagram
Tray 3 wiring diagram
Figure B-45 Tray 3 wiring diagram
Tray 4 wiring diagram
Figure B-46 Tray 4 wiring diagram
ENWW
Trays 2, 3, and 4 2497
Trays 2, 3, and 4 controller PCA diagram
J5
1
J6
1
J4
1
24V
J3
1
J7
1
J2
1
1
J8
J1
1
5V
1
J9
32V
1
J10
Figure B-47 Trays 2, 3, and 4 controller PCA diagram
2498 Appendix B Wiring diagrams
ENWW
Trays 2, 3, and 4 distribution PCA (A33) diagram
Figure B-48 Trays 2, 3, and 4 distribution PCA (A33) diagram
ENWW
Trays 2, 3, and 4 2499
Vacuum and aerosol wiring diagram
Figure B-49 Vacuum and aerosol wiring diagram
2500 Appendix B Wiring diagrams
ENWW
Vertical wiring diagram
Figure B-50 Vertical wiring diagram
ENWW
Vertical wiring diagram 2501
Web wipe wiring diagram
W33P14-EN13M4
M4/EN13
SN60
5
4
3
2
1
1
2
3
W33P20-SN60
W14J13-W33P13
1
2
1
2
M2_DCM3__WEB_DRIVE_DCMB
M2_DCM2__WEB_DRIVE_DCMA
W33P13-W14J13
EN11
SN21
18
17
16
15
14
13
12
11
10
9
8
7
6
5
4
3
2
1
4
3
2
1
W33P11-EN11
3
2
1
SS_LATCH_DETECT
SS_LATCH_GND
SS_LATCH_3.3V
WEB_BACKER_ENC_A
WEB_BACKER_ENC_GND
WEB_BACKER_ENC_5V
WEB_BACKER_ENC_B
WEB_ADV_ENC_GND
WEB_ADV_ENC_A
WEB_ADV_ENC_3.3V
WEB_ADV_ENC_B
OOWEB_3.3V
OOWEB_GND
OOWEB_SENSE
WEB_DRIVE_ENC_B
WEB_DRIVE_ENC_5V
WEB_DRIVE_ENC_A
WEB_DRIVE_ENC_GND
W33P12-W47J12
W33P21-SN21
M5/
EN10
4
3
2
1
2
1
W33P10-EN10
W41P5-M5
1
2
3
4
5
6
M2_DCM0__WIPER_LIFT_DCMA
M2_DCM1__WIPER_LIFT_DCMB
M2_DCM2__WEB_DRIVE_DCMA
M2_DCM3__WEB_DRIVE_DCMB
W41P1-W10J2
FAN7
FAN8
W38J1-W99P2
3
2
1
W99P7-FAN7
3
2
1
PEN_FAN_1_12V
PEN_FAN_1_GND
PEN_FAN_1_GOOD
PEN_FAN_2_12V
PEN_FAN_2_GND
PEN_FAN_2_GOOD
1
2
3
4
5
6
W99P2-W38J1
6
5
4
3
2
1
6
5
4
3
2
1
PEN_FAN_1_12V
PEN_FAN_1_GND
PEN_FAN_1_GOOD
PEN_FAN_2_12V
PEN_FAN_2_GND
PEN_FAN_2_GOOD
W38P1-W38J1
1
2
3
4
5
6
W38P3-A3J3
W99P8-FAN8
Figure B-51 Web wipe wiring diagram
2502 Appendix B Wiring diagrams
ENWW
PCA diagrams
ł
Drop Detect PCA (A22) diagram
ł
Image Processing PCA (A6) diagram
ł
Ink Assist PCA (A3) diagram
ł
Main Engine Backplane PCA (A4) diagram
ł
Main Engine PCA (A5) diagram
ł
Motion PCA (A2)
ł
Power Distribution PCA (A1) diagram
Drop Detect PCA (A22) diagram
Figure B-52 Drop Detect PCA (A22) diagram
ENWW
PCA diagrams 2503
Image Processing PCA (A6) diagram
J108
J107
J118
J111
J110
J115
J11B
J109
J117
J112
J113
J114
1
92
184
J39
J122
J123
J101
J103
J102
J100
SW1
2
4321
1
2 1
25
26
J11
J8 J6 J3
CARRIAGE 2
J38
1
J12 J9 J7
12
93
184
J4
TP2
19 20
TP3
TP6
12 11
J17
2 1
C1500
J1
J2
1
2
J40
J5
19
20
1
J23
J24
J106
J104
J121
J26
2
12 11
92
J119
J105
J120
1 2
J25
J21
9 10
TP7
TP5 TP4
J23
TP1
D9
D10
D11
J10
Figure B-53 Image Processing PCA (A6) diagram
2504 Appendix B Wiring diagrams
ENWW
Ink Assist PCA (A3) diagram
1
12
TEMP SENSORS
Q46
Q51
D7—12V
D9—3.3V
D8—5V
D5—32V
D10–FWHB
Q57
Q66
Q72
Q61
Q45
Q48
Q54
Q69
2
1
3
Q27
J25
1
Q21
1
J21
2
J7
Q16
34
33
12
1
J3
J2
CENTRAL
COOLING
FAN
PEN
COOLING
FANS
Q33
Q99 Q93 Q90
Q75 Q78 Q84
J18
Q39
Q30
Q91
1
GND
Q102 Q96
TP84
GND
Q42
Q36
Q31
Q76
Q81
Q87
BACK PLANE CONNECTOR
Q18Q61
Q24
J5
22
11
Q60
Q15
TP82
3.3V
J1
POWER
6
TP81
5V
TP80
12V
TP78
32V
Figure B-54 Ink Assist PCA (A3) diagram
ENWW
PCA diagrams 2505
Main Engine Backplane PCA (A4) diagram
Figure B-55 Main Engine Backplane PCA (A4) diagram
2506 Appendix B Wiring diagrams
ENWW
Main Engine PCA (A5) diagram
A24
A24
E24
E1
E24
JJ1
E1
A24
JJ2
JJ3
E24
E1
E1 E12
A1
JJ34
JJ42
J4
A1
A1 A12
A1
1 2
J6
1 2
J3006
1 2
J3007
J2520
J2521
1 2
JJ6
JJ7
JJ8
1 2
15 16
J1015
JJ15
JJ16
JJ14
2
JJ17
JJ18
J1008
JJ9
1
16 15
JJ10
JJ11
2
JJ43
JJ44
1
2 1
1
1 2
J3018
10 8
JJ22
J2
1 2
J130
J10
JJ25
JJ30
JJ37
1
JJ35
J3015
9 12
JJ31
JJ32
1 2
J117
J120
JJ26
JJ27
J3004
J28
JJ33
J116 J118
JJ28
JJ29
2 1
B94
B93
A94
A93
JJ23
JJ24
2
JJ19
J301
JJ20
JJ21
J1014
2
J34 J30 J39 J40
J32
J33 J31 J38
JJ38
JJ39
JJ40
JJ41
D1
D2
D3
D4
D5
D6
D7
D8
Figure B-56 Main Engine PCA (A5) diagram
ENWW
PCA diagrams 2507
Motion PCA (A2)
ł
Motion PCA (A2) diagram
ł
Motor distribution wiring diagram
ł
Left sensor distribution wiring diagram
ł
Right sensor distribution wiring diagram
Motion PCA (A2) diagram
Figure B-57 Motion PCA (A2) diagram
2508 Appendix B Wiring diagrams
ENWW
Motor distribution wiring diagram
Figure B-58 Motor distribution wiring diagram
Left sensor distribution wiring diagram
Figure B-59 Left sensor distribution wiring diagram
ENWW
PCA diagrams 2509
Right sensor distribution wiring diagram
Figure B-60 Right sensor distribution wiring diagram
2510 Appendix B Wiring diagrams
ENWW
Power Distribution PCA (A1) diagram
Figure B-61 Power Distribution PCA (A1) diagram
ENWW
PCA diagrams 2511
2512 Appendix B Wiring diagrams
ENWW
C
Timing charts
ł
ENWW
Scanner and ADF timing charts
2513
Scanner and ADF timing charts
ł
Scanner timing
ł
ADF (single) timing
ł
ADF (duplex) timing
Scanner timing
ADF (single) timing
2514 Appendix C Timing charts
ENWW
ADF (duplex) timing
ENWW
Scanner and ADF timing charts 2515
2516 Appendix C Timing charts
ENWW
D
ENWW
Internal pages
ł
Service information pages
ł
Print quality pages
2517
Service information pages
ł
Gaining access to service information pages
ł
Available service information pages
Gaining access to service information pages
ł
MFP diagnostic software
ł
Embedded Web server (EWS)
ł
Administrator menu
MFP diagnostic software
All of the service information pages can printed from the MFP diagnostic software.
For help printing service information pages from the MFP diagnostic software, see View, print, and edit
service information on page 63.
Embedded Web server (EWS)
Follow these steps to view service information in EWS:
1.
Click Information.
2.
Select the page that you want to view
3.
Click Print to print the page.
Administrator menu
Follow these steps to view service information in the control panel administrator menu:
1.
Log in to the control panel as the administrator.
2.
Touch Administration.
3.
Touch Information.
4.
Select the page that you want to print, and then follow the onscreen instructions.
Available service information pages
The following service information pages are available:
Page
Configuration
Source
Description
MFP
diagnostic
software
EWS
Administrator
menu
X
X
X
2518 Appendix D Internal pages
This page gives describes most of the machine
settings and configurations.
ENWW
Page
MFP
diagnostic
software
EWS
Event Log
X
X
Warning Log
X
Jam History
X
Preventive
Maintenance
X
Service Summary/
Device Status
X
Service Settings
X
Description
Administrator
menu
This page lists all of the errors that the machine
has encountered. The errors are listed
beginning with the most recent.
This page lists all of the warnings that the
machine has encountered. The warnings are
listed beginning with the most recent.
X
This page lists any recent paper jam error
codes. You can use this page to identify any
trends in the printer jam history.
This page provides the following information:
X
ł
PM parts that are due for immediate
replacement
ł
Estimates for when a PM part not due for
immediate replacement will need to be
replaced
This page gives an overview of the state of the
printer. For more detailed information, see
another page.
This page gives an overview parts and
assemblies that require adjustments or
calibrations. Some calibrations are performed
automatically, while others must be done
manually.
Supplies Status
X
X
This page displays the status of each ink
supply.
Usage Page
X
X
This page displays counts for pages printed,
paper types used, types of print jobs, and
scanner usage.
Device information
X
Fax Reports
ENWW
Source
This page displays MFP information such as
serial number and model.
X
The MFP offers several pages that detail fax
activity.
Service information pages 2519
Print quality pages
This section contains examples of the test pages that the MFP can print. For information on printing test
pages, see Print a test page on page 62
ł
ADF Footprint test page
ł
Engine Footprint test page
ł
Finisher Footprint test page
ł
All Colors test page
ł
Automatic Pen Alignment (APA) scanner page
ł
Composite Gray test page
ł
Dimensional IQ test page
ł
PQ test page
ł
Streaks test page
ł
Grid test page
ł
Nozzle Health plot
ł
Vertical Banding test page
2520 Appendix D Internal pages
ENWW
ADF Footprint test page
Print this test page when you make a copy, and the ADF damages the original or the ADF rollers
contaminate the originals. This test page shows where the rollers make contact with the original. Look
for smudges, contamination, or damage that indicate rollers that need to be serviced.
ENWW
Print quality pages 2521
Engine Footprint test page
Use the Engine Footprint test page to determine whether rollers or diverter fingers in the main engine
paper path are marking, damaging, or contaminating the prints. This test page shows where the main
engine rollers make contact with the paper. Look for smudges, damage, roller tracking marks, nicks, or
dents where the diverter fingers contact the page. Remove the finisher before printing this page in order
to isolate the main engine.
2522 Appendix D Internal pages
ENWW
Finisher Footprint test page
Use the Finisher Footprint test page to determine whether rollers or diverter fingers in the finisher paper
path are marking, damaging, or contaminating the prints. This test page shows where the finisher rollers
make contact with the paper. Check the roller that corresponds to the area of the test page that was
damaged or contaminated. Look for smudges, damage, roller tracking marks, nicks, or dents where the
diverter fingers contact the page.
ENWW
Print quality pages 2523
All Colors test page
The All Colors test page shows the following color schemes:
ł
Primary colors (CMYK) and primary composite colors (RGB) at 100 percent and 40 percent
ł
Composite gray (at the top of the page) at 40 percent
Use this page to diagnose print-quality problems, such as: vertical banding, streaks, ink contamination,
and color transitions.
Automatic Pen Alignment (APA) scanner page
Use the APA scanner page to verify whether the pens are aligned. The test page has three sections to
verify the following types of alignment:
ł
Carriage 1 and carriage-to-carriage horizontal alignment
ł
Carriage 2 horizontal alignment
ł
Carriages 1 and 2 and carriage-to-carriage vertical alignment
2524 Appendix D Internal pages
ENWW
-3
-2
-1
0
1
2
3
Carriage 1 & C to C Horizontal
�
-3
-2
-1
0
1
2
Carriage 2 Horizontal
Pen Alignment Plot
�
3
-3
-2
-1
0
3
2
Carriage 1& 2 Vertical
�
1
1
Carriage 1 and carriage-to-carriage horizontal alignment section
2
Carriage 2 horizontal alignment section
3
Carriages 1 and 2 and carriage-to-carriage vertical alignment section
Carriage 1 and carriage-to-carriage horizontal alignment
The Carriage 1 and carriage-to-carriage horizontal alignment section of the APA test page verifies the
following types of alignment:
ENWW
ł
Carriage-to-carriage horizontal alignment: Verify that the CMYK marks are aligned to black on the
left most column.
ł
Pen-to-pen horizontal alignment: Verify that the CMYK marks in each of the five groupings are
aligned to black along the zero zone of the page.
ł
Die-to-die horizontal alignment: Verify that the CMYK marks in each of the four groupings are
aligned to black along the zero zone of the page.
Print quality pages 2525
Die 1
Die 5
Die 4
Die 3
Die 2
Die 1
-3
-2
-1
0
�
�
1
2
3
�
1
Carriage-to-carriage vertical alignment
2
Pen-to-pen horizontal alignment.
3
Die-to-die horizontal alignment
4
Zero zone
�
Carriage 2 horizontal alignment
The Carriage 2 horizontal alignment section of the APA test page verifies the following types of
alignment:
ł
Pen-to-pen horizontal alignment: Verify that the CMYK marks in each of the five groupings are
aligned to black along the zero zone of the page.
ł
Die-to-die horizontal alignment: Verify that the CMYK marks in each of the four groupings are
aligned to black along the zero zone of the page.
2526 Appendix D Internal pages
ENWW
Die 5
Die 4
Die 3
Die 2
Die 1
-3
-2
-1
0
�
�
1
2
3
�
1
Pen-to-pen horizontal alignment.
2
Die-to-die horizontal alignment
3
Zero zone
Carriages 1 and 2 and carriage-to-carriage vertical alignment
The Carriages 1 and 2 and carriage-to-carriage vertical alignment section of the APA test page verifies
the following types of alignment:
ENWW
ł
Carriage-to-carriage vertical alignment: Verify that the CMYK marks are aligned to black on the left
most column.
ł
Pen-to-pen vertical: Verify that the CMYK marks in each of the five groupings are aligned to black
along the zero zone of the page. The marks on the left correspond to Carriage 2. The marks on
the right correspond to Carriage 1.
ł
Die-to-die vertical: Verify that the MK marks in each of the four groupings are aligned to black along
the zero zone of the page. The marks on the left correspond to Carriage 2. The marks on the right
correspond to Carriage 1.
Print quality pages 2527
C1 to C2
Die 5s
Die 4s
Die 3s
Die 2s
Die 1s
-3
-2
-1
�
0
�
3
2
1
�
1
Carriage-to-carriage vertical alignment
2
Pen-to-pen vertical alignment.
3
Die-to-die vertical alignment
4
Zero zone
2528 Appendix D Internal pages
�
ENWW
Composite Gray test page
The Composite Gray page has a composite gray area with primary colors blocks at 100 percent density
down the middle of the page. Each of the primary color blocks contains color text. Use this page to
diagnose print-quality problems, such as: vertical banding, graininess, bleed, and color misregsitration.
ENWW
Print quality pages 2529
Dimensional IQ test page
5
10
20 mm
LE1
LE2
15
20 mm
SE1
F
Dimensional IQ 8.5 x 11 v1.0
E
107.9 mm (4.25”)
A
B
127 mm (5”)
127mm (5”)
5
10
15
20 mm
20 mm
15
10
5
C
D
G
SE2
20 mm
TE1
15
10
TE2
5
The Dimensional IQ test page is available in the following paper sizes:
ł
8.5 x 11 in
ł
A4
ł
11 x 17 in
ł
A3
Use This page to evaluate print image placement and as a copy target when making scanner or ADF
image adjustments. The image centering reference varies based on page size, but the rest of the
references remain the same for all page sizes.
Terms to know
ł
SE1, SE2: Side edge 1 and 2
ł
LE1, LE2: Leading edge 1 and 2
ł
TE 1, TE2: Trailing edge 1 and 2
2530 Appendix D Internal pages
ENWW
Print dimensional IQ parameters
The following parameters apply to printing only. For copy adjustments, see Scanner and ADF
calibrations on page 53.
ł
Image registration: Distance from the top edge of the page to F. Specification 20 +/- 1 mm.
ł
Center line: Distance from the left side edge of the page to E.
Table D-1 Specifications
8.5 x 11
107.9 +/- 1 mm
11 x 17
139.7 +/- 1 mm
A4
105 +/- 1 mm
A3
148.5 +/- 1 mm
ł
Vertical magnification: Distance from A to D. Specification: 127 +/- 0.5 mm
ł
Horizontal magnification: Distance from A to B. Specification: 127 +/- 0.5 mm
ł
Skew: Absolute difference between distances from the top edge of the page to LE1 and LE2
respectively. Specification <1 mm for 11 x 17 / A3 test page.
ł
Orthogonality: Absolute difference between distances. Distance from A to C and B to D.
Specification: |(A to C) — (B to D)| < 1 mm.
PQ test page
ENWW
Print quality pages 2531
Use the PQ test page d to evaluate overall print quality. The page contains composite gray areas, color
registration marks, skin tones, black and colored text, and solid color areas. Use this page as a validation
page to check for text and graphics quality, color registration, color reproduction, and color balance.
Streaks test page
The Streaks test page is one of the three direct drive pages, so the source tray, output tray, and quantity
is predefined. This page is a single pass print. Each block is printed with all the nozzles in one die slot.
There are 1056 nozzles per die slot. The overlap between the die slots is equivalent to 64 nozzles. Use
this page for the streaks test in the Scan and Analyze routine to troubleshoot streaks and vertical
banding.
2532 Appendix D Internal pages
ENWW
Grid test page
The Grid test page is available in 11 x 17 in and A3 sizes. The page is black-only. The page contains a
10 mm grid with a margin of 5 mm around the grid. Use this page to evaluate image distortion, skew,
and line quality.
Nozzle Health plot
Use the Nozzle Health plot to diagnose the pen nozzles.
ENWW
Print quality pages 2533
1
Carriage 1 section
2
Carriage 2 section
3
Bonding Agent section
4
CM pens section
4
YK pens section
Color pens
Color pen nozzles are arranged in dies. Each pen has five dies. Each die has two die slots, one die slot
per color. Each die slot has two columns of nozzles.
2534 Appendix D Internal pages
ENWW
�
�
�
�
Figure D-1 Die
1
Column 1 in magenta die slot
2
Column 2 in magenta die slot
3
Column 1 in cyan die slot
4
Column 2 in cyan die slot
On the Nozzle Health plot, each die slot is represented by a block of colored dashes.
C1, P3, D1
C1, P3, D3
C1, P3, D5
C2, P3, D2
C2, P3, D4
C1, P3, D2
C1, P3, D4
C2, P3, D1
C2, P3, D3
Figure D-2 Nozzle Health plot dies
The page indicates the source of each block. For example, C1, P3, D5 represents Carriage 1 Pen 3 Die
5.
Each bar is made up of 20 spits from a single nozzle (at 18kHz). There are twelve bars in each vertical
series. The bars should step down uniformly across the pattern.
When you are using the Nozzle Health plot, look for bars that are missing or out of sequence.
Bonding Agent pens
The health of the Bonding Agent pens is indicated by the black and gray checkered patterns at the top
of the Nozzle Health plot. If the checkered pattern is clearly visible, then the Bonding Agent pens are
working.
CAUTION: The Bonding Agent health is not indicated correctly if the Nozzle Health plot is
printed on ColorLok media.
ENWW
Print quality pages 2535
�
�
Figure D-3 Die
1
Checkered pattern that indicates healthy Bonding Agent pens.
2
Incomplete checkered pattern that indicates unhealthy Bonding Agent pens.
The gray areas are printed with black ink and no Bonding Agent. The black areas are printed with black
ink and Bonding Agent.
Each box in the checkered pattern is 24 nozzles high. Bonding Agent is printed at a rate of one drop
per 600 (9kHz).
2536 Appendix D Internal pages
ENWW
Vertical Banding test page
The vertical banding test page shows the following colors:
ł
Colored bands of primary colors CMYK
ł
Composite primary colors RGB
ł
Additional colors
Use the Vertical Banding test page in the scan and analyze process to determine whether die-to-die
density difference is within product specification.
ENWW
Print quality pages 2537
2538 Appendix D Internal pages
ENWW
E
Voltage specification
This chapter contains information about the following topics:
ENWW
ł
Introduction
ł
Subsystem voltage specifications and ranges
ł
Vacuum and aerosol motor voltage specifications
ł
Dryer voltage specifications
2539
Introduction
There is no need to use the CDFT diagnostics in order to monitor the voltages for any of the sensors.
The voltage is always available between the PCA and device.
In order to monitor any voltage at any location along a wiring harness from the PCA to the device for
any motor, solenoid, or clutch, the CDFT diagnostics must be enabled and that device needs to be
selected. For example, if you enable the horizontal motor on the CDFT, the voltage between the PCA
and the motor is available for measurement.
2540 Appendix E Voltage specification
ENWW
Subsystem voltage specifications and ranges
The following sections provide DC voltage specifications and ranges for key MFP subsystems.
DC Voltage
ł
MFP print engine
ł
Trays 2, 3 and 4
ł
Finisher
ł
Automatic Document Feeder
ł
Scanner
ł
Tray 1
MFP print engine
Power supply and system voltage
outputs
Minimum voltage
Maximum voltage
+5VSB (volt standby)
+4.75
+5.25
+3.3
+3.14
+3.47
+5.1
+4.95
+5.25
+12.0
+11.4
+12.6
+20.0
+18.0
+22.0
+24.0
+22.8
+26.4
+28.0
+27.0
+29.0
+32.0
+28.8
+35.6
+52.0
+50.4
+53.6
Power supply and system voltage
outputs
Minimum voltage
Maximum voltage
+5.0
+4.75
+5.25
+24.0
+21.6
+26.4
+32.0
+28.8
+35.2
Power supply and system voltage
outputs
Minimum voltage
Maximum voltage
+3.3
+3.15
+3.45
Trays 2, 3 and 4
Finisher
ENWW
Subsystem voltage specifications and ranges 2541
Power supply and system voltage
outputs
Minimum voltage
Maximum voltage
+5.0
+4.75
+5.25
+32.0
+28.8
+34.2
+42.0
+39.9
+44.1
+52.0
+49.4
+54.6
Power supply and system voltage
outputs
Minimum voltage
Maximum voltage
5 VSB (volt stand-by)
+4.75
+5.25
5
+4.75
+5.25
24
+23.5
+25.4
Power supply and system voltage
outputs
Minimum voltage
Maximum voltage
3.3
+3.14
+3.47
5
+4.75
+5.25
11
+10.9
+11.4
24
+23.5
+25.4
Power supply and system voltage
outputs
Minimum voltage
Maximum voltage
TBD
TBD
TBD
TBD
TBD
TBD
Automatic Document Feeder
Scanner
Tray 1
2542 Appendix E Voltage specification
ENWW
Vacuum and aerosol motor voltage specifications
All lines to GND (TP84) on the Ink Assist PCA (A3).
Resistance between lines (Yellow-White/White-Brown/Brown-Yellow) on the motor should measure
1.6~1.7 Ohm when the motor is disconnected.
NOTE: Motors operate with pulse width modulated (PWM) DC voltages. Use the AC setting on
the voltmeter when checking voltages in PSM mode.
Vacuum and aerosol voltage specifications
Protected Service Mode (PSM) voltage test
Normal operation
Line To Ground (Yellow-GND/White-GND/Brown-GND)
~10–16V (This value varies and depends on the operating
condition.)
AC ~6V
Measure voltages between ground (TP84 on ink assist PCA)
and one of the motor connections.
DC ~2–3V
~11–13V (This value varies and depends on the operating
condition.)
Measure voltages between ground (TP84 on ink assist PCA)
and one of the fan connections.
Line To Line (Yellow-White/White-Brown/Brown-Yellow)
AC ~2–5V
~15–25V (This value varies and depends on the operating
condition.)
Measure voltages between motor wires.
ENWW
Vacuum and aerosol motor voltage specifications 2543
Dryer voltage specifications
Protected Service Mode (PSM) voltage test
Normal operation
Heater (FAN5)
Pin 1–2
~27–32V
DC ~27–32V
Pin 3–2
~1.6–3.3V (This value depends on RPM of the
fan.)
DC ~3.1–3.3V
Dryer heating coil (HTR1)
28 ohms per coil
2544 Appendix E Voltage specification
4 coils per heater assembly. Each coils should
be 28 ohms.
ENWW
F
ENWW
Reference diagrams
ł
Drum surface
ł
Electronics map
ł
Print pipeline
ł
Paper path sensors
ł
Error log table
2545
Drum surface
Figure F-1 Drum surface
2546 Appendix F Reference diagrams
ENWW
Electronics map
Figure F-2 Electronics map
ENWW
Electronics map 2547
Print pipeline
Figure F-3 Print pipeline
2548 Appendix F Reference diagrams
ENWW
Paper path sensors
Figure F-4 Paper path sensors
Sensor
Event log code
Staging area 1 (yellow)
Tray 4 Exit sensor (SN55)
A1.1304 on page 2042
Tray 3 Exit sensor (SN51)
N/A
Tray 2 Exit sensor (SN47)
A1.1302 on page 2041
Vertical Transport 1 sensor (SN35)
B0.1301 on page 2165
Staging area 2 (orange)
Vertical Transport 2 sensor (SN28)
B0.1302 on page 2166
Vertical Transport 3 sensor (SN25)
B0.1303 on page 2167
Vertical transport 4 sensor (SN26)
B0.1304 on page 2168
Transparency sensor 1 (SN1)
B1.1301 on page 2171
Horizontal Transport 2 sensor (SN3)
B1.1302 on page 2172 if paper is picked from Trays 2 ,3 or 4
A0.1301 on page 2029 if paper is picked from Tray 1
Tray 5
SN101
A2.1301 on page 2056
SN103
A2.1302 on page 2057
Tray 1
SN27
N/A
Staging area 3 (blue)
ENWW
Paper path sensors 2549
Sensor
Event log code
Horizontal Transport 3 sensor (SN2)
B1.1303 on page 2173
Horizontal Transport 4 sensor (SN5)
B1.1304 on page 2174
Staging area 4 (green)
IDO Input Staging 2 sensor (SN10)
B2.1301 on page 2186
IDO Media Thickness encoder (EN14)
B2.1302 on page 2187
Drum area
IDO Input Staging 1 sensor (SN7)
B2.1303 on page 2188
IDO Input Media sensor (SN8)
B2.1304 on page 2189
Top-of-form sensor (SN22)
C1.1301 on page 2232
SN56
C1.131A on page 2235
SN57
C1.132A on page 2236
Drum 1 sensor (SN33)
C1.1302 on page 2233
Drum 2 sensor (SN34)
C1.1303 on page 2234
Staging area 5 (purple)
IDO Duplex Staging sensor (SN11)
B2.1308 on page 2193
IDO Duplex Media sensor (SN16)
B2.1309 on page 2194
IDO output area
IDO Output Media sensor (SN9)
B2.1305 on page 2190
IDO Output 1 sensor (SN15)
B2.1306 on page 2191
IDO Output 2 sensor (SN12)
B2.1307 on page 2192
Finisher
Finisher Input 0 sensor (SN211)
A3.1300 on page 2145
Finisher Input 1 sensor (SN212)
A3.1301 on page 2146
Finisher Input 2 sensor (SN213)
A3.1302 on page 2147
Finisher Input 3 sensor (SN214)
A3.1303 on page 2148
Finisher Lower 1 sensor (SN215)
A3.1307 on page 2152
Finisher Lower 2 sensor (SN221)
A3.1308 on page 2153
Accumulator Entry sensor (SN246)
A3.1320 on page 2155
Accumulator Bearing Bracket Home sensor (SN248)
A3.1321 on page 2156
Accumulator Exit sensor (SN242)
A3.1322 on page 2158
Finisher Upper 1 sensor (SN231)
A3.1304 on page 2149
Finisher Upper 2 sensor (SN232)
A3.1305 on page 2150
Finisher Upper 3 sensor (SN233)
A3.1306 on page 2151
Finisher Job Separator Stack Height sensor (SN267)
N/A
2550 Appendix F Reference diagrams
ENWW
Error log table
Figure F-5 Error log table
ENWW
Error log table 2551
2552 Appendix F Reference diagrams
ENWW
Index
Symbols/Numerics
00.02E2 1900
00.0301 1901
16–22 AWG power
distribution 142
20–24 AWG motor drive
color coding 142
26–28 AWG sensors
color coding 141
30.0701 1902
30.0702 1903
30.0703 1904
30.0704 1905
30.0705 1906
30.0706 1907
30.0707 1908
30.0708 1910
30.0709 1912
30.0710 1913
30.0711 1914
30.0712 1915
30.0713 1916
30.0714 1917
30.0715 1918
30.0716 1919
30.0717 1920
30.0718 1921
30.0719 1922
30.0720 1923
30.0721 1924
30.0722 1925
30.0723 1926
30.0724 1927
30.0725 1928
30.0726 1929
31.1301 1930
31.1302 1932
31.1303 1934
31.1308 1935
ENWW
31.1311
31.1312
32.0500
32.0B03
32.0C00
32.0C01
32.1800
32.1801
32.1802
32.1803
32.1804
32.1805
32.1900
32.1902
32.1904
32.1905
32.1906
32.1C03
32.1C04
32.1C05
32.1C06
32.1C07
32.1C08
32.1C09
32.1C0A
32.1C0B
32.1C0C
32.1C0D
32.1C0E
32.1C0F
32.1C10
32.1C11
32.1C12
32.1C13
32.2100
32.2301
32.2302
32.2600
32.4400
1936
1937
1977
1938
1939
1940
1958
1959
1960
1961
1962
1963
1964
1965
1966
1967
1968
1941
1942
1943
1944
1945
1946
1947
1948
1949
1950
1951
1952
1953
1954
1955
1956
1957
1969
1970
1971
1972
1973
32.4401
32.4402
32.4403
32.5C00
49.0B01
49.yyzz
67.yyzz
68.8001
68.8002
68.8003
79.yyzz
80.0180
80.0181
80.0182
80.018B
80.018C
80.0301
80.0302
80.0303
80.0304
80.0305
80.0306
80.0307
80.0308
80.0309
80.0310
80.0312
80.0313
80.0314
80.0315
80.0316
80.0317
80.0318
81.yyzz
85.yyzz
86.yyzz
99.0001
99.0002
99.0004
1974
1975
1976
1978
1979
1980
1981
1982
1983
1984
1985
1986
1987
1988
1989
1990
1991
1992
1993
1994
1995
1996
1997
1998
1999
2000
2001
2002
2003
2004
2005
2006
2007
2008
2009
2010
2016
2017
2018
Index 2553
99.0006
99.0007
99.0009
99.000A
99.000C
99.000D
99.000E
99.000F
99.0013
99.0014
99.0015
99.0016
99.0017
99.0018
2019
2020
2021
2011
2012
2013
2014
2015
2022
2023
2024
2025
2026
2027
A
A0.03A1
A0.1301
A1.0102
A1.0103
A1.0104
A1.01A2
A1.01A3
A1.01A4
A1.01C1
A1.02C1
A1.02C3
A1.0701
A1.07A1
A1.1302
A1.1304
A2.0101
A2.0102
A2.0201
A2.0202
A2.03A1
A2.04A1
A2.04A2
A2.04A3
A2.04A4
A2.04A5
A2.04A6
A2.05A1
A2.1301
A2.1302
A3.0101
A3.0102
A3.0103
A3.0104
A3.0122
2028
2029
2030
2031
2032
2033
2034
2035
2036
2037
2038
2039
2040
2041
2042
2043
2044
2045
2046
2047
2048
2049
2050
2051
2052
2053
2055
2056
2057
2058
2059
2060
2061
2062
2554 Index
A3.0123
A3.0124
A3.0125
A3.0126
A3.0140
A3.0141
A3.0142
A3.0143
A3.0160
A3.01A1
A3.01A2
A3.01A3
A3.01A4
A3.01A5
A3.01A6
A3.01A7
A3.01A8
A3.01A9
A3.01C1
A3.01C2
A3.01E1
A3.0200
A3.0201
A3.0202
A3.0203
A3.0204
A3.0205
A3.0206
A3.0207
A3.0208
A3.0210
A3.0211
A3.0212
A3.0213
A3.0214
A3.0215
A3.0220
A3.0226
A3.0227
A3.0232
A3.0233
A3.0240
A3.0241
A3.0242
A3.0243
A3.0244
A3.0260
A3.0261
A3.0263
A3.0264
2063
2064
2065
2066
2067
2068
2070
2071
2073
2074
2075
2076
2077
2078
2079
2080
2081
2072
2082
2083
2084
2085
2086
2087
2088
2089
2090
2091
2092
2093
2094
2095
2096
2097
2098
2099
2100
2102
2103
2105
2106
2107
2108
2109
2110
2111
2112
2113
2114
2115
A3.02A0 2116
A3.02A1 2117
A3.02A2 2118
A3.02A3 2119
A3.02A4 2120
A3.02A5 2121
A3.02A6 2122
A3.02A7 2123
A3.02A8 2124
A3.02A9 2125
A3.0301 2126
A3.06A0 2127
A3.06A1 2128
A3.06A2 2129
A3.06A3 2130
A3.06A4 2131
A3.06A6 2132
A3.0702 2133
A3.0703 2134
A3.0704 2135
A3.0705 2136
A3.0706 2137
A3.0707 2138
A3.0708 2139
A3.0709 2140
A3.0710 2141
A3.07A1 2142
A3.07A2 2143
A3.07A3 2144
A3.1300 2145
A3.1301 2146
A3.1302 2147
A3.1303 2148
A3.1304 2149
A3.1305 2150
A3.1306 2151
A3.1307 2152
A3.1308 2153
A3.1320 2155
A3.1321 2156
A3.1322 2158
A3.1323 2159
A3.1324 2160
A3.1325 2161
A3.1360 2162
A3.38zz 2163
AC power (12 AWG UL1015)
color coding 142
accumulator
accumulator assembly 756
ENWW
accumulator covers 755
accumulator distribution PCA
(A240) 778
bearing bracket assembly 761
guide bar assembly 759
lever support shaft 778
lower eject shaft 781
offset shaft 779
offsetters (front and rear) 780
paper guide complete 783
removing and replacing 754
accumulator roller 82
accuracy, stopping 122
ADF
ADF assembly 182
ADF PCAs 200
adjustments 116
automatic image
adjustments 56
calibrations 53
center line simplex
adjustment 117
Control PCA (A401)
cover 191
covers and trays 183
duplex center line front and back
adjustments 116
feed cover 186
footprint test page 2521
front cover 184
hinges, lubricating 80
input cover 187
lower separation roller 197
magnification adjustment 116
manual image adjustments 59
motors 213
originals cover 193
output bin 189
paper-width guides 188
pick roller 195
pick rollers, cleaning 79
rear cover 185
removing and replacing
parts 182
scan start position
adjustmen 117
sensors 203
separation roller 193
solenoids 218
ENWW
switches 202
top cover 185
ADF assembly
removing and replacing 182
ADF contact glass
removing and replacing 229
ADF contact glass, cleaning 79
ADF covers and trays
ADF PCAs 200
Control PCA (A401)
cover 191
feed cover 186
front cover 184
input cover 187
lower separation roller 197
originals cover 193
output bin 189
paper-width guides 188
pick roller 195
rear cover 185
removing and replacing 183
sensors 203
separation roller 193
switches 202
top cover 185
ADF feed sensor, cleaning 77
ADF motors
removing and replacing 213
ADF solenoids
removing and replacing 218
ADF Tetris sensor, cleaning 80
ADF timing sensor, cleaning 78
adjustments
ADF 116
administrator menu
service information
pages 2518
administrator tools
embedded JetDirect 91
firmware, downloading 90
installation options 89
password, changing 91
startup options 91
touchscreen, calibrating 90
aerosol
aerosol door 549
aerosol duct assembly 553
aerosol duct wipes 559
aerosol fan (AERO) 551
aerosol fan (AERO) cover 553
aerosol filter 547
aerosol filter box 547
removing and replacing
parts 547
aerosol door
removing and replacing 549
aerosol duct assembly
removing and replacing 553
aerosol duct kit 85
aerosol duct wipes
removing and replacing 559
aerosol fan (AERO)
removing and replacing 551
aerosol fan (AERO) cover
removing and replacing 553
aerosol filter
removing and replacing 547
aerosol filter box
removing and replacing 547
aerosol manifold and hose
removing and replacing 469
aerosol voltage
specifications 2543
AFE
PCA diagram 2494
AFE PCA (A502)
removing and replacing 245
air pressure system assembly. See
APS assembly
air pump assembly
removing and replacing 539
alerts by e-mail 27
alignment, carriage-tocarriage 124
All Colors test page 2524
APA (Automatic Pen Alignment)
calibration 126
APS assembly
removing and replacing 536
Attention light 7
automatic document feeder
voltage specifications 2542
Automatic Pen Alignment (APA)
calibration 126
Automatic Pen Alignment (APA)
test page 2524
automatic scanner image
adjustments 54
AutoSend feature 28
Index 2555
B
B0.0101 2164
B0.1301 2165
B0.1302 2166
B0.1303 2167
B0.1304 2168
B1.0101 2169
B1.0201 2170
B1.1301 2171
B1.1302 2172
B1.1303 2173
B1.1304 2174
B2.0101 2175
B2.0102 2176
B2.0103 2177
B2.0104 2178
B2.0105 2179
B2.0106 2180
B2.01A1 2181
B2.01A2 2182
B2.0201 2183
B2.0301 2184
B2.03C1 2185
B2.1301 2186
B2.1302 2187
B2.1303 2188
B2.1304 2189
B2.1305 2190
B2.1306 2191
B2.1307 2192
B2.1308 2193
B2.1309 2194
back view 3
backup of non-volatile memory
(NVM) 94
beams, drop detector 128
belts and pulleys, curler output
transmission 82
belts, carriage drive 84
bins, output
capacities 17
optional finishers 4
single, locate 3
Bonding Agent pens 2535
Bonding Agent, cleaning up 77
Boot Manager 93
brightness-adjustment dial,
touchscreen
7
brochures, paper for 13
2556 Index
business plans, paper for 13
buttons
control panel 7
touchscreen 10
C
C0.0101
C0.0102
C0.0103
C0.0104
C0.0105
C0.0106
C0.0107
C0.0108
C0.01A1
C0.01A2
C0.01A3
C0.01A4
C0.01A5
C0.01A6
C0.01A7
C0.01A8
C0.01AA
C0.01AB
C0.01AC
C0.01AD
C0.01AE
C0.01AF
C0.0DC2
C1.0101
C1.0102
C1.01A1
C1.0203
C1.0204
C1.02A1
C1.02A2
C1.02A3
C1.02A4
C1.0501
C1.0503
C1.05A2
C1.1301
C1.1302
C1.1303
C1.131A
C1.132A
C2.0201
C2.0901
C2.09A1
C2.0C01
2195
2196
2197
2198
2199
2200
2201
2202
2203
2204
2205
2206
2207
2208
2209
2210
2211
2212
2213
2214
2215
2216
2217
2218
2219
2220
2221
2222
2223
2224
2225
2226
2228
2229
2231
2232
2233
2234
2235
2236
2237
2238
2239
2240
C3.22A0
C3.22A1
C3.22A2
C3.22A3
C3.22A4
C3.22A5
C3.22A6
C3.22A7
C3.22A8
C4.0101
C4.0102
C4.0201
C4.0202
C4.0203
C4.02A1
C4.0501
C6.0B01
C7.0701
C7.0B06
C7.0B07
C7.0B08
C7.0B10
C7.0B11
C7.0B12
C7.0B13
C7.0B20
C7.0B21
C7.0B22
C7.0B23
C7.0B30
C7.0B31
C7.0B32
C7.0B33
C7.0B40
C7.0B41
C7.0B42
C7.0B43
C7.0B50
C7.0B51
C7.0B52
C7.0B53
C7.0BA0
C7.0BA1
C7.0BA2
C7.0BA3
C7.0BA4
C7.0BA5
C7.0BA6
C7.0BA7
C7.0BA8
2241
2242
2243
2244
2245
2246
2247
2248
2249
2250
2251
2252
2253
2254
2255
2256
2257
2258
2259
2260
2261
2262
2263
2264
2265
2266
2267
2268
2269
2270
2271
2272
2273
2274
2275
2276
2277
2278
2279
2280
2281
2282
2283
2284
2285
2286
2287
2288
2289
2290
ENWW
C7.0BA9 2291
cable labeling standards
wires and cables 142
calibrating parts
Tray 5 calibrations 676
Tray 5 pick force 681
Tray 5 separator force 677
Tray 5 stack height 680
calibrations
ADF 116
cap assembly
removing and replacing 583
capacities, trays 2
capacities, trays and bins 17
cardstock 12
carriage
aerosol manifold and
hose 469
carriage 1 magnet 495
carriage 1 motor (M1) and
carriage 2 motor (M2) 492
carriage 1 v-bearings 497
carriage 2 magnets 496
carriage 2 v-bearings 499
carriage drive belt 477
carriage encoder strip 474
carriage handle 468
carriage idler pulleys 477
carriage magnets 495
carriage PCAs 505
carriage sensors 516
e-chain 480
encoder diagram 2467
pens 471
pocket PCA diagram 2467
PPS 501
PPS assembly 502
PPS cable 505
PPS cover 501
PPS felt oiler 504
PPS motor assembly 503
PSU PCA diagram 2468
removing and replacing
parts 468
v-bearings 497
wiring diagram 2466
carriage 1 motor (M1) and carriage
2 motor (M2)
removing and replacing 492
ENWW
carriage drive belt
removing and replacing 477
carriage encoder PCAs 84
carriage encoder strip
adjusting 474
removing and replacing 474
carriage encoder strip
adjustment 122
carriage extraction 143
carriage felt oiler 82
carriage handle
removing and replacing 468
carriage idler pulleys
removing and replacing 477
carriage inaccuracy 113
carriage magnets
carriage 1 magnet 495
carriage 2 magnets 496
removing and replacing 495
carriage PCAs
removing and replacing 505
carriage plate cover
removing and replacing 165
carriage sensors
removing and replacing 516
carriage stopping accuracy
calibration 122
carriage-to-carriage
alignment 124
carriage-to-carriage horizontal
alignment test page 2525
carriage-to-carriage vertical
alignment test page 2527
cartridge door, locate 2
catalogs, paper for 13
CDFT
Home screen 49
options chart 41
remote firmware upgrades
(RFUs) 50
tasks for 40
versions 40
voltages, testing 46
CDFT (Copier Diagnostic Field
Tool)
home screen 74
CDFT-E
description 40
starting 41
CDFT-L
description 40
embedded Web server
(EWS) 49
scan and analyze function 46
starting 41
center line adjustment 118
center line simplex
adjustment 117
charcoal filter 85
cleaning
Bonding Agent spill 77
contact glass 79
control panel 77
drive rollers 81
drum screen 81
feed sensor 77
ink 76
pick rollers 77, 79
Tetris sensor 80
timing sensor 78
cleaning MFP 76
cleaning pens 129
Clear button 7
cold reset 101
color
paper, recommended 13
color coding standards
16–22 AWG power
distribution 142
20–24 AWG motor drive 142
26–28 AWG sensors 141
AC power (12 AWG
UL1015) 142
wires and cables 141
color pen nozzles 2534
color schemes test page 2524
communications
testing 46
Composite Gray test page 2529
consumables, handling in service
calls 24
contact glass, cleaning 79
control panel
buttons 7
control panel assembly 259
control panel lamp 268
control panel LCD PCA 262
control panel PCA 260
control panel PCAs 260
Index 2557
Help system 10
Home screen 8
keypad assembly and button
assembly 264
LCD and touchscreen 266
lights 7
locate 2
power switch assembly 265
removing and replacing
parts 259
sign in 9
wiring diagram 2470
control panel assembly
removing and replacing 259
control panel lamp
removing and replacing 268
control panel PCAs
control panel LCD PCA 262
control panel PCA 260
removing and replacing 260
Copier Diagnostic Field Tool
(CDFT)
cable warning 32
description 19
isolating faulty
components 31
Coprocessor 97
coprocessor
removing and replacing 609
coprocessor hard disk
removing and replacing 609
copy
count 8
output bin, default 4
paper, recommended 13
count value 38
counters for Printer Maintenance
(PM) items 49
country/region codes 36
covers
carriage plate cover 165
front door engine left 164
front door engine right 165
front doors 164
IDS door 165
left case parts 171
lower inner cover 168
rear case parts 175
removing and replacing
parts 164
2558 Index
right case parts 173
standard input trays 167
top case parts 178
Trays 2, 3, and 4 167
upper inner cover 166
Web wipe access case
parts 170
wiring diagram 2469
covers, paper for 13
curler output transmission
belts 82
customer non-volatile memory
(NVM) 94
D
D0.0801
D0.0802
D0.08A1
D0.08A2
D0.08A3
D1.0101
D1.0102
D1.0201
D1.02A1
D1.02A2
D1.0700
D1.0701
D1.0702
D1.071A
D1.071B
D1.071C
D1.071D
D1.072A
D1.072B
D1.072C
D1.072D
D1.073A
D1.073B
D1.073C
D1.073D
D1.074A
D1.074B
D1.074C
D1.074D
D1.075A
D1.075B
D1.075C
D1.075D
D1.076A
D1.076B
2292
2293
2294
2295
2296
2297
2298
2299
2300
2301
2302
2303
2304
2305
2306
2307
2308
2309
2310
2311
2312
2313
2314
2315
2316
2317
2318
2319
2320
2321
2322
2323
2324
2325
2326
D1.076C
D1.076D
D1.0900
D1.0A07
D1.0A08
D1.0A1A
D1.0A1B
D1.0A2A
D1.0A2B
D1.0A3A
D1.0A3B
D1.0A4A
D1.0A4B
D1.0A5A
D1.0A5B
D1.0A6A
D1.0A6B
D2.01A0
D2.01A1
D2.01A2
D2.01A3
D2.01A4
D2.01A5
D2.01A6
D2.01A7
D2.02A1
D2.0701
D2.0703
D2.0704
D2.0705
D2.0707
D2.0708
D2.0709
D2.0710
D2.0711
D2.0712
D2.0713
D2.0714
D2.0715
D2.0716
D2.0723
D2.0724
D2.0901
D2.09A1
D2.09A2
D2.0AA1
D2.0AA2
D2.0AA3
D2.0AA4
D2.0AA5
2327
2328
2329
2330
2331
2332
2333
2334
2335
2336
2337
2338
2339
2340
2341
2342
2343
2344
2345
2346
2347
2348
2349
2350
2351
2352
2353
2354
2355
2356
2357
2358
2359
2360
2361
2362
2363
2364
2365
2366
2367
2368
2369
2370
2371
2372
2373
2374
2375
2376
ENWW
D2.0AA6
D2.2001
D2.2002
D2.2003
D2.2004
D2.2005
D3.1101
D3.1102
D3.2301
D3.3700
D3.4400
D4.0701
D4.0702
D4.0703
D4.0704
D4.0705
D4.0706
D4.0707
D4.0708
D4.0711
D4.0712
D4.0713
D4.0714
D4.0715
D4.0716
D4.0717
D4.07C1
D4.07C2
D4.09A1
D4.09A2
D5.1000
D5.1001
D5.1002
D5.1003
D5.1004
D5.1005
D5.1006
D5.1007
D5.1008
D5.1009
D5.1010
D5.1011
D5.1012
D5.1013
D5.1014
D5.1015
D5.1016
D5.1017
D5.1018
D5.1019
ENWW
2377
2378
2379
2380
2381
2382
2383
2384
2385
2386
2387
2388
2389
2390
2391
2392
2393
2394
2395
2396
2397
2398
2399
2400
2401
2402
2403
2404
2405
2406
2407
2408
2409
2410
2411
2412
2413
2414
2415
2416
2417
2418
2419
2420
2421
2422
2423
2424
2425
2426
D5.1020 2427
D5.1021 2428
D5.1022 2429
D5.1023 2430
D5.1024 2431
D5.1025 2432
D5.1026 2433
D5.1029 2434
D5.1030 2435
D5.1031 2436
D5.1032 2437
D5.1035 2438
D5.1036 2439
D5.1037 2440
D5.1038 2441
D5.1039 2442
D5.1040 2443
D5.3801 2444
D5.3802 2445
D5.3803 2446
D5.3804 2447
D5.3805 2448
D5.3806 2449
D5.3807 2450
D5.3808 2451
D5.3809 2452
D5.380A 2453
D5.380B 2454
D5.380C 2455
D5.380D 2456
D5.380E 2457
D5.380F 2458
data groupings 98
Data light 7
data storage location 100
date 9
date, setting 30
day code 37
DC voltage specifications 2541
decurler cam shaft assembly
removing and replacing 414
density calibration for pens 127
device status
Home screen 8
lights 7
diagnostic pages
subsystems 45
diagnostic pages, subsystem 44
diagnostic trends 44
diagrams for troubleshooting 44
Dimensional IQ test page 2530
disk loads, skipping 104
disk, initializing 102
document feeder
capacity 17
locate 2
voltage specifications 2542
documents, paper for 12
door interlock override device 32
doors
locate 2
doors and covers
front latch adjustment 707
front lower cover 707
front structure frame
cover 711
front upper cover 706
handle 1 715
handle 2 719
handle 3 721
left leg cover 708
lower middle cover 722
rear cover 708
rear structure frame
cover 712
removing and replacing 704
right side panel 713
separator covers 712
stapler 1 door 709
stapler 2 covers 710
stapler 2 door 709
top cover side 706
top door 705
top door left 705
drive roller
removing and replacing 372
drive rollers
removing and replacing 139
drive rollers, cleaning 81
drop detect assembly
drop detect spittoon 588
removing and replacing 587
drop detection
PCA diagram 2503
drop detector beam
calibration 128
drop detector beam
centering 128
drop detector inspection 129
Index 2559
drum
drum encoder disk 449
drum encoder PCAs 448
drum guide 443
drum guide assembly 443
drum guide motor (M22) 445
drum guide strip 445
drum illumination 1 and 2 LED
(LED8, LED9) 457
drum motor (M3) 446
drum screen 438, 439, 441
drum spittoon 437
encoder PCA diagram 2472
poppet A valves 452
poppet B valves 455
removing and replacing
parts 437
vacuum poppet valves 451
wiring diagram 2471
drum encoder disk
removing and replacing 449
drum encoder PCAs
removing and replacing 448
drum guide
drum guide assembly 443
drum guide motor (M22) 445
drum guide strip 445
removing and replacing 443
drum illumination 1 and 2 LED
(LED8, LED9)
removing and replacing 457
drum jam sensors 84
drum motor (M3)
removing and replacing 446
drum position calibration 121
drum screen
removal 439
removing and replacing 438
replacement 441
drum screen, cleaning 81
drum sensors
wiring diagram 2472
drum spittoon
removing and replacing 437
drum surface reference
diagram 2546
dryer
drum 1 sensor (SN33) 574
drum 2 sensor (SN34) 575
dryer assembly 563
2560 Index
dryer assembly left 570
dryer assembly right 569
dryer fan (FAN5) 568
dryer heater assembly 566
dryer sensors 573
dryer slider lever 571
dryer temperature 1 sensor
(SN36) 576
removing and replacing
parts 563
wiring diagram 2473
dryer assembly
removing and replacing 563
dryer assembly left
removing and replacing 570
dryer assembly right
removing and replacing 569
dryer fan (FAN5)
removing and replacing 568
dryer heater assembly
removing and replacing 566
dryer sensors
drum 1 sensor (SN33) 574
drum 2 sensor (SN34) 575
dryer temperature 1 sensor
(SN36) 576
removing and replacing 573
dryer slider lever
removing and replacing 571
dryer voltage specifications 2544
duct kit 85
duplex center line front and back
adjustments 116
duplex inner short damper
removing and replacing 407
duplex upper outer guide
removing and replacing 417
E
e-chain
removing and replacing 480
e-mail notification features 27
electronics bay cooling fan (FAN4)
removing and replacing 632
electronics map 2547
electrostatic discharge
protecting parts during removal
or replacement 137
embedded JetDirect 91
embedded Web server (EWS)
access to 26
passwords 26
service information
pages 2518
servicing 25
encoder diagram, carriage 2467
encoder PCA diagrams
drum encoder 2472
encoder strip adjustment 122
engine
footprint test page 2522
PCA diagram 2507
engine backplane
PCA diagram 2506
engine calibrations 51, 53
envelopes, not supported 12
erasing memory 103
Error button 10
error codes 2549
errors
viewing in event log 43
event log
errors and warnings 43
tasks 43
troubleshooting 43
viewing full log 43
event log code
00.02E2 1900
00.0301 1901
30.0701 1902
30.0702 1903
30.0703 1904
30.0704 1905
30.0705 1906
30.0706 1907
30.0707 1908
30.0708 1910
30.0709 1912
30.0710 1913
30.0711 1914
30.0712 1915
30.0713 1916
30.0714 1917
30.0715 1918
30.0716 1919
30.0717 1920
30.0718 1921
30.0719 1922
30.0720 1923
ENWW
30.0721
30.0722
30.0723
30.0724
30.0725
30.0726
31.1301
31.1302
31.1303
31.1308
31.1311
31.1312
32.0500
32.0B03
32.0C00
32.0C01
32.1800
32.1801
32.1802
32.1803
32.1804
32.1805
32.1900
32.1902
32.1904
32.1905
32.1906
32.1C03
32.1C04
32.1C05
32.1C06
32.1C07
32.1C08
32.1C09
32.1C0A
32.1C0B
32.1C0C
32.1C0D
32.1C0E
32.1C0F
32.1C10
32.1C11
32.1C12
32.1C13
32.2100
32.2301
32.2302
32.2600
32.4400
32.4401
ENWW
1924
1925
1926
1927
1928
1929
1930
1932
1934
1935
1936
1937
1977
1938
1939
1940
1958
1959
1960
1961
1962
1963
1964
1965
1966
1967
1968
1941
1942
1943
1944
1945
1946
1947
1948
1949
1950
1951
1952
1953
1954
1955
1956
1957
1969
1970
1971
1972
1973
1974
32.4402
32.4403
32.5C00
49.0B01
49.yyzz
67.yyzz
68.8001
68.8002
68.8003
79.yyzz
80.0180
80.0181
80.0182
80.018B
80.018C
80.0301
80.0302
80.0303
80.0304
80.0305
80.0306
80.0307
80.0308
80.0309
80.0310
80.0312
80.0313
80.0314
80.0315
80.0316
80.0317
80.0318
81.yyzz
85.yyzz
86.yyzz
99.0001
99.0002
99.0004
99.0006
99.0007
99.0009
99.000A
99.000C
99.000D
99.000E
99.000F
99.0013
99.0014
99.0015
99.0016
1975
1976
1978
1979
1980
1981
1982
1983
1984
1985
1986
1987
1988
1989
1990
1991
1992
1993
1994
1995
1996
1997
1998
1999
2000
2001
2002
2003
2004
2005
2006
2007
2008
2009
2010
2016
2017
2018
2019
2020
2021
2011
2012
2013
2014
2015
2022
2023
2024
2025
99.0017
99.0018
A0.03A1
A0.1301
A1.0102
A1.0103
A1.0104
A1.01A2
A1.01A3
A1.01A4
A1.01C1
A1.02C1
A1.02C3
A1.0701
A1.07A1
A1.1302
A1.1304
A2.0101
A2.0102
A2.0201
A2.0202
A2.03A1
A2.04A1
A2.04A2
A2.04A3
A2.04A4
A2.04A5
A2.04A6
A2.05A1
A2.1301
A2.1302
A3.0101
A3.0102
A3.0103
A3.0104
A3.0122
A3.0123
A3.0124
A3.0125
A3.0126
A3.0140
A3.0141
A3.0142
A3.0143
A3.0160
A3.01A1
A3.01A2
A3.01A3
A3.01A4
A3.01A5
2026
2027
2028
2029
2030
2031
2032
2033
2034
2035
2036
2037
2038
2039
2040
2041
2042
2043
2044
2045
2046
2047
2048
2049
2050
2051
2052
2053
2055
2056
2057
2058
2059
2060
2061
2062
2063
2064
2065
2066
2067
2068
2070
2071
2073
2074
2075
2076
2077
2078
Index 2561
A3.01A6
A3.01A7
A3.01A8
A3.01A9
A3.01C1
A3.01C2
A3.01E1
A3.0200
A3.0201
A3.0202
A3.0203
A3.0204
A3.0205
A3.0206
A3.0207
A3.0208
A3.0210
A3.0211
A3.0212
A3.0213
A3.0214
A3.0215
A3.0220
A3.0226
A3.0227
A3.0232
A3.0233
A3.0240
A3.0241
A3.0242
A3.0243
A3.0244
A3.0260
A3.0261
A3.0263
A3.0264
A3.02A0
A3.02A1
A3.02A2
A3.02A3
A3.02A4
A3.02A5
A3.02A6
A3.02A7
A3.02A8
A3.02A9
A3.0301
A3.06A0
A3.06A1
A3.06A2
2562 Index
2079
2080
2081
2072
2082
2083
2084
2085
2086
2087
2088
2089
2090
2091
2092
2093
2094
2095
2096
2097
2098
2099
2100
2102
2103
2105
2106
2107
2108
2109
2110
2111
2112
2113
2114
2115
2116
2117
2118
2119
2120
2121
2122
2123
2124
2125
2126
2127
2128
2129
A3.06A3
A3.06A4
A3.06A6
A3.0702
A3.0703
A3.0704
A3.0705
A3.0706
A3.0707
A3.0708
A3.0709
A3.0710
A3.07A1
A3.07A2
A3.07A3
A3.1300
A3.1301
A3.1302
A3.1303
A3.1304
A3.1305
A3.1306
A3.1307
A3.1308
A3.1320
A3.1321
A3.1322
A3.1323
A3.1324
A3.1325
A3.1360
A3.38zz
B0.0101
B0.1301
B0.1302
B0.1303
B0.1304
B1.0101
B1.0201
B1.1301
B1.1302
B1.1303
B1.1304
B2.0101
B2.0102
B2.0103
B2.0104
B2.0105
B2.0106
B2.01A1
2130
2131
2132
2133
2134
2135
2136
2137
2138
2139
2140
2141
2142
2143
2144
2145
2146
2147
2148
2149
2150
2151
2152
2153
2155
2156
2158
2159
2160
2161
2162
2163
2164
2165
2166
2167
2168
2169
2170
2171
2172
2173
2174
2175
2176
2177
2178
2179
2180
2181
B2.01A2
B2.0201
B2.0301
B2.03C1
B2.1301
B2.1302
B2.1303
B2.1304
B2.1305
B2.1306
B2.1307
B2.1308
B2.1309
C0.0101
C0.0102
C0.0103
C0.0104
C0.0105
C0.0106
C0.0107
C0.0108
C0.01A1
C0.01A2
C0.01A3
C0.01A4
C0.01A5
C0.01A6
C0.01A7
C0.01A8
C0.01AA
C0.01AB
C0.01AC
C0.01AD
C0.01AE
C0.01AF
C0.0DC2
C1.0101
C1.0102
C1.01A1
C1.0203
C1.0204
C1.02A1
C1.02A2
C1.02A3
C1.02A4
C1.0501
C1.0503
C1.05A2
C1.1301
C1.1302
2182
2183
2184
2185
2186
2187
2188
2189
2190
2191
2192
2193
2194
2195
2196
2197
2198
2199
2200
2201
2202
2203
2204
2205
2206
2207
2208
2209
2210
2211
2212
2213
2214
2215
2216
2217
2218
2219
2220
2221
2222
2223
2224
2225
2226
2228
2229
2231
2232
2233
ENWW
C1.1303
C1.131A
C1.132A
C2.0201
C2.0901
C2.09A1
C2.0C01
C3.22A0
C3.22A1
C3.22A2
C3.22A3
C3.22A4
C3.22A5
C3.22A6
C3.22A7
C3.22A8
C4.0101
C4.0102
C4.0201
C4.0202
C4.0203
C4.02A1
C4.0501
C6.0B01
C7.0701
C7.0B06
C7.0B07
C7.0B08
C7.0B10
C7.0B11
C7.0B12
C7.0B13
C7.0B20
C7.0B21
C7.0B22
C7.0B23
C7.0B30
C7.0B31
C7.0B32
C7.0B33
C7.0B40
C7.0B41
C7.0B42
C7.0B43
C7.0B50
C7.0B51
C7.0B52
C7.0B53
C7.0BA0
C7.0BA1
ENWW
2234
2235
2236
2237
2238
2239
2240
2241
2242
2243
2244
2245
2246
2247
2248
2249
2250
2251
2252
2253
2254
2255
2256
2257
2258
2259
2260
2261
2262
2263
2264
2265
2266
2267
2268
2269
2270
2271
2272
2273
2274
2275
2276
2277
2278
2279
2280
2281
2282
2283
C7.0BA2
C7.0BA3
C7.0BA4
C7.0BA5
C7.0BA6
C7.0BA7
C7.0BA8
C7.0BA9
D0.0801
D0.0802
D0.08A1
D0.08A2
D0.08A3
D1.0101
D1.0102
D1.0201
D1.02A1
D1.02A2
D1.0700
D1.0701
D1.0702
D1.071A
D1.071B
D1.071C
D1.071D
D1.072A
D1.072B
D1.072C
D1.072D
D1.073A
D1.073B
D1.073C
D1.073D
D1.074A
D1.074B
D1.074C
D1.074D
D1.075A
D1.075B
D1.075C
D1.075D
D1.076A
D1.076B
D1.076C
D1.076D
D1.0900
D1.0A07
D1.0A08
D1.0A1A
D1.0A1B
2284
2285
2286
2287
2288
2289
2290
2291
2292
2293
2294
2295
2296
2297
2298
2299
2300
2301
2302
2303
2304
2305
2306
2307
2308
2309
2310
2311
2312
2313
2314
2315
2316
2317
2318
2319
2320
2321
2322
2323
2324
2325
2326
2327
2328
2329
2330
2331
2332
2333
D1.0A2A
D1.0A2B
D1.0A3A
D1.0A3B
D1.0A4A
D1.0A4B
D1.0A5A
D1.0A5B
D1.0A6A
D1.0A6B
D2.01A0
D2.01A1
D2.01A2
D2.01A3
D2.01A4
D2.01A5
D2.01A6
D2.01A7
D2.02A1
D2.0701
D2.0703
D2.0704
D2.0705
D2.0707
D2.0708
D2.0709
D2.0710
D2.0711
D2.0712
D2.0713
D2.0714
D2.0715
D2.0716
D2.0723
D2.0724
D2.0901
D2.09A1
D2.09A2
D2.0AA1
D2.0AA2
D2.0AA3
D2.0AA4
D2.0AA5
D2.0AA6
D2.2001
D2.2002
D2.2003
D2.2004
D2.2005
D3.1101
2334
2335
2336
2337
2338
2339
2340
2341
2342
2343
2344
2345
2346
2347
2348
2349
2350
2351
2352
2353
2354
2355
2356
2357
2358
2359
2360
2361
2362
2363
2364
2365
2366
2367
2368
2369
2370
2371
2372
2373
2374
2375
2376
2377
2378
2379
2380
2381
2382
2383
Index 2563
D3.1102
D3.2301
D3.3700
D3.4400
D4.0701
D4.0702
D4.0703
D4.0704
D4.0705
D4.0706
D4.0707
D4.0708
D4.0711
D4.0712
D4.0713
D4.0714
D4.0715
D4.0716
D4.0717
D4.07C1
D4.07C2
D4.09A1
D4.09A2
D5.1000
D5.1001
D5.1002
D5.1003
D5.1004
D5.1005
D5.1006
D5.1007
D5.1008
D5.1009
D5.1010
D5.1011
D5.1012
D5.1013
D5.1014
D5.1015
D5.1016
D5.1017
D5.1018
D5.1019
D5.1020
D5.1021
D5.1022
D5.1023
D5.1024
D5.1025
D5.1026
2564 Index
2384
2385
2386
2387
2388
2389
2390
2391
2392
2393
2394
2395
2396
2397
2398
2399
2400
2401
2402
2403
2404
2405
2406
2407
2408
2409
2410
2411
2412
2413
2414
2415
2416
2417
2418
2419
2420
2421
2422
2423
2424
2425
2426
2427
2428
2429
2430
2431
2432
2433
D5.1029 2434
D5.1030 2435
D5.1031 2436
D5.1032 2437
D5.1035 2438
D5.1036 2439
D5.1037 2440
D5.1038 2441
D5.1039 2442
D5.1040 2443
D5.3801 2444
D5.3802 2445
D5.3803 2446
D5.3804 2447
D5.3805 2448
D5.3806 2449
D5.3807 2450
D5.3808 2451
D5.3809 2452
D5.380A 2453
D5.380B 2454
D5.380C 2455
D5.380D 2456
D5.380E 2457
D5.380F 2458
Ex.yyzz 2459
format 1880
event types 113
EWS (embedded Web server) 74
Ex.yyzz 2459
F
factory settings, restoring 101
fan filters, maintenance of 81
fans
removing and replacing 246
scanner fan 246
scanner inverter fan 247
fault trees 44
fax
output bin, default 4
feed sensor, cleaning 77
filter, scanner chamber 81
filters
aerosol 86
charcoal 85
filters, maintenance of 81
finisher
footprint test page 2523
main PCA diagram 2481
voltage specifications 2541
wiring diagrams 2474
finisher diverter solenoid (SOL211)
removing and replacing 857
finisher main PCA (A200)
removing and replacing 859
finishers, optional
capacities 17
locate 4
See also HP Multifunction
Finisher
firmware
about upgrades 105
updating 105
upgrading with FTP 106
upgrading with HP Web
Jetadmin 105
upgrading with MS-DOS 107
first nozzle position
calibration 133
flyers, paper for 13
footprint test page, ADF 2521
footprint test page, engine 2522
footprint test page, finisher 2523
formatter
description 31
wiring diagram 2482
formatter access door
removing and replacing 607
formatter assembly
removing and replacing 604
formatter electronics
Accessing formatter
PCAs 615
coprocessor 609
coprocessor hard disk 609
EIO Riser PCA (A31) 617
Finisher Interface PCA
(A29) 619
formatter access door 607
formatter assembly 604
formatter fan 613
formatter hard drive 611
formatter PCAs 615
Network/Fax PCA (A30) 618
PCI Express PCA (A28) 620
removing and replacing
parts 604
formatter fan
removing and replacing 613
ENWW
formatter hard drive
removing and replacing 611
formatter PCAs
Accessing formatter
PCAs 615
EIO Riser PCA (A31) 617
Finisher Interface PCA
(A29) 619
Network/Fax PCA (A30) 618
PCI Express PCA (A28) 620
removing and replacing 615
formatter, memory 97
front door covers
door engine left 164
door engine right 165
IDS door 165
removing and replacing 164
front door, locate 2
front view 2
FTP firmware upgrades 106
G
general cautions
removing and replacing
parts 136
removing and replacing
pens 145
general procedures, removing and
replacing parts
carriage extraction 143
drive rollers 139
MFP casters 162
pen care 145
pinch roller assembly 140
wires and cables 141
glass, cleaning 79
gloss calibration 119
grid test page 2533
guide, paper-width 131
H
handle 1
diverter assembly 718
handle 1 assembly 715
hard disk, initializing 102
heavy paper 12
Help system, control panel 10
hidden code 38
hinges, lubricating 80
Home screen 8, 49
ENWW
horizontal
horizontal assembly 337
horizontal drive rollers 345
horizontal jam access
guide 338
horizontal latch assembly 342
horizontal latch LED
(LED1) 347
horizontal motor (M7) 341
horizontal paper sensors 346
horizontal sensors 345
removing and replacing
parts 337
transparency sensor 1
(SN1) 345
horizontal alignment test
page 2526
horizontal assembly
removing and replacing 337
horizontal drive rollers
removing and replacing 345
horizontal jam access guide
removing and replacing 338
horizontal latch assembly
removing and replacing 342
horizontal latch LED (LED1)
removing and replacing 347
horizontal motor (M7)
removing and replacing 341
horizontal sensors
horizontal paper sensors 346
removing and replacing 345
transparency sensor 1
(SN1) 345
horizontal wiring diagram 2485
HP Multifunction Finisher
accumulator 754
accumulator assembly 756
accumulator bearing bracket
home sensor (SN248) 798
accumulator bearing bracket
motor (M242) 822
accumulator bearing bracket
sensors (SN240, 241,
242) 795
accumulator closed switch
(SW256) 851
accumulator covers 755
accumulator distribution PCA
(A240) 778
accumulator entry motor
(M240) 820
accumulator entry sensor
(SN246) and accumulator
paper tensioner
(SN247) 797
accumulator exit motor
(M241) 821
accumulator guide bar motor
(M243) 824
accumulator guide bar sensors
(SN243, 244, 245) 796
accumulator offset 1 motor
(M244) 825
accumulator offset 2 motor
(M245) 826
accumulator open motor
(M256) 831
accumulator retainer finger
motor (M246) 827
bearing bracket assembly 761
capacity 17
diverter assembly 718
doors and covers 704
finisher back latch sensor
(SN200) 789
finisher diverter solenoid
(SOL211) 857
finisher front latch sensor
(SN204) 790
finisher handle 1 back sensor
(SN202) 789
finisher handle 1 front sensor
(SN206) 791
finisher handle 1 LED
(LED234) 849
finisher handle 3 LED
(LED223) 848
finisher handle 3 sensor
(SN222) 794
finisher input paper path motor
(M210) 816
finisher job separator gate motor
(M262) 834
finisher job separator gate open
sensor (SN262) 803
finisher job separator lower limit
sensor (SN260) 802
finisher job separator offset back
sensor (SN265) 804
Index 2565
finisher job separator stack
height sensor (SN267) 804
finisher job support arm motor
(M253) 830
finisher LED 203, 204,
205 847
finisher lower 2 sensor
(SN221) 793
finisher lower elevator motor
(M250) 828
finisher lower elevator move
sensor (SN250) 799
finisher lower elevator overload
switch (SW250) 850
finisher lower elevator paper
present sensor (SN258) 802
finisher lower elevator stack
height sensor (SN257) 801
finisher lower paper path motor
(M220) 818
finisher main PCA (A200) 859
finisher right side panel sensor
(SN216) 793
finisher right-side panel LED
(LED201) 847
finisher separator drive motor
(M260) 833
finisher separator input motor
(M268) 835
finisher separator offset motor
(M264) 835
finisher stack holder motor
(M252) 829
finisher stack holder sensor
(SN252) 799
finisher upper paper path motor
(M230) 819
front latch adjustment 707
front lower cover 707
front structure frame
cover 711
front upper cover 706
guide bar assembly 759
handle 1 715
handle 1 assembly 715
handle 1 sensors (SN231, 232,
233) 794
handle 2 719
handle 3 721
2566 Index
input paper path (SN212, 213,
214, 215) 792
input paper path
assembly 734
job support assembly 731
job support position sensors
(SN253, 254) 800
LEDs 846
left leg cover 708
lever support shaft 778
lower eject shaft 781
lower elevator bottom switch
(SW251) 850
lower elevator tray 727
lower middle cover 722
motors 815
offset mechanism
assembly 739
offset shaft 779
offsetters (front and rear) 780
output bins 5
output media-path
assembly 738
paper gate assembly 740
paper guide complete 783
rear cover 708
rear structure frame
cover 712
removing and replacing
parts 704
right side panel 713
sensors 788
separator 737
separator covers 712
separator paper guide 741
separator structure 742
separator transmission 750
separator trays 726
stack holder assembly 727
stapler 1 assembly 751
stapler 1 door 709
stapler 1 motor (M272) 838
stapler 1 pivot position 1, 2
(SN271, 272) 805
stapler 1 rotate motor
(M271) 836
stapler 1 sensors (SN274, 275,
276) 807
stapler 2 assembly 753
stapler 2 covers 710
stapler 2 door 709
stapler 2 guard position 1, 2
sensors (SN280, 281) 809
stapler 2 motor (M281) 842
stapler 2 pinch switches
(SW285, SW286, and
SW287) 856
stapler 2 safety cover interlock
switches (SW283 and
SW284) 855
stapler 2 safety motor
(M280) 840
stapler 2 sensors (SN282, 283,
284) 811
stapler door 1 switch
(SW273) 853
stapler door 2 switch
(SW282) 854
switches 849
top cover side 706
top door 705
top door left 705
top door sensor (SN207) 791
trays 726
HP Multifunction Finisher LEDs
removing and replacing 846
HP Multifunction Finisher motors
removing and replacing 815
HP Multifunction Finisher sensors
removing and replacing 788
HP Multifunction Finisher switches
removing and replacing 849
HP Multifunction Finisher trays
lower elevator tray 727
removing and replacing 726
separator trays 726
HP paper, recommended 11, 12
HP Web Jetadmin
firmware upgrades 105
I
IDO
curler assembly 373
curler comb 383
curler drive shaft
assembly 384
curler front cover 354
curler handle and latches 385
curler input drive roller
assembly 376
ENWW
curler medium roller
assembly 378
curler rear cover 354
curler small roller
assembly 380
curler-drive rollers and drive
shaft 374
curler-large roller
assembly 375
decurler cam shaft
assembly 414
drive roller 372
duplex inner short
damper 407
duplex upper outer guide 417
IDO belts 372
IDO covers 352
IDO curler 373
IDO curler LED (LED2) 433
IDO curler motor (M15) 370
IDO decurler assembly 409
IDO decurler motor (M17) 372
IDO door 417
IDO Door LED (LED5) 436
IDO duplex media sensor
(SN16) 431
IDO duplex motor (M12) 368
IDO duplexer door 354
IDO duplexer door open sensor
(SN13) 429
IDO duplexer LED
(LED3) 434
IDO front cover 353
IDO H-bar damper 418
IDO H-bar interlock 420
IDO handle 2 assembly 391
IDO input 1 motor (M8) 364
IDO input 2 motor (M10) 365
IDO input media sensor
(SN8) 425
IDO interlock solenoid
(SOL3) 419
IDO LEDs 433
IDO media eject 393
IDO media eject motor
(M13) 369
IDO media thickness encoder
(EN14) 424
IDO motors 364
ENWW
IDO output 1 sensor
(SN15) 430
IDO output 2 sensor
(SN12) 427
IDO output door open sensor
(SN14) 430
IDO output media sensor
(SN9) 426
IDO output motor (M11) 367
IDO printer interface 421
IDO rear cover 353
IDO removable module (IDO
RM) 350
IDO sensors 424
IDO staging sensors 425
input guide assembly 388
input paper guide 362
Output bin full sensor
(SN17) 432
output bin LED (LED14) 436
pinch roller assembly 360
pinch roller guide
assembly 360
removing and replacing
parts 349
IDO belts
removing and replacing 372
IDO covers
curler front cover 354
curler rear cover 354
IDO front cover 353
IDO rear cover 353
removing and replacing 352
IDO curler
curler assembly 373
curler comb 383
curler drive shaft
assembly 384
curler handle and latches 385
curler input drive roller
assembly 376
curler medium roller
assembly 378
curler small roller
assembly 380
curler-drive rollers and drive
shaft 374
curler-large roller
assembly 375
removing and replacing 373
IDO decurler assembly
removing and replacing 409
IDO door
IDO H-bar damper 418
IDO H-bar interlock 420
IDO interlock solenoid
(SOL3) 419
removing and replacing 417
IDO duplexer door
removing and replacing 354
IDO handle 2 assembly
removing and replacing 391
IDO LEDs
IDO curler LED (LED2) 433
IDO Door LED (LED5) 436
IDO duplexer LED
(LED3) 434
output bin LED (LED14) 436
removing and replacing 433
IDO media eject
removing and replacing 393
IDO media thickness encoder
(EN14)
removing and replacing 424
IDO motors
IDO curler motor (M15) 370
IDO decurler motor (M17) 372
IDO duplex motor (M12) 368
IDO input 1 motor (M8) 364
IDO input 2 motor (M10) 365
IDO media eject motor
(M13) 369
IDO output motor (M11) 367
removing and replacing 364
IDO motors and encoders
wiring diagram 2486
IDO paper H-bar
wiring diagram 2489
IDO paper paths
wiring diagrams 2487, 2488
IDO pinch roller assembly
removing and replacing 360
IDO pinch roller guide assembly
removing and replacing 360
IDO printer interface
removing and replacing 421
IDO removable module (IDO RM)
removing and replacing 350
Index 2567
IDO sensors
IDO duplex media sensor
(SN16) 431
IDO duplexer door open sensor
(SN13) 429
IDO input media sensor
(SN8) 425
IDO output 1 sensor
(SN15) 430
IDO output 2 sensor
(SN12) 427
IDO output door open sensor
(SN14) 430
IDO output media sensor
(SN9) 426
IDO staging sensors 425
Output bin full sensor
(SN17) 432
removing and replacing 424
IDO system
PCA diagram 2492
wiring diagram 2490
IDS
air pump assembly 539
APS assembly 536
IDS assembly 525
IDS assembly removal 525
IDS assembly replacement (air
purge procedure) 535
IDS PCAs 539
IDS pressure sensor
(SN39) 545
IDS relief valve 538
IDS sensors 544
ink assist PCA (A3) 540
ink supply 522
ISS PCA (A8) 541
lower-left door sensor
(SN18) 544
removing and replacing
parts 522
vacuum pressure sensor
(SN40) 545
wiring diagram 2491
IDS assembly
IDS assembly removal 525
IDS assembly replacement (air
purge procedure) 535
removing and replacing 525
2568 Index
IDS PCAs
ink assist PCA (A3) 540
ISS PCA (A8) 541
removing and replacing 539
IDS relief valve
removing and replacing 538
IDS sensors
IDS pressure sensor
(SN39) 545
lower-left door sensor
(SN18) 544
removing and replacing 544
vacuum pressure sensor
(SN40) 545
image adjustments 54, 55, 56,
59
image processing
PCA diagram 2504
image quality, testing 46
image scan unit
removing and replacing. See
image scan unit cover. See ISU
cover
images
centering 117
Information button 10
initializing NVRAM 102
initializing the disk 102
ink assist
PCA diagram 2505
ink cartridges
door, locate 2
ink delivery system. See IDS
ink supply
removing and replacing 522
ink, cleaning up 76
input guide assembly
removing and replacing 388
input paper guide
removing and replacing 362
input paper path assembly
removing and replacing 734
Input power system sag 113
Input, duplex, output. See IDO
Internet links, editing 29
Interrupt button 7
ISU cover
removing and replacing 234
J
jam sensors 84
Jetadmin. See HP Web Jetadmin
JetDirect, embedded 91
job support assembly
removing and replacing 731
K
keypad assembly and button
assembly
removing and replacing 264
keys
control panel 7
touchscreen 10
L
labels, load 12
labels, retrofit tag 108
lamp, scanner exposure 86
language setting 30
laundering ink 76
LCD and touchscreen
removing and replacing 266
LCD
touchscreens;calibration 125
leading edge adjustment 116,
118
LEDs
finisher handle 1 LED
(LED234) 849
finisher handle 3 LED
(LED223) 848
finisher LED 203, 204,
205 847
finisher right-side panel LED
(LED201) 847
left case parts
removing and replacing 171,
172, 173
left sensor
distribution wiring
diagram 2509
letters, paper for 13
lights, control panel 7
line code 38
links, editing 29
locked features 9
log in 9
logs
maintenance 87
ENWW
MFP 68
Printer Maintenance (PM)
items 49
lower inner cover
removing and replacing 168
lubricating
ADF hinges 80
M
machine non-volatile memory
(NVM) 94
magnification adjustment,
vertical 116, 118
main engine backplane PCA (A4)
removing and replacing 633
main engine PCA (A5)
removing and replacing 631
main engine PCA cooling fan
(FAN2)
removing and replacing 638
maintenance log 87
maintenance settings 30
manual feed tray
capacity 17
locate 2
paper sizes supported 15
paper types supported 14
manual scanner image
adjustments 55
manuals, paper for 13
margins
side 116, 118
top 116, 118
margins, side 116
master power switch
locate 3
turn device on/off 6
media
brands recommended 11
capacities 17
capacities, trays 2
cardstock 12
document types 12
gloss calibration 119
side edge calibration 119
sizes supported 15
specialty 12
types supported 14
memory architecture
Coprocessor 97
ENWW
data groupings 98
data storage location 100
description 97
formatter 97
shadow copies 97
memory, erasing 103
memory-management tools
cold reset 101
disk loads, skipping 104
disk, initializing 102
memory, erasing 103
NVRAM, initializing 102
restoring factory settings 101
menus
Startup 88
subsystem 45
menus, paper for 13
MFP
cleaning 76
logs 68
preventive maintenance 68
status and service
information 29
wiring diagrams 2462
MFP casters
removing and replacing
parts 162
MFP diagnostic software
service information
pages 2518
MFP information 63
MFP print engine
voltage specifications 2541
mispicks 77, 79
model code, hidden 38
month code 36
motion
PCA diagram 2508
motion PCA (A2)
removing and replacing 628
motor
distribution wiring
diagram 2509
motors
accumulator bearing bracket
motor (M242) 822
accumulator entry motor
(M240) 820
accumulator exit motor
(M241) 821
accumulator guide bar motor
(M243) 824
accumulator offset 1 motor
(M244) 825
accumulator offset 2 motor
(M245) 826
accumulator open motor
(M256) 831
accumulator retainer finger
motor (M246) 827
finisher input paper path motor
(M210) 816
finisher job separator gate motor
(M262) 834
finisher job support arm motor
(M253) 830
finisher lower elevator motor
(M250) 828
finisher lower paper path motor
(M220) 818
finisher separator drive motor
(M260) 833
finisher separator input motor
(M268) 835
finisher separator offset motor
(M264) 835
finisher stack holder motor
(M252) 829
finisher upper paper path motor
(M230) 819
stapler 1 motor (M272) 838
stapler 1 rotate motor
(M271) 836
stapler 2 motor (M281) 842
stapler 2 safety motor
(M280) 840
MS-DOS firmware upgrades 107
Multifunction Finisher
capacity 17
output bins 5
N
network address 9
newsletters, paper for 13
non-volatile memory (NVM)
backup 94
customer 94
machine 94
restoring 95
notification features 27
Index 2569
nozzle health 52
nozzle health test page 2533
nozzle position calibration 133
NVM (non-volatile memory) 50
NVRAM, initializing 102
NVRAM, reinitializing 93
O
oiler, carriage felt 82
on/off button
locate 2
turn device on/off 6
online Help system, control
panel 10
optional finishers
capacities 17
locate 4
See also HP Multifunction
Finisher
options
conflicts 10
output bins
capacities 17
optional finishers 4
single, locate 3
override of door interlock 32
P
paper
brand recommended 11
capacities 17
capacities, trays 2
cardstock 12
document types 12
sizes supported 15
specialty 12
types supported 14
paper gloss calibration 119
paper jams 113
paper path sensors reference
diagram 2549
paper-width guide calibration 131
parts, handling in service calls 24
parts, ordering 29
password 9
password, changing 91, 92
pause
Interrupt button, locate 7
PCA diagram, carriage 2467,
2468
2570 Index
PCA diagrams
AFE 2494
carriage pocket 2467
carriage PSU 2468
drop detection 2503
finisher 2481
IDO system 2492
image processing 2504
ink assist 2505
main engine 2507
main engine backplane 2506
motion 2508
power distribution 2511
scanner CCD 2493
scanner control 2494
tray controller 2498
tray distribution 2499
trays 2484
pen alignment 126
pen alignment (APA) test
page 2524
pen care
handling pens 146
removing and replacing 145
storing pens 147
troubleshooting 873
pen cooling fans assembly
removing and replacing 591
pen density compensation
calibration 127
Pen Health Gauge 52
pen servicing routines 32
pen-to-paper spacing. See PPS
pens
Bonding Agent 2535
cleaning 129
color nozzles 2534
new 128
removing and replacing 471,
523
photographs, paper for 13
pick rollers, cleaning 77, 79
pinch roller assembly
removing and replacing 140
platen glass
removing and replacing 228
position calibration for drum 121
postcards, paper for 13
power
distribution PCA
diagram 2511
master switch 3
on/off button, locate 2
Sleep button 7
turn device on/off 6
power and control electronics
electronics bay cooling fan
(FAN4) 632
main engine backplane PCA
(A4) 633
main engine PCA (A5) 631
main engine PCA cooling fan
(FAN2) 638
motion PCA (A2) 628
power distribution PCA
(A1) 630
power supply assembly 625
removing and replacing
parts 625
power distribution PCA (A1)
removing and replacing 630
power supply assembly
removing and replacing 625
power switch assembly
removing and replacing 265
power system sag 113
PPS
PPS assembly 502
PPS cable 505
PPS cover 501
PPS felt oiler 504
PPS motor assembly 503
removing and replacing 501
preventive maintenac 68
preventive maintenance counters
resetting 77
preventive maintenance data 74
preventive maintenance kits 76
print
output bin, default 4
paper, recommended 13
print image placement test
page 2530
print pipeline reference
diagram 2548
print quality (PQ) test page 2531
ENWW
print zone
general procedures, removing
and replacing parts 148
removing 149
replacing 156
Printer Maintenance (PM) items
counters, resetting 49
estimated remaining life 49
log 49
problem-solve
Error button 10
Warning button 10
production line code 38
proposals, paper for 13
Protected Service Mode
(PSM) 31, 92
protected service mode (PSM)
options 41
PSU exhaust duct assembly
removing and replacing 465
PSU recirculation duct
removing and replacing 466
R
Ready light 7
rear case parts
removing and replacing 175,
176, 177
reference diagrams
drum surface 2546
electronics map 2547
paper path sensors 2549
print pipeline 2548
reinitializing NVRAM 93
relief valve, IDS 32
remote firmware upgrades
about 105
FTP 106
HP Web Jetadmin 105
MS-DOS 107
remote firmware upgrades
(RFUs) 50
removing and replacing parts
Accessing formatter
PCAs 615
accumulator 754
accumulator assembly 756
accumulator bearing bracket
home sensor (SN248) 798
ENWW
accumulator bearing bracket
motor (M242) 822
accumulator bearing bracket
sensors (SN240, 241,
242) 795
accumulator closed switch
(SW256) 851
accumulator covers 755
accumulator distribution PCA
(A240) 778
accumulator entry motor
(M240) 820
accumulator entry sensor
(SN246) and accumulator
paper tensioner
(SN247) 797
accumulator exit motor
(M241) 821
accumulator guide bar motor
(M243) 824
accumulator guide bar sensors
(SN243, 244, 245) 796
accumulator offset 1 motor
(M244) 825
accumulator offset 2 motor
(M245) 826
accumulator open motor
(M256) 831
accumulator retainer finger
motor (M246) 827
ADF 182
ADF assembly 182
ADF contact glass 229
ADF covers and trays 183
ADF feed cover 186
ADF front cover 184
ADF input tray 187
ADF motors 213
ADF originals cover 193
ADF output bin 189
ADF paper-width guides 188
ADF PCAs 200
ADF rear cover 185
ADF sensors 203
ADF solenoids 218
ADF switches 202
ADF top cover 185
aerosol 547
aerosol door 549
aerosol duct assembly 553
aerosol duct wipes 559
aerosol fan (AERO) 551
aerosol fan (AERO) cover 553
aerosol filter 547
aerosol filter box 547
aerosol manifold and
hose 469
AFE PCA (A502) 245
air pump assembly 539
APS assembly 536
bearing bracket assembly 761
cap assembly 583
carriage 468
carriage 1 magnet 495
carriage 1 motor (M1) and
carriage 2 motor (M2) 492
carriage 1 v-bearings 497
carriage 2 magnets 496
carriage 2 v-bearings 499
carriage drive belt 477
carriage encoder strip 474
carriage extraction 143
carriage handle 468
carriage idler pulleys 477
carriage magnets 495
carriage PCAs 505
carriage plate cover 165
carriage sensors 516
control panel 259
control panel assembly 259
control panel lamp 268
control panel LCD PCA 262
control panel PCA 260
control panel PCAs 260
Control PCA (A401)
cover 191
coprocessor 609
coprocessor hard disk 609
covers 164
curler assembly 373
curler comb 383
curler drive shaft
assembly 384
curler front cover 354
curler handle and latches 385
curler input drive roller
assembly 376
curler medium roller
assembly 378
curler rear cover 354
Index 2571
curler small roller
assembly 380
curler-drive rollers and drive
shaft 374
curler-large roller
assembly 375
decurler cam shaft
assembly 414
diverter assembly 718
door engine left 164
door engine right 165
doors and covers 704
drive roller 372
drive rollers 139
drop detect assembly 587,
588
drop detect spittoon 588
drum 437
drum 1 sensor (SN33) 574
drum 2 sensor (SN34) 575
drum encoder disk 449
drum encoder PCAs 448
drum guide 443
drum guide assembly 443
drum guide motor (M22) 445
drum guide strip 445
drum illumination 1 and 2 LED
(LED8, LED9) 457
drum motor (M3) 446
drum screen 438
drum spittoon 437
dryer 563
dryer assembly 563
dryer assembly left 570
dryer assembly right 569
dryer fan (FAN5) 568
dryer heater assembly 566
dryer sensors 573
dryer slider lever 571
dryer temperature 1 sensor
(SN36) 576
duplex inner short
damper 407
duplex upper outer guide 417
e-chains 480
EIO Riser PCA (A31) 617
electronics bay cooling fan
(FAN4) 632
fans 246
2572 Index
finisher back latch sensor
(SN200) 789
finisher diverter solenoid
(SOL211) 857
finisher front latch sensor
(SN204) 790
finisher handle 1 back sensor
(SN202) 789
finisher handle 1 front sensor
(SN206) 791
finisher handle 1 LED
(LED234) 849
finisher handle 3 LED
(LED223) 848
finisher handle 3 sensor
(SN222) 794
finisher input paper path motor
(M210) 816
Finisher Interface PCA
(A29) 619
finisher job separator gate motor
(M262) 834
finisher job separator gate open
sensor (SN262) 803
finisher job separator lower limit
sensor (SN260) 802
finisher job separator offset back
sensor (SN265) 804
finisher job separator stack
height sensor (SN267) 804
finisher job support arm motor
(M253) 830
finisher LED 203, 204,
205 847
finisher lower 2 sensor
(SN221) 793
finisher lower elevator motor
(M250) 828
finisher lower elevator move
sensor (SN250) 799
finisher lower elevator paper
present sensor (SN258) 802
finisher lower elevator stack
height sensor (SN257) 801
finisher lower paper path motor
(M220) 818
finisher main PCA (A200) 859
finisher right side panel sensor
(SN216) 793
finisher right-side panel LED
(LED201) 847
finisher separator drive motor
(M260) 833
finisher separator input motor
(M268) 835
finisher separator offset motor
(M264) 835
finisher stack holder motor
(M252) 829
finisher stack holder sensor
(SN252) 799
finisher upper paper path motor
(M230) 819
formatter access door 607
formatter assembly 604
formatter electronics 604
formatter fan 613
formatter hard drive 611
formatter PCAs 615
front doors 164
front latch adjustment 707
front lower cover 707
front scanner wire
assembly 258
front structure frame
cover 711
front upper cover 706
general cautions 136
general procedures 139
guide bar assembly 759
handle 1 715
handle 1 assembly 715
handle 1 sensors (SN231, 232,
233) 794
handle 2 719
handle 3 721
horizontal 337
horizontal assembly 337
horizontal drive rollers 345
horizontal jam access
guide 338
horizontal latch assembly 342
horizontal latch LED
(LED1) 347
horizontal motor (M7) 341
horizontal paper sensors 346
horizontal sensors 345
horizontal transparency sensor
1 (SN1) 345
ENWW
HP Multifunction Finisher 704
HP Multifunction Finisher
LEDs 846
HP Multifunction Finisher
motors 815
HP Multifunction Finisher
sensors 788
HP Multifunction Finisher
switches 849
HP Multifunction Finisher
trays 726
IDO 349
IDO belts 372
IDO cover 172
IDO covers 352
IDO curler 373
IDO curler LED (LED2) 433
IDO curler motor (M15) 370
IDO decurler assembly 409
IDO decurler motor (M17) 372
IDO door 417
IDO Door LED (LED5) 436
IDO duplex media sensor
(SN16) 431
IDO duplex motor (M12) 368
IDO duplexer door 354
IDO duplexer door open sensor
(SN13) 429
IDO duplexer LED
(LED3) 434
IDO front cover 353
IDO H-bar damper 418
IDO H-bar interlock 420
IDO handle 2 assembly 391
IDO input 1 motor (M8) 364
IDO input 2 motor (M10) 365
IDO input media sensor
(SN8) 425
IDO interlock solenoid
(SOL3) 419
IDO LEDs 433
IDO media eject 393
IDO media eject motor
(M13) 369
IDO media thickness encoder
(EN14) 424
IDO motors 364
IDO output 1 sensor
(SN15) 430
ENWW
IDO output 2 sensor
(SN12) 427
IDO output door open sensor
(SN14) 430
IDO output media sensor
(SN9) 426
IDO output motor (M11) 367
IDO pinch roller assembly 360
IDO pinch roller guide
assembly 360
IDO printer interface 421
IDO rear cover 353
IDO removable module (IDO
RM) 350
IDO sensors 424
IDO staging sensors 425
IDS 522
IDS assembly 525, 535
IDS door 165
IDS PCAs 539
IDS pressure sensor
(SN39) 545
IDS relief valve 538
IDS sensors 544
image scan unit 235
ink assist PCA (A3) 540
ink supply 522
input guide assembly 388
input paper guide 362
input paper path (SN212, 213,
214, 215) 792
input paper path
assembly 734
introduction 136
ISS PCA (A8) 541
ISU cover 234
job support assembly 731
job support position sensors
(SN253, 254) 800
keypad assembly and button
assembly 264
LCD and touchscreen 266
left case parts 171
left case parts, IDO cover 172
left case parts, left side middle
panel 173
left case parts, lower left
cover 173
left case parts, lower left
trim 172
left leg cover 708
left side middle panel 173
lever support shaft 778
lower eject shaft 781
lower elevator bottom switch
(SW251) 850
lower elevator overload switch
(SW250) 850
lower elevator tray 727
lower inner cover 168
lower left cover 173
lower left trim 172
lower middle cover 722
lower right cover 174
lower right trim 175
lower separation roller 197
lower-left door sensor
(SN18) 544
main engine backplane PCA
(A4) 633
main engine PCA (A5) 631
main engine PCA cooling fan
(FAN2) 638
MFP casters 162
motion PCA (A2) 628
Network/Fax PCA (A30) 618
offset mechanism
assembly 739
offset shaft 779
offsetters (front and rear) 780
Output bin full sensor
(SN17) 432
output bin LED (LED14) 436
output media-path
assembly 738
paper gate assembly 740
paper guide complete 783
PCI Express PCA (A28) 620
pen cooling fans
assembly 591
pens 471, 523
pick roller 195
pin alignment plate 645
pinch roller assembly 140
platen glass 228
poppet A valves 452
poppet B valves 455
power and control
electronics 625
Index 2573
power distribution PCA
(A1) 630
power supply assembly 625
power switch assembly 265
PPS 501
PPS assembly 502
PPS cable 505
PPS cover 501
PPS felt oiler 504
PPS motor assembly 503
print zone removal 149
print zone replacement 156
PSU exhaust duct
assembly 465
PSU recirculation duct 466
rear case parts 175
rear case parts, back
cover 176
rear case parts, electronics bay
cover 177
rear case parts, muffler 176
rear cover 708
rear scanner wire
assembly 249
rear structure frame
cover 712
removing used webs 595
right case parts 173
right case parts, lower right
cover 174, 175
right case parts, upper right
cover 174
right side panel 713
right-side lower panel 271
right-side middle panel 326
scanner 225
scanner assembly 225
scanner chamber filter 248
scanner control PCA
(A501) 242
scanner exposure lamp 229
scanner fan 246
scanner home position sensor
(SN503) 241
scanner inverter fan 247
scanner inverter PCA
(A504) 243
scanner length sensor
(SN502) 240
scanner mirrors 232
2574 Index
scanner motor (M501) 237
scanner original size detection
sensor (SN501) 240
scanner PCAs 242
scanner sensors 239
separation roller 193
separator 737
separator covers 712
separator paper guide 741
separator structure 742
separator transmission 750
separator trays 726
service station 577
service station assembly 577
service station latch sensor
(SN20) 590
service station sensors 589
stack holder assembly 727
standard input tray (Trays 2, 3,
and 4) covers 167
stapler 1 assembly 751
stapler 1 door 709
stapler 1 motor (M272) 838
stapler 1 pivot position 1, 2
(SN271, 272) 805
stapler 1 rotate motor
(M271) 836
stapler 1 sensors (SN274, 275,
276) 807
stapler 2 assembly 753
stapler 2 covers 710
stapler 2 door 709
stapler 2 guard position 1, 2
sensors (SN280, 281) 809
stapler 2 motor (M281) 842
stapler 2 pinch switches
(SW285, SW286, and
SW287) 856
stapler 2 safety cover interlock
switches (SW283 and
SW284) 855
stapler 2 safety motor
(M280) 840
stapler 2 sensors (SN282, 283,
284) 811
stapler door 1 switch
(SW273) 853
stapler door 2 switch
(SW282) 854
strategy 136
top case parts 178
top case parts, scanner left
trim 180
top case parts, scanner rear
trim 178
top case parts, scanner right
trim 181
top case parts, scanner service
cover 179
top cover side 706
top door 705
top door left 705
top door sensor (SN207) 791
Tray 1 301
Tray 1 assembly 301
Tray 1 drive arm 329
Tray 1 guide 330
Tray 1 handle 306
Tray 1 input tray 310
Tray 1 input tray
extension 313
Tray 1 latch 307
Tray 1 LED (LED12) 325
Tray 1 media sensor
(SN27) 324
Tray 1 paper-width guide 315
Tray 1 pick shaft 308
Tray 1 pick solenoid
(SOL1) 302
Tray 1 sensors 324
Tray 1 upper case part 303
Tray 1 width and media edge
sensors 324
Tray 1 width sensor (SN24)
assembly 320
Tray 5 640
Tray 5 back latch sensor
(SN106) 692
Tray 5 ball slide
extension 649
Tray 5 covers 640
Tray 5 distribution PCA
(A101) 687
Tray 5 elevator cables 653
Tray 5 elevator downhaul
cable 656
Tray 5 elevator front and rear
cables 653
Tray 5 elevator lower limit
sensor (SN110) 694
ENWW
Tray 5 elevator
transmission 651
Tray 5 elevator tray 658
Tray 5 elevator upper limit
sensor (SN108) 693
Tray 5 empty sensor
(SN111) 695
Tray 5 feed roller
assembly 661
Tray 5 front cover 641
Tray 5 front latch sensor
(SN105) 691
Tray 5 handle LED
(LED101) 700
Tray 5 latch assembly 649
Tray 5 LEDs 700
Tray 5 left bottom panel 645
Tray 5 load media sensor
(SN109) 694
Tray 5 lower separator encoder
disk 667
Tray 5 lower separator encoder
PCA 666
Tray 5 media 1 sensor
(SN101) 689
Tray 5 media 2 sensor
(SN103) 689
Tray 5 media door LED
(LED102) 701
Tray 5 media door open sensor
(SN107) 692
Tray 5 media hold down
assembly 683
Tray 5 motors 696
Tray 5 pick arm assembly 674
Tray 5 pick clutch
(CL101) 683
Tray 5 rear cover 643
Tray 5 right cover 644
Tray 5 sensors 688
Tray 5 separator clutch
(CL102) 685
Tray 5 stack height sensor
(SN104) 690
Tray 5 switches 702
Tray 5 top door 644
Tray 5 top front cover 641
Tray 5 top-left panel 646
Tray 5 top-left panel sensor
(SN112) 696
ENWW
Tray 5 upper media path
guide 688
Tray 5 upper separator slip
clutch assembly 663
Trays 2, 3, and 4 270, 274
Trays 2, 3, and 4 ambient
temperature sensor (SN41)
and humidity sensor
(SN42) 292
Trays 2, 3, and 4
assembly 272
Trays 2, 3, and 4 controller PCA
(A23) 290
Trays 2, 3, and 4 distribution
PCA 289
Trays 2, 3, and 4 exit roller
shaft 284
Trays 2, 3, and 4 LEDs 298
Trays 2, 3, and 4 media-length
guide actuator tape 276
Trays 2, 3, and 4 paper-empty
sensors (SN45, SN49, and
SN53) 295
Trays 2, 3, and 4 paper-exit
sensor flag 288
Trays 2, 3, and 4 paper-exit
sensors (SN47, SN51, and
SN55) 296
Trays 2, 3, and 4 paper-length
guide 275
Trays 2, 3, and 4 paper-low
sensors (SN44, SN48, and
SN52) 294
Trays 2, 3, and 4 paper-width
guide 277
Trays 2, 3, and 4 paper-width
sensor flag 278
Trays 2, 3, and 4 paper-width
sensors (SN46, SN50, and
SN54) 296
Trays 2, 3, and 4 pick arm
assembly 279
Trays 2, 3, and 4 pick
roller 282
Trays 2, 3, and 4 right lower
panel handle 287
Trays 2, 3, and 4 right side lower
panel LED (18) 299
Trays 2, 3, and 4 right side lower
panel open sensor
(SN43) 293
Trays 2, 3, and 4 sensors 292
Trays 2, 3, and 4 transport motor
(M18) 282
Trays 2, 3, and 4 tray-LEDs (15,
16, 17) 299
Trays 2, 3, and 4 tray-open
sensors (SN9, SN14, and
SN19) 298
Trays 2, 3, and 4 tray-paperlength sensors 298
upper inner cover 166
upper left cover 171
upper right cover 174
v-bearings 497
vacuum 459
vacuum fan assembly 459
vacuum poppet valves 451
vacuum pressure sensor
(SN40) 545
vacuum supply housing 462
vertical 326
vertical assembly 327
vertical door LED
(LED13) 336
vertical drive rollers 334
vertical latch assembly 333
vertical motor (M6 332
vertical sensors 335
web advance encoder
(EN11) 586
web drive motor (M5) 583
web low sensor (SN21) 590
web wipe 593, 594
Web wipe access case 170
Web wipe access case parts,
upper left cover 171
Web wipe access case parts,
Web wipe access panel 171
Web wipe access panel 171
web wipe cartridge 593
web wipe cartridge guide 581
web wipe encoder
assembly 602
web wipe material lift
assembly 584
Index 2575
web wipe material lift motor
(M4) 586
wires and cables 141
repair activities 22
reports, paper for 13
Reset button 7
reset, cold 101
restoring factory settings 101
restoring non-volatile memory
(NVM) 95
retrofit tag labels 108
RFU files 105
RFUs (remote firmware
upgrades) 50
right case parts
removing and replacing 173,
174, 175
right sensor
distribution wiring
diagram 2510
right-side lower panel
removing and replacing 271
right-side middle panel
removing and replacing 326
roller, accumulator 82
rollers, cleaning 77, 79, 81
rollers, tray pick 84
S
safety notes 32
sales flyers, paper for 13
scan and analyze function 46
scan start position
adjustment 117
scanner
ADF contact glass 229
CCD PCA diagram 2493
control PCA diagram 2494
fans 246
front wire assembly 258
image scan unit 235
ISU cover 234
platen glass 228
rear wire assembly 249
scanner assembly 225
scanner chamber filter 248
scanner exposure lamp 229
scanner mirrors 232
scanner motor (M501) 237
scanner PCAs 242
2576 Index
scanner sensors 239
voltage specifications 2542
wiring diagram 2493
scanner assembly
removing and replacing 225
scanner chamber filter
removing and replacing 248
scanner control PCA (A501)
removing and replacing 242
scanner exposure lamp
removing and replacing 229
scanner fan
removing and replacing 246
scanner home position sensor
(SN503)
removing and replacing 241
scanner inverter fan
removing and replacing 247
scanner inverter PCA (A504)
removing and replacing 243
scanner length sensor (SN502)
removing and replacing 240
scanner mirrors
removing and replacing 232
scanner motor (M501)
removing and replacing 237
scanner original size detection
sensor (SN501)
removing and replacing 240
scanner PCAs
AFE PCA (A502) 245
removing and replacing 242
scanner control PCA
(A501) 242
scanner inverter PCA
(A504) 243
scanner rear wire assembly
removing 249
replacing 252
scanner sensors
removing and replacing 239
scanner home position sensor
(SN503) 241
scanner length sensor
(SN502) 240
scanner original size detection
sensor (SN501) 240
scanners
automatic image
adjustments 54
calibrations 53
center line adjustment 118
leading edge adjustment 118
manual image adjustments 55
vertical magnification
adjustment 118
sensors
accumulator bearing bracket
home sensor (SN248) 798
accumulator bearing bracket
sensors (SN240, 241,
242) 795
accumulator entry sensor
(SN246) and accumulator
paper tensioner
(SN247) 797
accumulator guide bar sensors
(SN243, 244, 245) 796
finisher back latch sensor
(SN200) 789
finisher front latch sensor
(SN204) 790
finisher handle 1 back sensor
(SN202) 789
finisher handle 1 front sensor
(SN206) 791
finisher handle 3 sensor
(SN222) 794
finisher job separator gate open
sensor (SN262) 803
finisher job separator lower limit
sensor (SN260) 802
finisher job separator offset back
sensor (SN265) 804
finisher job separator stack
height sensor (SN267) 804
finisher lower 2 sensor
(SN221) 793
finisher lower elevator move
sensor (SN250) 799
finisher lower elevator paper
present sensor (SN258) 802
finisher lower elevator stack
height sensor (SN257) 801
finisher right side panel sensor
(SN216) 793
finisher stack holder sensor
(SN252) 799
handle 1 sensors (SN231, 232,
233) 794
ENWW
input paper path (SN212, 213,
214, 215) 792
job support position sensors
(SN253, 254) 800
stapler 1 pivot position 1, 2
(SN271, 272) 805
stapler 1 sensors (SN274, 275,
276) 807
stapler 2 guard position 1, 2
sensors (SN280, 281) 809
stapler 2 sensors (SN282, 283,
284) 811
Tetris 132
top door sensor (SN207) 791
top-of-form and Tetris 132
sensors, drum jam 84
separator
offset mechanism
assembly 739
output media-path
assembly 738
paper gate assembly 740
removing and replacing 737
separator paper guide 741
separator structure 742
separator transmission 750
serial numbers, format of 36
service assist mode
options 41
use of 47
service calls
final activities 22
initial activities 21
parts handling 24
repair activities 22
service information
editing 63
printing 63
viewing 63
service information pages
administrator menu 2518
embedded Web server
(EWS) 2518
MFP diagnostic
software 2518
table of 2518
service intervals 69
service links, configuring 29
service station
cap assembly 583
ENWW
drop detect assembly 587,
588
drop detect spittoon 588
pen cooling fans
assembly 591
removing and replacing
parts 577
service station assembly 577
service station latch sensor
(SN20) 590
service station sensors 589
web advance encoder
(EN11) 586
web drive motor (M5) 583
web low sensor (SN21) 590
web wipe cartridge guide 581
web wipe material lift
assembly 584
web wipe material lift motor
(M4) 586
wiring diagram 2495
service station assembly
removing and replacing 577
service station sensors
removing and replacing 589
service station latch sensor
(SN20) 590
web low sensor (SN21) 590
service tools
Boot Manager 93
password, changing 92
Protected Service Mode
(PSM) 92
reinitializing NVRAM 93
settings
conflicts 10
Reset button 7
shadow copies, memory 97
side edge calibration 119
side margins 116
sign in 9
single output bin
locate 3
skipping disk loading 104
Sleep button 7
sleep schedule 30
spottoon, drum 86
stack holder assembly
removing and replacing 727
stapler 1 assembly
removing and replacing 751
stapler 2 assembly
removing and replacing 753
Start button
control panel 7
touchscreen 10
Startup Menu 88
startup options 91
status
Home screen 8
lights 7
Stop button
locate 7
stopping accuracy of carriage
motors 122
strategy
removing and replacing
parts 136
streaks test page 2532
subsystem devices
running 46
subsystem diagnostic pages 44
subsystems diagnostic pages 45
subsystems menu 45
supplies, ordering 29
switches
accumulator closed switch
(SW256) 851
lower elevator bottom switch
(SW251) 850
lower elevator overload switch
(SW250) 850
stapler 2 pinch switches
(SW285, SW286, and
SW287) 856
stapler 2 safety cover interlock
switches (SW283 and
SW284) 855
stapler door 1 switch
(SW273) 853
stapler door 2 switch
(SW282) 854
T
test page, printing 62
test pages
ADF footprint test page 2521
Automatic Pen Alignment
(APA) 2524
Index 2577
carriage-to-carriage horizontal
alignment 2525
carriage-to-carriage vertical
alignment 2527
color schemes 2524
Composite Gray 2529
Dimensional IQ 2530
engine footprint test
page 2522
finisher footprint test
page 2523
grid 2533
horizontal alignment 2526
nozzle health 2533
print image placement 2530
print quality (PQ) 2531
streaks 2532
vertical banding 2537
testing
communications 46
motor voltages 46
Tetris sensor 132
Tetris sensor calibration 132
Tetris sensor, cleaning 80
time 9
time, setting 30
timing sensor, cleaning 78
top case parts
removing and replacing 178,
179, 180, 181
top margins 116, 118
top-of-form position
calibration 132
top-of-form sensor 132
touchscreen
brightness-adjustment dial 7
buttons 10
Home screen 8
sign in 9
touchscreen, calibrating 90
touchscreens, LCD
calibration 125
training materials, paper for 13
transparencies, not supported 12
Tray 1
capacity 17
input tray 310
input tray extension 313
labels, load 12
LED (LED12) 325
2578 Index
locate 2
media sensor (SN27) 324
paper sizes supported 15
paper types supported 14
paper-width guide 315, 316,
318
removing and replacing
parts 301
sensors 324
Tray 1 assembly 301
Tray 1 handle 306
Tray 1 latch 307
Tray 1 pick shaft 308
Tray 1 pick solenoid
(SOL1) 302
Tray 1 upper case part 303
width and media edge sensors
(SN24 and SN38) 324
width sensor (SN24)
assembly 320
Tray 1 assembly
removing and replacing 301
Tray 1 drive arm
removing and replacing 329
Tray 1 guide
removing and replacing 330
Tray 1 handle
removing and replacing 306
Tray 1 input tray
removing and replacing 310
Tray 1 input tray extension
removing and replacing 313
Tray 1 latch
removing and replacing 307
Tray 1 LED (LED12)
removing and replacing 325
Tray 1 paper-width guide
removing 316
removing and replacing 315
replacing 318
Tray 1 pick shaft
removing and replacing 308
Tray 1 pick solenoid (SOL1)
removing and replacing 302
Tray 1 sensors
media sensor (SN27) 324
removing and replacing 324
width and media edge sensors
(SN24 and SN38) 324
Tray 1 upper case part
removing and replacing 303
Tray 1 width sensor (SN24)
assembly
removing and replacing 320
Tray 2
capacity 17
locate 2
paper sizes supported 15
paper types supported 14
Tray 3
capacity 17
locate 2
paper sizes supported 15
paper types supported 14
Tray 4
capacity 17
locate 2
paper sizes supported 15
paper types supported 14
Tray 5
back latch sensor
(SN106) 692
ball slide extension 649
calibrations 676
capacity 17
covers 640
distribution PCA (A101) 687
elevator cables 653
elevator downhaul cable 656
elevator front and rear
cables 653
elevator lower limit sensor
(SN110) 694
elevator transmission 651
elevator tray 658
elevator upper limit sensor
(SN108) 693
empty sensor (SN111) 695
feed roller assembly 661
front cover 641
front latch sensor
(SN105) 691
handle LED (LED101) 700
latch assembly 649
LEDs 700
left bottom panel 645
load media sensor
(SN109) 694
locate 2
ENWW
lower separator encoder
disk 667
lower separator encoder
PCA 666
media 1 sensor (SN101) 689
media 2 sensor (SN103) 689
media door LED
(LED102) 701
media door open sensor
(SN107) 692
media hold down
assembly 683
motors 696
paper sizes supported 15
paper types supported 14
pick arm assembly 674
pick clutch (CL101) 683
pick force 681
pin alignment plate 645
rear cover 643
removing and replacing
parts 640
right cover 644
sensors 688
separator clutch (CL102) 685
separator force 677
stack height 680
stack height sensor
(SN104) 690
switches 702
top door 644
top front cover 641
top-left panel sensor
(SN112) 696
Tray 5 top-left panel 646
upper media path guide 688
upper separator slip clutch
assembly 663
Tray 5 ball slide extension
removing and replacing 649
Tray 5 calibrations
pick force 681
separator force 677
stack height 680
Tray 5 covers
front cover 641
left bottom panel 645
pin alignment plate 645
rear cover 643
removing and replacing 640
ENWW
right cover 644
top front cover 641
Tray 5 top door 644
Tray 5 top-left panel 646
Tray 5 distribution PCA (A101)
removing and replacing 687
Tray 5 elevator cables
downhaul cable 656
front and rear cables 653
removing and replacing 653
Tray 5 elevator transmission
removing and replacing 651
Tray 5 elevator tray
removing and replacing 658
Tray 5 feed roller assembly
removing and replacing 661
Tray 5 latch assembly
removing and replacing 649
Tray 5 LEDs
handle LED (LED101) 700
media door LED
(LED102) 701
removing and replacing 700
Tray 5 lower separator encoder disk
removing and replacing 667
Tray 5 lower separator encoder
PCA
removing and replacing 666
Tray 5 media hold down assembly
removing and replacing 683
Tray 5 motors
removing and replacing 696
Tray 5 pick arm assembly
removing and replacing 674
Tray 5 pick clutch (CL101)
removing and replacing 683
Tray 5 sensors
back latch sensor
(SN106) 692
elevator lower limit sensor
(SN110) 694
elevator upper limit sensor
(SN108) 693
empty sensor (SN111) 695
front latch sensor
(SN105) 691
load media sensor
(SN109) 694
media 1 sensor (SN101) 689
media 2 sensor (SN103) 689
media door open sensor
(SN107) 692
removing and replacing 688
stack height sensor
(SN104) 690
top-left panel sensor
(SN112) 696
Tray 5 separator clutch (CL102)
removing and replacing 685
Tray 5 switches
removing and replacing 702
Tray 5 upper media path guide
removing and replacing 688
Tray 5 upper separator slip clutch
assembly
removing and replacing 663
tray pick rollers 84
trays
controller PCA diagram 2498
distribution PCA
diagram 2484, 2499
voltage specifications 2541,
2542
wiring diagram 2483, 2496
Trays 2, 3, and 4
ambient temperature sensor
(SN41) and humidity sensor
(SN42) 292
controller PCA (A23) 290
distribution PCA 289
exit roller shaft 284
LEDs 298
media-length guide actuator
tape 276
paper-empty sensors (SN45,
SN49, and SN53) 295
paper-exit sensor flag 288
paper-exit sensors (SN47,
SN51, and SN55) 296
paper-length guide 275
paper-low sensors (SN44,
SN48, and SN52) 294
paper-width guide 277
paper-width sensor flag 278
paper-width sensors (SN46,
SN50, and SN54) 296
pick arm assembly 279
pick roller 282
removing and replacing 274
Index 2579
removing and replacing
parts 270
right lower panel handle 287
right side lower panel LED
(18) 299
right side lower panel open
sensor 293
right-side lower panel 271
sensors 292
transport motor (M18) 282
tray-LEDs (15, 16, 17) 299
tray-open sensors (SN9, SN14,
and SN19) 298
tray-paper-length sensors 298
Trays 2, 3, and 4
assembly 272
Trays 2, 3, and 4 assembly
removing and replacing 272
Trays 2, 3, and 4 controller PCA
(A23)
removing and replacing 290
Trays 2, 3, and 4 covers
removing and replacing 167
Trays 2, 3, and 4 distribution PCA
removing and replacing 289
Trays 2, 3, and 4 exit roller shaft
removing and replacing 284
Trays 2, 3, and 4 LEDs
removing and replacing 298
right side lower panel LED
(18) 299
tray-LEDs (15, 16, 17) 299
Trays 2, 3, and 4 media-length
guide actuator tape
removing and replacing 276
Trays 2, 3, and 4 paper-exit sensor
flag
removing and replacing 288
Trays 2, 3, and 4 paper-length guide
removing and replacing 275
Trays 2, 3, and 4 paper-width guide
removing and replacing 277
Trays 2, 3, and 4 paper-width
sensor flag
removing and replacing 278
Trays 2, 3, and 4 pick arm assembly
removing and replacing 279
Trays 2, 3, and 4 pick roller
removing and replacing 282
2580 Index
Trays 2, 3, and 4 right lower panel
handle
removing and replacing 287
Trays 2, 3, and 4 sensors
ambient temperature sensor
(SN41) and humidity sensor
(SN42) 292
paper-empty sensors (SN45,
SN49, and SN53) 295
paper-exit sensors (SN47,
SN51, and SN55) 296
paper-low sensors (SN44,
SN48, and SN52) 294
paper-width sensors (SN46,
SN50, and SN54) 296
removing and replacing 292
right side lower panel open
sensor (SN43) 293
tray-open sensors (SN9, SN14,
and SN19) 298
tray-paper-length sensors 298
Trays 2, 3, and 4 transport motor
(M18)
removing and replacing 282
trends, diagnostic 44
troubleshooting
diagnostic trends 44
event log events 43
image quality 46
options 44
pens 873
turn device on or off
master power switch, locate 3
on/off button, locate 2
use on/off button 6
U
updating firmware 105
upgrade firmware
about 105
upgrading firmware
FTP 106
HP Web Jetadmin 105
MS-DOS 107
upper inner cover
removing and replacing 166
user name 9
V
v-bearings
carriage 1 v-bearings 497
carriage 2 v-bearings 499
removing and replacing 497
vacuum
PSU exhaust duct
assembly 465
PSU recirculation duct 466
removing and replacing
parts 459
vacuum fan assembly 459
vacuum supply housing 462
vacuum fan assembly
removing and replacing 459
vacuum poppet valves
poppet A valves 452
poppet B valves 455
removing and replacing 451
vacuum supply housing
removing and replacing 462
vacuum voltage
specifications 2543
version code 37
versions
CDFT 40
vertical
removing and replacing
parts 326
right-side middle panel 326
Tray 1 drive arm 329
Tray 1 guide 330
vertical assembly 327
vertical door LED
(LED13) 336
vertical drive rollers 334
vertical latch assembly 333
vertical motor (M6) 332
vertical sensors 335
vertical assembly
removing and replacing 327
vertical banding test page 2537
vertical door LED (LED13)
removing and replacing 336
vertical drive rollers
removing and replacing 334
vertical latch assembly
removing and replacing 333
vertical magnification
adjustment 116, 118
ENWW
vertical motor (M6
removing and replacing 332
vertical sensors
removing and replacing 335
voltage specifications
automatic document
feeder 2542
DC 2541
dryer 2544
finisher 2541
MFP print engine 2541
scanner 2542
trays 2541, 2542
vacuum and aerosol 2543
voltages, testing 46
W
Warning button 10
warnings
viewing in event log 43
web wipe 27
web advance encoder (EN11)
removing and replacing 586
web drive motor (M5)
removing and replacing 583
Web Jetadmin. See HP Web
Jetadmin
Web server, embedded
(EWS) 49
web wipe
removing and replacing 594
removing and replacing
parts 593
removing used webs 595
web wipe 594
web wipe cartridge 593
web wipe encoder
assembly 602
Web wipe access case parts
removing and replacing 170,
171
web wipe cartridge
removing and replacing 593
web wipe cartridge guide
removing and replacing 581
web wipe encoder assembly
removing and replacing 602
web wipe material 86
web wipe material lift assembly
removing and replacing 584
ENWW
web wipe material lift motor (M4)
removing and replacing 586
web wipe warning 27
wires and cables
cable labeling standards 142
color coding standards 141
removing and replacing 141
wiring diagrams
carriage 2466
control panel 2470
covers 2469
drum 2471
drum sensors 2472
dryer 2473
finisher 2474
formatter 2482
horizontal 2485
IDO H-bar 2489
IDO motors and
encoders 2486
IDO paper paths 2487, 2488
IDO system 2490
IDS 2491
left sensor 2509
MFP 2462
motor distribution 2509
right sensor 2510
scanner 2493
service station 2495
trays 2483, 2496
X
XDM (XML Device Model) 26
XDM data, sending
automatically 28
Y
year code 36
Index 2581
2582 Index
ENWW
© 2007 Hewlett-Packard Development Company, L.P.
www.hp.com