1
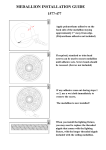
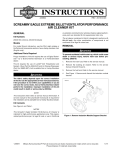
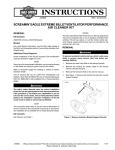
-J05667
REV. 2015-04-21
SCREAMIN' EAGLE PERFORMANCE AIR CLEANER KIT
GENERAL
REMOVAL
Kit Numbers
1.
Remove main fuse. See the service manual.
29400116, 29400117
2.
Remove the existing air cleaner per the service manual.
Save the two breather screws from the backplate.
Remaining parts can be discarded.
3.
See Figure 1. Remove and discard induction module
bracket (B).
Models
For model fitment information, see the P&A retail catalog or
the Parts and Accessories section of www.harley-davidson.com
(English only).
Installation Requirements
INSTALLATION
Proper installation of this kit requires the use of Digital Technician™ at a Harley-Davidson dealer.
Install Air Cleaner
Loctite® 243 Medium Strength Threadlocker and Sealant - Blue
(Part No. 99642-97) is required for proper installation of this
kit.
When servicing air cleaner, apply Loctite® 243 (blue) 9964297 to all fastener threads.
1.
See Figure 1. Install two O-rings (1) from kit in grooves
around breather screw holes on induction module side of
backplate assembly (2).
The rider's safety depends upon the correct installation
of this kit. Use the appropriate service manual procedures.
If the procedure is not within your capabilities or you do
not have the correct tools, have a Harley-Davidson dealer
perform the installation. Improper installation of this kit
could result in death or serious injury. (00333a)
2.
Align flat edge of gasket (3) with the molded tab. Install
gasket on induction module side of backplate
3.
Insert breather screws (A) through the backplate.
4.
Apply Loctite 243 (blue) to breather screw threads and
mating tapped holes in cylinder head.
NOTE
NOTE
5.
Thread screws into cylinder head but do not tighten.
This instruction sheet refers to service manual information. A
service manual for this year/model motorcycle is required for
this installation. One is available from a Harley-Davidson dealer.
6.
Thread air cleaner mounting screws (4) through mounting
bracket (6) and into backplate (2) until screw threads are
captured in induction module. Leave fasteners loose.
Kit Contents
7.
Alternately tighten two breather screws (A) to 120-144 inlbs (13.6-16.3 Nm).
NOTES
8.
The kit is intended for High Performance applications only.
Engine-related performance parts are intended FOR THE
EXPERIENCED RIDER ONLY.
Tighten three air cleaner screws (4) to 55-60 in-lbs (6.26.8 Nm).
9.
Press breather plugs (5) into breather screw cavities,
aligning tubes with recesses in backplate.
See Figure 1 and Table 1.
NOTES
Installation of this kit by an authorized Harley-Davidson dealer
does not affect your limited vehicle warranty.
The Product Information Label contained in this kit is a
requirement of the California Air Resource Board (CARB)
emission regulation for all 2000 and later Softail and 1999 and
later Dyna models.
Place the label on the right side of the frame directly beneath
the VIN sticker. This label is not required outside the state of
California.
The kit is intended for High Performance applications only.
This engine-related performance part is legal for sale or use
in California on pollution controlled motor vehicles.
-J05667
Install Air Cleaner Filter and Cover
NOTE
Whenever the air cleaner cover is installed, apply Loctite 243
(blue) to the air cleaner cover screw (8).
1.
See Figure 1. Install the air cleaner filter element (7) and
cover (9). Before tightening the center screw, align the
cover using the medallion for best appearance. Tighten
center screw to 36-60 in-lbs (4.1-6.8 Nm).
NOTE
Apply a small amount of dish soap to medallion O-ring to aid
in installation of medallion.
Many Harley-Davidson® Parts & Accessories are made of plastics and metals which can be recycled.
Please dispose of materials responsibly.
1 of 3
2.
Install the medallion into the center hole by pressing in
place. Do not damage the O-ring.
Final Assembly
1.
Install main fuse. Refer to the service manual.
NOTES
Install the rain sock over the air filter element in wet or rainy
conditions to prevent water intrusion.
DO NOT OVER-OIL THE AIR FILTER. Over-oiling interferes
with the proper performance of the engine and/or certain engine
components. If oil is still draining or dripping from the filter
media 20 minutes after oiling, clean and oil the filter element
again.
2.
To clean the element:
a.
Remove the center medallion by inserting a small flat
blade screwdriver in the slot at the bottom of the
medallion. Carefully work around the center portion
without scratching the finish of the air cleaner cover.
Rotating the medallion aids in its removal.
b.
Remove the air cleaner cover center screw.
c.
Tap the element to dislodge any loose dirt. Gently
brush with a soft bristle brush.
d.
EITHER spray air filter cleaner liberally onto the cotton
filter media, OR, roll and soak the media in a shallow
pan of air filter cleaner, removing immediately. In
either case, set the filter media aside to soak for ten
minutes.
e.
Rinse off the filter media (flowing from the clean side
to the dirty side), with low-pressure tap water.
f.
After rinsing, shake off excess water. Let the filter
media air dry. DO NOT use compressed air or a heat
gun to speed drying.
g.
After the filter media is dry, EITHER spray air filter oil
along each pleat, once only, holding the spray nozzle
approximately 3 in (76 mm) away from the media, OR
carefully use a squeeze bottle to deposit oil along
each pleat, once only.
Install the pre-charger (13) over the air filter element under
these circumstances.
Recalibrate ECM
You must recalibrate the ECM when installing this kit.
Failure to properly recalibrate the ECM can result in severe
engine damage. (00399b)
Download the new ECM calibration using the Digital Technician™ at a Harley-Davidson dealer.
Air Filter Element Maintenance
1.
Inspect the air filter element every 5000 miles (8000 km),
or more often under dusty conditions.
NOTES
The use of other cleaning, drying or oiling methods or products
damages the filter and voids the manufacturer's warranty
K&N® Air filter Cleaner is available from a Harley-Davidson
dealer, either alone (1 qt/0.95 L sprayer bottle, Part No. 9988388T) or a 12 fl oz/0.35 L sprayer bottle as part of the Filter Care
Service Kit (Part No. 99850-92T).
K&N Air Filter Oil is also available from a Harley-Davidson
dealer, either alone (12.25 oz/347 gram aerosol can, Part No.
99882-88T) or a 6.5 oz/184 gram aerosol can as part of the
Filter Care Service Kit.
-J05667
Let the oil absorb into the filter media for 20
minutes before proceeding.
After 20 minutes, inspect the filter media. Carefully
apply oil to any remaining visible white spots on the
filter media. Allow to absorb.
2 of 3
SERVICE PARTS
is08589a
A
5
B
1
13
3
7
2
6
11
4
8
10 12
9
Figure 1. Service Parts, Screamin' Eagle Performance Air Cleaner Kit
Table 1. Service Parts
Item
Description (Quantity)
Part Number
1
O-ring, #2-113 (2)
11292
2
Backplate, chrome (Kit 29400117)
Backplate, black (Kit 29400116)
29510-05
29400081
3
Gasket, throttle body
29583-01A
4
Screw, socket head cap, 1/4-20 x 2.0 in (51 mm) long (3)
Not sold separately
5
Plug, breather (2)
29557-05
6
Bracket, mounting
29400119
7
Air filter element
29400118
8
Screw, hex socket, flat head, 5/16-18 x 2.0 in (51 mm) long
Not sold separately
9
Cover, air cleaner
Not sold separately
10
Medallion, Screamin' Eagle
14100367
11
Screen, air filter, black (Kit 29400116)
Screen, air filter, chrome (Kit 29400117)
29400082
29400100
12
O-ring, medallion
11170
13
Pre-charger
29400121
Items mentioned in text, but not included in kit:
A
Breather screw (2)
B
Induction module bracket (remove and discard)
-J05667
3 of 3