1
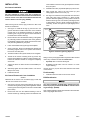
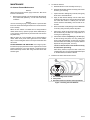
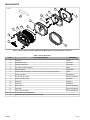
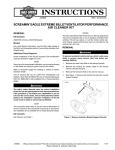
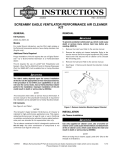
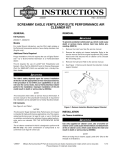
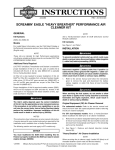
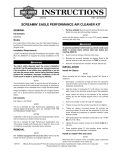
-J05824
REV. 2015-04-23
SCREAMIN' EAGLE EXTREME BILLET VENTILATOR PERFORMANCE
AIR CLEANER KIT
on pollution controlled motor vehicles. Engine-related performance parts are intended for the experienced rider only.
GENERAL
Kit Numbers
29400163 (chrome), 29400164 (black)
Models
For model fitment information, see the P&A retail catalog or
the Parts and Accessories section of www.harley-davidson.com
(English only).
Additional Parts Required
Proper installation of this kit requires the use of Digital Technician™ by a factory-trained technician at a Harley-Davidson
dealer.
This kit requires the use of Loctite® 243 Threadlocker and
Sealant - Blue (Part No. 99642-97) and Air Cleaner/Degreaser
(Part No. 99883-88T), both available from a Harley-Davidson
dealer.
The rider's safety depends upon the correct installation
of this kit. Use the appropriate service manual procedures.
If the procedure is not within your capabilities or you do
not have the correct tools, have a Harley-Davidson dealer
perform the installation. Improper installation of this kit
could result in death or serious injury. (00333a)
The air cleaner contained in this kit is designed to perform with
this kit only. Any other combination of components is not
confirmed to be legal for street use.
REMOVAL
To prevent accidental vehicle start-up, which could cause
death or serious injury, remove main fuse before proceeding. (00251b)
1.
Remove the main fuse. Refer to the service manual.
2.
Remove the existing air cleaner. Refer to the service
manual. Discard the parts.
3.
Remove the fuel tank. Refer to the service manual.
4.
See Figure 1. Remove and discard the induction module
bracket.
is05912
NOTE
This instruction sheet refers to service manual information. A
service manual for this year/model motorcycle is required for
this installation and is available from a Harley-Davidson dealer.
Kit Contents
See Figure 4 and Table 1.
NOTES
This Screamin' Eagle Ventilator Performance Air Cleaner is
intended for high performance applications only. This enginerelated performance part is legal for sale or use in California
-J05824
Figure 1. Remove Induction Module Support Bracket
Many Harley-Davidson® Parts & Accessories are made of plastics and metals which can be recycled.
Please dispose of materials responsibly.
1 of 4
of the emblem to the front cover (8) and press the emblem
firmly into place.
INSTALLATION
Air Cleaner Installation
Use only supplied air cleaner cover. Use of another air
cleaner cover could cause element failure and detachment
of the air cleaner cover, which could distract the rider and
result in death or serious injury. (00596b)
3.
Assemble wire mesh (12) and filler plate (13) to front cover.
4.
Apply Loctite 243 - Blue to all cover screws (11) and
mating tapped holes in back cover (14).
5.
See Figure 2. Install front cover plate with wire mesh and
mesh filler plate using 1/4-20x2.5 in. SHCS screws
provided. Alternate tightening in a star pattern until all six
fasteners are snug. Then one-half turn (180 degree) each
in same pattern. This is to avoid crushing the element. If
necessary, another one-quarter turn (90 degree) but no
more.
NOTE
When servicing the air cleaner, apply Loctite 243 - Blue to the
threads of all fasteners.
1.
See Figure 4. Install two O-rings (1) from the kit in the
grooves around the breather bolt holes on the induction
module side of the backplate assembly (2). Install the
remaining two O-rings in the grooves in the underside of
the heads of the breather bolts (5).
2.
Remove the liner from the adhesive backing of the gasket
(3). Carefully position the adhesive side of the gasket to
the backplate, aligning to the equally spaced screw holes,
and press the gasket firmly into place.
3.
Insert new breather bolts (5) through the backplate.
4.
Apply Loctite 243 - Blue to the breather bolt threads and
the mating tapped holes in the cylinder head. Position
back cover over back plate.
5.
Thread the bolts into the cylinder head, but do not tighten.
6.
Thread the air cleaner mounting studs (4) all the way
through the backplate (2) until the screw threads are captured in the induction module. Do not tighten completely
at this time.
is07671a
3
6
1
2
5
4
Figure 2. Fastener Tightening Sequence
NOTE
Riding a motorcycle equipped with an exposed air filter element
under rainy conditions IS NOT RECOMMENDED.
•
If parked, water could enter the engine.
If moving, enough water could be sucked in to cause
engine misfiring.
7.
Tighten the three air cleaner studs to 55-60 in-lbs (6.26.8 Nm).
•
8.
Alternately tighten the two breather bolts to 120-144 inlbs (13.6-16.3 Nm).
Slip the rain sock (10) over the air filter element under these
circumstances.
9.
Install the fuel tank.
Final Assembly
Air Cleaner Element and Cover Installation
NOTES
1.
Install the main fuse. Refer to the service manual.
ECM Recalibration
Whenever the air cleaner cover is installed, apply Loctite 243
- Blue to all air cleaner cover screws.
1.
See Figure 4. Secure the air filter element (8) to the air
cleaner mounting studs (4) using three bright-finish TORX®
screws (6) from the kit. Tighten the screws to 55-60 in-lbs
(6.2-6.8 Nm).
2.
Remove the liner from the adhesive backing of the air
cleaner emblem (9). Carefully position the adhesive side
-J05824
You must recalibrate the ECM when installing this kit.
Failure to properly recalibrate the ECM can result in severe
engine damage. (00399b)
Have a Harley-Davidson dealer download the new ECM calibration using Digital Technician™.
2 of 4
2.
MAINTENANCE
Air Cleaner Element Maintenance
NOTES
When servicing the air cleaner, apply Loctite 243 - Blue to the
threads of all fasteners.
1.
Remove the air cleaner cover and inspect the filter element
every 5000 miles (8000 km), or more often under dusty
conditions.
NOTES
The use of cleaning, drying or oiling methods or products other
than those shown will damage the filter and void the manufacturer's warranty
K&N® Air filter Cleaner is available from a Harley-Davidson
dealer, either alone (1 qt/0.95 L sprayer bottle, 99883-88T) or
a 12 fl oz/0.35 L sprayer bottle as part of the Filter Care Service
Kit (99850-92T).
K&N Air Filter Oil is also available from a Harley-Davidson
dealer, either alone (12.25 oz/347 gram aerosol can, 9988288T) or a 6.5 oz/184 gram aerosol can as part of the Filter Care
Service Kit.
DO NOT OVER-OIL THE AIR FILTER. Over-oiling may interfere with the proper performance of the engine and/or certain
engine components. If oil is still draining or dripping from the
filter media twenty minutes after oiling, clean and oil the filter
element again.
To clean the element:
a.
Disassemble front cover assembly screws (11).
b.
Disassemble air filter element screws (6) and remove
element (7) for cleaning.
c.
Tap the element to dislodge any loose dirt, then gently
brush with a soft bristle brush.
d.
Spray air filter cleaner liberally onto the cotton filter
media and let soak for ten minutes OR roll and soak
the cotton filter media in a shallow pan of air filter
cleaner. Remove immediately, and let soak for ten
minutes.
e.
Rinse off the filter media (flowing from the clean side
to the dirty side), with low-pressure tap water.
f.
After rinsing, shake off all excess water, and let the
filter media air dry. DO NOT use compressed air or
a heat gun to speed drying.
g.
After the filter media is completely dry, EITHER spray
air filter oil along each pleat, once only, holding the
spray nozzle approximately 3 inches (76 mm) away
from the media, OR carefully use a squeeze bottle to
deposit oil along each pleat, once only.
Let the oil absorb into the filter media for twenty
minutes before proceeding.
After twenty minutes, inspect the filter media, and
carefully apply oil to any remaining visible white spots
on the filter media, and allow to absorb.
3.
Install the air cleaner element and covers.
is05913
3
2
1
1. Air Cleaner/Degreaser solution
2. Filter pleats
3. Roll filter element in solution around perimeter
Figure 3. Cleaning the Filter Element
-J05824
3 of 4
SERVICE PARTS
14
is07670b
2
5
A
8
13
1
3
4
7
12
1
6
11
9
10
Figure 4. Service Parts, Screamin' Eagle Extreme Billet Ventilator Performance Air Cleaner Kit
Table 1. Service Parts Table
Item
Description (Quantity)
Part Number
1
O-ring (4)
11292
2
Backplate (50 mm)
29763-09
3
Gasket, throttle body
29241-08
4
Air cleaner mounting stud (3)
8250
5
Breather bolt (2)
29267-08A
6
Screw, button head TORX, 1/4-20 x 3/8 inch (9.5 mm) long (bright finish) (3)
3938
7
Element, air filter
29400022A
8
Front cover, air cleaner
Not sold separately
9
Insert, air cleaner cover
14100604
10
Rain sock
29400177
11
Screw (6)
10200259
12
Wire mesh
Not sold separately
13
Filler plate
Not sold separately
14
Rear cover, air cleaner
Not sold separately
Item mentioned in text, but not included in kit:
A
-J05824
Induction module bracket (remove and discard)
4 of 4