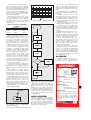
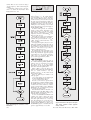
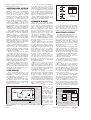
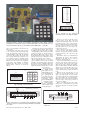
1
Copyright 2001, 2002 Wimborne Publishing Ltd (408 Wimborne Road East, Ferndown, Dorset, BH22 9ND, UK) and Maxfield & Montrose Interactive Inc., (PO Box 857, Madison, Alabama 35758, USA) All rights reserved. WARNING! The materials and works contained within EPE Online — which are made available by Wimborne Publishing Ltd and Maxfield & Montrose Interactive Inc — are copyrighted. You are permitted to make a backup copy of the downloaded file and one (1) hard copy of such materials and works for your personal use. International copyright laws, however, prohibit any further copying or reproduction of such materials and works, or any republication of any kind. Maxfield & Montrose Interactive Inc and Wimborne Publishing Ltd have used their best efforts in preparing these materials and works. However, Maxfield & Montrose Interactive Inc and Wimborne Publishing Ltd make no warranties of any kind, expressed or implied, with regard to the documentation or data contained herein, and specifically disclaim, without limitation, any implied warranties of merchantability and fitness for a particular purpose. Because of possible variances in the quality and condition of materials and workmanship used by readers, EPE Online, its publishers and agents disclaim any responsibility for the safe and proper functioning of reader-constructed projects based on or from information published in these materials and works. In no event shall Maxfield & Montrose Interactive Inc or Wimborne Publishing Ltd be responsible or liable for any loss of profit or any other commercial damages, including but not limited to special, incidental, consequential, or any other damages in connection with or arising out of furnishing, performance, or use of these materials and works. YUASA ENDURANCE 6V 100AH sealed lead acid batteries. £59 each or 10 for £499. GAS MASKS RUSSIAN, new and boxed standard NATO filter, £39. LOW COST NIGHT VISION system, Russian handheld complete with infra-red illuminator, l00m range. Runs on 2 AA batteries, just £109.95. COBRA NIGHT VISION equipment also stocked, more info on our web site at www.cobra-optics.co.uk. ELECTRIC SCOOTERS 18kph, 24V motor, 6 hour charge time, 22kg weight, max load 90kg, running time up to 1 hour, range 15km, 8·5A motor, 24V, direct drive. Our Price £229.95. Ref ESCOOT. VOICE CHANGERS Hold one of these units over your phone mouthpiece and you can adjust your voice using the controls on the unit. Battery operated, £15. Ref CC3. EMMINENCE LOUDSPEAKERS 12in. dia., 50W nom, 100W peak, 16 ohm impedance. Pack of 4 just £39.95. Ref SPEAK39. PIR SECURITY SWITCHES These brand new swivel mounting PIR units will switch up to 2 kilowatts. Adjustable sensitivity, light level and time delay (9 seconds to 10 minutes), 15m detection range, mains operated, waterproof. £5.99 Ref PIR1PACK or a pack of 5 for £22.95 Ref PIR5PACK or 10 for £39.95 Ref PIR10PACK. 12V 18Ah SEALED LEAD-ACID BATTERIES, new and boxed, unused, pack of 4 £69.95 Ref CYC7 or £21.95 each Ref CYC6. 12V 6.5Ah SEALED LEAD-ACID BATTERIES, new and boxed, pack of 5 £34.95 Ref CYC65A or individually at £8.99 Ref CYC65B. 12V 12Ah SEALED LEAD ACID BATTERIES, 100mm x 150mm x 95mm, 4kg. £15 each. Ref SSLB. 6V 100Ah SEALED LEAD ACID BATTERIES, 200mm x 208mm x 238mm. £59. SEALED LEAD-ACID CHARGER AND FLOAT CHARGER. Complete unit will charge 12V lead acids and maintain them with an automatic trickle charge. Charger on its own is £15 Ref LAC or charger and a 12V 12Ah battery (all fully cased) is £25 Ref ACB. AERIAL PHOTOGRAPHY KIT. This rocket comes with a built-in camera! It flies up to 500 feet (150m), turns over and takes an aerial photograph of the ground below. The rocket then returns with its film via its parachute. Takes 110 film. Supplied with everything including a launch pad and 3 motors (no film). £29.98 Ref Astro. BUILD YOUR OWN WINDFARM FROM SCRAP. New publication gives step-by-step guide to building wind generators and propellors. Armed with this publication and a good local scrapyard could make you self-sufficient in electricity! £12. Ref LOT81. MAGNETIC CREDIT CARD READERS AND ENCODING INFO, £9.95. Cased with flyleads, designed to read standard credit cards! Complete with control electronics p.c.b. and manual covering everything you could want to know about what’s hidden in that magnetic strip on your card! Just £9.95 Ref BAR31. 77 KILO LIFT MAGNET. These Samarium magnets measure 57mm x 20mm and have a threaded hole (5/16th UNF) in the centre and a magnetic strength of 2·2 gauss. We have tested these on a steel beam running through the offices and found that they will take more than 170lb. (77kg) in weight before being pulled off. Supplied with keeper. £19.95 ea. Ref MAG77. HYDROGEN FUEL CELL PLANS. Loads of information on hydrogen storage and production. Practical plans to build hydrogen fuel cell (good workshop facilities required). £8 set. Ref FCP1. STIRLING ENGINE PLANS. Interesting information pack covering all aspects of Stirling engines, pictures of home made engines made from an aerosol can running on a candle! £12 STIR2. 12V OPERATED SMOKE BOMBS. Type 3 is a 12V trigger and 3 smoke cannisters, each cannister will fill a room in a very short space of time! £14.99. Ref SB3. Type 2 is 20 smaller cannisters (suitable for mock equipment fires etc.) and 1 trigger module for £29. Ref SB2. Type 1 is a 12V trigger and 20 large cannisters, £49. Ref SB1. BRAND NEW NATO ISSUE RADIATION DETECTORS, SALE PRICE JUST £69.95. Current NATO issue standard emergency services unit. Used by most of the world’s military personnel. New and boxed. Normal retail price £400, Bull’s bargain price just £69.95. Ref PDRM. BASIC GUIDE TO BIO DIESEL. How to make diesel fuel from used kitchen oil, £6. Ref BIOF. SAVE £££££s. RCB UNITS. Inline IEC lead with fitted RC breaker. Installed in seconds. Fit to any computer, monitor, office equipment and make it safe! Pack of 10 just £9.98. Ref LOT5B. INFRA-RED REMOTE CONTROL WATCHES, £16.99. VIBRATING WATCHES, vibrate when your phone rings, £16.99. PULSE WATCHES, display your pulse, £16.99. www.quemex.co.uk MINIATURE TOGGLE SWITCHES. These top quality Japanese panel mounting toggle switches measure 35mm x 13mm x 12mm, are 2-pole changeover and will switch 1A at 250V a.c., or 3A at 125V a.c. Complete with mounting washers and nuts. Supplied as a box of 100 switches for £29.95. Ref SWT35 or a bag of 15 for £4.99. Ref SWT34. STEPPER MOTORS. Brand new stepper motors, 4mm fixing holes with 47·14mm fixing centres, 20mm shaft, 6·35mm diameter, 5V/phase, 0·7A/phase, 1·8 deg. step (200 step). Body 56mm x 36mm. £14.99 each. Ref STEP6, pack of 4 for £49.95. BASIC GUIDE TO LOCKPICKING. New publication gives you an insight! £6, Ref LPK. NEW HIGH POWER MINI BUG. With a range of up to 800 metres and 3 days use from a PP3 this is our top selling bug! Less than 1in. square and a 10m voice pick-up range. £28. Ref LOT102. IR LAMP KIT. Suitable for CCTV cameras, enables the camera to be used in total darkness! £6. Ref EF138. INFRA-RED POWERBEAM. Handheld battery powered lamp, 4in. reflector, gives out powerful pure infra-red light! Perfect for CCTV use, nightsights, etc. £29. Ref PB1. YOUR HOME COULD BE SELF-SUFFICIENT IN ELECTRICITY. Comprehensive plans with loads of info on designing systems, panels, control electronics etc. £7. Ref PV1. 200 WATT INVERTERS, plugs straight into your car cigarette lighter socket and is fitted with a 13A socket so you can run your mains operated devices from your car battery. £49.95. Ref SS66. THE TRUTH MACHINE. Tells if someone is lying by micro tremors in their voice, battery operated, works in general conversation and on the ‘phone and TV as well! £42.49. Ref TD3. AIR RIFLES FROM LESS THAN £40, CROSSBOWS, WIDE RANGE OF BB GUNS, AMMO, TARGETS, PISTOLS, REPLICA GUNS, UZI MACHINE GUN REPLICAS (BB), REPEATERS, LASER SIGHTS, ELECTRIC BB, GAS BB www.airpistol.co.uk INKJET CARTRIDGES FROM JUST £3 AT www.officebits.co.uk INFRA-RED FILM. 6in. square piece of flexible infra-red film that will only allow IR light through. Perfect for converting ordinary torches, lights, headlights etc. to infra-red output using only standard light bulbs. Easily cut to shape. 6in. square. £15. Ref IRF2 or a 12in. square for £29.95. Ref IRF2A. HYDROGEN FUEL CELLS. Our new hydrogen fuel cells are 1V at up to 1A output, hydrogen input, easily driven from a small electrolysis assembly or from a hydrogen source, our demo model uses a solar panel with the output leads in a glass of salt water to produce the hydrogen! Each cell is designed to be completely taken apart, put back together and expanded to whatever capacity you like (up to 10 watts and 12V per assembly). Cells cost £49. Ref HFC11. SMOKE ALARMS. Mains powered, made by the famous Gent company, easy fit next to light fittings, power point. Pack of 5 £15, Ref SS23, pack of 12 £24, Ref SS24. CCTV CAMERAS FROM £25. Check out our web site at www.cctvstuff.co.uk and www.home-cctv.co.uk. 14 WATT SOLAR PANELS. Amorphous silicon panel fitted in an anodised aluminium frame. Panel measures 3ft. by 1ft. with 3m leads for easy connection. 3ft. x 1ft. solar panel £79. Ref MAG45. Unframed 4 pack, 8-9W (3ft. x 1ft.) £99, Ref SOLX. 35 watts of solar power for just £99. 4 panels, each one 3ft. x 1ft. and producing 8W min., 13V. Pack of four £99, Ref SOLX. NEW 12V 12in. SQUARE SOLAR PANEL. Kevlar backed, 3 watt output, copper strips for easy solder connections. $14.99 Ref 15P42. Pack of four just £39.95, Ref 15P42SP. NEW UNIVERSAL SOLAR CHARGER. Charges AAAs, AAs, Cs and D-type NiCads. £9.99, Ref UNISOL. 12V SOLAR POWER WATER PUMP. Perfect for many 12V d.c. uses, from solar fountains to hydroponics! Small and compact yet powerful, works direct from our 10W solar panel in bright sun. Max HD: 17ft, max flow = 8 Lpm, 1·5A. Ref AC88. £18.99. SOLAR MOTORS. Tiny motors which run quite happily on voltages from 3V-12V d.c. Works on our 6V amorphous 6in. panels and you can run them from the sun! 32mm dia., 20mm thick. £1.50 each. MAMOD STEAM ENGINES and a full range of spare parts. Check out www.mamodspares.co.uk. SUPER WIDEBAND RADAR DETECTOR. Whistler 1630. Detects both radar and laser, X, K and KA bands, speed cameras and all known speed detection systems. 360 degree coverage, front and rear waveguides, 1·1in. x 2·7in. x 4·6in., fits on visor or dash, new low price £99, Ref WH1630. Other models available at www.radargun.co.uk. BUG DETECTORS. A new detector at a sensible price! Detects bugs hidden in rooms, computers etc., between 1-200MHz, adjustable sensitivity, 9V PP3 battery required. £29.95, Ref BDET2. GIANT WEATHER BALLOONS made by Totex, we blew one up to 7ft. diameter then it popped due to stones on the ground! £13.99, Ref TOTEX. PHILIPS VP406 LASER DISC PLAYERS, sale price just £9.95. Scart output, just put your video disk in and press play, standard audio and video outputs. £9.95, Ref VP406. 12V DC SIRENS. Very loud, suitable for indoors or outdoors, twotone, 160mm x 135mm, finished in white with bracket. £4.99, Ref SIR2A. FREEZER/MAINS FAIL ALARMS. Designed to fit around the mains cable on a freezer this alarm will sound if the device is unplugged from the mains supply, battery operated, cased, built-in sounder. Ideal for TVs, Hi-Fi equipment etc. £7.01, Ref FRE2. BARNET CROSSBOWS. We stock the entire range of crossbows, check out our web site at www.xbows.co.uk. HOT AIR BALLOON KITS. Everything you need to build a 1·7m high, 4·5m in circum. hot air balloon, launch over a small burner or heater. £12.49, Ref HA1. CROOKES RADIOMETER. Fascinating glass bulb contains blades driven around by the sun, £9.99, Ref SC120B. GIANT TV OR PC VIEWING SCREEN. Turn your TV into a supersize screen, converts small screens into a super size 26in. £26.99, Ref SVGA2. RADIOSONDES. Made by Valsala, unused, they measure pressure, temperature and humidity. Model RS80, good stripper at £15, Ref SONDE. AIR WIND POWER MODULE. Produces nearly 400 watts of power from the wind, 1·14m blade, 12V d.c. output, 3 year warranty, built-in battery regulator. £549, Ref AIR1. WORMERIES. The ideal solution for your kitchen waste! Supplied complete with worms. Turn your rubbish into liquid feed! Two sizes available, small (ideal for 1-2 people), £25.45, Ref WM2, and a large one (ideal for 4 or more), £42.44, Ref WM1. COMPLETE WIRELESS CCTV SYSTEM. Includes monitor, camera, up to 100m range, audio and video, UK legal, complete with infra-red lights. £169, Ref WMS333. PELTIER MODULES. 56W, 40mm x 40mm, 16V, sealed edges, new and boxed. Supplied with 18-page Peltier design manual featuring circuit designs, design information etc. 1 module and manual is £29.99, Ref PELT1, pack of 4 modules and manual is £99.99, Ref PELT2. The manual on its own is £4, Ref PET3. DC MOTOR. 12V d.c., general purpose model motor, 70mm x 50mm, 12V d.c., permanent magnet, 4mm x 25mm shaft. £6, Ref GPM1, pack of 10 is just £40, Ref GPM2. 180R.P.M. MAINS MOTOR. Induction type, 90mm x 70mm, 50mm x 5mm shaft, 12A continuous rating, thermal protected. £22, Ref MGM1. SOLID STATE RELAYS. P.C.B. mounting, these relays require 332V d.c. to operate but will switch up to 3A a.c. mains. Pack of 4 £5, Ref SPEC1B. 12V RELAYS. 2 x 2 c/o 16A contacts p.c.b. mount (will fit Vero), tray of 25 relays for just £9.95, Ref SPEC1. VENNER TIME CONTROLS. Designed to be wired in permanently they will switch up to 16A 240V a.c. motorised with dial and pins. New and boxed. £15, Ref VTS. GYROSCOPES. We still sell original 1917 design, hours of fun for all the family, complete with stand, string, box and info. £6, Ref EP70. INNOVATIONS. We also sell a wide range of innovative products for the home, these are at www.seemans.com. INVERTERS. Convert 12V d.c. into 240V mains (modified sine wave), 300 watt (150 watt continuous), £59.95, Ref VER3. 600 watt model (330 watt continuous), £79.97, Ref VER4. 10 WATT SILICON SOLAR PANEL, 10 year life, waterproof, 365mm x 365mm x 26mm, 14V, 10W, 1.8kg, framed. £84.99, Ref PAN. BULL ELECTRICAL UNIT D, HENFIELD BUSINESS PARK, HENFIELD, SUSSEX BN5 9SL TERMS: CASH, PO OR CHEQUE WITH ORDER PLUS £5.00 P&P (UK) PLUS VAT 24 HOUR SERVICE £7.50 (UK) PLUS VAT OVERSEAS ORDERS AT COST PLUS £3.50 (ACCESS/VISA/SWITCH ACCEPTED) ’phone: 01273 491490 Fax 491813 [email protected] STICKY LABELS. Small address labels etc. are very useful and can be ordered online at www.stickon.co.uk. RED L.E.D.s. Hewlett Packard red l.e.d.s, 5V operation, available in a pack of 50 for £8, Ref SS200, or 500 for £29.95, Ref SS201. MICROSOFT TRACKBALL AND MOUSE. Called the Microsoft Ballpoint this has 4 buttons, a trackball and PS2 connector. Will work with most PCs. £5.99, Ref EP50. MAXON WALKIE TALKIES, up to 2 mile range, UK legal, 300 channel, 2 x walkie talkies, £74.95, Ref. Maxon1. Chargers £14, Ref. Maxonc, battery packs £12, Ref. Maxonb (otherwise uses AAA batteries). 2-WAY MIRROR KIT. Contains enough material to make up to a 500mm x 2200mm mirror (excl. glass), full instructions. £19.95, Ref WF001. .22 AIR RIFLE. Under lever type, powerful Chinese training rifle, £38.26, Ref A1047. 500 pellets, £2.68, Ref A1091. .22 AIR RIFLE STANDARD TYPE. Chinese training rifle, on legal limit for air rifles, £29.75, Ref A1040. Pellets £2.68, Ref A1091. SHUT THE BOX. Check out www.bullybeef.co.uk for a range of pub games and magic tricks. WANT TO MAKE SOME MONEY? STUCK FOR AN IDEA? We have collated 140 business manuals that give you information on setting up different businesses, you peruse these at your leisure using the text editor on your PC. Also included is the certificate enabling you to reproduce (and sell) the manuals as much as you like! £14, Ref EP74. ANICS CO2 GAS POWERED PISTOL. Russian handheld pistol powered by Sparklets CO2 cylinders (give approx. 70 shots), fires steel BB. Pistol £58.22, Ref AGA101, tub of 1,500 BB shot £5.10, Ref A1015, pack of 5 CO2 cartridges £3.50, Ref GAS5. 33 KILO LIFT MAGNET. Neodynium, 32mm diameter with a fixing bolt on the back for easy mounting. Each magnet will lift 33 kilos, 4 magnets bolted to a plate will lift an incredible 132 kilos! £15, Ref MAG33. Pack of 4 just £39, Ref MAG33AA. BSA METEOR AIR RIFLE. UK made .22 rifle, top quality professional air rifle, £84.15, Ref BSAMET 500 Lazapell pellets £5, Ref LAZAPELL. MAMOD 1313 TE1A TRACTION ENGINE. Attractive working model of traditional steam engine, £85, Ref 1313. MAMOD STEAM ROADSTER (white), magnificent working steam model car, £112, Ref 1319. MAMOD STEAM WAGON. Working model steam wagon finished in blue. £112, Ref 1318. Brown version (with barrels), £122, Ref 1450. POCKET SPY MONOCULAR. Clever folding monocular with 8 x 21 magnification, made by Helios, with case. £14.99, Ref MONOC. KEVLAR BRITISH ARMY HATS. Broken or missing straps, hence just £8 each. Ref KEV99. CCTV SYSTEMS, £24.99. Complete with camera, 20 metres of cable, p.s.u. and info simple connection to scart, £24.99. Ref CCTVCAM2. FM BROADCAST BAND HIGH POWER TRANSMITTERS can be viewed and bought online at www.veronica-kits.co.uk. TONER CARTRIDGES FOR COPIERS AND PRINTERS can be bought online at www.nationaltoners.co.uk. VELOSOLEX. Traditional French style two-stroke moped (engine over front wheels), black only, £695, Ref VELO. Delivered direct in a box, you need to fit the pedals etc. then register it with your local DVLC. HYDROPONIC GROWING SYSTEMS. Complete, everything you need apart from plants and light, contains grow tank, nutrients, pump, tester etc. GT205 710mm x 390mm, NFT system, £31.45, Ref GT205. GT424 1070mm x 500mm, NFT system, £58.65, Ref GT424. ELECTRIC BIKES, £679, Viking, built-in indicators, radio, lights, 13mph, 5 hour charge, Shimano gears, up to 50 mile range, horn, 26in. wheels, suspension, no licence needed, key operated, £679, Ref VIKING. PIR PCBs. These contain a standard PIR detector circuit with all components, easy to wire up and use. Pack of 4 £6, Ref PIR8. NEBULISER, WATER ATOMISER. Ultrasonic module that you place in water, atomises the water into a very fine mist, many applications from special effects to scientific. £69, Ref NEB6. PORTABLE X-RAY MACHINE PLANS. Easy to construct plans on a simple and cheap way to build a home X-ray machine! Effective device, X-ray sealed assemblies, can be used for experimental purposes. Not a toy or for minors! £6/set, Ref F/XP1. TELEKINETIC ENHANCER PLANS. Mystify and amaze your friends by creating motion with no known apparent means or cause. Uses no electrical or mechanical connections, no special gimmicks yet produces positive motion and effect. Excellent for science projects, magic shows, part demonstrations or serious research and development of this strange and amazing psychic phenomenon. £4/set, Ref F/TKE1. ELECTRONIC HYPNOSIS PLANS & DATA. This data shows several ways to put subjects under your control. Included is a full volume reference text and several construction plans that when assembled can produce highly effective stimuli. This material must be used cautiously. It is for use as entertainment at parties etc only, by those experienced in its use. £15/set, Ref F/EH2. GRAVITY GENERATOR PLANS. This unique plan demonstrates a simple electrical phenomena that produces an anti-gravity effect. You can actually build a small mock spaceship out of simple materials and without any visible means cause it to levitate. £10/set, Ref F/GRA1. TESLA COIL/LIGHTNING DISPLAY GLOBE PLANS. Produces up to 750,000 volts of discharge, experiment with extraordinary HV effects, ‘Plasma in a jar’, St Elmo’s fire, corona, excellent science project or conversation piece. £5/set, Ref F/BTC1/LG5. COPPER VAPOUR LASER PLANS. Produces 100mW of visible green light. High coherency and spectral quality similar to argon laser but easier and less costly to build, yet far more efficient. This particular design was developed at the Atomic Energy Commission of NEGEV in Israel. £10/set, Ref F/CVL1. VOICE SCRAMBLER PLANS. Miniature solid-state system turns speech sound into indecipherable noise that cannot be understood without a second matching unit. Use on telephone to prevent third party listening and bugging. £6/set, Ref F/VS9. PULSED TV JOKER PLANS. Little handheld device utilises pulse techniques that will completely disrupt TV picture and sound! Works on FM too! Discretion advised. £8/set, Ref F/TJ5. BODYHEAT TELESCOPE PLANS. Highly directional long range device uses recent technology to detect the presence of living bodies, warm and hot spots, heat leaks etc. Intended for security, law enforcement, research and development etc. Excellent security device or very interesting science project. £8/set, Ref F/BHT1. BURNING, CUTTING CO2 LASER PLANS. Projects an invisible beam of heat capable of burning and melting materials over a considerable distance. This laser is one of the most efficient, converting 10% input power into useful output. Not only is this device a workhorse in welding, cutting and heat processing materials, but it is also a likely candidate as an effective directed energy beam weapon against missiles, aircraft, ground-to-ground etc. Burning and etching wood, cutting, plastics, textiles etc. £12/set, Ref F/LC7. www.bullnet.co.uk ISSN 0262 3617 PROJECTS . . . THEORY . . . NEWS . . . COMMENTS . . . POPULAR FEATURES . . . VOL. 31. No. 5 MAY 2002 www.epemag.wimborne.co.uk EPE Online: www.epemag.com Cover illustration by Jonathan Robertson Projects and Circuits FREEZER ALARM by Humphrey Berridge How to prevent your food from defrosting unexpectedly 316 PIC BIG-DIGIT DISPLAY by John Becker Control the giant ex-British Rail platform clock 7-segment digits that are now available on the surplus market 325 INGENUITY UNLIMITED hosted by Alan Winstanley Battery Discharger; Emergency Light 338 SIMPLE AUDIO CIRCUITS – 1. Power Amplifiers by Raymond Haigh 340 A compendium of useful audio amplifier circuits for the experimenting constructor WASHING READY INDICATOR by Terry de Vaux-Balbirnie Has the washing machine finished? – Avoid those washday blues 356 Series and Features NEW TECHNOLOGY UPDATE by Ian Poole Dye molecules improve solar cell efficiency 320 PRACTICALLY SPEAKING by Robert Penfold A general look at using enclosures with your projects 335 NET WORK – THE INTERNET PAGE surfed by Alan Winstanley Stripboard designing software 360 CIRCUIT SURGERY by Alan Winstanley and Ian Bell Linear opto-coupling; Dog and Cat Scarer circuit details 362 TEACH-IN 2002 – 7. Comparators and digital optical sensing, 368 plus more on Noise, with experiments by Ian Bell and Dave Chesmore Regulars and Services ELECTRONICS MANUALS Essential reference works for hobbyists, students and service engineers 310 EDITORIAL 315 NEWS – Barry Fox highlights technology’s leading edge Plus everyday news from the world of electronics 322 BACK ISSUES Did you miss these? Many now on CD-ROM! 350 READOUT John Becker addresses general points arising 353 CD-ROMS FOR ELECTRONICS A wide range of CD-ROMs for hobbyists, students and engineers 364 SHOPTALK with David Barrington, The essential guide to component buying for EPE projects 367 ELECTRONIC VIDEOS Our range of educational videos 378 PRINTED CIRCUIT BOARD AND SOFTWARE SERVICE PCBs for EPE projects. Plus EPE software 379 © Wimborne Publishing Ltd 2002. Copyright in all drawings, photographs and articles published in EVERYDAY PRACTICAL ELECTRONICS is fully protected, and reproduction or imitations in whole or in part are expressly forbidden. DIRECT BOOK SERVICE A wide range of technical books available by mail order 380 ADVERTISERS INDEX 384 Our June 2002 issue will be published on Thursday, 9 May 2002. See page 307 for details Readers Services ) Editorial and Advertisement Departments 315 Everyday Practical Electronics, May 2002 305 Visit our website www.distel.co.uk THE ORIGINAL SURPLUS WONDERLAND! THIS MONTH'S SELECTION FROM OUR VAST EVER CHANGING STOCKS GIANT 10” 7-SEGMENT DISPLAYS IC's -TRANSISTORS - DIODES A bulk purchase enables us to bring to you these GIANT 7-segment digital displays at a now affordable price!! The 10” character size gives exceptional readability at long distances and enables a host of applications including, score boards, digital clocks, counters, event timers etc. As the units are a simple electromechanical device and operate from 12V DC, simple switching via switches, relays, PIC or PC may be used to control single or multiple digits. Units feature integral ‘Zero Power’ memory which greatly simplifies desgn. For an excellent DIY practical article, see the May issue of ‘Everyday Practical Electronics’ magazine. Ideal School / College construction project. Supplied in good RFE condition, complete with data sheet. OBSOLETE – SHORT SUPPLY – BULK Less than 30% of makers price ! Surplus always wanted for cash! Only £29.95(B) or 4 / £99.00(D) Order RW44 Order PH26 THE AMAZING TELEBOX TV SOUND & VIDEO TUNER CABLE COMPATIBLE * Converts your colour monitor into a QUALITY COLOUR TV!! The TELEBOX is an attractive fully cased mains powered unit, containing all electronics ready to plug into a host of video monitors or AV equipment which are fitted with a composite video or SCART input. The composite video output will also plug directly into most video recorders, allowing reception of TV channels not normally receivable on most television receivers* (TELEBOX MB). Push button controls on the front panel allow reception of 8 fully tuneable 'off air' UHF colour television channels. TELEBOX MB covers virtually all television frequencies VHF and UHF including the HYPERBAND as used by most cable TV operators. Ideal for desktop computer video systems & PIP (picture in picture) setups. For complete compatibility – even for monitors without sound – an integral 4 watt audio amplifier and low level Hi Fi audio output are provided as standard. Brand new – fully guaranteed. TELEBOX ST for composite video input type monitors £36.95 TELEBOX STL as ST but fitted with integral speaker £39.50 TELEBOX MB Multiband VHF/UHF/Cable/Hyperband tuner £69.95 For overseas PAL versions state 5.5 or 6 mHz sound specification. *For cable / hyperband signal reception Telebox MB should be connected to a cable type service. Shipping on all Telebox's, code (B) of the art PAL (UK spec) UHF TV tuner module W State with composite 1V pp video & NICAM hi fi stereo sound NE outputs. Micro electronics all on one small PCB only 73 x 160 x 52 mm enable full tuning control via a simple 3 wire link to an IBM pc type computer. Supplied complete with simple working program and documentation. Requires +12V & + 5V DC to operate. BRAND NEW - Order as MY00. Only £39.95 code (B) See www.distel.co.uk/data_my00.htm for picture + full details HARD DISK DRIVES 2½" - 14" 2½" TOSHIBA MK1002MAV 1.1Gb laptop(12.5 mm H) New £59.95 2½" TOSHIBA MK4313MAT 4.3Gb laptop (8.2 mm H) New £105.00 2½" TOSHIBAMK6409MAV 6.1Gb laptop (12.7 mm H) New £98.00 2½" TOSHIBA MK1614GAV 18 Gb laptop (12 mm H) New £149.95 2½" to 3½" conversion kit for Pc's, complete with connectors £15.95 3½" COMPAQ 313706-B21 (IBM) 9 gb ULT/SCSI3 New £199.00 3½" FUJI FK-309-26 20mb MFM I/F RFE £59.95 3½" CONNER CP3024 20 mb IDE I/F (or equiv.) RFE £59.95 3½" CONNER CP3044 40 mb IDE I/F (or equiv.) RFE £69.00 3½" QUANTUM 40S Prodri ve 42mb SCSI I/F, New RFE £49.00 5¼" MINISCRIBE 3425 20mb MFM I/F (or equiv.) RFE £49.95 5¼" SEAGATE ST-238R 30 mb RLL I/F Refurb £69.95 5¼" CDC 94205-51 40mb HH MFM I/F RFE tested £69.95 5¼" HP 97548 850 Mb SCSI RFE tested £99.00 5¼" HP C3010 2 Gbyte SCSI differential RFE tested £195.00 £99.00 8" NEC D2246 85 Mb SMD interface. New 8" FUJITSU M2322K 160Mb SMD I/F RFE tested £195.00 8" FUJITSU M2392K 2 Gb SMD I/F RFE tested £345.00 Many other floppy & H drives, IDE, SCSI. ESDI etc from stock, see website for full stock list. Shipping on all drives is code (C) 10,000,000 items EX STOCK For MAJOR SAVINGS CALL or see web site www.distel.co.uk COMPUTER MONITOR SPECIALS Legacy products High spec genuine multysync. CGA, EGA, VGA, SVGA Mitsubishi FA3415ETKL 14” SVGA Multisync colour monitor with fine 0.28 dot pitch tube and resolution of 1024 x 768. A variety of inputs allows connection to a host of computers including IBM PC's in CGA, EGA, VGA & SVGA modes, BBC, COMMODORE (including Amiga 1200), ARCHIMEDES and APPLE. Many features: Etched faceplate, text switching and LOW RADIATION MPR specification. Fully guaranteed, in EXCELLENT little used condition. Tilt & Swivel Base £4.75 Order as VGA cable for IBM PC included. (E) CG73 External cables for other types of computers available - CALL Only £129 Generic LOW COST SVGA Monitors We choose the make, which includes Compaq, Mitsubishi, IBM, etc. Supplied ready to run with all cables, Standard RTB 90 day guarantee. 14” £59.00 15” £69.00 Supplied in good used condition. Shipping code (D) VIDEO MONITORS PHILIPS HCS35 (same style as CM8833) attractively styled 14” colour monitor with both RGB and standard composite 15.625 Khz video inputs via SCART socket and separate phono jacks. Integral audio power amp and speaker for all audio visual uses. Will connect direct to Amiga and Atari BBC computers. Ideal for all video monitoring / security applications with direct connection to most colour cameras. High quality with many features such as front concealed flap controls, VCR correction button etc. Good used condition - fully tested - guaranteed Dimensions: W14" x H12¾" x 15½" D. (E) PHILIPS HCS31 Ultra compact 9” colour video monitor with standard composite 15.625 Khz video input via SCART socket. Ideal for all monitoring / security applications. High quality, ex-equipment fully tested & guaranteed (possible minor screen burns). In attractive square black plastic case measuring W10" x H10" x 13½" D. 240 V AC mains powered. Only £79.00 (D) Only £99.00 INDUSTRIAL COMPUTERS Tiny shoebox sized industrial 40 Mhz 386 PC system measuring only (mm) 266 w X 88 h X 272 d. Ideal for dedicated control applications running DOS, Linux or even Windows ! Steel case contains 85 to 265 V AC 50 / 60 hz 70 Watt PSU, a 3 slot ISA passive backplane and a Rocky 318 (PC104) standard, single board computer with 8 MByte NON VOLATILE solid state 'Disk On Chip' RAMDISK. System comprises: Rocky 318 (PC104) SBC ISA card with 40MHz ALi 386SX CPU, 72 pin SIMM slot with 16 Mbyte SIMM, AMI BIOS, battery backed up real time clock. 2 x 9 pin D 16550 serial ports. EPP/ECP printer port, mini DIN keyboard connector, floppy port, IDE port for hard drives up to 528 MByte capacity, watchdog timer and PC/104 bus socket. The 8 MByte solid state 'disk on a chip' has its own BIOS, and can be fdisked, formatted & booted. Supplied BRAND NEW fully tested and guaranteed. For full data see featured item on website. Order as QG36 100’s of applications inc: firewall, routers, robotics etc ALL MAIL TO Dept PE, 29 / 35 Osborne Rd Thornton Heath Surrey CR7 8PD Open Mon - Fri 9.00 - 5:30 Est. 26 Years Only £99.00 (D) Unless marked NEW, items in this section are pre owned. HP6030A 0-200V DC @ 17 Amps bench power supply £1950 Intel SBC 486/125C08 Enhanced Multibus (MSA) New £1150 Nikon HFX-11 (Ephiphot) exposure control unit £1450 PHILIPS PM5518 pro. TV signal generator £1250 Motorola VME Bus Boards & Components List. SAE / CALL £POA Trio 0-18 vdc linear, metered 30 amp bench PSU. New £550 Fujitsu M3041R 600 LPM high speed band printer £1950 Fujitsu M3041D 600 LPM printer with network interface £1250 Siemens K4400 64Kb to 140Mb demux analyser £2950 Perkin Elmer 299B Infrared spectrophotometer £500 Perkin Elmer 597 Infrared spectrophotometer £3500 VG Electronics 1035 TELETEXT Decoding Margin Meter £3250 LightBand 60 output high spec 2u rack mount Video VDA's £495 Sekonic SD 150H 18 channel digital Hybrid chart recorder £1995 B&K 2633 Microphone pre amp £300 Taylor Hobson Tallysurf amplifier / recorder £750 ADC SS200 Carbon dioxide gas detector / monitor £1450 BBC AM20/3 PPM Meter (Ernest Turner) + drive electronics £75 ANRITSU 9654A Optical DC-2.5G/b waveform monitor £5650 ANRITSU ML93A optical power meter £990 ANRITSU Fibre optic characteristic test set £POA R&S FTDZ Dual sound unit £650 R&S SBUF-E1 Vision modulator £775 WILTRON 6630B 12.4 / 20GHz RF sweep generator £5750 TEK 2445 150 MHz 4 trace oscilloscope £1250 TEK 2465 300 Mhz 300 MHz oscilloscope rack mount £1955 TEK TDS380 400Mhz digital realtime + disk drive, FFT etc £2900 TEK TDS524A 500Mhz digital realtime + colour display etc £5100 HP3585A Opt 907 20Hz to 40 Mhz spectrum analyser £3950 PHILIPS PW1730/10 60KV XRAY generator & accessories £POA VARIACS - Large range from stock - call or see our website CLAUDE LYONS 12A 240V single phase auto. volt. regs £325 CLAUDE LYONS 100A 240/415V 3 phase auto. volt. regs £2900 TEST EQUIPMENT & SPECIAL INTEREST ITEMS MITSUBISHI FA3445ETKL 14” Ind. spec SVGA monitors £245 FARNELL 0-60V DC @ 50 Amps, bench Power Supplies £995 FARNELL AP3080 0-30V DC @ 80 Amps, bench Suppy £1850 KINGSHILL CZ403/1 0-50V @ DC 200 Amps - NEW £3950 1kW to 400 kW - 400 Hz 3 phase power sources - ex stock £POA IBM 8230 Type 1, Token ring base unit driver £760 Wayne Kerr RA200 Audio frequency response analyser £2500 INFODEC 1U, 24 port, RJ45 network patchpanels. #TH93 £49 3COM 16670 12 Port Ethernet hub - RJ45 connectors #LD97 £69 3COM 16671 24 Port Ethernet hub - RJ45 connectors £89 3COM 16700 8 Port Ethernet hub - RJ45 connectors NEW £39 IBM 53F5501 Token Ring ICS 20 port lobe modules £POA IBM MAU Token ring distribution panel 8228-23-5050N £45 AIM 501 Low distortion Oscillator 9Hz to 330Khz, IEEE I/O £550 ALLGON 8360.11805-1880 MHz hybrid power combiners £250 Trend DSA 274 Data Analyser with G703(2M) 64 i/o £POA Marconi 6310 Programmable 2 to 22 GHz sweep generator £4500 Marconi 2022C 10KHz-1GHz RF signal generator £1550 HP1650B Logic Analyser £3750 HP3781A Pattern generator & HP3782A Error Detector £POA HP6621A Dual Programmable GPIB PSU 0-7 V 160 watts £1800 HP6264 Rack mount variable 0-20V @ 20A metered PSU £475 HP54121A DC to 22 GHz four channel test set £POA HP8130A opt 020 300 MHz pulse generator, GPIB etc £7900 HP A1, A0 8 pen HPGL high speed drum plotters - from £550 HP DRAFTMASTER 1 8 pen high speed plotter £750 EG+G Brookdeal 95035C Precision lock in amp £1800 Keithley 590 CV capacitor / voltage analyser £POA Racal ICR40 dual 40 channel voice recorder system £3750 Fiskers 45KVA 3 ph On Line UPS – New batteries £4500 Emerson AP130 2.5KVA industrial spec.UPS £1499 Mann Tally MT645 High speed line printer £2200 Intel SBC 486/133SE Multibus 486 system. 8Mb Ram £945 17” £79.00 ve Sa££’s £ 19" RACK CABINETS Europe’s Largest Stocks of Europe’s Largest Stocks of quality qualityrack rackcabinets, cabinets, enclosures and accessories. enclosures and Over 1000 Racks from stock BIG This month’s special 33 / 42 / 47 U - High Quality SAVE £ R All steel Rack Cabinets Made by Eurocraft Enclosures Ltd to the highest possible spec, rack features all steel construction with removable side, front and back doors. Front and back doors are hinged for easy access and all lockable with five secure 5 lever barrel locks. The front door is constructed of double walled steel with a ‘designer style’ smoked acrylic front panel to enable status indicators to be seen through the panel, yet remain unobtrusive. Internally the rack features fully slotted reinforced vertical fixing members to take the heaviest of 19” rack equipment. The two movable vertical fixing struts (extras available) are pre punched for standard ‘cage nuts’. A mains distribution panel internally mounted to the bottom rear, provides 8 x IEC 3 pin Euro sockets and 1 x 13 amp 3 pin switched utility socket. Overall ventilation is provided by fully louvered back door and double skinned top section with top and side louvres. The top panel may be removed for fitting of integral fans to the sub plate etc. Other features include: fitted castors and floor levelers, prepunched utility panel at lower rear for cable / connector access etc. Supplied in excellent, slightly used condition with keys. Colour Royal blue. some grey available – CALL – Can be supplied in many other configurations. 33U 42U 47U Order as BC44 Order as DT20 Order as RV36 External dimensions mm=1625H x 635D x 603 W. (64” H x 25” D x 23¾” W ) External dimensions mm=2019H x 635D x 603 W. (79.5” H x 25” D x 23¾” W ) External dimensions mm=2019H x 635D x 603 W. (88” H x 25” D x 23¾” W ) Only £245 Only £345 Only £410 Call for shipping quotation LOW COLOUR COST CCD RAM CAMERAS & CPU’S B S IG Undoubtedly a miracle of modern technology & our special buying power ! A quality product featuring a fully cased COLOUR CCD camera at a give away price ! Unit features full autolight sensing for use in low light & high light applications. A 10 mm fixed focus wide angle lens gives excellent focus and resolution from close up to long range. The composite video output will connect to any composite monitor or TV (via SCART socket) and most video recorders. Unit runs from 12V DC so ideal for security & portable applications where mains power not available. Overall dimensions 66 mm wide x 117 deep x 43 high. Supplied BRAND NEW & fully guaranteed with user data, 100's of applications including Security, Home Video, Web TV, Web Cams etc, etc. AV Order as LK33 £ ER ONLY £79.00 or 2 for £149.00 (B) LOW SOFTWARE COST RAM SPECIALS & CPU’S NT4 WorkStation, complete with service pack 3 and licence - OEM packaged. ONLY £89.00 (B) ENCARTA 95 - CDROM, Not the latest - but at this price ! £7.95 DOS 5.0 on 3½" disks with concise books c/w QBasic . £14.95 Windows for Workgroups 3.11+ Dos 6.22 on 3.5" disks £55.00 Windows 95 CDROM Only - No Licence £19.95 Wordperfect 6 for DOS supplied on 3½" disks with manual £24.95 shipping charges for software is code B LOW SOLID COST STATE RAMLASERS & CPU’S Visible red, 670nm laser diode assembly. Unit runs from 5 V DC at approx 50 mA. Orginally made for continuous use in industrial barcode scanners, the laser is mounted in a removable solid aluminium block, which functions as a heatsink and rigid optical mount. Dims of block are 50 w x 50 d x 15 h mm. Integral features include over temperature shutdown, current control, laser OK ouput, and gated TTL ON / OFF. Many uses for experimental optics, comms & lightshows etc. Supplied complete with data sheet. Order as TD91 ONLY £24.95 (A) DC POWER SUPPLIES Virtually every type of power supply you can imagine.Over 10,000 Power Supplies Ex Stock - Call or see our web site. RELAYS LOW COST - 200,000 RAM FROM & CPU’S STOCK Save ££££'s by choosing your next relay from our Massive Stocks covering types such as Military, Octal, Cradle, Hermetically Sealed, Continental, Contactors, Time Delay, Reed, Mercury Wetted, Solid State, Printed Circuit Mounting etc., CALL or see our web site www.distel.co.uk for more information. Many obsolete types from stock. Save ££££'s 18 Million Items On Line Now ! Secure ordering, Pictures, Information www.distel.co.uk email = [email protected] ALL ENQUIRIES 0208 653 3333 FAX 0208 653 8888 All prices for UK Mainland. UK customers add 17.5% VAT to TOTAL order amount. Minimum order £10. Bona Fide account orders accepted from Government, Schools, Universities and Local Authorities - minimum account order £50. Cheques over £100 are subject to 7 working days clearance. Carriage charges (A)=£3.50, (B)=£6.50, (C)=£10, (D)=£15.00, (E)=£18.00, (F)=CALL. Allow approx 3 days for shipping - faster CALL. All goods supplied to our Standard Conditions of Sale which can be viewed at our website and unless stated guaranteed for 90 days. All guarantees on a return to base basis. All rights reserved to change prices / specifications without prior notice. Orders subject to stock. Discounts for volume. Top CASH prices paid for surplus goods. All trademarks, tradenames etc acknowledged. © Display Electronics 2002. E & O E.. NEXT MONTH BIOPIC HEARTBEAT MONITOR The Biopic monitors heartbeats across the chest using simple electrodes and outputs the display to a PC-compatible computer via an electrically-isolated serial data link. Pulse rates can be monitored separately by a handheld sensor that detects the opacity of the thumb, which changes as blood pulses through it. Based on a PIC16F876 microcontroller, the design uses only five i.c.s. The probes and contact pads used are those sold inexpensively by major chemists for use with proprietary TENS (pain relief) machines. It can also be used as a handheld unit without a PC. In this role, an l.c.d. shows the heart rate as a graphical waveform, and provides a beats per minute count, plus a real-time pulse beat via a flashing asterisk. The Biopic’s PC software is written in QBasic, but is self-contained and does not require QB itself to be installed. It can be run in DOS mode or under Windows 3.1, 95, 98 and ME. WORLD LAMP THE quest for a battery-powered lamp for lighting in poorer areas has presented an interesting and important design challenge for many years. Such a lamp should ideally be cheap, simple, efficient, and flexible – all at the same time. With this in mind, the authors have designed a lamp that is made from inexpensive readily-available stock parts and runs off a nominal 12V d.c. supply. This is converted to a p.w.m. (pulse width modulated) a.c. supply which will power any ordinary fluorescent lamp between 100mW and 15W. It will power the equivalent of a 60W incandescent lamp for about 80 hours off a standard 12V car battery and can provide low cost lighting whenever or wherever there’s no mains supply available. FREQUENCY STANDARD GENERATOR A high-precision selectable 1kHz to 100kHz frequency source derived from BBC Radio Four’s transmission signal which has a Rubidium frequency source as its reference and has an accuracy of one part in 1011. The primary virtue of this design is its phenomenal accuracy and stability. There will not usually be many really accurate standards of any kind in the workshop of a home constructor since they are usually prohibitively expensive. This design provides an exception to this rule by bringing a national frequency standard right onto the amateur’s bench. It should prove useful for checking and adjusting the calibration of frequency meters, oscilloscopes, and any other equipment used for measuring or generating frequency of any kind. NO ONE DOES IT BETTER DON'T MISS AN ISSUE – PLACE YOUR ORDER NOW! Demand is bound to be high JUNE 2002 ISSUE ON SALE THURSDAY, MAY 9 Everyday Practical Electronics, May 2002 307 QUASAR ELECTRONICS Limited Established 1990 PO Box 6935, BISHOPS STORTFORD, Herts. CM23 4WP TEL: 01279 467799 FAX: 07092 203496 ADD £2.00 P&P to all orders (or 1st Class Recorded £4, Next day (Insured £250) £7, Europe £5.00, Rest of World £10.00). We accept all major credit cards. Make cheques/PO's payable to Quasar Electronics. Prices include 17.5% VAT. MAIL ORDER ONLY FREE CATALOGUE with order or send 2 x 1st class stamps (refundable) for details of over 150 kits & publications. PROJECT KITS * 2 x 25W CAR BOOSTER AMPLIFIER Connects to the output of an existing car stereo cassette player, CD player or radio. Heatsinks provided. PCB 76x75mm. 1046KT. £24.95 * 3-CHANNEL WIRELESS LIGHT MODULATOR No electrical connection with amplifier. Light modulation achieved via a sensitive electret microphone. Separate sensitivity control per channel. Power handing 400W/channel. PCB 54x112mm. Mains powered. Box provided. 6014KT £24.95 * 12 RUNNING LIGHT EFFECT Exciting 12 LED light effect ideal for parties, discos, shop-windows & eye-catching signs. PCB design allows replacement of LEDs with 220V bulbs by inserting 3 TRIACs. Adjustable rotation speed & direction. PCB 54x112mm. 1026KT £15.95; BOX (for mains operation) 2026BX £9.00 * DISCO STROBE LIGHT Probably the most exciting of all light effects. Very bright strobe tube. Adjustable strobe frequency: 1-60Hz. Mains powered. PCB: 60x68mm. Box provided. 6037KT £28.95 * ANIMAL SOUNDS Cat, dog, chicken & cow. Ideal for kids farmyard toys & schools. SG10M £5.95 * 3 1/2 DIGIT LED PANEL METER Use for basic voltage/current displays or customise to measure temperature, light, weight, movement, sound levels, etc. with appropriate sensors (not supplied). Various input circuit designs provided. 3061KT £13.95 * IR REMOTE TOGGLE SWITCH Use any TV/VCR remote control unit to switch onboard 12V/1A relay on/off. 3058KT £10.95 SPEED CONTROLLER for any common DC motor up to 100V/5A. Pulse width modulation gives maximum torque at all speeds. 5-15VDC. Box provided. 3067KT £12.95 * 3 x 8 CHANNEL IR RELAY BOARD Control eight 12V/1A relays by Infra Red (IR) remote control over a 20m range in sunlight. 6 relays turn on only, the other 2 toggle on/off. 3 operation ranges determined by jumpers. Transmitter case & all components provided. Receiver PCB 76x89mm. 3072KT £52.95 PRODUCT FEATURE COMPUTER TEMPERATURE DATA LOGGER PC serial port controlled 4-channel temperature meter (either deg C or F). Requires no external power. Allows continuous temperature data logging of up to four temperature sensors located 200m+ from motherboard/PC. Ideal use for old 386/486 computers. Users can tailor input data stream to suit their purpose (dump it to a spreadsheet or write your own BASIC programs using the INPUT command to grab the readings). PCB just 38mm x 38mm. Sensors connect via four 3-pin headers. 4 header cables supplied but only one DS18S20 sensor. Kit software available free from our website. ORDERING: 3145KT £23.95 (kit form); AS3145 £29.95 (assembled); Additional DS18S20 sensors £4.95 each * SOUND EFFECTS GENERATOR Easy to build. Create an almost infinite variety of interesting/unusual sound effects from birds chirping to sirens. 9VDC. PCB 54x85mm. 1045KT £8.95 * ROBOT VOICE EFFECT Make your voice sound similar to a robot or Darlek. Great fun for discos, school plays, theatre productions, radio stations & playing jokes on your friends when answering the phone! PCB 42x71mm. 1131KT £8.95 * AUDIO TO LIGHT MODULATOR Controls intensity of one or more lights in response to an audio input. Safe, modern opto-coupler design. Mains voltage experience required. 3012KT £8.95 * MUSIC BOX Activated by light. Plays 8 Christmas songs and 5 other tunes. 3104KT £7.95 * 20 SECOND VOICE RECORDER Uses nonvolatile memory - no battery backup needed. Record/replay messages over & over. Playback as required to greet customers etc. Volume control & built-in mic. 6VDC. PCB 50x73mm. 3131KT £12.95 * TRAIN SOUNDS 4 selectable sounds : whistle blowing, level crossing bell, ‘clickety-clack’ & 4 in sequence. SG01M £6.95 X FACTOR PUBLICATIONS THE EXPERTS IN RARE & UNUSUAL INFORMATION! Full details of all X-FACTOR PUBLICATIONS can be found in our catalogue. N.B. Minimum order charge for reports and plans is £5.00 PLUS normal P.&P. * SUPER-EAR LISTENING DEVICE Complete plans to build your own parabolic dish microphone. Listen to distant voices and sounds through open windows and even walls! Made from readily available parts. R002 £3.50 * LOCKS - How they work and how to pick them. This fact filled report will teach you more about locks and the art of lock picking than many books we have seen at 4 times the price. Packed with information and illustrations. R008 £3.50 * RADIO & TV JOKER PLANS We show you how to build three different circuits for disrupting TV picture and sound plus FM radio! May upset your neighbours & the authorities!! DISCRETION REQUIRED. R017 £3.50 * INFINITY TRANSMITTER PLANS Complete plans for building the famous Infinity Transmitter. Once installed on the target phone, device acts like a room bug. Just call the target phone & activate the unit to hear all room sounds. Great for home/office security! R019 £3.50 * THE ETHER BOX CALL INTERCEPTOR PLANS Grabs telephone calls out of thin air! No need to wire-in a phone bug. Simply place this device near the phone lines to hear the conversations taking place! R025 £3.00 * CASH CREATOR BUSINESS REPORTS Need ideas for making some cash? Well this could be just what you need! You get 40 reports (approx. 800 pages) on floppy disk that give you information on setting up different businesses. You also get valuable reproduction and duplication rights so that you can sell the manuals as you like. R030 £7.50 308 * PC CONTROLLED RELAY BOARD Convert any 286 upward PC into a dedicated automatic controller to independently turn on/off up to eight lights, motors & other devices around the home, office, laboratory or factory. Each relay output is capable of switching 250VAC/4A. A suite of DOS and Windows control programs are provided together with all components (except box and PC cable). 12VDC. PCB 70x200mm. 3074KT £31.95 * 2 CHANNEL UHF RELAY SWITCH Contains the same transmitter/receiver pair as 30A15 below plus the components and PCB to control two 240VAC/10A relays (also supplied). Ultra bright LEDs used to indicate relay status. 3082KT £27.95 * TRANSMITTER RECEIVER PAIR 2-button keyfob style 300-375MHz Tx with 30m range. Receiver encoder module with matched decoder IC. Components must be built into a circuit like kit 3082 above. 30A15 £14.95 * PIC 16C71 FOUR SERVO MOTOR DRIVER Simultaneously control up to 4 servo motors. Software & all components (except servos/control pots) supplied. 5VDC. PCB 50x70mm. 3102KT £15.95 * UNIPOLAR STEPPER MOTOR DRIVER for any 5/6/8 lead motor. Fast/slow & single step rates. Direction control & on/off switch. Wave, 2-phase & half-wave step modes. 4 LED indicators. PCB 50x65mm. 3109KT £14.95 * PC CONTROLLED STEPPER MOTOR DRIVER Control two unipolar stepper motors (3A max. each) via PC printer port. Wave, 2-phase & half-wave step modes. Software accepts 4 digital inputs from external switches & will single step motors. PCB fits in Dshell case provided. 3113KT £17.95 * 12-BIT PC DATA ACQUISITION/CONTROL UNIT Similar to kit 3093 above but uses a 12 bit Analogueto-Digital Converter (ADC) with internal analogue multiplexor. Reads 8 single ended channels or 4 differential inputs or a mixture of both. Analogue inputs read 0-4V. Four TTL/CMOS compatible digital input/outputs. ADC conversion time <10uS. Software (C, QB & Win), extended D shell case & all components (except sensors & cable) provided. 3118KT £52.95 * LIQUID LEVEL SENSOR/RAIN ALARM Will indicate fluid levels or simply the presence of fluid. Relay output to control a pump to add/remove water when it reaches a certain level. 1080KT £5.95 * AM RADIO KIT 1 Tuned Radio Frequency frontend, single chip AM radio IC & 2 stages of audio amplification. All components inc. speaker provided. PCB 32x102mm. 3063KT £10.95 * DRILL SPEED CONTROLLER Adjust the speed of your electric drill according to the job at hand. Suitable for 240V AC mains powered drills up to ROOM SURVEILLANCE * MTX - MINIATURE 3V TRANSMITTER Easy to build & guaranteed to transmit 300m @ 3V. Long battery life. 3-5V operation. Only 45x18mm. B 3007KT £6.95 AS3007 £11.95 MRTX - MINIATURE 9V TRANSMITTER Our best selling bug. Super sensitive, high power - 500m range @ 9V (over 1km with 18V supply and better aerial). 45x19mm. 3018KT £7.95 AS3018 £12.95 HPTX - HIGH POWER TRANSMITTER High performance, 2 stage transmitter gives greater stability & higher quality reception. 1000m range 612V DC operation. Size 70x15mm. 3032KT £9.95 AS3032 £18.95 * MMTX - MICRO-MINIATURE 9V TRANSMITTER The ultimate bug for its size, performance and price. Just 15x25mm. 500m range @ 9V. Good stability. 6-18V operation. 3051KT £8.95 AS3051 £14.95 * VTX - VOICE ACTIVATED TRANSMITTER Operates only when sounds detected. Low standby current. Variable trigger sensitivity. 500m range. Peaking circuit supplied for maximum RF output. On/off switch. 6V operation. Only 63x38mm. 3028KT £12.95 AS3028 £21.95 HARD-WIRED BUG/TWO STATION INTERCOM Each station has its own amplifier, speaker and mic. Can be set up as either a hard-wired bug or two-station intercom. 10m x 2-core cable supplied. 9V operation. 3021KT £15.95 (kit form only) * TRVS - TAPE RECORDER VOX SWITCH Used to automatically operate a tape recorder (not supplied) via its REMOTE socket when sounds are detected. All conversations recorded. Adjustable sensitivity & turn-off delay. 115x19mm. 3013KT £9.95 AS3013 £21.95 700W power. PCB: 48mm x 65mm. Box provided. 6074KT £17.95 * 3 INPUT MONO MIXER Independent level control for each input and separate bass/treble controls. Input sensitivity: 240mV. 18V DC. PCB: 60mm x 185mm 1052KT £16.95 * NEGATIVE\POSITIVE ION GENERATOR Standard Cockcroft-Walton multiplier circuit. Mains voltage experience required. 3057KT £10.95 * LED DICE Classic intro to electronics & circuit analysis. 7 LED’s simulate dice roll, slow down & land on a number at random. 555 IC circuit. 3003KT £9.95 * STAIRWAY TO HEAVEN Tests hand-eye co-ordination. Press switch when green segment of LED lights to climb the stairway - miss & start again! Good intro to several basic circuits. 3005KT £9.95 * ROULETTE LED ‘Ball’ spins round the wheel, slows down & drops into a slot. 10 LED’s. Good intro to CMOS decade counters & Op-Amps. 3006KT £10.95 * 12V XENON TUBE FLASHER TRANSFORMER steps up a12V supply to flash a 25mm Xenon tube. Adjustable flash rate. 3163KT £13.95 * LED FLASHER 1 5 ultra bright red LED’s flash in 7 selectable patterns. 3037MKT £5.95 * LED FLASHER 2 Similar to above but flash in sequence or randomly. Ideal for model railways. 3052MKT £5.95 * INTRODUCTION TO PIC PROGRAMMING. Learn programming from scratch. Programming hardware, a P16F84 chip and a two-part, practical, hands-on tutorial series are provided. 3081KT £21.95 * SERIAL PIC PROGRAMMER for all 8/18/28/40 pin DIP serial programmed PICs. Shareware software supplied limited to programming 256 bytes (registration costs £14.95). 3096KT £12.95 * ATMEL 89Cx051 PROGRAMMER Simple-touse yet powerful programmer for the Atmel 89C1051, 89C2051 & 89C4051 uC’s. Programmer does NOT require special software other than a terminal emulator program (built into Windows). Can be used with ANY computer/operating system. 3121KT £24.95 * 3V/1·5V TO 9V BATTERY CONVERTER Replace expensive 9V batteries with economic 1.5V batteries. IC based circuit steps up 1 or 2 ‘AA’ batteries to give 9V/18mA. 3035KT £5.95 * STABILISED POWER SUPPLY 3-30V/2.5A Ideal for hobbyist & professional laboratory. Very reliable & versatile design at an extremely reasonable price. Short circuit protection. Variable DC voltages (3-30V). Rated output 2.5 Amps. Large heatsink supplied. You just supply a 24VAC/3A transformer. PCB 55x112mm. Mains operation. 1007KT £16.95. TELEPHONE SURVEILLANCE * MTTX - MINIATURE TELEPHONE TRANSMITTER Attaches anywhere to phone line. Transmits only when phone is used! Tune-in your radio and hear both parties. 300m range. Uses line as aerial & power source. 20x45mm. 3016KT £8.95 AS3016 £14.95 * TRI - TELEPHONE RECORDING INTERFACE Automatically record all conversations. Connects between phone line & tape recorder (not supplied). Operates recorders with 1.5-12V battery systems. Powered from line. 50x33mm. 3033KT £9.95 AS3033 £18.95 * TPA - TELEPHONE PICK-UP AMPLIFIER/WIRELESS PHONE BUG Place pick-up coil on the phone line or near phone earpiece and hear both sides of the conversation. 3055KT £11.95 AS3055 £20.95 HIGH POWER TRANSMITTERS * 1 WATT FM TRANSMITTER Easy to construct. Delivers a crisp, clear signal. Two-stage circuit. Kit includes microphone and requires a simple open dipole aerial. 8-30VDC. PCB 42x45mm. 1009KT £14.95 * 4 WATT FM TRANSMITTER Comprises three RF stages and an audio preamplifier stage. Piezoelectric microphone supplied or you can use a separate preamplifier circuit. Antenna can be an open dipole or Ground Plane. Ideal project for those who wish to get started in the fascinating world of FM broadcasting and want a good basic circuit to experiment with. 12-18VDC. PCB 44x146mm. 1028KT. £22.95 AS1028 £34.95 * 15 WATT FM TRANSMITTER (PRE-ASSEMBLED & TESTED) Four transistor based stages with Philips BLY 88 in final stage. 15 Watts RF power on the air. 88108MHz. Accepts open dipole, Ground Plane, 5/8, J, or YAGI antennas. 12-18VDC. PCB 70x220mm. SWS meter needed for alignment. 1021KT £99.95 * SIMILAR TO ABOVE BUT 25W Output. 1031KT £109.95 * STABILISED POWER SUPPLY 2-30V/5A As kit 1007 above but rated at 5Amp. Requires a 24VAC/5A transformer. 1096KT £27.95. * MOTORBIKE ALARM Uses a reliable vibration sensor (adjustable sensitivity) to detect movement of the bike to trigger the alarm & switch the output relay to which a siren, bikes horn, indicators or other warning device can be attached. Auto-reset. 6-12VDC. PCB 57x64mm. 1011KT £11.95 Box 2011BX £7.00 * CAR ALARM SYSTEM Protect your car from theft. Features vibration sensor, courtesy/boot light voltage drop sensor and bonnet/boot earth switch sensor. Entry/exit delays, auto-reset and adjustable alarm duration. 6-12V DC. PCB: 47mm x 55mm 1019KT £11.95 Box 2019BX £8.00 * PIEZO SCREAMER 110dB of ear piercing noise. Fits in box with 2 x 35mm piezo elements built into their own resonant cavity. Use as an alarm siren or just for fun! 6-9VDC. 3015KT £10.95 * COMBINATION LOCK Versatile electronic lock comprising main circuit & separate keypad for remote opening of lock. Relay supplied. 3029KT £10.95 * ULTRASONIC MOVEMENT DETECTOR Crystal locked detector frequency for stability & reliability. PCB 75x40mm houses all components. 4-7m range. Adjustable sensitivity. Output will drive external relay/circuits. 9VDC. 3049KT £13.95 * PIR DETECTOR MODULE 3-lead assembled unit just 25x35mm as used in commercial burglar alarm systems. 3076KT £8.95 * INFRARED SECURITY BEAM When the invisible IR beam is broken a relay is tripped that can be used to sound a bell or alarm. 25 metre range. Mains rated relays provided. 12VDC operation. 3130KT £12.95 * SQUARE WAVE OSCILLATOR Generates square waves at 6 preset frequencies in factors of 10 from 1Hz-100KHz. Visual output indicator. 5-18VDC. Box provided. 3111KT £8.95 * PC DRIVEN POCKET SAMPLER/DATA LOGGER Analogue voltage sampler records voltages up to 2V or 20V over periods from milli-seconds to months. Can also be used as a simple digital scope to examine audio & other signals up to about 5KHz. Software & D-shell case provided. 3112KT £18.95 * 20 MHz FUNCTION GENERATOR Square, triangular and sine waveform up to 20MHz over 3 ranges using ‘coarse’ and ‘fine’ frequency adjustment controls. Adjustable output from 0-2V p-p. A TTL output is also provided for connection to a frequency meter. Uses MAX038 IC. Plastic case with printed front/rear panels & all components provided. 7-12VAC. 3101KT £69.95 30-in-ONE GAIN BARUY!! B Electronic Projects Lab Great introduction to electronics. Ideal for the budding electronics expert! Build a radio, burglar alarm, water detector, morse code practice circuit, simple computer circuits, and much more! NO soldering, tools or previous electronics knowledge required. Circuits can be built and unassembled repeatedly. Comprehensive 68-page manual with explanations, schematics and assembly diagrams. Suitable for age 10+. Excellent for schools. Requires 2 x AA batteries. Order Code EPL030 ONLY £19.95 (phone for bulk discounts). WEB: http://www.QuasarElectronics.com email: [email protected] Secure Online Ordering Facilities Full Kit Listing, Descriptions & Photos Kit Documentation & Software Downloads Everyday Practical Electronics, May 2002 Credit Card Sales: 01279 467799 www.QuasarElectronics.com Our electronic kits are supplied complete with all components, high quality PCBs (NOT cheap Tripad strip board!) and detailed assembly/operating instructions SURVEILLANCE High performance surveillance bugs. Room transmitters supplied with sensitive electret microphone & battery holder/clip. All transmitters can be received on an ordinary VHF/FM radio between 88-108MHz. Available in Kit Form (KT) or Assembled & Tested (AS). WHETHER ELECTRONICS IS YOUR HOBBY OR YOUR LIVELIHOOD . . . YOU NEED THE MODERN ELECTRONICS MANUAL and the ELECTRONICS SERVICE MANUAL THE MODERN ELECTRONICS MANUAL (CD-ROM VERSION ONLY) NEW M O CD-R OF THE N O I VERS DERN L MO S MANUA IC E NOW RY TRVOAIN C LABL DUCTO E L A E O INTR IAL FFER O SPEC FRFICE £G5ULO R A P 31st 2002 RE MAY and ENDS Manuals R E F h OF more y bot Or bu ave even s The essential reference work for everyone studying electronics ) Over 800 pages ) In-depth theory ) Projects to build ) Detailed assembly instructions ) Full components checklists ) Extensive data tables ) Manufacturers’ web links ) Easy-to-use Adobe Acrobat format ) Clear and simple layout ) Comprehensive subject range ) Professionally written ) Regular Supplements EVERYTHING YOU NEED TO GET STARTED AND GO FURTHER IN ELECTRONICS! The revised CD-ROM edition of the Modern Electronics Base Manual (MEM) contains practical, easy-to-follow information on the following subjects: BASIC PRINCIPLES: Electronic Components and their Characteristics (16 sections from Resistors and Potentiometers to Crystals, Crystal Modules and Resonators); Circuits Using Passive Components (10 sections); Power Supplies; The Amateur Electronics Workshop; The Uses of Semiconductors; Digital Electronics (6 sections); Operational Amplifiers; Introduction to Physics, including practical experiments; Semiconductors (5 sections) and Digital Instruments (3 sections). CIRCUITS TO BUILD: There's nothing to beat the satisfaction of creating your own projects. From basic principles, like soldering and making printed circuit boards, to the tools needed for circuit-building, the Modern Electronics Manual and its Supplements describe clearly, with appropriate diagrams, how to assemble a radio, loudspeaker circuits, amplifiers, car projects, a computer interface, measuring instruments, workshop equipment, security systems, medical and musical circuits, etc. The Base Manual describes 12 projects including a Theremin and a Simple TENS Unit. ESSENTIAL DATA: Extensive tables on diodes, transistors, thyristors and triacs, digital and linear i.c.s. EXTENSIVE GLOSSARY: Should you come across a technical word, phrase or abbreviation you're not familiar with, simply look up the glossary included in the Manual and you'll find a comprehensive definition in plain English. The Manual also covers Safety and provides web links to component and equipment Manufacturers and Suppliers. The most comprehensive reference work ever produced at a price you can afford, the CD-ROM edition of THE MODERN ELECTRONICS MANUAL provides you with all the essential information you need. THE MODERN ELECTRONICS MANUAL (MEM – CD-ROM version only) Revised CD-ROM Edition of Basic Work: Contains over 800 pages of information in Adobe Acrobat format. Edited by John Becker. Regular Supplements: Additional CD-ROMs each containing approximately 500 pages of additional information on specific areas of electronics will be available for £19.95 each. Information on the availability and content of each Supplement CD-ROM will be sent to you as they become available. Presentation: CD-ROM suitable for any modern PC. Requires Adobe Acrobat Reader which is included on the MEM CD-ROM. Price of the Basic Work: £29.95 OFFER PRICE £24.95 POST FREE. Offer ends May 31st 2002 ORDER BOTH MANUALS TOGETHER AND SAVE ANOTHER £10 A mass of well-organised and clearly explained information is brought to you by expert editorial teams whose combined experience ensures the widest coverage Regular Supplements to these unique publications, keep you abreast of the latest technology and techniques if required ELECTRONICS SERVICE MANUAL (PRINTED VERSION ONLY) EVERYTHING YOU NEED TO KNOW TO GET STARTED IN REPAIRING AND SERVICING ELECTRONIC EQUIPMENT SAFETY: Be knowledgeable about Safety Regulations, Electrical Safety and First Aid. UNDERPINNING KNOWLEDGE: Specific sections enable you to Understand Electrical and Electronic Principles, Active and Passive Components, Circuit Diagrams, Circuit Measurements, Radio, Computers, Valves and Manufacturers' Data, etc. PRACTICAL SKILLS: Learn how to identify Electronic Components, Avoid Static Hazards, Carry Out Soldering and Wiring, Remove and Replace Components. TEST EQUIPMENT: How to Choose and Use Test Equipment, Assemble a Toolkit, Set Up a Workshop, and Get the Most from Your Multimeter and Oscilloscope, etc. SERVICING TECHNIQUES: The regular Supplements include vital guidelines on how to Service Audio Amplifiers, Radio Receivers, TV Receivers, Cassette Recorders, Video Recorders, Personal Computers, etc. TECHNICAL NOTES: Commencing with the IBM PC, this section and the regular Supplements deal with a very wide range of specific types of equipment – radios, TVs, cassette recorders, amplifiers, video recorders etc.. REFERENCE DATA: Detailing vital parameters for Diodes, Small-Signal Transistors, Power Transistors, Thyristors, Triacs and Field Effect Transistors. Supplements include Operational Amplifiers, Logic Circuits, Optoelectronic Devices, etc. The essential work for servicing and repairing electronic equipment )Around 900 pages )Fundamental principles )Troubleshooting techniques )Servicing techniques )Choosing and using test equipment )Reference data )Easy-to-use format )Clear and simple layout )Vital safety precautions )Professionally written )Regular Supplements )Sturdy gold blocked ring-binder SAL E £15 OFF ELECTRONICS SERVICE MANUAL (ESM – Printed version only) Basic Work: Contains around 900 pages of information. Edited by Mike Tooley BA Regular Supplements: Unlike a book or encyclopedia, this Manual is a living work – continuously extended with new material. If requested, Supplements are sent to you on approval approximately every three months. Each Supplement contains around 160 pages – all for only £23.50+£2.50 p&p. You can, of course, return any Supplement (within ten days) which you feel is superfluous to your needs. You can also purchase a range of past Supplements to extend your Base Manual on subjects of particular interest to you. Presentation: Durable looseleaf system in large A4 format Price of the Basic Work: £39.95 SALE PRICE £24.95 (to include a recent Supplement FREE). Offer ends May 31st 2002. Bu (Prin y the Ele ted ctr Or bu Version) onics Ser v y bot a h Ma t £15 off ice Manu nuals al regu DON more. and savelaervperice. n ’T THI MISS S! Offer ends May 31st 2002 Guarantee Our 30 day money back guarantee gives you complete peace of mind. If you are not entirely happy with the Electronics Service Manual, for whatever reason, simply return it to us in good condition within 30 days and we will make a full refund of your payment – no small print and no questions asked. All we ask is that you pay the return postage. (Overseas buyers also have to pay our overseas postage charge). Sorry, but we can only make exchanges on the Modern Electronics Manual (CD-ROM version) if the CD-ROM is faulty, we cannot offer a money back guarantee on this product as the content can be printed out. Wimborne Publishing Ltd., Dept Y5, 408 Wimborne Road East, Ferndown, Dorset BH22 9ND. Tel: 01202 873872. Fax: 01202 874562. Online shop: www.epemag.wimborne.co.uk/shopdoor.htm PLEASE $ $ ORDER FORM send me THE MODERN ELECTRONICS MANUAL (CD-ROM version only) ELECTRONICS SERVICE MANUAL plus a FREE SUPPLEMENT (Printed version only) I enclose payment of £24.95 (for one Manual) or £39.90 for both Manuals (saving another £10 by ordering both together) plus postage if applicable. (Offers end May 31st 2002) I also require the appropriate Supplements four times a year. These are billed separately and can be discontinued at any time. (Please delete if not required.) FULL NAME . . . . . . . . . . . . . . . . . . . . . . . . . . . . . . . . . . . . . . . . . . . . . . . . . . . . . . . . . . . . . (PLEASE PRINT) ADDRESS . . . . . . . . . . . . . . . . . . . . . . . . . . . . . . . . . . . . . . . . . . . . . . . . . . . . . . . . . . . . . . Simply complete and return the order form with your payment to the following address: Wimborne Publishing Ltd, Dept.Y5, 408 Wimborne Road East, Ferndown, Dorset BH22 9ND We offer a 30 day MONEY BACK GUARANTEE on ESM – see the panel above for details. POSTAGE CHARGES FOR ESM MEM CD-ROM POST FREE TO ALL COUNTRIES (Note we use the VAT portion of the MEM CD-ROM payment to pay for overseas postage) Price PER ESM PRINTED MANUAL Postal Region Surface Air . . . . . . . . . . . . . . . . . . . . . . . . . . . . . . . . . . . . . . . . . . . . . . . . . . . . . . . . . . . . . . . . . . . . . . . Mainland UK Scottish Highlands, . . . . . . . . . . . . . . . . . . . . . . . . . . . . . . . . . . . . . . . . . . . .POSTCODE . . . . . . . . . . . . . . . . . UK Islands & Eire Europe (EU) SIGNATURE . . . . . . . . . . . . . . . . . . . . . . . . . . . . . . . . . . . . . . . . . . . . . . . . . . . . . . . . . . . . . Europe (Non-EU) USA & Canada $ I enclose cheque/PO in UK pounds payable to Wimborne Publishing Ltd. Far East & Australasia $ Please charge my Visa/Mastercard/Amex/Diners Club/Switch Switch Issue No........... Rest of World Card No. . . . . . . . . . . . . . . . . . . . . . . . . . . . . . . . . . . . . . . . Card Exp. Date . . . . . . . . . . . FREE £7 each – £23 each £28 each £35 each £28 each – – £23 £30 £39 £43 £52 each each each each each Please allow four working days for UK delivery. NOTE: Surface mail can take over 10 weeks to some parts of the world. Each ESM weighs about 4kg when packed. mem-cd EE237 135 Hunter Street, Burton-on-Trent, Staffs. DE14 2ST Tel 01283 565435 Fax 546932 http://www.magenta2000.co.uk E-mail: [email protected] All Prices include V.A.T. ADD £3.00 PER ORDER P&P. £6.99 next day MAIL ORDER ONLY ) CALLERS BY APPOINTMENT EPE MICROCONTROLLER P.I. TREASURE HUNTER The latest MAGENTA DESIGN – highly stable & sensitive – with I.C. control of all timing functions and advanced pulse separation techniques. ) High stability drift cancelling ) Easy to build & use ) No ground effect, works in seawater PIC PIPE DESCALER KIT 868 ....... £22.95 ) Detects gold, silver, ferrous & non-ferrous metals ) Efficient quartz controlled microcontroller pulse generation. ) Full kit with headphones & all hardware KIT 847 . . . . . . . . .£63.95 POWER UNIT......£3.99 MICRO PEsT SCARER TEACH-IN 2000 KIT 879 £44.95 MULTIMETER £14.45 Plug-in power supply £4.99 KIT 842......................£22.56 A novel wind speed indicator with LED readout. Kit comes complete with sensor cups, and weatherproof sensing head. Mains power unit £5.99 extra. 68000 ) NEW PCB DESIGN ) 8MHz 68000 16-BIT BUS ) MANUAL AND SOFTWARE ) 2 SERIAL PORTS ) PIT AND I/O PORT OPTIONS ) 12C PORT OPTIONS KIT 849 . . . . . . . . . . . .£16.99 WINDICATOR KIT 856. . . . . . . . . . . . . . . . . . . . . . . . . . . . .£28.00 0 TENS UNIT 0 DUAL OUTPUT TENS UNIT As featured in March ‘97 issue. KIT 621 £99.95 ) ON BOARD 5V REGULATOR ) PSU £6.99 ) SERIAL LEAD £3.99 Magenta have prepared a FULL KIT for this. excellent new project. All components, PCB, hardware and electrodes are included. Designed for simple assembly and testing and providing high level dual output drive. Set of 4 spare electrodes £6.50 KIT 866. . Full kit including four electrodes £32.90 1000V & 500V INSULATION TESTER MD200...200 step...£12.99 Superb new design. Regulated output, efficient circuit. Dual-scale meter, compact case. Reads up to 200 Megohms. Kit includes wound coil, cut-out case, meter scale, PCB & ALL components. MD24...Large 200 step...£22.95 KIT 848. . . . . . . . . . . . £32.95 Stepping Motors MD38...Mini 48 step...£8.65 MD35...Std 48 step...£9.99 MOSFET MkII VARIABLE BENCH POWER SUPPLY 0-25V 2·5A Based on our Mk1 design and preserving all the features, but now with switching preregulator for much higher efficiency. Panel meters indicate Volts and Amps. Fully variable down to zero. Toroidal mains transformer. Kit includes punched and printed case and all parts. As featured in April 1994 EPE. An essential piece of equipment. 312 An innovative and exciting project. Wave the wand through the air and your message appears. Programmable to hold any message up to 16 digits long. Comes pre-loaded with “MERRY XMAS”. Kit includes PCB, all components & tube plus instructions for message loading. SK DI KIT 867. . . . . . . . . . . . . . . . . . . . . . . . . . . . .£19.99 KIT + SLAVE UNIT. . . . . . . . . . . . . . . . . . . .£32.50 84 E 6C AR C1 W PI FT H O IT S W & W HIP NOM C RO PP EE SPACEWRITER A powerful 23kHz ultrasound generator in a compact hand-held case. MOSFET output drives a special sealed transducer with intense pulses via a special tuned transformer. Sweeping frequency output is designed to give maximum output without any special setting up. DEVELOPMENT TRAINING KIT Full set of top quality NEW components for this educational series. All parts as specified by EPE. Kit includes breadboard, wire, croc clips, pins and all components for experiments, as listed in introduction to Part 1. *Batteries and tools not included. Our latest design – The ultimate scarer for the garden. Uses special microchip to give random delay and pulse time. Easy to build reliable circuit. Keeps pets/ pests away from newly sown areas, play areas, etc. uses power source from 9 to 24 volts. )RANDOM PULSES )HIGH POWER ) DUAL OPTION PORTABLE ULTRASONIC PEsT SCARER EPE TEACH-IN 2000 )SIMPLE TO BUILD )SWEPT )HIGH POWER OUTPUT FREQUENCY )AUDIO & VISUAL MONITORING An affordable circuit which sweeps the incoming water supply with variable frequency electromagnetic signals. May reduce scale formation, dissolve existing scale and improve lathering ability by altering the way salts in the water behave. Kit includes case, P.C.B., coupling coil and all components. High coil current ensures maximum effect. L.E.D. monitor. EPE PROJECT PICS 12V EPROM ERASER A safe low cost eraser for up to 4 EPROMS at a time in less than 20 minutes. Operates from a 12V supply (400mA). Used extensively for mobile work - updating equipment in the field etc. Also in educational situations where mains supplies are not allowed. Safety interlock prevents contact with UV. KIT 790 . . . . . . . . . . . .£29.90 SUPER BAT DETECTOR 1 WATT O/P, BUILT IN SPEAKER, COMPACT CASE 20kHz-140kHz NEW DESIGN WITH 40kHz MIC. A new circuit using a ‘full-bridge’ audio amplifier i.c., internal speaker, and headphone/tape socket. The latest sensitive transducer, and ‘double balanced mixer’ give a stable, high performance superheterodyne design. KIT 861 . . . . . . . . . . .£24.99 ALSO AVAILABLE Built & Tested. . . £39.99 ULTRASONIC PEsT SCARER Keep pets/pests away from newly sown areas, fruit, vegetable and flower beds, children’s play areas, patios etc. This project produces intense pulses of ultrasound which deter visiting animals. Programmed PICs for ) KIT INCLUDES ALL all* EPE Projects COMPONENTS, PCB & CASE 16C84/18F84/16C71 ) EFFICIENT 100V ) UP TO 4 METRES All £5.90 each TRANSDUCER OUTPUT RANGE PIC16F877 now in stock ) COMPLETELY INAUDIBLE ) LOW CURRENT TO HUMANS DRAIN £10 inc. VAT & postage Kit No. 845 . . . . . . . .£64.95 (*some projects are copyright) KIT 812. . . . . . . . . . . . . . . . . . . . . . . . . . . . . . £15.00 Everyday Practical Electronics, May 2002 INCREDIBLE LOW PRICE! Kit 857 £12.99 Power Supply £3.99 INCLUDES 1-PIC16F84 CHIP SOFTWARE DISK, LEAD CONNECTOR, PROFESSIONAL PC BOARD & INSTRUCTIONS EXTRA CHIPS: PIC 16F84 £4.84 Based on February ’96 EPE. Magenta designed PCB and kit. PCB with ‘Reset’ switch, Program switch, 5V regulator and test L.E.D.s, and connection points for access to all A and B port pins. PIC 16C84 DISPLAY DRIVER INCLUDES 1-PIC16F84 WITH DEMO PROGRAM SOFTWARE DISK, PCB, INSTRUCTIONS AND 16-CHARACTER 2-LINE LCD DISPLAY Kit 860 £19.99 Power Supply £3.99 FULL PROGRAM SOURCE CODE SUPPLIED – DEVELOP YOUR OWN APPLICATION! Another super PIC project from Magenta. Supplied with PCB, industry standard 2-LINE × 16-character display, data, all components, and software to include in your own programs. Ideal development base for meters, terminals, calculators, counters, timers – Just waiting for your application! PIC 16F84 MAINS POWER 4-CHANNEL CONTROLLER & LIGHT CHASER ) WITH PROGRAMMED 16F84 AND DISK WITH SOURCE CODE IN MPASM Now features full 4-channel chaser ) ZERO VOLT SWITCHING software on DISK and preMULTIPLE CHASE PATTERNS programmed PIC16F84 chip. Easily ) OPTO ISOLATED re-programmed for your own applica5 AMP OUTPUTS tions. Software source code is fully ) 12 KEYPAD CONTROL ‘commented’ so that it can be ) SPEED/DIMMING POT. followed easily. ) HARD-FIRED TRIACS Kit 855 £39.95 EW N EPE PIC TOOLKIT 3 SIMPLE PIC PROGRAMMER )THE LATEST TOOLKIT BOARD – 8, 18, 28 AND 40-PIN CHIPS )MAGENTA DESIGNED P.C.B. WITH COMPONENT LAYOUT AND EXTRAS )L.C.D., BREADBOARD AND PIC CHIP INCLUDED )ALL TOP QUALITY COMPONENTS AND SOFTWARE SUPPLIED KIT 880 . . . £34.99 with 16F84 . . . £39.99 with 16F877 PIC TOOLKIT V2 ) ) ) ) ) SUPER UPGRADE FROM V1 )18, 28 AND 40-PIN CHIPS READ, WRITE, ASSEMBLE & DISASSEMBLE PICS SIMPLE POWER SUPPLY OPTIONS 5V-20V ALL SWITCHING UNDER SOFTWARE CONTROL MAGENTA DESIGNED PCB HAS TERMINAL PINS AND OSCILLATOR CONNECTIONS FOR ALL CHIPS ) INCLUDES SOFTWARE AND PIC CHIP KIT 878 . . . £22.99 with 16F84 . . . £29.99 with 16F877 EPE PIC Tutorial At last! A Real, Practical, Hands-On Series ) Learn Programming from scratch using PIC16F84 ) Start by lighting l.e.d.s and do 30 tutorials to Sound Generation, Data Display, and a Security System. ) PIC TUTOR Board with Switches, l.e.d.s, and on board programmer PIC TUTOR BOARD KIT Includes: PIC16F84 Chip, TOP Quality PCB printed with Component Layout and all components* (*not ZIF Socket or Displays). Included with the Magenta Kit is a disk with Test and Demonstration routines. LOTS OF OTHER APPLICATIONS 8-CHANNEL DATA LOGGER KIT 870 .... £27.95, Built & Tested .... £42.95 Optional: Power Supply – £3.99, ZIF Socket – £9.99 LCD Display ........... £7.99 LED Display ............ £6.99 NE W ! As featured in Aug./Sept. ’99 EPE. Full kit with Magenta redesigned PCB – LCD fits directly on board. Use as Data Logger or as a test bed for many other 16F877 projects. Kit includes programmed chip, 8 EEPROMs, PCB, case and all components. Reprints Mar/Apr/May 98 – £3.00 set 3 KIT 877 £49.95 inc. 8 × 256K EEPROMS SUPER PIC PROGRAMMER ) READS, PROGRAMS, AND VERIFIES ) ) ) ) ) ) WINDOWSK SOFTWARE PIC16C6X, 7X, AND 8X USES ANY PC PARALLEL PORT USES STANDARD MICROCHIP )HEX FILES OPTIONAL DISASSEMBLER SOFTWARE (EXTRA) PCB, LEAD, ALL COMPONENTS, TURNED-PIN SOCKETS FOR 18, 28, AND 40 PIN ICs ) SEND FOR DETAILED INFORMATION – A SUPERB PRODUCT AT AN UNBEATABLE LOW PRICE. PIC Real Time In-Circuit Emulator * Icebreaker uses PIC16F877 in circuit debugger * Links to Standard PC Serial Port (lead supplied) TM * Windows (95+) Software included * Works with MPASM and MPLAB Microchip software * 16 x 2 L.C.D., Breadboard, Relay, I/O devices and patch leads supplied As featured in March ’00 EPE. Ideal for beginners AND advanced users. Programs can be written, assembled, downloaded into the microcontroller and run at full speed (up to 20MHz), or one step at a time. Full emulation means that all I/O ports respond exactly and immediately, reading and driving external hardware. Features include: Reset; Halt on external pulse; Set Breakpoint; Examine and Change registers, EEPROM and program memory; Load program, Single Step with display of Status, W register, Program counter, and user selected ‘Watch Window’ registers. Kit 862 £29.99 Power Supply £3.99 DISASSEMBLER SOFTWARE £11.75 PIC STEPPING MOTOR DRIVER INCLUDES PCB, Kit 863 £18.99 PIC16F84 WITH DEMO PROGRAM, SOFTWARE DISC, INSTRUCTIONS AND MOTOR. FULL SOURCE CODE SUPPLIED ALSO USE FOR DRIVING OTHER POWER DEVICES e.g. SOLENOIDS Another NEW Magenta PIC project. Drives any 4-phase unipolar motor – up to 24V and 1A. Kit includes all components and 48 step motor. Chip is pre-programmed with demo software, then write your own, and re-program the same chip! Circuit accepts inputs from switches etc and drives motor in response. Also runs standard demo sequence from memory. KIT 900 . . . £34.99 POWER SUPPLY Tel: 01283 565435 £3.99 STEPPING MOTOR £5.99 Fax: 01283 546932 Everyday Practical Electronics, May 2002 All prices include VAT. Add £3.00 p&p. Next day £6.99 E-mail: [email protected] 313 VOL. 31 No. 5 MAY 2002 Editorial Offices: EVERYDAY PRACTICAL ELECTRONICS EDITORIAL WIMBORNE PUBLISHING LTD., 408 WIMBORNE ROAD EAST, FERNDOWN, DORSET BH22 9ND Phone: (01202) 873872. Fax: (01202) 874562. Email: [email protected] Web Site: http://www.epemag.wimborne.co.uk EPE Online www.epemag.com EPE Online Shop: www.epemag.wimborne.co.uk/shopdoor.htm See notes on Readers’ Enquiries below – we regret lengthy technical enquiries cannot be answered over the telephone. Advertisement Offices: EVERYDAY PRACTICAL ELECTRONICS ADVERTISEMENTS MILL LODGE, MILL LANE THORPE-LE-SOKEN, ESSEX CO16 0ED Phone/Fax: (01255) 861161 Email: [email protected] Editor: MIKE KENWARD MAGIC POWERS Deputy Editor: DAVID BARRINGTON The start of this month’s new series on Simple Audio Circuits raises a question that always annoys me – I guess it is a pet hate of mine. To put it in simple terms, I hate to see audio output powers quoted by manufacturers that are frankly fairy tales. If you see a set of small computer speakers with internal amplifiers quoted as having 100W or greater output then I suggest you simply buy from a more honest manufacturer. How do manufacturers dream up these totally unrealistic figures? Well this is how it’s done, courtesy of Jake Rothman writing for our Modern Electronics Manual: Say the true r.m.s. output of an amplifier is 10W (this expresses the power of an unclipped sinewave as a d.c. voltage producing the same power into a given – say 8 ohm resistance). The first stage of the trick is to use the term “peak power’’ which derives the power from the peak voltage so our 10W becomes 20W. The next stage is to specify the output into 4 ohms so now we have 40W (note that 90 per cent of speakers are 8 ohm impedance). Step 3 is to call it music power which, because music is not continuous (like a sinewave), allows the output to be doubled again giving 80W. Finally, the two stereo channel outputs are added together to give 160W peak music power (stereo) you will usually see this quoted simply as 160W PMPO (peak music power output). As you can see, it’s a con, try dividing it by 16 to get the true output! In some cases manufacturers have gone even further and I have seen claims like 480W PMPO qualified by 12W + 12W r.m.s. output – at least they quoted the r.m.s. figure. So if you see audio output specifications that are not based on continuous sinewave r.m.s. figures at a stated level of distortion then I suggest that you simply do not believe them. You can tell the quality manufacturers by the way they quote their output figures. There is basically no way that miniature amplified computer speakers will provide a true 100W (or more) output, if you don’t believe me just take a look at the output available from the plug top power supply they normally use and ask yourself if you can get 100W output with less than 10W (12V, 800mA) input? Nice trick if you could really do it. It is, of course, all a marketing con. trick. AVAILABILITY Copies of EPE are available on subscription anywhere in the world (see below), from all UK newsagents (distributed by COMAG) and from the following electronic component retailers: Omni Electronics and Yebo Electronics (S. Africa). EPE can also be purchased from retail magazine outlets around the world. An Internet on-line version can be purchased and downloaded for just $9.99(US – approx £7.70) per year available from www.epemag.com SUBSCRIPTIONS Subscriptions for delivery direct to any address in the UK: 6 months £15, 12 months £28.50, two years £52; Overseas: 6 months £18 standard air service or £27 express airmail, 12 months £34.50 standard air service or £52 express airmail, 24 months £64 standard air service or £99 express airmail. Online subscriptions, for downloading the magazine via the Internet, $9.99(US – approx £7.70) for one year available from www.epemag.com. Cheques or bank drafts (in £ sterling only) payable to Everyday Practical Electronics and sent to EPE Subs. Dept., Wimborne Publishing Ltd. 408 Wimborne Road East, Ferndown, Dorset BH22 9ND. Tel: 01202 873872. Fax: 01202 874562. Email: [email protected]. Also via the Web at: http://www.epemag.wimborne.co.uk. Subscriptions start with the next available issue. We accept MasterCard, Amex, Diners Club, Switch or Visa. (For past issues see the Back Issues page.) BINDERS Binders to hold one volume (12 issues) are available from the above address. These are finished in blue p.v.c., printed with the magazine logo in gold on the spine. Price £5.95 plus £3.50 p&p (for overseas readers the postage is £6.00 to everywhere except Australia and Papua New Guinea which cost £10.50). Normally sent within seven days but please allow 28 days for delivery – more for overseas. Payment in £ sterling only please. Visa, Amex, Diners Club, Switch and MasterCard accepted. Send, fax or phone your card number and card expiry date with your name, address etc. Or order on our secure server via our UK web site. Overseas customers – your credit card will be charged by the card provider in your local currency at the existing exchange rate. Everyday Practical Electronics, May 2002 Technical Editor: JOHN BECKER Business Manager: DAVID J. LEAVER Subscriptions: MARILYN GOLDBERG Administration: FAY KENWARD Editorial/Admin: (01202) 873872 Advertisement Manager: PETER J. MEW, Frinton (01255) 861161 Advertisement Copy Controller: PETER SHERIDAN, (01202) 873872 On-Line Editor: ALAN WINSTANLEY EPE Online (Internet version) Editors: CLIVE (MAX) MAXFIELD and ALVIN BROWN READERS’ ENQUIRIES E-mail: [email protected] We are unable to offer any advice on the use, purchase, repair or modification of commercial equipment or the incorporation or modification of designs published in the magazine. We regret that we cannot provide data or answer queries on articles or projects that are more than five years old. Letters requiring a personal reply must be accompanied by a stamped self-addressed envelope or a selfaddressed envelope and international reply coupons. All reasonable precautions are taken to ensure that the advice and data given to readers is reliable. We cannot, however, guarantee it and we cannot accept legal responsibility for it. COMPONENT SUPPLIES We do not supply electronic components or kits for building the projects featured, these can be supplied by advertisers (see Shoptalk). We advise readers to check that all parts are still available before commencing any project in a back-dated issue. ADVERTISEMENTS Although the proprietors and staff of EVERYDAY PRACTICAL ELECTRONICS take reasonable precautions to protect the interests of readers by ensuring as far as practicable that advertisements are bona fide, the magazine and its Publishers cannot give any undertakings in respect of statements or claims made by advertisers, whether these advertisements are printed as part of the magazine, or in inserts. The Publishers regret that under no circumstances will the magazine accept liability for non-receipt of goods ordered, or for late delivery, or for faults in manufacture. TRANSMITTERS/BUGS/TELEPHONE EQUIPMENT We advise readers that certain items of radio transmitting and telephone equipment which may be advertised in our pages cannot be legally used in the UK. Readers should check the law before buying any transmitting or telephone equipment as a fine, confiscation of equipment and/or imprisonment can result from illegal use or ownership. The laws vary from country to country; readers should check local laws. 315 Constructional Project FREEZER ALARM HUMPHREY BERRIDGE Simply protect your food, learn about using the 8-pin PIC12C508, and about applying the Watchdog Timer. OME modern freezers contain alarms which sound if you leave the door open and allow the internal space to warm up. However, they do not work if the freezer suffers a power failure, which is a bit of a drawback. Making a temperature-sensitive circuit which can sound an alarm is not too difficult (a typical example was the Ice Alert in Feb ’01) but what is required here is a lowcost circuit which can run on batteries for a very long time. This design uses a circuit based on a PIC, using a feature about which little has been written, namely the ability to send it to sleep! The circuit is extremely simple, and the software uses several techniques which could be useful in other projects. S BABY PIC The design uses the “baby” of the PIC family, the PIC12C508. This is an extraordinarily versatile device, and in its OTP (one-time-programmable) version is very inexpensive. It is housed in an 8-pin d.i.l. package (see Fig.1), and has the same set of 33 RISC instructions as its big brothers. The prototype Freezer Alarm was built on a printed circuit board, however, the design is so simple that a small piece of stripboard is used in this article. data RAM available, program memory is 512 bytes. There are two internal timers, one of which is a “Watchdog”, and it can drive output devices with currents up to 50mA. This little PIC is extraordinarily versatile, and for many applications provides adequate microcontroller power. Of course, the more powerful versions such as the PIC16F84 can be programmed to operate in just the same way with few changes to the software, but why use a sledge-hammer to crack a nut? Fig.1 (above). The pin diagram for the PIC12C508 microcontroller. Fig.2 (right). Circuit diagram for the Freezer Alarm. Two pins are used for power (between 2·5V and 5·5V), the remainder can be configured as five I/O (input-output) pins and one input-only pin. An in-built oscillator runs at 4MHz – i.e. an instruction every 1ms. It has 25 bytes of CIRCUIT DESCRIPTION If you are the sort of person who enjoys the challenge of constructing complex circuits, you will be disappointed! The complete circuit contains only five components, as shown in Fig.2. The clever stuff, of course, is provided by the PIC. The temperature sensor used is a lowcost disc thermistor, R1, which can be attached via a length of 2-core cable. A small preset variable resistor, VR1 is used to set the operating point, the temperature threshold at which the alarm sounds. Capacitor C1 is used to make the input circuit time-dependant, as described in the next section. For the alarm, a piezo sounder (WD1) is used because it can make a relatively large amount of noise whilst using a very small amount of electrical power. The whole circuit will conveniently run off a 6V battery. HOW IT WORKS Thermistors are basically temperature sensitive resistors – normal n.t.c. (negative temperature coefficient) ones have a high resistance when cold, and a low resistance when hot, and the change of resistance is a very large effect. 316 Everyday Practical Electronics, May 2002 An easy way to test a thermistor is to place it in a freezer (which is normally at about –18°C) and connect it to a multimeter via leads of suitable length. After a few minutes the thermistor will reach the temperature of the freezer, and with the meter on its resistance range you will be able to measure the approximate value of resistance at this temperature. The thermistor used here has a resistance of around 1k9 at room temperature (see Table 1). Other types of n.t.c. thermistor could equally well be used with minor alterations to the circuit which are explained later. Fig.4. Capacitor charging curve. Table 1. Thermistor temperature/ resistance Room Fridge Freezer Temperature Resistance 22°C 2°C –20°C 9009 2k3 11k2 The microcontroller circuit needs to “measure” this resistance in order to evaluate whether the thermistor is too warm – we do not need to know its actual value, just whether it is higher or lower than a preset value. This can conveniently be done by comparing the resistance of the thermistor to that of a preset resistor, VR1. The PIC12C508 is basically a digital device, so we need a cunning plan to make it capable of measuring resistance. The method is to use the PIC as a timer which can count how long it takes a small capacitor C1 to charge up to a certain voltage. If we consider a very simple circuit (Fig.3) consisting of just a capacitor C and a resistor R, we can see that if the switch is closed, the voltage V across the capacitor is zero and it is uncharged. As soon as the switch is opened, the capacitor charges via the resistor, and the voltage rises along an exponential curve (Fig.4). In our circuit, we time how long it takes to go from zero to the logic threshold of the PIC (the point at which a logic 0 changes to a logic 1), which is about 3·0V, say. The mathematics of this charging process produces a very simple relationship, namely that the time taken to reach a certain voltage is directly proportional to the value of R, so the time we have counted out until the voltage rises to 3·0V is an accurate representation of the value of the resistor. So all we need to do is to time how long it takes for the capacitor to charge via the thermistor, then time how long it takes to charge via the preset resistor. If the first time is shorter than the second, the thermistor is too warm and we ought to sound the alarm! ALARMING Generally speaking, a piezo device is not a buzzer – it has to be driven by an oscillating signal to make the alarm COMPONENTS Everyday Practical Electronics, May 2002 See Resistor R1 SHOP TALK n.t.c. disc thermistor, 10k (1k at room temperature) page Potentiometer VR1 Fig.5. Flow chart for the main program. What makes it possible for the PIC to do this is that not only can we force pins to go high or low, but we can also change whether a pin is an output or an input as the program is running. Using this fact we can both switch between the two resistors, and discharge the capacitor between our readings. This is described in the section on programming. MAIN PROGRAM Fig.3. Simple circuit to demonstrate capacitor charging. In order to give a reasonable number of steps to do the counting and improve the range of accuracy of the measurement, two registers are used together to form a 16-bit value. The technique used for measuring resistance is shown in Fig.6, and involves the following: 1. First the capacitor needs to be completely discharged. To do this, pin 5 is set as an output, and then set at logic 0 (zero volts). This effectively shorts the capacitor. A delay of approximately 5ms makes sure it is fully discharged. 2. Next the two registers used to store the count time for the thermistor are set to zero. 3. Then pin 6 is set as an output, and reset to logic 0. Pin 5 is swapped to being an input pin, and then pin 6 taken to logic 1. At this moment the capacitor begins to charge up. 4. The program now starts to loop, incrementing the counter registers as it goes. Each time around the loop pin 5 is checked for having reached the voltage threshold at which it is considered to be at logic 1. 5. As soon as this happens, the routine ends, and the counter registers then contain the final time count. This process is repeated for the variable resistor VR1 using a different set of counter registers and pin 7 instead of pin 6. After both measurements have been made, the two answers are compared: all we need to do is to subtract one number from another – we just want to know which process took the longer. Depending upon the outcome, we either go directly into the Sleep mode, or sound the alarm for a short time before again going to sleep. The way the program operates is straightforward, as illustrated by the flow-chart in Fig.5. First the PIC is initialised in that pins are set up either as outputs or inputs. We then have to measure the charging times of the capacitor first for the preset resistor VR1, then for the thermistor R1. 10k min. enclosed carbon preset, horiz Capacitor C1 100n ceramic disc Semiconductor IC1 PIC12C508 preprogrammed microcontroller (see text) Miscellaneous WD1 piezo sounder, 3V to 24V Stripboard, 10 strips x 17 holes; plastic case, size and type to choice; battery holder; AA-size batteries (4 off); battery clip; 8-pin d.i.l. socket; connecting wire; solder, etc. £9 Approx. Cost Guidance Only excluding case & batts. 317 sounds. There are two reasons for using a “swept frequency” alarm sound using the software: a. Changing sounds such as beepers, sirens, etc. stand out much better from background noises, and Fig.7. Output waveform. b. the piezo device used here has a very sharp resonance – i.e. the sound output is very much higher at a specific frequency than at others. Different devices have different resonances, and even those tested of the same type had frequencies which varied quite a bit. By sweeping the frequency through the resonance one can be sure of making the most irritating noise! In this design, the frequency sweeps from approximately 2kHz to 8kHz. To make a PIC generate an oscillating signal is quite simple. Referring to the waveform in Fig.7, you take the output high, wait for a short time (tdel), take the output low, wait for a short time (tdel), and then repeat the process. The result is a square wave driving the piezo sounder. If, for instance, we made tdel = 0·5ms, the period would be 2 × tdel = 1·0ms, and the sound would have a frequency of 1kHz. Sweeping the frequency may be accomplished by gradually changing the value of tdel which can be done using the fact that delays in microcontroller systems are often made by “time-waster” loops where a counter counts down to zero. By changing the value loaded into a register in the first place, the time taken can be varied. Fig.8 shows the program segment responsible. For each specific frequency, eight cycles are generated. The whole process takes approximately 130ms. WATCHDOG Fig.6. Measuring the resistance of the thermistor. 318 Not many published projects seem to use a PIC’s Watchdog Timer (WDT), but when it comes to conserving power using the Sleep mode, it is very useful. Information can be found in Microchip’s data sheets and other publications. When a PIC is given the Sleep command, it shuts down nearly all its functions and as a result consumes a very tiny amount of power – it only draws about 4mA from the supply. There are three ways in which it can wake up again: a. by a logic change on a pre-defined pin b. when the WDT times-out, and c. by an external master Reset It is the second of these options that is used in this project. Inside the PIC12C508, the WDT function has its own internal oscillator and counter, and these continue to run even if the PIC is asleep. When the WDT times out, a system Reset is generated, and the program restarts. It should be noted that one bit of the configuration word of the PIC enables or disables the WDT, and this bit must be set when the chip is programmed. So, if we reset the WDT, it will then start counting and when it times-out (18ms later), the program goes through a Reset and starts again. That is not a very long time, but fortunately we can use the internal pre-scaler which can be used in conjunction with the WDT. To do this, we use the OPTION register to extend the time-out period to approximately 2·3 seconds. Fig.8. Flowchart for the piezo sweeper. The whole sequence takes approximately 130ms. Everyday Practical Electronics, May 2002 This may not seem very long, but what matters in conserving power is the ratio of the time taken to run the measurements compared and the time remaining asleep. If, for instance, it takes 50ms to take the measurements, the circuit is asleep for 98 per cent of the time with a resulting extension of battery life. The OPTION register has eight bits which must be set up in order to control the WDT and prescaler. The functions are shown in Table 2. For this application, the OPTION register must be set to contain the binary byte 11001111. The short main program section is shown in Fig.9. Note that during a Sleep period, the I/O ports maintain the same conditions that they had immediately beforehand. Therefore, to minimise the current drawn, all the pins are made inputs (high impedance) before the Sleep command. CONSTRUCTION Construction is very simple. The suggested stripboard component layout and track cut details are shown in Fig.10. The thermistor can be soldered to a short length of wire such as thin audio coax. An improvement would be to waterproof the thermistor connections by dunking it in polyurethane varnish. The wire can be fed into the freezer via the door seal. It is important to resist the temptation to add a light emitting diode as a battery indicator – the l.e.d. would take about a thousand times more power than the rest of the circuit! The PIC should be plugged into the board via an 8-pin d.i.l. socket. The circuit and batteries can be housed in a plastic box to sit outside the freezer, a small hole being provided to glue the piezo sounder behind. You should not need to replace batteries very often. Software and pre-programmed PICs are available as stated in this month’s Shoptalk. TESTING The circuit will work quite happily at room temperature. Once the batteries are connected (it seems to work well on 6V although this is higher than the maximum recommended). Gently rotate preset VR1 until the threshold is found between the alarm bleating or not. Set it so that the alarm is just off. Then hold the thermistor in your fingers to warm it up, and the alarm Fig.9. Main program ; Main program start start clrwdt clrf gpio ;initialise I/O movlw b’00000111’ tris gpio movlw b’11001111’ option ;wdt and prescaler setup call call call call xorlw delay measureR measureT compare 0FFH btfsc call movlw tris z alarm b’11111111 gpio ;all pins high impedance clrwdt sleep goto start ;settle down ;check if resT < resR ;If so, set off alarm! ;until reawakened by wdt ;with a reset kiss ;should never reach here! Table 2. Option Register Bits Bit 7 Bit 6 Bit 5 Bit 4 Bit 3 Bits 2-0 GPWU GPPU T0CS T0SE PSA Enable (0) or disable (1) wave-up on pin change Enable (0) or disable (1) weak pull-up resistors Timer 0 clock source Timer 0 edge select Prescaler assignment: Assigned to WDT (1), or to Timer 0 (0) Prescaler rate – division ratio (111 for WDT ratio of 1:128) Fig.10. Stripboard layout for the Freezer Alarm. should sound; let go to allow the thermistor to cool again to room temperature, and the alarm should stop. Once you are convinced all is well, put the thermistor in the freezer, and after allowing time for the temperature to stabilise, increase the resistance on the preset so that the alarm threshold is set where you would like it. In fact, the best way to find out if the batteries are OK is to let the thermistor warm up a bit when you open the freezer – if it is working and the alarm sounds, the batteries are fine! MODIFICATIONS As mentioned earlier, the techniques explained allow simple modifications to change how the circuit operates: a. To make the alarm work if something is too cold rather than too warm (for example as a greenhouse frost alarm), simply swap over the connections to pins 6 and 7. Alternatively, make the appropriate swaps in the software. b. The method can be adapted for any resistance changes – for example, the alarm could be made light-sensitive by using an l.d.r. (light dependent resistor) instead of a thermistor. Whatever thermistor or other device is used, VR1 needs to have a resistance which can be set to the same that the device has at its operating threshold. c. An important design consideration concerns the value of the capacitor C1. Once the resistance of the appropriate sensor is known, the variable preset resistor needs to have the same value. However, the counter which waits for the capacitor to charge to its threshold must not overflow. This will happen after 320ms with this design’s value for C1. Therefore, ensure that C(mF) × R(kW) <320ms. d. The circuit is remarkably accurate and stable. Because of the timing method of comparing the two resistors, any changes in the supply voltage (within the parameters above), or changes in the capacitance value caused by temperature or ageing, have virtually no effect. ACKNOWLEDGEMENTS The author expresses his thanks to Mrs Jan Edwards for her help in this project. $ 319 New Technology Update With a growing awareness of global warming, scientists are looking at ways of using dye molecules to produce more efficient solar cells, reports Ian Poole olar cells might seem to be an ideal S way of generating electricity. They convert the plentiful supply of sunlight that is freely available in many areas of the world into useful electricity. Whilst this may seem to be an excellent idea in theory, reality has been quite different and very few solar cells are used. The main reason for this is that a large area needs to be covered by solar cells to enable a useful amount of electricity to be generated. This means that the costs are prohibitively high for most applications. The raw silicon from which the solar cells are made is plentiful and cheap. Unfortunately the processing costs mean that the completed cells are expensive, especially considering the areas that have to be covered to collect a useful amount of light for conversion. If solar generated electricity is to become common, then cheaper methods of converting the sunlight into electricity are needed. Photosynthesis In the search for more efficient and cost effective methods of converting sunlight into electrical energy, scientists have investigated the way in which plants convert solar energy into chemical energy to explore any leads that could be followed and utilised for electrical energy conversion. This line of research was first investigated in the 1970s. The basic idea that was adopted was to use a layer of dye molecules that are highly absorbent to light. This is placed onto the surface of a semiconductor and once the dye is excited it delivers an electron into the conduction band. By adopting this approach the operation of the device is no longer dependent upon the absorption level of the semiconductor but the dye, over which there is more control. The drawback of using this approach is that the electrons move very slowly through the dye layer, and this reduces the efficiency of these devices considerably, even if the dye layer is made very thin. Initially efficiency levels of only 0·01% were achieved, and this is far less than that achieved by the traditional semiconductor techniques. New Concept To overcome this problem a new approach was adopted by the Swiss Federal Institute of Technology. Using their method they believe the new cells will offer the possibility of a significant reduction in the cost of solar generated electricity due to the very simple construction of the cell. In the new cell, light absorption occurs in what is termed a mono-layer of dye. This is adsorbed chemically at the surface of a semiconductor forming a layer that is only 1µm thick. Instead of using one continuous 320 layer, the new cell uses small particles that are held in a colloidal solution. When the dye is excited by a photon of light, the dye is able to transfer an electron to the semiconductor. If an external circuit is connected to the cell a current will flow as a result of the potential that is created by the transfer of the electrons. The potential is a function of the structure of the semiconductor and of the dye. Cell Structure would lead to a high level of resistance within the device and large losses. However, the reverse is true and electrons are able to diffuse in the bulk matter towards the supporting conductor with almost no energy loss. Also, it does not suffer the same problem of a reduced percentage efficiency under low light conditions that traditional semiconductor cells suffer. Traditional cells suffer from hole-electron recombination in the semiconductor, and this reduces the efficiency, particularly when light levels are low. The solar cell itself consists of two conducting glass electrodes in a sandwich configuration with an electrolyte separating the Now that the basic idea has been proven, two, see Fig.1. During the fabrication of the more research is ongoing to find some cell a layer of titanium dioxide is deposited solid-state substitutes for the liquid eleconto one of the electrodes. This is achieved trolyte as this will make its manufacture by using a colloidal preparation of monomuch easier. It will also enable the complete dispersed particles. The resultant layer of solar cell to be far more robust than it can titanium dioxide is very porous and has a currently be made. Some ideas have already high surface area. This allows the distribubeen tried and results using conductive tion of dye molecules into the titanium polymers such as those used in light emitdioxide. ting diodes may prove to be promising. The layer is heat treated to enable the resistivity of the film to reduce to a sufficiently low level to CONDUCTIVE GLASS ensure resistance lossPLATINUM es are within acceptMIRROR able limits. Then the TITANIUM OXIDE electrode with the PARTICLES ELECTROLYTE oxide layer is WITH DYE immersed in the dye solution for several CONDUCTIVE GLASS hours. The porous oxide absorbs the dye very efficiently giving an intense colour to Fig.1. Structure of the solar cell using organic dye and titanium oxide particles. the film. The dye coated elecAnother problem that is facing the trode is put together with another conductresearchers is that purifying some of the ing glass electrode and the space between materials used in the new processes is neithem is filled with an organic electrolyte. ther cheap nor easy at the moment. After This second glass plate has a reflecting ten years of research into the new cell there platinum plate to ensure light reaching it is is still plenty that needs to be done. reflected back into the cell. After making However, success will bring with it large provision for the electrical contacts with returns because there is a growing awarethe two electrodes the assembly is sealed. ness of global warming and new initiatives like these are likely to pay off the research and development costs many times over. The absorption of light using only a sinOther groups are also investigating simigle molecular thickness of dye would be lar technologies. For example, Bell Labs very low if it was not for the construction have produced a solar cell that is based technique used. The fact that a very rough around pentacene, an organic semiconducporous structure is used instead, allows for tor. Reports indicate that this achieved effimuch greater levels of efficiency to be ciency levels of around 4%, but they still achieved because there is a far higher surneed to investigate many aspects such as face area presented to the light. A further the effect of ultraviolet light on the organic advantage is gained from the fact that the semiconductor. semiconductor structure is nano-crystalline These new developments often take ten to and this spreads the light over the whole fifteen years to be completed but reports area, further increasing the efficiency. indicate that the new solar cells could be It might be thought that the heteroavailable in five years or so. geneuos structure of the semiconductor Other Research Greater Efficiency Everyday Practical Electronics, May 2002 News . . . A roundup of the latest Everyday News from the world of electronics PICS BREAK 1MB BARRIER. MICROCHIP’S new Flash microcontrollers are the first the break the one megabit memory barrier. The PIC18F6620, PIC18F8620, PIC18F6720 and PIC18F8720 offer field programmability, larger memory, a higher pin count and the most feature-rich peripheral set that Microchip has produced so far. Programming times allow a 1-megabit array to be fully erased and programmed in under two seconds. The ’620s feature 64K bytes of Flash memory, while the ’720s have 128K bytes (1Mbit). The ’8620 and ’8720 also have a linear address capability of 2Mbytes. Microchip has also released a low-cost, in-circuit debugger and programmer. The PC-based MPLAB ICD 2 supports the PIC16F and PIC18F devices. As new devices become available, users will be able to download new software into MPLAB ICD 2, at no cost, creating a highly adaptable tool. MPLAB ICD2 is available as a stand-alone unit or as an evaluation kit that includes a demonstration board and samples of the ’18F452 and ’16F877. The board features a 2 x 16 l.c.d., temperature sensor, EEPROM memory, l.e.d.s, piezo sounder and RS232 interface. For more information browse www.microchip.com. FARNELL COMBATS OBSOLESCENCE COMPONENT distributors Farnell have launched Product Watch, an “obsolescence service”, which gives customers advance notice of when components are about to become obsolete, and of any end-of-line and end-of-stock items. It sounds an excellent innovation. Few of us can claim to have never been afflicted by designing a circuit whose components become obsolete or no longer attainable on the day the design is completed! For more information email Farnell at [email protected]. 322 WCN SUPPLIES CAT THE 32-page catalogue from WCN Supplies is another that enterprising hobbyists should have in their library. Component categories run from audio, batteries, cables, chargers and connectors, through the alphabet via models (including some delightful ones from Humbro), motors, passive components (resistors, etc), power supplies, relays, semiconductors, and right on to Zircon drill sets. For more information contact WCN Supplies, Dept EPE, The Old Grain Store, Rear of 62 Rumbridge Street, Totton, Southampton SO40 9DS. Tel/Fax: 023 8066 0700. Email: [email protected]. EPSON RADIO FAIR SUNDAY 16 June 2002, is the date for Epsom Radio and Electronics Fair, at Epson Downs Racecourse Grandstand, 10am to 5pm. The organisers, Radio Fairs, tell us that it had been perceived that there was a need for a major radio rally to be staged south of the Thames in the North Surrey area, ostensibly to replace the Sandown Rally which is no longer held due to commercial restrictions. The Epsom fair is a one day event and will consist of private and trade stalls with added attractions throughout the day. Epsom Downs is considered to be an excellent venue as it is easy to get to from any direction. A car boot sale and a bring and buy sale will be incorporated into the rally. Ken Macintosh and his band will provide entertainment during the day. As an added attraction to the event, morse testing facilities will be available. It is hoped that Dr Bob Whelan, president of the RSGB, will open this new style event. Refreshments and light meals are available. Car parking is free. Free admission tickets will be made available to schools and colleges in the south east, to encourage new people to come into the hobby. Normal entry is £3, although concessions for wheelchair disabled and children will be priced at £2.50. For more information contact Brian Cannon G8DIU, 38 Sandringham Road, Worcester Park, Surrey KT4 8UJ. Tel: 020 833 0092 (10am-6pm Mon-Fri). Fax: 01737 279108 (24 hours). Email: [email protected]. MAPLIN’S C3 CAT MAPLIN Electronics have introduced a mini-variant of their large paper-based catalogue. It is free and is described as being their new specialist catalogue focusing on their most popular lines from the world of components, cables and connectors. The C3 is said to contain all the essential items for your hobbyist projects or commercial applications. David O’Reilly, Maplin’s Marketing Director, says “I would like to draw your attention to a number of new features: firstly the extended price breaks for volume enquires . . . plus the launch of our new information centre which will help you with some key technical principles and calculations for your specific application”. For more information contact Maplin Electronics through any one their nationwide stores, or telephone 0870 264 6000. Fax: 0870 264 6001. Email: [email protected]. Web: www.maplin.co.uk. Everyday Practical Electronics, May 2002 R.F. SOLUTIONS Music On Time By Barry Fox RECORD companies want radio and club DJs to have new releases ready to play on official release day. But if records go out in advance, some DJs break the embargo. So Warner Music in the US has patented a system for enforcing the embargo electronically (W0 01/15428). A batch of music CDs for DJs will be encrypted so they play back only on a modified player. The encryption is time-coded and the key tied to the official release date. To stop DJs cheating by advancing the player clock, the time code comes from GPS satellites. So everyone in the world gets to play their records for the first time, at the same time. National Vintage Communications Fair RADIO communications modules in various forms are at the heart of the product range for R.F. Solutions Ltd. Their latest catalogue consists of 70 A4-size pages in a ring-binder, and details a broad selection of remote control systems, including Microchip’s Keeloq encoders and decoders, radio telemetry systems, pager control, r.f. modems, and radio modules principally based on the standard frequencies of 315/433MHz, although modules operating at other frequencies are available. Amongst the other products offered are Microchip PIC emulator tools, compilers and programmers, an r.f. pocket meter and radio evaluation boards. There is also a 150-page book entitled An Introduction to Low Power Radio, which is aimed at the practical engineer and concentrates on discussing theoretical radio matters in an easy to understand manner. It is interesting to note that R.F. Solutions has complimented its range of PIC emulation products with the introduction of a compact low-cost programmer. The MEL-EPICA enables quick and easy programming of 8-pin and 18-pin mid-range PIC devices. It runs within Win95/98/NT or DOS and is able to integrate with MPLAB. There is also a C compiler for “quick and easy coding” of PICs. For more information, contact R.F. Solutions Ltd., Unit 21, Cliffe Industrial Estate, South Street, Lewes, E.Sussex BN8 6JL. Tel: 01273 488880. Fax: 01273 480661. Email: [email protected]. Web: www.rfsolutions.co.uk. BUBBLE-TIME By Barry Fox CALTECH, the Californian Institute of Technology, is patenting a new, eye-catching method of billboard advertising, using bubbles (W0 01/35379) which is sure to set constructors thinking. The system can be scaled down to display time on a domestic clock. A container, like a very thin fish tank, is filled with transparent viscous liquid. On the rear side of the tank, a matrix of piezoelectric pump holes release globs of coloured liquid with slightly different viscosity. As the globs escape they float slowly up or down, like bubbles. The pump holes are in groups, like the light sources of a digital display, to create alphanumeric characters or graphics. Caltec says the system works well with coloured detergents. Experimenters will doubtless come up with their own variations on the new theme. Everyday Practical Electronics, May 2002 PLUG IN AND FLASHGO By Barry Fox THE computer industry uses five different miniature memory card formats for digital cameras, handheld computers, PDAs and MP3 players; Compact Flash, Smart Media, Multimedia Card, Secure Digital and Memory Stick, as well as IBM’s tiny Microdrive hard disk. Users must use proprietary leads and software to connect each device to a PC. The law of cussedness ensures the right lead for the job is the one lead you have not got. Imation – a spin-off from 3M – is now selling a reader with a single slot and matrix of contacts that mates with any known card. The reader connects to a PC by single USB lead and all-purpose control software. FlashGo costs around £60. If more formats emerge, Imation will sell matching adaptors that plug into the reader slot. THE National Vintage Communications Fair will be held at N.E.C. Birmingham on Sunday 5 May 2002. It is the Tenth Anniversary Special and doors open from 10.30am to 4.00pm at an entry price of £5. Do come and have a chat with our sister publication Radio Bygones on their stand! All visitors will receive a free copy of the Sound & Vision Yearbook’s Collector’s Guide. This useful directory is really “the book of the show” but contains information that will be useful long after the show has closed. For more information contact N.V.C.F., 13 Belmont Road, Exeter, Devon EX1 2HF. Tel: 01392 411565. Email: [email protected]. Web: www.anglefire.com/tx/sunpress/ index.html. Mainline’s Cats THE latest Jackson Brothers catalogue of variable capacitors and drives has been received from Mainline Electronics. These 30 pages will be a highly useful source of information when looking for that vital radio component. Prices are quoted as a separate 4-page supplement. Also received is Mainline’s “Flyer”, a 32page catalogue of over 850 new products on offer. They say they have bought over 250 pallets of new surplus stock and have “many very unusual items, plus the usual freebies”. The components are varied too categorise here, so get a copy of the two cats! Contact Mainline Electronics, Dept EPE, Unit 1A Cutters Close, Coventry Road, Narborough, Leicester LE19 2FZ. Tel: 0116 286 5373. Fax: 0116 286 7797. Email: [email protected]. Smaller DVD Cassettes By Barry Fox SONY thinks the world needs a new video format. At the IFA electronics show in Berlin, Sony unveiled MicroMV, a tape cassette 70 per cent smaller than existing Mini DV digital video cassettes. The tape runs for an hour and the cassette has 64KB of onboard solid state memory that automatically indexes every shot and tells what is on a tape by instantly displaying still images taken from the start of the shots. 323 Constructional Project PIC BIG DIGIT DISPLAY JOHN BECKER Microcontrolling giant 7-segment displays ECENTLY Dave Fisher of Display Electronics told EPE that he had acquired several thousand electromechanical “big digits”. These had previously graced the platforms of British Rail as 6-digit 7-segment clocks. Yes, they were the familiar “click... click...” digits that surely any would-be passenger has watched mesmerised while waiting for that (where IS it?) train to arrive. In the course of conversation, the question of EPE designing a suitable electronic interface for these digits came up. Would Tech Ed be interested? Certainly, was the author’s timely response to a novel design idea. R DISPLAY RESULTS The resulting basic design is capable of driving from one to eight digits, with expansion up to 64 digits possible, as discussed later. They can be controlled via a standard 4 × 4 data entry keypad, or via a PC-compatible computer running under MS-DOS or Win95/98/ME. A PIC16F84 microcontroller is the controlling device between the PC or keypad and the multiplexed digits. The PC software is written in QBasic/QuickBASIC but can be run as a standalone program without the need for QB to be installed. The digits are ideal for use in any situation that requires a large electronically controlled display where the data is to be input intermittently. Applications that Everyday Practical Electronics, May 2002 come to mind are sporting scoreboards, ticket draw results, display of outdoor temperature in public arenas – well, you’ve seen where large digits can be used, think up your own applications! MONSTERS Since the digits were only large versions of 7-segment displays, reasoned the author before starting the design, they could be simply driven by a PIC through a minimal bit of multiplexing. No problem – or so it seemed until two arrived! The digits are monsters in several senses. Overall, they measure 12in high, 9in wide and 2·25in deep (30·5cm × 23cm × 5·5cm). The angled display area is effectively 10in high × 7in wide (25·5 × 18cm) and comprises seven bright-yellow hinged segments. In the absence of fully informative data, the first task was to establish some criteria about controlling the display segments. Basically all that was known from a rudimentary data sheet was that a pulse of 12V d.c. for about 0·25secs was required to turn segments on and off, and that the pinouts of a built-in connector were shown. There was no mention of the current required, although there was a warning not to connect d.c. to the segments for long periods otherwise damage/heating will occur. The original manufacturer’s name was printed on the rear of the digits, Bodet, +12V D3 1N4001 k a ON a D1 k D4 1N4001 k a OFF D1 AND D2 ARE BUILT INTO DIGIT UNIT EACH COIL 43Ω APPROX a D2 k 0V Fig.1. Basic circuit for controlling one segment. +12V ON A OFF A A ON B F OFF B B ON C OFF C G ON D OFF D ON E OFF E C E ON F ON G D OFF F OFF G Fig.2. Each digit has 15 connections, 12V power input and two on-off controls for each segment. along with the message Made in France. Doing a www.google.com search revealed the company at www.bodet.com, but no electronic specifications could be located, other than a schematic for one segment (see Fig.1 and Fig.2). An email to Bodet for data produced no response. Time for experiments! Briefly connecting an ammeter between a segment and a 12V power supply revealed the current required to activate the mechanical flap – around 280mA. What?! Surely not? An ohms check across the various controlling coils showed a typical d.c. resistance of 439. Wow, yes indeed, that unscientific test had shown a current figure in the right ball-park! Furthermore, there were seven segments to be controlled – about 2A per digit, and users would probably need several digits. More used to dealing with liquid crystal displays needing only a handful of milliamps, rather than two thousand milliamps, the 325 author recognised that the digits were more than just monsters in size. RESEARCHING DESIGN Having numerous data books and CDROMs is always to be recommended. These days, so is Internet access. Using a mixture of sources, a couple of evenings were spent researching the type of semiconductors that were available to handle such currents in a multiplexed situation. It was a foregone conclusion that they needed to be capable of being PIC-controlled. Any idea of using any form of discrete transistor, power-FET or otherwise, was rejected. Such techniques were fine years ago, but hardly today’s technology when multiplexing – even less so regarding any suggestion of relay control. No, it had to be semiconductors in integrated circuit form. Anyone familiar with controlling 4-digit 7-segment light emitting diode displays will know that they can easily be controlled by multiplexed signals – a common 7-line “bus” feeding identically to all segments of all digits, and then separate power supply lines, each feeding to its own digit. The technique required then is to send out segment control data along the common bus, and to only turn on digit power lines individually at the appropriate moment. However, data sheet browsing suggested that switching seven segments simultaneously at a total of 2A or so could present a significant problem. Perhaps switching segments individually at about 280mA would be more sensible? There are many chips that can provide 1-of-8 output selection in response to a 3-bit control code. Such chips include the 74HC138, whose outputs are normally high, but go low individually when selected by the appropriate control code. The 74HC237 operates with the opposite output logic, normally low but going high when selected. Although the outputs of these devices cannot handle the sinking or sourcing of 280mA, or a voltage of 12V, they are capable of driving intermediate high-current buffers. The question then became one of which buffers were available? It is a bipolar-fabricated Darlington device that requires a positive voltage at each input to turn on the respective opencollector output. Conveniently, each input has its own 10·5k9 series resistor, removing the need for external resistors (such as required in the control line feeding into the base of a “normal” discrete transistor). The inputs are also diode-protected. Using a 74HC237 multiplexer, the seven segments can readily be controlled directly through the ULN2004A driver. COMMON ANODE That took care of current sinking through the segments. The problem then became that of providing multiplexed power to each digit. If you relate the concept to a common-anode 7-segment l.e.d. matrix, the individual segment cathodes had now been catered for – it was the common-anode current control that was now required. In other words, a current source was needed, at a minimum of 280mA. It had been expected that as multiple high-current sinking paths were available in one i.c., as with the ULN2004A, so multiple high current sourcing devices would be equally common. It was found that there were many options available if a source current of no more than 100mA were required, especially as the current would be pulsed intermittently. However, the requirement for at least 280mA presented a seemingly unsolvable problem, unless discrete transistors were used – which the author was determined not to resort to. Quite simply, no ideal i.c. devices could be found. Briefly, power op.amps such as the L272 dual device seemed a possible solution, but that was not deemed “tidy”! Eventually, it was decided to accept a lessthan-optimum option, to use an L293DN quadruple Half-H driver. This has four devices that can each be set to sink or source a current of up to 1A at a voltage from 4·5V to 36V. It also has two enable inputs which allow pairs of drivers to have their outputs placed into a high-impedance state (see Fig.4). Additionally, it too has in-built diode protection. LINE DRIVER The device is intended for reversible After considerable research, it was motor and solenoid control. The term Halfdecided to use the 7-stage line driver type H refers to the bridge configuration in which ULN2004A to activate the segments. It the pairs of drivers can be operated. It can sink 500mA per stage, and is capable seemed suitable for this application since no of handling voltages up to 50V. other appropriate device format could be This device also has the benefit of havfound. Consequently, two L293DN devices ing built-in diodes across each output are used in the main circuit, each providing which inhibit back-e.m.f. generation when power for four multiplexed digits. They are switching inductive loads, such as the under combined control of another segment coils (see Fig.3). 74HC237 1-of-8 controller. The L293DN, however, has the unfortunate side a k COM effect of consuming ULN2004A OUTPUT around 20mA even c 10k5 when the outputs are b INPUT in a high impedance c k e b state. The “enable” inputs do not place 7k2 3k e a the device into a quiE escent state in highk a impedance mode, unlike many logic devices that you may be familiar with. Fig.3. Schematic of one stage within a ULN 2004A 7-stage Regrettably, it is not cheap. line driver. 326 1A 1,2 EN 2A 3A 3,4 EN 4A 2 3 1Y 1 7 10 6 11 2Y 3Y 9 15 14 4Y INPUTS OUTPUT A EN Y H H H L H L X L Z H = HIGH L = LOW X = IRRELEVANT Z = HIGH-IMPEDANCE OUTPUT (OFF) Fig.4. L293DN pinouts and logic table. Do not use any other type of L293 device. The L293DN (note the DN suffix), is a 16-pin device with diode protection. Other L293 device types may not have the same characteristics (the L293E, for instance, has 20 pins and cannot be used). MULTIPLEX CIRCUIT A simplified block diagram of the control requirement is shown in Fig.5. The circuit diagram showing the multiplexing and digit drive devices is given in Fig.6. Control data originates from a PIC16F84 microcontroller (discussed presently in relation to Fig.7). Through multiplexer IC1, 3-bit control data selects which digit is to be powered via source drivers IC2 or IC3. As shown in Fig.6, and designed on the printed circuit board to be described later, eight digits (one “bank”) can be controlled by these two drivers. Additional digit source drivers can be added separately if required (on stripboard for example, although no constructional details on this are offered). If fewer that five digits are to be controlled, IC3 can be omitted. The eight outputs of IC1 are common to all digit drivers, and IC1 does not need to be repeated if additional banks of drivers are added. The software allows two additional banks of eight digits (a total of 24 digits) to be controlled without modification to the program. Readers who are familiar with PIC and QB programming could modify the software to cope with multiplexing up to 64 digits if an additional 74HC237 multiplexer is used (see later). Segment selection is provided by a 3-bit code fed to multiplexers IC4 and IC5. These in turn control segment sink drivers IC6 and IC7, respectively. Only seven outputs of these multiplexers are used. The two multiplexers are under “chip select” (CS) control by separate CS1 lines (pins 6), so that segment On or Off control is achieved not only in respect of the 3-bit code, but also in terms of current-sinking pulse duration (more later). SELECT BANK 1 SELECT BANK 2 SELECT BANK 3 DIGITS 3-BIT CODE 3-BIT CODE 2-BIT CODE 8-BIT CODE +12V POWER SELECT 7-BIT CODE SEGMENT 7-SEGMENT DIGIT SELECT DIGIT SELECT SEGMENT CONTROL ON/OFF Fig.5. Multiplexed control logic. Everyday Practical Electronics, May 2002 +12V +5V +12V +5V 6 SELECT DIGIT FROM IC8 RB0 RB1 RB2 1 2 3 4 5 VCC1 +VE CS1 Y0 16 8 16 16 VCC2 2 15 IC1 Y1 14 74HC237 13 A0 Y2 12 A1 Y3 11 A2 Y4 10 Y5 9 LE Y6 7 CS2 Y7 GND 3 7 6 x4 10 11 IC2 15 1 9 14 L293DN EN1/2 EN3/4 GND DIGIT 2 +12V 1 DIGIT 3 +12V 2 DIGIT 4 +12V 3 4,5,12,13 VCC1 VCC2 x4 6 IC3 14 10 1 9 11 L293DN EN1/2 EN3/4 15 9 NC 1 14 Y1 74HC237 13 A0 Y2 12 A1 Y3 11 A2 Y4 10 Y5 9 LE Y6 7 CS2 Y7 GND 4 INT. DIODE 2 k GND 16 15 a 3 c 4 14 13 b 5 12 6 11 e IC6 7 10 ULN2004A ON A ON B ON C ON D ON E x7 ON F ON G 8 ALL BANKS 3 15 Y0 8 2 BANK SELECT RA0 FOR BANK 1 RA1 FOR BANK 2 RA2 FOR BANK 3 IC4 8 16 7 SEGMENT SELECT FROM IC8 CS1 DIGIT 1 +12V 5 8 ON/OFF FROM IC8 +VE 6 ALL BANKS DIGIT 5 +12V DIGIT 6 +12V DIGIT 7 +12V DIGIT 8 +12V 4,5,12,13 16 +VE 6 RB7 CS1 RB3 1 RB5 2 RB6 3 RB7 4 1 2 3 4 5 6 7 8 5 DIGIT POWER CONTROL TO IC2/IC3 OF OTHER BANKS IC5 Y0 15 9 NC 14 1 74HC237 13 A0 Y2 12 A1 Y3 11 A2 Y4 10 Y5 9 LE Y6 7 CS2 Y7 GND 2 Y1 INT. DIODE k 16 15 a 3 c 4 14 13 b 5 12 6 11 e IC7 7 10 ULN2004A 8 OFF A OFF B OFF C OFF D OFF E OFF F OFF G 8 0V Fig.6. Circuit diagram for the multiplexed control of the digits, basically for eight, but can be modified to control 64 digits. MICROCONTROLLER Because of the multiplexing arrangement, a PIC16F84 microcontroller is readily suitable for this design, see Fig.7. It is capable of being user-controlled either via a 16-key (4 × 4) data entry keypad, or via a PC-compatible computer, running under MS-DOS or Win95/98/ME. The PIC is run at 4MHz, as set by crystal X1. Port pins RB0 to RB2 control digit selection via IC1 (Fig.6), pins RB4 to RB6 control segment selection via IC4 and IC5, RB7 controls selection of IC4 (segment On control), and RB3 controls selection of IC5 (segment Off control). Port pins RA0 to RA2 perform “bank” selection. As shown, they can control up to three banks of eight digits. If they are used to control another 74HC237 1-of-8 multiplexer, however, they could control eight banks (with suitable software modification). Port B pins are also used for inputting data from a 16-key keypad, or from a PC. Note that it is unwise to connect a keypad and PC simultaneously since one might adversely affect the other. The PIC itself is protected against its Port B pins being undesirably affected by external PC/keypad control by the inclusion of buffer resistors R1 to R8. Pins RA3 and RB7 are used by the software to achieve “handshaking” with the PC when the unit is under computer control. Pin RA4 is used in a manner possibly not seen by readers before. It is used in oscillatory mode under software control and at a rate set by preset VR1 and capacitor C5. It allows the segment control pulse width to be varied. The controlling software routine will be discussed towards the end of this article. As usual with the author’s PIC designs, on-board programming can be performed via a 4-pin connection (TB1). Adverse Everyday Practical Electronics, May 2002 Whilst the 13·5V (or so) of a fully charged battery seems acceptable, it would appear to be unwise to allow the supply to significantly exceed this voltage. The voltage, current and pulse duration limits for the digits are not known since Bodet did not respond to the author’s request for information. The digital control i.c.s require to be powered at +5V d.c. (which must not be exceeded). This is provided from the 12V line via regulator IC9, which can supply up to 100mA of sustained current. Be aware, though, that on the prototype it was effects on the +5V power line are prevented during programming control by the inclusion of resistor R9 and diode D1. POWER SUPPLY Power for the digits needs to be 12V d.c. This may be provided from any source capable of supplying at least 500mA (to provide “headroom” when a segment is activated). It does not need to be stabilised. A 12V car battery is suitable. The prototype was found to operate with a supply voltage as low as 9V (with resultant reduction in current consumption). +12V +12V IN * IC9 OUT +5V 78L05 COM C1 100n VR1 100k 14 C2,C6, C7 100n +VE R9 1k *SEE TEXT RA0 IC8 RA1 PIC16F84 RA2 RA3 C3 10p TOCKI/RA4 16 X1 4MHz RB1 RB2 C4 10p RB3 15 OSC2/ CLK OUT RB4 RB5 CLK/RB6 4 18 1 2 3 MCLR DI0/RB7 PULSE LENGTH IC2/3 PINS 1/9 BANK 1 IC2/3 PINS 1/9 BANK 2 IC2/3 PINS 1/9 BANK 3 PC HANDSHAKE (SK1 "ERROR") OSC1/ CLK IN INT/RB0 D1 1N4148 a k 17 C5 100n 6 IC1 PIN 1 7 IC1 PIN 2 8 SELECT DIGIT IC1 PIN 3 9 IC5 PIN 6 SEGMENT OFF 10 IC4/5 PIN 1 11 IC4/5 PIN 2 12 SELECT SEGMENT IC4/5 PIN 3 13 IC4 PIN 6 SEGMENT ON GND 0V 5 0V TB1 0V MCLR DATA R1 TO R8 1k CLK TO 4 x 4 MATRIX KEYPAD PIN 1 2 OR PC PARALLEL PORT DATA (DA) PINS 0 1 3 2 4 3 5 4 6 5 7 6 8 9 7 GND Fig.7. Circuit diagram showing the PIC16F84 control connections, plus power supply. 327 COMPONENTS Resistors R1 to R9 1k (9 off) All 0·25W 5% carbon film Potentiometer VR1 100k min. preset, round See SHOP TALK page C3, C4 C4 C3 SEGMENTS VR1 X1 IC4 BANK 3 CTL (RA1) BANK 2 CTL (RA2) ERROR LINE SK1 IC6 IC8 KBD1/DA0 KBD2/DA1 KBD3/DA2 KBD4/DA3 KBD5/DA4 KBD6/DA5 KBD7/DA6 KBD8/DA7 KBD9/0V R1 R2 R3 R4 R5 R6 R7 R8 IC5 IC7 X Semiconductors IC1, IC4, IC5 IC2, IC3 IC6, IC7 IC8 IC9 74HC237 1-to-8 multiplexer (see text) (3 off) L293DN 16-pin Half-H driver (see text) (2 off) ULN2004A 7-way Darlington line driver (see text) (2 off) PIC16F84 microcontroller, preprogrammed (see text) 78L05 +5V 100mA (or 7805 +5V 1A) regulator (see text) C7 k C5 100n ceramic, 0·2in pitch (5 off) 10p ceramic, 0·2in pitch (2 off) R9 a D1 C6 Capacitors C1, C2, C5 to C7 TB1 0V CLK RB6 DATA RB7 MCLR 0V Y 0V IC9 OUT COM C2 IN C1 IC1 1 2 3 4 5 6 7 8 IC2 TO IC2/3 OF OTHER BANKS 1 2 IC3 3 4 5 6 7 8 +12V TO DIGITS Miscellaneous X1 A OFF B OFF C OFF D OFF E OFF F OFF G OFF BANK 1 LINK +5V +12V +12V A ON B ON C ON D ON E ON F ON G ON 4MHz crystal 3.1IN (78.7mm) Printed circuit board, available from the EPE PCB Service, code 341; RW44 10-inch 7-segment electromechanical display (big digit), quantity to suit (see text); 4 × 4 data entry keypad (optional – see text); stranded colour-coded connecting wire (individual wires or ribbon cable); 12V d.c. power source, min. 500mA output; 1mm terminal pins or pin headers; 16-pin d.i.l. socket (7 off, see text); 18-pin d.i.l. socket; printer port connectors to suit (optional – see text); solder, etc. £20 4.0IN (101.6mm) Approx. Cost Guidance Only excluding hardware required to constantly provide around 40mA (due to the two L293DN devices). It is thus likely to get a bit warm, especially if the source power is 12V or greater. If it is found to shut down through excessive heat (it is thermally regulated), change it to a standard 7805 +5V 1A device. It is perhaps prudent to switch off power during long periods of digit inactivity. Note that the digits themselves only consume power during the brief pulse that changes their segment display position. Capacitors C1, C2, C6 and C7 help to maintain powerline stability. CONSTRUCTION Printed circuit board component and track layout details are shown in Fig.8. This board is available from the EPE PCB Service, code 341. Assemble in order of link wires first, including the one marked “Bank 1 Link” – this will be discussed under “Expansion”. Note that some links go under the i.c. 328 341 Fig.8. Component layout and full-size underside copper foil master track pattern. positions. Follow with the d.i.l. (dual-inline) i.c. sockets and then continue in any convenient order. Insert 1mm terminal pins at the external connection points, but omit those alongside IC1 which are only needed if more than eight digits are to be controlled. There are two choices of data input, as said earlier. They are connected to the board at the pins to the left of resistors R1 to R8. If using the data entry keypad, connect its pins, as shown in Fig.9, to the similarly numbered points on the board. Keyboard Everyday Practical Electronics, May 2002 PIN 1 2 3 4 5 6 7 8 9 10 11 12 13 14 15 16 FUNCTION NC NC D OFF D ON E OFF C ON E ON C OFF F OFF B ON F ON B OFF G ON A ON G OFF A OFF ARROW ON CONNECTOR DENOTES PIN 1 15 1 16 2 VIEW LOOKING INTO 16-WAY CONNECTOR Fig.12. Pinouts for the connector mounted as part of the digit assembly. DIGIT WIRING Prototype display controller board during development testing using a plug-in breadboard to temporarily connect a data keypad and a PC via a Centronics connector (mounted on the p.c.b. used with Teach-In 2000 Part 4 – Feb ’00). pin 9 is a ground (0V) connection for the pad’s frame. If using a PC as the data source, it needs to be connected from its parallel printer port to the board. The easiest way is to use a standard printer cable with pre-attached connectors. The “printer end” of the cable has a 36-way male D-type Centronics connector which requires a matching female type at the unit end. The latter should be hardwired to the board at the designated points using short lengths of insulated stranded wire. The pinouts for a rightangled female connector are shown in Fig.10. A) 9 8 Alternatively, the unit can be hardwired to a separate 25-way D-type male connector plugged into the back of the computer – 10-way ribbon cable would be ideal. The connector’s pinouts are shown in Fig.11. Note that the “Error” line connects to the board pin situated near IC8. (“Error” is the name given in respect of that line’s normal purpose when interfaced to a printer.) Before inserting the d.i.l. i.c.s, do a thorough examination of the board for faulty assembly and soldering. Then only insert them after you have established that regulator IC9 is correctly supplying +5V at its output. Check this again once the i.c.s have been inserted. Be aware that they TOP are CMOS devices 1 2 3 4 and require the norB) mal handling precau5 TOP 1 2 3 A tions, discharging static electricity from 6 6 5 4 B 7 6 5 4 3 2 1 your body by touch7 ing the bare metal of 7 8 9 C REAR VIEW something earthed 8 0 D before handling them. Adjust preset VR1 PIN 9 - CONNECT TO 0V to a fully-clockwise setting (maximum Fig.9. Keypad connection details. pulse length) before testing the system. HANDSHAKE IC8 RA3 (ERROR) Monstrous is again a term that can be used in respect of the digit connection requirements. The digits need to be wired in parallel back to the control board. However, although the manufacturers have provided a single connector on each digit, this only allows for one set of the 15 connection wires needed. One would have expected two connectors, one for the cable harness arriving from the control board, another for the harness that then has to be connected to the next digit. The author offers no recommendations about using the digit’s own connector, although for the sake of good order, its pinouts are shown in Fig.12. It was decided that it was easier to hardwire the connections to solder pads at various positions on the back of the digits. They are the pads to which the manufacturer’s rectifier diodes (mounted inside the digit box) are soldered. The correct connection points were found experimentally and are shown in Fig.13. Ignore the unused pads. Whereas the 14 segment wires of each harness are connected in parallel to each digit, each digit needs its own separate +12V power supply wire, originating from the control unit p.c.b. as shown in Fig.8. Make the +12V connections in numerical order in relation to the digit positions in the proposed display. Before you fully interwire the digits, though, it is recommended that you just wire-up for the first one and check out the system. UNDERSIDE VIEW LOOKING AT PINS SK1 D5 D7 D6 36 19 18 1 D3 D4 D1 D2 D0 13 1 15 25 0V DA4 DA6 DA2 DA0 DA7 DA5 DA3 DA1 GND ERROR VIEWED FROM REAR OF SOCKET PLUGGED INTO COMPUTER PARALLEL PORT Fig.10. Connections to a 36-way D-type Centronics female connector used in conjunction with a standard PC parallel port cable. Everyday Practical Electronics, May 2002 Fig.11. Alternative connections via a 25-way male D-type connector. 329 KEYPAD OPERATION The software has been written so that on power being switched on the PIC sets its Port B for input with the input pull-up resistors active. A check is then made to see if the inputs are connected to any source that pulls them low. Under keypad control (with no keys pressed) there is nothing to pull the pins low and so the PIC assumes that a keypad is the data entry source. Having established that fact, the software goes into a perpetual loop scanning the keypad for keypresses. The software routine used is a variant of that described in the author’s Using PICs with Keypads of Jan ’01. In response to any keypresses, look-up tables are used to relate that input value to the data to be sent to the digits. The first table (VALUE) allocates the keypress data to a numerical value between 0 and 15. Another table (TABLE) then relates that value to a binary sequence in respect of the digit segments to be turned on. The sequence is in the right-to-left order (bit 0 to bit 7) of segment A to segment G. For example, binary 01111111 turns on all segments, resulting in the 7-segment display of numeral 8. Binary 00000110, on the other hand, only turns on segments B and C, resulting in numeral 1 being displayed. The full table is shown in Listing 1. B ON B OFF A ON A OFF FROM SEGMENT CONTROL I.C.s B ON B OFF A ON A OFF G ON G OFF F ON F OFF E ON E OFF G ON G OFF F ON F OFF E ON E OFF TO OTHER DIGITS ON FROM IC6 OFF FROM IC7 D OFF D ON C OFF C ON D OFF D ON C OFF C ON CONNECTOR IGNORE UNMARKED CONNECTION POINTS +12V FROM SELECTED POWER CONTROL I.C. Fig.13. Wiring details for a single digit. LISTING 1 TABLE: addwf PCL,F retlw %00111111 retlw %00000110 retlw %01011011 retlw %01001111 retlw %01100110 retlw %01101101 retlw %01111101 retlw %00000111 retlw %01111111 retlw %01100111 retlw %01110111 retlw %01111100 retlw %00111001 retlw %01011110 retlw %10000000 retlw %01000000 GFEDCBA ;0 ;1 ;2 ;3 ;4 ;5 ;6 ;7 ;8 ;9 ; 10 ; 11 ; 12 ; 13 ; 14 ; 15 A b C d blank - Note that bit 7 in the 14th jump is set at 1. This prevents the PIC from returning a zero value from this location, which would otherwise be recognised as “no data entered from keypad”. Whilst it is suggested that decimal display values from 0 to 9 are retained, other segment arrangements could be provided for the other six positions by readers having their own PIC assembly-programming facilities, such as the author’s Toolkit Mk3/TK3 (Oct/Nov ’01). It is also worth recognising that 7-segment displays cannot in many instances be used to represent alphabet characters. For example, capital letter A can be represented, but lower case a cannot. Conversely, b can be, but B cannot (it would just look like an 8). Also note that any letters having diagonals cannot be represented, such as K, M, N, Z, nor can T. It is worth experimenting to see what characters can be represented, and what compromises you might have to 330 Interwiring between the two digits used during development. make. You may recall that the author’s Teach-In 2000 series demonstration software illustrated the principle of 7-segment control. Having established the segment code required, the PIC then has to send the corresponding data to the segments individually. From within a loop, the PIC reads each data bit position to see whether a segment should be On or Off. At each position it uses another look-up table (TABLE2 – see Listing 2) for the code needed to send to multiplexers IC4 and IC5 in order to control that bit. The code also takes into account that the p.c.b. tracks are connected to the three control pins in the opposite order than might normally be expected (this was done for p.c.b. design simplicity). Only bits 6 to 4 are of importance in this table. LISTING 2 TABLE2: addwf PCL,F retlw %01000000 retlw %00100000 retlw %01100000 retlw %00010000 retlw %01010000 retlw %00110000 retlw %01110000 retlw %00000000 ;a ;b ;c ;d ;e ;f ;g ;- The code is output on the 3-line common bus feeding to IC4 and IC5. Which of these i.c.s is activated depends on whether the segment needs to be turned on or turned off. To turn on IC4 (segment On), bit 7 in the code is set high. If IC5 is required (segment Off) bit 3 is set high. Everyday Practical Electronics, May 2002 It is also necessary to specify which of the digits is the target for the segment information. This data is set into the code’s bits 0 to 2, representing the number (1 to 8) of the digit in the allocated bank, and destined for IC1 (see Fig.6). DIGIT SELECTION VIA KEYPAD Because the digits might be located away from the controlling keypad, and not be visible to the user, it was decided to allocate two keypad keys as digit stepping controls. At switch-on digit 1 is the default target, and any numeric data keyed in continues to be routed to it. To choose Digit 2 instead, press keypad “D” (Digit step). This changes the control code fed to IC1, incrementing it from binary 000 to binary 001, so selecting digit 2. Display data is now repeatedly fed to this digit. Pressing “D” repeatedly steps through each digit position in turn, irrespective of whether the digit physically exists in the system. To return to Digit 1 at any time press “C” (Clear back to start). It is not possible to step back individually from digit to digit. This, though, is a facility for which PIC-wise users could write a software routine. In this case it is suggested that key “B” is intercepted (Backwards) in a similar way to which letters “C” and “D” are intercepted. Each time the digit number is stepped forward, the software increments a 24-value counter (rolling over to 1 again following 24). This not only provides information on which digit is selected (from 1 to 8), but also on which Bank it is in (Bank 0 to 2), using yet another look-up table. This results in Port A pins RA0, RA1 or RA2 being selected as appropriate (in Bank order). Referring back to Fig.6 again, it will be seen that IC2 and IC3 are shown to be under selection control by pin RA0. If additional IC2 and IC3 devices are used they would be allocated to one of the other Port A pins, RA1 or RA2, in that order of Bank. In this way, 24 digits can be stepped through by pressing key “D” the required number of times. Yes, it tests the user’s counting ability, but seemed the best solution considering the limited number of keys available. The provision of monitoring via an alphanumeric liquid crystal display was considered, but was rejected on the grounds of adding complexity to a moderately simple design. PIC-knowledgeable readers could probably add l.c.d. facilities if needed. There are numerous examples of l.c.d. control in many of the published EPE PIC projects (especially in the author’s designs). Such a routine could be integrated almost as a “library” file. It is suggested that l.c.d. control is basically via Port B with the exception of the l.c.d. E line, which is better suited to control by the otherwise unused pin RA3 (it is only used when under PC control). Line E cannot be satisfactorily controlled by Port B as all pins are in use for other purposes, which would cause undesirable l.c.d. response. It is only Line E that is critical in this context. COMPUTER CONTROL When under computer control, data is fed to the PIC via the same connections as Everyday Practical Electronics, May 2002 the keypad (but preferably in the keypad’s absence). It is in a different coding format to that used with the keypad, however. Because of the full range of keys on a PC keyboard, is it is possible to send a much greater variety of data to the digits. On recognition by the PIC that a PC is connected to it (see earlier), it goes into a different monitoring routine (COMPROG). Synchronisation between the PIC and PC is maintained by using two handshake lines at the PIC end of the system, pins RA3 and RA7 as mentioned earlier. Port B pull-up resistors are turned off in this mode. The first significant handshake action the PIC takes following switch on for PC mode, is to set pin RA3 high. This indicates to the PC that the PIC is ready to receive data. The PIC then sits in a holding loop until acknowledgement from the PC is received. The PC software in its turn holds its printer port output DA7 low and waits for the RA3 = high signal to arrive via its printer port “Error” line. Having received this signal, however, it takes no immediate action, but waits for a keyboard key to be pressed. Having received a keypress, the PC relates it to a lengthy look-up table that holds segment data in respect of keypresses. If segment data has been allocated to that key, it is output as seven bits (same relationship as with keypad data) plus bit 7 set high. It then remains in another holding loop until the “Error” line goes low. The PIC, recognising that its RB7 pin has gone high, accepts the incoming 7-bits of RB0-RB6 data as valid. It immediately acknowledges this to the PC by setting line RA3 low. The PC, having accepted this acknowledgement, is now free to wait for another keypress, but will not send it until the PIC signals that it is ready. Between accepting bytes of data, the PIC sends the segment data serially to the selected digit in a similar fashion to that described earlier. On completion of each digit’s output, the PIC again sets handshake line RA3 high, asking for more PC data. DIGIT COUNT SELECTION address by pressing 0, 1 or 2 (pressing any other key, including <ENTER>, always selects 0, i.e. address 378). If you do not know which address your PC uses, try all three. The system will show you have the correct one when it proves that it can send data to the displays. (The PIC board must be free of assembly errors of course!) Having selected the register, the screen changes to that in Fig.14b. Underneath the main title you are asked to enter the number of digits that you wish to be controlled, with a range of 1 to 24. Values outside this range are not accepted. At the bottom of the screen are displayed the characters which can be sent for display via the 7-segment digits. With the exception of the control keys mentioned next, this represents the full range of keys that are functional. Any others will be ignored by the program (although you can add to the range as discussed later). To either side of the screen are quoted the commands available when the program is in full control mode. The <ESC> (escape) key causes the program to restart from its beginning and may be used at any time. Pressing the <CTRL> and <BRK> keys simultaneously causes the program to end. This is the only way in which it can be halted and exited. Otherwise, all keyboard characters shown in the bottom line are available for output to the digits. Acceptable keypresses are responded to immediately, and data is output to the digits in sequence, the PIC’s digit count being incremented following receipt of each character. When the final digit in the sequence has been triggered, the count automatically recommences from Digit 1. When entering data for output to the digits, pressing <ENTER> causes the PIC to reset the digit count back to Digit 1. Pressing the space bar causes the next digit to be cleared (no segments showing). PC FIRST, PIC SECOND In the mid-screen area you are told that you should switch on the PIC unit “now”. As said earlier, when the PIC program is first switched on, the PIC examines Port B to see whether its pins are high or low. If high, keypad control is assumed. On running the PC program, however, its first activity is to set its printer port lines low. On reading Port B being low, the PIC knows that PC control is required. The PC program has been written so that it can be set to the exact number of digits in use, unlike the keypad software which always expects 24 digits. It also provides the facility to select which printer port register address is used. On running the program, the screen shown in Fig.14a will be displayed. The three possible printer port registers addresses are displayed at the top. It is necessary to select the one appropriate to your PC’s configuration. Most likely it will be address 378 hex, but could be hex 278 or Fig.14. Sections of Big Digit PC program setup screens, (a) 3BC. Select the printer port selection, (b) digit quantity selections. 331 LISTING 3 DATA 01111110 DATA 10110000 DATA 21101101 DATA C1001110 DATA c0001101 DATA D0000000 DATA d0111101 DATA K0000000 DATA k0000000 DATA “ 0000000” DATA “^1100011” Fig.15. Example of PC screen during digit control. Consequently, do not switch on the PIC unit until you see the screen now being discussed. When you have switched on the PIC, then enter the number of digits to be controlled and press <ENTER>. The program then enters its full operational mode, first drawing on screen the same number of boxes as the number of digits specified. These boxes represent the 7-segment digits and display the same characters. Next the program sends data for numeral 8 to all digits required. It then sends a reset command to the PIC, resetting it for Digit 1, after which it sends data to clear all required digits, again followed by a reset command. This action has three functions, to synchronise the PIC with the computer’s order of digits, to prime the PIC so that it knows which segments are in which state, and thirdly to clear any existing display data. In the latter context it is worth recognising that the segments can be set by hand without damaging them. They are only balanced on light-duty pivots, freely responding to the electromagnetic fields generated by their coils. It is quite possible that someone could have set them by hand to random positions. (In a “field” situation, it is advisable to enclose the digits to prevent this happening – and of course to protect them from the “elements”.) From this point onwards, pressing any recognised key causes the data to be displayed sequentially, with the count returning to zero (Digit 1) after the final digit (or on pressing <ENTER> as described earlier). An example PC screen display is shown in Fig.15. PC CONTROL DATA OPTIONS Because of the greater variety of segment codes that can be generated via the PC than with the keypad, there is the option to program the PC software with any segment combination required. The data is held in a look-up table which can be added to by readers who have QBasic or QuickBASIC resident on their PC. The data is held as in the format extract example shown in Listing 3, in the bit order of segments ABCDEFG (the opposite order used by the PIC software’s table). 332 When the program is started, all data statements are “Read” and analysed. The first character in each data string holds the keyboard character that represents the following 7-bit segment data. Its ASCII value is taken and the remaining seven bits in the data are stored in a string array, seg$(x), at the address corresponding to the ASCII value. For example, in the first case, “01111110”, the leading “0” is the first character. Its ASCII value is 48 and so the rest of the data string (“1111110”) is stored at string array position seg$(48). In the fourth case, “C” is the character, having the ASCII value 67, so its 7-bit string data is stored at seg$(67). Note that some data statements have had to be enclosed in quotes so that the program recognises the associated character correctly (the last character in the above list cause the “degrees” symbol to be displayed when the “^” is pressed (as in 20oC). The one before it is for the space bar (turns off all segments in a digit). You will see instances where the character may be in upper or lower case, and in some cases both. If the value following the character contains one or more “1”s, the equivalent character can be generated on a 7-segment display. In the other cases, all zeros, the character cannot be formed using a 7-segment display. If a character is not included in the table, a value of zero is returned if its key is pressed. All unacceptable keypresses are ignored. ALLOCATING SEGMENTS For such “unacceptable” keys, however, a segment or PIC control code can be allocated separately. For instance, the program allocates the code “00000001” when the <ENTER> key (ASCII 13) is pressed. The PIC has been programed to recognise this bit combination as the command to reset the digit number count to Digit 1, in a similar way to that in which it responds when the “D” key on the 4 × 4 data keypad is pressed. You could, for example, allocate specific codes for the PC’s forwards/backwards cursor keys. The PIC could then be told to step the digit count value backwards or forwards without causing the display data to change. Then, on pressing another key, its character would be displayed at the new digit address. Such a facility would be of help in a display having many digits and where only one or two might need to be changed at any time. This would remove the need to key in data for all digits in the full display when only a few might need changing. Another option open to those who are familiar with QB programming is to write a code routine that allows a string of characters to be entered via the keyboard as a sentence (using INPUT instead of INKEY$). This would not be transmitted to the PIC until the <ENTER> key had been pressed. Each character would then be sent automatically in sequence to successive digits as required. SETTING PULSE LENGTH So far the discussion has assumed that the length of the control pulse that activates the segment coils is correct. Setting preset VR1 earlier to a fully clockwise position sets the length to the maximum design limit. It is likely that the pulse can be shortened, so speeding segment changes. The simple data sheet received indicated that a pulse length of about 0·25 seconds was required. Experiments with the digits showed that it could be much shorter. Although there was a slight variation in minimum operational pulse length for the various segments, the requirements were typically found to be about 70 milliseconds, but cannot be guaranteed in other assemblies (hence the need for user-adjustment rather than specifying the length as an accurate timing within the software). A 70ms pulse length is generated with preset VR1 at a roughly midway setting. The maximum pulse length that can be set is about twice that. These figures are based on the PIC being run at 4MHz. Once you have ascertained the correct response of the segments using a long pulse set via VR1, it is worth experimenting to find the lowest VR1 setting at which the segments will respond. This will speed the rate at which the displays can be changed. The digits will not respond if the resistance is set too low. An intermediate stage may also be found in which some digits respond but not others. Avoid setting VR1 to a nil resistance position which will overload RA4 when it is in output-low mode (the PIC is internally protected against brief overloads – but do not sustain this condition). It is worth noting that the software has also been written to speed segment changing. The status of each segment is recorded in the PIC’s memory. When a new character is to be displayed on a particular digit, the digit’s current segment status is checked against the segment requirement for the new character. If any segments match, they are ignored by the output routine, so saving one pulse duration – which can be a significant saving when many digits are in use. SCHMITT PULSING This now brings us to a software/hardware aspect that has not been used before in an EPE project – analogue control of frequency via a digital input. You are no doubt familiar with the type of circuit in which a single Schmitt trigger inverter is used with a resistor and capacitor in order to generate a frequency (an RC oscillator). The technique used in Big Digit is similar. The PIC16F84 has a Schmitt trigger input, pin RA4. Referring to Fig.7, the Everyday Practical Electronics, May 2002 resistance is provided by preset VR1, and the capacitance by C5. Initially software sets RA4 as an output set for logic 0. This discharges C5. RA4 is then set as an input, allowing current to charge up C5 via VR1. When the Schmitt threshold is reached, the software responds to this as an input change from logic 0 to logic 1. It immediately sets RA4 as an output at logic 0 again, discharging C5, and then resets RA4 as an input once more, and so the cycle can continue for as long as the software requires it. In this design, 16 waveform cycles are used, which allows a lower value capacitor to be used than with a single cycle. It also increases the capacitor’s discharge rate and reduces current flow when RA4 is briefly set low. Listing 1 shows the full pulse delay generation routine. The frequency of oscillation can be changed by varying VR1 or by using a different value for C5. EXPANSION As said earlier, additional banks of eight digits can be controlled. In this case IC2 and IC3 need to be duplicated on a stripboard layout. Their pins should be connected identically to those in Bank 1, referring to Fig.6. The connection points on the p.c.b. are those alongside IC1, previously left unused. The difference is that their enable pins (1 and 9) need to be controlled by a different Port A pin, RA1 for Bank 2, and RA2 for Bank 3. It is permissible to omit IC3 in the final bank if the digit count does not require it. If more than three Banks are needed (more than 24 digits), pins RA0 to RA3 should be wired into another 74HC237, mounted on stripboard, at its pins A0 to A2. The outputs would then be used as the Bank Select lines for up to eight pairs of IC2 and IC3. If using the extra 74HC237, remove the p.c.b. link wire marked Bank 1 Link. Connect point Y to pin Y0 of the new multiplexer. Point X then becomes the point to be regarded as the RA0 connection. The software for the PIC and the PC will need to be modified to cope with more than three banks of digits. For this reason, only readers highly familiar with programming in both PIC and QB languages should undertake this option. To such experi- LISTING 4 Send pulse to segment control enced programmers, the changes required PULSEIT: movlw %00010000 ; number of cycles required should be obvious, movwf PULSECNT but the author cannot offer advice on it. Nor PULSE2: btfss PORTA,4 ; has bit 4 gone high (cap charged can advice be offered up enough)? on a breadboard laygoto PULSE2 ; no, repeat check out for any additional bcf PORTA,4 ; yes, set bit 4 low to discharge cap chips added. again Note that it will be PAGE1 necessary to change bcf TRISA,4 ; set bit 4 as output regulator IC9 to a PAGE0 standard 7805 +5V nop ; brief wait discharge capacitor 1A type if additional PAGE1 copies of IC2/IC3 are bsf TRISA,4 ; set bit 4 as input added (each extra PAGE0 chip adds about decfsz PULSECNT,F ; repeat for set delay loop time 20mA to the power goto PULSE2 drawn from the +5V return line – see earlier). QB programmers provides a reasonable method of controlling will recognise that the multiplexing circuit the digits, whether just one is used, or many could be controlled directly from the PC’s more. We would be interested to know how printer port data lines, omitting the PIC many you use and in what applications. entirely. The port’s other control lines could then be used in place of the RA0 to RESOURCES RA2 connections. The QB software would The software for this design is available largely need to be rewritten, of course. on 3·5in disk (for which a nominal hanVALEDICTUM dling charge applies) from EPE Editorial office, or free via the EPE ftp site (path DIGITALIS! PUB/PICS/bigdigit). The easiest route to Two digits were sent to the author for the ftp site is via the link at the top of the experimentation. As described in this artimain EPE web page at www.epemag. cle, the resulting design is intended to drive wimborne.co.uk. up to at least 24 digits, and up to 64 with The PIC software is supplied as a source modification. Obviously this ability has not code (ASM – TASM grammar), HEX code been fully proved in practice. However, (MPASM) and OBJ code (TASM). It was extensive bench-tests and simulations have developed using EPE Toolkit Mk3/TK3. been made using the two digits and it is The PC program is supplied as a standbelieved that the claims are valid. If you alone program (EXE) and as find any aspect that does not justify this QBasic/Quick-BASIC source code (BAS). belief, let the author know via EPE HQ The PIC configuration required is XTAL (NOT via the Chat Zone as messages postXS, POR on, WDT off. This is embedded ed there may be overlooked). in the ASM and HEX codes, but readers The author hopes that readers will find using the TASM OBJ code must configure ways in which the PIC and QB programs can the PIC in the usual separate manner. be enhanced and write additional routines to Ensure that you read this month’s suit their own needs. His intention has been Shoptalk page for details of component to show with this design how the Big Digits buying for this project. can be controlled, and to provide an elementary framework within which readers can work to suit their own needs and the number ACKNOWLEDGEMENT of digits actually used. The author thanks Display Electronics Readers who do not wish to tailor the pro(www.distel.co.uk) for providing the Big grams, though, will find that the software is Digits for experimental use in the developperfectly usable as it stands, and that it ment of this project. Signed............................................................................. Name and Address......................................................... ........................................................................................ NEWSAGENTS ORDER FORM Please reserve/deliver a copy of Everyday Practical Electronics for me each month ........................................................................................ Post Code .......................... Everyday Practical Electronics is published on the second Thursday of each month and distributed S.O.R. by COMAG Make sure of your copy of EPE each month – cut out or photostat this form, fill it in and hand it to your newsagent. Everyday Practical Electronics, May 2002 333 PRACTICALLY SPEAKING Robert Penfold looks at the Techniques of Actually Doing It! project construction is E certainly a technical hobby, but it is not only a matter of test equipment, LECTRONIC PIC programming, and electronic theory. It is not just soldering irons, electronic components, and circuit boards either. There is also a “nuts and bolts” side to the hobby. Having completed a circuit board successfully you are by no means “home and dry”. There is usually a fair amount of work to do before you are ready to show off your new masterpiece. You should not find things too difficult if you have a reasonable selection of tools and often undertake DIY jobs around the house. On the other hand, project construction and general DIY jobs are certainly different. Electronic project construction requires a more gentle approach. The “hammer and tongs” approach usually ends in disaster, with a lot of time and materials being wasted. Most projects are housed in plastic or aluminium cases that are easily damaged. Some cases are actually quite tough, but many of the plastic cases are prone to cracking, and it is easy to dent or distort most aluminium cases. Bear in mind that most cases have finishes that are easily spoiled. With the “nuts and bolts” side of construction it is definitely advisable to proceed carefully and always use the minimum amount of force. Look Before You . . . If you look through a selection of project articles you will find detailed instructions for building the circuit boards and completing the hard wiring. Articles are usually more sketchy about the mechanical side of construction. This is simply because most constructors prefer to “do their own thing” with this aspect of project building. You can try to produce an exact copy of the original each time you build a project, but it is more interesting and satisfying if you do things your own way.You have greater freedom when “doing your own thing”, but the chances of ending up with a complete mess are greatly increased. It is fair to say that careful planning is important when building anything, and electronic projects are certainly no exception. Simply making it up as you go along is likely to produce an end result that looks muddled and badly thought out. It might even produce a 90 per cent complete project that can be taken no further. Without planning it is easy to produce projects that are fine, apart from the fact there is insufficient space for the battery, or the lid of the case can not be fitted into place. Another popular mistake is to miss out a control or socket which then has to be fitted in as best you can. At best this produces some odd-looking panel layouts. At worst you find that one or two controls cannot be adjusted when the headphones are plugged in, or something of this nature. Project Cases Although there are many different types of project cases in use at present, they break down into two main categories. The cheapest are the simple boxes that are normally of plastic construction, but can be made of metal or a mixture of plastic and metal. Instrument cases are generally larger and more expensive. The simple boxes consist of a fivesided main section plus a removable lid, although the latter is often used as the front panel. The more expensive metal types are of diecast aluminium construction and are very tough. They also have good screening properties that prevent radio signals from entering or exiting. The cheaper metal boxes use folded aluminium construction. While nothing like as tough as the diecast variety, they are more than adequate for most projects. A wide range of inexpensive plastic boxes are available, they are well suited to most small projects. Everyday Practical Electronics, May 2002 Simple boxes are fine for projects that require a small to medium size enclosure, but they are often a bit awkward when applied to larger projects. Instrument cases are usually the better option for larger projects. Apart from the fact that they “look the part”, they generally provide better access to the interior of the case which makes it easier to work on larger and more complex projects. Instrument cases vary considerably in design, but many have a base section combined with front and rear panels. The lid and sides are combined in another section. Ideally, the case should have removable front and rear panels, as this makes working on the panels very much easier. While it is normally acceptable to use any case that is large enough, it is as well to read the construction notes in the article. There may be other considerations, and in some applications plastic cases are not suitable while in others a metal case must not be used. Some projects rely on the metal casing to act as a heatsink or to provide screening, or earthing. Other projects, such as radios, require plastic cases that do not provide screening. It is important to heed the advice when an article stipulates a certain type of case. In most instances the exact type of case used is unimportant, and it is then a matter of choosing one that is big enough and within your price range. In general, simple boxes are substantially cheaper than instrument cases, and they are perfectly adequate for most small projects. For larger projects it is probably worthwhile paying the extra for an instrument case. The finished unit will probably look much better in an instrument case, and it will be easier to build as well. Size Is Important How do you work out whether or not a likely looking case will actually Instrument cases are a better choice for larger projects. 335 accommodate your latest project? Measurements taken from the circuit board and other large components might give some guidance, but even this early in the proceedings it is really advisable to give some thought to the general layout of the project. There is otherwise a risk of buying a case that is big enough to take the components, but not with the components positioned sensibly. Most component catalogues give both the internal and external dimensions for cases. It is the internal dimensions that are of most importance. Where no internal size is given, deducting about 8 millimetres from the external dimensions usually provides figures that are quite close to the internal ones. There is a slight problem in that most cases have internal obstructions that effectively reduce their internal dimensions. For example, most cases have mounting pillars and (or) guide-rails for printed circuit boards, and threaded pillars for the lid mounting screws. Many cases have mouldings that seem to serve no purpose at all, and make it difficult to fit in even the simplest of projects. Be especially careful with cases having fixing screws that penetrate several millimetres into the open area inside the case. Many metal instrument cases fall into this category. It is easy to produce a plausible looking layout that actually results in a fixing screw going straight into the battery or a circuit board when the lid of the case is fitted in place. Where a case is supplied with fixing screws that are clearly longer than necessary, it is probably worthwhile replacing them with shorter ones. It is not a good idea to make every project as small as possible. If a project really needs to be of diminutive proportions, then try to work out a layout that will give a really compact finished article. It is otherwise better to err on the side of caution and choose a case that seems to be slightly too large. This avoids making construction unnecessarily awkward, and will probably result in a finished unit that looks neater and is easier to use. It is certainly a good idea to place the circuit board, battery, and any other large components inside the case before you start the cutting and drilling. Alternatively, make some careful measurements and some drawings. This should enable you to establish that everything fits, and that the controls, circuit board, etc., are not vying for the same space. Long and Short of it When designing layouts you are often faced with conflicting requirements. You would like to place controls and sockets to give a neat and usable layout, but such a layout might not be very practical. It is best to avoid layouts that have long wires running all over the place. This is not simply because layouts of this type tend to look rather scrappy. With many projects it is best to keep the wiring short in order minimise problems with stray pick up of “hum” and other signals, and to keep stray feedback to a minimum. The article 336 Position control knobs, etc., on the front panel and move them around to find the best layout. should point out any restrictions on the layout, such as leads that have to be kept very short, or components that should be mounted well apart. It is advisable to keep inputs and outputs well separated. Layouts normally look neater if the spacing between control knobs of the same size is constant. On the other hand, a purely mathematical approach to front panel layouts will not necessarily produce the best looking results. The neatest layout is the one that looks best “in the flesh”, and not the one that looks best “on paper”. The best way to try out layouts is to place the control knobs onto the front panel, together with fixing nuts to represent things like toggle switches or sockets. This way you get a very accurate impression of what the finished project will look like. When everything looks just right, make careful measurements so that a plan of the layout can be drawn up. Perfect Marks Always check the final layout to make sure you have not overlooked something. When you are sure everything is correct, transfer the layout to the front panel, but take due care when doing this. Most project cases are made from soft plastics or aluminium that is easily worked, but they are also easily chipped and scratched. Mark the drilling points using something like a fibre-tip pen that will not scar the case for life. It is advisable not to use spirit-based inks on plastic panels. The spirit in the ink might dissolve and seriously damage the case. If in doubt, try the pen on the inner surface of the panel, where any damage will be of no consequence. Very soft pencils (about 5B or 6B) work well on aluminium panels and should not cause any damage. The lines can be removed using an ordinary eraser. Some plastic panels are resistant to virtually all inks. One option is to scratch the design onto the panel, making sure you only place marks in areas that will be cut or drilled away. The more popular option is to fix paper onto the panel with double-sided tape or a PrittStick. This method is quite a good one using any case, since it is easy to mark the layout very accurately, and the paper gives some protection to the panel. The paper is peeled off once work on the panel has been completed, and any adhesive or paper that remains is easily washed off. Use a centre punch to mark the centres of all holes in metal cases prior to drilling them. The small indentations guide the drill bit and make accurate drilling much easier. An automatic punch works well with aluminium. Go carefully when using an ordinary punch with aluminium panels. These buckle and distort quite easily, as you will soon discover if due care is not taken. Centre punches are unsuitable for many plastic cases, which could easily be cracked or more seriously damaged. An indentation is still needed to stop the drill bit from wandering, and this can be made using a pointed tool such as a bradawl, together with a minimum of pressure. Drilling Holes It is then a matter of using standard do-it-yourself tools to drill the holes, file cutouts, or whatever. Due to the softness of the materials used for most cases it is best to drill slowly and very carefully. If you use an electric drill that has some sort of speed control, a low speed is best. A hand drill is perfectly adequate for most project construction. With an awkward case it might be necessary to enlist the services of a helper to keep it in place while the holes are drilled. Normal clamping techniques can be used with most cases, but use some cloth to protect the panels from damage. Do not rely on any paper or plastic coverings to protect panels from clamps. Always have a piece of scrap timber, MDF, etc. under the work piece. This supports the panel so that there is less risk of it buckling and it gives “cleaner” holes that require less deburring. With metal panels you will still need to do a certain amount of deburring using a miniature file, or there are special tools for this task. Be careful when dealing with steel panels. Any raised edges around holes are likely to be quite sharp, so do not feel for them using a fingertip! Look carefully for any projections and immediately remove any that are found. Everyday Practical Electronics, May 2002 Video Surveillance ) C-MOS B/W Camera 15mm/15mm ) C-MOS Colour Camera 15mm/15mm ) PCB B/W Camera 32mm/32mm ) PCB Colour Camera w/Audio 32mm/32mm ) 23cm (1·3GHz) Video/Audio Transmitter ) 13cm (2·4GHz) Video/Audio Transmitter ) 1·2 Watt 2·4GHz Video/Audio Transmitter ) 4 TFT Boxed Colour Monitor w/Audio ) Video to VGA Converter ) VGA to Video Converter ) External USB Video Capture Box £29.00 £65.00 £24.00 £65.00 £35.00 £35.00 £120.00 £110.00 £65.00 £90.00 £55.00 All prices exclude VAT. Many more products on our website: WWW.BITZTECHNOLOGY.COM Tel: 01753 522 902 Fax: 01753 571 657 Wireless Remote Controls RC-11 3 channels RC-11 Key fob Control Transmitter with Rolling Code technology. UC-216 3 channels receiver with 2 relays output working from 9V to l2vdc UC-216 with learning mode and rolling code technology. RC-11 UC-216 UC-222 Also Price: £14.99 Wireless Wireless Wireless Wireless Wireless Wireless Wireless 9-l2Vdc 240 Vac pager alarm PG-4W PIR alarm JA-60S door magnet alarm smoke alarm glass break alarm alarm control panel alarm control panel with digital /voice dialler £29.00 £29.00 £125.00 £49.00 £39.00 £49.00 £49.00 £99.00 £149.00 Distributors Welcome. All prices exclude VAT and carriage. All transmitters are licence exempt working on 433.92Mhz. All transmitters work with rolling code technology. Bitz Technology Ltd [email protected] +44 (0) 1753 522 902 Everyday Practical Electronics, May 2002 337 I NGENUITY UNLIMITED Our regular round-up of readers' own circuits. We pay between £10 and £50 for all material published, depending on length and technical merit. We're looking for novel applications and circuit designs, not simply mechanical, electrical or software ideas. Ideas must be the reader's own work and must not have been submitted for publication elsewhere. The circuits shown have NOT been proven by us. Ingenuity Unlimited is open to ALL abilities, but items for consideration in this column should be typed or word-processed, with a brief circuit description (between 100 and 500 words maximum) and full circuit diagram showing all relevant component values. Please draw all circuit schematics as clearly as possible. Send your circuit ideas to: Alan Winstanley, Ingenuity Unlimited, Wimborne Publishing Ltd., 408 Wimborne Road East, Ferndown Dorset BH22 9ND. (We do not accept submissions for IU via E-mail.) Your ideas could earn you some cash and a prize! WIN A PICO PC BASED OSCILLOSCOPE WORTH £586 ) 100MS/s Dual Channel Storage Oscilloscope ) 50MHz Spectrum Analyser ) Multimeter ) Frequency Meter )Signal Generator If you have a novel circuit idea which would be of use to other readers then a Pico Technology PC based oscilloscope could be yours. Every 12 months, Pico Technology will be awarding an ADC200-100 digital storage oscilloscope for the best IU submission. In addition, a DrDAQ Data Logger/Scope worth £69 will be presented to the runner up. Battery Discharger – Out in a Flash circuit diagram of Fig.1 discharges any rechargeable 1·5V cell and the light-emitting diode D3 starts to flash when the battery T connected across the “test’’ terminal is sufficiently discharged. The HE design uses a two-transistor astable multivibrator operating at a frequency of about 25kHz. When transistor TR2 conducts, a current flows through the 4·7mH inductor L1, whereupon energy is stored in the resulting electromagnetic field. When TR2 is cut off, the surrounding electromagnetic field collapses which produces a back-e.m.f. at a level that exceeds the forward voltage (about 1·6V) of the l.e.d. D3. A current then flows through the l.e.d. which appears to be continually alight in normal operation. Diode D2 prevents the current flowing through resistor R6 and capacitor C2. This process is halted only when the battery voltage no longer provides a sufficient base potential for the transistors, and the battery can now be removed. However, the addition of the forward bias of D1 (about 0·3V) means that the final “discharge voltage” of the battery is raised to 0·9V to 1·0V. Additional resistors R3 and R5 ensure that sufficient current flows through D1. It should be noted that the battery is discharged sufficiently when the l.e.d. begins to flash. When the discharge is complete (i.e. to 0·9V), the l.e.d. goes out altogether. (Total discharge may damage Nickel Cadmium or Nickel Metal Hydride cells and is not recommended – ARW.) The flashing of l.e.d. D3 when the battery is nearing the recommended discharge level is caused by the increasing internal resistance of the battery lowering the terminal voltage to below the threshold level. Then when no current flows, the internal resistance is of no consequence since the terminal voltage rises to the threshold voltage by taking some energy from the battery. Liao Jian Mei, Singapore. Emergency Light – A Wind-up Fig.1. Circuit diagram for the Battery Discharger. INGENUITY UNLIMITED BE INTERACTIVE IU is your forum where you can offer other readers the benefit of your Ingenuity. Share those ideas, earn some cash and possibly a prize! circuit diagram shown in Fig.2 offers a stepper-motor powered Emergency Light. TWhen spun rapidly between the fingers, a small four-phase stepper HE motor will produce an a.c. voltage of around 5V at 25mA per phase. If all four windings are paralleled, up to 100mA can therefore be produced. If this is stepped up with a small 230V to 6V-0V-6V centre tapped mains transformer, a small stepper motor is capable of powering a 6 inch 4W fluorescent tube. The transformer must be a small one (around 250mA) or so, otherwise efficiency is compromised. Once the stepper motor’s common lead or leads have been identified, the others can be identified through trial and error. First take the common lead(s) to one terminal of the transformer’s primary windings, and try combinations of two wires on the other terminal until the tube lights up. Then connect the remaining wires. To obtain a good level of light for shorter term use, consider using gears on the motor to avoid the need for any undue exertion. 338 Fig.2. Emergency Light circuit diagram. Everyday Practical Electronics, May 2002 MARCONI 2019A SPECIAL OFFERS GOULD OS300 Dual Trace, 20MHz Tested with Manual TEKTRONIX 2445A 4-ch 150MHz delay,, cursors etc. Supplied with 2 Tektronix probes. ONLY TEKTRONIX 2232 Digital Storage Scope. Dual Trace, 100MHz, 100M/S with probes . . . .£525 H.P. 54501A Dig. Oscilloscope, 100MHz 4-Ch . . .£425 H.P. 3312A Function Gen., 0·1Hz-13MHz, AM/FM Sweep/Tri/Gate/Brst etc. . . . . . . . . .£300 FARNELL Dual PSU XA35-2T, 0-35V, 0-2A, Twice QMD, l.c.d. Display . . . . . . . . . . . . . . .£180 CIRRUS CRL254 Sound Level Meter with Calibrator 80-120dB, LEQ . . . . . . . . . . .£150 EDDYSTONE 1002 Receiver, 150kHz-30MHz + Brooadcast FM, unused . . . . . . . . . . . . . .£125 FARNELL AMM255 Automatic Mo Meter, 1·5MHz-2GHz, unused . . . . . . . . . . .£300 FARNELL DSG1 Low Frequency Syn Sig. Gen., 0·001Hz-99·99kHz, low distortion, TTL/Square/Pulse Outputs etc. . . . . . . . . . . .£95 FLUKE 8060A Handheld True RMS, DMM, 4½ digit . . . . . . . . . . . . . .As new £150, used £95 BECKMAN HD110 Handheld 3½ digit DMM, 28 ranges, with battery, leads and carrying case .£40 H.P. 3310A Function Gen., 0·005Hz-5MHz, Sine/Sq/Tri/Ramp/Pulse . . . . . . . . . . . . . . . .£125 FARNELL LFM4 Sine/Sq Oscillator, 10Hz-1MHz, low distortion, TTL output, Amplitude Meter .£125 H.P. 545A Logic Probe with 546A Logic Pulser and 547A Current Tracer . . . . . . . . . . .£90 FLUKE 77 Multimeter, 3½-digit, handheld . . .£60 FLUKE 77 Series 11 . . . . . . . . . . . . . . . . . . .£70 HEME 1000 L.C.D. Clamp Meter, 00-1000A, in carrying case . . . . . . . . . . . . . . . . . . . . . . .£60 Racal 9008 ONLY £95 Automatic Modulation Meter, AM/FM 1·5MHz-2GHz Datron 1061 £150 High Quality 5·5 Digit Bench Multimeter True RMS/4 wire Res/Current Converter/IEEE Datron 1061A High Quality 6½ digit Bench Multimeter True RMS/4 wire/Current Converter Racal Receiver RA1772 50kHz-30MHz L.E.D. Display. Basically working. ONLY £95 £425 £225 £250 AM/FM SYNTHESISED SIGNAL GENERATOR 80 kHz - 1040MHz NOW ONLY £400 MARCONI 893C AF Power Meter, Sinad Measurement . . . . . . . . . . . . . . . . . . . . . . .Unused £100, Used £60 MARCONI 893B, No Sinad . . . . . . . . . . . . . . . . . . .£30 MARCONI 2610 True RMS Voltmeter, Autoranging, 5Hz-25MHz . . . . . . . . . . . . . . . . . . . . . . . . . . . . . .£195 GOULD J3B Sine/Sq Osc., 10Hz-100kHz, low distortion . . . . . . . . . . . . . . . . . . . . . . . . . .£75-£125 AVO 8 Mk. 6 in Every Ready case, with leads etc. . .£80 Other AVOs from . . . . . . . . . . . . . . . . . . . . . . . . . . .£50 GOODWILL GVT427 Dual Ch AC Millivoltmeter, 10mV-300V in 12 ranges, Freq. 10Hz-1MHz . .£100-£125 SOLARTRON 7150 DMM 6½-digit Tru RMS-IEEE . . . . . . . . . . . . . . . . . . . . . . . . .£95-£150 SOLARTRON 7150 Plus . . . . . . . . . . . . . . . . . . . .£200 HIGH QUALITY RACAL COUNTERS 9904 Universal Timer Counter, 50MHz . . . . . . .£50 9916 Counter, 10Hz-520MHz . . . . . . . . . . . . . .£75 9918 Counter, 10Hz-560MHz, 9-digit . . . . . . . .£50 WAYNE KERR B424 Component Bridge . . . .£125 RACAL/AIM 9343M LCR Databridge. Digital Automeasurement of R, C, L, Q, D . . .£200 HUNTRON TRACKER Model 1000 . . . . . . . .£125 FLUKE 8050A 4·5 Digit. 2A. True RMS . . . . . .£75 FLUKE 8010A 3·5 Digit. 10A . . . . . . . . . . . . . .£50 FLUKE 8012A 3·5 Digit. 2A . . . . . . . . . . . . . . .£40 SOLARTRON 7045 Bench Multimeter ONLY 4·5 Digit Bright L.E.D. with leads. Portable Appliance Tester Megger Pat 2 Only £30 £180 H.P. 6012B DC PSU 0-60V, 0-50A, 1000W .£1000 FARNELL AP60/50 1KW Autoranging . . . . .£1000 FARNELL H60/50 0·60V 0-50A . . . . . . . . . . .£750 FARNELL H60/25 0-60V, 0·25A . . . . . . . . . . .£400 Power Supply HPS3010, 0-30V, 0-10A . . . . .£140 FARNELL L30-2 0-30V, 0-2A . . . . . . . . . . . . .£80 FARNELL L30-1 0-30V, 0-1A . . . . . . . . . . . . .£60 Many other Power Supplies available Isolating Transformer, 240V In/Out 500VA . . .£40 STEWART of READING MARCONI 2022E Synth AM/FM Sig Gen 10kHz-1·01GHz l.c.d. display etc . . . . . . . . . . . . . . .£525-£750 H.P. 8657A Synth sig gen, 100kHz-1040MHz . . . . . . . . . . .£2000 H.P. 8656B Synth sig gen, 100kHz-990MHz . . . . . . . . . . . .£1350 H.P. 8656A Synth sig gen, 100kHz-990MHz . . . . . . . . . . . . .£995 R&S APN62 Synth, 1Hz-260kHz sig. gen., balanced/unbalanced output, l.c.d. display . . . . . . . . . . . . . . .£425 PHILIPS PM5328 sig gen, 100kHz-180MHz with 200MHz, freq. counter, IEEE . . . . . . . . . . . . . . . . . . . . . . .£550 RACAL 9081 Synth AM/FM sig g en, 5kHz-1024MHz . . . . . .£250 H.P. 3325A Synth function gen, 21MHz . . . . . . . . . . . . . . . . .£600 MARCONI 6500 Amplitude Analyser . . . . . . . . . . . . . . . . . .£1500 H.P. 4192A Impedance Analyser . . . . . . . . . . . . . . . . . . . . .£5000 H.P. 4275A LCR Meter, 10kHz-10MHz . . . . . . . . . . . . . . . .£2750 H.P. 8903A Distortion Analyser . . . . . . . . . . . . . . . . . . . . . .£1000 WAYNE KERR 3245 Inductance Analyser . . . . . . . . . . . . .£2000 H.P. 8112A Pulse Generator, 50MHz . . . . . . . . . . . . . . . . . .£1250 MARCONI 2440 Frequency Counter, 20GHz . . . . . . . . . . . .£1000 H.P. 5350B Frequency Counter, 20GHz . . . . . . . . . . . . . . . .£2000 H.P. 5342A 10Hz-18GHz Frequency Counter . . . . . . . . . . . .£800 H.P. 1650B Logic Analyser, 80-channel . . . . . . . . . . . . . . . .£1000 MARCONI 2035 Mod Meter, 500kHz-2GHz . . . . . . . . . . . . . £750 RADIO COMMUNICATIONS TEST SETS MARCONI 2955/2995A . . . . . . . . . . . . . . . . . . . . . . .From £1500 ROHDE & SCHWARZ CMT 0·1-1000MHz . . . . . . . . . . . . . .£2000 SCHLUMBERGER 4040 . . . . . . . . . . . . . . . . . . . . . . . . . . . .£900 SPECTRUM ANALYSERS H.P. 8561B 50Hz-6·5GHz . . . . . . . . . . . . . . . . . . . . . . . . . .£6500 H.P. 8560A 50Hz-2·9GHz synthesised . . . . . . . . . . . . . . . .£5000 H.P. 8594E 9kHz-2·9GHz . . . . . . . . . . . . . . . . . . . . .£4500/£5000 H.P. 8591E 1MHz-1·8GHz, 75 Ohm . . . . . . . . . . . . . . . . . .£3500 H.P. 853A with 8559A 100kHz-21GHz . . . . . . . . . . . . . . . .£2250 H.P. 8558B with Main Frame, 100kHz-1500MHz . . . . . . . . .£1250 H.P. 3585A 20Hz-40MHz . . . . . . . . . . . . . . . . . . . . . . . . . .£3000 H.P. 3580A 5Hz-50kHz . . . . . . . . . . . . . . . . . . . . . . . . . . . . .£800 ADVANTEST R4131B 10kHz-3·5GHz . . . . . . . . . . . . . . . .£3500 EATON/AILTECH 757 0·001-22GHz . . . . . . . . . . . . . . . . . .£1500 MARCONI 2382 100Hz-400MHz, high resolution . . . . . . . .£2000 MARCONI 2370 30Hz-110MHz . . . . . . . . . . . . . . . . . .from £500 H.P. 182 with 8557 10kHz-350MHz . . . . . . . . . . . . . . . . . . . .£500 H.P. 141T SYSTEMS 8553 1kHz-110MHz . . . . . . . . . . . . . . . . . . . . . . . . . . .from £500 8554 500kHz-1250MHz . . . . . . . . . . . . . . . . . . . . . . . .from £750 8555 10MHz-18GHz . . . . . . . . . . . . . . . . . . . . . . . . . .from £1000 TEKTRONIX 491 10MHz-12·4GHz . . . . . . . . . . . . . . . . . . . .£500 H.P. 8443 Tracking Gen/Counter, 110MHz . . . . . . . . . . . . . .£250 H.P. 8444 OPT 059 . . . . . . . . . . . . . . . . . . . . . . . . . . . . . . .£750 B&K 2033R Signal Analyser . . . . . . . . . . . . . . . . . . . . . . . .£750 H.P. 5372A Frequency & Time Interval Analyser . . . . . . . . .£2250 H.P. 8754A Network Analyser, 4MHz-1300MHz . . . . . . . . .£1250 H.P. 3557A Network Analyser, 5Hz-200MHz . . . . . . . . . . . .£3000 H.P. 53310A Mod Domain Analyser Opt 001/003 . . . . . . . .£5000 ONO SOKKI CF300 Portable FFT Analyser . . . . . . . . . . . .£1500 Used Equipment – GUARANTEED. Manuals supplied 110 WYKEHAM ROAD, READING, BERKS. RG6 1PL Telephone: (0118) 9268041. Fax: (0118) 9351696 www.stewart-of-reading.co.uk Callers welcome 9am-5.30pm Monday to Friday (other times by arrangement) FRUSTRATED! This is a VERY SMALL SAMPLE OF STOCK. SAE or Telephone for lists. Please check availability before ordering. CARRIAGE all units £16. VAT to be added to Total of Goods and Carriage SQUIRES Looking for ICs TRANSISTORs? A phone call to us could get a result. We offer an extensive range and with a worldwide database at our fingertips, we are able to source even more. We specialise in devices with the following prefix (to name but a few). MODEL & CRAFT TOOLS 2N 2SA 2SB 2SC 2SD 2P 2SJ 2SK 3N 3SK 4N 6N 17 40 AD ADC AN AM AY BA BC BD BDT BDV BDW BDX BF BFR BFS BFT BFX BFY BLY BLX BS BR BRX BRY BS BSS BSV BSW BSX BT BTA BTB BRW BU BUK BUT BUV BUW BUX BUY BUZ CA CD CX CXA DAC DG DM DS DTA DTC GL GM HA HCF HD HEF ICL ICM IRF J KA KIA L LA LB LC LD LF LM M M5M MA MAB MAX MB MC MDAJ MJE MJF MM MN MPS MPSA MPSH MPSU MRF NJM NE OM OP PA PAL PIC PN RC S SAA SAB SAD SAJ SAS SDA SG SI SL SN SO STA STK STR STRD STRM STRS SV1 T TA TAA TAG TBA TC TCA TDA TDB TEA TIC TIP TIPL TEA TL TLC TMP TMS TPU U UA UAA UC UDN ULN UM UPA UPC UPD VN X XR Z ZN ZTS + many others We can also offer equivalents (at customers’ risk) We also stock a full range of other electronic components Mail, phone, Fax Credit Card orders and callers welcome Connect Cricklewood Electronics Ltd 40-42 Cricklewood Broadway London NW2 3ET Tel: 020 8452 0161 Fax: 020 8208 1441 Everyday Practical Electronics, May 2002 OSCILLOSCOPES TEKTRONIX TDS350 dual trace, 200MHz, 1G/S . .Unused £1500 TEKTRONIX TDS320 dual trace, 100MHz, 500M/S . . . . . .£1200 TEKTRONIX TDS310 dual trace, 50MHz, 200M/S . . . . . . . .£950 LECROY 9400A dual trace, 175MHz, 5G/S . . . . . . . . . . . .£1500 HITACHI VC6523, d/trace, 20MHz, 20M/S, delay etc.Unused £600 PHILIPS PM3092 2+2-ch., 200MHz, delay etc., £800 as new £950 PHILIPS PM3082 2+2-ch., 100MHz, delay etc., £700 as new £800 TEKTRONIX TAS465 dual trace, 100MHz, delay etc. . . . . . .£750 TEKTRONIX 2465B 4-ch., 400MHz, delay cursors etc . . . .£1500 TEKTRONIX 2465 4-ch., 300MHz, delay cursors etc. . . . . . .£900 TEKTRONIX 2445/A/B 4-ch 150MHz, delay cursors etc .£500-£900 TEKTRONIX 468 Dig. Storage, dual trace, 100MHz, delay . . .£450 TEKTRONIX 466 Analogue Storage, dual trace, 100MHz . . . .£250 TEKTRONIX 485 dual trace, 350MHz, delay sweep . . . . . . .£550 TEKTRONIX 475 dual trace, 200MHz, delay sweep . . . . . . .£400 TEKTRONIX 465B dual trace, 100MHz, delay sweep . . . . . .£325 PHILIPS PM3217 dual trace, 50MHz delay . . . . . . . . .£200-£250 GOULD OS1100 dual trace, 30MHz delay . . . . . . . . . . . . . .£150 HAMEG HM303 dual trace, 30MHz component tester . . . . . .£275 HAMEG HM203.7 dual trace, 20MHz component tester . . . .£200 FARNELL DTV20 dual trace, 20MHz component tester . . . .£125 Many other Oscilloscopes available JUST IN H.P. 6063B DC Electronic Load, 3-240V/0-10A, 250W . . . . . POA H.P. 66312A PSU, 0-20V/0-2A . . . . . . . . . . . . . . . . . . . . . . . £400 H.P. 66311B PSU, 0-15V/0-3A . . . . . . . . . . . . . . . . . . . . . . . £400 H.P. 66309D PSU Dual, 0-15, 0-3A/0-12, 0-1·5A. . . . . . . . . . £750 H.P. 6632B PSU, 0-20V/0-5A . . . . . . . . . . . . . . . . . . . . . . . . £500 H.P. 6623A PSU, triple output ranging from 0-7V 0-5A to 0-20V 0-4A. . . . . . . . . . . . . . . . . . . . . . . . . . . . . . . . . . . . . £850 H.P./AGILENT 34401A DMM 6½ digit . . . . . . . . . . . . . £400/£450 H.P. 3478A DMM 5½ digit. . . . . . . . . . . . . . . . . . . . . . . . . . . £275 FLUKE 45 DMM dual display . . . . . . . . . . . . . . . . . . . . . . . . £400 KEITHLEY 2010 DMM 7½ digit . . . . . . . . . . . . . . . . . . . . . . £950 KEITHLEY 617 Programmable Electrometer. . . . . . . . . . . . £1250 H.P. 4338B Milliohmmeter. . . . . . . . . . . . . . . . . . . . . . . . . . £1500 RACAL Counter type 1999 2·6GHz. . . . . . . . . . . . . . . . . . . £500 H.P. Counter type 53131A 3GHz. . . . . . . . . . . . . . . . . . . . . £850 H.P./AGILENT 33120A Func. Gen/ARB, 100mHz-15MH . . . . . . . . . . . . . . . . . . . . . . . . . . . . . . . . . . . . . . . . . £900/£1000 SONY/TEKTRONIX AFG320 Arbitary Func. Gen . . . . . . . . £1250 H.P. 8904A Syn. Function Gen, DC-600kHz . . . . . . . £1000/£1250 BLACK STAR JUPITOR 2010 Func. Gen, 0·2Hz-2MHz with frequency counter . . . . . . . . . . . . . . . . . . . . . . . . . . . . . . . £140 H.P. 8116A Pulse Generator, 1mH-50MHz . . . . . . . . . . . . . £1950 H.P. 8657B Syn Sig. Gen, 0·1-2080MHz . . . . . . . . . . . . . . . £2500 CO-AXIAL SWITCH, 1·5GHz . . . . . . . . . . . . . . . . . . . . . . . . . £40 IEEE CABLES . . . . . . . . . . . . . . . . . . . . . . . . . . . . . . . . . . . . £10 A COMPREHENSIVE RANGE OF MINIATURE HAND AND POWER TOOLS AND AN EXTENSIVE RANGE OF ELECTRONIC COMPONENTS FEATURED IN A FULLY ILLUSTRATED 528 PAGE MAIL ORDER CATALOGUE 2002 ISSUE SAME DAY DESPATCH FREE POST AND PACKAGING Catalogues: FREE OF CHARGE to addresses in the UK. Overseas: CATALOGUE FREE, postage at cost charged to credit card NEW SHOP EXTENSION OPENING SOON Squires, 100 London Road, Bognor Regis, West Sussex, PO21 1DD TEL: 01243 842424 FAX: 01243 842525 SHOP NOW OPEN 339 Constructional Project SIMPLE AUDIO CIRCUITS Part 1 – Introduction and Power Amplifiers RAYMOND HAIGH HOW MUCH POWER? A selection of pic-n-mix low-cost audio circuits from preamplifier to speaker! their particular area of interest, most electronics enthusiasts encounter the need to amplify and reproduce audio signals. The final stages of radio receivers, intercom units, security and surveillance installations, or just a hankering for a big sound from a Walkman or portable CD player, all involve audio amplification and a speaker system. And the amplification usually goes hand-in-hand with some form of signal processing. Music reproduction calls for a wide frequency response and tone-control circuitry. Speech communication, especially W HATEVER * LM386N-1 under difficult conditions, is greatly clarified if the frequency response is curtailed. This short series of articles describes simple, but effective, ways of meeting these different requirements. Although the circuits are capable of a good standard of reproduction, they will particularly interest the constructor who looks for plenty of performance per pound or dollar. We begin with the power amplifier. Six alternatives are given and, with the requirement of maximum performance for minimum cost and effort, they are all based on widely available integrated circuits (i.c.s): * TDA7052 * TBA820M Before considering the various circuits, it is worthwhile to reflect on the amount of power actually needed. Clear reproduction in Walkman type earphones of reasonable sensitivity can be achieved with a miserly milliwatt (0·001W). When listening to talk programmes in a quiet domestic setting, the power fed to the speaker will hover around 50mW (0·05W), and this is ample for the operator of a communications receiver whose ears are closer to the sound source. During the valve era, ten watts was considered adequate for the realistic reproduction of orchestral music, and some experts suggested a figure as low as five. One watt of power delivered to a * LM380N * TDA2003. Collection of simple i.c. power amplifier modules (left-to-right, top-to-bottom). * Single TDA2003 Amp * Twin TDA2003 Amp * TDA7052 Amp * TBA820M Amp * LM380N Amp * LM386N-1 Amp 340 Everyday Practical Electronics, May 2002 reasonably efficient speaker will produce a loud sound, a continuous five watts is becoming deafening, and ten will rattle windows. This assumes single channel, or mono, reproduction in a normal living room. The impact is, of course, greater with a stereo system. This is at odds with the high power ratings of many of the quality amplifiers currently advertised. The desire for a big reserve of power, the low efficiency of some modern speakers, and different ways of measuring output, may account for the difference. Output is variously rated as music power, sustained music, speech and music, and sinewave power. To add to the confusion, the figures are quoted at different distortion levels. The standard most often used when valves were commonplace, and the one adopted in this article, is the r.m.s. (root mean square) value of a continuous sinewave. This gives the lowest rating and is the most realistic expression of the amplifier’s ability to deliver power into a load (speaker). An increase in output power is reflected as much, if not more, in the cost of the power supply as it is in the actual amplifier. Because the theme of this article is good performance at modest cost, the most powerful amplifier described is rated at 12·5W r.m.s. STABILITY Provided a few basic precautions are observed, the amplifiers are all unconditionally stable. Most i.c.s of this kind have a ground connection for the input circuitry and a separate ground pin for the output stage. The printed circuit board (p.c.b.) layouts have been designed to maintain this isolation, and care should be taken to ground the signal inputs and connect the negative power supply lead to the designated points on the board. Failure to do this could result in “motor boating’’ (low frequency instability). Input leads should be screened to avoid mains hum and radio frequency (r.f.) signal pick up. Speaker leads should be twisted together to minimise external fields. Input and output leads should be spaced as far apart as possible: this is particularly important when the LM386N and TBA820M are set for high gain. All of the circuits include high and low frequency bypass capacitors across the supply rails. The former minimise the possibility of r.f. oscillation: the latter avoid low frequency instability when long power supply leads are used, or when batteries are ageing. overloads them, causing distortion and loss of clarity. Indeed, if the amplifier is being used primarily for speech, clarity can be much improved by rolling-off the frequency response below 300Hz, and an even lower value of coupling capacitor, say 100mF or even 47mF, would be of benefit. Readers seeking quality music reproduction at low power, via a speaker of reasonable size, should increase the coupling capacitor to say 1000mF. This relationship between coupling capacitors and frequency response will be considered more fully in the next article. DEVICE PROTECTION The integrated circuits covered here are electrically robust but they are by no means indestructible. The TDA7052, LM380, and the TDA2003 incorporate protection against overload and output short ciruits: the other devices do not. HIGH FREQUENCY RESPONSE The bandwidth of the amplifiers extends into the r.f. spectrum, and this makes the devices vulnerable DISTORTION Manufacturers of power-amplifier integrated circuits and modestly priced hi-fi systems (which invariably incorporate devices of this kind) usually rate the maximum power output at 10 per cent distortion. At this level there is a very noticeable roughness to the sound and clipping of the waveform on loud passages. The power output levels quoted here have been measured just before the onset of clipping or any noticeable distortion of the output waveform. They are somewhat lower than the figures quoted by the i.c. manufacturers, but they do represent the highest output, free from audible distortion, that the device can deliver for a particular supply voltage and load. NOISE Modern power amplifier i.c.s have a very low noise level. Manufacturers usually define this internally generated electrical noise as an equivalent signal voltage at the input, but this doesn’t give the average experimenter an immediate impression of its audible effect. Accordingly, the devices described here were tested by disconnecting the signal source, turning the input or volume control to maximum, and then listening to the output on a pair of sensitive, Walkman type earphones. In all cases the noise was no more than barely audible. The two devices which can be configured for high gain (LM386N and TBA820M) did produce a faint, but audible, hiss when the gain was set at maximum. The hiss was also noticeable with a loudspeaker connected. However, when the gain preset was turned back a little, these i.c.s became as silent as the rest. Some constructors may need the highest possible gain, and details will be given later of measures which can be taken to eliminate the noise. Everyday Practical Electronics, May 2002 er. lifi p m ra However, we o p even with this proe’’ g d tection, excessive supbri ply voltage will result in 3“ 0 20 immediate failure, and shorting DA the output when the amplifier is T n i being driven hard and/or when the supTw ply voltage is close to the operational maximum will quickly ruin the device. SUPPLY VOLTAGE to r.f. interference. Some of the i.c.s provide for the connection of an external capacitor in a negative feedback loop to “roll-off’’ the high frequency response. Selecting an appropriate value for this component will help to make the device immune. The problem of r.f. pick up invariably manifests itself when a high value (more than 10 kilohms) input potentiometer (VR1) is used to match the amplifier to the impedance of a signal source. If the potentiometer or volume control must have a high resistance, connecting a 1nF or, at most, 10nF capacitor across its track will shunt unwanted r.f. to ground. LOW FREQUENCY RESPONSE The low frequency response of three of the lower powered amplifiers has been curtailed a little by fitting a 220mF speaker coupling capacitor. Amplifiers of this kind are invariably used with small, inexpensive speakers which are incapable of producing an audible output at frequencies below 150Hz or so. Feeding low frequencies to speakers of this kind only Suitable mains power supplies will be covered in a later article, but it should be mentioned now that, off-load, d.c. output voltages rise to 1·4 times the a.c. voltage delivered by transformer secondaries. When using unregulated mains power supplies care should, therefore, be taken to ensure that the off-load voltage is always less than the maximum safe working voltage of the amplifier. Never connect a working power supply to an amplifier without first checking its output voltage. ELECTRICAL CHARACTERISTICS The electrical characteristics of the various devices are tabulated alongside the circuit diagrams (except one) for easy reference. Power output figures are based on measurements taken on a single, randomly purchased sample. For reasons already given, they are somewhat lower than the figures quoted by the manufacturers. Recommendations are made regarding the speaker impedances to use with various supply voltages in order to keep the dissipation of the devices within reasonable limits. The input resistance, maximum voltage ratings, and frequency response details are those supplied by the manufacturers. 341 AMPLIFIER PROJECTS In use, there is little to distinguish between the four, low powered amplifiers, all perform well. There are, however, differences which make one device more suitable than another for a particular application. Low current consumption is important when equipment is powered from dry batteries. Quiescent current drawn by the small amplifiers is in the region of 6mA (13mA for the LM380). In the case of the LM386N, TBA820M and LM380, current rises to around 120mA when 500mW is being delivered into an 8 ohm load. Current consumed by the TDA7052 is approximately 220mA, or almost double, under these conditions. In all cases, the signal input pin has been connected to the slider (moving contact) of the Volume control potentiometer (via a blocking capacitor in the case of the TDA2003). This minimises hum and noise and ensures that a more or less constant impedance is presented to the signal source. Potentiometers of 4700 ohms or 10 kilohms (10k) are usual, but the value can be increased to 100k to raise input impedance. This will, however, make the circuits more vulnerable to mains hum, r.f. interference and instability, and the value should be kept as low as the signal source impedance permits. This applies particularly to the TDA7052, where the value of the Volume control should, if possible, be no more than 10k. Earlier comments regarding stability are of relevance here. LM386N-1 AMPLIFIER CIRCUIT BOARD The printed circuit board component layout, wiring details and full-size copper foil master pattern are shown in Fig.2. This board is available from the EPE PCB Service, code 343 (LM386N-1). + +3V TO +12V C4 100n VR2 10k + VR1 10k + 6 C1 4µ7 FEEDBACK An internal negative feedback path can be accessed via pin 1 and pin 8. Bypass capacitor C5 reduces the feedback and increases the gain of the chip from 23 to 170 times (as measured: samples will vary). Preset potentiometer VR2 (wired as a variable resistor) controls the bypassing effect of C5 and enables the gain to be set within these limits. Bypass capacitor C6 makes the device more immune to supply line ripple, and C8 couples the output to the speaker LS1. The Zobel network, formed by resistor R2 and capacitor C7, ensures that the speaker always presents a resistive load to the amplifier. Without these components there is a risk of high level transients causing damage to the output transistors. Tabulated power output levels for various supply voltages and speaker impedances are included below the circuit diagram. Sustained operation at more than 300mW is not recommended. C3 220µ SIGNAL INPUT 1 2 W C5 10µ C8 220µ 8 IC1 R1 470Ω 5 + A circuit diagram for a simple amplifier using the low-voltage LM386N-1 power amplifier i.c. is shown in Fig.1. Also shown are the general performance and electrical characteristics of the circuit. Blocking capacitor C1 prevents any disturbance of the d.c. conditions in the signal source and potentiometer VR1 (the Volume control) sets the input level. The manufacturers of the chip, National Semiconductor, suggest an input network to roll-off high frequencies and resistor R1 and capacitor C2 perform this function. The unused non-inverting input (pin 3) is grounded to avoid instability when gain is set high. Capacitors C3 and C4, connected across the supply rails, prevent low and high frequency instability. LM386N-1 3 + 7 4 R2 10Ω VOLUME SCREEN C6 10µ C2 1n LS1 8Ω + C7 47n 0V SET GAIN 1 8 SET GAIN INPUT 2 7 SUPPLY VOLTAGE RIPPLE REJECTION INPUT + 3 6 SUPPLY VOLTAGE +V GROUND (0V) 4 5 SIGNAL OUT TOP VIEW OF LM386N-1 Fig.1. Circuit diagram and pinout details for the LM386N-1 Power Amplifier. LM386N-1 POWER AMPLIFIER R.M.S. power output just before the onset of waveform clipping Speaker Impedance ohms 3V 4 8 16 32 Completed LM386N-1 circuit board. 342 Supply Voltage 60mW 26mW 15mW - 4·5V 6V 9V 12V 150mW 105mW 60mW 35mW 320mW 200mW 110mW 62mW 500mW 560mW 320mW 170mW – 900mW 605mW 330mW Quiescent current: Input resistance: Input sensitivity for 560mW output (8 ohm load, 9V supply), (a) VR2 set for maximum resistance: (b) VR2 set for minimum resistance: Absolute maximum supply voltage, beyond which damage will occur: Suggested maximum supply voltage with a 4 ohm speaker Frequency response 6mA 50k ohms 90mV r.m.s. (gain 23) 12mV r.m.s. (gain 170) 15V 6V up to 300kHz Everyday Practical Electronics, May 2002 COMPONENTS POWER SUPPLY +VE SCREENED INPUT LEAD VR2 C3 C5 LM386N-1 AMPLIFIER + + + VOLUME Resistors C1 R1 470W All 0·25W 5% carbon film C4 W R1 IC1 C2 SHOP TALK Potentiometers VR1 VR2 R2 C6 See 10W C7 + + VR1 (FRONT VIEW) R2 10k min. rotary carbon, log. 10k enclosed carbon preset page C8 Capacitors (0V) POWER SUPPLY VE C1 C2 C3, C8 C4 C5, C6 C7 TO SPEAKER (LS1) 2.0IN (50.8mm) 343 4m7 radial elect. 25V 1n disc ceramic 220m radial elect. 25V (2 off) 100n disc ceramic 10m radial elect. 25V (2 off) 47n polyester Semiconductor 1.6IN (40.6mm) IC1 LM386N-1 audio power amp i.c. Miscellaneous LS1 4 to 32 ohm loudspeaker (see text) Printed circuit board available from the EPE PCB Service, code 343 (LM386N-1); case (optional), size and type to choice; 8-pin d.i.l. socket; multistrand connecting wire; audio screened cable; solder pins; solder etc. £10.50 Approx. Cost Guidance Only excluding case & speaker Fig.2. Printed circuit board, component layout, full-size copper foil master and interwiring for the LM386N-1 Amp. TDA7052 AMPLIFIER Philips have adopted a bridge arrangement for the TDA7052’s output stage. This enables the chip to maintain a good output at low supply voltages and eliminates the need for a speaker coupling capacitor. Gain is fixed internally, no provision is made for ripple rejection, and there is no Zobel network. This reduces the external component count to the d.c. blocking capacitor C1, Volume control VR1 and the supply line bypass capacitors, C2 and C3. The full circuit diagram, together with a specification guide, for the TDA7052 amplifier is shown in Fig.3. Protection against output short circuits is built in and the device shuts down when the dissipation becomes excessive. This explains the small rise in sustainable output when the speaker impedance is increased to 16 ohms with a 9V supply. Although usually costing a little more than the other low-power chips, this is the device of choice when the supply voltage has to be low, a good output is required, and high gain is not important. Current consumption for a given output power is, however, almost twice that of the LM386N and the TBA820M. CIRCUIT BOARD The printed circuit board component layout, wiring details and full-size copper foil master pattern are shown in Fig.4. This board is available from the EPE PCB Service, code 344 (TDA7052). TDA7052 POWER AMPLIFIER R.M.S. Power output just before the onset of waveform clipping Speaker Impedance Ohms 3V 4 8 16 32 70mW 60mW 40mW 24mW +3V TO +12V 1 SIGNAL INPUT 2 5 IC1 Supply Voltage 4·5V 6V 9V 12V 500mW 455mW 235mW 145mW 780mW 640mW 450mW 250mW – 1W 1·12W 600mW – – – 1·26W VR1 4k7 SCREEN LS1 8Ω TDA7052 + 3 C1 10µ 8 6 C2 100n W + C3 220µ VOLUME 0V Quiescent current Input resistance Input sensitivity for 1W output (8 ohm load, 9V supply) Absolute maximum supply voltage beyond which damage will occur Suggested maximum supply voltage: with a 4 ohm speaker with 8 or 16 ohm speakers Frequency response at the –3dB points 5mA 100k ohms 40mV r.m.s. (gain 70) 18V 6V 9V 25Hz – 20kHz Everyday Practical Electronics, May 2002 SUPPLY VOLTAGE +V 1 8 SIGNAL OUT INPUT 2 7 NOT CONNECTED INPUT GROUND 3 6 OUTPUT GROUND NOT CONNECTED 4 5 SIGNAL OUT TOP VIEW OF TDA7052 Fig.3. Circuit diagram and pinout details for the TDA7052 Amp. See left for performance guide. 343 COMPONENTS TDA7052 AMPLIFIER See Capacitors C1 SHOP TALK 10m radial elect. 25V 100n disc ceramic 220m radial elect. 25V C2 C3 Only four components are mounted on the TDA7052 p.c.b. page Potentiometers VR1 Fig.4 (below). Component layout, interwiring and full-size copper foil master for the TDA7052 Amp. 4k7 min. rotary carbon, log. Semiconductor TDA7052 power amp i.c. 1.2IN (30.5mm) Miscellaneous LS1 SCREENED INPUT LEAD 4 to 32 ohm loudspeaker (see text) + C1 Printed circuit board available from the EPE PCB Service, code 344 (TDA7052); case (optional), size and type to choice; 8pin d.i.l. socket; multistrand connecting wire; audio screened cable; solder pins; solder etc. POWER SUPPLY +VE C3 + VOLUME 1.6IN (40.6mm) IC1 POWER SUPPLY VE (0V) C2 w IC1 TO SPEAKER (LS1) VR1 (FRONT VIEW) £9.50 Approx. Cost Guidance Only excluding case & speaker 344 TABcircuit A8 20M AMPLIFIER diagram incorporating the TBA820M audio amp i.c., which is manufactured by SGS-Thomson, together with a general performance guide, is given in Fig.5. The input arrangements, supply line bypassing, speaker coupling and Zobel network are conventional, and the relevant components can be identified from previous circuit descriptions. Gain can be controlled by shunting an internal negative feedback loop, which is accessed at pin 2. Preset potentiometer VR2, placed in + C3 100n + C5 47µ LS1 8Ω TBA820M POWER AMPLIFIER 6 SIGNAL INPUT 8 7 5 R.M.S. power output just before the onset of waveform clipping C8 220µ + IC1 3 TBA820M + C1 4µ7 VR1 10k 4 2 Speaker Impedance Ohms 4 8 16 32 1 C6 390p R1 22Ω W VOLUME VR2 100Ω R2 1Ω + SCREEN C4 100µ C7 220n 0V SET HIGH FREQUENCY RESPONSE 1 8 SUPPLY VOLTAGE RIPPLE REJECTION SET GAIN 2 7 BOOTSTRAP INPUT 3 6 SUPPLY VOLTAGE +V GROUND (0V) 4 5 SIGNAL OUT TOP VIEW OF TBA820M Fig.5. Circuit diagram and pinout details for the TBA820M power amplifier. See right for general performance details. 344 Completed TBA820M amplifier module. +3V TO +12V C2 220µ Supply Voltage 3V 10mW 20mW 30mW 20mW 4·5V 320mW 200mW 115mW 60mW 6V 405mW 300mW 180mW 90mW Quiescent current Input resistance Input sensitivity for 680mW output (8 ohm load, 9V supply): (a) VR2 set for maximum resistance (b) VR2 set for minimum resistance Absolute maximum supply voltage beyond which damage will occur Suggested maximum supply voltage: with a 4 ohm speaker with an 8 ohm speaker High frequency response at –3dB point: with C6 220pF with C6 680pF 9V 980mW 680mW 405mW 225mW 12V – 1·1W 720mW 390mW 6mA 5M ohms 56mV r.m.s. (gain 40) 10mV r.m.s. (gain 230) 16V 9V 12V 20kHz 7kHz Everyday Practical Electronics, May 2002 COMPONENTS SCREENED INPUT LEAD + C6 C1 VOLUME TBA820M AMPLIFIER C5 See Resistors R1 22W R2 1W All 0·25W 5% carbon film Potentiometers VR1 W SHOP TALK R 1 R 2 page + TO SPEAKER (LS1) C8 C3 VR1 (FRONT VIEW) C4 C2 + POWER SUPPLY +VE + POWER SUPPLY VE (0V) C7 10k min. rotary carbon, log. 100W enclosed carbon preset VR2 + IC1 VR2 2.4IN (61.0mm) Capacitors C3, C4 C5 C6 C7 4m7 radial elect. 25V 220m radial elect. 25V (2 off) 100n disc ceramic 100m radial elect. 25V 47m radial elect. 25V 390p ceramic 220n polyester 1.6IN (40.6mm) C1 C2, C8 345 Semiconductor IC1 TBA820M audio power amp i.c. Miscellaneous LS1 4 to 32 ohm loudspeaker (see text) Fig.6. Topside component layout, off-board wiring details and full-size copper foil master for the TBA820M Amplifier. Printed circuit board available from the EPE PCB Service, code 345 (TBA820M); case (optional), size and type to choice; 8pin d.i.l. socket; multistrand connecting wire; audio screened cable; solder pins; solder etc. series with capacitor C4, controls the shunting effect and, with the sample tested, gain could be set between 40 and 230. High frequency response is determined by capacitor C6. The response at the –3dB points for different capacitor values is also listed in the table. If desired, the value of C6 can be increased to reduce the upper frequency response even more. In this application, the speaker LS1 is £10 Approx. Cost Guidance Only excluding case & speaker connected to the positive supply rail as this reduces the component count (a capacitor and resistor are saved). CIRCUIT BOARD The printed circuit board component layout, wiring details and full-size copper foil master pattern are shown in Fig.6. This board is available from the EPE PCB Service, code 345 (TBA820M). LM380N AMPLIFIER An amplifier circuit diagram incorporating the LM380N audio i.c. is shown in Fig.7. A general specification guide is shown below. The manufacturers, National Semiconductor, have made provision for optional heatsinking via some of the pins, and this makes the package larger (14-pin). The output is short-circuit proofed and there is dissipation limiting. Gain is fixed. Again, the purpose of the various components will be evident from earlier descriptions. In this version of the circuit, the signal LM380N POWER AMPLIFIER R.M.S. power output just before the onset of waveform clipping Speaker Impedance Ohms 4 8 16 32 Supply Voltage 9V 12V 15V 18V 400mW 275mW 137mW 68mW 1·12W 720mW 405mW 202mW 1·62W 1·32W 720mW 360mW – 2·25W 1·32W 765mW Quiescent current Input resistance Input sensitivity for 720mW output (8 ohm load, 12V supply) Absolute maximum supply voltage beyond which damage will occur 13mA 150k ohms 50mV r.m.s. (gain 50) 22V Everyday Practical Electronics, May 2002 Finished LM380N circuit board. A “twin’’ heatsink may be required for this chip A heatsink should be fitted if the device is to be operated, other than intermittently, at output levels in excess of 1W. Without a heatsink, the suggested maximum supply voltages are: with a 4 ohm speaker 12V with an 8 ohm speaker 15V Frequency response up to 100kHz 345 + COMPONENTS +9V TO +18V C2 220µ C3 100n SIGNAL INPUT 14 C1 4µ7 + 8 + R1 3,4,5, 10,11,12 1 R1 2Ω 7 W LS1 8Ω + C4 10µ VOLUME 0V SUPPLY VOLTAGE RIPPLE REJECT 1 14 SUPPLY VOLTAGE +V INPUT + 2 13 NOT CONNECTED 3 12 INPUT INPUT GROUND (0V) 4 11 SHOP TALK 2W7 0·25W 5% carbon film Potentiometers VR1 10k rotary carbon, log. C6 100n SCREEN OUTPUT, GROUND (0V) AND HEATSINK See Resistors LM380N 2 7 VR1 10k LM380N AMPLIFIER C5 220µ IC1 + 6 page Capacitors C1 C2, C5 C3, C6 C4 4m7 radial elect. 50V 220m radial elect. 50V (2 off) 100n disc ceramic (2 off) 10m radial elect. 50V Semiconductor IC1 OUTPUT, GROUND (0V) AND HEATSINK LM380N audio power amp i.c. Miscellaneous 5 10 6 9 NOT CONNECTED 7 8 SIGNAL OUT LS1 4 to 32 ohm loudspeaker (see text) Printed circuit board available from the EPE PCB Service, code 346 (LM380N); case (optional), size and type to choice; 14-pin d.i.l. socket; heatsink (see text); multistrand connecting wire; audio screened cable; solder pins; solder etc. TOP VIEW OF LM380N £11 Approx. Cost Guidance Only Fig.7. Circuit diagram for the LM380N Amplifier. excluding case & speaker is applied to the inverting input (pin 6) and, to avoid instability, the non-inverting input (pin 2) is grounded (0V). The manufacturers quote a minimum supply voltage of 10V. The sample tested worked with a 9V supply, but performance became erratic at lower voltages. Quiescent current, although modest, is double that of the other low-power devices, and this, together with the higher operating voltage, makes the i.c. more suitable for mains-powered equipment. component layout, wiring and copper foil master are given in Fig.8. This board is also available from the EPE PCB Service, code 346 (LM380N). Although the board has been kept small, as much copper as possible has been retained to afford some heatsinking. CIRCUIT BOARD Details of the printed circuit board TDA2003 AMPLIFIER Produced by SGS-Thomson, the TDA2003 low-cost i.c. is mainly for use in car radios. Although chips designed specifically for “hi-fi’’ amplifiers are available, they usually require higher voltage and/or split rail power supplies. This makes them less easy and more expensive to use. + C3 220µ +6V TO +15V Component layout on the TDA2003 p.c.b. C4 100n 5 + SIGNAL INPUT C2 4µ7 IC1 4 VR1 10k 3 R.M.S. power output just before the onset of waveform clipping C5 39n R2 220Ω W R4 1Ω LS1 4Ω C6 470µ + R1 39Ω C8 100n 0V TYPE No. 5 4 3 2 1 SUPPLY VOLTAGE +V SIGNAL OUT GROUND (0V) INPUT INPUT + FRONT VIEW OF TDA2003 Fig.9. Circuit diagram for a single TDA2003 Amp. 346 Speaker Impedance Ohms 2 4 8 R3 2Ω 2 VOLUME SCREEN METAL TAG CONNECTED TO PIN 3 (GROUND) TDA2003 POWER AMPLIFIER TDA2003 2 + C1 4µ7 C7 1000µ + + 1 Supply Voltage 9V 12V 15V 2·25W 1·28W 720mW 4W 2·6W 1·44W 5·75W 3·9W 2·1W Quiescent current 45mA Input sensitivity for 2.6W output (4 ohm load, 12V supply) 42mV r.m.s. (gain 80) Absolute maximum supply voltage beyond which damage will occur 28V Absolute maximum operating voltage 18V Frequency response: 40Hz to 15kHz at the –3dB points. The upper frequency limit can be extended by reducing the value of C5. Everyday Practical Electronics, May 2002 COMPONENTS SCREENED INPUT LEAD + + C3 C4 POWER SUPPLY +VE C2 TDA2003 AUDIO AMPLIFIER + VOLUME POWER SUPPLY VE (0V) C1 IC1 W + C5 TO SPEAKER (LS1) R 1 See Resistors R1 R2 R3 R4 All 0·25W 5% C6 SHOP TALK 39W 220W 2W2 1W page carbon film VR1 (FRONT VIEW) Potentiometers VR1 10k rotary carbon, log. HEATSINK Capacitors 2.5IN (63.5mm) C1, C2 346 1.8IN (45.7mm) C3 C4 C5 C6 C7 C8 4m7 radial elect. 50V (2 off) 220m radial elect. 50V 100n disc ceramic 39n polyester 470m radial elect. 50V 1000m radial elect. 50V 100n polyester Semiconductor IC1 TDA2003 audio power amp i.c. Miscellaneous LS1 Fig.8. The LM380N printed circuit board component layout, off-board interwiring and full-size copper foil master pattern. Note the heatsinks. HEATSINKS For those readers who wish to get the most out of the chip, a suitable heatsink for the LM380 (Fig.7 and Fig.8) can be formed from two, 40mm (15/8in.) lengths of 25mm × 0·4mm (1in. × 1/64in.) brass strip. Make two shallow cuts, 5mm (3/16in.) apart, close to the centre, and bend out a tag which can be soldered to the relevant pins of the i.c. Thin brass strip can be purchased from almost all model shops. The TDA2003 incorporates short circuit and overload protection, and is extremely rugged. It will deliver a worthwhile output at modest supply voltages, and the suitability of car batteries as a power source may make it of particular interest to some readers. The circuit diagram of a single chip TDA2003 audio amplifier is given in Fig.9. Grounding the input (pin 1) of this device would upset the internal biasing arrangements, so a second blocking capacitor C2 must be provided. The high POWER SUPPLY +VE POWER SUPPLY VE SCREENED INPUT LEAD C5 VOLUME C1 R 2 + 2 1 R1 IC1 4 3 5 + C7 C4 R 4 + W + C6 R3 C2 + C3 C8 VR1 (FRONT VIEW) TO SPEAKER (LS1) 3.4IN (86.4mm) Printed circuit board available from the EPE PCB Service, code 347 (TDA2003); case (optional), size and type to choice; heatsink (see text); audio screened cable; multistrand connecting wire; solder pins; solder etc. £11 Approx. Cost Guidance Only excluding case & speaker frequency response is set by capacitor C5 in conjunction with resistor R1. The response can be extended by reducing the value of C5. Supply line ripple rejection is afforded by capacitor C6. The outputs which can be delivered at various supply voltages are tabulated in the accompanying table. The current drawn from a 15V supply when 4W are dissipated into a 4 ohm load is around 500mA. The 2 ohm load is obtained by connecting two 4 ohm speakers in parallel. At these power levels, the device must, of course, be connected to an adequate heatsink, and this is discussed later. The printed circuit board component layout, wiring and full-size copper foil master pattern for the single chip TDA2003 amplifier are shown in Fig.10. This board is available from the EPE PCB Service, code 347 (TDA2003). 1.2IN (61.0mm) TWIN TDA2003 AMPLIFIER 347 Fig.10. Printed circuit board component layout, full-size foil master and off-board wiring for the single TDA2003 Amplifier. Everyday Practical Electronics, May 2002 4 to 32 ohm loudspeaker (see text) A circuit diagram using two TDA2003 chips in a bridge configuration is shown in Fig.11, together with a general performance guide. Drawing around 1·7A from a 15V supply, this combination will deliver a clean 12·5W into a 4 ohm load. The case for this being adequate for domestic listening has already been argued, but individual constructors will, of course, decide whether or not it will meet their needs. 347 TWIN TDA2003 AMPLIFIER COMPONENTS TWIN TDA2003 POWER AMP See Resistors R1, R4 R2 R3, R5 R6 All 0·25W 5% Twin TDA2003 Amplifier circuit board component layout. SHOP TALK 1W (2 off) 220W 10W (2 off) 470W carbon film page +6V TO +15V Potentiometers VR1 10k rotary carbon R4 1Ω C3 100n + C6 100n C10 220µ C8 100n Capacitors C1, C2 C9 C3, C8 1 IC1 + SIGNAL INPUT 5 + 4 TDA2003 2 + VR1 10k TDA2003 audio power amp i.c. (2 off) R2 220Ω C4 22µ 3 R6 470Ω C7 10µ R5 10Ω + IC1, IC2 1 TDA2003 R1 1Ω 3 C1 4µ7 Semiconductor + IC1 4 2 C2 4µ7 + C4 C5, C6 C7 C10 LS1 4Ω 5 4m7 radial elect. 50V (3 off) 100n disc ceramic (2 off) 22m radial elect. 50V 100n polyester (2 off) 10m radial elect. 50V 220m radial elect. 50V W + C5 100n VOLUME R3 10Ω C9 4µ7 SCREEN 0V Miscellaneous LS1 2 to 8 ohm loudspeaker (see text) TWO TDA2003 BRIDGE CONFIGURATION POWER AMP Fig.11 (above). Circuit diagram for the Twin TDA2003 Power Amplifier. Printed circuit board available from the EPE PCB Service, code 348 (TDA2003); case (optional), size and type to choice; heatsink (see text); audio screened cable; multistrand connecting wire; solder pins; R.M.S. power output just before the onset of waveform clipping Speaker Impedance Ohms £14 Approx. Cost Guidance Only excluding case & speaker Supply Voltage 2 4 8 9V 12V 15V 6·25W 3·78W 2W 10·5W 8W 5W – 12·5W 8·2W Quiescent current 80mA Input sensitivity for 8W output (4 ohm load, 12V supply) 70mV r.m.s. (gain 40) See single TDA2003 for details of absolute maximum ratings. Fig.12 (below). Component layout, off-board interwiring and full-size copper foil master for the Twin TDA2003 Amp. You will need a heatsink for these devices. TO SPEAKER (LS1) SCREENED INPUT LEAD IC1 + C4 2 C1 VOLUME 1 W + C2 IC2 + 4 3 C6 5 R2 R4 C3 R 6 2 + C7 C9 R 1 R5 + 1 4 3 POWER SUPPLY +VE 5 C8 R 3 C5 + POWER SUPPLY VE (0V) C10 VR1 (FRONT VIEW) 348 348 1.2IN (61.0mm) 4.0IN (101.6mm) Everyday Practical Electronics, May 2002 The printed circuit board component layout, wiring and copper foil master are detailed in Fig.12. Again, combined or separate heatsinks must be fitted to the integrated circuit’s metal tabs. The p.c.b. is obtainable from the EPE PCB Service, code 348 (Twin TDA22003). HEATSINKS A large area metal heatsink is required for the TDA2003 (Fig.9 and Fig.11). Because the device incorporates overload protection, the actual size is not too critical (the i.c. will shut down when it begins to overheat), but sustained high output will only be developed if the heatsink is adequate. At the very least use 40sq. cm (6·5sq. in.) of 16s.w.g. aluminium per chip, or fit a proprietary heatsink with a thermal resistance not greater than 7°C per watt. The i.c.s are arranged on the p.c.b. (see Fig.10 and Fig.12) so that they can be bolted to the back of a metal case by their metal tabs. A 50mm × 150mm × 200mm (2in. × 6in. × 8in.) aluminium box would be more than adequate as a heatsink. Insulating washers are not required, but a smear of heat transfer compound should be applied. COMPONENTS Slight differences in the i.c. type numbers can cause confusion. The LM386N-1 has the lowest power rating of this group of devices. The suffixes “N-3’’ and “N-4’’ indicate devices rated at 700mW and 1W respectively. The suffix “M’ indicates surface mounting. Suppliers offering the LM386 are usually referring to the N-1 version. The TDA7052 is sometimes given the suffix “A’’. This indicates that the chip contains a d.c. volume control and is not suitable for the circuit described here. Some suppliers give the LM380 the suffix “14’’ to indicate the 2·5W 14-pin version, and the suffix “8’’ for the 8-pin 600mW alternative. When ordering, make it clear that the 14-pin chip is required. The suffix “P’’ or “V’’ is sometimes added by suppliers to the TDA2003 to indicate that it is for vertical, and “H’’ for horizontal, mounting. There is no electrical difference, but the p.c.b.s illustrated here have been designed for vertical chips. CONSTRUCTION on the p.c.b. to act as an “orientation’’ guide. This should be followed by the leadoff solder pins, and then the smallest components (resistors) working up to the largest, electrolytic capacitors and presets. Finally, the lead-off wires (including the screened input cable), off-board Volume control and loudspeaker should be attached to the p.c.b. On completion, check the board for poor soldered joints or bridged tracks. Check the orientation of the electrolytic capacitors and the i.c.(s). If using a mains power supply, make sure the voltage delivered does not exceed the safe working voltage of the amplifier for the load impedance being used. If all is in order, connect the power supply and check the quiescent current consumption. Inject a signal and re-check the current drain and supply voltage. All the amplifiers covered in this part are assembled on printed circuit boards and construction is reasonably Next Month: Transistor preamplifiers straightforward. The use of an i.c. holder will permit the substitution and checking of the low power amplifiers. However, if reliance is to be placed on the p.c.b. foil for minimal heatsinking of the LM380, the device should be soldered directly in place. Solder pins, inserted at the lead-out points, will simplify off-board wiring. It may help to start construction of the chosen circuit board by first placing and soldering the i.c. holder A COMPLETE RANGE OF A Complete range of regulated inverters to power 220V and 240V AC equipment via a car, lorry or boat battery. Due to their high performance (>90%) the inverters generate very little heat. The high stability of the 150W TO 2500W - 12V & 24V output frequency (+/-1%) makes them equally suitable to power sensitive devices. These inverters generate a modified sine wave, which are considerably superior to the square waves which are produced by most other inverters. Due to this superior feature they are capable of powering electrical equipment such as TV,s, videos, desktop & notepad computers, microwave ovens, electrical lamps, pumps, battery chargers, etc. Low Battery Alarm The inverters give an audible warning signal when the battery voltage is lower than 10.5V (21V for the 24V version). The inverter automatically shuts off when the battery voltage drops below 10V (20V for the 24V version). Fuse protected input circuitry. Order Code Price Voltage Power INVERTERS 651.581 651.578 651.582 651.585 651.583 651.593 651.587 651.597 651.602 651.605 651.589 651.599 REF D4 150W Continuous 150W Continuous 300W Continuous 300W Continuous 600W Continuous 600W Continuous 1000W Continuous 1000W Continuous 1500W Continuous 1500W Continuous 2500W Continuous 2500W Continuous 12V 24V 12V 24V 12V 24V 12V 24V 12V 24V 12V 24V £36.39 £36.39 £50.64 £50.64 £101.59 £101.59 £177.18 £177.18 £314.52 £314.52 £490.54 £490.54 ILLUSTRATION SHOWN IS 651.583 600W VERSION All prices are inclusive of V.A.T. Carriage £6.00 Per Order Many uses include:- * Fetes * Fairgrounds * Airshows * Picnics * Camping * Caravans * Boats * Carnivals * Field Research and * Amateur Radio field days * Powering Desktop & Notepad Computers. B.K. ELECTRONICS DELIVERY CHARGES ARE £6-00 PER ORDER. OFFICIAL ORDERS FROM SCHOOLS, COLLEGES, GOVT. BODIES, PLC,S ETC. PRICES ARE INCLUSIVE OF V.A.T. SALES COUNTER. VISA AND ACCESS ACCEPTED BY POST, PHONE OR FAX, OR EMAIL US AT [email protected] ALTERNATIVELY SEND CHEQUE OR POSTAL ORDERS MADE PAYABLE TO BK ELECTRONICS. For Full Specifications View our web site at:- UNIT 1, COMET WAY, SOUTHEND-ON-SEA, ESSEX. SS2 6TR TEL.: +44(0)1702-527572 FAX.:+44(0)1702-420243 W W W . B K E L E C . C O M / I N V E R T E R S . H T M Everyday Practical Electronics, May 2002 349 BACK ISSUES We can supply back issues of EPE by post, most issues from the past three years are available. An EPE index for the last five years is also available – see order form. Alternatively, indexes are published in the December issue for that year. Where we are unable to provide a back issue a photostat of any one article (or one part of a series) can be purchased for the same price. Issues from Jan. 2001 onwards are also available to download from www.epemag.com. DID YOU MISS THESE? JAN ’01 PROJECTS ) Versatile Optical Trigger ) UFO Detector and Event Recorder ) Two-Way Intercom ) PIC-Monitored Dual PSU–Part 2. FEATURES ) Using PICs and Keypads ) The Schmitt Trigger–Part 3 ) New Technology Update ) Circuit Surgery ) Practically Speaking ) Ingenuity Unlimited ) CIRSIM Shareware Review ) Net Work – The Internet. SEPT ’01 JAN ’02 PROJECTS ) Water Monitor ) L.E.D. Super Torches ) Synchronous Clock Driver ) Perpetual Projects 3 – Loop Burglar Alarm – Touch-Switch Door-Light – Solar-Powered Rain Alarm. FEATURES ) Controlling Flight ) Ingenuity Unlimited ) Practically Speaking ) Circuit Surgery ) New Technology Update ) Net Work – The Internet Page. FEB ’01 PROJECTS ) PIC Magick Musick ) Time Delay Touch Switch ) Versatile Bench Power Supply ) Forever Flasher. FEATURES ) Teach-In 2002 – Part 3 ) Practically Speaking ) Ingenuity Unlimited ) New Technology Update ) Circuit Surgery ) Net Work – The Internet Page. FEB ’02 PROJECTS ) Ice Alert ) Using LM3914-6 Bargraph Drivers ) Simple Metronome ) PC Audio Power Meter. FEATURES ) The Schmitt Trigger–Part 4 ) Ingenuity Unlimited ) Circuit Surgery ) New Technology Update ) Net Work – The Internet ) Free 16-page supplement – How To Use Graphics L.C.D.s With PICs. PROJECTS ) PIC Spectrum Analyser ) Guitar Practice Amp ) HT Power Supply ) Versatile Current Monitor. FEATURES ) Teach-In 2002 – Part 4 ) Ingenuity Unlimited ) Russian Space Shuttle Revisited ) Circuit Surgery ) Interface ) New Technology Update ) Net Work – The Internet Page. MAR ’01 PROJECTS ) Doorbell Extender ) Body Detector ) DIY Tesla Lightning ) Circuit Tester FEATURES ) Understanding Inductors ) The Schmitt Trigger–Part 5 ) Circuit Surgery ) Interface ) New Technology Update ) Net Work – The Internet Page. OCT ’01 Photostats only PROJECTS ) PIC Toolkit Mk3 ) Camcorder Power Supply ) 2-Valve SW Receiver ) Perpetual Projects 4 – Gate Sentinel – Bird Scarer – In-Out Register. FEATURES ) Traffic Control ) Ingenuity Unlimited ) New Technology Update ) Circuit Surgery ) Interface ) Net Work – The Internet Page ) Free 2 CD-ROMs – Microchip 2001 Tech Library. NOV ’01 APRIL ’01 PROJECTS ) Wave Sound Effect ) Intruder Alarm Control Panel–Part 1 ) Sound Trigger ) EPE Snug-Bug Pet Heating Control Centre. FEATURES ) The Schmitt Trigger–Part 6 ) Practically Speaking ) Ingenuity Unlimited ) Circuit Surgery ) Net Work – The Internet Page ) FREE supplement – An End To All Disease. MAY ’01 PROJECTS ) Camcorder Mixer ) PIC Graphics L.C.D. Scope ) D.C. Motor Controller ) Intruder Alarm Control Panel–Part 2. FEATURES ) The Schmitt Trigger–Part 7 ) Interface ) Circuit Surgery ) Ingenuity Unlimited ) New Technology Update ) Net Work – The Internet Page. JUNE ’01 PROJECTS ) Hosepipe Controller ) In-Circuit Ohmmeter ) Dummy PIR Detector ) Magfield Monitor. FEATURES ) Controlling Jodrell Bank ) PIC1687x Extended Memory Use ) Practically Speaking ) Ingenuity Unlimited ) New Technology Update ) Circuit Surgery ) Net Work – The Internet Page. JULY ’01 PROJECTS ) Stereo/Surround Sound Amplifier ) PIC to Printer Interface ) Perpetual Projects 1– Solar-Powered Power Supply and Voltage Regulator ) MSF Signal Repeater and Indicator. FEATURES ) The World of PLCs ) Ingenuity Unlimited ) Circuit Surgery ) New Technology Update ) Net Work – The Internet Page. MAR ’02 PROJECTS ) Capacitance Meter ) Pitch Switch ) Lights Needed Alert ) Teach-In 2002 Power Supply. FEATURES ) Teach-In 2002 – Part 1 ) Practically Speaking ) Circuit Surgery ) New Technology Update ) Ingenuity Unlimited ) Net Work – The Internet Page ) Free 16-page Supplement – PIC Toolkit TK3 For Windows . DEC ’01 PROJECTS ) Ghost Buster ) PIC Polywhatsit ) Twinkling Lights ) Mains Failure Alarm. FEATURES ) Teach-In 2002 – Part 2 ) Marconi – The Father of Radio ) Interface ) Ingenuity Unlimited ) Circuit Surgery ) New Technology Update ) Net Work – The Internet Page ) 2001 Annual Index. PROJECTS ) MK484 Shortwave Radio ) PIC Virus Zapper ) RH Meter ) PIC Mini-Enigma. FEATURES ) Teach-In 2002 – Part 5 ) Ingenuity Unlimited ) Programming PIC Interrupts–1 ) Circuit Surgery ) Practically Speaking ) New Technology Update ) Net Work – The Internet Page. APR ’02 PROJECTS ) Electric Guitar Tuner ) PIC Controlled Intruder Alarm ) Solar Charge and Go ) Manual Stepper Motor Controller. FEATURES ) Teach-In 2002 – Part 6 ) Interface ) Programming PIC Interrupts–2 ) Circuit Surgery ) Ingenuity Unlimited ) New Technology Update ) Net Work – The Internet Page ) FREE Giant Op.Amp Data Chart. BACK ISSUES ONLY £3.30 each inc. UK p&p. Overseas prices £3.80 each surface mail, £5.25 each airmail. We can also supply issues from earlier years: 1998 (except Jan. to May, July, Nov., Dec.), 1999, 2000 (except Feb., July), 2001 (except Oct). Where we do not have an issue a photostat of any one article or one part of a series can be provided at the same price. ORDER FORM – BACK ISSUES – PHOTOSTATS– INDEXES 1 Send back issues dates . . . . . . . . . . . . . . . . . . . . . . . . . . . . . . . . . . . . . . . . . . . . . . . . . . . . . . . . . . . . . . . . . . . 1 Send photostats of (article title and issues date) . . . . . . . . . . . . . . . . . . . . . . . . . . . . . . . . . . . . . . . . . . . . . . . . . 1 Send copies of last five years indexes (£3.30 for five inc. p&p – Overseas £3.80 surface, £5.25 airmail) Name . . . . . . . . . . . . . . . . . . . . . . . . . . . . . . . . . . . . . . . . . . . . . . . . . . . . . . . . . . . . . . . . . . . . . . . . . . . . . . . . . . . . Address . . . . . . . . . . . . . . . . . . . . . . . . . . . . . . . . . . . . . . . . . . . . . . . . . . . . . . . . . . . . . . . . . . . . . . . . . . . . . . . . . . . . . . . . . . . . . . . . . . . . . . . . . . . . . . . . . . . . . . . . . . . . . . . . . . . . . . . . . .Tel: . . . . . . . . . . . . . . . . . . . . . . . . . . . . . 1 I enclose cheque/P.O./bank draft to the value of £ . . . . . . . . . . . . . . . . . . . . . . . . . . . . . . . . . . . . . . . . . . . . . . . . 1 Please charge my Visa/Mastercard/Amex/Diners Club/Switch £ . . . . . . . . Switch Issue No. . . . . . . . . . AUG ’01 PROJECTS ) Digitimer ) Lead-Acid Battery Charger ) Compact Shortwave Loop Aerial ) Perpetual Projects 2 – L.E.D. Flasher – Double Door-Buzzer. FEATURES ) Controlling Power Generation ) Ingenuity Unlimited ) Interface ) Circuit Surgery ) New Technology Update ) Net Work – The Internet Page. 350 Card No. . . . . . . . . . . . . . . . . . . . . . . . . . . . . . . . . . . . . . . . . . . . . . . Card Expiry Date . . . . . . . . . . . . . . . . . . . SEND TO: Everyday Practical Electronics, Wimborne Publishing Ltd., 408 Wimborne Road East, Ferndown, Dorset BH22 9ND. Tel: 01202 873872. Fax: 01202 874562. E-mail: [email protected] On-line Shop: www.epemag.wimborne.co.uk/shopdoor.htm Payments must be in £ sterling – cheque or bank draft drawn on a UK bank. Normally supplied within seven days of receipt of order. Send a copy of this form, or order by letter if you do not wish to cut your issue. M05/02 Everyday Practical Electronics, May 2002 STORE YOUR BACK ISSUES ON MINI CD-ROMS NOW VOL 5 AVAI LABL E ONLY £12.45 each including VAT and p&p A great way to buy EPE Back Issues – our mini CD-ROMs contain back issues from our EPE Online website plus bonus articles, all the relevant PIC software and web links. Note: no free gifts are included. All this for just £12.45 each including postage and packing. VOL 1 CONTENTS BACK ISSUES – November 1998 to June 1999 (all the projects, features, news, IUs etc. from all eight issues). Note: No advertisements are included. PIC PROJECT CODES – All the available codes for the PIC based projects published in these issues. VOL 2 CONTENTS BACK ISSUES – July 1999 to December 1999 (all the projects, features, news, IUs, etc. from all six issues). Note: No advertisements are included. PIC PROJECT CODES – All the available codes for the PIC-based projects published in these issues. VOL 3 CONTENTS BACK ISSUES – January 2000 to June 2000 (all the projects, features, news, IUs, etc. from all six issues). PIC PROJECT CODES – All the available codes for the PIC-based projects published in these issues. Order on-line from www.epemag.wimborne.co.uk/shopdoor.htm or www.epemag.com (USA $ prices) or by phone, Fax, E-mail or Post BACK ISSUES MINI CD-ROM ORDER FORM Please send me ........ (quantity) BACK ISSUES CD-ROM VOL 1 VOL 4 CONTENTS Please send me ........ (quantity) BACK ISSUES CD-ROM VOL 2 BACK ISSUES – July 2000 to Dec. 2000 (all the projects, features, news, IUs etc. from all six issues). PROJECT CODES – All the available codes for the programmable projects in these issues. Please send me ........ (quantity) BACK ISSUES CD-ROM VOL 3 VOL 5 CONTENTS BACK ISSUES – January 2001 to June 2001 (all the projects, features, news, IUs etc. from all six issues). PROJECT CODES – All the available codes for the programmable projects in these issues, including those for Interface. Please send me ........ (quantity) BACK ISSUES CD-ROM VOL 3 Please send me ........ (quantity) BACK ISSUES CD-ROM VOL 5 Price £12.45 each – includes postage to anywhere in the world. Name . . . . . . . . . . . . . . . . . . . . . . . . . . . . . . . . . . . . . . . . . . . . Address . . . . . . . . . . . . . . . . . . . . . . . . . . . . . . . . . . . . . . . . . . EXTRA ARTICLES – ON ALL VOLUMES ................................................ BASIC SOLDERING GUIDE – Alan Winstanley’s internationally acclaimed fully illustrated guide. UNDERSTANDING PASSIVE COMPONENTS – Introduction to the basic principles of passive components. HOW TO USE INTELLIGENT L.C.Ds, By Julyan Ilett – An utterly practical guide to interfacing and programming intelligent liquid crystal display modules. PhyzzyB COMPUTERS BONUS ARTICLE 1 – Signed and Unsigned Binary Numbers. By Clive “Max” Maxfield and Alvin Brown. PhyzzyB COMPUTERS BONUS ARTICLE 2 – Creating an Event Counter. By Clive “Max” Maxfield and Alvin Brown. INTERGRAPH COMPUTER SYSTEMS 3D GRAPHICS – A chapter from Intergraph’s book that explains computer graphics technology in an interesting and understandable way with full colour graphics. . . . . . . . . . . . . . . . . . . . . . . . . . . Post Code . . . . . . . . . . . . . EXTRA ARTICLE ON VOL 1 & 2 THE LIFE & WORKS OF KONRAD ZUSE – a brilliant pioneer in the evolution of computers. A bonus article on his life and work written by his eldest son, including many previously unpublished photographs. NOTE: These mini CD-ROMs are suitable for use on any PC with a CD-ROM drive. They require Adobe Acrobat Reader (available free from the Internet – www.adobe.com/acrobat) Everyday Practical Electronics, May 2002 $I enclose cheque/P.O./bank draft to the value of £ . . . . . . . . . $Please charge my Visa/Mastercard/Amex/ Diners Club/Switch £ ............................................... Card No. . . . . . . . . . . . . . . . . . . . . . . . . . . . . . . . . . . . . . . . . . Expiry Date . . . . . . . . . . . . . . . . . . Switch Issue No. . . . . . . . SEND TO: Everyday Practical Electronics, Wimborne Publishing Ltd., 408 Wimborne Road East, Ferndown, Dorset BH22 9ND. Tel: 01202 873872. Fax: 01202 874562. E-mail: [email protected] Payments must be by card or in £ Sterling – cheque or bank draft drawn on a UK bank. Normally supplied within seven days of receipt of order. Send a copy of this form, or order by letter if you do not wish to cut your issue. 351 READOUT WIN A DIGITAL MULTIMETER E-mail: [email protected] A 31/2 digit pocket-sized l.c.d. multimeter which measures a.c. and d.c. voltage, d.c. current and resistance. It can also test diodes and bipolar transistors. John Becker addresses some of the general points readers have raised. Have you anything interesting to say? Drop us a line! Every month we will give a Digital Multimeter to the author of the best Readout letter. 0 LETTER OF THE MONTH 0 ANALYSING NYQUIST Dear EPE, I read with interest the email from Mr Nick de Smith in EPE March ’02, concerning the PIC Spectrum Analyser. What he says about the lack of anti-aliasing filters and the problems with signals greater in frequency than half the sampling rate (Nyquist frequency) causing aliasing of the signals is absolutely correct. It has been accepted as a fact that in signal analysis it is not possible to retrieve signals which are greater than half of the sampling frequency. This premise is clearly stated in all textbooks on this subject as the “Nyquist Criteria” or as “Shannon’s Sampling Theory”. For example, with a sampling frequency of 2kHz it is not possible to retrieve signals in excess of 1kHz. Any frequencies greater than this 1kHz value will appear as a false or aliased signal and a considerable amount of research and commercial activity has emerged to eliminate such signals by filtering them out from the signal presentation. However, it has now been proved through a research program (undertaken by myself and Dr R. F. McLean) that the above premise is false and that the limitation of the Nyquist Criteria can easily be overcome. A theoretical study along with a simple capturing device has been developed which can retrieve signals in excess of 2000 times this hitherto limitation in frequency. The system also dispenses with the need for any form of filtering of the incoming signal. For example, by sampling at no greater than 2kHz, frequencies of up to 2·4GHz are unambiguously retrievable. PIC MINI-ENIGMA Dear EPE, The Mini-Enigma (Mar ’02) is an intriguing idea from Nick Dossis, but please bear in mind that your encryption is not as secure as the original Enigma. It is (worst case figures) eight times more complex than a simple substitution cipher. Like the original Enigma, no letter codes to itself, so for each of the first eight characters there are 25 possible resulting encryptions (these eight being the maximum codeword length). This gives rise to 258 possibilities. Daunting perhaps, but not outside the scope of modern computing equipment. The example BYEBYE only appears to have no repetition as the codeword in your article is four characters, ABCD. If, instead, a 3-character codeword was applied, then repetition would be immediately apparent – bad news for attempted secrecy! I found a software emulation of the original machine, on the Internet, at: www.ugrad.cs.jhu.edu/~russell/classes/enigma/. Godfrey Manning, Edgware, Middlesex, via email Hello again Godfrey. You are reading more into Nick’s design than you should. Don’t you recall passing coded messages on paper between Everyday Practical Electronics, May 2002 The technique has been used in vibration condition monitoring and it removes the need for the analyst to predict the maximum frequency of interest in a signal, and thus removes the need to predict the maximum sampling frequency, nor does the analyst need to consider filtering, which could inadvertently filter out the signals of interest. It therefore ensures greater accuracy in diagnosing machinery defects. Also, with its high frequency potential, it will be suitable for use in the field of communication, data encryption and associated disciplines. The above technique and equipment has already been successfully used within industry. There is a patent pending on this technique and more information can be seen on our web site at www.HolisticSignals.co.uk. Stephen H Alsop, Sands Systems Ltd, Sheffield, via email Thanks, Stephen. Historically, I understand that Nyquist was a radio engineer investigating the most economically reliable method for transmitting speech data. It was in this context that his ratios were established, with 2:1 being the absolute minimum but 3:1 being considered better for adequate intelligibility. Although I know that stable waveforms can be accurately sampled at frequencies well below their fundamental, I assume your techniques are far superior. In which case you have an amazing breakthrough – a bit like breaking the light barrier, or turning the arrow of time backwards! you and your classmates at school, probably even written using “invisible” lemon juice ink? That’s how we felt Mini-Enigma would find appeal – as a modern equivalent! Nick himself replies: It is nice to hear from someone who also takes an interest in encryption techniques. I appreciate your comments pointing out that the encryption technique used in the project does not match that of the original Enigma machine. As mentioned in the article, my design was never meant to be a simulation of the original, however to the untrained eye the coded message would still be difficult to crack. I am sure that if you wanted to make the encryption technique more secure it would be quite straightforward to alter the software. I would certainly be interested to know if anybody tries it. Don’t forget that the message could be made more secure if the user transfers the encrypted message into the match-box memory unit. By using this method, the would-be cracker would first need to know how to retrieve the data out of the PIC’s EEPROM memory (which, of course, is in encrypted binary format) and then attempt to decipher the message. How this affects the possibility of cracking the code is practically immeasurable. Nick Dossis WEATHER MONITORING Dear EPE, I came across your magazine quite by chance with the February issue. For some time now I have been wanting to put together a weather station, just for my own records. I am more mechanical/hydraulic orientated but have sort of taught myself a bit about the electrical side. Am currently doing a course with Colu to make me Mech/Elect. Have looked at some of the off the shelf jobs, just plug in as it were but my goodness what a price! Wonder if NASA can afford them? Do you perhaps know where I can purchase stand-alone units/senders or where to get kits or plans to build my own units. The parameters I am interested in are: barometric pressure; min/max temperature, including windchill (wet bulb thermometer); wind speed/direction; rainfall; humidity. I plan to download this info say every six hours into a datalogger (if feasible) or direct to PC and would also want the results output as graphs. I am also busy setting up to capture images from satellite to show what the sky is doing. Maybe there are future articles planned? I really enjoy reading the mag. Albin Draper, via email Well Albin, my Met Office weather station was published in EPE issues Dec ’95, Jan ’96. However, I am working on a sophisticated update for publication later this year, PIC controlled complete with logger and PC interface. It will do all you mention, except windchill (which I’d not thought about, but might look into). Wind sensing will be solid-state. I regret that I don’t know of commercial sources, although a general search via the web may help you. No, we’ve nothing astronomical in the pipeline. PICtutor AND TK3 Dear EPE, I recently bought a PICmicro development board and the PIC Toolkit TK3 V1.1. I was under the impression that with these two I would be able to program the PICMicro on the board and run my own programs. I also have Windows 2000. When I got the CD it told me that the Toolkit will not run on Windows 2000 and it also seems that I need to order more software in order to use the PICmicro development board. I also now notice that the PICTutor software does not appear to work on Windows 2000 either. Chris Ringrow, Linden, Alhampton, Somerset, via email Chris, you have misunderstood – PICtutor and Toolkit are not related to each other. PICtutor is to teach about PICs, with reference to the PIC16F84 (which the Tutor board will handle). Toolkit 3 is for those who are experienced PIC programmers for use in developing their own programs. As said in the article, Toolkit does not run under Win2000 (although we have an article in the pipeline which gives details of using it with 2000 and XP). PICtutor runs under any Windows format, but if you have problems you should contact the manufacturers, Matrix Multimedia. 353 MSF, WWVB AND BBC Dear EPE, Andy Flind’s answer to Steve Davenport’s email (Mar ’02) prompted me to look up the original article (which was July ’01 not July ’98 as quoted!). Since WWVB broadcasts on the same frequency as MSF (60kHz), there seems every chance that the MSF repeater will work with WWVB without modification. I wonder if Steve is aware of www.boulder.nist.gov/timefreq/stations/wwvb.htm It wasn’t until I did a Google search on WWVB and spent 30 minutes trawling through this splendid site, which although not totally relevant unless you live in the US, has some excellent info about time and related topics. Barry Taylor, Rickmansworth, via email Thanks Barry, nice to hear from you again. And, yes, July ‘01! Incidentally, folks, Barry also drew our attention to a web site devoted to the history of BBC equipment and those who helped run it, of whom Barry was one. The site is well worth a visit and is at: www.roger.beckwith.btinternet.co.uk/bh/ menu.htm. INTERRUPTING THE Z BIT Dear EPE The article by Malcolm Wiles on Programming PIC Interrupts (Mar-Apr ’02) was of interest and I was surprised to see the query raised over the use of the instruction MOVF Status,W i.e. what will be the bit in W corresponding to the Z bit of the Status register. Will it be the value in the Status register at the start of the instruction or the value at the end of the instruction? A simple consideration of the hardware of registers will indicate what happens. The flip-flops of W will have the Status register routed to it and it will be clocked into the flipflops at the same time that the output of the Zero detection logic is being clocked into the Status register. Hence the old value of the Status register is clocked into W and the zero condition of the old value of the Status register is reflected in the new Z bit which is clocked into the Status register. Ken Naylor, via email Malcolm replies: As a software engineer I would never presume to guess or assume how Microchip have implemented their hardware. Just because there is a simple, or obvious, maybe even textbook, way of doing something, does it necessarily follow that every implementation does it that way? If the spec or data sheet doesn’t explicitly state something, I think it is safest, from a software point of view, not to make any assumptions. The situation is almost identical with instructions in which W is both the source of data and its destination e.g. SUBWF f,W . The hardware functions as required because the old value of W at the start is processed with the contents of ‘f’ and the result clocked back into W to give a new value. Hence the new value does not circulate round giving another ‘new’ value in the same clock cycle. Malcolm Wiles INTERRUPTS CONTEXT Dear EPE, I wonder if I have misunderstood the concept of changing memory bank as part of the “context” in Malcolm Wiles’ Using PIC Interrupts. Referring to Listing 2 (page 171) it is necessary to select BANK1 prior to initiating the reading of EEPROM by instruction BSF EECON1,RD. Now, what if the interrupt is activated between these two instructions? One of the actions inside the interrupt service routine at ISR is to set its own context and select BANK0. I 354 can’t see how the bank selected by the main program is reinstated prior to return at the RETFIE instruction. It looks as though the return continues to thread main program code but with BANK0 still selected. Is there some implicit reselection of the main program’s required BANK, for example, through the STATUS word? As an aside, and as I’ve said before, it’s been a revelation starting to read EPE again – keep up the good work and don’t change any of it! Let me also put in a good word for BBC Basic for Windows (not just because it’s developed by a fellow licensed radio amateur!). Limitations it has, just as with any language, but its use must not be underestimated and its new lease of life under Windows is a boon. At its quoted price, it’s also excellent value. Godfrey Manning, G4GLM Thanks Godfrey for your continued appreciative interest in us. Malcolm Wiles replies to your question: Reference to the PIC data sheets will show that the Bank select bits (RP0 and RP1) are physically part of the STATUS register (bits 5 and 6 respectively). So their setting on entry to the ISR is preserved (along with Z, C, DC, TO, PD, and IRP) when the STATUS register is saved by the SWAPF STATUS,W . . . MOVWF SAVES sequence at the beginning of the ISR. After that has been done, the ISR can safely change any of these flags, because they will all be reinstated to the values they had on entry to the ISR by the POP: SWAPF SAVES,W . . . MOVWF STATUS instructions at the end of the ISR. This reinstatement includes the values of RP0 and RP1, so at this point Bank 1 will again be selected if it was the setting on entry to the ISR. Clearly the ISR must not subsequently contain any code which depends on Bank or other STATUS register flag settings made in the ISR itself. (Recall the discussion in the article which noted that once STATUS has been so restored, only non-STATUS affecting instructions (e.g. SWAPF) can be used in any further ISR code.) Malcolm Wiles NOTABLY SENIOR Dear EPE, This year I will become an official Senior Citizen, and although a long-time reader of EPE and PE before that, I have never written to the magazine before, so would you indulge me for a moment and allow me to say: Thank you and all contributors for a splendid magazine, I have had many hours of pleasure, education and also some frustration – due to my shortcomings, not EPE’s! In particular, the (relatively) recent interest in PIC’s has certainly given my grey matter a bashing – that’s not a bad thing! – and your Toolkit Mk3 is a joy. Following the PIC Tutorials has enabled me to modify Bart Trepak’s excellent Xmas Lights Dimmer (a wonderfully informative article, Dec ’98) to suit my taste – you are definitely never too old to learn! My circumstances are such that I am not able to buy EPE every month, and this sometimes leaves me with a problem regarding the Please Take Note messages. Of course gremlins creep in occasionally, that is understood, but if I can’t afford to buy the mag for a month or two after I’ve built a project, I miss any error corrections that appear. Would it be possible for all error correction notes to be put onto the Web site? Of course it would be best if I could buy the mag every month – I wish! – but I expect some other readers may have the same problem, and using the already excellent site would really help. I now intend to construct the EPE Virtual ’Scope (Jan/Feb ’98). Without asking you to give too much away, should I go ahead, or do you have any news of an updated version in the pipeline (perhaps using your mastery of VB? – is flattery ok?)! Derek Waite, via email I wholeheartedly agree, Derek, that keeping the grey cells active is vital (and enjoyable!). I’m pleased to know we’ve helped to inspire you, and flattery is always welcome! We shall actively consider putting Please Take Note on our FTP site, thanks for the suggestion. My Virtual Scope is the most advanced of all those I’ve done. There have been some simpler versions based around PICs since then but they are more limited than the VS. I’ve no plans to do another scope unless technology takes a quantum leap forward again in some way regarding the hardware – VB would only offer a cosmetic advantage, not a physical one. WHEELS A-TURNING? Dear EPE, We need to measure distances on archeological sites. Did I see a project for a measuring wheel in EPE some time ago? Philip Vallis, via the net I replied to Philip that I had designed a PIC unit for use on my pushbike for distance etc, and that it was published as PICagoras in two parts Apr/May ’97. Philip came back saying: I am not allowed to ride a bike after a heart attack. We need a machine that we can carry around and measure distances accurately. We use 30-metre tapes at present. I built the Earth Resistivity Meter (Jan/Feb ’97), but the archeologist that wanted it has not yet built the frame. I built a magnetometer last year that worked first time! We have used it but found nothing so far. If you can design a measuring wheel I would appreciate it. That reminds me of a tale when I was in local government. White lines were paid for by the yard. One day an engineer had to measure a road about one mile long, using the measuring wheel. On that day he had been in the pub for lunch. He was somewhat incapable so he called on a van driver to let him lay down in the back and he put the wheel down at the start of each line and lifted it off at the end. Unfortunately the driver decided that he was going too slow and the wheel started going faster and faster. When they got to the end of the road they had measured enough white lines to stretch from London to Brighton. Philip, I’m sorry to hear you can’t enjoy the pleasures(?) of pushbikes, although I’m on the verge of feeling that age is gradually putting a spoke in my wheels! My PICagoras, though, can be used with any wheel and its diameter can be easily programmed into the unit using a signal generator. I still think it might do for you, but regret I can’t offer to do it for you. What a delightful tale! It reminds of when my wife and I were in Zante, one of the Greek islands. Cycling along a main road that had recently been white lined, the painting gang had not bothered to avoid a snake in their path, which was now also painted, but dead of course! Incidentally, I’m soon to start testing an Earth Resistivity Logger that (I think!) I have designed for archeology. TK3 AND PIC16F74 Dear EPE, Is it possible to modify the TK3 software to incorporate the PIC16F74? I have several for my private use, but no means to program them as yet. It would seem they are not as popular as their 8K cousins. Peter Barratt, Australia, via email It appears to be pin-compatible with the F874/7 series and should program OK in TK3 – just treat it as being from that family, although its configuration bits may not be the same. Reading its data sheet via www.microchip.com should give you the ’74’s full details. Everyday Practical Electronics, May 2002 Learn About Microcontrollers NEW 32 bit PC Assembler Experimenting with PC Computers with its kit is the easiest way ever to learn assembly language programming. If you have enough intelligence to understand the English language and you can operate a PC computer then you have all the necessary background knowledge. Flashing LEDs, digital to analogue converters, simple oscilloscope, charging curves, temperature graphs and audio digitising. Kit now supplied with our 32 bit assembler with 84 page supplement detailing the new features and including 7 experiments PC to PIC communication. Flashing LEDs, writing to LCD and two way data using 3 wires from PC’s parallel port to PIC16F84. Book Experimenting with PCs ............... £21.50 Kit 1a ‘made up’ with software .............. £52.00 Kit 1u ‘unmade’ with software ............... £45.00 C & C++ for the PC PIC Training & Development System The best place to start learning about microcontrollers is the PIC16F84. This is easy to understand and very popular with construction projects. Then continue on using the more sophisticated PIC16F877 family. The heart of our system is a real book which lies open on your desk while you use your computer to type in the programme and control the hardware. Start with four very simple programmes. Run the simulator to see how they work. Test them with real hardware. Follow on with a little theory..... Our complete PIC training and development system consists of our universal mid range PIC programmer, a 306 page book covering the PIC16F84, a 212 page book introducing the PIC16F877 family, and a suite of programmes to run on a PC. The module is an advanced design using a 28 pin PIC16F872 to handle the timing, programming and voltage switching requirements. The module has two ZIF sockets and an 8 pin socket which between them allow most mid range 8, 18, 28 and 40 pin PICs to be programmed. The plugboard is wired with a 5 volt supply. The software is an integrated system comprising a text editor, assembler disassembler, simulator and programming software. The programming is performed at normal 5 volts and then verified with plus and minus 10% applied to ensure that the device is programmed with a good margin and not poised on the edge of failure. Requires two PP3 batteries which are not supplied. Experimenting with C & C++ Programmes teaches us to programme by using C to drive the simple hardware circuits built using the materials supplied in the kit. The circuits build up to a storage oscilloscope using relatively simple C techniques to construct a programme that is by no means simple. When approached in this way C is only marginally more difficult than BASIC and infinitely more powerful. C programmers are always in demand. Ideal for absolute beginners and experienced programmers. Book Experimenting with C & C++ ........ £24.99 Kit CP2a ‘made up’ with software ......... £32.51 Kit CP2u ‘unmade’ with software .......... £26.51 Kit CP2t ‘top up’ with software .............. £12.99 The Kits The assembler and C & C++ kits contain the prototyping board, lead assemblies,components and programming software to do all the experiments. The ‘made up’ kits are supplied ready to start. The ‘top up’ kit is for readers who have already purchased kit 1a or 1u. The kits do not include the book. Hardware required All systems in this advertisement assume you have a PC (386 or better) and a printer lead. The experiments require no soldering. Universal mid range PIC programmer module + Book Experimenting with PIC Microcontrollers + Book Experimenting with the PIC16F877 (2nd edition) + Universal mid range PIC software suite .....+ PIC16F84 and PIC16F872 test PICs. . . . . . £157.41 UK Postage and insurance. . . . . . . . . . . . . . . £ 7.50 (Europe postage & Insurance. . £13.00. Rest of world. . £22.00) Experimenting with PIC Microcontrollers This book introduces the PIC16F84 and PIC16C711, and is the easy way to get started for anyone who is new to PIC programming. We begin with four simple experiments, the first of which is explained over ten and a half pages assuming no starting knowledge except the ability to operate a PC. Then having gained some practical experience we study the basic principles of PIC programming, learn about the 8 bit timer, how to drive the liquid crystal display, create a real time clock, experiment with the watchdog timer, sleep mode, beeps and music, including a rendition of Beethoven’s Für Elise. Finally there are two projects to work through, using the PIC16F84 to create a sinewave generator and investigating the power taken by domestic appliances. In the space of 24 experiments, two projects and 56 exercises the book works through from absolute beginner to experienced engineer level. Ordering Information Telephone with Visa, Mastercard or Switch, or send cheque/PO for immediate despatch. All prices include VAT if applicable. Postage must be added to all orders. UK postage £2.50 per book, £1.00 per kit, maximum £7.50. Europe postage £3.50 per book, £1.50 per kit. Rest of World £6.50 per book, £2.50 per kit. Web site:- www.brunningsoftware.co.uk Experimenting with the PIC16F877 The second PIC book starts with the simplest of experiments to give us a basic understanding of the PIC16F877 family. Then we look at the 16 bit timer, efficient storage and display of text messages, simple frequency counter, use a keypad for numbers, letters and security codes, and examine the 10 bit A/D converter. The 2nd edition has two new chapters. The PIC16F627 is introduced as a low cost PIC16F84. We use the PIC16F627 as a step up switching regulator, and to control the speed of a DC motor with maximum torque still available. Then we study how to use a PIC to switch mains power using an optoisolated triac driving a high current triac. Mail order address: 138 The Street, Little Clacton, Clacton-on-sea, Essex, CO16 9LS. Tel 01255 862308 Everyday Practical Electronics, May 2002 355 Constructional Project WASHING READY INDICATOR TERRY DE VAUX-BALBIRNIE Has the washing machine finished? Avoid those washday blues! UR OLD washing machine gave long and faithful service. Unfortunately, when it did eventually fail, it was not possible to repair it economically. O DREAM MACHINE The replacement washing machine is a famous brand, renowned for its high quality and long life. However, after using it for the first time, it became apparent that something that “old faithful” had was lacking in its successor. This was a lamp that came on when it had completed the washing. The only way of knowing whether it has finished or not is to look closely at the program switch or listen until the machine has not made a sound for some time. Taking the washing out promptly is important if you wish to re-load the machine or if you want to dry the laundry as quickly as possible. A further point is that if the washing machine is situated in a garage or other place remote from the house, even a warning light will be of little help. You would have to visit it periodically to check whether it had finished its work. LAUNDRY DONE The washing machine alarm circuit described here will give an audible signal (in the form of high-pitched bleeping) when the washing cycle has finished. If the machine has been left on a “rinse hold” setting, it will give a signal when the program has reached this point. This will prevent the user from forgetting about it and leaving the washing overnight in a machine filled with water. Readers may find the circuit useful for other similar appliances and it has been tested successfully with tumble driers. However, if the washing machine is situated in some place remote from the house, the buzzer could be placed somewhere else – in the kitchen, for example. For this to be done, you would need to route a length of light-duty twin wire between the main unit and buzzer position. While operating under standby conditions, the prototype required just 500µA, which may be regarded as negligible. While actually sounding, the current rises to a few milliamps depending on the Fig.1. Block schematic diagram for the Washing Ready Indicator. Being battery-operated, the circuit is safe to construct and in operation. Also, because no modifications are made to the appliance itself, using the device will not invalidate any manufacturer’s warranty. The circuit consists of a main unit (see photographs) which is placed near the washing machine. This contains the circuit panel and a 6V battery pack. There is an on-off switch on the front of the case and a socket on the side which is used to connect a sensor. This is placed so as to make mechanical contact with some part of the washing machine. The warning device (a small piezo buzzer) will normally be mounted on the circuit board with a hole drilled in the box to allow the sound to pass through. buzzer used. The internal 6V battery pack will provide several hundred operating hours and will probably give more than one year of service. OVERVIEW The Washing Ready Indicator works by responding to the sound and/or vibration that occurs while the washing machine motor is operating. When correctly adjusted, other sources of sound have only a minimal effect unless they are particularly loud. Even if they do have some temporary effect, this should not prevent the circuit from giving a proper warning. The sensor consists of an electret microphone insert (that is, the working part without the external case). While the motor is turning, this provides an electrical signal which is passed to the main unit. While the machine vibrations continue, the warning does not sound. When it stops, the warning continues to be held off for a further preset time and after that the buzzer sounds. HOLD-OFF TIME This hold-off time is necessary because the motor in a washing machine is not operating all the time during the washing cycle. The drum turns in alternate directions to prevent the clothes tangling and there will be several seconds of silence between each movement. There may also be longer “quiet” times when the machine is filling with water. The hold-off time must be sufficient to take account of all these factors and will be set by the user for best effect at the testing stage. 356 Everyday Practical Electronics, May 2002 LONG SILENCE To prevent the warning being given while the washing machine is not in use (obviously a long period of silence!), the unit must be switched on and off manually. The user is unlikely to forget to switch it off because the buzzer will continue to sound until this has been done. However, he or she will need to remember to switch it on at the beginning of the washing cycle whenever a warning is required. HOW IT WORKS Basic operation of the Washing Ready Indicator is best illustrated by the block diagram shown in Fig.1. It will be seen that this comprises seven main parts: vibration sensor; audio amplifier; level detector; integrator; Schmitt trigger inverter; slow astable (low-frequency oscillator) and piezo buzzer. The complete circuit diagram is shown in Fig.2. MIC1 is the electret microphone insert of the type specified in the parts list. This has an inbuilt f.e.t. preamplifier which requires its own power supply. This is derived from the 6V battery pack, B1, through resistor R1. Operational amplifier (op.amp), IC1 is a quad device – it contains four identical units IC1a, IC1b, IC1c and IC1d (although only three of these are actually used). IC1a is used for the audio amplifier, IC2b for the level detector and IC1c for the Schmitt trigger inverter. Taking IC1a first, this is used in a.c. inverting mode. For this, the signal arriving from the sensor MIC1 is applied, via coupling capacitor C1 and input resistor R2, to the inverting input (pin 2). Capacitor C1 allows the alternating current (a.c.) component (that is, the signal) to pass while blocking the passage of direct current (d.c.) This prevents it interfering with the d.c. conditions of the op.amp. STANDING CONDITIONS As far as d.c. is concerned, the op.amp non-inverting input (pin 3) is held at onehalf of supply voltage (3V nominally) by the potential divider action of equal-value resistors R3 and R4. Regarding the a.c. signal, it is at 0V since the impedance of Component layout on the finished circuit board. capacitor C2 is very small at the audio frequencies involved. The standing d.c. voltage at the output (pin 1) is equal to that at the non-inverting input – that is, nominally 3V. The gain of the amplifier is determined by the ratio of feedback resistance (R5) to input resistance (R2). In fact, the gain is negative but this has no practical consequence here. With the values specified, the gain is therefore fixed at (–)220. The result is that a voltage of some 1V peak-to-peak will exist at the output, pin 1, and this will be superimposed on the standing d.c. voltage. Capacitor C3, connected in parallel with the feedback resistor R5, provides a low impedance path at higher frequencies but a much higher one at the typical frequencies of vibration. It thus has little effect at the “intended” frequencies but the gain is much reduced at higher ones. The circuit is therefore less sensitive to much of the “normal” sound in the vicinity of the washing machine. ON THE LEVEL The level detector based on IC1b “looks at” the voltages applied to its inverting (–) and non-inverting (+) inputs (pin 6 and pin 5 respectively). If the voltage at pin 5 exceeds that at pin 6 the op.amp will be on with the output (pin 7) high. Otherwise it remains low. The signal provided by the output of the audio amplifier (IC1a pin 1) is applied direct to IC1b inverting input (pin 6). A certain preset voltage is applied to the noninverting input, pin 5, by the potential divider network made up of R6/VR1/R7. Preset potentiometer VR1 will be adjusted at the end so that the voltage at pin 5 is slightly lower than that at pin 6 (that is, less than 3V) when no vibration is detected. The state of the level detector output (pin 7) will therefore be low when no vibration exists. Fixed resistors R6 and R7 narrow the range of adjustment of VR1 to the middle one-third of the voltage range (nominally 2V to 4V) and this simplifies setting-up at the end. RAPID SWITCHING When vibration is detected, the voltage at IC1b pin 6 rises on the positive halfcycles and falls on the negative ones. The former have no effect. However, on the negative excursions, the voltage at pin 6 will fall below that at µ Ω µ Ω µ Fig.2. Complete circuit diagram for the Washing Ready Indicator. The battery pack B1 is made up of 4 x AA alkaline cells. Everyday Practical Electronics, May 2002 357 pin 5 and this will result in the output (pin 7) switching between high and low states at the frequency of vibration. The length of the on times will depend on how much the a.c. wave falls below the voltage at pin 5 as set by preset VR1. This preset therefore provides the Sensitivity control. Note that, as the supply voltage falls in the process of battery ageing, this makes no difference to the operating point. This is because the voltages applied to both IC1b inputs vary in the same proportion. Ignoring the connection from the output of IC1b at pin 7 to resistor R8 for the moment, the signal from the output of the level detector can be directed to the lightemitting diode (l.e.d.) D1 using a “jumper wire” on the circuit board. The operating current is limited to some 10mA by series resistor R9. The l.e.d. is used to check operation of the circuit up to this point because it will flash when vibration is picked up. It is also used to make a reasonably correct adjustment to preset VR1. At the end of testing, the jumper wire will be cut to prevent the l.e.d. from working and so reduce the current requirement of the circuit. INTEGRATION Returning now to the output from the level detector IC1b at pin 7, consider the current flowing through fixed resistor R8 and diode D2. This allows capacitor C4 to charge up and provides the “integrator” aspect of the circuit. While pulses are given by IC1b output (pin 7), the relatively small value of resistor R8 allows the capacitor to charge to almost supply voltage in a very short time. In fact, it will not quite reach this value because it is being constantly drained by the network comprising fixed resistor R10 and preset VR2. When the pulses stop, the capacitor gradually discharges in a time dependent on the adjustment of VR2. It cannot drain back into IC1b pin 7 because diode D2 is reverse biased. Note that without R10 and VR2, capacitor C4 could only discharge by leakage and this would take a very long time. This is because the input resistance of op.amp IC1c (whose purpose will be explained presently) is extremely high. INVERTING EFFECT Op.amp section, IC1c gives a Schmitt trigger inverting effect. It works like this. The voltage existing across capacitor C4 is applied to the inverting input (pin 9). The non-inverting input (pin 10) is maintained at approximately 2V by the potential divider action of resistors R11 and R12. While pulses are detected, the inverting input voltage (which is close to supply positive voltage) will exceed the non-inverting one and IC1c output (pin 8) will be low. When the pulses stop and sufficient time has elapsed to discharge C4 below the 2V level, the conditions reverse and pin 8 will go high. Resistor R13 provides some positive feedback and sharpens the switching between the output on and off states. When the “machine’’ vibration stops for a short time, the voltage across capacitor C4 does not fall sufficiently for IC1c output pin 8 to go high. When vibration is detected again, the capacitor rapidly charges to its former value. 358 TIME ADJUSTMENT The hold-off time can be adjusted using preset VR2 between limits of almost zero and two minutes approximately. The shortest timing is provided simply for testing purposes. The maximum timing could be extended if required by raising the value of capcitor C4. A CMOS version of the 555 timer i.c., IC2, is configured as a low frequency astable. While vibration is detected, the low state of IC1c output (pin 8) applies a similar state to IC2 reset input (pin 4). This disables the device and it does nothing. When the hold-off time expires, IC1c pin 8 goes high and, with IC2 reset input also high, a stream of pulses are passed to IC2 output at pin 3 and hence to buzzer WD1. The frequency of oscillation is determined by the value of fixed resistors R14 and R15 in conjunction with capacitor C5 and with the values used, this should be some 3kHz. In fact, it appears to vary with operating conditions and was much slower in the prototype. This may be seen as a benefit because it reduces the current requirement. The buzzer connected to IC2 output, pin 3, therefore bleeps in sympathy. CONSTRUCTION Construction of the Washing Ready Indicator is based on a single-sided printed circuit board (p.c.b.). This board is available from the EPE PCB Service, code 342. The topside component layout, interwiring to off-board switch and jack socket, and full-size underside copper foil master pattern are shown in Fig.3. Begin construction by drilling the two mounting holes and soldering the i.c. sockets and p.c.b. mounting terminal block (TB1) in position. Solder the jumper wire to link points A and B. Follow with the resistors and capacitors (including preset potentiometers VR1 and VR2). Now, add the polarity-sensitive components which are the electrolytic capacitors, l.e.d. D1, diode D2 and buzzer WD1 (if this is to be mounted on-board) taking care over the orientation of these components. Adjust preset VR1 to approximately midtrack position and VR2 fully anti-clockwise (as viewed from the bottom edge of the p.c.b.). This gives a near-zero hold-off time. Finish construction of the circuit board by inserting IC1 (but not IC2 at this stage) into its socket taking care with the orientation. Since this is a CMOS component, it is vulnerable to damage by static charge which may be present on the body. To avoid any such problems, touch something which is earthed (such as a metal water tap) before removing the i.c. from its packaging. TESTING It will be found convenient to make a basic test on the unit before the p.c.b. is mounted in its box. In this way, errors are more easily corrected and the preset potentiometers are more accessible. Cut off a short piece of light-duty twin wire to connect the microphone insert sensor (MIC1) temporarily to the terminal block at points TB1/2 and TB1/3. Look carefully at the microphone connecting pads. The one which is connected to the metal case of the device must be taken to Using screened audio cable to connect the electret microphone to the main unit. COMPONENTS Resistors R1, R2 R3, R4 R5, R12 R6, R7 R8 R9 R10 R11 R13, R15 R14 All 0·25W 5% See 1k (2 off) 47k (2 off) 220k (2 off) 470k (2 off) page 1009 3909 10k 390k 10M (2 off) 100k carbon film. SHOP TALK Potentiometers VR1 VR2 470k sub-min. enclosed carbon preset, vert. 4M7 sub-min. enclosed carbon preset, vert. Capacitors C1 C2 C3 C4 C5 10µ radial elect. 16V 47µ radial elect. 16V 5n ceramic 22µ radial elect. 16V 22n ceramic Semiconductors D1 D2 IC1 IC2 3mm red l.e.d. 1N4148 signal diode ICL7642 quad op.amp ICM7555IPA CMOS timer Miscellaneous WD1 miniature solid-state buzzer – 3V to 24V operation at 10mA maximum TB1 4-way p.c.b. screw terminal block – 5mm pin spacing MIC1 miniature two-terminal electret microphone insert SK1/PL1 3·5mm mono panel mounting jack socket, with plug Printed circuit board available from the EPE PCB Service, code 342; plastic box, size 143mm x 82mm x 44mm; 8-pin i.c. socket; 14-pin i.c. socket; battery holder and four AA size alkaline cells; PP3 type battery snap (or as required); light-duty screened wire; multistrand connecting wire; solder, etc. Approx. Cost Guidance Only £20 excluding batt Everyday Practical Electronics, May 2002 the negative (0V) of the supply – that is to TB1/3. The other one is connected to TB1/2. Connect the PP3 battery snap (or as appropriate) to TB1/1 and TB1/4 taking care over the polarity. Insert the cells in their holder, apply the battery snap and switch on. Adjust Sensitivity preset VR1 to the point where the “test’’ l.e.d. D1 is just off. If the microphone is touched, or the table top is tapped, the l.e.d. should flash momentarily. Adjust VR1 so that this happens reliably. The battery should now be disconnected and IC2 inserted into its socket observing the anti-static precautions mentioned earlier for IC1. It is best to leave the l.e.d. in circuit for the moment. Positioning of components inside the plastic case. With no sound detected, buzzer WD1 should operate. Sound should make the buzzer stop but begin again as soon as it stops. This might not work properly unless preset VR2 is adjusted slightly clockwise to give a small hold-off time. If that works, adjust VR2 to provide a longer hold-off time of, say, 30 seconds. Check that if sounds are made periodically within this time, the sound is held off. This will provide an approximate setting but final adjustments to the presets can only be made with the unit under actual operating conditions. BOXING UP Remove the temporary sensor wires from terminal block TB1. Place the p.c.b. and battery holder on the bottom of the box to find their best positions. If the unit is to be wall-mounted, remember to allow space for the holes which will be used to attach it. Mark through the holes for the various parts, also mark positions for on-off switch (S1) and the 3·5mm mono jack socket which is used for sensor MIC1 connection. Measure the buzzer position and drill a hole in the lid directly above this. If the buzzer is to be mounted remotely, mark the position for a further socket (say, a small “power-in” or a 2·5mm mono jack type) for this to be connected. Remove all these parts, drill the holes and attach them. Use plastic stand-off insulators for p.c.b. mounting to bring the buzzer up to level of the hole in the lid. Everyday Practical Electronics, May 2002 Fig.3. Printed circuit board component layout, full-size copper foil master and wiring to off-board components. Refer to Fig.3 and complete the wiring using light-duty stranded connecting wire. If buzzer WD1 is mounted remotely, connect the buzzer pads on the p.c.b. to the buzzer output socket taking account of the polarity. metal case of the microphone should be the one which is connected to the screening. If the buzzer is to be mounted remotely, the connecting wire may be of any convenient length and be of any light-duty stranded twin type. SITING THE UNIT FINAL TESTS Decide on a suitable position for the main unit. This should be placed fairly close to the washing machine (say, within 4 metres). Make the sensor connection using light-duty single screened wire (microphone cable). This is because ordinary wire could pick-up stray mains “hum” and could result in the injection of unwanted signals into the circuit. It is possible that this could hold off the warning in the absence of any vibration. When connecting the jack plug to the sensor wire, solder the outer (sleeve) terminal to the screening. Mount the microphone insert inside a small plastic box (a potting box was used in the prototype). To do this, drill a hole to make a push fit for the microphone insert. Secure it using a little quick-setting adhesive. Drill a further hole in the side of the box for the connecting wire to pass through. Pass the wire through the hole and, allowing a little slack apply a tight cable tie to provide strain relief. Twist and sleeve some of the screening braid and solder the wires to the microphone pads. The pad which is connected to the With the main unit in position, route the screened sensor wire between it and the washing machine and plug it in. Make some tests with the sensor in various positions observing the l.e.d. A suitable place should be found where the drumming noises of the washing machine case cause the l.e.d. to flash brightly. When satisfied about this, make further adjustments to preset VR1 as required. In some cases it will not be found necessary for the sensor to touch the washing machine at all – just placed close enough for it to pick up the noise. However, if doing this, you may need to set the sensitivity somewhat higher and this may make the unit more susceptible to the pick-up of stray random noise. Make some tests under real operating conditions. Adjust preset VR2 for a suitable hold-off time so that the buzzer is prevented from operating under all “silent” conditions on all washing programs. When satisfied about all aspects of operation, cut the jumper wire on the p.c.b. to prevent the l.e.d. operating. Happy washday! $ 359 SURFING THE INTERNET NET WORK ALAN WINSTANLEY to Net Work, our monthly column written for Internet W users. Have you visited our web site at www.epemag.wimborne.co.uk recently? You can view a summary of all issues of EPE ELCOME dating back several years, with colour photographs and indexes of projects also available together with any Please Take Note corrections for that year. You can buy back issues, books, CD-ROMs, videos and p.c.b.s online via our online shop (shopdoor.htm). You can also download copies of the magazine from www.epemag.com (our Online issue priced in US dollars). Our “Chat Zone” message board is proving to be increasingly popular, and is an easy way of posting plain text messages into a forum where you can communicate with other readers; if you are looking for advice or help from fellow electronics enthusiasts, why not ask them by posting your message into the EPE Chat Zone? We are very grateful to the regular readers who support us and help out with queries in the Chat Zone. Strip Teaser In the March ’02 issue of EPE Net Work I pointed the way to a simple Stripboard Designer graphics program that is available as shareware from www.geocities.com/stripboarddesigner. The principle of shareware is very simple – you download the demo for free and if you like the product, you buy it! If you don’t like it, you haven’t lost anything! Some of the world’s best programs such as JASC Paint Shop Pro started out as modest shareware, so by supporting shareware honestly you encourage software authors to develop their ideas further. One of the tasks I still enjoy is the creation of stripboard layouts, which I always found to be a stimulating mental exercise (followed by all the troubleshooting afterwards!). For decades I used quadrille (squared) paper and after some frenetic scribbling and erasing I would finally develop a layout that I could take to the workbench. Nowadays, computers can help a lot by allowing layouts to be created and edited on-screen, also the design can be saved and printed for future reference. Probably the first commercial program to help with this task was Ambyr’s Stripboard Magic, which my fellow contributor Andy Flind (who creates many of EPE’s drawings) reviewed in EPE March 1998 issue. The program could create automatically from a circuit diagram a layout either for stripboard or a plug-in solderless breadboard. I occasionally get emails asking me what happened to Stripboard Magic. Well, just as the program was starting to gain acceptance, it is believed that Ambyr sold the exclusive distributorship to a mail order company. The program and its web site sank without trace and Ambyr Ltd. was dissolved in December 1999 (according to Companies House Online at www.companieshouse.gov.uk). Top view of a small sample board created in Lochmaster 2.0. New pages can be added to a project design, each page having its own “tab”. A very handy feature is the Test command, which literally highlights a route taken by a conductor throughout the board, including wire jumper links (but not through components). You can, therefore, reveal a path of interconnections to prevent unwanted short circuits to other components or strips. You still need rather an agile mind to create stripboard layouts, but this technique will suit many electronics enthusiasts absolutely fine. Lochmaster 2.0 is available direct from Abacom for 35.28 (about £22 or US$30). Lochmaster 2.0 However, I am very grateful to reader Branko Zupan in Slovenija who has brought to my attention a German stripboard design package called Lochmaster. This is produced by Abacom and an English version is downloadable from www.abacomonline.de. The demo allows ten elements to be positioned, and print and save functions have been disabled. It appears to be a very good tool for helping to design layouts by hand, although it does not automate the total design process as Stripboard Magic did. The component library is comprehensive and incorporates all the usual discrete and integrated devices, semiconductors, plus a good range of hardware, including fasteners, pin headers and d.i.l. sockets. New components can also be added to the library. Stripboards are designed by placing components on the board, rotating and linking as necessary and making breaks in the copper track using the Split command. Different views are available – the component side of course, plus an X-ray mode and a solder-side (flipped) view. The views are zoomable and, usefully, a Components List can be created and printed from the board design. 360 Scale Assistant, part of the Front Designer package, creates complex scales for rotary controls. Front Line Also worth checking out is Abacom’s Front Designer package for drafting front panel layouts for your projects. Amongst other things, its “Scale Assistant” helps with the divisional markings for those pesky rotary switches and volume controls. You can then print out the final design onto transparent film or photopaper (or consider large Avery “invisible” clear inkjet labels?) and affix it to your project. The whole point of such software packages, of course, is that you can play around on-screen to your heart’s content without doing any damage to that precious anodised aluminium panel. See you next month – you can email Alan at alan@epemag. co.uk or visit his web site at: http://homepages.tcp.co.uk/~alanwin. Everyday Practical Electronics, May 2002 Regular Clinic CIRCUIT SURGERY ALAN WINSTANLEY and IAN BELL Our monthly feature of readers’ queries looks at analogue opto-couplers and a timely problem Linear Opto-coupler In Isolation None of this allows us to escape the fact that the real world is actually analogue – a world in which many electronics applications must obtain information from their environment and condition it correctly, before it can be handed over for digital processing.” Our series outlines many fundamental principles of operational amplifiers, instrumentation amplifiers, low noise techniques, including a lot of material not covered before in EPE. My thanks to Dave Larner who writes by email; I found the March instalment of Teach-In 2002 with the practicalities of the instrumentation amplifier very informative and helpful. I wondered if you could give me a pointer of where to look for a linear optocoupler. I have been experimenting with some of the biofeedback circuits dating back to Practical Electronics May 1987! I would like to connect these to my oscilloscope or maybe some kind of recorder. This would leave the biofeedback circuit battery powered for reasons of safety and electrical noise. I have tracked down a number of data sheets but the applications all seem to be for coupling digital circuits. Are there specialist types available? How to optically isolate an analogue signal is something I put to Dr David Chesmore, one of the Teach-In 2002 cowriters and closely involved with the Biomedical Engineering Research Group at the University of York. Dave has produced most of the environmental monitoring material of our series, and he suggested that most opto-isolators can be operated linearly since they contain l.e.d.s and (usually) phototransistors. +5V +5V R2 10k R4 10k a *D2 R5 68k R6 470Ω k *SEE TEXT TR2 2N3904 We’re pleased you’re enjoying Teach-In 2002 Making Sense of the Real World, our multi-part series created to help constructors adapt and use many types of environmental sensors within their own projects. We hope that there is something in this Teach-In 2002 series to suit everyone: as we said right at the beginning, “one often gets the impression that the world has gone completely digital in nature, with telephones, television, music, photography and radio all following this trend. TR1 R1 68k 2N3906 TR4 2N3904 c b TR3 2N3906 e e e b VIN VOUT c b c R3 10Ω R7 10Ω *D3 a a 7 6 3 k k 8 2 c *D1 D2 1 e b 0V D1 D3 4 0V 5 HCNR200 Fig.1. Circuit for a high speed, low-cost analogue opto-isolator using the HCNR200. (Courtesy Agilent.) +15V +15V R5 270W R2 2k2 e b INPUT R1 200k 1% C4 100n c TR1 R3 6k8 C2 47p C6 33p 2N3906 7 7 2 *SEE TEXT 6 IC1 (BNC) 6 k a C3 100n IC2 4 4 OUTPUT 2 VR1 50k LT1097 3 3 LT1097 + *D1 R6 174k 1% + C1 100n (BNC) a R4 33k D4 k 1N4150 a *D2a k C5 100n k *D3 a 0V 0V 15V 15V Fig.2. Circuit for a precision analogue isolation amplifier based on the HCNR200. (Courtesy Agilent.) 362 Everyday Practical Electronics, May 2002 It would be worth putting a variable voltage onto such an l.e.d. and observing the output. The Toshiba 4N29, for example, has an l.e.d. and a photo-Darlington transistor which means the transistor output (with load resistor from emitter to ground and collector to positive supply) will produce an output proportional to the l.e.d.’s drive current. Subsequently, Mr. Larner reverted with more details of an interesting device he had found after consulting Agilent (the optoelectronics offshoot of Hewlett Packard). The Agilent HCNR200 is a high linearity analogue opto-coupler containing a high efficiency l.e.d. that illuminates two closely matched photodiodes (see Fig.1). The “input side” photodiode (D1) can be used to stabilise the light output of the l.e.d. (D2), so that the non-linearity and drift of the l.e.d. can be eliminated. The Agilent HCNR200 claims 0·25% non-linearity and the higher spec. HCNR201 0·05% maximum non-linearity. You can download the data sheet from www.agilent.com. They are available from RS Components (rswww.com) e.g. the HCNR200 Part No. 801-465 is listed at £2.47, excluding VAT and P&P. Other linear opto-couplers are also available from RS including the IL300 which may be worth investigating. A practical example of a low cost analogue isolator is shown in Fig.1, while Fig.2 shows a suggested precision analogue isolation amplifier. Low noise and shielding techniques using BNC and triaxial connectors are also covered in TeachIn 2002 and may be helpful in applications like these. The Agilent data sheet contains more practical circuits and detailed theory. Thanks for letting us know! ARW. Dog and Cat Scarer An interesting circuit recently appeared in our readers’ circuits feature – Ingenuity Unlimited, March 2002 (p163). The Dog and Cat Scarer prompted a letter from reader Martin Stubbs who emails: A device such as the Dog and Cat Scarer would be extremely useful to us as we enjoy walking, particularly on holiday as last year we were harassed by dogs in Greece. I am intrigued to know how the two 555 timers used in the circuit work. I cannot determine how IC1 is set up as an oscillator or IC2 as a buffer amplifier. Perhaps Circuit Surgery could dedicate a few lines of explanation as to how it works. Referring back to the March I/U, first of all an unfortunate error crept into the circuit diagram: note that the connections to pin 2 and pin 3 of IC2 should be reversed. The circuit’s operation then makes a whole lot more sense! We also stated that it should NOT be relied upon as a defence against aggressive dogs. First, IC1 is configured as an oscillator using a method that is often overlooked by constructors. It utilises one feedback timing resistor between the output (pin 3) and the threshold (pin 6) and a capacitor to control the frequency. If the CMOS 7555 version is used, then the fact that it switches from rail-to-rail means that you can obtain a 50 per cent duty cycle (the main advantage of this type of circuit). The result is a square wave appearing at pin 3. Everyday Practical Electronics, May 2002 Turning to the H+V bridge arrangement, this uses four power TR1 TR2 transistors wired in (ON) (OFF) c c complementary b b IC2 opposing pairs. When EQUIVALENT e e IC1 output goes high, this turns on the npn IC1 PIN 3 TR3 TR4 transistor TR1, but the LS1 (OFF) (ON) e e pnp transistor TR3 b b does not conduct. The c output of IC1 also c triggers the monostable IC2 – the trig0V ger pin (2) needs to be taken low for the timer Fig.3. In an H-bridge driver, opposing pairs of complemento trigger. So, with IC1 output tary transistors drive the load as shown by the path (tint) high, IC2 trigger input taken by the current. (One phase of full circuit is shown.) is pulled high, so IC2 output remains low. This allows the pnp transistor TR4 to conduct because its base +9V is pulled low – so with the pair TR1 and R3 R1 TR4 conducting hard, current flows 100k 22k through the ultrasonic sound transducer 8 4 LS1 as shown in Fig.3. +V RST The designer mentioned a current flow of 7 2 TRIG DISCH 4 amps when using a bench power supply which I can well believe; the Power Siren IC1 555 3 6 shown in Circuit Surgery June 1997 uses a S1 OUT THR ZSD100 siren chip and an H-bridge driver GND R2 to produce an ear-splitting and highly effi1 220Ω cient loudspeaker siren. When IC1 output goes low then TR3 a + C1 conducts instead of TR1, and IC2 is now D1 10µ k triggered at pin 2. The monostable timer output goes high which supplies base cur0V rent to TR2. Current therefore passes through TR2, LS1 and TR3 to 0V. Fig.4. Circuit for testing the re-triggerThus, two opposing transistors are ability of a 555 monostable. Keep switched alternately in order to supply high switch S1 closed for several seconds currents through LS1. Exactly the same and observe the l.e.d. D1. principle is often used to control the direction and speed of powerful d.c. motors, and special driver chips are available for this. 25µS Buffered Solution You asked how IC2 works as a buffer amplifier. It is wired as a monostable (single shot timer) with a short period. Once triggered by IC1, the monostable will start timing and it will ignore any more trigger signals until it times out. However, if a trigger signal is present when the monostable tries to time out, then a 555 will carry on timing until the trigger is removed, when the output will go low at the same time. A quick 555 breadboard experiment will demonstrate this – build the monostable of Fig.4, briefly trigger it and watch the l.e.d. time out automatically after a second or two. Then keep it triggered for several seconds – the output will go low as soon as the trigger is removed. Taking a brief look at the timing of the circuit, in theory the on-time of IC2 is calculated approximately by 1·1 R2.C4 which is 11ms. If IC1 is said to run at 40kHz then by using frequency = 1/t the period (t) of its output is 25ms. These figures do not allow for component or formula tolerances and are only for illustration. Let’s think about this a bit more. If we assume the astable has a 50% duty cycle then it is high for (say) 12·5ms and low for 12·5ms, see Fig.5. Each negative-going edge triggers the monostable for 11ms, after which the monostable wants to time out but the trigger voltage is still there (with 1·5ms still to go): so the monostable IC1 OUTPUT 12.5µS 'LOW' TRIGGERS IC2 IC2 OUTPUT 11µS IC2 CONTINUES WITH HIGH OUTPUT DUE TO IC1 PROVIDING A TRIGGER SIGNAL Fig.5. The monostable IC2 will continue to give a High output for as long as its trigger pin is held low by IC1. IC2 can therefore be used as an inverter. carries on timing until the trigger is removed, when the monostable output will go low at the same time. After a further 12·5ms the monostable is triggered once again. These timing values may not be quite the same in practice, but you get the general idea. The overall result is that the monostable simply inverts the astable’s square wave. It provides base current to both transistors TR2 and TR4, because the bipolar 555 is able to sink up to 200mA current into its input and source current out when it’s high. You could perhaps “force” the inverter operation more by ensuring the monostable period is even shorter still. Overall, it’s quite a cunning design and I look forward to constructing one myself. My thanks to Dave Stringwell in Scunthorpe for submitting the design. ARW. 363 ELECTRONICS CD-ROMS ELECTRONICS PROJECTS Electronic Projects is split into two main sections: Building Electronic Projects contains comprehensive information about the components, tools and techniques used in developing projects from initial concept through to final circuit board production. Extensive use is made of video presentations showing soldering and construction techniques. The second section contains a set of ten projects for students to build, ranging from simple sensor circuits through to power amplifiers. A shareware version of Matrix’s CADPACK schematic capture, circuit simulation and p.c.b. design software is included. The projects on the CD-ROM are: Logic Probe; Light, Heat and Moisture Sensor; NE555 Timer; Egg Timer; Dice Machine; Bike Alarm; Stereo Mixer; Power Amplifier; Sound Activated Switch; Reaction Tester. Full parts lists, schematics and p.c.b. layouts are included on the CD-ROM. Logic Probe testing ANALOGUE ELECTRONICS Complimentary output stage N2 ERSIO NEW V Analogue Electronics is a complete learning resource for this most difficult branch of electronics. The CD-ROM includes a host of virtual laboratories, animations, diagrams, photographs and text as well as a SPICE electronic circuit simulator with over 50 pre-designed circuits. Sections on the CD-ROM include: Fundamentals – Analogue Signals (5 sections),Transistors (4 sections), Waveshaping Circuits (6 sections). Op.Amps – 17 sections covering everything from Symbols and Signal Connections to Differentiators. Amplifiers – Single Stage Amplifiers (8 sections), Multi-stage Amplifiers (3 sections). Filters – Passive Filters (10 sections), Phase Shifting Networks (4 sections), Active Filters (6 sections). Oscillators – 6 sections from Positive Feedback to Crystal Oscillators. Systems – 12 sections from Audio Pre-Amplifiers to 8-Bit ADC plus a gallery showing representative p.c.b. photos. DIGITAL ELECTRONICS V2.0 Virtual laboratory – Traffic Lights Digital Electronics builds on the knowledge of logic gates covered in Electronic Circuits & Components (opposite), and takes users through the subject of digital electronics up to the operation and architecture of microprocessors. The virtual laboratories allow users to operate many circuits on screen. Covers binary and hexadecimal numbering systems, ASCII, basic logic gates, monostable action and circuits, and bistables – including JK and D-type flipflops. Multiple gate circuits, equivalent logic functions and specialised logic functions. Introduces sequential logic including clocks and clock circuitry, counters, binary coded decimal and shift registers. A/D and D/A converters, traffic light controllers, memories and microprocessors – architecture, bus systems and their arithmetic logic units. Sections on Boolean Logic and Venn diagrams, displays and chip types have been expanded in Version 2 and new sections include shift registers, digital fault finding, programmable logic controllers, and microcontrollers and microprocessors. The Institutional versions now also include several types of assessment for supervisors, including worksheets, multiple choice tests, fault finding exercises and examination questions. ELECTRONICS CAD PACK PCB Layout Electronics CADPACK allows users to design complex circuit schematics, to view circuit animations using a unique SPICEbased simulation tool, and to design printed circuit boards. CADPACK is made up of three separate software modules. (These are restricted versions of the full Labcenter software.) ISIS Lite which provides full schematic drawing features including full control of drawing appearance, automatic wire routing, and over 6,000 parts. PROSPICE Lite (integrated into ISIS Lite) which uses unique animation to show the operation of any circuit with mouse-operated switches, pots. etc. The animation is compiled using a full mixed mode SPICE simulator. ARES Lite PCB layout software allows professional quality PCBs to be designed and includes advanced features such as 16-layer boards, SMT components, and an autorouter operating on user generated Net Lists. “C’’ FOR PICMICRO MICROCONTROLLERS FILTERS Filter synthesis Filters is a complete course in designing active and passive filters that makes use of highly interactive virtual laboratories and simulations to explain how filters are designed. It is split into five chapters: Revision which provides underpinning knowledge required for those who need to design filters. Filter Basics which is a course in terminology and filter characterization, important classes of filter, filter order, filter impedance and impedance matching, and effects of different filter types. Advanced Theory which covers the use of filter tables, mathematics behind filter design, and an explanation of the design of active filters. Passive Filter Design which includes an expert system and filter synthesis tool for the design of lowpass, high-pass, band-pass, and band-stop Bessel, Butterworth and Chebyshev ladder filters. Active Filter Design which includes an expert system and filter synthesis tool for the design of low-pass, high-pass, bandpass, and band-stop Bessel, Butterworth and Chebyshev op.amp filters. DIGITAL WORKS 3.0 Digital Works Version 3.0 is a graphical design tool that enables you to construct digital logic circuits and analyze their behaviour. It is so simple to use that it will take you less than 10 minutes to make your first digital design. It is so powerful that you will never outgrow its capability. )Software for simulating digital logic circuits. )Create your own Counter project macros – highly scalable. )Create your own circuits, components, and i.c.s. )Easy-to-use digital interface. )Animation brings circuits to life. ) Vast library of logic macros and 74 series i.c.s with data sheets. )Powerful tool for designing and learning. PRICES Prices for each of the CD-ROMs above are: C for PICmicro Microcontrollers is designed for students and professionals who need to learn how to use C to program embedded microcontrollers. This product contains a complete course in C that makes use of a virtual C PICmicro which allows students to see code execution step-by-step. Tutorials, exercises and practical projects are included to allow students to test their C programming capabilities. Also includes a complete Integrated Development Environment, a full C compiler, Arizona Microchip’s MPLAB assembler, and software that will program a PIC16F84 via the parallel printer port on your PC. (Can be used with the PICtutor hardware – see opposite.) Although the course focuses on the use of the PICmicro series of microcontrollers, this product will provide a relevant background in C programming for any microcontroller. Hobbyist/Student ...................................................£45 inc VAT Institutional (Schools/HE/FE/Industry)..............£99 plus VAT Institutional 10 user (Network Licence) ..........£199 plus VAT Site Licence........................................................£499 plus VAT (UK and EU customers add VAT at 17.5% to “plus VAT’’ prices) ELECTRONIC COMPONENTS PHOTOS Interested in programming PIC microcontrollers? Learn with PICtutor This highly acclaimed CD-ROM by John Becker, together with the PICtutor experimental and development board, will teach you how to use PIC microcontrollers with special emphasis on the PIC16x84 devices. The board will also act as a development test bed and programmer for future projects as your programming skills develop. This interactive presentation uses the specially developed Virtual PIC Simulator to show exactly what is happening as you run, or step through, a program. In this way the CD provides the easiest and best ever introduction to the subject. Nearly 40 Tutorials cover virtually every aspect of PIC programming in an easy to follow logical sequence. The Virtual PIC HARDWARE Whilst the CD-ROM can be used on its own, the physical demonstration provided by the PICtutor Development Kit, plus the ability to program and test your own PIC16x84s, really reinforces the lessons learned. The hardware will also be an invaluable development and programming tool for future work. Two levels of PICtutor hardware are available – Standard and Deluxe. The Standard unit comes with a battery holder, a reduced number of switches and no displays. This version will allow users to complete 25 of the 39 Tutorials. The Deluxe Development Kit is supplied with a plug-top power supply (the Export Version has a battery holder), all switches for both PIC ports plus l.c.d. and 4-digit 7-segment l.e.d. displays. It allows users to program and control all functions and both ports of the PIC. All hardware is supplied fully built and tested and includes a PIC16F84. PICtutor CD-ROM HARDWARE Hobbyist/Student . . . . . . . . . . . . . . . . . . . .£45 inc. VAT Institutional (Schools/HE/FE Industry) . . .£99 plus VAT Institutional 10 user (Network Licence) .£199 plus VAT Standard Development Kit . . . .£47 inc. VAT Deluxe Development Kit . . . . .£99 plus VAT Deluxe Export Version . . . . . .£96 plus VAT Deluxe PICtutor Hardware N2 VERSIO A high quality selection of over 200 JPG images of electronic components. This selection of high resolution photos can be used to enhance projects and presentations or to help with training and educational material. They are royalty free for use in commercial or personal printed projects, and can also be used royalty free in books, catalogues, magazine articles as well as worldwide web pages (subject to restrictions – see licence for full details). Also contains a FREE 30-day evaluation of Paint Shop Pro 6 – Paint Shop Pro image editing tips and on-line help included! Price £19.95 inc. VAT (UK and EU customers add VAT at 17.5% to “plus VAT’’ prices) ELECTRONIC CIRCUITS & COMPONENTS V2.0 ELECTRONICS IN CONTROL Two colourful animated courses for students on one CD-ROM. These cover Key Stage 3 and GCSE syllabuses. Key Stage 3: A pictorial look at the Electronics section featuring animations and video clips. Provides an ideal introduction or revision guide, including multi-choice questions with feedback. GCSE: Aimed at the Electronics in many Design & Technology courses, it covers many sections of GCSE Electronics. Provides an ideal revision guide with Homework Questions on each chapter. Worked answers with an access code are provided on a special website. Provides an introduction to the principles and application of the most common types of electronic components and shows how they are used to form complete circuits. The virtual laboratories, worked examples and pre-designed circuits allow students to learn, experiment and check their understanding. Version 2 has been considerably expanded in almost every area following a review of major syllabuses (GCSE, GNVQ, A level and HNC). It also contains both European and American circuit symbols. Sections include: Fundamentals: units & multiples, electricity, electric circuits, alternating circuits. Passive Circuit simulation screen Components: resistors, capacitors, inductors, transformers. Semiconductors: diodes, transistors, op.amps, logic gates. Passive Circuits. Active Circuits. The Parts Gallery will help students to recognise common electronic components and their corresponding symbols in circuit diagrams. Selections include: Components, Components Quiz, Symbols, Symbols Quiz, Circuit Technology. Included in the Institutional Versions are multiple choice questions, exam style questions, fault finding virtual laboratories and investigations/worksheets. Single User £29 inc. VAT. Multiple User £39 plus VAT Student copies (available only with a multiple user copy) £6 plus VAT (UK and EU customers add VAT at 17.5% to “plus VAT’’ prices) MODULAR CIRCUIT DESIGN VER SION Contains a range of tried and tested analogue and digital circuit 3 modules, together with the knowledge to use and interface them. Thus allowing anyone with a basic understanding of circuit symbols to design and build their own projects. Version 3 includes data and circuit modules for a range of popular PICs; includes PICAXE circuits, the system which enables a PIC to be programmed without a programmer, and without removing it from the circuit. Shows where to obtain free software downloads to enable BASIC programming. Essential information for anyone undertaking GCSE or “A’’ level electronics or technology and for hobbyists who want to get to grips with project design. Over seventy different Input, Processor and Output modules are illustrated and fully described, together with detailed information on construction, fault finding and components, including circuit symbols, pinouts, power supplies, decoupling etc. Hobbyist/Student . . . . . . . . . . . . . . . . . . . . . . . . . . . . . . . . . . . . .£45 inc VAT Institutional (Schools/HE/FE/Industry) . . . . . . . . . . . . . . . . . . .£99 plus VAT Institutional 10 user (Network Licence) . . . . . . . . . . . . . . . . .£199 plus VAT Institutional Site Licence . . . . . . . . . . . . . . . . . . . . . . . . . . . .£499 plus VAT Single User £19.95 inc. VAT. Multiple User £34 plus VAT (UK and EU customers add VAT at 17.5% to “plus VAT’’ prices) (UK and EU customers add VAT at 17.5% to “plus VAT’’ prices) Minimum system requirements for these CD-ROMs: Pentium PC, CD-ROM drive, 32MB RAM, 10MB hard disk space. Windows 95/98/NT/2000/ME/XP, mouse, sound card, web browser. CD-ROM ORDER FORM Please send me: Electronic Projects Analogue Electronics Digital Electronics V2.0 Filters Digital Works 3.0 Electronics CAD Pack C For PICmicro Microcontrollers PICtutor Electronic Circuits & Components V2.0 PICtutor Development Kit – Standard PICtutor Development Kit – Deluxe Electronic Components Photos Electronics In Control – Single User Electronics In Control – Multiple User Modular Circuit Design – Single User Modular Circuit Design – Multiple User B3 Version required: Hobbyist/Student Institutional Institutional 10 user Institutional site licence Deluxe Export Note: The software on each version is the same (unless stated otherwise), only the licence for use varies. Note: The CD-ROM is not included in the Development Kit prices. Note: The software on each version is the same, only the licence for use varies. Full name: . . . . . . . . . . . . . . . . . . . . . . . . . . . . . . . . . . . . . . . . . . . . . . . . . . . . . . . . . . . . . . . . . . . . . . Address: . . . . . . . . . . . . . . . . . . . . . . . . . . . . . . . . . . . . . . . . . . . . . . . . . . . . . . . . . . . . . . . . . . . . . . . . .............................................................................. . . . . . . . . . . . . . . . . . . . . . . . . . . . .Post code: . . . . . . . . . . . . . . . .Tel. No: . . . . . . . . . . . . . . . . . . . . Signature: . . . . . . . . . . . . . . . . . . . . . . . . . . . . . . . . . . . . . . . . . . . . . . . . . . . . . . . . . . . . . . . . . . . . . . . I enclose cheque/PO in £ sterling payable to WIMBORNE PUBLISHING LTD for £ . . . . . . . . . . . . . . Please charge my Visa/Mastercard/Amex/Diners Club/Switch: £ . . . . . . .Card expiry date: . . . . . . . Card No: . . . . . . . . . . . . . . . . . . . . . . . . . . . . . . . . . . . . . . . . . . . . . . . . . . . Switch Issue No. . . . . . . . ORDERING ALL PRICES INCLUDE UK POSTAGE Student/Single User/Standard Version price includes postage to most countries in the world EU residents outside the UK add £5 for airmail postage per order Institutional, Multiple User and Deluxe Versions – overseas readers add £5 to the basic price of each order for airmail postage (do not add VAT unless you live in an EU (European Union) country, then add 17½% VAT or provide your official VAT registration number). Send your order to: Direct Book Service Wimborne Publishing Ltd 408 Wimborne Road East Ferndown, Dorset BH22 9ND To order by phone ring 01202 873872. Fax: 01202 874562 Goods are normally sent within seven days E-mail: [email protected] Online shop: www.epemag.wimborne.co.uk/shopdoor.htm ee50b Radio Bygones The leading magazine for vintage radio enthusiasts NATIONAL MEET US AT THE VINTAGE COMS. FAIR N.E.C. BIRMINGHAM SUNDAY 5 MAY 02 10.30 a.m. to 4 p.m. WHETHER your interest is in domestic radio and TV or in amateur radio, in military, aeronautical or marine communications, in radar and radio navigation, in instruments, in broadcasting, in audio and recording, or in professional radio systems fixed or mobile, RADIO BYGONES is the magazine for you. ARTICLES on restoration and repair, history, circuit techniques, personalities, reminiscences and just plain nostalgia youll find them all. Plus features on museums and private collections and a full-colour photo-feature in every issue. ITS MOSTLY about valves, of course, but solid-state whether of the coherer and spark-gap variety or early transistors also has a place. FROM THE DAYS of Maxwell, Hertz, Lodge and Marconi to what was the state-of-the-art just a few short years ago . . . There is also a selection of free readers' For Sale and Wanted advertisements in every issue. Radio Bygones covers it all! THE MAGAZINE is published six times a year, and is available by postal subscription. It is not available at newsagents. TO TAKE OUT a subscription, or to request a sample copy, please complete the form below and return it to: RADIO BYGONES, Wimborne Publishing Ltd, 408 Wimborne Road East, Ferndown, Dorset BH22 9ND. Tel: 01202 873872. Fax 01202 874562. Web sites: www.radiobygones.co.uk www.radiobygones.com RADIO BYGONES ORDER FORM A SAMPLE COPY of Radio Bygones . . . . . . . . . . .£3.25 (Add 70p for overseas Airmail postage) SUBSCRIPTIONS (post paid): 1 YEAR 2 YEAR UNITED KINGDOM £18.50 £35.00 REST OF EUROPE (AIRMAIL) £20.50 £39.00 REST OF THE WORLD (AIRMAIL) £24.50 £47.00 o Yes, I would like a sample copy of RADIO BYGONES o Yes, I would like to take out a subscription for: o One year (6 issues) o Two years (12 issues) o I enclose a cheque/Eurocheque/PO for £ . . . . . . . . o payable to Wimborne Publishing Ltd Please debit my card My card number is: ............................................ Please print clearly, and check that you have the number correct Expiry date . . . . . . . . . . . . . .Switch Issue No. . . . . . . . My name is . . . . . . . . . . . . . . . . . . . . . . . . . . . . . . . . . . . My address . . . . . . . . . . . . . . . . . . . . . . . . . . . . . . . . . . . ............................................ Post Code/Zip . . . . . . . . . . . . . .Tel: . . . . . . . . . . . . . . . Signed .................................... If you do not wish to cut your magazine, send a letter or a copy of this form 366 Everyday Practical Electronics, May 2002 PIC Big Digit Display It is important that constructors keep to the specified semiconductor devices when putting together parts of the PIC Big Digit Display project. The L293DN 16-pin Half-H driver chip (also known as a stepper motor driver i.c.) was purchased from Rapid Electronics (P 01206 751166 or www.rapidelectronics.co.uk), code 82-0192. The “D’’ denotes it is a 16-pin device and has diode protection. Do not use other L293 device types as they may not have the same characteristics – for instance, the L293E has 20 pins and cannot be used. (Check out the Texas web site at: www.ti.com). Bulk purchasing has enabled Display Electronics (P 0208 653 3333 or www.distel.co.uk) to offer the “British Rail’’ giant 10 inch 7-segment electromechanical display at a very reasonable price; claimed to be less than 30 per cent of the original. A single display module (code RW44) cost just £29.95 plus VAT and £99 plus VAT for four units (code PH26). A carriage charge will need to be added to these prices – see their advertisement in this issue for details. The 7-stage Darlington line driver type ULN2004A was also purchased from Rapid (see above), code 82-0622. It is also listed by RS (P 01536 444079 or rswww.com), code 652-825. For those readers unable to program their own PICs, a ready-programmed PIC16F84 microcontroller can be purchased from Magenta Electronics (P 01283 565435 or www.magenta2000.co.uk) for the inclusive price of £5.90 each (overseas add £1 p&p). The software is available on a 3·5in. PC-compatible disk (EPE Disk 5) from the EPE Editorial Office for the sum of £3 each (UK), to cover admin costs (for overseas charges see page 379). It is also available Free from the EPE web site: ftp://ftp.epemag.wimborne.co.uk/pub/PICS/PICbigdigit. The printed circuit board is available from the EPE PCB Service, code 341 (see page 379). Finally, the optional 4x4 matrix data entry keypad came from RS (see earlier), code 331-304. Washing Ready Indicator Some readers may experience difficulty in tracking down the specified quad op.amp used in the Washing Ready Indicator project. We have found that the Harris Semiconductors CMOS ICL7642ECPD quad op.amp is stocked by RS (code 630-623) and can be ordered through any bona fide stockists, including some of our advertisers. You can order direct (credit card only) from RS on 01536 444079 or through the web at rswww.com. A post and handling charge will be made. The sub-miniature, omni-directional electret microphone insert used in the model was obtained from Maplin (P 01283 565435 or www.maplin.co.uk), code FS43W. You could possibly use their ultraminiature version, code QY62S. This has not been tried in the unit. The same company also supplied the 3V to 24V d.c. 10mA max. piezoelectric buzzer, code KU56L. Most of our components advertisers should be in a position to offer an identical buzzer. The small printed circuit board is available from the EPE PCB Service, code 342 (see page 379). Teach-In 2002 – Lab 7 Like most of the Lab Works in the Teach-In 2002 series, it’s the sensor elements that are usually “specials’’ and cause most purchasing problems. However, this is not the case with the first simple comparator demonstration circuits, Lab 7.1, where the light-dependent resistor (l.d.r.) type ORP12 is needed. This is widely stocked and advertisers such as ESR, Bardwell, Bowood, Cricklewood and Sherwood Electronics should be able to supply. For the Anemometer (Wind Speed/Force) – Lab 7.2 and the Wind Direction Indicator – Lab 7.3, the miniature reflective opto-switch type SG2BC was ordered from Farnell (P 0113 263 6311 or www.farnell.com) code 491-366. They also supplied the TLC7524 8-bit DAC chip, code 397-246. It may be well worth investigating the possibility of using the “wind cup’’ hardware stocked by Magenta Electronics (P 01283 565435 or www.magenta2000.co.uk). Freezer Alarm The circuit for the Freezer Alarm project uses the “baby’’ of the PIC family, the “one-time-programmable’’ PIC12C508 microcontroller. The rest of the components should be readily available. For those readers unable to program this type of PIC, a ready-programmed PIC12C508 microcontroller can be purchased from Magenta Electronics (P 01283 565435 or www.magenta2000.co.uk) for the inclusive price of £5.90 each (overseas add £1 p&p). The software is available on a 3·5in. disk (EPE Disk 5) from the EPE Editorial Office for the sum of £3 each (UK), to cover admin costs (for overseas charges see page 379). It is also available Free from the EPE web site: ftp://ftp.epemag.wimborne.co.uk/pub/PICS/PICfreezer. Simple Audio Circuits – 1 We do not expect any component buying problems to be encountered when shopping for parts for the various amplifier modules called-up in this month’s Simple Audio Circuits projects. All the audio amp i.c.s should be “shelf’’ items. All the small printed circuit boards are available from the EPE PCB Service. See page 379 for individual ordering codes and prices. MAKE IT A GIFT EVERY MONTH – AND SAVE UP TO 68p AN ISSUE NEXT MONTH – DON’T MISS OUT o BIOPIC HEARTBEAT MONITOR o o WORLD LAMP o o SIMPLE AUDIO CIRCUITS–2 o MAKE SURE OF YOUR COPY NOW! Annual subscription rates: 6 Months: UK £15, Overseas £18 (standard air service), £27 (express airmail) 1 Year: UK £28.50, Overseas £34.50 (standard air service) £52 (express airmail) 2 Years: UK £52.00, Overseas £64.00 (standard air service) £99 (express airmail) To: Everyday Practical Electronics, Wimborne Publishing Ltd., 408 Wimborne Road East, Ferndown, Dorset BH22 9ND SUBSCRIPTION ORDER FORM I enclose payment of £ ............. (cheque/PO in £ sterling only), payable to Everyday Practical Electronics Tel: 01202 873872 Fax: 01202 874562 E-mail: [email protected] Order from our online shop at: www.epemag.wimborne.co.uk/shopdoor.htm Name .................................................................................................. My card number is: ....................................................................... Please print clearly, and check that you have the number correct Address ............................................................................................... Signature ......................................................................................... ............................................................................................................. Card Ex. Date ......................................... Switch Issue No. ............. Post code ......................... Tel. ........................................................... Subscriptions can only start with the next available issue. For back numbers see the Back Issues page. If you do not wish to cut your issue, send a letter or a copy of this form. Everyday Practical Electronics, May 2002 05/02 367 EPE Tutorial Series TEACH-IN 2002 Part Seven – More on Noise, plus Comparators and Digital Optical Sensing IAN BELL AND DAVE CHESMORE Making Sense of the Real World: Electronics to Measure the Environment many applications we use sensors to measure the quantity that they are sensitive to – temperature, humidity, strain etc. We may simply be interested in monitoring or recording this value (e.g. the temperature of a room) or we may be using it in a more complex way – for example, to control the environment of an enclosure. This may require sophisticated manipulation of the sensor data using a microcontroller or PC. In other cases we do not need to know the value measured by the sensor, but simply have to switch an output when the level crosses a preset threshold (e.g. to switch on lights at night). I N COMPARABLE Such applications often require comparators which will form one of the topics of our discussion this month. The sensor/comparator combination provides a digital signal which has uses beyond that of the simple level-switching just mentioned, and provides a means of measuring quantities other than those directly detected by the sensor. The most common use of this approach is in motion sensing – e.g. position, direction and speed and the sensors most commonly used are optical sensors (hence the phrase Digital Optical Sensing in this part’s sub-title). Although magnetic sensors are also used in this way, digital optical sensing is our main sensor topic this month and we will be building wind speed and direction instruments. You may be thinking that digital sensing and use of comparators rather than accurate amplification and measurement of a sensor signal means that we can relax and forget about the nasty problems of noise and errors that we have discussed in the last few parts. Unfortunately this is not the case. NOISE RETURNS As we will see later, noise may cause a comparator to switch multiple times as a threshold is crossed. Furthermore, offsets and other errors may shift the threshold level. Last month we introduced the fact that there is noise that originates from within the components themselves. We now move 368 on to see that there is a variety of types of noise generated within electronic sensors and associated circuitry, these are thermal noise, shot noise, flicker noise, burst noise and avalanche noise. We will have a quick look at each of them in turn. THERMAL NOISE Thermal noise (also known as Johnson noise) is a fundamental property of resistors (including the internal resistances of sensors and semiconductor devices), which results in a white-noise voltage across its in-circuit terminals. This is a fundamental property of any resistor and therefore sets the lower limit of the noise from any sensor – whatever we do, we cannot get lower noise than the thermal noise. Thermal noise cannot be reduced by improved component manufacture. However, as it is temperature-dependent, reducing the temperature will reduce the noise. Cooling sensors to very low temperatures may be appropriate for some situations, such as physics experiments, but in most cases it would be too difficult and expensive to be justifiable. The thermal noise r.m.s. voltage across a resistor is given by: VN,rms = Ö4kTRDf Where: k is a physical constant known as Boltzmann’s Constant (1·38 × 10-23JK-1 (Joules per Kelvin)) T is the temperature in Kelvin (K) R is the resistance in ohms (W) Df is the bandwidth of interest in Hertz (Hz), i.e. the range of frequencies over which you are measuring the noise. Df is pronounced “delta f”, the delta symbol means “change in” and so Df represents a range of frequencies. The fact that a bandwidth has to be specified in order to get a noise voltage means that noise figures are often expressed in “volts per bandwidth unit” form, rather than simply as voltages (have a look on data sheets for i.c.s. such as op.amps and you will see noise figures expressed this way). This value is known as noise density. If we divide both sides of the first equation by the square root of the bandwidth (ÖDf) we get: VN,rms = Ö4kTR ÖDf The value Ö4kTR has units “volts per root Hertz”, often written as V/Hz1/2 or V/ÖHz. So, for example, the noise from a 100kW resistor at 20°C (293K) is: Ö4 × 1·38 × 10–23 × 293 × 100 × 103 = 40nV/Hz1/2. If we were interested in a bandwidth of say 20kHz, the thermal noise voltage from this resistor would be 40nV × Ö20 × 103 = 5·7mV. Statistical analysis of the properties of thermal noise shows that the instantaneous peak noise voltage will be less than five times the r.m.s. (average) value for 99 per cent of the time. The equation for thermal noise indicates that we can reduce noise voltage by reducing resistance (source or internal resistance in the case of a sensor) or by reducing bandwidth. Reducing source resistance may not be possible, as it will often be fixed for a particular sensor. However, effective reduction in bandwidth can be achieved by making many measurements and averaging, or measurement over a longer period of time. Why does making multiple measurements reduce effective Df ? If we make a measurement over a certain period of time those random variations which occur many times during this period will be averaged out. However, variations much longer than our period of making measurements will not “be seen” by our measurement process. Thus we have effectively removed some of the noise in the high frequency end of Df, reducing its range and hence reducing the noise. This approach is useful, but of course we pay for it by reduction in the speed with which we make our measurement. We also cannot extend our measurement period for longer than the time for which the quantity being measured will have a “constant” value, and as we increase measurement time other errors such as drift become more significant. Everyday Practical Electronics, May 2002 SHOT NOISE When current flows through a resistance it will generate additional white noise above the thermal noise due to the quantum nature of electric current at the atomic level. Electric current is the flow of discrete charge carriers (e.g. electrons), rather than a “continuous” flow. This noise is known as shot noise and like thermal noise is due to fundamental physics and cannot be reduced. For an applied current of I in amps (A) the shot noise is given by: IN,rms = Ö2eIDf Fig.7.1. Comparator input-output characteristics, (a) schematic, (b) ideal response, (c) realistic response. where e is the electronic charge (charge on one electron = 1·6 × 10–19C (Coulombs)) and Df is the bandwidth as before. For a current of 1mA this is 0·57pA/Hz1/2, which is about 80pA over a 20kHz bandwidth. 80pA noise on 1mA is a variation of 0·008%, which is an SNR (signal-to-noiseratio) of around 82dB. For very low currents the effect of shot noise becomes increasingly significant, limiting the accuracy of low-level measurements. Shot noise is an important source of noise in semiconductor devices such as diodes and transistors. which can lead to a popping sound (hence the name popcorn noise). Avalanche noise is produced by Zener diodes (or other diode junctions undergoing Zener or avalanche reverse breakdown). Avalanche noise is much larger than shot noise and so Zener diodes can introduce a lot of noise into a circuit. For this reason they should be avoided in low noise circuits even though they are a temptingly easy way to produce a stable voltage reference. YET MORE NOISE COMPARATORS In addition to thermal noise and shot noise, resistors and active devices produce yet more noise for various and often complex reasons. This noise is called flicker noise, also known as 1/f noise or pink noise, as it typically has a 1/f relationship with frequency (f) (as defined last month). Unlike thermal and shot noise, flicker noise in resistors (and other devices) depends on the component type and manufacture, and can even vary quite widely for components of same type. For a decade bandwidth (frequency range of 1 to 10 times) the flicker noise for typical resistors varies from tens of nanovolts to a few microvolts, depending on type and quality. Carbon composition resistors produce the highest flicker noise and wirewound resistors the lowest. As flicker noise is more prominent at lower frequencies, unlike white noise, its effect is not reduced by longer sampling times. Burst noise (also known as popcorn noise) occurs in transistors and results in pulses often in the audio frequency range, Earlier in the series we discussed how an op.amp that is used without negative feedback has very high gain. Thus, for all but a small range of input voltage differences, the output will be saturated (see Fig.7.1). These two voltages (e.g. –Vsat and +Vsat) may represent logic 0 and 1 and will indicate which of the two inputs is at the higher voltage. An op.amp used in this way is known as a comparator. One input of the comparator is usually connected to a fixed reference level (VREF in Fig.7.1, sometimes called the threshold) and the other input is connected to the signal of interest (e.g. from a sensor). A real op.amp may not switch when the input is at exactly VREF due to offsets. Furthermore, for a range of input voltages, the op.amp will be in normal “linear” mode and will output intermediate voltages (see Fig.7.1c). This range of inputs is very small, however, and the situation is much better using an op.amp than, say, a single transistor, as we will see in this month’s Lab Work. Fig.7.3. Comparator without hysteresis. Everyday Practical Electronics, May 2002 Fig.7.2. Response of an inverting regenerative comparator. The simplest use of a comparator with a sensor is to switch a load on or off when the sensor output goes above or below a particular level. For example, to produce an overor under-temperature alarm. A window comparator uses two comparators to indicate when a signal is between two levels. These circuits are often used to determine if a measured value is between acceptable limits. An ideal comparator would switch instantaneously when the input signals cross the comparison threshold. A real comparator takes a finite time before it reacts. This time is known as the propagation delay. An ideal comparator’s output voltage switches between its two possible output states instantaneously. Again, a real comparator takes a finite time. The rate of Fig.7.4. Comparator with hysteresis. 369 change of the comparator’s output voltage as it switches is known as its slew rate. Any op.amp may be used as a comparator, but the best performance is obtained by using devices that have been specifically designed as comparators. COMPARATOR HYSTERESIS A comparator with a single threshold value may switch states many times as a noisy, slowly changing input crosses the threshold. This is often undesirable, for example, if the number of threshold-crossings is to be counted. The problem may be overcome by using two thresholds, e.g. VTH and VTL. The difference between VTH and VTL is called the hysteresis. When the input increases past VTH the comparator switches, but it does not switch if the input decreases past VTH. The input must decrease past a lower threshold, VTL, before the comparator switches again. This is illustrated in Fig.7.2. If the input noise level is known, the hysteresis can be set slightly larger than this. The comparator will then not switch as a result of the noise. Fig.7.3 and Fig.7.4 show the result of applying the same noisy signal to a simple comparator and one with hysteresis. Fig.7.5. Inverting regenerative comparator circuit. An inverting version of the circuit is shown in Fig.7.5. A non-inverting version can also be made. The equations are slightly different, but the basic operation of the circuit is the same. OPTICAL MOTION SENSING Consider a rotating disc marked with black and white sections above which an optical sensor has been placed (see Fig.7.6). Assume that light is shining onto the disc so that when the sensor is above a white area we get a relatively large signal compared to when it is above a black area. REGENERATIVE COMPARATORS (b) Comparators with hysteresis are also known as regenerative comparators and Schmitt triggers. A comparator with hysteresis can be made using a single-threshold comparator by setting the threshold depending on the comparator’s present output state. The comparator has two output states so these can be used to set the two thresholds as required, by using positive feedback (hence the name regenerative). A regenerative comparator can be made using an op.amp as shown in Fig.7.5. The switching point, Vcomp depends on VREF and Vout. VREF will usually be fixed, but Vout depends on the current state of the comparator. One of two values can be taken by Vout, that is, ±VO (basically the op.amp positive and negative saturation voltages, which for simplicity we will assume to have the same magnitude). To follow the operation of the circuit start by assuming that Vin is less than vcomp so Vout = +VO. As Vin is slowly increased, this condition remains until Vin = Vcomp = VTH (upper threshold), where: R2 VTH = Vref + R1 + R2 R1 Vo R1 + R2 On switching at Vcomp = VTH the output changes to Vout = –VO. Changing the threshold to a new value, Vcomp = VTL (lower threshold), where: VTL = R2 R1 + R2 Vref – R1 R1 + R2 Vo Vout will now stay at –VO until the input falls below the new Vcomp value. The difference in the switching points, i.e. the hysteresis, VH, is: VH = VTH – VTL = 370 (a) 2R1 Vo R1 + R2 Fig.7.7. (a) Disc patterned with binary code, (b) arrangement of sensors. Fig.7.6. Optical sensing of motion. The grey bar represents the fixed sensor mounting and the black dot indicates the location of the sensor. The disc is free to rotate past the sensor. Assume that this signal is passed through a suitable comparator circuit so that a clean digital output signal is obtained, with 0 representing a black area and 1 a white area. As the disc rotates we will get an alternating 1 and 0, the frequency of this pulsed signal indicating the speed of rotation. We are not restricted to rotary motion with this technique – we can pattern a linear bar and measure movement in a similar way. We can also use holes in the disc, or bar, or other object rather than black and white areas to switch the level of light falling on the sensor as movement occurs. More sophisticated measurement of the disc’s movement can be achieved by using more complex patterns on the disk and multiple sensors. If we use several sensors and arrange the black and white areas appropriately, we can provide a binary coded output that indicates the location (angle of rotation) of the disc. Fig.7.7 provides an example of this using a 3-bit number, giving us an angular resolution of 45 degrees. segment to the next the bits which change may not do so at the same instant, leading to unwanted “intermediate” codes. The worse case in the Fig.7.7 example is the change from 000 to 111 or vice versa, where any 3-bit number (or even a sequence of two numbers) could appear as an intermediate code. The solution is to pattern the disc so that only one bit changes as we move from one segment to the next, as shown in Fig.7.8. This type of binary code is called a Gray code and a 3-bit Gray code is shown in Table 7.1. We can use a logic circuit to convert it to standard binary numbers as shown in Fig.7.9. Using code-patterned discs is useful where the disc position is simply an angle, but if the movement of the disc over multiple revolutions must be measured it is less useful. Furthermore if high resolution is required the printing of the disc becomes complex and difficult, and a potentially large number of sensors is required (one per bit). AVOIDING UNCERTAINTY This seems fine, but actually it is not a sensible way of patterning the disc. The problem is that, unless the sensors are perfectly aligned, as we move from one Fig.7.8. Gray coded disc. Everyday Practical Electronics, May 2002 Table 7.1. 3-bit Gray Code Output Codes A B 0 0 0 0 0 1 0 1 1 1 1 1 1 0 1 0 A = inner ring of Fig.7.8 B = middle ring of Fig.7.8 C = outer ring of Fig.7.8 C 0 1 1 0 0 1 1 0 An incremental encoder disc pattern and its sensor locations are shown in Fig.7.10. The quadrature signal is obtained from sensors A and B and the reference signal from sensor I. The spacing of the alternate black and white zones determines the resolution with which location can be measured. The separation distance between sensors A and B is half the length of the black and white sections. The waveforms obtained from the sensors are shown in Fig.7.11. Technologies (formerly Hewlett Packard). These chips also include simple digital filters to remove glitches from the input waveforms. Specialist motion control processors, such as the LM628 from National Semiconductor, also have built-in quadrature decoders and counters. OPTICAL ENCODING SENSORS As we have seen, it is possible to detect the rate and angle of rotation using specially designed discs and optical sensors. There are several techniques and a number of readily available sensors that we can use: * Photodiode (or phototransistor) and l.e.d.. As shown in Fig.7.12, the l.e.d. and photosensor are mounted on opposite sides of the encoding disc that has alternating transparent and opaque areas. The photosensor will detect light shining through the transparent area. Fig.7.9. Gray code to binary code converter. INCREMENTAL ENCODING An alternative approach, called an incremental encoder, uses two sensors that generate a quadrature signal – that is, two waveforms offset by a 90 degree phase shift. Movement is indicated by the output of either sensor switching and direction is indicated by the relative phase (plus or minus 90 degrees) of the signals. These signals can be used to control a counter to obtain a binary representation of position. As this approach, unlike the Gray code disc, does not directly indicate absolute location, a third sensor may be used to provide an index or reference point. Fig.7.11. Quadrature signals from the incremental encoder in Fig.7.10. We can build logic circuits to determine the direction of movement from the A and B signals in Fig.7.11. The simplest approach is to look at the level of (say) B when there is a positive edge on A (i.e. at the instant that it changes from low to high). Checking Fig.7.11 will show that a 0 indicates clockwise and a 1 indicates anticlockwise in this arrangement. We can check the direction at any of the edges of the two waveforms in this way. Each edge also represents a definite indication of movement and can therefore be used to increment or decrement a counter circuit depending on the direction. The binary value in the counter will then represent the relative movement of the disc since the counter was last set to a particular value (e.g. reset). RESPONSE TIME (a) (b) Fig.7.10. Incremental encoder for motion sensing (a) disc pattern, (b) sensor locations. Everyday Practical Electronics, May 2002 The logic design for an incremental encoder can be a little tricky due to the need to prevent races between the direction discrimination and the counting. It is further complicated by the need to distinguish between definite movement in a particular direction and vibration about a basically fixed point, which can continuously switch one of the sensors. The latter problem prevents us from using the simple solution of connecting (say) A to the clock of an up/down counter and B to the up/down control. The best approach is to sample the quadrature waveform using an external clock running at a faster rate than the fastest possible input signals and use a state machine to work out what is going on. The state machine then controls the position counter. A state machine is a sequential logic system whose outputs depend on the previous and present inputs (as in a counter, for instance) as opposed to processes that are functions of present inputs alone. Fortunately, incremental position sensor decoder i.c.s are available, for example the HCTL-200xx series from Agilent Fig.7.12. Sensing using a separate l.e.d. and photosensor. * Slotted optosensors. A slotted optosensor has a built-in phototransistor and l.e.d. mounted facing each other across a small gap, as indicated in Fig.7.13. Again a disc that has alternating transparent and opaque areas is used. The sensor is mounted at the edge of the disc so that the light beam is interrupted when the disc rotates. Another name given to this type of sensor is a photointerrupter. Fig.7.13. Slotted photosensor. * Reflective optosensors. These also have a built-in l.e.d. and phototransistor but which are mounted side by side on one side of the disc only, which does not need to be transparent. Light is reflected back to the phototransistor by a reflective surface placed close to the sensor as shown in 371 Fig.7.14. Reflective photosensor. Fig.7.15.(a) Schematic of slotted optosensor and (b) connections. Fig.7.14. We use this type of sensor in the Lab Work experiments this month. Another application of reflective optosensors is for proximity sensing, i.e. to sense when an object is close to the sensor. The schematic diagram of a typical reflective optosensor which consists of an infra-red (IR) l.e.d. and a phototransistor is shown in Fig.7.15a. The components are mounted in a plastic that is transparent to IR so as to reduce interference from ambient light (e.g. a.c. powered room lighting). This does not mean that they are totally immune to ambient light since there is quite a lot of IR around, especially in tungsten lamps, so precautions Table 7.2. Data for the SG-2BC Reflective must still be taken to Photointerrupter reduce ambient light as Parameter Value much as possible. L.E.D. Forward Voltage (I = 4mA) 1·2V (max) A typical circuit for Power Dissipation 75mW (max) operating an optosenPeak Wavelength 940nm sor is shown in 0·1mA Fig.7.15b, where the Phototransistor Collector Dark Current Light Current (diode current = 4mA) 100mA l.e.d. is forward biased Leakage Current 0·1mA via resistor R1, the 30ms Risetime (VCC = 2V, Ic = 100mA value of which depends RL = 1kW on the required current Falltime (as above) 30ms for the l.e.d. (typically Collector Current 20mA (max) 5mA to 20mA). The Collector-emitter Voltage 30V (max) phototransistor can be Emitter-collector Voltage 3V (max) used with its collector connected to the power * Cup anemometers. These are probably supply voltage and the emitter to ground via the most familiar and operate by the resistor R2, as shown. wind blowing three or sometimes four The value of R2 can be calculated from cups around on a spindle. In a variation datasheets – the relevant data for the reflecon the separate cups concept, the cups tive device we will be using this month is are replaced by an S-shaped arrangegiven in Table 7.2. ment. Cup anemometers suffer from In Lab Work, we illustrate the use of stalling at very low speed due to friction, optosensors, and describe a rotation sensor i.e. they will not start until a particular that uses one in a circuit for measuring minimum wind speed. wind speed. Before that, though, let’s discuss a few basics about wind sensing. * Hot-wire anemometers. If a wire is heated to a given temperature and air is WIND SPEED allowed to flow across the wire, some of MEASUREMENT the heat will be removed. Hot-wire The speed of the wind is measured in anemometers use this principle and can be distance per unit time, such as miles per extremely sensitive. They are, however, hour (mph), kilometres per hour (kph), quite fragile since the wire is very thin. metres per second (ms–1) or knots. Another, * Acoustic anemometers. The speed of subjective, measurement uses the Beaufort sound in air depends on the relative direcScale, a numbering system that goes from 0 tion of the sound in relation to the direcrepresenting calm, to 12 representing hurrition of the wind, and to a lesser degree on cane force. The scale actually goes to 17 temperature and barometric pressure. (126mph to 136mph) but such high wind speeds are extremely rare. It is possible to use ultrasonic pulses Table 7.3 gives the basic Beaufort Scale to measure changes in sound velocity and corresponding wind speeds in miles per and hence determine wind speed. These hours. It is often useful to be able to convert can be highly sensitive and have no between the other different wind speed units; moving parts, thus making them robust. this is given in Table 7.4. To use the table, It is also possible to have three or four choose the units, e.g. 30mph to change to sensors mounted at fixed angles to each kph, read the FROM-TO multiplication facother to obtain the wind’s direction. tor (1.609) and multiply – 30mph = 48·3kph. To convert back use the TO-FROM multipliOPTICALLY MONITORED er, e.g. 100kph = 360ms–1. ANEMOMETER There are many commercial wind speed Last month we designed a simple rotameters available (anemometers) which fall tion speed circuit using a magnetic sensor into three categories: and a pulse width-to-voltage converter. This suffers from two Table 7.3. Beaufort Scale for Wind Speed disadvantages: Beaufort Scale 0 1 2 3 4 5 6 7 8 9 10 11 12 Description calm light air slight breeze gentle breeze moderate breeze fresh breeze strong breeze near gale gale strong gale storm violent storm hurricane mph 1 1-3 4-7 8-12 13-18 19-24 25-31 32-38 39-46 47-54 55-63 64-72 73-82 Table 7.4. Conversion between Wind Speed Units Typical examples of slotted and reflective photosensors. 372 Unit 1 mph mph mph ms–1 ms–1 knots Unit 2 kph ms–1 knots knots kph kph From-To 1·609 0·447 0·869 1·944 3·6 1·852 To-From 0·621 2·237 1·151 0·514 0·278 0·54 * One pulse per revolution means that low speeds are difficult to measure as the voltage on the capacitor in the frequency-to-voltage converter will decay and the output will not be a linear function of rotation rate. * The frequency-tovoltage converter does not follow rapid changes in rotation rate. We can overcome these problems by increasing the number of pulses per revolution and using a different Everyday Practical Electronics, May 2002 Fig.7.17 (above). Timing diagram of anemometer circuit. Fig.7.16 (left). Block diagram of anemometer circuit. type of frequency-to-voltage converter employing a counter and a digital-to-analogue converter (DAC). To illustrate the theory (that we put into practice in Lab Work), we can use a reflective optosensor and the disc shown in Fig.7.10 to create eight pulses per revolution. These are counted over a defined interval by an 8-bit binary counter and the count is converted into a voltage using a DAC as indicated in the block diagram in Fig.7.16. We need to control the counter and DAC so that at the end of each timing period (e.g. one second) the value on the counter outputs is transferred to the DAC, after which the counter is reset ready for the next counting interval, as shown in Fig.7.17. A well-designed circuit can produce a stable voltage output as a linear function of shaft rotation speed which changes at regular intervals. However, we need to work out several values before the circuit can be finalised. These will depend on the intended output (e.g. ms–1, mph or kph), the design of the anemometer cups (number of cups, relative size, etc) and the relationship between output voltage and wind speed. In the Lab Work design, we produce an output voltage of 3·0V for a wind speed of 30ms–1. From comparative measurements using the 3-cup anemometer and a commercial device, the number of pulses per second (pps) obtained from the circuit is 30·3pps for a wind speed of 6ms–1, which gives 5·05pps per ms–1. At the maximum wind speed of 30ms–1 (67mph) we get 151·5pps. The output of the DAC is determined by: V × (D / N) where: V is the maximum voltage that the DAC can output (frequently, but not always, the same voltage as on the positive supply line) D is the digital input value, usually in binary form N is the number of input bits that the DAC has been designed to accept, typically having a decimal value range of 0 to 255 (8-bit), although DACs having other input ranges are available. Using an 8-bit DAC (as we do in Lab Work), to achieve an output voltage of 3·0V for 30ms–1, the input value required is D = 3 × 256 / 5 = 154, to the nearest integer. This means we need to count 154 pulses every interval to make the output read 3·0V at 30ms–1 which makes the interval very close to one second, precisely calculated as 1·016s. WIND SPEED CALCULATION Unfortunately, wind speed is not the easiest parameter to calibrate unless you possess a wind tunnel! The main reason for this is that the relationship between cup design and rotation speed with wind speed is not straightforward, so we cannot perform simple calculations. There are two main options for calibration: * Compare with a commercial anemometer. This is the way we determined the number of pulses per second in the Lab Work design. * Place the anemometer on a long pole and put it (vertically!) out of a car window and drive at a known speed. The anemometer needs to be away from the slip stream of the vehicle. This requires considerable care (remember you are not jousting. Ed)! WIND DIRECTION SENSING Measuring wind direction requires a binary or Gray coded disc and multiple sensors – the more bits in the code, the higher the resolution but the more complex the circuit. The main part of a wind direction sensor is a vane and counter weight (to ensure balance). The vane points into the wind and turns a coded disc. All one needs to do is ensure the code’s origin is aligned with North and the instrument can be calibrated in relation to the number of bits and the angular displacement that each represents. We discuss wind sensing in a practical sense in Labs 7.2 and 7.3. First, though, we experiment with comparators. TEACH-IN 2002 – Lab Work 7 DAVE CHESMORE Comparator and Optosensing Experiments, plus Anemometer Assembly Lab 7.1 Comparators N this Lab we examine the characteristics of comparators by building an op.amp version of the light switch in Part 2. Fig.7.18 shows the circuit diagram using an OP177 op.amp and a light dependent resistor (l.d.r.). Since we are using a single +5V supply rail (rather than a dual ±5V supply), we I Everyday Practical Electronics, May 2002 need to generate a reference voltage. This is achieved using Zener diode D1 to give a 2·7V reference. Resistor R2 provides sufficient current for the Zener diode to reach its Zener voltage. Build the circuit on your breadboard and connect the Picoscope to the op.amp’s output. You should be able to see the output change state when the light level changes sufficiently for the voltage at the op.amp’s non-inverting input (pin 3) to cross the reference threshold voltage at the inverting input (pin 2). Use the Picoscope on a small sampling interval and see if the output changes like that shown in Fig.7.19. This rapid changing of state at the switching point is obviously not a good thing! 373 COMPONENTS N.B. Some components are repeated between Lab Works Fig.7.18. Comparator circuit without hysteresis. R1 R2, R3 R4 LDR1 Semiconductors D1 IC1 BZY88C 2·7V Zener diode OP177 op.amp Lab 7.2 Resistors R1 R2 R3 R4 R5 R6, R7 All 0·25W 5% Fig.7.19. Typical noisy output from circuit in Fig.7.18. Now modify the circuit in Fig.7.18 to become that in Fig.7.20 and repeat the above experiments. The multiple switching should have disappeared (see Fig.7.21). You should also notice that the point at which the output changes state will be different when the light level increases to that when it decreases – this is due to the hysteresis now introduced by the inclusion of resistors R3 and R4. Fig.7.20. Comparator hysteresis. 0 50 100 200 250 circuit 300 400 with 450 Fig.7.21. Typical clean switching output from circuit in Fig.7.20. You can vary the amount of hysteresis by changing the values of these resistors as described in this month’s tutorial section. Try increasing R4 to 1MW and then R3 to 100kW and see the difference. You may be able to see the hysteresis better by replacing the l.d.r. with a 100kW variable resistor (potentiometer) which will allow you to vary the input voltage in a controlled way. 374 SHOP TALK page 39k 1k (2 off) 100k ORP12 light dependent resistor Resistors R1 to R4 0·25W 5% carbon film. Resistors Breadboard assembly for circuit in Fig.7.18. Lab 7.1 See Breadboard assembly for circuit in Fig.7.20. If you compare the results from this experiment with the transistor-based light switch in Part 2, then it is obvious that a well-designed comparator is much better. 560W 56k 390W 4k7 10k 39k (2 off) carbon film. Potentiometer VR1 22k preset, min. round Capacitors C1 C2, C3 47m tantalum 16V 10n ceramic (2 off) Semiconductors Lab 7.2 Anemometer using an Optical Sensor For this anemometer we use the incremental encoder disc in Fig.7.10 and a single reflective optosensor to measure wind speed in a similar manner to that used with the magnetic sensor design in last month’s Teach-In. The general principle of operation was illustrated in Fig.7.16, where a counter is used to accumulate pulses over a known period of time and then the count is converted into an analogue voltage using a digital-to-analogue converter (DAC). The complete circuit diagram of the anemometer is shown in Fig.7.22. The output of the photosensor (X1) is amplified by transistor TR1 and then input to an 8-bit binary counter formed using the two 4-bit counters, IC1a and IC1b. The counter increments on the positive-going edges received at IC1a’s clock input CPOA (pin 1). When IC1a rolls over from 15 to 0 (overflow), the negative-going output at OA3 (pin 6) triggers the second counter, IC1b, via its CP1B input (pin 10), causing it to increment. The eight outputs are connected to a TLC7524 8-bit DAC (IC2) connected to produce an output voltage at its pin 15 (REF). As discussed in the tutorial section, the output voltage is 5V × D / 256 where D is the digital input value (between 0 and 255). In the prototype, the photosensor used was a type SG-2BC, chosen for its small size. Other common reflective optosensors that could be used include the SY-CR102 and OPB706B. TIMING The circuit based around the four 2-input Schmitt NAND gates within IC3 performs all timing logic. TR1 IC1 IC2 IC3 BC548 or similar small signal npn transistor 4520 dual binary counter TLC7524 8-bit digital-toanalogue converter 4093 quad 2-input Schmitt NAND gate Miscellaneous X1 Resistors SG-2BC reflective photointerrupter (see text) Lab 7.3 R1 to R3 560W (3 off) R4 to R6 56k (3 off) R7 to R9 390W (3 off) R10 to R12 4k7 (3 off) R13 to R20 470W (8 off) All 0·25W 5% carbon film. Semiconductors D1 to D8 red l.e.d. (8 off) (see text) TR1 to TR3 BC548 or similar small signal npn transistor (3 off) IC1 74HC138 or 74LS138 3-to-8 line decode Miscellaneous Materials for wind cups and vane (see text). Approx. Cost Guidance Only £15 excl. hardware IC3a is configured as an oscillator with a period of one to three seconds, controllable by preset VR1 (a fixed resistor was used in the test model). Its output is passed to IC3b via a pulse-shaping C-R (capacitor-resistor) network formed by C2 and R6. This causes the output of IC3b to go low for a short period (about 5ms) when the input to C2 goes high – this is the Write signal for DAC IC2. Everyday Practical Electronics, May 2002 Ω Ω µ Fig.7.22. Circuit diagram for the anemometer. Prototype “homemade’’ anemometer assembly. Similarly, IC3c produces a short negative-going pulse, having a period set by C3 and R7, when the output of IC3b goes high. This is inverted by IC3d and produces the Reset pulse for the counters. ANEMOMETER MECHANICS The anemometer is constructed using three half ping-pong balls to make the cups (they can easily be cut using a hacksaw) connected to a central hub with short lengths of plastic as shown in Fig.7.23. Larger cups may be used if you require. One suggestion is to use plastic scoops available with washing powder. The basic rule for calculating how far the cups should be away from the hub is that the distance from the hub to the centre of the cup should be equal to the cup’s diameter. The hub is attached to a length of plastic or aluminium rod which passes through the barrel of an old felt pen. If the hub is made of plastic then it should ride on the pen with little friction. The pen is attached to a box which contains the disc and electronics. The bottom of the shaft should reach the base of the box and Everyday Practical Electronics, May 2002 Fig.7.23. Basic format for a suggested anemometer assembly (see text). 375 Ω Ω Ω Ω Mounting of the sensor in the prototype anemometer. a short length of pen tube is used to stop the shaft from moving sideways. The encoded disc is secured to the shaft at a position a couple of millimetres away from the top of the sensor. You should note that the design is very crude and many modifications can be made. For example, using a ball race as the top bearing to ensure that the friction is low and the shaft is secured (in our design, the cup assembly can simply be lifted off the rest). Ω Ω SENSOR DISK Since the sensor is a reflective type, we can use a black and white disc such as that in Fig.7.10. We suggest you get an enlarged photocopy of the disc and paste it onto a piece of stiff card. The sensor needs to be within a few millimetres of the surface of the disc. Build the circuit on breadboard (but with the sensor mounted on a small bit of stripboard) and set the oscillator period to about one second using VR1. Use the Picoscope to measure the period. Monitor the voltage at point A in Fig.7.22 and rotate the disc. The output should be similar to that in Fig.7.24. If it is not then try moving the sensor closer to the disc. Ω Ω Fig.7.26. Circuit diagram for the wind direction sensor. Fig.7.24. Example of output pulses at point A in Fig.7.22. Once you get a good series of pulses at point A, connect a voltmeter (or the Picoscope) to the output of the circuit. You should get a voltage which changes approximately once per second and which is proportional to the speed of rotation. Fig.7.25 Fig.7.25. Output of anemometer showing wind speed variation. 376 shows a typical output captured using the Picoscope (note that the “noise” is due to the limited resolution of the Picoscope ADC-40 and not the DAC). If the oscillator is set to 1·016s then 0.1V at the DAC’s output should be roughly equal to 1ms–1 (i.e. 3·0V equals 30ms–1). Accurate calibration is not easy, as discussed earlier in the theory section. Lab 7.3 Wind Direction Meter Measuring wind direction can be done using a binary or Gray coded disc and multiple sensors. In this Lab we show you how to build an instrument to indicate eight points on the compass – north, north-east, east, etc, so we need a 3-bit Gray coded disc. The circuit diagram is shown in Fig.7.26. The outputs of the sensors are amplified by transistors TR1 to TR3 and input to a 3-to8 line decoder, IC1. The decoder takes a 3bit binary input and sets the corresponding output low. For example, if the input is binary 000, output Y0 goes low; an input of binary 110 causes output Y6 to go low. Table 7.5. Relationship between Outputs and Compass Points for Lab 7.3 Output/L.E.D. Y0-D1 Y1-D2 Y2-D3 Y3-D4 Y4-D5 Y5-D6 Y6-D7 Y7-D8 Compass point South East West East North West South South West North East North The decoder has three enables, two active low and one active high. In this circuit they are set to permanently enable the device. Each output is connected to an l.e.d. to indicate whether or not it is low. Since the disc is Gray coded, the outputs Y0-Y7 do not correspond to successive points on the compass as they would if the disc were binary coded. Use Table 7.5 to connect the l.e.d.s in the correct order. Photocopy the disc in Fig.7.8. Mount the sensors in a similar manner to Lab 7.1. Everyday Practical Electronics, May 2002 Example of a reflective sensor, as used in the wind vane. Breadboard assembly for the display circuit in Fig.7.26. Individual l.e.d.s may be used in place of the bargraph display and discrete resistors in place of the resistor module. Above: Stripboard assembly mounting for the wind vane. Right: Fig.7.27. Basic format for a suggested wind vane assembly (see text). There are three points to note in this particular design: 1. The outputs from the sensors are inverted by the transistors so that the black areas correspond to a logic 1. This may not be correct if you use different sensors. 2. The disc in our design faced upwards when the sensor was completed thus making everything occur in the opposite way. If your disc faces down, swap west for east, north west for north east, and south west for south east in Table 7.5. 3. In our prototype we demonstrated the direction indicating principle using an l.e.d. bargraph, but if you choose to use individual l.e.d.s. instead, we suggest you arrange them in a circle. Most of the construction of the wind vane is the same as for the anemometer, but using the Gray coded disc instead. The vane itself is a horizontal length of aluminium or plastic rod to which is attached a vertical vane at one end and a counterbalance weight at the other. The photograph of a commercial vane should give you a good idea of the design. Having completed construction, the only thing left to do is use a compass to align north on the disc (centre of the black-blackblack area) to magnetic north. NEXT MONTH In Part 8 next month, we examine control-feedback closed-loop systems, filters, sensor actuator combinations, with reference to smoke and gas detectors. Example of a commercial wind vane. EPE BINDERS KEEP YOUR MAGAZINES SAFE – RING US NOW! This ring binder uses a special system to allow the issues to be easily removed and re-inserted without any damage. A nylon strip slips over each issue and this passes over the four rings in the binder, thus holding the magazine in place. The binders are finished in hard-wearing royal blue p.v.c. with the magazine logo in gold on the spine. They will keep your issues neat and tidy but allow you to remove them for use easily. The price is £5.95 plus £3.50 post and packing. If you order more than one binder add £1 postage for each binder after the initial £3.50 postage charge (overseas readers the postage is £6.00 each to everywhere except Australia and Papua New Guinea which costs £10.50 each). Send your payment in £’s sterling cheque or PO (Overseas readers send £ sterling bank draft, or cheque drawn on a UK bank or pay by card), to Everyday Practical Electronics, Wimborne Puublishing Ltd, 408 Wimborne Road East, Ferndown, Dorset BH22 9ND. Tel: 01202 873872. Fax: 01202 874562. E-mail: [email protected]. Web site: http://www.epemag.wimborne.co.uk Order on-line from www.epemag.wimborne.co.uk/shopdoor.htm We also accept card payments. Mastercard, Visa, Amex, Diners Club or Switch (minimum card order £5). Send your card number and card expiry date plus Switch Issue No. with your order. Everyday Practical Electronics, May 2002 377 VIDEOS ON ELECTRONICS A range of videos selected by EPE and designed to provide instruction on electronics theory. Each video gives a sound introduction and grounding in a specialised area of the subject. The tapes make learning both easier and more enjoyable than pure textbook or magazine study. They have proved particularly useful in schools, colleges, training departments and electronics clubs as well as to general hobbyists and those following distance learning courses etc BASICS VT201 to VT206 is a basic electronics course and is designed to be used as a complete series, if required. VT201 54 minutes. Part One; D.C. Circuits. This video is an absolute must for the beginner. Series circuits, parallel circuits, Ohms law, how to use the digital multimeter and Order Code VT201 much more. VT202 62 minutes. Part Two; A.C. Circuits. This is your next step in understanding the basics of electronics. You will learn about how coils, transformers, capacitors, etc are used in Order Code VT202 common circuits. VT203 57 minutes. Part Three; Semicon ductors. Gives you an exciting look into the world of semiconductors. With basic semiconductor theory. Plus 15 different semiconductor devices explained. Order Code VT203 VCR MAINTENANCE VT102 84 minutes: Introduction to VCR Repair. Warning, not for the beginner. Through the use of block diagrams this video will take you through the various circuits found in the NTSC VHS system. You will follow the signal from the input to the audio/video heads then from the heads back to the output. Order Code VT102 VT103 35 minutes: A step-by-step easy to follow procedure for professionally cleaning the tape path and replacing many of the belts in most VHS VCR's. The viewer will also become familiar with the various parts found in the tape path. Order Code VT103 DIGITAL Now for the digital series of six videos. This series is designed to provide a good ground ing in digital and computer technology. VT301 54 minutes. Digital One; Gates begins with the basics as you learn about seven of the most common gates which are used in almost every digital circuit, plus Binary Order Code VT301 notation. VT201 VT204 56 minutes. Part Four; Power Supplies. Guides you step-by-step through different sections of a power supply. Order Code VT204 VT205 57 minutes. Part Five; Amplifiers. Shows you how amplifiers work as you have never seen them before. Class A, class B, Order Code VT205 class C, op.amps. etc. VT206 54 minutes. Part Six; Oscillators. Oscillators are found in both linear and digital circuits. Gives a good basic background in Order Code VT206 oscillator circuits. £34.95 each inc. VAT & postage Order 8 or more get one extra FREE Order 16 get two extra FREE RADIO VT401 61 minutes. A.M. Radio Theory. The most complete video ever produced on a.m. radio. Begins with the basics of a.m. transmission and proceeds to the five major stages of a.m. reception. Learn how the signal is detected, converted and reproduced. Also covers the Motorola C-QUAM a.m. stereo Order Code VT401 system. VT402 58 minutes. F.M. Radio Part 1. F.M. basics including the functional blocks of a receiver. Plus r.f. amplifier, mixer oscillator, i.f. amplifier, limiter and f.m. decoder stages of a typical f.m. receiver. Order Code VT402 VT302 55 minutes. Digital Two; Flip Flops will further enhance your knowledge of digital basics. You will learn about Octal and Hexadecimal notation groups, flip-flops, Order Code VT302 counters, etc. VT303 54 minutes. Digital Three; Registers and Displays is your next step in obtaining a solid understanding of the basic circuits found in today’s digital designs. Gets into multiplexers, registers, display devices, etc. Order Code VT303 VT304 59 minutes. Digital Four; DAC and ADC shows you how the computer is able to communicate with the real world. You will learn about digital-to-analogue and analogue-to-digital converter circuits. Order Code VT304 VT305 56 minutes. Digital Five; Memory Devices introduces you to the technology used in many of today’s memory devices. You will learn all about ROM devices and then proceed into PROM, EPROM, EEPROM, SRAM, DRAM, and MBM devices. Order Code VT305 VT306 56 minutes. Digital Six; The CPU gives you a thorough understanding in the basics of the central processing unit and the input/output circuits used to make the system Order Code VT306 work. VT202 VT403 58 minutes. F.M. Radio Part 2. A continuation of f.m. technology from Part 1. Begins with the detector stage output, proceeds to the 19kHz amplifier, frequency doubler, stereo demultiplexer and audio amplifier stages. Also covers RDS digital data encoding Order Code VT403 and decoding. MISCELLANEOUS VT501 58 minutes. Fibre Optics. From the fundamentals of fibre optic technology through cable manufacture to connectors, transmitters and receivers. Order Code VT501 VT502 57 minutes. Laser Technology A basic introduction covering some of the common uses of laser devices, plus the operation of the Ruby Rod laser, HeNe laser, CO2 gas laser and semiconductor laser devices. Also covers the basics of CD and bar code scanning. Order Code VT502 ORDERING: Price includes postage to anywhere in the world. OVERSEAS ORDERS: We use the VAT portion of the price to pay for airmail postage and packing, wherever you live in the world. Just send £34.95 per tape. All payments in £ sterling only (send cheque or money order drawn on a UK bank). Make cheques payable to Direct Book Service. Visa, Mastercard, Amex, Diners Club and Switch orders accepted – please give card number, card expiry date and Switch Issue No. Orders are normally sent within seven days but please allow a maximum of 28 days, longer for overseas orders. Send your order to: Direct Book Service, Wimborne Publishing Ltd., 408 Wimborne Road East, Ferndown, Dorset BH22 9ND Tel: 01202 873872. Fax: 01202 874562. E-mail: [email protected] Online store: www.epemag.wimborne.co.uk/shopdoor.htm 378 VT305 Each video uses a mixture of animated current flow in circuits plus text, plus cartoon instruction etc., and a very full commentary to get the points across. The tapes are imported by us and originate from VCR Educational Products Co, an American supplier. We are the worldwide distributors of the PAL and SECAM versions of these tapes. (All videos are to the UK PAL standard on VHS tapes unless you specifically request SECAM versions.) Everyday Practical Electronics, May 2002 PCB SERVICE Printed circuit boards for most recent EPE constructional projects are available from the PCB Service, see list. These are fabricated in glass fibre, and are fully drilled and roller tinned. All prices include VAT and postage and packing. Add £1 per board for airmail outside of Europe. Remittances should be sent to The PCB Service, Everyday Practical Electronics, Wimborne Publishing Ltd., 408 Wimborne Road East, Ferndown, Dorset BH22 9ND. Tel: 01202 873872; Fax 01202 874562; E-mail: [email protected]. On-line Shop: www.epemag. wimborne.co.uk/shopdoor.htm. Cheques should be crossed and made payable to Everyday Practical Electronics (Payment in £ sterling only). NOTE: While 95% of our boards are held in stock and are dispatched within seven days of receipt of order, please allow a maximum of 28 days for delivery – overseas readers allow extra if ordered by surface mail. Back numbers or photostats of articles are available if required – see the Back Issues page for details. Please check price and availability in the latest issue. Boards can only be supplied on a payment with order basis. PROJECT TITLE Vibralarm NOV ’99 Demister One-Shot oGinormous Stopwatch – Part 1 oGinormous Stopwatch – Part 2 DEC ’99 Giant Display Serial Port Converter Loft Guard Scratch Blanker JAN ’00 Flashing Snowman (Multi-project PCB) oVideo Cleaner FEB ’00 Find It oTeach-In 2000 – Part 4 High Performance MAR ’00 Regenerative Receiver oEPE Icebreaker – PCB257, programmed PIC16F877 and floppy disc Parking Warning System oMicro-PICscope APR ’00 Garage Link – Transmitter Receiver Versatile Mic/Audio Preamplifier MAY ’00 PIR Light Checker oMulti-Channel Transmission System – Transmitter Receiver Interface oCanute Tide Predictor JUNE ’00 oPIC-Gen Frequency Generator/Counter JULY ’00 g-Meter oEPE Moodloop AUG ’00 Quiz Game Indicator Handy-Amp Active Ferrite Loop Aerial SEPT ’00 oRemote Control IR Decoder Software only oPIC Dual-Channel Virtual Scope OCT ’00 Handclap Switch NOV ’00 oPIC Pulsometer Software only Twinkling Star DEC ’00 Festive Fader Motorists’ Buzz-Box oPICtogram oPIC-Monitored Dual PSU–1 PSU Monitor Unit Static Field Detector (Multi-project PCB) Two-Way Intercom JAN ’01 UFO Detector and Event Recorder Magnetic Anomaly Detector Event Recorder Audio Alarm oUsing PICs and Keypads Software only Ice Alarm FEB ’01 oGraphics L.C.D. Display with PICs (Supp) Using the LM3914-6 L.E.D. Bargraph Drivers Multi-purpose Main p.c.b. Relay Control L.E.D. Display oPC Audio Power Meter Software only Doorbell Extender: Transmitter MAR ’01 Receiver Trans/Remote Rec./Relay EPE Snug-bug Heat Control for Pets APR ’01 Intruder Alarm Control Panel Main Board External Bell Unit Camcorder Mixer MAY ’01 oPIC Graphics L.C.D. Scope Hosepipe Controller JUNE ’01 Magfield Monitor (Sensor Board) Dummy PIR Detector oPIC16F87x Extended Memory Software only Stereo/Surround Sound Amplifier JULY ’01 Perpetual Projects Uniboard–1 Solar-Powered Power Supply & Voltage Reg. MSF Signal Repeater and Indicator Repeater Board Meter Board oPIC to Printer Interface Everyday Practical Electronics, May 2002 Order Code Cost 230 245 246 £6.93 £6.78 £7.82 247 248 249 250 932 251 252 253 254, 255 256 £7.85 £3.96 £4.44 £4.83 £3.00 £5.63 £4.20 £4.52 £5.49 Set } Set only £22.99 258 £5.08 259 £4.99 261 262 Set £5.87 } 260 263 264 265 Set 266 267 268 269 271 272 273 274 – 275 270 – 276 277 278 279 280 281 932 282 } 283 284 285 – 287 288 } 289 290 291 – 292 293 294 295 296 } Set Set £3.33 £3.17 £6.34 £3.05 £5.07 £4.36 £5.47 £4.52 £4.52 £4.67 – £5.15 £3.96 – £4.28 £5.71 £5.39 £4.91 £4.75 £5.23 £3.00 £4.76 PROJECT TITLE Lead/Acid Battery Charger AUG ’01 Shortwave Loop Aerial oDigitimer – Main Board – R.F. Board Perpetual Projects Uniboard–2 L.E.D. Flasher –– Double Door-Buzzer Perpetual Projects Uniboard–3 SEPT ’01 Loop Burglar Alarm, Touch-Switch Door-Light and Solar-Powered Rain Alarm L.E.D. Super Torches – Red Main – Display Red – White L.E.D. oSync Clock Driver oWater Monitor Camcorder Power Supply OCT ’01 PIC Toolkit Mk3 Perpetual Projects Uniboard–4. Gate Sentinel, Solarpowered Bird Scarer and Solar-Powered Register Teach-In 2002 Power Supply NOV ’01 Lights Needed Alert Pitch Switch Capacitance Meter – Main Board (double-sided) – Display Board (double-sided) ooPIC Toolkit TK3 – Software only 4-Channel Twinkling Lights DEC ’01 Ghost Buster – Mic – Main oPIC Polywhatsit – Digital – Analogue Forever Flasher JAN ’02 Time Delay Touch Switch oPIC Magick Musick Versatile Bench Power Supply oPIC Spectrum Analyser FEB ’02 Versatile Current Monitor Guitar Practice Amp oPIC Virus Zapper MAR ’02 RH Meter oPIC Mini-Enigma – Software only oProgramming PIC Interrupts – Software only oPIC Controlled Intruder Alarm APR ’02 oPIC Big Digit Display MAY ’02 Washing Ready Indicator Audio Circuits–1 – LM386N-1 – TDA7052 – TBA820M – LM380N – TDA2003 – Twin TDA2003 Order Code 309 310 311 312 Cost £4.99 £5.07 £6.50 £4.36 305 305 £3.00 £3.00 313 314 315 316 317 318 319 305 320 321 322 323 324 – 325 326 327 328 329 330 331 332 333 334 335 336 337 338 – – 339 341 342 343 344 345 346 347 348 } Set £6.10 £4.28 £5.94 £4.91 £5.94 £8.24 £3.00 £4.28 £5.39 £5.87 } Set £12.00 – £6.82 } Set £5.78 } Set £7.61 £4.44 £4.60 £5.87 £5.71 £7.13 £4.75 £5.39 £4.75 £4.28 – – £6.50 £6.02 £4.75 £4.28 £4.12 £4.44 £4.44 £4.60 £4.75 EPE SOFTWARE Software programs for EPE projects marked with a single asterisk ( are available on 3.5 inch PC-compatible disks or free from our Internet site. The following disks are available: PIC Tutorial (Mar-May ’98); PIC Toolkit Mk2 V2·4d (May-Jun ’99); EPE Disk 1 (Apr ’95-Dec ’98); EPE Disk 2 (1999); EPE Disk 3 (2000); EPE Disk 4 (2001); EPE Disk 5 (Jan 2002 issue to current cover date); EPE Teach-In 2000; EPE Spectrum; EPE Interface Disk 1 (October ’00 issue to current cover date). ooPIC Toolkit TK3 software (Nov ’01) is on CD-ROM. The 3·5 inch disks are £3.00 each (UK), the CD-ROM is £6.95 (UK). Add 50p each for overseas surface mail, and £1 each for airmail. All are available from the EPE PCB Service. All files can be downloaded free from our Internet FTP site: ftp://ftp.epemag.wimborne.co.uk. EPE PRINTED CIRCUIT BOARD SERVICE Order Code Project Quantity Price ..................................................................................... £6.19 Name ........................................................................... – £4.60 £5.23 Address ....................................................................... £7.14 – £4.20 £4.60 £4.28 £4.92 £6.50 297 298 299 300 301 302 303 – 304 305 £6.97 £4.76 £6.34 £5.07 £5.14 £4.91 £4.36 – £4.75 £3.00 306 307 308 £4.75 £4.44 £5.39 .............................................................................. Tel. No. ......................................................................... I enclose payment of £................ (cheque/PO in £ sterling only) to: Everyday Practical Electronics MasterCard, Amex, Diners Club, Visa or Switch Card No. ................................................................................ Card Exp. Date................................ Switch Issue No............ Signature............................................................................... NOTE: You can also order p.c.b.s by phone, Fax, E-mail or via our Internet site on a secure server: http://www.epemag.wimborne.co.uk/shopdoor.htm 379 DIRECT BOOK SERVICE EPE TEACH-IN 2000 CD-ROM The whole of the 12-part Teach-In 2000 series by John Becker (published in EPE Nov ’99 to Oct 2000) is now available on CD-ROM. Plus the Teach-In 2000 interactive software covering all aspects of the series and Alan Winstanley’s Basic Soldering Guide (including illustrations and Desoldering). Teach-In 2000 covers all the basic principles of electronics from Ohm’s Law to Displays, including Op.Amps, Logic Gates etc. Each part has its own section on the interactive software where you can also change component values in the various on-screen demonstration circuits. The series gives a hands-on approach to electronics with numerous breadboard circuits to try out, plus a simple computer interface which allows a PC to be used as a basic oscilloscope. ONLY £12.45 including VAT and p&p Order code Teach-In CD-ROM project construction PRACTICAL REMOTE CONTROL PROJECTS Owen Bishop Provides a wealth of circuits and circuit modules for use in remote control systems of all kinds; ultrasonic, infrared, optical fibre, cable and radio. There are instructions for building fourteen novel and practical remote control projects. But this is not all, as each of these projects provides a model for building dozens of other related circuits by simply modifying parts of the design slightly to suit your own requirements. This book tells you how. Also included are techniques for connecting a PC to a remote control system, the use of a microcontroller in remote control, as exemplified by the BASIC Stamp, and the application of ready-made type-approved 418MHz radio transmitter and receiver modules to remote control systems. 160 pages Order code BP413 The books listed have been selected by Everyday Practical Electronics editorial staff as being of special interest to everyone involved in electronics and computing. They are supplied by mail order direct to your door. Full ordering details are given on the last book page. FOR A FURTHER SELECTION OF BOOKS SEE THE NEXT TWO ISSUES OF EPE. All prices include UK postage range of electronic components, such as resistors, capacitors, operational amplifiers, diodes, transistors, SCRs and triacs, with the aid of only a limited amount of test equipment. The construction and use of a Tristate Continuity Tester, a Signal Tracer, a Logic Probe and a CMOS Tester are also included. 136 pages Order code BP391 £5.49 TEST EQUIPMENT CONSTRUCTION R. A. Penfold This book describes in detail how to construct some simple and inexpensive but extremely useful, pieces of test equipment. Stripboard layouts are provided for all designs, together with wiring diagrams where appropriate, plus notes on construction and use. The following designs are included:AF Generator, Capacitance Meter, Test Bench Amplifier, AF Frequency Meter, Audio Mullivoltmeter, Analogue Probe, High Resistance Voltmeter, CMOS Probe, Transistor Tester, TTL Probe.The designs are suitable for both newcomers and more experienced hobbyists. 104 pages Order code BP248 £4.49 Audio and Music £6.49 PRACTICAL ELECTRONIC MODEL RAILWAY PROJECTS R. A. Penfold The aim of this book is to provide the model railway enthusiast with a number of useful but reasonably simple projects that are easily constructed from readily available components. Stripboard layouts and wiring diagrams are provided for each project. The projects covered include: constant voltage controller; pulsed controller; pushbutton pulsed controller; pulsed controller with simulated inertia, momentum and braking; automatic signals; steam whistle sound effect; two-tone horn sound effect; automatic two-tone horn effect; automatic chuffer. The final chapter covers the increasingly popular subject of using a computer to control a model railway layout, including circuits for computer-based controllers and signalling systems. VALVE & TRANSISTOR AUDIO AMPLIFIERS John Linsley Hood This is John Linsley Hood’s greatest work yet, describing the milestones that have marked the development of audio amplifiers since the earliest days to the latest systems. Including classic amps with valves at their heart and exciting new designs using the latest components, this book is the complete world guide to audio amp design. Contents: Active components; Valves or vacuum tubes; Solid-state devices; Passive components; Inductors and transformers; Capacitors, Resistors, Switches and electrical contacts; Voltage amplifier stages using valves; Valve audio amplifier layouts; Negative feedback; Valve operated power amplifiers; Solid state voltage amplifiers; Early solid-state audio amplifiers; Contemporary power amplifier designs; Preamplifiers; Power supplies (PSUs); Index. 151 pages 250 pages Order code BP384 £5.49 A PRACTICAL INTRODUCTION TO SURFACE MOUNT DEVICES Bill Mooney This book takes you from the simplest possible starting point to a high level of competence in handworking with surface mount devices (SMD’s). The wider subject of SM technology is also introduced, so giving a feeling for its depth and fascination. Subjects such as p.c.b. design, chip control, soldering techniques and specialist tools for SM are fully explained and developed as the book progresses. Some useful constructional projects are also included. Whilst the book is mainly intended as an introduction it is also an invaluable reference book, and the browser should find it engrossing. 120 pages Order code BP411 £5.49 FAULT-FINDING ELECTRONIC PROJECTS R. A. Penfold Starting with mechanical faults such as dry joints, short-circuits etc, coverage includes linear circuits, using a meter to make voltage checks, signal tracing techniques and fault finding on logic circuits. The final chapter covers ways of testing a wide 380 Order code NE24 £21.99 AUDIO AMPLIFIER PROJECTS R. A. Penfold A wide range of useful audio amplifier projects, each project features a circuit diagram, an explanation of the circuit operation and a stripboard layout diagram. All constructional details are provided along with a shopping list of components, and none of the designs requires the use of any test equipment in order to set up properly. All the projects are designed for straightforward assembly on simple circuit boards. Circuits include: High impedance mic preamp, Low impedance mic preamp, Crystal mic preamp, Guitar and GP preamplifier, Scratch and rumble filter, RIAA preamplifier, Tape preamplifier, Audio limiter, Bass and treble tone controls, Loudness filter, Loudness control, Simple graphic equaliser, Basic audio mixer, Small (300mW) audio power amp, 6 watt audio power amp, 20/32 watt power amp and power supply, Dynamic noise limiter. A must for audio enthusiasts with more sense than money! 116 pages Order code PC113 £10.95 radio / tv video ELECTRONIC PROJECTS FOR VIDEO ENTHUSIASTS R. A. Penfold This book provides a number of practical designs for video accessories that will help you get the best results from your camcorder and VCR. All the projects use inexpensive components that are readily available, and they are easy to construct. Full construction details are provided, including stripboard layouts and wiring diagrams. Where appropriate, simple setting up procedures are described in detail; no test equipment is needed. The projects covered in this book include: Four channel audio mixer, Four channel stereo mixer, Dynamic noise limiter (DNL), Automatic audio fader, Video faders, Video wipers, Video crispener, Mains power supply unit. 109 pages Order code BP356 £5.45 SETTING UP AN AMATEUR RADIO STATION I. D. Poole The aim of this book is to give guidance on the decisions which have to be made when setting up any amateur radio or short wave listening station. Often the experience which is needed is learned by one’s mistakes, however, this can be expensive. To help overcome this, guidance is given on many aspects of setting up and running an efficient station. It then proceeds to the steps that need to be taken in gaining a full transmitting licence. Topics covered include: The equipment that is needed; Setting up the shack; Which aerials to use; Methods of construction; Preparing for the licence. An essential addition to the library of all those taking their first steps in amateur radio. 86 pages Order code BP300 £4.45 EXPERIMENTAL ANTENNA TOPICS H. C. Wright Although nearly a century has passed since Marconi’s first demonstration or radio communication, there is still research and experiment to be carried out in the field of antenna design and behaviour. The aim of the experimenter will be to make a measurement or confirm a principle, and this can be done with relatively fragile, short-life apparatus. Because of this, devices described in this book make liberal use of cardboard, cooking foil, plastic bottles, cat food tins, etc. These materials are, in general, cheap to obtain and easily worked with simple tools, encouraging the trial-and-error philosophy which leads to innovation and discovery. Although primarily a practical book with text closely supported by diagrams, some formulae which can be used by straightforward substitution and some simple graphs have also been included. 72 pages Order code BP278 £4.00 25 SIMPLE INDOOR AND WINDOW AERIALS E. M. Noll Many people live in flats and apartments or other types of accommodation where outdoor aerials are prohibited, or a lack of garden space etc. prevents aerials from being erected.This does not mean you have to forgo shortwave-listening, for even a 20-foot length of wire stretched out along the skirting board of a room can produce acceptable results. However, with some additional effort and experimentation one may well be able to improve performance further. This concise book tells the story, and shows the reader how to construct and use 25 indoor and window aerials that the author has proven to be sure performers. Much information is also given on shortwave bands, aerial directivity, time zones, dimensions etc. 50 pages Order code BP136 £2.25 Everyday Practical Electronics, May 2002 circuits and design AN INTRODUCTION TO PIC MICROCONTROLLERS Robert Penfold Designing your own PIC based projects may seem a daunting task, but it is really not too difficult providing you have some previous experience of electronics. The PIC processors have plenty of useful features, but they are still reasonably simple and straightforward to use. This book should contain everything you need to know. Topics covered include: the PIC register set; numbering systems; bitwise operations and rotation; the PIC instruction set; using interrupts; using the analogue to digital converter; clock circuits; using the real time clock counter (RTCC); using subroutines; driving seven segment displays. 166 pages Order code BP394 £6.49 PRACTICAL OSCILLATOR CIRCUITS A. Flind Extensive coverage is given to circuits using capacitors and resistors to control frequency. Designs using CMOS, timer i.c.s and op.amps are all described in detail, with a special chapter on ``waveform generator’’ i.c.s. Reliable “white’’ and “pink’’ noise generator circuits are also included. Various circuits using inductors and capacitors are covered, with emphasis on stable low frequency generation. Some of these are amazingly simple, but are still very useful signal sources. Crystal oscillators have their own chapter. Many of the circuits shown are readily available special i.c.s for simplicity and reliability, and offer several output frequencies. Finally, complete constructional details are given for an audio sinewave generator. 133 pages Order code BP393 £5.49 PRACTICAL ELECTRONIC CONTROL PROJECTS Owen Bishop Explains electronic control theory in simple, non-mathematical terms and is illustrated by 30 practical designs suitable for the student or hobbyist to build. Shows how to use sensors as input to the control system, and how to provide output to lamps, heaters, solenoids, relays and motors. Computer based control is explained by practical examples that can be run on a PC. For stand-alone systems, the projects use microcontrollers, such as the inexpensive and easy-to-use Stamp BASIC microcontroller. 198 pages Temporarily out of print PRACTICAL ELECTRONICS HANDBOOK – Fifth Edition. Ian Sinclair Contains all of the everyday information that anyone working in electronics will need. It provides a practical and comprehensive collection of circuits, rules of thumb and design data for professional engineers, students and enthusaists, and therefore enough background to allow the understanding and development of a range of basic circuits. Contents: Passive components, Active discrete components, Circuits, Linear I.C.s, Energy conversion components, Digital I.C.s, Microprocessors and microprocessor systems, Transferring digital data, Digital-analogue conversions, Computer aids in electronics, Hardware components and practical work, Microcontrollers and PLCs, Digital broadcasting, Electronic security. 440 pages Order code NE21 £16.99 COIL DESIGN AND CONSTRUCTIONAL MANUAL B. B. Babani A complete book for the home constructor on “how to make’’ RF, IF, audio and power coils, chokes and transformers. Practically every possible type is discussed and calculations necessary are given and explained in detail. Although this book is now twenty years old, with the exception of toroids and pulse transformers little has changed in coil design since it was written. 96 pages Order code 160 OPERATIONAL AMPLIFIER USER’S HANDBOOK R. A. Penfold The first part of this book covers standard operational amplifer based “building blocks’’ (integrator, precision rectifier, function generator, amplifiers, etc), and considers the ways in which modern devices can be used to give superior performance in each one. The second part describes a number of practical circuits that exploit modern operational amplifiers, such as high slew-rate, ultra low noise, and low input offset devices. The projects include: Low noise tape preamplifier, low noise RIAA preamplifier, audio power amplifiers, d.c. power controllers, opto-isolator audio link, audio millivolt meter, temperature monitor, low distortion audio signal generator, simple video fader, and many more. 120 pages Order code BP335 £5.45 £4.49 OPTOELECTRONICS CIRCUITS MANUAL R. M. Marston A useful single-volume guide to the optoelectronics device user, specifically aimed at the practical design engineer, technician, and the experimenter, as well as the electronics student and amateur. It deals with the subject in an easy-to-read, down-to-earth, and nonmathematical yet comprehensive manner, explaining the basic principles and characteristics of the best known devices, and presenting the reader with many practical applications and over 200 circuits. Most of the i.c.s and other devices used are inexpensive and readily available types, with universally recognised type numbers. A BEGINNERS GUIDE TO CMOS DIGITAL ICs R. A. Penfold Getting started with logic circuits can be difficult, since many of the fundamental concepts of digital design tend to seem rather abstract, and remote from obviously useful applications. This book covers the basic theory of digital electronics and the use of CMOS integrated circuits, but does not lose sight of the fact that digital electronics has numerous “real world’’ applications. The topics covered in this book include: the basic concepts of logic circuits; the functions of gates, inverters and other logic “building blocks’’; CMOS logic i.c. characteristics, and their advantages in practical circuit design; oscillators and monostables (timers); flip/flops, binary dividers and binary counters; decade counters and display drivers. 182 pages 119 pages Order code NE14 £15.99 £5.45 audio and music INTRODUCTION TO DIGITAL AUDIO (Second Edition) Ian Sinclair The compact disc (CD) was the first device to bring digital audio methods into the home. This development has involved methods and circuits that are totally alien to the technician or keen amateur who has previously worked with audio circuits. The principles and practices of digital audio owe little or nothing to the traditional linear circuits of the past, and are much more comprehensible to today’s computer engineer than the older generation of audio engineers. This book is intended to bridge the gap of understanding for the technician and enthusiast. The principles and methods are explained, but the mathematical background and theory is avoided, other than to state the end product. 128 pages Order code PC102 £8.95 PROJECTS FOR THE ELECTRIC GUITAR J. Chatwin This book is for anyone interested in the electric guitar. It explains how the electronic functions of the instrument work together, and includes information on BOOK ORDERING DETAILS All prices include UK postage. For postage to Europe (air) and the rest of the world (surface) please add £1 per book. For the rest of the world airmail add £2 per book. Send a PO, cheque, international money order (£ sterling only) made payable to Direct Book Service or card details, Visa, Mastercard, Amex, Diners Club or Switch to: DIRECT BOOK SERVICE, WIMBORNE PUBLISHING LIMITED, 408 WIMBORNE ROAD EAST, FERNDOWN, DORSET BH22 9ND. Books are normally sent within seven days of receipt of order, but please allow 28 days for delivery – more for overseas orders. Please check price and availability (see latest issue of Everyday Practical Electronics) before ordering from old lists. For a further selection of books see the next two issues of EPE. Tel 01202 873872 Fax 01202 874562. E-mail: [email protected] Order from our online shop at: www.epemag.wimborne.co.uk/shopdoor.htm BOOK ORDER FORM Full name: ............................................................................................................................................... Address: .................................................................................................................................................. ................................................................................................................................................................. the various pickups and transducers that can be fitted. There are complete circuit diagrams for the major types of instrument, as well as a selection of wiring modifications and pickup switching circuits. These can be used to help you create your own custom wiring. Along with the electric guitar, sections are also included relating to acoustic instruments. The function of specialised piezoelectric pickups is explained and there are detailed instructions on how to make your own contact and bridge transducers. The projects range from simple preamps and tone boosters, to complete active controls and equaliser units. 92 pages Order code BP358 £5.45 VALVE AMPLIFIERS Second Edition. Morgan Jones This book allows those with a limited knowledge of the field to understand both the theory and practice of valve audio amplifier design, such that they can analyse and modify circuits, and build or restore an amplifier. Design principles and construction techniques are provided so readers can devise and build from scratch, designs that actually work. The second edition of this popular book builds on its main strength – exploring and illustrating theory with practical applications. Numerous new sections include: output transformer problems; heater regulators; phase splitter analysis; and component technology. In addition to the numerous amplifier and preamplifier circuits, three major new designs are included: a low-noise single-ended LP stage, and a pair of high voltage amplifiers for driving electrostatic transducers directly – one for headphones, one for loudspeakers. 488 pages .............................................. Post code: ........................... Telephone No: ............................................. Signature: ................................................................................................................................................ I enclose cheque/PO payable to DIRECT BOOK SERVICE for £ ................................................... Please charge my card £ ....................................... Card expiry date............................................... Card Number ........................................................................................... Switch Issue No..................... Please send book order codes: .............................................................................................................. ................................................................................................................................................................. Please continue on separate sheet of paper if necessary Order code NE33 £26.99 VALVE RADIO AND AUDIO REPAIR HANDBOOK Chas Miller This book is not only an essential read for every professional working with antique radio and gramophone equipment, but also dealers, collectors and valve technology enthusiasts the world over. The emphasis is firmly on the practicalities of repairing and restoring, so technical content is kept to a minimum, and always explained in a way that can be followed by readers with no background in electronics. Those who have a good grounding in electronics, but wish to learn more about the practical aspects, will benefit from the emphasis given to hands-on repair work, covering mechanical as well as electrical aspects of servicing. Repair techniques are also illustrated throughout. A large reference section provides a range of information compiled from many contemporary sources, and includes specialist dealers for valves, components and complete receivers. 288 pages ................................................................................................................................................................. Everyday Practical Electronics, May 2002 Order code BP333 Order code NE34 £20.99 LOUDSPEAKERS FOR MUSICIANS Vivan Capel This book contains all that a working musician needs to know about loudspeakers; the different types, how they work, the most suitable for different instruments, for cabaret work, and for vocals. It gives tips on constructing cabinets, wiring up, when and where to use wadding, and when not to, what fittings are available, finishing, how to ensure they travel well, how to connect multispeaker arrays and much more. Ten practical enclosure designs with plans and comments are given in the last chapter, but by the time you’ve read that far you should be able to design your own! 164 pages Order code BP297 £5.49 381