1
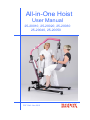
All-in-One Hoist
User Manual
25-20010, 25-20020, 25-20030
25-20040, 25-20050
PDF 5946 Nov-2010
General about the hoist
Index
General about the hoist
Operation
Operating instructions
Battery charging
Safety function, lifting motor
Emergency stop
Emergency lowering
Brakes
Transfer - person lifting General
Lifting to and from wheelchair
Lifting to and from bed
Lifting from floor
Transfer – Stand-up hoist General
Lifting from chair
Assembly instructions
25-20010, 25-20020, 25-20030
25-20040, 25-20050
Technical information
Maintenance
Daily check
Cleaning
Monthly maintenance
Yearly inspection
Trouble shooting
Claims deadline and service
3
4
4
5
5
5
5
6
6
7
7
8
8
9
10
11
14
14
14
14
15
16
In case of inquiries concerning spare parts and service, please state the
following information:
Customer:
Hoist model:
Serial number:
Year and month:
Max. load:
Producer
Ropox A/S
Ringstedgade 221
DK-4700 Næstved
Tel.:
+45 55 75 05 00
Fax:
+45 55 75 05 50
[email protected]
www.ropox.dk
2
Distributor
General about the hoist
Note! It is important that the user is familiar with the operation of the hoist
and its facilities and that the hoist performs properly. In order to
obtain optimum safety, all persons operating the hoist must read
these instructions carefully prior to use.
All-in-One lifts have a life expectancy of 10 years, subject to the electronics and moving
parts that depend on the daily use and maintenance according to this manual.
Ropox A/S is only responsible for the safety of the hoist, its reliability and performance
subject to the following conditions:
·
·
·
·
The hoist must be assembled and connected according to our instructions.
The hoist must be used and cleaned as described in these instructions.
The hoist must be used indoor.
The hoist must be inspected at least once a year according to the procedures of the
“Service Manual”.
The hoists are intended for lifting persons, e.g. from floor, chair and bed. The special
leg-spreading facility also makes it possible to lift the person from toilet and bath.
NOTE!
UNDER NO CIRCUMSTANCES should the hoist be used for lifting objects
other than persons – and only persons, whose weight, including the lifting
sling, does not exceed the maximum load stated.
In the event of loads exceeding the maximum value prescribed or lifting of
objects other than persons Ropox A/S shall disclaim any responsibility in
connection with insurance, right to complain and service.
Users should always make sure that the mechanical and electrical systems of the hoist
work satisfactorily. In case of malfunction the hoist must be stopped immediately and
inspected or repaired, as required. Malfunction may be a symptom of defects that may
get worse and jeopardise the safety in critical situations
The battery should be charged at regular intervals to ensure that the hoist is always
operational (e.g. every night).
Warning! or Note!
means that the text contains important safety and operating
instructions, which must be observed in order to avoid
accidents.
The All-in-One hoist has CE-marking and thus meets the functional and safety
requirements of the Directives for Medical Devices, Low Voltage and EMC.
Declaration of Conformity can be delivered on request.
The product is in risk group 1.
It has been tested by the Danish Centre for Assistive Technology according to the rules
of Standard DS / EN ISO 10535, „Hoists for the transfer of disabled persons –
requirements and test methods“. All electrical components meet current electrical
standards.
3
Operation
Note!
It is important to have read this User Manual prior to operation in order to be
familiar with the use of the hoist and its facilities. This will ensure optimum
safety for all users.
For the All-in-One you can use any of Ropox Domino slings
Operating instructions
1. Check that the emergency stop has been released. If not, turn the button clockwise
until release.
2. The hoist is operated by means of the hand control unit. The two upper buttons
control the lifting/lowering movement, whereas the two lower buttons control the leg
spreading facility. It is not possible to use two functions simultaneously.
Note!
In case of erroneous operation of the hand control unit (e.g. too quick change
of direction) the hoist does not react. Let go of the push button – wait a few
seconds and press again.
3. Check that the sling provided is correct for the lifting operation to be performed. This
applies to size as well as shape. Further information about the choice of slings will
be found in ”Domino Slings User manual”.
4. The battery should be recharged regularly, to ensure that the hoist is always
available (e.g. every night).
Emergency situation
Emergency stop and emergency lowering (electrical and mechanical) should be used in
emergencies only. Should it be necessary to activate the emergency functions, contact
the distributor before using the hoist again.
Recharging the battery
·
·
·
·
·
·
·
4
The battery must be recharged after approx. 60 lifting operations – i.e. at 50%
battery capacity. In case of continued use you will hear an acoustic signal. The
battery can still be used, but it will affect is recharging capability.
We recommend charging as soon as the hoist is not being used for a longer period
of time, e.g. every night. The battery cannot be over-charged and it is only ”healthy”
for the battery to be recharged often as it increases the battery life.
Charging is made directly in the control unit by means of the mains cable provided.
Insert the cable into the wall outlet and the control unit, see drawing page 12, and
switch on power. The hoist cannot be used when connected to mains voltage.
A green light on the control unit indicates connection to mains voltage. A yellow light
indicates that the battery is being recharged.
When the battery has been fully charged, the yellow light will be out.
Full recharging takes 4-5 hours.
If charging is made via a wall-mounted charging station (optional) a battery may be
constantly charged in the station. The batteries may be easily switched by means of
the snap system on top of the battery box.
Operation
Safety function, liftingmotor
The lifting motor is provided with a safety function, splejn, against jamming. If the lifting
arm meets with resistance during lowering, the movement of the arm will stop
automatically. Thus, a person cannot get jammed between the lifting arm and the bed.
WARNING!!
Owing to the safety function on the motor the lifting arm and
spreader bar may fall freely to the spindle of the motor.
Therefore make sure that the lifting arm does not ”hang”, that is
has always been pressed down to ensure that it rests on the
spindle of the motor before and after all lifting operations. This is
important as otherwise an injury may result if the lifting arm ”falls”
down.
Emergency stop
If the hoist is to be stopped owing to an emergency – press the red button on the
control unit. When the button has been depressed the electrical functions of the hoist
cannot be activated and the battery indicator has been switched off.
Emergency lowering
If the hoist is to be lowered and the hand control unit does not work, there are two
possible solutions:
- The electrical emergency lowering of the control unit (marked emergency), see
drawing page 12. Press with a ball pencil or the like and the person will be lowered
slowly.
- The mechanical emergency lowering of the lifting motor. Pull up the red handle, see
drawing page 11.
Brakes
The hoist may be
braked on the two
large rear wheels.
Press down the rear
part of the brake with
the foot to brake the
hoist. Release the
brake by pressing the
front part of the brake
with the foot.
Note!
Brake
Release
Never brake the hoist during lifting except when used in stand-up mode.
5
Transfer- person lifting
General
· It
is important that the user is familiar with the hoist and that it works satisfactorily
before lifting a person.
· It is important to choose the correct type of sling for the lifting operation to be
performed. This applies to size as well as shape. Further information about the choice
of sling will be found in ”Instructions for the Use of Domino Slings”.
· With a person in the hoist always move slowly in order to avoid swaying.
· Only use the hoist on surfaces with less than 5° gradient.
· Only brake the hoist when it is parked or standing on a sloping surface, e.g. in
bathrooms.
· Never lift a person higher than necessary.
· Be aware of the maximum load of the hoist.
Before lifting a client, try the hoist yourself.
Risk assessment shall be carried out to ensure that the
correct size, type and shape of slings is being used for
the patient
Lifting from wheelchair
· Mount the sling.
· Increase the width between the legs of the hoist and move it to the chair.
· Place the spreader bar above the person in the chair.
· Lower the lifting arm and place the straps of the sling correctly in the hooks
of the
spreader bar. Make sure that all straps have been fitted correctly.
· Lift the person a few centimetres above the seat of the chair - STOP – and make sure
that the sling has been fitted correctly.
· When the person is comfortable in the sling, lift him/her clear of the chair.
· Pull the hoist away from the chair - STOP – adjust the legs of the hoist to parallel
position before proceeding with the transfer.
Placing in wheelchair
To place a person in a wheelchair proceed in reverse order:
· Increase the width between the legs of the hoist and move it to the chair.
· Make sure that the person has been placed correctly in relation to the chair and lower
the hoist slowly.
· Check that the person is in the proper position during the entire operation.
· When assisting a person in getting back into the chair, lower the person to just touch
the chair.
· If the chair can be tilted a little backward it is easier to place the person correctly. Also
pull the straps on the back of the sling.
· If two helpers are available, one may press gently on the knees of the person.
Note!
6
The wheelchair must be braked during transfer to and from the chair.
Transfer – person lifting
Lifting to and from bed
· If
the bed has an adjustable headrest and the client is capable of being raised a little,
a raised headrest will facilitate application of the sling.
· Place the lower edge of the sling so that it just covers the base of the spine.
· If the client is to be transferred from wheelchair to bed, a raised headrest will also
facilitate the operation. It will be easier to place the client correctly in the bed and to
remove the sling straps.
· As an alternative roll the client to a lateral position. Unfold the sling and place it so that
the lower edge just covers the base of the spine.
· Place the spreader bar above the bed and lower it to approx. 25 cm above the waist.
· Fix the straps of the sling in the spreader bar.
· Lift the client slowly approx. 2 cm above the bed and make sure that the sling is
positioned correctly and that the client is comfortable and properly supported.
· Lift the client clear of the bed and transfer him/her to the required position.
Note!
Always adjust the sling before lifting the client completely clear of the bed.
Lifting from floor
Make sure that the general condition of the client allows him/her to be lifted.
· Follow the same procedures as when lifting from bed when placing the sling under the
client.
· Lift the client to a half seated position and use a chair or a similar stable back support
with a cushion.
· Move the open end of the hoist towards the client and lift the legs of the client over
one leg of the hoist. Do not brake the hoist.
· The hoist may be placed in the opposite position, i.e. with the head of the client
towards the control unit of the hoist.
· Lower the lifting arm and fix the straps of the sling in the spreader bar.
· Lift the client slowly while checking that the sling is placed correctly and that the client
is comfortable and properly supported.
Note!
When operating the hoist use the wheels opposite to the push handles as a
pivot point. This will facilitate manoeuvring.
7
Transfer – Stand-up hoist
General
· It
is important that the user is familiar with the operation of the hoist and that it
performs properly prior to lifting.
· It is important to choose the correct type of sling for the lifting operation to be
performed. This applies to size as well as shape. Further information about the choice
of slings will be found in ”Instructions for the Use of Domino Slings”.
· Transfer of a person in a stand-up hoist must only be made to and from seated
position.
· The stand-up hoist must be braked during lifting.
· The client must not wear slippery clothes or underwear.
· Be aware of the maximum load of the hoist.
Lifting from chair
· Apply the Thorax standing sling with the lower edge right above the waistband.
· Increase the width between the legs of the hoist and move it to the chair.
· Approach the client and place his/her legs on the base plate.
· Push the hoist as closely to the client as possible – brake the hoist.
WARNING!
MAKE SURE THAT THE FEET OF THE CLIENT DO NOT GET
JAMMED BETWEEN BASE PLATE AND FLOOR.
· Adjust the knee support so that it provides support right under the knees of the client.
· Lower the lifting arm.
· Place the lifting straps of the sling in the hooks of the fork-shaped lifting bar.
· If the client can hold on to the lifting bar with his/her arms during lifting, use the middle
step of the suspension strap.
the client has but little stability and strength in the upper part of the body, use the
outermost step of the suspension strap.
· Tell the client to lean back in the sling and look up.
· Now lifting may be commenced. If required, support the client during lifting.
· Lift the client to standing position.
· If
Note!
· To
8
We recommend lifting the client approx. ¾, so that the knees are slightly bent.
Be aware of the pressure on the knees/lower part of the leg.
prevent the sling from sliding upward, place the straps in a loop.
Assembly instructions
Assembly instructions for All-in-One :
25-20010, 25-20020 and 25-20030
Place the lifting mast in the mast holder of
the frame. Tighten the two screws with the
5mm Insex wrench provided.
· Connect the cable from the leg spreading
motor to the control unit in output terminal 2,
see ”Technical information” .
·
Screws
Mounting and dismounting of arm
with spreader bar and stand-up hoist
module
Mounting
·
·
·
·
·
·
·
Brake the rear wheels.
Hold the lifting module (turn it through 90°) so that the locking pin may be pushed
into the corresponding slide rail of the lifting mast.
Be aware that the bar may swing. We recommend holding on to it.
Push in the lifting module.
Then turn it 90° clockwise until you hear a click.
Make sure that the arm has been properly locked.
If the hoist is going to be used as a stand-up hoist, hook on the knee support with
base plate.
·
Now the hoist is ready for use.
9
Assembly instructions
Dismounting
Brake the rear wheels.
If the hoist has been used as a stand-up hoist, lift off the knee support.
Pull the locking pin while turning the lifting module 90° counter-clockwise.
Be aware that the bar may swing. We recommend holding on to it.
Now the lifting module may be pulled out.
·
·
·
·
·
Note!
Be aware of the weight of the lifting module.
Locking
pin
Assembly instructions for All in One
25-20040 and 25-20050
Place the lifting mast in the mast holder of
the frame. Tighten the two screws with the
5mm Insex wrench provided.
· Connect the cable from the leg spreading
motor to the control unit in output terminal
2, see ”Technical information” .
·
Now the hoist is ready for use.
10
Screws
Technical information
Frame
Material:
Surface:
St.37
Powder-coated in the colours RAL 4006 traficpurple, RAL 4007 purpleviolet
and PHM 7812/CWS black. .
Wheels
Front:
Rear:
Diameter 75mm double wheels
Diameter 100mm with brake
Motors
Type designation
Power consumption, max.
Pressure
Speed
Protection
Sound power level (ISO 3746)
Lifting motor
LA34.4
10A
7500 N
unloaded 15 mm/s
Loaded 9 mm/s
IP66
≤42dBA
Leg spreading motor
LA12.1
3.2A
750 N
14 mm/s
6 mm/s
IP65
≤58dBA
The lifting motor has a mechanical
emergency lowering facility. To release
it, pull the red handle.
Hand control unit
Type designation
HB52B
The hand control unit has two functions.
The two upper buttons control the lifting/lowering movement.
The two lower buttons control the leg spreading facility.
11
Technical information
Control unit
Type designation
Mains voltage
Output voltage
Max. output current
Protection
CBJ2
100-240V
24V DC
10.8A
IP65
The electrical system is intended for
periodical use with a duty circle of max.
10%,
1 min. operation / 9 min. pause.
1
2
1.
2.
3.
4.
5.
6.
7.
Emergency stop
Emergency lowering
Charging indicator
Connected to mains voltage
Plug for remote control
Plug for lifting motor, outlet terminal 1
Plug for leg spreading motor, outlet
terminal 2
8. Plug for charging, mains cable
3
4
8
5
6
7
The control unit is equipped with:
- protective motor switch for lifting and leg spreading, protecting against overloading
- short-circuit protection
- acoustic signal sounding when the batteries need charging
- electrical emergency lowering if the hand control unit does not work
- built-in charger
Battery
Type designation
Outlet voltage
Protection
BAJ1
24V DC, 2.7 amps
IP65
The battery is fitted directly on the control unit. When the battery capacity is approx.
50% the control unit will beep during operation, and the battery must be charged.
Charging takes 4-5 hours.
Note!
12
The hoist does not work during charging.
Technical information
Dimensions
25-20010
25-20020
25-20040
Person hoist
Lifting capacity
150 kg
150 kg
Min. lifting height, lifting hook
55 cm
95 cm
Max. lifting height. lifting hook
180 cm
191 cm
Lifting travel
125 cm
96 cm
Length chassis frame
117 cm
117 cm
Length legs
97 cm
97 cm
Min. inside distance between legs
50 cm
50 cm
Max. inside distance between legs
94 cm
94 cm
Min. outside distance between legs
65 cm
65 cm
Max. outside distance between legs
109 cm
109 cm
Height of chassis frame
12 cm
12 cm
Free height under legs
7 cm
7 cm
100/75 cm
100/75 cm
Turning circle
125 cm
125 cm
Weight of arm with spreader bar
6.5 kg
Wheel diameter
25-20020
25-20030
25-20050
Stand-up
Weight of fork-shaped bar
5.5 kg
Weight of knee support with base
plate
8.5 kg
Weight of battery
Total weight
Approximate number of lifting
operations per charging
3.0 kg
3.,0 kg
51.0 kg
58.5 kg
60
60
13
Technical information
755
600
1980
1225
Dimensions All-in-One 150Kg: 25-20010, 25-20020, 25-20040
590
530
700
840
930
725
410
14
Technical information
520
160
60
115
190
15
Maintenance
Always make sure that the mechanical and electrical systems of the hoist operate
satisfactorily. In case of malfunction stop the hoist and check or repair it, as required.
Malfunction may be a symptom of a defect, which may become worse and present a
safety risk in critical situations. It is therefore important to check the hoist as described
below.
Daily check
Sling
1.
Check that the slings are clean, If not, send them to the wash.
2. Check for wear and that the seams are intact and not frayed. A worn sling
must be replaced.
Hoist
3.
Check that the hand control unit works satisfactorily and is mounted
correctly.
4.
Check that cables have been correctly inserted into the control unit.
5.
Check visually that shaft and bolted joints run smoothly and silently.
6.
Keep the hoist clean. A clean hoist is safer and has a longer life.
Cleaning
Clean the hoist with a damp cloth wrung in warm water with a mild detergent.
Electrical components may be dried with a firmly wrung cloth. Do not use water directly
on these components.
Never use solvents.
Monthly maintenance
Sling
1.
Inspect the slings carefully and replace them in case of visible defects or
wear.
Hoist
2.
Check that hand control unit, control unit and battery have no visible
defects.
3.
Check that cables have been inserted correctly and are undamaged.
4.
Check that the lifting motor is not bent and is undamaged.
5.
Check that all shaft and bolts joints are undamaged and stable. Worn parts
should be replaced
6.
Check that the wheels run smoothly. Clean them once a month
Yearly inspection
Preventive service must be made once a year. Follow the procedures described in the
”Service Manual”.
16
Trouble shooting
If the hoist does not work, check and test the following procedures
before contacting an authorised distributor.
1. Has the battery been charged?
2. Has the emergency stop been released?
3. Have all plugs been inserted correctly?
4. Does the hand control unit work properly and has it been mounted correctly?
5. Try with another hand control unit or charger.
6. If the lifting arm cannot be lowered by means of the hand control unit, use
mechanical or electrical emergency lowering, and the lifting arm will come down.
Symptom
Possible cause
Indicator for mains
voltage does not
light up
- Mains voltage not
connected
- Control unit defective
The motors do not
start. A click is
heard from the
relays of the
control unit
- The plug has not been
correctly inserted into
the control unit
- Motor defective
- Control unit defective
The motors do not
start. No click is
heard from the
relays of the
control unit
- Control unit defective
- Hand control unit
defective
Action
- Connect mains
voltage
- Send control unit to
repair shop
- Insert the motor
plug correctly into
the control unit
- Replace the motor
- Replace the control
unit
- Send control unit to
repair shop Send
hand control unit to
repair shop
The control unit is
completely dead.
No click is heard
from the relays of
the control unit
- Battery completely
discharged
- Battery defective
- Charge the battery
- Replace the battery
The control unit is
in order except for
one direction of
one channel
- Hand control unit
defective
- Send hand control
unit to repair shop
- Send control unit to
repair shop
- Control unit defective
17
Claims deadline and service
Claims deadline
See General Terms of Sale and Delivery on www.ropox.dk
Service
Always make sure that the mechanical and electrical systems of the walking trainer
operate satisfactorily. In case of malfunction, stop using the product and inspect or
repair it, as required. Malfunction may be a symptom of defects that may get worse and
jeopardise the safety in critical situations.
Preventive service must be carried out once a year, following the procedures of the
”Service Manual”.
Service and repairs must always be carried out by trained and competent personnel.
We recommend registration in a log book for each walking trainer in connection with
service visits to be used as documentation in case of complaints.
Only use original spare parts and accessories.
Modifications of the walking trainer must be carried out by authorised Ropox personnel.
18
ROPOX A/S
Ringstedgade 221
DK – 4700 Naestved
Denmark
Tel.: +45 55 75 05 00 Fax.: +45 55 75 05 50
E-mail: [email protected]
www.ropox.com
19