1
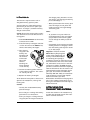
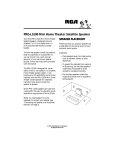
Deceiver
Is it a monster truck or a race car? Both! It’s two toys in one!
OWNER’S MANUAL — Please read before using this equipment.
Your RadioShack Deceiver will fool all
your friends as it transforms from a
monster truck into a high-profile race
car and back at the touch of a button!
The Deceiver’s headlights blink and
the engine makes realistic sounds.
The Deceiver comes in two frequencies — 27 MHz and 49 MHz — so you
can race with your friends. Check the
box for the frequency listing.
The Deceiver is recommended for
ages 8 and up.
THE FCC WANTS YOU TO
KNOW
Your Deceiver or transmitter might
cause TV or radio interference even
when it is operating properly. To determine whether your Deceiver or
transmitter is causing the interference, turn off your Deceiver and release the transmitter’s control sticks.
If the interference goes away, your
Deceiver or transmitter is causing it.
Try to eliminate the interference by:
• Moving your Deceiver or transmitter away from the TV or radio
• Contacting your local RadioShack
store for help
If you cannot eliminate the interference, the FCC requires that you stop
using your Deceiver and transmitter.
INSTALLING BATTERIES
Cautions:
• Use only a fresh battery/battery
pack of the required size and recommended type.
• If you will not be using the Deceiver for a week or more, remove
the battery from the transmitter
and the battery pack from the
Deceiver. Batteries can leak
chemicals that can damage electronic parts.
• Never leave dead or weak batteries in the Deceiver or the transmitter.
Warning: Dispose of old batteries
promptly and properly. Do not burn or
bury them.
In the Transmitter
The transmitter requires one 9-volt
battery. For the best performance
and longest life, we recommend a
RadioShack alkaline battery.
1. Press down and slide the battery
compartment cover off in the
direction of the arrow.
2. Place a battery in the battery
compartment according to the
polarity symbols (+ and –) marked
inside.
3. Replace the cover and snap it into
place.
Note: When the transmitter’s range
decreases, replace its battery.
©
2001 RadioShack Corporation. All Rights Reserved.
RadioShack and RadioShack.com are trademarks
used by RadioShack Corporation.
the charging time), disconnect it from
the charger. Overcharging the battery
pack could damage it.
In The Vehicle
The Deceiver requires one 9.6-volt rechargeable battery pack for power.
• When you disconnect the battery pack
from the charger, do not pull on the
connector’s wires. You might damage
the battery pack.
You must charge a rechargeable battery
pack before you can use it to power your
Deceiver. To charge it, follow the battery
charger’s instructions.
Notes:
Caution: Be sure the battery pack’s connectors and wires do not touch the Deceiver's
moving parts.
• If you want to run your vehicle for
extended periods of time, we suggest
you purchase an extra battery pack.
You can charge one while you use the
other.
1. Slide OFF/ON/SOUND OFF on the bottom
of the Deceiver to OFF.
2. Press the battery lid stopper and slide
it in the direction of the OPEN arrow,
then lift the battery lid stopper.
• Occasionally, let the battery pack fully
discharge before recharging it. Otherwise the battery pack may lose its ability to fully charge.
3. Place the battery pack in the
battery compartment with
its connector
on the same
side as the
vehicle’s
matching connector and push
it in all the way.
Important: The EPA certified
RBRC® Battery Recycling Seal
on the nickel-cadmium (Ni-Cd)
battery indicates RadioShack
is voluntarily participating in
an industry program to collect and recycle
these batteries at the end of their useful
life, when taken out of service in the United States or Canada. The RBRC program
provides a convenient alternative to placing
used Ni-Cd batteries into the trash or the
municipal waste stream, which may be illegal in your area. Please call 1-800-THESHACK (1-800-843-7422) for information
on Ni-Cd battery recycling and disposal
bans/restrictions in your area.
RadioShack’s involvement in this program is
part of the company’s commitment to preserving our environment and conserving our
natural resources.
4. Connect the battery pack’s connector
to the vehicle’s connector. The connector fits only one way.
5. Replace the battery lid stopper.
If the Deceiver loses power or does not respond to the transmitter, recharge the
battery pack.
Cautions:
• Use only the recommended battery
pack and charger.
ATTACHING THE
TRANSMITTER'S ANTENNA
• Do not charge or recharge the battery
pack while it is in the Deceiver.
Attach the antenna to the transmitter by
screwing the threaded end into the transmitter's antenna connector.
• After you charge or recharge the battery pack (see the charger’s manual for
2
INSTALLING THE
VEHICLE'S ANTENNA TUBE
1. Push the antenna wire's loose end
through the tube.
The antenna tube holds up the antenna wire
for the best reception and range.
2. Insert the tube securely into the vehicle's tube holder. Let the extra
antenna wire hang freely.
DRIVING THE DECEIVER
Fully extend the transmitter’s
antenna. For maximum range,
hold the transmitter with the
antenna pointing straight up.
Transform Button
Press while the vehicle is
stopped to make the Deceiver transform. The Deceiver transforms from a
monster truck to a race car
and back again.
The transmitter has no power
switch. When you press either
control lever, the Deceiver
responds and the red indicator
lights.
Cautions:
Right Control Lever
Push left to move left.
Push right to move
right.
Release to go straight.
Left Control Lever
Push forward to move forward.
Pull back to move backward.
Release to stop.
Warning: Never play with your Deceiver in
the street.
• If you make the Deceiver
transform while it is
moving, it might change
the vehicle’s direction.
• Never insert your finger
or other object inside
the chassis while the
Deceiver is transforming.
4. When you finish driving the Deceiver,
slide OFF/ON/SOUND OFF to OFF.
Caution: Do not drive the vehicle in puddles, on a wet floor, on sand, or in mud, rain,
or snow. These can damage it.
ADJUSTING WHEEL
ALIGNMENT
If the Deceiver does not drive in a straight
line when you release the right control lever, adjust the wheel alignment control
(between the front wheels, underneath the
car). Turn the control toward L (left) if the
car is pulling to the right, or toward R
(right) if the car is pulling to the left.
Note: To perform the coolest stunts, your
Deceiver needs to be running at high speed.
1. Slide OFF/ON/SOUND OFF on the bottom
of the Deceiver to ON.
2. To make the Deceiver pop a wheelie,
quickly switch from reverse to forward. If the road surface is rough or
the battery is running low, your
Deceiver might not pop a wheelie.
HELPFUL HINTS
• Running your car for long periods generates high heat levels. Heat causes
wear and tear on the motor. To help
keep heat levels down, when your
Deceiver’s battery power dies, let the
car cool at least 10 minutes before
installing a newly charged battery pack.
Caution: If the Deceiver gets stuck
under an object, immediately release
the transmitter’s control levers and
retrieve the car.
3. You hear the Deceiver’s engine sound
when OFF/ON/SOUND OFF is set to ON.
To drive the Deceiver with the sound
off, set OFF/ON/SOUND OFF to SOUND
OFF.
• If someone uses a CB nearby, it might
interfere with control of the Deceiver.
3
If this happens, move the car and
transmitter away from the CB.
• You cannot operate your Deceiver near
devices with transmitters that use the
same frequency as the Deceiver (either
27 MHz or 49 MHz).
• If the Deceiver moves slowly, and you
just installed a fully charged battery
pack, check the wheel mechanisms for
lint, thread, hair or dust.
CARE
Keep the Deceiver dry. Use and store the
Deceiver only in normal temperature environments. Handle the Deceiver carefully;
do not drop it. Modifying or tampering with
the Deceiver’s internal components can
cause a malfunction and might invalidate its
warranty and void your FCC authorization
to operate it. If your Deceiver is not performing as it should, take it to your local
RadioShack store for assistance.
Part Description
RSU #
Front Bumper Set: Front Bumper
and Tapping Screw (3x14 #8,Qty
2)
12258232
Transmitter Antenna
10538213
Transmitter Battery Lid
12055364
Transmitter (27 MHz)
12333118
Transmitter (49 MHz)
12333126
Antenna Tube Set
10681781
Service Manual (not pictured)
12258133
Owner’s Manual (not pictured)
12258190
Antenna Tube Set
Transmitter
Antenna
USER-REPLACEABLE PARTS
N
Transmitter
Battery Lid
PE
Front Bumper Set:
Front Bumper and
Tapping Screw
O
You can order replacement parts for your
vehicle at your local RadioShack store. Simply identify the part(s) you need from the
exploded view on the right, then find the
part number in this list.
Transmitter
Limited Ninety-Day Warranty
This product is warranted by RadioShack against manufacturing defects in material and workmanship under normal use for ninety (90) days from the date of purchase
from RadioShack company-owned stores and authorized RadioShack franchisees and dealers. EXCEPT AS PROVIDED HEREIN, RadioShack MAKES NO EXPRESS WARRANTIES AND ANY IMPLIED WARRANTIES, INCLUDING THOSE OF MERCHANTABILITY AND FITNESS FOR A PARTICULAR PURPOSE, ARE
LIMITED IN DURATION TO THE DURATION OF THE WRITTEN LIMITED WARRANTIES CONTAINED HEREIN. EXCEPT AS PROVIDED HEREIN, RadioShack
SHALL HAVE NO LIABILITY OR RESPONSIBILITY TO CUSTOMER OR ANY OTHER PERSON OR ENTITY WITH RESPECT TO ANY LIABILITY, LOSS OR DAMAGE CAUSED DIRECTLY OR INDIRECTLY BY USE OR PERFORMANCE OF THE PRODUCT OR ARISING OUT OF ANY BREACH OF THIS WARRANTY, INCLUDING, BUT NOT LIMITED TO, ANY DAMAGES RESULTING FROM INCONVENIENCE, LOSS OF TIME, DATA, PROPERTY, REVENUE, OR PROFIT OR ANY
INDIRECT, SPECIAL, INCIDENTAL, OR CONSEQUENTIAL DAMAGES, EVEN IF RadioShack HAS BEEN ADVISED OF THE POSSIBILITY OF SUCH DAMAGES.
Some states do not allow limitations on how long an implied warranty lasts or the exclusion or limitation of incidental or consequential damages, so the above limitations or exclusions may not apply to you.
In the event of a product defect during the warranty period, take the product and the RadioShack sales receipt as proof of purchase date to any RadioShack store.
RadioShack will, at its option, unless otherwise provided by law: (a) correct the defect by product repair without charge for parts and labor; (b) replace the product with
one of the same or similar design; or (c) refund the purchase price. All replaced parts and products, and products on which a refund is made, become the property of
RadioShack. New or reconditioned parts and products may be used in the performance of warranty service. Repaired or replaced parts and products are warranted for
the remainder of the original warranty period. You will be charged for repair or replacement of the product made after the expiration of the warranty period.
This warranty does not cover: (a) damage or failure caused by or attributable to acts of God, abuse, accident, misuse, improper or abnormal usage, failure to follow instructions, improper installation or maintenance, alteration, lightning or other incidence of excess voltage or current; (b) any repairs other than those provided by a
RadioShack Authorized Service Facility; (c) consumables such as fuses or batteries; (d) cosmetic damage; (e) transportation, shipping or insurance costs; or (f) costs
of product removal, installation, set-up service adjustment or reinstallation.
This warranty gives you specific legal rights, and you may also have other rights which vary from state to state.
RadioShack Customer Relations, 200 Taylor Street, 6th Floor, Fort Worth, TX 76102
We Service What We Sell
05A01
60-4299
12/99
Printed in China