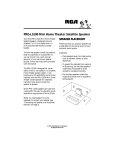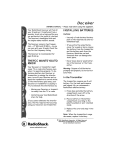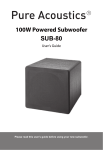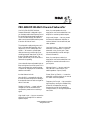
1
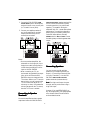
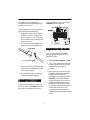
PRO-SW220P 200-Watt-Powered Subwoofer Your RCA PRO-SW220P 200-Watt Powered Subwoofer is designed to give you the best possible low frequency sound for the ultimate home theater experience. You will be astonished by the realism it adds to movie sound effects and the power it lends to all kinds of music. The subwoofer combines the power of a built-in 200-watt RMS amplifier with a responsive, 12-inch coated paper cone woofer — all housed in a ported bassreflex enclosure to produce tight, floorrumbling powerful bass (down to 36 Hz) that you can feel as well as hear. The power indicator lets you know when the subwoofer is operating. Your subwoofer has an adjustable high cut filter and high and low level inputs so it is easily incorporated into existing systems, or used as an integral part of a subwoofer/ satellite combination. Its other features include: Auto On/Off — automatically switches the PRO-SW220P’s amplifier to standby if the subwoofer does not receive a signal for about 11 minutes. Standby Indicator — power indicator changes color when the subwoofer is connected to power but not receiving a signal. Note: You need speaker wire (not supplied) to connect the subwoofer to an amplifier or receiver’s speaker outputs. High Level Output — lets you connect the subwoofer between an amplifier or receiver (without line out terminals) and other speakers. Low Level Input — lets you connect the subwoofer to an amplifier’s or receiver’s subwoofer out or pre out jacks. These inputs automatically sum left and right channel information. Note: You need phono cables (not supplied) to connect the subwoofer to an amplifier or receiver’s subwoofer out or pre out jacks. Volume Control — lets you match the PRO-SW220P’s output level to your satellite speakers’ output (if used). Phase (Polarity) Switch — Inverts the subwoofer’s output polarity so you can set it to match the main speakers. Frequency Hz Control — lets you set the high frequency cutoff point. Rotated fully clockwise, the subwoofer cuts high frequencies over 200 Hz. Rotated fully counterclockwise, it cuts high frequencies over 50 Hz. High-Level Input — lets you connect the subwoofer to an amplifier’s or receiver’s speaker outputs. © 2001 RadioShack Corporation. All Rights Reserved. SAFETY INSTRUCTIONS WARNING: To reduce the risk of fire or shock hazard, do not expose this product to rain or moisture. • Never open the cabinet or remove the metal control panel, as this might result in electrical shock or damage to the unit. CAUTION • If your PRO-SW220P needs servicing, contact your local RadioShack store. RISK OF ELECTRIC SHOCK. DO NOT OPEN. ! CAUTION: TO REDUCE THE RISK OF • To prevent electrical shock, do not use a polarized plug with any extension cord or outlet unless the blades can be fully inserted to prevent blade exposure. ELECTRIC SHOCK, DO NOT REMOVE COVER OR BACK. NO USER-SERVICEABLE PARTS INSIDE. REFER SERVICING TO QUALIFIED PERSONNEL. • Unplug the PRO-SW220P power cord from the electrical outlet if it will not be used for a long time. This symbol is intended to alert you to the presence of uninsulated dangerous voltage within the product’s enclosure that might be of sufficient magnitude to constitute a risk of electric shock. Do not open the product’s case. ! • Only connect this unit to a power supply of the type described in the owner’s manual or marked on the unit. • Route the power-supply cord so it is not likely to be walked on or pinched by items placed upon or against it, especially at the plug, the outlet, and the point where the cord exits the unit. This symbol is intended to inform you that important operating and maintenance instructions are included in the literature accompanying this product. • Placing the subwoofer on the same stand or shelf as your turntable can result in a low-frequency rumble or acoustic feedback. Cautions: • To prevent fire or shock, do not expose this subwoofer to rain or moisture. • Do not place the subwoofer with its metal plate against the floor. • Place the subwoofer away from heat sources such as radiators, stoves, or other appliances that produce heat. 2 CHOOSING A LOCATION you place the PRO-SW220P at least 4 inches away from the wall, and at least 2–3 feet away from your television or computer’s disk drive system so the subwoofer’s magnet will not distort the colors of your TV picture or erase your floppy disks. Cautions: • To prevent the cabinet from warping or discoloring, do not place the subwoofer in a place where it is exposed to direct sunlight or excessive humidity. ATTACHING FEET EET • Do not place the subwoofer where it might be knocked over or exposed to falling objects. Using the supplied screws, secure the four protective feet (packed separately) into the pre-drilled holes at each corner of the cabinet’s bottom. • The metal control panel on the back of the PRO-SW220P acts as the heat sink for the subwoofer’s internal amplifier. Therefore, place the unit at least 4 inches (10 cm) away from a wall, and do not let anything come into contact with this panel. CONNE NNECTING TO AN AMPLIFIER Where and how you position your subwoofer greatly affects its bass response. Adjusting the subwoofer’s volume control in relation to the left and right speakers and adjusting the subwoofer’s high cut filter also affects your speakers’ overall sound. You can connect your PRO-SW220P to an amplifier/receiver’s subwoofer out or pre out jacks or speaker terminals. Note: You can connect your PROSW220P to your TV if it has variable line out jacks. Although low frequencies are nondirectional, factors such as room reflections, standing waves, resonance, and absorption strongly affect your subwoofer’s performance. For maximum bass output, place your subwoofer in a corner. To reduce output, move it away from corners and back walls. Even slightly moving the subwoofer can have a major effect on bass response. Caution: To avoid any damage to the subwoofer or amplifier, disconnect power from your components before making any connections. Connecting to to Subwoof oofer Out Out or Pre Out Terminals als Use this connection if your amplifier/ receiver has jacks labeled SUBWOOFER OUT or PRE OUT. Do not use the PRE OUT jacks if they are already connected by cables or jumpers to your amplifier. We recommend that you test the subwoofer in different locations to determine where the best balance is between your satellite speakers (if used) and subwoofer. We also recommend that 3 1. Connect the PRO-SW220P’s LOW LEVEL INPUT jacks to the amplifier/ receiver’s line sub out or pre out jacks (or TV’s audio line out jacks). HIGH LEVEL INPUT speaker terminals. Be sure to connect the terminals in phase, connecting positive (+) to positive and negative (–) to negative. Wiring the subwoofer with + to – causes reduced bass performance. To match the subwoofer’s polarity with your system’s polarity and receive full bass response, slide the PHASE switch to REV or NOM. Choose the setting that provides the greatest bass output. 2. Connect your satellite speakers (if any) to the amplifier’s or receiver’s output terminals as they would normally be connected. Notes: • On some receivers/amplifiers, the subwoofer out is a single jack. Use a single phono cable (not supplied) to connect the subwoofer jack to the L input on the PRO-SW220P. Connecting Speaker eakers You can connect your left and right speakers to your amplifier/receiver (as shown in “Connecting to Subwoofer Out or Pre Out Terminals”), or to the PROSW-220P’s HIGH LEVEL OUTPUT speaker terminals (as shown above). • When connecting to a TV, we recommend using variable line output jacks, which will allow the PROSW220P’s volume to change with the TV’s volume. Refer to your TV owner’s manual. Also, you can connect to the TV line out and then adjust the TV volume up or down. If the subwoofer volume changes with the TV volume, then the TV line out is variable. Note: The High Level Output is a passthrough, and only works when using a High Level Input. However, if you use MEGACABLE or any other high-quality, low-gauge speaker wire, the terminals will be too small to accommodate the wires. Connecting to Speak eaker Terminals Connect the amplifier/receiver’s speaker output terminals to the PRO-SW220P’s 4 You need two pairs of speaker pins (available at your local RadioShack store) to make the connection. receive a signal for about 11 minutes the STANDBY indicator lights red. Follow these steps to connect the wires to each terminal using speaker pins. 1. Separate the conductors for a length of about 2 inches on the end of each wire. Then strip 1/2 inch of insulation from the ends of each conductor and twist the wire ends. 2. Position each wire end between the open barrel ends of the speaker pin. To PRO-SW220P ADJUSTING THE VOLUME Once you have made all connections, follow these steps to adjust the PROSW220P’s volume. 1. Rotate VOLUME CONTROL to MIN. From Left or Right Speaker 2. Turn on your amplifier/receiver and another component (such as a radio, cassette player, CD player, or turntable). 3. Using a pair of pliers, crimp the open barrel ends of the speaker pin to hold the wire ends in place. 3. Begin playing an audio source (such as a radio) and adjust the amplifier/ speaker’s overall volume to a comfortable level. Rotate VOLUME CONTROL on the PRO-SW220P clockwise a little at a time, until you achieve a pleasing balance of bass between the PRO-SW220P and the main speakers (and satellite speakers, if used). Bass output should not overpower the main speakers, but should blend across the entire musical range. 4. Plug the speaker pin into the proper terminal on the PRO-SW220P. CONNE NNECTING TO POWER Plug the PRO-SW220P’s AC power cord into an AC outlet.The STANDBY indicator lights green. If the subwoofer does not 5 Care an and Maintenance Once you have adjusted the PROSW220P’s VOLUME CONTROL, use the amplifier/receiver’s volume control to control the speakers’ volume. Keep the PRO-SW220P dry; if it gets wet, wipe it dry immediately. Use and store the PRO-SW220P only in normal temperature environments. Handle the PRO-SW220P carefully; do not drop it. Keep the PROSW220P away from dust and dirt, and wipe it with a damp cloth occasionally to keep it looking new. ADJUSTING THE HIGH CUT FREQUENCY FREQUENCY HZ adjusts the level (between 50 Hz and 200 Hz) at which the subwoofer begins passing frequencies to other speakers. This control’s setting depends on the low frequency capabilities of your satellite speakers (if used), speaker placement, and other factors that affect bass performance. Modifying or tampering with the PROSW220P’s internal components can cause a malfunction and might invalidate its warranty. Caution: You might permanently damage your speakers by cleaning them with a vacuum cleaner. Use a feather duster or a soft loose cloth instead. While playing music, rotate FREQUENCY HZ clockwise until the music sounds too bass-heavy. Then rotate it counterclockwise until the bass sounds more natural. This subwoofer has been manufactured to the specifications of RadioShack and is covered by a limited warranty from RadioShack. If your subwoofer is not operating as it should, take it to your local RadioShack store or call 1-800-THESHACK for assistance. If the mid-bass sounds natural but you want more low bass, rotate FREQUENCY HZ counterclockwise a little, then rotate the subwoofer’s VOLUME CONTROL clockwise by about the same amount. This increases low-bass output without affecting the mid-bass output. To reduce low-bass output without affecting the mid-bass output, equally rotate FREQUENCY HZ clockwise and the subwoofer’s VOLUME CONTROL counterclockwise. 6 SPECIFICATIONS Amplifier Output ....................................................... 200W RMS (4 Ohms @ 10% THD) Amplifier Output .......................................................... 180W RMS (4 Ohms @ 1% THD) Crossover ................................................................................ 50 Hz–200 Hz Adjustable Frequency Response ................................................................................. 36 Hz–200 Hz Power Voltage ........................................................................................ AC 120 V/60 Hz Power Consumption .............................................................................................. 120W Dimensions (HWD) ....................................... 16 x 16 x 16 Inches (407 x 407 x 407 mm) (with feet and grill attached) ............ 1713/16 x 16 x 195/8 Inches (431.8 x 407 x 482.6 mm) Weight ................................................................................................. 45 lb (20.412 kg) Specifications are typical; individual units might vary. Specifications are subject to change and improvement without notice. 7 Limited One-Year Warranty This product is warranted by RadioShack against manufacturing defects in material and workmanship under normal use for one (1) year from the date of purchase from RadioShack company-owned stores and authorized RadioShack franchisees and dealers. EXCEPT AS PROVIDED HEREIN, RadioShack MAKES NO EXPRESS WARRANTIES AND ANY IMPLIED WARRANTIES, INCLUDING THOSE OF MERCHANTABILITY AND FITNESS FOR A PARTICULAR PURPOSE, ARE LIMITED IN DURATION TO THE DURATION OF THE WRITTEN LIMITED WARRANTIES CONTAINED HEREIN. EXCEPT AS PROVIDED HEREIN, RadioShack SHALL HAVE NO LIABILITY OR RESPONSIBILITY TO CUSTOMER OR ANY OTHER PERSON OR ENTITY WITH RESPECT TO ANY LIABILITY, LOSS OR DAMAGE CAUSED DIRECTLY OR INDIRECTLY BY USE OR PERFORMANCE OF THE PRODUCT OR ARISING OUT OF ANY BREACH OF THIS WARRANTY, INCLUDING, BUT NOT LIMITED TO, ANY DAMAGES RESULTING FROM INCONVENIENCE, LOSS OF TIME, DATA, PROPERTY, REVENUE, OR PROFIT OR ANY INDIRECT, SPECIAL, INCIDENTAL, OR CONSEQUENTIAL DAMAGES, EVEN IF RadioShack HAS BEEN ADVISED OF THE POSSIBILITY OF SUCH DAMAGES. Some states do not allow limitations on how long an implied warranty lasts or the exclusion or limitation of incidental or consequential damages, so the above limitations or exclusions may not apply to you. In the event of a product defect during the warranty period, take the product and the RadioShack sales receipt as proof of purchase date to any RadioShack store. RadioShack will, at its option, unless otherwise provided by law: (a) correct the defect by product repair without charge for parts and labor; (b) replace the product with one of the same or similar design; or (c) refund the purchase price. All replaced parts and products, and products on which a refund is made, become the property of RadioShack. New or reconditioned parts and products may be used in the performance of warranty service. Repaired or replaced parts and products are warranted for the remainder of the original warranty period. You will be charged for repair or replacement of the product made after the expiration of the warranty period. This warranty does not cover: (a) damage or failure caused by or attributable to acts of God, abuse, accident, misuse, improper or abnormal usage, failure to follow instructions, improper installation or maintenance, alteration, lightning or other incidence of excess voltage or current; (b) any repairs other than those provided by a RadioShack Authorized Service Facility; (c) consumables such as fuses or batteries; (d) cosmetic damage; (e) transportation, shipping or insurance costs; or (f) costs of product removal, installation, set-up service adjustment or reinstallation. This warranty gives you specific legal rights, and you may also have other rights which vary from state to state. RadioShack Customer Relations, 200 Taylor Street, 6th Floor, Fort Worth, TX 76102 We Service What We Sell 12/99 RadioShack A Division of RadioShack Corporation Fort Worth, Texas 76102 40-5031 03/2001 Printed in USA