1
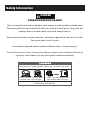
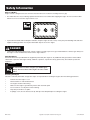
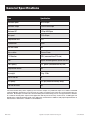
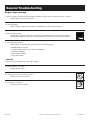
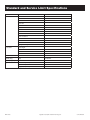
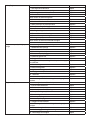
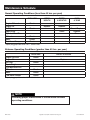
LCT Engines
Service Manual
Safety Information
DANGER
CARBON MONOXIDE HAZARD
Never use engine inside homes, garages, crawl spaces, or other partially enclosed areas.
Poisonous gases that can be harmful or fatal can build up in these areas. Using a fan and
opening doors or windows does not provide enough fresh air.
Engine exhaust contains carbon monoxide - a poisonous gas that can be harmful or fatal.
You cannot see or smell this gas.
Use a battery-powered carbon monoxide detector when running an engine.
If you start to feel sick, dizzy, or weak while using an engine, shut it off and get to fresh air
right away. See a doctor. You may have carbon monoxide poisoning.
Using an engine or engine application CAN KILL YOU IN MINUTES.
Exhaust contains carbon monoxide, a poison gas you cannot see or smell.
NEVER use in the home or in partly
enclosed areas such as garages.
ONLY use outdoors and far from
open windows doors, and vents.
Avoid other engine dangers.
READ MANUAL BEFORE USE.
Safety Information
When servicing this engine, your safety and the safety of others should be your top priority.
To assist you in making informed decisions regarding safety, we have provided operating procedures and other information on labels
and in this manual. This information warns you of potential hazards that could hurt you or others.
Please stay safety conscious when servicing this engine.
We have provided important safety information in a variety of forms, including:
• Safety Labels: placed on the engine.
• Safety messages: preceded by a safety alert symbol and one of three signal words, DANGER, WARNING, or CAUTION. These safety
alert symbols mean:
DANGER
If you do not follow instructions, it WILL cause you SERIOUS INJURY or DEATH.
WARNING
If you do not follow instructions, it MAY cause you SERIOUS INJURY or DEATH.
CAUTION
If you do not follow instructions, it may cause you SERIOUS INJURY or EQUIPMENT DAMAGE.
• Safety Headings: such as IMPORTANT SAFETY INSTRUCTIONS.
• Safety Section: such as ENGINE SAFETY.
• Instructions: How to service this engine correctly and safely.
Thoroughly read and review this manual to know how to stay safe and get maximum benefit and enjoyment from using this engine.
IMPORTANT SAFETY INSTRUCTIONS
Accidents occur less frequently when instructions are followed, the operator is safety conscious and the engine is properly maintained.
Some of the most common hazards are discussed below, along with the best way to protect yourself and others.
•
•
•
•
•
•
•
•
Carefully read the owners manual.
Always wear proper eye protection when servicing engines.
Follow the instructions in this manual carefully.
Familiarize yourself with all controls and know how to stop the engine quickly in case of an emergency.
Keep children away from the engine and do not let them operate it. Keep children and pets away from the area of operation.
Operate this engine in well-ventilated areas. NEVER run engine indoors.
Stop engine and remove spark plug prior to servicing.
Only use parts that meet LCT specifications.
•
Only use tools designed for the product you’re servicing.
•
Always install new gaskets, o-rings, fittings, when reassembling.
•
Always torque nuts and bolts with inner bolt or larger diameter bolt first. Check torque specification chart in the back of the
manual for proper values. Tighten nuts and bolts diagonally to proper value.
•
Always clean parts before reassembly in proper solvents.
•
Always lubricate any moving parts before reassembly.
REV. 040708
Copyright © 2008 Liquid Combustion Technology, LLC
Service Manual: 3
Safety Information
Exhaust / Muffler
Engine exhaust is dangerous because of intense heat and emission of carbon monoxide (poisonous gas).
• The muffler becomes very hot during operation and remains hot for a while after stopping the engine. Do not touch the muffler
while it is hot. Do not store the engine until it is cool.
• To prevent fire hazards and for adequate ventilation, keep the engine at least 3 feet (1 meter) away from building walls and other
equipment during operation. Do not place flammable objects close to the engine.
DANGER
• Carbon Monoxide Hazard: Exhaust gas contains carbon monoxide, a poisonous gas. Avoid inhalation of exhaust gas. Always run
the engine in a well-ventilated area. Never run the engine indoors.
Other Equipment
Review the instructions provided with the equipment powered by this engine for any additional safety precautions that should be
observed in conjunction with engine startup, shutdown, operation, or protective safety gear that may be needed to operate the
equipment.
WARNING
Do not touch hot sections of engine (see muffler figure
above). The hot sections of the engine can cause severe
burns.
Refueling the Engine
Gasoline is extremely flammable, and gasoline vapor can explode. When refueling the engine, take the following precautions.
•
•
•
•
•
•
•
REV. 040708
Perform when the engine is cool.
Refuel outdoors in well-ventilated areas.
The engine should not be running.
Make sure the engine is grounded to prevent static electrical spark.
Do not smoke or use cell phones when refueling.
Keep away from flames or sparks.
If spillage occurs, be sure all areas are dry and vapor has dissipated prior to starting the engine.
Copyright © 2008 Liquid Combustion Technology, LLC
Service Manual: 4
General Specifications
Item
Specification
Maximum speed
3850±50rpm
Maximum Torque
9.25lb-ft @2600rpm
Maximum HP*
6.25hp @3600rpm
Idle speed
2100±50rpm
Compression ratio
8.5:1
Displacement
208cc
Cast iron sleeve
yes
Bore x stroke
70mm x 54mm
P.T.O Rotation
CCW (measured from PTO side)
Fuel
regular unleaded gasoline (do not use E85)
Fuel Capacity
0.91 gallons (measured from dry tank)
Compression release
yes
Dry weight
15kg - 33lbs
Low oil shut off
no
Oil Capacity
0.64 qts (measured from dry sump)
Fuel shut off valve
yes
*The Horse Power rating of the engine(s) is the measures output of a production engine in accordance with SAE
J1349 at 3600 rpm. Performance may vary from one engine to another on this value due to manufacturing process
variations. All attempts are made to be consistent during the manufacturing process to keep performance variation
to a minimum. Actual power output of final application will vary based on many circumstances, including (but not
limited to) the required operating speed of the application, environmental conditions and proper implementation of
manufacturer’s maintenance schedule recommendations.
REV. 040708
Copyright © 2008 Liquid Combustion Technology, LLC
Service Manual: 5
General Troubleshooting
Engine will not start:
1. Check oil level- Do you have the correct amount of oil? (Reference Oil Fill Section, pg. 12)
Remedy: Oil should be visible and to the top 2 threads of the LOWEST oil fill spout.
2. Is on/off switch on?
Remedy: Turn to the on position.
3. Do you have fuel in the fuel tank?
Remedy: Add fuel.
1
2
4. Is the fuel petcock turned to the on position?
Remedy: Turn to the on position.
5. Was the engine choked?
Remedy: When starting the engine the choke lever should be pushed left to the on position and after starting
pushed right to the off position. If engine still does not start move to half choke and pull twice.
6. Is the spark plug boot securely fastened to the spark plug?
Remedy: Slide over spark plug and fit securely.
7. Has the fuel being used been purchased within the last three months and was it stored in a plastic container?
Remedy: Replace old fuel with new fuel.
8. Is the engine flooded?
Remedy: Remove spark plug and replace with any of the following plugs.
• BPR6ES (NGK) / Torch Plug
• Champion Model: RN9YC (some tables show RN9YCC)
• NGK Model: BPR6ES
• BOSCH Model: WR6DC
• NOTICE
Using an incorrect spark plug may cause engine damage.
REV. 040708
Copyright © 2008 Liquid Combustion Technology, LLC
Service Manual: 6
3
General Troubleshooting
Engine stops running:
1. Has the fuel being used been purchased within the last three months and was it stored in a plastic container?
Remedy: Replace old fuel with new fuel.
2. Is the air filter dirty?
Remedy: Replace air filter element if dirty. Clean prefilter of any dirt or dust. (See pg. 13)
3. Was the engine choked?
Remedy: When starting the engine the choke lever should be pushed left to the on position and after
starting pushed right to the off position. If engine still does not start move to half choke and pull twice.
4. Is the spark plug corroded?
Remedy: Remove spark plug and replace with any of the following plugs.
• BPR6ES (NGK) / Torch Plug
• Champion Model: RN9YC (some tables show RN9YCC)
• NGK Model: BPR6ES
• BOSCH Model: WR6DC
• Denso Model: XXXX
• NOTICE
Using an incorrect spark plug may cause engine damage.
5. Has the engine run out of fuel?
Remedy: Refuel engine.
1
2
3
6. Is the fuel petcock turned to the on position?
Remedy: Turn to the on position.
7. Is the throttle set too low?
Remedy: Increase the throttle.
REV. 040708
Copyright © 2008 Liquid Combustion Technology, LLC
Service Manual: 7
Standard and Service Limit Specifications
Crankshaft
Crankshaft O.D.
Valves
Valves clearance IN
30.985mm
Intake
0.15±0.02 mm
Exhaust
0.2±0.02 mm
Stem OD
Intake
5.49mm
Exhaust
5.45mm
Guide ID
Intake
5.50mm
Exhaust
5.50mm
Stem Clearance
Camshaft
Intake
0.01—0.04mm
Exhaust
0.05—0.08mm
Seat width
1.1mm
Spring free length
31mm
Cam height
Intake
27.6-27.8mm
Exhaust
27.7-27.8mm
Camshaft O.D.
14.984mm
Crankcase cover
Camshaft holder I.D.
15mm
Spark plug
Gap
0.7-0.8mm
Spark plug cap
Resistance
7.5-12.5
Ignition coil
Resistance primary coil
0.8-1.0Ω
Secondary coil
Air gap (at flywheel)
REV. 040708
5.9-7.1kΩ
0.4±0.2
Copyright © 2008 Liquid Combustion Technology, LLC
Service Manual: 8
Advanced Troubleshooting
– For Authorized LCT Technicians
ENGINE
Complaint
Symptom and possible causes
Engine will not start, or is hard
to start
Compression too low
Remedy
1. Valves out of adjustment
Adjust
2. Worn valve guides or poor seating of valves
Repair or Replace
3. Mistiming valves
Adjust
4. Excessively worn piston rings
Replace
5. Worn-down cylinder bore
Replace
6. Poor seating of spark plug
Retighten
7. Failed head gasket
Replace
Plug not sparking
1. Fouled spark plug
Replace
2. Wet spark plug
Dry off
3. Defective ignition coil
Replace
4. Spark plug wire damaged
Replace
5. Kill switch in “OFF” position
Switch to “On”
6. Ignition coil air gap is too wide
Reset
7. Ignition coil failure
Replace
No fuel reaching the intake manifold
Engine idles poorly
Engine stalls easily
REV. 040708
1. Clogged fuel filter or fuel line
Replace
2. Dirty/gummed up carburetor
Clean
3. Fuel petcock is turned off
Turn on
4. Fuel tank is empty
Fill
1. Out of adjustment tappet clearance
Adjust
2. Poor seating of valves
Replace or Repair
3. Defective valve guides
Replace
4. Worn down camshaft
Replace
5. Too wide spark plug gap
Adjust or replace
6. Defective ignition coil
Replace
7. Ignition coil air gap too wide
Adjust
8. Dirty/gummed up carburetor
Clean
9. Stale fuel
Replace
1. Dirty/gummed up carburetor
Clean
2. Fouled spark plug
Replace
3. Clogged fuel line
Replace
4. Valves out of adjustment
Adjust
Copyright © 2008 Liquid Combustion Technology, LLC
Service Manual: 9
Noisy Engine
Excessive Valve Chatter
1. Too large valve clearance
Adjust
2. Weakened or broken valve spring
Replace
3. Worn tappet or cam lobe
Replace
4. Worn and burnt camshaft journal
Replace
Noise seems to come from piston
1. Worn down piston or cylinder
Replace
2. Fouled with carbon combustion chamber
Clean
3. Worn piston pin or piston pin bore
Replace
4. Worn piston rings or ring grooves
Replace
Noise seems to come from crankshaft
1. Rattling bearings due to wear
Replace
2. Worn and burnt main bearings
Replace
3. Worn and burnt pin bearing
Replace
4. Too large endplay
Adjust
Noise seems to come from outside of engine
1. Loose trim item
Engine runs poorly in high speed Defective engine internal/electrical parts
range
1. Weakened valve springs
Tighten
Replace
2. Worn camshaft
Replace
3. Valve timing out of adjustment
Adjust
4. Too narrow spark plug gaps
Adjust
5. Defective ignition coil
Replace
6. Clogged air cleaner element
Replace
7. Clogged fuel line, resulting in inadequate fuel supply
to carburetor
Replace
8. Worn bearings
Replace
9. Blown head gasket
Replace
10. Ignition coil air gap too wide
Adjust
11. Dirty/gummed up carburetor
Clean
12. Stale fuel
Replace
Defective air flow system
1. carburetor gasket leak - sucking air causing engine to
run lean
Engine lacks power
Replace
Defective engine internal/electrical parts
1. Loss of valve clearance
Adjust
2. Weakened valve springs
Replace
3. Out of adjustment valve timing
Adjust
4. Worn piston ring or cylinder
Replace
5. Poor seating of valves
Replace
6. Fouled spark plug
Replace
7. Incorrect spark plug
Replace
8. Clogged air filter element
Replace
9. Carburetor gasket leak - sucking air causing engine to Replace
run lean
REV. 040708
10. Too much engine oil
Adjust
11. Air fins clogged on engine causing to overheat
Remove debris
12. Not enough oil in engine
Adjust
Copyright © 2008 Liquid Combustion Technology, LLC
Service Manual: 10
Dirty or heavy exhaust smoke
No sparking or poor sparking
Spark plug soon become fouled
with carbon
Spark plug become fouled too
soon
Spark plug electrodes overheat
or burn
1. Too much engine oil in the engine
Adjust
2. Worn piston rings or cylinder
Replace
3. Worn valve guides
Replace
4. Scored or scuffed cylinder wall
Replace
5. Worn valve stems
Replace
6. Defective stem seal
Replace
7. Worn oil ring side rails
Replace
1. Defective ignition coil
Replace
2. Defective spark plug
Replace
3. Open-circuit wiring connection
Check and repair
1. Incorrect gasoline
Replace
2. Dirty air cleaner element
Replace
3. Too cold spark plug
Use hotter plug
1. Worn piston rings
Replace
2. Worn piston or cylinder
Replace
3. Excessive clearance of valve stems in valve guides
Replace
4. Worn valve stem oil seal
Replace
1. Too hot spark plug
Use colder plug
2. Overheated the engine
Tune up
3. Loose spark plug
Tighten
4. Too lean fuel mixture
Check for air leak
Spark Plug Service
Recommended spark plugs: BPR6ES (NGK) / Torch Plug
Cross References
• Champing plug cross reference is: RN9YC (some tables show RN9YCC)
• NGK plug cross reference is: BPR6ES
• BOSCH plug cross reference is: WR6DC
• NOTICE
Using an incorrect spark plug may cause engine damage.
1. When engine is cool, disconnect the spark plug cap and remove any debris from the spark plug area with high pressure air.
2. Remove the spark plug with a 13/16-inch spark plug wrench.
3. Inspect the spark plug. Replace it if the electrodes are worn or if the insulator is cracked or chipped. Spark plug gap should
be set to 0.027 - 0.030 inches.
4. Install the spark plug carefully to avoid cross threading. Screw in spark plug by hand until it stops turning.
5. Tighten the spark plug with a 13/16-inch spark plug wrench. Tighten 1/4 turn after the spark plug seats.
• NOTICE
A loose spark plug can overheat and damage the engine. Over-tightening the spark plug can damage the threads in the
cylinder head.
6. Attach the spark plug cap. Ensure spark plug cap snaps into place securely.
REV. 040708
Copyright © 2008 Liquid Combustion Technology, LLC
Service Manual: 11
Engine Oil Level Check
Check the engine oil level with the engine stopped and with the engine in a level position.
1. Remove either side mounted filler cap dipstick or high oil fill dipstick and wipe it clean.
2. Insert and remove the dipstick without screwing it into the filler neck. Check the oil level shown on the dipstick.
3. If the oil level is low, fill to the edge of the oil filler hole with the recommended oil.
4. Securely screw in the filler cap/dipstick. Running the engine with a low oil level can cause engine damage.
Always check the engine oil before start up.
Fill if oil is
below letter
“L” on the
filler cap
Fill if oil
is below
“Add”
on the
dipstick
Engine Oil Change
Drain the used oil while the engine is warm. Warm oil drains quickly and completely.
Avoid contact with hot oil.
1. Place a suitable container below the engine to catch the used oil then remove the
filler cap/dipstick and the drain plug.
2. Allow the used oil to drain completely, then reinstall the drain plug, and tighten
it securely. Do not over tighten. Dispose of used motor oil in a manner that is
compatible with the environment. We suggest you take used oil in a sealed
container to your local recycling center or service station for reclamation. Do not
throw used oil in the trash, pour it on the ground, or pour down a drain.
3. With the engine in a level position, fill to the outer edge of the oil filler hole with the
recommended oil. (see fill limits right)
Max Upper
Level
Max Lower
Level
• NOTICE
Running the engine with a low oil level can cause engine damage.
4. Securely screw in the filler cap/dipstick.
Engine Oil
Recommendations
Engine oil affects performance and service life. Use 4-stroke automotive
detergent oil.
SAE 10W-30 is recommended for general use. Other viscosities shown in
the chart may be used when the average temperature in your area warrants.
The SAE oil viscosity and service classification are in the API label on the oil
container. The manufacturer recommends you use API SERVICE category
SJ engine oil, or better.
REV. 040708
Copyright © 2008 Liquid Combustion Technology, LLC
Service Manual: 12
Governor Adjustment
1.
Loosen the governor arm pinch bolt nut and move the arm to fully open the throttle.
2. Rotate the arm shaft in the same direction as far as it can go
3.
Start the engine, all it to reach normal operating temperature. Run the engine at maximum speed by moving adjusting the
throttle lever.
4. Adjust the throttle lever limiting screw so the throttle lever cannot move past that point.
Limiting Screw
Pinch Bolt/Nut
Governor Arm
Throttle Assembly
Valve Adjustment
Specs:Exhaust .007 -.009
Intake: .005 - .007
1. Remove spark plug and hold thumb over hole
2. Slowly rotate engine until air flow (pressure) is felt
3. Position piston at top dead center (TDC)
Air Filter Replacement
1. Remove air filter cover by disassembling 8mm screws.
Prefilter
2. Remove prefilter and clean if needed.
Element
3. Replace air filter element
Cover
8mm Screws
4. Reinstall pre filter
5. Attach air filter cover to back with 8mm screws
Back
REV. 040708
Copyright © 2008 Liquid Combustion Technology, LLC
Service Manual: 13
Maintenance Schedule
Normal Operating Conditions (less than 40 hrs. per year)
EACH USE
Engine Oil Level
Engine Oil
Air Filter
Spark Plug*
Cylinder/Head Fins
Oil Leaks
Bolts
Fuel Hose Clamps
FIRST
MONTH
EVERY
6 MONTHS
Replace
Replace
ONCE
A YEAR
Check
Check
Clean
Clean / Replace
Replace
Clean
Check
Check
Check
* Spark plug gap to be set to 0.027 - 0.030 inches.
Extreme Operating Conditions (greater than 40 hrs. per year)
Engine Oil Level
Engine Oil
Air Filter
Spark Plug*
Cylinder/Head Fins
Oil Leaks
Bolts
Fuel Hose Clamps
EACH USE
Check
EVERY 40 HOURS
Replace
Check
Check
Check
Check
* Spark plug gap to be set to 0.027 - 0.030 inches.
NOTE
Following proper maintenance is critical under extreme
operating conditions.
REV. 040708
Copyright © 2008 Liquid Combustion Technology, LLC
Service Manual: 14
Service Kit Breakdown
1
SK208-1000
CYLINDER HEAD SERVICE KIT
16A
SK208-8300
CALIFORNIA FUEL TANK CAP SERVI
2
SK208-1001
PUSH ROD SERVICE KIT
17
SK208-2400
CARBURETOR SERVICE KIT
3
SK4500
VALVE COVER SERVICE KIT
18
SK208-2500
IGNITION COIL SERVICE KIT
4
SK208-1300
CYLINDER SERVICE KIT
19
SK2750
IGNITION MODULE SERVICE KIT
5
SK208-1400
PISTON SERVICE KIT
20
SK1500
SPARK PLUG SERVICE KIT
6
SK208-1500
CONNECTING ROD SERVICE KIT
21
SK208-2600
ENGINE ON/OFF SWITCH SERVICE I
7
SK208-1600
CAMSHAFT SERVICE KIT
22
SK208-2700
LOW OIL SENSOR SERVICE KIT
8
SK208-1700
FLYWHEEL SERVICE KIT
23
SK5930
LOW OIL SENSOR MODULE SERVIC
9
SK208-4000
COOLING FAN SERVICE KIT
24
SK208-2800
THROTTLE CONTROL SERVICE KIT
10
SK208-1800
CRANKSHAFT SERVICE KIT
25
SK208-2900
GOVERNOR GEAR SERVICE KIT
11
SK208-2002
AIR FILTER ASSEMBLY SERVICE Kit
26
SK208-3000
GOVERNOR ARM SERVICE KIT
12
SK208-2120
PAPER FILTER SERVICE KIT
27
SK208-3100
GOVERNOR CRANK SERVICE KIT
12A
SK208-9001
FOAM FILTER SERVICE KIT
28
SK208-3200
RECOIL STARTER SERVICE KIT
13
SK208-2100
49 STATE MUFFLER SERVICE KIT
29
SK208-3300
STARTER CUP SERVICE KIT
13A
SK208-9000
CALIFORNIA MUFFLER SERVICE Kit
30
SK208-3400
BLOWER HOUSING SERVICE KIT
14
SK208-2200
49 STATE FUEL TANK SERVICE KIT
31
SK208-3600
PTO COVER SERVICE KIT
14A
SK208-8200
CALIFORNIA TANK SERVICE KIT
32
SK208-3900
SEAL SERVICE KIT
15
SK208-2220
FUEL TANK PETCOCK SERVICE KIT
33
SK208-3700
HIGH OIL FILL TUBE SERVICE KIT
16
SK208-2300
49 STATE FUEL TANK CAP SERVICE
34
SK208-3800
SPARK PLUG BOOT SERVICE KIT
REV. 040708
Copyright © 2008 Liquid Combustion Technology, LLC
Service Manual: 15
Crankshaft Height Dimensions
*Drawings do not accurately represent actual engine appearance.
REV. 040708
Copyright © 2008 Liquid Combustion Technology, LLC
Service Manual: 16
PTO & Mounting Configurations
2.200"
41.25+0.025
3.622"
4-5/16-24
Mounting Foot Specs
REV. 040708
Copyright © 2008 Liquid Combustion Technology, LLC
Service Manual: 17
Torque Specs
Item
Torque(N.M)
Drain bolt
15~18
Oil sensor
5~8
The bolt fix wire of oil sensor
5~8
Oil level cap ass
6~8
Spark plug
20~25
Stud A of inlet air admission
9.8~12
Stud B of exhaust gas
12~15
Pivot bolt M8
22~25
Connecting rod bolt
12~14
Flange bolt
18~24
Distributor M6*27
9.8~12
Flange bolt of cylinder head M8*55
22~25
Pivot adjusting nut for inlet, exhaust valve
9.8~10
Flange bolt for head cover
9.8~12
The bolt for crankcase cover M6*14
9.8~12
Side plate M6*12
9.8~12
Support of governor
9.8~12
Nut for carburetor M6
9.8~12
Nut for muffler M8
13~15
Spark plug
20~25
Rocker bolt
20~25
Connecting rod bolt
15~20
Cover bolts
20~26
Cylinder head bolt
26~35
Flywheel nut
60~74
Spark plug electrode gap
0.7~0.8mm
Ignition gap
0.4~0.6mm
Inlet valve gap
0.15±0.02mm
Exhaust valve gap
0.20±0.02mm
High oil fill bracket bolts
8~10
Cylinder head
26~36
Flywheel Nut
60~75
Ignition Coil
10~12
Valve cover
6~7
Blower housing and recoil
10~12
Fuel tank
10~12
Carburetor nuts
10~12
Exhaust stud nuts
13~15
Fuel Petcock
5~8
Oil drain
15~18
Oil sensor module
5~8
Control bracket
8~10
Muffler Shield
8~10
Muffler Support Bracket Bolt
8~10
REV. 040708
Copyright © 2008 Liquid Combustion Technology, LLC
Service Manual: 18