1
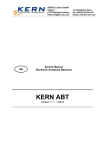
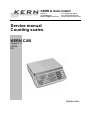
KERN & Sohn GmbH
Ziegelei 1
D-72336 Balingen
E-Mail: [email protected]
Tel: +49-[0]7433- 9933-0
Fax: +49-[0]7433-9933-149
Internet: www.kern-sohn.com
Service manual
Counting scales
KERN CXB
Version 1.3
4/2009
GB
CXB-SH-e-0913
GB
KERN CXB
Version 1.3 4/2009
Service manual
Counting scales
Table of Contents
1
Basic information _______________________________________________ 3
2
Introduction ____________________________________________________ 4
3
General Information _____________________________________________ 4
4
Error messages_________________________________________________ 5
5
Explanation of display ___________________________________________ 6
5.1
Symbol indicator _________________________________________________ 7
6
Explanation of keyboard _________________________________________ 8
7
External calibration______________________________________________ 9
7.1
Calibration of non-approval models (CXB) ____________________________ 9
7.2
Back to the original value of calibration_______________________________ 9
7.3
Calibration of approval models (CXB-M) _____________________________ 10
8
Service mode access ___________________________________________ 11
9
Linearity calibration ____________________________________________ 12
10 Spec. calibration _______________________________________________ 15
10.1
Reference values for capacity setting _______________________________ 17
11 Temperature calibration _________________________________________ 18
11.1
Indoor air (normal) temperature calibration___________________________ 18
11.2
High temperature calibration_______________________________________ 19
11.3
Low temperature calibration _______________________________________ 20
11.4
Check / Delete temperature calibration data __________________________ 20
12 Spare parts ___________________________________________________ 21
2
CXB-SH-e-0913
1 Basic information
Grundlegende Hinweise
The device must be repaired only by trained specialist staff or personnel with
professional formation (such as a repair-specialist accredited by law
concerning verification).
The service manual is obligatory for repair work.
After repair, original conditions of the device have to be restored.
Only original spare parts should be used.
Instructions about conformity-evaluated scales:
Repair must be carried only at 100% compliance with the type approval.
A violation of this specification will result in a loss of the type approval!
After successful repair the balance will have to be reverified before it can be
used again in a statutorily regulated field.
Das Gerät darf nur von geschultem oder beruflich ausgebildetem
Fachpersonal (z. B. eichrechtlich anerkannter Instandsetzer) repariert werden.
Die Serviceanleitung ist bindend für Reparaturen.
Das Gerät muss nach erfolgter Reparatur wieder in den Originalzustand
zurückversetzt werden.
Es dürfen nur Originalersatzteile verwendet werden.
Hinweis zu konformitätsbewerteten Waagen:
Reparatur darf nur in 100% -iger Übereinstimmung mit der
Bauartzulassung erfolgen. Ein Verstoß gegen diese Vorgabe führt zum Erlöschen
der Bauartzulassung!
Nach erfolgreicher Reparatur muss eine Nacheichung erfolgen, um die Waage
wieder im gesetzlich geregelten Bereich verwenden zu können.
CXB-SH-e-0913
3
2 Introduction
1. There are 3 ways to rectify the linearity for setting the temperature calibration,
which can make the scale more accurate.
n Inside air temperature (normal temperature)
o High temperature
p Low temperature
♦ It is adequate to only do the inside air temperature calibration. Upon the
customer’s request, we also offer the high temperature and low temperature
calibration as well.
2. Sampling speed is also depended on the user’s need (01~05).
3. Linearity calibration, capacity setting and temperature calibration can be set
separately.
4. Weighing unit: g or kg (depending on model)
5. Tare range is full range tare.
3 General Information
1. The newly manufactured scale without passing the calibration and setting process
will automatically enter the linearity calibration mode. After the linearity calibration
procedure is done, the program will automatically enter the Specification Setting
Mode.
2. Zero Range
The internal value should be in between 120,000~250,000 with the platter on
and without any load (check Æ see chapter 10 “Spec. calibration”)
3. Maximum Capacity
The internal value should be over 300,000 when the scale is fully loaded.
4. When rubbing the tetragon, the inaccuracy value should be smaller than 10
divisions.
5. Tare range is full range tare.
4
CXB-SH-e-0913
4 Error messages
Non-approval models:
E1 ⇒ ZERO over 300,000 internal value.
E2 ⇒ ZERO below 10,000 internal value.
Approval models:
E1 ⇒ ZERO over the zero position in weight calibration + 10% of full scale.
E2 ⇒ ZERO over the zero position in weight calibration - 10% of full scale.
All models:
E4 ⇒ ZERO is unstable.
E5 ⇒ Turning on machine core value is under 0.
E6 ⇒ Core value is over 250,000.
E7 ⇒ Core value is below 120,000.
- - OL - ⇒ The weighing range is exceeded.
NOTES:
•
Non-approval models (CXB): After E1, E2 or E4 is displayed press
to continue.
•
Approval models (CXB-M): After E1, E2 or E4 appear, set the jumper SWA1
on main board to “ADJ” position and press
to return the counting
mode.
Then press
+
+
at the same time followed by pressing
to access calibration (see chap. 7.3).
CXB-SH-e-0913
5
5 Explanation of display
Weight
Loading status display
6
Reference weight
Pieces
CXB-SH-e-0913
5.1 Symbol indicator “3”
Display weight
Here, the weight of your goods is displayed.
Overlay W indicates:
Æ0Å
Zeroing display
PRETARE
Tare in memory
Battery very low
Display reference weight
The reference weight of a sample is shown here. This value is either entered by user
of calculated by balance.
Overlay W indicates:
Placed number of pieces insufficient for reference calculation
Placed reference weight insufficient for reference calculation
Display quantity
Here, all the parts placed on balance are immediately displayed by number.
Overlay W indicates:
M+
Data in summation memory
Stability display
Battery charge status display
red
green
CXB-SH-e-0913
Battery is almost discharged
Battery is completely discharged
7
6 Explanation of keyboard
Choice
-
8
Function
•
Number keys
•
Delete key
•
Call counting with tolerance control
•
•
Store reference weights in memory
Call stored reference weights
•
•
Addition in total memory
Call up total memory
•
Delete summation memory
•
•
•
•
•
•
Enter reference weight through weighing
Display reference weight stored last
Enter target number of pieces
Numeric entry reference weight
Display reference weight stored last
Enter target weight
•
•
Zeroing key
Back to weighing mode
•
•
Taring key
Enter numerical tare
CXB-SH-e-0913
7 External calibration
7.1 Calibration of non-approval models (CXB)
♦ Before calibrating, adjust the mini jumper SWA1 to “ADJ” position (see chap. 8)
♦ Observe stable environmental conditions. A warming up time of 30 minutes is
required for stabilization.
Operation
Ensure that there are no objects on the weighing plate.
a W
PRETARE
Press the
key
0
key and keep it pressed down whilst simultaneously operating the
Weight value of calibration weight is flashing on display. However, you may enter a
value of your choice via the number keys. *
a W
PRETARE
3000
CAL
Carefully place calibration weight in the centre of the weighing plate. Calibration
will be carried out automatically after dead stop control.
Remove calibration weight during count down to zero.
The balance returns automatically into weighing mode. An error message will
appear on the display should a calibration error occur or should the calibration
weight be incorrect. Turn balance off, then restart it and repeat the calibration
process.
* The calibration should be made with the recommended calibration weight (see
chap. 1 "Technical data" in the operating manual).
Note
Use the
key to exit calibration mode. The balance returns to weighing mode.
7.2 Back to the original value of calibration
(only non-approval models)
n Press and hold
key followed by pressing
key until the scale is counting
backward to zero, then release it.
o The scale will show the original value, which is the value setting at the factory.
CXB-SH-e-0913
9
7.3 Calibration of approval models (CXB-M)
♦ Before calibrating, adjust the mini jumper SWA1 to “ADJ” position (see chap. 8)
♦ Observe stable environmental conditions. A warming up time of 30 minutes is
required for stabilization.
Operation
Ensure that there are no objects on the weighing plate.
Ö Press
+ 1 + 5 keys
Ö Press
key
The display shows:
0.000
M+
0
194452
(Example)
Ö Press
key
The display shows:
15.000
M+
0
194452
(Example)
Weight value of calibration weight is flashing on display.
Ö Carefully place calibration weight in the centre of the weighing plate.
Ö Press
key
Calibration will be carried out automatically after dead stop control.
Ö Remove calibration weight during count down to zero.
The balance returns automatically into weighing mode. An error message will
appear on the display should a calibration error occur or should the calibration
weight be incorrect. Turn balance off, then restart it and repeat the calibration
process.
* The calibration should be made with the recommended calibration weight (see
chap. 1 "Technical data" in the operating manual).
10
CXB-SH-e-0913
8 Service mode access
♦ Access to the service mode is controlled by jumper SWA1 on the main PCB. The
jumper has two positions LOCK, which prevents access to the service mode and
ADJ, which allows access to the calibration and configuration routines.
♦ SWA 1 jumper is located adjacent to the RF screening cover of the main PCB.
♦ Place your balance upside down and remove seal/cap. For calibration and
configuration routines the jumper “SWA1” must be set to position “ADJ”.
Sealing mark / unlocking switch
Position of unlocking switch
Status
To the right
Unlock the balance for calibration process (ADJ)
To the left
Verification position - calibration locked (LOCK)
CXB-SH-e-0913
11
9 Linearity calibration
♦ Before calibrating, please adjust the mini jumper SWA1 to “ADJ” position.
♦ After finish the calibration, please re-adjust the mini jumper SWA1 to
“LOCK” position.
~ Divide the capacity into 5 sections before linearity calibration.
E.g. CXB 30K2 (capacity = 30kg)
Divide it into 5 phases: 3kg, 6kg, 12kg, 12kg, 3kg
(The total calibrated weight should be between 1.1~1.25 times of the capacity
weight. E.g.: 3kg + 6kg + 12kg + 12kg + 3kg = 36kg are 1.2 times of 30kg)
n Turn on the machine, after the scale resets back to zero,
then press
key + 1 key + 6 key (at the same time) to enter the linearity
calibration mode. (Please press 9 key to pass over this linearity calibration
mode.)
Weight
Piece Weight
Pcs
0 0 L.
XXXXXX
key in *n value
display the number of times of calibration
core value
(zero internal value)
♦ *n = the calibrated value of phase X / the calibrated value of 1st phase
[*n = multiplier (2,3,4…) of 1st calibration weight / 1st phase]
♦ *n ⇒ must be an integral
o Press . key
Weight
01 1
Piece Weight
Pcs
XXXXXX
internal value of the phase
12
CXB-SH-e-0913
p Put the 1st weight mass (e.g. weight mass=3kg, *n=1), then press . key
Weight
Piece Weight
02 1
Pcs
XXXXXX
input *n value
internal value of the phase
q Add the 2nd weight mass (e.g. 6kg, in sum 9kg) and input *n value (e.g. *n=2),
then press . key
Weight
Piece Weight
03 1
Pcs
XXXXXX
input *n value, e.g. n=2
internal value of the phase
r Add the 3rd weight mass (e.g. 12kg, in sum 21kg) and input *n value
(e.g. *n=4), then press . key
Weight
Piece Weight
04 1
Pcs
XXXXXX
input *n value, e.g. n=4
internal value of the phase
s Add the 4th weight mass (e.g. 12kg, in sum 33kg) and input *n value
(e.g. *n=4), then press . key
Weight
05 1
input *n value, e.g. n=4
CXB-SH-e-0913
Piece Weight
Pcs
XXXXXX
internal value of the phase
13
t Add the 5th weight mass (e.g. 3kg, in sum 36kg) and input *n value (e.g. *n=1),
then press . key
Weight
Piece Weight
Pcs
06 1
XXXXXX
input *n value, e.g. n=1
u Press
internal value of the phase
key (“CONFIRM” key), the buzzer beeps once
Weight
SYS
Piece Weight
Pcs
UP
v Remove all the weight mass, the scale will reset back to zero automatically,
then the procedures finished.
14
CXB-SH-e-0913
10 Spec. calibration
♦ Before calibrating, please adjust the mini jumper SWA1 to “ADJ” position.
♦ After finish the calibration, please re-adjust the mini jumper SWA1 to “LOCK”
position.
n Turn on the machine, after the scale resets back to zero,
then press
key + 1 key + 7 key (at the same time) to enter the spec.
calibration mode.
Weight
Piece Weight
03001
Pcs
021XX
program version
202053
keyboard default value
(to check keyboard function)
core value
(internal value of zero)
see chapter 3
“General Information“
o Press
key
Weight
Ñ0Ò0
Piece Weight
000
00000
full capacity setting
key in “ full scale+9d ”
(overload function max.+ 9d)
Pcs
000001
preset calibrated value
suggest key in “full scale”
refer to “Approx. 1”
Approx. 1: 0 0 0 0 0 1
a
b c d e
a ⇒ input the division 1 = e.g. 1g / 10g
2 = e.g. 0,2g / 2g
b ⇒ input the decimal point 0 = e.g. 1g
5 = e.g. 0,5g / 5g
1 = e.g. 0,2g
2 = e.g. 0,01kg
3 = e.g. 0,001kg
c ⇒ input the unit of the unit weight 0, 1, 2, 8, 9 (full capacity are 10n of division)
0 = 100
1 = 101
2 = 102
8 = 10-2
9 = 10-1
(x 1)
» CXB 15K1 / CXB 30K2
(x 10)
(x 100)
(x 0.01)
(x 0.1) » CXB 3K0.2 / CXB 6K0.5
Example: CXB 3K0.2 a= 2.
value of a x 10n = Readout
d ⇒ define the keyboard function of
2 x 10-1 = 0,2g
c= 9
; kg/lb ; PST CE keys (use always 1 )
0 = PST CE, unit weight in kg
1 = 10 preset, unit weight in kg (OIML approval model)
2 = kg/lb (1st unit = kg, 2nd unit = lb)
3 = 10 preset, kg/lb (1st unit kg, 2nd unit lb)
4 = PST CE, lb unit only
5 = 10 preset, lb unit only
6 = lb/kg (1st unit lb, 2nd unit kg)
7 = 10 preset, lb/kg (1st unit lb, 2nd unit kg)
CXB-SH-e-0913
15
e ⇒ different versions of models setting
0 = Non-approval model (External calibration is applicable)
1 = OIML approval model (The display resolution should be set at 1/3000,
External calibration is NOT applicable)
4 = Non-approval model (External calibration is NOT applicable)
p After input spec., press
key (not necessary to put the weight mass on the
platter, the calibrated weight value is the reference for the temperature
calibration procedure).
♦ The scale will be self-tested and reset back to zero.
Press
key+ 1 key+ 5 key, then press
key to enter the temperature
calibration mode (see chapter 11).
NOTES:
(1) The last number of full capacity value must be variable number, can be fixed “0”.
(2) The digit and location of preset calibrated value, refer to the location of capacity
digit.
(3) Input capacity + 9d in order to run 9 times overload function.
(4) If max. number of digit is “0”, please input “0”.
(5) Reference values for capacity setting see chapter 10.1.
16
CXB-SH-e-0913
10.1 Reference values for capacity setting
Weighing unit – g –
Weight
CXB 3K0.2
Ñ3Ò0
018
Weight
CXB 6K0.5
Ñ6Ò0
045
Weight
CXB 15K1
Ñ1Ò5
009
Weight
CXB 30K2
Ñ3Ò0
018
Weight
CXB 3K1M
Ñ3Ò0
018
Weight
CXB 6K2M
Ñ6Ò0
045
Piece Weight
30000
Piece Weight
60000
Piece Weight
15000
Piece Weight
30000
Piece Weight
30000
Piece Weight
60000
Pcs
2 1 9 1 0 (1)
Pcs
5 1 9 1 0 (1)
Pcs
1 0 0 1 0 (1)
Pcs
2 0 0 1 0 (1)
Pcs
1 0 0 1 1 (1)
Pcs
2 0 0 1 1 (1)
Weighing unit – kg –
Weight
CXB 15K1
Ñ1Ò5
009
Weight
CXB 30K2
Ñ3Ò0
018
Weight
CXB 3K1M
Ñ0Ò3
009
Weight
CXB 6K2M
Ñ0Ò6
018
Weight
CXB 15K5M
Ñ1Ò5
045
Weight
CXB 30K10M
Ñ0Ò3
CXB-SH-e-0913
009
Piece Weight
15000
Piece Weight
30000
Piece Weight
03000
Piece Weight
06000
Piece Weight
15000
Piece Weight
03000
Pcs
1 3 0 1 0 (1)
Pcs
2 3 0 1 0 (1)
Pcs
1 3 0 1 1 (1)
Pcs
2 3 0 1 1 (1)
Pcs
5 3 0 1 1 (1)
Pcs
1 2 0 1 1 (1)
17
11 Temperature calibration
♦ Before calibrating, please adjust the mini jumper SWA1 to “ADJ” position.
♦ After finish the calibration, please re-adjust the mini jumper SWA1 to “LOCK”
position.
11.1 Indoor air (normal) temperature calibration
n * The scale will be self-tested and reset back to zero.
Press
key+ 1 key+ 5 key, then press
key to enter the temperature
calibration mode.
Weight
Piece Weight
0. 0 0 0
XX
indoor temperature(°C)
o
Pcs
XXXXXX
zero internal value
No weight on the platter, press . key to calibrate zero.
Weight
3 0. 0 0 0
full capacity value
Piece Weight
XX
indoor temperature(°C)
Pcs
XXXXXX
internal value of full capacity
p
Put the full capacity weight on the platter, press . key to calibrate full capacity
value.
q
After scale is stable, it will reset back to zero automatically (remove the weight
mass from the platter before it resets back to zero), then the procedures
finished. Put the weight mass on the platter again to check if the display
shows the accurate weight. If it’s correct, turn off the power, then re-adjust the
mini jumper SWA1 to “LOCK” position.
NOTES:
(1)
The procedures are for the scale without the temperature IC or for the scale in
the normal temperature environment.
(2)
To achieve the accuracy of the scale, please run the high temperature and low
temperature calibration procedures.
(3)
18
The procedures for high temperature and low temperature are totally reversed.
CXB-SH-e-0913
11.2 High temperature calibration
⇒ scales must be in the temperature lab chamber
n
Press
key+ 1 key+ 5 key, then press
key to enter the temperature
calibration mode
Weight
Piece Weight
0. 0 0 0
XX
high temperature(°C)
o
Pcs
XXXXXX
zero internal value
No weight on the platter, press . key to calibrate zero
Weight
3 0. 0 0 0
full capacity value
Piece Weight
XX
high temperature(°C)
Pcs
XXXXXX
internal value of full capacity
p
Put the full capacity weight on the platter, press . key to calibrate full capacity
value.
q
After scale is stable, it will reset back to zero automatically (remove the weight
mass from the platter before it resets back to zero), then the procedures
finished. Put the weight mass on the platter again to check if the display
showing the accurate weight. If it’s correct, turn off the power, then re-adjust
the mini jumper SWA1 to “LOCK” position.
CXB-SH-e-0913
19
11.3 Low temperature calibration
⇒ scales must be in the control room of low temperature
n
Press
key+ 1 key+ 5 key, then press
key to enter the temperature
calibration mode
Weight
Piece Weight
0. 0 0 0
XX
Pcs
XXXXXX
low temperature(°C)
o
No weight on the platter, press . key to calibrate zero
Weight
3 0. 0 0 0
full capacity value
p
zero internal value
Piece Weight
Pcs
XX
low temperature(°C)
XXXXXX
internal value of full capacity
Put the full capacity weight on the platter, press . key to calibrate full capacity
value.
q
After scale is stable, it will reset back to zero automatically (remove the weight
mass from the platter before it resets back to zero), then the procedures
finished. Put the weight mass on the platter again to check if the display
showing the accurate weight. If it’s correct, turn off the power, then re-adjust
the mini jumper SWA1 to “LOCK” position.
11.4 Check / Delete temperature calibration data
n Press
key+ 1 key+ 5 key
Weight
Piece Weight
Sho t
00
show temperature
temperature (°C)
Pcs
XXXXXX
internal value
o Press 2 or 8 key to check the temperature calibration data.
p Press 2 or 8 key to select the desirable data, and double-press . key to
delete it.
20
CXB-SH-e-0913
12 Spare parts
CXB-SH-e-0913
21
No.
1
2
3
4
5
6
7
8
9
10
11
12
13
14
15
16
17
18
19
20
21
22
23
24
25
26
27
28
29
30
31
32
33
34
35
36
37
38
39
40
41
42
22
Description
Switch on/off (2 pin)
Power socket
Level
Buckle plug (HP-13)
Terminal Cover (male)
Round head screw M3*6
Round head screw M4*6
Round head screw TP2 3*8
Flat head screw M3*10
Round head screwTP2 4*16
Hexagon screw M4*12
Round head screw M4*25 W/10
Hexagon screw M4*16
Washer 6*13
1/4 spring washer
Nut 3*6
Battery Cap Foam
Power nameplate 230V AC
Power sticker
Dust cover
FD aluminum support
FD aluminum bracket
Battery 6V/4AH
X2 capacitor 0.1µF/275V(P=15)
Wire Fixer
Front panel
Rear panel
Keypad
Keypad circuit
Load cell
9501 battery fixer
AE washer 2.0mm
FD Pad for Cockroach Filter Cap
9910 Upper noise Filter Cap t=0.8mm
9910 Lower Noise Filter Cap t=0.8mm
FD Anti-cockroach plastic
Waterproof rubber 27*18*1mm
Main board
FD plastic pan
FD stainless steel pan
Adjust feet
Battery cover (blue)
Q’ty
1
1
1
1
5
2
2
1
1
4
1
1
4
4
4
3
1
1
1
1
1
1
1
1
1
1
1
1
1
1
1
2
4
1
1
4
1
1
1
1
4
1
CXB-SH-e-0913
43
44
45
46
47
48
49
50
51
52
Upper housing
Lower housing
AE Sealing
Round head screw M4*8
Multi wire 150mm
Alloy hexagon screw M6*16
Power cable
Capacity sticker
Spring
Transformer 115/230V-10V
CXB-SH-e-0913
1
1
1
6
1
4
1
1
1
1
23