1
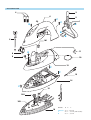
Steam Iron Mistral
GC 2015
Philips Domestic Appliances and Personal Care
Service Manual
PRODUCT INFORMATION
TECHNICAL INFORMATION
Features
Voltage
: 120 V, 220-240 V.
- Colour white/peach
Frequency
: 50-60 Hz
- Ceralon soleplate
Power consumption
: 1300 W, 1600 W.
- Tank capacity (200 ml)
Water advice
: Suitable for tap water use. However if
the tap water in your area is very hard,
we advise you to mix it with a equal
portion of distilled water or to use
distilled water only.
- Steam rate (25 g/min)
- Calc clean
- Shot of steam (45 g/min)
- Vertical steam
- Integrated cord winder with clip
- Length of cord : 1.9 m.
Soleplate
Ceralon, the name indicates the strong combination of a non-stick
coating (“lon”) blended with ceramic (“Cera”) particles. The
soleplate is coated with Ceralon material which is smooth gliding,
high scratch resistance and good durability advantage over the non
stick coatings.
Calc clean
The integrated Calc clean function ensure a longer lifetime using
normal tap water by removing the scale out of the steam chamber.
Shot of steam (S.O.S)
The shot of steam knob releases a powerful shot of steam boost
(up to 45 g/min), created by a separate shot of steam area. This
helps getting rid of stubborn wrinkles easily.
Vertical Steam
The same shot of steam button can be used in a vertical position
for curtains or hanging garments.
This product meets the requirements regarding
interference suppression on radio and TV.
Published by Philips Domestic Appliances and Personal Care
4322 277 00631
01/05
Printed in the Netherlands
© Copyright reserved
Subject to modification
DISASSEMBLY ADVICE + PARTS LIST
BACKPLATE 1
DIAL 10
COVER 14
SWIVEL 2
LIGHT CONDUIT 11
THERMOSTAT BUSH 15
CORDSET 3
TANK SET 12
SOLEPLATE 16
LIGHT 13
SEALING SET 7
Remove Screw A 1x
Remove Backplate 1
Remove Screw B 2x
(cord clamp)
Remove Screw A 1x
Remove Backplate 1
Remove Screw B 2x
(cord clamp)
Remove Cord set 3
Remove Dosing unit 5
Remove Screw D 1x
Remove Operation knob 4
Remove Screw C 2x
Remove Inlay 6
Remove Dial 10
Remove Screw E 1x
OPERATION KNOB 4
DOSING UNIT 5
INLAY 6
PUMP 8
NOZZLE 9
Remove Screw A 1x
Remove Backplate 1
Remove Screw B 2x
(cord clamp)
Remove Cord set 3
Remove Dosing unit 5
Remove Screw D 1x
Remove Operation knob 4
Remove Screw C 2x
Remove Inlay 6
Pos
Description
1.
2.
3.
4.
5.
6.
7.
8.
9.
10.
Backplate
Swivel
Cordset EU
Operation knob
Dosing unit
Inlay
Sealing set.
Pump
Nozzle
Dial (prtd Ita/Spa)
Dial (Ger/Swe)
Dial (Fre/Du)
Light conduit
Tank set (printed)
Lamp
Cover
Thermostat bush
Soleplate + thermostat
11.
12.
13.
14.
15.
16.
Remove Screw A 1x
Remove Backplate 1
Remove Screw B 2x
(cord clamp)
Remove Cord set 3
Remove Dosing unit 5
Remove Screw D 1x
Remove Operation knob 4
Remove Screw C 2x
Remove Inlay 6
Remove Dial 10
Remove Screw E 1x
Remove Tank set 12
Remove Screw F 3x
Romove Cover 14
Consist of
Service code
4822 441 12291
4822 325 10229
4239 000 08070
9965 000 10616
4239 021 07860
4239 021 08080
4822 310 11269
4822 360 10416
4822 479 20254
4239 021 09620
4239 021 09570
4239 021 08200
4239 025 99590
4239 021 08030
4239 020 90650
4239 026 01710
4822 532 61258
4239 021 08340
102,103
101
N
RESISTOR
HEATING
UNIT
INPUT
LAMP
L
E
FUSE
THERMOSTAT
EXPLODED VIEW
3
4
6
2
C
1
C
A
D
B
B
5
101
11
E
8
9
10
12
F
F
13
14
F
15
102
103
16
Screws :
d
x
l
A,B,C,D,E
F
G
3.5 x 16.5 mm
4.0 x 9.0 mm (with washer)
4.0 x 9.0 mm
IMPORTANT + ADJUSTMENTS AND CONTROLS
IMPORTANT
Due to high voltage of the iron, only the specified cordsets must be used.
NOTES :
1) For standardisation reasons :
Dial
Soleplate
Type plate
: With English/Spanish text only.
: Ceralon soleplate will be provided for all models.
: No info. about the typenumber and voltage has been stamped onto the typeplate.
When replacing the typeplate, engrave at least the typenumber onto the typeplate with a sharp object.
2) Parts with numbers from 100 and higher, cannot be ordered seperately.
3) After the product has been repaired, it should function properly and has to meet the safety requirements and
legal regulations as laid down and officially established at this moment.
ADJUSTMENTS AND CONTROLS
Thermostat
Thermostat, fitted to the soleplate 16 has already been adjusted by the supplier and secured by glue. To avoid mal-function of the
iron, NEVER re-adjust the thermostat.
NOTE : the thermostat can only be ordered together with the soleplate assembly 16.