1
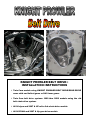
KNIGHT PROWLER BELT DRIVE®
INSTALLATION INSTRUCTIONS
Twin Cam models using KNIGHT PROWLER BELT DRIVE/GEAR DRIVE
cams with our Helical gears or S&S inner gears.
Twin Cam belt drive systems 1999 thru 2006 models using the old
belt chain drive system.
All 06-dyna and 2007 & UP roller link chain drive models.
All 06-DYNA and 2007 & Up gear drive models
KNIGHT PROWLER BELT DRIVE
Installation Procedures
Professional Mechanics ONLY:
Harley Davidson Twin Cam engine mechanics.
Read installation instructions thoroughly so that you have a
complete understanding of the task before proceeding with
each step.
STEP 1:
Place bike on suitable stand where rear wheel can be rotated in 4th or 5th gear when
necessary.
STEP 2:
Remove front exhaust pipe. If necessary, remove as a one-piece unit.
*Tip – Removing front floorboard will help a lot.
STEP 3:
Using easiest method - bolt cutter, etc. - remove pushrods and discard. We
recommend using the S&S Quickee install pushrods and S&S roller tappets
WITHOUT travel limiters. Remove tappet covers and tappets.
STEP 4:
Remove outer cam cover and rotate engine until timing marks are aligned together.
STEP 5:
Using Harley-Davidson service manual procedure, retract the outer chain tension
shoe.
STEP 6:
Remove crankshaft and crankshaft sprocket retaining bolts using Harley-Davidson
service manual procedure and tools. Continue to the next page for special
instructions concerning this step with 06-DYNA & CHAIN DRIVE MODELS and also
with 1999 THRU 2006 CHAIN DRIVE MODELS.
1
STEP 6a: 06-DYNA & CHAIN DRIVE MODELS
If you are going to use the stock or camshafts that are already installed in your
engine, you may install the belt drive crank pulley and tighten with supplied
(5/16 - 18 X 1 ¼) 12 point bolt. There is no need to torque at this time. Install
camshaft timing gear and spider gear. Next check for alignment – see step 20.
Remove crank and cam pulleys and install ½” pin into cam support plate.
(See pictures #1 & #2) Install block off plate and torque to Harley-Davidson
specifications and tightening sequence. Proceed to step 17.You may now install
crank gear and cam gear. Then proceed to steps 21 thru 25.
STEP 6b: 1999 THRU 2006 CHAIN DRIVE MODELS (EXCEPT 06-DYNA)
On these models, regardless of the chain drive cams you are going to use, you
must proceed to steps 7 thru 12. Now proceed to steps 17 & 18. Install supplied
cam spacer and cam spider gear. Tighten snug with supplied (3/8 – 24 x 1 ¾)
12 point bolt and hardened 1” washer. If you are using an after market camshaft
that has the .050 hardened washer against the roller cam bearing, remove it at this
time. You will only need the spacer supplied with this kit. Proceed to steps 20 thru
25.
STEP 7:
Remove cam support plate. Remove oil pump and set aside at this time. Inspect
support plate for wear and ensure it is the latest Harley-Davidson part number.
STEP 7a:
Put transmission in 4th or 5th gear at this time. Place the dial indicator on
round portion near end of crankshaft. CHECK THE CRANK RUN OUT! It
should be .000 to .004. Call Wood Performance if more than .004.
STEP 8:
Using Harley-Davidson service manual procedure, remove all cams, chains,
tensioners – bearings, etc.
STEP 9:
Remove both front and inner shoe tensioner-mounting studs. They are pressed in
cam support plate and will press out easily. DO NOT ATTEMPT TO PLUG HOLES
– IT IS NOT NECESSARY. Remove front chain guide on front cam support cover.
Note: The two mounting bosses that secure the front chain guide must now be
machined down to the even surface of the cam support plate. (See picture #3)
2
STEP 10:
At this time, if you are going to use any camshaft over .510 Lift, you must clearance
the cases to provide ample (.030 min.) rotating clearances at any of the cams 360
degrees rotation points. This can be achieved easily by installing the cams – one at
a time – and rotating by hand.
STEP 11:
Clean entire inner cam case cavity. Remove the original inner cam case bearings
and install the new B148 Torrington bearing with approved Harley-Davidson
installation tool.
STEP 12:
Thoroughly clean and inspect cam support plate using Harley-Davidson service
manual procedure. Install new cam bearings furnished in the installation kit. Secure
bearing retainer plate.
Note: We recommend using the S&S heavy-duty bearing retainer plate part no.
33-5212.
STEP 13: PROCEDURE FOR HELICAL OR S&S INNER GEARS.
Drive gears can now be installed on both the front and rear camshafts. Note that
there is a front gear for the front cam and a rear gear for the rear cam. Gears can
be assembled by pressing camshafts into drive gears with drive keys in place.
Note: The gears must be pressed into the camshafts with the timing marks
facing the cam lobes!
STEP 14:
After drive gears and bearings have been assembled, both camshafts can be
installed into the cam support plate. Cam lobe surfaces should be coated with
engine oil or assembly lube.
Note: At this point, timing marks on both cam drive gears must be correctly
aligned. DO NOT PLACE ANY OIL OR LUBE ON INNER GEARS AT THIS TIME!
HELICAL GEAR NOTE:
When using HELICAL GEARS, we recommend that you press the front cam in the support
plate approximately ¼”. Install the rear camshaft, making sure the timing marks are going to
be together when both cams are fully pressed into the plate. You will notice while pressing in
either camshaft, the HELICAL GEARS will rotate the other cam at the same time.
3
STEP 15: CHECKING CAM GEAR BACKLASH
(DOES NOT APPLY TO HELICAL GEARS)
Once the new cams and gears are installed, backlash for S&S inner cam drive
gears (34T) must be checked. Using a wooden rod, (or you may machine yourself a
nice aluminum rod approximately 8” long that will fit into the lifter bore) press down
on the front cam through the exhaust lifter bore and hold the front cam from
rotating. Rotate the rear cam back and forth to check gear backlash. Some
backlash must be present. Recommended operating backlash for cold gears is
.0005 to .001. Cams should roll freely with NO binding. Cams with a 0.000 backlash
(too tight) may whine when running. Backlash greater than .002 is too much and
can sound like noisy lifters at lower RPM. Either of these conditions must be
corrected before continuing! Under sized or over sized cam gears are available at
Wood Performance. If gear clearance is OK, remove cam support plate and oil
gears now.
STEP 16:
Inspect and clean oil pump thoroughly. Replace with new Harley-Davidson pump if
necessary. Install ‘O’ ring in case cavity. Install cam support plate assembly and
torque to Harley-Davison service manual procedures. (90-120 inch lbs.)
STEP 16a:
Note: 06-DYNA and 2007 gear drive models only:
Lubricate both sides of furnished .075 thrust washer and install on rear cam.
STEP 17:
Install KNIGHT PROWLER base plate cover with the 10 new (¼ - 20 x 1) stainless
steel bolts and new gasket – supplied in the kit. Torque to Harley-Davison service
manual procedure. (90-120 inch lbs.)
Note: USE EXACT TIGHTENING AND SEQUENCE STEPS!
STEP 18:
Install KNIGHT PROWLER BELT DRIVE® crank gear with outer flange as a unit.
Place transmission in 4th or 5th gear. Using a 3/8 – 12 point socket, tighten the
(5/16 – 18 x 1 ¼) bolt to make sure the crank gear is seated properly. You may now
remove the crank gear retaining bolt and belt flange. Note: Check for minimum
.010 to .020 clearance between base plate and rear flange of crank pulley.
STEP 19:
Install the supplied 3/16” key in the rear camshaft. Install the KNIGHT PROWLER
BELT DRIVE® cam gear using the (3/8 – 24 x 1 ¾) stainless steel bolt with the
3/8 - 12 point head and the special 1” heavy-duty washer. PLACE THE .055 SHIM
IN THE CAM GEAR FIRST, THEN THE 1” WASHER. Always use this bolt and
washer on the initial install of the cam gear as it will draw the cam gear into the cam
while keeping it in alignment – not tilted, etc, After starting several threads of this
bolt, rotate cam pulley drive gear to ensure it is rotating evenly.
4
Installation Picture Reference
PICTURE #1
Note: block off plate is black
only for identification.
PICTURE #2
PICTURE #3
PICTURE #4
Note: machined surface is
shown in black.
Note: Shown as a 2007
model.
5
Installation Picture Reference
PICTURE #5
WT-001
Install
WT-002
Removal
Note: Any tool that uses threaded
rod or bolts; you should use
lubricant on threads.
WT-003
(WT-001 & WT-002) You may
use a 1" open-end wrench or
adjustable crescent wrench
to hold tool while using the
removal or installation tools.
Crank pulley
removal
Reference only:
Center tool (WT-002) shown
installed on cam spider gear.
PART# WTK - COMPLETE TOOL KIT
Removal tool (WT-003) shown
mounted to crank pulley. The
(5/16–18 x 1.5) set screw is to
be inserted in crank until
flush with end of crank gear.
PICTURE #6
6
Note: Wood Performance has special tools for removing and installing the cam
gear and crank gear assemblies. Use WT-001 for installing the cam gear and
WT-002 for removing the cam gear. Use the WT-003 tool for removing the crank
gear. When using the WT-001 tool, you need only to tighten the cam gear onto
the camshaft until it is fully seated. Do not torque at this time. (See Picture #5)
STEP 20:
Using any small straight edge, (See picture #4) place on end of crank gear and
check alignment with end of the cam gear. A variance + or - .010 is OK. Shims of
.005, .010 and .020 are supplied. If the cam gear does not protrude far enough,
remove cam gear with WT-002 tool. (CHAIN DRIVE CAMS DO NOT REQUIRE
USE OF THE WT-002 TOOL AS THEY ARE NOT PRESSED ON AND DO NOT
USE THE WOODRUFF KEY.) Remove key from keyway and install necessary
shim. Reinstall cam gear and check alignment.
*SPECIAL NOTE: 1999 THRU 2008 & UP
06-DYNA and 2007 & UP models have special thrust washers from .110” to .150”
thick. If you cannot get alignment to fall in the + or - .010 with our supplied shims,
YOU MUST PURCHASE THE CORRECT THRUST WASHER FROM HARLEYDAVIDSON. Should you need them, we usually have these thrust washers in stock.
You may also use Shim kit 301120 that has standard .005 .010 .020 shims used in Twin
Cam gear drive kits. Use ONLY between factory thrust washer and our Cam Spider
gear. When alignment is correct, make sure cam is recessed at least .010 or more
below inside shoulder of the spider gear. 1999 THRU 2008 MODELS & UP: If cam is
recessed .015+ below the cam gear, you may discard the .055 washer. Then install
(1 1/8” x .225) hardened washer and (3/8 – 24 x 1 3/4) 12 point retaining bolt.
Note: NEVER ATTEMPT TO REMOVE CAM GEAR OR CRANK GEAR BY PRYING OR USING
FORCED METHODS! ANY DAMAGE WHATSOEVER VOIDS ALL WARRANTY!!!
STEP 21:
With both gears on but not yet torqued, align cam and crank timing marks together.
(CRANK TIMING MARK ALIGNED WITH THE SINGLE DOT CAM TIMING MARK.
THIS WILL PLACE THE #2 CYLINDER, OR REAR CYLINDER, ON ITS
COMPRESSION STROKE. (See picture #6) Start by placing timing belt on lower
portion of crank gear lower teeth. While holding belt slightly taut, engage belt on
right side of cam gear. While holding the belt teeth engaged, walk belt teeth around
in a counter-clockwise direction. This may take a time or two, but keeping the belt
taut while doing this will make it easier. Once you have the belt on the cam gear –
check cam and crank timing marks and make sure they are still aligned. You will
find it easier pressing the belt on the crank gear first and rotating to the top in a
back and forth motion. Make sure timing belt is flush with end of cam and crank
gear. – CHECK TIMING MARKS AGAIN!
7
STEP 22:
Place inner and outer furnished ‘O’ rings on removable flange. (Note – grooved on
both sides) They will normally stay in place. Place the flange into the front of the
crank gear. Place small amount of Loctite 242 Blue on the (5/16 – 18 x 1 ¼)
12 point bolt and torque to 25 ft lbs. max. (Transmission still in gear) Install camretaining bolt with hardened washer (3/8 – 24 x 1 ¾) 12 point bolt using small
amount Loctite 242 Blue and torque to 35 ft lbs.
Note: You should always start with cam and crank gear ADVANCE / RETARD
marks set at the “0” point. You may now torque the 4 (5/16 – 24) 12 point nuts to
120” lbs.
STEP 23: ADJUSTING PUSHRODS
We recommend you turn crank until #1 cylinder (front) is at TDC (Top Dead Center)
on its compression stroke. Adjust your pushrods to recommended number of turns
by MFG. Now turn engine until #2 cylinder is at its TDC (Top Dead Center)
compression stroke position.
*SPECIAL NOTE:
Some technicians prefer to adjust pushrods on #2 cylinder since its already on TDC
compression stroke when timing marks are aligned. This is OK too.
STEP 24:
You may now install the belt guard and the outer cover. Do not tighten completely
at this time. Install front head pipe loosely and allow it to rotate down until it touches
the belt guard cover. Using a suitable marker, note where pipe is touching the belt
guard cover. REMOVE and modify pipe to clear the belt guard cover by leaving
approximately 1/8” clearance. DO NOT ATTEMPT TO MODIFY PIPE WHILE IT IS
ON THE BIKE! Recommended procedure is to mark pipe and use a small torch and
a suitable round object to gently compress pipe to get the needed clearance. Many
pipes will vary by MFG. After installing complete exhaust system, you may install
the complete belt guard cover. MAKE SURE TO USE ANTI-SEIZE ON THE ENDS
OF THESE 4 (1/4 – 20 X 1 ½) STAINLESS STEEL SCREWS. TORQUE TO
30 INCH LBS.
(IF YOU STRIP ONE OF THESE ¼ - 20 HOLES, YOU GET TO BUY A NEW BASE
PLATE!)
STEP 25:
Install spark plugs with anti-seize and torque to Harley-Davidson specifications.
Kick the tires and light the fires you’re ready to go. HAVE SOME FUN!
8
*** SPECIAL NOTES ***
BELT QUICK CHANGE PROCEDURE: Take plugs out and jack up
bike and place in 5th gear. Simply rotate engine until timing belt is
slightly slack on both sides. Place a small dot of (whiteout or
correction fluid) on cam and crank gear as if they were new
timing marks. Just remove belt, install new timing belt and erase
the dots.
*** BELT CHANGE INTERVALS***
Recommended: Change annually.
***END NOTE***
We all like to have fun while working on our bikes. These
instructions may often have a little humor, but written in averageeveryday layman terms. Don't ever be intimidated or afraid to call
when you are not sure of any portion of this install manual. My
brain, like everyone else’s, from time to time does not become
fully engaged before I speak. There is a good possibility that I
may have left something out on this install manual. For goodness
sakes, if you have any suggestions on how I may improve it, call
me right now.
Phone number: 205-525-4949
P.S. If you have any better install photos, please send them at
once and I'll make sure you get the "courtesy of" credits.
Thanks and good luck.
Bobby Wood
9
8