1
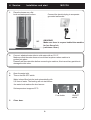
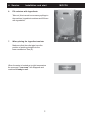
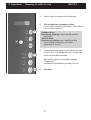
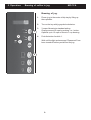
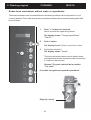
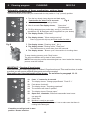
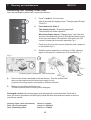
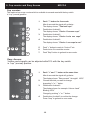
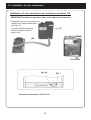
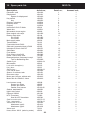
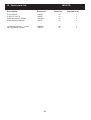
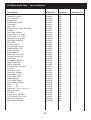
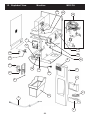
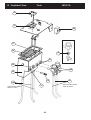
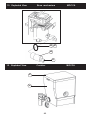
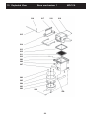
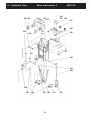
Service manual
MOCCA
Your retail dealer
S_EN
Rev. 090828
1. Table (list) of contents
MOCCA
1.
Table of contents
page.
2.
3.
3.
4.
General
Overview of the components, front.
Overview of the components, mixer system.
Installation and start
3
4
5
6-7
5.
Operation;
Brewing of coffee in cup
Brewing of jug
8
9
Hot Water
2
6.
6.
6.
6.
6.
Cleaning program
Automatic cleaning of In/Outlet valves
Rotate brew mechanism without water or ingredients
Automatic cleaning of brew mechanism, mixing bowl
Cleaning of brew house
10
11
12
13
7.
Cleaning and maintenance
Outward cleaning when needed
Cleaning and dismantling of coffee filter
14
15
Cup counter and Easy access
Safety functions
Failure messages
Storage and transportation
Installation of coin mechanism
Circuit diagram
16
17
17
17
18
19
8.
9.
10.
11.
12.
13.
14. Spare part list
15. Exploded View
20 - 22
23- 27
2
2. General.
MOCCA
We congratulate to your choice of a Freshbrew machine.
Please read this manual before you take the machine into operation for the first time.
The manual contains important instructions for a safe and proper use of the machine.
Always keep this manual within reach for the user!
Mocca
- Making freshly coffee cup by cup
- Brewing mechanism with coffee filter
- Electronically temperature controlled
- Adjustable coffee strength
Fakta:
Height
Width
Depth
Weight
Tank volume
675mm
270mm
530mm
15 kg
2.0 litre
Electricity:
Water connection:
230V/2200W
½” outside thread
Capacity:
Approx. cups of coffee
100 / filling
3.
3. Overview of components, front
Display
Strength of drinks ++ / - Key switch
Large coffee
Small coffee
Hot water
Door lock
Outlet
(warm drinks)
Cupholder
Drip tray insert
Drip tray
Options:
Base cabinet
with waste box
4.
MOCCA
3. Overview of components, mixing system
MOCCA
Ingredients
canister
FUSE holder
Door lock
Brewing
mechanism
Outlet
Coffee
Waste box
Detail;
Canister;
Outlet hot water
Ingredients;
Coffee
Width;
Height;
160
250
5.
Amount/unit
1
ON/OFF
switch
4. Service.
1.
Installation and start
Place the brewer on a flat
level and waterproof surface.
MOCCA
Connect the electrical plug to a separate
grounded wall socket
90º
OBSERVE!
Make sure there is a space behind the machine
for free flow of air.
( minimum 10cm ).
2.
Connect attached water tube to cold water with an R 1/2”.
Make sure that the water hose not are kinked anywhere when machine is
pushed into place.
Please flush the water tube before connecting to machine, this to avoid any particles to
damage the inlet valve.
3.
4.
Open the water inlet.
Turn on the ON-OFF switch
Water is been filled into the tank automatically with
2,0 litres of water. The heating will not start before
the water level reaches the level sensor.
Set temperature is approx 97ºC.
Fuse holder
5.
Close door.
6.
ON/OFF
switch
4. Service.
6.
Installation and start
MOCCA
Fill canisters with ingredients.
Take out (this to avoid unnecessery spillage in
the machine) ingredient canisters and fill them
with ingredients.
(A).
7.
When placing the ingredient canister
Make sure that the outlet pipe have the
position of pointing straight into the
brew mechanism. See (A).
When the water is heated up to right temperature
the message ”Low temp” will disappear and
machine is ready to use.
7.
”Low temp.”
5. Operation:
Brewing of coffee in cup
MOCCA
1.
Place a cup in the centre of the cup holder.
2.
The strength has a standard setting,
if you wish to increase or decrease it, do as follows
if not continue to point 3.
2.
Stronger drink;
Increase by pushing + or ++ for 5% or 10%
alternative
Weaker drink;
Decrease by pushing - or -- for 5% or 10%
(the indication lamp will go up or down
depending of choice).
3.
3.
Choose drink by pushing on the button to the right
of each menu. The display will show; ”Please wait”,
and the cup will be illuminated.
Wait until the light on cup and the message
”Please wait”
has been turned off before you take your cup.
4.
4.
Hot water.
8.
5. Operation:
Brewing of coffee in jug.
MOCCA
Brewing of jug.
1.
Place a jug in the centre of drip tray by lifting up
the cupholder.
2.
Turn on the key with jug symbole clockwise.
3.
3 cups of brewing is standard setting.
Change amount of cups by pushing + or - button.
Optional up to 12 cups or down to 1 cup brewing.
4.
Push the button for drink 1.
3.
2.
Wait until the light and message ”Please wait” has
been turned off before you take out the jug.
4
9.
6. Cleaning program
CLEANING
MOCCA
Automatic cleaning of In/Outlet valves:
The In/Outlet valves can easily be cleaned with the key switch in ”cup” (normal) position.
1.
Place a jug in the drip tray.
2.
Turn the key slowly ninety degrees and back again.
3.
Push button for drink 1 and 2 at the same time
for 6 seconds.
Keep buttons down.
All In/Outlet valves will now start to open and close
with 2 pulses/second in 10 seconds or as long as
you hold the buttons.
2.
The display shows: ”Cleaning valves”.
4.
Push button for drink 2 for making a brew cycle
and flush remaining water and scale from
the cleaning.
3
3
4
By cleaning is meant that valves ”knocks” away
eventual scale and other particles which has been
attached in the cylinders and that they are flushed
away with the water.
10.
6. Cleaning program
CLEANING
MOCCA
Rotate brew mechanism without water or ingredients:
The brew mechanism can be rotatedwithout water and ingredients with the key switch in ”cup”
(normal) position.To be used when brew mechanism has been dismounted forwashing and shall
be remounted.
1.
Push ”+” button for 6 seconds
After 4 seconds the signal will go faster.
The display shows: ”Change paper/Rotate”
”Push E/ +”
2.
Push + button.
2
1
The display shows:”Rotate cycle without water”.
3.
Push button for drink 2.
The display shows: ”Rotate”
The brew mechanism rotate one turn without water
and ingredients and the mechanism falls into position
if it has been dismounted.
Observe! The push rod shall be in position
”8 o clock”
3
If not take out again and repeat the procedure.
Eight (8) o clock.
11.
6. Cleaning program
CLEANING
MOCCA
Automatic cleaning of brew mechanism, mixing bowl:
Shall been done every week.
The brewmechanism can easily be cleaned with the key switch in ”cup” (normal) position.
1. Turn the key slowly ninety degress and back again.
Push button for drink 1 for 6 seconds.
Fig. A
2. After 4 seconds the signal will go faster.
3. After 6 seconds The display shows;
”Open door”
”load detergent”.
4. Fill 25gr detergent (one portion bag, see fig. A ) into the brew
mechanism. fig. B.(Detergent will be supplied from your dealer)
5. The display shows; ”Close door”
1
1
6
6. The display shows; ” When ready press key”
Place a jug into the drip tray and push button for drink 1
Fig. B
7. The display shows; ”Cleaning mixer” (2....)
8. The display shows: ”Rinsing coffee” ”Soak time:”
The machine start to count down from 300 seconds.
9. The display shows. ”Brewer cycle” the machine is counting down.
To stop cleaning process: push ”Stop” button.
The brew mechanism will go back to start position.
NOTE! Dont stop the process when detergent has been loaded the cleaning
process must be finished.
IMPORTANT! Cleaning of brew house.
After the automatic cleaning program is finished. Clean brew house! This must be done, to make
sure that you will remove residual detergents and coffee remains!
Dismantling and cleaning/washing brew house: Do as follow in paragraph 10- 19.
10.
12.
10.
11.
12.
13.
14.
15.
16.
17.
18.
19.
Push ”+” button for 6 seconds
The display shows: ”Change paper/Rotate” ”Push E/ +”
Pusk button for drink 2.
The display shows; ”Preparing paperload”.
The machine will rotate in position.
The display shows,”Change paper”
Open door, dismantle, clean and reassemble brew house.
see page 20.
Close door.
Machine is ready to use again.
Take out a cup of coffee and pour it out to make sure that there is
nothing left of detergent.
If machine not will go back in start
position. Restart machine.
12.
6. Cleaning program
CLEANING
MOCCA
Dismantling and cleaning brew house:
Dismantle brew house:
1.
2.
Reassemble brew house.
NOTE! When reassemble brew house
make sure that (B) wiper are between (A)
arms.
3. Flush brew house!
To remove detergent and coffee remnants.
4.
Important! wash carefully
To remove cleaning
and coffee remains
13.
7. Cleaning and maintenance.
MOCCA
Cleaning when needed.
Outside cleaning; use a
soft rag and liquid cleaning agent to
prevent scratches.
Note! Make sure that all parts are dry before use.
Cleaning of parts.
Drip tray and its insert to be washed by hand in ordinary dishwater.
CAUTION! Must not be washed in a dish washing machine!
Ingredient canister and chute can be washed in dish washing machine
14.
7. Cleaning and maintenance.
MOCCA
Dismantling and cleaning coffee filter.
A tool dismantling the coffee filter, comes with machine.
1.
1
2.
2
Push ”+ button” for 6 seconds.
After 6 seconds the display shows; ”Change paper/ Rotate”
”Push E/+”.
Push button for drink 2.
The display shows; ”Preparing paperload”.
The machine will rotate in position.
When the display shows,”Change paper” open the door
and insert the dismantling tool (A) through the brewer spout
all the way to the back of the cylinder, then slide it up until
contact is made with the screen assembly.Fig. 1.
Push up on the rear of the screen assembly until it pops out
of the cylinder.Fig. 2.
3.
Soak the screen assembly in a solution of 25gr. cleaning
agent in 3dl water for a maximum of 10 minutes.Fig. 3.
Fig. 3.
3
97º Celsius
.10 minutes
Fig. 2.
Fig. 1.
.3 dl water
(Cleaning agent is supplied by your retail dealer)
(A)
4.
Remount the screen assembly and close the door. Then the machine will
return to start position and the machine is ready for use.
If machine not will go back in start position. Restart machine!
5.
Make a cup of coffee and throw it out.
To make sure that there is nothing left of detergent.
Prolonged contact with cleaning agent may damage the screen assembly. Once this is
done, the screen should then be thoroughly rinsed with dish soap and warm water to remove
any leftover residue.
Cleaning agent: (brew mechanism)
Filter: (brew mechanism)
Tool: (dismantling filter)
article no 1104161
article no 47200213
article no 4720090
15.
8. Cup counter and Easy Access
MOCCA
Cup counter:
The machine has a cup counter which is available to see and reset with the key switch
in ”cup” (normal) position.
1.
5.
2.
1.
3.
7.
2.
3.
4.
5.
6.
7.
4.
6.
Push ”-” button for 6 seconds.
After 4 seconds the signal will go faster..
The display shows: ”Total xxx cups”
Push button for drink 2.
The display shows: ”Choice 1 free xxx cups”
Push button for drink 2.
The display shows ”Choice 1 coin xxx cups”
Push button for drink 2.
The display shows ”Choice 1 xxx cups in can”
Push ”+” button to reach to ”choice 2” etc.
Push choice 3 to reset the counter.
Push ”Stop” button to go back to user mode.
Easy Access:
Volume and strength can be adjusted with±15% with the key switch
in ”cup” (normal) position.
1.
1.
2.
3.
3.
4.
4.
Push ”+” and ”-” button at the same time.
After 4 seconds the signal will go faster.
The display shows: ”Easy access” ”strength 1 100%”
Choose the drink you want to change
by pushing”+” or ”-” button.
Push button for drink 2.
The display shows: for example. Volume 4 and”
Blinking 100%”
Change by pushing ”+” or ”-” button.
Push button for drink 2 to confirm the change.
Press ”stop” to go back to user mode.
16.
9. Safety functions.
MOCCA
The machine is equipped with following safety functions
1.
Indication of door
Door not closed
The display shows; ”Door open”
2.
”Door open”
When machine is not in use:
Valves are blocked.
10. Failure messages.
Failure messages which can mostly be corrected without any help from
service company
1.
The display shows; ” Blocked” ”Water level low”
Please check incoming water connection
Turn off the machine with the main switch
wait for 10 sec. and turn on again.
2.
The display shows normal: but no drink is coming.
Possible cause of failure:
Mechanical stop in the ingredients canisters.
”Blocked”
Measure: Try to find the cause of failure. Clean the mixer system
and try again.
11. Storage / Transport.
Transport and no use in long time.
1.
2.
3.
Turn off the switch, pull out the plug and close incoming water tube.
Empty the water tank.
Keep machine free from frost.
Long machine storage at temperatures below 0ºC (zero degrees celsius) can cause
damage of the machine. Total emptying of water is recommended.
17.
12. Installation of coin mechanism.
Installation of coin mechanism for freshbrew machines CQ.
IMPORTANT: Installation must been done of an authorized technician.
1. Assemble coin mec and connect to
display-card, placed inside door.
(see fig. 10).
( Connect with the enclosed
cable (A). Make sure that
power is off.
fig.(10)
(A)
Connection
Connection placement; Version 212
18.
13. Circuit diagram.
MOCCA
19.
14. Spare parts list.
MOCCA
Description;
Article no;
Electronic card
Displaycard
Spacer for displaycard
Key switch
Key
Drip tray, extension
Drip tray insert
Drip tray
Inlet hose 3/4”X1/2” White
Waste box
Microswitch, brew engine
Brew engine unit compl.
Brewer dock white
Pin 3,5x36
Pin 2,0x36
Main supply cable
Transformator
Connection block PA 80
Side wall (connection block) PA 80
Inletvalve 2,5L/min. 24V DC
Solid State
Fuse holder
Fuse 2 Amp. slow 5x20
Decal - fuse 2 Amp. slow
Brewmechanism permanent compl.
Tool for dismantling filter
Switch 2 pol.
Microswitch
Lock with clamp(door)
Key, (door
Service key
Feet 19X10 Svart
Spacer for airhose, tank
Non return valve
Motor gear 145 rpm, without axle
Motor axle for 1604612, 16mm
1604102
1604101
1203416
1202551
1202553
1105334
1105333
1105332
150541
1105331
160829
1201432
120144
1201453
1201454
160522
710151
160351
160352
1206371
1604201
1604351
1604382
1701981
710075
4720090
160801-04
160841
120250
120251
180290-03
1203202
1203151
1206123
1604612
1604616
1
2
3
3
4
5
6
7
8
9
10
11
12
13
14
15
16
17
17
17
18
19
20
21
21
21
22
23
1
1
4
1
1
1
1
1
1
1
1
1
1
1
1
1
1
1
1
1
1
2
1
1
1
1
1
1
2
2
1
4
1
1
1
1
Level sensor compl.
Sensor pin 55mm
Sensor pim 90mm
Gasket, level sensor
Gasket, watertank lid
High Limit Control
Element 2200W
NTC-Thermistor
Seal for NTC thermistor
Seal for outlet valve
Plug, (watertank)
Valve outlet 24 V DC
Membrane typ 40
Membrane typ 46
Water tank
Hose, silicon 8X12 (sales by metre)
120548
120550
120551
150118-02
1206591
220220
1601361
711000
1605361
160537-03
160538-03
1206286
1501191
1501192
710021
150501
25
26
27
28
29
30
31
32
33
34
34
34
35
36
1
1
1
1
1
1
1
1
1
2
2
2
2
2
1
1
20.
Detail no;
Amount/ unit;
14. Spare parts list.
MOCCA
Description;
Article no;
O-ring 36,2X3
O-ring 15, 6X1,78
Outlet brewmech. straight
Outlet brewmechanism
120650
120652
12014641
120147
40
41
42
43
1
1
1
1
Ingredients canister
compl.
Lid, Ingredients canister
1205621
1205675
46
47
1
1
21.
Detail no;
Amount/ unit;
14. Spare parts lists.
Brew mechanism
Description;
Article no;
Detail no;
Deflector, Cylinder
Pin, Crank Arm
O-ring Piston
Rubber Ring, Piston
Teflon Seal
Plate, Top
Screw, 8 x 1/2, Truss, AB, TAPP
Cylinder
Plug, Vent, Cylinder
Screw, 4-40 x ¼, Truss
Screw, 8-32 x ½, Truss
Assembly, Filter Screen
Seal, Brew Chamber
Bar, Latch
Carriage, Wiper
Rod, Carriage, Wiper
Retaining Ring, .250
Wiper, Complete
Brew Chamber
Spring Clip, Latch Bar
Housing, Vertical Rod
Cam, Triple
Unwipe Arm Assembly
Spacer, Wipe Arm
Spring, Wipe Arm
Retaining Ring,TRU ARC
Vevarm
Plate, Ret., Cycle
Plate, Ret., Support
Latch, Block, LHS
Latch, Block, RHS
Retaining Ring
Tube, Outlet, Water
Wrap, Brew Chamber
Shim
0,2
Shim
0,5
Spacer, Sil., 3/16 x .350 x 1.5
Spring, H-Frame
H-Frame
Screw, 8-32 x 3/4, PAN
Pin, Grooved, 3/16 x 1.25
Wipe Arm, Assembly
Vertical Rod, Welded
4720008
4720010
4720012
4720013
4720014
4720015
4720016
4720017
4720018
4720019
4720020
47200213
4720022
4720023
4720024
4720025
4720026
4720027
4720028
4720029
4720001
4720002
4720003
4720004
4720005
4720006
4720007
4720030
4720031
4720032
4720033
4720034
4720035
4720036
1303501
1303502
4720038
4720039
4720040
4720041
4720046
4720048
4720049
200
201
202
203
204
205
206
207
208
209
210
211
212
213
214
215
216
217
218
219
220
221
222
223
224
225
226
227
228
229
230
231
232
233
234
235
236
237
238
239
240
241
242
22.
Amount/ unit;
1
1
1
1
1
1
1
1
1
1
1
1
1
1
1
1
1
1
1
1
1
1
1
1
1
1
1
1
1
1
1
1
1
1
1
1
1
1
1
1
1
1
1
15. Exploded View.
Machine
MOCCA
22
23
18
1
17
19
16
20
15
21
2
10
14
3
13
11
12
4
9
5
8
7
6
23.
15. Exploded View.
Tank
MOCCA
25
26
28
27
29
34
32
33
34
35
30
36
Silicone hose 150501
sales by metre
36
Silicone hose 150501
sales by metre
31
24.
15. Exploded View.
Brew mechanism
40
MOCCA
41
42
43
15. Exploded View.
Canister
47
46
25.
MOCCA
15. Exploded View.
Brew mechanism 1
216
217
218
MOCCA
219
215
214
213
212
211
210
209
208
207
206
205
204
203
202
201
200
26.
15. Exploded View.
Brew mechanism 2
232
228 229
MOCCA
234
235 236
233
237
238
227
239
230
231
240
241
242
226
225
224
223 222
27.
221
220
Mocca
FOR SERVICE
please contact
Your retail dealer
...............................................................................
...............................................................................
...............................................................................
CREM International AB
Box 960, 671 29 ARVIKA, Sweden
Tel: +46 (0)570-477 00, Fax: +46 (0)570-47719
E-mail: [email protected] www.creminternational.com
Art. nr/Art. no.1740034