1
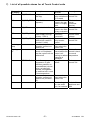
SERVICE MANUAL
HOBS
Touch II
Electronic information
© AEG Hausgeräte GmbH
Muggenhofer Straße 135
D-90429 Nürnberg
Germany
Fax +49 (0)911 323 1022
Spares Operation
Edition:
12.02
Publ.-Nr.:
599 51 49 02
685
EN
Index
Safety instructions ........................................................................................................... 3
1)
Function test by Service Mode .......................................................................... 4
2)
Safety functions of the electronic system .......................................................... 4
3)
Changing the Hob to DEMO mode for trade shows, exhibitions etc. ................ 4
4)
TOUCH II - Hob not working - possible causes of error .................................... 5
5)
Calibration and/or checking the pan detection unit ............................................ 5
6)
Switching off the automatic pan and three-circuit detection .............................. 5
7)
List of all possible alarms for all Touch Control units ........................................ 6
HV 844-N 12.02 A. B.
-2-
374 298 002
EN
Safety instructions
Attention: In case of any interventions with this appliance pay attention to the safety specifications
according to DIN/VDE 0701 (related to repairs) resp. VDE 0700/ICE 65 (related to appliances)!
Components according to IEC resp. VDE guidelines! In case of an exchange use only parts with the
same specifications.
In case of controls which are provided with MOS modules, use only parts with the same specifications.
Pay attention to the MOS instructions when handling MOS components!
Mechanical repairs resp. inspections of mechanical components may only be made in a voltage-free
condition.
HV 844-N 12.02 A. B.
-3-
374 298 002
EN
1)
Function test by Service Mode
Service Mode activation:
-
Switch on main button, then 30 sec time for starting the Service Mode
Press buttons VL (front L.H.), HL (rear L.H.) and Key Lock simultaneously (not longer than 1
sec)
Release - 1 beep - then press the + button
o
the display front L.H. will show s (Service Mode); rear L.H. will show d (Demo Mode)
Press rear right button
o
Service Mode is automatically executed (all LEDs lit, all relays switch on/off, acoustic
signal sounding)
o
Hob automatically changing to normal mode
You can use this test to
-
2)
test the relays (each of the relays switches on/off)
test LEDs and 7SA (are all lit)
test the acoustic signal (beeps)
Safety functions of the electronic system
Automatic safety cut-out: the electronic system automatically switches the hotplate off after a
certain time (1: 6h, 2: 6h, 3: 5h, 4: 5h, 5: 4h, 6: 1.5h, 7: 1.5h, 8: 1.5h, 9: 1.5h) depending on the
cooking stage, if you do not change the entire adjustment over the total duration.
Overheating protection: The electronic system automatically switches off heating elements front
L.H. and front R.H. when temperatures are exceeded, until the hob has cooled down (hotplates rear
L.H. and rear R.H. will continue to work normally). Such a condition cannot be reached in normal
mode.
Overflow protection: If you press one or several buttons for more than 20 seconds, the hob
automatically changes over to the OFF condition.
Wrong connections: If a 230-V hob is by error connected to 400 V, a shrill beep goes off; the wrong
connection can be remedied within 10 minutes; if the wrong connection is maintained for more than
10 minutes, the electronic system will destroy itself to prevent risk of fire etc.
3)
Changing the Hob to DEMO mode for trade shows, exhibitions etc.
DEMO Mode activation:
-
Switch on main button, wait then 30 sec for Service Mode start
Press buttons VL (front L.H.), HL (rear L.H.) and Key Lock simultaneously (not longer than 1
sec)
Release => 1 beep => then press the + button
o
the rear R.H. display will show s (Service Mode); rear L.H. will show d (Demo Mode)
Press button HL
o
Hob is now in DEMO Mode, i.e., heating elements are not switched on, otherwise the
control panel can be used normally
o
This condition cannot be reset by network reset
HV 844-N 12.02 A. B.
-4-
374 298 002
EN
DEMO Mode deactivation:
Switch on main button, wait then 30 sec for Service Mode start
Press buttons VL (front L.H.), HL (rear L.H.) and Key Lock simultaneously (not longer than 1
sec)
Release 1 beep - then press the - button
o
Hob is now in Normal Mode
4)
TOUCH II - Hob not working - possible causes of error
-
5)
Function of sensor OK? (the function is ensured from a touch diameter of 12mm by the final
testing in the works)
wrong connection 400 V (electronic completely tied up), you have to exchange the electronic
unit
error code when electronics are damaged (shown in the 4 hotplate displays: Fxx, x = 0 … 9
Prior to changing the electronic, first test the following:
o
heating element defect?
o
plugged connections on heating element defect?
o
wrong operation by Customer? Safety function activated? (see 2)
o
Hob by error in DEMO mode? (see 3)
o
Relays, LEDs, beeper defect? (see 1)
o
installation of electronic into the hob OK? (sealing profiles correctly seated)
o
are any plugs loose? (electronic correctly seated in plastic housing?)
Calibration and/or checking the pan detection unit
-
switch on the mains voltage
-
Simultaneously press buttons front L.H. and front R.H. and release them immediately
-
if u is shown on all 4 plates, you can start calibration
-
cooking plates on right-hand side
First place the Customer’s saucepan (145) and then Customer’s saucepan rear R.H.
(170*265). When both displayed “u”s have gone dark, remove the saucepans.
-
cooking plates on left-hand side
First place the Customer’s saucepan rear L.H. (145) and then Customer’s saucepan
L.H. (210); When both displayed “u”s have gone dark, remove the saucepans.
front
Pay attention to the display
Always observe after calibration
Disconnect the hob from the mains voltage for 1 minute (switch off the fuse). Then connect the hob
again to the mains voltage.
Use the same pans, which the Customer normally uses. It is important that the pan is of the same
size or larger than the heating element.
6)
Switching off the automatic pan and three-circuit detection
-
Switch on the appliance
Touch the desired cooking zone selection key
Select a stage by using the+ or - key
Touch the key “Three-circuit zone/roasting pan” einfügen Symbol , stay with your finger on the
key and, at the same time, touch once again the cooking zone selection key of the desired
cooking zone within 10 seconds. An acoustic signal confirms your selection.
HV 844-N 12.02 A. B.
-5-
374 298 002
EN
7)
List of all possible alarms for all Touch Control units
Error code Error name
on display
F12
ER_RELAIS
F16
F22
F25
F26
Persisting
beep
Flashing
“H”
F33
F
HV 844-N 12.02 A. B.
Description
Possible cause
of error
Relay port not identical Short-circuit in
with copy
relay excitation to
5V or earth
ER_TGE_FREQ TGE: Oscillator
Short-circuit or
frequency
break in the pan
sensor or supply
lines
ER_KEY
Key evaluation is faulty Short-circuit or
break in the field
of key evaluation
Control unit is
ER_SPG_HOCH Secondary tension of
incorrectly
power supply too high
connected
(primary > 300 V)
ER_REL_SPNG Relay tension too high in Short-circuit in
relay tension
switched off condition
control
(nominal: 0 volts)
Water on the
Permanent key
glass above the
activation: control unit
control unit
switches off
Excess temperature on Hot saucepan is
placed above the
control unit: hotplates
near the control unit are control unit:
sealing to radiant
switched off
elements is
damaged
Component is
EEPROM-Defekt Start of emergency
defect
programme: no pan
detection possible, no
more additional circuits
active, no halo light
possible; all hotplates
are switched off in case
of overtemperature
Water on the
Permanent key
glass above the
activation: control unit
switches off (for Basic- control unit
TC)
Overheating, due
to a too small
pan, for instance
-6-
Remedy
Exchange
control unit
Eliminate the
cause
(customer
service)
Exchange
control unit
Connect the
correct mains
voltage
Exchange
control unit
Clean
Wait until
control is back
to normal
temperature
Exchange
control unit
Clean
Switch off
appliance and
wait
374 298 002
EN