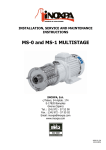
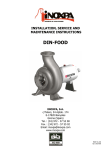
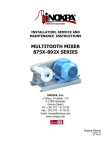
1
INSTALLATION, SERVICE AND MAINTENANCE INSTRUCTIONS RV PUMP INOXPA, S.A. c/ Telers, 54 Aptdo. 174 E-17820 Banyoles Girona (Spain) Tel. : (34) 972 - 57 52 00 Fax. : (34) 972 - 57 55 02 Email: [email protected] www.inoxpa.com Original Manual 01.214.30.02EN (0) 2013/07 EC DECLARATION OF CONFORMITY The manufacturer: INOXPA, S.A. c/ Telers, 57 17820 Banyoles (Girona), Span herewith declares that the machine: RV helical impeller pump with the serial number: ________________ conforms to the relevant provisions of the following directives: Machinery Directive 2006/42/EC (RD 1644/2008) Low voltage Directive 2006/95/EC Electromagnetic Compatibility Directive 2004/108/EC Applicable harmonised Standards: UNE-EN ISO 12100:2012 UNE-EN 809:1999+A1:2010 In compliance with Regulation (EC) 1935/2004 relating to materials and articles intended to come into contact with food, the materials in contact with the product do not transfer their constituents to the product in quantities which could endanger human health. Identification of the person empowered to draw up the Declaration on behalf of the manufacturer, and qualified to compile the technical file established by the Community: Banyoles, 21 September 2012 David Reyero Brunet Technical Office Manager 1. Safety 1.1. INSTRUCTION MANUAL This instruction manual contains information on the reception, installation, operation, fitting, stripping and maintenance for the RV pump. The information given herein is based on the most up-to-date data available. INOXPA reserves the right to modify this instructions manual without having to give prior notice. 1.2. START-UP INSTRUCTIONS This instruction manual contains vital and useful information for properly operating the pump and for keeping it in good running condition. Not only should the safety instructions set forth in this chapter be carefully read before putting the pump into operation, but those concerned must also familiarise themselves with the operating features of the pump and strictly adhere to the instructions given herein. It is extremely important that these instructions be kept in a set place near the installation. 1.3. SAFETY 1.3.1. Warning signs Danger for people in general. Danger of injury caused by rotating parts of the equipment. Danger! Electricity. Danger! Caustic or corrosive agents. Danger! Suspended loads. Danger to the proper operating of the machine. Obligation to ensure safety at work. Use of safety goggles obligatory. 1.4. GENERAL INSTRUCTIONS This equipment is suitable for his use in food process. Please read the instruction manual carefully before installing and commissioning the pump. Should you have any doubts or queries, contact INOXPA. 1.4.1. During the installation You must always bear in mind the Technical Specifications set forth in Chapter 8. Do not put the pump into operation before connecting it to the pipes. Do not put the pump into operation if the cover of the pump has not been fitted and the impeller fixed in the pump. Check that the motor specifications are correct, especially if there is a special risk of explosion due to the work conditions. During the installation procedure, all the electrical work must be carried out by duly authorised personnel. 1.4.2. During operation You must always bear in mind the Technical Specifications set forth in Chapter 8. The limit values that have been set must NEVER be exceeded. NEVER touch the pump or pipes whenever the pump is being used to decant hot liquids or during the cleaning procedure. 2013/07 1.Safety 3 The pump has moving parts. Do not put your fingers into the pump when it is operating. NEVER work with the suction and the delivery valves shut off. NEVER directly sprinkle the electric motor with water. Standard motor protection is IP-55: dust and water sprinkling protection. 1.4.3. During maintenance You must always bear in mind the Technical Specifications set forth in Chapter 8. NEVER strip the pump down until the pipes have been drained. Remember that there will always be some liquid left in the pump casing (if it has not been fitted with a drain). Always remember that the liquid that has been pumped may be dangerous or subject to high temperatures. For situations of this type, please consult the prevailing regulations in the country in question. Do not leave loose parts on the floor. ALWAYS turn the power supply to the pump off before embarking on maintenance work. Take out the fuses and disconnect the wires from the motor terminals. All electrical work must be carried out by duly authorised personnel. 1.4.4. In accordance with the instructions Any failure to comply with the instructions could lead to a hazard for the operators, the atmospheric conditions of the room, and the machine, and it could lead to a loss to any right to make a claim for damages. Such non-compliance could bring with it the following risks: Important operating failures of the machine / plant. Failure to comply with specific maintenance and repair procedures. Potential electrical, mechanical and chemical hazards. Atmospheric conditions in the room could be hazardous due to the release of chemical substances. 1.4.5. Warranty We wish to point out that any warranty issued will be null and void and that we are entitled to an indemnity for any civil liability claim for products which might be filed by third parties if: Operation and maintenance work has not been done following the corresponding instructions; the repairs have not been made by our personnel or have been made without our written authorization; Modifications are made to our material without prior written authorization; The parts or lubricants used are not original INOXPA parts/lubricants; The material has been improperly used due to error or negligence or have not been used according to the indications and the intended purpose. The parts of the pump have been damaged as a result of having been exposed to strong pressure as there was no safety valve. The General Delivery Terms which you have already received are also applicable. No modification can be made to the machine without the prior consent of the manufacturer. For your safety, use spare parts and original accessories. The use of other parts exempts the manufacturer from any and all responsibility. Any change in operating conditions can only be done with the prior written consent of INOXPA. In the event of doubt or should you require a fuller explanation on particular data (adjustment, assembly, disassembly...), please do not hesitate to contact us 4 1.Safety 2013/07 2. Index 1. Safety 1.1. 1.2. 1.3. 1.4. Instruction manual ........................................................................................................ 3 Start-Up Instructions ..................................................................................................... 3 Safety .......................................................................................................................... 3 General instructions ....................................................................................................... 3 2. Index 3. General Information 3.1. Description ................................................................................................................... 6 3.2. Operating principle ........................................................................................................ 6 3.3. Application ................................................................................................................... 6 4. Installation 4.1. 4.2. 4.3. 4.4. 4.5. 5. Pump selection ............................................................................................................. 7 Transport and storage ................................................................................................... 7 Location ....................................................................................................................... 8 Pipes ............................................................................................................................ 8 Electrical installation ...................................................................................................... 8 Start-up 5.1. Start-Up ....................................................................................................................... 9 6. Operating problems 7. Maintenance 7.1. 7.2. 7.3. 7.4. 8. Technical Specifications 8.1. 8.2. 8.3. 8.4. 8.5. 8.6. 2013/07 General maintenance ................................................................................................... 11 Storage ...................................................................................................................... 11 Cleaning ..................................................................................................................... 11 Pump disassembly/assembly ........................................................................................ 12 Technical specifications ................................................................................................ 14 Weights ...................................................................................................................... 14 Tightening torque........................................................................................................ 14 RV pump exploded view............................................................................................... 15 RV pump section view ................................................................................................. 16 RV pump Parts List ...................................................................................................... 16 2.Index 5 3. General Information 3.1. DESCRIPTION RV Helical Impeller pumps are compactly built. They are axial suction and radial discharge pumps, and are fitted with hygienic type connection. The pump casing and impeller are manufactured with investment casting technology. All the parts that come into contact with the product are made of AISI 316L stainless steel. The RV range is designed for continuous operation. The most significant constructional features of the range are: Monobloc pump Pump casing with drainage Helical type impeller Mechanical seal with silicon carbide faces B35 motor complying with IEC standards. 3.2. OPERATING PRINCIPLE Even though the impeller pump is of the helical type, its operating principle is that of a centrifugal pump. The pump is not reversible. The direction of rotation is clockwise when the pump is viewed from the rear side of the motor. 3.3. APPLICATION RV pumps bring together a series of characteristics suited to those sectors in which any alteration to the product is forbidden. As a result of the helical profile of the impeller, the pump does not clog up, and what is more, the solid substances in suspension remain undamaged, because this type of impeller accompanies the product to the inside of the pump casing. This characteristic of the RV pump makes it an essential element in many tasks such as pieces of fruit or whole fruits, olives, mushrooms, orange segments, vegetables, fish, etc, which require the preservation of the form of the solids in suspension. RV pumps are widely in wineries for the pump-over process where the high capacity and minimum destruction of the solid parts (seeds, skins, etc.) is required. The design of the pump contributes to a better extractions of tannin, the colouring matter of wine, in the phase of vinification, reducing the lees formation and, as the result, achieving high quality wines. 6 3.General Information 2013/07 4. Installation 4.1. PUMP SELECTION INOXPA is not responsible for any deterioration of the material as a result of its transportation or unpacking. Visually check that the packing has not suffered any damage. The pump will be accompanied by the following documentation: Dispatch notes. Pump Instruction and Service Manual. Motor Instruction and Service Manual (*). (*) If the pump has been supplied with a motor from INOXPA. Unpack the pump and check the following: The pump suction and delivery connections, removing the remains of any packaging materials. Check that the pump and the motor have not suffered any damage. If the equipment is not in good condition and/or any part is missing, the carrier should draw up a report accordingly as soon as possible. 4.1.1. Pump identification and marking 01.30.32.0003 Serial number Pump plate 4.2. TRANSPORT AND STORAGE RV pumps are quite often too heavy to be put into their storage space manually. Lift the pump as is shown below: Always use two support points placed as far apart as possible. Secure the supports so that they will not move. 2013/07 4.Installation 7 4.3. LOCATION Position the pump as near as possible to the suction tank, and whenever possible below the level of the liquid. Place the pump in such a way that there is enough space around it to provide access both to the same and to the motor. (See Chapter 8. Technical Specifications to consult dimensions and weights). Place the pump on a level and flat surface. The basement must be rigid, horizontal and against any vibration. Install the pump in such a way that it can be properly ventilated. If the pump is to be installed outside, it must be done so under cover. Its positioning must enable easy access for any inspection and maintenance operations that may need to be carried out. 4.4. PIPES In general, suction and delivery pipes should be fitted in straight stretches, with the minimum amount of elbows and accessories, in order reduce, as far as possible, any load loss that might be produced by friction. Make sure that the pump mouths are well aligned with respect to the piping, and that they are similar in diameter to that of the pipe connections. Position the pump are near as possible to the suction tank, and whenever possible below the level of the liquid, or even lower with respect to the tank in order for the static suction head be at its maximum. Place brackets for the piping as near as possible to the suction and delivery mouths of the pump. 4.4.1. Shut-off valves The pump can be isolated for the purpose of carrying out maintenance work. To this end, shut-off valves should be fitted at the pump’s suction and delivery connections. These valves must ALWAYS be open whenever the pump is operating. 4.5. ELECTRICAL INSTALLATION Leave the connecting of the electrical motors to qualified personnel. Take the necessary measures to prevent any breakdowns in the connections and wires. The electrical equipment, the terminals and the components of the control systems may still carry an electric charge even when disconnected. Contact with them may put the safety of operators at risk, or cause irreparable damage to the material. Before manoeuvring the pump, make sure that the electric box is switched off. Connect the motor in accordance with the instructions supplied by the manufacturer of the same. Check the direction of the rotation (see the signaling label on the pump). Check ALWAYS the direction of the motor’s rotation with liquid inside the pump. 8 4.Installation 2013/07 5. Start-up Before putting the pump into operation read carefully the instructions on installation given in Chapter 4. Installation. 5.1. START-UP Read Chapter 8. Technical Specifications carefully. INOXPA will not assume responsibility for any improper or incorrect use of the equipment. Do not touch the pump or the piping while it is pumping products at a high temperature. 5.1.1. Checks to be carried out before putting the pump into operation Completely open the pipes’ suction and delivery shut-off valves. If the liquid fails to flow toward the pump, fill it with the liquid to be pumped. The pump must NEVER rotate without liquid. Check that the rotation direction of the motor is correct. Check that the electrical supply is according as indication on the motor pate. 5.1.2. Checks to be carried out on putting the pump into operation Check to make sure that the pump is not making any strange noises. Check to see if the absolute inlet pressure is sufficient, in order to avoid cavitations in the pump. Consult the curve for the minimum required pressure above the steam pressure (NPSHr). Monitor the delivery pressure. Check that there are no leaks in the sealed areas. A shut-off valve should not be used in the suction pipe to regulate the flow rate. It must be completely open during operation. Monitor motor consumption in order to avoid a circuit overload. Reduce the flow and the power consumed by the motor: Regulating the flow to the pump delivery. Decreasing motor speed. 2013/07 5.Start-up 9 6. Operating problems The table given below provides solutions to problems that might arise during pump operation. With respect to the same, it is assumed that the pump has been properly installed and has been correctly selected for the application in question. Should there be a need for technical service please contact INOXPA. Operating problems Probable causes Motor overload The pump does not provide enough flow or pressure No pressure on the delivery side Uneven delivery flow / pressure Noise and vibration The pump gets clogged Overheated pump Abnormal wear The mechanical seal is leaking. 8, 9, 13. 1, 2, 4, 5, 7, 9, 10, 15, 17. 2, 3, 6, 16. 1, 2, 4, 5, 6, 9. 2, 4, 5, 6, 7, 8, 9, 10, 13, 14. 9, 10, 13. 8, 9, 10, 13. 4, 5, 10. 11, 12. Probable causes 1 Solutions Wrong direction of rotation NPSH is not high enough 2 3 4 5 6 7 Pump not drained Cavitation Air is sucked in by the pump. Clogged suction tube Delivery pressure too high Flow too high 8 9 10 11 12 13 14 15 16 17 Fluid viscosity too high Fluid temperature too high Mechanical seal damaged or worn. O-rings unsuitable for the fluid. The impeller scrapes. Taught tubes Pump speed too low The cut-off valve on the suction side is closed Delivery pressure too low Change the direction of rotation. Increase the available NPSH: Place the suction tank higher Place the pump lower Increase the diameter of the suction pipe Shorten and simplify the suction pipe Drain or fill Increase suction pressure (see also 2) Check the suction pipe and all its connections Check the suction pipe. If necessary, reduce load losses, e.g. by increasing the diameter of the tube Decrease the flow: Reduce the flow by means of a diaphragm. Partially shut off the delivery valve. Reduce speed. Decrease the viscosity by injecting liquid or increasing the diameter of the piping. Reduce the temperature by cooling the fluid. Replace the seal Fit suitable O-rings after checking with the supplier. Reduce temperature Reduce suction pressure Connect the tubing to the pump avoiding taughtness. Increase speed. Check and open Increase the pump speed. If the problems persist stop using the pump immediately. Contact the pump manufacturer or his representative. 10 6.Operating problems 2013/07 7. Maintenance 7.1. GENERAL MAINTENANCE This pump, as with any other machine, needs to be maintained. The instructions contained in this manual deal with the identification and replacement of the spare parts. These instructions have been drawn up by maintenance staff and are destined for those people who are responsible for supplying spare parts. Read carefully Chapter 8. Technical specifications. All the parts or materials that are changed must be duly eliminated/recycled in accordance with the prevailing directives in each area. ALWAYS disconnect the pump before starting out on any maintenance work. 7.1.1. Check the mechanical seal Periodically check that there are no leaks in the shaft area. Should there be any leaks in the mechanical seal area, replace the same pursuant to the instructions given in the section entitled Stripping and Assembly of the pump. 7.2. STORAGE Before being stored the pump must be completely emptied of liquids. Avoid, as far as possible, the exposure of the parts to excessively damp atmospheres. 7.3. CLEANING The use of aggressive cleaning products such as caustic soda and nitric acid may give rise to skin burns. Use rubber gloves during the cleaning process. Always use protective goggles. If the pump is installed in a system fitted with a CIP process, there will be no need for stripping. If it is not fitted with an automatic cleaning process, strip the pump pursuant to the instructions given in the section entitled Stripping and Assembly of the pump. Cleaning solutions for CIP processes. Only use clear water (chloride free) to mix with the cleaning agents: a) Alkaline solution: 1% in weight of caustic soda (NaOH) to 70ºC (150ºF) 1 Kg NaOH + 100 l. water = cleaning solution or 2.2 l. NaOH al 33% + 100 l. of water = cleaning solution b) Acid solution: 0.5% in weight of nitric acid (HNO3) to 70ºC (150ºF) 0.7 liters HNO3 to 53% + 100 l. water = cleaning solution Monitor the concentration of cleaning solutions, it could give rise to the deterioration of the pump sealing gaskets. In order to remove any remains of cleaning products, ALWAYS rinse the element in question with clean water after completing the cleaning process. 2013/07 7.Maintenance 11 7.4. PUMP DISASSEMBLY/ASSEMBLY 7.4.1. Pump casing and impeller Disassembly Loosen the retention ring nut and remove the retention ring (15) along with the housing (01) and the O-ring (80) Loosen the impeller (02) allen screw (51) using an allen key Take out the impeller (02) along with the allen screw (51) Assembly Mount the impeller (02). Fasten it in place using the allen screw (51). Place the O-ring (80) Assemble the housing (01) using the retention ring (15) 7.4.2. Lantern and mechanical seal Disassembly Remove the key (61) and take out the rotary part of the mechanical seal (08) Loosen the 4 hexagonal screws (52) using a fixed wrench Remove the hexagonal screws (52), the grower washers (53) and remove the lantern (04), the fixed part of the seal, which is housed in the lantern, and remove the splash ring (82). 12 7.Maintenance 2013/07 Assembly Slide the splash ring (82) over the pump shaft (05) without pushing it to the end. Fit the lantern (04) and fasten the 4 hexagonal screws (52) and the grower washers (53). Place the fixed part of the mechanical seal (08) in the lantern (04) taking into account the position of the impeller knob. Assemble the rotary part of the mechanical seal (08) by entering the seal through the pump shaft. Check that the mounting dimension "A" is like the detailed (table below). Then tighten the two screws (51A) securing the shaft (05) in accordance with an appropriate torque (see table 8.3.) Place the key (61), and continue with the assembly of the pumpcasing (01) and the rotor (02) (paragraph 7.4.1.) ¡IMPORTANT! When assembling the new seal, be careful and mount the parts and the O-rings with soapy water in order to allow an easy glide of the parts, either the stationary part and the rotary part on the shaft. 2013/07 7.Maintenance 13 8. Technical Specifications 8.1. TECHNICAL SPECIFICATIONS 180 m3/h (793 US GPM) 22 m (72 ft) 10 bar (145 PSI) -10 ºC a +140ºC (EPDM) 14 ºF a 284 ºF (EPDM) 1800 rpm 60-80 dB(A) DIN 11851 (standard) Maximum flow rate .............................................................. Maximum differential head .................................................... Maximum working pressure .................................................. Operating temperature ......................................................... Maximum speed ................................................................... Sound level ......................................................................... Suction / delivery connections ................................................. Data refers to clean water at 20ºC Whenever the noise level in the area of operation exceeds 85 dB(A) use special protection. Materials Parts in contact with the product ............................................... Other parts in stainless steel ..................................................... Gaskets and joints in contact with the product ........................... Other optional joints materials .................................................. Internal surface finish.............................................................. External surface finish................................................................ AISI 316L AISI 304 EPDM (standard) Consult your supplier Mirror polish Matte Mechanical seal Seal type ............................................................................. . Static part ........................................................................... Rotating part ....................................................................... Gaskets ............................................................................... Single internal mechanical seal Silicon Carbide Silicon Carbide EPDM 8.2. WEIGHTS Pump Type Power [kW] Speed [rpm] Weight [Kg] Weight [lbs] RV-65 0,75 1500 26 57 RV-80 2,2 1500 49 108 RV-100 4 1500 67 148 8.3. TIGHTENING TORQUE Unless explain specifically, the torques indicates in the table below should be used for the nuts and screws of this pump 14 Size Nm lbf·ft M6 10 7 M8 21 16 M10 42 31 M12 74 55 8.Technical Specifications 2013/07 8.4. RV PUMP EXPLODED VIEW 2013/07 8.Technical Specifications 15 8.5. RV PUMP SECTION VIEW 8.6. RV PUMP PARTS LIST Position Description Quantity Material 01 Pump housing 1 AISI 316L 02 Helical impeller 1 AISI 316L 04 Lantern 1 AISI 316L 05 Shaft 1 AISI 316L 08* Mechanical seal 1 Si / Si / EPDM 15 Retention ring 1 AISI 304 47 Protection 2 Methacrylate 50 Screw 4 A2 51 Allen screw 1 A4 51A Allen screw 2 A2 52 Hexagonal screw 4 A2 53 Grower washer 4 A2 53A Flat washer 4 A2 61 Key 1 AISI 316 80* O-ring 1 EPDM 81A* Gasket 1 PTFE 82 Splash ring 1 NBR 87 Drain plug 1 --- 1 --- 93 Motor (*) Recommended spare parts 16 8.Technical Specifications 2013/07 NOTES NOTES NOTES In addition to our branch offices, INOXPA operates with an independent distributor network which encompasses a total of more than 50 countries throughout the world. For more information consult our web page: www.inoxpa.com This information is a guideline only. We reserve the right to modify any material or characteristic without prior notice.