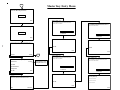
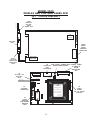
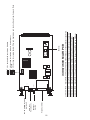
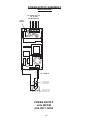
1
3300/3600 SERVICE MANUAL 627-0004193 REV B 1 Copyright © 2001 by NCR EasyPoint LLC All rights reserved. No part of this manual may be reproduced, stored in a retrieval system, or transmitted in any form or by any means, electronic, mechanical, photocopying, recording, or otherwise, except as may be expressly permitted by the applicable copyright statutes or in writing by NCR EasyPoint LLC For information, write: EasyPoint ATM, 2310 McDaniel Drive, Carrollton, TX, 75006 1-866-371-1321 TABLE OF CONTENTS 3300/3600 Installation..........................................................................4 3300/3600 Programming ................................................................ 13 3300/3600 Programming Flow Charts ............................................ 45 3300/3600 Error Messages by Code Number ................................... 63 3300/3600 Error Messages ............................................................. 69 3300/3600 Troubleshooting Guide ....................................................99 Illustrations ......................................................................................129 3300/3600 Installation 4 Installation Specifications: Temperature Requirements: Operating Temperature – 60 to 90 degrees F. Storage Temperature – 0 to 125 degrees F. Weight: 3300 - 209 lbs. 3600 UL 291 Business Hours Vault with 1 cassette – 242 lbs. UL 291 Level 1 with 2 cassettes – 707 lbs Power Requirements: 100-250 VAC, 50 – 60 Hz, 2.5 amps Power Connections: Model 3300s are not shipped with a built in surge protector and will require a dedicated, ground electrical circuit unless an optional approved surge protector is purchased for the unit. Using the surge protector supplied with the 3600 eliminates the need and expense of installing a dedicated electrical circuit. If the 3600 is installed without the surge protector, a dedicated grounded circuit shall be required to validate the warranty. Although the surge protector eliminates the need for a dedicated electrical circuit, a grounded circuit will be required to receive the warranty supplied by the surge protector manufacturer. Supplying AC power to the ATM via a power strip or an extension cord will void the manufacturer’s warranty. Phone Line Requirements: The 3300/3600 Series shall be connected to a dedicated phone line. This line shall be a direct line equipped with a standard telephone wall jack (RJ-11C). TCP\IP Connection Requirements: As an option, the 3300/3600 can be connected to any broadband connection that is configured with an RJ-45 ethernet jack. Preferably a connection that resides behind a hardware firewall such as a router. Depending on the options ordered, the Main PCB may or may not contain an Ethernet connection required for TCP/IP 5 20“ CABINET DIMENSIONS 6 21“ CABINET DIMENSIONS 7 INSTALLING THE 3300/3600 Remove the unit from the shipping container and remove all packing material. For three and four cassette units, the dispenser will be shipped in a separate container. Refer to the intructions on the following pages to install the dispenser once the unit has been secured to the floor. Bolt Down Procedures: Step 1: Place the ATM in the desired location. Step 2: Mark the floor at the four bolt down holes in the bottom of the vault. Step 3: Remove the ATM from the desired location and using a hammer drill and a 5/8” drill bit, drill four holes approximately 3 inches deep. Remove all the dust from the holes. Step 4: Place an anchor into each hole and “set” each one with a hammer and a 1/2” setting tool or equivalent. Step 5: Position the ATM over the four drill holes and install and tighten the four 1/2” bolts with washers using a 3/4” wrench. DO NOT OVER TIGHTEN. Step 6: Route the power cord and telephone line out of the cabinet and plug them into their respective outlet. TCDM DISPENSER INSTALLATION A single cassette dispenser will be mounted on a fixed tray. A two, three and four cassette dispenser will be mounted on a tray with a slide rail assembly. Step 1: Remove the two screws towards the front of the dispenser tray. Remove the cash cassettes from the dispenser. Step 2: Place the dispenser on the tray just forward of the mounting position. Slide the dispenser straight back until the back of the dispenser engages under the tab at the back of the dispenser tray. Secure the front of the dispenser with two screws removed in the previous step through the bracket located underneath the bottom cassette. Step 3: Connect the communication and power cable as shown below. Ensure back of dispenser engages under tab. Screw postions for securing front of the dispenser Connect the communication cable to the Dispenser PCB at J11 Connect the power cable to the Dispenser PCB at J13. 8 HAWK DISPENSER INSTALLATION The Dispenser for a one cassette unit is mounted on a fixed tray. For a two cassette unit, the dispenser hangs from a slide rail assembly and shipped inside the vault. For three and four cassette units, the dispenser will be shipped in a separate container. Remove the unit from the shipping container and remove all packing material. Use the following instructions to mount the dispenser inside the vault. Step 1: Slide both slide rails out of the vault. Pull the release pin to release the left slide rail. Remove and retain the two screws at the top of each slide rail. Step 2: Remove the cash cassettes from the dispenser. Place the dispenser assembly so the left and right edge of the top plate is resting on the left and right slide rails. Caution: Do not place the dispenser on the extended slide rails without the unit being secured to the floor. Step 3: Align the four screw holes in the plate with the four holes on the slide rails. Secure the dispenser with the screws removed in step 1. Step 4: Connect the communication and two power cables as shown below. Step 5: Slide the dispenser into the vault until the Release Pin locks the assembly in place. Slide Rail mounting screws Release Pin for left slide assembly Comm cable connection to J1 on the Dispenser PCB DC Power Cable to J3 on the Dispenser PCB AC Power Cable to Bulkhead Connector just behind the Dispenser PCB 9 Shipping Brackets and hardware may be included. Only needed if transporting the unit with the dispenser mounted. DIAL COMBINATION LOCK Changing Index DESCRIPTION Opening Index There are two (2) marks on the dial (see drawing). The index at the top is used for opening the lock. The index 30 degrees to the left is used only when changing the combination. The dial should always be turned slowly and evenly. A revolution is counted each time the selected number is aligned with the opening index. DO NOT TURN THE DIAL BACK TO COMPENSATE FOR OVER-DIALING A NUMBER. If, when dialing the combination any number is turned beyond the index, the entire sequence must be repeated. Locks are shipped with a factory setting of “50”. To unlock, turn the dial to the left (counter-clockwise) four (4) turns, stopping on “50”. Then turn the dial to the right until the bolt is retracted. WARNING: NEVER LUBRICATE ANY INTERNAL OR ANY EXTERNAL PARTS OF THE COMBINATION LOCK. CHANGING THE COMBINATION The combination lock should not need maintenance other than changing of the combination or replacement. Step 1: Open the lower cover and the Vault Door. Step 2: Dial the existing combination, stopping with the numbers aligned with the changing index. Step 3: With the last number aligned with the changing index, insert the change key in the keyhole located on the backplate of the lock. Step 4: Through the Vault Door inside cover, turn the change key 1/4 turn, clockwise. Note: DO NOT USE NUMBERS BETWEEN 1 AND 20 OR 80 AND 0 FOR THE LAST NUMBER. FOR MAXIMUM SECURITY, DO NOT USE NUMBERS THAT END IN 0 OR 5. USING NUMBERS IN SEQUENCE (13-23-33) IS NOT AS SECURE AS NUMBERS IN CROSS-SEQUENCE (23-13-33). Step 5: Turn the dial counter-clockwise passing the first number of the new combination three times, stopping on the fourth time at the changing index. Step 6: Turn the dial clockwise passing the second number of the new combination two times, stopping on the third time at the changing index. Step 7: Turn the dial counter-clockwise passing the third number of the new combination one time, stopping on the second time at the changing index. Step 8: Turn the change key counter-clockwise 1/4 turn and remove the key (see figure on this page). Caution: TRY OPENING THE LOCK SEVERAL TIMES, WITH THE DOOR OPEN, PRIOR TO CLOSING AND LOCKING THE VAULT DOOR. 10 DIAL COMBINATION LOCK UNLOCKING WITH A THREE DIGIT COMBINATION (For Example “50-25-50”) Step 1: Turn the dial counter- clockwise passing “50” three time, stopping on the fourth at the opening index. Step 2: Turn the dial clockwise passing “25” two times, stopping on the third time at the opening index. Step 3: Turn the dial counter-clockwise passing “50” one time, stopping on the second time at the opening index. Step 4: Turn the dial slowly to the RIGHT, until the bolt retracts. LOCKING Step 1: Turn the dial to the LEFT at least four (4) revolutions. ELECTRONIC LOCK DESCRIPTION The electronic lock requires a six digit combination code for entry. A correct entry is indicated by double beep and the LED will flash twice. An invalid entry is indicated by a triple beep and the LED will flash three times. Four consecutive invalid codes initiates a five minute delay period. The default combination from the factory is “123456”. Enter the default combination and the lock will beep twice and the LED will flash twice. Within four seconds, turn the keypad clockwise to the open position and open the vault door. CHANGING THE COMBINATION Step 1: With the vault door open and the keypad in the locked position, enter “Zero” six times. Step 2: Enter the existing six digit code one time. Step 3: Enter the NEW six digit code two times. Step 4: If a mistake is made wait thirty seconds and repeat steps 1 through 3. Step 5: Test the lock operation several times before closing the door. ♦ Valid Code Entry - Double signal after valid six digit code in entered. ♦ Invalid Code Entry - Triple signal and old code is still valid. 11 Open Position ELECTRONIC LOCK OPENING THE LOCK Step 1: Enter the valid six digit code. Step 2: The lock will indicate a valid code entry with a double beep and the LED will flash twice. Step 3: Within four seconds, turn the keypad clockwise to the open position. Step 4: Turn the vault door handle and open the door. WRONG TRY PENALTY ♦ Entry of four consecutive invalid codes starts a 5-minute delay period. - LED flashes at ten second intervals. ♦ At the end of the delay period, two more invalid codes will restart an additional 5 minute delay period. The Keypad will not respond to a single keystroke during the delay period. BATTERY LOW WARNING ♦ Repeated beeping during an opening sequence indicates that the battery is low and needs immediate replacement. ♦ The lock uses one 9-volt Alkaline Battery. The lock manufacturer recommends the use of Duracell™ or Eveready™ Alkaline batteries. ♦ If the battery is depleted and will not allow the lock to open, hold a new 9-volt alkaline battery on the contact points located on the front of the keypad. Place the large battery contact to the large keypad contact and the small to the small. Maintain contact and enter the valid code and turn the keypad clockwise to open. The lock contains nonvolatile memory, even with batteries removed the lock will retain all programming. CHANGING THE BATTERY Step 1: Open the vault door and remove the battery box by pulling on the front portion away from the safe door. Step 2: Disconnect the terminal connector on top of the battery being careful not to pull on the wires. Step 3: Connect a new 9-volt battery to the battery terminal connector then place the battery inside the battery compartment. Step 4: Replace the cover and test the lock several times before closing and locking the door.. Remove Battery Compartment Cover Replace battery and place inside compartment and place cover on. Battery Compartment located on back of vault door 12 3300/3600 Programming 13 Menu Definitions 300 IS THE MAX TO DISPENSE FOR ATM TRANSACTIONS Allows the programmer to set the maximum amount that can be dispensed by the ATM for a single financial transaction. 90 DAYS OF JOURNAL WILL BE STORED ON THIS MACHINE Enables the programmer to select the number of business days to be maintained for the Electronic Journal. The selection can be programmed with a range of 1 to 9999. The number of days programmed into this selection is the number of business days that will be maintained in the Main PCB Flash Memory before being overwritten. ACTIVITY REPORT Indicates the last dispenser load, the amount of notes dispensed since the last load and the number of notes remaining for each cassette. The report also indicates the amount of notes dispensed or rejected during diagnostic testing. The number of door openings and dispenser resets performed by each manager is also indicated on this report. ADD GFX Allows you to add the selected graphic to the autoload.tid file. AIMS Contains all of the setup options to configure the ATM to communicate of the AIMS Computer. AIMS COMPUTER PHONE Allows the programmer to set phone number for the AIMS computer. AIMS DIAL MODE Allows the programmer to set the dial mode for the AIMS Phone Number. This item can be set to Pulse (Rotary) or Touchtone. AIMS DIAL MODE Allows the programmer to set the dial mode for the AIMS Phone Number. This item can be set to Pulse (Rotary) or Touchtone. AIMS PASSWORD Allows the programmer to set the password AIMS security. AIMS REMOTE CONTROL MODE SHOULD TIMEOUT IN 180 SECONDS Determines how long the ATM will remain connected to AIMS if the user does not end the remote control feature. With default set to 180 seconds, the timeout has a range between 60 and 300 seconds. Remote control to the ATM requires AIMS version 3.12 or greater. AIMS SETUP Allows the setup programming to be restored from the AIMS Computer. ALLOW MAC KEYS IN FINANCIAL RESPONSES When enabled, allows the Host to return encrypted MAC working keys in the Financial Host Response Messages. This option must e supported by the Host. AMOUNT WILL BE CHARGED/REFUNDED TO CUSTOMER Determines if the surcharge amount will be debited to the customer. AS CLERK, CAN/CAN NOT LOAD THE DISPENSER Determines if the selected manager, when logging on without the manager button, will be able to load the dispenser count. 14 AS CLERK, CAN/CAN NOT PERFORM DISPENSE AND REJECT Determines if the selected manager, when logging on without the manager button, will be able to perform a dispense and reject test. AUTOMATIC CUTOVER Allows the Programmer to setup the ATM to automatically perform a cutover at a specific time every day. BALANCE INQUIRES ARE/ARE NOT ALLOWED Allows the programmer to enable or disable the Balance selection in the Customer Selection Screens. The default value is allowed. BANK ID Allows the programmer to enter Bank ID numbers for ON-US Transactions. BIN VEND ALGORITHM Allows the programmer to select the dispense sequence of the cash cassettes for multicassette units. Small First – Multiples of Two Round Robin – Smallest First Round Robin – Largest First Maximize – Largest First. Maximize for ATM CARD BEFORE CASH With this option enabled, the unit will not dispense the cash until the customer removes their card from the Smart Card Reader. The feature only applies to EMV transactions using the Smart Card Reader. A customer could accidentally leave their card in the Smart Card Reader if this option is disabled. CASH Contains setup options for a maximum dispense amount and the cash template. CASH TEMPLATE TO EDIT Allows the programmer to select the Cash Template position to edit, 1 through 8. CASH TEMPLATE X = XXX Allows the programmer to view the programmed template amount for each position, 1 through 8. The template position can be selected by repeatedly pressing Cash Template to Edit until the desired position is displayed. X = the template position number and XXX = the template dollar amount. CASSETTE # Allows the programmer to toggle between cassettes in a multiple cassette unit in order to enter the bill count for the selected cassette. CASSETTE DENOMINATION Allows the programming of the cassette denomination. CASSETTE TO EDIT Allows you to select the cassette you wish to edit in the Dispenser Settings Menu. CASSETTE X COUNT BELOW LIMIT YES/NO Allows the programmer to enable or disable a bill count low status to the Host Provider. X = the cassette number. CASSETTE X LOW LIMIT 15 Allows the programmer to set the amount that the ATM will send a Low Currency status message to the Host. (This feature must be supported by the Host Provider). X = the cassette number. CENTER Centers the receipt lines that are being programmed. CHECKING HOST Contains all of the setup options to configure the ATM to process check cashing transactions with a Check Cashing Host. CLEAR SELECTED/CLEAR ALL When clearing errors, allows the user to clear the errors on the selected device or clear errors on all devices at one time. CUSTOMER WILL/WILL NOT BE ASKED IF THEY WANT ANOTHER TRANSACTION Allows the programmer to set the unit up to ask the customer if they want another transaction after the first transaction is complete. The default value is will not be asked. CUSTOMERS NAME WILL/WILL NOT BE ON THE RECEIPT Determines if track one on the magnetic strip will be printed on the receipt. CUTOVER (Z) When performed, will end the business day and print a cutover (Z) report. All transactions performed after the cutover will be posted on the next business day (if supported by the Host). The information provided on the report is received from the Host. The report prints transaction totals for the current business day, previous business days and Host information. The actual Host information contained on the report depends on the Host Provider. DATE FORMAT Enables the programmer to edit the date format of the unit to month/day/year (MMDDYYYY), to day/month/year (DDMMYYYY) or to year /month/day (YYYYMMDD). This selection should be set to date format expected by the Host with the default value at (MMDDYYYY). DEL PRINTER FLASH Enables the programmer to clear the Flash Memory on the Printer PCB. This operation can be useful for correcting printer malfunctions. DIAGNOSTICS Contains a diagnostic test for each single component of the ATM. A System Test can also be selected that will automatically step the tester through each test. DIRECTION Allows the selection of the encryption direction for the Master Key to be entered. This selection can be set to Encrypt or Decrypt. DISPENSE THRESHOLD Allows the programming of a minimum dollar amount that must be dispensed before a coupon will print. DISPENSER Allows the programmer to setup the cassettes for dispensing cash, coupons, stamps, or user definable documents. 16 Also allows the programming of the note thickness and length for each cassette. Note: A single cassette unit can only be configured to dispense cash. DISPLAY MESSAGE 1 – 4 Contains four lines of 30 characters each. These text line appear on the display while the unit is idle between transactions. If a Display Message is programmed, the message will be displayed at the Welcome Screen instead of the Attractor. EMPTY REJECT Allows the programmer to Zero the reject count without performing a Load Dispenser. ENABLE/DISABLE TCP/IP Offers the programmer the option of enabling or disabling TCP/IP. The option must be enabled to utilize Broadband connection. TCP/IP (Transmission Control Protocol/Internet Protocol) is a communication protocol that allows devices to communicate over a network. TCP/IP networks require an IP address which is either permanently assigned or dynamically assigned at start-up. ENCRYPTION LEVEL Allows the programmer to set encryption level for each host type. This selection can be set to Single, Double, Triple/2 Key or Triple 3 Key. ENCRYPTION LEVEL Allows the selection of Single or Triple/2 Key encryption. ENGINEERING MENU Allows the programmer to write trace journal and system files a Compact Flash Card. ENGLISH OPTIONAL SPELLING Allows the programmer to select the English spelling of Checking for Customer Selection Menus. This option can be set to Checking, Cheque, or Chequing. ENHANCED JOURNALING This option is only used in Mexico. When set to YES, the customer’s entire card number is written to the Electronic Journal. ERASE PRINTER FLASH Allows the clearing of the Flash Memory on the Printer PCB. This may be required before performing a Save Printer Flash for loading coupons. EXTENDED STATUS Allows the status of all of the ATM components to be displayed or printed. FINANCIAL HOST Contains all of the setup options to configure the ATM to process ATM transactions with a Financial Host. GO OFFLINE Enables the programmer to place the ATM offline. GRAPHICS Enables the programmer the ability to load or restore graphic files and the Autoload.tid file. 17 GROUP 3 ISSUER FEE Enables the ATM to prompt the customer for any bank fees in addition to the surcharge. Note: This feature is not functional in the United States whereas, the United Kingdom requires it. This feature must be supported by the Host. GROUP 6 MAC’ING Required by some international Host, a code is calculated and sent with financial request and response messages to ensure the messages are authentic. MAC Master Keys will be required if MAC’ing is enabled. This feature must be supported by the Host. GROUP 12 EXTENDED STATUS MONITORING FIELDS ARE NOT INCLUDED/INCLUDED IN HOST MESSAGES If enabled, the ATM will include the status of the Bill Acceptor and/or the Card Dispenser in the request message to the Host Provider. GROUP 4 STATUS MONITORING ARE INCLUDED/NOT INCLUDED IN HOST MESSAGES If enabled, the request message to Financial, Check Cashing or Pre-Paid Product Host will include the ATM status condition. This feature must be supported by the Host. GROUP 7 HOST SCREEN LINES Enables the Financial, Check Cashing Host or Pre-Paid Product Host to send text lines to be displayed on the ATM. This option is found in both Host Setup Menus. It must be host supported. GUARD TONE A modem communication parameter used in the United Kingdom. The default value is OFF. HOST Contains all of the setup options for Financial, Checking and Pre Paid Product Host. This menu also contains the status monitoring configuration options. HOST COMMUNICATIONS DATA BITS 7\8 Allows the programmer to edit the number data bits for the serial communications to the Host. This option is set to 7 or 8 with the default value at 7 Data Bits. This selection is available for Financial and Check Cashing. HOST COMMUNICATIONS OCCUR AT 1200 or 2400 BAUD Allows the programmer to edit the baud rate for the serial communications to the Host. This option can be set to 1200 or 2400 baud. This selection is available for Financial and Check Cashing. HOST COMMUNICATIONS PARITY EVEN\ODD\NONE PARITY Allows the programmer to edit the parity for the serial communications to the Host. This option can be set to EVEN, ODD. or NONE. This selection is available for Financial and Check Cashing. HOST COMMUNICATIONS STOP BITS 1\2 18 Allows the programmer to edit the number stop bits for the serial communications to the Host. This option is set to 1 or 2 with the default value at 1 Data Bits. This selection is available for Financial and Check Cashing. HOST DOES/DOES NOT REQUIRE END OF TRANSMISSION SIGNAL Allows the unit to be setup to require an End of Transmission from the Host (not required by most Host Providers). HOST HAS 30 SECONDS TO ANSWER (ENQ) AFTER A DIAL OUT This is the amount of time that the unit waits for the Host to send an ENQ once the modems synchronize. The default value is 30 seconds. JOURNAL COMMUNICATION FAILURE When set to ON, this feature will make a log to the Electronic Journal in the case of a communications failure. MAXIMIZE FOR ATM This is a dispense sequence. Only used if unit is setup to do Check Cashing. The ATM will not dispense denominations such as $1, and $100 for ATM transactions as they would be used for Check Cashing. MAXIMUM DISPENSE AMOUNT FOR ATM/CHECKING TRANSACTIONS The maximum dollar amount that can be dispensed for ATM or Check Cashing transactions. MAXIMUM NOTE LENGTH The length is the distance between the leading edge and the trailing edge of the note. Any note on the feed path that exceeds this length, will be rejected (overlapping, stream feeding, skewed notes). MAXIMUM NOTE THICKNESS Allows the programming of the maximum note thickness. Any note on the feed path that exceeds this thickness, will be rejected (doubles, overlapping notes). MEDIA TYPE Allows the selected cassette to be programmed for cash or unused. MERCHANT Site information into the unit such as surcharge recipient name, store address, store number, receipt headers, receipt trailers, and display messages can be edited here. MINIMUM FREE SPACE FOR ATM Allows the programmer to set the amount of disk space to always remain free for the ATM. It is recommended that this item be left at its default value of 4,096,000. Altering this option for the purpose of maximizing storage for graphics or the electronic journal can cause the system to shut down. MINIMUM NOTE LENGTH The length is the distance between the leading edge and the trailing edge of the note. Any note on the feed path shorter than this length, will be rejected. MODEM CONFIGURATION MENU Contains the items to configure the communication parameters of the modem. MODEM COUNTRY CODE 19 This feature allows the programmer to apply the modem setup properties by country for the Global modems, e.g. United States, Australia, Canada, Mexico or United Kingdom. MUTITECH FASTCONNECT SETTING This feature allows the programmer to fast connect setting for the Global modems. The default value is $F1 and this should be the value for Global Modems. NEW SYS STARTUP Allows the programmer to Cold Start the ATM. When this item is performed all programmer and manager codes are erased and all setup options return to their default values. NEXT GFX Allows you to highlight or select the next graphic file in the list. NEXT ITEMS Allows you to highlight or select the next graphic file in the autoload.tid list. NUA VALUE Links directly to the X.28 Protocol allowing the routing addresses to be edited. This feature is not used in the United States. ONE ACCOUNT This selection toggled to “Enabled” the Select Type Withdrawal selection is omitted from the Customer Selection Screens. This feature is added for countries issuing card for only one type of account, either saving or checking. The default value is Disabled. ON/OFF-LINE CHANGES YES/NO If the Status Change Comm option is enabled and this option is set to Yes, a status message will be sent to the Host if the status of the ATM goes from Online to Offline or Offline to Online. OPERATIONS Contains Load Dispenser, Clear Errors, Set Date/Time and Restart. PPP AUTHORIZATION Enables to programmer to set the Prepaid Products Terminal ID, unit serial number and the Pre Paid Products Authorization Code. PREPAID PRODUCTS HOST Contains all of the setup options to configure the ATM to process prepaid product transactions with a Prepaid Products or a Financial Host. PREVIOUS DEVICE/NEXT DEVICE When clearing errors, allows the user to select a specific device for error clearing. PRIMARY DIAL MODE Allows the programmer to set the dial mode for the Primary Host Phone Number. This item can be set to Pulse (Rotary) or Touchtone. PRIMARY PHONE # When a transaction is performed, the unit will dial this number to contact the Host. If contact is not made, the unit will dial this number a second time in an attempt to contact the host. If contact cannot be made with the Host on both Primary Number dial attempts, the unit will attempt to contact the Host using the Secondary Phone Number. 20 PROGRAMMERS CODE The programmer’s code is a 6-digit code and a 4-digit PIN number assigned when the unit is first programmed. The programmer will have access to all menu items in the Supervisors Main Menu. PRINT HOST LINES LINE ON RECEIPT AFTER PARTIAL DISPENSE With this selection Enabled, we will print the Host Print Lines sent by the host for when a reversal is needed. The bottom of the receipt will contain the following print lines: Our records will show that your received X. With this selection Disabled, we will suppress the Host Print Lines sent by the Host when a reversal is needed. The receipt will then contain the following: Requested X Dispensed X PRINTER COUPONS Allows the programmer to setup the conditions for when a coupon will print. Coupons can be set to print with all transactions or for cash withdrawals only. A dispense threshold can also be set to only print coupons if the programmed amount or higher is approved for a cash withdrawal transaction. PRINTING MESSAGE Allows the programming of a message to be displayed while the coupon is being printed if Group 3 Issuer Fee is enabled. The message can be 4 lines of 40 characters each. The message can be programmed in English, Spanish or French. RAISE CONTRAST/LOWER CONTRAST When programming a 3300 with the 5.7" display, this option allows the Programmer to adjust the contrast of the display so that it is most visible given the ambient light conditions. RECEIPT HEADER 1 Allows the programming of Receipt Header 1, the top line of the receipt. The header line consists of 40 characters. Receipt Header 1 or 2 must be used for the name of the location. RECEIPT HEADER 2 Allows the programming of Receipt Header 2, the second line of the receipt. The header line consists of 40 characters. Receipt Header 1 or 2 must be used for the name of the location. RECEIPT TRAILER 1-4 Allows the programming of the receipt trailers. Each trailer line consists of 40 characters. The receipt trailer is printed at the bottom of the customer’s receipt. RECEIPT WILL AUTO-PRINT/ASK FOR PRINT CONFIRMATION Allows the programmer to set the unit up to ask the customer if they want a receipt after they conduct a transaction. The default value is a receipt will automatically print. REPORTS 21 Contains all of the reports, Local and Host Reports. RESTART SYSTEM Initiates a simple system reboot. RESTORE SETUP Loads the setup programming from the Compact Flash Card. The Compact Flash Card must be plugged into the Main PCB and contain the file AC4SETUP in the Terminal ID named file folder to complete this operation. The Terminal ID must be programmed into Financial Host before a Restore Setup can be performed ROUND ROBIN – LARGEST FIRST (multi-cassette only) This is a dispense sequence. Depending on the amount requested, the dispenser will begin dispensing from the largest denomination first and attempt to vend an even number of bills from each cassette. This selection is designed to empty the cassettes evenly. ROUND ROBIN – SMALLEST FIRST (multi-cassette only) This is a dispense sequence. Depending on the amount requested, the dispenser will begin dispensing from the smallest denomination first and attempt to vend an even number of bills from each cassette. This selection is designed to empty the cassettes evenly. ROUTING NUMBER Allows contact to the Host through telephone service providers (supplied by the Host). SAVE PRINTER FLASH Allows loading of printer coupons into Flash Memory on the Printer PCB. This process will be required before the printer will print coupons. Use Erase Printer Flash if you choose to remove the coupons from Printer Flash. SAVE/PRINTER COUPON Allows loading of printer coupons into Flash Memory on the Printer PCB. If the operation is successful the coupon will be printed. If the operation fails, perform an Erase Printer Flash and attempt the Save/Printer option again. If the coupon is already in Flash Memory, the coupon will only be printed. SECONDARY DIAL MODE Allows the programmer to set the dial mode for the Secondary Host Phone Number. This item can be set to Pulse (Rotary) or Touchtone. SECONDARY PHONE # This is the backup number to the primary phone number (see Primary Phone Number). If the Host cannot be contacted by dialing the Primary number (two attempts will be made), the unit will attempt to contact the Host using the Secondary number (two attempts will be made). SEND MESSAGE LENGTH FIELD If enabled, a message length indicator will precede message to the Host Provider. SEND STATUSES TO A HOST ON/OFF Allows the programmer to configure the ATM for Status Change Communication messages. If this item is enabled, a status message will be sent to the Host when the status of the unit changes. 22 This feature must be supported by the Host Provider. SEND SURCHARGE RESULT If enabled, a flag is added to the request message indicating to the Host if the transaction is a surcharge transaction or not. Used in conjunction with the Bank ID numbers for ON-US transactions. SET DATE Allows the programmer to change the date. The date is controlled by the Host Provider. If the date is changed at the unit, the date will revert back to the date set at the Host when a transaction is performed. SET TIME Allows the programmer to change the time. The time is controlled by the Host Provider. If the time is changed at the unit, the time will revert back to the time set at the Host when a transaction is performed. SMALL FIRST – MULTIPLE OF TWO (multi-cassette only) This is a dispense sequence. The dispenser will pick bills in multiples of two from each cassette, starting with the smallest denomination first. If the dispenser picks a multiple of 2 from every cassette, and a balance remains to complete the requested amount, the unit will dispense from the largest denomination, to the smallest to complete the request. STATUS CHANGE COMM Contains all of the setup options to configure the ATM to send a status message to the Host Provider when the status of the ATM changes. STORE Allows you to copy the autoload.tid and graphic files to a Compact Flash Card. The files can be copied to a general location on the flash card or to a specific Terminal ID named file folder. STORE CITY/STATE/ZIP One line of 40 characters each that will print on the receipt as the City, State and Zip Code of the location. STORE ID # Allows programming of a store or location ID number. STORE STREET ADDRESS One line of 40 characters each that will print on the receipt as the street address of the location. SUBNET MASK Required when manually programming an IP address. This information will be supplied by the Network Administrator and need to be manually input. The technique used by the IP protocol to determine when network segment packets are destined for. The Subnet Mask is a binary pattern that is stored in the client machine, server or router and is matched with the IP address. 23 SUPERVISORS MAIN MENU This is the highest level of the programming menus and is accessible by the programmer (MGR 01). The Supervisors Main Menu contains all the setup programming of the unit. Managers can have access to this menu and the options available to the managers will depend on the privileges set by the Programmer. SURCHARGE Contains the setup items to enter a surcharge amount and to configure the programmable surcharge lines. SURCHARGE INFO WILL/WILL NOT BE PRINTED ON RECEIPT Enables the programmer to enable or disable the printing of the surcharge charge on the customer’s receipt. The default value is will be printed. SURCHARGE RECIPIENT NAME enables the manager to program the recipient of the surcharge. The merchant name appears on the receipt and in the default surcharge message (during a surcharge transaction) as the recipient of the surcharge. SYSTEM Contains items that configure your system such as the keypad beeper status, language setup, days to be stored on the electronic journal and customer choice receipts. SYSTEM SETUP REPORT Contains all of the setup programming information that is programmed into the unit. This report is very helpful in checking for programming errors or obtaining a record of how the unit is programmed. TERMINAL CAPABILITIES - SEND/DON’T SEND With this option set to send, the ATM will send the capabilities of the terminal and the card to the Financial Host in the request message for EMV transaction. The default setting for this selection is don’t send. TCP/IP SETUP Contains all of the setup options to configure the ATM to communicate to the Host via a TCP/ IP connections instead of using a dial up phone line. TIDEL SUPPLIED KEY TO ENABLE CHECKING TRANSACTIONS An authorization code is required to enable Check Cashing Transactions. The code can be obtained by contacting NCR EasyPoint and it is based on the Financial Host Terminal ID. TIDEL SUPPLIED KEY TO ENABLE EMV TRANSACTIONS An authorization code is required to enable EMV Transactions. The code can be obtained by contacting NCR EasyPoint and it is based on the Check Cashing Terminal ID. TIDEL SUPPLIED KEY TO ENABLE PREPAID PRODUCTS TRANSACTIONS An authorization code is required to enable Pre Paid Product Transactions. The code can be obtained by contacting NCR EasyPoint. The code is based on the Pre Paid Products Terminal ID and the unit serial number. TOGGLE CAPS 24 Allows the programmers to toggle between upper case and low case letters while programming receipt lines. TONE DIAL SPEED A modem communication parameter used in the United Kingdom. The default value is 95. TRANSACTION REPORT This is a time audit report that will allow the printing of up to the last 2000 transactions. Any activity conducted on the unit such as loading bill counts, unit going off-line, and ATM vends is considered a transaction. The user has the option of selecting the start and stop date of the report to print a specific area of time. The report can also be printed selecting only one type of transaction or a particular manager’s activity. TRANSFER TRANSACTIONS ARE/ARE NOT ALLOWED Allows the programmer to enable or disable the Transfer selection in the Customer Selection Screens. The default value is allowed. USE DEFAULT ACCOUNT TYPE (99) If enabled, the account type in the Request Message will be listed as (99) for all accounts types. Do not turn this option on unless the Host requires it. VENDING REPORT (Cassette) Contains the number of notes requested and dispensed for each cassette up to the past five business days. WAIT FOR ENQ Only applicable if the unit is TCP/IP enabled. If disabled, the unit will not wait for an ENQ from the Host Provider before sending the request message. WAIT XX SECONDS FOR CARD REMOVAL Allows the programmer to set the number of seconds the unit will wait before prompting the customer to remove their card. The default value is 45 seconds with a range of 5 to 240 seconds. WHEN BILL COUNT IS < = 0, REPORT LOW BILL COUNT TO AIMS Allows the programmer to set the low bill count level that will trigger a call to the AIMS computer. WHEN TO PRINT Allows the programmer to select the type of transaction that a coupon will be printed. If set to All Transactions, a coupon will print for every transaction, including denied transactions. If set to Cash Withdrawals, a coupon will only print for approved cash withdrawal transactions. WHICH COUPON Enables or disables the printing of coupons. Multiple coupons can be programmed for a third option called Rotate which enables the ATM to rotate to a different coupon for each transaction. Customer Choice will only apply if coupons are loaded as customer choice coupons. WRITE SETUP 25 Writes the setup programming to the Compact Flash Card, creating the file AC4SETUP. The setup file will be located in a file folder by the name of the Financial Host Terminal ID. X.28 PROTOCOL NO/YES If enabled with a “YES”, allows the ATM to communicate with the Host through a switch used only in the United Kingdom. ZERO ACTIVITY Zeros the diagnostic information, the manager door openings and number of dispenser resets on the Activity Report. ZIP CODE Enables the programmer to set the Zip Code of where the ATM is installed for Pre Paid Product transactions. 26 27 About Programming Entering Alpha Characters: Press the corresponding key repeatedly until the desired selection is displayed. To Advance to the Next Character: Pause entry selection for 1-2 seconds, then continue with the next character. To Backspace 1 Character or Clear an Entry: Press the “Clear” key. To Enter a Space: Press the “0” key twice then pause 1-2 seconds. To Clear a Previous Entry: Press the “Clear” Key repeatedly until all characters of the entry are clear. To Change to Upper Case or Lower Case If the “TOGGLE CAPS” selection is in all capitol letters, entered text will also be in all caps. If the “toggle caps” selection is in lower case, entered text will also be in lower case. Select “Toggle Caps” to change the case. 28 3300/3600 Minimum Mandatory Programming Initial Startup: Step 1: Form the “Please enter manager/programmer card” screen (cold start), insert and remove a Tidel Magnetic Card or enter a six digit Programmers Code and press “Enter”. Step 2; The display will then prompt “Enter card again for verification purposes. Insert and remove the Tidel Magnetic Card or enter the six digit Programmers Code that was entered in the previous step. Step 3: The display will then prompt “Please enter your PIN - then press Enter”. Enter a four digit PIN number and press “Enter”. Step 4: The display will then prompt “Enter your PIN again for verification purposes”. Enter the four digit PIN number entered in the previous step and press “Enter”. The display will then go to the Supervisor Main Menu. Host Setup Parameters (Financial): Step 5: From the Supervisor Main Menu, select “Configuration”, “Local Setup”, “Host”, then “Financial Host”. Step 6: Select “ATM TermID” and enter the specific Terminal ID and press “Enter”. Step 7: Select “More” then “Primary phone #”. Enter the Host Primary Phone Number and press “Enter”. For a PBX System, preceed the number with an “8” or a “9” followed by one or more decimal point “.”. Each decimal point is a 2 second delay. Step 8: Select “Secondary phone” and enter the Host Seconday Phone Number and press “Enter”. For a PBX System, preceed the number with an “8” or a “9” followed by one or more decimal point “.”. Each decimal point is a 2 second delay. Step 9: Select “Done” to return to the Main Menu Page 1 of the Local Setup Menu. Cash Setup Parameters: Step 10: Select “Dispenser” then select “Cassette to edit = X” until the desired cassette number is displayed. Step 11: Select “Edit Cassette” then “Cassette Denomination” . Enter the cassette denomination in for the selected cassette and press “Enter”. Step 12: Select “More” to go to the “Edit Cassette Page 2” screen. For currency other than US Dollars, select “Maximum note thickness” and enter the note thickness in .01 millimeter units and press “Enter”. Select “Minimum note length” and enter the minimum note length in millimeters and press “Enter”. Select “Maximum note length” and the enter the maximum note length in millimeters and press “Enter”. The note length is the distance between the leading edge (top of the bill) and the trailing edge. Step 13: Select “Done” to return to the first screen of the Dispenser Setting Menu. Repeat step 10 through 12 for each cassette to be programmed. Step 14: Select “Done” to return to the Main Menu, Page 1 of the Local Setup Menu. Proceed to the next step to edit the Cash Template Amounts. If you choose to use the defualt template amounts go to step 18. 29 Step 15: Select “Cash” then select “Cash Template to Edit = X” until the desired template number to edit is displayed. Step 16: Select “Cash template X” and enter the cash amount of the selected template and press “Enter”, Repeat steps 15 and 16 for each template position to be programmed. Step 17: Select “Done” to return to the Main Menu, Page 1 of the Local Setup Menu. Merchant Setup Parameters Step 18: Select “Merchant” then select “Surcharge recipient name” and enter the name of the surcharge recipient and press “Enter”. The Surcharge Recipient will not appear at the top of the receipt as the name of the location. Step 19: Select “Store Street address” and enter the street address of the ATM location and press “Enter”. Select “Center” to center the street address line on the receipt then press “Enter”. Step 20: Select “Store city/state/zip” and enter the city, state and zip code of the ATM location and press “Enter”. Select “Center” to center the address line on the receipt then press “Enter”. Step 21: Select “More” twice then select “Receipt Header 1” and enter the desired receipt header for line1. Select “Center” to center the header line on the receipt then press “Enter”. Step 22: Select “Receipt Header 2” and enter the desired receipt header for line 2 and press “Enter”. Select “Center” to center the header line on the receipt then press “Enter”. Step 23: Select “More” to program Receipt Trailers. Select the desired receipt trailer, “Receipt Trailer 1 through 4”. Step 24: Enter the desired receipt trailer. Select “Center” to center the trailer line on the receipt and press”Enter”. Step 25: Repeat steps 23 and 24 for each receipt trailer to be programmed. Step 26: Select “Done” to return to the Main Menu, Page 1 of the Local Setup Menu. Surcharge Information Step 27: Select “Surcharge” then select “Current surcharge”. Step 28: Select “Amont is” and enter the surcharge amount and press “Enter”. Press “Done” to return to the Surcharge Setting (pg 1) menu. Step 29: To use the optional surcharge lines, proceed with the next step. To use the default surcharge message, proceed with step 35. Step 30: Select “DO NOT USE configurable surcharge display lines” to toggle the item to “USE configurable surcharge display lines” then select “Edit Lines”. Step 31: Select “Current Language:” to select the language of the surcharge message to be programmed. Step 32: Select “Line to Edit X:” to select the line to be programmed. Step 33: Select “Edit Line” and enter the contents of the line selected in step 32 and then press “Enter”. Use 6 # symbols in place of the surcharge amount in your text. The 6 # symbols will be replaced with the programmed surcharge amount when the surcharge message is displayed. Step 34: Repeat steps 32 and 33 for each line to be programmed for the selected language. Repeat steps 31 through 33 to program the surcharge lines for another language. Select “Done” twice to return to the Main Menu, Page 1 of the Local Setup Menu. 30 Step 35: Select “Done” to exit the Local Setup Menu. The display will prompt “Do you want to save any changes before exiting?” Select “Yes” to save your changes and the unit will go to the Supervisor Configuration Menu. If you select “No” the display will prompt “Are you sure you want to exit Local Setup without saving?”. If “Yes” is selected the unit will go to the Supervisor Configuration Menu without saving the changes made to the setup. If “No” is selected the unit will return to the Local Setup Menu. Master Key Entry Step 36: From the Supervisor Configuration Menu, select “Master Key Entry”. Step 37: Select the “Host Type” to toggle to the type of Host that you are going to enter the Master Keys for. The Host Type can be set to “Financial”, or “Checking”. Step 38: Select the “Encryption Level” to toggle to the Host required configuration. The Encryption Level can be set to “Single”, “Triple/2 Key”, or “Triple/3 Key”. Most Host use Triple/2 Key. Step 39: Select “Next >>” to continue with the Master Key entry. Step 40: The Display will prompt you to enter the Master Key Password #1. Enter Master Key password #1 and press “Enter”. The default for Password 1 is “1234”. Step 41: The Display will prompt you to enter the Master Key Password #2. Enter Master Key password #2 and press “Enter”. The default for Password 2 is “5678”. Step 42: The Display will then prompt: ***Warning*** You are about to change the Master Key on your keypad. Once you begin, you will NOT be able to quit. Incorrect MK entry could result in rejected host transactions. Please ensure that you have the correct Master Key information before you continue. Step 43: Select “Continue >>” to continue with the Master Key entry. Step 44: Select “Key Parts” to toggle to the number of parts per key for Master Key 1. The Key Parts can be set to “1” or “2”. Most Master Keys contain 2 parts per key. Step 45: Select “Direction” to toggle to the encryption direction for the key to be entered. The Direction can be set to “Encrypt” or “Decrypt”. Most Host require “Decrypt” for the first key. Continue with the next step to enter the Master Key using the below example as a reference. 31 Step 46: Select “Enter MK” to enter Master Key 1 part 1. The first person will enter the left most 16 characters of the first key component and press “Enter”. For alphabetic entry press: “#” and then “1” for A “#” and then “2” for B “#” and then “3” for C “#” and then “4” for D “#” and then “5” for E “#” and then “6” for F Step 47: Select “Enter MK” to enter Master Key 1 part 2. The second person will enter the left most 16 characters of the second key component and then press “Enter”. Step 48: Select “Key Parts” to toggle to the number of parts per key for Master Key 2. The Key parts can be set to “1” or “2”. Most Master Keys contain 2 parts per key. Step 49: Select “Direction” to toggle to the encryption direction for the key to be entered. The Direction can be set to “Encrypt” or Decrypt”. Most Host require “Encrypt” for the second key. Step 50: Select “Enter MK” to enter Master Key 2 part 1. The first peson will then enter the right most 16 characters of the first key component and press “Enter”. Step 51: Select “Enter MK” to enter Master Key 2 part 2. The second person will then enter the right most 16 characters of the second key component and press “Enter”. Step 52: If “Triple/3 Key” was selected in step 38, repeat steps 48 through 51 to enter the Master Key 3. Step 53: The “Master Key Summary” screen will be displayed indicating the Master Key Check Sums for each part of each key and the total checks sum for each key. Step 54: Verify correct entry of each key by comparing checksum values supplied by the Host Provider. Step 55: Select “Done” and the display will briefly show “Updating system... please wait...” before returning to the Supervisor Configuration Menu. Step 56: Master Key Check Sums and direction of each Master Key can be verified in Diagnostics. From the Supervisor Configuration Menu, select “Done”, then “Diagnostics”, then “Master Keys”. The display will show breifly show “Loading Key Info... Please Wait...” then the “Master Key Diagnostics” will be displayed. The checksum and encryption direction will be displayed for each key for each Host. H1 keys are for Financial Host, H2 keys are for Check Cashing Host and H3 keys are for Pre Paid Products Host. Select “Pass” to exit the test. Step 57: Select “Done” to return to the Supervisors Main Menu. Loading the Dispenser Count Step 58: From the Supervisor Main Menu, select “Operations”, then “Load Dispenser”. Step 59: For multi-cassette units, select “Cassette #” to toggle to the cassette number you wish to load. Step 60: Select “Enter Count” and enter the total number of bills in the cassette and press “Enter”. Step 61: Select “New Count” and the table at the top of the screen will indicate the number of notes loaded. 32 Step 62: Select “Done” to exit and a Cassette Summary Report will be printed. Step 63: Select “Clear Errors” and the unit will check each component for any error conditions. The display will indicate if an error is detected with any component. Select “Clear All” and the unit will check or reset each component in an attempt the clear the errior. Refer to the 3600 Troubleshooting Guide for error conditions that will not clear. Step 64: Select “Done” twice to return to the Supervisors Main Menu. Perform Close-out to the Host Step 65: From the Supervisor Main Menu, select “Report”, “Host Reports”, then “Cutover (Z)”. The unit will dial out to the Host. The Host will respond by loading the Communication Keys and a receipt (Z-Report) will be printed. Step 66: Select “Done” twice to return to the Supervisors Main Menu. The System Status box at the top of the display should indicate “System OK”. Select “Done” to place the unit Online. If an error is present, perform a “Clear Errors” from the Operations Menu. For errors that will not clear, please refer to the 3600 Troubleshooting Guide. 33 EMV Setup An EMV Authorization code will be required to enable EMV (Euro Master Card Visa). Only ATMs sold with an EMV license can receive an Authorization Code. Once the EMV license is in place, you can obtain a code by contacting the Tidel EasyPoint Help Desk during normal business hours at 1-877371-1322 or 214-393-5900. The Authorization Code can also be obtained from the Tidel EasyPoint Web Store. The setup parameters for all EMV cards to be processed will be required to configure the unit for EMV transactions. All of the parameters can be entered either at the keypad or with an AC4SETUP file with the exception of the Load Default and Terminal Configuration Values that can only be loaded via an AC4SETUP file. Contact your Host Provider for a setup file containing these values. Use the following instructions to authorize a unit for EMV: Step 1: Obtain an Authorization Code from the Tidel EasyPoint Help Desk or the Web Store. The Terminal ID and Serial Number of the ATM will be required to receive a code. The code is calculated based on the Terminal ID and Serial Number. The issued code will only work with the Terminal ID and Serial Number used to receive the code. Step 2: Ensure that the Terminal ID has been entered in Host Settings page 1. Step 3: From the Supervisors Main Menu, select “Configuration”, “Local Setup”, “Host”, “Financial Host”, “More”, “More” then “EMV Authorization”. Step 4: Select “Serial Number of the ATM” and then enter the ATM Serial Number without the dash. Step 5. Select “Tidel-Supplied key to enable EMV Transactions” and enter the 16 digit code received in step 1. Step 6: If all three components are correct, “EMV is authorized” should be display on the EMV Authorization Screen. Use the following instructions for EMV Setup: The below items can also be entered via a setup file. Refer to the next page for details. Step 1: From the Supervisors Main Menu, select “Configuration”, “Local Setup”, “Host”, “EMV Card Setup” and then “EMV Country and Currency Selection” Step 2: Using the top selection key, toggle to the desired country. If the desired country is not available, toggle the selection to “Other” and enter the 3 digit country code. Step 3: Using the third selection key, toggle to the desired currency. If the desired currency is not available, toggle the selection to “Other” and enter the 3 digit currency code. Select “Done’ to return to the EMV Card Setup (pg 1). Step 4: Select “EMV AID Entry” then enter the required Application Identifier value and set the Compare status to Partial or Full for each desired AID entry. Select “Done” to return to the EMV Card Setup (pg 1). Step 5. If desired, toggle the “Card Before Cash” selection to Enabled. Select the “Wait XX seconds for Card Removal” and enter the desired value. Step 6: Select “More” to access EMV Card Setup (pg 2). If desired, toggle the Terminal Capabilities to Send. Step 7: The remaining setup items, Load Default and Terminal Configuration Values, must be loaded via an AC4SETUP file. Refer to the following section for more information. 34 Required AC4SETUP Parameters for EMV The Load Default Values and Terminal Configuration Vales are required for setting up EMV. The items can only be loaded into the ATM from an AC4SETUP file. Refer to the following for the configuration parameters for each application. The parameters can be repeated for several applications. :EMVLDAID~S~~ :EMVLDTAG~W~~ :EMVLDVAL~S~~ :EMVTCTAG~W~~ :EMVTCVAL~S~~ Refer to the following for an example of the parameters populated and their meaning: Load Default Values Load Application Value :EMVLDAID~S~XXXXXXXXXXXXXX~ :EMVLDTAG~W~XXXX~ :EMVLDVAL~S~XXXXXX~ :EMVTCTAG~W~XXXX~ :EMVTCVAL~S~XX~ Load TAG Value Load Value Terminal Configuration Values Terminal Configuration TAG Value Terminal Configuration Value The values may not be saved correctly if the setup parameter ID fields are altered. Please refer to the structure of a typical setup parameter: Setup Field Identification Tilde Character Colon :EMVLDAID~S~~ Data Type Two Tilde Characters Data must be inserted between these two characters The AC4SETUP file must be in a folder on the Compact Flash Card by the name of the programmed Financial Host Terminal ID. For example: If the Financial Host Terminal ID is “Host1234”, the AC4SETUP file must be in a file folder named “Host1234”. 35 MAC’ing (Group 6) Host Providers may require that Message Authentication Code (MAC’ing) be used for security reasons. The code is calculated and sent with the Financial Request and Response Message to ensure the messages are authentic. Use the following procedures to enable MAC’ing. Step 1: From the Supervisors Main Menu, select “Configuration”, “Local Setup” , “Host” then “Financial Host”. Step 2: Select “More” until you get to “Host Settings (pg 8)”. Step 3: Toggle the “Group 6 Mac’ing” selection to “ON’. Step 4. If required by the Host Provider, toggle the “Allow MAC Keys in Financial Responses” to “ON”. Step 5: Mac Master Keys will now be required. Select “Done” twice and you will be prompted to save your changes. Step 6: Select “Master Key Entry” then enter Master Key Password 1 then enter Master Key Password 2 then select “Continue” to skip changing the Passwords. Step 7: Toggle the “Pin Keys” selection to “MAC Keys”. Using the second selection key on the left side of the display, toggle to the desired encryption type, Single DES or Triple DES. If this selection is changed, you will receive a warning that all Mac Keys will be zeroed. Select “Continue” to proceed. Step 8: Toggle the “Hybrid” selection to the desired setting, “Allowed/Not Allowed”. Step 9: If Triple DES was selected in Step 7, toggle to Two Key D-E-D or Two Key E-D-E. Step 10: Select Enter MK and follow the screen prompts to enter the Mac Master Keys. Use “#” then 1 through 6 for A through F. Checksum values will be displayed at the end of the entry process. Step 11: From the Supervisor Menu, select “Reports”, “Host Reports”, then “Cutover (Z)”. 36 Performing Software Upgrade (Main PCB) Step 1: Power down the ATM and remove the Main PCB. Place a jumper strap on pins 9 and 10 at JP1 then reinstall the Main PCB. Step 2: Insert the Software Upgrade Flash Card into the Compact Flash Card slot on the Main PCB and then power up the ATM. Step 3: The display will indicate the software is being loaded by scrolling, “Reading Device” then “Erasing Flash” then “Writing Flash”. After a few seconds the unit will boot up in the EasyPoint Installation screen. Step 4: The display will prompt “Do you want to remove all existing CEATM files prior to the installation?” If selecting “1” for NO, the unit will maintain all programming setup options and all reports. If selecting “2” for YES, all codes and programming setup options will return to their default state and all reports will be erased. Press the desired selection and then press “0” to Continue. Step 5: The display will prompt “Choose dispenser type via keypad”. Select “3” for the MCDM Dispenser, select “4” for TCDM Dispenser, select “5” for the Fujitsu Dispenser or Select “6” for NCR - 5635 (Hawk Dispenser). Press the “0” key to Continue. Do not select either of the Simulation selections. They are used for in-house purpose only. Step 6: The display will then prompt “Please choose the card reader type via the keypad”. Select “2” for the DS5002 or select “3” for the IS65. The two selection are telling the Software, where is the Card Reader connected. If the Card Reader is connected to the VEPP PCB (non Smart Card Readers) select DS5002. If the Card Reader connects to the Electronic Box via a IS65 connector (Smart Card) select IS65. Press the “0” key to Continue. Step 7: The display will then prompt “Choose printer type via the keypad”. Select “1” for FTP629. The Simulator selections is for in-house purpose only. Press the “0” key to Continue. Step 8: The display will then prompt “Is there a modem on this ATM?”. Select “1” if the unit will be using the internal modem on the Main PCB, select “2” if using an External Modem, select “3” if the External Port Server (NDS-1141) will be used or select “4” if no modem is present. Select the “0” key to Continue. Step 9: The display will then prompt “Select the ATM model” Select “1” for the 3600 (10.4” Display), select “2” for the 3700 (Through the Wall), select “3” for 3300 Color (5.7” Color Display) or select “4” for 3300 Mono (5.7” Monochrome Display) . Press the “0” to continue. Step 10: The display will then indicate the percentage of completion as files are written to the Main PCB. Step 11: Once the file load is complete the display will prompt: System restart required to finish installation... Please remove installation media and Press ENTER to continue... Step 12: Remove the flash card and press “Enter” to continue. The display will start to fade then briefly show “Finishing installation” and then show “Starting ATM”. The condition of the ATM prior to the software upgrade and the option selected is step 4 will depend if the ATM comes up online, offline or at the “Please programmer/manger card” screen (cold start). 37 Copying the Setup to a Flash Card The setup programming can be copied to a Compact Flash Card. A Compact Flash Reader is built into the 3300/3600 Main PCB. Use the following instructions to insert a Compact Flash Card into the Main PCB. Push down on edge of flash card until the Flash Card seats firmly into position. Insert Flash Card with lip on top edge of card facing towards inside of unit. Use the following instructions to copy the Setup to the Compact Flash Card. Step 1: From the Supervisors Main Menu, select “Configuration” then “Write Setup” Step 2: The display will briefly show “Writing setup information to card” then show “Setup sucessfully saved to the card”. Step 3: The unit creates a file folder by the name of the programmed Financial Host Terminal ID and copies the setup file in this folder. For example: If the Financial Host Terminal ID is “Host1234” a file folder named “Host1234” is created and the AC4SETUP file is copied to that folder. This gives the Programmer the ability to load several setup files on one Compact Flash Card, provided that each setup file that is saved, has a different Teminal ID that was programmed. Step 4: If desired the Compact Flash Card can now be removed from the Main PCB. Restoring the Setup fom the Flash Card Step 1: Before the setup can be restored from the Compact Flash Card, the Financial Host Terminal ID must be programmed with the Terminal ID that was programmed when the setup file was copied to the card. (See Coping the Setup to a Flash Card). Step 2: Insert the Compact Flash Card with the setup file into the Main PCB. Step 3: From the Supervisors Main Menu, select “Configuration” then “Restore Setup”. Step 4: The display will breifly show “Restoring setup information from the card” then show “Setup Configuration processing complete”. Step 5: The bill count is not restored when a “Restore Setup” is performed. The unit will required at least a “Load Dispenser” and the “Cutover” to be peformed before the unit can be placed online. (Note: The bill count will be restored if the System Files are saved and restored from the card. See Saving and Restoring the System Files on the next page). 38 Saving and Restoring the System Files It is also recommended to save the System Files when saving the Setup. Use the following instructions to Save and Restore the System Files. Step 1: Insert a Compact Flash Card into the Main PCB. Step 2: From the Supervisors Main Menu, select “Operations”, “Engineering Menu” then “Write Sys Files”. Step 3: The display will then show “System files successfully written to media”. Step 4. To restore the System Files, ensure the Financial Terminal ID has been programmed, then select “Operations”, “Engineering Menu” then “Restore Sys Files”. The display will show “System Files Restored - Reboot System”. Step 5: To reboot the unit, select “Done”, “Operations” then “Restart System”. Step 6: The display will then prompt “Are you sure you want to reboot the system?”. Select “Yes” to continue with the reboot process. Performing a Cold Start Performing a Cold Start when the Programmers Code is known Step 1: From the Supervisors Main Menu, select “Configuration” then “New Sys Startup”. Step 2: The display will then prompt “You are about to remove all configuration items and passwords!”. Step 3: Select “Confirm” to continue with the cold start. The display will breifly show “Deleting System Files” then show “Restarting System”. Step 4: When the unit completes it’s boot up cycle, the display will show: “Please enter manager/ programmers card”. Step 5: The unit is now ready to be reprogrammed. Performing a Cold Start when the Programmers Code is not known Step 1: Remove power from the ATM. Step 2: Press and hold down on the Manager Switch while restoring power to the ATM. Step 3: The ATM will detect that the Manager Switch is down when it boots up and the following prompt will be displayed: “Manager switch down -- if you wish to cold start, press & release the manager switch”. When this prompt appears, release the Manager Switch. Step 4: Press and release the Manager Switch again to continue with the cold start. Step 5: When the unit completes it’s boot up cycle, the display will show: “Please enter manager/ programmers card”. Steo 6: The unit is now ready to be reprogrammed. 39 TCP/IP TCP/IP is an optional communication method that can be used on 3300/3600 with this feature. If the 3300/3600 Main PCB contains an ethernet connector, this optional communication method can be used. If the Main PCB does not have this connector, the unit will have to be upgraded with a Main PCB that does. Use the following instructions for TCP/IP setup. Step 1: From the Supervisors Main Menu, select Configuration then TCP/IP Setup. Setup with DHCP If the Remote Supervisor Screen is to be used with TCP/IP, it is recommended to have a Static IP Address assigned to the ATM instead of using DHCP. If DHCP is required, use the following instructions. Step 1: Plug the network Cat 5 patch cable into the TCP/IP connection (J4) on the Main PCB. Step 2: From the Network Configuration menu, select “Enable TCP/IP” then “Enable DHCP”. The setup window in the middle of the display should indicate that TCP/IP and DHCP are both enabled. Step 3: The “IP Address” and “Subnet Mask” and the should be set by the DHCP server. Step 4; The Computer Name should be decided by the locations System Administrator. Step 5: The ATM will require a System Restart. You can either power cycle the ATM or select “System Restart” in the Operations Menu. Setup Static IP Address The Static IP Address, Subnet Mask and the Default Gateway must be supplied by the locations System Administrator. Note: Software Version 03.01.00 and later requires a decimal point to be entered between each 3 digit segment. Earlier versions of software will require leading 0’s to be entered to fill out the 3 digit segment. For Example: 192.168.1.25 must be entered as 192.168.001.025 Step 1: From the Network Configuration Menu, Select “Enable TCP/IP”. The setup window in the middle of the display should indicate that TCP/IP is enabled. Make sure DHCP is disabled. If DHCP is enabled, select “Disable DHCP”. Step 2: Select “IP Address” and enter the IP Address supplied by the System Administrator. Step 3: Select “Subnet Mask” and enter the Subnet Mask supplied by the System Administrator. 40 Host Setup The following information must be obtained from the Host Provider: Primary and Secondary IP Address (address may be the same for Primary and Secondary), settings for “Wait For ENQ” (YES/NO) and ‘Send Message Length Field” (YES/NO) Step 1: From the Supervisors Main Menu, select “Configuration”, “Local Setup”, “Host”, then “Financial Host” Step 2: Select “More” then select “Primary Phone #” and enter the Host supplied IP Address inserting periods between the 3 digit segments. Step 3: Select “Secondary Phone #” and enter the Host supplied IP Address inserting periods between the 3 digit segments. Step 4 Select “More” until you get to “Host Settings (pg 7)”. Toggle the “Wait for ENQ” and “Send Message Length Field” selections to the required Host configuration. 41 External Modem Setup If using an external modem for Host communications, connect the modem to the DB 9 Connector on the front edge of the electronic box. The ATM may be equipped with two DB 9 connectors. The external modem port will be on the top. The bottom port is for the Smart Card Reader. The external modem port is optional, therefore, all units may not be equipped with this port. The External Modem option must have been selected when the application software was loaded into the Main PCB. Refer to “Performing Software Upgrade” step 8. A modem setup file will be required to load the properties of the external modem. The file name must be “MODEMSETUP” without a file extension. The file must be located in the same directory on a compact flash card as the “AC4SETUP” file. See Copying the Setup to a Flash Card. Use the following steps to create the Terminal ID Directory and “AC4SETUP” file. Step 1: From the Supervisors Main Menu, select “Configuration” then “Write Setup”. Step 2: The display will briefly show “Writing setup information to card” then show “Setup successfully saved to the card”. Step 3: The unit creates a file folder by the name of the programmed Financial Host Terminal ID and copies the setup file in this folder. For example: If the Financial Host Terminal ID is “Host1234” a file folder named “Host1234” is created and the AC4SETUP file is copied to that folder. This gives the Programmer the ability to load several setup files on one Compact Flash Card, provided that each setup file that is saved, has a different Terminal ID that was programmed. Step 4: If desired the Compact Flash Card can now be removed from the Main PCB. Use the following instructions to create the Modem Setup file. Step 1: Using the example on the following page, create a modem setup file. The name of the file must be “MODEMSETUP” with no file extension. The allowed connect baud rates must be in verbose mode instead of numeric. Example: a numeric 10 = 2400 baud. Use 2400 instead of the number 10. The modem setup strings indicated on the following page are only an example. Actual values required for each item may vary for each modem type and manufacturer. Use the following instructions to load the modem setup file into the ATM. Step 1: Before the setup can be restored from the Compact Flash Card, the Financial Host Terminal ID must be programmed with the Terminal ID that was programmed when the setup file was copied to the card. (See Coping the Setup to a Flash Card). Step 2: Insert the Compact Flash Card (with the AC4SETUP and modemsetup files) into the Main PCB. Step 3: From the Supervisors Main Menu, select “Configuration” then “Restore Setup”. Step 4: The display will briefly show “Restoring setup information from the card” then show “Setup Configuration processing complete”. Step 5: The external modem should now be active. 42 43 Milliseconds DTR will be held to hang up modem Milliseconds modem will be held in reset Milliseconds modem will be allowed to recover after reset Number of rings before and incoming call will be answered Note: The above modem setup strings are only an example. The actual values required for each item will vary for each modem type and manufacturer Modem Setup File Example Financial Host 2400 Baud modem setup string string :MAXCMD~W~39~ :HANGUPMS~W~1600~ :RESETONMS~W~1000~ :RESETOFFMS~W~5000~ :PICKUPCNT~B~002~ :CONNECT~B~2400 4800 7200 9600 12000 14400 16800 19200 21600 24000 26400 28800 31200 33600 ~ :SETUPIG~S~M0 W2 %C0 &C1 &D2 &Q5 S0=0 S7=90 ~ :SETUPT1~S~B0 M0 W2 %C0 %E0 &C1 &D2 &Q6 S0=0 S7=40 S10=30 S28=0 S36=3 S37=5 S48=128 ~ Financial Host :SETUPT2~S~M0 W2 %C0 %E0 &C1 &D2 &Q6 S0=0 S7=40 S10=30 S28=0 S36=3 S37=6 S48=128 ~ 1200 Baud :SETUPOG~S~M0 W2 %C0 %E0 &C1 &D2 &Q6 S0=0 S7=90 S10=30 S28=0 S36=3 S37=6 S48=128 ~ modem setup Outgoing AIMS modem setup string Incoming AIMS modem setup string Allowed connection baud rates in verbose mode Number of bytes of each setup string that will be sent to the modem at a time Graphics The 3300/3600 can display images in Graphic Interchange Format (*.GIF), Bitmap (*.BPM) or Joint Photographic Experts Group (*.JPEG). Refer to the Graphics Manual, 450-0133-001 for instructions on creating an Autoload.tid file. For the loading of custom graphics, Windows CE based units require the images and the Autoload.tid file be located in specific folders as indicated in the examples below: The files and folders can be located in a folder with the name of the programmed Financial Host Terminal ID (Specific). This would allow custom graphics for several location to be stored on one Compact Flash Card. Example 1 is a directory of a Compact Flash Card with TERMINAL as the programmed Financial Host Terminal ID: Compact Flash Card Programmed Financial Host Terminal ID Images folder must contain all of the graphic images Autoload Folder must contain the Autoload.tid file and the Images folder Example 1 To load these images: From the Supvisors Main Menu, select “Graphics”, “Autoload”, “Load”, then “From Card (Specific)”. The files and folders can be located on the Compact Flash Card without the Teminal ID folder (General or Generic). This would allow the same images to be loaded into several units regardless of the programmed Financial Host Terminal ID. Refer to Example 2. Compact Flash Card Autoload Folder must contain the Autoload.tid file and the Images folder Images folder must contain all of the graphic images Example 2 To load these images: From the Supvisors Main Menu, select “Graphics”, “Autoload”, “Load”, then “From Card (General)”. To copy the Graphic Files and the Autoload.tid to a Compact Flash Card: From the Supvisors Main Menu, select “Graphics”, “Autoload”, then “Store”. Selecting “Specific” will store the images and the Autoload.tid file in a Terminal ID specific folder as described in Example1. Selecting “Generic” will load the files without the Terminal ID specific folder as described in Example 2. The graphic files can now be loaded on other Windows CE based ATMs with different Terminal ID’s. 44 3300/3600 Programming Flow Chart 45 3300/3600 Programming Flow Chart Supervisor logon 51A Supervisor Main Menu Operations Configuration 53A 65A Diagnostics Reports 52A Graphics Extended Status Go Offline Done Supervisor Configuration Menu Local Setup 54A AIMS Setup Master Key Entry 55A TCP/IP Setup Master Key Pwds Reset Programmer 46 Restore Setup Done Main Menu Page 1 56A Merchant 57A 55B Cash 55C Surcharge Dispenser System 59A More Done Host Setup Page 1 60A 61A Financial Host EMV Card Setup 63B 58A Checking Host Main Menu Page 2 AIMS 62A PrePaid Products Host 57B Printer Coupons Manager Status Change Comm 63A More Done 58B Bank ID More Supervisor Extended Status Display New Sys Startup Write Setup Host 66A Done 64A System Errors: Cash Dispenser: Status: Healthy Type: TCDM Firmware: XX Pin Pad: Status: Healthy Tamper: 0x30 Version: RXX.XX Card Reader: Status: Healthy Type: DS5002 Printer: Status: Healthy Type: FTP629 Vault Door: Closed Speech Device: OK Firmware: XX.XX Modem: OK EMV Kernel: Version: N/A Checksum: N/A Previous Status Next Status Print Done Operations Menu 50A Supervisor Operations Menu Supervisor Clear Errors Clear Errors =>Cash Dispenser HEALTHY Card Reader HEALTHY Pin Pad HEALTHY Printer HEALTHY Speech Device HEALTHY Modem HEALTHY Persistant HEALTHY Guides/Temps not present Bill Acceptor not present Card Dispenser not present Previous Device Supervisor Engineering Menu 64A Engineering Menu Load Dispenser Write Sys Files Trace Zones Next Device Set Date Clear Selected Trace Journal Restart System Restore Sys Files LCD Panel Set Time Del Printer Flash Setup Modem Data Entry Clear All Done Done Enter date MM/DD/YYYY Done XX/XX/XXXX Load Dispenser Data Entry External Modem Setup Menu Enter time HHMM (24 hour clock) Load Modem File Cassette # 1 Empty Reject 0000 Enter Count 0 Add Count 47 Set Modem Port New Count Done Done LCD Information Supervisor Restart Confirmation Menu Data Entry Are you sureyou want to reboot the system? Enter modem port: (i.e. 1-External, 6-Internal) Data Entry Yes Enter note count (must be less than 10000) No Raise Contrast Cancel Lower Contrast Done 6 Reports Menus 50A Supervisor Reports Menu Host Reports Supervisor Host Reports Menu Local Reports Cutover (Z) PPP Cutover (Z) Balance (X) Done Cancel Done Supervisor Local Reports Menu Transaction Transaction Report Start Date End Date Vending Copy to CF xxxxxxxx Journal Activity xxxxxxxx 48 Print Last TX ALL TX Type ALL Manager Cancel Zero Activity Manager System Setup Done Done Last TX Report Menu Supervisor Local Reports Menu Last TX Filters Use Pinpad < or > Vending Pg Up Report Data PPP Vending Pg Down Print Done Cancel Done Electronic Journal Menu Start Date Last TX Report Menu App Info xxxxxxxx I/O Data I/O Data End Date xxxxxxxx Host All Copy to Media Print Cancel All App Info Host Done Done Graphics Menus 50A NOTE: The following menus only apply when 'Change' is set to 'Edit COUPON Screen' Graphics Autoload Graphics: Autoload UI Load Load Change Store Edit COUPON Screen Edit Erase Printer Flash Done Save Printer Flash NOTE: The change button will toggle between HOST, WELCOME and COUPON. The Load and Store buttons function the same for all 3 types. All screens for HOST and WELCOME types are the same. Graphics: Autoload Load Change Done Store Graphics: Edit COUPON Screen Edit HOST Screen Edit Do you want to store the autoload file to the generic folder or to a machine-specific folder? (These backup the autoload.tid associated graphic files; "General" puts the files in a folder that can be later loaded onto any machine; "Specific" files can only be later loaded by machines with the same terminal ID) Edit Item Data Entry Next GFX Done Enter display time in 1/10 seconds (255 is the max) 49 Specific Graphics: Edit Welcome Screen Next Item Cancel 40 Generic Add GFX Save/Done Cancel Next Item Edit Item Next GFX Graphics: Edit "XXXXXXXX.XXX" Add GFX Cancel Save/Done Edit Barcode 0 Data Entry Enter the sequence # for this image (1-96) Edit Sequence 1 Delete 1 Save/Print Coupon Graphics: Edit "XXXXXXXX.XXX" Done Edit Time 40 Edit Sequence 1 Delete Graphics: Autoload Load Data Entry Data Entry From Card (General) Enter UPC-A barcode (enter '0' to disable barcode) Done From Card (Specific) 0 Are you sure you want to delete this autoload item? Done No Yes Enter the sequence # for this image (1-96) 1 50A Master Key Entry Menu Please enter Master Key password #1 MK 1 of 2/Part 1 of 2 Done Use '#' 1-6 to enter alpha characters A-F (#1='A', #2='B', #3='C', #4='D', #5='E', #6='F'). Shift CANNOT be undone (press CLEAR to restart). Enter 16 MK 2 of 2/Part 1 of 2 characters to make a valid checksum. Use '#' 1-6 to enter alpha characters A-F (#1='A', #2='B', #3='C', #4='D', #5='E', #6='F'). Shift CANNOT be undone (press CLEAR to restart). Enter 16 characters to make a valid checksum. Please enter Master Key password #2 0 Characters 0 Characters Done MK 1 of 2/Part 2 of 2 MK 2 of 2/Part 2 of 2 Master Key passwords are correct: however, they are also stillidentical to the factory defaults. For security purposes, do you wish to change these passwords, or continue? 50 Enter MK Enter MK Done Done Continue Change 55A MK 1 of 2/Part 2 of 2 Use '#' 1-6 to enter alpha characters A-F (#1='A', #2='B', #3='C', #4='D', #5='E', #6='F'). Shift CANNOT be undone (press CLEAR to restart). Enter 16 characters to make a valid checksum. Financial Host MK 2 of 2/Part 2 of 2 Use '#' 1-6 to enter alpha characters A-F (#1='A', #2='B', #3='C', #4='D', #5='E', #6='F'). Shift CANNOT be undone (press CLEAR to restart). Enter 16 Sensitive Mode Master Key Setup characters to make a valid checksum. Pin Keys Toggle to MAC Keys when entering MAC master keys Triple DES Hybrid Not Allowed Two Key D-E-D Enter MK 0 Characters Done 0 Characters MK 2 of 2/Part 1 of 1 ***Warning!!*** You are about to change the Master Key on your keypad. Once you begin, you will not be able to quit. Incorrect MK entry could result in rejected host transactions. Please ensure you have the proper Master Key information before you continue. Master Key Summary Person 1 Checksum: XXXX-XX Person 2 Checksum: XXXX-XX Enter MK Total Checksum: XXXX-XX Done Abort Continue>> Done 50A 54A MK Change Password, Cash & Surcharge Menus Please enter current Master Key password #1 50B Cash Settings Please re-enter Master Key password #2 for verification Note: The cash template will toggle 1-8 for the individual fast cash amounts. 300 is the max amount dispense for ATM transaction Cash template to edit is 1 Cash template 1 is 20 Cancel More Cancel Please enter the new Master Key password #1 Done Enter the cash template at position 1 (in whole units; $20 = 20) Master Key Password Change Enter the max amount to dispense for a single ATM transaction Master Key passwords were changed successfully 20 50C Cancel Cancel 300 Done Cancel Done OK 51 Please re-enter Master Key password #1 for verification Surcharge Settings (pg 1) DO NOT use configurable surcharge lines Edit Lines Current surcharge = +0150 Done Cancel Edit Surcharge Amount Amount is 0.00 Optional Surcharge Lines Please enter current Master Key password #2 Amount will be CHARGED to Customer Current Language: ENGLISH Line to Edit 1: Edit Line Done View current language's lines Done Cancel Enter the surcharge amount Enter Surcharge Line Please enter the new Master Key password #2 0.00 Cancel Cancel Center TOGGLE CAPS Cancel Done Done Merchant Settings Menu 50A Merchant Settings (pg 1) Store ID = Surcharge recipient name = Store street address = Store city/state/zip = More Done Enter the Store city/state/zip Merchant Settings (pg 2) Enter the Store street address Enter the name of the receipient of the surcharge (will not appear on receipt header) Center TOGGLE CAPS Center TOGGLE CAPS Cancel Done Cancel Done Enter the Store ID # TOGGLE CAPS TOGGLE CAPS Cancel Done Cancel Done Display Message 1 = Display Message 2 = Display Message 3 = Display Message 4 = More Done Enter the fourth display message for attractor Enter the third display message for attractor Enter the second display message for attractor Enter the first display message for attractor 52 TOGGLE CAPS Merchant Settings (pg 3) Cancel Done TOGGLE CAPS Cancel Done TOGGLE CAPS Cancel Done TOGGLE CAPS Cancel Done Receipt Header 1 = Receipt Header 2 = Enter the second line of receipt header More Enter the first line of receipt header Done Merchant Settings (pg 4) Center TOGGLE CAPS Center TOGGLE CAPS Cancel Done Cancel Done Receipt Trailer 1 = Receipt Trailer 2 = Receipt Trailer 3 = Receipt Trailer 4 = More Done Enter the fourth line of receipt trailer Enter the third line of receipt trailer Enter the second line of receipt trailer Enter the first line of receipt trailer Center TOGGLE CAPS Center TOGGLE CAPS Center TOGGLE CAPS Center TOGGLE CAPS Cancel Done Cancel Done Cancel Done Cancel Done Dispenser & Manager Settings Menu 50A 50B Dispenser Settings Bin vend algorithum = SMALL FIRST - MULTIPLE OF TWO Cassette to edit = 1 NOTE: Other options include: ROUND ROBIN - SMALLEST FIRST ROUND ROBIN - LARGEST FIRST MAXIMIZE - LARGEST FIRST MAXIMIZE FOR ATM Manager Settings Manager to edit is 2 Edit Cassette Edit Manager Done More Done Edit Cassette (pg 1) Media Type = CASH Edit Manager 2 (pg 1) Cassette Denomination = 20 (in whole units; $20 = 20) Manager IS NOT marked for deletion Manager card # = ATM offline when cassette empty = NO Enter a 4-digit card number or swipe the card Enter the cassette denomination Manager PIN = More Done 53 Manager's initals = 2000 More Cancel Edit Cassette (pg 2) Done Done Cancel Done Maximum note thickness = 11 Edit Manager 2 (pg 2) Minimum note length = 58 Manager CAN NOT zero the unit Maximum note length = 66 Enter a 4-digit PIN number Manager CAN NOT configure unit Enter the minimum note length As Clerk, CAN NOT load the dispenser More Done As Clerk, CAN NOT perform Dispense and Reject 58 More Cancel Done Enter the maximum note thickness 11 Done Cancel Done Enter the maximum note length Enter initials (up to 5 characters) Cancel Done 66 Cancel Done Cancel Done 50A AIMS Setup Menu AIMS Settings (pg 1) AIMS dial mode = TOUCHTONE AIMS computer phone # = AIMS password = POWERUP When bill count is < = 0, report low Bill Count to AIMS More Done Enter the bill count used as a trigger for reporting low Bill Count to the AIMS computer Enter the password communications with AIMS (default is POWERUP) 0 POWERUP Cancel AIMS Settings (pg 2) Enter the phone number for AIMS computer communications Done Cancel Done Cancel Done ATM CAN NOT make outgoing calls to AIMS computer 50B ATM CAN NOT receive calls from the AIMS computer Bank ID Edit ATM will check in w/ AIMS every 000 hours ATM will check in w/ AIMS at 1200 54 More Done Enter the time at which the ATM will check in with AIMS (24-hour HHMM style) Enter the interval (in hours) at which the ATM can check in with AIMS View and/or remove existing Bank IDs Add a new Bank ID 000 000 More Cancel AIMS Settings (pg 3) Done Cancel Done Done Edit Send Status Time 1 Send Status Time 1 = OFF Enter the new Bank ID # AIMS Remote Control Mode should timeout in 180 seconds. More Done Enter the seconds to be used for the AIMS Remote Control Mode timeout Enter the #1 time for sending status to the AIMS computer (24-hour HHMM format) Cancel 180 Cancel AIMS Settings (pg 4) ATM CAN call AIMS computer if it goes offline or out of service 0000 Done Cancel Done View/Remove Bank IDs Scroll Page ATM CAN call AIMS computer if placed online or in-service. ATM CAN call AIMS computer when vault door is opened More Done Done Scroll: Current ID#/DATA: 001 More Done 50A System Settings Menu Enter the temperature (0-125) at which the cooling fan turns ON/OFF System Settings (pg 1) 80 Keypad WILL beep when keys are pressed System Settings (pg 5) Transfer transactions ARE allowed Cancel 3700 Cooling Fan turns ON/OFF at 80 degrees F Done Balance inquiries ARE allowed 3700 Heater turns ON/OFF at 75 degrees F Customer WILL NOT be asked if they want another transaction More Enter the # of days of journal data to store on this machine Enter the temperature (0-125) at which the heater turns ON/OFF 3700 Fan trip point hysteresis is 1 degrees F Done 75 More Done System Settings (pg 2) 90 Print host lines on receipt after partial dispense Cancel Done Surcharge info WILL NOT be printed on receipt Cancel Done Receipt will AUTO-PRINT 90 days of journal datawill be stored on this machine More Done Enter the hour (0-23) at which the ATM will perform its daily reboot 3700 ATM goes offline if temperature is at or over 125 degrees F 1 3700 ATM goes offline if temperature is at or below 50 degrees F 55 System Settings (pg 3) 3 3700 offline trip point hysteresis is 1 degrees F Cancel Done ATM will perform daily reboot at hour 3 ATM will perform daily reboot a minute 0 Cancel Margin before fan/heater turns back ON/ OFF (0-5 degrees) System Settings (pg 6) More Done Margin before ATM goes back online (0-5 degrees) Minimum free space for ATM = 4096000 Done Customer's name WILL be on the receipt 1 More Done Enter the minute (0-59) at which the ATM will perform its daily reboot Cancel 0 When bill count is >= 1200, report Cassette Almost Full Edit Languages Cancel ATM will go off-line if dispenser is FATALor EMPTY Done Done System Settings (pg 7) System Settings (pg 4) Enter the low temperature (0-125) at which the ATM goes offline Date Format Currency Symbol 50 Engineering Options More Edit Languages More Current Language: English Cancel Engineering Options (pg 1) ****WARNING: NOT FOR GENERAL USE **** Trace Level : 0 ENGLISH IS the default language ENGLISH IS enabled English optional spelling: Checking More Done Done Dispenser up to 40 per dispense cycle (40 is approved value) Done Enter the high temperature (0-125) at which the ATM goes offline 125 Done More Done Cancel Done 50A A Financial Host Setup Menu Host Settings (pg 1) Host Settings (pg 6) ATM TermID = TERMINAL Enable Host TX Reports = NO Enter the Master Key Index to use (default is 3) Enter the number used to identify ATM transactions to the host 3 TERMINAL Send Surcharge Result = NO Automatic Cutover OFF Group 12 extended status monitory fields are NOT INCLUDED in host messages Group 3 Issuer Fee is DISABLED Master Key Index is 3 (normal default = 3) More Done Cancel Done Cancel One Account is DISABLED Done More Done Host Settings (pg 2) Primary phone # = Enter the secondary phone number for ATM host communications Primary dial mode = TOUCH TONE Enter the primary phone number for ATM host communications Host Settings (pg 7) APPLICABLE ONLY IF TCP/IP ENABLED Wait for ENQ = Yes Secondary phone # = Send message length field = NO Secondary dial mode = TOUCHTONE More X.28 Protocol = NO Done Cancel Done Cancel Done NUA VALUE = More Done Host Settings (pg 3) Routing # = A01100 56 Host has 30 seconds to answer (ENQ) after a dialout 62B EMV AUTHORIZATION More Enter the # of seconds the Host has to answer the line before the transaction times out Enter the # of seconds the Host has to respond to a transaction before the unit times out Host has 90 seconds to respond to a requested transaction 90 Done Host Settings (pg 4) Enter the # used by some host processors to route the call A01100 30 Cancel Cancel Done Done Cancel Done Host Type 3 Routing Code = Host Type 3 Routing Code length = 20 Host Settings (pg 8) Group7 Host Screen Lines are Disabled Enter the length of the routing code used by Host Type 3 processors Group4 status monitoring fields are NOT INCLUDED in host messages More Done Enter the routing code used by Host Type 3 processors Group 6 - Mac'ing = Off Allow MAC Keys in Financial Response = Off Ignore Extra Host ENQS - YES 20 Use Default Account Type (99) - NO Cancel 62A Host Settings (pg 5) Modem Configuration Host DOES NOT REQUIRE End Of Transmission signal Host is Type 1 A Host WILL NOT be dialed upon customer card entry More Done Done Cancel Done More Done 50A Check Cashing Host Setup Menu B A Check Cashing Host Settings (pg 1) Check Cashing Host Settings (pg 6) Checking TermID is TERMINAL Host is Type -1 Enter the number used to identify transactions to the host 1000000 (cents) is the max amount to dispense for checking transactions Enter the Master Key Index to use (default is 3) Tidel-supplied key to enable checking transactions = Customer ID verified by SOCIAL SECURITY # 3 TERMINAL More Done The machine DOES offer ATM transactions More Cancel Check Cashing Host Settings (pg 2) Done Cancel Done Done Primary phone # = Primary dial mode = TOUCH TONE Enter the 16-character key supplied by Tidel that enables checking transactions Secondary phone # = Secondary dial mode = TOUCHTONE More Enter the secondary phone number for Checking host communications Done Enter the primary phone number for Checking host communications Cancel Check Cashing Host Settings (pg 3) Done Send Surcharge Result = NO 57 Group 4 status monitoring fields are NOT INCLUDED in host messages Cancel Done Cancel Done Enter the max amount (in hundreths; $100.00 = 1000 to dispense a single checking transaction Group7 Host Screen Lines are Disabled More Done 1000000 Cancel Check Cashing Host Settings (pg 4) Done 62A Modem Configuration Host has 30 seconds to answer (ENQ) after a dialout Enter the # of seconds the Host as to answer the line before the transaction times out Enter the # of seconds the Host has to respond to a transaction before the unit times out Host has 90 seconds to respond toa requested transaction Host DOES NOT REQUIRE End Of Transmission signal More 30 90 Done Cancel Cancel Done Done Check Cashing Host Settings (pg 5) Routing # = A01100 Host Type 3 Routing Code = HOSTTYPE3ROUTINGCODE Enter the length of the routing code used by Host Type 3 processors A Host Type 3 Routing Code length = 20 Enter the routing code used by Host Type 3 processors Enter the # used by some host processors to route the call Master Key Index = 3 (default is 3) B More A01100 20 Done Cancel Done Cancel Done Cancel Done 50A Host Status Change & EMV Card Setup Menus 50B Host Status Change Settings (pg 1) Send statuses to a Host = OFF EMV Cards Setup (pg 1) Include Status Monitoring Field in Status Change Comm = NO EMV Cards Setup (pg 2) EMV Country and currency selection TERMINAL CAPABILITIES - DON'T SEND On/Off-line changes = NO EMV AID Entry Items loaded = NO Card Before Cash - Disabled More Done Wait 45 Seconds for card removal More Done More Done Host Status Change Settings (pg 2) ATM Idle Time Exceeded = NO Idle 3600 sec then send status to Host EMV Country and Currency Selection ATM Fatal Customer Service Device = NO United States Enter the # of seconds unit must be idle before status information can be sent to the Host More USA.......USD Done 3600 Cancel 58 Cancel Host Status Change Settings (pg 3) Done Done EMV AID Entry (pg 1) Cassette 1 count below limit = NO AID-01 = Cassette 2 count below limit = NO AID-01 Compare = Cassette 3 count below limit = NO AID-02 = Enter lowest # of items in cassette 1 before Status info sent to the Host Cassette 4 count below limit = NO More AID-02 Compare = Done More 0 Done The AID menu has 10 pages totalling 20 different AID numbers. Host Status Change Settings (pg 4) Cancel Done Cassette 1 low limit = 0 Cassette 2 low limit = 0 Cassette 3 low limit = 0 Cassette 4 low limit = 0 More Done Enter lowest # of items in cassette 4 before Status info sent to the Host Enter lowest # of items in cassette 3 before Status info sent to the Host 0 Cancel Enter lowest # of items in cassette 2 before Status info sent to the Host 0 Done Cancel 0 Done Cancel Done PPP Host, Modem Settings & EMV Authorization 60A 61A 50A PrePaid Products Host Settings (pg 1) Modem Settings PPP Authorization Host communications occur at 1200 baud Zip Code = PrePaid Products Authorization Host communication data bits = 7 500 is the max amount to be dispensed for PrePaid Product transactions Host communication parity = Even Parity Serial Number of the ATM = Done Host communication Stop Bits = 1 Tidel-supplied key to enable PrePaid Products = More Done PPP is not authorized Done Modem Settings Enter the max amount to dispense for a single PrePaid Products transaction Communication Standard = BELL 212A Enter the 16-character key supplied by Tidel that enables PrePaid Product transactions Guard Tone = OFF Make/Break Ratio = 39/61% 10PPS 500 Tone Dial Speed = 95 59 Cancel More Done Cancel Enter the Zip Code where the ATM is located Done Done Modem Settings Enter the Serial Number of the ATM **Do not enter the dash Modem Country Code = United States MultiTech FastConnect Setting = $F1 Cancel Done Cancel Done More Done Enter the Serial Number of the ATM **Do not enter the dash 60B Cancel Done Enter the 16-character key supplied by Tidel that enables EMV transactions EMV Authorization Serial Number of the ATM = Tidel-supplied key to enable EMV transactions = EMV is not authorized Done Cancel Done Printer Coupon Messages & Trace Journal Menus NOTE: When entering printing message, the same layout applies to all four lines of entry. 64A Enter the first English printing message line 51A Edit English Coupon Printing Message Printer Coupons Settings Supervisor Trace Journal Menu Line 1 = Toggle Caps Cancel Line 2 = Which Coupon (0=NONE, 1-16=SEQUENCE, 100=ROTATION, 101=CUSTCHOICE) = 0 Line 3 = When To Print = ALL TRANSACTIONS Up Copy All Dispense Threshold - Cash Withdrawals Only (in cents) = 2000 Line 4 = Done Copy Selected Down Copy Current Trace File Size Number of Files Done Printing Message Test Crash Done Done Enter the first Spanish printing message line Edit Spanish Coupon Printing Message Select Language of Coupon Printing Message To Edit Line 1 = Data Entry Enter maximum number of journal Files (1 to 20) English Line 2 = Spanish 5 Line 3 = French Toggle Caps 60 Cancel Line 4 = Done Done Done Enter the first French printing message line Data Entry Edit French Coupon Printing Message Enter Maximum Trace File Size (1048576 to 10000000) Line 1 = Line 2 = 1048576 Line 3 = Toggle Caps Cancel Done Line 4 = Done Diagnostics Menus 50A Pin Pad Diagnostic Menu Press each key and verify it appears in box FK1 Master Key Diagnostics Master Key H1K1 H1K2 H1K3 FK6 Device Status: HEALTHY Tamper State: 0x30 FK2 Supervisor Diagnostics Menu FK7 FK3 Done (Pass) FK4 Done (Fail) FK5 Done PIN Pad Checksums Person 1 Checksum: XXXXXX Person 2 Checksum: XXXXXX Total Checksum: XXXXXX Master Keys Dispenser (Reject) Modem Printer Clear Test Results Card Reader Print Test Results Pass Not Field Supported More Cash Dispenser Reject Diagnostic Device Status: Done HEALTHY Runs All Tests Supervisor Diagnostics Menu Test Count: 1 Reset Set Test Count Door Switch Start Test Stop Test System Test Removable Media Done Headphones Will test the printer and dispenser sequentially for 40 cylces Repetitive Test Modem Dispense 61 Keypad Beeper Device Status: Paper Low: Position: HEALTHY Reset NORMAL FORWARD Set Test Count Last Event: Test Count: Not Field Supported More Printer Diagnostic Menu Keypad Beeper Diagnostics Beeper is OFF 1 Print Removable Media Diagnostic Menu Insert media and press TEST Advance and Cut Done Pass Fail Test Card Reader Diagnostics Dip a Card. Press DONE to exit. Track 1: Done Track 2: Device Status: Test Count: HEALTHY 1 Door Switch Diagnostics Open and close the door. Verify state changes HeadPhone Diagnostics Insert/remove headphones. Verify audio when IN. Reset Headphones: OUT Done Vault Door: CLOSED Speech Device: Reset Pass Pass Fail Fail Direction D E D HEALTHY Fail TCP/IP MENUS 50A NOTE: The following menus only apply when DHCP is DISABLED Network Configuration Menu Disable TCP/IP Disable DHCP TCP/IP: Disabled DHCP: Disabled IP Address: Subnet Mask: Listen Port: 8001 Computer Name: Network Configuration Menu Disable TCP/IP Listen Port Enable DHCP Computer Name Cancel TCP/IP: Disabled DHCP: Disabled IP Address: Subnet Mask: Listen Port: 8001 Computer Name: Listen Port Subnet Mask IP Address Gateway Done Cancel Data Entry Enter subnet mask in the form 002.064.128.255 Done 0.0.0.0 Enter Computer Name (4-16 characters) Data Entry Enter IP address in the form 002.064.128.255 62 Cancel Done 0.0.0.0 Data Entry Enter default gateway in the form 002.064.128.255 Data Entry 0.0.0.0 Enter incoming call listen port (1-66535) 8001 Data Entry Enter incoming call listen port (1-66535) 8001 3300/3600 Error Messages By Code Number 63 002 002 003 004 005 007 009 010 011 011 011 012 013 014 015 016 017 018 019 019 020 021 021 022 023 024 025 026 027 028 028 029 030 031 032 033 033 033 034 034 034 035 035 035 ENQ transmit timeout (FUJI) Dispenser Not Responding (HAWK, MCDM, TCDM) Command response receive time-out (HAWK) Communication write failed (HAWK) Block check character error (HAWK) Dispenser Response Timeout (HAWK, MCDM, TCDM) FIB (Feeder/dispenser Interface Board) jumper setting error (HAWK) FIB not responding (HAWK, MCDM, TCDM) Dispenser Demo Mode Jumper Setting Error Invalid item length or thickness FIB error recovery failure (HAWK, MCDM, TCDM) Power Fail During Dispense (MCDM, TCDM) Empty Cassette(S) (TCDM) All Cassettes Out Of Service (TCDM) Left Cassette 4 Sensor Blocked (TCDM) Right Cassette 4 Sensor Blocked (TCDM) Left Cassette 3 Sensor Blocked (TCDM) Right Cassette 3 Sensor Blocked (TCDM) Unknown error code (FUJI) Left Cassette 2 Sensor Blocked (TCDM) Right Cassette 2 Sensor Blocked (TCDM) Power fail during dispense (FUJI) Left Cassette 1 Sensor Blocked (TCDM) Right Cassette 1 Sensor Blocked (TCDM) Left Sensor Before RVDT Blocked (TCDM) Right Sensor Before RVDT Blocked (TCDM) Left Sensor Before Diverter Blocked (TCDM) Right Sensor Before Diverter Blocked (TCDM) Left Reject Sensor Blocked (TCDM) Count mismatch (FUJI) Right Reject Sensor Blocked (TCDM) Left Sensor After Diverter Blocked (TCDM) Right Sensor After Diverter Blocked (TCDM) Left Eject Sensor Blocked (TCDM) Right Eject Sensor Blocked (TCDM) Cassette 1 not installed (FUJI) Feed failure (HAWK) Pick Failure (MCDM, TCDM) Cassette 1 pick failure (FUJI) Item mis-track at feed (HAWK) Jam Between Cassette 1 and RVDT (TCDM) Cassette 2 not installed (FUJI) Item mis-track at double detect (HAWK) Jam Between Cassette 2 and RVDT (TCDM) 64 036 036 036 037 037 037 037 038 038 038 039 039 039 039 040 040 040 040 041 041 042 042 043 044 044 044 045 045 046 046 046 047 047 047 048 048 048 049 049 049 050 050 051 051 052 Cassette 2 pick failure (FUJI) Item mis-track at exit (HAWK) Jam Between Cassette 3 and RVDT (TCDM) Cassette 3 not installed (FUJI) Delay At Exit Sensor (MCDM) Item too long at exit (HAWK) Jam Between Cassette 4 and RVDT (TCDM) Cassette 3 pick failure (FUJI) Blocked exit (HAWK) Exit Sensor Blocked (MCDM) Cassette 4 not installed (FUJI) Jam Between Diverter and Exit (TCDM) Timing Wheel Error (MCDM) Too many items (HAWK) Cassette 4 pick failure (FUJI) Double Detect Before Picking Jam Between Diverter and Reject (TCDM) Timing wheel error (HAWK) Diverter Error (HAWK, MCDM) Note At Exit Too Long (TCDM) Exit Count Error (MCDM) Note At Exit Too Short (TCDM) Bldc Motor Failure (TCDM) Motor failure (FUJI) Operation time-out (HAWK) Sensor Error (TCDM) Jam between pick & potentiometer sensors (FUJI) Motor Failure Check 24v Power (TCDM) Abnormal Feeding Speed (TCDM) Calibration error (HAWK) Exit Sensor Initialization Error (MCDM) Jam between potentiometer and exit sensors (FUJI) Cassette type not equal to position (HAWK) Diverter Failed Note(S) Rejected (TCDM) Check diverter gate (FUJI) Diverter Failed Note(S) Ejected (TCDM) Empty cassette(s) (HAWK) All cassettes out of service (HAWK) Dispenser Error Code Unknown (MCDM) Diverter Failed During Initialization (TCDM) Dispense Timeout (MCDM) Sensor Error-Notes Mistracked (TCDM) Exit sensor blocked (HAWK) Note Skew-Check Condition Of Notes (TCDM) Abnormal double detect in last dispense (HAWK) 65 052 053 053 054 054 054 054 055 055 055 056 056 057 058 059 060 061 066 067 068 077 079 080 081 083 084 085 087 088 089 090 091 095 097 098 099 100 105 106 107 108 113 114 115 116 Too Many Notes Requested (TCDM) Bad Command To Dispenser (MCDM) Too Many Notes Rejected (TCDM) TCDM Unknown Command (TCDM) Cassette 1 Pick Sensor Blocked (MCDM) EPROM error (HAWK) Unknown Dispenser Error Code (TCDM) Potentiometer failure (FUJI) Cassette 2 Pick Sensor Blocked (MCDM) Potentiometer Error (TCDM) Empty cassette(s) (FUJI) Reject Cassette Missing (TCDM) TCDM Dip Switch 3 Not Set Correctly (TCDM) Warning - Cassette Missing (TCDM) Warning - Reject Cassette Almost Full (TCDM) Dispensing From Wrong Cassette (TCDM) Clear Dispenser Errors Ejected Notes (TCDM) Printer Device Error Card Reader Device Failure Dispensed item count not equal to requested item count Door opened with no log-on Telephone line and/or modem problem(s) Modem TX/RX problems Reversal in process Host response Message Type 97 - invalid Sequence Number Host response Message Type 99 - invalid request Terminal ID Card removal display message down-load error No Valid Cash Selections Transaction file date error Host response Message Type 96 - invalid message sequence Host type-2 dispense amount error Out of Service - close-out required Modem Setup Required - External Modem Cassette-1 empty (MCDM, TCDM) Cassette-2 empty (MCDM, TCDM) Cassette-3 empty (MCDM, TCDM) Cassette-4 empty (MCDM, TCDM) Cassette-1 low Cassette-2 low Cassette-3 low Cassette-4 low Cassette-1 zero document count Cassette-2 zero document count Cassette-3 zero document count Cassette-4 zero document count 66 129 130 131 132 162 960 990 993 996 997 998 Cassette-1 Missing or Out Of Service (HAWK, MCDM, TCDM) Cassette-2 Missing or Out Of Service (HAWK, MCDM, TCDM) Cassette-3 Missing or Out Of Service (HAWK, MCDM, TCDM) Cassette-4 Missing or Out Of Service (HAWK, MCDM, TCDM) PPP not authorized or PPP Host Cutover Required Abnormal Power Off (TCDM) Disk free-space is low DS5002 Keyload Failure Speech Device Failure Dispenser Device Failure PinPad Device Failure 67 68 3300/3600 Error Messages 69 70 ABNORMAL DOUBLE DETECT IN LAST DISPENSE - HAWK Dispenser: 1) Perform a Clear All in Operations > Clear Errors 2) Double detect sensor was active before pick sensor was activated. 3) Check for skewed note condition. 4) Check/reload the notes in the Cassette. 5) Check for jams/obstructions in the picking area of the feed path. 6) Exit sensor blocked prior to dispense. Check for jams or obstructions. 7) Exit sensor dirty 8) Possible defective sensor(s) ABNORMAL FEEDING SPEED - TCDM Dispenser: 1) Check for jams or obstructions in the feed path or belts. 2) Check connections at J7 on the Dispenser PCB. 3) Check the condition of the timing wheel. 4) Check the belts on the right side of the dispenser. Insure tension wheel applies moderate pressure to the belt. 5) Check voltages on both sides of the 2 fuses on the Dispenser PCB. Top = +24vdc (4 Amp) Btm = +5vdc (1.5 Amp) If voltage is present on the right side of the fuse only, the fuse may be blown. If voltage is not present on the right side of the fuse, check voltages at the Dispenser power cable. Red = +5vdc Org = +5vdc Wht = +24vdc. If incorrect: 6) Check voltages at the Backplane PCB test points (Next to the LED’s) TP1 TP2 TP3 TP4 = = = = +5vdc +12vdc -12vdc +24vdc. If an LED is not illuminated on the Backplane PCB, disconnect all components from the Backplane PCB, one at a time, until the defective component is identified. If all components are disconnected and the LED is not illuminated or the voltages are still incorrect, proceed to the next step. 7) Check Power Supply output voltages at terminal J14 on the ATM Backplane PCB (pin order is right to left). Pin Pin Pin Pin Pin 1= 2= 6= 7= 8= +5vdc +5vdc +12vdc -12vdc +24vdc. If incorrect, Power Supply may be defective or require voltage adjustment. 71 If Power Supply output voltages are correct, The Backplane PCB may be defective. ABNORMAL POWER OFF - TCDM Dispenser: 1) Check the power cable connection at terminal J13 on the Dispenser PCB and terminal J24 on the Backplane PCB. 2) Check voltages on both sides of the 2 fuses on the Dispenser PCB. Top = +24vdc, (4 Amp). Btm = +5vdc (1.5 Amp) If voltage is present on the right side of the fuse only, the fuse may be blown. If voltage is not present on the right side of the fuse, check voltages at the Dispenser power cable. Red = +5vdc Org = +5vdc Wht = +24vdc. If incorrect: 3) Check voltages at the Backplane PCB test points (Next to the LED’s) TP1 TP2 TP3 TP4 = = = = +5vdc +12vdc -12vdc +24vdc If an LED is not illuminated on the Backplane PCB, disconnect all components from the Backplane PCB, one at a time, until the defective component is identified. If all components are disconnected and the LED is not illuminated or the voltages are still incorrect, proceed to the next step. 4) Check the Power Supply output voltages at terminal J14 on the ATM Backplane PCB (pin order is right to left). Pin Pin Pin Pin Pin 1= 2= 6= 7= 8= +5vdc +5vdc +12vdc -12vdc +24vdc. If incorrect, the Power Supply may be defective or require voltage adjustment. If the Power Supply output voltages are correct, The Backplane PCB may be defective. ALL CASSETTES OUT OF SERVICE - TCDM and HAWK Dispenser: 1) Check the System Status for additional error messages or troubleshooting information. 2) Perform a Clear Errors in Operations > Clear Errors 3) Perform a Load Dispenser and re-enter the number of notes loaded in the cassette. Operation > Load Dispenser 4) The cassette bill count may less than the “low bill count” warning level in the AIMS Setup Menu. 5) If a pick failure occurs the ATM will label the Cassette out of service. BAD COMMAND TO DISPENSER - MCDM Dispenser 72 1) See DISPENSER REPONSE TIMEOUT - MCDM DISPENSER. 2) Check magnet settings of cassettes. 3) Possible defective Pick Module. BLDC MOTOR FAILURE - TCDM Dispenser: 1) Check the feed path for jams or obstructions. 2) Check the Main Motor connection at J8 on the Dispenser PCB. 3) Check connections at J7 on the Dispenser PCB and at the Timing Sensors. 4) Check the condition of the timing wheel. 5) Perform a Clear All in Operations > Clear Errors Verify the Main Motor runs. If not: 2) Check voltages on both sides of the 2 fuses on the Dispenser PCB. Top = +24vdc, (4 Amp). Btm = +5vdc (1.5 Amp) If voltage is present on the right side of the fuse only, the fuse may be blown. If voltage is not present on the right side of the fuse, check voltages at the Dispenser power cable. Red = +5vdc Org = +5vdc Wht = +24vdc. If incorrect: 3) Check voltages at the Backplane PCB test points (Next to the LED’s) TP1 TP2 TP3 TP4 = = = = +5vdc +12vdc -12vdc +24vdc If an LED is not illuminated on the Backplane PCB, disconnect all components from the Backplane PCB, one at a time, until the defective component is identified. If all components are disconnected and the LED is not illuminated or the voltages are still incorrect, proceed to the next step. 4) Check the Power Supply output voltages at terminal J14 on the ATM Backplane PCB (pin order is right to left). Pin Pin Pin Pin Pin 1= 2= 6= 7= 8= +5vdc +5vdc +12vdc -12vdc +24vdc. If incorrect, the Power Supply may be defective or require voltage adjustment. If the Power Supply output voltages are correct, The Backplane PCB may be defective. BLOCK CHECK CHARACTER ERROR - Hawk Dispenser: 1) See DISPENSER NOT RESPONDING - HAWK DISPENSER. BLOCKED EXIT - Hawk Dispenser: 73 1) Check for obstruction in delivery throat. 2) Clean lens on Exit Sensor with a soft dry cloth. **DO NOT USE SOLVENTS** CALIBRATION ERROR - Hawk Dispenser 1) Check the note settings in the Dispenser setup, Configuration > Local Setup > Dispenser. CARD READER DEVICE FAILURE - Non Smart Card Readers 1) Check the Card Reader connections at terminal J2 on the Control Panel PCB and at the Card Reader. Insure no pins are missed or bent 2) Check the POWER/COMM cable connection at J1 on the Control Panel PCB and the Electronics box (below cooling fan, 3600 only). If the Keypads work: 3) Test cards using “Card Reader Test” in the Diagnostics Menu. Test results should indicate a passed test. If not, the Card Reader may be defective. Note: Applying pressure to the wires on the cable while performing a Card Reader Test may reveal a defective cable. If Keypads are also inoperative: 4) Check for stuck/damaged keypads. 5) Check the Tamper LED at D7 on the Control Panel PCB. If the LED is flashing, go to step 6. If the LED is on solid (not blinking) or not lit, go to step 7. 6) For the purpose of troubleshooting only, place a jumper on pins 7 and 8 at JP1 then test for keypad operation. If the keypad is working with the jumper on pins 7 and 8, the Card Reader or Card Reader cable may be defective. Remove the jumper from pins 7 and 8. If the keypad is still inoperative, go to step 7. 7) Check voltages at the Backplane PCB test points (next to the LED’s) TP1 = +5vdc TP2 = +12vdc TP4 = +24vdc If correct, the Control Panel PCB may be defective. If incorrect or an LED is not illuminated: a) Disconnect all components from the Backplane PCB, one at a time, and recheck the LED/voltages until the defective component is identified. If all components are disconnected and the LED is not illuminated or the voltages are still incorrect: a) Check Power Supply output voltages at terminal J14 on the ATM Backplane PCB. Red = +5vdc (both) Ylw = +12vdc If incorrect, Power Supply may be defective or require voltage adjustment. a) If Power Supply output voltages are correct, The Backplane PCB may be defective. 74 8) Check the device status list in the Supervisor Main Menu: a) If the Card Reader status is “FATAL” and the Pin Pad Status is “HEALTHY”, the Card Reader May be defective. b) If the Card Reader status and Pin Pad status are “FATAL”, the Control Panel assembly may be defective. CARD READER DEVICE FAILURE - Smart Card Readers 1) Check the Card Reader connections at the Electronic Box (just above the POWER/COMM cable) and at the Card Reader. Insure no pins are missed or bent. 2) Check the POWER/COMM cable connection at J1 on the Control Panel PCB and the Electronics box (below cooling fan, 3600 only). If the Keypads work: 3) Test cards using “Card Reader Test” in the Diagnostics Menu. Test results should indicate a passed test. If not, the Card Reader may be defective. Note: Applying pressure to the wires on the cable while performing a Card Reader Test, may reveal a defective cable. If Keypads are also inoperative: 4) Check for stuck/damaged keypads. 5) Check the Tamper LED at D7 on the Control Panel PCB. If the LED is flashing, go to step 6. If the LED is on solid (not blinking) or not lit, go to step 7. 6) Check for the presence of a Jumper on pins 7 and 8 at JP1 on the Control Panel PCB. This jumper is required for Smart Card Readers. 7) Check voltages at the Backplane PCB test points (next to the LED’s) TP1 = +5vdc TP2 = +12vdc TP4 = +24vdc If correct, proceed to step 7. If incorrect or an LED is not illuminated: a) Disconnect all components from the Backplane PCB, one at a time, and recheck the LED/voltages until the defective component is identified. If all components are disconnected and the LED is not illuminated or the voltages are still incorrect: a) Check Power Supply output voltages at terminal J14 on the ATM Backplane PCB. Red = +5vdc (both) Ylw = +12vdc If incorrect, Power Supply may be defective or require voltage adjustment. a) If Power Supply output voltages are correct, The Backplane PCB may be defective. 8) Check the device status list in the Supervisor Main Menu: a) If the Card Reader status is “FATAL” and the Pin Pad Status is “HEALTHY”, the Card Reader May be defective. 75 b) If the Card Reader status and Pin Pad status are “FATAL”, the Control Panel assembly may be defective. CARD REMOVAL DISPLAY MESSAGE DOWNLOAD ERROR 1) Perform a power reset 2) Check the Card Reader connections on the Control Panel PCB and at the Card Reader. Insure no pins are missed or bent. 3) Check the POWER/COMM cable connection at J1 on the Control Panel PCB and the Electronics box (below cooling fan). CASSETTE-X EMPTY - All Dispensers: 1) Cassette may be empty. 2) Perform a Load Dispenser and re-enter the number of notes loaded in the cassette. Operation > Load Dispenser 3) Reload the bills in the cassette. 4) Check the operation of the cassette packer plate. 5) Insure the note guide rails inside the cassette are properly adjusted. CASSETTE-X LOW - All Dispensers: 1) Add bills to the cassette and perform a Load Dispenser in Operations > Load Dispenser CASSETTE-X MISSING OR OUT OF SERVICE - Hawk Dispenser: 1) Cassette not properly installed. 2) Perform a Clear All in Operations > Clear Errors 3) Ensure the cassette position magnets are the correct configuration for the cassette position. 4) Check the ribbon cable connection at J2 on the Dispenser PCB and also between pick modules. CASSETTE-X MISSING OR OUT OF SERVICE - TCDM Dispenser: 1) Cassette not properly installed. 2) Perform a Clear Errors in Operations > Clear Errors 3) Insure the “plugs” at the top/rear of the cassette lid have not been removed. 4) Check the cable connection at J14 on the Dispenser PCB. 5) Check the Pick Motor connection at terminal J9 on the Dispenser PCB. CASSETTE-X NOT INSTALLED - Fujitsu Dispenser: 1) Cassette not properly installed. 2) Perform a Clear All in Operations > Clear Errors 3) Insure the “address magnets” in the top of the cassette lid have are present and secured. CASSETTE-X PICK FAILURE - Fujitsu Dispenser: 1) Cassette loaded improperly. Reload Cassette 2) Insure the feed path cleaning tab is closed. 3) Check operation of the cassette packer plate. CASSETTE-X PICK SENSOR BLOCKED - MCDM Dispenser: 1) Remove the cassette and check the feed path for obstructions. 2) Perform a Clear Errors in Operations > Clear Errors 76 3) Remove the dispenser and check the sensor from the back. The pick sensor is located just below the Double Detect assembly. 4) Clean the sensor with compressed air. 5) Check the Pick sensor cable connection at terminal J8 on the Dispenser PCB. CASSETTE-X ZERO DOCUMENT COUNT - All Dispensers: 1) Perform a “Load Dispenser” and re-enter the number of notes currently loaded in the cassette. CASSETTE TYPE NOT EQUAL POSITION - Hawk Dispenser 1) Cassette in the wrong position. Check cassette locations. 2) Check magnet settings of cassettes. 3) Possible defective Pick Module. CHECK DIVERTER GATE - Fujitsu Dispenser: 1) The number of notes detected by the reject sensor was incorrect. 2) Check for jams at the diverter. 3) Check connections at the TOC and CPM terminals on the Dispenser Main PCB. CLEAR DISPENSER ERRORS EJECTED NOTES - TCDM Dispenser: 1) Note(s) were detected leaving the dispenser when a Clear Dispenser Errors was performed. COMMAND RESPONSE RECEIVE TIME-OUT - Hawk Dispenser: 1) See DISPENSER NOT RESPONDING - HAWK DISPENSER. COMMUNICATION WRITE FAILED - Hawk Dispenser: 1) See DISPENSER NOT RESPONDING - HAWK DISPENSER. COUNT MISMATCH - Fujitsu Dispenser: 1) The number of notes dispensed from the cassette does not agree with the number of notes detected at the EXIT/DELIVERY sensor. 2) Check the operation of the diverter fingers. 3) Check for notes in the feed path area. 4) Check for obstructions at the EXIT/DELIVERY sensor. DELAY AT EXIT SENSOR - MCDM DISPENSER: 1) Check the exit sensor for obstruction or jammed bills. 2) Clean the exit sensor with compressed air (both send and receive sensors). 3) Check for bent exit sensor mounting brackets. The send and received sensors should be facing each other. 4) Re-seat all cable connections at the top of the Dispenser PCB. DISK FREE-SPACE IS LOW 1) Disk space needed for operation is getting low. 2) Copy the Electronic Journal to a Compact Flash Card for backup. Reports > Local Reports >Journal. 3) Copy the Setup and the System Files to a Compact Flash Card. 4) Reload software from a Compact Flash and select the option to delete the system files. 77 DISPENSE TIMEOUT - MCDM Dispenser: 1) See DISPENSER RESPONSE TIMEOUT - MCDM Dispenser. DISPENSED ITEM COUNT NOT EQUAL TO REQUESTED ITEM COUNT 1) The number of notes dispensed from the cassette do not agree with the number of notes detected at the Exit/Delivery sensor. 2) Check the operation of the diverter fingers. 3) Check for notes in the feed path area. 4) Check for obstructions in the Exit/Delivery sensor. DISPENSER DEMO JUMPER SETTING ERROR 1) The Dispenser dipswitch setting may be incorrect. (see DIPSWITCH SETTINGS in the Troubleshooting Guide). DISPENSER DEVICE FAILURE 1) This error message will normally be accompanied by another dispenser related error message. Please refer to the additional error message(s). 2) If this is the only error message, see DISPENSER NOT RESPONDING for the Hawk Dispenser and DISPENSER RESPONSE TIMEOUT for the MCDM and TCDM Dispensers. DISPENSER ERROR CODE UNKNOWN - MCDM DISPENSER: 1) Check the dipswitch setting (See DIPSWITCH SETTINGS in the Dispenser section of the Troubleshooting Guide) DISPENSER NOT RESPONDING- Hawk Dispenser: 1) Dispenser communication interruption. Perform a Clear All in Operations > Clear Errors. 2) Check 120VAC power cable connection on side of the Dispenser. 3) Check communication cable connection J1 on the dispenser main PCB and J3 on the FIB PCB. 4) Check voltages at J3 on the dispenser PCB. Org=5vdc, Wht=24vdc & Red=5vdc. If correct, check fuses in the lower right corner of the Dispenser PCB. If fuses are not blown, the Dispenser PCB may be defective. If incorrect, check for 12VDC on the 2 pin connector on J5 of the FIB PCB. If correct: The FIB PCB may be defective. If incorrect: 5) Check voltages at the Backplane PCB test points (next to the LED’s) TP1=5vdc, TP2=12vdc, TP3=-12vdc, TP4=24vdc. If correct: The Dispenser Power cable may be defective. If incorrect: a) If an LED is not illuminated on the Backplane PCB, disconnect all components from the Backplane PCB, one at a time, until the defective component is identified. If all components are disconnected & the LED is not illuminated or the voltages are still incorrect, proceed to the next step. b) Check Power Supply output voltages at terminal J14 on the ATM Backplane PCB (pin order is right to left). If incorrect, Power Supply may be defective or require voltage adjustment. If correct, the Backplane PCB may be defective. 78 DISPENSER NOT RESPONDING - MCDM Dispenser: 1) See DISPENSER RESPONSE TIMEOUT - MCDM Dispenser. DISPENSER NOT RESPONDING - TCDM Dispenser: 1) See DISPENSER RESPONSE TIMEOUT - TCDM Dispenser. DISPENSER RESPONSE TIMEOUT - Hawk Dispenser: 1) See DISPENSER NOT RESPONDING - HAWK DISPENSER. DISPENSER RESPONSE TIMEOUT - MCDM Dispenser: 1) Perform power reset. 2) Insure the dipswitch setting on the Dispenser PCB matches the ATM run mode. (See DISPENSER in the Troubleshooting section of this manual. 3) Check the Dispenser communication cable connection at the Backplane PCB and the Dispenser PCB 5) Perform cold start, Configuration > New Sys Startup. 6) Check for error messages in the ERROR MENU for additional troubleshooting information. If no LED’s are lit on the Dispenser PCB: 7) Check the input voltages at the Dispenser: MCDM DISPENSER - 120vac. If correct, the Dispenser may be defective. If incorrect, check voltage/connection at the AC power strip inside the unit. 8) Possible defective Dispenser COMM cable. DISPENSER RESPONSE TIMEOUT - TCDM Dispenser: 1) Perform a power reset. 2) The Dispenser dipswitch setting may be incorrect. (see DIPSWITCH SETTINGS in the Troubleshooting Guide) 3) Check the dispenser LED’s on power up. If only 2 decimal points appear, or the “0.0.” is very slow to appear, the Double Detect sensor is not seen by the Dispenser PCB. Re-seat the connection at terminal J10 on the Dispenser PCB. 4) Check the Dispenser communication cable connection at the Backplane PCB and the Dispenser PCB 5) Perform a Clear All in Operations > Clear Errors If no LED’s are lit on the Dispenser PCB: 6) Check the input voltages at the Dispenser: Red = +5vdc Org = +5vdc Wht = +24vdc. If incorrect, proceed to step 9. If correct, check voltages on both sides of the 2 fuses on the Dispenser PCB. Top = +24vdc (4A). Btm = +5vdc (1.5A) If voltage is present on the right side of the fuse only, the fuse may be blown. 79 7) Check the power cable connection at terminal J24 on the Backplane PCB. 8) Check voltages at the Backplane PCB test points (next to the LED’s) TP1 TP2 TP3 TP4 = = = = +5vdc +12vdc -12vdc +24vdc. If correct, the Dispenser Power cable may be defective. 9) If voltages are incorrect or an LED is not illuminated on the Backplane PCB , disconnect all components from the Backplane PCB, one at a time, until the defective component is identified. 10) If all components are disconnected and the LED is not illuminated or the voltages are still incorrect, Check the Power Supply output voltages at terminal J14 on the ATM Backplane PCB (pin order is right to left). Pin Pin Pin Pin Pin 1= 2= 6= 7= 8= +5vdc +5vdc +12vdc -12vdc +24vdc. If incorrect, Power Supply may be defective or require voltage adjustment. If correct, the Backplane PCB may be defective. DISPENSING FROM WRONG CASSETTE - TCDM Dispenser: 1) Check cassettes for signs of damage. 2) Possible note left in the feed path from previous dispense. 3) Check the feed path entrance for jammed notes or obstructions. 4) Remove and reload cassette. DIVERTER ERROR - Hawk Dispenser: 1) Perform a Clear All in Operations > Clear Errors 2) Exit sensor may be blocked. 3) Diverter may be in the wrong position at beginning of dispense. 4) Check diverter for obstructions/ease of movement. 5) Check the exit sensor connection at J6 on the top of the Dispenser Main PCB. 6) Check the diverter solenoid connection at J7. DIVERTER ERROR - MCDM Dispenser: 1) Perform a Clear All in Operations > Clear Errors 2) Exit sensor may be blocked. 3) Diverter may be in the wrong position at beginning of dispense. 4) Check diverter for obstructions/ease of movement. 5) Check the exit sensor connection at J3 and J4 on the top of the Dispenser Main PCB. 6) Check the diverter solenoid connection at J1 DIVERTER FAILED DURING INITIALIZATION - TCDM Dispenser: 1) Perform a Clear All in Operations > Clear Errors. At the end of each motor cycle, the solenoid should operate. 80 If the solenoid does not operate: a) Check the Solenoid connection at J6 on the Dispenser PCB. If the solenoid does operate: a) Check the Solenoid Sensor connections at the Sensors and J5 on the Dispenser PCB. 2) Check the Diverter for ease of movement/obstructions. 3) Check the Solenoid for ease of movement/damage. DIVERTER FAILED NOTES EJECTED - TCDM Dispenser: 1) Notes that were supposed to be diverted to the reject cassette were delivered. 2) Perform a Clear All in Operations > Clear Errors. At the end of each motor cycle, the solenoid should operate. If the solenoid does not operate: a) Check the Solenoid connection at J6 on the Dispenser PCB. If the solenoid does operate: a) Check the Solenoid Sensor connections at the Sensors and J5 on the Dispenser PCB. 3) Check the Diverter for ease of movement/obstructions. 4) Check the Solenoid for ease of movement/damage. DIVERTER FAILED NOTES REJECTED - TCDM Dispenser: 1) Notes that were supposed to be delivered were diverted to the reject cassette. 2) Perform a Clear All in Operations > Clear Errors. At the end of each motor cycle, the solenoid should operate. If the solenoid does not operate: a) Check the Solenoid connection at J6 on the Dispenser PCB. If the solenoid does operate: a) Check the Solenoid Sensor connections at the Sensors and J5 on the Dispenser PCB. 3) Check the Diverter for ease of movement/obstructions. 4) Check the Solenoid for ease of movement/damage. DOOR OPEN WITH NO LOGON 1) Door was opened prior to logging on as a Programmer, Manager or User/Clerk. 2) Perform a Clear All in Operations > Clear Errors. 3) Possible defective Door Switch or associated wiring. DOUBLE DETECT BEFORE PICKING 1) The double detect was active before the pick sensor was activated. 2) Perform a Clear All in Operations > Clear Errors. 3) Check for skewed notes. 4) Check/reload the notes in the cassette. 5) Check for jams or obstructions in the picking area of the feed path. 81 6) Check the two cable connections at the double detect assembly. 7) Check the double detect assembly connection at J6 on the Dispenser Main PCB. DS5002 KEYLOAD FAILURE 1) Perform a Clear All in Operations > Clear Errors. 2) Reenter Master Keys in Configuration > Master Key Entry. 3) Check the Master Key setup according to the Host requirements. 3) Check for the presence of the Tamper LED on the Control Panel PCB. EMPTY CASSETTE(S) 1) Cassette empty. 2) Perform a Load Dispenser and re-enter the number of notes currently in the cassette in Operation > Load Dispenser 3) Reload the cassette. 4) Check the operation of the cassette packer plate. END OF TRANSMISSION CHARACTER NOT RECEIVED - Hawk Dispenser: 1) See DISPENSER NOT RESPONDING - HAWK DISPENSER. ENQ TRANSMIT TIMEOUT - Fujitsu Dispenser: 1) Dispenser communication interruption. Perform “CLEAR DISPENSER ERRORS”. 2) Check the communication cable connection, Backplane PCB to Interface PCB. 3) Check the communication cable connection, Feeder Interface PCB to Dispenser Main PCB. 4) Check the door switch jumper at terminal CN24V on the Dispenser Main PCB. 5) Check Power Supply output voltages at terminal J3 on the ATM Backplane PCB. Pin 1=5vdc, pin 2=5vdc, pin 6=12vdc, pin 7=-12vdc, pin 8=24vdc, (pin order is left to right). If incorrect, the Power Supply may be defective. 6) Check disconnect the Dispenser Power cable from the Dispenser & check voltages the following: wht/prpl = 24 vdc wht/grn = 24 vdc wht/orng = 24 vdc wht/brn = 24 vdc black = 5 vdc red = 5 vdc wht/red = 24 vdc wht/ylw = 24 vdc wht/blu = 24 vdc If incorrect, Dispenser Power cable or Backplane PCB may be defective. 7) Possible defective communication cable, Backplane PCB to Interface PCB. 8) Possible defective communication cable, Feeder Interface PCB to Dispenser Main PCB. 9) Possible defective Feeder Interface PCB, Dispenser Main PCB, or Backplane PCB. 82 EPROM ERROR - Hawk Dispenser: 1) Perform a NV Ram clear on the dispenser. 2) Check and/or reseat the EPROM on the Dispenser PCB located at U7. EXIT COUNT ERROR - MCDM: 1) Perform a Clear All in Operations > Clear Errors. 2) Check delivery throat for obstructions. 3) Clean Exit Sensor lenses with a soft dry cloth. **DO NOT USE SOLVENTS**. EXIT SENSOR BLOCKED - MCDM and Hawk Dispenser: 1) Perform a Clear All in Operations > Clear Errors. 2) Check delivery throat for obstructions. 3) Clean Exit Sensor lenses with a soft dry cloth. **DO NOT USE SOLVENTS** Hawk Dispenser: 4) Possible faulty connection, Check J6 on dispenser main PCB. 5) Possible defective Exit Sensor. MCDM Dispenser: 6) Possible faulty connection, Check J4 on dispenser main PCB. 7) Possible defective Exit Sensor. EXIT SENSOR INITIALIZATION ERROR - MCDM Dispenser: 1) Perform a Clear All in Operations > Clear Errors 2) Check for reject tray full. 3) Clean Exit Sensor lenses with a soft dry cloth. **DO NOT USE SOLVENTS** 4) Possible faulty connection, Check J4 on dispenser main PCB. 5) Possible defective Exit Sensor. FEED FAILURE - HAWK Dispenser 1) Cassette is empty. 2) Remove cassette, reload and reinstall the cassette in the Dispenser. 3) Check the condition of the belts. 4) Check the cassette for damage. 5) Insure all vacuum lines are secure and that suction cup on pick arm are in good shape FIB NOT RESPONDING FIB ERROR RECOVERY FAILURE FIB JUMPER SETTING ERROR 1) Dispenser communication interruption. Perform a Clear All in Operations > Clear Errors MCDM Dispenser: 1) Check for the demo dipswitch, switch number 1 at SW1 on the Dispenser Main PCB. The only be down when in demo mode. 2) Check voltage at the Dispenser (120vac). If AC voltage is not correct, check the power/connection at the power strip inside the unit. If AC voltage is correct, check voltage at J14 on the Dispenser PCB. 83 Red = 5vdc, Yellow (2) = 24vdc. If incorrect, the Dispenser Power Supply may be defective. 3) Check the Dispenser communication cable for damage. 4) Check the Dispenser communication cable connection at terminal J8 on the Backplane PCB and terminal J10 on the Dispenser PCB. 5 Insure the dipswitch setting on the Dispenser PCB matches the ATM run mode. (See DISPENSER in the Troubleshooting section of this manual. 6) Possible defective Dispenser COMM cable. ** Note: In the event that the Dispenser loses power during a transaction, the customer will be charged the full amount of the transaction. This is due to the fact that the Dispenser was unable to acknowledge to the ATM, the amount dispensed due to the power loss. HAWK Dispenser: 1) Check for the demo jumper on pins 1 & 2 of the terminal JP1 on the Feeder Interface PCB. The jumper should only be on both pins if the unit is in demo mode. 2) Check the Dispenser communication cable connection (Backplane PCB to Feeder Interface PCB). 3) Check the Feeder Interface PCB power cable connection (Backplane PCB to terminal J5 on the Feeder Interface PCB). 4) Check for 12vdc at terminal J5 on the Feeder Interface PCB. If 12vdc is present, the Feeder Interface PCB may be defective. 4) Check voltages at the Backplane PCB test points (next to the LED’s) TP1=5vdc, TP2=12vdc, TP3=-12vdc TP4=24vdc. If correct, possible defective FIB power cable If incorrect, Power Supply may be defective or require voltage adjustment. If Power Supply output voltages are correct, The Backplane PCB may be defective. TCDM Dispenser: 1) Check for the demo dipswitch, switch number 2 at SW1 on the Dispenser Main PCB. The only be up when in demo mode. 2) Check voltage at the Dispenser PCB. Red = 5vdc, Yellow (2) = 24vdc. If incorrect, the Dispenser Power Supply may be defective. 3) Check the Dispenser communication cable for damage. 4) Check the Dispenser communication cable connection at terminal J8 on the Backplane PCB and terminal J10 on the Dispenser PCB. 5 Insure the dipswitch setting on the Dispenser PCB matches the ATM run mode. (See DISPENSER in the Troubleshooting section of this manual. 6) Possible defective Dispenser COMM cable. ** Note: In the event that the Dispenser loses power during a transaction, the customer will be charged the full amount of the transaction. This is due to the fact that the Dispenser was unable to acknowledge to the ATM, the amount dispensed due to the power loss. 84 HOST HOST HOST 1) MSG 96 - INVALID MSG SEQUENCE MSG 97 - BAD SEQUENCE # MSG 99 - BAD TERMINAL ID Verify the Terminal ID is programmed correctly in Configuration > Local Setup > Host > Financial Host 2) Delete and re-enter the terminal ID, Then perform 2 balances/trial closes back to back. 3) If the problem is reoccurring, the Terminal ID may be programmed in another unit at a different location. 4) Terminal may not be activated at the Host. HOST TYPE 2 - DISPENSE AMOUNT ERROR 1) Denomination not setup properly at the Host (type 2 processors only). HOST TYPE 2 ERROR 1) Master Key Index set incorrectly in Configuration > Local Setup > Host > Financial Host INITIALIZING SETUP DISPENSER PORT - MCDM Dispenser 1) Perform power reset. 2) Perform a Clear All in Operations > Clear Errors 3) Insure the dipswitch setting on the Dispenser PCB matches the ATM run mode (see DISPENSER in the Troubleshooting section of this manual. 4) Check voltage at the Dispenser (120vac). If AC voltage is not correct, check the power/connection at the power strip inside the unit. If AC voltage is correct, check voltage at J14 on the Dispenser PCB. Red = 5vdc, Yellow (2) = 24vdc. If incorrect, the Dispenser Power Supply may be defective. 5) Insure the correct Dispenser type is selected in the ENGINEERING DIAGNOSTICS MENU. 6) Check the Dispenser communication cable for damage. 7) Check the Dispenser communication cable connection at terminal J18 on the Backplane PCB and terminal J10 on the Dispenser PCB. Red = 5vdc, Yellow (2) = 24vdc. If incorrect, the Dispenser Power Supply may be defective. 8) Perform a cold start. 9) Possible defective Dispenser COMM cable. INVALID ITEM LENGTH OR THICKNESS 1) Perform a Clear All in Operations > Clear Errors 2) Renter the cassette configuration information in Configuration > Local Setup > Dispenser > Edit Cassette MCDM, TCDM and FUJITSU Dispensers (USD): Bill Thickness = 11 Minimum Note Length = 58 Maximum Note Length must be set to = 66 ITEM MIS-TRACK AT DOUBLE DETECT – HAWK Dispenser 1) Perform a Clear All in Operations > Clear Errors 85 2) Perform a DISPENSER (REJECT) test in Diagnostics > Dispenser (Reject). ITEM MIS-TRACK AT EXIT – HAWK Dispenser 1) Perform a Clear All in Operations > Clear Errors. 2) Possible defective Exit Sensor. ITEM MIS-TRACK AT FEED – HAWK Dispenser 1) Clean Timing Wheel & Count Sensors with a clean dry cloth **DO NOT USE SOLVENTS** 2) Check Dispenser for jammed notes. 3) Possible defective Timing Wheel/Count Sensor. 4) Possible defective Dispenser Main PCB. ITEM TOO LONG AT EXIT – HAWK Dispenser 1) Length of the note leaving the Note Feeder was incorrect. 2) Possible skewed notes. Remove the cassette & check the condition of the notes. JAM BETWEEN CASSETTE (1-4) AND RVDT - TCDM Dispenser: 1) The note was seen at the Cassette Pick Sensor but was not seen at the Double Detect Sensor. 2) Check for jams/obstructions in the feed path 3) Check the idle roller springs at the rear of the Dispenser (multi cassette units). 4) Check the condition of the belts. JAM BETWEEN DIVERTER AND EXIT - TCDM Dispenser: 1) Note was seen at the Divert Distance Sensor but was not seen at the Divert Delivery Sensor. 2) Check for jams/obstructions in the feed path 3) Check the condition of the belts. 4) Perform a Clear All in Operations > Clear Errors. At the end of each motor cycle, the solenoid should operate. If the solenoid does not operate: a) Check the Solenoid connection at J6 on the Dispenser PCB. If the solenoid does operate: a) Check the Solenoid Sensor connections at the Sensors and J5 on the Dispenser PCB. 5) Check the Diverter for ease of movement/obstructions. 6) Check the Solenoid for ease of movement/damage. 7) Check the connection at J5 on the Dispenser PCB and at the Divert Delivery Sensors. JAM BETWEEN DIVERTER AND REJECT - TCDM Dispenser: 1) Note was seen at the Divert Distance Sensor but was not seen at the Divert Reject Sensor. 2) Check for jams/obstructions in the feed path 3) Check the condition of the belts. 4) Perform a Clear All in Operations > Clear Errors At the end of each motor cycle, the solenoid should operate. If the solenoid does not operate: 86 a) Check the Solenoid connection at J6 on the Dispenser PCB. If the solenoid does operate: a) Check the Solenoid Sensor connections at the Sensors and J5 on the Dispenser PCB. 5) Check the Diverter for ease of movement/obstructions. 6) Check the Solenoid for ease of movement/damage. 7) Check the connection at J5 on the Dispenser PCB and at the Divert Reject Sensors. JAM BETWEEN PICK & POTENTIOMETER SENSORS - Fujitsu Dispenser: 1) Check for notes jammed at feed path entrance. Insure cleaning door is closed inside cassette cavity. 2) Check for notes jammed on transport at rear of Dispenser. 3) Check for notes present in the reject path. 5) Perform CLEAR DISPENSER ERRORS and check for proper motor/belt operation. If operation is incorrect, check for obstructions that may restrict belt/motor movement. JAM BETWEEN PICK & POTENTIOMETER SENSORS - Fujitsu Dispenser: 1) Check for notes jammed on the feed path between the Double Detect sensor and the Exit/Delivery sensor. 2) Check for obstructions in the Exit/Delivery sensor. 3) Check the operation of the diverter fingers. 4) Perform CLEAR DISPENSER ERRORS and check for proper motor/belt operation. If operation is incorrect, check for obstructions that may restrict belt/motor movement. LEFT CASSETTE (1-4) SENSOR BLOCKED - TCDM Dispenser: The number in the Error Message denotes which cassette position is reporting the problem. 1) The Cassette Pick Sensor on the “cold side” of the unit is blocked. Remove the cassette and check for jams. 2) Perform a Clear All in Operations > Clear Errors. 3) Check the connection at the Cassette Pick Sensor and the following Dispenser PCB terminals: Cassette Cassette Cassette Cassette 1 2 3 4 = = = = J12 J19 J17 J15 and and and and J14 J20 J18 16 4) Clean the lens of the Pick Sensors with a clean soft cloth. LEFT EJECT SENSOR BLOCKED - TCDM Dispenser: 1) Check for jams/obstructions in the feed path near the Delivery Sensor on the “cold side” of the Dispenser. 2) Perform a Clear All in Operations > Clear Errors. 87 3) Check the condition of the belts. 4) Check the connection at J4 on the Dispenser PCB and at the Delivery Sensors. 5) Clean the lens of the Delivery Sensors with a clean soft cloth. LEFT REJECT SENSOR BLOCKED - TCDM Dispenser: 1) Check for jams/obstructions in the feed path at the Divert Reject Sensor on the “cold side” of the Dispenser. 2) Perform a Clear All in Operations > Clear Errors. 3) Check the condition of the belts. 4) Check the connection at J5 on the Dispenser PCB and at the Divert Reject Sensors. 5) Clean the lens of the Divert/Reject Sensors with a clean soft cloth. LEFT SENSOR AFTER DIVERTER BLOCKED - TCDM Dispenser: 1) Check for jams/obstructions in the feed path at Divert Delivery Sensor on the “cold side” of the Dispenser. 2) Perform a Clear All in Operations > Clear Errors. 3) Check the condition of the belts. 4) Check the connection at J5 on the Dispenser PCB and at the Divert Delivery Sensors. 5) Clean the lens of the Divert Delivery Sensors with a clean soft cloth. LEFT SENSOR BEFORE DIVERTER BLOCKED - TCDM Dispenser: 1) Check for jams/obstructions in the feed path at Divert Distance Sensor on the “cold side” of the Dispenser. 2) Perform a Clear All in Operations > Clear Errors 3) Check the condition of the belts. 4) Check the connection at J5 on the Dispenser PCB and at the Divert Distance Sensors. 5) Clean the lens of the Divert Distance Sensors with a clean soft cloth. LEFT SENSOR BEFORE RVDT BLOCKED - TCDM Dispenser: 1) Check for jams/obstructions at the Length/Distance/Skew Sensors on the “cold side” of the Dispenser. 2) Perform a Clear All in Operations > Clear Errors 3) Check the condition of the belts. 4) Check the connection at J7 on the Dispenser PCB and at the Length/Distance/Skew (LDS) Sensors. 5) Clean the lens of the Length/Distance/Skew Sensors with a clean soft cloth. MODEM SETUP REQUIRED - EXTERNAL MODEM 1) Perform a Clear All in Operations > Clear Errors MODEM TX/RX PROBLEMS 1) Perform a Clear All in Operations > Clear Errors 2) Remove and reseat the modem on the Main PCB. MOTOR FAILURE – Fujitsu Dispenser 1) Timing wheel sensor did not detect movement after command. 2) Perform “CLEAR DISPENSER ERRORS”. 88 If motor does not run: a) Check for jammed notes on the feed path. b) Check Dispenser power cable connection at the ATM Backplane PCB and the power input (BDU) terminal on the Dispenser Main PCB. c) Check the Main Motor connection at terminal CPM on the Dispenser Main PCB. d) Check Power Supply output voltages at terminal J3 on the ATM Backplane PCB. Pin 1=5vdc, pin 2=5vdc, pin 6=12vdc, pin 7=-12vdc, pin 8=24vdc, (pin order is left to right). If incorrect, the Power Supply may be defective. e) Check disconnect the Dispenser Power cable from the Dispenser & check voltages at the following: wht/prpl = 24 vdc wht/grn = 24 vdc wht/orng = 24 vdc wht/brn = 24 vdc black = 5 vdc red = 5 vdc wht/red = 24 vdc wht/ylw = 24 vdc wht/blu = 24 vdc If incorrect, Dispenser Power cable or Backplane PCB may be defective. If correct, Dispenser Main PCB or Main Motor may be defective. If motor does run: 3) Check for broken or loose belts. 4) Insure timing disk is not broken. 5) Possible defective Dispenser Main PCB. 6) Replace the Dispenser. MOTOR FAILURE, CHECK 24V POWER - TCDM Dispenser: 1) Timing wheel sensor did not detect movement after command. 2) Perform Clear All in Operation > Clear Errors and check for proper motor/belt/shutter operation. If operation is incorrect, check for obstructions that may restrict movement. If motor does not run: a) Check for jammed notes on the feed path. b) Check Motor power cable connection at J8 on the Dispenser PCB. c) Check voltages both sides of the 2 fuses on the Dispenser PCB (TCDM). Top = +24vdc (4A). Btm = +5vdc (1.5A) n If voltage is present on the right side of the fuse only, the fuse may be blown. n If voltage is correct at the fuses, the Dispenser PCB or Motor may be defective. If motor does run: 3) Check the Timing Wheel Sensor connection at J7 (TCDM) on the Dispenser PCB. 4) Check the connections at the Timing Wheel Sensors. 89 NO VALID CASH SELECTIONS: 1) Check the Cassette Configuration in the CASH SETUP MENU. At least 1 cassette must be a cash cassette. 2) Check the Cash Template in the CASH SETUP MENU. 3) Check the # of bills in the Load Dispenser Count menu. 4) If the # of bills & amount of bills are less than the lowest selection in the Cash Template, this error message may be generated. NOTE AT EXIT TOO LONG - TCDM Dispenser: 1) Length of the note leaving the Note Feeder was incorrect. 2) Possible notes sticking together. Remove the cassette and check the condition of the notes. 3) Check operation of the packer plate in the cassette. 4) Check cassette guide rail adjustments in the cassette. 5) Check for obstructions in the feed path entrance. 6) Check for loose or broken belts. 7) Check the cassette type and denomination in Configuration > Local Setup > Dispenser > Edit Cassette 8) Check for loss of cork on Packer Plate. 9) Check for obstructions in the cassette. 10) Remove the pick roller assembly from the cassette. Clean the rollers, check for obstructions and damage to rollers and gears. 11) Check for damage to the pick roller drive gear, inside the dispenser cassette cavity. NOTE AT EXIT TOO SHORT - TCDM Dispenser: 1) Check condition of notes in cassette. 2) Check for obstructions in the feed path entrance and transport at the rear of the Dispenser. NOTE SKEW, CHECK CONDITION OF NOTES - TCDM Dispenser: 1) Check condition of notes. 2) Check for jams/obstructions in the feed path. 3) Check the alignment of the Length/Distance/Skew (LDS) Sensors. 4) Check the connection at J7 on the Dispenser PCB and at the Length/Distance/Skew (LDS) Sensors. 5) Clean the lens of the Length/Distance/Skew Sensors with a clean soft cloth. 6) Perform a Clear All in Operation > Clear Errors and check for proper motor/belt operation. If operation is incorrect, check for obstructions that may restrict movement. OPERATION TIME OUT – HAWK Dispenser 1) Command to dispenser has timed out. Perform Clear All in OPERATIONS > CLEAR ERRORS. OUT OF SERVICE - CLOSE OUT REQUIRED 90 1) Perform a Cutover or Balance in Reports > Host Reports > Cutover/Balance 2) Check the Supervisor Main Menu for additional Error Messages. PICK FAILURE - MCDM Dispenser 1) Cassette loaded improperly, reload. 2) Check the condition of the belts. 3) Check the cassette for damage. 4) Check the idle roller springs on both sides of the Dispenser. 5) Check the Pick Motor connection at terminal J9 on the Dispenser PCB. PICK FAILURE - TCDM Dispenser: 1) Cassette loaded improperly, reload. 2) Insure the number of bills loaded in the cassette are the same as the number of bills in the Load Dispenser menu. 3) Check the cassette for damage. 4) Check operation of the cassette packer plate. 5) Check side rail adjustment inside cassette. 6) Check for loss of cork on Packer Plate. 7) Check for obstructions in the cassette. 8) Remove the pick roller assembly from the cassette. Clean the rollers, check for obstructions and damage to rollers and gears. 9) Check for damage to the pick roller drive gear, inside the dispenser cassette cavity. PINPAD DEVICE FAILURE 1) Check the keypad area for damage or abuse. 2) Check the power/communication cable connection at terminal J1 on the Control Panel PCB and at the Control Box (below the cooling fan). 3) Check the Tamper LED on Control Panel Assembly. n If blinking, reload the Master Keys. n If the LED is on solid or not illuminated, the Control Panel assembly should be replaced. 4) Check the device status list in the Supervisor Main Menu: a) If the Pin Pad status is “BAD”, the Control Panel assembly may be defective. 5) Check the Extended Status menu. If the Pin Pad version is blank, the Control Panel assembly should be replaced. POTENTIOMETER ERROR - TCDM Dispenser: 1) Check for notes jammed at the Double Detect Sensor. 2) Clean the Double Detect Sensor roller. 3) Perform a Clear All in Operations > Clear Errors 4) Inspect the Double Detect actuator for damage. POTENTIOMETER FAILURE - Fujitsu Dispenser: 1) Check for notes jammed at the Double Detect Sensor. 91 2) Perform Double Detect adjustment. See pages 150-151. POWER FAIL DURING DISPENSE 1) Perform a Clear All in Operations > Clear Errors PPP NOT AUTHORIZED OR PPP HOST CUTOVER REQUIRED 1) Insure the PPP Host information is entered correctly Configuration > Local Setup > Host Setup > PrePaid Host 2) Perform a Cutover or Balance Reports > Host Reports > PPP Cutover 3) Check the Supervisor Main Menu for additional Error Messages. PRINTER DEVICE ERROR 1) Insure Printer Cutter is closed securely. 2) Check the wiring harness connection at terminal J4 on the Backplane PCB and terminal J1 on the Printer Interface PCB. 3) Check the wiring harness connections at terminals J2, J4 and J5 on the Printer Interface PCB. 4) Check the Printer connections at terminals CN3 and CN4 on the Printer PCB 5) Insure all wiring harness connections on the Printer PCB are seated securely and no wires are pulled out of the connectors. 6) Perform a printer reset (Apply power while holding down feed button). The Printer should print a test report. NOTE: Perform a power reset to stop the test print. If the printer reset works 7) Perform a Clear All in Operations > Clear Errors and attempt to print a report. If the printer reset does not work: 8) Check voltages at terminal J4 on the Backplane PCB. Red = +5vdc Wht = +24vdc If incorrect: 9) Check voltages at the Backplane PCB test points (next to the LED’s) TP1 = +5vdc TP2 = +12vdc TP4 = +24vdc. If correct, proceed to step 10. If incorrect or an LED is not illuminated: a) Disconnect all components from the Backplane PCB, one at a time, and recheck the LED/voltages until the defective component is identified. If all components are disconnected and the LED is not illuminated or the voltages are still incorrect: a) Check the Power Supply output voltages at terminal J14 on the ATM Backplane PCB (pin order is right to left). Red = +5vdc (both) Ylw = +12vdc 92 If incorrect, the Power Supply may be defective or require voltage adjustment. a) If the Component Power Supply output voltages are correct, The Backplane PCB may be defective. 10) Check voltages at terminal CN5 on the Printer PCB. Red = pin 3 - +24vdc Wht = pin 1 - +5vdc If incorrect, the Printer Interface PCB may be defective. 11) Check voltages at terminal CN6 on the Printer PCB. Blk = pin 1 - +5vdc If incorrect, the Printer Interface PCB may be defective. 12) Possible defective Printer Interface PCB. 13) Possible defective Printer PCB. 14) Possible defective Printer REJECT CASSETTE MISSING - TCDM Dispenser: 1) Remove and install the Reject Cassette. 2) Check the connection at J4 and the Reject Cassette Sensor. REVERSAL IN PROCESS 1) Amount of transaction was not completely fulfilled, processor has not indicated reversal has completed. 2) Perform power reset. 3) May require a New Sys Startup to correct. n Saving the setup information to the compact flash card by performing a “Write Sys Files” prior to cold starting the unit will allow the setup to be reloaded from the flash card after the cold start is performed. 4) Insure you have all programming information for the terminal or perform a Write Setup to the compact flash card Configurations > Write Setup. 5) Perform a New Sys Startup in Configuration > New Sys Startup. 6) Reprogram the unit manually or perform a Restore Setup from the flash card if a Write Setup was performed in step 1. RIGHT CASSETTE (1-4) SENSOR BLOCKED - TCDM Dispenser: The number in the Error Message denotes which cassette position is reporting the problem. 1) The Cassette Pick Sensor on the “hot side” of the unit is blocked. Remove the cassette and check for jams. 2) Perform a Clear All in Operations > Clear Errors 3) Check the connection at the Cassette Pick Sensor and the following Dispenser PCB terminals: Cassette Cassette Cassette Cassette 1 2 3 4 = = = = J12 J19 J17 J15 and and and and J14 J20 J18 16 4) Clean the lens of the Delivery Sensors with a clean soft cloth. 93 RIGHT EJECT SENSOR BLOCKED - TCDM Dispenser: 1) Check for jams/obstructions in the feed path near the Delivery Sensor on the “hot side” of the Dispenser. 2) Perform a Clear All in Operations > Clear Errors. 3) Check the condition of the belts. 4) Check the connection at J4 on the Dispenser PCB and at the Delivery Sensors. 5) Clean the lens of the Delivery Sensors with a clean soft cloth. RIGHT REJECT SENSOR BLOCKED - TCDM Dispenser: 1) Check for jams/obstructions in the feed path at the Divert Reject Sensor on the “hot side” of the Dispenser. 2) Perform a Clear All in Operations > Clear Errors. 3) Check the condition of the belts. 4) Check the connection at J5 on the Dispenser PCB and at the Divert Reject Sensors. 5) Clean the lens of the Divert Reject Sensors with a clean soft cloth. RIGHT SENSOR AFTER DIVERTER BLOCKED - TCDM Dispenser: 1) Check for jams/obstructions in the feed path at Divert Delivery Sensor on the “hot side” of the Dispenser. 2) Perform a Clear All in Operations > Clear Errors. 3) Check the condition of the belts. 4) Check the connection at J5 on the Dispenser PCB and at the Divert Delivery Sensors. 5) Clean the lens of the Divert Delivery Sensors with a clean soft cloth. RIGHT SENSOR BEFORE DIVERTER BLOCKED - TCDM Dispenser: 1) Check for jams/obstructions in the feed path at Divert Distance Sensor on the “hot side” of the Dispenser. 2) Perform a Clear All in Operations > Clear Errors. 3) Check the condition of the belts. 4) Check the connection at J5 on the Dispenser PCB and at the Divert Distance Sensors. 5) Clean the lens of the Divert Distance Sensors with a clean soft cloth. RIGHT SENSOR BEFORE RVDT BLOCKED - TCDM Dispenser: 1) Check for jams/obstructions at the Length/Distance/Skew Sensors on the “hot side” of the Dispenser. 2) Perform a Clear All in Operations > Clear Errors 3) Check the condition of the belts. 4) Check the connection at J7 on the Dispenser PCB and at the Length/Distance/Skew (LDS) Sensors. 5) Clean the lens of the Length/Distance/Skew Sensors with a clean soft cloth. SENSOR ERROR, NOTES MISTRACKED - TCDM Dispenser: 1) Check for jams/obstructions on the feed path. 2) Perform a Clear All in Operations > Clear Errors 3) Check the condition of the belts. 94 SENSOR ERROR - TCDM Dispenser: 1) Perform a Clear All in Operations > Clear Errors 2) Check Dipswitch setting (see Dispenser in the Troubleshooting Guide). 3) Perform Sensor Test and Resistance Check to determine if sensor requires replacement. (See Miscellaneous in the 3000 Series Troubleshooting Guide). SPEECH DEVICE FAILURE 1) Check the cable connections at the Audio PCB and terminal J10 on the Backplane PCB. TCDM DIPSWITCH 3 NOT SET CORRECTLY - TCDM Dispenser: 1) Check Dipswitch setting (see Miscellaneous in the 3000 Series Troubleshooting Guide). TCDM UNKNOWN COMMAND - TCDM Dispenser: 1) Perform a Clear Errors in Operations > Clear Errors TELEPHONE LINE AND/OR MODEM PROBLEM 1) Check for dedicated phone line. Insure no other equipment is sharing phone line. 2) If AIMS outgoing calls are enabled, disable outgoing calls, perform power reset on unit and attempt transaction again. 3) Check terminal ID and phone #’s. 4) Possible phone line connection problem at wall socket, surge suppressor or Backplane PCB. 5) Plug a phone into the phone jack on the Main PCB to verify dial tone and connectivity. 6) Perform cold start. 7) Possible defective phone cable. 8) Remove and re-seat the modem. 9) Possible defective modem. 10) Possible defective Backplane PCB. TIMING WHEEL ERROR - HAWK Dispenser: 1) Check timing wheel for cracks or damage. 2) Check all belts on Dispenser. 4) Check sensor connector at J6 on dispenser main PCB 4) Perform purge dispenser in the MANAGER MENU. If Dispenser does run but short cycle: a) Timing wheel or timing wheel sensor may be defective. If Dispenser does not run: a) Check fuses in the lower right corner of the Dispenser PCB. If fuses are not blown, the Dispenser PCB may be defective. If incorrect: a) Check for 12VDC on the 2 pin connector on J5 of the FIB PCB. If correct: The FIB PCB may be defective. If incorrect: b) Check voltages at the Backplane PCB test points (next to the LED’s) TP1=5vdc, TP2=12vdc, TP3=-12vdc TP4=24vdc. If correct: The Dispenser Power cable may be defective. 95 If incorrect: a) If an LED is not illuminated on the Backplane PCB, disconnect all components from the Backplane PCB, one at a time, until the defective component is identified. If all components are disconnected & the LED is not illuminated or the voltages are still incorrect, proceed to the next step. b) Check Power Supply output voltages at terminal J14 on the ATM Backplane PCB (pin order is right to left). If incorrect, Power Supply may be defective or require voltage adjustment. If correct, the Backplane PCB may be defective. TOO MANY NOTES REQUESTED 1) More than 40 notes were required to complete the requested transaction. 2) Check the cassette configuration in Configuration > Local Setup > Dispenser > Edit Cassette. 3) Check the cash template in Configuration > Local Setup > Cash. TOO MANY NOTES REJECTED 1) More than 40 notes have been rejected. Perform an Empty Rejects in Operation > Load Dispenser > Empty Rejects 2) Insure the bill thickness is set to the following in Configuration > Local Setup > Dispenser > Edit Cassette. TCDM Dispenser: Bill Thickness = 11 Minimum Note Length = 58 Maximum Note Length must be set to = 66 TOO MANY NOTES - Hawk Dispenser TOO MANY NOTES REQUESTED TOO MANY BILLS REQUESTED TOO MANY ITEMS 1) More than 40 notes were required to complete the requested transaction. 2) Check the cassette configuration in Configuration > Local Setup > Dispenser > Edit Cassette. TRANSACTION FILE DATE ERROR 1) Print a Transaction Report in Reports > Local Reports > Transaction. 2) Perform a cold start: n Saving the setup information to the compact flash card by performing a Write Setup Files prior to cold starting the unit will allow the setup to be reloaded from the flash card after the cold start is performed. Warning: If the problem with the unit exists in the setup, you will be restoring the problem when you load the setup to the unit from the flash card. a) Insure you have all programming information for the terminal or perform a Write Setup to the compact flash card in Configuration > Write Setup. b) Perform a New Sys Startup in Configuration > New Sys Startup. c) Reprogram the unit manually or perform a Restore Setup from the flash card if a Write Setup was performed in step 1. 96 3) Download latest version of software. 4) Possible defective Main PCB. UNKNOWN DISPENSER ERROR CODE - TCDM Dispenser: 1) Perform a power reset. 2) Perform a Clear All in Operations > Clear Errors UNKNOWN ERROR CODE - Fujitsu Dispenser: 1) The Dispenser has sent an error code that the ATM does not recognize. 2) Perform a Clear All in Operations > Clear Errors. 3) Insure Dispenser is not in R.A.S. mode. 4) Insure the correct Dispenser type is set in Engineering Diagnostics. WARNING - CASSETTE MISSING - TCDM Dispenser: 1) Remove and reinstall cassettes 2) Check the top rear lid of the cassette. Insure the “plugs” are in place. 3) Insure the “plugs” at the top/rear of the cassette lid have not been removed. 4) Check the cable connection at J14 on the Dispenser PCB. WARNING REJECT CASSETTE ALMOST FULL - TCDM Dispenser: 1) More than 40 notes have been rejected. Perform an Empty Rejects in Operation > Load Dispenser > Empty Rejects. 2) Perform a Clear All in Operations > Clear Errors. 97 98 3300/3600 Troubleshoooting Guide 99 DOES NOT READ ANY CARDS 1) Clean the Card Reader head with a Tidel approved Card Reader cleaner card. 2) If unit is in DEMO mode, encryption cannot be set to single. 3) Check connections at the Card Reader and on the Control Panel PCB. Note: Applying pressure to the wires on the cable while performing a Card Reader Test, may reveal a defective cable. 4) Check for the presence of an “Anti-Theft” type device near the ATM. Disable the theft device and check to see if the problem is remedied. If so, the theft device may be causing interference. 5) Check for the jumper on the Control Panel PCB terminal JP1, terminals 7 and 8. remove it if the unit is not equipped with a Smart Card Card Reader. If the Keypads work: 6) Test cards using Card Reader Test in Diagnostics > Card Reader Test. Card information should appear on tracks 1 and 2. Test results should indicate a passed test. Note: Applying pressure to the wires on the cable while performing a Card Reader Test, may reveal a defective cable. 7) Insure the head has tension against the card. 8) If a tamper condition (LED is not illuminated) on the Control Panel PCB exists, replace the Control Panel PCB. If the Card Reader light stays on: 9) Check the Card Reader throat for obstructions. If the Keypads are also inoperative or the Card Reader light does not illuminate when the card is inserted: 10) Check for stuck keypads. 11) Check the COMM cable connection at J1 on the Control Panel PCB and the Electronics box (below cooling fan). 12) Disconnect the cable from the Card Reader. Check for +5 vdc at all wires (except black). If +5vdc is present at all wires (except black), the Card Reader may be defective. 13) Check voltages at the Backplane PCB test points (Next to the LED’s) TP1 TP2 TP3 TP4 = = = = +5vdc +12vdc -12vdc +24vdc. If correct, the Control Panel PCB may be defective. Continued on next page Card Reader 100 DOES NOT READ ANY CARDS (Continued) If incorrect: a) If an LED is not illuminated on the Backplane PCB, disconnect all components from the Backplane PCB, one at a time, until the defective component is identified. If all components are disconnected and the LED is not illuminated or the voltages are still incorrect, proceed to the next step. b) Check Power Supply output voltages at terminal J14 on the ATM Backplane PCB (pin order is right to left). (Units equipped with TCDM Dispenser) Pin Pin Pin Pin Pin 1= 2= 6= 7= 8= +5vdc +5vdc +12vdc -12vdc +24vdc If incorrect, Power Supply may be defective or require voltage adjustment. If Power Supply output voltages are correct, The Backplane PCB may be defective. DOES NOT READ SOME CARDS 1) Clean the Card Reader head with a Tidel approved Card Reader cleaner card. 2) Check connections at the Card Reader and on the Control Panel PCB. Note: Applying pressure to the wires on the cable while performing a Card Reader Test, may reveal a defective cable. 3) Check for the presence of an “Anti-Theft” type device near the ATM. Disable the theft device and check to see if the problem is remedied. If so, the theft device may be causing interference. If the Keypads work: 4) Test cards using the Card Reader Test in Diagnostics > Card Reader Test. Card information should appear on tracks 1 and 2. Test results should indicate a passed test. Note: Applying pressure to the wires on the cable while performing a Card Reader Test, may reveal a defective cable. 5) Insure the “spring” has tension on the Card Reader head. 6) Possible bad cards being used. DOES NOT READ TIDEL CARDS 1) Cards may be defective. 2) Cards may not be programmed into the unit. JUMPER SETTINGS 1) At JP4 on the Card Reader, the (2) pins at the following locations should be jumpered: 2 - (both pins) 5 - (both pins) 7 - (both pins) Card Reader 101 READS TIDEL CARDS ONLY, WILL NOT READ CUSTOMER CARDS 1) Check System Status Menu for “WAITING REVERSAL COMPLETION”, even if the unit is ONLINE. If the error message is present, unit is waiting for reversal from Host. If host cannot generate reversal, a New Sys Startup must be performed to correct problem. 2) Test cards using Card Reader Test in Diagnostics > Card Reader Test. Card information should appear on tracks 1 and 2. Test results should indicate a passed test. Note: Applying pressure to the wires on the cable while performing a Card Reader Test, may reveal a defective cable. Card Reader 102 BUSY WITH OTHER CALL DISPLAYED WHEN TRANSACTION IS ATTEMPTED 1) AIMS outgoing call is being processed. Turn AIMS outgoing calls off in Configuration > Local Setup > More > Aims, then perform a power reset, then turn AIMS outgoing calls back on to cancel. 2) Check phone line for other equipment, (fax machine, credit card terminals, etc…) 3) Remove and reseat the Modem onto the Main PCB. 4) Possible defective modem. INVALID/BAD PIN # ON RECEIPT 1) Perform 2 balances/trial close, back to back. 2) Verify the correct master key check sums in Diagnostics > Master Keys. If incorrect, reload the master keys. 3) Verify Master Key Index is correct. Configuration > Local Setup > Host > Financial Host 4) Check the LED on the Control Panel PCB. If blinking, the keypad and PCB are intact. If the LED is not illuminated, replace the Control Panel PCB 5) Verify correct Encryption Level (single/triple) in Configuration > Master Key Entry 6) If the Pinpad Version is blank in the Extended Staus Menu, the Control Panel PCB may be defective. 7) If this message or one similar to it appears on the receipts and seems to come and go, the same terminal ID may be programmed in a unit at another location. KEY ERROR IS PRINTED ON RECEIPT WHEN TRANSACTION IS PERFORMED 1) Verify Master Key Index is correct. Configuration > Local Setup > Host > Financial Host 2) Verify the correct master key check sums in Diagnostics > Master Keys. 3) Check the LED on the Control Panel PCB. If blinking, the keypad and PCB are intact. If the LED is not illuminated, replace the Control Panel PCB 4) Verify correct Host Type is selected in Configuration > Local Setup > Host > Financial Host > More 4X 5) Verify Host Routing Code and Routing Code Length is correct in Configuration > Local Setup > Host > Financial Host. 7) Verify correct Encryption Level (single/triple) in Configuration > Master Key Entry REVERSAL BEING SENT TO HOST CONTINUOUSLY 1) Unit is not receiving or accepting acknowledgment of reversal from Host. 2) If Host is unable to send acknowledgment, perform a Configuration > New Sys Startup and re-program the unit to correct this problem. REVERSAL GENERATED, UNIT SENDS ORIGINAL X-ACTION REQUEST TO HOST REPEATEDLY Communication 103 1) Verify Host routing code in Configuration > Local Setup > Host > Financial Host > More 2) Verify the correct Host Type setting in Configuration > Local Setup > Host > Financial Host > More SURCHARGE AMOUNT IS INCORRECT 1) Check with Host to verify correct surcharge amount. 2) Verify the Surcharge amount in Configuration > Local Setup > Surcharge 3) Check the Configurable Surcharge Display Lines in Configuration > Local Setup > Surcharge > Edit Lines 4) Check the receipt headers and trailers for incorrect text messages in Configuration > Local Setup > Merchant > More SURCHARGE DOES/DOES NOT APPEAR ON DISPLAY/RECEIPT 1) Check with Host to verify correct surcharge amount. 2) Verify the Surcharge amount in Configuration > Local Setup > Surcharge 3) Check the Configurable Surcharge Display Lines in Configuration > Local Setup > Surcharge > Edit Lines 2) Check the Surcharge Info Printed On Receipt setting in Configuration > Local Setup > System > More 3) Check the Bank ID entry information in Configuration > Local Setup > More > Bank ID 4) Check the Send Surcharge Result setting in Configuration > Local Setup > Host > Financial Host Y = Host will not surcharge cards that contain a number programmed in the Bank Maint ID Menu. N = Host will not receive Bank ID number information and will surcharge all cards. SURCHARGES NON-SURCHARGE CUSTOMERS OR DOES NOT SURCHARGE SURCHARGABLE CUSTOMERS 1) Insure the numbers entered in the Bank Maint ID menu are correct. 2) Check the Send Surcharge Result setting in Configuration > Local Setup > Host > Financial Host Y = Host will not surcharge cards that contain a number programmed in the Bank Maint ID Menu. N = Host will not receive Bank ID number information and will surcharge all cards. TEMP UNABLE TO PROCESS TRANSACTION (NO RECEIPT GENERATED) Communication 104 1) Print a Last TX report and refer to LAST TX REPORT information in the Service Manual. 2) Note: Performing the following steps will reset programming parameters to default settings and may speed up the troubleshooting process. a) Verify Host required parameter with the Host (Terminal ID, Primary and Secondary Phone #’s, etc...) b) Perform a New Sys Startup in Configuration > New Sys Startup c) After entering the Programmer Code, Date and Time, select Manual Setup (DO NOT SAVE AND RESTORE THE SETUP FROM A COMPACT FLASH CARD). d) Enter the Host required parameters. e) Attempt a transaction. 3) Verify the following in Configuration > Local Setup > Host > Financial Host Terminal ID Primary or secondary phone numbers. Try dialing the numbers on the ATM phone line to verify connection with Host Host Type Master Key Index Host routing number Routing code length Host has 30 seconds to naswer (ENQ) after a dialout Host has 90 seconds to respond to a requested transaction Host communications occur at 1200 baud Host does/not require End Of Transmission signal Group 4 status monitoring fields are/not included in host messages Group 12 extended status monitoring fields are/not included in host messages 4) Plug a telephone into the phone port on the Main PCB and dial the Primary Phone number exactly as it is programmed. Check for dial tone, restrictions, PBX lines or operator messages. 5) Check for loose connections of the phone cables at the wall socket, surge suppressor and Backplane PCB 6) Check with the Host. Terminal may not be activated. 7) Possible defective Modem or Main PCB (re-seat Modem in socket and attempt again prior to part replacement). 8) Possible defective Backplane PCB. Communication 105 TEMP UNABLE TO PROCESS TRANSACTION (RECEIPT GENERATED) 1) Refer to the receipt for denial reasons (insufficient funds, invalid PIN, etc...) TRANSACTION TAKES A LONG TIME 1) Primary phone number problem. a) Verify the Primary Phone number in Configuration > Local Setup > Host > Financial Host > More b) Plug a phone into the phone line that the ATM is using and dial the primary number exactly as it is programmed. Check for connection with the Host. 2) Print a Last TX report for further troubleshooting info. 3) Check for loose connections of the phone cables at the wall socket, surge suppressor and Backplane PCB. TRANSMIT COM TO CPU ERROR IS PRINTED ON RECEIPT 1) Perform a power reset. 2) Perform a cutover/trial close. 3) Verify the correct master key check sums in Diagnostics > Master Keys. 4) Re-enter the Master Keys. 5) Verify correct Encryption Level (single/triple). Configuration > Master Key Entry 6) Check the LED on the Control Panel PCB. If blinking, the keypad and PCB are intact. If the LED is not illuminated, replace the Control Panel PCB TRANSMITTING ANYCARD STATUS IS DISPLAYED WHEN A CARD IS SWIPED 1) Host is a Host Type 2 processor. This is normal. 2) Verify Group 4 status monitoring fields are/not included in host messages. Configuration > Local Setup > Host > Financial Host > More 3) Verify Group 12 extended status monitoring fields are/not included in host messages. Configuration > Local Setup > Host > Financial Host > More Communication 106 BILLS JAM IN CASSETTE (TCDM Dispenser) 1) Check the operation of the Packer Plate. 2) Check side rail adjustment inside cassette. 3) Check for loss of cork on Packer Plate. 4) Check for obstructions in the cassette. 5) Remove cassette, reload and reinstall the cassette in the Dispenser. 6) Remove the pick roller assembly from the cassette. Clean the rollers, check for obstructions and damage to rollers and gears. 7) Check for damage to the pick roller drive gear, inside the dispenser cassette cavity. 8) Check the condition of the belts on the feed path. CASSETTE CANNOT BE INSERTED INTO THE DISPENSER 1) Check for obstructions/bent mechanisms inside the cassette in the release mechanism (TCDM Dispenser). 2) Check for obstructions inside the dispenser cassette cavity DEMO MODE 1) Set the ATM Term ID to DEMOMODE in Configuration > Local Setup > Host > Financial Host and Check Cashing Host. 2) Disconnect AC power from the unit. 3) On the TCDM Dispenser PCB, place dipswitch #2 in the ON position. 4) Re-apply AC Power. DIPSWITCH SETTINGS TCDM Dispenser DIPSWITCHES 1 and 2 = Operating mode or Demo mode Operating mode Demo Mode Diagnostic Mode 1=OFF 2=OFF 1 = OFF 2 = ON 1=ON 2=ON DIPSWITCHES 3 and 4 = Number of feed cassettes. Single Cassette 3 = ON 4 = ON 2 Cassette 3 Cassette 4 Cassette 3 = OFF 4 = ON 3 = ON 4 = OFF 3 = OFF 4 = OFF MCDM-III Operating mode: Demo Mode: 1 = ON 1 = OFF HAWK Dispenser Operating mode: FIB JP1 - Pins 1 & 2 NOT jumpered Dispenser PCB DIPSWITCHED Demo Mode: FIB JP1 - Pins 1 & 2 ARE jumpered U18 All off U26 1,2 & 3 = ON 4,5,6,7 & 8 = OFF Dispensers 107 FEED CASSETTE WONT CLOSE (TCDM Dispenser) 1) Cassette lid rails (height) adjusted incorrectly. 2) Check the operation of the packer plate release mechanism. 3) Cassette over-packed. FEED CASSETTE STUCK IN DISPENSER (TCDM Dispenser) 1) Press down on cassette latches on right and left side of cassette to remove. FEED CASSETTE WONT LOCK INTO DISPENSER (TCDM Dispenser) 1) Check for bent lock pins on the inside of the cassette cavity on the Dispenser. 2) Inspect the Cassette for damage. HIGH NUMBER OF REJECTED BILLS 1) Check condition of notes being rejected. 2) Insure the bill thickness is set to the following in Configuration > Local Setup > Dispenser > Edit Cassette. TCDM Dispenser: Bill Thickness = 11 Minimum Note Length = 58 Maximum Note Length must be set to = 66 3) Check for belts off or broken belts. 4) Check the System Status Menu for additional troubleshooting information. 5) Clean the Double Detect Roller. 6) Check the operation of the Diverter and check the Diverter solenoid for ease of movement. 7) Check the pinch roller springs at the rear of the dispenser (multi-cassette). 8) Press in on each connector on the Dispenser PCB. Insure cables are connected securely. 9) Check the Double Detect actuator for damage. Dispensers 108 INITIALIZING SETUP DISPENSER PORT IS DISPLAYED (TCDM Dispenser) FOR A LONG TIME ON POWER UP 1) Perform a power reset. 2) Perform a Clear All in Operations > Clear Errors. 3) Check the Dispenser LED’s on power up. If only 2 decimal points appear, or the “0.0.” is very slow to appear, the Double Detect sensor is not seen by the Dispenser PCB. Re-seat the connection at terminal J10 on the Dispenser PCB. 4) Check the communication cable connection at the Backplane PCB and the Dispenser PCB. 5) Check the System Status Menu for additional troubleshooting information. 6) Perform a New Sys Statrtup in Configuration > New Sys Startup 7) Check voltages both sides of the 2 fuses on the Dispenser PCB. Btm Top = +5vdc (1.5 amp) = +24vdc (4 amp). a) If voltage is present on the right side of the fuse only, the fuse may be blown. b) If voltage is not present on the right side of the fuse, check voltages at the Dispenser power cable. Red = +5vdc Org = +5vdc Wht = +24vdc. If voltages are correct at the Dispenser power cable, the Dispenser may be defective. If voltages are incorrect at the Dispenser power cable: 9) Check the power cable connection at terminal J24 on the Backplane PCB. 10) Check voltages at the Backplane PCB test points (next to the LED’s) TP1 TP2 TP3 TP4 = = = = +5vdc +12vdc -12vdc +24vdc. If correct, the Dispenser power cable may be defective. If incorrect: a) If an LED is not illuminated on the Backplane PCB, disconnect all components from the Backplane PCB, one at a time, until the defective component is identified. If all components are disconnected and the LED is not illuminated or the voltages are still incorrect, proceed to the next step. b) Check Power Supply output voltages at terminal J14 on the ATM Backplane PCB (pin order is right to left). Pin Pin Pin Pin Pin 1 2 6 7 8 = +5vdc = +5vdc = +12vdc = -12vdc = +24vdc. If incorrect, Power Supply may be defective or require voltage adjustment. If correct, the Backplane PCB may be defective. 109 Dispensers MAIN MOTOR WILL NOT RUN (TCDM Dispenser) 1) Check connection at terminal J8 on the Dispenser Main PCB. 2) Check the System Status Menu for existing error messages. 3) Insure the reject cassette in installed. 4) Check the dispenser LED’s on power up. If only 2 decimal points appear, or the “0.0.” is very slow to appear, the Double Detect sensor may be inoperative. Re-seat the connection at J10 on the Dispenser PCB. 5) Check the System Status Menu for existing error messages. 6) Perform Clear All in Operations > Clear Errors. 7) Check voltages both sides of the 2 fuses on the Dispenser PCB. Btm = +5vdc (1.5 amp) Top = +24vdc (4 amp). a) If voltage is present on the right side of the fuse only, the fuse may be blown. b) If voltage is not present on the right side of the fuse, check voltages at the Dispenser power cable. Red = +5vdc Wht = +24vdc If voltages are incorrect at the Dispenser power cable: 9) Check the power cable connection at terminal J24 on the Backplane PCB. 10) Check voltages at the Backplane PCB test points (next to the LED’s) TP1 TP2 TP3 TP4 = = = = +5vdc +12vdc -12vdc +24vdc. If correct, the Dispenser Power cable may be defective. If incorrect: a) If an LED is not illuminated on the Backplane PCB, disconnect all components from the Backplane PCB, one at a time, until the defective component is identified. If all components are disconnected and the LED is not illuminated or the voltages are still incorrect, proceed to the next step. b) Check Power Supply output voltages at terminal J14 on the ATM Backplane PCB (pin order is right to left). Pin 1 = +5vdc Pin 2 = +5vdc Pin 6 = +12vdc Pin 7 = -12vdc Pin 8 = +24vdc. If incorrect, Power Supply may be defective or require voltage adjustment. If correct, the Backplane PCB may be defective. Dispensers 110 SENSOR CHECK - TCDM Dispenser (Procedure) To enter diagnostic mode: 1) Set the Dispenser dipswitches # 1 and 2 to the ON position. 2) Press the reset button on the Dispenser. 3) Press the “UP” button on the Dispenser PCB - 5 times - The LED’s will show “0.5.” 4) Press the START button on the Dispenser PCB. The Dispenser should cycle. 5) After the Dispenser motor runs 2 times, press and hold the STOP button until the LED’s display “0.5.” 6) Turn the Dispenser dipswitch #1 off. 7) Press the “DOWN” button on the Dispenser PCB - 5 times - The LED’s will show “0.0.” To enter the Sensor Test mode: 8) Press and hold the “UP” button until the LED’s display “2.0.” 9) Press the “START” button on the Dispenser PCB to run the test. Refer to test results below. 10) Press the “STOP” Button to exit the test, Display will show “2.0.” Test Results: The Dispenser LED’s will display one of the following: a) FF = All sensors are working and within calibration specifications b) The LED’s will display the Sensor # reporting the problem (see the Dispenser Sensor Number chart in the illustration section of this manual). SENSOR RESISTANCE CHECK - TCDM Dispenser (Procedure) Must perform Sensor Test first. To enter the Sensor Resistance test mode from the Sensor Test Mode: 1) The LED’s should display “2.0.” 2) Press the “UP” button 2 times. The Dispenser LED’s will display “2.2.” 3) Press the “START” button. The Dispenser LED’s will display sensor 0 and the value of sensor 0. a) Left LED = Sensor # (See Sensor # Chart in the illustration section of this manual). b) Right LED = Sensor resistance value. 0 - 4 = Good 5 - 7 = Dirty or defective F = Not seen 4) Press the up and down buttons to select the desired sensor. 5) Press “STOP” to exit the test. The LED will display “2.2.” 6) Perform a power reset. Dispensers 111 BLUE DISPLAY, NO MESSAGES OR GRAPHICS 1) Check the Display cable connection at the Display and the Control Panel PCB. Insure the ribbon cable is properly secured in the seats. Note: Applying pressure to the cable while observing the Display may reveal problems with the Display cable/connection. 2) Re-seat the Main PCB. 3) Check the COMM cable connection at J1 on the Control Panel PCB and the Electronics box (below the cooling fan). 4) Check voltages at the Backplane PCB test points (next to the LED’s) TP1 TP2 TP3 TP4 = = = = +5vdc +12vdc -12vdc +24vdc. If correct: a) The Main PCB may be defective. b) The Control Panel PCB may be defective. If incorrect: a) If an LED is not illuminated on the Backplane PCB, disconnect all components from the Backplane PCB, one at a time, until the defective component is identified. If all components are disconnected and the LED is not illuminated or the voltages are still incorrect, proceed to the next step. 5) Check Power Supply output voltages at terminal J14 on the ATM Backplane PCB (pin order is right to left). (Units equipped with TCDM Dispenser) Pin Pin Pin Pin Pin 1 2 6 7 8 = = = = = +5vdc +5vdc +12vdc -12vdc +24vdc. If incorrect, Power Supply may be defective or require voltage adjustment. If Power Supply output voltages are correct, the Backplane PCB may be defective. 6) Possible defective Display. Display 112 BROKEN OR BLUE LINE AT BOTTOM OF DISPLAY 1) Check the Display cable connection at the Display and the Control Panel PCB. Insure the ribbon cable is properly secured in the seats. Note: Applying pressure to the cable while observing the Display may reveal problems with the Display cable/connection. DIM DISPLAY 1) Check the fluorescent bulb, if dimly lit or not illuminated: a) Check voltage where the bulb connects to the Ballast PCB. Voltage should be 10001600 VAC. If correct, bulb may be defective. If incorrect: a) Check for +12vdc (color) at the Ballast PCB terminal CN1. If correct, the Ballast PCB may be defective. If incorrect: 3) Check the connection at terminal J3 on the Control Panel PCB. 4) Check the COMM cable connection at J1 on the Control Panel PCB and the Electronics box (below cooling fan). 5) Check voltages at the Backplane PCB test points (Next to the 4 LED’s) TP1 TP2 TP3 TP4 = = = = +5vdc +12vdc -12vdc +24vdc. If correct: a) The Main PCB may be defective. b) The Control Panel PCB may be defective. If voltages are incorrect at the test points: a) If an LED is not illuminated on the Backplane PCB, disconnect all components from the Backplane PCB, one at a time, until the defective component is identified. If all components are disconnected and the LED is not illuminated or the voltages are still incorrect, proceed to the next step. 6) Check Power Supply output voltages at terminal J14 on the ATM Backplane PCB (pin order is right to left). TCDM Dispenser: Pin Pin Pin Pin Pin 1 2 6 7 8 = = = = = +5vdc +5vdc +12vdc -12vdc +24vdc. If incorrect, Power Supply may be defective or require voltage adjustment. If Power Supply output voltages are correct, the Backplane PCB may be defective. 7) Possible defective Display. Display 113 DISPLAY CPU VER/REL X.XX Note: This usually is caused by no communication between the Main PCB and the Control Panel PCB. 1) Check the COMM cable connection at J1 on the Control Panel PCB and the Electronics box (below cooling fan). 2) Re-seat the Main PCB. 3) Check voltages at the Backplane PCB test points (Next to the 4 LED’s) TP1 TP2 TP3 TP4 = = = = +5vdc +12vdc -12vdc +24vdc. If correct the Control Panel PCB may be defective. If voltages are incorrect at the test points: a) If an LED is not illuminated on the Backplane PCB, disconnect all components from the Backplane PCB, one at a time, until the defective component is identified. If all components are disconnected and the LED is not illuminated or the voltages are still incorrect, proceed to the next step. 4) Check Power Supply output voltages at terminal J14 on the ATM Backplane PCB (pin order is right to left). TCDM Dispenser: Pin Pin Pin Pin Pin 1 2 6 7 8 = = = = = +5vdc +5vdc +12vdc -12vdc +24vdc. a) If incorrect, Power Supply may be defective or require +5vdc voltage adjustment. b) If Power Supply output voltages are correct, the Backplane PCB may be defective. 6) May require re-load of application software Display 114 GRAPHICS SCRAMBLED 1) Check the Display cable connection at the Display and the Control Panel PCB. Insure the ribbon cable is properly secured in the seats. Note: Applying pressure to the cable while observing the Display may reveal problems with the Display cable/connection. 2) Perform a power reset on the unit. 3) Incorrect file type or size. a) File sizes 10.4" screen = 640 pixels (8.70") wide X 480 pixels (7.00") high. b) Files types may be Bitmap, JPEG or GIF. 4) Reload graphics. DISPLAYED MESSAGES/GRAPHICS ARE UPSIDE DOWN 1) Possible defective Display. GRAPHICS WONT LOAD 1) Check the autoload.tid file. 2) Incorrect file type or size. a) File sizes 10.4" screen = 640 pixels (8.70") wide X 480 pixels (7.00") high. b) Files types may be Bitmap, JPEG or GIF. 3) Reload graphics. If graphics appear to load properly, but don’t display: 4) Open the graphic file (on a PC), using a graphics editor, then save as a non interlaced file. HORIZONTAL LINES SCROLLING ON DISPLAY 1) Check the Display cable connection at the Display and the Control Panel PCB. Insure the ribbon cable is properly secured in the seats. Note: Applying pressure to the cable while observing the Display may reveal problems with the Display cable/connection. Display 115 NO DISPLAY (COLOR) If Display bulb is not lit: 1) Check voltage where bulb connects to Ballast PCB. Voltage should be 1000-1600 VAC. If correct, bulb may be defective. If incorrect, proceed to next step. 2) Check for +12vdc (color display) at the Ballast PCB terminal CN1. If correct, the Ballast PCB may be defective. If incorrect proceed to the next step. 3) Check the connection at terminal J3 on the Control Panel PCB. 4) Check the COMM cable connection at J1 on the Control Panel PCB and the Electronics box (below the cooling fan). 5) Check voltages at the Backplane PCB test points (Next to the 4 LED’s) TP1 TP2 TP3 TP4 = = = = +5vdc +12vdc -12vdc +24vdc. If correct the Control Panel PCB may be defective. If voltage at the test points are incorrect: a) If an LED is not illuminated on the Backplane PCB, disconnect all components from the Backplane PCB, one at a time, until the defective component is identified. If all components are disconnected and the LED is not illuminated or the voltages are still incorrect, proceed to the next step. 6) Check Power Supply output voltages at terminal J14 on the ATM Backplane PCB (pin order is right to left). TCDM Dispenser: Pin Pin Pin Pin Pin 1 2 6 7 8 = = = = = +5vdc +5vdc +12vdc -12vdc +24vdc. If incorrect, Power Supply may be defective or require voltage adjustment. If Power Supply output voltages are correct, the Backplane PCB may be defective. Continued on next page Display 116 NO DISPLAY - COLOR (Continued) If the Display bulb is lit: 1) If possible, perform Adjust Video Settings. 2) Check the POWER/COMM cable connection at J1 on the Control Panel PCB and the Electronics box (below cooling fan). 3) Re-seat the Main PCB. 4) Check the Display cable connection at the Display and the Control Panel PCB. Insure the ribbon cable is properly secured in the seats. Note: Applying pressure to the cable while observing the Display may reveal problems with the Display cable/connection. 5) Check for a jumper on pins 15 and 16 of terminal JP3 on the Main PCB. Remove it from both pins. 6) Check voltages at the Backplane PCB test points (Next to the 4 LED’s) TP1 TP2 TP3 TP4 = = = = +5vdc +12vdc -12vdc +24vdc. If correct, the Main PCB or Control Panel PCB may be defective. If voltage at the test points are incorrect: a) If an LED is not illuminated on the Backplane PCB, disconnect all components from the Backplane PCB, one at a time, until the defective component is identified. If all components are disconnected and the LED is not illuminated or the voltages are still incorrect, proceed to the next step. 7) Check Power Supply output voltages at terminal J14 on the ATM Backplane PCB (pin order is right to left). TCDM Dispenser: Pin Pin Pin Pin Pin 1 2 6 7 8 = = = = = +5vdc +5vdc +12vdc -12vdc +24vdc. If incorrect, Power Supply may be defective or require voltage adjustment. If Power Supply output voltages are correct, the Backplane PCB may be defective. Display 117 PARTIAL DISPLAY (COLOR) 1) Verify problem exists in graphic screens and menu screens. If problem exists in graphics screens only, check and reload graphics files. 2) Check the POWER/COMM cable connection at J1 on the Control Panel PCB and the Electronics box (below the cooling fan). 3) Re-seat the Main PCB. 4) Check the Display cable connection at the Display and the Control Panel PCB. Insure the ribbon cable is properly secured in the seats. Note: Applying pressure to the cable while observing the Display may reveal problems with the Display cable/connection. 5) Possible defective Display. 6) Possible defective Main PCB. Display 118 LINES ON DISPLAY 1) Verify problem exists in graphic screens and menu screens. If problem exists in graphics screens only, check and reload graphics files. 2) Check the COMM cable connection at J1 on the Control Panel PCB and the Electronics box (below cooling fan). 3) Re-seat the Main PCB. 4) Check the Display cable connection at the Display and the Control Panel PCB. Insure the ribbon cable is properly secured in the seats. Note: Applying pressure to the cable while observing the Display may reveal problems with the Display cable/connection. 5) Possible defective Display. 6) Possible defective Main PCB. WHITE DISPLAY 1) Check the Display cable connection at the Display and the Control Panel PCB. Insure the ribbon cable is properly secured in the seats. Note: Applying pressure to the cable while observing the Display may reveal problems with the Display cable/connection. 3) Re-seat the Main PCB. 4) Check the COMM cable connection at J1 on the Control Panel PCB and the Electronics box (below cooling fan). 5) Perform a Cold Start. 6) Check voltages at the Backplane PCB test points (Next to the 4 LED’s) TP1 TP2 TP3 TP4 = = = = +5vdc +12vdc -12vdc +24vdc. If correct the Control Panel PCB may be defective. If voltage at the test points are incorrect: a) If an LED is not illuminated on the Backplane PCB, disconnect all components from the Backplane PCB, one at a time, until the defective component is identified. If all components are disconnected and the LED is not illuminated or the voltages are still incorrect, proceed to the next step. 7) Check the Power Supply output voltages at terminal J14 on the ATM Backplane PCB (pin order is right to left). TCDM Dispenser Pin Pin Pin Pin Pin 1 2 6 7 8 = = = = = +5vdc +5vdc +12vdc -12vdc +24vdc. If incorrect, Power Supply may be defective or require voltage adjustment. If Power Supply output voltages are correct, the Backplane PCB may be defective. Display 119 CODE ENTRY INACCESSIBLE THROUGH KEYPAD (WONT ACCEPT CODES) 1) Possible incorrect code or card. If possible, log on and verify codes in the Manager menu. Configuration > Local Setup > More > Manager 2) Possible stuck keypad. If the Card Reader is also inoperable: 3) Check the connection at the Card Reader and on the Control Panel PCB. Note: Applying pressure to the wires on the cable while performing a Card Reader Test, may reveal a defective cable. 4) Check Card Reader throat for obstructions. 5) Check the POWER/COMM cable connection at J1 on the Control Panel PCB and the Electronics box (below cooling fan). 6) Disconnect the cable from the Card Reader. Check for 5 vdc at all wires (except black). If +5vdc is present at all wires (except black), the Card Reader may be defective. 7) Check voltages at the Backplane PCB test points (Next to the 4 LED’s) TP1 TP2 TP3 TP4 = = = = +5vdc +12vdc -12vdc +24vdc. If correct the Control Panel PCB may be defective. If voltage at the test points are incorrect: a) If an LED is not illuminated on the Backplane PCB, disconnect all components from the Backplane PCB, one at a time, until the defective component is identified. If all components are disconnected and the LED is not illuminated or the voltages are still incorrect, proceed to the next step. 8) Check Power Supply output voltages at terminal J14 on the ATM Backplane PCB (pin order is right to left). TCDM Dispenser Pin Pin Pin Pin Pin 1 2 6 7 8 = = = = = +5vdc +5vdc +12vdc -12vdc +24vdc a) If incorrect, Power Supply may be defective or require voltage adjustment. b) If Power Supply output voltages are correct, the Backplane PCB may be defective. If the Card Reader is working 9) Check the Touchpad connection at J5 on the Control Panel PCB. Inspect the cable for tears or breaks. 10) Possible defective Touchpad (function keyapds) or Control Panel PCB (alpha/numeric keypads). Keypads 120 KEYPADS INOPERATIVE MISCELLANEOUS KEYPADS INOPERATIVE KEYPADS QUIT FUNCTIONING DURING TRANSACTION 1) Possible incorrect code or card. If possible, log on as programmer and verify codes in Manager Code Maint menu. 2) Possible stuck keypad. 3) Manager keypad entry toggled off (applies to manager codes only). If the Card reader is also inoperable: 4) Check connection at the Card Reader and on the Control Panel PCB, Note: Applying pressure to the wires on the cable while performing a Card Reader Test, may reveal a defective cable. 5) Check the Card Reader throat for obstructions. 6) Check the COMM cable connection at J1 on the Control Panel PCB and the Electronics box (below cooling fan). 7) Disconnect the cable from the Card Reader. Check for 5 vdc at all wires (except black). If +5vdc is present at all wires (except black), the Card Reader may be defective. If voltages are not correct at the Card Reader cable: 8) Check voltages at the Backplane PCB test points (Next to the 4 LED’s) TP1 TP2 TP3 TP4 = = = = +5vdc +12vdc -12vdc +24vdc. If correct the Control Panel PCB may be defective. If voltage at the test points are incorrect: a) If an LED is not illuminated on the Backplane PCB, disconnect all components from the Backplane PCB, one at a time, until the defective component is identified. If all components are disconnected and the LED is not illuminated or the voltages are still incorrect, proceed to the next step. 9) Check Power Supply output voltages at terminal J14 on the ATM Backplane PCB (pin order is right to left). (Units equipped with TCDM Dispenser) Pin Pin Pin Pin Pin 1 2 6 7 8 = = = = = +5vdc +5vdc +12vdc -12vdc +24vdc If incorrect, Power Supply may be defective or require voltage adjustment. If Power Supply output voltages are correct, the Backplane PCB may be defective. If the Card Reader is working 10) Check the Touchpad connection at J5 on the Control Panel PCB. Inspect the cable for tears or breaks. 11) Possible defective Touchpad (function keypads) or Control Panel PCB (alpha/numeric keypads). Keypads 121 BILL COUNT/REPORT INFO IS INCORRECT 1) Customer may be using Add Count in the Load Dispenser Count menu. Add Count - Will add the amouint entered to the existing amount. New Count - Removes the current count and replaces it with the amount entered. COLD START Performing a Cold Start will erase all programming and return all parameters to factory defaults. 1) Disconnect AC power from the unit 2) Press and hold the Manager Switch down while re-applying AC power. 3) Continue to hold the Manager Switch down until the Display shows: Manager switch down -- If you wish to cold start the machine, press & release the manager switch. 4) Press and release the Manager Switch. COMM KEY TO CPU ERROR 1) Perform a power reset. 2) Check the COMM cable connection at J1 on the Control Panel PCB and the Electronics box (below cooling fan). 3) May require New Sys Startup (performing a Write Setup prior to performing the New Sys Startup is recommended). DATE AND TIME CANNOT BE ENTERED 1) Refer to the Keypad section of this manual to insure the Keypads are working properly. 2) Remove and re-seat the Main PCB. DISPLAY LOCKS UP ON “TRANSACTION COMPLETE, TAKE RECEIPT AND CASH” 1) Application software upgrade is recommended. DEMO MODE (OFF) 1) Enter a valid Terminal ID in Configuration > Local Setup > Host > Financial Host. 2) Exit the programming menu (select YES when prompted to save changes)) 3) Place the Dispenser dipswitch #2 in the OFF position. 4) Perform a power reset. DEMO MODE (ON) 1) Enter DEMOMODE for a Terminal ID in Configuration > Local Setup > Host DEMOMODE must be entered as the Terminal ID in both the Financial Host and Check Cashing Host menus 2) Exit the programming menu (select YES when prompted to save changes)) 3) Place the Dispenser dipswitch #2 in the ON position. 4) Perform a power reset. Miscellaneous 122 MGR/PRGM SWITCH DOES NOT RESPOND 1) Check the COMM cable connection at J1 on the Control Panel PCB and the Electronics box (below cooling fan). 2) Check for stuck Keypads. 3) Reseat the Main PCB. 4) Check voltages at the Backplane PCB test points (Next to the 4 LED’s) TP1 TP2 TP3 TP4 = = = = +5vdc +12vdc -12vdc +24vdc. If voltage at the test points are incorrect: a) If an LED is not illuminated on the Backplane PCB, disconnect all components from the Backplane PCB, one at a time, until the defective component is identified. If all components are disconnected and the LED is not illuminated or the voltages are still incorrect, proceed to the next step. 5) Check Power Supply output voltages at terminal J14 on the ATM Backplane PCB (pin order is right to left). TCDM Dispenser Pin Pin Pin Pin Pin 1 2 6 7 8 = = = = = +5vdc +5vdc +12vdc -12vdc +24vdc a) If incorrect, Power Supply may be defective or require voltage adjustment. b) If Power Supply output voltages are correct, the Backplane PCB may be defective. If voltage at the test points are correct: 6) Check Card Reader throat for obstructions. 7) Disconnect the cable from the Card Reader. Check for 5 vdc at all wires (except black). If +5vdc is present at all wires (except black), the Card Reader may be defective. PROGRAMMING LOST EACH TIME AC POWER IS LOST 1) Possible defective battery, requires replacement of the Main PCB. 2) Possible jumper on pins of 13 and 14 of terminal JP1 on the Main PCB. Miscellaneous 123 FUSE INDICATORS (LED’S) ARE NOT ILLUMINATED FUSE INDICATORS ARE BLINKING 1) Check voltages at the Backplane PCB test points (Next to the 4 LED’s) TP1 TP2 TP3 TP4 = = = = +5vdc +12vdc -12vdc +24vdc. If voltage at the test points are incorrect: a) If an LED is not illuminated on the Backplane PCB, disconnect all components from the Backplane PCB, one at a time, until the defective component is identified. If all components are disconnected and the LED is not illuminated or the voltages are still incorrect, proceed to the next step. 2) Check Power Supply output voltages at terminal J14 on the ATM Backplane PCB (pin order is right to left). TCDM Dispenser Pin Pin Pin Pin Pin 1 2 6 7 8 = = = = = +5vdc +5vdc +12vdc -12vdc +24vdc a) If incorrect, Power Supply may be defective or require voltage adjustment. b) If Power Supply output voltages are correct, the Backplane PCB may be defective. POWER RESETS EACH TIME THE DISPENSER ACTIVATES OR A PURGE DISPENSER IS PERFORMED 1) Check voltages at the Backplane PCB test points (Next to the 4 LED’s) TP1 TP2 TP3 TP4 = = = = +5vdc +12vdc -12vdc +24vdc. If voltage at the test points are incorrect, adjust the +5vdc to +5.10vdc. 2) Possible defective Power Supply. 3) Possible defective Dispenser Power Supply 124 AUTO-FEED FEATURE NOT WORKING 1) Insure paper is being loaded from the rear of the Printer. 2) Insure the cutter mechaism is closed fully onto the Printer. 3) Check for obstructions/jams in the Printer and cutter. 4) Perform a printer reset (apply power while holding paper feed switch down). Note: Thermal Printers require a power reset to stop the test print. BLANK COLUMN DOWN ENTIRE REPORT 1) Perform printer reset (apply power while holding down paper feed switch). If the problem appears on test print-out, The Printer may be defective. NOTE: Thermal printers require power reset to stop test print. 2) In some cases the Printer PCB can cause this problem. If the problem re-occurs after the Printer has been replaced, the Printer PCB and Printer may need to be replaced at the same time. PAPER FEEDS CONTINUOUSLY 1) Perform printer reset (apply power while holding paper feed switch down). Note: Thermal printers require a power reset to stop the test print. 2) Disconnect the paper feed switch from the Printer PCB and apply power. If paper continues to feed with switch disconnected, the Printer PCB may be defective. If paper does not feed with switch disconnected, the paper feed switch may be defective. PRINTING IS LIGHT OR NON-EXISTENT ON ONE SIDE OF REPORT 1) Insure Printer is mounted flush to mounting bracket surface and mounting plate. 2) Perform printer reset (apply power while holding paper feed switch down). Note: Thermal printers require a power reset to stop the test print. If the problem exists on the test report, the Printer may be defective. RECEIPT JAMS (ACCORDION FASHION) 1) Check the alignment of the Printer/Cutter with the Receipt Guide. 2) Check for paper jams in the cutter or Printer throat. 3) Check for obstructions in the receipt guide. RECEIPT JAMS (SIDE TO SIDE MOVEMENT) 1) Insure Tidel approved paper is being used in printer. 2) Check for warped print roller: a) Open the cutter, place a 1/4" wide piece of paper into one side (left or right) of the printer and close the cutter. b) Pull the paper out, noting the amount of drag felt between the cutter and printer. c) Open the cutter and repeat the process on the opposite side of the printer. If a significant difference in the amount of drag is felt between the 2 sides, the printer may be defective. Printer 125 RECEIPT JAMS (PAPER NOT FEEDING THROUGH GUIDE) 1) Insure Tidel approved paper is being used in printer. 2) Check for obstructions in the Receipt Guide. 3) Check the alignment of the Receipt Guide with the Printer. WONT CUT PAPER 1) Perform printer reset (apply power while holding feed button down). Note: Thermal printers require power reset to stop test print. 2) Perform a Printer test in the Diagnostics Menu 3) Possible dirty/defective cutter. Blow out shavings from cutter. 4) Possible defective Printer. WONT FEED PAPER WHEN FEED BUTTON IS PRESSED 1) Check connections at the Paper Low Sensor PCB. 2) Check the connections at the Printer PCB. 3) Perform a power reset 4) Perform a printer reset (apply power while holding down the paper feed switch). Note: Thermal printers require power reset to stop test print. If a test pattern prints, perform a Clear Errors and test by printing any report from the ATM menu’s. If the test pattern does not print: 5) Verify +5vdc and +24vdc at the Printer PCB. If correct, the Printer or Printer PCB may be defective. If voltages are incorrect at the Printer PCB: 6) Check the Power Supply output voltages at terminal J3 on the ATM Backplane PCB. (pin order is left to right). Pin Pin Pin Pin Pin 1 2 6 7 8 = = = = = +5vdc +5vdc +12vdc -12vdc +24vdc If incorrect, the Power Supply may be defective or require +5vdc adjustment. If voltage outputs are correct at terminal J3 on the Backplane PCB, but incorrect at the Printer PCB, the Backplane PCB may be defective. Printer 126 WONT PRINT WHEN REPORT IS SELECTED (WILL FEED PAPER, NO TEXT) 1) Perform a power reset. 2) Insure paper is properly loaded on thermal printers (thermal paper may be upside down). 3) Insure the cutter is securely closed against the Printer. 4) Perform a Printer reset (Apply power while holding feed button down). Note: Thermal printers require power reset to stop the test pattern. a) If not, the Printer may be defective. b) If test report prints, perform “Cancel Print” and test by printing any report from the ATM menu’s. WONT PRINT WHEN REPORT IS SELECTED (WONT FEED PAPER) 1) Perform a power reset. 2) Perform a printer reset (apply power while holding down feed button). Note: Thermal printers require power reset to stop the test pattern. If the test pattern does not print: a) Check connections at the Paper Low Sensor PCB. b) Check the connections at the Printer PCB. c) Verify +5vdc and +24vdc at terminal CN10 on the Printer PCB. If voltages are correct:, the Printer may be defective. If voltages are incorrect: 4) Check voltages at the Backplane PCB test points (Next to the 4 LED’s) TP1 TP2 TP3 TP4 = = = = +5vdc +12vdc -12vdc +24vdc. If voltage at the test points are incorrect: a) If an LED is not illuminated on the Backplane PCB, disconnect all components from the Backplane PCB, one at a time, until the defective component is identified. If all components are disconnected and the LED is not illuminated or the voltages are still incorrect, proceed to the next step. 5) Check the Power Supply output voltages at terminal J14 on the ATM Backplane PCB (pin order is right to left). TCDM Dispenser Pin Pin Pin Pin Pin 1 2 6 7 8 = = = = = +5vdc +5vdc +12vdc -12vdc +24vdc If incorrect, the Power Supply may be defective or require voltage adjustment. If Power Supply output voltages are correct, the Backplane PCB may be defective. Printer 127 128 3300/3600 Illustrations 129 MODEL 3300 DISPLAY AND VEPP CONTROL PANEL PCB WITH MONOCHROME DISPLAY CN 2 1400 VAC OUTPUT TO LIGHT DISPLAY MONOCHROME DISPLAY WHT PINK BLK GND RED +5VDC CN 1 J4 MONOCHROME DISPLAY CABLE J5 FUNCTION KEY TOUCHPAD JP1 PINS 7 AND 8 JUMPER FOR SMART CARD READER JP1 PROGRAM IGNITION J1 POWER, COMM &VIDEO FROM BACKPLANE PCB CHAMELEON BLK GND RED+5VDC 1 D7 TAMPER INDICATOR HARDWARE VERSION: 207-0245-001 REV. C FIRMWARE VERSION 5.02 DO NOT REMOVE COVER! + J2 CARD READER Mag Stripe Reader Only NO USER SERVICEABLE PARTS IN ASSEMBLY Visa Approved PIN Entry Device _ 3.6VDC LITUIUM BATTERY 130 CON1 FROM J3 ON CONTROL PANEL PCB BRN GND BLK +12VDC MODEL 3300 DISPLAY AND CONTROL PANEL PCB (5.7” COLOR DISPLAY) EDT XXXXXXXXXX XXXXX’XX BALLAST PCB VIDEO CABLE FROM CONTROL PANEL PCB HIGH VOLTAGE CON 2 1400 VAC OUTPUT TO LIGHT DISPLAY CAUTION JP1 JP2 PINS 7 AND 8 JUMPER FOR J5 POWER, COMM SMART CARD READER FUNCTION & VIDEO IN KEY FROM TOUCHPAD BACKPLANE PCB J3 TO CON 1 ON BALLAST PCB BLK GND RED +12VDC JP1 PROGRAM IGNITION CHAMELEON 1 HARDWARE VERSION: 207-0245-001 REV. C D7 TAMPER INDICATOR FIRMWARE VERSION 5.02 DO NOT REMOVE COVER! + NO USER SERVICEABLE PARTS IN ASSEMBLY Visa Approved PIN Entry Device J2 CARD READER MAG STRIPE READER ONLY _ 131 J6 VIDEO CABLE TO 5.7” COLOR DISPLAY 132 COMPONENT SIDE VIEW J1 FROM J3 ON CONTROL PANEL PCB BALLAST INPUT VOLTAGE. +12 VDC. MEASURE ACROSS THESE TWO POINTS BALLAST PCB BALLAST OUTPUT FOR BOTTOM BULB. 1400 VAC. MEASURE ACROSS THESE TWO POINTS BALLAST OUTPUT FOR TOP BULB. 1400 VAC. MEASURE ACROSS THESE TWO POINTS J2 J3 J2 & J3 1400 VAC OUTPUT TO LIGHT DISPLAY BLK GND RED +12VDC WARNING LAMP HIGH VOLTAGE OPTREX 10.4” DISPLAY OPTREX CN1 VIDEO CABLE FROM CONTROL PANEL PCB FERRITE BEAD FOR FLAT RIBBON VIDEO CABLE TOUCHPAD W/ MOUNTING PLATE 133 COMPONENT SIDE VIEW J1 FROM J3 ON CONTROL PANEL PCB BALLAST INPUT VOLTAGE. +12 VDC. MEASURE ACROSS THESE TWO POINTS BALLAST PCB BALLAST OUTPUT FOR BOTTOM BULB. 1400 VAC. MEASURE ACROSS THESE TWO POINTS BALLAST OUTPUT FOR TOP BULB. 1400 VAC. MEASURE ACROSS THESE TWO POINTS J3 J2 PINK J2 & J3 1400 VAC OUTPUT TO LIGHT DISPLAY BLK GND RED +12VDC WHT WHT PINK SHARP 10.4” DISPLAY SHARP LQ 104V1DG51 18 XXXXXX MADE IN JAPAN CN1 VIDEO CABLE FROM CONTROL PANEL PCB FERRITE BEAD FOR FLAT RIBBON VIDEO CABLE TOUCHPAD W/ MOUNTING PLATE JP1 PINS 7 AND 8 JUMPER FOR SMART CARD READER J5 FUNCTION KEY TOUCHPAD J1 POWER, COMM & VIDEO IN FROM BACKPLANE PCB J3 TO BALLAST PCB JP1 PROGRAM IGNITION D7 TAMPER INDICATOR CHAMELEON LED Flashing - Non-Tamper Condition 1 LED Out - Possible Tamper Contion has occured. HARDWARE VERSION: 207-0245-001 REV. C FIRMWARE VERSION 5.02 DO NOT REMOVE COVER! + J2 CARD READER Mag Stripe Reader Only NO USER SERVICEABLE PARTS IN ASSEMBLY J6 VIDEO CABLE TO 5.7” COLOR DISPLAY Visa Approved PIN Entry Device _ 3.6VDC LITUIUM BATTERY VEPP Control Panel PCB Component Side QZ ABC 2 1 GHI JKL 5 4 PRS TUV 8 7 * 0 DEF 3 X CANCEL < MNO 6 CLEAR WXY 9 O ENTER # . VEPP Control Panel PCB Keypad Side 134 Compact Flash Card Slot Manager Switch Telephone Jack 135 20 19 JP1 1 1 J6 Pins 13 and 14 Clear System Files 2 12 12 12 12 12 12 12 12 12 Pins 15 and 16 Download J3 9 1 1 1 1 1 1 1 1 3600 MAIN PCB P/N 207-0388-741S SW1 J4 Pulse RJ-45 COMM to Rear Control Panel and TCP/IP Modem XP ST 16C554DCJ DC 0323 Epson J6 1 Flash Card Slot Manager Switch USB (For Future use) RJ-45 COMM Ethernet (optional) J3 10 123 123 123 123 123 136 Modem 3300/3600 MAIN PCB 9 XILINX 210-0108-702S – Main PCB, 3300 and 3600, without Ethernet Capability and no Modem 210-0108-702S – Main PCB, 3300 and 3600, with Ethernet Capability and no Modem 210-0108-742S – Main PCB, 3300 and 3600, 56K Global Modem with Ethernet Capability 210-0108-741S – Main PCB, 3300 and 3600, 56K Global Modem without Ethernet capability SW1 J4 1 JP1 12 12 12 12 12 2 JP1 Setting for loading software from Compact Flash JP1 Setting for erasing System Files and Application and Load software from Compact Flash JP1 Setting for Monochrome Displays 12 12 12 12 12 12 12 12 1212 Epson J-15 FLOPPY DRIVE POWER RED +5VDC BLK GND BLK GND J-9 FLOPPY DRIVE COMM BLK GND ORG +24VDC BRN GND VOL -12VDC BLK GND YEL +12VDC BLK GND BLK GND RED +5VDC J-14 DC POWER IN FROM POWER SUPPLY RED +5VDC J-20 CIRCULATING FAN J-3 CONTROL PANEL COMM 1 & POWER 1 F3 123456 123456 123456 123456 123456 +5VDC RESETABLE FUSE F7 1234 1234 1234 1234 F5 1234 1234 F4 123456 123456 123456 123456 +24VDC RESETABLE FUSE +12VDC RESETABLE FUSE -12VDC RESETABLE FUSE J-11 SMART CARD READER F2 F1 J-5 TCP/IP 12345678901234567890123456789012123456789012345678901234567890121234567890123456789012345678901212345678901234567890123456789012123456 12345678901234567890123456789012123456789012345678901234567890121234567890123456789012345678901212345678901234567890123456789012123456 12345678901234567890123456789012123456789012345678901234567890121234567890123456789012345678901212345678901234567890123456789012123456 12345678901234567890123456789012123456789012345678901234567890121234567890123456789012345678901212345678901234567890123456789012123456 12345678901234567890123456789012123456789012345678901234567890121234567890123456789012345678901212345678901234567890123456789012123456 12345678901234567890123456789012123456789012345678901234567890121234567890123456789012345678901212345678901234567890123456789012123456 123+12V +24V 123 123 123 TP 2123 123TP 4 123 -12V 123 +5V TP 1123 123 TP 3 J-10 AUDIO OUTPUT J-4 PRINTER POWER & COMM J101 FIB POWER J-17 FUJITSU DISPENSER POWER J-7 DOOR SWITCH VOLTAGE PRESENT 2 PIN CABLE LED’S J102 (The -12 LED ALT FIB may not be POWER present) J-1 MAIN PCB 4 PIN CABLE BACKPLANE PCB with TCDM 207-0390-001S 137 J-24 TCDM DISPENSER POWER J2 TELCO IN J-8 COMM 4 DISPENSER COMM J-9 FLOPPY DRIVE COMM RED +5VDC BLK GND BLK GND J-15 FLOPPY DRIVE POWER BLK GND ORG +24VDC YEL +12VDC RED +5VDC J-3 CONTROL PANEL COMM 1 & POWER RED +5VDC J-14 DC POWER IN FROM POWER SUPPLY 1 1234567 1234567 1234567 F3 1234567 +5VDC RESETABLE FUSE F7 F4 1234567 1234567 1234567 1234567 +24VDC RESETABLE FUSE +12VDC RESETABLE FUSE J-11 SMART CARD READER F2 F1 J-5 TCP/IP 123456789012345678901234567890121234567890123456789012345678901212345678901234567890123456789012123456789012345678901234567890121234567 123456789012345678901234567890121234567890123456789012345678901212345678901234567890123456789012123456789012345678901234567890121234567 123456789012345678901234567890121234567890123456789012345678901212345678901234567890123456789012123456789012345678901234567890121234567 123456789012345678901234567890121234567890123456789012345678901212345678901234567890123456789012123456789012345678901234567890121234567 123456789012345678901234567890121234567890123456789012345678901212345678901234567890123456789012123456789012345678901234567890121234567 12+12V +24V 12 12 TP 4 TP 2 12 12 123 -12V 12 +5V 123 12 TP 1 123 12 TP 3 J-10 AUDIO OUTPUT (OPTIONAL) J-4 PRINTER POWER & COMM VOLTAGE PRESENT LED’S J-7 DOOR SWITCH J2 TELCO IN J-1 MAIN PCB BACKPLANE PCB with MCDM 207-0390-002S 138 J-8 COMM 4 DISPENSER COMM RED +5VDC RED +5VDC BLK GND BLK GND BRN GND ORG +24VDC BLK 110 VAC VOL -12VDC BLK GND BLK GND BLK GND GRN GND YEL +12VDC WHT NEUTRAL P1 - AC POWER IN AC LINE FILTER/ POWER CORD RECEPTICLE F1 5AMP/230VAC FUSE R354- +5V ADJUST AC POWER CORD RECEPTICALE FOR THE LIGHT KIT POWER SUPPLY with TCDM 642-0016-001S 139 VR302 - FACTORY SET DO NOT ADJUST POWER SUPPLY ASSEMBLY with MCDM YEL +12VDC BLK 110 VAC BLK GND BLK GND RED +5VDC RED +5VDC F1 2.5 AMP 250V WHT NEUTRAL GRN GND +5VDC ADJUST ORG +24VDC DC POWER OUT TO J14 ON THE BACKPLANE PCB AC POWER IN AC LINE FILTER/ POWER CORD RECEPTICALE AC POWER CORD RECEPTICALE FOR THE LIGHT KIT POWER SUPPLY with MCDM 642-0017-005S 140 PRINTER PCB CN2 CN6 CN7 CN2 CN6 CN7 CN3 - PRINTER COMMUNICATION CABLE CN5 CN5 CN8 CN8 CN4 - PRINTER MOTOR CN3 CN4 PRINTER CABLE RELEASE/LOCK TABS PRINTER MOTOR CABLE RELEASE/LOCK TABS PAPER LOW ADJUSTMENT SLOTS SW1 18 J100 TO PRINTER PCB AND CUTTER SW1 PAPER FEED SWITCH J100 J1 POWER AND COMM FROM BACKPLANE PCB 6 10 1 10 5 J1 VOLTAGE LEGEND PIN 1 GRY - SIGNAL PIN 2 VOL - SIGNAL PIN 3 RED - +5VDC PIN 4 WHT - +24VDC PIN 5 GRN - GND PIN 6 BRN - SIGNAL PIN 7 YEL - SIGNAL PIN 8 BLU - +12VDC PIN 9 ORG - NOT USED PIN 10 BLK - GND AUTO FEED PRINTER PCB and PRINTER INTERFACE PCB 644-0031-009S 207-0990-001S 141 SENSOR 17 (H) SENSOR 15 (F) SENSOR 13 (D) SENSOR 14 (E) SENSOR 11 (B) SENSOR 12 (C) SENSOR 9 SENSOR 10 (A) SENSOR 8 SENSOR 7 SENSOR 6 SENSOR 5 SENSOR 4 SENSOR 3 SENSOR 2 SENSOR 1 SENSOR 0 TCDM SENSOR LOCATION for DIAGNOSTICS TEST 142 DELIVERY SENSOR DIVERT DELIVERY SENSOR DIVERT SOLENOID SENSOR REJECT CASSETTE PRESENT SWITCH DIVERT DISTANCE SENSOR DOUBLE DETECT DIVERT REJECT SENSOR SW3 1 2 TIMING WHEEL AND SENSOR (COLD SIDE) LENGTH/ DISTANCE/SKEW (LDS) SENSOR ON 3 4 5 6 7 8 CASSETTE 1 PICK SENSOR Demo Switch Down - OFF Up - ON CASSETTE 2 PICK SENSOR Cassette Setting 1 Cassette - 3 ON, 4 0N 2 Cassette - 3 OFF, 4 ON 3 Cassette - 3 ON, 4 OFF 4 Cassette - 3 OFF, 4 OFF CASSETTE 3 PICK SENSOR CASSETTE 4 PICK SENSOR TCDM COMPONENT LOCATION 143 EXIT SENSOR DIVERT SOLENOID SENSOR TIMING WHEEL AND SENSOR REJECT SENSOR SW3 1 2 DOUBLE DETECT ON 3 4 5 6 7 8 PICK SENSOR Demo Switch Down - DEMO Up - PRODUCTION Cassette Setting 1 Cassette - 5 OFF, 6 ON 2 Cassette - 5 ON, 6 OFF MCDM III COMPONENT LOCATION 144 FEEDER INTERFACE PCB J-3 DISPENSER COMMUNICATION TO THE CASH DISPENSER PCB RS232C XXX-XXXX-XXX J-4 DISPENSER COMMUNICATION FROM THE BACK PLANE PCB 2 8 1 ˚ JP1 JUMPER PINS 1 AND 2 FOR DEMONSTRATION MODE 145 J-5 FEEDER INTERFACE PCB POWER FROM BACKPLANE PCB ADJUSTMENT OF THE FUJITSU DISPENSER POTENTIOMETER This adjustment will be required if the dispenser is reporting a “Potentiometer Failure” or “Thickness Abnormal” in the error menu. 1. Determine the dispenser software version by printing a system setup report or selecting the version release menu in the program setup menu. 2. Remove dispenser from ATM and place on a platform in front of the ATM with the cables attached and the unit powered up. 3. Enter Reliability Accessibility Serviceability (RAS) mode by depressing the SW1, SW2 and ST buttons on the right side of the dispenser simultaneously. Result, LEDs indicate: 0. 0. 4. Depress SW1 until LEDs indicate: 6. 0. 5. Depress ST twice (2 times), current calibration values will be displayed on the LEDs. 6. From the access holes in the sides of the dispenser, barely loosen both vertical lock screws, leaving both tight enough for a snug fit. CAUTION Do not loosen the horizontal lock screw, re-calibration of potentiometer will be required. VERTICAL LOCK SCREW POTENTIOMETER ADJUSTMENT SCREW HORIZONTAL LOCK SCREW VIEW FROM THE RIGHT SIDE FACING THE FRONT OF THE DISPENSER 146 ADJUSTMENT OF THE FUJITSU DISPENSER POTENTIOMETER 7. From the top of the dispenser, gently place a finger on the attachment screw securing the deflector plate behind and below the potentiometer. 8. The LED reading should decrease as pressure is gently applied to the deflector plate. If not: a. Loosen the vertical lock screws for a looser fit. b. Grasp the mounting bracket and lift gently to reposition the adjustment bracket. c. Tighten the vertical lock screws to attain a snug fit for adjustment purposes. d. Repeat steps 7 and 8 until values decrease when pressure is applied to the deflector plate. 9a. For dispensers with software version 10 or earlier, turn the potentiometer adjustment screw until an LED reading of is achieved. A fluctuation of one number is acceptable. E 9 9b.For dispensers with software version 11 or later, turn the potentiometer adjustment screw until an LED reading of is achieved. A fluctuation of one number is acceptable. E 3 NOTE: The potentiometer readings are from 0 to 9 then A to F DEFLECTION PLATE 10.Tighten the two vertical lock screws. 11.Depress the SW1, SW2 and ST buttons on the right side of the dispenser simultaneously until 0. 0. is displayed. ATTACHMENT SCREW HORIZONTAL LOCK SCREW 12.Depress the SW1, SW2 and ST buttons on the right side of the dispenser simultaneously until 0 0 VERTICAL LOCK SCREW is displayed. MOUNTING BRACKET VIEW FROM THE TOP OF THE DISPENSER 147 NCR EasyPoint LLC 2310 McDaniel Dr. Carrollton, Texas 75006 (214) 393-5900 FAX (214) 393-5901 Toll Free 1-866-371-1321