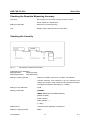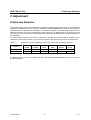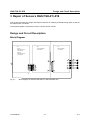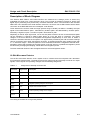
1
Test and Measurement
Division
Service Manual
Average Power Sensor
R&S FSH-Z1
10 MHz to 8 GHz / 200 pW to 200 mW
1155.4505.02
R&S FSH-Z18
10 MHz to 18 GHz / 200 pW to 200 mW
1165.1909.02
Printed in the Federal
Republic of Germany
R&S FSH-Z1/-Z18
Contents Section 1
Contents
1
Performance Test............................................................................................................... 1.1
Preliminary Remarks ....................................................................................................................... 1.1
Test Instructions .............................................................................................................................. 1.1
Measuring Equipment and Accessories ....................................................................................... 1.1
Performance Test with Calibration Kit R&S NRVC and Calibration Software Recal ................ 1.2
Performance Test with Other Measuring Equipment................................................................... 1.2
Checking Absolute Measuring Accuracy ................................................................................... 1.2
Checking the Linearity................................................................................................................ 1.3
Checking Matching..................................................................................................................... 1.4
Quick Test......................................................................................................................................... 1.5
Test Instructions......................................................................................................................... 1.5
Measuring Equipment and Accessories Required for the Quick Test ....................................... 1.6
Checking Zeroing ....................................................................................................................... 1.6
Checking the Absolute Measuring Accuracy ............................................................................. 1.7
Checking the Linearity................................................................................................................ 1.7
Checking Input Impedance ........................................................................................................ 1.9
Test Report .............................................................................................................................. 1.10
1165.2286.82
I-1.1
E-1
R&S FSH-Z1/-Z18
Contents Section 2
Contents
2
Adjustment............................................................................................................................ 2.1
Preliminary Remarks ....................................................................................................................... 2.1
1165.2286.82
I-2.1
E-1
R&S FSH-Z1/-Z18
Contents Section 3
Contents
3
Repair of Sensors R&S FSH-Z1/-Z18 ......................................................................... 3.1
Design and Circuit Description ...................................................................................................... 3.1
Block Diagram ............................................................................................................................ 3.1
Description of Block Diagram..................................................................................................... 3.2
18 GHz Microwave Detector .......................................................................................... 3.2
Analog Board.................................................................................................................. 3.3
Digital Board................................................................................................................... 3.3
Module Replacement....................................................................................................................... 3.4
Tools Required ............................................................................................................... 3.4
List of Modules ........................................................................................................................... 3.6
Opening and Reassembly (Exchange of Plastic Shell Halves) .................................... 3.7
Replacement of Sensor Cable W1............................................................................................. 3.9
Removing the Sensor Cable .......................................................................................... 3.9
Installing the Sensor Cable ............................................................................................ 3.9
Troubleshooting ............................................................................................................................ 3.10
Overview of Errors, Causes and Corrective Steps .................................................................. 3.11
1165.2286.82
I-3.1
E-1
R&S FSH-Z1/-Z18
Contents Section 4
Contents
4
Firmware Update ................................................................................................................ 4.1
Installation of New R&S FSH-Z1/-Z18 Firmware ........................................................................... 4.1
Hardware and Software Requirements...................................................................................... 4.1
Preparation................................................................................................................................. 4.2
Updating the Application Firmware ............................................................................................ 4.3
Updating the Boot Loader .......................................................................................................... 4.4
1165.2286.82
I-4.1
E-1
R&S FSH-Z1/-Z18
Contents Section 5
Contents
5
Documents ............................................................................................................................ 5.1
Shipping of Instrument and Ordering of Spare Parts .................................................................. 5.1
Shipping of Instrument ............................................................................................................... 5.1
Ordering Spare Parts ................................................................................................................. 5.1
Ordering Replacement Sensors................................................................................................. 5.2
Spare Parts ....................................................................................................................................... 5.3
1165.2286.82
I-5.1
E-1
R&S FSH-Z1/-Z18
Preliminary Remarks
1 Performance Test
Preliminary Remarks
Verifying the data sheet specifications for the Power Sensors R&S FSH-Z1 and R&S FSH-Z18 requires
a considerable amount of equipment and care. Rohde & Schwarz therefore recommends using the
Power Calibration System R&S NRVC or corresponding equipment that yields the same accuracy. The
tests are to be carried out directly at the manufacturer, its representatives or subsidiaries or at
calibration sites that are equipped accordingly.
A quick test (see page 1.5) is recommended for checking the sensor with simple means.
Test Instructions
•
The tests are to be performed at an ambient temperature of 20°C to 25°C. The DUT should be
connected to the (activated) R&S NRP base unit for at least 30 minutes before the tests are
performed.
•
The test limits used in the following sections are based on the data sheet for the sensors
R&S NRP-Z11 and R&S NRP-Z21 which are identical in design and function to the Power Sensors
R&S FSH-Z1 and R&S FSH-Z18. The test limits are valid only on the conditions defined in the
corresponding test step. They are therefore not binding as far as accuracy is concerned but are
strictly data sheet information.
Measuring Equipment and Accessories
Item
1
2
3
Type of unit
Recommended characteristics
Recommended
units
R&S
order Application
number
R&S NRVC
1109.0500.02
R&S NRVC-B1
1109.1007.02
R&S SMP02
1035.5005.02
R&S NRVD
0857.8008.02
Linearity
-30 dBm to +23 dBm
calibration system
Test frequency 50 MHz
R&S NRVC-B2
1109.1207.02
R&S SMGL
1020.2005.52
Network analyzer
R&S ZVM
1127.8500.60
Power calibration 10 MHz to 18 GHz
system
Calibration level 0 dBm
10 MHz to 18 GHz
Absolute
accuracy
measuring
Linearity
Matching
Test port: N connector
1
4
Controller 1
PC with IEC/IEEE-bus card (NI)
5
Power meter
To connect the DUT
6
Adapter from
To connect the DUT to the
R&S FSH to R&S R&S NRP
NRP
In connection with
R&S NRVC and
R&S NRVC-B2
R&S NRP
1143.8500.02
1155.4940.00
Absolute
measuring
accuracy
and linearity
For program-controlled calibration in connection with Calibration Kit R&S NRVC and Calibration Software Recal.
1165.2286.82
1.1
E-1
Performance Test
R&S FSH-Z1/-Z18
Performance Test
with Calibration Kit NRVC and Calibration Software Recal
For detailed information about the performance test, refer to the operating manual for Calibration Kit
R&S NRVC.
SWR measurement has to be carried out on a separate network analyzer. Evaluation is performed by
Calibration Software Recal.
Performance Test with Other Measuring Equipment
Checking Absolute Measuring Accuracy
The sensor contains three measurement paths. Individual calibration factors are stored for these
measurement paths in the sensor. The measurement paths therefore have to be checked separately.
(Table 1-1 and Table 1-2). The maximum permissible error depends on the calibration uncertainties of
the sensor (Table 1-2) and the uncertainties of the calibration system. It is recommended to combine
both uncertainties according to the RSS method (square root based on the sum of squares) and to use
the extended combined uncertainty as the test limit.
To calibrate measurement path 1, the measurement result of measurement path 2 can be used if the
calibration system does not provide a calibration power of 10 µW or if its uncertainty is too high. In this
case, only the displayed difference between the two measurement paths will be checked (Table 1-3).
Table 1-1
Calibration powers
Measurement path
Power measurement range
Calibration power
1
200 pW to 50 µW
(-67 dBm to -13 dBm)
10 µW
2
20 nW to 5 mW
(-47 dBm to +7 dBm)
1 mW
3
2 µW to 200 mW
(-27 dBm to +23 dBm)
1 mW
Table 1-2
Extended calibration uncertainties of Sensors R&S FSH-Z1/-Z18 (in dB)
Frequency
10 MHz to
<20 MHz
20 MHz to
<100 MHz
100 MHz to
4 GHz
>4 GHz to
8 GHz
Measurement path
>8 GHz to
12.4 GHz
>12.4 GHz to
18 GHz
Only R&S FSH-Z18
1
0.056
0.056
0.066
0.083
0.094
0.123
2
0.047
0.047
0.057
0.071
0.076
0.099
3
0.048
0.047
0.057
0.072
0.076
0.099
Calibration frequencies:
1165.2286.82
10 MHz, 15 MHz, 20 MHz, 30 MHz, 50 MHz, 100 MHz;
from 250 MHz to 18 GHz in 250 MHz steps.
1.2
E-1
R&S FSH-Z1/-Z18
Table 1-3
Performance Test with Other Measuring Equipment
Max. measurement error (in dB) between meas. paths 1 and 2 at –20 dBm (10 µW)
10 MHz to
<20 MHz
Frequency
20 MHz to
<100 MHz
100 MHz to
4 GHz
>4 GHz to
8 GHz
>8 GHz to
12.4 GHz
>12.4 GHz to
18 GHz
Only R&S FSH-Z18
Measurement error
0.045
0.044
0.048
0.054
0.063
0.079
Procedure:
•
Perform zeroing (without power applied).
•
Set measurement path in Sensor – Range menu on the R&S NRP.
•
Set calibration frequency in Frequency menu on the R&S NRP.
•
Read power on the R&S NRP and compare with power value of calibration system. At least three
measurements are recommended, with the sensor set to a different position with respect to the
output connector of the calibration system each time.
Checking the Linearity
The linearity check is performed at 50 MHz with autoranging activated. The reference power is 1 mW
(0 dBm). The maximum permissible linearity error depends on the linearity uncertainty of the sensor
(Table 1-4) and the linearity uncertainty of the calibration system. It is recommended to combine both
uncertainties according to the RSS method (square root based on the sum of squares) and to use the
extended combined uncertainty as the test limit.
Table 1-4
Extended linearity uncertainties of Sensors R&S FSH-Z1 and R&S FSH-Z18 at 50 MHz
(in dB, with reference to 0 dBm)
Test level
-30 dBm to -13 dBm
-13 dBm to +1 dBm
+1 dBm to +23 dBm
Uncertainty
0.044
0.022
0.044
Calibration level:
-30 dBm, -25 dBm, -20 dBm, -15 dBm, -10 dBm, -5 dBm, 0 dBm,
+5 dBm, +10 dBm, +15 dBm, +20 dBm, +23 dBm
Procedure:
•
Perform zeroing (without power applied).
•
Set autoranging in Sensor – Range menu on the R&S NRP.
•
Set 50 MHz in Frequency menu on the R&S NRP.
• Apply level of 0 dBm and activate Relative On in the Measurement menu on the R&S NRP. Use
the current measurement value as the reference value (Reset). Set unit to dB.
• Set the calibration level and compare the relative level measured by the R&S NRP with that of the
calibration system.
1165.2286.82
1.3
E-1
Performance Test with Other Measuring Equipment
R&S FSH-Z1/-Z18
Checking Matching
For these measurements, the sensor can be operated with or without the R&S NRP base unit. The
measurement procedure depends on the network analyzer used.
Table 1-5
Frequency
Max. SWR of Sensors R&S FSH-Z1 and R&S FSH-Z18
10 MHz to
<30 MHz
30 MHz to
2.4 GHz
>2.4 GHz to
8 GHz
>8 GHz to
12.4 GHz
>12.4 GHz to
18 GHz
Only R&S FSH-Z18
Max. SWR
1165.2286.82
1.13
1.11
1.18
1.4
1.23
1.23
E-1
R&S FSH-Z1/-Z18
Quick Test
Quick Test
The following tests are used to check the R&S FSH-Z1 and R&S FSH-Z18 with simple means. If the
tests are passed, compliance of the sensors with the specifications within the complete frequency and
power range is largely ensured.
The test consists of:
•
Zeroing.
•
Absolute measuring accuracy at 0 dBm (50 MHz).
•
Linearity with reference to 0 dBm (50 MHz).
•
Input impedance (for DC voltage/current).
Test Instructions
•
The tests are to be performed at an ambient temperature of 15°C to 35°C. The DUT should be
connected to the (activated) R&S NRP base unit for at least 30 minutes before the tests are
performed.
•
The test limits used in the following sections are based on the data sheet but are valid only on the
conditions defined for the corresponding test step. They are therefore not binding as far as accuracy
is concerned but are strictly data sheet information.
•
The entries made on the Spectrum Analyzer R&S FSH are abbreviated as follows:
[<KEY>]
Press front-panel key, e.g. [SPAN].
[<SOFTKEY>] Press softkey, e.g. [MARKER -> PEAK].
[<nn unit>]
Enter value and confirm with unit, e.g. [12 kHz].
Successive entries are separated by [:], e.g. [ BW : MANUAL RES BW : 3 kHz ].
1165.2286.82
1.5
E-1
Quick Test
R&S FSH-Z1/-Z18
Measuring Equipment and Accessories Required for the Quick Test
Item
Type of unit
Recommended characteristics
Recommended
units
1
Spectrum
analyzer
To connect the DUT
R&S FSH
2
Power meter
With power reference 1 mW / 50 MHz
Extended uncertainty <1.2 %
3
Signal
generator
50 MHz
Output level 0 dBm to +10 dBm with
the option of electronic level setting in
this range
4
Step attenuator 50 MHz
Settings 0 / 10 / 20 dB
2
5
System
voltmeter
R&S order
number
Application
1145.5850.03
1145.5850.13
Zeroing,
absolute measuring
accuracy, linearity
R&S NRP
R&S NRP-B1
1143.8500.02
1146.9008.02
Absolute measuring
accuracy
R&S SML03
1090.3000.13
Linearity
R&S RSP
0831.3515.02
Linearity
4-pin impedance measurement at
50 Ω
Input impedance
Extended measurement uncertainty
<0.2 Ω
6
Adapter
BNC (plug) to 4-mm sockets (2-pin).
7
Adapter
BNC (socket) to N (socket).
0017.6742.00
Input impedance
Input impedance
Checking Zeroing
Test setup
- Sensor (DUT) is connected to power reference output of power
meter (2).
- Power reference is switched off.
Settings on R&S FSH
- [ PRESET]
- [ MEAS: MEASURE: POWER SENSOR ]
- [ UNIT: dBm ]
- [ FREQ: 50 MHz ]
- [ TIME: LONG ]
- [ ZERO: CONTINUE ]
Test
- Message "Power Sensor Zero OK".
- Display value is within limits of test report.
2
Alternatively, also two attenuators with a nominal attenuation of 10 dB and 20 dB can be used.
1165.2286.82
1.6
E-1
R&S FSH-Z1/-Z18
Quick Test
Checking the Absolute Measuring Accuracy
Test setup
- Sensor (DUT) is connected to power reference output.
- Power reference is switched off.
Setting on R&S FSH
- Same as for Checking Zeroing.
Test
- Display value is within the limits of test report.
Checking the Linearity
Fig. 1-1
Test setup for checking the linearity
((Übersetzung zur Abbildung:
Signalgenerator
Signal generator
Stufenabschwächer
Step attenuator))
Setting on signal generator
- Frequency 50 MHz, output level +10 dBm, unmodulated.
- Activate electronic level switchover (for the following level
settings, the position of the mechanical step attenuator remains
unchanged compared to the setting of +10 dBm).
Setting on step attenuator
- 10 dB
Setting on R&S FSH
- [ PRESET]
- [ MEAS: MEASURE: POWER SENSOR ]
- [ FREQ: 50 MHz ]
- [ TIME: LONG ]
- [ UNIT: dB REL…]
- [ → REF]
Measurement
- 0.00 dB must be displayed on R&S FSH.
Setting on signal generator
- 0 dBm
1165.2286.82
1.7
E-1
Quick Test
R&S FSH-Z1/-Z18
Measurement
- Read magnitude of level variation (∆L1) on R&S FSH and
store (approx. –10 dB).
Setting on step attenuator
- 20 dB
Setting on R&S FSH
- [ → REF: → REF]
Measurement
- 0.00 dB must be displayed on R&S FSH.
Setting on signal generator
- +10 dBm
Measurement
- Read magnitude of level variation (∆L2) on R&S FSH and
store (approx. +10 dB).
Test
- Calculate nonlinearity (∆L2 + ∆L1) for level movement from
-20 dBm (measurement path 1) to –10 dBm (measurement
path 2) and check for compliance with limits of test report.
Setting on step attenuator
- 0 dB
Setting on signal generator
- 0 dBm
Setting on R&S FSH
- [ → REF: → REF]
Measurement
- 0.00 dB must be displayed on R&S FSH.
Setting on signal generator
- +10 dBm
Measurement
- Read magnitude of level variation (∆L3) on R&S FSH and
store (approx. +10 dB).
Test
- Calculate nonlinearity (∆L3 + ∆L1) for level movement from
0 dBm (measurement path 2) to +10 dBm (measurement path
3) and check for compliance with limits of test report.
1165.2286.82
1.8
E-1
R&S FSH-Z1/-Z18
Quick Test
Checking Input Impedance
Test setup
Fig. 1-2
- System voltmeter is set to 4-pin impedance measurement and
is connected to DUT according to figure.
Connection of DUT for measuring the input impedance
Test
1165.2286.82
- Check input impedance of sensor for compliance with limits of
test report.
1.9
E-1
Quick Test
R&S FSH-Z1/-Z18
Test Report
Quick test
Power Sensor R&S FSH-Z1
Stock number: 1155.4505.02
Name: ............................
Serial number: ......................
Date: ............................
Item
no.
Characteristic
Min. value
Actual value
Max. value
Unit
1
Zeroing
-------
-66.0
dBm
2
Absolute measuring accur.
-0.10
+0.10
dBm
-0.10
+0.10
dB
-0.10
+0.10
dB
50.2
51.8
Ω
at 0 dBm / 50 MHz
3
Linear. of meas. path 1 → 2
(∆L2 + ∆L1)
4
Linear. of meas. path 2 → 3
(∆L3 + ∆L1)
5
Input impedance
Quick test
Power Sensor R&S FSH-Z18
Stock number: 1165.1909.02
Name: ............................
Serial number: ......................
Date: ............................
Item
no.
Characteristic
Min. value
Actual value
Max. value
Unit
6
Zeroing
-------
-66.0
dBm
7
Absolute measuring accur.
-0.10
+0.10
dBm
-0.10
+0.10
dB
-0.10
+0.10
dB
50.2
51.8
Ω
at 0 dBm / 50 MHz
8
Linear. of meas. path 1 → 2
(∆L2 + ∆L1)
9
Linear. of meas. path 2 → 3
(∆L3 + ∆L1)
10 Input impedance
1165.2286.82
1.10
E-1
R&S FSH-Z1/-Z18
Preliminary Remarks
2 Adjustment
Preliminary Remarks
The Sensors R&S FSH-Z1 and R&S FSH-Z18 cannot be adjusted manually but have to be adjusted by
updating the calibration data in the memory. Calibration Software Recal, which is part of the equipment
supplied with the Calibration Kit R&S NRVC, is therefore required. The measurement results for the
absolute calibration of the three measurement paths which can be obtained during a performance test
(see Section 1) form the basis of the adjustment. The Calibration Kit R&S NRVC is recommended but is
not mandatory.
To ensure that the measuring accuracy corresponds to the data sheet values after the adjustment, the
calibration system must not have any inaccuracies that are higher than those given in the table below.
Table 2-1
Frequency
Uncertainty of power calibration system at 0 dBm (in dB, including mismatch)
10 MHz to
<20 MHz
20 MHz to
<100 MHz
100 MHz to
4 GHz
>4 GHz to
8 GHz
>8 GHz to
12.4 GHz
>12.4 GHz to
18 GHz
Only R&S FSH-Z18
0.04
0.04
0.05
0.065
0.07
0.09
For further details, refer to the operating manual for the Calibration Kit R&S NRVC or the online help for
the Recal program.
1165.2286.82
2.1
E-1
R&S FSH-Z1/-Z18
Design and Circuit Description
3 Repair of Sensors R&S FSH-Z1/-Z18
This section describes the design and simple measures for repairing and determining faults as well as
the replacement of modules.
The firmware update is explained in section 4 of this service manual.
Design and Circuit Description
Block Diagram
A3
A2
A1
FSH-Z1
8GHz DETECTOR
1138.3085.02
ANALOG BOARD
1137.6900.02
DIGITAL BOARD
1137.6845.02
FSH-Z18
18GHz DETECTOR
1137.6080.02
Fig. 3-1
Block diagram of Sensors R&S FSH-Z1 and R&S FSH-Z18
1165.2286.82
3.1
E-2
Design and Circuit Description
R&S FSH-Z1/-Z18
Description of Block Diagram
The Sensors R&S FSH-Z1 and R&S FSH-Z18 can determine the average power of almost any
modulated RF signal over a large dynamic range. They include all modules required for analog and
digital signal processing and provide fully corrected measured values. Communication with the R&S
NRP base unit is handled via a serial interface. Moreover, the sensor has a USB interface which allows
connection to the R&S NRP base unit via adapter 1155.4940.00.
Three detectors are used to obtain the large dynamic range of 90 dB (–67 dBm to +23 dBm); the input
signal is fed unattenuated to path 1, attenuated by 20 dB to path 2 and attenuated by 40 dB to path 3.
Sensitivity is highest on path 1, medium on path 2 and lowest on path.
Depending on the RF input signal level, one or two test paths are driven at such a level that these paths
can be evaluated. A channel is always either driven at a very low level or overdriven. The output
voltages of the three detectors are amplified and digitized independently of each other to obtain a
continuous transition between the test paths. The digital values provided by the A/D converters undergo
various corrections (zero offset, temperature, linearity). A weighting algorithm then decides which path
or – in transition ranges – which two paths are to be evaluated, and forms a weighted measured value.
Integration values that represent the average power of the RF signal in a predefined integration period
are derived by averaging all sampling values within the integration period.
The final measured values are the averaged result from several integration values.
18 GHz Microwave Detector
The 18 GHz microwave detector A3 is a hybrid circuit. It contains the three test paths and a thermistor
for temperature measurement. The detector has an RF signal input and a flexstrip connector for output
signals, control signals and operating voltages with the following assignment:
Table 3-1
Assignment of flexstrip connector W3
Connector
Signal name
Description
W3:1
CHOP
Logic signal for controlling the choppers
W3:2
NTC
Thermistor connector (the other connector of the thermistor is connected to ground)
W3:3
W3:4
CH3
Output of the most insensitive test path
W3:5
–5VA
Negative operating voltage for the choppers
W3:6
W3:7
CH2
Output of the medium test path
W3:8
+5VA
Positive operating voltage for the choppers
W3:9
W3:10
CH1
Output of the most sensitive test path
The casing of the detector is at ground potential.
1165.2286.82
3.2
E-2
R&S FSH-Z1/-Z18
Design and Circuit Description
Analog Board
The analog board A2 contains three test channels of the same design, each consisting of an
instrumentation amplifier, a buffer amplifier and a 14-bit A/D converter. The instrumentation amplifiers
amplify the output difference voltage of the detectors and convert it into a ground-referenced voltage.
The buffer amplifiers are quickly settling operational amplifiers with negative current feedback; they
isolate the instrumentation amplifiers from the current peaks occurring at the A/D converter inputs. The
A/D converters operate on the successive approximation principle. They have serial outputs.
The serial output data streams of the A/D converters are subjected to serial-parallel conversion in a
CPLD and stored in three addressable registers. The digital board consecutively addresses and reads
out these registers.
The analog board also comprises an 8-bit D/A converter for generating a noise-line large-scale dither
signal that is controlled by the digital board with a sequence of pseudo-random digital values.
The analog board contains a four-channel 12-bit A/D converter for measuring the substrate temperature
of the detector as well as for monitoring the operating voltages ±5 V and +1.75 V. The 12-bit A/D
converter is supplied by the 3.3 V operating voltage of the digital board and is thus operational even if
the voltage supply of the analog board is defective. It is connected to the synchronous serial interface of
the digital board and utilizes the MICROWIRE™ protocol.
The +5 V operating voltage of the analog board is generated from +3.3 V by a charge pump doubler
with subsequent linear regulator. The 5 V operating voltage is generated by a switching regulator with a
very low output ripple voltage.
Digital Board
The digital board A1 mainly consists of a controller based on a microcontroller Intel StrongARM
SA1110, two SRAMs (together 1 Mbyte) as random access memory and two flash PROMs (together
2 Mbyte).
The interface to the R&S FSH base unit or another host is formed by connector X1 on the digital
board. In addition to the four conductors for the serial interface and power supply, the sensor cable
contains two pairs of wires for the USB interface.
The connection to the analog board is established by press-in connector X2.
The digital board contains two DC/DC converters that generate the voltages +3.3 V and +1.75 V (for the
microcontroller core) from the +5 V operating voltage.
1165.2286.82
3.3
E-2
Module Replacement
R&S FSH-Z1/-Z18
Module Replacement
The following section describes how to exchange the plastic shell halves and how to replace the
connecting cable. If one of the electronic modules (microwave detector, analog board or digital board) is
defective, the sensor has to be sent to Rohde & Schwarz Central Service for repair.
Caution!
•
Observe the safety instructions at the beginning of this manual.
•
To avoid damaging electronic components, the instrument
should only be opened on a workplace protected against
electrostatic discharges.
The following methods can be used separately or combined to
ensure protection against electrostatic discharges:
Wrist strap with cord
Building ground
•
Anti-static wrist strap with grounding cable.
•
Conductive flooring with foot strap.
Ground connection
of operational site
Heel strap
Floor mat
Tools Required
Torx screwdriver
Size
T8
Thread
M 2.5
Note:
The numeric values in brackets refer to the item in the list of mechanical parts and
spare parts in section 5.
These items are identical to the item numbers in the drawings illustrating the module
replacement.
1165.2286.82
3.4
E-2
R&S FSH-Z1/-Z18
Module Replacement
Unlock
Contact side
Contact side
Unlock
Lock
Lock
Fig. 3-2
Membrane cables
Note:
Remove membrane cables:
Membrane cables can be removed after unlocking the female connector.
Connect membrane cables:
Observe the contact side and lock the female connector.
1165.2286.82
3.5
E-2
Module Replacement
R&S FSH-Z1/-Z18
List of Modules
Table 3-2
Item No.
List of modules/spare parts for R&S FSH-Z1 and R&S FSH-Z18
Electrical
identification
Designation
Stock No.
20
ANALOG BOARD
A2
**)
40
POWER SENSOR CABLE FSH-Z1
W1
1155.4563.02
60
SCREW 7985/ISR-M2X8-A4 FOR POWER SENSOR CABLE W1
80
DIGITAL BOARD
90
SCREW 7985/ISR-M2X10-A4 FOR DIGITAL BOARD A1
100
18 GHZ DETECTOR ( FSH-Z18)
A3
**)
101
8 GHZ DETECTOR (FSH-Z1)
A3
**)
150
SHIELDING
1137.6068.00 *)
160
SENSOR HOUSING
1137.6022.00
170
SCREW 7985/ISR-M2X8-A4 FOR OUTER CASING
1148.2600.00 *)
180
LABEL 1 R&S FSH-Z1
1155.4611.00
190
LABEL 2 R&S FSH-Z1
1155.4628.00
200
LABEL 1 R&S FSH-Z18
1165.1938.00
210
LABEL 2 R&S FSH-Z18
1165.1944.00
ADAPTER FROM FSH TO NRP
1155.4940.00
1148.2600.00 *)
A1
**)
1148.2917.00 *)
*) Available, but not in spare parts stock, therefore longer delivery times.
**) Spare part not available, to be replaced only via Central Service of Rohde & Schwarz.
1165.2286.82
3.6
E-2
R&S FSH-Z1/-Z18
Module Replacement
Opening and Reassembly (Exchange of Plastic Shell Halves)
Opening
¾ Undo two screws (170) on the two sides of the cable connector.
¾ First pull off the plastic shell halves of the cable connector and take them apart by twisting them at
the RF connector.
¾ The shielding is attached by a catch of the body on the RF connector side. Slightly bend and unlock
the shielding by firmly pressing on the two slim sides and pull it off in the cable direction.
Reassembly
¾ Push the shielding and lock it into the catch of the body.
¾ Insert the sensor into one of the shell halves and lock the second shell half on the RF connector side
and close at the cable connector.
¾ Attach the shell halves to the body using two screws (170).
Catch for locking the
shielding
170
Press
Press
170
Fig. 3-3
Opening the sensor
1165.2286.82
3.7
E-2
Module Replacement
R&S FSH-Z1/-Z18
Caution:
Observe a torque of 29 Ncm for all screws.
1165.2286.82
3.8
E-2
R&S FSH-Z1/-Z18
Module Replacement
Replacement of Sensor Cable W1
Removing the Sensor Cable
¾ Opening the sensor (see page 3.7).
¾ Undo 6 screws (90).
¾ Carefully remove digital board A1 from the body.
¾ Unplug sensor cable W1 from digital board.
¾ For removing sensor cable W1, undo two screws (60) and remove the cable from the body.
Installing the Sensor Cable
¾ Install in the reverse order.
¾ Ensure that the guide pins of press-in connector X2 lock into the corresponding boreholes of the
digital board.
Digital board A1
90 (6x)
W1
60 (2x)
W1
X2
Guide pins
Fig. 3-4
Replacement of sensor cable
1165.2286.82
3.9
E-2
Troubleshooting
R&S FSH-Z1/-Z18
Troubleshooting
Malfunctions may sometimes be due to simple reasons but may also result from defective components.
These troubleshooting instructions permit malfunctions or errors to be traced down to module level.
Module replacement and further diagnosis of errors or malfunctions should be carried out by our
customer service. It is therefore recommended to send the unit to the nearest service center (see list of
addresses at the beginning of this manual).
Caution:
Prior to opening sensor and replacing modules, disconnect sensor from base unit
(R&S FSH or R&S NRP) or USB adapters (R&S NRP-Z3 or R&S NRP-Z4).
1165.2286.82
3.10
E-2
R&S FSH-Z1/-Z18
Troubleshooting
Overview of Errors, Causes and Corrective Steps
This section provides an overview of possible errors, their causes and corrective steps.
Problems that occur when connecting the sensor or activating the power
measurement function on the R&S FSH base unit.
•
Error:
The power sensor is not found (neither measured values nor error messages are
displayed on the R&S FSH base unit).
Troubleshooting instruction
Potential error source and further corrective
steps
Unplug sensor from base unit and check male and Defective connection.
female connector for damage.
Exchange sensor cable or connector block 8
(1157.3287.00) in R&S FSH.
⇓
Check whether the error also occurs on a different Error source within base unit.
base unit.
Replace defective cable in cable set or exchange
motherboard.
Error source within sensor.
Open sensor and check connection of sensor
cable W1 with digital board.
Exchange sensor cable.
Send sensor in for repair (digital board possibly
defective).
•
Error:
R&S FSH base unit detected error (error message Power Sensor Error ).
Troubleshooting instruction
Potential error source and further corrective
steps
Base unit and sensor cannot communicate with
each other. The firmware versions may not be
compatible.
⇓
Load current firmware into sensor and base unit
according to section 4.
If updated firmware does not correct problem,
perform the same measures as described above
(sensor is not found).
1165.2286.82
3.11
E-2
Troubleshooting
•
Error:
R&S FSH-Z1/-Z18
Power Sensor detected error (error message Power Sensor Hardware Error).
Troubleshooting instruction
Potential error source and further corrective
steps
The sensor detected an error during selfttest or
during communication (hardware defect or
defective voltage supply).
⇓
Check whether error also occurs on a different Error source within base unit.
base unit.
Exchange mainboard.
Error source within sensor.
Send sensor in for repair (analog board or digital
board is defective).
Problems during measurement
•
Error:
Measured power readings are erroneous.
Troubleshooting instruction
Potential error source and further corrective
steps
Perform performance test or selftest according to Sensor was overloaded: indicated by very poor
matching and/or errors in measurement path 1.
section 1.
Send sensor in for repair (microwave detector is
defective).
Other parts of sensor hardware are defective.
Send sensor in for repair (microwave detector or
analog board is defective).
Sensor hardware is probably ok since test limits
are only slightly exceeded.
Perform update of calibration factors in data
memory of sensor according to section 2.
1165.2286.82
3.12
E-2
R&S FSH-Z1/-Z18
Installation of New R&S FSH-Z1/-Z18 Firmware
4 Firmware Update
Section 4 provides information on the firmware update. Descriptions enclosed with the firmware update
can be filed here.
Installation of New R&S FSH-Z1/-Z18 Firmware
The new firmware for the Sensors R&S FSH-Z1 and R&S FSH-Z18 is loaded directly from the USB
connector of a PC by means of the program module "Firmware Update". The program module is part of
the R&S NRP Toolkit which is used to update the boot loader and the application firmware. The
R&S NRP Toolkit can be ordered on request from your nearest Rohde & Schwarz subsidiary. Two
adapters are required for the update (see Hardware and Software Requirements).
Hardware and Software Requirements
The system requirements for a firmware update are the same as for the operation of the power sensor
on a PC (an update via the power meter is not possible):
• PC with free USB port.
• USB Interface Adapter R&S NRP-Z3 or R&S NRP-Z4.
• Adapter from FSH to NRP interface (R&S spare part 1155.4940.00).
• Operating system Windows™ 98, Windows™ ME, Windows™ 2000, or Windows™ XP.
• The R&S NRP Toolkit software must already be installed on your PC.
• One of the following files must be selected (depending on the software component to be updated):
• <Type>_Sensor<Version Number>.nrp
• Bootloader_<Version Number>.nrp,
1165.2286.82
4.1
Application
Boot loader
E-1
Installation of New R&S FSH-Z1/-Z18 Firmware
R&S FSH-Z1/-Z18
Preparation
½ Connect the power sensor to the PC using the two USB interface adapters.
½ If a second power sensor or an R&S NRP is connected to the PC, unplug these devices from the
PC.
½ Shortly afterwards, the PC should have identified the new USB hardware and assigned the
appropriate driver from the R&S NRP Toolkit to the power sensor (brief message in a small
window).
If you forgot to install the R&S NRP Toolkit beforehand, Windows will try in vain to
find a USB driver for the power sensor. If this happens, the R&S FSH-Zxx is
highlighted by a yellow exclamation mark in the Windows device manager. In this
case, proceed as follows:
½
Abort the dialog for driver installation.
½
Install the R&S NRP Toolkit.
Then manually assign the USB driver from the toolkit to the power sensor.
½
Go to Control Panel – Add/Remove Hardware and start the hardware assistant to
search for new components.
½
Mark the R&S FSH-Zxx in the list of hardware components and complete the driver
installation.
½
Unplug the power sensor and reconnect it.
1165.2286.82
4.2
E-1
R&S FSH-Z1/-Z18
Installation of New R&S FSH-Z1/-Z18 Firmware
Updating the Application Firmware
The update can be started as follows:
½
Either double-click the icon of the update file named
<Type>_Messkopf_<Version Number>.nrp
½
Or start R&S NRP Toolkit – Firmware Update from the
Windows Start menu.
The dialog box on the left is displayed next.
½
If the update was started via the Windows Start menu,
enter the file name of the application firmware in the
Firmware File box (or search for the name by using the
Browse button).
½
Click the Start button to start the file transfer, which is
performed automatically.
½
Observe the following:
•
Do not disconnect the power sensor from the PC.
•
Neither connect nor disconnect the power supply for the
R&S NRP-Z3 adapter.
•
Exit the Firmware Update program only after it has been
completely executed.
½
During the update, the State Messages box informs you
of the progress. The update has been completed
successfully if the message ’Device
<Type
Designation><Serial
Number>
is
active’
appears.
½
You can then use the power sensor for measuring.
Potential problems
- Error in the compatibility and consistency checks.
In this case, the update is aborted and an error message
is output.
½
1165.2286.82
Unplug the power sensor, reconnect it and start the
update again.
4.3
E-1
Installation of New R&S FSH-Z1/-Z18 Firmware
R&S FSH-Z1/-Z18
Updating the Boot Loader
The boot loader update is similar to the update of the
application firmware (see above).
½
Instead of the application, however, you must load the
new boot loader named
Bootloader_<Version Number>.nrp
Strictly observe the warnings under "Updating the
application firmware", since the destruction of the boot
loader will generally require a repair of the power sensor.
Potential problems
- The power sensor cannot be accessed after the update
(error message).
½
1165.2286.82
Exit the Firmware Update program, unplug the power
sensor from the PC and reconnect it. The power sensor is
now ready for operation.
4.4
E-1
R&S FSH-Z1/-Z18
Shipping of Instrument and Ordering of Spare Parts
5 Documents
This section provides information for ordering spare parts and contains the relevant documents for the
Rohde & Schwarz Power Sensors R&S FSH-Z1 and R&S FSH-Z18.
Shipping of Instrument and Ordering of Spare Parts
Please contact your Rohde & Schwarz support center or our spare parts express service if you need to
request service, repair your equipment, or order spare parts and modules.
The list of Rohde & Schwarz representatives and the address of our spare parts express service are
provided in the front section of this service manual.
You will need to provide the following information in order for us to respond to your inquiries quickly and
accurately and to determine whether the warranty for your instrument is still valid:
•
•
•
•
Instrument model
Serial number
Detailed error description in case of repair
Contact partner for checkbacks
Shipping of Instrument
When shipping the instrument, be sure to provide sufficient mechanical and anti-static protection:
½
Repack the instrument as it was originally packed. The antistatic packing foil prevents unintentional
electrostatic charging from occurring.
½
If you do not use the original packaging, include sufficient padding to prevent the instrument from
slipping inside the package. Wrap antistatic packing foil around the instrument to protect it from
electrostatic charging.
Ordering Spare Parts
To deliver replacement parts promptly and correctly, we need the following information:
•
•
•
•
•
R&S stock number (refer to the spare part lists in this section)
Designation
Number of units
Instrument type for the replacement part
Contact person for possible questions
The R&S stock number to be used when ordering replacement parts and modules as well as power
cables can be found further below.
1165.2286.82
5.1
E-1
Shipping of Instrument and Ordering of Spare Parts
R&S FSH-Z1/-Z18
Ordering Replacement Sensors
Rohde & Schwarz maintains a replacement program for a number of power sensors. Within this
program, it is possible to provide a fully operational power sensor to replace a defective one at short
notice and at a fixed price. Please note that replacement sensors are used equipment but are always
tested. They are therefore equivalent to new sensors even though they may exhibit slight signs of use.
If required, the delivery of replacement sensors can include a new calibration. If interested, please
contact your nearest Rohde & Schwarz office.
1165.2286.82
5.2
E-1
R&S FSH-Z1/-Z18
Spare Parts
Spare Parts
The R&S stock numbers necessary for ordering replacement parts and modules can be found in the
spare part lists provided below.
List of R&S FSH-Z1/-Z18 Spare Parts
The following table lists available spare parts together with their R&S stock numbers.
Item No.
Electrical
identification
Designation
Stock No.
20
ANALOG BOARD
A2
**)
40
POWER SENSOR CABLE FSH-Z1
W1
1155.4563.02
60
SCREW 7985/ISR-M2X8-A4 FOR POWER SENSOR CABLE W1
80
DIGITAL BOARD
90
SCREW 7985/ISR-M2X10-A4 FOR DIGITAL BOARD A1
100
18 GHZ DETECTOR ( FSH-Z18)
A3
**)
101
8 GHZ DETECTOR (FSH-Z1)
A3
**)
150
SHIELDING
1137.6068.00 *)
160
SENSOR HOUSING
1137.6022.00
170
SCREW 7985/ISR-M2X8-A4 FOR OUTER CASING
1148.2600.00 *)
180
LABEL 1 R&S FSH-Z1
1155.4611.00
190
LABEL 2 R&S FSH-Z1
1155.4628.00
200
LABEL 1 R&S FSH-Z18
1165.1938.00
210
LABEL 2 R&S FSH-Z18
1165.1944.00
ADAPTER FROM FSH TO NRP
1155.4940.00
1148.2600.00 *)
A1
**)
1148.2917.00 *)
Note: The reference can be found in the drawings 3-3 and 3-4 in Section 3.
*) Available but not maintained in spare parts stock, i.e. delivery time may be longer.
**) Spare part not available; to be replaced only by Rohde & Schwarz Central Service.
1165.2286.82
5.3
E-1