1
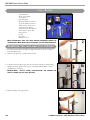
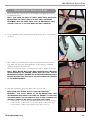
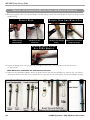
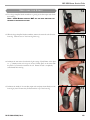
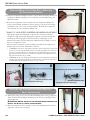
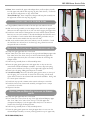
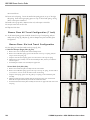
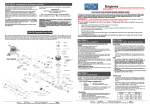
2003-2004 BOXXER SERVICE GUIDE
For exploded diagram and part number information, refer to the Spare Parts Catalog available on our website at
www.rockshox.com.
Contact your local distributor or visit the RockShox website at www.rockshox.com for ordering information.
Information contained in this publication is subject to change at anytime without prior notice.
For the latest technical information, visit our website at www.rockshox.com.
Names used in this manual may be trademarks or registered trademarks of others.
© SRAM Corporation • December 2003
PN 95.4308.635.000, Rev. C
2003-2004 Boxxer Service Guide
TOOLS NEEDED
Torque Wrench
Plastic Faced Mallet
3/8" Ratchet
Snap Ring Pliers
Small Flat Blade Screwdriver
Large Flat Blade Screwdriver
24mm Socket, 32mm Socket
3 and 5mm Hex Wrench
Adjustable Open End Wrench
Dental Pick, or Sharp Pick
Safety Glasses
Oil Pan
Judy Butter
RockShox 5wt oil
NOTE: THOROUGHLY READ THIS GUIDE BEFORE PERFORMING SERVICE ON
YOUR PRODUCT. NOTE WHAT KIND OF KITS/PARTS YOU MAY NEED TO REPLACE.
2
R E M OV I N G TO P CA P S A N D C O I L S P R I N G S
1. Loosen the crown bolts and slide the upper and lower crown up to remove
from the upper tubes.
2. Remove top caps using a 24mm socket wrench.
3. Compress the fork upper tubes into the lower legs and remove white spring
spacers/All Travel spacers from top of each spring (Boxxer Race 7" travel
configuration). See fig 3a.
BOXXER RACE:
FOR 6"
3b
TRAVEL CONFIGURATION, THE SPRINGS ARE
DIRECTLY UNDER THE TOP CAPS
4. Remove springs from upper tubes.
100
3a
(FIG 3B)
4
© SRAM Corporation • 2003-2004 BOXXER SERVICE GUIDE
2003-2004 Boxxer Service Guide
REMOVING OIL FROM
THE
FORK
5. Invert the fork into a large oil pan. Cycle (compress) the upper tubes until oil
has drained from fork.
5
NOTE: JUST UNDER THE SPRING IS A WHITE SPRING PERCH SPACER (FOR
BOXXER RACE THE SPRING PERCH IS ON BOTH SIDES, FOR BOXXER
TEAM/WORLD CUP THE SPRING PERCH IS ON THE REBOUND SIDE ONLY).
THIS MAY SLIDE OUT OF THE FORK WHEN THE FORK IS INVERTED.
6. Using a 5mm hex wrench, unscrew both shaft bolts three turns. Leave bolts in
the shafts.
7. With a mallet, tap the shaft bolts to release the internal shafts from the lower
legs. After both shafts have been tapped free of the lower legs, completely
unthread and remove the shaft bolts.
6
7
Inspect the nylon crush washers and crush washer retainers. Replace if necessary.
NOTE: EARLY BOXXER RACE
FORKS WERE ASSEMBLED WITH TWO WHITE
CRUSH WASHERS ON THE REBOUND DAMPER SHAFT BOLT SIDE.
THE 03
BOXXER RACE EXTERNAL HARDWARE KIT INCLUDES CRUSH WASHER, CRUSH
WASHER RETAINERS AND SHAFT BOLTS FOR BOTH PRODUCTION VERSIONS
OF THE
03 BOXXER RACE.
8. Pull apart the lower leg from each upper tube over the oil pan.
NOTE: THERE
MAY BE SOME OIL STILL INSIDE THE LOWER LEG.
IMPORTANT:
THE
INITIAL VERSION OF THE
8
03 BOXXER RACE FORK
IF YOUR FORK
INCLUDED BRAKE BOSS HOLES IN THE LOWER LEG ASSEMBLY.
HAS BRAKE BOSSES, THE FOLLOWING KITS MUST BE USED TO SERVICE THE
(THESE KITS ARE SPECIFIC TO BOSSED LOWER LEGS):
11.4307.311.002 03 Boxxer Race HC2 Rebound Damper Assy (Boss Lower Leg)
11.4307.663.000 03 Boxxer Race Compression Rod Kit (Boss Lower Leg)
11.4307.664.000 03 Boxxer Race Shaft Bolt Kit (Boss Lower Leg
INTERNALS
•
•
•
PN 95.4308.635.000, REV. C
101
2003-2004 Boxxer Service Guide
R EMOVING
THE
C OMPRESSION /N EUTRAL S HAFT
AND
R EBOUND A SSEMBLIES
9. With snap ring pliers, remove the rebound damper assembly and the neutral shaft assembly(Race)/compression damper (Team
and World Cup).
BOXXER RACE
2003 Boxxer Race
Rebound Damper
2003-04 Boxxer Race
Neutral Shaft
BOXXER TEAM AND WORLD CUP
2003 Boxxer WC Rebound
Damper
2003-04 Boxxer Team and WC
Compression Damper
R E B O U N D B A S E VA LV E :
ALL 2004 MODELS
10. Inspect the damper piston o-ring or glide ring, and replace if worn, cut or torn. 03-04 Boxxer Damper Service Kit
(11.4308.333.000).
NOTE: BASE
VALVE APPEARANCE AND CONFIGURATION MAY VARY.
11. Inspect the rebound damper adjuster window for proper function with the rebound adjuster or 3mm hex key. The window
should open and close smoothly. If the window does not open and close smoothly, replace HC2 rebound damper assembly.
11
10a
10b
102
© SRAM Corporation • 2003-2004 BOXXER SERVICE GUIDE
2003-2004 Boxxer Service Guide
SERVICING
THE
SEALS
12
12. Use a large sharp flat blade screwdriver to gently pry the dust wiper seals from
the lower leg.
NOTE: 03-04 BOXXER
FORKS DO
WASHER IN THE SEALING SYSTEM.
NOT
USE THE SNAP RING AND FLAT
13. With the large sharp flat blade screwdriver, remove the main oil seals from the
lower leg. Clean the area of the lower leg with a rag.
14. Lubricate the new main oil seals with a light coating of Judy Butter. Then place
a 1 ¼" (32mm) socket tool on top of the seal. Firmly press on the socket with
the palm of your hand to install the oil seal. Ensure the seal is completely
seated inside the lower leg.
15. Lubricate the inside of the new dust wiper seals and press them firmly into the
lower leg by hand. Ensure they fit flush with the top of the lower leg.
PN 95.4308.635.000, REV. C
13
14
15
103
2003-2004 Boxxer Service Guide
T EAM
AND
W ORLD C UP F ORKS O NLY : S ERVICING
THE C OMPRESSION D AMPER
16
16. Clamp the compression damper rod into a soft-jaw alum vice clamp. Remove the
compression damper end plug from the compression rod assembly using a flat
adjustable wrench.
17. Remove the compression valve assembly from the compression damper rod.
Using a small flat-blade screwdriver, remove the large o-ring from the end plug
and replace it with a new o-ring (11.4304.700.000). Re-install the compression
valve assembly into the compression damper rod.
TUNING TIP: HIGH-SPEED COMPRESSION DAMPING ADJUSTMENT
High-speed compression adjustment can alter the rate at which your Boxxer
compresses at high shaft speeds. High-speed compression results from large hits
and drops, as well as high-speed consecutive obstacles. Depending on your
preference, the terrain, and your riding style, adjustments may be made to control
the rate of compression stroke.
With the internal compression valve assembly removed from the compression
damper shaft you may make adjustments as follows:
•
17
To increase the amount of high-speed compression (slower compression at high shaft
speeds), use an open-end adjustable wrench on the high-speed preload nut, and insert a
2.5 mm hex wrench (3mm hex for 1998-2002) into the threaded shaft end. Turn the
high-speed preload nut clockwise. Two full turns will make a noticeable difference in
high-speed compression (fig. A and B).
To decrease the amount of high-speed compression (faster compression at high shaft
speeds) turn the high-speed preload nut counterclockwise. Two full turns will make a
noticeable difference in high-speed compression (fig. A and C).
•
A
R EBOUND
B
C OMPRESSION D AMPER /N EUTRAL
S HAFT I NSTALLATION
AND
C
18
19
18. Add a light coating of 5wt oil to the rebound damper piston o-ring or glide ring.
Insert the HC2 rebound damper assembly into the bottom of the right (rider's
right) upper tube.
BOXXER RACE: BEFORE INSTALLING THE REBOUND DAMPER
PAGES 1 AND 8 FOR ALL TRAVEL CONFIGURATIONS.
ASSEMBLY, SEE
19. Slide the rebound base valve assembly over the rebound damper shaft and into
upper tube. Secure with a snap ring.
104
© SRAM Corporation • 2003-2004 BOXXER SERVICE GUIDE
2003-2004 Boxxer Service Guide
20 Race: Insert neutral shaft, upper tube adapter sleeve, and base plate assembly
into left upper tube and fix with snap ring (fig 20a, 6-inch shown). For Boxxer
race All Travel configuration, see figs. 43a and 43b.
Team/World Cup: Insert compression damper and base plate assembly into
left upper tube and fix with snap ring (fig. 20b).
I N S TA L L I N G
THE
20a
20b
LOWER LEGS
21. Using Judy Butter, lubricate the inside of the dust wiper seals and main oil seals.
22. Slide the lower leg assembly over the damper shafts, and onto the upper tubes.
Make sure the dust wiper seals do not roll over when engaging the upper tubes.
23. Install new crush washers if damaged into the crush washer retainers (Boxxer
Race may use two crush washers on the rebound damper shaft bolt! Be sure to
note the number of crush washers befor dissassembling and make sure you
install it with the same number that they came off with.).
24. Slide crush washer retainer (with crush washers) onto the shaft bolts. Install
the shaft bolts into the bottom of the lower legs using a 5mm hex wrench.
Torque shaft bolts to 60 in-lbs.
B O X X E R R A C E I N S TA L L I N G
THE
SPRINGS
AND
OIL
25. Clamp the right upper tube into a fork stand.
26. Pour 190cc/ml of 5wt oil into the top of the right (rebound damper) upper tube.
Pour 190cc/ml of 5wt oil into the top of the left (neutral shaft) upper tube.
Cycle the upper tubes slowly five or six times to circulate the oil through the
damper circuits.
27. Pull lower leg assembly down to full-extended position.
28. Insert the spring perch spacers into each upper tube so they rest into the
neutral shaft and rebound damper assemblies. To insert, drop each spring
perch, narrow end down, into the top of the upper tube (figure 30a and b).
29. Insert each coil spring, adding preload spacers as needed.
30. 7-inch Travel Only: Insert the All-Travel/spring spacer (white) on the top of
the coil spring, one on each side. In the 6 inch travel setting, the All Travel
spacer will be located on the rebound and neutral shaft assemblies. See fig. 30b
for correct spacer orientation.
31. Install each top cap with a 24mm socket wrench and torque to 60 in-lbs.
32. Install the lower crown/steerer tube assembly, and upper crown. Torque
crown bolts to 65 in-lbs.
33. Wipe the fork clean.
30a
6-inch Boxxer Race
30b
BOXXER TEAM AND WORLD CUP INSTALLING THE SPRINGS
AND OIL
34. Clamp the right upper tube into a fork stand.
35. Pour 190cc/ml of 5wt oil into the top of the right (rebound damper) upper
tube. Pour 190cc/ml of 10wt oil into the top of the left upper tube
(Compression Damper). Cycle the upper tubes slowly five or six times to
circulate the oil through the damper circuits.
36. Pull lower leg assembly down to fully extended position.
37. Insert the spring perch spacer into the right upper tube so it rests onto the
rebound damper assembly. To insert, just drop perch into top of upper tube,
PN 95.4308.635.000, REV. C
7-inch Boxxer Race
105
2003-2004 Boxxer Service Guide
narrow end down.
38. Insert each coil spring. Insert the small white spring spacer on top of the right
side spring. Insert the longer spring spacer on top of the left side spring. See fig.
38 for correct parts orientation.
38. Install each top cap with a 24mm socket tool, and torque to 60 in-lbs.
39. Torque crown bolts to 65 in-lbs.
40. Wipe the fork clean.
38
B o x x e r R a c e A l l Tr a v e l C o n f i g u r a t i o n ( 7 i n c h )
41. An All Travel spring spacer should be located on top of each spring, and just
under each top cap (fig. 30b).See fig. 43a for damper base plate assembly parts
configuration.
B o x x e r R a c e : S i x I n c h Tr a v e l C o n f i g u r a t i o n
42. The spring is located just under each top cap (fig. 30a).
43. Rebound Damper (Right) Side (fig 43a):
a. Remove base valve assembly from rebound damper shaft.
b. Remove the small black spring cap from the bottom of the top out spring. Pull/unsnap to remove the spring cap.
c. Snap the white All Travel/spring spacer onto the bottom of the top out spring.
d. Slide the base valve assembly onto the rebound damper shaft, and rest just under the
All Travel spacer.
e. Install damper and base valve assembly into upper tube.
43a
Neutral Shaft (Left) Side (43b):
a. Remove the neutral base plate assembly from the neutral shaft.
b. Remove the small black spring cap from the top of the top out spring. Set this aside in
your tool box. It is not used in the fork in 6 inch travel setting.
c. Snap the white spring spacer onto the gold top out spring on the neutral base plate
assembly.
d. Slide the neutral base plate assembly, white all-travel spacer first, onto neutral shaft.
White all-travel spacer should be just under the neutral shaft head.
e. Install neutral shaft and base plate assembly into bottom of upper tube and secure with
snap ring.
106
43b
© SRAM Corporation • 2003-2004 BOXXER SERVICE GUIDE