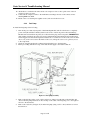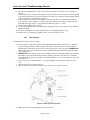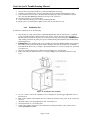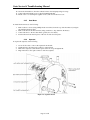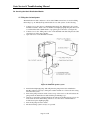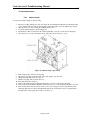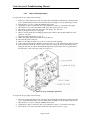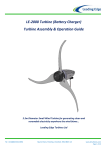
1
OASIS SERVICE &
TROUBLESHOOTING MANUAL
(WITH DM10 OR DM12)
Revision 1.0
Page 1 of 50
THE INFORMATION CONTAINED IN THIS DOCUMENT IS THE SOLE PROPERTY OF INTERNATIONAL THERMAL
RESEARCH, LTD. ANY REPRODUCTION IN PART OR AS A WHOLE WITHOUT THE WRITTEN PERMISSION OF
INTERNATIONAL THERMAL RESEARCH, LTD. IS PROHIBITED
Oasis Service & Troubleshooting Manual
__
!
#$% "
&
&' + '
%1(
& ' ,-.
1 221%
3 4 - #1
(1%
56
- #1
#
(1%
"
"
"
$' # %(
,
) ' / ' !"
%1(
%%
)*
0(-(
100$1##
3 4 $- 100$1%% 2
*
Right to Modify:
Due to our commitment for quality and ongoing product improvement,
ITR reserves the right to modify or change without notice, any
materials, applications, equipment, accessories, and/or prices. All
measurements and weights are approximate.
Page 2 of 50
$- 100$1#(
Oasis Service & Troubleshooting Manual
__
TABLE OF CONTENTS
LIST OF FIGURES..............................................................................................................................................4
0.0
GENERAL INFORMATION ...............................................................................................................5
1.0
OPERATION OF THE OASIS HEATING MODULE ......................................................................6
1.1
1.2
2.0
BURNER ...............................................................................................................................................6
ELECTRIC HEATING ELEMENTS ............................................................................................................9
OPERATION OF THE OASIS DISTRIBUTION MODULE..........................................................10
2.1
DOMESTIC HOT WATER .....................................................................................................................11
2.2
CABIN HEAT.......................................................................................................................................11
2.2.1 DM10 ............................................................................................................................................12
2.2.2 DM12 ............................................................................................................................................12
2.3
JUMPERS.............................................................................................................................................12
3.0
TROUBLESHOOTING.......................................................................................................................14
3.1
SYSTEM ..............................................................................................................................................14
3.2
OASIS HEATING MODULE ..................................................................................................................18
3.2.1 Compressor ...................................................................................................................................18
3.2.2 Fuel Pump .....................................................................................................................................19
3.2.3 Combustion Fan ............................................................................................................................21
3.2.4 Ignitor............................................................................................................................................22
3.2.5 Flame Out .....................................................................................................................................23
3.2.6 Voltage ..........................................................................................................................................27
3.2.7 Low Water .....................................................................................................................................28
3.3
OASIS DISTRIBUTION MODULE ..........................................................................................................30
4.0
SERVICING THE OASIS HEATING MODULE ............................................................................32
4.1
INDICATIONS SERVICE IS REQUIRED ..................................................................................................32
4.2
CLEANING THE COMBUSTION CHAMBER ............................................................................................33
4.3
PART REPLACEMENTS ........................................................................................................................34
4.3.1 Compressor ...................................................................................................................................34
4.3.2 Fuel Pump .....................................................................................................................................35
4.3.3 Fuel Solenoid ................................................................................................................................36
4.3.4 Combustion Fan ............................................................................................................................37
4.3.5 Hour Meter....................................................................................................................................38
4.3.6 Aquastat ........................................................................................................................................38
4.3.7 Igniter............................................................................................................................................39
4.3.8 Fuel Filter .....................................................................................................................................40
4.3.9 Fuel Nozzle....................................................................................................................................41
4.3.10 Flame Sensor.................................................................................................................................42
4.3.11 Level Switch ..................................................................................................................................43
4.3.12 Primary Electric Heating Element ................................................................................................44
4.3.13 Secondary Electric Heating Element ............................................................................................45
4.3.14 Air Filter .......................................................................................................................................46
5.0
SERVICING THE OASIS DISTRIBUTION MODULE..................................................................47
5.1
FILLING THE COOLANT SYSTEM .........................................................................................................47
5.2
PART REPLACEMENTS ........................................................................................................................48
5.2.1 Summer pump................................................................................................................................48
5.2.2 Loop 1 and Loop 2 pumps .............................................................................................................49
Page 3 of 50
Oasis Service & Troubleshooting Manual
__
List of Figures
Figure 1: Oasis Heating Module ............................................................................................... 6
Figure 2: Burner schematic....................................................................................................... 7
Figure 3: Front of Oasis Heating Module ................................................................................. 8
Figure 4: Oasis Remote Operating Panel.................................................................................. 9
Figure 5: Electric heating components schematic .................................................................. 10
Figure 6: Oasis Distribution Module ...................................................................................... 10
Figure 7: distribution module zone board............................................................................... 11
Figure 8: Distribution Module Zone Board Jumpers.............................................................. 12
Figure 9: ITR Cabin Fan (Aquastat Wiring)........................................................................... 14
Figure 10: Oasis Heating Module Components...................................................................... 18
Figure 11: Burner box components......................................................................................... 33
Figure 12: Compressor components ....................................................................................... 34
Figure 13: Fuel pump assembly.............................................................................................. 35
Figure 14: Fuel solenoid components ..................................................................................... 36
Figure 15: Combustion fan mounting ..................................................................................... 37
Figure 16: Aquastat mount...................................................................................................... 38
Figure 17: Igniter assembly .................................................................................................... 39
Figure 18: Fuel filter assembly ............................................................................................... 40
Figure 19: Fuel nozzle assembly............................................................................................. 41
Figure 20: Flame sensor attachment ....................................................................................... 42
Figure 21: Level switch assembly........................................................................................... 43
Figure 22: Primary element location....................................................................................... 44
Figure 23: Air filter assembly................................................................................................. 46
Figure 24: Initial fill up Oasis system..................................................................................... 47
Figure 25: Summer Pump replacement................................................................................... 48
Figure 26: Loop 1&2 pump replacement................................................................................ 49
Page 4 of 50
Oasis Service & Troubleshooting Manual
__
0.0 General Information
TOOLS
The tools in this list should be considered the minimum required for performance of routine maintenance,
servicing and minor repair work.
• Wrench Sizes 11/32 , 9/16 , 5/8 , 7/8 , 15/16 , 13/8
• Socket Wrench Sizes ¼ , 5/16 , 7/16 , 11/32
• Adjustable Crescent Wrench
• Phillips Head Screw Driver No. 2
• Flat Head Screw Driver
• Combination pliers
• Pliers – vise grip
• Pliers – needle nose
• Multi meter
MAXIMUM TORQUE VALUES
The fasteners used to assemble this heater are all US thread size. Most threaded fasteners should be tightened to
a specific torque value. Over tightening the fastener can weaken it and cause it to break, while under tightening
can cause it to eventually come loose. Below is a table with the specific torque values for each type of
bolt/screw used in this heater. Be sure to follow the recommendations closely.
Table 1: Fastener Torque values
U.S. THREAD SIZE
Ft-lbs
#8
2
#10
3
¼-20
6 to 9
3/8-16
22 to 32
Page 5 of 50
In-lbs
24
36
72 to 108
264 to 384
Nm
3
4.5
9 to 12
30 to 43
Oasis Service & Troubleshooting Manual
__
1.0 Operation of the Oasis Heating Module
The Oasis Heating Module has two sources of heat; a 50,000 BTU burner and two 1500 Watt immersion
electric heating elements. The burner is the primary heat source and the electric heating elements are used as a
secondary heat source.
Figure 1: Oasis Heating Module
1.1 Burner
The burner consists of the following 12VDC components:
• Air compressor (10)
• Fuel pump (8)
• Fuel solenoid (5)
• Combustion fan (9)
• Igniter (2)
Page 6 of 50
Oasis Service & Troubleshooting Manual
__
Figure 2: Burner schematic
When the burner is activated (burner switch on Oasis Remote Operating Panel, must be turned ON), it will go
through the following ignition sequence:
1.
2.
3.
4.
5.
6.
7.
8.
The igniter will turn ON and the combustion fan will turn OFF.
The igniter will glow for 10 seconds to allow it to reach ignition temperature.
After the igniter has been glowing for 10 seconds, the air compressor, fuel pump, fuel solenoid, and
combustion fan will turn ON.
The air compressor provides a constant air supply to the nozzle under a specific pressure and flow rate.
This air is filtered before it enters the compressor. In the nozzle the compressed air is guided over the tip of
the nozzle where it creates a negative pressure in the center tube. This negative pressure is used to draw
fuel from the fuel regulator. All fuel lines from the regulator to the nozzle must be air tight. Any leaks will
have an adverse effect on the flame. The nozzle produces a solid cone pattern spray with extremely fine
particles of fuel. This spray is then ignited when it makes contact with the igniter.
The fuel pump pumps fuel from the fuel tank up to the fuel regulator. Before the fuel enters the fuel pump,
it passes an internal fuel filter. Fuel is only allowed to pass the regulator when there is a negative pressure
between the regulator and the nozzle. In between the regulator and the nozzle is a fuel solenoid. This fuel
solenoid prevents the fuel from being drawn back from the nozzle when the burner is off. This allows for a
clean ignition.
The combustion fan draws outside air which is used to create a forced air flow through the combustion
chamber for optimal combustion and to exhaust the combustion gasses through an exhaust pipe system into
the atmosphere.
After ignition takes place, the igniter will remain ON for an additional 5 seconds. This is so if there are any
air bubbles in the system, the atomized fuel will continue to be ignited.
After 5 seconds, the igniter will turn OFF and the air compressor, fuel pump, fuel solenoid, and
Combustion fan will remain ON. At this point the flame sensor will also look for a flame.
Page 7 of 50
Oasis Service & Troubleshooting Manual
9.
__
The burner will continue to run until one of the following occurs:
• The coolant inside of the Oasis Heating Module reaches the set operating temperature range
• The burner switch is turned off
• The power button is pressed
• The reset button is pressed
• One of the components fault
• A flame out occurs
• A low water level fault occurs
• A voltage fault occurs
Note: After any of the above situations, the combustion fan will run for 2 minutes to purge exhaust gases from
the system. The only time the combustion fan will not run after the system cycles/faults/resets is when the
combustion fan has faulted. In this case all of the burner components will shut down immediately.
This ignition sequence can be followed by observing the diagnostic LED’s on the front of the Oasis Heating
Module (Figure 3). If any of the burner components happen to fault during the ignition sequence or during the
operation of the burner, the burner components will shut down and the diagnostic LED’s associated with those
components will flash.
Figure 3: Front of Oasis Heating Module
Table 2: Diagnostic Information
Diagnostic LED’s
Power LED
AC Heat
Compressor
Fuel Pump
Combustion Fan
Igniter
Flame Out
Voltage
Low Water
Normal Operation
ON
ON
ON
ON
ON
ON
OFF
OFF
OFF
Page 8 of 50
FAULT
FLASHING
FLASHING
FLASHING
FLASHING
ON
ON
ON
Oasis Service & Troubleshooting Manual
__
If the diagnostic LED’s are indicating a fault, refer to the troubleshooting section (3.2) for the appropriate fault
to troubleshoot the problem.
Notes on flame out:
If the flame goes out while the burner is running, the flame sensor will detect a flame-fault after 2 seconds. If
the flame goes out during the ignition period (5 seconds), the flame sensor will detect a flame fault 2 seconds
after the ignition period (i.e. 7 seconds from the start of the ignition period).
After the first flame-fault, the burner will attempt the ignition sequence one more time. If the flame goes out a
second time within a 2 minute period of the initial flame out, then the Oasis Heating Module will shut down and
the combustion fan will purge for 2 minutes and turn OFF. The Oasis Heating Module will remain in this state
until the reset button on the Oasis Heating Module is pressed or until the burner switch on the Oasis remote
operating panel is turned OFF (delay 1 second) and turned ON again.
Notes on voltage fault:
When the voltage goes below 10.5 volts for a period of more than 10 seconds, the Oasis Heating Module will
shut down. If the voltage goes above 10.5 volts, the heater will restart. If the voltage drops below 10.5 volts a
second time within a 2 minute period of the initial low voltage fault, then the Oasis Heating Module will shut
down and the combustion fan will purge for 2 minutes and turn OFF. The Oasis Heating Module will remain in
this state until the reset button on the Oasis Heating Module is pressed or until the burner switch on the Oasis
remote operating panel is turned OFF (delay 1 second) and turned ON again.
1.2 Electric Heating Elements
When AC power is available, the AC heat LED on the Oasis Heating Module (Figure 3) will turn ON. This only
indicates that AC power is available and does not indicate that the electric heating elements have been activated.
The user has the option of using the electric heating elements by placing the AC switch on the Oasis remote
operating panel in the ACI or ACI & ACII position (see Figure 4).
Figure 4: Oasis Remote Operating Panel
The ACI position will turn on the primary electric heating element. The ACI & ACII position will turn on the
primary and secondary electric heating elements. The OFF position will turn both electric heating elements
OFF. When either of the electric heating elements has been activated, the AC heat LED on the Oasis remote
operating panel will turn ON. See Figure 5 for the location of the primary and secondary electric heating
elements.
Page 9 of 50
Oasis Service & Troubleshooting Manual
__
Figure 5: Electric heating components schematic
Note: If AC power is not available at the primary AC connection to the Oasis Heating Module, the AC
elements will not operate. The primary AC connections (HOT and NEUTRAL) are tied together with BLACK
heat shrink inside of the AC box on the top left side of the Oasis Heating Module (see Figure 5).
2.0 Operation of the Oasis Distribution Module
The purpose of the Oasis Distribution Module (see Figure 6) is to circulate hot coolant (generated by the Oasis
Heating Module and/or the Engine) through the system, whether it is for domestic hot water, engine heat/preheat, or cabin heat.
Figure 6: Oasis Distribution Module
Page 10 of 50
Oasis Service & Troubleshooting Manual
__
The Oasis Distribution Module consists of the following 12VDC components:
• Summer Pump
• Loop 1 Pump
• Loop 2 Pump
The Oasis Distribution Module activates only when the coolant inside of the Oasis Heating Module has reached
a pre-set temperature range and there is a call for cabin heat or domestic hot water. It detects the coolant
temperature by using a temperature sensor (see Figure 17) that is mounted inside of the Oasis Heating Module,
on the coolant tank.
The distribution module zone board (see Figure 7) will indicate what components are activated by lighting the
green LED next to the component name. If a component has blown a fuse, the Red LED next to the component
name will be lit.
Figure 7: distribution module zone board
2.1 Domestic Hot Water
The call for domestic Hot water is automatic. There is a temperature sensor mounted on the domestic water inlet
pipe to the heat exchanger. Once the hot water tap is opened, the domestic water will begin circulating through
this heat exchanger. Once the inlet pipe cools below a pre determined temperature range, the distribution
module zone board will respond to a call for domestic hot water, as long as it detects that heat is available inside
of the Oasis Heating Module. In this situation, the distribution module zone board will turn on the summer
pump and will circulate hot coolant through a small loop (summer loop) that goes through the heat exchanger
and back to the Oasis. This will allow a constant supply of hot water, whenever the domestic hot water is used.
2.2 Cabin Heat
The distribution module is available in 2 versions. One is the DM10 which has all of the cabin fans on a single
loop. The other is the DM12 which has the cabin fans on two separate loops. Depending on the installation, the
user can have one thermostat to control multiple zones, or multiple thermostats to control multiple zones. When
the thermostat(s) call for heat in one or more zones, the distribution module zone board will indicate what zones
are calling for heat by lighting the Green LED next to the zones.
Page 11 of 50
Oasis Service & Troubleshooting Manual
2.2.1
__
DM10
Once a thermostat in any zone calls for heat, the distribution module zone board will activate the Loop 1 pump
and cabin fans associated with the zones calling for heat. When this happens, the Loop 1 pump forces the
coolant to flow through the large cabin fan loop. When using hot water, less heat is available for the cabin fan
loop. Domestic hot water supply has priority over space heating. Note that the summer pump will not run when
the Loop 1 pump is running. The Loop 1 pump moves the coolant through the domestic water heat exchanger as
well.
2.2.2
DM12
Once a thermostat in zone 1 or 2 calls for heat, the distribution module zone board will activate the Loop 1
pump and cabin fans associated with the zones calling for heat. When this happens, the Loop 1 pump forces the
coolant to flow through the first cabin fan loop. Once a thermostat in zone 3, 4, or 5 calls for heat, the
distribution module zone board will activate the Loop 2 pump and cabin fans associated with the zones calling
for heat. When this happens, the Loop 2 pump forces the coolant to flow through the second cabin fan loop.
Note that both cabin fan loops can be activated at the same time. When using hot water, less heat is available for
the cabin fan loops. Domestic hot water supply has priority over space heating. Note that the summer pump will
not run when the Loop 1 pump or Loop 2 pump is running. The Loop 1 and Loop 2 pumps move the coolant
through the domestic water heat exchanger as well.
2.3 Jumpers
The bypass jumper (activated via a switch mounted on the top of the distribution module zone board) can be
used in conjunction with a purge pump to initially fill the system with coolant. When this jumper is activated,
the Loop 1 and Loop 2 pumps turn on and push coolant through the entire system. Once the system is filled and
purged of air, the bypass switch must be turned OFF.
The series jumper is in place for distribution module zone boards used with the DM10. The jumper is removed
for distribution module zone boards that are used with the DM12.
Figure 8: Distribution Module Zone Board Jumpers
Page 12 of 50
Oasis Service & Troubleshooting Manual
__
Table 3: Distribution module zone board jumpers
Jumper Name
Jumper Function
This jumper is in place when the distribution module zone board is used with a DM10
Series Loop
(series plumbed system). When this jumper is in place, all zones will activate the Loop 1
Jumper
pump.
This jumper is used to fill/purge the system. This jumper activates the Loop 1 and Loop 2
pumps. A switch that is mounted on top of the distribution module zone board is
Bypass Jumper
connected to this jumper. To activate this jumper, the switch should be turned to the ON
position.
IMPORTANT: Make sure the bypass switch is NOT in the ON position during normal operation. The switch
should only be used when the system is initially hooked up to prime the pumps in the Oasis Distribution
Module. The pumps should not be run dry.
Page 13 of 50
Oasis Service & Troubleshooting Manual
__
3.0 Troubleshooting
3.1 System
The Burner switch is in the ON position, and the thermostats are calling for heat, but there is no cabin fan heat
or domestic hot water available.
Ensure that the Oasis Heating Module is powered ON (Power LED on the front cover must be ON – see Figure
3). Check the burner LED on the Oasis remote operating panel (Figure 4). Proceed to Q1.
Q1: Is the burner LED on the Oasis remote operating panel ON?
IF YES:
Check the service LED on the Oasis remote operating panel. Proceed to Q2.
IF NO:
Check the connections from the Oasis remote operating panel to the distribution module zone
board and from the distribution module zone board to the Oasis Heating Module. Proceed to
Q6.
Q2: Is the service LED on the Oasis remote operating panel ON?
IF YES:
There is a problem with the Oasis Heating Module. Look at the front panel of the Oasis
Heating Module and refer to the diagnostic section (section 3.2) for additional information.
IF NO:
Check to see if the burner portion of the Oasis Heating Module is firing. Proceed to Q3.
Q3: Is the burner portion of the Oasis Heating Module firing?
IF YES:
If the temperature sensors on the cabin fans (If using ITR fans) have not been wired into the
circuit (see Figure 9), and if the system is cold, the cabin fans will blow cold air (until the
heated coolant reaches the fans) when the thermostats are calling for heat.
Figure 9: ITR Cabin Fan (Aquastat Wiring)
IF NO:
If the system is cold, it will take approximately 15 minutes for the diesel portion of the Oasis
Heating Module to heat the coolant loop. Proceed to Q4.
Check to see if the Oasis Heating Module is heating the coolant. Feel the pressure relief cap
on top of the Oasis Heating Module. Be careful as the cap can be very HOT. Proceed to Q5.
Q4: Are the cabin fans blowing cold air after 15 minutes?
IF NO:
There is no problem. The system is operating as expected.
IF YES:
The Oasis Distribution Module is not circulating the coolant properly. See the Servicing the
Oasis Distribution Module (section 5.0) for troubleshooting.
Page 14 of 50
Oasis Service & Troubleshooting Manual
__
Q5: Is the pressure relief cap in the Oasis Heating Module hot?
IF YES:
The Oasis Heating Module is cycling. The Oasis Distribution Module is not circulating the
coolant properly. See the Servicing the Oasis Distribution Module (section 5.0) for
troubleshooting.
IF NO:
The Operating temperature sensor may be damaged. Contact ITR for further assistance.
Q6: Are the connections from the Oasis remote operating panel to the distribution module zone board and from
the distribution module zone board to the Oasis Heating Module secure?
IF NO:
Secure the connections at the Oasis remote operating panel, distribution module zone board,
and Oasis Heating Module.
IF YES:
Contact ITR for further assistance.
AC switch is in AC I position or AC I & AC II position, but the AC Heat LED is not lit.
Ensure that the Oasis Heating Module is powered ON (Power LED on the front cover must be ON – see Figure
3).
If the thermostats are calling for heat, check if the fans are blowing warm air. If the thermostats are not calling
for heat, turn on the hot water tap and check for hot water.
Q1: Are the fans blowing warm air or is the domestic water hot?
IF YES:
The heater is cycling. This is part of the normal operation. Once the coolant inside the heater
reaches a pre-set temperature range, it will turn off the burner as well as the AC elements until
the temperature drops below the pre-set temperature range.
IF NO:
Locate the breaker panel where the AC elements are connected. Note that each AC element
must be connected to a separate 15 amp breaker. Place each breaker (individually) in the ON
position, starting with the breaker labeled “primary”, or “ACI”. Check to see if the breaker
trips. If the breaker does not trip, observe the AC heat LED on Oasis remote operating panel.
After the “primary” AC breaker is turned on, turn on the breaker labeled “secondary”, or
“ACII”. Check to see if the breaker trips. Proceed to Q2.
Q2: Does the AC heat LED turn on once the primary AC breaker is put into the ON position?
IF YES:
Problem solved.
IF NO:
Proceed to Q3
Q3: Do the “primary” or “secondary” AC element breakers trip once they are placed in the ON position?
IF YES:
IMPORTANT: Ensure both AC element breakers are in the OFF position and that all
incoming AC power is turned OFF before proceeding with the next step. Failure to do so can
result in SERIOUS INJURY or DEATH. Remove the AC access cover (Figure 1) on the
Oasis Heating Module and check the AC wiring.
The hot and neutral wires for the primary AC element are bound together with BLACK heat
shrink. The hot and neutral wires from the primary AC element breaker should be connected
to these wires (BLACK – hot, WHITE – neutral). The hot and neutral wires from the
secondary AC element breaker should be connected to the remaining BLACK and WHITE
wires. If there is no secondary AC element breaker, these wires should be left unconnected.
Page 15 of 50
Oasis Service & Troubleshooting Manual
IF NO:
__
The ground (GREEN) wire on the Oasis Heating Module should be connected to the ground
wire of the breaker panel. Proceed to Q7.
Check that the AC supply is available and that the main AC breaker is ON. Proceed to Q4.
Q4: Is AC supply available and is the main AC breaker ON?
IF NO:
Ensure that AC power is available and that the main AC breaker is ON. Note that each AC
heating element is a 1500 Watt element (12.5 amps @ 120VAC). Ensure that the combined
load of the AC heating elements and the rest of the electrical equipment does not exceed the
available AC supply, otherwise the main breaker will trip.
IF YES:
Remove the access panel to the AC high limit temperature sensors (Figure 1). The two high
limit temperature sensors on the top of the tank should be accessible. Attempt to reset the high
limit temperature sensors by pressing the square red button on the top of the sensors. If the
buttons on either of the high limit temperature sensors click or are able to be pushed down,
then this indicates that the high limit temperature sensor has tripped. Proceed to Q5.
Q5: Have one or both of the high limit temperature sensors tripped?
If YES:
Contact a service representative before attempting to run the heater again.
IF NO:
Check to see if the Oasis Heating Module is heating the coolant. Feel the pressure relief cap
on top of the Oasis Heating Module. Be careful as the cap can be very HOT. Proceed to Q6.
Q6: Is the pressure relief cap of the Oasis Heating Module tank hot?
IF YES:
The Oasis Heating Module is cycling. The Oasis Distribution Module is not circulating the
coolant properly. See the Servicing the Oasis Distribution Module (section 5.0) for
troubleshooting.
IF NO:
There could be a problem with the AC detector relay. Contact ITR for further assistance.
Q7: Are the AC elements wired correctly?
IF NO:
Correct the wiring and put the wires back into the AC box on the Oasis Heating Module. Turn
ON the breakers for the AC elements and turn ON the incoming AC power.
IF YES:
Turn off the power button (front panel of Oasis Heating Module) and allow the heater to
completely power down (this will take 2 minutes). Remove the screws on the front panel of
the Oasis Heating Module and fold down the front panel (do not disconnect the plug on the
front panel). IMPORTANT: when folding down the front panel, place spacers underneath
the panel which will prevent the buttons from being pressed.
Disconnect the yellow connectors with the matching BLACK and YELLOW heat shrink (left
side of the burner box). Wrap the connectors in electrical tape. Fold up the front panel of the
Oasis Heating Module and turn ON the power button. Go back to the AC breaker panel and
place the primary and secondary AC element breakers in the ON position and turn on the
incoming AC power. Check to see if the breakers trip. Proceed to Q8.
Q8: Did the primary or secondary AC element breakers trip once the yellow connectors were disconnected?
IF YES:
There is a problem with the wiring from the AC breaker panel to the AC element. Check the
wiring at the breaker panel. Also check that no AC wires are bare and touching the chassis of
the heater. Once the wiring has been corrected, re-connect the yellow connectors with the
matching BLACK and YELLOW heat shrink.
Page 16 of 50
Oasis Service & Troubleshooting Manual
IF NO:
__
The primary and/or secondary AC element (depending on which breaker tripped) need to be
replaced. Turn off the primary and secondary AC element breakers.
To replace the primary AC element, refer to Servicing the Oasis Heating Module (section
4.3.12).
To replace the secondary AC element, refer to Servicing the Oasis Heating Module (section
4.3.13).
AC switch is in AC I position or AC I & AC II position, the AC Heat LED is lit, but there is no heat in the
system.
The AC heating elements are 1500 Watt elements. If they are used by themselves, it will take approximately 1
hour for the coolant inside the Oasis Heating Module to reach operating temperature (when the coolant is not
circulating). If the Oasis Distribution Module is circulating the coolant, then it will take much longer to heat up
the coolant.
Locate the AC breaker panel and ensure that the secondary AC heating element breaker is in the ON position.
Ensure that that coolant in the system is cool (close to ambient temperature). Disconnect the power to the Oasis
Distribution Module (to stop the flow of coolant).
To determine if the primary AC heating element is working properly, put the AC switch on the Oasis remote
operating panel (see Figure 4) to the ACI position and allow the heating element to heat the coolant in the Oasis
Heating Module for approximately 2 hours. After approximately 2 hours, observe the AC heat LED on the
Oasis Heating Module or on the Oasis remote operating panel. Proceed to Q1.
To determine if the primary AND secondary AC elements are working properly, put the AC switch on the Oasis
remote operating panel to the ACI & ACII position and allow the elements to heat the coolant in the Oasis
Heating Module for approximately 1 hour. After approximately 1 hour, observe the AC heat LED on the Oasis
Heating Module or on the Oasis remote operating panel. Proceed to Q1.
Q1: After approximately 1 hour of running the AC heating elements, does the AC heat LED on the front plate
of the Oasis Heating Module or on the Oasis remote operating panel turn OFF?
IF YES:
The Oasis Heating Module is operating as expected. If no heat is being distributed to the rest
of the system (taking into account that it will take a long time for the AC heating elements to
heat the entire system by themselves), then the Oasis Distribution Module may not be
circulating the coolant properly. See Servicing the Oasis Distribution Module (section 5.0) for
troubleshooting.
IF NO:
There could be a problem with the AC relays or with the AC heating elements. Contact ITR
for further assistance.
Page 17 of 50
Oasis Service & Troubleshooting Manual
__
3.2 Oasis Heating Module
Figure 10: Oasis Heating Module Components
3.2.1
Compressor
Air compressor LED flashing
Turn off the power button (front panel of Oasis Heating Module) and allow the heater to completely power
down (this will take 2 minutes). Remove the screws on the front panel of the Oasis Heating Module and fold
down the front panel (do not disconnect the plug on the front panel). IMPORTANT: when folding down the
front panel, place spacers underneath the panel which will prevent the buttons from being pressed. Once the
front panel is folded down, loosen but do not remove the screws from the outer cover (screws are located on the
inside of the cover). Lift up the outer cover to gain easy access to the components.
The two high limit temperature sensors on the top left side of the tank (see Figure 17) should be accessible.
Note that the ground wire for the air compressor goes through these two temperature sensors before returning to
the ground bar. If one or both of these temperature sensors have tripped, the air compressor will stop working.
Attempt to reset the high limit temperature sensors by pressing the square red button on the top of the sensors. If
the buttons on either of the high limit temperature sensors click or are able to be pushed down, then this
indicates that the high limit temperature sensor has tripped. Proceed to Q1.
Q1: Have one or both of the high limit temperature sensors tripped?
A:
If YES:
Feel the pressure relief cap on top of the Oasis Heating Module. Be careful as the cap can be
very HOT. WARNING: removing the pressure relief cap when the system is hot can expel
HOT coolant which can cause SEVERE BURNS. If the pressure relief cap is hot, allow the
system to cool for at least 30 minutes. Once the system has cooled, remove the cap. Check
coolant level from the filler neck. Proceed to Q4.
IF NO:
Check that the connections to the RED and BLACK wires on the air compressor (see Figure
10) are secure. This connection will have RED heat shrink on both sides of the matching
Page 18 of 50
Oasis Service & Troubleshooting Manual
__
connectors. If the heat shrink colors on both sides of the connectors do not match, then the
component has been misconnected. Also, the wire connected to the BLACK wire on the air
compressor must be securely connected to the ground bar on the left side of the burner box.
Proceed to Q2.
Q2: Are all air compressor connections secure and correct?
IF NO:
Correct the connections. Turn on the power button (front panel of Oasis Heating Module) and
attempt to run the heater.
IF YES:
Without removing the air compressor, disconnect the connectors from the Red and Black air
compressor wires. Take a new air compressor and connect its wires to the wires that were
connected to the old air compressor. Turn on the power button (front panel of Oasis Heating
Module) and attempt to run the heater. Note that the air compressor is not connected to the
system, so if the heater attempts to run, it will detect a flame fault after 7 seconds. Proceed to
Q3.
Q3: Does the heater attempt to run for the first 7 seconds without flashing the air compressor LED?
If YES:
Problem solved. The new air compressor needs to be installed. To install the air compressor
refer to Servicing the Oasis Heating Module (section 4.3.1).
IF NO:
Contact ITR for further assistance.
Q4: Is the coolant level up to the filler neck?
IF YES:
Contact ITR before attempting to run the heater again.
IF NO:
1. Fill up the tank (using filler neck) with a 50/50 mixture of propylene glycol and water
2. Ensure that the tank is filled up to the filler neck
3. Place the pressure relief cap back on the filler neck
4. Turn ON the power button (front panel of Oasis Heating Module) and allow the heater to
fire.
5. Observe that the heater cycles OFF (once it comes up to temperature) and then ON again
(once the coolant temperature drops). Proceed to Q5.
Q5: Does the heater cycle OFF and ON again?
IF YES:
Problem solved.
IF NO:
Contact ITR for further assistance.
3.2.2
Fuel Pump
Fuel pump LED flashing
Turn off the power button (front panel of Oasis Heating Module) and allow the heater to completely power
down (this will take 2 minutes). Remove the screws on the front panel of the Oasis Heating Module and fold
down the front panel (do not disconnect the plug on the front panel). IMPORTANT: when folding down the
front panel, place spacers underneath the panel which will prevent the buttons from being pressed.
Check that the connections to the RED and BLACK wires on the fuel pump (see Figure 10) are secure. This
connection will have BLUE heat shrink on both sides of the matching connectors. If the heat shrink colors on
both sides of the connectors do not match, then the component has been misconnected. Also, the wire connected
Page 19 of 50
Oasis Service & Troubleshooting Manual
__
to the BLACK wire on the fuel pump must be securely connected to the ground bar on the left side of the burner
box. Proceed to Q2.
Q2: Are all fuel pump connections secure and correct?
IF NO:
Correct the connections. Turn on the power button (front panel of Oasis Heating Module) and
attempt to run the heater.
IF YES:
Without removing the fuel pump, disconnect the connectors from the RED and BLACK fuel
pump wires. Take a new fuel pump and connect its wires to the wires that were connected to
the old fuel pump. Turn on the power button (front panel of Oasis Heating Module) and
attempt to run the heater. Note that the fuel line is not connected to the new fuel pump, so if
the heater attempts to run, it will detect a flame fault after 7 seconds. Proceed to Q3.
Q3: Does the heater attempt to run for the first 7 seconds without flashing the fuel pump LED?
If YES:
Problem solved. The new fuel pump needs to be installed. To install the fuel pump refer to
Servicing the Oasis Heating Module (section 4.3.2).
IF NO:
Re-connect the wires of the original fuel pump and ensure that the wires have BLUE heat
shrink on both sides of the matching connectors.
IMPORTANT: Disconnect the main power (12VDC) from the Oasis Heating Module.
Disconnecting the 12VDC power ensures that the heater will not attempt to fire if the power
button is accidentally turned ON. If the heater were to attempt to fire with the burner box
cover off, it will project open flame towards the user.
Remove the screws on the burner box cover and remove the cover. Check that the connections
to the BLACK wires on the fuel solenoid (see Figure 10) are secure. This connection will
have BLUE heat shrink on both sides of the matching connectors. If the heat shrink on both
sides of the connectors do not match, then the component has been misconnected. Also, the
BLACK/BLUE wire connected to one of the BLACK fuel solenoid wires must be securely
connected to the ground bar on the left side of the burner box. Proceed to Q4.
Q4: Are all fuel solenoid connections secure and correct?
IF NO:
Correct the connections. Screw the burner box cover back in place. IMPORTANT: DO
NOT attempt to run the heater with the burner box cover off as it will project open flame
towards the user. Connect the main 12VDC power to the Oasis Heating Module. Turn ON the
power button (front panel of Oasis Heating Module) and attempt to run the heater.
IF YES:
Without removing the fuel solenoid, disconnect the connectors from the BLACK fuel
solenoid wires. Take a new fuel solenoid and connect its wires to the wires that were
connected to the old fuel solenoid. Screw the burner box cover back in place. IMPORTANT:
DO NOT attempt to run the heater with the burner box cover off as it will project open flame
towards the user. Connect the main 12VDC power to the Oasis Heating Module. Turn on the
power button (front panel of Oasis Heating Module) and attempt to run the heater. Note that
the fuel line is not connected to the new fuel solenoid, so if the heater attempts to run, it will
detect a flame fault after 7 seconds. Proceed to Q5.
Q5: Does the heater attempt to run for the first 7 seconds without flashing the fuel pump LED?
IF YES:
Problem solved. The new fuel solenoid needs to be installed. To install the fuel solenoid, refer
to Servicing the Oasis Heating Module (section 4.3.3).
Page 20 of 50
Oasis Service & Troubleshooting Manual
IF NO:
__
Contact ITR for further assistance.
3.2.3
Combustion Fan
Combustion Fan LED flashing
Turn off the power button (front panel of Oasis Heating Module) and allow the heater to completely power
down (if the combustion fan has faulted, this should happen immediately; otherwise the combustion fan will run
for 2 minutes before powering down). Remove the screws on the front panel of the Oasis Heating Module and
fold down the front panel (do not disconnect the plug on the front panel). IMPORTANT: when folding down
the front panel, place spacers underneath the panel which will prevent the buttons from being pressed.
Check that the connections to the RED and BLUE wires on the combustion fan (see Figure 10) are secure. This
connection will have WHITE heat shrink on both sides of the matching connectors. If the heat shrink on both
sides of the connectors do not match, then the component has been misconnected. Also, the wire connected to
the BLUE wire on the combustion fan must be securely connected to the ground bar on the left side of the
burner box. Proceed to Q2.
Q2: Are all combustion fan connections secure and correct?
IF NO:
Correct the connections. Turn on the power button (front panel of Oasis Heating Module) and
attempt to run the heater.
IF YES:
IMPORTANT: Disconnect the air compressor wires (RED heat shrink) from the main
harness. Disconnecting these wires ensures that the heater will not attempt to fire. If the heater
were allowed to start with the combustion fan not blowing into the burner box, flame would
come back into the burner box and cause damage to the components and wiring. Without
removing the combustion fan, disconnect the connectors from the RED and BLUE
combustion fan wires. Take a new combustion fan and connect its wires to the wires that were
connected to the old combustion fan. Turn on the power button (front panel of Oasis Heating
Module) and observe the combustion fan. Proceed to Q3.
Q3: Does the combustion fan run for 2 minutes without flashing the combustion fan LED?
If YES:
Problem solved. The new combustion fan needs to be installed. To install the combustion fan,
refer to Servicing the Oasis Heating Module (section 4.3.4).
IF NO:
Turn off the power button (front panel of Oasis Heating Module) and allow the heater to
completely power down (if the combustion fan has faulted, this should happen immediately).
Re-connect the wires of the original combustion fan and ensure that the wires have WHITE
heat shrink on both sides of the matching connectors. Check that the connections to the hour
meter are secure. The wires going to the hour meter will have CLEAR heat shrink on them.
Also, the WHITE/BLACK wire connected the hour meter must be securely connected to the
ground bar on the left side of the burner box. Proceed to Q4
Q4: Are all hour meter connections secure and correct?
IF NO:
Correct the connections. Connect the air compressor wires to the main harness ensuring both
sides of the connectors have matching RED heat shrink. Turn on the power button (front
panel of Oasis Heating Module) and attempt to run the heater.
IF YES:
Without removing the hour meter, disconnect the connectors from the terminals of the hour
meter. Take a new hour meter and connect it to the wires that were connected to the old hour
meter. Turn on the power button (front panel) and observe the combustion fan. Proceed to Q5.
Page 21 of 50
Oasis Service & Troubleshooting Manual
__
Q5: Does the combustion fan run for 2 minutes without flashing the combustion fan LED?
IF YES:
Problem solved. The new hour meter needs to be installed. To install the hour meter, refer to
Servicing the Oasis Heating Module (section 4.3.5).
IF NO:
Contact ITR for further assistance.
3.2.4
Ignitor
Ignitor LED flashing
Turn off the power button (front panel of Oasis Heating Module) and allow the heater to completely power
down (if the combustion fan has faulted, this should happen immediately; otherwise the combustion fan will run
for 2 minutes before powering down). Remove the screws on the front panel of the Oasis Heating Module and
fold down the front panel (do not disconnect the plug on the front panel). IMPORTANT: when folding down
the front panel, place spacers underneath the panel which will prevent the buttons from being pressed.
IMPORTANT: Disconnect the main power (12VDC) from the Oasis Heating Module. Disconnecting the
12VDC power ensures that the heater will not attempt to fire if the power button is accidentally turned ON. If
the heater were to attempt to fire with the burner box cover off, it will project open flame towards the user.
Remove the screws on the burner box cover and remove the cover. Check that the connections to the WHITE
wires on the ignitor (see Figure 10) are secure. This connection will have BLACK heat shrink on both sides of
the matching connectors. If the heat shrink on both sides of the connectors do not match, then the component
has been misconnected. Also, the BLACK/PINK wire connected to one of the BLACK wires on the ignitor
must be securely connected to the ground bar on the left side of the burner box. Proceed to Q2.
Q2: Are all ignitor connections secure and correct?
IF NO:
Correct the connections. Screw the burner box cover back in place.
IMPORTANT: DO NOT attempt to run the heater with the burner box cover off as it will
project open flame towards the user. Connect the main 12VDC power to the Oasis Heating
Module. Turn on the power button (front panel of Oasis Heating Module) and attempt to run
the heater. Proceed to Q3.
IF YES:
1. Install a new ignitor. To install a new ignitor, refer to Servicing the Oasis Heating
Module (section 4.3.7).
2. Once the ignitor is installed, turn on the power button (front panel of Oasis Heating
Module) and attempt to run the heater. Proceed to Q3.
Q3: Does the ignitor turn on without flashing the ignitor LED?
If YES:
Problem solved.
IF NO:
Contact ITR for further assistance.
Page 22 of 50
Oasis Service & Troubleshooting Manual
3.2.5
__
Flame Out
Flame Out LED ON
Notes:
1
2
For troubleshooting a flame out, leave the burner switch on the Oasis Remote Operating Panel in the
ON Position.
There are two methods to reset the Oasis Heating Module after a flame out has been detected:
1. Turn the burner switch OFF, wait 1 second and turn it ON again.
2. Press the reset button on the front panel of the Oasis Heating Module (this method will be used
in this troubleshooting section).
Check the following before continuing with the troubleshooting:
• The fuel supply from the fuel storage tank to the fuel inlet of the Oasis Heating Module must be from a
dedicated fuel pickup on the top of the tank.
• The fuel level in the fuel storage tank must be above the level of the bottom of the fuel pickup tube.
• The total rise from the bottom of the fuel pickup tube to the fuel inlet on the Oasis Heating Module
should not exceed 60”.
• The fuel return from the Oasis Heating Module must go back to the diesel fuel storage tank.
• The fuel line from the diesel fuel tank to the inlet of the Oasis Heating Module must not have any
kinks or leaks.
• All fittings must be leak tight.
• External fuel filter must be clear of any contaminants obstructing the flow of fuel.
• The first time that the fuel line is connected to the Oasis Heating Module, there will be air in the line. It
may be necessary to reset the Oasis Heating Module a couple of times to bleed the air from the fuel
line.
If any of the above issues were found to be a problem, correct the situation and press the reset button on the
front panel of the Oasis Heating Module to allow the burner to fire again.
Keeping the power button ON, remove the screws on the front panel of the Oasis Heating Module and fold
down the front panel (do not disconnect the plug on the front panel). IMPORTANT: when folding down the
front panel, place spacers underneath the panel which will prevent the buttons from being pressed.
Refer to the following underlined statements that best describe the problem that is being encountered:
When the heater attempts to light, there is no flame and a flame-out occurs after 7 seconds.
Press the reset button on the Oasis Heating Module and look through the flame observation window (see Figure
1) and check for a glow when the ignitor LED on the Oasis Heating Module is ON. Proceed to Q1.
Q1: Is there a glow in the burner chamber when the ignitor LED on the Oasis Heating Module is ON (10
seconds before the other components turn ON)?
IF NO:
1. Install a new ignitor. To install the ignitor, refer to Servicing the Oasis Heating Module
(section 4.3.7).
2. Once the ignitor is installed, turn on the power button (front panel of Oasis Heating
Module) and attempt to run the heater.
IF YES:
During the first 7 seconds when the fuel pump is running (fuel pump LED is ON), ensure the
fuel return line is open and check the fuel coming out of the fuel return line. Proceed to Q2.
Page 23 of 50
Oasis Service & Troubleshooting Manual
__
Q2: When the fuel pump is running, is there fuel coming out of the fuel return line?
IF YES:
Place your finger on the air compressor’s air filter (see Figure 10). Once the air compressor
turns on, there should be enough suction to keep your finger in place. Proceed to Q3.
IF NO:
1. Replace the fuel filter because it may be clogged. To replace the fuel filter, refer to
Servicing the Oasis Heating Module (section 4.3.8).
2. Once the fuel filter has been replaced, press the reset button (front panel of Oasis Heating
Module) and attempt to fire the heater. During the first 7 seconds when the fuel pump is
running (fuel pump LED is ON), ensure the fuel return line is open and check the fuel
coming out of the fuel return line. Proceed to Q4.
Q3: Once the air compressor turns on, is there enough suction at the inlet of the air filter to hold your finger in
place?
IF NO:
Change the air compressor. To change the air compressor, refer to Servicing the Oasis
Heating Module (section 4.3.1).
IF YES:
Check the glow of the ignitor. Turn off the power button (front panel of Oasis Heating
Module) and allow the heater to completely power down (this will take 2 minutes). To check
the glow of the ignitor, do the following:
1. IMPORTANT: Disconnect the air compressor wires (RED heat shrink) from the main
harness. Disconnecting these wires ensures that the heater will not attempt to fire if the
power button is accidentally turned ON. This will make it safe to view the ignitor with an
open burner box.
2. Remove the screws on the burner box cover and remove the cover.
3. Loosen the tab on top of the fuel block and pull the fuel block out from its mounting
position.
4. Ensure that the ignitor tip is horizontal (see Figure 18).
5. With the fuel block out of the way, turn on the power button (front panel) and observe the
ignitor during the first 10 seconds. Note: the heater will stop and show a compressor fault
after 10 seconds. Proceed to Q6.
Q4: Once the fuel filter has been changed and the fuel pump is running (fuel pump LED is ON), is there fuel
coming out of the fuel return line?
IF YES:
Problem solved.
IF NO:
1. Change the fuel pump. To change the fuel pump, refer to Servicing the Oasis Heating
Module (section 4.3.2).
2.
Once the fuel pump has been replaced, press the reset button and attempt to fire the
heater. During the first 7 seconds when the fuel pump is running (fuel pump LED is ON),
ensure the fuel return line is open and check the fuel coming out of the fuel return line.
Proceed to Q5.
Q5: Once the fuel pump has been changed and the fuel pump is running (fuel pump LED is ON), is there fuel
coming out of the fuel return line?
IF YES:
Problem solved.
IF NO:
Contact ITR for further assistance.
Page 24 of 50
Oasis Service & Troubleshooting Manual
__
Q6: Is the ignitor glowing bright yellow?
IF YES:
1. Clean the fuel nozzle. To clean the fuel nozzle, refer to Servicing the Oasis Heating
Module (section 4.3.9).
2. Once the fuel nozzle has been cleaned, turn on the power button (front panel of Oasis
Heating Module) and attempt to run the heater. Proceed to Q7.
IF NO:
Replace Ignitor. To replace the ignitor, refer to Servicing the Oasis Heating Module (section
4.3.7).
Q7: Does the heater fire once the fuel nozzle has been cleaned?
IF YES:
Problem solved.
IF NO:
Check the fuel solenoid. Turn off the power button (front panel) and allow the heater to
completely power down (this will take 2 minutes). IMPORTANT: Disconnect the main power
(12VDC) from the Oasis Heating Module. Disconnecting the 12VDC power ensures that the
heater will not attempt to fire if the power button is accidentally turned ON. If the heater were
to attempt to fire with the burner box cover off, it will project open flame towards the user. To
check the fuel solenoid, do the following:
1. Remove the screws on the burner box cover and remove the cover.
2. Disconnect the wires to the fuel solenoid.
3. Being careful the O-ring stays in place on the brass head, unscrew the fuel solenoid from
the brass head and remove the plunger (inside of fuel solenoid).
4. Screw the solenoid body back in place (note this is temporary to test if the fuel solenoid
is a problem).
5. Screw the burner box cover back in place.
6. Connect the main 12VDC power to the Oasis Heating Module.
Turn on the power button (front panel of Oasis Heating Module) and attempt to run the heater.
Proceed to Q8.
Q8: Does the heater fire once the plunger from the fuel solenoid is removed?
IF YES:
Problem solved. Replace the fuel solenoid. To replace the fuel solenoid, refer to Servicing the
Oasis Heating Module (section 4.3.3).
IF NO:
Contact ITR for further assistance.
When the Oasis Heating Module attempts to fire, a stable flame comes on for 7 seconds. After 7 seconds the
Oasis Heating Module detects a flame out.
IMPORTANT: Disconnect the main power (12VDC) from the Oasis Heating Module. Disconnecting the
12VDC power ensures that the heater will not attempt to fire if the power button is accidentally turned ON. If
the heater were to attempt to fire with the burner box cover off, it will project open flame towards the user.
Remove the screws on the burner box cover and remove the cover. Check that the connections to the RED,
BLACK, and YELLOW wires on the flame sensor (see Figure 10) are secure. This connection will have
YELLOW heat shrink on both sides of the matching connectors. Proceed to Q1.
Q1: Are all flame sensor connections secure and correct?
IF YES:
1. Disconnect the flame sensor wires and unscrew (counter-clockwise) the flame sensor
from the fuel block.
2. Check for soot build up on the flame sensor eye.
3. Check for soot buildup in the flame sensor hole in the fuel block (using a flashlight). This
hole should have a clear line of sight into the burner chamber. Proceed to Q2.
Page 25 of 50
Oasis Service & Troubleshooting Manual
IF NO:
1.
2.
3.
4.
__
Correct the connections.
Screw the burner box cover back in place.
Connect the main 12VDC power to the Oasis Heating Module.
Turn on the power button (front panel of Oasis Heating Module) and attempt to run the
heater.
Q2: Does the flame sensor eye have soot on it, or is soot blocking the flame sensor hole in the fuel block?
IF YES:
1. Clean the soot off the flame sensor eye
2. Clean the flame sensor hole using high pressure air
3. Screw the flame sensor (clockwise) into the fuel block.
4. Connect the flame sensor wires to the connectors with matching YELLOW heat shrink.
5. Screw the burner box cover back in place.
6. Connect the main 12VDC power to the Oasis Heating Module.
7. Turn on the power button (front panel of Oasis Heating Module) and attempt to run the
heater.
IF NO:
1. Replace the flame sensor. To replace the flame sensor, refer to Servicing the Oasis
Heating Module (section 4.3.10).
2. Turn on the power button (front panel of Oasis Heating Module) and attempt to run the
heater. Proceed to Q3.
Q3: Did the new flame sensor allow the heater to continue running after 7 seconds?
IF YES:
Problem solved.
IF NO:
Contact ITR for further assistance.
The heater sputters intermittently and eventually flames out.
The sputtering effect is due to air in the fuel system. When the burner chamber is hot, this sputtering effect can
cause the heater to backfire. Intermittent sputtering is commonly caused by leaks in the fuel line. To check the
fuel line, do the following:
1.
2.
3.
4.
5.
6.
Turn off the fuel supply to the Oasis Heating Module before proceeding with the next step.
Remove the fuel line from the fuel inlet of the Oasis Heating Module and replace it with a short piece of
fuel line. Secure this line with a hose clamp.
Put a fuel filter on the other end of the fuel line and place the end in a jerry can filled with diesel fuel.
Turn on the power button (front panel of Oasis Heating Module) and attempt to run the heater.
There will be air in this new fuel line. It may be necessary to reset the Oasis Heating Module to bleed the
air from the fuel line.
Proceed to Q1.
Q1: Does the heater continue to sputter after the jerry can is put in place?
IF YES:
If the fuel block was taken out or the fuel solenoid replaced, then the fuel line from the outlet
of the fuel regulator to the inlet of the fuel solenoid could have been damaged. To check this
fuel line for leaks, do the following:
Turn off the power button (front panel of Oasis Heating Module) and allow the heater to
completely power down (this will take 2 minutes). Remove the screws on the front panel of
the Oasis Heating Module and fold down the front panel (do not disconnect the plug on the
front panel). IMPORTANT: when folding down the front panel, place spacers underneath
the panel which will prevent the buttons from being pressed.
1. IMPORTANT: Disconnect the main power (12VDC) from the Oasis Heating Module.
Disconnecting the 12VDC power ensures that the heater will not attempt to fire if the
Page 26 of 50
Oasis Service & Troubleshooting Manual
2.
3.
IF NO:
__
power button is accidentally turned ON. If the heater were to attempt to fire with the
burner box cover off, it will project open flame towards the user.
Remove the screws on the burner box cover and remove the cover.
Inspect the fuel line from the regulator to the fuel solenoid for leaks. The hose clamps
must be secured on the outlet of the fuel regulator and on the inlet of the fuel solenoid.
Also, if the fuel solenoid was replaced, check to for proper sealant on the threads.
Proceed to Q2.
The problem is not with the Oasis Heating Module. There may be a cut in the fuel line
running from the fuel tank to the fuel inlet of the Oasis Heating Module, or the hose clamps
may not be secured in place.
Q2: Is the fuel line leaking or does the fuel solenoid not have proper sealant on the threads?
IF YES:
• If the fuel line is leaking, replace the fuel line with 3/16” I.D. diesel approved fuel line
(SAE 30R7).
• If the fuel solenoid does not have sealant on the threads, refer to Servicing the Oasis
Heating Module (section 4.3.3) to put on the appropriate sealant.
IF NO:
Refer to the next section (continuous sputtering). If this section does not solve the problem,
contact ITR for further assistance.
The heater sputters continuously and eventually flames out.
The sputtering effect is due to air in the fuel system. When the burner chamber is hot, this sputtering effect can
cause the heater to backfire. Continuous sputtering is commonly caused by a damaged O-ring in the fuel nozzle.
To check the nozzle, refer to Servicing the Oasis Heating Module (section 4.3.9). Proceed to Q1.
Q1: Is the O-ring in the fuel nozzle damaged?
IF YES:
Replace the fuel nozzle. To replace the fuel nozzle, refer to Servicing the Oasis Heating
Module (section 4.3.9).
IF NO:
Refer to the previous section (intermittent sputtering). If this section does not solve the
problem, contact ITR for further assistance.
3.2.6
Voltage
Voltage LED ON
Check the DC voltage (see Figure 1) to the Oasis Heating Module using a multi-meter. Note that the voltage at
the battery is not necessarily the voltage supplied to the Oasis Heating Module. Depending on the gauge and
length of the power wires, there will be a voltage drop between the battery and the Oasis Heating Module. To
ensure the correct voltage is being measured, measure the voltage as close to the Oasis Heating Module as
possible. Proceed to Q1.
Q1: Is the voltage range between 10.5V and 16 Volts?
IF NO:
If the voltage is below 10.5V, correct the situation by charging the battery. If the voltage is
above 16V, then there is a problem with the charger. Once the situation is corrected, press the
reset button (front panel of Oasis Heating Module) to restart the heater.
Page 27 of 50
Oasis Service & Troubleshooting Manual
If YES:
__
Check the voltage to the Oasis Heating Module using a multi-meter, and at the same time,
press the reset button (front panel of Oasis Heating Module). At this point the heater will
begin its ignition sequence. Monitor the voltage during the ignition sequence. If at any time
the voltage drops below 10.5V and stays below 10.5V for longer than 10 seconds, the Oasis
Heating Module will indicate a voltage fault (RED Voltage LED on front panel will light) and
shut down. The Oasis Heating Module will attempt to re-start one more time, and if the same
thing happens, it will shut down and indicate a voltage fault. The Oasis Heating Module will
remain off until the reset button (front panel of Oasis Heating Module) is pressed. Proceed to
Q3.
Q3: Once the burner fires, does the voltage drop below 10.5V?
IF YES:
The battery is discharged and showing a voltage that it is not capable of supporting under
load. Once a load is put onto the battery (i.e. when the burner attempts to fire), the battery
voltage will drop. This situation indicates that the battery needs to be charged or possibly
replaced. Once the battery is charged press the reset button to restart the Oasis Heating
Module.
IF NO:
Contact ITR for further assistance.
3.2.7
Low Water
Low Water LED ON
Remove the radiator cap from the filler neck on the Oasis Heating Module and fill up the tank with a 50/50
mixture of propylene glycol and water. Ensure that the tank is filled up to the filler neck. Place the expansion
cap back on the filler neck. Observe the Low Water LED on the Oasis Heating Module as the tank is being
filled up. Proceed to Q1.
Q1: Does the low water level LED turn off when the tank is filled?
IF YES:
Problem solved. Fill up the overflow bottle half way with a 50/50 mixture of propylene glycol
and water.
IF NO:
Turn off the power button (front panel) and allow the heater to completely power down (this
will take 2 minutes). Remove the screws on the front panel of the Oasis Heating Module and
fold down the front panel (do not disconnect the plug on the front panel). IMPORTANT:
when folding down the front panel, place spacers underneath the panel which will prevent the
buttons from being pressed.
Check that the connections to the YELLOW wires on the level switch (see Figure 10) are
secure. This connection will have GREEN heat shrink on both sides of the matching
connectors. If the heat shrink on both sides of the connectors do not match, then the
component has been misconnected. Proceed to Q2.
Q2: Are all level switch connections secure and correct?
IF NO:
Correct the connections. Move the front panel of the Oasis Heating Module to a position
where it can be observed. Turn on the power button and observe the Low Water LED.
IF YES:
Unplug the level switch from the main harness (GREEN heat shrink on both ends). Move the
front panel of the Oasis Heating Module to a position where it can be observed. Turn on the
power button and observe that the Low Water LED turns on. Plug a new level switch into the
wires that were connected to the old level switch. Hold the level switch so the “NO” engraved
Page 28 of 50
Oasis Service & Troubleshooting Manual
__
on the switch is flat and visible when looking at the level switch from the top. Lift the arm of
the level switch to the up position and at the same time monitor the Low Water LED on the
front panel. Proceed to Q3.
Q3: Does the Low Water LED turn OFF when the arm of the new level switch is moved to the UP position?
IF YES:
Problem solved. The new level switch must be installed. To install the level switch, refer to
Servicing the Oasis Heating Module (section 4.3.11).
IF NO:
Contact ITR for further assistance.
Page 29 of 50
Oasis Service & Troubleshooting Manual
__
3.3 Oasis Distribution Module
IMPORTANT: If at any time the pump inside the Oasis Distribution Module starts making loud noises,
disconnect the Oasis Distribution Module harness immediately and refer to Servicing the Oasis Distribution
Module (section 5.1). Running the pumps dry will permanently damage the pumps.
If the Oasis Heating Module fires and comes up to temperature, but heat is not available at the cabin fans or
domestic hot water, then coolant is not being circulated adequately.
The distribution module zone board controls the Oasis Distribution Module which circulates hot coolant to the
cabin fans and the domestic water/engine heat exchanger. If the coolant inside the Oasis Heating Module is hot,
but heat is not available at the cabin fans or the domestic hot water, do the following:
Ensure that the thermostats for all of the zones are calling for heat. Check the power LED on the distribution
module zone board. Proceed to Q1.
Q1: Is the power LED on the distribution module zone board ON?
IF YES:
Check the zone thermostat LED’s on the distribution module zone board. Proceed to Q2.
IF NO:
Check the fuse (from battery to distribution module zone board) and make sure that 12V is
available to the distribution module zone board.
Q2: Are the zone thermostat LED’s on the distribution module zone board ON for the zones that are calling for
heat?
IF YES:
Check the Green LED’s for the summer pump, Loop 1 pump, Loop 2 pump, and Zone fans on
the distribution module zone board. Proceed to Q3.
IF NO:
Check the connections to the thermostat wires on the input to the zone board. The wires
connected from the thermostat to these inputs must be 12V and must be connected to the same
battery that is feeding power to the distribution module zone board.
Q3: Are the Green LED’s for the summer pump, Loop 1 pump, Loop 2 pump, and zone fans ON?
IF YES:
Check the connection from the zone board to the Oasis Distribution Module. Proceed to Q4.
IF NO:
Check the RED LED’s for the summer pump, Loop 1 pump, Loop 2 pump, and Zone fans on
the distribution module zone board. Proceed to Q5.
Q4: Are the connections from the distribution module zone board to the Oasis Distribution Module secure?
IF YES:
Check to see if the pumps are running. Check the “heating loop supply” and “to heater inlet”
connections on the Oasis Distribution Module for vibration. Proceed to Q8.
IF NO:
Secure the connections at the distribution module zone board and at the Oasis Distribution
Module.
Q5: Are any of the RED LED’s for the summer pump, Loop 1 pump, Loop 2 pump, and zone fans ON?
IF YES:
The fuse is blown for the component that has the RED LED ON. Remove the front cover on
the distribution module zone board and replace the fuse. Note the following are the fuse
values:
Page 30 of 50
Oasis Service & Troubleshooting Manual
Fuse Name
Cabin Fan 1
Cabin Fan 2
Cabin Fan 3
Cabin Fan 4
Cabin Fan 5
Summer Pump
Heating Loop 1 Pump
Heating Loop 2 Pump
Engine Pre-heat Pump
IF NO:
__
Amperage
10 A
5A
5A
5A
5A
5A
5A
5A
5A
If the fuse blows again, the component with the RED LED has shorted. If the component that
has shorted is a cabin fan, replace the fan. If the component that has shorted is one of the
pumps in the Oasis Distribution Module, replace the pump. To replace the pumps, refer to
Servicing the Oasis Distribution Module (sections 5.2.1 and 5.2.2).
Turn ON the bypass switch on top of the distribution module zone board. Proceed to Q6.
Q6: Once the bypass switch is ON, do the Green LED’s for the Loop 1 and Loop 2 pumps, and zone fans turn
ON?
IF YES:
Check the connections from the distribution module zone board to the Oasis Heating Module.
Proceed to Q7.
IF NO:
distribution module zone board could be damaged. Turn the bypass switch OFF and contact
ITR for further assistance.
Q7: Are the connections from the distribution module zone board to the Oasis Heating module secure?
IF YES:
The problem could be with the heat detection sensor. Contact ITR for further assistance.
IF NO:
Secure the connections at the distribution module zone board and at the Oasis Heating
Module.
Q8: Is there vibration present at the “heating loop supply” and “to heater inlet” connections on the Oasis
Distribution Module?
IF YES:
There is most likely an air lock in the system, or the pumps in the distribution module have
not been primed. To prime the pumps and bleed the air out of the system, refer to Servicing
the Oasis Distribution Module (section 5.1).
IF NO:
The pumps may need to be replaced. To replace the pumps, refer to Servicing the Oasis
Distribution Module (section 5.2.1 and 5.2.2).
Page 31 of 50
Oasis Service & Troubleshooting Manual
__
4.0 Servicing the Oasis Heating Module
4.1 Indications Service Is Required
The flame is a dirty orange color.
Press the reset button on the front panel of the Oasis Heating Module and place your finger on the air
compressor’s air filter. Once the air compressor turns on, there should be enough suction to keep your finger in
place. Proceed to Q1.
Q1: Once the air compressor turns on, is there enough suction at the inlet of the air filter to hold your finger in
place?
IF NO:
Replace the air compressor. To replace the air compressor refer to Servicing the Oasis
Heating Module (section 4.3.1). Once the air compressor has been replaced, turn on the power
button (front panel of Oasis Heating Module) and attempt to run the heater. Proceed to Q2.
IF YES:
Clean the fuel nozzle. To clean the fuel nozzle, refer to Servicing the Oasis Heating Module
(section 4.3.9). Once the fuel nozzle has been cleaned, turn on the power button (front panel
of Oasis Heating Module) and attempt to run the heater. Proceed to Q2.
Q2: Is the flame a bright yellow color after replacing the air compressor or cleaning the fuel nozzle?
IF YES:
Problem solved.
IF NO:
Contact ITR for further assistance.
The flame is small and has a blue color
Clean the fuel nozzle. To clean the fuel nozzle, refer to Servicing the Oasis Heating Module (section 4.3.9).
Once the fuel nozzle has been cleaned, turn on the power button (front panel of Oasis Heating Module) and
attempt to run the heater. Proceed to Q1.
Q1: Is the flame a bright yellow color after cleaning the fuel nozzle?
IF YES:
Problem solved.
IF NO:
Replace the fuel filter attached to the inlet of the fuel pump. To replace the fuel filter, refer to
Servicing the Oasis Heating Module (section 4.3.8). Turn on the power button (font panel of
Oasis Heating Module) and attempt to run the heater. Proceed to Q2.
Q2: Is the flame a bright yellow color after replacing the fuel filter?
IF YES:
Problem solved.
IF NO:
Contact ITR for further assistance.
1000 hours has passed since the last service
The following service needs to be done after 1000 hours of operation:
• Replace the fuel filter; refer to Servicing the Oasis Heating Module (section 4.3.8).
• Clean or replace the fuel nozzle; refer to Servicing the Oasis Heating Module (section 4.3.9).
• Replace the air filter on the air compressor; refer to Servicing the Oasis Heating Module (section
4.3.14).
• Clean the combustion chamber; refer to Servicing the Oasis Heating Module (section 4.2).
Page 32 of 50
Oasis Service & Troubleshooting Manual
__
4.2 Cleaning the Combustion Chamber
To clean out the combustion chamber, do the following:
1.
2.
3.
Turn off the power button (front panel of Oasis Heating Module) and allow the heater to
completely power down (this will take 2 minutes). Remove the screws on the front panel of the
Oasis Heating Module and fold down the front panel (do not disconnect the plug on the front
panel). IMPORTANT: when folding down the front panel, place spacers underneath the panel
which will prevent the buttons from being pressed.
IMPORTANT: Disconnect the main power (12VDC) from the Oasis Heating Module.
Disconnecting the 12VDC power ensures that the heater will not attempt to fire if the power
button is accidentally turned ON. If the heater were to attempt to fire with the burner box cover
off, it will project open flame towards the user.
Remove the screws from the burner box cover (using a Philips head screw driver) and remove the
cover
Figure 11: Burner box components
4.
5.
6.
7.
8.
9.
10.
11.
12.
13.
Remove the fuel line from the elbow connected to the inlet of the fuel solenoid (using a pair of
pliers on the hose clamp).
Remove the air compressor hose from the fuel block (using a pair of pliers on the hose clamp).
Remove the 4 locknuts (using 7/16” socket) that are holding the burner box in position.
Pull out the burner and the counter-flow tube (see Figure 12) and clean them with carb cleaner.
Clean out the ash from inside the burner chamber (using a vacuum or pressurized air).
Place the counter-flow tube back in position followed by the burner and secure them in place using
the 4 locknuts (recommendation: use new brass locknuts).
Connect the fuel line to the brass elbow connected to the inlet of the fuel solenoid and secure it in
place using the hose clamp.
Attach the air compressor hose to the fuel block and secure it in place using the hose clamp.
Screw the burner box cover back in place.
Connect the main 12VDC power to the Oasis Heating Module.
Page 33 of 50
Oasis Service & Troubleshooting Manual
__
4.3 Part Replacements
4.3.1
Compressor
To install the air compressor do the following:
1.
2.
3.
Turn off the power button (front panel of Oasis Heating Module) and allow the heater to completely
power down (this will take 2 minutes). Remove the screws on the front panel of the Oasis Heating
Module and fold down the front panel (do not disconnect the plug on the front panel). IMPORTANT:
when folding down the front panel, place spacers underneath the panel which will prevent the buttons
from being pressed. Once the front panel is folded down, loosen but do not remove the screws from the
outer cover (screws are located on the inside of the cover). Lift up the outer cover to gain easy access
to the components.
IMPORTANT: Disconnect the air compressor wires (RED heat shrink) from the main harness.
Disconnecting these wires ensures that the heater will not attempt to fire if the power button is
accidentally turned ON. If the heater were to attempt to fire with the burner box cover off, it will
project open flame towards the user.
Cut the tie wrap on the top left corner of the air compressor that is holding the 4 air compressor and
combustion fan wires in place.
Figure 12: Compressor components
4.
5.
6.
7.
8.
9.
Remove the screws from the burner box cover (using a Philips head screw driver) and remove the
cover
Use an 11/32” socket to remove the 4 nuts from the upper left hand corner of the burner box (see
Figure 13).
Remove the air compressor and unscrew the attached bracket (using a Philips head screwdriver).
Screw this bracket to the new air compressor and place it in the same position as the old air compressor
Attach the 4 nuts to the upper left hand corner of the burner box
Screw the burner box cover back in place.
Page 34 of 50
Oasis Service & Troubleshooting Manual
__
10. Attach the two combustion fan wires and two air compressor wires to the top left corner of the air
compressor using a tie wrap.
11. Connect the air compressor wires to the main harness ensuring both sides of the connectors have
matching RED heat shrink.
12. Put the outer cover back in place (tighten screws) and screw in the front cover.
4.3.2
Fuel Pump
To install the fuel pump do the following:
1.
2.
3.
Turn off the power button (front panel of Oasis Heating Module) and allow the heater to completely
power down (this will take 2 minutes). Remove the screws on the front panel of the Oasis Heating
Module and fold down the front panel (do not disconnect the plug on the front panel). IMPORTANT:
when folding down the front panel, place spacers underneath the panel which will prevent the buttons
from being pressed. Once the front panel is folded down, loosen but do not remove the screws from the
outer cover (screws are located on the inside of the cover). Lift up the outer cover to gain easy access
to the components.
Cut the tie wrap that attaches the combustion fan air intake hose to the fuel pump.
Before proceeding with the next step, ensure that the fuel supply to the heater is shut off.
Figure 13: Fuel pump assembly
4.
5.
Remove the fuel lines (using a pair of pliers on the hose clamps) from the inlet of the fuel filter and
outlet of the fuel pump. There are two hose clamps on the outlet of the fuel pump (one to the regulator
and one to the fuel return).
Remove the 2 nylocks (see Figure 14) from the fuel pump (using a 7/16” socket) and remove it from
the burner box.
Page 35 of 50
Oasis Service & Troubleshooting Manual
__
6.
Place the new fuel pump in the position of the old one and attach it to the burner box using the two
nylocks.
7. Connect the fuel line coming from the regulator to the fuel outlet (bottom connection) of the fuel pump
and connect the fuel line going to the fuel return to the outlet (top connection) of the fuel pump. Ensure
both connections are secured with hose clamps.
8. Connect the fuel line coming from the input of the heater to the inlet of the fuel filter and make sure
the connection is secured with a hose clamp. If any of the fuel lines are cracked or damaged, replace
them with diesel approved hose of appropriate size and length (5/16”, ¼”, 3/16”).
9. Clean up any diesel fuel that was spilt.
10. Connect the fuel pump wires to the main harness ensuring both sides of the connectors have matching
BLUE heat shrink.
11. Secure the air intake hose from the combustion fan to the fuel pump using a tie wrap.
12. Put the outer cover back in place (tighten screws) and screw in the front cover.
4.3.3
Fuel Solenoid
To install the fuel solenoid, do the following:
1.
2.
3.
4.
5.
Turn off the power button (front panel of Oasis Heating Module) and allow the heater to completely
power down (this will take 2 minutes). Remove the screws on the front panel of the Oasis Heating
Module and fold down the front panel (do not disconnect the plug on the front panel). IMPORTANT:
when folding down the front panel, place spacers underneath the panel which will prevent the buttons
from being pressed.
IMPORTANT: Disconnect the main power (12VDC) from the Oasis Heating Module. Disconnecting
the 12VDC power ensures that the heater will not attempt to fire if the power button is accidentally
turned ON. If the heater were to attempt to fire with the burner box cover off, it will project open flame
towards the user.
Remove the screws from the burner box cover (using a Philips head screw driver) and remove the
cover
Disconnect the wires to the fuel solenoid.
Unscrew the fuel solenoid coil housing from the solenoid body (counter-clockwise).
Figure 14: Fuel solenoid components
6.
Make sure the old O-ring and plunger are removed as well.
Page 36 of 50
Oasis Service & Troubleshooting Manual
__
7.
8.
9.
Unscrew the coil housing from the new solenoid including the new O-ring.
Carefully screw back the new solenoid coil housing into the body without damaging the O-ring.
Connect the fuel solenoid wires to the main harness ensuring the connectors and the fuel solenoid
wires have matching BLUE heat shrink on both sides of the connectors.
10. Screw the burner box cover back in place.
11. Connect the main 12VDC power to the Oasis Heating Module.
12. Put the outer cover back in place (tighten screws) and screw in the front cover.
4.3.4
Combustion Fan
To install the combustion fan, do the following:
1.
2.
3.
4.
Turn off the power button (front panel of Oasis Heating Module) and allow the heater to completely
power down (this will take 2 minutes). Remove the screws on the front panel of the Oasis Heating
Module and fold down the front panel (do not disconnect the plug on the front panel). IMPORTANT:
when folding down the front panel, place spacers underneath the panel which will prevent the buttons
from being pressed.
IMPORTANT: Disconnect the main power (12VDC) from the Oasis Heating Module. Disconnecting
the 12VDC power ensures that the heater will not attempt to fire if the power button is accidentally
turned ON. If the heater were to attempt to fire with the burner box cover off, it will project open flame
towards the user.
Cut the tie wrap that attaches the combustion fan air intake hose to the fuel pump.
Remove the screws from the burner box cover (using a Philips head screw driver) and remove the
cover
Figure 15: Combustion fan mounting
5.
6.
7.
8.
9.
Use a ¼” socket to remove the 2 machine screws (see Figure 16) from the upper right hand corner of
the burner box.
Remove the combustion fan and place the new combustion fan in the same position as the one that was
removed.
Attach the 2 nuts to the upper right hand corner of the burner box
Screw the burner box cover back in place.
Connect the combustion fan wires to the main harness ensuring both sides of the connectors have
matching WHITE heat shrink.
Page 37 of 50
Oasis Service & Troubleshooting Manual
__
10. Secure the air intake hose from the combustion fan to the fuel pump using a tie wrap.
11. Connect the main 12VDC power to the Oasis Heating Module.
12. Put the outer cover back in place (tighten screws) and screw in the front cover.
4.3.5
Hour Meter
To install the hour meter, do the following:
1.
2.
3.
4.
Remove the two screws (using a Philips head screw driver) from the top of the hour meter (see Figure
10) and lift up the hour meter.
Remove the wires from the hour meter (being careful not to drop them into the heater).
Connect the wires to the new hour meter (polarity does not matter).
Position the new hour meter in place of the old one and screw it in place.
4.3.6 Aquastat
To replace the aquastat, do the following:
1.
2.
3.
4.
Use an 11/32 socket to remove the aquastat from the tank.
Unplug the wires from the spade connector on the aquastat.
Insert a new aquastat, assure that the square washer is on top and tighten nut.
Plug in the wires to the spade connector of the new aquastat.
Figure 16: Aquastat mount
Page 38 of 50
Oasis Service & Troubleshooting Manual
4.3.7
__
Igniter
To install the igniter, do the following:
1.
2.
3.
4.
Turn off the power button (front panel of Oasis Heating Module) and allow the heater to completely
power down (this will take 2 minutes). Remove the screws on the front panel of the Oasis Heating
Module and fold down the front panel (do not disconnect the plug on the front panel). IMPORTANT:
when folding down the front panel, place spacers underneath the panel which will prevent the buttons
from being pressed.
IMPORTANT: Disconnect the main power (12VDC) from the Oasis Heating Module. Disconnecting
the 12VDC power ensures that the heater will not attempt to fire if the power button is accidentally
turned ON. If the heater were to attempt to fire with the burner box cover off, it will project open flame
towards the user.
Remove the screws from the burner box cover (using a Philips head screw driver) and remove the
cover.
Disconnect the igniter wires.
Figure 17: Igniter assembly
5.
6.
Remove the pin that holds the igniter in the igniter tube and remove the igniter (see Figure 18).
Place the new igniter in the igniter tube, being careful the igniter tip does not hit the sides of the igniter
tube.
7. Once the igniter is fully inserted into the igniter tube, secure the pin that holds the igniter in place,
being careful not to pierce the heat shrink on the igniter. Note that the pin can go in only if the igniter
tip is in the horizontal position (see Figure 18).
8. Connect the igniter wires to the main harness ensuring both sides of the connectors have matching
BLACK heat shrink.
9. Screw the burner box cover back in place.
10. Connect the main 12VDC power to the Oasis Heating Module.
11. Put the outer cover back in place (tighten screws) and screw in the front cover.
Page 39 of 50
Oasis Service & Troubleshooting Manual
4.3.8
__
Fuel Filter
To install the fuel filter, do the following:
1.
2.
3.
Turn off the power button (front panel of Oasis Heating Module) and allow the heater to completely
power down (this will take 2 minutes). Remove the screws on the front panel of the Oasis Heating
Module and fold down the front panel (do not disconnect the plug on the front panel). IMPORTANT:
when folding down the front panel, place spacers underneath the panel which will prevent the buttons
from being pressed.
Cut the tie wrap that attaches the combustion fan air intake hose to the fuel pump.
Before proceeding with the next step, ensure that the fuel supply to the heater is shut off.
Figure 18: Fuel filter assembly
4.
5.
Remove the fuel line (using a pair of pliers on the hose clamps) from the inlet of the fuel filter.
Unscrew the fuel filter (counter-clockwise) from the brass elbow on the inlet of the fuel pump (see
Figure 19) using a 15/16” wrench (stabilize the fuel pump by holding the brass elbow using a 9/16”
wrench.
6. Place a small amount of thread sealer (compatible with diesel fuel) on the threads of the new fuel filter.
7. Screw in a new fuel filter (clockwise) to the brass elbow on the inlet of the fuel pump and attach the
fuel line to the inlet of the fuel filter, ensuring it has been secured with the hose clamp.
8. Secure the air intake hose from the combustion fan to the fuel pump using a tie wrap.
9. Clean up any diesel fuel that was spilt
10. Put the outer cover back in place (tighten screws) and screw in the front cover.
Page 40 of 50
Oasis Service & Troubleshooting Manual
4.3.9
__
Fuel Nozzle
To install the fuel nozzle, do the following:
1.
2.
3.
4.
Turn off the power button (front panel of Oasis Heating Module) and allow the heater to completely
power down (this will take 2 minutes). Remove the screws on the front panel of the Oasis Heating
Module and fold down the front panel (do not disconnect the plug on the front panel). IMPORTANT:
when folding down the front panel, place spacers underneath the panel which will prevent the buttons
from being pressed.
IMPORTANT: Disconnect the main power (12VDC) from the Oasis Heating Module. Disconnecting
the 12VDC power ensures that the heater will not attempt to fire if the power button is accidentally
turned ON. If the heater were to attempt to fire with the burner box cover off, it will project open flame
towards the user.
Remove the screws from the burner box cover (using a Philips head screw driver) and remove the
cover.
Loosen the thumb screw on top of the fuel block and remove it from its mounting position.
Figure 19: Fuel nozzle assembly
5.
6.
Unscrew the fuel nozzle (counter-clockwise) using a 5/8” wrench (see Figure 20).
When the fuel nozzle is removed, a fuel filter is visible inside the fuel block. Remove this filter and
clean it using solvent and high pressure air.
7. For the following procedure, keep the nozzle vertical so the distributor does not fall out when the
nozzle is taken apart.
8. Hold the fuel nozzle using a 5/8” wrench and turn the stem counter-clockwise using a crescent wrench.
9. Clean the distributor orifice and air slots of any debris using solvent and high pressure air. Check Orings for nicks and replace if in doubt.
10. When putting the nozzle head and stem back together, ensure the distributor is fitted properly in
position. Also, keep the nozzle vertical when putting the nozzle head and stem back together. If this is
not done, the nozzle will get damaged.
Page 41 of 50
Oasis Service & Troubleshooting Manual
__
11. Place the filter in the fuel block and screw the cleaned fuel nozzle (clockwise) back in place. When
doing this, position the fuel block so the fuel nozzle is vertical when being screwed into the fuel bock.
If this is not done, the fuel filter can fall out.
12. Place the fuel block back in its mounting position and tighten the tab on top of the fuel block to secure
it in place.
13. Clean up any diesel fuel that was spilt
14. Screw the burner box cover in place.
15. Connect the main 12VDC power to the Oasis Heating Module.
16. Put the outer cover back in place (tighten screws) and screw in the front cover.
4.3.10 Flame Sensor
To install the flame sensor, do the following:
1.
2.
3.
Turn off the power button (front panel of Oasis Heating Module) and allow the heater to completely
power down (this will take 2 minutes). Remove the screws on the front panel of the Oasis Heating
Module and fold down the front panel (do not disconnect the plug on the front panel). IMPORTANT:
when folding down the front panel, place spacers underneath the panel which will prevent the buttons
from being pressed.
IMPORTANT: Disconnect the main power (12VDC) from the Oasis Heating Module. Disconnecting
the 12VDC power ensures that the heater will not attempt to fire if the power button is accidentally
turned ON. If the heater were to attempt to fire with the burner box cover off, it will project open flame
towards the user.
Remove the screws from the burner box cover (using a Philips head screw driver) and remove the
cover.
Figure 20: Flame sensor attachment
4.
5.
6.
Disconnect the flame sensor wires and unscrew (counter-clockwise) the flame sensor from the fuel
block (see Figure 21).
Screw (clockwise) a new flame sensor into the fuel block.
Connect the flame sensor wires to the main harness ensuring both sides of the connectors have
matching YELLOW heat shrink.
Page 42 of 50
Oasis Service & Troubleshooting Manual
7.
8.
9.
__
Screw the burner box cover in place.
Connect the main 12VDC power to the Oasis Heating Module.
Put the outer cover back in place (tighten screws) and screw in the front cover.
4.3.11 Level Switch
The tank must be partially drained before the new level switch is installed. To drain the tank and install the level
switch do the following:
1.
2.
3.
4.
5.
6.
7.
Turn off the power button (front panel of Oasis Heating Module) and allow the heater to completely
power down (this will take 2 minutes). Remove the screws on the front panel of the Oasis Heating
Module and fold down the front panel (do not disconnect the plug on the front panel). IMPORTANT:
when folding down the front panel, place spacers underneath the panel which will prevent the buttons
from being pressed. Once the front panel is folded down, loosen but do not remove the screws from the
outer cover (screws are located on the inside of the cover). Lift up the outer cover to gain easy access
to the components.
IMPORTANT: Disconnect the main power (12VDC) from the Oasis Heating Module. Disconnecting
the 12VDC power ensures that the heater will not attempt to fire if the power button is accidentally
turned ON.
Clamp the inlet and outlet hose so no fluid can flow through them.
Open the radiator cap on the filler neck of the Oasis Heating Module.
Disconnect the inlet hose and connect a pump to the inlet tube on the Oasis Heating Module.
Use the pump to drain the coolant. Drain approximately 2 gallons out of the tank (the tank does not
need to be fully drained).
Once the tank has been drained, use a 7/8” wrench to remove the level switch (counter-clockwise)
from the tank (see Figure 22).
Figure 21: Level switch assembly
8.
9.
Place a small amount of thread sealer on the threads of the new level switch and screw it (clockwise)
into the tank. Once the level switch is in place, ensure the “NO” engraved on the switch is flat and
visible when looking at the level switch from the top.
Connect the level switch wires to the main harness ensuring both sides of the connectors have
matching GREEN heat shrink.
Page 43 of 50
Oasis Service & Troubleshooting Manual
__
10. Fill up the tank with a 50/50 mixture of propylene glycol and water. Ensure that the tank is filled up to
the filler neck.
11. Place the expansion cap back on the filler neck.
12. Connect the inlet hose to the inlet of the Oasis Heating Module and unclamp the inlet and outlet hoses
so fluid can flow through.
13. Clean up any coolant that was spilt.
14. Connect the main 12VDC power to the Oasis Heating Module.
15. Put the outer cover back in place (tighten screws) and screw in the front cover.
4.3.12 Primary Electric Heating Element
The tank must be drained before the electric heating element is installed. To drain the tank and install the
primary electric heating element, do the following:
1.
2.
3.
4.
5.
6.
7.
8.
IMPORTANT: Ensure both AC element breakers are in the OFF position and that all incoming AC
power is turned OFF before proceeding with the next step. Failure to do so can result in SERIOUS
INJURY or DEATH.
Turn off the power button (front panel of Oasis Heating Module) and allow the heater to completely
power down (this will take 2 minutes). Remove the screws on the front panel of the Oasis Heating
Module and fold down the front panel (do not disconnect the plug on the front panel). IMPORTANT:
when folding down the front panel, place spacers underneath the panel which will prevent the buttons
from being pressed. Once the front panel is folded down, loosen but do not remove the screws from the
outer cover (screws are located on the inside of the cover). Lift up the outer cover to gain easy access
to the components.
IMPORTANT: Disconnect the main power (12VDC) from the Oasis Heating Module. Disconnecting
the 12VDC power ensures that the heater will not attempt to fire if the power button is accidentally
turned ON.
Clamp the inlet and outlet hose so no fluid can flow through them.
Open the radiator cap on the filler neck of the Oasis Heating Module.
Disconnect the inlet hose and connect a pump to the inlet tube on the Oasis Heating Module.
Use the pump to drain the coolant. Drain approximately 6 gallons out of the tank (the tank does not
need to be fully drained).
Once the tank has been drained, disconnect the yellow connector with the matching BLACK heat
shrink and unplug the connector going from the primary AC heating element to the primary AC relay
(see Figure 23).
Figure 22: Primary element location
Page 44 of 50
Oasis Service & Troubleshooting Manual
9.
10.
11.
12.
13.
14.
15.
16.
17.
__
Unscrew the primary (left) AC heating element from the tank (counter-clockwise) using a 13/8”
wrench.
Place thread sealer on the threads of the new AC heating element and screw it (clockwise) into the
tank.
Connect the yellow connector on the new AC heating element to the yellow connector with BLACK
heat shrink. Plug the other wire on the AC heating element to the primary AC relay.
Fill up the tank with a 50/50 mixture of propylene glycol and water. Ensure that the tank is filled up to
the filler neck.
Place the expansion cap back on the filler neck.
Connect the inlet hose to the inlet of the Oasis Heating Module and unclamp the inlet and outlet hoses
so fluid can flow through.
Clean up any coolant that was spilt.
Connect the main 12VDC power to the Oasis Heating Module.
Put the outer cover back in place (tighten screws) and screw in the front cover.
4.3.13 Secondary Electric Heating Element
The tank must be drained before the electric heating element is installed. To drain the tank and install the
secondary electric heating element, do the following:
1. IMPORTANT: Ensure both AC element breakers are in the OFF position and that all incoming AC
2.
3.
4.
5.
6.
7.
8.
9.
10.
11.
12.
13.
14.
15.
16.
power is turned OFF before proceeding with the next step. Failure to do so can result in SERIOUS
INJURY or DEATH.
Turn off the power button (front panel of Oasis Heating Module) and allow the heater to completely
power down (this will take 2 minutes). Remove the screws on the front panel of the Oasis Heating
Module and fold down the front panel (do not disconnect the plug on the front panel). IMPORTANT:
when folding down the front panel, place spacers underneath the panel which will prevent the buttons
from being pressed. Once the front panel is folded down, loosen but do not remove the screws from the
outer cover (screws are located on the inside of the cover). Lift up the outer cover to gain easy access
to the components.
IMPORTANT: Disconnect the main power (12VDC) from the Oasis Heating Module. Disconnecting
the 12VDC power ensures that the heater will not attempt to fire if the power button is accidentally
turned ON.
Clamp the inlet and outlet hose so no fluid can flow through them.
Open the radiator cap on the filler neck of the Oasis Heating Module.
Disconnect the inlet hose and connect a pump to the inlet tube on the Oasis Heating Module.
Use the pump to drain the coolant. Drain approximately 6 gallons out of the tank (the tank does not
need to be fully drained).
Once the tank has been drained, disconnect the yellow connector with the matching YELLOW heat
shrink and unplug the connector going from the secondary AC heating element to the secondary AC
relay (see Figure 5).
Cut the tie wrap that attaches the combustion fan air intake hose to the fuel pump.
Before proceeding with the next step, ensure that the fuel supply to the heater is shut off.
Disconnect the fuel line (using a pair of pliers on the hose clamps) from the inlet of the fuel regulator
and from the outlet of fuel pump to the fuel return.
Remove the 2 nuts from the fuel pump (using a 7/16” socket) and move it out of the way of the
secondary AC heating element.
Unscrew the secondary (right) AC heating element from the tank (counter-clockwise) using a 13/8”
wrench.
Place thread sealer on the threads of the new AC heating element and screw it (clockwise) into the
tank.
Connect the yellow connector on the new AC heating element to the yellow connector with the
YELLOW heat shrink. Plug the other wire on the AC heating element to the secondary AC relay.
Attach the fuel pump to the burner box using the two nuts.
Page 45 of 50
Oasis Service & Troubleshooting Manual
__
17. Connect the fuel line from the outlet of the fuel pump to the inlet of the fuel regulator and connect the
fuel line from the fuel return to the outlet of the fuel pump. Ensure both fuel lines are secured with the
hose clamps.
18. Secure the air intake hose from the combustion fan to the fuel pump using a tie wrap.
19. Open the fuel supply to the heater.
20. Fill up the tank with a 50/50 mixture of propylene glycol and water. Ensure that the tank is filled up to
the filler neck.
21. Place the expansion cap back on the filler neck.
22. Connect the inlet hose to the inlet of the Oasis Heating Module and unclamp the inlet and outlet hoses
so fluid can flow through.
23. Clean up any fuel or coolant that was spilt.
24. Connect the main 12VDC power to the Oasis Heating Module.
25. Put the outer cover back in place (tighten screws) and screw in the front cover.
4.3.14 Air Filter
To install the air filter of the air compressor do the following:
1.
Turn off the power button (front panel of Oasis Heating Module) and allow the heater to completely
power down (this will take 2 minutes). Remove the screws on the front panel of the Oasis Heating
Module and fold down the front panel (do not disconnect the plug on the front panel). IMPORTANT:
when folding down the front panel, place spacers underneath the panel which will prevent the buttons
from being pressed.
Figure 23: Air filter assembly
2.
3.
4.
Remove the air filter (see Figure 24) from the hose that is connected to the air inlet of the air
compressor (using a pair of pliers on the hose clamps).
Attach the new air filter to the hose that is connected to the air inlet of the air compressor.
Screw in the front cover.
Page 46 of 50
Oasis Service & Troubleshooting Manual
__
5.0 Servicing the Oasis Distribution Module
5.1 Filling the Coolant System
The Distribution module contains two valves with ½”NPT connections to be used for filling
the heating loop. To initially fill up and bleed the air out of the system, do the following:
1.
2.
3.
Connect a hose to the outlet of a diaphragm pump and to the “filling inlet” valve on the
distribution module. Attach a hose to the inlet of a diaphragm pump and place the hose in
a container filled with a 50/50 mixture of propylene glycol and water. (see Figure 24).
Connect a hose to the “filling outlet” valve on the distribution module and place the other
end of the hose in the same container.
Open both valves on the Distribution module.
Figure 24: Initial fill up Oasis system
4.
5.
6.
7.
8.
Turn ON the diaphragm pump. This will prime the pumps in the Oasis Distribution
Module. It may be necessary to fill up the container with more coolant as the air is being
bleed from the system.
Turn on the pump activation switch, located on top of the zone box, this will activate the
pumps inside the distribution module and fill up both heating loops.
Once the coolant in the container remains at the same level and there appears to be no air
in the return stream from the filling outlet hose, close the valves on the distribution
module and stop the diaphragm pump.
Turn off the pump activation switch.
The Oasis heating system is ready to be operated.
Page 47 of 50
Oasis Service & Troubleshooting Manual
__
5.2 Part Replacements
5.2.1
Summer pump
To replace the summer pump, do the following:
1.
2.
3.
4.
5.
Before proceeding with the next step, disconnect the Oasis Distribution Module from the harness that
goes to the distribution module zone board. This ensures the pumps do not run while being serviced.
Open the front cover by loosening the 6 Phillips head screws.
Locate the summer pump as shown in Figure 25
Clamp the hose that is connected to the summer pump inlet so that no coolant can flow through it.
The outlet hose is closed by the built in check valve, that only allows flow to go up.
Figure 25: Summer Pump replacement
6.
7.
8.
9.
10.
11.
12.
13.
Remove the Spade connectors on the pump.
Move the hose clamps on the inlet and outlet of the pump to the other side.
Wiggle the pump until the hoses come off.
Install a new pump and reconnect the hoses.
Reconnect the spade connectors.
Remove the clamp from the summer pump inlet hose to allow coolant to flow through it.
Connect the Oasis Distribution Module to the harness that goes to the distribution module zone board.
If air was introduced into the system, it may be necessary to purge the system again. Run the Oasis
heating module and see if heat is distributed throughout the system. If heat does not get distributed
throughout the system, purge the system (see section 5.1)
Page 48 of 50
Oasis Service & Troubleshooting Manual
5.2.2
__
Loop 1 and Loop 2 pumps
To replace the Loop 1 pump, do the following:
1.
2.
3.
4.
5.
6.
7.
8.
9.
10.
11.
12.
13.
Before proceeding with the next step, disconnect the Oasis Distribution Module from the harness that
goes to the distribution module zone board. This ensures the pumps do not run while being serviced.
Open the front cover by loosening the 6 Phillips head screws.
Clamp the hose that is connected to the Loop 1 pump inlet so that no coolant can flow through it.
The outlet hose is closed by the built in check valve, that only allows flow to go up.
Move the hose clamps on the inlet and outlet of the pump to the other side.
Remove the Spade connectors to the pump.
There is one nylock nut that is holding the pump in place. Remove this nut and carefully move the
pump out of its place.
Wiggle the pump until the hoses come off.
Insert a new pump, tighten the nut and reconnect the hoses.
Reconnect the spade connectors.
Remove both clamps from the hoses to allow coolant to flow through them.
Connect the Oasis Distribution Module to the harness that goes to the distribution module zone board.
If air was introduced into the system, it may be necessary to purge the system again. Run the Oasis
heating module and see if heat is distributed throughout the system. If heat does not get distributed
throughout the system, purge the system (see section 5.1)
Figure 26: Loop 1&2 pump replacement
To replace the Loop 2 pump, do the following:
1.
2.
3.
4.
Before proceeding with the next step, disconnect the Oasis Distribution Module from the harness that
goes to the distribution module zone board. This ensures the pumps do not run while being serviced.
Open the front cover by loosening the 6 Phillips head screws.
Clamp the hose that is connected to the Loop 2 pump inlet so that no coolant can flow through it.
The outlet hose is closed by the built in check valve, that only allows flow to go up.
Page 49 of 50
Oasis Service & Troubleshooting Manual
5.
6.
7.
8.
9.
10.
11.
12.
13.
14.
__
Move the hose clamps on the inlet and outlet of the pump to the other side.
Remove the Spade connectors to the pump.
There are two Phillips head screws located on the side that is holding the pump bracket in place.
Remove these screws and carefully move the pump bracket out of its place.
The pump is attached to the bracket with 2 nylock nuts. Remove these nuts and insert a new pump.
Tighten the new pump with 2 nylock nuts.
Insert the new pump inside the case, tighten the screws and reconnect the hoses.
Reconnect the spade connectors.
Remove the hose clamp from the hose to allow coolant to flow through it.
Connect the Oasis Distribution Module to the harness that goes to the distribution module zone board.
If air was introduced into the system, it may be necessary to purge the system again. Run the Oasis
heating module and see if heat is distributed throughout the system. If heat does not get distributed
throughout the system, purge the system (see section 5.1)
Page 50 of 50