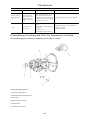
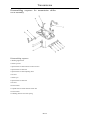
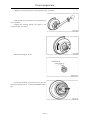
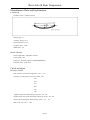
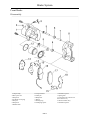
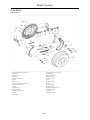
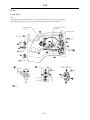
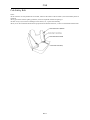
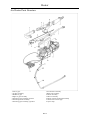
1
EQ1030T47D-820
Light Commercial Truck
Service Manual
PEOPLE'S REPUBLIC OF CHINA
DONGFENG AUTOMOBIL CO.,LTD.
2006, 6
TOC
General
QD32 Engine
Clutch
Transmission
Front Suspension
Rear Axle & Rear Suspension
Propeller Shaft & Differential
Steering System
Brake System
Cab & Frame
Electric System
General
GL
TOC
Preventive Measures ..................................................................................GL-2
How to Use Manual ...................................................................................GL-3
Maintenance Specifications......................................................................GL-4
Grease Application Place and Schedule ................................................GL-7
Main Adjusting Data ..................................................................................GL-8
Lubricant ......................................................................................................GL-8
Capacity Data ..............................................................................................GL-8
Fuel ................................................................................................................GL-9
Engine Lubricant ........................................................................................GL-9
Gear Oil ........................................................................................................GL-9
Transmission Gear Oil .............................................................................GL-10
Lubricating Grease ...................................................................................GL-10
Fluid for Brake and Clutch .....................................................................GL-10
Engine Coolant ..........................................................................................GL-10
Tightening Torque ....................................................................................GL-10
General
General
This manual mainly contains maintenance and service method of the DONGFENG STAR EQ1030T47D-820
light commercial truck.
DONGFENG STAR
Engine
Equip
EQ1030T47D-820
CYQD32 diesel
engine
COE, single row, with front independent suspension,
power steering, front disc and rear drum brake
To use vehicles safely and efficiently, it is important for you to read the manual thoroughly and make sure
that you are familiar with the items that mark "Note".
Due to continuous improvements on our vehicles, maybe there are some instructions in the manual that does
not compliance with the actual vehicles. Please consult the local agency for the latest news. The informaion in this
manual are correct before issuance, DONGFENG reserve the rights of changing any of the content without notice.
Maintenance method varified due to different skill level, method, tools and available parts that serviceman adopts
to. Any serviceman should firstly take into consideration on personal safety and vehicle safety when working.
The Application File Section of Test Department, the Commercial Product R & D Institute of DONGFENG
AUTOMOBILE CO., LTD. is in charge of compiling.
2006,6
GL-1
General
Preventive Measures
See preventive measures below to get safe operation and suitable maintenance surely. These measures will not be repeated in the next pages.
1.Do not let engine run too long absolutely unless it is under special ventilation to ensure that there is good ventilation in working area, no fire
things there.
Be careful sternly the any burnable, poisonous things like gasoline, refrigerant etc are used.
Working in a ditch or close environment and contacting any dangerous
things, it is necessary any dangerous things,it is necessary to provide good
ventilation in the working area, and smoking is prohibited there absolutely.
2.When truck is lifted, use a wheel stationary block to stop the truck move.
After lifted, used a safe mat to support the truck on a specially designed
point of truck to bear the truck weight, then begin its maintenance.
These operations should be completed on an even ground.
3.Being unfixed a heavier assembly like engine, gear box or rear axle, be
careful to keep it balance, avoid it fall down. And not permit to damage
the details next to the brake pipes, etc.
4.Working at some maintenance without battery, turn off the ignition
switch and power switch at first, and then take off the negative line on
the battery to avoid unexpected accident happening like short circuit.
5.To prevent serious burnt accident, avoid touching some hot metal, such
as radiator, exhaust manifold and muffler etc. When a engine is hot, do
not take off the lid of radiator absolutely.
6.Before maintenance, use the suitable cloth to cover the inner ornaments
and ground mat of the truck, in order to keep it in a good condition.
Note:
Be careful not smash the painted surface of the truck.
GL-2
General
7.Before the check and assembly of a disassembled part, clean it first.
8.During the reassembling, oil seal, gasket, O-washer, lock washer and
split pin should use the new one.
9.Replace the outer and inner rings of tapered roller bearing in whole set.
10.Arrange the disassembling procedures according to the part assembling
order.
11.Mark on the disassembled brake pipe about the connecting relationship.
12.Use suitable lubricating oil, brake fluid,cooling liquid and seal glue
according to standard.
13.Use general and special tools to ensure maintenance safely and efficiently.
14.Deal properly with drained lubricating oil and solvent used to wash
parts.
How to Use Manual
1.Look up contents as quickly as possible. The contents of every section
are completely listed on the first page of each chapter.
2.The subject of each chapter is on the top of every page, showing the
name of each system of assembly.
3.The page code of each chapter is of two or three letters, to show the
name and page code of a certain chapter(ex, "BR-5").
4.A larger diagram is used to show the separated construction of an assembly, its contents: tightening torque, lubricating points, and the other
information for maintenance. These are dor the reference of maintenance, and you have to see the SPARE PARTS CATALOG for parts
booking.
5.The smaller diagram mainly indicate: every main checking procedures,
all the tools needed, work skills latent procedures which are not listed in
the larger diagram above. To some more complicated assembly system,
in dictate them with diagrams one by one.
6.The measuring units in this book are mainly international standard ones.
7.The data and axplanation of maintenance are in the last pages of every
chapter to be the reference.
8.In the procedure marked "Warning","Notes","Caution" strictly observe
these procedure norms, to avoid body hurt and damage to some parts.
Warning: indicates if you do not follow this instruction, it will
cause body hurts.
Note: indicates if you do not follow this instruction, it will cause
some parts damaged.
Except some instructions of warning and notice, again some helpful information are provided.
GL-3
General
Maintenance Specifications
It is necessary for periodical inspection and maintenance of a vehicle to extend its service life, and improve
on its power performance and fuel economy. So periodical inspection and maintenance should be carefully and
maintenance should be carefully and strictly implemented in accordance with the following specifications so as to
achiveve maximal economic and social benefits.
The users have to do the maintenance according to this chapter. The following schedule is only for maintenance items with in 4,0000km, it is also suitable for normal maintenance items after 40,000km.
△—Running-in Maintenance Mileage (1,500~2,500km)
☆—Running in maintenance items
★—Normal maintenance items
Note:
Customers should carry out the inspection and maintenance intervals according to the different area
condition. Properly shorten the maintenance intervals can ensure the truck to get the reasonable
maintenance and move reliability. Never prolong the intervals.
CYDQ32 engine
R=Replace I=Inspect
Replace if necessary.
A=adjust C=Clean D=Dry and check
Maintenance Items
5
R
Replace lubricant ★
Replace oil filter cartridge
★
Maintenance Intervals (× 1000km)
10
R
15
R
R
Maintenance Items
Exhaust device and tighting of other nuts
Drive belt
Engine coolant
Cooling system
Fuel pipeline
Air filter
Air inlet and outlet valve
Fuel spray nozzle
Idle speed
20
R
25
R
R
30
R
35
R
R
40
R
45
R
50
R
R
55
R
R
60
R
65
R
R
70
R
75
R
80
R
R
R
Maintenance Intervals (× 1000km)
1
I
I
10
20
30
I
I
A
C
C
A
I
I
C
40
50
60
I
I
R
I
I
I
R
C
C
A
A
请看注意 (1)
I
I
70
C
80
I
R
I
I
R
A
I
Note:
If the engine power apparently dropped, or exhausted black smoke, check the starting pressure of the
fuel spray nozzle and fuel spray conditions, and adjust if necessary.
If there is a ★ in the maintenance item, it has to follow the "Maintenance in bad using environment "
and do the maintenance more frequent.
CYQD32 engine maintenance in bad using enviroment
The maintenance above is in the normal using environment, but if the vehicle is used in a bad environment for a long time, it will be necessary to do the following maintenance more frequent.
GL-4
General
A—Dusty area B—Frequent start in short time C—Towing long trailer D—Long tome idle speed
E—Extremely bad climate, high temperature or bitter cold area.
Using Environment
A B C D
A
E
Maintenance Item
Oil and oil filter
All types
Fuel filter
Operation
Replace
Replace
Replace
Maintenance Interval
Often
Often
Every 20,000km
Clutch
Maintenance Intervals( × 1,000km)
△ 4 8 12 16 20 24 28 32 36 40
☆ ★ ★ ★ ★ ★ ★ ★ ★ ★ ★
☆ ★ ★ ★ ★ ★ ★ ★ ★ ★ ★
☆ ★ ★ ★ ★ ★ ★ ★ ★ ★ ★
Maintenance Items
Check working condition of clutch
Check clutch pedal free play
Check hydraulic pipe line and pump for leakage
Transmission
Maintenance Intervals( × 1,000km)
△ 4 8 12 16 20 24 28 32 36 40
☆ ★ ★ ★ ★ ★ ★ ★ ★ ★ ★
☆ ★ ★ ★ ★ ★ ★ ★ ★ ★ ★
Maintenance Items
Check transmission for oil leakage
Check transmission oil level
Check worn condition between transmission and propeller shaft
☆ ★ ★ ★ ★ ★ ★ ★ ★ ★ ★
spline
Check the connections of control mechanism for looseness
☆
★
★
Replace transmission lubricant oil
☆
★
★
Brake system
Maintenance Items
Check effectiveness of service brake and parking brake
Check brake line for oil leakage
Check remain hydraulic oil of clutch and brake system
Check the tightness of the brake support plate
Check brake pedal free play
Check brake shoe for wearing
Check vacuum booster oil pipe and valve for oil leakage
Check brake drum and brake disc for wearing
Replace hydraulic oil of clutch and brake system
Check parking brake lever and steel wire for the working condition
Maintenance Intervals( × 1,000km)
△ 4 8 12 16 20 24 28 32 36 40
☆ ★ ★ ★ ★ ★ ★ ★ ★ ★ ★
☆ ★ ★ ★ ★ ★ ★ ★ ★ ★ ★
☆ ★ ★ ★ ★ ★ ★ ★ ★ ★ ★
☆
★
★
★
★
★
★
★
★
★
★
★
★
★
★
★
☆
★
★
★
★
★
★
Steering system
Maintenance Items
Check steering gear and pipe for oil leakage
Check the tightening condition of pitman arm
Check the tightening condition of steering gear to thr frame
GL-5
Maintenance Intervals( × 1,000km)
△ 4 8 12 16 20 24 28 32 36 40
☆ ★ ★ ★ ★ ★ ★ ★ ★ ★ ★
☆ ★ ★ ★ ★ ★ ★ ★ ★ ★ ★
☆ ★ ★ ★ ★ ★ ★ ★ ★ ★ ★
General
Steering system
Maintenance Items
Check the tightening condition of tie rod ends and drag link joints
Check the tightening condition of transition arm and driven arm
Check steering gearing device for looseness
Check steering wheel for free play and operating
Check steering gear oil level,add if necessary
Check spline hub of the steering drive shaft for wear
Maintenance Intervals( × 1,000km)
△ 4 8 12 16 20 24 28 32 36 40
☆ ★ ★ ★ ★ ★ ★ ★ ★ ★ ★
☆ ★ ★ ★ ★ ★ ★ ★ ★ ★ ★
☆ ★ ★ ★ ★ ★ ★ ★ ★ ★ ★
☆
★
★
★
★
★
☆
★
★
★
★
★
★
★
★
★
★
☆
★
★
Check and adjust front wheel toe-in
Check the tightening condition of upper and lower cross arm ball head
☆
to steering knuckle
Clean steering gear and pipe, replace steering gear oil
☆
Check front wheel alignment
★
★
★
★
☆
★
★
Check the pull rod ball head working condition of the steering system
★
★
Suspension system
Maintenance Items
Check shock absorber for oil leakage and fasten bracket bolts
Maintenance Intervals( × 1,000km)
△ 4 8 12 16 20 24 28 32 36 40
☆ ★ ★ ★ ★ ★ ★ ★ ★ ★ ★
☆ ★ ★ ★ ★ ★ ★ ★ ★ ★ ★
Clean rear leaf spring and shock absorber
Check the working condition of the front independent suspension
☆ ★ ★ ★ ★ ★ ★ ★ ★ ★ ★
upper and lower cross arm ball pin and the dust cap
Check the working condition of torsion bar fixed adjusting arm
☆
★
★
★
★
★
Tighten U-bolts and nuts of leaf spring during full load
☆
★
★
★
★
★
Check the working condition of front suspension torsion bar and push
☆
★
★
★
★
★
rod
Check the working condition of front independent suspendion upper
☆
★
★
★
★
★
and lower cross arm
Tighten the connecting bolt of front independent suspension
☆
★
★
★
★
★
Check the tightening condition of leaf spring shackle bolt
☆
☆
Check the working condition of rubber assist spring
Check leaf spring and shock absorber for any damage
★
★
★
★
★
★
★
Replace leaf spring pins and sleeves
Check the working condition of front independent suspendion rubber
limit block
Check the vehicle left and right height
★
★
★
★
★
★
★
★
★
* If the ball pin dust cap is damaged, replace it immediately, because it may damage the ball pin and
cause danger in driving.
Propeller shaft
Maintenance Items
Check shaft connecting part for looseness
Check tightening condition of spider bearing of propeller shaft
Check propeller shaft splines for wear and damage
GL-6
Maintenance Intervals( × 1,000km)
△ 4 8 12 16 20 24 28 32 36 40
☆ ★ ★ ★ ★ ★ ★ ★ ★ ★ ★
☆
★
★
★
★
★
☆
★
★
★
★
★
General
Axle & wheel
Maintenance Items
Clean front, rear axle assembly and wheel assembly
Check main reductor for oil leakage
Check tire pressure and wheel bolt and nut for tightening torque
Check tire for wear and damage
Check lubricant level of main reductor and clean the vent plug
Rotate tires
Replace the main reductor lubricant
Maintenance Intervals( × 1,000km)
△ 4 8 12 16 20 24 28 32 36 40
☆ ★ ★ ★ ★ ★ ★ ★ ★ ★ ★
☆ ★ ★ ★ ★ ★ ★ ★ ★ ★ ★
☆ ★ ★ ★ ★ ★ ★ ★ ★ ★ ★
☆ ★ ★ ★ ★ ★ ★ ★ ★ ★ ★
☆
★
★
★
★
★
★
★
★
★
★
☆
★
★
Other
Maintenance Items
△
Maintenance Intervals( × 1,000km)
4 8 12 16 20 24 28 32 36 40
Check the connecting part tightening conditions of cargobody to
☆
frame
Check thelongitudinal and cross member of the cargo body for loose☆
ness and damage
Check chassis frame rivets for looseness
☆
Check connections of cab for looseness
☆
☆
Check battery electrolyte level (fill up if it is not enough)
★
★
★
★
★
★
★
★
★
★
★
★
★
★
★
★
★
★
★
★
★
★
Periodic Replacement
Periodical replacement parts are hose which deteriorate with lapse of time. These parts are mainly
rubber parts such as brake hoses,fuel hoses. It is difficult to predict the safety of these parts when
checking them with the method used in the usual predict inspection. Hence, applicable parts must be
replaced whether they appear to be usable or not.
Replace Items
1
Rubber parts of brake valves
2
Replace Intervals (Year)
3 4 5 6 7 8 9 10 11 12
★ ★ ★
★ ★ ★
★
★
★
Rubber hoses of brake system
Rubber hoses for vacuum pump
Rubber hoses of clutch control system
★ ★ ★ ★ ★ ★ ★ ★ ★
★ ★ ★ ★ ★ ★ ★ ★ ★
★
★
★
★
★
★
★
★
★
★
★
★
★
★
★
Rubber sealing ring of master and slave cylinder of clutch
Front independent suspension upper and lower cross arm ball pin
★ ★ ★ ★ ★ ★ ★ ★ ★ ★ ★ ★
assembly
Propeller shaft spider assembly
★ ★ ★ ★ ★ ★ ★ ★ ★ ★ ★ ★
★ ★ ★ ★ ★ ★ ★ ★ ★ ★ ★ ★
Steering drive shaft spider ball pin assembly
Grease Application Place and Schedule
Greasing should be performed periodically for all parts of the vehicle. Before filling up, clean all
dust and dirty from the grease nipples and other parts which are needed to lubricated, then apply grease.
After greasing, wipe off the excess grease. Be sure to put the caps back on.The table includes first
40,000km lubricating schedule. You have to follow the schedule after the first several kilometers.
△—Running-in maintenance mileage (1,500~2,500km)
GL-7
General
☆—Running-in maintenance lubrication item
★—Normal driving lubricating item
Lubricating interval mileage (× 1,000km)
△ 4 8 12 16 20 24 28 32 36 40
Place of lubricating
Slip yoke of steering drive shaft and spider bearing
☆
☆
☆
☆
Door hinge
Door lock, glass regulator, odometer flexible shaft
Hub bearing
★
★
★
★
★
★
★
★
★
★
★
Main Adjusting Data
Adjusting Items
Air valve clearance (cold)
Standard
0.35mm
Inlet valve
Exhaust valve
0.35mm
Oil pressure of idling engine
Oil pressure of normal run engine
Water temperature of normal run engine
69~100kPa
196~490kPa
80~95 ℃
10~15mm
25~40mm
Tension grade of alternator belt
Free travel of clutch pedal
Free play of brake pedal
Steering wheel free play
Toe-in
20~25mm
10°
0~2mm
Lubricant
Place
Lubricant
Engine lubricating system
Engine cooling system
Antifreeze, anti-rust coolant
Transmission
Manual operation special oil
Main reductor
Industrial gear oil
Engine oil
Steering gear
Power steering fluid
Clutch & brake system
Synthetic brake liquid
Bearing and ball pin
Li-base lubricant grease
Type
Grade
5W/20
API CF-4
75W/90
75W/90
ATF-2
901-4
2, 3#
API GL-4
API GL-5
Capacity Data
Part
Capacity (L)
Fuel tank
Engine lubricant system
65
6.5
Water tank and cooling system
13 to full
Transmission
Main reductor
Steering gear
Brake system
2.7
6.5~5.0 to overflow
to the MAX
to the MAX
GL-8
DOT4
SH0535-93
General
Fuel
The qualified light diesel oil specified by GB/T19147-2003 could be applied for in China, and the
users choose different qualified light diesel oil according to the local temperature.
0# Light diesel oil
Local temperature above 4 ℃
10# Light diesel oil
Local temperature above -5 ℃
20# Light diesel oil
Local temperature between
35# Light diesel oil
Local temperature between -14 ℃ ~ -29 ℃
50# Light diesel oil
Local temperature between -29 ℃ ~ -44 ℃
-5 ℃ ~ -14 ℃
As for the vehicle for export, please take the local national regulations and standards and the climate for reference to choose the proper diesel oil.
Engine Lubricant
API CF-4 Grade diesel oil or special oil for CYQD32 is recommended. According to the local air
temperature, the user may choose different CF oil with different viscosity grade. Recommended temperature range is as below.
Gear Oil
Middle-load (API GL-4) gear oil, heavy-load (GL-5) gear oil is recommended. The recommended
ambient temperature range for all gear oil is as below:
GL-9
General
Transmission Gear Oil
The manually operated gear oil API GL-4, 75W/90 is recommended.
Lubricating Grease
The compound lithium grease is recommended, but the general lithium grease could also be used.
Fluid for Brake and Clutch
The DOT4, 901-4 brake fluid is recommended.
Note:
Never use brake fluid with different quality or type.
Engine Coolant
Long effective frostbite antirust fluid is recommended and its freezing point must be lower than the
lowest local temperature for 8 ℃ .
Tightening Torque
Tightening torque of the important part
Part
Tightening torque (N.m)
Upper cross arm and ball connecting part
22~26
Ball joint and steering shaft connecting part
78~98
Buffer rubber and cross member connecting part
62~76
Distance rod front end locking nut
118~157
Distance rod and cross member connecting part
54~71
Lower cross arm fixed nut
108~147
Upper cross arm fixed part on the frame
108~147
Torsion arm and lower cross arm fixed part
50~68
Upper cross arm fixed nut of two ends
71~103
Adjusting nut (on the adjusting arm)
108~127
Lower cross arm cotter pin fixed nut
118~191
Upper bracket nut of front shock absorber
32~42
Tighten nut of front shock absorber upper end
16~22
Nut of front shock absorber lower pin
32~42
Rear leaf spring U bolt and nut
100~105
The fixed part of rubber assist spring
35~47
Leaf spring pin and shackle fixed nut (Q341B12)
80~102
Leaf spring pin fixed bolt (Q151B0818)
16~22
Nut of rear shock absorber upper pin
46~62
Nut of rear shock absorber lower pin
46~62
Engine rear mounting cushion and cross member connecting part
88~108
Engine rear mounting bracket and cushion connecting
part
Follow EQB-37-1999
Transmission bolt and rear mounting bracket connecting part
Follow EQB-37-1999
GL-10
General
Part
Tightening torque (N.m)
Transition output shaft and propeller shaft connecting
part
69~78
Transition control flexible shaft fixed bracket and longitudinal member connecting part
13~16
Fixed bolt of flexible shaft two ends ball joint
25~30
propeller shaft and rear axle connecting part
69~78
Brake pipe joint
15~22
Front wheel nut
118~147
Rear wheel nut
118~147
Engine front mounting bracket and cylinder connecting part
30~41
Engine front mounting cushion nut
46~56
Engine and clutch housing conneting part
39~49
Engine exhaust pipe and vehicle exhaust pipe connecting part
51~65
Steering wheel locking nut
29~39
Steering gear and steering gear drive shaft universal
knuckle fork connecting nut
25~29
Steering gear and frame connecting nut
88~98
Steering drop arm locking nut
235~265
Drag link and drop arm connecting nut
88~137
Drag link and transition arm fixed nut
88~137
Middle pull rod and driven arm, transition arm fixed
nut
88~137
Steering knuckle arm and tie-rod connecting nut
88~137
Driven arm, transition arm bracket fixed bolt
52~627
Steering knuckle arm and steering knuckle fixed bolt
108~147
Steering limit bracket and frame fixed bolt
72~98
Steering knuckle and upper cross arm ball head fixed
nut
78~98
Steering knuckle and lower cross arm ball head fixed
nut
118~191
Rocker arm shaft nut
200~230
Middle pull rod clamp locking nut
25~28
Transition arm fixed nut
200~230
Driven arm fixed nut
160~190
Vehicle body front & rear mounting bracket and frame
connecting part
60~72
Front and rear fixed part of the vechile body
75~87
Front seat fixed bolt on floor
21~26
Rear seat fixed bolt on floor
43~55
Rear axke 3-way oil pipe joint and rear axle connecting part
21~25
Fuel tank bracket and frame connecting part
21~28
Fuel tank band fixed bolt part
20~23
GL-11
General
Part
Tightening torque (N.m)
Muffler fixed bolt
32~38
Battery frame and frame connecting part
35~47
Battery pressure lever fixed nut part
19~24
Front bumper and cross member connecting part
19~24
Power steering oil pipe joint nut
30~40
Air filter bracket and longitudinal connecting part
21~28
Power steering pump adjusting nut
25~31
Power steering pump adjusting bolt
19~25
Alternator adjusting lever bolt and nut
13~19
Push lever bolt of clutch master cylinder
8~11
Clutch pedal brake lock locking nut
12~15
Clutch pressure disc and flywheel fixed bolt
25~35
Fan fixed bolt
7~9
Push lever nut of brake thruster
16~22
As for the other torques not mentioned, please see the standard of DONGFENG EQB-37-1999.
Note:
No locking spacer, but to make sure the required tightening torque.
When tightening during installing, make use of the oil to lubricate. Do not use the bolt with thread
damaged.
Each bolt need to tighten within 2~3 times.
GL-12
Clutch
CL
TOC
Precaution and Preparation...................................................................... CL-1
Clutch System ............................................................................................. CL-3
Clutch Control System .............................................................................. CL-4
Clutch Release Mechanism ...................................................................... CL-6
Clutch Driven Disc and Pressure Plate .................................................. CL-7
Service Data and Specifications .............................................................. CL-9
Clutch
Clutch
Precaution and Preparation
Precaution:
The DOT 4 901-4 compound brake fluid is recommended for the
clutch hydraulic system.
Dirty brake fluid is forbidden to use.
Never let the brake fluid on paint, it may damage the paint coat.
Use tools to assemble or disassemble the clutch pipeline.
Use clean brake fluid to clean the master cylinder, slave clinder and
fluid reservoir.
Forbidden to use mineral oil like gasoline, coal oil ,etc, it will erode
the rubber parts in the hydraulic system.
Note:
After clean the clutch pressure disc, use the dust collector to clean the
dirt, not the compressed air.
Preparation
Specified tools
CL-1
Clutch
Clutch System
1.Clutch
pedal bracket assy
2.Rubber hose assy--oil reservoir to master pump
3.Clutch
master pump assy
pedal welding assy
5.Pedal jacket
6.Clutch pedal shaft
7.Clutch pedal return spring
8.Lower fixed board
4.Clutch
CL-2
9.Dustproof
10.Front oil pipe assy
11.Spacer
12.Rear oil pipe assy
13.Clutch rear bent
pipe bracket
assy
15.Gasket
16.Clutch slave pump assy
14.Hose
Clutch
Adjusting Clutch Pedal
1.Adjust the pedal height by means the spacing screw.
Height of the clutch pedal H:
160~170mm
2.Adjust the clutch pedal free play by master cylinder push rod:
Loose the locking nut when adjusting, turn the master cylinder push rod,
then make the push rod withstand the spacer and screw off for 1/5~1/2 circles, screw down the locking nut at last.
Pedal free play A:
30~50mm
Bleeding Procedure
Bleed air according to the following procedure:
Carefully monitor fluid levlel at master clinder during bleeding operation.
1.Fill in reservior with rocommended brake fluid.
2.Connect a transparent plastic tube to air bleeder valve.
3.Fully depress clutch pedal several times.
4.With clutch pedal depressed, open bleeder valve to release air.
5.Tighten the bleed valve.
6.Repeat steps 3 and 5 above until brake fluid flows from air bleeder valve
without air bubbles.
CL-3
Clutch
Clutch Control System
Clutch master pump
1.Oil
intake joint
wire clamp
3.Pump body
4.Return spring
5.Piston oil intake valve return spring seat
6.Piston oil intake valve return spring
7.Piston oil intake valve oil seal
8.Piston oil intake valve
9.Oil pipe joint
10.Limit screw seal ring
2.Dual
CL-4
11.Limit
screw
12.Rubber cup
13.Piston
14.Retainer ring
15.Push rod thread fork
16.Hex thin nut
17.Push rod spacer
18.Push rod
19.Dustproof
Clutch
Disassembly and assembly
Push pistion into cylinder body with screwdriver when removing or
tightening valve stopper screw.
Align groove of piston assembly and valve stopper when installing valve
stopper screw.
Clutch slave pump
1.Slave
pump push rod nut
2.Shield
3.Push
rod
4.Piston
5.Rubber
cup
body
7.Oil drain screw plug
8.Dustproof
6.Pump
Inspection
1.Check rubbing surface of slave cylinder for wear, rust or damage.
2.Check piston cup for wear or damage. Replace if necessary.
3.Check dust cover for cracks, deformation or damage. Replace if
necessaty.
4.Check piston spring for wear or damage. Replace if necessary.
CL-5
Clutch
Clutch Release Mechanism
1.Clutch
driven disc
Removel and installation
Install retainer spring and spring holder.
CL-6
2.Clutch
cover and pressure plate
Clutch
Remove release bearing.
Install release bearing with suitable tolerance.
Inspection
Check whether the release bearing has crackle and wear. The release bearing should run smoothly and noiselessly. Change it if necessary.
Check whether the surface of the release bushing and release fork has
wear, damage and corrosion. Change them if necessary.
Lubrication
Lubrication the fit surface and the friction surface of the bushing and fork
with recommended grease.
Warning
•Too much grease might result in damage to the clutch driven disc
Clutch Driven Disc and Pressure Plate
CL-7
Clutch
Clutch Driven Disc
Check
Check the wear of the driven disc;
The wear limit between the friction facing and rivet head: 0.3mm.
Check up the spline tooth gap and its deviation for the driven disc; Check whether the driven disc has been burnt, discolored or polluted with
oil or grease. Change it if necessary.
Assembling
Apply some grease on the connecting surfaces and spring.
Note:
•Most grease might result in damage to the driven disc surface.
Clutch Pressure Plate and Flywheel
Checking and adjustment
·Check the height and unevenness of diaphragm spring.
·Put the feeler (T=0.2) on the space bush during checking up the height of
the diaphragm spring.
Height of the diaphragm spring:41~43mm
·If the height of the diaphragm spring is measure beyond the set range,
change the pressure plate surely.
·Check the worn or damage condition for the diaphragm spring support
washer by rocking the pressure plate by listening to the vibration sound.
Judge whether there is light crackle sound by patting the rivet gently.
Change the pressure plate if necessary.
·Check whether the pressure surface of the pressure plate is burnt or dirtied. Remedy it with the emery paper.
CL-8
Clutch
·Check whether the matching surface of the pressure plate and driven disc
has deformation or damage. Change them if necessary.
·Adjust the unevenness of the diaphragm spring with tool.
Flywheel check
·Check whether the working surface of the flywheel is burnt or discolored.
Remedy it with the emery paper.
Check its surface for planeness.
Clutch cover and flywheel
When assemble the clutch pressure plate and driven disc, insert the special
tool into the spline hole of the driven disc. (using for central position)
·Tighten the fixed bolts the clutch cover. ·Tighten the bolts as cross procedure shown in the figure with two steps.
Service Data and Specifications
Clutch driven disc
Outside diameter:
260mm
Thickness:
8.0 ± 0.3mm
Checking and adjusting
Pedal height
160~170
Pedal free travel
30-50mm
The datum measured is referred to distance between the floor surface and
the pedal.
Clutch driven disc Wear limit form the friction surface to the
rivet head
Effective thickness of the friction lining
Clutch pressure plate
Diaphragm spring height: 41-43mm
CL-9
0.3mm
1.2mm(Nominal size)
Clutch
CL-10
Transmission
MT
TOC
Technical Performance Overview .......................................................... MT-1
Service and Maintenance Notes for Transmission ............................. MT-1
Trouble and Troubleshooting .................................................................. MT-1
Disassembling Procedures and Notes for Transmission Assembly MT-2
Check and Repair .................................................................................... MT-11
Reassembling Procedures and Notes for Transmission Assembly MT-13
Transmission
Transmission
Technical Performance Overview
Structure pattern
The 17G1A8-25 transmission is a mechanically manual transmission with 5 forward speeds and 1 reverse
speed. All the forward speeds are synchromeshed. 5th speed is overdrive gear. All of them apply skew cylindrical
gear engagement and the gear shifting is smooth.
Gear ratio
1st speed
2nd speed
3rd speed
4th speed
5th speed
Reverse speed
5.016
2.672
1.585
1.000
0.77
4.783
Odometer ratio:14/4.
lubricating oil
Brand: Manual transmission oil LAN-1 85W/90 or engine oil SAE 5W-30.
Oil volume: 2.7L
Service and Maintenance Notes for Transmission
1.Add lubricating oil as specified before mounting the transmission on the vehicle.
2.During shifting operation, depress the clutch pedal to the bottom. Before shifting into the reverse speed, stop the
vehicle completely.
3.When crossing a river or operating in mud, prevent water form entering into the transmission. Otherwise, oil
must be replaced.
4.The Service and maintenance of transmission shall follow the service and maintenance instructions for lightduty vehicles. Replace the lubricating oil of transmission periodically. When replacing the oil, loosen the oil drain
plug at the lower part of transmission housing. After draining the oil in the housing, tighten the oil drain plug. Fill
the lubricating oil into the transmission through the filling plug port on transmission shifting cover until it
reaches the lower edge of filler port.
Trouble and Troubleshooting
Trouble
Disengagement
Phenomenon
1.The transmission
shifts into neutral
automatically during
driving.
Probable case
Judgement &Trouble shooting
1.Wear of fork shaft circular groove
and interlock pin, plastic deformation of lock ball spring.
2.Wear of fork working surface.
3.Wear of connecting cone for synchronizer toothed ring and gear
sleeve.
4.Axial looseness of gear.
1. Check the operating system to see whether
the shifter rock arm of transmission is pushed
in position, or dismount the transmission cover
and push the fork by hand to engage the gear,
check the engagement condition.
2. If not completely engaged,check the fork for
deformation or overwear of working suface.
3. If the gear sleeve is completely engaged,
check the gear sleeve and the back taper part of
connecting tooth for wear.
4. If the clearance is too large when stirring the
fork, check the fork shaft groove to see whether
the locating spring is worn or faulty.
5. Check the 2nd shaft nut of tightening flange
for looseness, if so, the axial position of 2nd
shaft gear will change.
MT-1
Transmission
Trouble
The gear couldn't
be engaged properly.
Noise
Phenomenon
Probable case
Judgement &Trouble shooting
1.Without the failure
of clutch,shifting is
difficult with serious
pound or disengagement at some gear is
hard.
1.Severe wear of interlock pin.
2.The fork head of internal speed
selective rocker arm is sevrely worn
or damaged, or separate from shifter
small rocker arm groove.
1.Check the faulty area and remove the failure.
1.Regular pound
2.Even noise.
1.Some individual gear and tooth is
broken.
2.Gear clearance is increased or gear
is damaged.
3.Bearing is worn.
4.Lubricating oil is not sufficient.
1.Disassemble,inspect, clean or replace damaged gear or bearing.
2.Replace or add oil.
Disassembling Procedures and Notes for Transmission Assembly
Disassembling procedures of transmission from the vehicle
Disassembling sequence:
1.Operating flexible shaft
2.Odometer driveing flexible shaft
3.Drive shaft
4.Parking brake assembly
5.Starting motor
6.Transmission assembly
MT-2
Transmission
Disassembling sequence and notes for transmission
Disassembling sequence:
1.Clutch release bearing assembly
2.Clutch release fork shaft and release fork arm assembly
3.Clutch case connecting bolt, 9.8 grade
4.Clutch case
5.2nd shaft nut
6.Odometer flexible shaft sleeve sets
7.Connecting bolt, 9.8 grade
8.Rear cover
9.Odometer drive gear
10.Distance sleeve
11.Connecting bolt, 9.8 grade
12.Cover assembly
MT-3
Transmission
13.Self-locking spring and steel ball
Take off 3 self-olcking springs and 3 self-lock steel balls from the
transmission housing.
14.Elastic pin sets
15.Fork shaft (reverse~5 speed)
Before disassembling, place all the fork shafts in neutral position.
Push the rear end of rork shaft (reverse~5 speed) so that it moves forward.
Then move the fork shaft backward to dismantle the shifting arm and shifting device.
16.Fork shaft(3rd speed~4th speed)
Push the rear end of fork shaft so that it moves forward. Then move
the fork shaft backward to dismantle the shifting arm and shifting device.
Prevent the front-mounted interlock pin and steel ball from falling out.
Take out the inter lock pin from the front end of the fork shaft and
then remove 2 steel balls from the transmission case. At this time, be careful not to mix or lose them.
17.Fork shaft(1st speed~2nd speed)
Refer to the above for disassembling procedures. Take 2 setting steel
balls from the transmission case. Be careful not to mix up or lose them.
MT-4
Transmission
18.Shifter fork
19.Retainer ring(countershaft rear bearing)
20.Countershaft rear centripetal ball bearing
Strike the front end of countershaft with copper bar or hand hammer
and move the countershaft backward 3mm.
Remove the retainer ring, place special tools into the ring groove and
dismount the bearing.
21.Countershaft front centripetal ball bearing
Strike the rear and of countershaft with copper hammer, move the
countershaft forward 3mm. Place special tools into the ring groove and
remove the bearing.
22.1st shaft
Hold an appropriate bar against the outer ring of 1st shaft bearing,
and then strike the outer ring of bearing towards the front of transmission.
23.Centripetal ball bearing(rear of 2nd shaft)
Strike the front end of 2nd shaft with copper hammer and move the
2nd shaft backward 3mm. Put special tools into the ring groove and
remove the bearing.
24.2nd shaft assembly
Take off the 2nd shaft assembly from the transmission case. MT-5
Transmission
25.PTO coverplate bolt, 6.8 grade 26.PTO coverplate 27.Reverse shaft stop pin
After removing the PTO coverplate, take off the reverse shaft gear
stop pin from the transmission case.
28.Reverse shaft
Knock the rear end of reverse shaft with an appropriate metal bar and
strike it towards the interior of transmission case.
29.Reverse shaft gear assembly
30.Counter shaft 5th speed gear
Remove the retainer ring and put it aside. Then remove the 5th speed
gear of coun tershaft inward and take it out with the countershaft assembly.
MT-6
Transmission
Disassembling scheme and notes for 2nd shaft
assembly and 1st shaft assembly
Disassembling sequence of 2nd shaft assembly and 1st shaft
assembly
1.Thrust washer
2.2nd shaft 5th speed gear
3.Retainer ring
4.Synchronizer gear ( 5th speed)
MT-7
Transmission
5.Synchronizer assembly(reverse~5th speed)
Remove the retainer ring and the synchronizer assembly,and then dismount the synchronizer spring,synchronizer gear sleeve,sliding block and
synchronizer gear hub.
Notes:
As the dimension of each retainer ring matches the clearance of
synchronizer gear hub respectively,do not mix the disassembled retainer
rings.
6.2nd shaft reverse gear
7.Needle bearing(reverse)
8.Synchronizer gear ring(4th speed)
9.Synchronizer assembly (3rd speed~4th speed)
Tighten the 2nd shaft with its front end upwards,remove the retainer
ring, synchronizer gear ring and synchronizer assembly (3rd speed~4th
speed).
Notes:
The disassembled retainer rings couldn't be mixed.
10.Synchronizer gear ring (3rd speed)
11.2nd shaft 3rd speed gear and needle bearing
12.Retainer ring and thrust washer
13.2nd shaft 2nd speed gear and needle bearing(2nd speed)
MT-8
Transmission
14.Synchronizer gear ring(2nd speed)
15.Synchronizer assembly(1st speed~2nd speed)
Remove the retainer ring and synchronizer assembly(1st speed~2nd
speed)
Notes:
The disassembled retainer rings couldn't be mixed.
16.Synchronizer gear ring(1st speed)
17.2nd shaft 1st speed gear
18.Needle bearing(1st speed)
19.1st shaft centripetal ball bearing
When disassembling, use bench press.
MT-9
Transmission
Disassembling sequence for transmission shifter
cover assembly
Disassembling sequence:
1.Backing lightswitch
2.Elastic pin sets
3.Speed selective shaft external rocker arm sets
4.Speed selective shaft sets
5.Speed selective shaft adjusting shim
6.Oil seal
7.Elastic pin
8.Speed selective shaft sets
9.Oil seal
10.Flat washer
11.Speed selective shaft internal rocker arm
12.Flat washer
13.Shifting shaft reverse limit spring
MT-10
Transmission
Check and Repair
If wear of part, damage of part or other fault is found through inspection, repair or replace it.
1.Thickness of shifter fork(mm)
Standard
Limit
10.0
9.0
2.Free length of self-locking spring(mm)
Standard
Limit
31.6
30.1
3.Clearance between,synchronizer gear ring and the end face of joint
tooth (mm)
Standard
Limit
3rd, 4th speed
1.0
0.5
1st, 2nd, 5th speed
1.5
0.5
4.Clearance between synchronizer gear ring and sliding block(mm)
Standard
2nd, 3rd, 4th, 5th speed
4.34~4.66
1st speed
4.84~5.16
5.Clearance between synchronizer gear hub and sliding block(mm)
Standard
0.09~0.31
MT-11
Transmission
6.2nd shaft radial runout(mm)
Limit
0.1
7.Clearance between gear orifice and 2nd shaft(mm)
5th speed
Standard
Limit
0.05~0.08
0.2
8.Clearance between the liner and reverse gear shaft(mm)
Standard
Limit
0.04~0.08
0.2
9.Radial runout of centripetal ball(mm)
Limit
0.2
MT-12
Transmission
Reassembling Procedures and Notes for
Transmission Assembly
Reassembling of 1st shaft and 2nd shaft assembly as
showed in the figure
Assembling sequence:
1.1st shaft centripetal ball bearing
Use bench press when assembling.
2.Needle bearing(1st speed)
3.2nd shaft 1st speed gear
4.Synchronizer gear collar(1st~2nd speed)
5.Synchronizer assembly (1st~2nd speed)
Mount it non-directional,select and fit the thickest snap ring
Provided thickness(mm)
1.75
1.825
MT-13
1.875
Transmission
6.Synchronizer gear ring(1st~2nd speed)
7.2nd shaft 2nd speed gear
8.Thrust washer and retainer ring
After assembling,measure the distance X and select the fittest retainer
ring from the table below.
Distance X
Retainer ring thickness(mm)
2.20~2.27
1.875
2.27~2.32
1.925
2.32~2.37
1.975
2.37~2.43
2.025
9.2nd shaft 3rd speed gear and needle bearing(3rd speed)
10.Synchronizer gear ring (3rd~4th speed)
11.Synchronizer assembly(3rd~4th speed)
The sliding block is non-directional, place the synchronizer gear
sleeve with its groove facing the 3rd speed gear and the synchronizer gear
hub with its big end facing backward, select and mount the thickest
retainer ring.
Provided thickness(mm)
1.775
1.825
1.875
12.Synchronizer gear ring(3rd~4th speed) 13.Needle bearing(reverse)
14.2nd shaft reverse gear
15.Synchronizer assembly(reverse~5th speed)
The synchronizer gear hub face with bigger basal plane must face the
reverse gear (the front for transmission), select and fit the thickest retainer
ring.
Provided thickness(mm)
1.775
1.825
16.Synchronizer gear ring(5th speed)
17.Retainer ring
18.2nd shaft 5th speed gear assembly
19.Thrust washer
MT-14
1.875
Transmission
Reassembling of shifter cover assembly
Assembling sequence:
1.Oil seal
2.Speed selective shaft sets
3.Speed selective shaft internal rocker arm
4.Flat washer
5.Speed selective shaft reverse stop spring
6.Flat wasger
7.Elastic pin
8.Oil seal
9.Flat washer
10.Speed selective shaft sets
11.Speed selective shaft external rocker arm sets
12.Elastic pin sets
13.Backing light switch
MT-15
Transmission
Reassembling and specifications for transmission
assembly
Assembling sequence:
1.Countershaft
2.Countershaft 5th speed gear
Put the countershaft assembly and 5th speed gear together and mount
them into the case with the 5th speed gear close to the rear end.
3.Reverse shaft gear assembly
When assembling, be sure that the longer end of reverse shaft gear
hub faces forward, and then insert the reverse shaft pin.
MT-16
Transmission
4.Reverse shaft
5.Reverse shaft stop pin
6.PTO Coverplate
7.Connecting bolt, 6.8 grade
8.2nd shaft assembly
9.Centripetal ball bearing(the rear of 2nd shaft)
10.1st shaft assembly
First measure the distance x between the front end face of synchronizer gear hub(3rd speed~4th speed) and the front end face of housing.
When the value of X is less than 53.85mm, mount 1st shaft centripetal ball bearing first, then install 1st shaft shim and retainer ring in
sequence.
When the value of X is more than 53.85, first mount the shim, press
1st shaft centripetal ball bearing and then fit the retainer ring.
Apply lithium grease into the gear ring of 1st shaft and fit the 1st
shaft assembly into the transmission case. Then check whether the sliding
block of synchronizer assembly (3rd speed~4th speed) is inserted into.
11.Countershaft front centripetal ball bearing
12..Countershaft rear centripetal ball bearing
13.Retainer ring
MT-17
Transmission
14.Shifter fork
15.Shifter fork shaft (1st speed~2nd speed)
16.Shifter fork shaft (3rd speed~4th speed)
17.Shifter fork shaft (reverse~5th speed)
Before assembling, place the shifter fork shaft in neutral position.
Mount 2 steel balls on the position between 1st~2nd speed shifter fork
shaft and 3rd~4th speed shifter fork shaft.
Insert the interlock pin into 3rd~4th speed shifter fork shaft.
Mount 2 steel balls on the position between 3rd~4th shifter fork shaft
and reverse~5th speed shifter fork shaft.
18.Elastic pin sets
Never use second-hand elastic pin, replace with new elastic pin.
When assembling, align the slot line.
19.Distance sleeve
20.Odometer drive gear
21.Speed selective shaft rear cover assembly
Apply seal gum to the joint face of rear cover,the gum track must be
continuous.
MT-18
Transmission
22.Connecting bolt, 9.8 grade
23.Odometer shaft sleeve and odometer driven gear
24.Clutch case assembly
Apply seal gum on the joint face of clutch case, the gum track must
be continuous .
25.Clutch case connecting bolt, 10.9 grade
26.Ball-end supporter
27.Release fork and dust cover
28.Clutch release bearing assembly
29.2nd shaft nut
30.Self-locking spring and steel ball
31.Shifter cover assembly
32.Connecting bolt, 9.8 grade
Tightening torque value of each connecting bolt during reassembling
Position
Torque (N.m)
Connection between backing light switch and shifter cover
29~39
Connection between filler plug and transmission cover
39~59
Connection between drain plug and transmission cover
39~59
Connection between PTO coverplate and transmission case
10~25
Connection between odometer shaft sleeve and rear cover
11~19
Connection between shifter cover and transmission case
15~25
Connection between 2nd shaft nut transmission case
147~196
Connection between clutch case and transmission case
69~93
Connection between rear cover and transmission case
15~25
MT-19
Front Suspension
FA
TOC
Notice & Preparation ................................................................................. FA-1
Front Suspension ........................................................................................ FA-2
Driving Inspection and Repair ................................................................. FA-3
Front Axle....................................................................................................... FA-9
Hub & Brake Disc .................................................................................... FA-10
Steering Knuckle ...................................................................................... FA-14
Front Independent Suspension ..................................................... FA-16
Maintenance Data & Explanation ................................................ FA-25
Front suspension
Notice
When assembling the rubber part, the vehicle must be
in curb weight, and the rubber part has to be screwed down
after the wheels touched down the ground.
Curb weight: the vehicle equipped with full fuel,
coolant, oil, and spare tyre, jack, service tools, and parked
on the level ground.
Use tool to disassemble and assemble hub.
When disassembling the suspension part, check the
wheel alignment and adjust it if necessary.
Preparation
Special tools
Tool name
Description
To disassemble the connecting part between ball head pin and steering kunckle
Extractor
Disassemble the ball head connection of tie-rod and drag link.
Ball head pin replacer
Assemble the hub bearing.
Bearing punch
Disassemble and assemble bearing nut
Wheel bearing nut wrench
FA-1
Front suspension
Front Suspension
FA-2
Front suspension
Riding Inspection and Repair
Note:
When assembling the rubber part, the vehicle must be in curb weight, and the rubber part has to be screwed
down after the wheels touched down the ground.
Curb weight: the vehicle equipped with full fuel, coolant, oil, and spare tyre, jack, service tools, and parked
on the level ground.
When disassembling the suspension parts, please don't squash by the related parts.
Front suspension part
Check the front suspension for loose, crack, wear or other damages.
(1) Shake front wheel.
(2) Confirm that the cotter pin is in ggod condition .
(3) Screw down all bolts and nuts again to the
required torque.
Check the shock absorber for any leakage or damage.
FA-3
Front suspension
Chck the upper and lower transverse arm ball head
dust proof for any damage, crack, or loose.
Warning:
If any of the above situation has happened, replace
the ball head pin in time and forbidden to drive the vehicle. Otherwise, it may cause accident.
Check the vertical clearance of the ball head.
Upper ball head clearance ≤ 1.6mm
(1) Lift the front part of the vehicle and set a footstep.
(2) Fix the dial gauge to the tie rod and set the
contact of the dial gauge to the lower edge of the brake
caliper.
(3) Make sure that the front wheel is in the straight
driving line and the brake pedal has been pressed down.
(4) Insert a crowbar between the tie rod and wheel
inner felloe.
(5) At the time of pressing the crowbar, observe the
Max. read of the dial gauge.
(6) If the ball head motion clearance is beyond the
required value, disassemble the ball head and check, and
replace it if necessary.
Front wheel bearing
Check the wheel bearing for smooth operating.
Check the shaft end clearance.
It is forbidden to have clearance in the shaft end.
If the shaft end has clearance or the bearing operates unsmoothed, adjust the bearing pretightening force.
FA-4
Front suspension
As for the front wheel bearing pretightening force adjustment, please take the reference of other chapter.
Front wheel alignment
Before check the front wheel alignment, do the following primary inspection.
Primary inspection
1.Check the tyre for wear, and the tyre pressure.
(standard pressure: 530kPa)
2.Check the inside and outside radial runout of the
wheel assembly.
(Outside radial runout value + inside radial runout
value) × 0.5:
Radial runout limit value: 0.8mm
Lateral runout limit value: 0.8mm
3.Check the front wheel bearing for looseness.
4.Check the front suspension for looseness.
5.Check the steering pull rod for looseness.
6.Use the standard vibration to test the shock absorber
for normal work.
7.Measure the vehicle gesture (no load): =A-B mm
Reference to "Maintenance data & explanation"
(1) Shock the front part of the vehicle for 4~5 times to make the front suspension do the relative motion to
confirm the correct vehicle gesture.
(2) Measure the wheel alignment.
See "Wheel alignment" of "Maintenance data & explanation".
(3) If the wheel alignment is not the same as the required value, adjust the vehicle gesture.
See "Wheel alignment" of "Maintenance data & explanation".
(4) Adjust the wheel alignment.
See "Wheel alignment" of "Maintenance data & explanation".
Wheel camber, caster, and king pin inclination
Before check the wheel camber, caster and king pin
inclination, set the front wheel alignment test device under
the wheel, then make the vehicle shock up and down for
several times to limit the friction force, and make sure the
vehicle gesture is correct.
FA-5
Front suspension
After the test, if it is necessary to adjust the angle, please follow the steps below:
First, check the upper and lower ball head pin for wear and looseness, the hub bearing for looseness, and the
steering kunckle for deformation.
Wheel camber (zero load)
See "maintenance data & explanation" for reference.
King pin inclination (zero load)
See "maintenance data & explanation" for reference.
Caster (zero load)
See "maintenance data & explanation" for reference.
Adjustment
The change of the wheel camber and caster is through
increase or decrease the ajusting spacer between shock
absorber and upper transverse arm shaft.
Before increase or decrease the adjusting spacer, lift
the lower transverse arm by the jack.
FA-6
Front suspension
Thickness of the adjusting spacer: 1.0mm, 1.6mm, 3.2mm
Don't use more than 3 spacers in the same place.
When assemble the spacer, insert from top to bottom.
The total thickness of the spacer should not be more than 9.6mm.
The thickness difference of the same side of the front and rear end should not be more than 4.8mm.
Follow the below steps to confirm the needed spacer thickness of adjusting wheel camber and caster:
1.Respectively increase the adjusting spacer of 1mm thickness at the same side, front and rear end, and then
the wheel camber angle of this side will reduce 0°15´, while the caster will not change.
2.If the front end is 1mm more than the rear end adjusting spacer of the same side, the caster angle of this
side will reduce 0°24´, while the camber angle will reduce 0°7´30¨.
3.If the front end is 1mm less than the rear end adjusting spacer of the same side, the caster angle of this side
will increase 0°24´, while the camber angle will increase 0°7´30¨.
4.If the wheel alignment parameter is still incorrect after the adjustment of above, the frame has to be
adjusted.
Toe-in
1.Mark a reference line on the tyre, make the vehicle
front part on the ground, and shock it up and down for
several times to eliminate the clearance, and then set the
steering wheel to the position of front straight driving.
2.Measure the toe in
Measure A and B at the wheel midline, in the same
height.
Toe in value:
See "maintenance data & explanation" for reference.
3.Change the middle tie rod length to adjust the toe
in.
(1) Loose the lock nut.
(2) Turn the left and right joint of the same degree to
adjust the toe in.
FA-7
Front suspension
Make sure that the middle tie rod has less than 35mm length turned into the left and right joint, this is to
assure the same length of the middle tie rod left an right
joint.
(3) Use the moment wrench to tighten the lock nut
to the required value.
Tightening torque:25~28N.m。
Front wheel turning angle
1.Turn the front wheel to the front, move the vehicle
ahead to set the front wheel on the turning angle test
device.
2.Turn the steering wheel left and right to the turning limit to measure the wheel turning angle.
Wheel turning angle: See "maintenance data &
explanation" for reference
3.Adjust the front wheel turning angle by the limit bolt if necessary.
FA-8
Front suspension
Front Axle
1.Front
9.Brake
2.Retainer
wheel hub cover
ring
3.Hex thin nut
4.Antifriction spcer--steering knuckle
5.Front wheel hub outer bearing assy
6.Front wheel hub
7.Wheel nut
8.Front wheel bolt
10.Front
disc
wheel hub inner bearing assy
11.Front wheel hub oil seal assy
12.Oil seal retainer
13.Left dustproof assy--front brake
14.Left steering knuckle
15.Left steering knuckle arm
16.Disc brake assy
FA-9
Front suspension
Hub & Brake Disc
Disassembly and assembly
Dismount the brake caliper assembly.
The brake pipe need not to be dismount from the
brake caliper, and pay attention not to depress the brake
pedal to avoid piston extruded.
Note:
Never distort the brake pipe.
Dismount the lower hub cover, cotter pin and the
adjusting spacer.
Dismount the hub bearing locking nut by proper
tools.
Remove the hub bearing from the steering knuckle
shaft.
Note:
Never let the outer bearing out.
Dismount the tortion bar spring.
See chapter "Front suspension".
After assemble the hub and hub bearing, adjust the
bearing pretightening force.
Pretightening force adjustment
After replace the hub bearing or hub, the bearing
pretightening force has to be adjusted.
The adjusting method:
1.Before adjustment, clean all of the parts first.
2.Smear some lubricating grease on the following
parts:
Rubbing surface of the steering knuckle shaft
Interface between outer bearing and locking washer.
Wheel hub cap
Grease sealing ring edge
FA-10
Front suspension
3.Tighten the bearing locking nut to the required torque: 34~39N.m
4.Turn the hub for several times to set the bearing in
correct position.
5.Tighten the bearing locking nut again to the
required torque: 34~39N.m
6.Back the locking nut for 45°.
7.Install the adjusting cap and new cotter pin, and
back the locking nut for 15° or less to install the cotter
pin.
FA-11
Front suspension
8.Measure the wheel hub bearing tightening force
and shaft end clearance.
Shaft end clearance: 0mm
Bearing tightening force(at the hub bolt):
Standard torque: 0.7~101N.m
Spring balance read: 9.8~27.5N
Repeat the above procedure until obtain the correct
bearing tightening force.
9.Bend the cotter pin.
10.Install the hub cover.
Disassemble
Disassemble the inner oil seal.
Use a propper copper bar to disassemble the bearing
outer ring.
Check
Clean the hub bearing and hub.
Hub bearing
Make sure if the bearing could be in free rotation, and whether there are noise, crack, dent and wear or not.
Hub
Check the hub for crack by magnetic particle inspection.
FA-12
Front suspension
Assembly
Use the proper tool to install the bearing outer ring
into the hub.
Smear some grease on the bearing tapered face.
Smear some grease on the flange part of the oil seal
and then install it in the hub.
FA-13
Front suspension
Steering Knuckle
Disassembly
Use special tool to dismount the steering tie-rod.
Install the check nut on the check bolt in reverse to
protect the bolt.
Dismount the steering knuckle from the ball head
connecting part.
(1) Loose (Don't dismount) the upper and lower ball
head pin clamp nut.
(2)Dismount the steering knuckle from the upper
and lower ball head connecting part by special tool.
Never screw off the loose nut in step (1).
(3)Screw off thelock nut of ball head pin, and lift the
lower transverse arm by the jack.
(4)Dismount the steering knuckle from the upper and lower transverse arm.
FA-14
Front suspension
Inspection
Steering knuckle
Check the steering knuckle for any defprm, crack or damages by the method of magnetic test.
Assembly
Use the jack to lift the lower transverse arm, and
install the upper and lower ball head pin and the steering
knuckle.
Note:
Never let the grease on the steeing knuckle tapered face and the thread and tapered face of the upper and
lower ball head pin assembly.
During the assembling process, do not damage the dustproof of the ball head pin.
After assembly the steering knuckle, adjust the hub bearing pretightening force.
See chapter "Hub & brake disc" to be the reference o fhe adjustment of pretightening force.
FA-15
Front suspension
Front Independent Suspension
1.Shock
15.Torsion
2.Upper
absorber assy
arm shaft
3.Inner side washer
4.Rubber bush assy
5.Big washer
6.Upper transverse arm
7.Bolt
8.Round head pin assy
9.Front suspension cross member assy
10.Circlip for holes
11.Torsion bar adjusting arm
12.Adjust bolt
13.Round head
14.Front torsion bar spring
16.Lower
bar fixing bar
arm shaft
17.Lower transverse arm assy
18.Rubber bush assy
19.Limit block assy
20.Bolt
21.Rubber bush assy
22.Round head pin assy
23.Bolt
24.Propelling rod
25.Big washer
26.Rubber bush
27.Spacer sleeve
When assembling the rubber part, the final tightening has to be under such condition: wheel on the ground,
no load.
Condition of no load: with full fuel, coolant, engine lubricant, and the spare tyre, jack, driver tool on the
vehicle, and the vehicle park on the level position.
FA-16
Front suspension
Shock absorber
Disassembly and assembly
When disassembling and assembling the shock
absorber, never let the oil or grease touch the rubber parts.
Check
Use the proper cleanser to wash all the parts except the non-metal parts, and then dry them with compressed
air.
Make use of the compressed air to clean the non-metal parts.
Check the shock absorber for loose or crack ad oil leakage, replace if necessary.
Check the piston lever for crack, deform, or other damages, replace if necessary.
Check the rubber parts for wear, crack, damage or deform, replace if necessary.
Torsion bar spring
Disassembly
Make a location mark between the torsion bar and its
adjusting arm and the fixed arm.
Measure the length of the extruding part of the
adjusting bolt.
FA-17
Front suspension
Disassemble the torsion bar adjusting arm from
behind and draw out the torsion bar.
Disassemble the torsion bar fixed arm.
Check
Check the torsion bar for any wear, deform, bend or any other damages.
Check the parts serrating spline for crack, wear, distort or other danages.
Assembly and adjustment
Along the tightening direction to adjust the adjusting nut of the adjusting arm. Never adjust the nut along the
nut loose direction.
1.Install the torsion bar fixed arm to the lower transverse arm.
2.Wipe a layer of grease on the spline tooth of the torsion bar.
3.Adjust the lower transverse arm position to assure
the alignment of both the torsion bar mark and its adjusting
arm mark.
FA-18
Front suspension
4.Install the torsion bar spring
When install the torsion bar spring, please pay attention to the mark on the end of the spring. Don't install in
wrong direction.
5.Install the adjusting arm
Make sure the vehicle is in no load.
Make the same extending length of the fixed bolt and
the extending length before disassembling, and then
screw down.
Tighten or loose the adjusting nut to adjust the
vehicle gesture, and before tightening, there should be
loose first and then tighten up as required.
After adjusting the vehicle body gesture, tighten the
locking nut to the required torque.
Tightening torque: 108~127N.m
6. With the wheel on ground (vehicle no load), shock
the vehicle to eliminate the friction force of the suspension
parts.
7.Measure the vehicle gesture H
H=A-B mm (no load)
See "Maintenance data & explanation" for reference.
FA-19
Front suspension
(1) Shock vehicle front part up and down for 4~5 times to make the vehicle gesture is in correct height.
(2) Measure the vehicle gesture value H.
See "Wheel alignment" of "Maintenance data & explanation".
(3) If the H is different from the required value, adjust the vehicle gesture.
See "Wheel alignment" of "Maintenance data & explanation".
(4) Check the front wheel alignment if necessary.
See "Wheel alignment" of "Maintenance data & explanation".
8.If the H value is not in the required range, adjust the adjusting nut of the adjusting arm to assure the correct
vehicle gesture.
Upper transverse arm
Disassembly
Disassemble the fixed nut of the lower shock
absorber.
Disassemble the connecting bolt of the upper ball
head pin and upper transverse arm.
Lift the lower transverse arm by jack.
Dismount the fixed bolt of the upper transverse arm
shaft.
Assembly
When tightening the upper transverse arm shaft, make
use of some adjusting spacer of the wheel camber.
FA-20
Front suspension
Check the A and B dimension after tightening.
A=110mm
B=32mm
Assemble the upper ball head pin on the upper
transverse arm.
Assemble the upper fixed nut of the shock absorber.
Tighten the upper transverse arm locking nut under
the condition of wheel on ground, no load.
After the assembly, check the front wheel alignment and adjust if necessary.
See "Wheel alignment" of the "Maintenance data & explanation" for reference.
Disassembly
Press out the upper transverse arm shaft with a block.
Check
Check the upper transverse arm shaft and rubber sleeve for damage and replace if necessary.
Check the upper transverse arm for deform or break and replace if necessary.
Assembly
Wipe some soapy water on the rubber sleeve.
When pressing the upper transverse arm bush, the
bush has to be pressed into the proper position.
FA-21
Front suspension
Install the upper transverse arm shaft and inside
washer.
Install the inside washer by using of the fillet of
inside machined surface.
Press the bush of the other end, and the bush must
be pressed into the proper position.
Tighten the nut for the moment.
Push rod
Disassemble and assemble
Disassenble the assembling nut of the lower transverse arm and the frame.
Support the lower transverse arm by jack.
Assemble the push rod
Confirm the correct installation of the bush and
washer. The final tightening of the rubber parts has to be
under the condition of no load, wheel on ground.
Check
Check the push rod for deform or distort, replace if
necessary.
Check the rubber bush for crack, wear, or other damage, replace if necessary.
FA-22
Front suspension
Lower transverse arm
Diasassembly and assembly
Disassemble the lower fixed nut of the lower shock absorber bracket.
Disassemble the torsion bar spring. See "Torsion bar spring disassembly".
Disassemble the fixed nut of push rod. See "Disassembly and assembly of the push rod".
Disassemble the lower transverse arm ball head pin
from the steering knuckle. See "Front axle--steering
knuckle".
disassemble the lower transverse arm fixed nut.
Dismount the rubber bush of the lower transverse
arm shaft from the frame by the proper tool.
When assembling the rubber bush, wipe some sopy
water on the bush face.
After assembling the lower transverse arm, adjust
the front wheel alignment and vehicle height. See "Front
alignment" of "Examine and repair".
Check
Lower and upper transverse arm
Check the lower and upper transverse arm for damage and crack, replace if necessary.
Lower transverse arm bush
Check the bush for deform or other damage, replace if necessary.
FA-23
Front suspension
Upper and lower ball head pin
Disassemble and assemble
Disassemble the upper and lower transverse arm. See "Steering knuckle".
Check
Shock at direction A (see the the right figure), and
check the ball head pin.
See "Maintenance data & explanation" for reference.
If the torque A is not in the required range, replace the ball head pin.
Check the ball head pin for its driving torque B.
See "Maintenance data & explanation" for reference.
If torque B is not in the required range, replace the ball head pin.
Check the ball head pin vertical clearance C.
See "Maintenance data & explanation" for reference.
If the clearance value is over than the required range, replace the ball head pin.
Check the dust proof for damage.
Note:
If the ball head pin is new, and the dust proof is damaged, replace the dust proof under the quide of the professional person. If the ball head pin is in use, and the dust proof is damaged, replace the ball head pin assembly.Only replace the dust proof is forbidden.
FA-24
Front suspension
Maintenance Data & Explanation
Torsion bar spring
Length mm 1000
Diameter mm 30
Shock absorber
Diameter A mm 54
Diameter B mm 45
Recover risistance N 2250±350
Compression resistance N 1000±200
Check and adjustment
Front alignment (no load)
Wheel camber: -0°25´~0°35´
Caster: 0°15´~1°15´
King pin inclination: 7°50´~8°50´
Difference value of left and right wheel alignment (wheel camber, caster, king pin inclination: less than 45´
Toe-in mm 0~2
Front wheel maximum turning angle
Inside turning angle:35°~36°
Outside turning angle: 27°~29°
FA-25
Front suspension
Vehicle gesture (no load)
Lower transverse arm central height H mm
139~145
No load: full fuel, coolant, lubricant, and original tyre, jack and driver tool, vehicle is parked on the level
ground.
Ball head pin
Upper ball head pin
Lower ball head pin
19.6~122.6
9.8~39.2
Driving torque B (N.m)
1.0~4.9
1.0~3.9
Vertical clearance limit C (mm)
0.1~1.0
0.1~1.0
Swing force A (N)
(Measure position: cotter pin hole)
Hub bearing
Hub bearing locking nut
Tightening torque N.m
34~39
Loose locking nut first then tighten again N.m
34~39
Withdrawal angle
45°~120°
Hub bearing driving moment N.m
9.8~27.5
Axial clearance mm
0
FA-26
Rear axle & Rear Suspension
RA
TOC
Precaution .....................................................................................................RA-1
Rear Axle and Rear Suspension ..............................................................RA-2
Rear Axle......................................................................................................RA-4
Rear Suspension ..........................................................................................RA-9
Maintainance Data and Explaination ...................................................RA-13
Rear Axle & Rear Suspension
Precaution:
Assemble the rubber parts under the vacuum conditions, tighten them at last.
No load: Full fuel, coolant and oil, equipped with spare tyre, jack, and driving tools.
Use the tools to disassemble and assemble the brake pipes.
Every time the suspension part is moved, the front wheel alignment must be checked, and adjust it if necessary.
RA-1
Rear Axle & Rear Suspension
Rear Axle and Rear Suspension
RA-2
Rear Axle & Rear Suspension
Rear axle and rear suspension
Check rear axle and rear suspension parts for any looseness, wear, or damage.
Turn the left and right wheel to check if it is in normal condition.
Retighten all the bolts and nuts to the required torque.
Tightening torque: aim to the requirement of rear suspension
Check the shock absorber for leakage or other damage.
Wheel bearing
Axle end clearance:
1.Check the bearing drive to see if it is smooth.
2.Check the axle end clearance.
RA-3
Rear Axle & Rear Suspension
Rear Axle
1.Rear
axle half axle
2.Dustproof
3.Half
axle outer oil seal seat
outer oil seal assy
5.Half axle bearing seat
6.Half axle supporting bearing
7.Lock spacer
8.Half axle bearing lock nut
4.Half
9.Rubber
seal gasket assy
spacer
11.Half axle inner oil seal assy
12.Ventilation plug assy
13.Rear axle housing assy
14.Seal washer
15.Screw plug assy
16.Scerw plug
10.Adjusting
RA-4
Rear Axle & Rear Suspension
Disassemble
1.Disassemble the parking brake cable and brake pipe.
2.Disassemble the brake drum.
3.Remove the bearing lock nut.
4.Pull out the half axle by special tool.
Be careful not damage the oil seal when pulling the half
axle.
5.Disassemble the oil seal.
the disassembled oil seal can't be reused, replace a new
one.
6.Make use of the screw driver to turn up the protruding
part of the lock washer.
RA-5
Rear Axle & Rear Suspension
7.Remove the bearing lock nut by special tool.
8.Disassemble the wheel bearing, bearing cover and
splash guard from the half axle.
9.Disassemble the grease seal ring from the bearing cover
by a proper lever.
10.Use a brass bar to disassemble the outer ring of the
wheel bearing.
RA-6
Rear Axle & Rear Suspension
Check
Half axle
Check the half axle for any bend, crack, damage, wear or distort, replace if necessary.
Wheel bearing
Make sure if the bearing drive freely, without noise, crack, notch or wear.
Rear axle housing
Check the rear axle housing for distort or crack, replace if necessary.
Assembly
1.Make use of the proper tool to install the wheel
bearing outer ring.
2.Install a new grease seal ring in the bearing cover.
After installing the new seal ring, wipe some li-based
grase on the edge of the seal ring.
3.Make use of a copper bar to install the bearing
inner ring.
Smear some li-based grease on every conic bearing
ring.
4.Assemble the flat spacer and a new bearing lock
washer.
5.Use tool to tighten the bearing lock nut.
Tighten the lock nut to make the bearing lock washer
edge in the proper groove of the bearing lock nut, and then
make the edge upwarping.
6.Assemble a new oil seal by the proper tool.
After assembling the new oil seal, smear some grease
on the edge of the oil seal.
RA-7
Rear Axle & Rear Suspension
7.Put lithium based lubricating grease into the flute of
the axle end cover.
8.Put lubricating grease into the Spline slot of half
shaft and wipe lubricating grease on the half shaft's surface
where need to be lubricated.
9.Adjust clearance of axle end.
10.Select gasket end face gasket
11.Assembly half shaft by guide tool.
When assembly half shaft, pay atttention not to damage oil seal.
12.Measure clearance of axle end.
Clearance of axle end:
Check the half shaft of both sides
One side half shaft (Left or right)
0.4~1.6mm
The other side half shaf
0.02~0.15mm
13.If the clearance of axle end is not in prescriptive range, select gasket of end cover again.
When adjust the clearance of axle endpay atttention not to damage oil seal.
RA-8
Rear Axle & Rear Suspension
Rear Suspension
Structure Summary
RA-9
Rear Axle & Rear Suspension
Shock Absorber
Disassembly and assembly
Loose the nut of uper and lower end to disassembly the
shock absorber.
Check
If there are any oil leak, crack or distortion on shock absorber, it has to replace the shock absorber ass'y.
If there are any crack or distortion on rubber sleeve, it has to replace the rubber sleeve
Leaf Spring
Disassembly and assembly
Lift rear part of vehicle, mount supporting seat.
1.Loose the lower enf of shock absorber and disassembly U type bolt.
2.Disassembly shackle of rear spring.
3.Disassembly front pin.
RA-10
Rear Axle & Rear Suspension
Check
Check if there are any crack on leaf spring. If there are, replace the spring.
Check if there are any abrasion, crack, distortion or damaged screw thread on front bracket, shackle, U type
bolt and gasket. If there are any, replace the parts when necessary.
Check if there are any distortion or craze on all sleeves, replace them when necessary. Make sure that sleeves
are correctly assemblyed.
Assembly
1.Wiper suds on rubber sleeve.
2.Assembly shackle and front pin and tighten the nuts by hand.
3.Assembly supporting plate and nut below leaf spring
or axle housing.
4.Tighten U type bolt in diagonal.
Tighten U type bolt to make them all in the same
length on the scew thread part below the suporting plate.
5.Assembly shork absorber and tighten nuts by hand.
6.On non-load condition shake vehicle to eliminate the
damp of leaf spring.
7.Thighten shackle, front pin and nut of shock
absorber.
RA-11
Rear Axle & Rear Suspension
Rubber Cushion Block
Disassembly rubber cushion block
Make sure front mark is on the outside of vehicle as
the picture showed.
RA-12
Rear Axle & Rear Suspension
Maintainance Data and Explaination
Leaf Spring
Thickness (mm) --Amount of piece
Main spring: 7--3
Auxiliary spring: 14--2
Static deflection S: 101
Length L (mm) : 1200
Width (mm) : 70
Shock Absorber
Work length (mm) : Min/Max: 338/548
Jouney (mm) : 210
Damp (N) : Extend/Compress: 2250±350/600±130
Diameter (mm) : A/B: 54/45
Check and adjust
Bearing of wheel
Side clearance of wheel bearing (mm) : 0.02 ~ 0.15
Thickness of side gascket of rear axle (mm) : 0.05
0.07
0.10
0.15
0.20
0.50
1.00
Tightne torque of bearing locking nut (N.m) : 167~196
Tightne torque after loose the bearing locking nut (N.m) : 167~196
Start torque of turning the wheel bearing (N.m) : 2.1 ~ 3.4
Bolt of nub (N) : 24.5 ~ 40.2
RA-13
Rear Axle & Rear Suspension
RA-14
Profeller Shaft and Differential
PD
Catalog
Preperation ..................................................................................... PD-1
Profeller Shaft ................................................................................ PD-4
Maintainance .................................................................................. PD-9
Disassembly and Assembly.......................................................... PD-10
Main Reducer ............................................................................... PD-11
Disassembly ................................................................................. PD-12
Check............................................................................................ PD-17
Adjust ........................................................................................... PD-18
Assembly...................................................................................... PD-19
Maintainance Data and Explaination ........................................... PD-25
Profeller Shaft and Differential
Preperation
Special Tool
1.Differential fixing assistant tool:
1) Engine bracket 2) Seat
2.Differential assistant tool:
Assembly driving axle
3.Flange spanner:
Disassembly and assembly driving axle locking nut and drive gear locking
nut
4.Differential bearing adjusting nut spanner:
Adjust bearing preload and tooth sapce
5.Differential bearing adjusting nut spanner:
6.Differential bearing adjusting nut spanner:
7.Drive wimble gear assembly gauge:
1) Model shaft
2) Height gauge
3) Thrust screw
Select gear height adjusting gasket
PD-1
Profeller Shaft and Differential
8.Drive wimble gear assembly gauge:
1) Height gauge
2) Model shaft
9.Drive wimble gear assembly gauge:
1) Height gauge
2) Tightening clincher
10.Drive wimble gear inside track tension seat:
1) Tension implement
2) Seat
Disassembly and assembly drive bearing rear taper bearing
11.Preload testing gauge:
1) Torque spanner
2) Inserted joint
3) Inserted joint
Teat gear bearing preload and total preload
12.Differential bearing tension implement seat:
1) Tension implement
2) Joint
Disassembly and assembly drive bearing inside taper bearing
13.Weight block:
Select bearing adjusting gasket
PD-2
Profeller Shaft and Differential
14.Revise gauge:
Select bearing adjusting gasket
15.Differential bearing punch:
Assembly inside taper bearing
16.Punch:
Assembly rear bearing sleeve
17.Punch:
Assembly front bearing sleeve
18.Punch:
Assembly rear bearing sleeve
19.Bearing seat punch:
Assembly bearing seat
20.Bearing punch:
Assemble taper inside bearing
21.Bearing seat front oil seal punch:
Assembly front oil seal
PD-3
Profeller Shaft and Differential
Profeller Shaft
Maintain of theVehicle
Vibration on Profeller shaft
If profeller shaft vibrates when the vehicle is in high speed, check the diameter run-out of the shaft first.
. Lift rear axle.
2. Turn profeller shaft and check the diameter run-out
amount of a certain point on it.
Measure point of profeller shaft (mm):
A=155
B=165
C=185
PD-4
Profeller Shaft and Differential
3.If diameter run-out amount exceeds the limited
value, turn the connecting flange of the rear axle's one end
for 180 degree, then assembly the profeller shaft.
Diameter run-out amount refers to Maintainance data
and Explaination.。
4.Check diameter run-out amount again, if it still exceeds the limited value, replace a new profeller shaft.
5. Road test.
Check the Appearance
Check weather there are any cracks or sucken holes on the surface of profeller shaft. Replace the shaft when
there are any ones.
Disassembly and Assembly
Mark the flange set then disassemble the profeller
shaft from rear axle's end.
Pull the profeller shaft out of transmssion system and
fill in it with a plug.
Check
Ckeck the diameter run-out amount of profeller shaft,
if it exceeds the limited value, replace the shaft.
PD-5
Profeller Shaft and Differential
Check the Axial Freedom Degree of Cross Axle
Replace the cross axle of profeller shaft if it's axial
fredom degree exceeds the limited degree.
Axial fredom degree amount refers to Maintainance
data and Explaination.
Disassembly
Disassembly cross axle.
1. Mark the profeller shaft and flange yoke.
2. Disassembly the clip.
3. Knock the flange yoke with a hammer. Be careful
to avoid damaging the cross axle and the hole of flange
yoke when disassembly the cross axle bearing.
PD-6
Profeller Shaft and Differential
4. Use the same approch to disassembly the other cross
axle bearing. Mark the disassemblyed parts in order to keep
their former positions in the later assemly.
Assembly
Cross axle
1. Assembly the cross axel bearing, and lay the recommendatory multi-purpose grease on the inner side of bearing.
Do not loose any needles in the needle bearing when
assembly it.
2. Select a clip which could meet the demand of cross
axle's axial clearance, then assembly it. The thickness difference value should be within 0.06mm.
3. Knock the flange yoke to elimate the clearance
between bearing and clip.
PD-7
Profeller Shaft and Differential
4. Check agility and axial freedom degree of cross
axle.
Axial freedom degree refers to Maintainance data and
Explaination.
PD-8
Profeller Shaft and Differential
Maintainance
Replace Front oil Seal
Attention:
For drive system, adjustable washers are used. Afer
disassembly flange, the preload force of bearing has to be
adjust. Therefore final gear needs to be checked.
1 .Disassembly profeller shaft.
2. Release lower nut.
Tool amount refers to Preparation
3. Disassembly connecting flange.
4. Disassembly front oil seal.
5. Afer fill the cavum of oil seal with multi-purpose
grease, insert oil seal seat.
6. Assembly flage set and drive gear nut.
7. Assembly profeller shaft.
Tool refers to Preparation
PD-9
Profeller Shaft and Differential
Disassembly and Assembly
Disassembly
Disassembly profeller shaft
After disassembly profeller shaft, stuff the ouput port of trassmition case with a plug.
Disassembly axle casehalf shaft. (Refer to rear axle part)
Attention:
When disassembly profeller shaft,take care to aviod
damaging splin, socket flange yoke and oil seal.
Assembly
Fully Inject the recommendatory gear lubricating
oil.
PD-10
Profeller Shaft and Differential
Drive Gear
1.Hex nut
11.Rear asle final drive housing
21.Differential bearing
2.Flange
12.Flange nut
22.Stop spacer
3.Dust thround
13.Spring washer
23.Bolt
4.Oil seal ass'y
14.Gasket
24.Supporting washer
5.Driving conic gear bearing
15.Adjusting nut
25.Planetary gear
6.Adjusting gasket
16.Adjusting nut
26.Spring pin
7.Adjusting sleeve
17.Inside/outside track
27.pin of planetary gear
8.Driving conic gear bearing
18.Bolt
28.Half shaft thrust block
9.Adjusting gasket
19.Bevel gear differential housing
29.Half shaft gear
10.Driving conic bevel gear
20.Sub-driving conic bevel gear
30.Supporting washer
PD-11
Profeller Shaft and Differential
Disasembly
Pre-check
Before disassembly drive differential, check the following:
Preload force
1)Turn drive gear for several times to put bearing in
its right position.
2) Use tool check the preload force.
Clearance between driven gear and drive gear.
Measure the clearance of main reduct gear at different
points with a micrometer gauge.
Radial run-out of driven gear
Measure the radial run-out of driven gear with a
micrometer gauge.
Gear contact area
Checking of gear contact area refers to Adjusting.
Clearance between half shaft gear and planetary gear.
Use a thickness gauge to measure the clearance
between the thrust gasket of half shaft gear and differential
housing.
PD-12
Profeller Shaft and Differential
Differential
1 .Fixing main differential ass'y by tool.
2 .Mark the seat of hakf shaft bearing with paint or a
special tool to avoid mistaking in reassembly.
Since the bearing seat is linear bored in machining, it
should be in its former position when reassembly it.
3.Diassembly locking pin of lower half shaft and
bearing seat of half shaft.
4 .Disaaembly adjusting spacer of lower hafl shaft by
tool.
PD-13
Profeller Shaft and Differential
5. Disassembly differential housing ass'y by a tommy
bar.
Pay attention that seperate the outside track of bearing
and taper in right and left respectively--in order not to mistacken them.
6. Diassembly nut of drive conic gear by tool.
7. Disassemby connecting flange by tension implement.
PD-14
Profeller Shaft and Differential
8. Take off drive conic gear, its rear inner conic bearing, bearing seat and adjusting gasket of bearing together.
9. Disassembly front oil seal and front conic bearing.
10.Disassembly outside track of gear bearing by a
brass stick.
11.Disassembly inner conic bearing of drive conic
gear and adjusting gasket.
Differential Housing
1 .Disassembly inner conic bearing of half shaft.
Pay attention not to damage bearing or engaging key.
PD-15
Profeller Shaft and Differential
Pay attention not to mistake left and right bering
parts.
2 .Loose bolt of driven gear by tool.
3 .Knock driven gear by soft harmmer, then disassembly the gear from differential housing.
4 .Take off cross locking pin from the side of driven
gear by punch.
5 .Disassembly differential housing and mark on left
and right differential housing.
PD-16
Profeller Shaft and Differential
Check
Driven Gear and Drive Gear
Check whether there are any nicks, cracks or chippings, if there are some obvious damage, must replace the
gears together.
Differntial Housing Ass'y
Check the assembly surface of differential housing,bearing of half shaft, planetary gear, shaft of planetary
gear and thrust washer.
Bearing
1. Wash bearing completely.
2 .Check the abrasion, scratch, hole or scall off situation of bearing. Check the drive agility of conic rolling
bearing. If there are any damage, replace outside track of
bearing and inner taper together.
PD-17
Profeller Shaft and Differential
Adjusting
Gear Contact Area
To proof whether the driven conic gear and drive conic gear mesh correctly, the shape of contact area should
be checked. If the hyperbola gear mesh mesh incorrectly, it will cause noise and shorten the duration of the gears.
By checking the shape of contact area and adjust the gears to their best meshing position, it will reduce noise and
increase the duration of the gears.
1. Wash the gears of driven conic gear and drive conic
gear completely.
2 .Select 3~4 gears of driven gear which are near
drive gear and wipe a flat of ferric oxide.
3 .Turn connecting flange by hand to turn driven conic
gear positive and negative.
If the caculated clearance value and the thickness are
correct, the shape of gear contact area will be normal. But
generally because of the wrong shape of contact area, it has
to repeat the mentioned process above until adjuting to the correct way. Several shapes of gear contact area and
adjust approches are showed .
A.Adjust approch:Increase the thickness of the gasket of drive gear to close it to driven gear.
B.Adjust approch:Decrease the thickness of the gasket of drive gear to keep away it from driven gear
After adjusting, wipe up the ferric oxide.
PD-18
Profeller Shaft and Differential
Assembly
Differential Housing
1. Assembly gear of half shaft, planetary gear, planetary gear set and thrust spacer.
2. Incert the planetary gaer shaf into differential housing and contact it to the hole of locking pin.
3. Select thrust spacer of half shaft gear and adjust
clearance between the back side of half shaft and thrust
spacer.
4 .Assembly the locking pin of planetary gear by
punch.
PD-19
Profeller Shaft and Differential
5. Put gear oil on the surface of gear and check the
running situation of gear.
6. Put seal glue on differential housing and the surface
of driven gear's contact area, then put the differential housing on the main reducer driven gear.
7 .Put seal glue on the bolt of driven gear.
8 .Assembly new locking spacer and bolt.
Screw down bolt by tool and knock the head of bolt by hammer softly.
Bend the locking spacer to lock the bolt in the tight
position.
9. Assembly the inner taper of half shaft bearing on
differential housing by tool.
PD-20
Profeller Shaft and Differential
Differential Seat
1 .Assembly the outside track of front and rear bearing.
2 .Select adjusting gasket of drive gear. Refer to the
explaination of adjusting.
3 .Assembly adjusting gasket of drive gear, insert the
inner taper of drive gear's rear conic bearing by tool.
4. Assembly the inner taper of drive gear's front conic
bearing.
PD-21
Profeller Shaft and Differential
5. Put universal grease in the cavum of oil seal' s lip.
Assembly front oil seal.
6. Reassembly bearing gasket of drive gear, adjusting
gasket of bearing and drive gear on gear seat.
7 .Knock connecting flange by soft hammer softly and
assembly the flange on drive gear.
8 .Tighten the nut of drive gear by prescriptive torque.
PD-22
Profeller Shaft and Differential
9 .Turn driver gear repeatly and measure the preload
of the drive gear bearing.
10.Assembly the differential housing which has the
outside track of half shaft bearing into the gear seat.
11.Turn adjusting gasket softly by special tool to lay
the gasket on a suitable screw thread connecting position of
gear seat.
12.Point at the marks on bearing cover and gear seat,
then assembly the bearing cover.
Do not screw too tight to lock the adjusting gasket of
bearing.
PD-23
Profeller Shaft and Differential
13.Tighten the left and right gasket of half shaft bearing one by one and measure the windage and preload force
of driven gear. Tighten the left and right gasket in turns to
get the prescripive windage and preload force.
When check preload force, turn the drive conic gear
repeatly to lay bearing in the right position.
14.Tighten the bolt of half shaft bearing's seat.
15.Assembly lateral locking pin.
16.Check the radial run-out of main reducer driven
gear (by micrometer).
If the difference of clearance on different position is
great, it may caused by other reasons beside driven gear
and differntial.
If the radial run-out amont of driven gear is inner the
prescriptive range while the clearance of differential housing on different position is great, replace the drive and
driven gear or differential housing.
17.Check gear contact area (refer to the explanation of adjusting).
PD-24
Profeller Shaft and Differential
Maintainance Data and Explaination
Profeller Shaft
General Explaination
Wheelbase mm:2515
Rear wheel:Single wheel
Type of rear axle:Single class hyperbola conic main reducer differential, punch jointing axle housing
Type of profeller shaft:Single, open
Amount of tie-in:2
Main Differential
Gear ratio:4.875
(Provided by JMC)
PD-25
Profeller Shaft and Differential
PD-26
Steering System
ST
TOC
Notes.............................................................................................................. ST-1
Check With the Vehicle ............................................................................. ST-2
Steering Wheel and Steering Column .................................................... ST-3
Steering Gear ............................................................................................... ST-6
Steering Tie-rod .......................................................................................... ST-7
Power Steering System ............................................................................ ST-10
Maintenance Data and Explanation ...................................................... ST-11
Steering System
Steering System
Notes
·Before disassembling, please clean external surface of the parts carefully.
·Disassemble the parts in a clean working area to prevent any dirt and other objects from entering. ·Put the disassembled parts in order for later reassembling.
·Clean the parts by using nylon or soft paper, normal shop cloth will cause some remains on the parts to interfere
the movement.
·Before check or assembly, clean all the parts carefully with liquid.
·Before assembly, it is better to apply a layer of oil used for auto transmission on the surface of hydraulic parts,
and apply a layer of vaseline on the O-type oil seal instead of lithium lubricanting grease.
·Replace all the washers, oil sealing and O-type rings to avoid using damaged washers, oil sealing and O-type
rings in assembling. After the assembly, proceed a test-run for property.
Special Maintenance Tools
Tool Name
Brief Description
Disassemble the steering wheel
Pulling tools, steering wheel
Release the ball connection
Ball connection separator
Disassemble the steering arm
Pulling tools, steering arm spanner
Lock nut wrench
Adjusting and tightening the lock nut
Spanner, adjusting screw
Measuring the torque
Torque spanner
ST-1
Steering System
Tool Name
Brief Description
Installing the steering gear on it
Accessories, bracket and steering
gear casing
Adjusting the preload of worm bearing
Torque connecting end
Check with the Vehicle
Check the free play of the steering wheel
·Measure the free play when steering wheel is in central position (driving
straight).
Free Play Value:
≤ 35mm
·If not within this value, check whether the gear clearance and rod ball pin
of steering gear for any loose.
Check the central position of the steering wheel
·Before disassembling the steering wheel, calibrate the central position of
the steering wheel. Check
·Check whether the steering wheel is in the central position when driving
straight.
·If not, disassemble the steering wheel and reassemble it again.
·If the central position is just between two fine gears, release the lock nut
of tie rod, and move the rod reversal at the same distance both on the left
and right to compensate the difference of the central position.
Check turning Angle of the Front wheel
·Turning the steering wheel to on both left and right extreme to measure
the turning angle of the front wheel.
Inner wheel
37°
External wheel
28°
ST-2
Steering System
Steering Wheel and Steering Column
Steering Wheel
·Remove the horn button.
·Disassembling the steering wheel by using special tools.
ST-3
Steering System
·When installing the steering wheel, apply a layer of multi-purposed
grease on the whole surface (two parts) of the automatic return-back pin of
steering indicator and touch point of the horn.
·Install the steering wheel on the column shaft at the central position.
·After installing, turn the steering wheel, make sure to have a smooth
movement and the same turning cycles on both left and right side at the
central position.
Steering Column
·When fixing the steering column, first screw all the lock bolts of lower
bracket and clips with hands, and then re-tightening again to make sure no
extra pressure will apply to the steering column.
·When fixing the steering spline shaft, make sure that the tightening bolts
and the sunken part of the shaft are correctly faced to each other.
Disassembly and Assembly
·When assembling and disassembling, turn on the steering lock with the
key.
·Be sure the surface of the spring lock ring after installing faces with the
shaft.
·Before putting the shaft into the sleeve, install the spring lock ring.
ST-4
Steering System
·Install the spring lock ring on the upper shaft with tools.
Steering Lock
a) Remove the lock screw with a clamp.
b) Tightening the lock screw.
Notes:
Pay attention to whether the position of the steering lock mechanism is
correctly located.
Adjusting the Mechanism
·After installing the steering column, check the movement of the adjusting
mechanism.
Front, Rear
L1:
15mm
L2:
45mm
L3:
10mm
L4:
20mm
Upper, Lower
Check
·If the steering wheel could not turn smoothly, check the steering column
from the following aspects, and replace relevant damaged parts.
Check whether bearing of the steering column is damaged or uneven,
lubricate it with recommended common grease. If necessary, replace the
steering column assembly.
Check whether the sleeve is deformed or damaged, replace it if necessary.
If the vehicle is hit a little, check the dimension of L. If the L value is ont
in the required range, replace the steering column.
L: 484mm
ST-5
Steering System
Steering Gear
1.Hex
26.Duct
2.Spring
neck bolt
washer
3.Hex nut
4.Side cover
5.O rubber sealing ring
6.Retaining nut
7.Adjusting bolt
8.Retaining ring
9.High pressure sealing ring
10.Needle bearing
11.Steering arm shaft
12.Cone plug
13.Housing
14.O rubber sealing ring
15.Dustproof
16.Spring washer
17.Hex thin nut
18.Casing cap
19.Sealing ring
20.O rubber sealing ring
21.Steering nut
22.Steel ball
27.Steering
23.Steel ball duct
24.Spring washer
25.Cross-recessed
ST-6
flat round head screw
clip
screw lever
28.Cylinder pin
29.O rubber sealing ring
30.Torsion bar
31.Valve
pocket
bearing
33.Cylinder pin
34.Imput shaft
35.Cylnder pin
36.Steel ball
37.Outside ring
38.Sealing ring
39.O rubber sealing ring
40.O rubber sealing ring
41.Valve body
42.Big cone joint
43.Circlip for holes
44.Single annular ball bearing
45.Oil seal
46.O rubber sealing ring
47.Upper cover
48.Retainer nut
49.Dust cap
32.Needle
Steering System
Steering Tie-rod
Disassembly and assembly
1.Remove the cotter pin and nut from the tie-rod connecting
part, and then make use of proper tool to separate steering knuckle
arm from tie-rod.
ST-7
Steering System
2.Make use of proper tool to release the ball pin connection
part like connecting pull rod, etc.
3.Remove the drag link from the steeringdrop arm by use
of tools.
4.Remove the fixed bolt of front and rear limit bracket.
Intermediate pull rod and tie-rod
1.When disassemble the tir-rod ball head connection,
adjust the pull rod length.
Adjust it betwen the ball head bolt center.
Standard length: See "Maintenance data and explanation"
2.Lock the fixed nut of the tie-rod to assure the consistent
motion of two ends.
Note:
To assure the connecting pull rod screw up to 40mm length in
the tie-rod pipe.
ST-8
Steering System
Check
Ball head pin assembly
1.Check the ball head pin travel. If there is damage, too large
axial clearance or hard move of the ball head pin, replace the ball
head pin assembly.
Transverse swing force(measuring point: cotter pin) A:
See "Maintenance data and explanation".
Driving moment B:
See "Maintenance data and explanation".
Axial clearance C:
0mm
2.Check the working condition of the dust proof. If it had been
damaged, replace immediately.
a.When replacing the dust proof, pay much attention to it and
do not damage it.
b.Use the li-based grease to lubricate the ball head pin if necessary.
c.Install the dust proof by the special tool, and be careful never
let the dust proof over expansion.
Note:
Be careful and never let the grease on the tapered part of the bal
head pin.
Drag link and tie-rod
Check the tie-rod and the related rods for any break, bend or
crack, replace if necessary.
Fixing and adjusting part:
Check each connecting part (bolt and cotter pin) for any looseness, clearance or damage.
If there is looseness or extra clearance, check the ball head pin
for damage.
When reassembling the ball head pin, use a new one.
ST-9
Steering System
Power Steering System
1.Steering
2.Steering
oil pump assy
oil pump bracket
3.Bolt
4.Bolt
5.Oil
reservoir assy
pump intake pipe assy
7.Clip
8.Adjustable elbow joint assy
9.Rubber hose
6.Oil
ST-10
10.Steering
gear oil intake hose assy
joint
12.Throat hoop
13.Dual pipe clip upper bracket
14.Steel pipe clip backing ring
15.Steering gear oil intake pipe assy
16.Steering gear oil return pipe assy
17.Power steering gear assy
11.Straight
Steering System
Maintenance Data and Explanation
Basic parameter
Steering gear drive ratio: 23~26
Steering wheel turning circle: 4.3
Check and adjust
Steering wheel
Steering wheel axial clearance (mm): 0
Steering wheel free travel (mm): 10~40
Steering column:
Steering column length L (mm): 484
Connecting rod mechanism
Ball head pin assy
Transverse swing force (measuring point: cotter pin) N:
Drag link/tie-rod/intermediate pull rod:
5.9~64.7
Driving moment (N.m):
Drag link/tie-rod/intermediate pull rod:
0.3~3.4
Axial clearance (mm):
Drag link/tie-rod/intermediate pull rod:
Tie-rod standard length L (mm):
ST-11
664.5
0
Steering System
ST-12
Brake System
BR
TOC
Attentions .....................................................................................................BR-1
Check and Adjust .......................................................................................BR-2
Exhaust..........................................................................................................BR-3
Brake Pipe ....................................................................................................BR-4
Brake Pedal and Bracket ...........................................................................BR-6
Brake Booster ..............................................................................................BR-8
Vacuum Pipe ..............................................................................................BR-11
Front Brake ................................................................................................BR-12
Rear Brake..................................................................................................BR-13
Parking Brake System .............................................................................BR-14
Brake System
Attentions
Use brake liquid of "901-4" to meet the requirements of DOT4.
May use other brand liquids which meet the requirements of DOT4,
but two kinds of liquids are not allowed to mix up for use.
Do not reuse the exhausted and unclean liquid.
Be careful not to spray the liquid to the painted area, this will damage
the painting surface. If the liquid sprayed out to the painted area without
care, wash it immediately with water.
Clean the main pump, sub-pump and brake dump with clean liquid.
The mineral oils as gasoline and coal oil are not allowed to use, they
will damage the rubber parts in the hydraulic system.
Disassemble the brake piping with tools.
Note:
Clean the friction lining with vacuum cleaner to minimize
the air pollution caused by friction material and dust.
BR-1
Brake System
Check and Adjust
Check the brake liquid level
Check the level of the reservoir, it should be between "MAX" and
"MIN".
If the level of the liquid is too low, check whether the brake system is
leaking.
If the brake warning light is till on when releasing the hand brake rod,
check whether the parking brake control system is adjusted to the right
position.
Check the brake pipe
Note::
If the leakage is from the joints, tighten or replace the damaged parts.
1.Check whether the brake piping is broken or aging or has other
damages, replace the parts if necessary.
2.Depress the brake pedal to the end to check whether the oil is
leaking when the engine is in running.
Brake liquid replacement
Fill up with "901-B" brake liquid.
1.Use a nylon pipe to connect each exhaust valve.
2.Exhaust the brake liquid by depressing the brake pedal.
3.Add new brake liquid until it flows out from each exhaust valve.
Exhaust out the oil from hydraulic system with the same
steps and add new liquid. Exhausting steps are refereed to
"Exhaust" part.
Note:
Do not reuse the exhausted and unclean liquid.
Be careful not spray the brake liquid on the painted area, it will
destroy the painting film. If you do it carelessly, clean it at once with
water.
BR-2
Brake System
Exhaust
Note:
Monitor the level of the liquid in process of exhausting.
Add new liquid of "901-4" in to the reservoir to assure
it is always full during the whole process.
Place a container under the main pump to avoid liquid
coming out.
1.Use a nylon pipe to connect the exhaust valve.
2.Depress the pedal to the end several times.
3.Maintain the pedal at the end, loosen the valve to exhaust.
4.Tighten the exhaust valve.
5.Release off the pedal slowly.
6.Repeat the 2-5 steps until pure liquid flowing out of the
exhaust pipe.
Exhaust following the steps below:
Left rear wheel → right rear wheel → left front wheel →
right front wheel
BR-3
Brake System
Brake Pipe
1.Oil brake pipe assy
2.Oil brake pipe assy
3.Three line straight joint
4.Oil brake pipe assy
5.1st oil brake pipe assy
6.Three way joint
7.Front three way bracket assy
8.Oil brake pipe assy
9.Oil brake pipe assy
10.Pipe clip for three pipe inline
11.Shim
12.Brake hose assy
13.Straight joint
14.Single pipe clip
15.2nd oil brake pipe assy
16.Brake hose assy
17.Oil brake hose assy
18.Oil brake hose assy
19.Nylon bush
20.Bracket
21.Upper bracket
22.Three pipes clip
BR-4
Brake System
Disassembly
Note:
Be careful not spray the brake liquid on the painted
area, otherwise it will damage the painting surface; if it
dose, clean it immediately with clean water.
Avoid bending, twisting and stretching of all the hoses
too much when disassembling.
1.Use a nylon pipe to connect the exhaust valve.
2.Depress the pedal several times to exhaust all the liquid
out of the valve.
3.Loosen the nut of the hose mouth connected with the brake.
4.Whenever cut off the hydraulic pipes, block the open with clean staff to
avoid dust entering.
Check
Check whether there is any crack, wear of the brake piping (pipes and
hoses), replace if there is.
Installation
Note:
Add new liquid of "901-4".
Do not use exhausted and unclean liquid.
1.Tighten all the expansion nuts and bolts.
Tightening torque of the nuts: 15~18N.m
Tightening torque of the bolts: 17~20N.m
2.Add new liquid until it flows out from the valve.
3.Exhaust air based on the above steps.
BR-5
Brake System
Brake Pedal and Pracket
Disassemble and assemble
1.Pedal bracket assy
2.Support shaft
3.Brake lamp switch assy
4.Return spring
5.Brake pedal
6.Rubber mat
7.Vaccum booster with brake master pump
Assembly
Check the following items of the pedal:
Whether the pedal is bent.
Whether the pin is damaged.
Whether the welding area is cracked.
Whether the pin head is cracked.
BR-6
Brake System
Adjustment
Check the free height from pedal to reinforced plate.
Free height 169~175 mm
Note:
The booster rod couldn't be in a pressed position when assembling the
booster head pin.
Adjust the pedal height if necessary.
Adjustment
1.Loosen the lock nut, turn on the booster rod to adjust the
pedal height, then tighten the nut.
Assure the pushing rod head end on the inner side of the
pushing board.
2.Loosen the lock nut to adjust the light switch clearance, and
then tighten the nut.
3.Check the pedal free travel.
Assure the brake light is off when releasing the pedal.
4.Check the height of the pedal when depressing it under the running of
the engine.
If the height is lower than the specified value, check the system
whether there is any leakage, or with air, or damage of the main pump,
etc.), and then conduct necessary repairs.
BR-7
Brake System
Brake Booster
Brake master pump with vacuum booster
1.Oil reservoir assy
2.Front chamber oil pipe assy
3.Rear chamber oil pipe assy
4.Vacuum booster with brake master pump assy
5.Nylon pipe with one-way valve assy
BR-8
Brake System
Driving Inspection
Control check
Shut down the engine and depress the pedal for several
times for any travel change.
Press down the brake pedal, start the engine, if the pedal
slowly down a litle, it is nornal.
Sealing check
Start the engine for one or two minutes then shut off. Press
down the pedal for several times slowly, if the first time
pedal down more and both the second and third time down
less, the booster is normal.
Depress the pedal when the engine is running, and then shut
off the engine without releasing the pedal. If no distance
change after the pedal depressing for 30 seconds, it proves
that the booster is in good condition.
Booster disassembly
Note::
Be careful not to let the liquid spray on the painted surface, it will destroy the painting film. If it does, clean
it right away with clean water.
Be careful not to bend the brake pipe when disassemble the booster.
Check
Check the rod length of output end
Provide 66.7kPa vacuum for the booster with high strength of vacuum pump.
Check the push rod length
Specified length:
10.0-10.25mm
Clearance between the rod and the master pump piston:
0.1-0.5mm
BR-9
Brake System
Assembly
Note:
Be careful not bend the brake pipe when installing the booster.
If the U-type clip pin is damaged, replace it.
Add new liquid of "901-4" to meet the requirements of "GB12.981-HZY4".
May use other brand liquids which meet the requirements of GB12.981-HZY4, but two kinds of liquids are
not allowed to mix up for usage.
Do not reuse unclean liquid.
Be careful not destroy the fixed bolt screws of the booster when installing if. Proper installation angle may
avoid destroying the screws by metal around the instrument panel holes.
1.Adjust the push rod as shown in the right picture before installing the booster.
2.Tighten the fixed bolts between pedal bracket and
booster when installing the booster.
3.Connect the pedal with the U-type rod of the booster
input end.
4.Tighten the fixed nuts.
5.Assemble the master pump based on the above steps.
6.Exhaust based on the above steps.
The distance from booster connecting yoke pin center
to booster installing surface must be adjusted to 1200-0.5mm, then lock the connecting yoke nuts.
BR-10
Brake System
Vacuum Pipe
Note;
Pay attention to the following points when installing the vacuum hose:
Do not put any oil on the vacuum hose and check
valve.
Insert the vacuum pipe to the vacuum hose and make
the hose touch the upper protruding ring of the formed pipe.
Install the Nylon tube with single one-way valve assy.,
pay attention to the direction.
Check
Hose and joint
Check the vacuum pipe, joint and valve for sealing,
and check the improper connection and damage.
Check valve
Use the vacuum pump to check the vacuum.
Connect the booster side: vacuum
Connect the engine side: no vacuum
BR-11
Brake System
Front Brake
Disassembly
1.Caliper
8.Caliper
14.Insulation
2.Hose
body
joint core
3.Dustproof
4.Oil drain screw plug
5.Rest pin
6.Dustproof
7.Rubber bush
9.Guide
bracket
pin
10.Dustproof
11.Piston
12.Sealing ring
13.Damping spacer
15.Spring leaf
16.Left brake friction block with
BR-12
spacer
alarm inductor assy
17.Friction block assy
18.Insulation spacer
Brake System
Rear Brake
Disassembly
1.Rear left brake bottom plate assy
2.Dustproof
3.Oil drain screw
4.Joint core
5.Wheel cylinder shield
6.Piston
7.Rubber cup
8.Rear brake wheel cylinder body
9.Wheel cylinder spring
10.Shim
11.Left pull arm
12.Spring washer
13.Brake shoe plate assy
14.Fork
15.Spring seat
16.Brake shoe pressure spring
17.Spring seat
18.Rear brake drum
19.Return spring
20.Return spring
21.Fork
22.Ratchet wheel
23.Fork
24.Return spring
25.Return spring
26.Parking brake cable assy
27.Dustproof plug
28.Pull rod
29.Dustproof plug
BR-13
Brake System
Parking Brake System
1.Parking brake control lever assy
2.Elastic clip
3.Parking
brake wire rope assy
with welding nut assy
5.Monotube clamping piece
6.Monotube clamping piece
7.Flexible shaft shim
8.Bracket assy
9.Spring shim
4.Bracket
10.Rubber
bush
assy
12.Cotter pin
13.Pin shaft
14.Return spring
15.Parking brake wire rope assy
16.Connecting rack and welding nut assy
17.Parking brake wire rope assy
11.Rocker
BR-14
Cab & Frame
BF
TOC
Cab
Clip and Fastener ........................................................................................ BF-1
Cab Front Panel........................................................................................... BF-2
Door ............................................................................................................... BF-3
Instrument Panel ......................................................................................... BF-4
Cab Interior Trims and Exterior Trims .................................................. BF-5
Seat .............................................................................................................. BF-12
Cab Safety Belt ......................................................................................... BF-13
Rear Mirror Outside Cab ........................................................................ BF-14
Cab and Cargo Body ................................................................................ BF-15
Chassis Frame
Chassis Frame ........................................................................................... BF-15
Heater
Using of Heater ......................................................................................... BF-18
Air Heater Parts Structure ....................................................................... BF-19
Special Service Tool ................................................................................ BF-20
Cab
Cab
Precautions
•When removing or installing various parts, place a cloth or padding onto the vehicle body to prevent scratches.
•Disassemble or assemble the handle device, molding parts, instrument, inner trims and so on carefully, not to soil
or damage them.
•Apply seal glue on necessary place when assembling.
•Be careful not let the glue flow out of the parts when applying.
•When replacing the metal parts extarnal plate of the body, be sure to take rust prevention measures.
Clip and Fastener
•The following codel and pictures and symbols are subiect ot the clip and fastener in the BF section.
•The clip and fastener must be replaced if damaged during assembling or disassembling.
BF-1
Cab
Cab Front Panel
Disassembly of the front bumper assy:
1.Remove the fixed bolt of front bumper.
2.Disassemble the connection device for right and left fog light.
3.Remove the bumper assy.
4.Disassemble the clip and bolt..
BF-2
Cab
Door
Front Door
Note:
•When disassembling the front door, it is better to disassemble the cover at front side first.
•After adjusting the door or door lock, check the door lock open and lock condit ion.
BF-3
Cab
Instrument Panel
Note:
•Before disassembling the instrument panel, switch off the power-supply.
•e careful not to scratch pad and other parts.
•These parts are made of plactic. Excessive force will damage them.
Cab arrangement
1.Ignition lock
2.Horn button
3.Combined light switch
4.Windshield wiper & washer rod
5.Compartment light switch
6.Windshield switch
7.Vent
8.Instrument panel
9.Fog light switch
10.Heater switch
11.Hazard warning light switch
12.Radio cassette
13.Cigarette lighter
14.Ashtray
15.Storage box
16.16.Glove box
BF-4
Cab
Cab Interior Trims and Exterior Trims
Interiorl trims
Side ard floor trims--Passenger area
Note:
•Wrap the tip of flat-bladed screwdriver with a cloth when removing metal clips from garnishes.
Disassembly of the side inner trims:
① Disassemble the sun visor.
② Disassemble the rearview mirror.
③ Disassemble the roof lamp ass'y.
④ Disassemble the handrail.
⑤ Disassemble the seats.
⑥ Disassemble the safely belt.
⑦ Disassemble the door guardrail.
⑧ Disassemble the rear window glass.
BF-5
Cab
Door trims
Disassembly of the door trims:
① Disassemble lock knob.
② Disassemble inside seal.
③ Disassemble inside handle escutcheon rear door).
④ Disassemble pull handle.
⑤ Pull out regulator handle.
⑥ Disassemble inner guard board of door (front door).
BF-6
Cab
Roof trims
Disassembly of the roof trims
① Remove part of headlining from corner and gradually peel headlining off.
Cab Exterior Trims
BF-7
Cab
① Front upper cover
② Front lower cover and lower cover board
③ Side external cover board
④ Front and rear windows
⑤ Cab door seal strips
⑥ Door and window seal strips
⑦ Front pedal cover and pedal mat
Cab Front Panel Grill
BF-8
Cab
Front and rear window pane
Cab door seal strip
BF-9
Cab
Door outside molding
BF-10
Cab
Pedal shield and pedal pad
1.Welded
left side panel assembly
nut assembly
3.Outer cover assembly
2.Plastic
4.Pedal shield
5.Pedal pad
6.Clip
assembly
bracket
8.Buffering rubber nail
9.Door lock dowel pin assembly
10.Door sealing strip assembly
7.Front
BF-11
Cab
Seat
Note:
•When assemble or disassemble the seat, it should be maintarined clean and well.
Front seat
BF-12
Cab
Cab Safety Belt
Notes:
•If the vehicle in severely dashed in an accident, whatever the nature of the accident is, the belt assembly must be
replaced.
•If any part of the belt has quality problems, it must be replaced instead of repairing it.
•If there is any cut, looseness or damage on the texture, etc., replace the assembly.
•Wine, oil or other material should not be sprayed into the buckle hole lock, so does not the huckle and the knob.
BF-13
Cab
Rear Mirror Outside Cab
1.Handrail
2.Handrail
3.Sun visor assembly
4.Outside rear view mirror bar assembly
5.Rear view mirror assembly
6.Inside rear view mirror
7.Dome glove box with roo lamp assembly
8.Down view mirror assembly
BF-14
Cab
Cab and Cargo Body
Cab
•The following parts at least should be disassembled in the area of cab engine:
1)Main electric system and wire harness.
•Sparate the engine part from steering transminsion device, brake system and clutch operation system.
•The following parts at least should be disassembled in the area of cab:
1)Transmission system and steering control system.
2)Hand brake operation and brake drag wire.
3)Electric system, wire harness and tube.
Cargo body
•First disassemble the following part:
1)Rear combination light system and license lamp.
BF-15
Cab
Cargo Body Installation
1.Front
9.Main
2.Left
board assy
side board assy
3.Right side board assy
4.Rear board assy
5.Locking bar assy
6.Rubber gasket
7.Rubber base plate
8.Left rear mudguard
10.Left
sill supporting base plate
rear mudguard assy
11.Buffer stopper
12.Left locking device assy
13.Aixs pin
14.License fixing plate assy
15.Left rear locking bar
16.Cargo body bottom plate assy
Notes: Different model has different shape of cargo body.
BF-16
Chassis Frame
Chassis Frame
Chassis Frame
1.Front
10.Engine
2.Left
bumper
side member
3.Front tow hook
4.1st cross member assy
5.Left gusset assy
6.Right side member
7.Right side member gusset plate assy
8.Front mounting cross member assy
9.Body angle iron
11.3rd
rear mounting cross member assy
cross member assy
12.Cross member
13.Shock absorber cross member assy
14.Cross member
15.Cross member
16.6th cross member
17.Rear tow hook assy
BF-17
Heater
Heater
Using of Heater
Control panel
1.Change-over switch (no use)
2.Fan switch
3.Operating-mode chosen switch
4.Plug
5.Inside air circulation switch
Fan switch
There are five speeds provided, from 0 to 4. At 0 position, the fan stops, and the wind will become even
stronger from 1 to 4 speed successively.
Turn these switch to adjust to the satisfied mode if the heater is needed.
Operating-mode chosen switch
—blowing to your head
—blowing to your feet
—blowing both to your head and feet
—inside heating and defogging
—inside defogging
Turn the switch to select the needed wind mode.
1.Cab inside air circulating switch
—circulating internal air
Press this button to circulate the cab inside air and average the air thermal distribution.
Note:
•The warm air is heated by the cooling liquid of the engine. Its temperature depends on the temperature of the
cooling liquid. Please do not use the heating device too long when the engine is stop or idle, otherwise it will wear
out the battery and influence the normal driving.
BF-18
Heater
Air Heater Parts Structure
1.Left
8.Air
2.Air
air pipe
duct assembly
3.Middle air pipe
4.Right air pipe assembly
5.Defrosting pipe assembly, left door
6.Defrosting nozzle assembly
7.Defrosting pipe assembly, right door
9.Plastic
inlet duct assembly
nut assembly
10.Heater assembly
11.Blower assembly
12.Heater control mechanismassembly
13.Water inlet & outlet pipe
14.Nylon strap
BF-19
Heater
Special Service Tool
As for the operating method please see the tool service manual for detail.
BF-20
Electric System
EL
TOC
Harness Connector ..................................................................................... EL-1
Standard Relay ............................................................................................ EL-1
Fuse Wire and Fusible Link ..................................................................... EL-2
Battery ........................................................................................................... EL-2
Charging System ......................................................................................... EL-4
Starting System ........................................................................................... EL-5
Combined Switches.................................................................................... EL-6
Front Head Lights ....................................................................................... EL-6
Combined Instrument Panel ..................................................................... EL-7
Windshield Washer and Wiper ................................................................ EL-8
Radio Cassette and Antenna................................................................... EL-10
Electric System
Electric System
Harness Connector
All the terminals have been improved, which could prevent from loosening and disconnection.
Terminals could be loosened by pressing and pulling lock parts.
Note:
Don't pull electric wire while disconnecting terminals.
Example:
Standard Relay
Relay can be divided into three types:open, close and mixed.
EL-1
Electric System
Fuse Wire and Fusible Link
Fuse wire
If the fuse wire is broken,the problem must be solved before replacing the fuse wire.
Use proper fuse,do not use the fuse with much higher than rated
value.
Insert the fuse box correctly,do not slope it.
Take off the fuse wire of the clock,if the vehicle is not used for long
time.
Fusible link
The melted fusible link can be seen with eyes,if not sure,check it with
a electric measuring device and a check lamp.
Note:
If the fusible link is melted,maybe the key circuit breaks down(power line
or big electric flow circuit).Under such condition,carefully check and
solve the problems.
Battery
Caution:
Start the engine with supporting battery and the cable if necessary
.please use 12 V auxiliary battery.
After connecting the battery cable, make sure their connection with
the joints is well.
How to maintain the battery
Method of preventing over-discharge
The following precautions must be taken to prevent the battery overdischarge.
1.The battery surface(partticularly its top)should always be kept clean
and dry.
If there is electrolyte or water on the top, it will cause the battery to
discharge.
2.If the vehicle no used for quite long time, release off the negative pole
joint.
EL-2
Electric System
3.Check the condition of battery charge
Check the proportion of electrolyte periodically, carefully watch the
charge state to prevent over-charging.
Liquid level check
Warning:
Do not let the electrolyte touch with your skin,eyes,and painted
surface.After touching the battery,you must clean your hands thoroughly.If
acid liquid goes into your eyes, skin,and cloth,wash them right away with
clean water for 15 minutes and seek some medical attention. Normally the
battery does not need to add water, but under bad condition, steamed water
needs to be added.
1.Release off the battery plug with proper tools.
2.Add in steamed water until "max".
Sulphation
If battery is not maintained for a long time, the proportion of electrolyte is lower than 1.00,and the battery is totally discharged,it will cause
sulfating of the battery pole penal.Although the sulfating battery pressure
is very high at initial charging stage compared with normal battery,its current is not even enough smooth, as shown in the picture.
Specific gravity check
1.Read hydrometer and thermometer indications at eye level.
2.When the electrolyte level is too low, the battery can be lilted is raise the
liquid level so the measurement could be taken easily.
EL-3
Electric System
Battery charging
Charging per-fixed current
7.0A can be used for initial charging until average pressure of the single battery reaches to over 2.4V,then
3.0A can be changed for charging. If the pressure change of the battery is not over 0.05 V/h within 2 hours at the
end of charging period,the proportion of the electrolyte does not change obviously,also taking temperature into
consideration,then the battery can be regarded as fully charged.During the whole charging period, the temperature
of electrolyte should be maintained around 20~40℃,taking the middle single battery measuring value as standard.
10.0A can be used for normal charging until average pressure of the single battery reaches to over 2.4V,then
5A can be changed for charging.If the pressure change of the battery is not over 0.05 V/h within 2 hours at the end
of charging period,the proportion of electrolyte does not change obviously, also taking temperature into consideration,then the battery can be regarded as fully charged.During the whole charging period, the temperature of electrolyte should be maintained around 20~40 ℃ ,taking the middle single battery measuring value as standard.
Charging per-fixed pressure
Use fixed pressure 14.80 ± 0.05V for charging,the max. current should not be over 30A(During the initial
charging period ,if the current is over this number,the pressure is allowed to reduce properly).If the pressure
change of the battery is not over 0.1A/h within 2 hours at the end of charging period,the proportion of the electrolyte does not change obviously,also taking temperature into consideration,then the battery can be regarded as fully
charged.During the whole charging period,the temperature of electrolyte should be maintained around 20~40 ℃
,taking the middle single battery measuring value as standard.
When there is a lot of bubbles coming out of the battery,and the pressure is stable at the end of charging,the
proportion and the height of the electrolyte should be adjusted to their specified value.
The electrolyte proportion of a fully charged battery is 1.28 ± 0.01(at 25 ℃ ).
Charging System
Note:
When installing the battery,be careful to make the earth pole of the battery same as the engine, which is negative earth pole, otherwise, diode of the engine will be damaged.
It is not allowed to use way of short circuit (making fire jump from armature B to the body) to check whether
the motor generates power.
It is not allowed to dismount the main powered devices as battery while engine is in high running speed.
Common breakdown causes
Motor not generate power:
Rectifier damaged.
Brush blocked and not touch the sliding ring.
Stator coil cut and short circuited or earthed.
Rotator coil cut and short circuited or earthed.
Motor power not enough:
Motor driven belt too loose.
Individual rectifier damaged.
Brush not connected well.
Sliding ring dirty and damaged.
Rotator coil short circuited.
Battery internal short circuited.
EL-4
Electric System
Charging current too big:
Adjusting pressure of adjuster too high.
Battery internal short circuited.
Charging current too small:
Adjuster pressure value too low.
Motor abnormal noise:
Motor not well installed.
Motor bearing worn and loose.
Rotator and stator rub each other.
Coils of rotate and stator cut circuited, diode cut and short circuited and electric appears.
Starting System
Breakdown causes
Motor not running
Battery power not enough severely.
Starting relay not connected.
Armature coil cut and short circuited.
Drive gear shaft blocked.
Magnetic switch touching point burned and oxidized or not well adjusted
Ignition switch damaged or not connected well.
Battery connecting wire not connected well.
Brush wore and not well connected.
Magnetic switch coil cut and short circuited or earthed.
Flexible core of magnetic switch blocked.
Motor with weak running
Battery charging not well.
Motor not well installed with some mechanical break downs.
Rectifier dirty or damaged.
Starter idling.
Single-directed clutch sliding.
Battery connecting wire not well connected.
Brush worn and spring tension reduced.
Armature coil cut circuit somewhere.
Drive gears not well teeth.
Motor not stopping
Ignition switch blocked, touching point not disconnected.
Magnetic switch main touching point burned and sticked.
Starting relay touching point not disconnected.
Flying wheel gear ring and drive gear rough and sticked.
EL-5
Electric System
Combined Switches
Replacement
It is not necessary to dismount the combined switch base while
replacing each switch.
When dismount the combined switches, first dismount the connecting
bolts.
Front Head Lights
Bulb replacement
The front head light is half sealed, using a replaceable halogen osram
lamp.The lamp can be replaced from the inner end without releasing off
the whole head light assembly.
Hold the plastic bracket while replacing, do not touch the glass cover.
1.Release off the connecting wire harness from the rear end.
2.Turn the bulb anti-clockwise until it loose and off.
3.Open the rubber cover.
4.Be careful not shake or turn the bulb while removing.
5.The steps for installing is just on the contrary of removing.
Note:
Do not place the bulb outside the reflecting cover for long time,
otherwise, dust, gas or smoke will go into the light to affect the function of
the light. So the bulb can be removed only when replacing.
Focus adjustment
Use a focus device, focus screen or head light tester when focusing.
Note:
.Keep all the tires at normal pressure.
EL-6
Electric System
Keep the vehicle and the tester at the same level.
No load on the vehicle, except the driver (on place the same weight
on the driver's seat).
Low beam
Switch on the low beam.
Make beam-focus adjustment by adjusting screws.
First tighten all the adjusting screws,and then loosen them to adjust.
Beam forcusing adjustment
As shown in the picture,adjust the head light to make its main shaft of
the light parallel with the center line of light shaft,and overlapped with
point P.
The beam-focus adjustment shown in the picture is suitable to the
right side drive area.
The dotted line in the picture stands for light shaft centerline.
"H":
"WL":
"L":
"C":
Paralleled center line
Distance between centerline of two head lights
5,000mm
138.4mm
Combined Instrument Panel
EL-7
Electric System
Windshield Washer and Wiper
Disassembly of wiper
Before disassembling, turn off the wiper switch.
Disassembly
Disassemble the wiper arm.
Disassemble the lock nuts, washer and seal rubber shim.
Disassemble the instrument assembly.
Disassemble the left and right guide pipe and ventilating pipe.
Prize the wiper connecting rod off the motor arm with a screw driver.
Note:
Be careful not to destroy the wiper connecting rod while
disassembling.
Disassemble wiper motor-to-amplifier harness connector.
Disassemble the bolts on the wiper motor bracket.
Disassemble the motor arm.
Disassemble the wiper motor from the installation bracket.
Disassemble the wiper intermittent relay from the bracket.
Disassemble the wiper connecting rod.
Installation
When installing, proceed the above procedures reversedly.
The wiper must be adjusted after installation.
Adjustment
Before installing the wiper arm,first the wiper motor,then turn it off
(automatic stop).
Raise up the wiper brush,then place it on the surface of window glass
right away to make the brush center on the location between "c" and
"d",then tighten the nuts.
Spray some cleanser, start the wiper motor, and then switch it off.
Assure to make the wiper brush on "C" and "D" position,and then
tighten wiper arm nuts to its specified torque.
Standard cab:
"C" 45~55mm
"D" 45~55mm
EL-8
Electric System
Before reassembling the wiper arm,clean the core shaft as shown in
the picture so that the arm will not be easily loose after assembling.
Adjust the cleaner nozzle
Adjust the cleaner nozzle with the tool as shown in the picture.
Max adjusting range: 10°
Check the wiper intermittent relay
Connect the wire as shown in the picture.
When the connecting pole is connected with negative pole of the battery, and the test lamp is on, the relay is in normal condition.
EL-9
Electric System
Radio Cassette and Antenna
Adjustmen of the antenna rod
Adjust the antenna nutted rod under following condition:
MW (AM) signal can't be received or very weak.
After installing the new antenna, feeder cable, or radio, before the
adjustment, check the connection of harness and antenna or feeder cable
for correctness.
Pull out the antenna completely.
Switch on the radio and tuning to loud the volumn of the speaker.
Round the1400KHz, there is a broadcasting station whose signal is
very weak (nearly can't be heard).
Turn the antenna left and right to find a optimum position for the
receiving result.
Note:
Don't over turn the nutted rod antenna, half circle is allowed.
Antenna position
EL-10