1
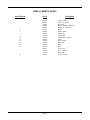
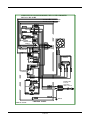
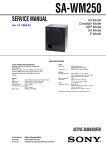
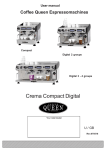
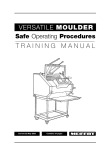
MODEL PFB PROOFER BASE
Installation, Operation, Parts &
Service Manual
319558E
CONTENTS
Page
SPECIFICATIONS
3
GENERAL PROOFING INFORMATION
3-4
FROZEN DOUGH - PROBLEMS, CAUSES & REMEDIES
LACK OF VOLUME
TOP MUCH VOLUME
CRUST COLOR TOO PALE
CRUST COLOR TOO DARK
CRUST TOO THICK
POOR CRUMB TEXTURE (CRUMBLY)
STREAKING OR SPOTTING ON CRUST (WHITE)
STREAKING OR SPOTTING ON CRUST (DARK)
5
5
5
6
6
6
6
6
DOUGH AGE AND CHARACTERISTICS
YOUNG DOUGH (UNDERPROOFED)
7
PROPERLY PROOFED
GENERAL COMMENTS
7
7
OLD DOUGH (OVERPROOFED)
7
DIAGNOSTICS
8
REPLACEMENT PARTS
9
BAKING CENTER CONTROLS
10
WIRING DIAGRAM
11
NOTICE:
Please supply the Model Number and the Serial Number when ordering replacement parts or
requesting service.
We recommend service by Duke Authorized Service Agencies during and after the
warranty period.
2 of 12
Specifications
Power to the proofer base is supplied through a nine foot
(9') power cord, 3-wire, 14 gauge, equipped with a
NEMA 5-15 CAP grounded plug.
The master on/off switch connects to the axial fan,
thermometer transformer, (120v primary/12v secondary)
and to the controller, which has a temperature range
from 85" - 165°F.
The controller provides power to the air heat element
(10-<5 watts), and to the proofer ready light. A second
(500 watt) element used to regulate humidity in the
cabinet is controlled by an infinite switch. (The humidity
element will come on only when the air heat element is
on.) The humidity element heats a pan of water in the
bottom of the oven producing steam vapor.
A sixty minute timer controls the timed proof cycle, and
connects power to a buzzer indicating the end of the
cycle.
There are two probes within the proofer cavity. One is
connected to the controller to sense oven temperature.
The second probe is connected to the digital
thermometer to indicate oven temperature.
The axial fan located in the bottom of the oven circulates
heated air throughout the cavity. The fan runs
continuously when the main on/off switch is turned on.
Opening or closing the door has no effect on the heat or
fan controls.
General Proofing Information
temperature and humidity. Time and temperature
are easily controlled with properly maintained
equipment. Correct proofer humidity control can
only be maintained with a balance between
temperature and humidity settings.
Retarder Principles
Retarders provide a location for the frozen dough to
thaw slowly, until it reaches a state of even temperature
throughout the dough piece. Retarders protect the
dough from the unequal thawing caused by excessively
warm locations. The best retarders are designed to
promote a controlled, cool, slightly moist environment.
To eliminate moisture loss and crusting it is often still
appropriate to cover the entire pan of trayed product
with a heavy plastic bag.
NOTE: Condensation can cause thin, close fitting
plastic bags (like trash bags) to stick to the dough. This
often creates damaged surfaces when the plastic is pulled
free. Baking supply houses carry zippered "elephant
bags" specifically for the retarding process.
By keeping the dough between 33° - 40°F the yeast
activity in the dough is minimal, yet limited
fermentation does occur improving product flavor and
dough handling characteristics. Doughs held in the
retarder for over 48 hours often will develop strong
"sour" aromas and flavors, and if baked, will result in
inferior crumb texture and shelf life. Follow and
understand the practices outlined on the following pages
when retarding your frozen product:
Today many bakers use frozen dough products in their
operations. Frozen doughs are ready for traying,
thawing, proofing (if required), baking and finishing.
The baker bypasses mixing, dividing, make-up and
fermentation time.
1. Maintain temperature between 33" - 40°F
Handling Frozen Dough
5. Longer retards will require shorter proof times.
Frozen dough must be kept at a temperature of -10°F
with minimal fluctuations to prevent product damage. Be
sure to rotate your inventory so that the first product
stocked is the first product to be used.
6. Fermentation begins
Frozen dough is affected by three factors: Time,
2. Avoid formation of crust or skin on dough pieces
3. Retard 12-16 hours (overnight)
4. Do not over-retard product (sour product)
Proofer Operation
For the best results in a frozen dough operation, a
relative humidity of 70% - 75% is desirable, with a
temperature between 90° - 110°F. The humidity and
temperatures settings will vary depending on the
strength and kind of dough to be proofed.
3 of 12
Larger pieces of dough should be proofed at a lower
temperature while smaller pieces are proofed at a higher
temperature.
Basic yeast dough should be at room temperature when it
is placed in the proofer. Placing retarded dough (directly
from the walk-in or refrigerator) into the proofer cabinet
will often result in excessive build up of condensation on
the surface of the dough. This may lead to crust
imperfections (spotting and streaking) and blistering. In
severe cases this may often result in total collapse of the
baked product after removal from the oven.
It is important to stage your retarded product into the
proofer to avoid "overproofing". For optimal results the
product must be baked immediately after the proofing
process.
The majority of yeast-raised products can be proofed
successfully between 90° - HOT and 70% - 75% relative
humidity. The quality of your final product will depend
on the initial product quality and handling from the
freezer to the oven.
Proofing Bagels
The proofing process allows the bagels to warm up and
to expand slightly before they are boiled. Bagels which
are not proofed sufficiently, may not rise to the surface
when they are boiled. However, overproofed bagels will
tend to collapse after boiling and before they are placed
in the oven.
Optimum temperatures and times will vary for various
bagel formulations. All bagels should be proofed at a
low relative humidity (65% - 75% R.H.).
Bagels which have been held overnight in a retarder or
for a short time in a freezer are usually allowed to proof
at lower temperatures (86° - 90°F) than bagels processed
without interruption. Continuously produced bagels are
generally proofed at 104°-110°F.
4 of 12
Frozen Dough
Problems, Causes & Remedies
Bread & Rolls
PROBLEM: lack of Volume (Too Small)
Possible Causes
1. Incomplete Thawing
Remedy
Thaw completely or allow to proof longer. (The colder the
dough, the longer the necessary proofing time.)
2. Loaves Too Small for Pan
Use proper sized pans or increase size of dough.
3. Underproofed
Proof at proper temperature, humidity and time.
4. Oven Temperature Too High
Use oven thermometer to check oven temperature against
temperature dial. Recalibrate dial if necessary
5. Dough Too Old
Rotate inventory. Use “First In, First Out” system. Use
products with earliest date codes first.
6. Dough Has Been Thawed and Refrozen
Maintain uniform freezer temperature at minus 10°F.
Do not Refreeze Thawed dough.
Place frozen dough in freezer immediately on receipt.
7. Dough is Dry
Retard product in sealed plastic bags.
Increase moisture, (humidity setting) in proof box.
PROBLEM: Too Much Volume (Too Large)
Possible Causes
Remedy
1. Over Proofing
Proof at proper temperature, humidity and time.
2. Oven Temperature Too Low
Use oven thermometer to check accuracy of dial indicator.
3. Loaves Too Large for Pans
Use proper sized pan or decrease size of dough.
4. Dough Has Risen Too Much During Proofing
Remold dough into proper shape as outlined in
manufacturers directions and let rise again.
PROBLEM: Crust Color is Pale (Too Light)
Possible Causes
Remedy
1.Thawing Time Too Long; Dough Has Aged
Retard dough in properly controlled retarding cabinet (38°40°F)
2. Crust Has Developed on Dough
Keep dough pieces in plastic bag while thawing; maintain
proper humidity, steam or moisture in proof box.
3. Insufficient Humidity in Proof Box.
Maintain proper temperature and humidity levels; check
water reservoir.
4. Oven Temperature Too Low
Use oven thermometer to check accuracy of dial indicator.
5 of 12
PROBLEM: Crust Color is Too Dark
Possible Causes
Remedy
1. Dough Improperly Thawed
Thaw completely according to instructions.
2. Oven Temperature Too High
Use thermometer to check accuracy of dial indicator.
PROBLEM: Crust Blisters:
Possible Causes
Remedy
1. Careless Molding
Mold retarded product to manufacturers specifications.
2. Overproofing
Proof at proper temperature, humidity and time.
PROBLEM: Crust Too Thick
Possible Causes
Remedy
1. Dough Has Aged Too Much After Thawing
Thaw properly in plastic bags to avoid formation of
crusting.
2. Crust Develops During Proofing
Maintain proper humidity, moisture and temperature levels
in proofer cabinet.
3. Oven Temperature Too Low
Use oven thermometer to insure that dial indicator is
accurate.
PROBLEM: Poor Crumb Texture (Crumbly)
Possible Causes
Remedy
1. Dough Has Aged Too Much
Thaw properly in plastic bags; keep refrigerated to control
aging.
2. Overfroofed
Proof at proper temperature, humidity and time.
3. Proof Box Temperature Too High
See Above.
4. Oven Temperature Too Low
Use oven thermometer to insure correct calibration of oven
dial.
PROBLEM: Streaking or Spotting on Crust (White)
Possible Causes
1. Overproofed
Make sure correct proofing practices are followed. Do not
put “wet” dough into oven for baking. (Water will serve as
insulator preventing even coloration of curst. These white
spots are referred to as “fish-eyes”.)
PROBLEM: Streaking or spotting on Crust (Dark)
Possible Causes
1. Formulation
Remedy
Remedy
Dark spotting can often be caused by incomplete mixing in
the processing stage of the dough.
6 of 12
Dough Age and Characteristics
Young Dough (Underproofed)
Has the tendency to develop blisters and blemishes during handling. The loaf may often be small in volume, have a "shelltop" and a fox-red color.
Always remember the relationship of heat to the formed loaf. Young dough generates its own internal heat during
fermentation. A frozen loaf in the retarder and/or proofer sees heat only from the outside of the loaf. (The interior may be
35°-38°F at the beginning of the proofing cycle.) Premature processing of frozen dough will often result in "coring" or a
loaf or roll with an under baked center.
NOTE: The shorter the retarding time, the longer the necessary proofing time.
Cell Structure: The cell structure of young dough is nearly circular. The cell wall is thin and has little resistance to
elasticity. This inelasticity often causes the loaf to burst.
Shelf Life and Texture: Young dough has a short shelf life and stales quickly. The texture of the baked loaf will be
slightly crumbly.
Properly Proofed
Cell Structure: The cell structure of correctly proofed dough has an elliptical/elongated cell structure and thin cell walls.
The dough is readily extensible and holds gases easily.
Shelf Life and Texture: Correctly proofed dough will yield the best product having long shelf life, uniform crumb and
enhanced flavor.
General Comments:
95% of all baking problems are caused by incorrect proofing or retarding.
95% of the fermentation in frozen dough occurs during proofing.
The longer the fermentation stage in dough development the shorter the shelf life.
The larger the item the lower the proofing temperature.
Properly proofed pan breads will exhibit "break and shred". This should be subtle in character. The break
should occur directly above the lip of the pan and the shredding slightly above the break. This is the result of
"oven spring". (Oven spring occurs within the first 10-12 minutes of the bake.)
Old Dough (Overproofed)
As dough ages it becomes more acidic. The finished baked loaf has a lighter crust color as a result of the sugar
that is depleted through the fermentation process.
Cell Structure: The cell structure of old dough is elliptical in form and has thick cell walls. The dough is difficult to
form. The presence of old cell structure is usually most noticeable in the top or "crown" of the loaf.
7 of 12
DIAGNOSTICS
Equipment Problem
Remedy
Proofer will not operate
Make sure cord is plugged in and wall circuit breaker is
turned on. Check power to master switch at black wire #1
& white wire #2. If power is present turn switch on and read
voltage across wires #3 & #4. If no voltage is present
replace switch.
Proofer on, no fan
Read voltage across wires #4 & #12 going to fan motor. If
voltage is present replace fan motor.
Proofer on, no heat
Check power across wires #5, & #7 at air heat element. If
voltage is present replace element. If no voltage is present,
read voltage from wire #7 on element to ground; if no
voltage, check the controller. Amber light will illuminate if
controller is working.
Humidity feature not working
(Humidity element energized only when controller is calling
for heat to air element.) Turn infinite control on. Verify
voltage across L1 & L2 of infinite switch. Read voltage
across H1 & H2 of infinite switch; if not present replace
infinite switch. If voltage is present check voltage at
humidity element at wires #6 & #13. If voltage is present
replace humidity element.
Thermostat out of calibration
Check proofer temperature with remote test instrument.
Loosen screw to controller knob, turn knob to dial setting
that agrees with test instrument reading. Tighten screw.
8 of 12
REPLACEMENT PARTS
# on Diagram
6
7
8
9
10
11
12
13
14
15
19
Part #
Description
314350
314351
312559
312429
312428
553925
312074
312568
312566
312574
312573
512289
153203
156255
153142
153211
00924
316535
314861
Caster, w/brake
Caster, w/o brake
Fan, axial
Heater, humidity, 500 watts
Heater, air, 1045 watts
Buzzer
Infinite switch
Thermostat
Transformer
Thermometer, w/probe
Probe
Power switch
Heat light
Timer
Knob
Power Cord
Door assembly
Wire rack
Control overlay
9 of 12
10 of 12
SCHEMATIC DIAGRAM FOR MODELS PFB-1 & PFB-2 PROOFER
120 VAC 1 PH. 60 HZ.
TEMPERATURE CONTROL PROBE
TEMPERATURE DISPLAY PROBE
3 BK
3 BK
BLACK
1 BK
MASTER
SWITCH
WHITE
2W
4W
4W
5 BK
5 BK
DISPLAY
TRANSFORMER
F
TEMPERATURE
DISPLAY
A
6 BK
6 BK
BROWN
NO
TEMPERATURE
CONTROLLER
COM
4W
4W
6 BK
6 BK
HEAT
LIGHT
BROWN
4W
3 BK
3 BK
3 BK
FAN
WHITE
BLACK
AIR HEAT
ELEMENT
4W
4W
RED
3 BK
3 BK
HUMIDITY
ELEMENT
4W
6 BK
4W
4W
6 BK
7 BK
8W
4W
P L1 L2
HUMIDITY
CONTROL H1
H2
8W
7 BK
9 BK
4W
4W
D B0 A1
TIMER
3 BK
B
A
1 BK
BLACK
2W
WHITE
GREEN
3 BK
9 BK
4W
BUZZER
10 G
10 G
GROUND
CONTROL PANEL
PART N0. 502724
11 of 12
POWER CORD
#14-3 SJT
9 FT. LONG
NEMA 5-15P CAP