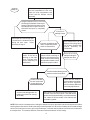
1
ELECTROLUX HOME PRODUCTS NORTH AMERICA 2003 Technical Training Manual :KLWH:HVWLQJKRXVH Produced by Service Assistance Center and Technical Information Department 5995382636 January 2003 SAFE SERVICING PRACTICES - ALL APPLIANCES To avoid personal injury and/or property damage, it is important that Safe Servicing Practices be observed. The following are some limited examples of safe practices: 1. DO NOT attempt a product repair if you have any doubts as to your ability to complete it in a safe and satisfactory manner. 2. Before servicing or moving an appliance: Remove the power cord from the electrical outlet, trip the circuit breaker to the OFF position, or remove the fuse. Turn off the gas supply. Turn off the water supply. 3. Never interfere with the proper operation of any safety device. 4. USE ONLY REPLACEMENT PARTS CATALOGED FOR THIS APPLIANCE. SUBSTITUTIONS MAY DEFEAT COMPLIANCE WITH SAFETY STANDARDS SET FOR HOME APPLIANCES. 5. GROUNDING: The standard color coding for safety ground wires is GREEN, or GREEN with YELLOW STRIPES. Ground leads are not to be used as current carrying conductors. It is EXTREMELY important that the service technician reestablish all safety grounds prior to completion of service. Failure to do so will create a hazard. 6. Prior to returning the product to service, ensure that: All electrical connections are correct and secure All electrical leads are properly dressed and secured away from sharp edges, high-temperature components, and moving parts All non-insulated electrical terminals, connectors, heaters, etc. are adequately spaced away from all metal parts and panels All safety grounds (both internal and external) are correctly and securely connected All panels are properly and securely reassembled ATTENTION!!! This service manual is intended for use by persons having electrical and mechanical training and a level of knowledge of these subjects generally considered acceptable in the appliance repair trade. Electrolux Home Products cannot be responsible, nor assume any liability, for injury or damage of any kind arising from the use of this manual. © 2002 White Consolidated Industries 2 Electrolux Home Products 2003 Technical Training Manual Table of Contents Safe Servicing Practices 2 Table of Contents 3 Service Assistance Center, TID, Frigidaire.com, ServiceBench.com 4 EHP Phone Numbers 5 Important Warranty Claim Information 6 New Servicer Provider Information Guide 7 Elux Express Shipment Program 7 Top TID Questions on: Refrigerators Freezers Air Conditioners Ranges (Serial numbers beginning with VF) Ranges (Serial numbers beginning with NF) Dishwashers Washers/Dryers 8 14 16 18 21 23 27 Hot Product Updates OTR microwave oven fault codes and diagnostics Next Gen ranges service manual information 42 43 Cold Product Updates Control kit 5303918282 doesnt have the damper heater Next Gen refrigerators service manual information Control kit 5303918282 will not install in new SxS refrigerators Frost and ice beads forming on evaporator cover of top mount refers Gurgling sound when door opened or closed on top mount refers Water dripping into food compartment on top mount refers 44 44 47 47 48 49 Wet Product Updates Timer cycle chart confusing on tumble action washer Laundry & Dishwasher products service manual information 50 51 Product Warranty Quick Reference Guide 1990 thru 2002 EHP Product LInes 52 Warranty Parts Recovery Program 64 3 Service Assistance Center 1-888-842-3660 Option 4 8:00 a.m. - 8:00 p.m. Eastern Time Zone In order to better serve our valued Home Service Providers, Electrolux Home Products has launched its Service Assistance Center. One TOLL FREE call will take care of all your warranty questions, such as claims, rate increases, in-warranty authorizations, and much more! Please keep in mind that we are not the technical department, so all technical questions should be directed to the proper options for the product you are servicing. The Territory Administrators are still a vital part of the Service Assistance Center, but to ensure that our technicians have up to date knowledge and training on all Electrolux products, the Territory Administrators will now be conducting Product Training in the field. Look for upcoming school schedules. QIR , O FD L U PD W RQ 'H L SD Technical Information Department P UW KQ F H 7 2Q HQ W H &K DOO RQ L W ROX HQ J H H6 2 Q Call 1-888-842-3660 and enter your 8-digit account number followed by the pound (#) sign. Then press: Option 1 for Refrigerators, Freezers, A/C, or Dehumidifiers Option 2 for Range Products Option 3 for Laundry or Dishwasher Products The following documents can be found at http://www.frigidaire.com/tip User Name: service Password : tips • • • • • • • • Service Bulletins Service Kits Service Request Form Service Provider Info Guide Repair Tips FAQ’s Computer Based Training Range Training Video And now available at www.frigidaire.com are: • • • • Wiring Diagrams Installation Instructions Owners Guides Parts Catalogs File Your Claims Electronically at: (ServiceBench Toll Free Number 1-877-424-3624) 4 EHP Phone Numbers: ELECTROLUX HOME PRODUCTS, INC. 250 Bobby Jones Expressway Augusta, Georgia 30907 Name Reason For Call Phone Number FAX Number Customer Assistance Center Concession Any Consumer Issue 706-860-4110 706-651-7135 Credit Department Balance on Account Need Invoice 614-825-0849 614-781-9312 Damage Claim Center Return Authorization Damage Claims Damage Allowances 800-456-4669 (Option # 1) 706-651-7715 Dealer Distributor Allowances 800-456-4669 (Option # 1) 706-651-7715 National Locator Parts, Service, Dealer, Manuals 800-444-4944 Parts Department Order Parts 800-456-4407 706-869-9096 706-228-4598 Product Specialist (DDPS) Product Exchange 800-456-4669 (Option # 2) 706-651-7135 Service Contract NOTE: This information is also available by logging on to ServiceBench.com and Frigidaire.com Contract Status Number Type Model/Serial Number Expiration Date Full Coverage Deductible 706-651-7740 706-651-7735 Technical Information (TID) Wiring Diagram Technical Feedback Territory Manager Pay Increase Technical Specifications 888-842-3660 Warranty Claim Status Rejection Inquire Wrong Amount Warranty Payments 706-651-7740 NOTE: This information is also available by logging on to ServiceBench.com 5 706-651-7735 Important Warranty Claim Information: Detailing Service Claim Information Have you ever received a check from a customer and found out later they forgot to sign it? How do you handle this situation? This check is not valid without a signature. Im sure you have taken the time to return to the customer for a signature or contact them and hope they will mail you another check with a proper signature. As you know, this is a waste of productive time and creates frustration for you and/or your company employees. It is an embarassing lesson to learn. Factory engineers feel similar frustration when they receive service claim information stating only that the product is broke, defective, out, or dont work and then repaired, replaced part, fixed, or works now. Just as the unsigned check is invalid for deposit, an incomplete complaint or service performed statement is invalid to determine what failed on the product. The Service Provider Information Guide you received when you signed on to become an authorized Electrolux Home Products servicer has a section entitled Filing Warranty Claims Electronically. You are asked to explain the complaint as the customer reports it and asked to describe in detail what service was performed. With proper detailed information, our factory engineers will be able to improve products and make your job easier by providing our tech line with answers to help you with service problems encountered in the field. Please take the time to detail your information. Travel Payment Guidelines for Warranty Claims Electrolux Home Products will pay a Travel Allowance of $0.50 per mile for miles traveled outside a 20 mile radius of your service location. A 40 mile round trip is considered the EHP standard for an authorized service providers coverage area. For example: If you travel 60 miles round trip from your service location, calculate the mileage owed you and enter it in the Travel field on the ServiceBench.com warranty claim form. (It is beneficial to add this information to the comment section when submitting the claim.) The calculation for travel allowance would be: 60 miles - 40 miles (20 out and 20 back) = 20 miles X $.050 = $10.00 If servicing more than one product on the call, you may only request mileage on one of the claims. All travel payment requests over $50.00 or travel payment requests considered by you as an exception will require preauthorization from your Territory Administrator or Service Assistance Center. All travel or mileage allowance requests are subject to review and audit. If a customers address is a PO Box, you must insert the physical address in the 2nd address field of the Servicebench.com warranty claim form and calculate your mileage in the comment section and put the dollar ($) amount in the Travel field. Scrapped, Sold As Is, or Scratch and Dent Products If a product does not have a valid Model/Serial plate, or it is not legible, it does not carry any warranty. Nor can it be serviced under an Electrolux Service Contract. This product may be a scrapped unit and Electrolux reserves the right to reject payment on any claim submitted or previously paid on a product determined to be a scrapped unit. Products sold As Is by any dealer, distributor or any other source carry no manufacturer warranty and cannot be covered under an Electrolux Service Contract. Electrolux reserves the right to reject payment on any claim submitted or previously paid on a product determined to be sold As Is. Electrolux may sell Scratch and Dent products to dealers or allow dealers to sell products designated as such. These units carry a functional warranty only. If you are requested to service cosmetic damage from a known Scratch and Dent dealer, you must collect payment from the dealer, not by filing a warranty claim. Electrolux reserves the right to reject payment on any claim submitted or previously paid on a product determined to be of cosmetic nature on units identified as a Scratch and Dent product. 6 New Service Provider Information Guide The new Service Provider Information Guide is now available online at http://www.frigidaire.com/tip. This new guide supercedes any previous Service Operating Guide. You will find information about filing claims with ServiceBench and most of the information you'll need to know to have a better understanding about your relationship with Electrolux Warranty and Service Agreements. Elux Express Shipment Program for Part Distributors Electrolux Home Products has been rated Best in Class for fulfilling parts/accessory orders from our Asheville, NC facility. Our year-to-date fill rate to our Parts Distributors is 97.9%. If a Parts Distributor tells you it will take several days (or weeks) to get a functional part for your (and our) customer, they are WRONG! Each Parts Distributor location (branch) can now order up to ten different part numbers (line items) per day through the ELUX EXPRESS part shipment program. These parts will be shipped 2nd day Air direct to the Parts Distributor location. The parts will arrive within 2 business days with no shipping charges to the Parts Distributor. In effect, Electrolux Home Products has suspended all freight charges on EMERGENCY 2nd day orders. However, if the Parts Distributor has to ship the part from their location once they receive it, there may be added freight charges and possibly additional day(s) delay in getting the part. But the Parts Distributor does not have to wait until he has a stock order to provide you the part to satisfy our mutual customer. Satisfying the customer is our top priority and as an Electrolux Authorized Servicer, it should be your top priority as well. ELUX EXPRESS is the answer to receiving emergency Electrolux Home Products parts quickly in order to satisfy the customer. 7 Top TID Questions on Refrigerators: 1. Problem: Solution: Freezing food in the fresh food compartment of Next Gen SxS refrigerators manufactured after March of 2001. Follow the steps... Step 1 Check both the freezer and the food compartment temperatures. (At the mid-range setting, the freezer should be between -1 and +3 F. The food compartment should be +35 to +36 F.) If the freezer is -10 F or colder, set at mid range. If the freezer is +8 F or warmer, set at mid range, Check the wattage on the compressor. If the wattage is normal you have a bad freezer control. If the freezer control was set at midpoint and the freezer temp is -10 F or colder, the freezer control is defective and the air entering the food compartment is so cold it is starting to freeze food on the top shelf by the damper before the damper has a chance to close. This should not cause the food to freeze in the rest of the compartment. The rear filter may freeze on rear filter models. If the wattage is low or high you have a problem with the sealed system. A restriction, low refrigerant charge or inefficient compressor. Use data sheet provided with product for correct wattage information. NOTE: Keep in mind the temperature of the air coming through the damper must be +15 F at the mid range to close the damper. If the air temperature is +18 F the damper will not close but the food in the food compartment will freeze. 8 If the food is freezing throughout the complete food compartment, there is an additional problem beside the freezer control and will need to follow the instructions for checking the food compartment control system. Step 2 If the freezer temperature is good but the food compartment is too cold, check the food compartment cold control and the damper control assembly. Using an inspection mirror, look in the air outlet grill at the back of the control housing in the food compartment. See if the damper door is open or closed. It should be wide open or completely closed. If the damper door is all the way open or closed and no obstructions are holding the door open, follow instructions in Step 3. The damper control is broken, or the door is catching on the foam block. Replace with control assembly kit 5303918283. If the door is partially closed: If the door is straight up and down, but part way closed, check for obstructions. If the cap tube from the freezer control is catching on the door and not allowing it to close, remove control housing and reposition freezer control cap tube in proper location. If the damper door is at an angle, the door hinge pin is out of place. Replace with control assembly kit 5303918283. If there is ice in the damper holding the damper door open: Check for air leaks allowing excess moisture to enter the product. Check the door seals for good contact to the cabinet and the door alignment with the cabinet. Make all necessary adjustments. Check to see that the door closers are closing the doors. Caution the customer to make sure the food packages are not keeping the doors from closing all the way. Also check to see that the door seal is tight in the channel of the inner door panel. If the seal can be pulled out of the channel easily, remove the seal and run a bead of Silicone sealer in the channel and reinstall the gasket. NOTE: If there is ice in the damper door holding the damper door open, then there is an excess amount of moisture entering the product and it is not all condensing on the evaporator coil. When the circulating air still contains a large amount of moisture as it turns to go through the damper, it will slow down and allow the moisture to condense on the damper door. This moisture will then collect and freeze at the bottom of the housing. 9 Step 3 If the damper has no ice or obstructions holding it open, drop the front of the control housing by removing the front and one side screw. This will allow the control panel to drop down and hang on the one rear screw and the wiring harness. If the damper door is open, use a jumper wire between the number 2 contact (Black Wire) on the food compartment control and the number 3 contact (Pink Wire). This should close the damper door. If the damper motor opens and closes the damper, replace with control assembly kit 5303918283. If the damper motor will not run, replace with control assembly kit 5303918283. If the damper door is closed, use a jumper wire between the number 2 contact (Black Wire) on the food compartment control and the number 1 contact (Purple Wire). This should open the damper door. If the damper motor will not run, replace with control assembly kit 5303918283. 10 If the damper motor will open and close the damper, replace with control assembly kit 5303918283. 2. Problem: Solution: Dispenser light comes on when the freezer door is opened and closed or the change filter light will change from Green to Red, or the Cube and Crushed light will come on at the same time. Any one of the above or a combination of all of the above. This can happen to any Next Gen SxS refrigerator built between serial numbers LA109..... and LA151...... The control board will need to be replaced with a new control board. The control board is located in the front face plate. Make sure you replace the control board, NOT the power board located in the dispenser. The part numbers are as follows: 5304421828 will be replaced by 5304426002 5304422345 will be replaced by 5304426003 5304422029 will be replaced by 5304426004 5304421640 will be replaced by 5304426005 5304424418 will be replaced by 5304426008 5304422633 will be replaced by 5304426010 The original board numbers are listed in the part information for the models you are servicing. NOTE: The control board is sensitive to static electricity discharge, the servicer should use a static guard grounding device at all times when handling the board . After the board is replaced mark a number 1 in the bottom of the dispenser ( under the sump ). The number 1 will indicate the control board has been replaced. 3. Problem: Solution: Where is the wiring diagram and data sheet located on the Next Gen refrigerators? In a plastic bag on the bottom of the refrigerator on the right hand side behind the toe grill. 4. Problem: Solution: The crisper cover is falling down on Next Gen SxS refrigerators. Install a shim (p/n 240523101). To install the shim, remove the crisper cover. Using a punch push the pin in the support through the support (see illustration below). Remove the front crisper cover supports and place shim over support as shown in figure 1. Reinstall the support with the pin out, then install the pin until it is flush with the front of the support. Reinstall the crisper cover. SUPPORT PIN SUPPORT 5. Problem: Solution: SHIM Door on Next Gen SxS refrigerator is making a clicking sound when door is opened and closed. First check to see that the screw holding the bottom cam in place on the lower hinge is in and tight. If the screw is loose reinstall the screw using loc-tite on the thread. Next, check the upper cam to see that it is tight in the door stop. If the cam is moving in the door stop replace the cam and door stop. 11 6. Problem: Solution: Crisper cover will not stay on support in Top Mount refrigerators. Order and install two cover extensions (p/n 240553701), one for each side of the crisper cover. Remove the cover and slide the extensions into the steel support running through the front of the cover (see Figure 1). Push the extension in with the open end toward the front until it rests against the cover (see Figure 2). The extensions may be filed off if they are too wide and cover will not fit in product. Slide in steel bar in cover with open end facing front of cover End of extension may be filed if too wide Figure 1 7. Problem: Solution: 1/4" Figure 2 The food compartment light switch is catching on the inner door panel of Next Gen Top Mount refrigerators. First check to see if the unit has the new light switch installed (see Figure 1 below). The new switch has a 3/8 wide actuator, the original switch had a 1/4 wide actuator. There is now a raised area added to the inner door panel to add additional surface for the switch actuator to make contact (see Figure 2 below). The raised area was added between January and May 2002, one production line at a time. In some cases the food door may need to be raised, this can be accomplished by adding a nylon washer or washers (p/n 240311301) to the post at the bottom food door hinge. Use caution when adding over 2 washers because the food door could start to make contact with the door stop on the freezer door (see Figure 3 below). Contact with the door stop can cause damage to the top of the food door. If over two washers are needed to be added, you will also need to add a washer to the bottom freezer door hinge pin to raise the freezer door. 3/8" Raised area for switch to contact Freezer door stop Figure 1 Figure 2 12 Figure 3 8. Problem: Solution: Next Gen SxS refrigerators are not defrosting correctly. The ADC (Adaptive Defrost Control) was upgraded to aid in eliminating noise in the electrical line from sending false signals to the board from the defrost limit switch. This part of the upgrade was accomplished by the addition of two resistors. An upgraded ADC will have a yellow label on the relay of the board. Older ADCs will have a white label on the relay of the board. 9. Problem: Solution: The evaporator fan motor on Next Gen SxS refrigerators is running slow or not at all. The voltage coming out of the ADC is less than 95 VAC and this is causing the fan to run slow or not at all. This voltage can be tested by checking the voltage between the Red/White wire on the ADC and the Light Blue wire. The ADC was upgraded with a larger capacitor for the fan motor to correct the problem. An upgraded ADC will have a yellow label on the relay of the board. Older ADCs will have a white label on the relay of the board. 10. Problem: There is a gurgling sound from the drain on Top Mount refrigerators when the door is opened and closed. The vacuum that is created as a result of opening and closing the door is released by pulling air up the defrost water drain tube. The gurgling sound is a result of water being trapped in the drain tube. First make sure the refrigerator is level side to side and front to back. If the product is level, you will need to separate the rubber extension from the hard plastic tube coming out of the back of the cabinet by the compressor. Try opening and closing the door again, if the noise goes away the rubber extension is trapping the water and will need to be routed so there is no sag in the tube and the end of the tube is up out of the water. If the noise is still present the water is trapped inside the cabinet and an external drain kit (p/n 5303918261) will need to be installed. (This subject is also covered under the Cold Products Updates, page 48.) Solution: 13 Top TID Questions on Freezers: 1. Problem: Solution: Sealed system leaks in a chest freezer. If there is a restriction that cannot be flushed free, call CAC to arrange an exchange. If there is a leak, split the system and determine whether it is a high side or low side leak. If high side leak, install external condenser kit. If low side leak, call CAC to arrange an exchange. 2. Problem: Solution: Frost along the edge and top of the breaker strip on chest freezers. Adjust lid for optimum gasket seal. 3. Problem: Solution: Sealed system restriction in upright freezer that cannot be flushed. In a frost-free freezer, replace the evaporator, heat exchanger, and compressor. In a manual defrost freezer, replace heat exchanger and compressor. 4. Problem: Solution: Frost on light shield and/or the door panel. Check condition of door seal and bottom door vent valves that may be sticking open. 5. Problem: Drain Pan Kit (p/n 5303925444 that is mounted to the side of replacement compressors for all Frost Free models (U11, U14, U17 and U20) is obselete. The old U-shaped drain pan is no longer being produced. A new Drain Pan Kit (p/n 5304428401) has been designed to use standard product components (a new drain cup and heater) and is being used on all production for Frost Free freezers after March 2002. This new drain pan kit does not show up on the IPL parts information on the CD. Please see Instruction Sheet below. Solution: DRAIN PAN KIT - P/N 5304428401 CONTENTS: 1 - Drain Pan Assembly 1 - Drain Hose 1 - Clip 1- Instruction Sheet This kit provides the parts needed to replace a drain pan that was originally attached to the compressor. INSTRUCTIONS: Remove and discard drain pan trap (see Figure 1). Attach one end of the drain hose to the drain and the other end to the spout of the drain pan. Use clip to secure the hose to the shell bottom. Using double back tape and screw on bottom of drain pan. Secure drain pan to side rail (see Figure 2). Set largest locating boss of drain into largest hole in side rail. CURRENT Locate Drain Cup in 13/16 dia. hole REPLACEMENT Drain Drain Trap Drain Hose Drain Drain Drain Cup Assy Drain Hose Drain Clip Figure 2 See drawings next page. Figure 1 14 Condenser Condenser Evaporator Evaporator Drier Oil Cooler Drier Suction Port Suction Port Discharge Port Oil Cooler Ports Discharge Port Process Port Process Port Drain Pan Heater Drain Pan Heater WITH OIL COOLER WITHOUT OIL COOLER Hook up copper tubing using appropriate drawing. 6. Problem: Solution: Temperature alarm light is illuminated. Check interior temperature. If cold enough, check sensor. If temperature is warm, check fan, door seal, or possible sealed system problem. 7. Problem: Solution: Door is hard to open. Wait an adequate time for interior pressure to equalize. Check bottom door vent valves for proper operation. 8. Problem: Solution: Drain freezing on upright frost-free freezers. Remove drain obstruction and pour hot water in drain. If drain trap is missing, replace on end of tube on compressor mounted drain pan. 9. Problem: Solution: Requesting part numbers on all freezer models. Call TID line @ 1-888-842-3660 for help finding the correct part or part numbers. 10. Problem: Solution: Sealed system leak in the wall of upright freezers. Split the system and pressurize high side to verify condenser leak. If leak is found, order external condenser kit. 15 Top TID Questions on Air Conditioners: 1. Problem: Solution: Unit freezing up. Location of ice buildup is key information. Frost on startup is normal. * Ice on evaporator (not frost): a. Leak in system. b. Low charge (not enough R-22). c. Clogged capillary tube. d. Wrong sized capillary tube. e. Clogged strainer inside condenser coil. f. Low fan speed from defective motor, defective capacitor, or incorrect wiring. * Ice on suction line and evaporator: a. Air filter dirty. b. Too cold outside. c. Too cold inside. d. Indoor humidity too low e. Indoor air recirculation. f. Defrost control bulb not properly installed in evaporator fins or connected on back of control board (electronic models). * Ice on accumulator: a. Water in system. b. Screen touching stand pipe. c. Suction line inserted too far into accumulator and touching screen causing restriction. 2. Problem: Solution: Unit short cycles and evaporator freezing up (15,000 BTU and larger). * Unit is oversized for application. * Defective thermistor/thermostat. * Thermistor not connected to proper terminal on control board. 3. Problem: Solution: Electronically controlled unit has no power; control board wont light up. * Defective transformer. * Compressor relay wired incorrectly. * Unit experienced power surge. * Motor shorted to ground. 4. Problem: Solution: Condensation buildup on the bottom of unit in customers home. * Unit not installed properly. * Cracked evaporator tray. 5. Problem: Solution: Condensation buildup on top of unit next to top rail. * Scroll plate and scroll not installed or seated properly. * Evaporator coil/bulkhead clip not seated properly causing air gap. 6. Problem: Solution: Fan motor running in reverse. * Motor wired incorrectly. * Motor failed internally. * Defective capacitor. 7. Problem: Solution: Unit has three fan speeds but only one works. * Check for broken wires. * Defective switch, check HI/MED/LOW to power. * Wrong fan motor. 16 8. Problem: Solution: Cant locate model or serial numbers. Every unit has a model and serial number. On most models its located on the right hand side of the unit on the wrapper, or on the left side below the control panel on the inside of the unit (remove front to locate). They are also on two separate white bar code tags on the front of the base of the unit. Thru-the-wall unit trim kits may have to be removed sometimes to locate the serial plate on the right hand side. 9. Problem: Solution: Thru-the-wall unit cycling off prematurely. Not installed properly per the installation instructions. If using a 22" sleeve on a 18" unit make sure you have followed the installation instructions and used the vertical divider provided with the kit. 10. Problem: Solution: Warranty claims not being paid and trying to contact Territory Administrator. Contact the warranty department (706-651-7740) for warranty claim questions. Listen to all options when calling the Tech line, then select proper option. 11. Problem: Solution: Received wrong part number from distributor. Tech line will provide correct part number. 17 Top TID Questions on Ranges (with serial numbers beginning with VF): 1. Problem: Solution: What do the various F codes indicate on Electronic Oven Controls? Refer to pages 19 and 20, VF Serial NUmber Range EOC Fault Codes. 2. Problem: Solution: What do the various F codes indicate on OTR microwave ovens? Refer to page 42, Hot Product Updates. 3. Problem: What causes discoloration/staining of manifold panel and control panel during self clean? Can the stains be removed? Infrequent and/or improper cleaning can be a major cause of this condition. Customers should preclean heavy spills or deposits and run the self clean cycle more often. Blocked oven vents and damaged or defective door seals also create problems during the self clean cycle. Make sure the door seal is properly installed and that it is pliable. Some times the stains on the panels can be removed using a mild abrasive (Soft Scrub/Bon Ami, etc.). Solution: 4. Problem: Solution: 5. Problem: Solution: 6. Problem: Solution: 7. Problem: Solution: How do you reset the door latch to unlock when the door is open and the latch hook is in the way preventing the door from closing? With your finger, push in and hold the door light switch button or pushrod. This will allow the motor to complete its rotation to the fully locked position. After the motor stops running, push the cancel button on the EOC or turn the selector switch to OFF while still holding the light switch button in. This should unlatch the hook. Oven door locks at random times even when the customer is not cooking. It sometimes happens when customer walks by the range or opens the door. What is the most likely cause? On some models the oven door light switch can have an internal short that will send voltage to the door latch lock motor. Disconnect the wire from door switch to terminal MDL on the EOC. This disables the lock relay on the EOC. If the door latch motor continues to lock, replace the door light switch. Remember to reconnect the MDL wire to the EOC. What should the amp draw be through the oven glow bar igniter in order for the oven gas safety valve to open? The minimum amp draw should be 2.9. Some valves may open momentarily at a lower reading but the igniter is considered faulty if the amp draw is less than 2.9. Some electronic oven controls do not have a calibration feature to adjust for temperature variances. How do you repair the product when the temperature is out of the acceptable range? The problem is most likely the probe. Test the oven temperature with a good quality test meter. When the oven temperature is at 350 deg, the resistance of the probe should be 1654 ohms ± 10.8 ohms. A higher resistance reading will result in the oven temp being too cool, and a lower reading will result in the oven temp being too hot. If the resistance reading is higher than the specified level, check the wire harness connector on the end of the probe. This connector is sometimes the source of the problem. If the connector is suspected as the problem you can cut it out of the harness and hard wire the connection with ceramic wire nuts. If the probe resistance is within the specified limits, then replace the EOC. 18 8. Problem: Solution: On a gas oven the igniter glows and pulls the proper amps but oven burner will not light. The oven gas safety valve has been replaced and still the oven burner will not light. What else could be the problem? On the gas pressure regulator there is a small spring loaded lever located on the back side. Often times this lever has been inadvertently tripped during the installation or LP conversion process resulting in no gas flow to the oven gas safety valve. The lever should be pointing in line with the body of the regulator. Reset the lever and the oven should work. Troubleshooting Range EOCs (Electronic Oven Controls): When an oven with an electronic control fails, it usually signals the failure with an F code. These F codes are considered by many people to be an indicator as to positively which part in the circuit has failed (F1 a defective control, F3 a defective oven probe, etc.). To the embarrassment of many servicemen who have believed this, they have installed the indicated part only to find it did not correct the problem. To troubleshoot an oven with an electronic oven control that is not operating: 1. Make sure electrical power is being supply to the control. 2. Disconnect power for 30 seconds. If fault returns when power is reconnected, go to the back of the control and disconnect the multi-pin plug. 3. Check the wiring diagram to determine which two pins in the plug (not on the EOC) are connected to the oven sensor. 4. With an Ohmmeter check the resistance between the two pins in the plug that are connected to the sensor. At room temperature: a. If the meter reads below 900 Ohms or above 1200 Ohms, remove the sensor from the oven and check it for resistance. If the resistance of the sensor is the same as the reading at the plug, the sensor is defective. If the resistance of the sensor reads between 900 & 1200 Ohms, the wiring between the control and the sensor is defective. b. If the meter reads between 900 Ohms & 1200 Ohms check the resistance between one of the pins going to the sensor and chassis. If the meter reads infinity go to step c. If the meter shows continuity, remove the sensor and check from one of its pins to the case of the sensor. If the meter reads continuity, the sensor is defective. If the meter reads infinity, the wiring between the control and the sensor is shorted to chassis of the range. c. From the wiring diagram, determine which 3 wires (if automatic lock) or which 2 wires (if manual lock) in the plug is from the door lock switch or switches. From the diagram determine which of the switches are open or closed when the door in the unlocked position. With an Ohmmeter check to see if the switch that is shown open is open and the switch that is shown closed is closed by checking the proper pins in the plug. 5. If the above checks test good and the relay on the board for the selected function is not closing, replace the control. IMPORTANT NOTE: If the oven problem is intermittent, you must do the above tests when the oven is malfunctioning. VF Serial Number Range EOC Fault Codes: NOTE: Not all EOCs will display every fault code listed. Some of the F-codes are found only on older products. For example: F3 on current models can be an open or shorted probe and they will not display an F4, but on some older models F3 indicates an open probe and F4 indicates a shorted probe. F1 - Control Failure: Shorted keypad. Internal checks may have corrupted control relay. Shorted or defective oven sensor (RTD). Check sensor and sensor wiring. If wiring checks OK, power off for 30 seconds. If fault returns, replace control. F2 - Oven temperature above specifications: The oven temp has risen above 665 degrees F and the oven door is not locked or the oven temp has risen above 965 degrees F with the door locked. Test the door latch switch or switches, oven sensor (RTD), and electronic oven control (EOC). 19 F3 - The oven sensor (RTD) is open/shorted: Check for open wiring connections between the EOC and RTD, including the quick connect plug. If quick connect plug is defective, remove from circuit and splice sensor leads with porcelain (hi-temp) wire nuts. Check resistance of RTD using resistance table. If resistance test is correct and wiring is good replace EOC. F4 - Shorted oven sensor (RTD): Check for shorted wiring between EOC and RTD. Check resistance of RTD using resistance table. If resistance test is correct and wiring is good, replace EOC. F5 - The watchdog circuit is active when it should be disabled: The microprocessor checked for operation of EOC relay after selection of Bake, Broil, or Clean operation and relay failed test. Check for shorted keypad or pushbuttons binding in glass and stuck. If not, replace EOC. F6 - No 60 Hz base: Time base is required for time controlled cycling. Replace EOC. F7 - Lock motor relay watchdog circuit active when it should be disabled: The microprocessor checked for operation of the EOC lock relay after selection, and the relay failed the test. Replace EOC. F8/F9 - Problem with motor door latch assembly: The EOC microprocessor has found the lock motor switches to be out of sequence or shorted. Test switches, lock motor, and wiring. If found to be good and in proper sequence, replace EOC. Oven Sensor (RTD) Resistance Scale: Temperature (°F) 32 ± 1.9 75 ± 2.5 250 ± 4.4 350 ± 5.4 450 ± 6.9 550 ± 8.2 650 ± 9.6 900 ± 13.6 Resistance (ohms) 1000 ± 4.0 1091 ± 5.3 1453 ± 8.9 1654 ± 10.8 1852 ± 13.5 2047 ± 15.8 2237 ± 18.5 2697 ± 24.4 INFORMATIONAL NOTE: RTD = Resistance Temperature Detector (Oven Sensor) 20 Top TID Questions on Ranges (with serial numbers beginning with NF): 1. Problem: Solution: What do the various F codes indicate on Electronic Oven Controls? Refer to page 22, NF Serial Number Range EOC Fault Codes. 2. Problem: Solution: Oven door cannot be unlocked. 30 Freestanding Electric Range - The door switch is installed behind the righthand bodyside panel and is activated by the righthand door hinge. Disconnect range from power and remove the righthand bodyside panel. First raise the main top and disconnect the lift and lock rod from the bodyside. Then remove the two screws holding the bodyside to the rear panel. Lift the rear of the bodyside to disengage it from the four shoulder screws that hold it to the range frame. You can now access the door switch to see if oven door hinge is activating the switch. Reconnect power and activate switch while pressing the clean pad. Continue to activate switch until clean cycle begins and then press the Cancel/Clear pad (while still activating the switch). The door latch should now unlock. Realign door hinge to properly activate switch or replace defective switch. Wall Oven, Slide-in/Drop-In (Electric or Dual Fuel), 40 Freestanding Range (Electric or Dual Fuel) - Try to cancel the self clean cycle. While doing a Cancel, push in on the oven door at the top right side of the door panel to ensure the light switch plunger is depressed. Or try to start the selfclean cycle while pushing in on the top right side of the oven door. Once the self clean cycle has begun (ventilation fan running), press the Cancel pad. If this doesnt work, try unplugging the range for about 5 minutes. Further diagnosis may be necessary by removing the back panel to access the door lock motor and rod assembly. Check the door lock motor, door lock switches (check each switch separately; in the fully locked or fully unlocked position, only one switch should be closed at a time), and door switch. If components and wiring check OK, replace EOC. 3. Problem: Solution: Hot surface light stays on. On products with separate hot surface lights in addition to separate indicator lights, the limiter inside the element is defective. Replace element. On products with only one light that doubles as the hot surface light and indicator light, it could be an element or a switch. 4. Problem: Solution: Ignitor keeps sparking. Most of the time it is an ignitor switch out of position on the burner valve. They are supposed to be snapped onto the shoulder of the valve. It could also be the humidity or spilled water passing through the opening switch hole. Remove the knobs and look for a black rubber umbrella that sits on top of the valve. It is there to prevent moisture entry into the ignitor switch. If missing, replace it. If all switches appear to be positioned correctly and covered with the black rubber umbrella, then one of them is stuck closed causing all ignitors to spark (switches are in parallel so if one is activated, they all spark). 5. Problem: Solution: 27 and 30 Electric Wall Ovens (single or double) has moisture dripping on the floor. Moisture kit part numbers 27 Single Wall Oven 27 Double Wall Oven 903036-9010 (Black) 903035-9010 (Black) 903036-9011 (White) 903035-9011 (White) 30 Single Wall Oven 30 Double Wall Oven 903033-9010 (Black) 903034-9010 (Black) 903033-9011 (White) 903034-9011 (White) Troubleshooting Range EOCs (Electronic Oven Controls): When an oven with an electronic control fails, it usually signals the failure with an F code. These F codes are considered by many people to be an indicator as to positively which part in the circuit has failed (F1 a defective control, F3 a defective oven probe, etc.). To the embarrassment of many servicemen who have believed this, they have installed the indicated part only to find it did not correct the problem. 21 To troubleshoot an oven with an electronic oven control that is not operating: 1. Make sure electrical power is being supply to the control. 2. Disconnect power for 30 seconds. If fault returns when power is reconnected, go to the back of the control and disconnect the multi-pin plug. 3. Check the wiring diagram to determine which two pins in the plug (not on the EOC) are connected to the oven sensor. 4. With an Ohmmeter check the resistance between the two pins in the plug that are connected to the sensor. At room temperature: a. If the meter reads below 900 Ohms or above 1200 Ohms, remove the sensor from the oven and check it for resistance. If the resistance of the sensor is the same as the reading at the plug, the sensor is defective. If the resistance of the sensor reads between 900 & 1200 Ohms, the wiring between the control and the sensor is defective. b. If the meter reads between 900 Ohms & 1200 Ohms check the resistance between one of the pins going to the sensor and chassis. If the meter reads infinity go to step c. If the meter shows continuity, remove the sensor and check from one of its pins to the case of the sensor. If the meter reads continuity, the sensor is defective. If the meter reads infinity, the wiring between the control and the sensor is shorted to chassis of the range. c. From the wiring diagram, determine which 3 wires (if automatic lock) or which 2 wires (if manual lock) in the plug is from the door lock switch or switches. From the diagram determine which of the switches are open or closed when the door in the unlocked position. With an Ohmmeter check to see if the switch that is shown open is open and the switch that is shown closed is closed by checking the proper pins in the plug. 5. If the above checks test good and the relay on the board for the selected function is not closing, replace the control. IMPORTANT NOTE: If the oven problem is intermittent, you must do the above tests when the oven is malfunctioning. NF Serial Number Range EOC Fault Codes: F1 - Control Failure: Shorted keypad. Internal checks may have corrupted control relay. Shorted or defective oven sensor (RTD). Check sensor and sensor wiring. On some models, the touch panel membrane, the ribbon connector from the timer to the relay board (or misconnection), or the relay board itself could be defective. F3 - The oven sensor (RTD) is open/shorted: Check for open wiring connections between the EOC and RTD, including the quick connect plug. If quick connect plug is defective, remove from circuit and splice sensor leads with porcelain (hi-temp) wire nuts. Check resistance of RTD using resistance table. If resistance test is correct and wiring is good replace EOC. F9 - Problem with motor door latch assembly: The EOC microprocessor has found the lock motor switches to be out of sequence or shorted. Test switches, lock motor, and wiring. Oven Sensor (RTD) Resistance Scale: Temperature (°F) 32 ± 1.9 75 ± 2.5 250 ± 4.4 350 ± 5.4 450 ± 6.9 550 ± 8.2 650 ± 9.6 900 ± 13.6 Resistance (ohms) 1000 ± 4.0 1091 ± 5.3 1453 ± 8.9 1654 ± 10.8 1852 ± 13.5 2047 ± 15.8 2237 ± 18.5 2697 ± 24.4 22 Top TID Questions on Dishwashers: 1. Problem: Solution: Spray arm is not turning. Spray arms alternate and do not spray both arms at the same time. The arms alternate bottom to center and this changing does not start until after the light wash or short wash cycles. On mechanical timer models set the timer to the light wash cycle. After the second fill and the wash motor starts, the detergent dispenser will open. After the dispenser opens, the spray arms will start alternating. On the electronic models start the test cycle and see that the arms will change bottom to center. 2. Problem: Solution: Clean light will not go out. On dishwashers with mechanical timers, the timer needs to be turned one more notch for the light to go out. When the dishwasher comes to the end of the dry cycle the timer will turn the clean light on and the light will stay on until the customer turns the light off. This is covered in the customers use and care manual. On Electronic model dishwashers the clean light comes on at the end of the wash cycle to inform the customer the dishes are clean. The light will remain on until the door is opened. After the door is opened and the door switch interrupts power to the control, the light goes out. If the door switch does not open, the control will not allow the dishwasher to restart. If the clean light stays on, you need to check the door switches to make sure they are both opening properly. 3. Problem: Solution: Dishwasher is not draining properly. The drain hose may not be installed properly. Dishwashers produced before January of 2002 need to have the drain hose looped on the side of the tub to keep the drain pump full of water for priming. (see Service Bulletin Vol. 99, #5, page 9). Dishwashers produced after January 2002 have a new style drain pump with the drain check valve on the discharge side of the pump, so each time the tub fills with water the pump will fill. (See Service Bulletin Vol. 22, #3, page 7.) 4. Problem: Solution: Dishes are not drying or are not dry at end of dry cycle. Vent grate holes not opening properly. Steam pressure on the inside of tub opens the holes in the vent grate during the dry cycle. If these holes do not open, the following checks need to be made: * * * Check the water temperature in the tub. The temperature needs to be 120°F to properly heat the dishes before the dry cycle. Check the setting of the rinse aid dispenser. Increasing the rinse aid will remove more water from the dishes to allow them to dry faster. Increased air flow can also be achieved by removing a 6 section from the center of the lower door seal. See article in Service Bulletin Vol. 22, #7, page 7 for instructions on cutting seal. Remember that drying dishes is more than air movement. For this reason it is necessary for all of the above checks be performed so proper drying can be achieved. There is a new vent grate for Tower Wash dishwashers and some Precision Wash models which have a convection dry system. These model dishwashers have a honey comb style vent grate mounted in the inner door liner. The new vent grate, p/n 154442001, is a louvered design which will allow more air movement out of the dishwasher tub while in the dry cycle. Its best to check the venting system before replacing the vent grate. To replace vent grate see Service Bulletin Vol. 22, #9, page 7 for instructions. 5. Problem: Solution: White gritty residue on the dishes. Grit can be caused by anything from undissolved detergent to instant potato or starchy foods. The first item that needs to be checked is the water temperature. The water in the tub needs a minimum of 120°F. The hot water is needed to dissolve the detergent and to loosen the food from the dishes. Next be sure the proper amount of detergent is used according to the hardness of the water. The best way to remove grit from the dishwasher and the dishes is to run a longer cycle. The longer cycle will add a rinse. This extra rinse will rinse out most, if not all of the grit. The filter should also be checked. If the filter is restricted, it can allow the water and food mixture to be pulled into the sump around the outside edge of the filter creating the grit. 23 6. Problem: Solution: 7. Problem: Solution: Dishes are not coming clean. In most cases, this is a water and detergent problem. The first thing to determine is what does the customer consider as not clean. Is the dishwasher having a problem removing food from the dishes? Is it redepositing food back on the dishes? Or are the dishes/glasses coming out cloudy? * If the dishwasher is not removing food from the dishes, it is a water and detergent problem. You need to first check the water temperature. The water in the tub needs to be a minimum of 120°F in the very first fill. The hot water is needed to dissolve the detergent and to start removing the food from the dishes. If the food is not coming off, either the detergent is not loosening the food (date code expired?) or the water is not hot enough to remove it. * If the dishwasher is redepositing the food back on the dishes, the food is getting pass the filter some how. The water in the dishwasher is filtered 100% so check the filter to be sure it is not plugged. Check under the filter for grease buildup that is not visible from the top. The pump can warp a plugged filter during operation by creating a suction action which can cause the outside edges of the filter to raise and allow food to be pulled into the pump. Check the filter to ensure it has not been warped out of shape. Also, check the filter for cracks or holes which could allow food to by-pass the filter. * If dishes/glasses are coming out cloudy they have not been rinsed properly and a detergent film is still on them. Check the hardness of the water and advise the customer of the proper amount of detergent to use. Also, be sure the dispenser is opening at the proper time in the cycle. If the customer has good hot water and knows how much detergent to use based on the hardness of their water, they will get clean dishes. PF codes on electronic model dishwashers. A PF or power failure code can show up in a number of ways. On some models with a display window a PF will be displayed along with a row of flashing lights. On models without the display window, only the lights will flash. The Precision wash dishwasher can have one of two different control systems. The earliest system had three components in the system - a control board, a keypad, and a transformer. There may be a display board but it should not give a PF code. The current system has two components - a control board and a keypad assembly. * The three component system - With this system if a PF or flashing lights appear, the transformer is working. Check the control to be sure there is 12VAC from the transformer by testing between the black-white and the white-black wires come from the transformer. Next check the control and the keypad. Check the ribbon going into the control from the keypad. Lift the lock and remove the ribbon. Check the contacts on the inside of the connection block. They need to be straight and not broken off. Next clean the ribbon contacts using a pencil eraser. Reinstall the ribbon into the control and make sure the ribbon seats completely into the connection, then lock the ribbon in place. Reapply power to the dishwasher and check operation. If the dishwasher fails to start or a PF code or flashing lights reappear, you have a circuit problem. This means that either the control or the keypad has failed. This design of keypad does not provide a check for contact closing on the keypad by pressing a program pad. * The two component system - checking the two component system was covered in the Service Bulletin Vol. 21, #7, page 11. There are pictures on checking the transformer mounted on the control and where to read for power input and transformer output power. Checking the keypad assembly was also in Service Bulletin Vol. #2, page 8. It instructs you on which lines in the ribbon to check for each function pad depressed. With this type of system you can check the keypad to narrow down the cause of the power failure. 24 8. Problem: Solution: Timer stalling. A thermostat is not closing. Servicers have called to see if we are having a problem with new timers stalling after they have been replaced for this condition. The first check that needs to be made on timer stalling calls is the thermostats. If the timer is stalling at the 6:00, 7:30, or 8:30 position on the dial, these are the locations of the heat delays. The following tests will aid in determining which thermostat is causing the problem: * Check water temperature. If the water is not 120°F in the first fill this can cause the heat delay to be extended for a longer period of time. * Check the heating element for continuity. The resistance should be 9 to 10 Ohms on the 24 models and 23 to 25 Ohms on the 18 models. * Check the high limit thermostat at the left rear on the underside of the tub (24 models only). This thermostat is normally closed, and should only open when there is excessive heat. * Check the control thermostats. They are normally open at room temperature and close at specific temperatures. Part Number 154227805 154227806 154227808 154227807 Closing Temperature 127°F+-5°F 137°F+-5°F 132°F+-5°F 147°F+-5°F The length of time the timer will stay in a heat delay will depend on how hot the water is and how long it takes the water to rise to the temperature to close the control thermostat. Due to the small amount of water used in the Precision Wash dishwasher, the heated water will increase in temperature about 1° every 4 minutes. This is why good hot water is needed at the first fill. 9. Problem: Solution: Leaking water in front of dishwasher. The vent cover is not sealing on the inner door panel on both static and active vents. Replace the vent cover. A new cover gasket has been increased in thickness down both sides and across bottom to prevent leaks. When installing the new cover, do not over tighten the cover screws. This can cause the cover to bow in the middle and the leak can return. 10. Problem: Solution: Dishwasher is not getting enough water. This dishwasher uses very little water, only 1.2 gallons of water per fill. The water level in the Precision wash model dishwasher will be at the bottom of the mounting bracket that holds the heater to the tub. The location for easy reference is where the metal bracket and the plastic tub meet. There are two ways to check and be sure you are getting enough water. The first is to check the fill time which is 87 seconds on most models. The second way is to remove the fill tube and direct the fill water into a bucket or pan capable of holding over 5 quarts. The amount of water in the bucket after one complete fill cycle should be approximately 5 quarts. 25 11. Problem: Solution: The electronic dishwasher will not start. This could have a number of causes depending on the model of the product: * Check voltage to dishwasher junction box and connections in junction box. * Touch pad not lighting. Check voltage to control board. Check ribbon from key pad to control. Clean ribbon from key pad. * Touch pad lights but nothing operates. Check door switches to make sure they are both opening and closing properly. See Service Bulletin Vol. 21, #2, page 8 for test procedure for testing key pad assembly. * Touch pad lights but lights go out in a few seconds. Check door switches to make sure they are both opening and closing properly. See Service Bulletin Vol. 21, #2, page 8 for test procedure for testing key pad assembly. * PF shows in display. There was a power failure. Check ribbon connections. 26 Top TID Questions on Washers/Dryers: 1. Problem: Solution: Help with diagnosing circuitry. This is a very difficult process to explain over the phone. The servicer must be capable of reading schematic diagrams and timer cycle charts. All laundry products are shipped with Service Data Sheets located inside console housings, behind louvered service panels, or front service panels. These data sheets contain a wealth of service information that will aid the service technician in diagnosing service problems. Additional service information such as installation instructions, operating instructions, operational characteristics, and tear down instructions are available in the following service manuals: * 5995369211 Tumble Action Washer (with AC Motor) * 5995271441 Tumble Action Washer (with DC Motor) * 5995377099 Top Load Washer * 5995373155 Electric/Gas Dryer 2. Problem: Solution: Water left in dispenser after wash cycle is completed on tumble action washer. There is information in the customers Owner Guide under the dispenser operation that states, Note: From time to time you may see water in the bleach and fabric softner compartments. This is a result of the siphoning action and is part of the normal operation of the washer. 3. Problem: Solution: Timer not advancing in Auto Dry cycle on dryers. How the auto dry cycle operates depends on whether the dryer has a regular timer control circuitry or moisture sensor control circuitry. * If the dryer has a regular timer control circuitry, the timer motor current flow in the auto dry cycle is through a 4.4K Ohm resistor mounted on the timer between timer terminals TM and R. If this resistor is open, the timer will not advance. Also check for an open wire between terminal R on the timer and the high limit thermostat. * If the dryer has moisture sensor control circuitry, there are sensor bars inside the dryer, just behind the intake vent louver. During the auto dry cycle, capacitance is measured between these sensor bars to determine the wetness of the clothes. An electronic moisture sensor control reads this capacitance and determines how much resistance to be placed in the current flow circuit through the timer motor. With no clothes in the dryer, disconnect the electrical plug from the electronic moisture sensor control and measure the resistance between the two red wires in the plug (you are checking the sensor bars for continuity). If the resistance is infinity (none), then the electronic mositure sensor control is probably defective. If the resistance measurement shows some continuity, then there is a short in the harness to the sensor bars or something is stuck across the bars. * For further information about the Auto Dry cycle, refer to the Electric/Gas Dryer service manual p/n 5995373155. 4. Problem: Solution: Top load washer agitator popping (or snapping) noise. The mechanism in the agitator must be dry to operate. A wet mechanism will exhibit a popping sound when the upper portion of the agitator is turned CCW with respect to the lower portion of the agitator. To ensure the mechanism remains dry, the mechanism cap and accompanying o-ring must be properly seated. * To remove: a. If water is present, drain water to below the bottom of the upper agitator section (auger). b. Remove the softener cap. c. Remove the mechanism cap by placing a cloth between the jaws of pliers and grasping the handle on the cap. Pull upward firmly until the cap pops out. d. Remove the agitator bolt in the center of the retainer plate above the mechanism. e. Remove the agitator from the transmission drive block by pulling upward. 27 * To reinstall: a. Replace the agitator on the drive block and torque the bolt to 220 inch pounds. b. Wipe the mechanism cap o-ring and sealing surface inside the upper agitator with a dry cloth to remove any foreign material that might prevent a proper seal. DO NOT wash out the agitator mechanism or contaminate with any liquid. Reinstall the mechanism cap by placing one side of the cap under the plastic ridge at the level of the upper agitator softener holes. Push the cap firmly downward using a padded instrument, such as a rubber coated pliers handle or cushioned hammer handle, and work around the cap edge using very light vertical blows until seated. Excessive force may crack the cap. A very thin film of soap and water applied to the o-ring will ease the installation. DO NOT contaminate the mechanism by allowing soap or other liquid to drip inside the upper agitator before the cap is fully seated. c. Inspect the cap for proper installation and the agitator for proper operation using visual and functional tests listed below. * To inspect for proper cap installation, the integrity of the mechanism cap seal should be inspected visually and by conducting a bubble test: a. Visual inspection: 1. Make sure the o-ring is properly seated in the groove on the cap before installation. 2. Look for the black o-ring through the softener holes in the upper agitator. If any black can be seen, the cap is not properly installed. 3. Check that the entire edge of the mechanism cap is under the four plastic ridges on the inside of the upper agitator. b. Bubble test: 1. Fill the machine to the highest water level and observe the periphery of the mechanism cap as water covers the cap. 2. No repeating bubbles should be seen. * To inspect for proper agitator operation: a. If the agitator is not installed in the washer, hold the upper portion in one hand and the lower in the other. Twist the upper CCW and CW with respect to the base. The upper portion should lock in the CCW direction without popping and rotate freely in the CW direction. b. If the agitator is installed in the washer, grasp the upper portion and twist it CCW until the spin tub begins to move. Release and repeat several times. The upper portion should lock without popping and rotate freely in the CW direction. * If the agitator is not working properly, check for the following: a. If the upper portion is dragging or not indexing smoothly, inspect the mechanism area for cracked, missing or broken parts. A powdery residue is normal and should not be removed. Never wash out the upper portion without the mechanism cap properly installed. Three cylindrical rollers should be visible around the edge of the retainer plate and a red bearing should be seen when looking through the inspection hole. If any parts are missing or cracked, replace the agitator assembly. b. If the upper portion is making a popping sound, check the mechanism cap for proper installation and leakage. Remove the cap and inspect the mechanism area for water intrusion. If water is present, replace the agitator assembly and mechanism cap or attempt a repair procedure. c. To repair a wet mechanism, remove the cap and dry the mechanism area as thoroughly as possible using a dry cloth. A heated air source such as a hair dryer can also be used to improve results. Sprinkle talcum powder in the mechanism and work the agitator back and forth. If the popping stops, replace the mechanism cap and conduct the visual and bubble tests. If the popping does not stop, replace the agitator assembly. 28 5. Problem: Dryer vent system is within factory specifications but clothes are not dry at end of cycle, long dry times, top panel too hot, discoloration, etc. Solution: Air leakage in and around blower system. Install Kit # 134088800. Components of the Kit will increase the amount of heated air being drawn through the dryer drum. Follow the instructions below. 1. Disconnect dryer from electrical source. 2. Remove dryer front panel. 3. Remove dryer drum. 4. Remove louvered rear access panel. 5. For front console model, remove top panel. For rear console model, remove top panel from rear hinges and hang on side of cabinet. 6. Remove two (2) top screws securing heater housing assembly to rear of dryer. 7. Gently move top of heater housing assembly away from cabinet approximately two inches. 8. From rear, insert the longer screw Figure 1 through top left side hole in cabinet. From front, install spacer on screw (see Figure 1). 9. Move top of heater housing toward cabinet and start screw into housing. Do not tighten screw. 10. Repeat process for other side. 11. Remove two (2) bottom screws securing heater housing assembly to rear of dryer. 12. Repeat process to install spacers in bottom of heater housing assembly. 13. Tighten all four (4) screws. 14. Remove foam air duct seal from air duct. Clean surface of duct, removing all old residue of the seal Figure 2 and glue. 15. Apply a small 1/4" bead of supplied adhesive to air duct surface and attach new air duct seal supplied with Kit (see Figure 2). 16. Remove two (2) screws securing lint trap cover to front cover, then remove cover. 17. Using four (4) clips supplied with Kit, secure air duct to inner ring of front panel (see Figure 3). 18. Reinstall lint filter cover, drum, belt, front panel, rear access panel, top panel and related wiring. 19. Reconnect dryer to electrical supply and test to ensure proper Figure 3 operation. 29 6. Problem: Very irritating squealing sound when top load washer is spinning or coasting to a stop after the spin cycle. Solution: If snubber is dirty with foreign material (sand/dust or grit), clean the base. If the snubber is damaged, replace it. * The snubber is a ring that is located between the convex (domed up) center portion of the base and the domed down center portion of the leg & dome assembly. It has teflon strips at the top and bottom edges that slide easily on the base as well as the underside of the leg and dome assembly. This system makes the machine very stable by providing isolation between the leg & dome assy. which carries both the inner and outer tubs, as well as the main motor and transmission and the base; which is of course connected to the cabinet. This means that the machine is capable of spinning out of balance loads that washers made by other manufacturers cannot. 6SODVK7XE /HJ'RPH $VVHPEO\ 6QXEEHU %DVH * As simple as this system is, if one on the strips is bent or there is some foreign material on the base in the snubber area, the result can be an extremely obnoxious scratching or squealing sound. A very similiar sound can be produced when the belt is worn but the difference is that a snubber noise can be produced during the spin cycle or when the cycle has finished and the spin tub is coasting to a stop. A worn belt noise can only be produced while the motor is actively engaged in spinning the spin tub. If it is discovered that the belt is worn and the base has black, shredded belt residue then it may not be necessary to clean the snubber area (belt residue generally will not cause a problem with the snubber). It will be necessary however, to find the cause of the belt failure. * The following procedure should be followed to diagnose and eliminate the squealing noise. The base must be wiped whether the snubber is replaced or not. Any residue whether it is dust or grit of any kind (other than belt residue as noted above) can cause the objectionable sound to occur. To remove, examine and/or replace the snubber: a. Remove the front service panel and place the timer in the spin cycle and start the machine. You want to try to duplicate the complaint. Inspect the base for signs of any foreign material. Lift the top panel up and over and lean it against the rear wall if possible. If it is not possible, most consumers will assist if asked, do not be afraid to ask. b. You will need a tool to raise the entire Leg & Dome Assembly (to which the main motor, tubs and transmission are attached). The machine will not need to be disassembled; the springs will not even be released. Some techs use a length of two-by-four to raise the assembly. A pry-bar makes an excellent tool when combined with a block of wood to act as a fulcrum or pivot point (see Figure 1). Before raising the assembly, pull forward on it so that when you do raise it, the rear of the tub cover does not catch on the rear cabinet frame as it is being lifted. c. Using your body weight, raise the assembly high enough to slide the snubber out (see Figure 2). You will need to inspect the snubber for defects or damage. It is a good idea to be prepared with some sort of supports (like 3/4 inch pieces of wood) to slide between the lower edge of the assembly and the base to help support it if it were to slide off of your pry-bar. 30 Figure 1 Figure 2 WARNING: YOU MUST MAKE SURE THAT YOU HAVE THE ASSEMBLY SUPPORTED SECURELY. YOU WILL BE REACHING IN WITH YOUR HAND TO WIPE OUT THE BASE WITH A CLOTH. BE VERY CAREFUL. d. Inspect the snubber carefully. The teflon strips on upper and lower edges of the snubber must be perfectly smooth and undamaged in any way. The example in Figure 3 shows the top strip bent over. This would cause the distinctive fingernails on blackboard sound. Also note the arrow on the side of the snubber. When reinstalling or replacing the snubber, the arrow must be pointing upward. e. As stated before, the base must be wiped out whether the snubber is replaced or not (see Figure 4). A cloth wetted with denatured (camp stove) alcohol or rubbing alcohol will clean any residue, such as soap, or fabric softener off of the base and will also cut any waxes or oils that may have been missed by the factory, during assembly. An old cloth work glove would work as well. Make sure that the snubber area is wiped out completely. NEVER OIL THE BASE TO STOP NOISE. Oil (such as WD40 or silicone spray) may temporarily stop the sound but will cause the assembly to slide too easily on the base and could cause damage to the sides of the cabinet from being hit by the tub during an out-of-balance spin cycle. It could also cause the machine to walk from its position and cause a banging sound. f. Before installing a new snubber, have it out of it's packaging, with arrow positioned upward, and ready to be installed. While holding the assemby up, you will not have time to mess with tearing it out of its bag. When the job is completed, make sure to test the machine in the spin cycle to make sure that you were successful. Unbalance the tub with a few towels on one side to test it. When the job is done, make sure to reposition the machine to its original position and re-set the rear leveling legs. Figure 3 Figure 4 31 7. Problem: Solution: Dryability complaints: Dryer will not dry the clothes within the time alloted by the timer. This is the single most prevalent complaint that servicers encounter when servicing any brand of dryer. For that reason, we will be dealing extensively with the problem and examining every factor that may contribute to this problem. * Examine the lint screen. If it has not been cleaned, and is packed with lint, you must question the consumer to see that it has been cleaned every time the dryer is used. Remove the lint screen and hold it up to the light and look through it. Are the holes in the screen blocked? It is possible that the consumer is using too much fabric softener or that the Washer is impeded in some way from rinsing out soap or fabric softener. Fabric softener sheets can also cause screen blockage. * If it is an Electric Dryer, check to see that full power is available at the receptacle. The motor will run and the drum will tumble if supplied with 110 volts (or 108V or 120V), but the heater requires 220 volts (or 215V or 240V). If it is not heating, find out why. If it is a Gas Dryer, is the burner igniting? Once ignited, does it continue to burn or does it immediately shut down? With the door shut you can hear the burner ignite and then cycle off. Bear in mind that if the door is open it will cycle on the flame switch at a much faster rate than normal. The blower will pull air from the path of least resistance, namely the open door and not through the burner tube. This will cause heat to pool in the burner area instead of being drawn through the drum, which then causes the (bimetal) limit switch to open, thus cutting power to the coils in the valve and turning off the gas. In either model, this short-cycling can also be caused by a defective seal on the door, an improper seal at the drum glide or drum seal, or the air duct seal between the fan cover located on the fan housing and the duct that is mounted on the front panel, as well as a defective blower fan. The result is that the load will take longer to dry. * Test the temperature inside the drum. Hang the probe of any electronic or analog temperature detector over the top of the door and let it hang in the air flow without being in contact with the door. Set the machine to the regular cycle at the high heat setting and start it. At this setting, the temperature should climb to about 155 degrees, at which time the control thermostat will open (sometimes audibly) and the temperature should quickly lessen until it reaches about 115 degrees. The control thermostat will then close and the temps will again rise, repeating the process. On electric models, if the vent is blocked or there is a problem with the door or fan seal (as described previously) the temperature will climb to 210 degrees or more. This is because the control thermostat located on the fan housing, cannot sense the rising temps in the drum because of lack of air movement through the drum and fan housing. If the heated air is not being drawn through the drum, it can only rise and build up in the heater area until it is sensed by the high-limit thermostat mounted on the heater assembly which opens at about 210 degrees. This heat build up can also result in the top panel getting extremely hot directly above the heater (typically right in front of the control panel). If this condition is allowed to persist, the paint on the underside of the panel above the heater will become discolored from the heat. If you suspect a venting problem, inspect this area for discoloration. On gas models, a vent blockage will also cause the effects noted above. * Without removing the temperature probe, disconnect the vent tube or pipe from its connection at the wall (or wherever) and allow the dryer to vent into the room. Test the temperature again. If the machine begins to cycle at the normal temperatures described at the beginning of #3 above, you have found the cause of the dryability complaint. Another thing you will notice is that when the heater cycles off, the temperature will fall much more rapidly than it did when it was blocked. * Now determine if the cause of the vent blockage is from a flexible vent hose being pinched because the machine has been pushed too far back against the wall, or if the blockage is in the wall (house-related service problem). A house-related service problem or an installation correction is not covered under the factory warranty. Most dryability complaints can be traced back to the vent blockage problem. 32 NOTE: The vent restriction problem will also cause a build-up of lint inside the cabinet of the dryer. The fan will force lint out at the seams of the vent tube (inside the machine) and into the cabinet. This can be a fire hazard. If you observe a large amount of lint inside the cabinet, this could be an indicator of a vent restriction. If the dryer is operating normally and you can find no fault with the venting system, or anything else, the fault may lie elsewhere. a. The dryer is overloaded because the Washer was overloaded. When the Washer spins the clothes at the end of the wash and rinse cycles, the ability of the product to extract the water from the load can be seriously hampered. Simply put, the wetter the load, the longer it takes to dry. This, of course, is a customer education issue and must be considered. b. If the Washer is in need of service, such as if the belt is worn, it may not be extracting the water in the spin cycle as well as it once did. This degredation may have occured so gradually that the consumer has not noticed it. Have the consumer load the washer (with clean towels if necessary), agitate for a minute and then spin them. If there is a rubber smell or a squealing sound or anything else out of the ordinary, investigate the cause. c. If the dryer is located in a laundry room, closet or any other similarily small space, examine the door to the room. If the door is of solid construction, and the consumer is in the habit of closing the door when the machine is in operation, the appliance may be suffocating for the lack of air. This could be tripping you up, as you will probably be testing the machine with the door to the room open. To exhaust air to the outside, the dryer must pull air from the room. If air cannot be pulled into the room because of the closed door, the vent is effectively blocked. A minimum of 120 sq. in. (774.2 sq. cm) of opening, equally divided at the top and bottom of the door is required. A louvered door with equivalent air openings for the full length of the door is also acceptable. d. If the dryer has been installed undercounter, this same lack of air supply may also be present, especially if it is sitting on carpet. * If all of the above checks OK, what else is there to check? The venting system in the house may have been incorrectly designed. As unlikely as this may seem, the possibility cannot be ignored, especially in homes or multi-family dwellings where the original venting system has been altered or was non-existent. The following method is the most accurate method of determining if the exhaust system is acceptable: a. Connect an inclined or digital manometer between the dryer and the vent. b. Set the heat setting to air fluff (cool down), start dryer and read the measurement. c. The system backpressure must not be higher than 0.75 inches of water column. If the system backpressure is less than 0.75 inches of water column, the system is acceptable. If the reading is higher, the system is too restrictive and is unacceptable. * The following chart can be used as an approximate guide in determining if the vent length from the dryer vent hook-up to the final exit at the vent hood on the outside of the dwelling is within acceptable tolerances. As stated previously, the most accurate method is to measure the backpressure at the dryer with a manometer. In this way, all the variables can be factored in, such as if the vent needs to be cleaned or if someone stepped on the vent pipe in the attic and crushed it. This information conforms to all of our E-line (since Jan 1998) free standing and stackable dryer models which develop 200 CFM of air flow. For further conditions and restrictions, see the Installation Instructions supplied with the product. 33 MAXIMUM LENGTH MAXIMUM LENGTH of 4 (10.2cm) dia. rigid metal duct of 4 (10.2cm) dia. flexible metal duct VENT HOOD TYPE Number of 90s µ VENT HOOD TYPE µ Number of 90s 0 60 feet 48 feet 30 feet 18 feet 0 1 52 feet 40 feet 22 feet 14 feet 1 2 44 feet 32 feet 14 feet 10 feet 2 3 32 feet 24 feet not recommended 3 4 28 feet 16 feet not recommended 4 * In the series of diagrams at the right, some examples of typical vent installations are shown. We discourage the use of flexible vinyl or foil vent tubing in favor of the far superior rigid metal pipe, or the flexible variety of metal pipe. Unfortunately, most people use the flexible tubing shown in diagrams D, E and F. The advantages to the use of the metal pipe is that it affords less resistance to the flow of air. This means that it can dramatically reduce the cost of operation. Not only will each load require less energy to dry, they will dry faster. Over the lifetime of the product, this could amount to a substantial savings. The vent will also need cleaned less often. In example E, the low spot in the vent will tend to accumulate lint which can build-up and eventually restrict the air flow. Moreover, the stovepipe style vent cannot be crushed by pushing the machine too far back against the wall. 34 A C E B D F * Laundry Centers The Laundry Centers push 180 CFM of air as compared to 200 CFM generated by the Freestanding and Stackable Dryers. The system backpressure must not be higher than 0.75 inches of water column. If the system backpressure is less than 0.75 inches of water column, the system is acceptable. If the reading is higher, the system is too restrictive and is unacceptable, or the vent needs to be cleaned, or someone may have stepped on the vent pipe in the attic and crushed it. Use the following graph for Laundry Center dryers as an approximate guide in determining if the vent length from the dryer vent hook-up to the final exit at the vent hood on the outside of the dwelling is within acceptable tolerances. MAXIMUM LENGTH MAXIMUM LENGTH of 4 (10.2cm) dia. rigid metal duct of 4 (10.2cm) dia. flexible metal duct VENT HOOD TYPE VENT HOOD TYPE Number Number of µ 90s 0 1 2 3 µ 56 feet 56 feet 42 feet 30 feet 30 feet 22 feet 46 feet 34 feet 32 feet 46 feet 34 feet 32 feet 36 feet 28 feet 18 feet 22 feet 16 feet 10 feet 22feet 16 feet 10 feet 14 feet 10 feet 5 feet 8. Problem: Solution: of 90s 0 1 2 3 Odor complaints in Tumble Action Washers. What has been observed is that residual FABRIC SOFTENER has been building up at the entrance to the drain trap (located in the bottom of the outer tub assembly) that leads to the remote drain pump. * To check to see if this is happening, one of the vanes must be removed to gain (limited) access. The only vane that can be removed is the vane that is located on top of the seam of the inner tub. In production, the drum consists of a rectangular piece of stainless steel that is rolled into a cylinder shape and seamed together. Locate the vane on the seam and remove the two screws to the right side of it. Pull back (toward you) on the vane and swing it to the left and remove. By turning the spin drum, the area between the tubs can be accessed. The picture on the right shows the view of the drain trap from under the vane. If this is the source of the odor, you will observe the inner ridges of this drain trap to be covered with thick, globs of fabric softener. If this is the case, a bottle brush (or a condenser coil brush) can be used to clean it out. (For more information on odor complaints, see Service Bulletin Vol. 99, Issue #8, page 33.) 35 9. Problem: Solution: Boot replacement on tumble action washer. Replacement of the BOOT on the Front Load Tumble Action Washer is to many technicians, a job best avoided at all costs. Sooner or later you will be confronted by this job and with a little preparation under your belt, you may be pleasantly surprised to learn that it is easier than anticipated. This article will show you how to do the job, what pitfalls to avoid and will include some great tips. (1) If the machine has a Dryer stacked on top of it or is positioned in such a way that it would be too much bother to move, you will be better off leaving it where it is. However, if it is possible, it would be easier to do this job if the machine could be leaned back against a wall (protect the wall against being defaced though). By leaning it back, the tubs will hang back from the (non-removable) front panel and you will have increased space to work. If leaning it back is not possible, then a 6 or 8 inch block of wood will be handy to use to wedge between the front panel and the tub to hold the tub back out of the way. (2) The boot is attached to a lip around the perimeter of the opening in the front panel and is glued on in spots about three inches apart, all the way around. Use a razor blade as shown in Figure 1 to carefully slice the glued spots on the boot away from the front panel. (3) Once the boot is loose from the front panel, push it into the opening of the tub and out of the way as shown in Figure 2. At this point, if the machine is not leaning back, take your block of wood and while pushing back on the tub through the opening, wedge the block between the front panel and the tub about ten inches to the bottom - right of the opening. This will afford you more space to work with the boot. Figure 1 Figure 2 (4) You will now notice that the boot is still attached to the duct that is located just inside the front panel at the upper left corner from the opening. This is where the water, soap, bleach and fabric softener enter the tub. To remove (and later on, reattach) the clamp holding this in place on the end of the duct you will have to make yourself a tool from a three inch piece of 3/8 inch soft copper tubing. (5) In Figure 3 you will see that the end of the tube is flattened somewhat so that it can be slipped over the twisted ends of the clamp as shown in Figure 4. Twist the tube counterclockwise to slip the clamp and set both the tool and the wire clamp aside. Pull the boot free from the duct. 36 Figure 3 Figure 4 (6) Using both hands, grab onto the boot at the top of the opening to the tub and pull downward and toward you with slow steady pressure. As the boot is pulled free from the outer lip of the tub (at the top), the coiled spring that holds the boot from the groove behind the lip around the opening to the front shell will become visible. You can either continue pulling on the boot until it comes off or you can hook the spring (with a piece of coat hanger fashioned into a hook) and pull it off and then pull the boot off separately. (7) Once the boot is off, examine the lip that extends around the entire perimeter of the front opening of the front shell of the tub (the front shell and the rear shell are so named because when bolted together, form the outer tub that surrounds the inner tub). The boot has a lip that will have to be folded into the groove behind the lip on the front shell. To start this, examine the new boot and locate the groove in front of the lip that corresponds to the similar lip and tab on the tub shell. It will make this job a lot easier if you can obtain some liquid dishwashing soap from the consumer, and sparingly lubricate this groove on the boot to make it easier to slip onto the lip of the shell (see Figure 5). No soap is preferable to too much soap. Have a cloth handy to wipe the soap from your fingers. (8) Once the groove in the boot is lubed with soap, locate the arrow as shown in Figure 6 that is located on the top of the boot (located to the right of the extrusion that slips over the duct). This arrow must point up when the boot is installed. Figure 6 Figure 5 37 (9) With the boot in one hand and the other hand spreading the lip and groove (on the boot near the arrow), force the lip into the groove behind the lip at the top of the opening on the tub shell (see Figure 7). (10) With one hand holding the boot so it does not slip off, use the other hand to continue spreading the lip and groove of the boot further to the right. In this way you continue this action 360 degrees around until the boot is mounted onto the front shell (see Figure 8). Your fingers will take a beating while you do this and may become quite tired. Dont give up. Rest one hand at a time if needed. Whatever you do, do not remove both hands until the boot is on (unless you want it to fall off and then you get to start over with it). Figure 7 Figure 8 (11) Now is the time to put the spring back on. Included in the BOOT KIT is a set of three spacers (an example of which is shown in Figure 9 below). These spacers are to be used to hold the spring in place in the groove on the outside perimeter of the boot. As it will take both hands to stretch this spring into place, these spacers will prevent the spring from popping out when you let go of it to use both hands to stretch it further around the boot. Begin by pushing the spring down into the groove just forward from where the boot contacts the front shell at about the 12 oclock position. While holding it in place with one hand, Use the other to tightly wedge the spacer above it, between the spring (in its groove) and the weight ring above it as shown in Figure 10. Figure 9 Figure 10 38 (12) Working your way to the right, push the spring down into the groove. When you have placed the spring about 90 degrees around the opening from the first spacer, the spring will begin to get tight. Push in another spacer at that point (making sure to keep checking the first spacer, if it pops out - the spring will pop out). (13) Continue working your way around (while checking both spacers, you dont want them to slip out) until you reach 180 degrees from the first spacer. Install the third spacer. (14) The spring will be extremely tight now as shown in Figure 11. Once you have gone more than half way around, the spring will be easier to roll into the rest of the groove (so long as all three spacers are holding tight). When you have the spring in place, make sure to remove the three spacers before proceeding to step # 15. Figure 12 Figure 11 (15) Replace the boot extrusion back onto the duct and pull it up over the ridge on the duct near the top of the opening as shown in Figure 12. Reinstall the clamp in such a way that the clamp sits between the ridges on the extrusion and above the ridge on the duct. Snap the clamp closed with the copper tubing tool that you used previously. (16) Before attaching the new boot to the front panel, clean the surface of the front panel with alcohol or household cleaner. Also clean the flat surface of the new boot that will be contacting the front panel. This step is needed to remove the mold release material used in the manufacturing process and will allow the adhesive to stick. (17) Remount the boot onto the front panel as shown in Figure 13, making sure that the boot is not wrinkled. If large wrinkles exist, they may pool water in the boot and dribble onto the floor when the door is opened. If this is the case, pull it loose from the front panel and remount it slightly more clockwise or counter clockwise as needed. (18) Using the adhesive supplied in the kit, sparingly apply dots of glue under the edge of the boot. Spot glue at the 12 oclock, 1, 2, 3, 4, 5, 6, 7, 8 and 9 oclock positions around the opening. Caution the consumer to wait a couple of hours before using the washer to allow the adhesive enough time to dry. 39 Figure 13 10. Problem: Solution: Cannot remove the knob from the timer on top load washers. This timer was originally introduced around 12/96 and has a totally plastic body. The interior is not accessible without breaking the case. The timer knob does not screw onto the shaft as with past timers. It slides onto the shaft and is held in place by a locking rod that is inserted through the rear of the timer. This D shaped rod (when pulled from the rear of the timer) spreads two retaining fingers on the front shaft and then allows the knob to be pulled off. Technicians may have a hard time grasping the rear rod with pliers. Instead, insert a flat tool such as a pocket screwdriver along the round side of the rod and push behind the protruding ledge and pry it out from the body of the timer. The tech could also insert a pointed object, such as a nail, along the flat side of the shaft, then push it into the hole in the shaft and pry it out from the body of the timer. 11. Problem: Solution: Top load washer shakes excessively, or walks during the spin. This is an old problem that seems to reoccur with such frequency that it must be reviewed from time to time. Unlike other manufacturers top load washers, ours has the best load balancing capability available. This washer will not shutdown if the spin cycle is initiated with an out-ofbalance load. The tub is mounted on a leg and dome assembly which sits on a snubber ring and is secured to a base by 3 main springs and 3 lesser springs. This allows the tub to move independently of the base providing a greater range of movement. Even if the load is grossly outof-balance, the load will still spin to extract the water. Although, if the tub is so out of balance that the outer tub contacts the sides of the cabinet, the washer will vibrate (and of course make lots of noise) and will most likely walk from its installed position. * The first place to start is with the floor where the washer is installed. It must be solid and secure. If the washer is sitting on carpet it will bounce and vibrate and probably walk. The front legs have rubber pads that grip the floor but will not grip carpeting very well. If it is sitting on a surface with a mirror smooth finish (such as polished marble) the pads could slide. If the floor is wet (for any reason) the pads will also slide. If the floor is wood make sure that it is solid. If the floor is vibrating during the spin cycle (that is, if you are vibrating just standing next to the washer) or if objects on shelves or pictures on walls are moving, this means the floor is flexing. This flexing can cause the washer to bounce and if the rubber pads lose contact with the floor, it will walk. * Check the position of the front legs. The more they are extended, the more vibration will occur. The more vibration that occurs, the less contact the pads have with the floor and the greater the likelihood that the washer will walk. * The next thing to check is to see if the shipping bolt has been removed. This shipping bolt secures the leg and dome assembly to the base which restricts movement of the entire tub, motor and transmission assembly during shipment. If it is not removed, the washer will move very energetically. * Next remove the front service panel and inspect the notches that the 3 large main springs are set into on the base. There are 3 locations: a. On the front location, the large spring must be in the 2nd from the front notch. b. On the left side location, the large spring must be in the 4th from the left notch. c. On the right side, the large spring must be in the 3rd from the left notch. * Next ask the customer to load the washer (if they have no dirty clothes, ask for clean towels). All of these tests are best done with a full load to duplicate the conditions that produce the objectionable behavior of the washer. If the base of the washer is knocking on the floor, then the base is flexing and must be replaced. 40 * With the washer at rest, reset the rear leveling legs. Put your left hand on the left rear corner of the cabinet under the console end cap and your right hand on the right rear corner of the cabinet under the console end cap. Pull up and forward on the cabinet (never, ever pull on the console, you may break off the mounting tabs on the end caps) and raise the rear leveling legs off the floor and set it back down gently. This will produce a distinctive sound. If there is no sound, the leveling assembly may be seized. Lubricate these assemblies from the inside of the cabinet at the left and right rear corners with any good lubricant (make sure that you use just enough lubricant to do the job as you do not want to get any on the legs or floor). Tilt the washer forward as descibed above and grab one of the rear legs with your hand and work it in and out until it moves easily. Set the washer down gently and repeat the leveling procedure and listen for the distinctive sound. Call the customer into the room and demonstrate how to reset the rear leveling legs. Let them do it and point out the distinctive sound. Inform the customer that this procedure must be performed whenever the washer is moved, even if it is moved very little such as when it is moved for sweeping. * In conclusion, some vibration is normal. An unbalanced load will vibrate more. You can deliberately unbalance the load by wetting the load, placing all items to one side and put it in spin. But even a very unbalanced load should not make the washer walk. If it is so unbalanced that the tub hits the inside of the cabinet, this concussion can cause the rubber pads to break contact with the floor and possibly cause the washer to walk. Also, never lubricate the snubber ring (to stop snubber squeal). This will cause the complete tub assembly to slide back and forth during the spin cycle which in turn will cause the tub to contact the cabinet sides. 41 Hot Product Updates: PROBLEM: Need OTR microwave oven fault codes and sensor diagnostic procedures. SOLUTION: Below is a list of the OTR microwave oven fault codes along with diagnostic procedures for the humidity sensor. It is important to note that testing the microwave oven sensor with an ohm meter can damage the sensor. THE ONLY PORTION OF THE SENSOR THAT SHOULD BE TESTED WITH A METER IS THE HEATER (pins 3 & 4). The heater resistance is approximately 30 ohms. * F0 - Humidity sensor problem (open or shorted) at start of cooking program. Press keypads 7 & 8 simultaneously and read sensor value showing in the display. Compare value to sensor Quick Test values to determine if there is a problem. * F3 - Shorted key panel (keypad/panel shorted for a period of over 60 seconds). You can test this feature by holding in one of the keypads for over 60 seconds. F3 will display. * F4 - Open humidity sensor during cooking process. Sensor was open for a period of over 60 seconds during the cooking process. * F5 - Shorted humidity sensor during cooking process. Sensor shorted for a period of over 5 seconds during the cooking process. * Microwave Oven Sensor Quick Test - Sensor Cooking Diagnosis: 1. Simultaneously touch and hold keypads 7 & 8 and record the number showing in the display. 2. If the number showing is between 15 and 185 then the reading is more than likely normal; however you need to go one step further and verify by performing a Sensor Detection Test. 3. If the number showing in the display is higher than 213 you more than likely have one or more of the following problems: sensor failed open, sensor unplugged, wiring, or smart board. 4. If the number showing in the display is less than 6 you more than likely have a shorted sensor, or a defective smart board. * Microwave Oven Gas/Humidity Sensor Detection Test: The Gas/Humidity sensor detects both humidity (steam) and hydrocarbons (food odors) during sensor cooking modes. 1. 2. 3. 4. Place 1/3 cup of water in the center of the microwave. Push the VEGETABLE keypad (FRESH VEGGIES will scroll across the display). Push START. Simultaneously press keypads 7 & 8 and record the diagnostic number showing in the display (eg: 42). 5. The unit will begin heating the water and will display FRESH-VG until it reaches humidity detection. When humidity detection occurs, the control will beep and begin counting down. At the end of the cycle the control will beep and the microwave will shut off. 6. Touch CLEAR /OFF NOTE: If you successfully completed steps 1 through 6 with no problems, then the humidity sensor is operating normally. However, if you encountered a problem during the test (TEST FAILED), then suspect a problem in the sensor circuit (sensor, sensor wiring/connection, or control smart board). 42 PROBLEM: Need service information on the new Next Gen ranges. SOLUTION: There are three new range service manuals now available: * Service Manual p/n 5995361523 is for the Next Gen 30 Electric Freestanding Ranges. It contains information on the new electronic surface element control system as well as the five different EOC (electronic oven control) systems - ES100, ES200, ES300, ES400, and ES450. It also includes a structural disassembly section. * Service Manual p/n 5995361531 is for the Next Gen 30 and 36 Gas Freestanding Ranges. It contains information on LP conversions and gas related rules and regulations, the five EOC systems described above, and a structural disassembly section. * Service Manual p/n 5995362828 is for 30 and 40 Electric Freestanding Ranges with serial numbers starting with NF. These ranges use similar EOC controls as those listed above, but the range body is structurally different. There is also a section about models with a PRC Glass Touch system (capacitance touch). 43 Cold Products Updates: PROBLEM: Control box kit 5303918282 doesnt have the damper heater. SOLUTION: All 5303918282 control box kits are being subbed to part number 5303918283. A running change has been made to the 5303918282 damper kit by adding the damper heater assembly to the kit. Some shipments of the 5303918282 control box kits were delivered with the heater assembly installed and some without. Please examine your current stock of the 5303918282 to determine if your kits contain the required heater. Check for a yellow sticker that says HEATER ASSY as indicated in the photo below. The damper heater is not available through the parts department as a separate part for the older 5303918282 kits. It is a difficult job and should be installed at the factory. However, if you feel you are capable of installing the damper heater, contact the Tech Line and they can ship you the heater. PROBLEM: Need service information on the new Next Gen refrigerators. SOLUTION: There are two Next Gen refrigerator service manuals available as well as two Product Information and Technical Guides (Service Date Sheets): * Service Manual p/n 5995352423 is for the Next Gen Side by Side Refrigerators. It contains information on the new cold control system, ADC (adaptive defrost control), ice maker, ice-n-water dispensing system, and sealed system repairs. Product Information and Technical Guide p/n 5995374443 is for Next Gen Side by Side refrigerators built between June 2001 and March 2002. * Service Manual p/n 5995345245 is for the Next Gen Top Mount Refrigerators. (NOTE: An error was found on page 26 in this manual illustrating the air circulation. The following page is the correction to that error.) Also, Product Information and Technical Guide p/n 5995355665 is for Next Gen Top Mount refrigerators built between October 1999 and May 2001. 44 SECTION D - AIR CIRCULATION AUTOMATIC DEFROST MODELS Principals Of Automatic Defrost Operation Automatic defrost refrigerators operate on the principle that moisture or frost transfers or migrates to the coldest surfaces (evaporator) in the freezer compartment. For example, a small amount of water spilled from an ice cube tray in the freezer compartment will freeze immediately. However, this ice in time will evaporate and transfer to the colder surfaces of the freezer evaporator coil. Air Circulation Patterns Automatic defrost models have a single evaporator in the freezer compartment, and have forced air cooling in the freezer and refrigerator compartments. The fin and tube aluminum type evaporator is located on the back wall of the freezer compartment. A circulating fan (suction type) pulls air from the air return in the freezer and refrigerator compartments up through the evaporator surfaces from the bottom. The cold air is forced into a fan cover and discharged into the freezer and refrigerator compartments as shown in Figure D1. Figure D1 Cold air for the refrigerator compartment flows from the evaporator through an air duct located in front of the evaporator cover and into the food compartment through air ducts on the Control Box. Return air from the refrigerator compartment flows through an opening on each side of the control housing, located all the way to the back next to the liner, through a 90° air return duct and back to the evaporator. Cold air for the freezer compartment flows from the evaporator through an air discharge grill, around the fan motor and into the freezer compartment. Return air from the freezer compartment flows through the louvers located on the back wall near the bottom of the freezer compartment, just in front of the evaporator. The air circulating fan operates only when the compressor is running. During the defrost period, the compressor and circulating fan do not operate. The automatic defrost timer opens the electrical circuit to the fan motor and compressor. (This page replaces page 26 in Service Manual 5995345245, Next Generation Top Mounts, dated November 2000.) 45 (This page is left intentionally blank) 46 PROBLEM: Control box kit, 5303918283, will not install in new SxS refrigerators CAUSE: Refrigerators with two pegs coming out the back of the control box (see Figure 1) and built after serial number LA24400000 do not have the thimble in the side of the liner to accept the screw in the back of the control box that was used on products built before serial number LA244. SOLUTION: Control Box kit, number 54003918283, requires a long screw in the back of the control box, behind the damper that threads into a grommet in the side of the liner, to hold the control box tight against the liner. (See Figure 2. ) The control box needs to touch the liner on the bottom to get a good seal between the liner and the damper. New control boxes have two tabs coming out of the control box that go into the opening in the liner, to hold the back of the control box in place. On refrigerators built between September and the end of October, the liner will except either control box. Products built after November 1 do not have the grommet in the side of the liner to except the screw to hold the old control box. This is the reason the 5303918283 kit will not work on products built after November 1, 2002 (LA244). On products built after that date, the controls, damper and ADC should be ordered separately and will not sub to the kit. Post to hold back of control box in place Tabs to hold back of control box in liner. Grommet in liner to hold post will be removed. Figure 1 Figure 2 PROBLEM: Frost and ice beads are forming on the evaporator cover of Top Mount Refrigerator models. CAUSE: Frost will form from air leaks or a door left open. Also, large amount of frost may form from heavy use in a high humidity environment. SOLUTION: During heavy use in a high humidity environment, moisture will condense on the evaporator cover before the fan can pull it all back to the evaporator. When the refrigerator goes through the defrost cycle, the direct contact will allow the cover temperature to rise high enough to turn the frost to ice. By adding an insulation pad, p/n 5316651102, between the evaporator and the evaporator cover, it will stop a lot of the heat transfer from the evaporator to the cover during defrost. It will also help reduce a lot of the noise from the defrost cycle and some of the refrigerant gurgling sound. To install the insulation, remove the cover and cut the insulation to fit from the top of the evaporator down to the top of the louvers in the evaporator cover. NOTE: Do not block the louvers in the bottom of the cover. Tape the insulation to the back of the evaporator cover and reinstall the cover over the evaporator. 47 PROBLEM: Gurgling sound when doors are opened and closed on Top Mount refrigerators CAUSE: When the doors are opened and closed, a vacuum is created inside the cabinet. This vacuum is released by allowing air to be drawn up the defrost water drain tube. The gurgling is caused by water being trapped in the drain line. SOLUTION: First make sure the refrigerator is level. Next, separate the flexible extension running to the drain pan from the hard tube coming out of the cabinet. Open and close the doors again. If the noise has stopped, there is water trapped in the flexible extension. This is caused by a sag in the tube or the end of the tube laying in the defrost water pan. Remove the sag and /or tape the end of the tube up so it will stay out of the water in the pan. If separating the drain line has no effect on the noise, the water is trapped in the hard tube inside the cabinet. At this point, you can use the 5303918285 drain tube and ice maker plug kit. The drain line extension, provided in the kit, has a built in trap that is large enough so the air will not pull past the water in the trap. This will stop the sound, but it can make the door harder to reopen after it is closed. If the customer feels the door is too hard to open with this kit, the external drain kit, part number 5303918261, can be installed. This will bypass the internal drain and stop the vacuum action by allowing air to be drawn up the drain line. The external drain kit takes longer to install and it requires drilling a hole in the cabinet. This has created some concern with customers. The installation of the drain tube with the trap does not require any change to the cabinet. PROBLEM: Water dripping onto food compartment top shelf of top freezer model refrigerators. CAUSE: There can be two causes for this problem: 1. Defrost water is migrating forward from the drain and dripping out the diffuser. 2. Frost is collecting on the inside of the air duct and melting during defrost, causing it to drip into the food compartment. SOLUTION: Defrost water migrating forward from the drain opening is a result of the foam block in the food compartment control box not sealing to the liner, or not getting a tight fit between the control box and the foam block. This allows water to run between the liner and the foam block or the control box, and drip into the food compartment. (See Figures 1 and 2 on next page.) Frost collecting inside of the air duct in front of the fan cover can be caused by air leaking into the cabinet. This can come from the door seals, ice maker fill tube, and if the cabinet is not well sealed; it can come up the defrost water drain. There is now a kit, part number 5303918285, that has a new seal for the ice maker fill tube opening (only used on products without an ice maker) and a new drain trap extension that has a trap in it to hold water. (See Figures 3,4, 5, and 6 on next page.) This kit can be used to correct cabinet air leaks and ice maker fill tube air leaks. If the air leak is from the door seal, it may not be of much help, so check the door seals. When checking the door seals, check between the seal and the cabinet. Also pull the seal out of the channel in the door panel. The seal should be difficult to pull out. If it comes out easy, the air leak can be between the door and the door seal. If the gasket is loose in the channel, run RTV sealer in the channel and reinstall the gasket. 48 WATER CAN MIGRATE BETWEEN THE LINER AND THE FOAM BLOCK OR BETWEEN THE FOAM BLOCK AND THE HOUSING RUN A 3/8" STRIP OF PERMAGUM CORD AROUND THE FOAM BLOCK MAKING SURE TO SEAL THE OPENING BETWEEN THE BLOCK AND HOUSING Figure 1 Figure 2 NEW PLUG FOR ICE MAKER FILL TUBE OPENING NEW DRAIN TUBE WITH TRAP Figure 3 TOP OF TRAP TUBE WILL TOUCH BOTTOM OF CABINET DISCONNECT EXTENSION FROM HARD TUBE COMING OUT OF CABINET BOTTOM OF TRAP IN TUBE WILL TOUCH DRAIN PAN Figure 4 Figure 5 REMOVE THE OLD FOAM PLUG INSTALL NEW PLUG Figure 6 49 Wet Product Updates: PROBLEM: Timer cycle chart confusing when checking input code voltage to speed control board when operating. SOLUTION: The operational chart shown below will be in the upcoming CD Video for Tumble Action Washers. This chart will help explain the timer/speed control board relationship on tumble action washers. CYCLE CYCLE TIMER TIME PHASE STEP IN SEC. ACTIVITY DRUM SPEED CONTROL WAX W ATER W ATER PRESSURE VOLTAGE VOLTAGE RPM INPUT CODES MOTOR VALVE TEMP SW ITCH AT AT FABRIC BLEACH SOFTENER 1 = 120 VAC AND 0 = ZERO VOLTS A B C D E DRAIN PUMP BYPASS SOLENOID SOLENOID HEAVY 1 180 FILL & TUMBLE 52 1 0 1 1 0 OFF WASH FILL H.W,C ON 0 0 WASH 2 110 FILL THEN TUMBLE 52 1 1 0 1 0 OFF WASH FILL H.W,C OFF 0 0 REG 3 400 FILL THEN TUMBLE 52 1 0 0 1 0 OFF WASH FILL H,W,C OFF 0 0 4 352 FILL THEN TUMBLE 52 1 1 1 1 0 OFF WASH FILL H,W,C OFF 0 0 5 50 DRAIN & FILL (SPRAY) 52 0 1 0 0 0 ON RINSE FILL C ON 0 0 6 130 DRAIN AND 450 0 0 0 1 1 ON OFF ON 0 0 OFF 120 VAC 0 ON 0 0 OFF 120 VAC 0 ON 0 0 C OFF 120 VAC OFF ON 0 0 W,C OFF 0 120 VAC ON 0 0 WASH SHORT WASH IMPLUSE SPIN RINSE 1 7 180 FILL THEN TUMBLE 52 1 0 1 1 0 OFF RINSE FILL 8 160 DRAIN AND 450 0 1 1 1 1 ON OFF RINSE 2 9 18 FILL & COAST 0 0 0 1 0 0 OFF RINSE FILL EX RIN 10 50 DRAIN TUMBLE 52 0 1 0 0 0 ON/OFF OFF 11 110 FILL THEN TUMBLE 52 1 1 0 1 0 OFF RINSE FILL C IMPLUSE SPIN FINAL 12 220 DRAIN & SPIN 450 0 1 0 0 1 ON OFF RINSE 3 13 110 FILL THEN TUMBLE 52 1 1 0 1 0 OFF RINSE FILL EXTRACT 14 660 DRAIN AND SPIN 950 1 1 0 1 1 ON OFF 15 145 C RINSE FINAL SPIN PAUSE 0 1 0 0 0 0 OFF OFF ON 0 0 TUMBLE 52 1 0 0 0 0 OFF OFF ON 0 0 CYCLE SIGNAL 0 1 0 0 0 0 OFF OFF ON 0 0 GRAPHICS 16 STOP 0 0 0 0 0 0 OFF OFF OFF 0 0 OFF 17 STOP 0 0 0 0 0 0 OFF OFF OFF 0 0 52 1 0 0 1 0 OFF WASH FILL H,W,C OFF 0 0 0 PERM WASH 18 400 FILL THEN TUMBLE PRESS FINAL 19 352 FILL THEN TUMBLE 52 1 1 1 1 0 OFF WASH FILL H,W,C OFF 0 20 50 DRAIN & FILL 52 0 1 0 0 0 ON RINSE FILL C ON 0 0 RINSE 1 21 180 FILL THEN TUMBLE 52 1 0 1 1 0 OFF RINSE FILL C OFF 120VAC 0 22 50 DRAIN & TUMBLE 52 0 1 0 0 0 ON OFF ON 0 0 RINSE 2 23 180 FILL THEN TUMBLE 52 1 0 1 1 0 OFF RINSE FILL C OFF 120VAC 0 EX RINSE 24 50 DRAIN TUMBLE 52 0 1 0 0 0 OFF/ON OFF ON 0 0 25 180 FILL THEN TUMBLE 52 1 0 1 1 0 OFF RINSE FILL C OFF 120VAC 0 ON 0 0 C OFF 0 120VAC 26 220 DRAIN & SPIN 450 0 1 0 0 1 ON OFF RINSE 3 27 180 FILL THEN TUMBLE 52 1 0 1 1 0 OFF RINSE FILL EXTRACT 28 500 DRAIN & SPIN 850 1 0 1 0 1 ON OFF ON 0 0 0 RINSE FINAL SPIN 950 29 145 PAUSE 0 1 0 0 0 0 OFF OFF ON 0 TUMBLE 52 1 0 0 0 0 OFF OFF ON 0 0 END CYCLE SIGNAL 0 1 0 0 0 0 OFF OFF ON 0 0 0 GRAPHICS 30 STOP 0 0 0 0 0 0 OFF OFF OFF 0 OFF 31 STOP 0 0 0 0 0 0 OFF OFF OFF 0 0 FILL THEN TUMBLE 35 1 1 0 0 0 OFF WASH FILL OFF 0 0 0 0 HAND WASH 32 609 H,W,C, WASH 33 50 DRAIN & FILL 52 0 1 0 0 0 ON RINSE FILL C ON 34 180 FILL THEN TUMBLE 52 1 0 1 1 0 OFF RINSE FILL C OFF 35 220 DRAIN & SPIN 450 0 1 0 0 1 ON OFF RINSE 2 36 110 FILL THEN TUMBLE 52 1 1 0 1 0 OFF RINSE FILL EX RINSE 37 50 DRAIN & TUMBLE 52 0 1 0 0 0 OFF/ON OFF 38 110 FILL THEN TUMBLE 52 1 1 0 1 0 OFF RINSE FILL 39 430 DRAIN & SPIN 450 1 1 1 0 1 ON RINSE 1 FINAL EXTRACT SPIN 120VAC 0 ON 0 0 C OFF 120VAC 0 ON 0 0 C OFF 0 120VAC OFF ON 0 0 0 650 40 145 PAUSE 0 1 0 0 0 0 OFF OFF ON 0 TUMBLE 52 1 0 0 0 0 OFF OFF ON 0 0 END CYCLE SIGNAL 0 1 0 0 0 0 OFF OFF ON 0 0 GRAPHICS 41 STOP 0 0 0 0 0 0 OFF OFF OFF 0 0 OFF 42 STOP 0 0 0 0 0 0 OFF OFF OFF 0 0 50 PROBLEM: Need service information on laundry products. SOLUTION: There are three new laundry product service manuals now available: * Service Manual p/n 5995369211 is for the Tumble Action Washer with the AC drive motor. It contains operational information, troubleshooting information, and a structural disassembly section. (The previous service manual p/n 5995271441 provided service information for the Tumble Action Washer with the DC drive motor.) * Service Manual p/n 5995373155 is for all 27 Gas and Electric Dryers. It also contains operational and troubleshooting information as well as structural disassembly instructions. * Service Manual p/n 5995377099 is for Top Load Washers with 2.7 and 3.0 cu. ft. tubs. It also contains operational and troubleshooting information as well as structural disassembly instructions. PROBLEM: Need service information on dishwasher products. SOLUTION: There are two new dishwasher product service manuals now available: * Service Manual p/n 5995355186 is for the 24 Built-in Dishwashers with Mechanical Timers and having the Precision Wash System. It contains operational information, troubleshooting information, structural disassembly, and Service Data Sheets. * Service Manual p/n 5995371183 is for the 18 Dishwasher with Mechanical Timers having the Tower Wash System. It contains operational and structural disassembly information as well as a Tech Data Sheet. 51 PRODUCT WARRANTY QUICK REFERENCE GUIDE 1990 - 2002 EHP PRODUCT LINES PRODUCT PAGE Refrigerators 53-54 Food Freezers 54-55 Room Air Conditioners 56 Washers 57-58 Top Load 57 Tumble Action 58 Dryers 58 Laundry Centers 59 Dishwashers 60 Ranges 61-62 Free Standing 61 Over & Under 62 Gas & Electric Cooktops 62 Ovens 62-63 Microwave - Over the Range 62 Microwave - Countertop 63 Micro Wall 63 Wall 63 Range Hoods 63 NOTE: For detailed warranty information, please refer to the customers warranty supplied with each product. Be aware that warranties supplied with each product may contain both USA and Canadian versions. For products purchased and used in the USA, refer to the USA Warranty. 52 PRODUCT WARRANTY QUICK REFERENCE GUIDE 1990-2002 EHP PRODUCT LINES PRODUCT WARRANTIES - 1990 TO 2001 Products / Brands Product Period st 1 Year Additional Coverage's or Exceptions REFRIGERATORS Frigidaire • Models without a PureSource Ice & Water Filter 1990 - Present Full Parts & Labor • • • • Models with a PureSource Ice & Water Filter 1996 - Present Full Parts & Labor • • • • Frigidaire Gallery / Pro Gallery • Models without a PureSource Ice & Water Filter 1995 - Mar 1999 • Mar 1999 - Present Models with a PureSource Ice & Water Filter Full Parts & Labor • • Full Parts & Labor • • • • Frigidaire Next Generation (Models with script logo versus blocked style) 2001 - Present Full Parts & Labor • • • st 1 year: Labor & full parts. nd 2 year: Repair or replace any defective parts of the ice maker and/or ice and water dispenser on Through-the-Door dispenser models only (parts and full labor). nd th 2 -5 years: Repair or replace any defective parts of the Sealed System (compressor, condenser, evaporator, drier and tubing) or Cabinet Liner (parts and full labor). st 1 year: Labor & full parts. st 1 year exclusion (On models with a PureSource Ice & Water Filter): Original and replacement cartridges are warranted for 30 days (parts only). nd 2 year: Repair or replace any defective parts of the ice maker and/or ice and water dispenser on Through-the-Door dispenser models only (parts and full labor). nd th 2 -5 years: Repair or replace any defective parts of the Sealed System (compressor, condenser, evaporator, drier and tubing) or Cabinet Liner (parts and full labor). st nd 1 & 2 years: On models from 1995 to models with serial st numbers previous to March 1 , 1999 (LA911.., and earlier) parts and full labor rd th 3 - 5 years: Repair or replace any defective parts of the Sealed System (compressor, condenser, evaporator, drier and tubing) or Cabinet Liner (parts and full labor). st nd 1 & 2 years: Repair or replace any defective parts of the ice maker and/or ice and water dispenser on Through-the-Door dispenser models only (parts and full labor). st nd Exclusion - 1 & 2 years (on models with PureSource Ice & Water Filter): Original and replacement cartridges are warranted for 30 days (parts only). nd th 2 -5 years: Repair or replace any defective parts of the Sealed System (compressor, condenser, evaporator, drier and tubing) or Cabinet Liner (parts and full labor). th th 6 - 10 years: Replace any defective compressor (part only). st 1 year: Labor & full parts. st 1 year exclusion (On models with a PureSource Ice & Water Filter): Original and replacement cartridges are warranted for 30 days (parts only). nd th 2 -5 years: Repair or replace any defective parts of the Sealed System (compressor, condenser, evaporator, drier and tubing) or Cabinet Liner (parts and full labor). USERS OF THIS CHART PLEASE NOTE: Many of the changes in the warranty coverage's are "DATE SPECIFIC" according to the date of manufacture. The serial number of any product contains this manufacturing date and follows the following format; "alpha character", "alpha character", "numeric", "numeric", "numeric". For nd example, the serial number LA952…, signifies that the product was made in the 52 week of 1999. The serial th number TH012…, means it was made in the 12 week of 2000. 53 Products / Brands Product Period 1st Year Additional Coverage's or Exceptions REFRIGERATORS (Continued) Gibson 1990 - 1997 Full Parts & Labor • • • 1998 - Present Full Parts & Labor • • • Kelvinator* Support Brands Tappan White Westinghouse st 1 year: parts and full labor. nd th 2 - 5 years: Repair or replace any defective parts of the Sealed System (compressor, condenser, evaporator, drier and tubing), diagnosis & travel excluded. th th 6 - 10 years: Replace any defective compressor. st nd 1 - 2 years: parts and full labor. rd th 3 - 5 years: Repair or replace any defective parts of the Sealed System (compressor, condenser, evaporator, drier and tubing), diagnosis and travel excluded. th th 6 - 10 years: Replace any defective compressor (parts only). 1990 - Present Full Parts & Labor • • 1 year: Labor & full parts. nd th 2 - 5 year: Repair or replace any defective parts of the Sealed System (compressor, condenser, evaporator, drier and tubing), diagnosis and travel excluded. 1995 - Mar 1999 Full Parts & Labor • • 1 year: Parts and full labor st rd 1 - 3 years: Covers food loss due to defects in materials and workmanship. Covers food spoilage loss in excess of $5.00 per occurrence, but not to exceed this maximum payment schedule: Cumulative Maximum Size-Cu. Ft. 0.5 to 9.9 $100.00 10.0 to 16.5 $150.00 16.6 to 21.5 $200.00 21.6 + $250.00 nd th 2 - 5 year: Repair or replace any defective parts of the Sealed System (parts and productive labor, diagnosis and travel excluded). th th 6 - 10 years (1995 or later models): Replace any defective compressor (part only). st FOOD FREEZERS Frigidaire (non-Gallery models) • • Frigidaire Gallery 1995 - Mar 1999 Full Parts & Labor st • 1 - 2 years: On models from 1995 to March 1 , 1999 with serial st numbers previous to March 1 , 1999 (LA911…, and earlier) Parts and full labor • 1 - 3 years: Food chart same as for Frigidaire non-Gallery models. • rd th 3 - 5 year: Repair or replace any defective parts of the Sealed System (compressor, condenser, evaporator, drier and tubing) or Cabinet Liner (parts and full labor). • 6 - 10 years: Replace any defective compressor (part only) st st th nd st rd th Limited Warranty - Alaskan Exclusion (Applicable to ALL PRODUCTS/BRANDS LISTED IN THIS CHART for the time periods outlined): All of the coverage's of each product warranty apply, plus any exclusions on the actual warranties (see *Normal Responsibilities of the Consumer). Not covered Costs of the technician's travel to the home and any costs for pickup and delivery of the appliance required because of service. 9-5-00 mcd * Not Produced in 1996 - 1997 54 Products / Brands Product Period 1st Year Additional Coverage's or Exceptions FOOD FREEZERS (Continued) Frigidaire Gallery Gibson Gibson Kelvinator*, Tappan, White Westinghouse*, Multiflex Brands Mar 1999 - Present 1990 - 1997 1998 - Present 1990 - Present Full Parts & Labor Full Parts & Labor Full Parts & Labor Full Parts & Labor • 1 year: On models with serial numbers effective March 1 , 1999 (LA911…, and earlier) Parts and full labor • 1 - 3 years: Food Loss chart same as for Frigidaire non-Gallery models. • 2 - 5 year: Repair or replace any defective parts of the Sealed System (compressor, condenser, evaporator, drier and tubing) or Cabinet Liner (parts and full labor). • 6 - 10 years: Replace any defective compressor (part only) • 1 year: Parts and full labor • st rd 1 - 3 years: Food Loss chart same as for Frigidaire non-Gallery models. • 2 - 5 year: Repair or replace any defective parts of the Sealed System (compressor, condenser, evaporator, drier and tubing) or Cabinet Liner (parts and productive labor, diagnosis and travel excluded). • 6 - 10 years: Replace any defective compressor (part only) • 1 • st rd 1 - 3 years: Food Loss chart same as for Frigidaire non-Gallery models. • 3 - 5 year: Repair or replace any defective parts of the Sealed System (compressor, condenser, evaporator, drier and tubing) or Cabinet Liner (parts and productive labor, diagnosis and travel excluded). • 6 - 10 years: Replace any defective compressor (part only) • 1 year: Parts and full labor • st rd 1 - 3 years: Food Loss chart same as for Frigidaire non-Gallery models. • nd th 2 - 5 year: Repair or replace any defective parts of the Sealed System (compressor, condenser, evaporator, drier and tubing) or Cabinet Liner (parts and productive labor, diagnosis and travel excluded). st st st rd nd th th th st nd th th th st nd - 2 years: Parts and full labor rd th th th st Limited Warranty - Alaskan Exclusion (Applicable to ALL PRODUCTS/BRANDS LISTED IN THIS CHART for the time periods outlined): All of the coverage's of each product warranty apply, plus any exclusions on the actual warranties (see *Normal Responsibilities of the Consumer). Not covered Costs of the technician's travel to the home and any costs for pickup and delivery of the appliance required because of service. 9-5-00 mcd * Not Produced in 1996 - 1997 55 Products / Brands Product Period 1st Year Additional Coverage's or Exceptions ROOM AIR CONDITIONERS Frigidaire Gallery Previous to Mar 99 Full Parts & Labor • • • Mar 1999 - Present Full Parts & Labor • • • Frigidaire, Gibson (all non-compact models), Kelvinator*, Tappan, White Westinghouse and Support Brands 1990 - 1998 Full Parts & Labor • • • • Gibson Compact Models 1990 - 1998 Full Parts & Labor • • • 1999 - Present Full Parts & Labor • • • Gibson Heavy Duty, Intermediate, Slider/Casement & Through the Wall Models 1999 - Present Full Parts & Labor • • st ND 1 - 2 years: On models with serial numbers effective March st 1 , 1999 (JK911…, and earlier) Parts and full labor rd th 3 - 5 years: Repair or replace any defective parts of the Sealed System (compressor, condenser, evaporator, drier and tubing), parts and productive labor (diagnosis and travel excluded). th th 6 - 10 years: Replace any defective compressor (part only) st st 1 year: On models with serial numbers effective March 1 , 1999 (JK911…, and later) Parts and full labor nd th 2 - 5 years: Repair or replace any defective parts of the Sealed System (compressor, condenser, evaporator, drier and tubing), parts and productive labor (diagnosis and travel excluded). th th 6 - 10 years: Replace any defective compressor (part only) st 1 year: Full parts and labor nd th 2 - 5 years: Repair or replace any defective parts of the Sealed System (compressor, condenser, evaporator, drier and tubing), parts and productive labor (diagnosis and travel excluded). nd th 2 - 5 years (Gibson brands only): Repair or replace any defective parts of the Sealed System (compressor, condenser, evaporator, drier and tubing), parts and full labor. th th 6 - 10 years: Replace any defective compressor (part only) st 1 year: Full parts and labor st th 1 - 5 years: Provide a comparable model air conditioner if the Sealed Refrigeration System fails (parts & full labor). th th 6 - 10 years: Replace any defective compressor (part only) st 1 year: Full parts and labor st th 1 - 5 years: Provide a comparable model air conditioner if the Sealed Refrigeration System fails (parts & full labor). th th 6 - 10 years: Replace any defective compressor (part only) st 1 year: Full parts and labor rd th 3 - 5 years: Repair or replace any defective parts of the Sealed System (compressor, condenser, evaporator, drier and tubing), parts and productive labor (diagnosis and travel excluded). Limited Warranty - Alaskan Exclusion (Applicable to ALL PRODUCTS/BRANDS LISTED IN THIS CHART for the time periods outlined): All of the coverage's of each product warranty apply, plus any exclusions on the actual warranties (see *Normal Responsibilities of the Consumer). Not covered Costs of the technician's travel to the home and any costs for pickup and delivery of the appliance required because of service. 9-5-00 mcd * Not Produced in 1996 - 1997 56 Product Period Products / Brands st 1 Year Additional Coverage's or Exceptions TOP LOAD WASHERS Frigidaire (non-Gallery models) 1990 - Present Full Parts & Labor • • • • Frigidaire Gallery Models 1995 - Mar 1999 Mar 1999 - Present Full Parts & Labor Full Parts & Labor • • • • • • • Gibson 1990 - Present Full Parts & Labor • • • • • Kelvinator*, Tappan, White Westinghouse, Support Brands 1990 - Present Full Parts & Labor • • • st 1 year: Parts and full labor nd th 2 - 5 years: Repair or replace defective transmission (part only) Exception: Transmissions on models with serial numbers th effective December 15 , 1999 (XC952…,) and newer are not field serviceable, coverage is for part replacement only. st th 1 - 25 years: (In-Home, excludes Alaska) Replace defective inner wash basket (parts & full labor, in-home service labor).Parts and full labor. st nd 1 - 2 years: On models with serial numbers previous to March st 1 , 1999 (XC911…,) parts & full labor. rd th 3 - 5 years: Repair or replace defective transmission (part only) st th 1 - 25 years: (In-Home, excludes Alaska) Replace defective inner wash basket (parts & full labor, in-home service labor).Parts and full labor. st st 1 year: On models with serial numbers effective March 1 , 1999 (XC912…, and later) parts & full labor. nd th 2 - 5 years: Repair or replace defective transmission (part only). Exception: Transmissions on models with serial numbers th effective December 15 , 1999 (XC952…,) and newer are not field serviceable, coverage is for part replacement only. st th 1 - 25 years: (In-Home, excludes Alaska) Replace defective inner wash basket (parts & full labor, in-home service labor).Parts and full labor. st 1 year: Parts and full labor. nd 2 year: 1990 to 1995 models, Repair or replace all defective parts only (labor not included). nd 2 year: 1996 to 2000 models, coverage is for parts & full labor. rd th 3 - 5 years: Repair or replace defective transmission (part only). st th 1 - 25 years: (In-Home, excludes Alaska) Replace defective inner wash basket (parts & full labor, in-home service labor). st 1 year: Parts and full labor. nd th 2 - 5 years: Replace defective transmission (part only) st th 1 - 25 years: (In-Home, excludes Alaska) Replace defective inner wash basket (parts & full labor, in-home service labor). Limited Warranty - Alaskan Exclusion (Applicable to ALL PRODUCTS/BRANDS LISTED IN THIS CHART for the time periods outlined): All of the coverage's of each product warranty apply, plus any exclusions on the actual warranties (see *Normal Responsibilities of the Consumer). Not covered Costs of the technician's travel to the home and any costs for pickup and delivery of the appliance required because of service. 9-5-00 mcd * Not Produced in 1996 - 1997 57 Products / Brands Product Period 1st Year Additional Coverage's or Exceptions TUMBLE ACTION WASHERS Frigidaire (non-Gallery models) 1995 - Present Full Parts & Labor • • • Gibson 1990 - Present Full Parts & Labor • • • Frigidaire Gallery 1995 - Mar 1999 Full Parts & Labor • • • Mar 1999 - Present Full Parts & Labor • • • st 1 year: Parts and full labor nd th 2 - 5 years: Replace any defective main motor, drive pulley or motor controller (part only). nd th 2 - 25 years: (excludes Alaska) Replace defective inner wash basket (part only). st nd 1 - 2 years: Labor and full parts. Exception - Gibson models st from 1990 - 1994 have 1 year full parts and labor only. rd th 3 - 5 years: Replace any defective main motor, drive pulley or motor controller (part only) Exception - Gibson models from 1990 nd th 1994; parts covered from 2 - 5 years. rd th 3 - 25 years (excludes Alaska): Replace defective inner wash basket (part only). Exception - Gibson models from 1990 - 1994; nd th basket covered from 2 - 5 years. st nd 1 - 2 years: On models from 1995 to March, 1999, with serial st numbers previous to March 1 , 1999 (XC911…, and earlier) parts & full labor. rd th 3 - 5 years: Replace any defective main motor, drive pulley or motor controller (part only). rd th 3 - 25 years: (excludes Alaska) Replace defective inner wash basket (part only). st st 1 year: On models with serial numbers effective March 1 , 1999 (XC912…, and later) parts and full labor. nd th 2 - 5 years: Replace any defective main motor, drive pulley or motor controller (part only). nd th 2 - 25 years: (excludes Alaska) Replace defective inner wash basket (part only). DRYERS Frigidaire Gallery Gibson Frigidaire (non-Gallery), Kelvinator*, Tappan, White-Westinghouse 1995 - Mar 1999 Full Parts & Labor • 1 - 2 years: On models from 1995 to March, 1999, with serial st numbers previous to March 1 , 1999 (XD911…, and earlier) parts and full labor. Mar 1999 - Present Full Parts & Labor • 1 year: On models with serial numbers effective March 1 , 1999 (XD911…, and later) parts and full labor. 1990 - 1995 Full Parts & Labor • • 1 year: Parts and full labor nd 2 year: All parts covered (labor excluded). 1996 - Present Full Parts & Labor • 1 - 2 years: Parts and full labor. 1990 - Present Full Parts & Labor • 1 year: Parts and full labor st nd st st st st st * Not Produced in 1996 - 1997 58 nd Products / Brands Product Period st 1 Year Additional Coverage's or Exceptions LAUNDRY CENTERS Frigidaire Gallery 1995 - Mar 1999 Full Parts & Labor • • • • Frigidaire Gallery Mar 1999 - Present Full Parts & Labor • • • • Frigidaire (non-Gallery), 27" Gibson, 27" Support Brands Mar 1999 - Present Full Parts & Labor • • • • 24" Frigidaire **, 24" Support Brands 1990 - 1998 Full Parts & Labor • • st nd st 1 - 2 years: On models with serial numbers effective March 1 , 1999 (XE912…, and later) parts & full labor. rd th 3 - 5 years: Repair or replace defective transmission (part only) Exception: Transmission on models with serial numbers th effective December 15 , 1999 (XE952…, and newer) are not field serviceable, coverage is for part replacement only. st th 1 - 25 years: (In-Home, excludes Alaska) Replace defective inner wash basket (parts & full labor, in-home service labor). st 1 year: Full parts & full labor.. nd th 2 - 5 years: Repair or replace defective transmission (part only) Exception: Transmission on models with serial numbers th effective December 15 , 1999 (XE952…, and newer) are not field serviceable, coverage is for part replacement only. st th 1 - 25 years: (In-Home, excludes Alaska) Replace defective inner wash basket (parts & full labor, in-home service labor). st 1 year: Full parts & full labor. st nd 1 - 2 years: (Gibson models from 1996 to present) Labor and full parts. rd th 3 - 5 years: Repair or replace defective transmission (part only) Exception: Transmission on models with serial numbers th effective December 15 , 1999 (XE952…, and newer) are not field serviceable, coverage is for part replacement only. st th 1 - 25 years: (In-Home, excludes Alaska) Replace defective inner wash basket (parts & full labor, in-home service labor). st 1 year: Full parts & full labor. nd th 2 - 5 years: Repair or replace defective transmission (part only) Limited Warranty - Alaskan Exclusion (Applicable to ALL PRODUCTS/BRANDS LISTED IN THIS CHART for the time periods outlined): All of the coverage's of each product warranty apply, plus any exclusions on the actual warranties (see *Normal Responsibilities of the Consumer). Not covered Costs of the technician's travel to the home and any costs for pickup and delivery of the appliance required because of service. 9-5-00 mcd * * Not Produced in 1998 - 2000 59 Products / Brands Product Period 1st Year Additional Coverage's or Exceptions DISHWASHERS Frigidaire Gallery / Gallery Pro Series 1995 - Mar 1999 Full Parts & Labor • • • Mar 1999 - Present Full Parts & Labor • • • Gibson Mar 1999 - Present Full Parts & Labor • • • • • Frigidaire (non-Gallery) Tappan, Kelvinator, White Westinghouse, Support Brands 1990 - Present Full Parts & Labor • • • • • • • st nd 1 - 2 years: On models from 1995 to March, 1999, with serial st numbers previous to March 1 , 1999 (TH911…, and earlier) parts & full labor. rd th 3 - 5 years (Electronic controls, Control Board, Relay Board, Transformer & Nylon-Coated Racks): Replace listed defective electronic parts - ribbon not included (part only). Replace defective nylon-coated racks (part only) if the upper or lower rack rusts or peels due to a manufacturing defect. st th 1 - 20 years (tub and door liner): Replace tub or door liner that fails to hold water due to a manufacturing defect (part only). st st 1 year: On models with serial numbers effective March 1 , 1999 (TH912…, and later) parts & full labor. nd th 2 - 5 years (Electronic controls, Control Board, Relay Board, Transformer & Nylon-Coated Racks): Replace listed defective electronic parts - ribbon cable not included (part only). Replace defective nylon-coated racks (part only) if the upper or lower rack rusts or peels due to a manufacturing defect. st th 1 - 20 years (tub and door liner): Replace tub or door liner that fails to hold water due to a manufacturing defect (part only). st 1 year: Labor and full parts nd st 2 year (Gibson models manufactured after Nov. 1 , 1996 (TH644…, and later): Labor & full parts. nd st 2 year (excluding models manufactured after Nov. 1 , 1996 (TH644.., and later: Replace defective parts of water distribution system (pump, motor, lower wash arm and internal soft/hard food disposer on all models, plus the wash tower, upper spray arms with associated supply tube and filter assembly on models with these features. Not covered: Associated Inlet and Drain plumbing parts (parts only; no labor). rd th st nd th 3 - 5 years on models manufactured after Nov. 1 , 1996 (2 - 5 st on models before Nov. 1 , 1996): Replace any nylon-coated racks (part only) if they rust or peel due to a manufacturing defect. rd th st nd 3 - 10 years on models manufactured after Nov. 1 , 1996 (2 th st 10 on models before Nov. 1 , 1996): Replace tub or door liner that fails to hold water due to a manufacturing defect (part only). st 1 year: Labor and full parts nd st 2 year (excluding models manufactured after Nov. 1 , 1996 (TH619.., and later: Replace defective parts of water distribution system (pump, motor, lower wash arm and internal soft/hard food disposer on all models, plus the wash tower, upper spray arms with associated supply tube and filter assembly on models with these features. Not covered: Associated Inlet and Drain plumbing parts (parts only; no labor). nd th 2 - 5 years: Replace any nylon-coated racks (part only) if they rust or peel due to a manufacturing defect. nd th 2 - 5 years (applies to Frigidaire branded Electronic Control models produced prior to May 31, 1996 (TH619…, and earlier): Replace any defective Electronic Controls, Control Board, Relay board, Transformer (ribbon cable not included) part only. nd th 2 - 5 years (Nylon-coated rack models; applies to all st Frigidaire, Non-Gallery models produced prior to May 31 , 1996 (TH619…, and earlier): Replace defective nylon-coated racks (part only) if they rust or peel due to a manufacturing defect. nd th 2 - 20 years (Frigidaire branded "Ultra Power" models st produced prior to May 31 , 1996 only): Replace defective tub or door liner (parts only). nd th 2 - 10 years: Replace defective tub or door liner (part only). 60 Products / Brands Product Period 1st Year Additional Coverage's or Exceptions FREE STANDING RANGES Gas & Electric models -Frigidaire (non-Gallery), Kelvinator*, Support Brands, Tappan, White Westinghouse 1990 - Present Full Parts & Labor Frigidaire Gallery Gas & Electric Ranges (includes stand alone, Warm & Serve Drawer models) 1995 - Mar 1999 Full Parts & Labor 1 year: Labor and full parts. nd th 2 - 5 years (Soiled Element models- Glass Top, Seal & Surface Heating Units): Replace any defective surface heating element, deteriorated rubberized-silicone seal (upswept Freestanding models only), or glass top that breaks due to thermal breakage (not customer abuse). Parts only. • 1 - 2 years: On models from 1995 to March 1999, with serial st numbers previous to March 1 , 1999 (VF911…, and earlier) parts & full labor. rd th 3 - 5 years (Soiled Element models- Glass Top, Seal & Surface Heating Units): Replace any defective surface heating element, deteriorated rubberized-silicone seal (upswept Freestanding models only), or glass top that breaks due to thermal breakage (not customer abuse). Parts only. • Mar 1999 - Present Gibson Electric models (Smoothtops, Coil Element) Gibson Gas Models • • 1990 - 1997 Full Parts & Labor Full Parts & Labor • • • • • 1998 - Present Full Parts & Labor • • • st st nd st st 1 year: On models with serial numbers effective March 1 , 1999 (XC912…, or NF912…, and later) parts and full labor. nd th 2 - 5 years (Soiled Element models- Glass Top, Seal & Surface Heating Units): Replace any defective surface heating element, deteriorated rubberized-silicone seal (upswept Freestanding models only), or glass top that breaks due to thermal breakage (not customer abuse). Parts only. st 1 year: Labor and full parts. nd th 2 - 5 years (Soiled Element models- Glass Top, Seal & Surface Heating Units): Replace any defective surface heating element, deteriorated rubberized-silicone seal (upswept Freestanding models only), or glass top that breaks due to thermal breakage (not customer abuse). Parts only. nd th 2 - 5 years: Replace any defective surface unit grates, top burner and valves or oven thermostat, burner, and valves (parts only). st nd 1 - 2 years: Labor and full parts. rd th 3 - 5 years (Soiled Element models- Glass Top, Seal & Surface Heating Units): Replace any defective surface heating element, deteriorated rubberized-silicone seal (upswept Freestanding models only), or glass top that breaks due to thermal breakage (not customer abuse). Parts only. rd th 3 - 5 years: Replace any defective surface unit grates, top burner and valves or oven thermostat, burner, and valves (parts only). Limited Warranty - Alaskan Exclusion (Applicable to ALL PRODUCTS/BRANDS LISTED IN THIS CHART for the time periods outlined): All of the coverage's of each product warranty apply, plus any exclusions on the actual warranties (see *Normal Responsibilities of the Consumer). Not covered Costs of the technician's travel to the home and any costs for pickup and delivery of the appliance required because of service. 9-5-00 mcd * Not Produced in 1996 - 1997 61 Product Period Products / Brands 1st Year Additional Coverage's or Exceptions OVER & UNDER RANGE Tappan 1990 - Present Full Parts & Labor • 1 year: Labor and full parts. • 2 year: Replace any defective part of the microwave oven section (part only). nd th 2 - 10 years: Replace any defective magnatron tube (part only). Note: Over-Under microwave models have not been produced since 1997; from 1998 to present, the upper oven is a gas or electric unit. • • st nd GAS & ELECTRIC COOKTOPS Frigidaire (non-Gallery) Support Brands White Westinghouse Tappan Frigidaire Gallery, Pro Gallery 1990 - Present Full Parts & Labor • • 1 year: Labor and full parts. nd th 2 - 5 years: (Solid Element models - Glass Top, Seal & Surface Heating Units) Replace any defective surface heating element, deteriorated rubberized-silicone seal (upswept Freestanding models only), or glass top that breaks due to thermal breakage (not customer abuse). Parts only. 1995 - Mar 1999 Full Parts & Parts • • 1 year: Labor and full parts. nd th 2 - 5 years: (Solid Element models - Glass Top, Seal & Surface Heating Units) Replace any defective surface heating element, deteriorated rubberized-silicone seal (upswept Freestanding models only), or glass top that breaks due to thermal breakage (not customer abuse). Parts only. Mar 1999 - Present Full Parts & Labor • 1 year: On models from March 1999 (VF911…, or NF911…, and later) parts and full labor. rd th 3 - 5 years: (Solid Element models - Glass Top, Seal & Surface Heating Units) Replace any defective surface heating element, deteriorated rubberized-silicone seal (upswept Freestanding models only), or glass top that breaks due to thermal breakage (not customer abuse). Parts only. • st st st MICROWAVE OVENS (Over-the-Range Models) Frigidaire (non-Gallery) White Westinghouse* Tappan 1990 - Present Full Parts & Labor • • • Gallery Pro Series 1995 - Mar 1999 Full Parts & Labor • • • Mar 1999 - Present Full Parts & Labor • • • st 1 year: Labor and full parts. nd 2 year: In-Home Warranty - Replace any defective part in the microwave oven (parts only). nd th 2 - 10 years: Replace any defective magnatron tube (part only) st nd 1 - 2 years: Labor and full parts. rd 3 year: In-Home Warranty - Replace any defective part in the microwave oven (parts only). rd th 3 - 10 years: Replace any defective magnatron tube (part only) st 1 year: Labor and full parts. nd 2 year: In-Home Warranty - Replace any defective part in the microwave oven (parts only). nd th 2 - 10 years: Replace any defective magnatron tube (part only) Limited Warranty - Alaskan Exclusion (Applicable to ALL PRODUCTS/BRANDS LISTED IN THIS CHART for the time periods outlined): All of the coverage's of each product warranty apply, plus any exclusions on the actual warranties (see *Normal Responsibilities of the Consumer). Not covered Costs of the technician's travel to the home and any costs for pickup and delivery of the appliance required because of service. 9-5-00 mcd * Not Produced in 1996 - 1997 62 Products / Brands Product Period 1st Year Additional Coverage's or Exceptions MICROWAVE OVENS (Countertop Models) Frigidaire & Tappan .6, .8, 1.0, 1.2, 1.3, 1.5 Cu. Ft. Models 1990 - Present Tappan Reconditioned Models 1990 - 1995 Full Parts & Labor • • • Full Parts & Labor • • • st 1 year: Labor and full parts. nd 2 year: Carry-In Warranty - Replace any defective part of the microwave oven section (part only). nd th 2 - 10 years: Replace any defective magnatron tube (part only). st 1 year: Labor and full parts. nd 2 year: Carry-In Warranty - Replace any defective part of the microwave oven section (part only). nd th 2 - 10 years: Replace any defective magnatron tube (part only). MICRO WALL OVENS Frigidaire Tappan 1990 - Present Full Parts & Labor • • st • 1 year: Labor and full parts. nd 2 year: Carry-In Warranty - Replace any defective part of the microwave oven section (part only). nd th 2 - 10 years: Replace any defective magnatron tube (part only). WALL OVENS Frigidaire (non-Gallery) Gas & Electric, Tappan Gas & Electric, White Westinghouse Electric Models 1990 - Present Full Parts & Labor • 1 year: Labor and full parts. Frigidaire Gallery / Pro Gallery Gas & Electric Models 1995 - Mar 1999 Full Parts & Labor • • 1 - 2 years: Labor and full parts. nd th 2 - 10 years: Replace any defective magnatron tube (part only) Mar 1999 - Present Full Parts & Labor • 1 year: Labor and full parts. 1995 - Mar 1999 Full Parts & Labor • 1 - 2 years: Labor and full parts. Mar 1999 - Present Full Parts & Labor • 1 year: Labor and full parts. 1990 - Present Full Parts & Labor • 1 st st nd st RANGE HOODS Frigidaire Gallery Support Brands st nd st std year: Labor and full parts. Limited Warranty - Alaskan Exclusion (Applicable to ALL PRODUCTS/BRANDS LISTED IN THIS CHART for the time periods outlined): All of the coverage's of each product warranty apply, plus any exclusions on the actual warranties (see *Normal Responsibilities of the Consumer). Not covered Costs of the technician's travel to the home and any costs for pickup and delivery of the appliance required because of service. 9-5-00 mcd 63 Warranty Parts Recovery Program As part of an increased effort to drive supplier quality, EHP is implementing a Warranty Parts Recovery program to collect failed component parts from the field for review and testing. The following list is provided to give the service community a "heads up" as to which parts they may be required to return to the factory via prepaid shipping labels. A sample of these service parts will have a prepaid Fed Ex shipping label and an instruction label included in the packaging. Servicers are instructed to use the same box the part was packaged in to return the part to the factory for testing. Simply apply the Fed Ex label and have part shipped at no cost direct to the factory. This process has already been implemented in a limited capacity by our Dishwasher Product Line as well as in Refrigeration. This new program is an expanded effort building upon their precedence. Top Parts for Return Part # Item Part # Item Part # Item 240370304 Filter Cup Hsg 240352403 Ice Maker 5308002385 Snubber Ring 131686100 Washer Belt 316207502 EOC 131878400 Trans Assembly 5303279394 Water Seal Kit 5303918277 Ice Maker 316220805 Clock Overlay 5303935066 Ignitor 240531101 Water Valve 131878401 Trans Assembly 5304425594 Compressor 134149200 Controller Assy 154373301 Water Valve 240369701 Evap Fan Motor 5304426010 Control Board 134101800 Lid Lock 5304426004 Control Board 131560100 Motor, Main Drive 134051200 Drain Pump 218428101 Handle Door 316233900 Probe, Oven Temp 316220804 Clock Overlay 316021501 Element Switch 154362809 Control 154418301 Motor Assembly 131878402 Trans Assembly 316135701 Spark Module 131902700 Motor, Pulley 316222802 EOC 131553900 Heater, Hsg Assy 131192800 Screw, Lockplate 316251942 Main Top Assy 154361201 Latch Assembly 154408901 Timer 316021500 Element Switch 154361203 Latch Assembly 5303207418 Water Valve 154230101 Detergent Disp. 131802100 Timer Washer Please be aware that all claims are subject to an auditing process and fraud is punishable by law. 64