1
Infusomat® Space P
and Accessories
Instructions for Use
It is recommended that all pumps at
your ward are equipped with the
same software version.
GB Valid for Software 687F
CONTENTS
CONTENTS
Infusomat® Space P Overview ...............................................................................................3
Patient Safety
........................................................................................................................5
Menu Structure / Overview ....................................................................................................8
Menu Structure / Navigation.................................................................................................9
Chapter 1
Operation ..........................................................................................................11
1.1 Start of Infusion .........................................................................................................................11
1.2 Entry With Different Combinations of Rate, VTBI (= Volume To Be Infused)
and Time .......................................................................................................................................13
1.3 Bolus Application.......................................................................................................................14
1.4 Infusion Line Change and New Therapy Start ..................................................................15
1.5 End of Infusion ...........................................................................................................................15
1.6 Standby Mode.............................................................................................................................16
Chapter 2
Advanced Operations....................................................................................17
2.1 Status Request of Pump when Infusion is Running........................................................17
2.2 Rate, VTBI and Time Change Without Infusion Interruption and Reset
of Status Menu Data ................................................................................................................17
Chapter 3
Special Functions* .........................................................................................18
3.1
3.2
3.3
3.4
3.5
Chapter 4
Dose Rate Calculation (Overview) ........................................................................................18
Dose Rate Calculation (Operation) .......................................................................................18
Drug Library.................................................................................................................................19
Patient Controlled Analgesia (PCA) ......................................................................................20
Piggyback Function ...................................................................................................................22
Options..............................................................................................................24
4.1 Occlusion Pressure.....................................................................................................................24
4.2 Data Lock......................................................................................................................................24
4.3 Bolus Rate....................................................................................................................................25
4.4 KVO-Mode....................................................................................................................................25
4.5 Contrast / Display Light / Keypad Light ..............................................................................26
4.6 Alarm Volume..............................................................................................................................26
4.7 Date / Time ..................................................................................................................................26
4.8 Macro Mode ................................................................................................................................26
4.9 Language ......................................................................................................................................26
4.10 Upstream Occlusion Pressure.................................................................................................27
Chapter 5
Alarms ...............................................................................................................28
5.1
5.2
5.3
5.4
Device Alarms .............................................................................................................................28
Pre-Alarms and Operating Alarms........................................................................................28
Reminder Alarms........................................................................................................................31
Alarm Hints..................................................................................................................................32
Chapter 6
Battery Operation and Maintenance .......................................................33
Chapter 7
Start Up Graphs and Trumpet Curves......................................................35
Chapter 8
Technical Data ................................................................................................36
Chapter 9
Warranty / Training / TSC`** / Service / Cleaning / Disposal ...........39
Chapter 10 Instructions for Use Accessory...................................................................41
Ordering
.....................................................................................................................46
*The availability of the listed features is depending on the configuration of the pump.
**Technical Safety Check
2
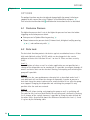
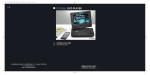
INFUSOMAT SPACE® OVERVIEW
I N F U S O M AT ® S PA C E P O V E R V I E W
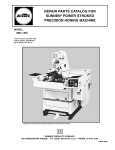
Arrow up and -down
Scroll through menus, change setting of numbers from
0-9, answer Yes/No questions.
Arrow left and -right
Select data from a scale and switch between digits when
numbers are entered. Open a function while pump is
running or stopped with the left arrow key.
q
Press to reset single values
to zero and switch back to
the previous screen/menu
level.
Press to
open the
pump door.
c
x
Press to
initiate
bolus.
Yellow LED:
Pre-alarm, reminder alarm
Green / Red LED: Infusion occuring / device alarm,
operating alarm
Blue LED:
Currently connected to SpaceControl
k
Open certain functions
and press to confirm
values/settings/alarms.
m
Press to link the pump to
SpaceControl and to assign a
barcode after scanning.
Press to turn
pump on/off.
B o
n
f
S
Press to Start/Stop
infusion.
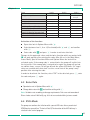
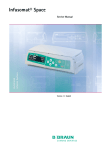
Cover of Battery Compartment
Before changing the battery, always disconnect the pump from the patient and switch off the device.
To remove the battery cover push the button below the battery compartment with a pointed pen and pull the cover
away from device. Slide green locking mechanism on back of battery up and take out battery pack for exchange.
A crank in order to open the pump door in case of emergency is attached to the inside of the battery compartment
cover (for closer information see 1.4).
Port for drop sensor
Port P3 for future options
3
Port P2 for power supply, SpaceStation,
connection lead (12V), combi lead and
further accessory leads (staff call, service)
INFUSOMAT® SPACE P OVERVIEW
Pressure
sensor
Opening lever
Safety
clamp
Air
sensor
Signal lamp
Line guide
cover
Upstreamsensor
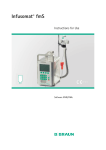
Fixaton of PoleClamp (Universal Clamp)
Line up bar of pump with bar of PoleClamp
and slide PoleClamp forward until locking
mechanism clicks.
To remove, press release button on frame,
push handle down and pull PoleClamp bakkwards.
Transport
A maximum of three pumps (Infusomat®
Space P or Perfusor® Space) plus one
SpaceControl may be stacked together.
Avoid external mechanical influence.
Locking Devices Together
Line up the bar of the lower pump with the
bar of the pump above and slide the lower
pump backwards until the lock clicks and
the green buttons are above each other.
To disconnect, push green locking buttons
of top pump device and slide bottom pump
forward.
Pole Fixation
Push the opening of the PoleClamp against
the vertical pole and lock the screw tightly.
Unscrew to release.
For vertical fixation of PoleClamp push
lever down and rotate either way until lever
clicks into notch. Push lever for rotation.
Caution: Do not lean on pump when
attached to pole!
4
PATIENT SAFETY
PAT I E N T S A F E T Y
w
Intended use
The Infusomat® Space Volumetric Infusion Pump System includes an external
transportable electronic volumetric infusion pump, dedicated administration
Read Instructions
for Use prior to use. sets, and pump accessories. The system is intended for use on adults, pediatrics,
The infusion device and neonates for the intermittent or continuous delivery of parenteral and
enteral fluids through clinically accepted routes of administration. These routes
should only be
include, but are not limited to intravenous, irrigation/ablation, and enteral. The
used by specially
trained staff.
system is used for the delivery of medications indicated for infusion therapy
including but not limited to colloids and cristalloids, blood and blood components, Total Parenteral Nutrition (TPN), lipids, and enteral fluids. The Infusomat®
Space Volumetric Infusion Pump System is intended to be used by trained
healthcare professionals in healthcare facilities, home care, outpatient, and
medical transport environments.
Qualified medical staff should decide how the device should be used based on
its features and specifications. For more details, please read the Instructions for
Use.
Operation
• The initial training of the Infusomat® Space P is to be performed by B. Braun
sales personnel or other authorized persons. After each software update, the
user is required to inform himself about the changes to the device and
accessories in the instructions for use.
• Ensure the unit is properly positioned and secured. The pump must be
positioned on a level surface if used in combination with the short stand. Do
not position the pump above the patient.
• Prior to administration, visibly inspect the pump for damage, missing parts or
contamination and check audible and visible alarms during selftest.
• Only connect to patient once the line has been correctly inserted and
completely primed. Interrupt connection during line change to prevent
incorrect dose delivery.
• Select infusion line/catheter suitable for use with the intended medical
application.
• Position the infusion line free of kinks.
• Recommended change of disposable each 24 h (or as per national hygiene
regulations).
• Installation in medically used rooms must comply with the appropriate
regulations (e.g. VDE 0100, VDE 0107 or IEC-publications). Observe national
specifications and deviations.
• Do not operate the pump in the presence of flammable anaesthetics to
prevent explosion.
5
PATIENT SAFETY
• Compare the displayed value with the entered value. Only start the infusion
if the values showing are the same.
• If staff call is used we recommend checking the equipment once after
connecting the pump.
• Protect the device and the power supply against moisture.
• If the pump falls down or is exposed to force, it must be checked by the
service department.
• The displayed data must always be checked by the user prior to making
further medical decisions.
• During mobile use (homecare, patient transport inside and outside the
hospital): Make sure the device is securely fixed and positioned. Positioning
changes and severe shock can lead to minor changes in the delivery
accuracy.
• A supplemental patient monitoring must be carried out if life-saving
medication is performed.
• The air detector cannot detect air diffusing in the following components:
three-way stopcocks, infusion adapters and further lines placed between
pump and patient.
• In case high potent drugs are given be sure to have a second infusion pump
for that drug at hand.
• Independant of the soft limits the selected values have to be the medically
correct ones for the given patient.
• In case values relevant for the dose rate calculation are changing always the
flow rate will be updated and the dose rate will be fix.
Enteral Nutrition
The Infusomat Space may be used for entaral nutrition, too. Do not use enteral
fluids for intravenous infusion as this may harm your patient. For this reason
only use disposables dedicated and labelled for enteral nutrition.
Transfusion
The Infusomat Space may be uses for blood transfusion, too. For this therapy
only use disposables dedicated and labelled for transfusion.
Other components
• Use only pressure-proof and compatible disposable items (min. 2 bar/
1500 mm Hg) to avoid influencing performance data- which would result in
impairing patient safety.
6
• Where several infusion lines are connected on one single vascular access, the
possibility of the lines exerting a mutual influence over each other cannot be
excluded.
PATIENT SAFETY
• Refer to respective manufacturer’s information for possible incompatibilities
of equipment with respect to drugs.
• Use only compatible combinations of equipment, accessories, working parts
and disposables with luer lock connectors.
• Connected electrical equipment must comply with the relevant IEC/ENspecifications (e.g. IEC/EN 60950 for data-processing equipment). The
user/operator is responsible for the system configuration if additional
equipment is connected. The international standard IEC/EN 60601-1-1 has to
be taken into account.
Safety Standards
Infusomat® Space P satisfies all safety standards for medical electrical devices
in compliance with IEC/EN 60601-1 and IEC/EN 60601-2-24.
• The EMC-limits (electro-magnetic compatibility) according to
IEC/EN 60601-1-2 and IEC/EN 60601-2-24 are maintained. If the equipment
is operated in the vicinity of other equipment which may cause high levels of
interference (e.g. HF surgical equipment, nuclear spin tomography units,
mobile telephones etc.) maintain the recommended protective distances from
these devices.
• The Infusomat® Space P fulfils the applicable requirements of EN 13718 to
be used in the air, on the water and in difficult terrain. During transport the
Infusomat® Space needs to be fixed on a suitable restraint system by means
of SpaceStation or Pole Clamp SP. When stored under temperature conditions
beyond the defined operating conditions the Infusomat® Space P needs to
remain under room temperature at least one hour before usage.
• As there is no dedicated norm existing for enteral feeding pumps the safety
features of Infusomat Space P are also for enteral nutrition according to the
a.m. norms.
Safety Instructions
• In case the demand button is used with SpaceStation the PCA pump has to
be placed in the lowest slot of the lowest SpaceStation.
• Access to the pump settings can be prohibited by DataLock 3. The code for
DataLock level 3 should differ from the one for levels 1 and 2 in case the
pump is only allowed to be used by pain management professionals.
• When ending PCA and starting it again the therapy data are set to default
values.
• Using the demand button also the patient is a permitted user. With the
demand button only a PCA-bolus can be requested. This is limited to predefined doses by drug list and pump settings.
7
MENU STRUCTURE / OVERVIEW
MENU STRUCTURE / OVERVIEW
Cutline
o On/Off button
x
C Clear button
K OK button
Q Keypad with arrow up, -down,
Door open button
s Start/Stop button
f
b Bolus button
n
-left, -right button
m Connection button
Menu Structure
Start Up
Menu
Main
Menu
Special
Functions
Options
Menu
Status
Menu
Line
selection
Change to
PGY 1/2
Dose Rate
Calculation
Occlusion
Pressure
Total
(Total volume)
Prime ?
Concentration
Drug Library
Data Lock
Total
(Total amount)
Use last
therapy ?
Weight
Piggyback
Bolus
Rate
Total
(Total time)
Use dose rate
calculation ?
Dose
Change-over
from
continuous
mode to PCA
KVOMode
Intermed.
volume
Use drug
library ?
Rate
Contrast
Intermed.
amount
VTBI
VTBI
Display
Light
Intermed.
time
Time
Keypad
Light
Line
Special
Functions
Alarm
Volume
Drug Info
Options
Date
PGY
Change
Status
Time
Batt. cap.
Macro
Mode
Version
Language
Upstream
Pressure
In dose mode:
Display of flow
rate in large
scale.
8
The pump can
be customized
by (de-)
activating the
menu items of
the Start Up
(except VTBI)
and Options
Menu as well as
the bolus function via the
service program.
MENU STRUCTURE / NAVIGATION
MENU STRUCTURE / NAVIGATION
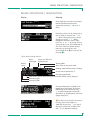
Display
Meaning
At the top of the screen the last therapy is
indicated. Yes/No question can be
answered by pressing u for yes or d
for no.
Parameters which can be changed (e.g.
rate in ml/h) are opened with l or
k. When editing parameters, switch
digits/levels using l r. White
background indicates current digit/
level. Use u or d to change current
setting. Help text on the bottom/top of
the screen indicates options how to
proceed (e.g. confirm rate with k,
start infusion with s
f or clear rate by
pressing c).
Typical display during infusion:
Mains
connection
Battery
status
Set pressure limit and
current pressure
Therapy profile
Active VTBI- or time preselection
Scrolling arrows indicate pump is infusing
Set rate can be opened with l
Unit of drug application
Total volume infused. Alternatively the intermediate volume can be displayed.
Remaining time
Remaining VTBI
All status information is available in the
bottom line of the dislplay. The desired
information can be selected by using d
u and will be displayed permanently
thereafter (e. g. drug long name, time until
syringe empty etc.).
n has been pressed while the pump is
b
infusing. Start manual bolus at
1200 ml/h by pressing k (see top of
display) or proceed to set bolus limit
with l (see bottom of display).
9
MENU STRUCTURE / NAVIGATION
Display
Meaning
This hint pops up if a user tries to edit or
change a parameter by pressing l when
that parameter is unable to be changed.
Set pressure level with l or r and
confirm by pressing k.
Cancel to edit pressure by using c.
Pre-alarms are indicated by a message on
the display (e.g. “VTBI near end”), an
audible tone and a flashing yellow LED.
To confirm a pre-alarm press k.
In case of an operating alarm (e.g. "VTBI
infused") the infusion stops, an audible
tone sounds and the red LED flashes.
Confirm alarm by using k.
Confirming does not activate an acoustic
feedback.
Press and hold o for 3 sec to turn pump
off. A white bar stretches from left to
right and counts down the 3 sec.
As long there is an infusion line inserted
the pump will not turn off but will use
standby.
10
OPERATION
Chapter 1
OPERATION
1.1 Start of Infusion
• Ensure that the pump is properly installed. Check the equipment for completeness
and damages. Do not attach the infusion bottle below the pump level.
• Put the spike vertically into the infusion bottle. Fill the bottom part of the drop
chamber by max. 2/3.
• Fill the infusion line from bottom to top, then close the roller clamp.
• If the device is connected to the mains, the display indicates the battery status, the
mains connection symbol and the last therapy.
• Press o to switch on the device. Observe the automatic self-test: The message
“Self-test active” and the software version are displayed, two audible tones sound
and all three LEDs (yellow, green/red and blue) flash once. Information about the
power supply (mains or battery operation) and the set pressure level are indicated.
In addition, the line type appears at first (provided that the line is already inserted).
Then, the accumulated air volume and the max. size of air bubbles is indicated
which is triggering the air alarm of the device.
The pump offers the possibility to load up to four languages into the pump
(depending on the number of the language specific characters), among which the
user can choose during the operation of the pump. During the first ever start-up of
the device, the user is requested to select the languages and to mark them with l.
After that, the selection has to be confirmed by choosing the last menu item at the
bottom of the list and pressing k. Then the desired language must be selected with
t and confirmed with k. Answer the following question with d in order to
activate the selected language.
• Press c to start the direct entry of therapy parameters, or press x and u to
open the pump door in order to continue with inserting the line.
Caution: You may only insert the line while the device is switched on and the line
guide element is inserted. Otherwise, there is the danger of freeflow. The pump is permitted to be used on a temperature scale from 18 - 35 °C. Do not use the pump beyond these temperatures. Never leave the pump unattended when inserting the tube.
Caution: Inserting different lines into the pump is identical. Please see instructions and
packaging of the different lines (standard, transfusion, opaque, enterel nutrition etc.)
to receive information about preparation and usage of these lines.
11
OPERATION
Chapter 1
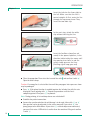
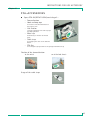
Insert the infusion line from right to
the left. Make sure that the line is
routed straight. At first, route the line
through the upstream sensor. Then,
insert the two-hole clip.
In the next step, attach the white
clip without twisting the line.
Insert the freeflow clamp (see red
arrow) in the opened aperture, in the
direction indicated by the arrow, until
the opening lever locks in and the
safety clamp squeezes the lines
(flashing signal lamp goes out).
• Close the pump door. Then select the inserted line with t and confirm it with l.
Open the roller clamp.
Caution: If a wrong line is selected the time until the pump goes into a pressure alarm
may be prolonged.
• Press u if the prime function is enabled to prime the infusion line with the rate
displayed. Cancel priming with k. Repeat the procedure until the line is
completely primed. Then press d to proceed.
Note: During priming, all air and drop alarms are switched off.
• Establish the patient connection.
• Answer the question whether the old therapy is to be used either with u or d
(the question can be deactivated via the service manual). If you select u, the
pump jumps to the Main Menu. If you select d with no drop sensor connected,
you must first enter a VTBI which is smaller than the container filling and confirm
it with k.
12
OPERATION
Chapter 1
Note: At rates smaller 1 ml/h the detection of a closed roller clamp cannot always be
ensured due to physical reasons. Therefore it is recommended especially at small rates
to use a drop sensor.
Adjusting the delivey rate:
• In the Main Menu, open the rate with l and set it with q.
• Press s
f to start the infusion. Running arrows on the display and the green
LED indicate that the pump is infusing.
Note: The running infusion can be cancelled at any time by pressing s
f. The
pump can be turned off at any time by pressing o for 3 sec (Exception: Data
lock level 2) and as long a disposable is inserted.
1.2 Entry With Different Combinations of Rate, VTBI
(= Volume To Be Infused) and Time
The Infusomat® Space P offers the possibility to enter a volume- and time limit in
addition to an infusion rate. When two of these parameters are entered, the third is
calculated by the pump. If a volume and/or time is preselected, an arrow symbol is
placed in front of one of these parameters in the Main Menu. It is called the “target”.
During the infusion of the pump, this target symbol is displayed next to the moving
arrows in the run display. This indicates that the pump has been programmed, either
with a volume- or time limit. The assignment of the target symbol, apparent in the
Main Menu, shows the established parameter for the application (VTBI or time). When
the rate is changed, the so-called target parameter is principally not adjusted to the
new rate but to the parameter which does not have the target symbol in front. After
the infusion has started, the remaining VTBI and time are displayed in the Main Menu
and the run display (values are counting down).
1.) Enter VTBI and time: The infusion rate will be calculated and displayed on the
bottom of the display.
Target: Volume
• Select VTBI with t and open with l.
• Enter VTBI with q and confirm with k.
• Select time with t and open with l.
• Enter time with q and confirm with k.
Check calculated rate on plausibility.
Proceed in the same way to calculate 2.) and 3.).
2.) Infusion with volume limit
Enter rate and VTBI: The infusion time will be calculated and displayed on the
bottom of the display.
Target: VTBI
13
OPERATION
Chapter 1
3.) Infusion with time limit
Enter rate and time: The infusion volume will be calculated and displayed on the
bottom of the display.
Target: Time
Changing already entered values of VTBI and time (rate, VTBI and time already exist
at the point of change):
a) Target symbol is placed in front of VTBI:
• Change of VTBI => Adjustment of time. Old and new target: VTBI
• Change of time => Adjustment of rate. Old and new target: VTBI
b) Target symbol is placed in front of time:
• Change of time => Adjustment of VTBI. Old and new target: Time
• Change of VTBI => Adjustment of time. New target: VTBI
1.3 Bolus Application
There are three ways to administer a bolus:
1.) Manual Bolus: Press n
b. Then press k and hold button. Fluid is
administered for as long as the button is held down. The infused bolus
volume is displayed.
The max. bolus time is limited to 10 sec.
2.) Bolus with volume preselection: Press n
b. Then press l and set bolus dose
limit by using q. Press n
b to confirm and start bolus. Depending on the
service tool settings an acoustic signal will sound after finishing the bolus
volume.
3.) Bolus with rate calculation: Press n
b. Then press l and set bolus dose by
using q. Press k to confirm bolus dose. Set time with q in which a
bolus is to be delivered. Calculated bolus rate is shown on top of the display.
Press n
b to confirm and start bolus.
The unit of the bolus always depends on the selected dose. If the dose is for
example selected as mg/kg/h, then the bolus will be given in mg/kg. If a dose is
administered without a relation to the patient's weight (mg/h), then the bolus
will be given in mg.
You can use the service program to enter a default and a maximum bolus rate.
Once a new therapy is started the device always returns to the default rate
- even if the bolus rate was manually changed beforehand..
Note: If the bolus limit is not entered after pressing b
n, the pump switches back into
the run display automatically.
Note: The infused volume during bolus with volume preselection counts up.
In order to purge the line at any time while the pump is stopped press n
b.
Answer the following question by pressing u in order to start the purge
process. Cancel by pressing k or any other key.
14
OPERATION
Chapter 1
Caution: Take care not to overdose! Given a bolus rate of 1200 ml/h, 1 ml will
be administered in just 3 sec. To cancel bolus infusion at any time press k. At
low bolus volumes, under dosages due to the start up characteristic of the pump
and the tolerances in the infusion system cannot be excluded. Disconnect
patient while purging.
1.4 Infusion Line Change and New Therapy Start
Note: Always interrupt the patient connection before changing a line to avoid dosing
errors. Never let the pump run unattended when changing the line. Check and clean
the safety clamp regularly.
• Press s
f to stop the delivery. The green LED goes out. Close the roller clamp
and interrupt the patient connection.
• Press x and open the pump door with u. Press down the green opening lever
completely until it locks in place, remove the line and insert a new line.
Note: If for an unknown reason the pump door cannot be opened anymore, you need
to take a crank from the inside of the battery compartment cover. Use this crank to
remove the emergency aperture cover of the pump. Place the crank in the aperture and
turn it clockwise until the pump door opens.
• Close the pump door, confirm the inserted line with k and open the roller clamp.
• If required, prime the pump with u. Then press d to proceed.
• Establish the patient connection and check the parameters with t.
• Start the infusion by pressing s
f.
Note: A new therapy can be started at any time during a stopped infusion. If the pump
is in the Main, Status or Options Menu, press C (repeatedly) and follow the
instructions as described.
1.5 End of Infusion
• Press s
f to stop the infusion. The green LED goes out. Close the roller clamp
and interrupt the patient connection.
• Press x. Answer the question whether the pump door is to be opened with
u.
• Press down the green opening lever completely until it locks in place.
Remove the line and close the pump door.
• Press o for 3 sec to switch off the pump.
Note: The settings will be permanently saved by the switched off device.
15
ADVANCED OPERATIONS
Chapter 1
1.6 Standby Mode
In the case of extended interruption, the user has the option to maintain the set values.
• Press s
f to stop the infusion. Then press o for less than 3 sec.
• Confirm that the device is supposed to switch to stand-by by pressing u.
• The default time for standby is displayed. Accept the default time with k or
change it with q (0-24 hours) and then confirm it by pressing k.
=> While the pump is in the standby mode, it’s display shows the drug and the
remaining time for this mode. Change of remaining time by pressing k.
Exit standby by pressing c .
16
ADVANCED OPERATIONS
Chapter 2
ADVANCED OPERATIONS
2.1 Status Request of Pump when Infusion is Running
Press c to switch between run display and Main Menu while the device is
infusing. Navigate through the menu using t to check parameters. In order to
check the menu parameters in the Status-/Options Menu, select "Status"
respectively "Options" in the Main Menu, open menu with l and scroll
through menu with t.
2.2 Rate, VTBI and Time Change Without Infusion
Interruption and Reset Of Status Menu Data
• Press c when the pump is in the run display in order to switch to the Main Menu.
Select rate/VTBI/time with t and press l in order to open the parameter.
• Enter new value with q and confirm with k.
Reset Status Menu Data:
The parameters intermediate volume and -time can be reset when the pump is
infusing or when the pump has stopped.
• Select “Status” in Main Menu with t and press l.
• Highlight intermediate volume (in ml) or intermediate time (in h:min) with t and
open parameter with l.
• Reset values by pressing u.
Both parameter total volume and -time, are displayed in the pump as "Total" with the
according unit and can be reset by starting a new therapy. A second way to reset the
parameters when the pump is in the Main Menu: Press c, answer question whether
the last therapy is to be used with u and reset the values with u.
The type of the inserted line is displayed in menu item „Line“ and cannot be changed
once it has been confirmed at the beginning of the infusion. The drug info states the
drug name, the name of the drug list and its date of origin. If the change from the
secondary to the primary infusion will be performed manually or automatically will be
displayed in line “PGY change”. The current battery capacity in hours and minutes is
displayed in the menu item “Battery Cap.” and the current software version in menu
item "Version".
17
SPECIAL FUNCTIONS
Chapter 3
SPECIAL FUNCTIONS
3.1 Dose Rate Calculation (Overview)
The dose rate calculation enables a calculation of the rate in ml/h from the entered
dose parameters.
Infusion rate [ml/h] =
Dose
x Patient weight (optional)
Concentration
[
]
Setting parameters:
1. Concentration as the amount of the active ingredient per volume.
- Amount of the active ingredient in µg, mg, mmol, IU or mEq.
- Volume in ml.
2. Where necessary: Patient weight in kg or lbs.
3. Dose prescription:
- time related as the amount of the active ingredient per min, h or 24h.
- time and patient weight related as the amount of the active
ingredient per kg per min, h or 24h.
4. Where necessary: VTBI in ml.
3.2 Dose Rate Calculation (Operation)
a Select dose rate calculation with l.
a Select the unit of the active ingredient with T and confirm it with l.
a Enter the concentration by entering the amount of the active ingredient
and the volume. In order to do so set the values with q and confirm
with k.
a If the patient's weight does not need to be entered press d.
Press u for a time and weight related calculation, set the patient
weight with q and confirm it with k.
a Select the dose prescription with t and confirm it with l.
a Set the dose with q and confirm with k. The rate will be
automatically calculated and displayed at the bottom of the display.
a Check the calculated rate and if necessary the adapted parameters with
t on plausibility before starting the infusion with s
f.
a Check the parameters with t on plausibility before starting with s
f.
Concentration and dose can belatedly be changed in the Main Menu in the
same way as the rate, VTBI and time (compare 2.2). The effect of dose
modifications on other parameters is shown at the bottom of the display.
Additionally the total and intermediate amount of the infused drug can be
18
SPECIAL FUNCTIONS
Chapter 3
taken from the Status Menu. These can be checked and reset in the same way
as the other total and intermediate values.
A deactivation of the dose rate calculation is only possible when the pump is
stopped. Press c from Main Menu and then press d.
3.3 Drug Library
Up to 720 drug names including therapy data and information can be stored in
15 categories. The loading process into the pump can be performed using a
separate PC program („Drug List Editor Space“).
Note: The drug library can be started over the Start Up and Special Functions
Menu. The user has to make sure prior to the therapy start that the drug library
in the pump complies with the patient target group. The name of the drug
library (see headline) will be displayed on the pump.
There are different ways of activating the drug library. This can be done while
the infusion is running or when the pump is stopped.
On the one hand, a drug name including the according therapy data can be
taken from the drug library. On the other hand, if a rate, VTBI and/or time were
already defined in the Main Menu, the drug name and the adjusted values of
the data set will be loaded.If a dose rate calculation has already been started a
belated assignment of the drug name nevertheless is possible.
In the following the loading of a drug including the according parameters will
be described:
•
Open the drug library by pressing l.
•
Navigate through list with t and select the drug from category in
alphabetical order (all drugs) or within a category with l.
•
Confirm the displayed drug information with l.
•
Check if the drug short name in the Main Menu is the same as the selected
drug. Check the parameter in the Main Menu with t and start infusion
with s
f.
Hard Limits:
If the set rate/dose/bolus volume and bolus rate exceed the values stored in the
drug library (hard limits), the drug will be rejected, a hint will be displayed and
the pump will fall back into the drug selection. If this occurs while the pump is
infusing the pump will continue to administrate.
Soft Limits:
For the same parameters so called soft limits can be preset via the Drug List
Editor. These can be exceeded without any constraint. The following symbols
19
SPECIAL FUNCTIONS
Chapter 3
that describe the status with regard to the soft limits are being displayed:
The infusion is within the range of the minimum and maximum
soft limits
=
The infusion is within the range of the maximum soft limit
=
The infusion is within the range of the minimum soft limit
=
Violation of the upper soft limit
=
Violation of the lower soft limit
=
No soft limit is defined
=
Only a drug name is available
(It is possible to select a drug name only from the drug library)
=
The limits of the drug library have to comply with the limits of the pump and
the disposable.
Note: An adequate monitoring when infusing highly potent drugs is
recommended.
Note: In case a drug from the drug library is selected and the pump is running
under dose rate calculation the initial values will be overwritten by the drug
library values if selected.
3.4 Patient Controlled Analgesia (PCA)
For PCA a drug list with at least one drug activating the profile PCA is
necessary. By this the conditions for an effective and safe therapy are defined.
Switch on pump with o and wait until self-check is finished. Depending on
the settings the choice of a drug is offered direcly or the pump is in “Main
Menu”.
Select “Special Functions” with t from “Main Menu” and confirm with l.
After the selection the pump
offers additional drug related
Information which are confirmed
by l.
Select profile PCA by using and
confirm with t .The therapy settings stored in the drug list are
displayed *.
*Bolus volume is the volume of a single bolus the patient may demand. Max. Limit is the amount of
drug or volume a patient may demand within a certain time in total. Lockout is the time in between
two boli.
20
SPECIAL FUNCTIONS
Chapter 3
Select drug list, category and desired drug by using q.
The therapy can be started now with s
f in case all values are defined.
Depending on the pre-defined settings the therapy is started with an initial
bolus and a basal rate or not.
Before leaving the patient the pump should be put into DataLock level 3 with
q in Menu “Options”. This is necessary especially in case non-authorised access
to the settings can be anticipated.
The pump display now may look
like this.
The code is entered with q and confirmed with k.
In this state the patient is allowed to demand boli. Depending on the status of
the therapy these are either administered or denied. Changing the syringe is also
possible by using the code for level 1 or level 2. Altering the settings for PCA or
other therapies however is only possible with the code for level 3.
The status of the therapy can be checked in the menu „Status“ .
Enter the „Main Menu“ with c and select the “Status“ with q.
The A/D-ratio indicates the
percentage of administered and
demanded boli thus giving an idea
about the effectivity of the
therapy.
An acoustic confirmation of demanded boli can be activated and modulated by
t in Data Lock 3.
Is a demand button connected, the therapy symbol looks like this:
In case there is no demand button connected the therapy symbol looks like
this:
.
The demand button is connected to the interface P2 at the rear side of the
pump.
Hint: It is possible to start a therapy in continuous mode and switch over to
PCA later on (in case the drug is dedicated for use with continuous and PCA
application).
21
SPECIAL FUNCTIONS
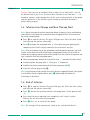
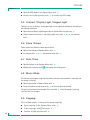
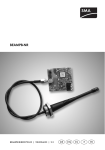
3.5 Piggyback Function
The piggyback-mode offers the possibility to interrupt the current (primary)
infusion temporarily in order to administer a piggyback (secondary) infusion.
Above the pump the piggyback-infusion line is connected with a Y-connector to
the administration set. The secondary infusion is supposed to be located approx.
20 cm higher than the primary infusion. All infusion lines need to be completely
primed. A back check valve has to be placed according to the drawing (see next
page).
A precondition to start the piggyback function is that the pump is stopped.
Note: Please mind to set a VTBI of the primary and secondary infusion that
corresponds to the size of the container.
• Enter the rate manually or load into the pump via the dose rate calculation or the
drug library. It is not possible to begin with the secondary infusion if the data for
the primary infusion (rate and VTBI) is not set.
• Select „Piggyback” from the Special Functions Menu and confirm with l.
• The change from the secondary to the primary infusion ("PIGY" to "PRIM") can be
done manually or automatically. Correspondingly, if an automatic change is to be
made automatically or manually is to be answered with u or d.
• The rate and VTBI of the secondary infusion can be loaded via the dose rate
calculation, the drug library or are to be entered manually with q.
• Start secondary infusion by pressing s
f. Device delivers the piggyback
volume with the set piggyback rate.
Symbols in the headline of the run display ("PRIM" or "PIGY") will indicate if
the primary or secondary infusion is currently running.
When the piggyback volume is infused the pump automatically changes to the
primary infusion if this was selected. If the VTBI of Primary infusion is infused
the pump will continue with the KVO-rate respectively after the KVO-operation
the pump stops and activates an alarm. If a manual change from secondary
infusion to primary infusion was selected, the pump will stop or continue with
KVO after the secondary infusion is completed and the user manually has to
change via the menu item “Change to PRIM“ in the Main Menu to the primary
infusion and start with s
f.
Note: Switching manually between primary and secondary infusion in the Main
Menu is possible at any time while the pump is stopped. It is recommended to
keep the roller clamp of the non-active infusion closed.
22
SPECIAL FUNCTIONS
Chapter 4
Secondary
infusion
e.g. 100 ml
bag volume
with delivery
rate 10 ml/h
Primary
infusion
e.g. 1000 ml
bag volume
with delivery
rate 25 ml/h
Clamp
Clamp
Back check valve
Y-connector
Piggyback line
Dripchamber
Roller clamp
Infusion pump
To
patient
23
OPTIONS
Chapter 4
OPTIONS
The options functions may be selected and changed while the pump is infusing or
stopped. To edit a menu item, select “Options” in the Main Menu and press l.
Then select desired function with t and follow the Instructions for Use as described.
4.1 Occlusion Pressure
The higher the pressure level is set at, the higher the pressure level must rise before
triggering an occlusion pressure alarm.
• Enter pressure in Options Menu by pressing l.
• Choose between nine pressure levels (1=lowest level; 9=highest level) by pressing
l or r and confirm entry with k.
4.2 Data Lock
The data lock function protects the device against unauthorized access. A four
digit code (default setting “9119”), which can be changed via the service
program activates this function in level 1 or level 2. There are three security
levels.
Level 1:
A modification of values as well as a bolus application are not possible but a
change of the disposable can be conducted. It is possible to navigate through all
menus and status data can be checked. Starting, interrupting and switching the
pump off is possible.
Level 2:
This level has the same performance characteristic as described under level 1
and additional will not allow the change of disposable. In order to prevent a
data lock alarm the correct code must be entered within 20 sec after the pump
was stopped. Changing the disposable and switching the pump off is only
possible after the code was entered.
Level 3:
This level will allow starting and stopping the pump as well as switching off.
The code for this level may be different for each drug and is defined in the drug
list. A change of the syringe, however, is possible by using the code defined for
the other levels. An overview about the differences between the levels 1, 2 and
3 is given by the following table.
24
OPTIONS
Chapter 4
Event
Change of disposable
Start of infusion
Change of parameters
Stop of infusion
Switching off pump / Standby
PCA bolus with pump-based bolus button
Customisable screen
Acoustic feedback of demanded boli
Indicates denied PCA boli
Level 1
Level 2
Level 3
with code for
level 1/2
= possible | = not possible | = followed by standby-alarm
Activation of the function:
•
Open data lock in Options Menu with l.
•
Select between level 1, 2 or 3 (if activated) with l and r and confirm
with k.
•
Enter code with q and press k in order to activate data lock.
Changes to the protected values and the bolus function which are marked with
y are only possible after entering the code. After 20 sec in the Main Menu,
Status Menu, Special Functions Menu and Options Menu the lock will be
activated again. If the wrong code is entered twice the pump will switch into
the last menu. If the wrong code is entered twice again the pump will go into
an audible alarm, a nurse call will go off and the yellow LED blinks. If a target
value was reached while data lock is active a new start of the pump is only
possible after entering the code.
In order to deactivate the function, select “Off” in the data lock, press k, enter
the code and press k again.
4.3 Bolus Rate
• Open bolus rate in Options Menu with l.
• Change bolus rate with q and confirm setting with k.
Note: Set bolus rate according to therapy requirements. Take care not to overdose!
Given a bolus rate of 1200 ml/h, e.g. 0.33 ml are reached within just one second.
4.4 KVO-Mode
The pump can continue the infusion with a preset KVO-rate after a preselected
VTBI/time has passed (see "Technical Data"). The duration of the KVO delivery is
selected in the service program.
25
OPTIONS
Chapter 4
• Open the KVO-mode in the Options Menu with l.
• Answer the Yes/No question with u to enable the KVO-mode.
4.5 Contrast / Display Light / Keypad Light
Contrast as well as display- and keypad light can be adjusted individually according to
the lighting conditions.
• Open contrast/display light/keypad light in Options Menu by pressing l.
• Choose between 9 contrast- and display light levels with l or r and confirm
with k.
4.6 Alarm Volume
Chose between 9 different alarm volume levels.
• Open alarm volume in Options Menu with l.
• Set volume with l or r and confirm entry with k.
4.7 Date / Time
• Open date/time in the Options Menu with l.
• Modify date and time with q and confirm the setting with k.
4.8 Macro Mode
The infusion rate appears larger on the display when the macro mode is activated and
the pump is infusing.
• Open macro mode in Options Menu with l.
• Answer Yes/No question by pressing u to activate the macro mode.
For quick activation of macro mode: Press and hold r while the pump is infusing
until the font size changes.
4.9 Language
This function enables a change of the pump language.
26
•
Open language in the Options Menu with l.
•
Select language with t then press l.
•
Confirm Yes/No question with u.
OPTIONS
Chapter 4
4.10 Upstream Occlusion Pressure
The device is equipped with an upstream pressure sensor that detects an
occlusion (e.g. closed roller clamp, kinked line) between the container and the
pump. The higher the pressure level is set at, the lower the pressure level must
drop before triggering an upstream occlusion pressure alarm.
•
Access upstream pressure in Options Menu by pressing l.
•
Choose between nine pressure levels (1=lowest level; 9=highest level) by
pressing l or r and confirm entry with k.
27
ALARMS
Chapter 5
ALARMS
The Infusomat® Space P is equipped with a audible and optical alarm signal.
Alarmtype
Device
Alarm
Audible
signal Red LED
yes
flashes
OperatingAlarm
yes
flashes
PreAlarm
yes
off
flashes
see alarm
description
Reminder yes
Alarm
off
flashes
see alarm
description
Alarm
Hint
off
off
see alarm
description
yes
Optical signal
Yellow LED Text
flashes
device alarm
and alarm
code
(see service
program)
off
see alarm
description
Staff call
User confirmation
yes
Press O and follow
the instruction on the
display.
Press k to
acknowledge the
audible alarm, alarm
text and staff call. The
red LED remains on
until the infusion is
restarted.
(de-)activate Press k to mute
alarm and turn off staff
via service
call. Visible alarm
program
remains until end.
Press k to mute
yes
alarm, turn off staff
call and delete the
alarm text.
Hint disappears
no
without confirmation.
yes
5.1 Device Alarms
When a device alarm occurs the infusion is immediately stopped. Press o to switch
off the device. Then switch the device on again. In case of a repeated device alarm you
must close the rollerclamp, disconnect from the patient, open the front door of the
pump and take out the disposable. The device needs to be handed to the service
department.
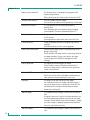
5.2 Pre-Alarms and Operating Alarms
Pre-alarms:
Pre-alarms occur a few minutes (dependable on service settings) prior to operating
alarms. During pre-alarms an audible tone sounds, the yellow LED blinks and a staff
call is activated (optional). The display message varies depending on the alarm reason.
The signal tone and the staff call are turned off with k. Display and LED stay in prealarm until the operating alarm goes off. Pre-alarms don't lead to an interruption of
the infusion.
28
ALARMS
Chapter 5
Display message
Pre-alarm reason
“VTBI near end“
The preselected volume is nearly infused.
“Time near end“
The preselected time is almost over.
“Battery nearly empty“
The battery is almost discharged.
“KVO active“
VTBI/time are reached and the pump continues
the infusion at the KVO-rate.
"Communication error"
The pump is located in a system in which at least
one device is incompatible or defective. The use
of this device in a system is not permitted. The
system is to be checked by a service technician.
A stopwatch on the display counts down the remaining time (depending on the
service program, between 3-30 min). After that, the pump changes to the
operating alarm.
The pre-alarms “VTBI near end“ (volume preselection) and “Time near end“ (time
preselection) can be deactivated via the service program.
Operating alarms:
Operating alarms lead to an interruption of the infusion. An audible tone
sounds, the red LED flashes and a staff call is activated. The display states
“Alarm“ and the reason for the operating alarm. The signal tone and the staff
call are turned off with K. Corrections are to be made according to the alarm
reason.
Display message
Alarm reason
“VTBI infused “
The preselected volume was infused.
Continue therapy or select new therapy.
“Time expired“
The preselected time has ended.
Continue therapy or select new therapy.
“Battery empty“
The battery pack is discharged.
Connect device with mains and/or exchange
battery pack. The battery alarm will be on for 3 min.
Then the pump will automatically turn off.
“Pressure high“
An occlusion occured in the system. The set pressure
level was exceeded. A bolus reduction is automatically
initiated by the pump.
Check if tubing contains kinks or is damaged as well
as IV- and filter patency.
Increase occlusion pressure if necessary.
“KVO finished“
The KVO-time has ended. Continue therapy or set new
therapy.
29
ALARMS
Chapter 5
“Battery cover removed“
The battery cover is not properly engaged on the
battery compartment.
When pushing on the battery cover listen for “click”.
“Standby time expired“
The set standby time has ended.
Set new time or continue with previously set therapy.
“No battery inserted“
It is not possible to use the pump without a
battery pack.
Turn off pump and insert battery pack according
to description “Overview Infusomat® Space P“.
“Drive blocked“
Stepper motor does not deliver due to excess pressure
in the system.
Interrupt patient connection and reinsert the line.
“Calibrate device“
Pump calibration data have changed (e.g. after an
update).
Recalibrate device via the service program.
“Drop sensor connection“
Contact to the drop sensor is interrupted while the
pump is delivering.
Check whether the drop sensor is correctly placed on
the drop chamber. If necessary, replace the drop
sensor or preselect VTBI/time and proceed with
therapy.
“Check upstream“
The upstream sensor triggers an alarm.
Check if roller clamp is closed or infusion line is
kinked. If a drop sensor is connected the upstream
alarm is deactivated.
“Air bubble "/"Accumulated air“ Air inside the system.
Check the line for small air bubbles and disconnect
from patient to repeat priming, if necessary.
30
“No drops“
The drop sensor does not detect any drops.
The infusion container is empty, the roller clamp is
closed, the drop sensor is not put on, check the line
for obstructions, condensation on drop chamber
(remove by shaking it).
"Too few drops"
The number of fallen drops is lower than the preset
rate.
A negative pressure in a glass infusion container can
be eliminated by opening the vent flap on the drop
chamber. Check whether the infusion bottle is empty,
the roller clamp is completely opened and whether
there are any kinks in the line.
"Too many drops"
The number of fallen drops is higher than the preset
rate.
ALARMS
Chapter 5
Check the line for damage and make sure that the
line is correctly inserted.
"Flow"
Drop chamber is completely filled or leak in the
system.
Examine the line for damage and check the drop
chamber.
“Data were reset”
Therapy and pump settings could not be restored.
Enter therapy and pump settings again.
"Therapy data were reset"
Therapy data could not be restored.
Enter therapy again.
„Data Lock"
An attempt was made to stop or switch the pump off
without entering the code.
Enter the correct code in order to continue the
therapy respectively turning the pump off.
The red LED doesn’t extinguish until the administration is started again respectively the
pump is turned off.
Caution: If a wrench is displayed and/or a yellow, red and blue LED blink then
the pump is in the service mode and is not permitted to be used on a patient.
The pump must then be checked by a service technician.
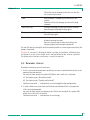
5.3 Reminder Alarms
Reminder alarms only occur in two cases:
1. A line is inserted, the pump does not deliver, no value is edited and the device is not
operated for two minutes.
An acoustic tone sounds, the yellow LED blinks and a staff call is activated.
a) The display states “Reminder alarm!”
b) The display states “Config. not finished!”
Confirm alarm with K and continue to set therapy/Start Up configuration.
2. A value edition was started but not finished and confirmed. This is also possible
with a missing disposable.
An acoustic tone sounds, the display states “Value not accepted“, the yellow LED
blinks and a staff call is activated.
Confirm alarm with K and continue to set therapy.
31
ALARMS
Chapter 5
5.4 Alarm Hints
If inproper entries are made the display states corresponding hints (e.g. “Attention!
Rate is out of range”; “The parameter can not be modified”) and an audible tone
sounds. These hints disappear after a few seconds and don't need to be confirmed.
32
BATTERY OPERATION AND MAINTENANCE
Chapter 6
BATTERY OPERATION AND MAINTENANCE
The Infusomat® Space P is equipped with the latest NiMH-battery. It has an operating
lifetime of 4 hours at 100 ml/h when new. For optimal treatment of the battery, the
device is equipped with protection against overcharge and deep depletion. The battery
pack is charged by the pump during connection to mains. When disconnected from
mains or in case of power failure, the pump automatically switches to battery power.
Note: Prior to a longer storage of the pump (> 0,5 months) the battery pack must be
completely charged and then removed from the pump. Before changing the battery,
always disconnect the pump from the patient and switch off the device.
The battery status indicator is a trend display (low, medium, high). For more detailed
information on the current battery capacity (operating time in hours and minutes)
please refer to menu item “Batt. Cap.” in the Status Menu of the Infusomat® Space P.
Important information for battery self-check:
If the battery symbol is blinking during mains operation, the battery is either
discharged or has a reduced capacity. In this case, the pump should not be
disconnected from mains. If it is necessary to disconnect the pump from mains power
for urgent reasons, the user should check to ensure if the battery capacity is sufficient
for the proposed use. When the battery symbol blinks permanently (>1h), the battery
must be checked by a technician and replaced if necessary.
Directions for optimal battery use:
The actual battery life may vary due to
• ambient temperature
• varying load (e.g. frequent boluses).
The optimal life time of a battery pack will only be reached if it's ompletely discharged
from time to time. A maintenance mode which conducts this battery maintenance is
built in. This function should be activated once a month. Furthermore:
• If possible, only charge the battery if it has been completely discharged.
• If a battery, which is not completely discharged, is charged several times, its
capacity can be reduced. Its original capacity can be reached again if the battery
is completely discharged and then recharged.
• Under normal temperature conditions a battery can be charged and discharged
approx. 500 times before its lifetime decreases.
• When the pump is not connected to mains power the battery discharges itself
slowly. This can occur even when the pump is not operating. The original
capacity will only be reached after several cycles of charging and discharging.
• The battery operating time only can be realized if the pump operates
continuously with a fully charged battery at room temperature. The display of
the battery operating time on the pump is an approximate value based on the
current delivery rate. If the battery is aged it may differ from the actual
achievable operating time.
33
BATTERY OPERATION AND MAINTENANCE
Chapter 6
Caution: Batteries may explode or leak if they are opened or incinerated. Consider
disposal directions!
Battery maintenance:
To accurately balance the battery capacity a cyclical battery maintenance is necessary.
The pump asks the user to perform a battery maintenance every 30 days. The battery
maintenance mode detects a possible capacity loss (e.g. through ageing of the battery
pack) and then the capacity/running time will be calculated anew. After a longer
storage time or a longer operation without battery maintenance it can happen that
the battery pre-alarm time can no longer be maintained. In this case it is necessary to
perform a battery maintenance.
To initiate the discharge process the message „Battery maintenance“ and the k-key
will be displayed after switching the pump off. By pressing k and u the discharge
process will start. The process is interrupted by switching the pump on again. If the
battery maintenance is to be continued a new activation is necessary. After completely
discharging the battery it will be completely charged again. The total duration of the
battery maintenance process takes approx. twelve hours.
Caution: Please take into account that, if the battery maintenance has not been
completed there is a possibility of a reduced battery operating time.
34
START UP GRAPHS AND TRUMPET CURVES
Chapter 7
START UP GRAPHS AND TRUMPET CURVES
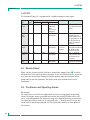
Start Up Graphs
Trumpet Curves
The graphs show the accuracy/uniformity of flow in relation to time. They allow
for the following:
The delivery behaviour or delivery precision is essentially influenced by the type
of the disposable used. Deviations from the technical data of the pump cannot be
excluded if lines (disposables) other than those stated in the order data are used.
Trumpet Curves
Measured values for second hour in each case.
Measurement interval
∆t = 0.5 min
Observation interval
p x ∆t [min]
Start Up Graphs
Measurement interval
Measurement duration
Flow Qi
∆t = 0.5 min
T = 120 min
(ml/h)
35
TECHNICAL DATA
Chapter 8
T E C H N I C A L D ATA
Type of unit
Volumetric infusion pump
Classification (acc. to IEC/EN 60601-1)
defibrillator-proof; CF equipment
Protective Class II; Protective Class I in
combination with SpaceStation
Class (acc. to Directive 93/42 EEC)
IIb
Moisture protection
IP 22 (drip protected for horizontal usage)
External power supply:
• Rated voltage
• External low voltage
36
Via B. Braun SpaceStation or optional
mains adaptor (rated voltage 100 … 240 V
AC~, 50/60 Hz) for stand alone operation
11 … 16 V DC
via Connection Lead SP
12 V or via SpaceStation
Staff call
Max. 24 V / 0,5 A / 24 VA (VDE 0834)
EMC
IEC/EN 60601-1-2 / 60601-2-24
Time of operation
100 % (continuous operation)
Operating conditions:
• Relative humidity
• Temperature
• Atmospheric pressure
30 % … 90 % (without condensation)
+10 … +40 °C
500 … 1060 mbar
Storage conditions:
• Relative humidity
• Temperature
• Atmospheric pressure
30 % … 90 % (without condensation)
-20 … +55 °C
500 … 1060 mbar
Type of battery pack (rechargeable)
NiMH
Operating time of rechargeable battery
Approx. 4 hours at 100 ml/h
Recharging time
Approx. 6 hours
Weight
Approx. 1.4 kg
Dimensions (W x H x D)
214 x 68 x 124 mm
Volume preselection
0.1 - 99.99 ml in increments of 0.01 ml
100.0 – 999.0 ml in increments 0.1 ml
1000 – 9999 ml in increments 1 ml
Time preselection
00:01 – 99:59 h
Accuracy of set delivery rate
± 5 % according to IEC/EN 60601-2-24
Alarm in the case of incorrect dose
For incorrect dosages of 1,4 ml due to
malfunctions of the device the pump will
automatically shut off
Technical inspection (safety check)
Every 2 years
TECHNICAL DATA
Chapter 8
Rate increments
0.1 - 99.99 ml/h in increments of
0.01 ml/h
100.0 - 999.9 ml/h in increments of
0.1 ml/h
1000.0 - 1200 ml/h in increments of
1 ml/h
Accuracy of bolus infusion
typ. ± 5 % as of a bolus volume > 1 ml
KVO-rate
Delivery rate ≥ 10 ml/h: KVO-rate 3 ml/h
Delivery rate < 10 ml/h: KVO-rate 1 ml/h
Delivery rate < 1 ml/h: KVO-rate = set rate
(default setting 0.1 ml/h)
USB connection in combination with
B. Braun interface lead CAN SP
(8713230) including electrical
insulation. Please pay attention to
safety notices.
Technical sensitivity:
Detection of air bubbles ≥ 0.01 ml
Alarm triggering:
At an air bubble size of typ.
0.02 - 0.3 ml* respectively 1.5 ml/h**
(cumulated value over 1 h from air
bubbles size 0.01ml).
9 levels from -0,12 bar to -0,21 bar
(pressure reduction)
Computer connection
Air detector
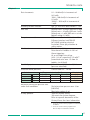
Sensitivity upstream sensor
Occlusion alarm pressures
Occlusion pressure
[bar]
Level 1
typ. 0.3
typ. 0.7
Level 5
Level 9
typ. 1.2
9 levels from 0.3 - 1.2 bar
Time to occlusion alarm [min] at rate
[1 ml/h]
[25 ml/h]
[100 ml/h]
05:32
00:28
00:05
21:55
01:03
00:13
37:35
01:38
00:17
Mechanical occlusion pressure limit
under fault conditions
History protocol
Max. bolus
[ml]
0,0059
0,0625
0,0723
Occlusion alarm pressure max. 3 bar
(300 kPa).
Max. bolus volume 2 ml.
1000 last history entries.
100 events for system diagnose.
Refer to separate documents of the
History Viewer for closer information.
* to be set via the service program in increments
of 0.01ml
** to be set via the service program from
0.5-3.8 ml/h in increments of 0.1ml
37
TECHNICAL DATA
Chapter 8
Note: The technical data stated in this Instructions for Use manual were
determined with the Infusomat® Space lines as of Intrafix® Primeline Classic
(406 2957). These technical data can change when using set configurations.
38
WARRANTY / TRAINING / TSC* / SERVICE / CLEANING / DISPOSAL
Chapter 9
WARRANTY / TRAINING / TSC* / SERVICE /
CLEANING / DISPOSAL
Responsibility of the Manufacturer
The manufacturer, assembler, installer or importer is responsible for the effects
on safety, reliability and performance of the equipment only if:
• assembly operations, extensions, re-adjustments, modifications or repairs
are carried out by authorized personnel,
• the electrical installation of the relevant room complies with the
appropriate requirements (e.g. VDE 0100, 0107 and/or the IEC-publications
resp. national requirements),
• the equipment is used in accordance with the Instructions for Use and
• the Technical Safety Checks are carried out regularly.
The CE mark
confirms that this
medical product
complies with the
"Council Directive
on Medical
Devices
93/42/EEC” dated
14th June 1993.
B. Braun
Melsungen AG
Warranty
B. Braun provides 24 months warranty, as from the date of delivery, for every
Infusomat® Space P (12 months for every Battery-Pack SP). This covers repair or
replacement of parts damaged as a result of design/manufacturing errors or
material defects. Modifications or repairs to the unit undertaken by the
user/operator or by third parties invalidate the warranty.
The warranty does not cover the following:
Elimination of faults attributable to incorrect/unauthorized handling, or to
normal wear and tear.
Training
B. Braun offers a training for version F. Please ask your local representative for
further details.
Technical Safety Check*) / Service
The Technical Safety Check is recommended to be carried out every 2 years and
should be documented. Servicing work must be carried out exclusively by
B. Braun trained personnel.
39
WARRANTY / TRAINING / TSC* / SERVICE / CLEANING / DISPOSAL
Chapter 9
Check regularly
Check for cleanliness, completeness and damage. Use only according to
Instructions for Use. During an exchange interval of the disposable the pump
has to perform an occlusion test. Check the following items each time the pump
is switched on: self-check, audible alarm, process- and alarm control indication.
Cleaning
Clean external surface of pump using mild soap suds. Do not use spray
disinfectants at the mains power connection. Recommended: disinfectant for
wiping available from B. Braun (e.g. Meliseptol®). After cleaning, allow the
device to vent for at least 1 min prior to use. Do not spray into openings in the
device. Be sure to observe the instructions provided concerning waste disposal
and hygiene for batteries and disposables. The line guide element can be
loosened with the help of a pointed object (e.g. ballpoint pen) which is inserted
in the lower right hand corner. The cover can then be cleaned under running
water. Spray disinfectant on the peristalsis and wipe it with a soft cloth
(Caution: Do not touch peristalsis with sharp object!). When reinserting the line
guide element, make sure that it is not damaged and that it audibly locks in.
Prime the next infusion line in order to ensure the proper position of each
finger. Do not use Hexaquart®.
Disposal
The pumps as well as battery packs can be returned to B. Braun for further
disposal. When taking care of disposing of disposables as well as infusion
solutions, please consider the applicable hygiene and disposal regulations.
Inspection on Delivery
Despite careful packaging, the risk of damage during transport cannot be
entirely prevented. Upon delivery, please check that all items are present. Do not
use a damaged device. Contact the service department.
Testing the proper funciton of the device should be performed before initial use.
This is even ruled by law in several countries. A respective form can be obtained
from B. Braun.
Included in Delivery
Infusomat® Space P, Battery-Pack SP, Instructions for Use-Set.
40
INSTRUCTIONS FOR USE ACCESSORY
Chapter 10
INSTRUCTIONS FOR USE ACCESSORY
SpaceStation (8713140)
Station for up to four pumps. For further information see Instructions for Use of
SpaceStation.
SpaceCover Standard (871 3147)
SpaceCover Comfort (871 3145)
Cover to be placed on upper SpaceStation incl. built-in handle. The SpaceCover
Comfort additionaly includes a central alarm management and alarm LEDs.
PoleClamp SP (8713130)
A maximum of three B. Braun Space pumps and one SpaceControl can be
stacked together when used with the PoleClamp SP. For detailed instructions on
secure fixation of the PoleClamp SP please refer to "Overview Infusomat® Space
P" and "Patient Safety".
Power Supply SP (8713110A - 8713114A)
The Power Supply SP is adequate to supply power for a single pump and one
SpaceControl.
1.) Connect plug of Power Supply SP with socket P2 on back of pump
(ensure that plug “clicks”).
2.) Push power plug into wall outlet.
Note: For disconnection from pump, press lever on plug down.
A maximum of three plugs can be stacked upon each other in socket P2.
Technical Data: 100 – 240V AC~, 50/60 Hz
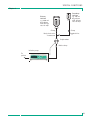
Combi Lead SP 12 V (8713133)
The Combi Lead SP can connect up to three pumps. All pumps can then be
operated via the Connection Lead SP (12 V).
1.) Connect plug of the Combi Lead SP 12 V with the socket P2 on the
back of the pump.
2.) Connect plug of Connection Lead SP with Combi Lead SP.
3.) Push plug of Connection Lead SP into 12 V connector.
Note: A maximum of three plugs can be stacked upon each other in socket P2.
41
INSTRUCTIONS FOR USE ACCESSORY
Chapter 10
Drop Sensor SP (8713175)
The drop sensor provides an additional safety function and is therefore
particularly recommended in connection with low delivery rates.
The connection of the Drop Sensor SP on the pump is located at the rear of the
device, in the lower left corner. At the time of delivery the port of the drop
sensor is protected by a cover. Use a screw driver to break off the cover for
further disposal.
Use holder on PoleClamp, in order to park the drop sensor.
Short Stand SP (8713135)
Use the Short Stand SP to attach an infusion container to the pump.
Caution: Do only position the pump on a level surface if the pump is used in
combination with the short stand.
1.) Push the PoleClamp on the pump.
2.) Plug the short stand into the aperture on the PoleClamp; make sure
that it audibly locks in.
3.) To remove the short stand: Press the white button at the lower end of
the PoleClamp and remove the short stand.
Battery-Pack SP (8713180)
For further information on the Battery-Pack SP (NiMH) see “Battery Operation”.
Interface Lead CAN SP (8713230)
Interface Lead CAN SP is needed in order to set up a connection between the
SpaceStation/pump and the computer outlet (for service requirements).
1.) Push plug into socket F3 on the SpaceStation or P2 on the pump and
connect with the CAN/USB converter.
2.) Connect CAN/USB converter to computer outlet as described in the
Instructions for Use manual.
Caution: The Interface Lead CAN SP is only to be used by the service
department; never use while patient is connected.
Note: A maximum of three plugs can be stacked upon each other in socket P2.
42
INSTRUCTIONS FOR USE ACCESSORY
Chapter 10
Connection Lead SP (12 V) (8713231)
Install the Connection Lead SP (12 V) in the following way:
1.) Connect plug to socket P2 on back of pump or F3 on SpaceStation
respectively.
2.) Put the connection lead into the car socket.
3.) If necessary, remove red adaptor of motor vehicle connector by slightly
turning and simultanously pulling.
The green LED of the electronic box shows the operating voltage. The mains
connector can easily be replaced by another plug if required.
Caution: Do not connect the pump to a patient during external car battery
charging!
Note: A maximum of three plugs can be stacked upon each other in socket P2.
Connection Lead for Staff Call SP (8713232)
To connect the Infusomat® Space P to staff call, use the Connection Lead for
Staff Call SP. The staff call needs to comply with the requirements of VDE 0834
(consider country specific regulations).
Note: Test staff call signalling before every use.
The Infusomat® Space P offers three different staff call operating modes. They
are displayed in the signalling scheme. Consider the staff call of the hospital
when choosing an operating mode. Choose the operating mode via the service
program.
43
INSTRUCTIONS FOR USE ACCESSORY
Chapter 10
turned off
static
without
OffAlarm*)
Alarm
dynamic
without
Off–Alarm
Alarm
dynamic
with
Off-Alarm
Alarm
turned on
turned off
Operating Alarm
Operation
1 sec
Operation
1 sec
1 sec
Operation
*) in the mode static without Off-Alarm, the staff call can be surpressed with k
Caution: The user should always closely observe the local pump alarms as well.
Note: A maximum of three plugs can be stacked upon each other in socket P2.
Technical Data
Alarm
Operation
Connecting Wire
white and green
white and brown
disconnected
connected
connected
disconnected
Polarity of connexion is arbitrary:
max. 24 V / 0.5 A / 12 VA
44
INSTRUCTIONS FOR USE ACCESSORY
Chapter 10
PCA-ACCESSORIES
•
Space PCA-Kit (REF 8713554) consisting of: :
- Demand button
- Hook and loop tape
for fixation of the demand button at
the patient´s arm
- Line fixation
connection between hook and loop tape
and demand button
- Metal clip
alternatively for fixation at the bed
sheet
- Cable strap
for wrapping the cable of the demand
button
- PCA-Key
for locking the syringe holder or the Syringe Anti Removal Cap
Fixation of the demand button:
at the wrist:
or at the bed sheet:
Usage of the cable strap:
45
ORDERING
Art. No.
B. Braun Infusomat® Space P (100 - 240 V) ......................................871 3070
Recommended accessories for the B. Braun Infusomat® Space P:
SpaceStation............... ........................................................................................871 3140
SpaceCover Standard........................................................................................871 3147
SpaceCover Comfort............... ..........................................................................871 3145
PoleClamp SP ......................................................................................................871 3130
Power Supply SP (Euro Plug) ..........................................................................871 3110A
Power Supply SP (UK Plug) .............................................................................871 3111A
Power Supply SP (US Plug) .............................................................................871 3112A
Power Supply SP (Australian Plug) ...............................................................871 3113A
Power Supply SP (Universal Plug) .................................................................871 3114A
Power Supply SP (RSA Plug)...........................................................................871 3115A
Combi Lead SP 12 V..........................................................................................871 3133
Drop Sensor SP ..................................................................................................871 3175
Short Stand SP....................................................................................................871 3135
Battery-Pack SP (NiMH) ..................................................................................871 3180
Interface Lead CAN SP .....................................................................................871 3230
Connection Lead SP (12 V) .............................................................................871 3231
Connection Lead for Staff Call SP ................................................................871 3232
Infusomat® Space P Lines:
Intrafix Primeline Classic; 150 cm................................................................406 2957
Intrafix Primeline Comfort; 180 cm.............................................................406 2981L
Intrafix Primeline Comfort, BCV; 150 cm...................................................406 3252
Intrafix Primeline Comfort, BCV; 180 cm...................................................406 3287
Intrafix Air P; 180 cm ......................................................................................406 2981
Intrafix Air P; 230 cm.......................................................................................406 0407
Intrafix Air P, with siliconised spike; 180 cm............................................406 2990
Intrafix Air P, with Y-Injection Piece; 230 cm .........................................406 0202
Intrafix Air-matic P; 150 cm..........................................................................406 3953
Intrafix Air-matic P; 180 cm..........................................................................406 3988
Intrafix Air-matic P; BCV; 150 cm................................................................406 3759
Intrafix Air-matic P, BCV; 180 cm................................................................406 3783
Intrafix SafeSet; 180 cm.................................................................................406 3000
Intrafix SafeSet, BCV; 180 cm.......................................................................406 3001
Intrafix SafeSet P, 230 cm..............................................................................406 3003
Intrafix SafeSet P, I.S., 180 cm......................................................................406 3005
46
ORDERING
Other Lines:
Fresenius Perfudrop Air M-P ..........................................................................48403608
Codan L86 P ........................................................................................................43.4304
Codan V86 P.........................................................................................................43.4291
Hint: B. Braun does not have any influence on the quality of other lines.
Changes in quality of those lines may have an influence on the technical
characteristics of the pump.. B. Braun therefore is not liable for deviations
caused by disposables from other vendors than B. Braun. In case of inadequate
performance caused by these disposables please contact the correspondant
manufacturer.
47
Manufactured by
B. Braun Melsungen AG
Carl-Braun-Straße 1
34212 Melsungen
Tel +49 (0) 56 61-71-0
Germany
P.O.Box 1120
D-34209 Melsungen
Tel (0 56 61) 71-0
Fax (0 56 61) 71-20 44
www.bbraun.com
www.bbraun.com
Material-No. 38911848 • Drawing No. M687 70 02 01 F04
0308 • Printed on pulp bleached 100 % chlorine-free
B. Braun Melsungen AG
Sparte Hospital Care