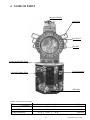
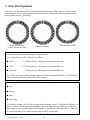
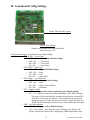
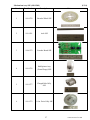
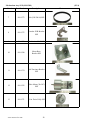
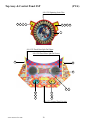
1
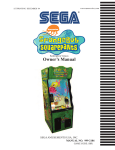
www.seuservice.com 1ST PRINTING Nov ‘02 A Redemption Game Owner’s Manual SEGA ENTERPRISES, INC. USA MANUAL NO. 999-1590 SSP VISIT OUR WEBSITE! BEFORE USING THE PRODUCT, BE SURE TO READ THE FOLLOWING: To maintain the safety: To ensure the safe usage of the product, be sure to read the following before using the product. The following instructions are intended for the users, operators and the personnel in charge of the operation of the product. After carefully reading and sufficiently understanding the warning displays and cautions, handle the product appropriately. Be sure to keep this manual nearby the product or elsewhere convenient for referring to it when necessary. Herein, explanations which require special attention are enclosed with dual lines. Depending on the potentially hazardous degrees, the terms of WARNING, CAUTION, etc. are used. Be sure to understand the contents of the displays before reading the text. WARNING! Indicates that mishandling the product by disregarding this warning will cause a potentially hazardous situation which can result in death or serious injury. CAUTION! Indicates that mishandling the product by disregarding this caution will cause a slight hazardous situation which can result in personal injury and or material damage. For the safe usage of the product, the following pictographs are used: Indicates “HANDLE WITH CARE.” In order to protect the human body an equipment, this display is attached to places where the Owner’s Manual and or Service Manual should be referred to. Perform work in accordance with the instructions herein stated. Instructions for work are explained by paying attention to the aspect of accident prevention. Failing to perform work as per the instructions can cause accidents. In the case where only those who have technical expertise should perform the work to avoid hazardous situation, the instructions herein state that the serviceman should perform such work. Be sure to turn off power before working on the machine. To prevent electric shock, be sure to turn off power before starting the work in which the worker touches the interior of the product. If the work is to be performed in the power-on status, the Instruction Manual herein always states to that effect. Be sure to ground the Earth Terminal (this, however, is not required in the case where a power cord with earth is used). This product is equipped with the Earth Terminal. When installing the product, Connect the Earth Terminal to the “accurately grounded indoor earth terminal” by using an earth wire. Unless the product is grounded appropriately, the user can be subject to electric shock. After performing repair, etc. for the Control equipment, ensure that the Earth Wire is firmly connected to the Control equipment. Ensure that the Power Supply used is equipped with an Earth Leakage Breaker. This product does not incorporate the Earth Leakage Breaker. Using a power supply which is not equipped with the Earth Leakage Breaker can cause a fire when earth leakage occurs. Be sure to use fuses which meet the specified rating. (only for the machines which use fuses). Using fuses exceeding the specified rating can cause a fire and electric shock. Specification changes (removal of equipment, conversion and addition) not designated by SEGA are not allowed. The parts of the product include warning labels for safety, covers for personal protection, etc. It is very hazardous to operate the product by removing parts and or modifying the circuits. Should doors, lids and protective parts be damaged or lost, refrain from operating the product, and contact where the product was purchased from or the office herein stated. SEGA shall not be held responsible for any accidents, compensation for damage to a third party, resulting from the specifications not designated by SEGA. Ensure that the product meets the requirements of appropriate Electrical Specifications. Before installing the product, check for Electrical Specifications. SEGA products have a nameplate on which Electrical Specifications are described. Ensure that the product is compatible with the power supply voltage and frequency requirements of the location. Using any Electrical Specifications different from the designated Specifications can cause a fire and electric shock. Install and operate the product in places where appropriate lighting is available, allowing warning labels to be clearly read. To ensure safety for the customers, labels and printed instructions describing potentially hazardous situation are applied to places where accidents can be caused. Ensure that where the product is operated has sufficient lighting allowing the warnings to be read. If any label is peeled off, apply it again immediately. Please place an order with where the product was purchased from or the office herein stated. When handling the Monitor, be very careful. (Applies only to the product w/monitor.) Some of the monitor (TV) parts are subject to high tension voltage. Even after running off power, some portions are still subject to high tension voltage sometimes. Monitor repair and replacement should be performed only be those technical personnel who have knowledge of electricity and technical expertise. Be sure to adjust the monitor (projector) properly. (Applies only to the product w/monitor.) Do not operate the product leaving on-screen flickering or blurring as it is. Using the product with the monitor not properly adjusted may cause dizziness or a headache to an operator, a player, or the customers. When transporting or reselling this product, be sure to attach this manual to the product. In the case where commercially available monitors and printers are used in this product, only the contents relating to this product are explained herein. Some commercially available equipment has functions and reactions not stated in this manual. Read this manual together with the specific Instruction Manual of such equipment. • Descriptions herein contained may be subject to improvement changes without notice. • The contents described herein are fully prepared with due care. However, should any question arise or errors be found, please contact SEGA. INSPECTIONS IMMEDIATELY AFTER TRANSPORTING THE PRODUCT TO THE LOCATION. Normally, at the time of shipment, SEGA products are in a status allowing for usage immediately after transporting to the location. Nevertheless, an irregular situation may occur during transportation. Before turning on power, check the following points to ensure that the product has been transported in a satisfactory status. Are there any dented portions or defects (cuts, etc.) on the external surfaces of the cabinet? Are Casters and Adjusters, damaged? Do the power supply voltage and frequency requirements meet with those of the location? Are all wiring connectors correctly and securely connected? Unless connected in the correct direction, connector connections can not be made accurately. Do not insert connectors forcibly. Do power cords have cuts and dents? Do the fuses used meet specified rating? Is the Circuit Protector in an energized status? Are all accessories available? Can all Doors and Lids be opened with the Accessory keys? Can Doors and Lids be firmly closed? TABLE OF CONTENTS BEFORE USING THE PRODUCT, BE SURE TO READ THE FOLLOWING: TABLE OF CONTENTS INTRODUCTION OF THE OWNER’S MANUAL 1. HANDLING PRECAUTIONS .......................................................................................... 2. PRECAUTIONS CONCERNING INSTALLATION LOCATION ................................... 3. OPERATION ..................................................................................................................... 4. ASSEMBLING AND INSTALLATION ............................................................................ 5. PRECAUTIONS TO BE HEEDED WHEN MOVING THE MACHINE ........................ 6. NAME OF PARTS............................................................................................................. 7. GAME DESCRIPTION...................................................................................................... 8. HOW TO PLAY................................................................................................................... 9. PRIZE DISC EXPLAINED.................................................................................................. 10. GAMEBOARD CONFIG SETTINGS................................................................................ 11. GAME ERROR CODES.................................................................................................... 12. COIN SELECTOR............................................................................................................. COIN DOOR.............................................................................................................. 13. TICKET DOOR................................................................................................................. TICKET DISPENSOR............................................................................................... 14. DESIGN RELATED PARTS............................................................................................. 15. PARTS................................................................................................................................ MECHANISM ASSY SSP (999-1589)...................................................................... TOP ASSY. & CONTROL PANEL SSP..................................................................... HEAD AND ELECTRONICS SSP............................................................................ 1 2 - 3 5 - 6 7 - 9 10 11 12 13 14 15 16 - 17 18 - 19 19 20 - 24 21 - 24 25 26 - 36 26 - 29 30 - 33 34 - 36 Installation Space Height Width Length Weight Power, maximum current MONITOR SPECIFICATIONS : : : : : : 47 inches width X 52 inches 90 inches 43 inches 24 inches 280 lbs 300W 2.5A (AC 120V 60 Hz AREA) : NO MONITOR USED FOR THIS GAME INTRODUCTION OF THE OWNERS MANUAL This Owner's Manual is intended to provide detailed descriptions together with all the necessary information covering the general operation of electronic assemblies, electromechanicals, servicing control, spare parts, etc. as regards the product, SONIC SPINNER REDEPTION GAME. This manual is intended for the owners, personnel and managers in charge of operation of the product. Operate the product after carefully reading and sufficiently understanding the instructions. If the product fails to function satisfactorily, non-technical personnel should under no circumstances touch the internal system. Please contact where the product was purchased from. Use of this product is unlikely to cause physical injuries or damages to property. However, where special attention is required this is indicated by a thick line, the word "IMPORTANT" and its sign in this manual. STOP Indicates that mishandling the product by disregarding this display can cause the product's intrinsic performance not to be obtained, resulting in malfunctioning. IMPORTANT! SEGA ENTERPRISES, INC. (U.S.A.)/CUSTOMER SERVICE 45133 Industrial Drive, Fremont, California 94538, U.S.A. Phone : (415) 701-6580 Fax : (415) 701-6594 DEFINITION OF LOCATION MAINTENANCE MAN AND SERVICEMAN WARNING! Non-technical personnel who do not have technical knowledge and expertise should refrain from performing such work that this manual requires the location's maintenance man or a serviceman to carry out, or work which is not explained in this manual. Failing to comply with this instruction can cause a severe accident such as electric shock. Ensure that parts replacement, servicing & inspections, and troubleshooting are performed by the location's maintenance man or the serviceman. It is instructed herein that particularly hazardous work should be performed by the serviceman who has technical expertise and knowledge. The location's maintenance man and serviceman are herein defined as follows: "Location's Maintenance Man" : Those who have experience in the maintenance of amusement equipment and vending machines, etc., and also participate in the servicing and control of the equipment through such routine work as equipment assembly and installation, servicing and inspections, replacement of units and consumables, etc. within the Amusement Facilities and or locations under the management of the Owner and Owner's Operators of the product. Activities of Location's Maintenance Man : Assembly & installation, servicing & inspections, and replacement of units & consumables as regards amusement equipment, vending machines, etc. Serviceman : Those who participate in the designing, manufacturing, inspections and maintenance service of the equipment at an amusement equipment manufacturer. Those who have technical expertise equivalent to that of technical high school graduates as regards electricity, electronics and or mechanical engineering, and daily take part in the servicing & control and repair of amusement equipment. Serviceman's Activities : Assembly & installation and repair & adjustments of electrical, electronic and mechanical parts of amusement equipment and vending machines. LISTED UL ® 5K92 AMUSEMENT MACHINE NOTES: 1. HANDLING PRECAUTIONS When installing or inspecting the machine, be very careful of the following points and pay attention to ensure that the player can enjoy the game safely. Non-compliance with the following points or inappropriate handling running counter to the cautionary matters herein stated can cause personal injury or damage to the machine. WARNING! Before performing work, be sure to turn power off. Performing the work without turning power off can cause an electric shock or short circuit. In the case work should be performed in the status of power on, this manual always states to that effect. To avoid electric shock or short circuit, do not plug in or unplug quickly. To avoid electric shock, do not plug in or unplug with a wet hand. Do not expose Power Cords and Earth Wires on the surface, (floor, passage, etc.). If exposed, the Power Cords and Earth Wires are susceptible to damage. Damaged cords and wires can cause electric shock or short circuit. To avoid causing a fire or electric shock, do not put things on or damage Power Cords. When or after installing the product, do not unnecessarily pull the power cord. If damaged, the power cord can cause a fire or electric shock. In case the power cord is damaged, ask for replacement through where the product was purchased from or the office herein stated. Using the cord as is damaged can cause fire, electric shock or leakage. Be sure to perform grounding appropriately. Inappropriate grounding can cause an electric shock. Be sure to use fuses meeting specified rating. Using fuses exceeding the specified rating can cause a fire or electric shock. Completely make connector connections for IC BD and others. Insufficient insertion can cause an electric shock. Specification changes, removal of equipment, conversion and/or addition, not designated by SEGA are not permitted. • Failure to observe this may cause a fire or an electric shock. Non-compliance with this instruction can have a bad influence upon physical conditions of the players or the lookers-on, or result in injury during play. • SEGA shall not be held responsible for damage, compensation for damage to a third party, caused by specification changes not designated by SEGA. Be sure to perform periodic maintenance inspections herein stated. 1 www.seuservice.com STOP IMPORTANT! For the IC board circuit inspections, only the logic tester is allowed. The use of a multiple-purpose tester is not permitted, so be careful in this regard. Static electricity from your body may damage some electronics devices on the IC board. Before handling the IC board, touch a grounded metallic surface so that the static electricity can be discharged. Some parts are the ones designed and manufactured not specifically for this game machine. The manufacturers may discontinue, or change the specifications of, such general-purpose parts. If this is the case, Sega cannot repair or replace a failed game machine whether or not a warranty period has expired. PRODUCTION DATE This SEGA product was produced in the year of: 2002 This signifies that this work was disclosed in 2002. www.seuservice.com 2 2. PRECAUTIONS CONCERNING INSTALLATION LOCATION WARNING! This product is an indoor game machine. Do not install it outside. Even indoors, avoid installing in places mentioned below so as not to cause a fire, electric shock, injury and or malfunctioning. Places subject to rain or water leakage, or places subject to high humidity in the proximity of an indoor swimming pool and or shower, etc. Places subject to direct sunlight, or places subject to high temperatures in the proximity of heating units, etc. Places filled with inflammable gas or vicinity of highly inflammable/volatile chemicals or hazardous matter. Dusty places. Sloped surfaces. Places subject to any type of violent impact. Vicinity of anti-disaster facilities such as fire exits and fire extinguishers. The operating (ambient) temperature range is from 5ºC to 30ºC. LIMITATIONS OF USAGE REQUIREMENTS WARNING! Be sure to check the Electrical Specifications. Ensure that this product is compatible with the location's power supply, voltage and frequency requirements. A plate describing Electrical Specifications is attached to the product. Non-compliance with the Electrical Specifications can cause a fire and electric shock. This product requires the Breaker and Earth Mechanisms as part of the location facilities. Using them in a manner not independent can cause a fire and electric shock. Ensure that the indoor wiring for the power supply is rated at 2.5 A or higher (AC single phase 100 ~ 120 V area). Non-compliance with the Electrical Specifications can cause a fire and electric shock. Be sure to independently use the power supply equipped with the Earth Leakage Breaker. Using a power supply without the Earth Leakage Breaker can cause an outbreak of fire when earth leakage occurs. Putting many loads on one electrical outlet can cause generation of heat and a fire resulting from overload. When using an extension cord, ensure that the cord is rated at 2.5 A or higher (AC 100 ~ 120 V area). Using a cord rated lower than the specified rating can cause a fire and electric shock. 3 www.seuservice.com Operation Area WARNING! STOP For the operation of this machine, secure a minimum area of 47 in. (W) × 52 in. (D). In order to prevent injury resulting from the falling down accident during game play, be sure to secure the minimum area for operation. Be sure to provide sufficient space so as to allow this product's ventilation fan to function efficiently. To avoid machine malfunctioning and a fire, do not place any obstacles near the ventilation opening. SEGA shall not be held responsible for damage, compensation for damage to a third party, resulting from the failure to observe this instruction. For transporting the machine into the location's building, the minimum necessary dimensions of the opening (of doors, etc.) are 43 in. (W) and 76 in. (H). IMPORTANT! Electric current consumption MAX. 2.5 A (AC 120 V 60 Hz) 47 in. 2 in. Vent approx. 10 in. 52 in. 2 in. over www.seuservice.com 4 3. OPERATION PRECAUTIONS TO BE HEEDED BEFORE STARTING THE OPERATION To avoid injury and trouble, be sure to constantly give careful attention to the behavior and manner of the visitors and players. In order to avoid accidents, check the following before starting the operation: WARNING! To ensure maximum safety for the players and the customers, ensure that where the product is operated has sufficient lighting to allow any warnings to be read. Operation under insufficient lighting can cause bodily contact with each other, hitting accident, and or trouble between customers. It is suggested to ensure a space allowing the players who feel sick while playing the game to take a rest. Check if all of the adjusters are in contact with the surface. If they are not, the Cabinet may move and cause an accident. Ensure that all of the Adjusters are in contact with the floor. 5 www.seuservice.com CAUTION! WARNING! Immediately stop such violent acts as hitting and kicking the product. Such violent acts can cause parts damage or falling down, resulting in injury due to fragments and falling down. Do not put any heavy item on this product. Placing any heavy item on the product can cause a falling down accident or parts damage. Do not climb on the product. Climbing on the product can cause falling down accidents. To check the top portion of the product, use a step. To avoid electric shock, check to see if door & cover parts are damaged or omitted. To avoid electric shock, short circuit and or parts damage, do not put the following items on or in the periphery of the product. Flower vases, flowerpots, cups, water tanks, cosmetics, and receptacles/ containers/vessels containing chemicals and water. PRECAUTIONS TO BE HEEDED DURING OPERATION (PAYING ATTENTION TO CUSTOMERS) To avoid injury and trouble, be sure to constantly give careful attention to the behavior and manner of the visitors and players. To avoid injury and accidents, those who fall under the following categories are not allowed to play the game. WARNING! • Those who have experienced muscle convulsion or loss of consciousness when playing video game, etc. • Intoxicated persons. • Persons whose act runs counter to the product's warning displays. To avoid injury resulting from falling down and electric shock due to spilled drinks, instruct the player not to place heavy items or drinks on the product. To avoid electric shock and short circuit, do not allow customers to put hands and fingers or extraneous matter in the openings of the product or small openings in or around the doors. To avoid falling down and injury resulting from falling down, immediately stop the customer's leaning against or climbing on the product, etc. WARNING! WARNING: HAZARD TO EPILEPTICS. A very small portion of the population has a condition which may cause them to experience epileptic seizures or have momentary loss of consciousness when viewing certain kinds of flashing lights or patterns that are present in our daily environment. These persons may experience seizures while watching some kinds of television pictures or playing certain video games. People who have not had any previous seizures may nonetheless have an undetected epileptic condition. If you or anyone in your family has experienced symptoms linked to an epileptic condition (e.g., seizures or loss of awareness), immediately consult your physician before using any video games. We recommend that parents observe their children while they play video games. If you or your child experience the following symptoms: dizziness, altered vision, eye or muscle twitching, involuntary movements, loss of awareness, disorientation, or convulsions, DISCONTINUE USE IMMEDIATELY and consult your physician. www.seuservice.com 6 4. ASSEMBLING AND INSTALLATION WARNING! CAUTION! Perform assembly work by following the procedure herein stated. Failing to comply with the instructions can cause electric shock hazard. Perform assembling as per this manual. Since this is a complex machine, erroneous assembling can cause an electric shock, machine damage and or not functioning as per specified performance. When assembling, be sure to use more then one person. Depending on the assembly work, there are some cases in which working by one person alone can cause personal injury or parts damage. Ensure that connectors are accurately connected. Incomplete connections can cause electric shock hazard. Be careful not to damage the wires. Damaged wires may cause electric shock or short circuit or present a fire risk. This work should be performed by the Location's Maintenance Man or Serviceman. Performing work by non-technical personnel can cause a severe accident such as electric shock. Failing to comply with this instruction can cause a severe accident such as electric shock to the player during operation. Provide sufficient space so that assembling can be performed. Performing work in places with narrow space or low ceiling may cause an accident and assembly work to be difficult. To perform work safely and avoid serious accident such as the cabinet's falling down, do not perform work in places where step-like grade differences, a ditch, or slope exist. Handle molded parts with care. Undue weight or pressure may cause them to break and the broken pieces may cause injury. To perform work safely and securely, be sure to prepare a step which is in a secure and stable condition. Performing work without using the step can cause violent falling down accidents. Tools such as a Phillips type screwdriver, wrench, socket wrench and Ratchet Handle are required for the assembly work. Phillips type screwdriver 7 www.seuservice.com Be sure to secure all five screws on the marquee holder to the marquee. A stool or ladder is needed for this operation to be performed safely. Installing the Marquee 47 in. 2 in. Vent approx. 10 in. 52 in. 2 in. over FIG. 6. 2 e Provide ventilation space for the ventilation opening. Allow more than 28 in. of space for customer traffic. www.seuservice.com 8 POWER SUPPLY, AND EARTH CONNECTION WARNING! Be sure to independently use the power supply socket outlet equipped with an Earth Leakage Breaker. Using a power supply without an Earth Leakage Breaker can cause a fire when electric leakage occurs. Ensure that the "accurately grounded indoor earth terminal" and the earth wire cable are available (except in the case where a power cord plug with earth is used). This product is equipped with the earth terminal. Connect the earth terminal and the indoor earth terminal with the prepared cable. If the grounding work is not performed appropriately, customers can be subjected to an electric shock, and the product's functioning may not be stable. Ensure that the power cord and earth wire are not exposed on the surface (passage, etc.). If exposed, they can be caught and are susceptible to damage. If damaged, the cord and wire can cause electric shock and short circuit accidents. Ensure that the wiring position is not in the customer's passage way or the wiring has protective covering. After wiring power cord on the floor, be sure to protect the power cord. Exposed power cord is susceptible to damage and causes an electric shock accident. The AC Unit is located inside on one side of Cabinet. The AC Unit has Main SW, Earth Terminal and the Inlet which connects the Power Cord. Ensure that the Main SW is OFF. Power is off when the MAIN SWitch is in the down position. To supply power to the unit, flip the MAIN SWitch upwards. Back-Bottom Right of Cabinet MAIN SW INLET * Note: Actual Power Supply connection may vary from photo AC Cable (Power Cord) 9 www.seuservice.com 5. PRECAUTIONS WHEN MOVING THE MACHINE WARNING! CAUTION! When moving the machine, be sure to unplug the power plug. Moving the machine with the plug as is inserted can damage the power cord and cause fire and electric shock hazards. When moving the machine on the floor, pay careful attention so that adjusters do not tread power cords and earth wires. Damaging the power cords can cause electric shock and short circuit hazards. Do not push the cabinet from the left/right when attempting to move the unit. Pushing from the sides may cause the unit to tip and result in injury and damage to parts. Do not push on any parts made of glass (e.g. Main Plex) or plastic, as these parts may break and result in bodily injury. Do not push the cabinet from the left/right direction. In locations with low ceilings, remove the Marquee before moving the machine. www.seuservice.com 10 6. NAME OF PARTS Marquee Display Game Ears Play Wheel Play Disc Control and Display Panel Ticket Dispenser Coin and Cashbox Door Main Base TABLE 4 Dimensions and Weights CABINET ASSY POP When assembled Width 43 in 15.5 in 43 in x Length x Height x 24 in x 76 in x .25 in x 15 in x 24 in x 90 in 11 Weight 279 LBS 1 LB 280 LBS www.seuservice.com 7. GAME DESCRIPTION The following explanations apply to the case the product is functioning satisfactorily. Should there be any moves different from the following contents, some sort of faults may have occurred. Immediately look into the cause of the fault and eliminate the cause thereof to ensure satisfactory operation. When the power is connected, the fluorescent lamps behind the wheels and the ears are always on. When in an advertising state, the lights in the prize disk light and spin in clockwise and counterclockwise directions. Sounds are heard from the speakers on the right and left of the credit/ticket display. The Sonic Play button and the Tails Play button on the control panel are integrated with a lamp. The Sonic Play button (lamp) flashes and the Sonic and Tails disc’s spin pointing to the illumentated lamps when the enough coins are inserted (depending of Config Switches SW1 and SW2) to play the game. Flourescent Lamps are lit Bulbs light in a spinning fashion. Sound is emitted. Buttons Blink at appropriate times. Coin Entry Tickets are dispenced. Game Overview This game is a redemption game. Meaning that you input coins/tokens and after play it despenses tickets to be redeemed for prizes. The game has two spinning discs which rotate in opposite directions pointing at a lighted number. By Pressing the buttons (sonic first then tails) you can stop the discs rotation and depending on which numbers are lit at stop time they are multiplied together for ticket amount won. www.seuservice.com 12 8. HOW TO PLAY After enough coins/tokens are inserted through the coin/credit slot, the games starts to run. The Sonic/Tails wheels start turning with the numbered lights in the outside rings in opposite Directions. At the same time, the Sonic Button Starts to Flash. Starts Spinning Starts Swirling Starts Blinking At this time the Player would hit the Sonic Button with the goal of Stoping the Sonic Wheel (finger points to outside ring) at a certain number. When the button is hit the Disc will slow and stop and the Lit number that it stops at is the First Multiplyer. Then, the player would do the same thing with the Tails Button(finger points to the inside ring), pressing it to stop the Tails disc. This will stop tails from spinning and this finger stopping on a lighted number. This x number will be the Second Multiplier. The product of the First Multiplier times the Second Multiplier is the resulting amount of tickets that are dispenced which is also displayed on the 3 digit counter. Depending on which Prize Disc in installed on this game the results will vary. Press to stop Sonic Disc Press to stop Tails Disc Tickets Dispenced For Example: If the Heart Prize Disc is inserted and the player stops Sonic on the 50 outside ring and stops Tails on the x10 inside ring, the amount of tickets dispenced would be 500 tickets. 13 www.seuservice.com 9. Prize Disc Explained Your Sonic and Tails Spinner Game is shipped with 3 different Prize Dials. They are: Hearts, Clubs, and Diamonds. You can tell which dial you have installed by looking at the bottom of the dial for the corresponding symbol. (See Photo) Hearts Prize Wheel (Comes Default on Game) Clubs Prize Wheel Diamonds Prize Wheel Each Prize Dial is associated with a different Payout percentage. This percentage allows you to maximze your earnings by tailoring the game to your location. The Average Payout per Prize Wheel are as follows: Hearts 17.5 Tickets per play (With game set to normal difficulty) Clubs 8.75 Tickets per play (With game set to normal difficulty) Diamonds 35 Tickets per play (With game set to normal difficulty) Note: These are average tickets awarded with the machine set to Normal Difficulty. The Skill of the players at your location can greatly effect these averages. In addition to the Prize Dials, there are Four Difficultry Settings. They are: Easy Normal Hard Super Hard The Difficulty Setting will effect the average tickets awarded per game. The higher the difficulty, the harder it will be to hit the large payout numbers. When you adjust the game difficulty, it makes the game harder or easier by increasing or decreasing the “Virtual Speed” of the Prize Wheel. This will give the player more or less time to actually stop the wheel on each prize. www.seuservice.com 14 10. Gameboard Config Settings Conifig (DIP) Switch Location Sonic & Tails Spinner Config Switch Settings for Production Models software version: 052 Config Switch Settings: ✺and bold denote default settings • SW1 & SW2 -- Coins/Game ✺ OFF - OFF = 1 Coin Game (Default Setting) • OFF - ON = 2 Coin Game • ON - OFF = 3 Coin Game • ON - ON = 4 Coin Game • SW3 & SW4 -- Skill Level ✺ OFF - OFF = Normal (Default Setting) • OFF - ON = Hard • ON - OFF = Easy • ON - ON = Super Hard • SW5 & SW6 -- Card Selection ✺ OFF - OFF = Hearts (Default Setting) • OFF - ON = Clubs • ON - OFF = Spades (not available) • ON - ON = Diamonds • SW7 - Continuous Play ✺ OFF – normal operation, tokens required for play (Default setting) • ON – 1 to 4 tokens are required to start (depending on SW1 &SW2 setting). The game will then start and play continuously until power is turned OFF. No further coins/tokens are required. if the stopbuttons are not pressed during the course of a game, the game will timeout (wheels will stop as if SONIC/TAILS buttons pressed), pay tickets, and automatically start again. • SW8 – Use ticket dispenser ✺ OFF = Yes, dispense tickets (Default Setting) • ON = Demo Mode – don’t dispense tickets. during payout, display will rapidly count-down tickets on the 3-digit display without dispensing tickets. 15 www.seuservice.com 11. Game Error Codes Error # E01 E02 E03 E04 Problem Area --- Problem Detail --During Game Play, Coin-IN Coin-IN Switch switch was found to be continuously in ON position ----- Ticket Notch E05 Ticket Notch E06 --- E07 Ticket Notch E08 --- E09 E10 E11 E12 Points Layout Tails Index Sonic Index During Ticket Dispensing, Ticket Notch Continuously Found During Ticket dispensing, Can’t find Next Ticket notch --During CAL & if Tickets are being used (CONFIG SW 8 - OFF), unsuccessful attempt was made to find the Ticket Notch --- Possible Cause --- Action to Reset Error Code --- Coin Stuck or foreign material in Coin Mech Turn game OFF, Clear Obstruction. Turn game ON --Out of Tickets OR Ticket motor not turning on OR Ticket Mech Bad/Jammed OR Bad Ticket Disp cable Out of Tickets OR Ticket Motor not turning on OR Ticket Mech BAD/Jammed OR Bad Ticket Disp cable --Ticket Motor not turning on OR Ticket Mech Bad/Jammed OR Bad Ticket Disp cable --- --Load More Tickets and Hit Flashing Sonic Stop Button to Continue Dispensing tickets where game left off. OR Turn game OFF, Check Ticket Mechanism, Cable, Power Supply. Turn game ON Load More Tickets and Hit Flashing Sonic Stop Button to Continue Dispensing tickets where game left off. OR Turn game OFF, Check Ticket Mechanism, Cable, Power Supply. Turn game ON --Turn game OFF, Check Ticket mechanism, Cable, Power Supply. Turn game ON --- During the Inital Configuration Display, the CONFIG Switches 5&6 were Set to a Points Layout that is not supported by the installed software version Improper setting of CONFIG Switches 5&6 Game will continuously display error and cannot be reset without turning the game OFF. Turn game OFF, properly set CONFIG, turn game ON, and make sure Inital Configuration Display shows a points layout consistant witht he points card that is installed During CAL, Tails Index Pulses were not found Tails Motor not spinning OR Tails Opto not working OR Bad cabling Game will continuously display error and cannot be reset without turning game OFF. Turn game OFF, check Tails Motor & Opto cabling & Power Supply. Turn Game ON. During CAL, Sonic Index Pulses were not found Sonic Motor not spinning OR Sonic Opto not working OR Bad cabling Game will continuously display error and cannot be reset without turning game OFF. Turn game OFF, check Tails Motor & Opto cabling & Power Supply. Turn Game ON. During CAL both Sonic AND Tails Index Pulses were not found Both Sonic & Tails Motor not spinning OR Both Sonic & Tails Opto not working OR Common Power Supply problem Game will continuously display error and cannot be reset without turning game OFF. Turn game OFF, check Sonic & Tails Motor & Opto cabling & Power Supply. Turn Game ON. Sonic & Tails Indicies www.seuservice.com 16 Error # E13 E14 Problem Area ----- Problem Detail ----- Possible Cause ----- E15 Sonic Sectors During game play, Sonic Sector Pulses not being detected Sonic Motor not spinning OR Sonic Opto not working Tails Motor not spinning OR Tails Opto not working OR Bad cables/connectors Both Sonic & Tails Motor not spinning OR Both Sonic & Tails Opto not working OR Common Power Supply/ Cabling Problem ----- Action to Reset Error Code ----Game will continuously display error and cannot be reset. Turn game OFF, check Sonic Motor & Opto cabling. Turn Game ON. Game will continuously display error and cannot be reset. Turn game OFF, check Tails Motor & Opto cabling. Turn Game ON. Tails Sectors During game play, Tails Sector Pulses not being detected E17 Sonic & Tails Sectors During game play, both Sonic AND Tails sector pulses not being detected E18 E19 ----- ----- E20 Sonic Stop Switch During CAL, the Sonic Stop Switch was detected as ON 1) Defective Switch 2) Foreign Material blocking switch button E21 Tails Stop Switch During CAL, the Tails Stop Switch was detected as ON 1) Defective Switch 2) Foreign Material blocking switch button E22 Coin-In Switch During CAL, the Coin-In Swtich was detected as Stuck ON 1) Defective Switch 2) Foreign Material blocking switch button Select Switch During CAL, the Select Switch was detected as Stuck ON 1) Defective Switch 2) Foreign Material blocking switch button Game will continuously display error and cannot be reset without turning game OFF. Turn game OFF, service Select Switch, Turn game ON. Step Switch During CAL, the Step Switch was detected as ON 1) Defective Switch 2) Foreign Material blocking switch button Game will continuously display error and cannot be reset. Turn game OFF, service Step Switch, Turn game ON. E16 E23 E24 17 Game will continuously display error and cannot be reset. Turn game OFF, check Sonic & Tails Motor & Opto cabling. Turn Game ON. ----Game will continuously display error and cannot be reset without turning game OFF. Turn game OFF, service Sonic Stop Switch, Turn game ON. Game will continuously display error and cannot be reset without turning game OFF.. Turn game OFF, service Tails Stop Switch, Turn game ON. Game will continuously display error and cannot be reset without turning game OFF.. Turn game OFF, service Coin-IN Switch, Turn game ON. www.seuservice.com 12. COIN SELECTOR HANDLING THE COIN JAM If the coin is not rejected when the REJECT button is pressed, open the coin chute door and open the selector gate. After removing the jammed coin, put a normal coin in and check to see that the selector correctly functions. CLEANING THE COIN SELECTOR STOP IMPORTANT! GATE Remove and clean smears by using a soft cloth dipped in water or diluted chemical detergent and then squeezed dry. Never apply machine oil, etc. to the Coin Selector. After cleaning the Coin Selector, insert a regular coin in the normal working status and ensure that the Selector correctly functions. FIG. 11 a The coin selector should be cleaned once every 3 months. When cleaning, follow the procedure below: (1) Turn the power for the machine OFF. Open the coin chute door. (2) Remove the coin selector from the coin chute door. (3) Open the gate and dust off by using a soft brush (made of wool, etc.). (4) Remove and clean smears by using a soft cloth dipped in water or diluted chemical detergent and then squeezed dry. (5) Remove the CRADLE. When removing the retaining ring (E ring), be very careful so as not to bend the rotary shaft. (6) Remove stain from the rotary shaft and shaft receiving portions by wiping off with a soft cloth, etc. (7) After wiping off as per (6) above, further apply a dry cloth, etc. to cause the coin selector to dry completely. Insert a coin while keeping COIN INSERTION TEST Once every month, when performing the Coin SW Test, simultaneously check the following: FIG. 11 b the Reject Button pressed down and check if it is rejected. COIN METER Does the Coin Meter count satisfactorily? Does the coin drop into the Cashbox correctly? Is the coin rejected when inserted while keeping the Reject Button pressed down? www.seuservice.com CRADLE 18 FIG. 11 c COIN DOOR 19 www.seuservice.com 13. TICKET DOOR Ticket Door is a Happ Controls Part #40-0549-00 and comes with the Ticket Stickers Happ Controls Part#42-1378-00 There is a ticket Meter in this game for an ongoing ticket count. www.seuservice.com 20 TICKET DISPENSER 21 www.seuservice.com www.seuservice.com 22 23 www.seuservice.com DETAILS OF PARTS P/N QTY DELTRONIC LABS P/N NAME 11 12 13 14 15 16 1 1 1 1 2 1 SHFT-IDLRLR/TD RM-SFTMTR/TD SPAC PIVBLK/TD/4HOL RM-SPCPB/TD RM-RLRIDL/TD/VALD RM-RLRDRV/TD/VALD IDL. ROLLER SHAFT MOTOR PIVOT SHAFT PIVOT BRACKET SPAC SPACER BLOCK IDLER ROLLER DRIVER ROLLER 17 18 19 20 21 22 23 24 25 26 27 28 29 30 31 32 33 34 35 36 37 38 39 40 41 42 43 2 2 1 1 1 1 1 1 1 2 1 4 1 1 1 1 1 4 1 2 2 4 2 1 1 1 SPRG-TENSN/TD RM-BKTPVT/TD RM-PANLFT/TD/NOPM RM-WHLBRK/TD SPR-LOCA/TD RM-BRKTBRK/TD RM-BKTTUB/TD/3/8 PCBD-12275/TD RM-MOTOR/TD RM-PLATFR/TD RM-CONN2P/TE/20G BRNG-F312/TT/BRASS SPAC-PCBD/TD SPAC/HEX/TD/1-1/4 RM.1M/TT/50V SPAC-HEX/TD/1/4” GUID-BOTTOM/TD/MET RING-E25RT/TT GUID-TOP/TD/MET PULY-SP212/TE/NYLN SPRG-FRONTTP/TD RM-PEMNUT/TD/FRPL RM-PEMNUT/TD/FRPN COVR-H21A/TD/OPTO CONN MOLEX/TD/4PM RM-LABEL/TD/ALUM WIRE-REDBLK/TD/MOTOR TENSION SPRING BRAKE WHEEL FRONT PANEL BRAKE WHEEL LOCATING SPRING BRAKE BRACKET URETHANE BRAKE PC BOARD MOTOR FRAME PLATE 2-PIN FEMALE CONN. BUSHING P.C. BOARD SPACER HEX SPACER 1-1/4” .IMFD 50V STAND OFF LOWER GUIDE MET. RETAINING RING GUIDE TOP METAL SPACER WASHER SPRING FRONT-PLATE PEMNUT FRAME PEMNUT FRONT DUST COVER 4 WIRE MOLEX MA. LABEL ALUMINUM 44 2 SPAC-PIVBRK/TD/HEX SPACER 1/4” HEX Material List for Screws www.seuservice.com 24 P/N QTY PART # DESCRIPTION 1 11 EM-#4-40S/TD-1/4 4-40X1/4”SCREW 2 3 RM-#4-40R/TS-1/4 4-40X1/4”WASHER HEAD 3 2 RM-#4-40R/TD-1/2 4-40X1/2”WASHER HEAD 4 1 RM-#8SCRW/TD 8-33X1-1/4” 5 1 RM-#4FLTW/TT #4 FLAT WASHER 6 5 RM-#4SPSW/TT #4 SPLIT LOC. WASHER 7 2 RM-#4-40T/TD/1/8 PHILLIPS TRUSSHEAD 8 1 RM-#8STAR/TD #8 INT STAR WASHER 9 1 SCRW-SET/TT 8-32X3/16” SET SCREW 10 1 SCRW-SET/TD/BKWH 8-32 X 1/8 SET SCREW 14. DESIGN RELATED PARTS 999-1532 Marquee See (A) Below 999-1530 Spinning Sonic Disc 999-1531 Spinning Tails Disc 999-1555 Front Plex Clear SSP 999-1527 Prize Dial Heart 999-1528 Prize Dial Club 999-1529 Prize Dial Diamond 999-1523 Decal Base Left 999-1524 Decal Base Right 999-1525 Decal Base Spkr Pnl Upper 999-1534 Design Plate Credit/Ticket 999-1526 Decal Base Spkr Pnl Lower 999-1533 Ctrl Pnl Overlay 999-1538 Decal Sonic Button Insert 999-1539 Decal Tails Button Insert 999-1522 Decal Front Panel “Tickets” Decal Happ controls Part # 42-1378-00 (A) 999-1535 Jackpot Insert Heart 999-1536 Jackpot Insert Club 999-1537 Jackpot Insert Diamond 25 www.seuservice.com www.seuservice.com 11 2 26 12 Motor (2X) Motor Base (2X) 14 101 PCB Bracket (2X) 8 7 Belt (2X) Encoder Board (2X) 3 101 1 WARNING! TENSION. Only tighten finger tight to allow at least 1/4 in. deflection. Mechanism Shelf 9 1/4-20x11/2 Hex Head Bold (2X) 15 DO NOT OVERTIGHTEN BELT 3/8" Drive Pulley 13 6 1/4" Drive Pulley (2X) 5 101 Flanged Idler Pulley 2 2Axle Mechanism Assy SSP (999-1589) Belt Tension Bracket (2X) 10 4 Front Flange 1 Encoder Wheel ( 2x) 15. PARTS (P 1/4) Mechanism Assy SSP (999-1589) (P 2/4) Item Number Part Number Description 1 999-1578 Encoder Wheel SSP 2 999-1581 Axle SSP 3 998-0172 Encoder Board SSP 4 999-1576 Hub Spinner Assy (Front Flange) SSP 5 999-1577 Flanged Idler Pully SSP 6 999-1572 1/4 in. Drive Pully SSP 27 Picture www.seuservice.com Mechanism Assy SSP (999-1589) (P 3/4) Item Number Part Number Description 7 999-1573 Belt (350 5M 09) SSP 8 999-1575 Encoder PCB Bracket SSP 9 999-1582 Mechanism Shelf SSP 10 999-1580 Motor Base Bracket SSP 11 999-1574 Belt Tensioner Bracket SSP 12 999-1583 Globe Motor (24v DC) SSP 13 999-1571 3/8 in. Drive Pully SSP www.seuservice.com Picture 28 No Photo At Print Time Mechanism Assy SSP (999-1589) (P 4/4) Item Number Part Number Description 14 999-1579 Pillow Block W/ Bearings SSP 15 999-1588 Tension Bolt (For Mech Assy) SSP 999-1530 Spinning Sonic Disc SSP 999-1531 Spinning Tails Disc SSP 999-1570 3/8 in. E-Ring SSP 101 29 Picture www.seuservice.com Top Assy. & Control Panel SSP (P 1/4) 999-1530 Spinning Sonic Disc 4 3 2 1 15 16 17 18 6 999-1525 Decal Base Spkr Pnl Upper 999-1526 Decal Base Spkr Pnl Lower 5 14 13 11 12 6 7 6 9 8 10 999-1533 Control Panel Overlay www.seuservice.com 30 Top Assy & Control Panel (P 2/4) Item Number Part Number Description 1 999-1567 Ear Front Left SSP 2 999-1566 Ear Base Left SSP (without light fixture) 3 999-1560 Fixture for Ear Left (18” Cool White Local Purchase) SSP No Photo at time of Print 4 999-1587 Left Ear Assy SSP (includes light fixture) No Photo at time of Print 5 999-1523 Decal Base Assy. Left SSP 6 999-1568 1250X-2 12v 5w Xenon Bulb SSP 7 999-1562 Blue Button SSP (without sonic insert) 31 Picture www.seuservice.com Top Assy & Control Panel SSP (P 3/4) Item Number Part Number Description 8 999-1538 Decal Sonic Button Insert SSP 9 999-1563 Button Yellow SSF (without Tails insert) 10 999-1539 Decal Tails Button Insert SSP 11 998-0173 3 Digit Numeric Display SSP 12 999-1534 Design Plate Credit/ Ticket SSP www.seuservice.com Picture 32 Top Assy & Control Panel SSP (P 4/4) Item Number Part Number Description 13 999-1556 Speaker Grill SSP 14 999-1524 Decal Base Right SSP 15 999-1565 Ear Front Right SSP 16 999-1564 Ear Back Right (without Light Fixture) SSP 17 999-1560 Fixture for Ear Right SSP No Photo at time of print 18 999-1586 Ear Assy Right SSP No Photo at time of print 33 Picture www.seuservice.com Header and Electronics SSP (P 1/3) 1 2 11 10 3 9 8 4 7 6 5 www.seuservice.com 36 Header and Electronics SSP (P 2/3) Item Number Part Number Description 1 999-1532 Marquee SSP 2 999-1559 R14 03604 Mini Flood SSP 3 999-1527 999-1528 999-1529 Prize Dial Heart SSP Prize Dial Club SSP Prize Dial Diamond SSP 4 Purchase from Happ Part # 42-1378-00 Ticket graphic SSP 5 999-1585 Leg Leveler SSP 6 998-0176 7 998-0177 8 998-0167 Astec 24v2a/12v1a Power Supply SSP Autec 12v3a/5v3a Power Supply SSP Picture No Photo at time of print No Photo at time of print Game Board SSP 37 www.seuservice.com Header and Electronics SSP (P 3/3) Item Number Part Number Description Picture 9 998-0175 Ribbon Cable Interconnect SSP No Photo at time of print 10 998-0168 998-0169 998-0170 998-0171 Lamp Board (A) SSP Lamp Board (B) SSP Lamp Board (C) SSP Lamp Board (D) SSP No Photo at time of print 11 999-1558 MiniFlood Lamp Socket For Marquee No Photo at time of print 998-0174 Wire Harness SSP No Photo at time of print 999-1569 999-1561 999-1584 999-1557 www.seuservice.com Wedge Base Sockets SEP Internal Light Fixture SSP (18in Cool White Local Purchase) Wood Marquee Bracket SSP 8ohm 4” Speaker 20 watt SSP 38 No Photo at time of print No Photo at time of print No Photo at time of print No Photo at time of print Warranty Your new Sega Product is covered for a period of 90 days from the date of shipment. This certifies that the Printed Circuit Boards, Power Supplies and Monitor are to be free of defects in workmanship or materials under normal operating conditions. This also certifies that all Interactive Control Assemblies are to be free from defects in workmanship and materials under normal operating conditions. No other product in this machine is hereby covered. Sellers sole liability in the event a warranted part described above fails shall be, at its option, to replace or repair the defective part during the warranty period. For Warranty claims, contact your Sega Distributor. Should the Seller determine, by inspection that the product was caused by Accident, Misuse, Neglect, Alteration, Improper Repair, Installation or Testing, the warranty offered will be null and void. Under no circumstances is the Seller responsible for any loss of profits, loss of use, or other damages. This shall be the exclusive written Warranty of the original purchaser expressed in lieu of all other warranties expressed or implied. Under no circumstance shall it extend beyond the period of time listed above.