1
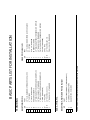
OPERATOR INSTRUCTIONS, INSTALLATION AND SERVICE MANUAL
ALL MODELS
GPC 23 THROUGH GPC 280 SERIES
GPC 23‐280 SERIES
PATENT NO:
US 7,624,589 B1 MADE IN THE USA
P.O. BOX 5198 SCOTTSDALE, AZ 85261
PHONE: (480)272‐7700
FAX: (866)276‐2083
www.glacierpoolcoolers.com
IMPORTANT SAFETY INSTRUCTIONS
When installing and using this electrical equipment, basic
safety precautions should always be followed, including
the following:
1. READ AND FOLLOW ALL INSTRUCTIONS.
2. WARNING: TO REDUCE THE RISK OF INJURY, DO NOT PERMIT CHILDREN TO USE THIS PRODUCT UNLESS THEY ARE CLOSELY SUPERVISED AT ALL TIMES.
3. SAVE THESE INSTRUCTIONS.
PG 2
PREFACE Adequate knowledge of pool cooler maintenance and control is necessary for optimum safe performance over time. In this manual, equipment, function, operation, and checking procedures will be described as follows: PREPARATION FOR STARTING Clean Basin Open the drain at the bottom of the water basin and drain. Remove dirt and debris and clear suction holes at base of pump and basin with pool water or hose as needed. Close the drain for start of operation. Clean Fan Guard Clean leaves, pine needles, and any other debris from the top of the cooler on or around the fan guard. Check Inside Remove hand hole cover and inspect interior of cooler. Remove any debris from top of PVC filling by reaching through the hand hole cover. ALWAYS MAKE SURE COOLER IS COMPLETELY TURNED OFF BEFORE REACHING INSIDE THE UNIT! NEVER PLACE HAND INSIDE UNIT WHEN FAN MOTOR IS ON! TO START AND OPERATE COOLER
MANUAL OPERATION Close main drain. (This is the far left 1” line with ball valve at the bottom basin.) Turn pool pump on. Open center valve to the two o’clock position. This is the input line to the pool cooler. (Installer should have line marked) Look through hand hole cover. Sprinkler heads should be turning at a “moderate” speed. If sprinkler heads aren’t turning, slightly open center valve more. If sprinkler heads are moving too fast, close valve more. (If water is splashing through the top of fan guard it is too fast.) Wait approx. 30 seconds while basin fills with water. Open right valve to the two o’clock position. This is the output line back to the pool. (Installer should mark valve) Turn fan switch to the on position in the switch box. TURNING THE COOLER OFF Turn the fan switch to the OFF position Close the center and right valves and open the main drain valve and leave open until next use. THE COOLER SHOULD BE LEFT IN THIS POSITION WHEN NOT IN USE! FAILURE TO FOLLOW THESE INSTRUCTIONS COULD RESULT IN THE BURNING UP OF THE PUMP SYSTEM! **These instructions are for manual operation. If system is automated refer to your installers instructions. CAUTIONS DURING OPERATION WARRANTY INFORMATION Keep hands and foreign objects away from fan motor and assembly at all times. Glacier Pool Coolers offers the following limited warranty: Since the cooling performance will be affected by the volume of the circulating water, be sure to maintain the regulation of water flow at all times. 5 years on FRP (fiberglass) casing and cold water basins. Keep the interior of the cooler always clean and take care that no scale, calcium, salt, or debris accumulates. 1 year on all fan motors, major drive components, and all internal moving parts. When the level of the water in the basin drops, air is sucked in and cavitation may develop; therefore, it is necessary to keep the water at the proper level at all times. It is important to note that the water level should rise and fall with the pump operation. Do not try to balance the water level as doing so will eventually result in the basin being sucked dry and WILL NOT ALLOW WATER TO YOUR POOL PUMP, WHICH IN RESULT COULD DAMAGE THIS PUMP. 2 years on all PVC fillings. You can register your unit on our website at www.glacierpoolcoolers.com. Please be sure to include the following information: PURCHASE DATE RETAILER PURCHASED FROM MODEL NO SERIAL NO YOUR NAME, INSTALLED ADRESS, AND PHONE
FREQUENTLY ASKED QUESTIONS 1. WHY IS THERE SPLATTER COMING OUT THE TOP OF MY COOLER? If there is water droplets splattering out the top of the cooler you need to slow your sprinkler wands down. In order to do this simply restrict the flow of water coming into the unit by slowly turning the ball valve back on the IN line. The wands should be turning at a slower of “walking” rate of speed. As a rule of thumb both the IN and OUT valves should be positioned at about the 2 o’clock position. 2. MY COOLER ONLY DROPPED MY POOL DOWN BY 5 DEGREES. IS THERE SOMETHING WRONG? If a desirable drop in degrees is not established within an 8‐12 hour period, there may need to be some use adjustments. Always make sure that the sprinkler wands are turning at a slower or “walking” rate of speed. It is recommended that the cooler run at night when the sun is off the 3.
4.
5.
6.
7.
8.
9.
10.
11.
pool. An initial drop in temperature should be expected overnight. If the sun warms the pool back up by afternoon, just turn the system on to keep your pool refreshing. IS THE WATER SUPPOSED TO FILL UP IN THE BASIN AND THEN DRAIN EVERY FEW MINUTES? Yes. The cooler is designed so that the cool water collects in the basin and the internal pump system kicks on and pushes the water back into your pool. You should never try to balance the water flow as this will eventually cause cavitation in your pool pressure. IS THE POOL COOLER LOUD? The cooler has about the same noise level as your pool pump. HOW MUCH ELECTRICITY DOES THE POOL COOLER USE? Our residential models are extremely energy efficient. They average 5.5 amps (amperage) when in use. SHOULD I OVERSIZE MY COOLER TO GET MORE COOLING? No. Our line of pool coolers have been designed to accommodate specific pool sizes as shown on the specs. You will not see an increase in cooling by putting a larger cooler on a smaller pool. DO THE COOLERS WORK IN HIGH HUMIDITY AREAS? Yes. Glacier Pool Coolers work efficiently in all regions. All of our research and development was actually done in Houston, TX and the Gulf Coast region. Our coolers take the heat from the water regardless of humidity or air temperature. CAN I INSTALL THE COOLER MYSELF? Yes you can. You can get all the parts at your local home improvement store. We strongly recommend an authorized installer from our list if one is in your area. WHAT DO I NEED TO DO TO WINTERIZE MY COOLER? You must keep your IN and OUT valves closed and your main drain ball valve (the bottom left valve) open so the system is drained and will stay empty from rain water. If water stays in the basin over the off‐season it could potentially burn up your pump. You may also want to purchase a cover or tarp to keep any leaves or debris out of the fan area and basin especially if the cooler is under or around trees or bushes. Upon start‐up at the beginning of the summer season, make sure the unit is clear of debris especially around the pump. A good hose down should do the trick. WILL THE POOL COOLER WORK WITH A SALT WATER POOL? Yes. Our units are made of reinforced fiberglass, with stainless steel components. You can not harm the unit with salt residue, however extra care to maintain the cooler on your salt pool is necessary. Keep the cooler hosed down regularly to reduce salt build up and rusting. HOW DO I CONTROL THE TEMPERATURE OF MY POOL? Our residential coolers do not come with thermostat controls. Cooling is determined by the run time of your pool pump. If it’s too cold, cut back your hours. If it’s not cool enough, run your pump longer. Now if your pool is automated our pool cooler can integrate into your system and a temperature range can be set through your automated system. GLACIER POOL COOLER PARTS
FAN MOTOR
FRP CASING
FAN ASSEMBLY
SPRINKLER WAND ASSEMBLY
PVC FILLING
CASING SUPPORT
LOUVERS
PUMP SYSTEM
OUTLET LINE
BASIN
INLET LINE
MAIN DRAIN
PART
1.5" 2 LB. RAINBOW SPRING CHECK VALVES
2" T‐FITTINGS
2" TO 1.5" REDUCERS
90 DEGREE ELBOWS
1.5" MALE ADAPTERS (THREADED) OR NIPPLES
1.5" BALL VALVES ‐ STANDARD
1" MALE ADAPTER (THREADED) OR NIPPLES
1" PLUG (THREADED)
1" PVC PIPE
1.5" PVC PIPE (EST. FT)
1" BALL VALVE ‐ STANDARD
.5" SEAL TIGHT CONDUIT (DETERMINE FT)
.5" CONDUIT CONNECTORS
GAUGE WIRE ‐ 3 COLORS
2
14
**ADDITIONAL PARTS MAY BE NEEDED FOR AUTOMATED SYSTEMS
PART
QTY
EXISTING AND NEW POOL BUILD
ELECTRICAL
QTY
2
2
2
10
2
2
1
1
12"
20 FT
1
EXISTING POOL
PLUMBING
QTY
1
1
1
5
2
1
1
1
12"
20 FT
1
PART
1.5" 2 LB. RAINBOW SPRING CHECK VALVES
2" T‐FITTING
2" TO 1.5" REDUCER
90 DEGREE ELBOWS
1.5" MALE ADAPTERS (THREADED) OR NIPPLES
1.5" BALL VALVES ‐ STANDARD
1" MALE ADAPTER (THREADED) OR NIPPLES
1" PLUG (THREADED)
1" PVC PIPE
1.5" PVC PIPE (EST. FT)
1" BALL VALVE ‐ STANDARD
NEW POOL BUILD
BASIC PARTS LIST FOR INSTALLATION
main drain
Add T-Fitting
Skimmer/
suction
1"
1.5"
2 lb. Check
Valve
inlet line
in out
Diagram 3.
PUMP
2lb. Check
Valve
Ball Valves
FILTER
outlet line
=waterflow
Fitting
Add T-Fitting
HEATER
Return to pool
STANDARD INSTALLATION
EXISTING POOL SET-UP
Techs should attempt to do the electrical installation!
1. FIRST STEP - ADD and connect a PVC T- Fitting right after the Filter
or Heater line return to the pool, then ADD your PVC pipe line. Next,
ADD a 2lb. Check valve on this line, then ADD a Ball valve before the
inlet. Connect this to a threaded adapter fitting (1 1/2 Male size) going to
the MIDDLE inlet hole (input) to the cooler (connect and glue all parts).
You can use 1.5" or 2" pipe.(Must ADD 2" Reducer fitting after ball
valve, going into cooler if using 2" pipe on install on ALL residential
models).
2. SECOND STEP- ADD another adapter fitting at the right outlet hole,
(output) then ADD and connect your Ball Valve FIRST, then ADD your
PVC pipe line out of the cooler. NEXT, ADD a 2 lb. Rainbow Check valve
on this line down (closer to the pool pump) at the suction/skimmer side
of the equipment set-up. Then, ADD a PVC T- Fitting at suction/skimmer
line to connect this line at the pump.
3. THIRD STEP- ADD 1" plug in top hole on the left side of basin. ADD
1" threaded fitting, then a 1" Ball valve at bottom lower outlet.
4. FOURTH STEP- ELECTRICAL The pool cooler works with the pool
pump power. The minimum amperage needed is a 20 amp breaker to
operate the pool cooler with the pool pump. Electrical installation on a
retro-fit Cooler 220v intermatic timeclock. The cooler is 110v and
most pool systems operate @ 220v, therefore take the hot leg from the
cooler and run it to either load on the T104R3 220v timeclock. The
ground ties into the grounding lug on the bottom of the timeclock. The
Neutral wire needs to be run either to the ground or to the open screw on
the far left of the terminal. Run an extra piece of ground wire to the open
terminal (far left, and a little offset)if you decide to use the extra terminal
for the ground wire, which is preferred. Electrical installation using an
Aqualink or Compool system. Installation of a Glacier Cooler on a
Jandy or a Compool is virtually the same. First, find the primary filter
pump which will be feeding the cooler. The relay has 4 screws 2 lines
and 2 loads as follows from left to right....Line1 Load1 Line2 Load2. Use
one of the Loads as your HOT for the Cooler, either one, but only one,
you will need an available relay or add another if space is available. Take
the cooler relay's (line) and wire it to either of the filter pumps load, this
will keep the cooler from running without the filter pump. Ground and
Neutral tie into the Grounding terminal. Each relay has a plug that must
be plugged into an open Aux female socket to allow control through the
automated system. When using actuators, you will need (Factory
recommends one actuator per valve actuator control) otherwise both
actuators can be tied together and plugged into one valve control. There
are many different ways to electrically install a Glacier Cooler, depending
on the needs of your customers. Only qualified Swimming pool