1
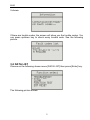
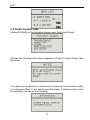
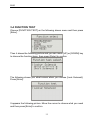
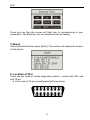
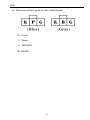
H685
Table of Contents
Safety Precautions…………….……….…………..…………..2
About H685……….………..………..…………………….……..4
1. Function…………………..……….……………………….…..4
2. Systems supported………………….…..……….……………4
3. Appearance and Key Descriptions………………….……….4
Operation Instructions……………….....……………………..6
1. Preparation for Testing…………….………….……………..6
2. Connect the H685……………….…………..……………….7
3. Diagnose………………..…………..…..…………...…………7
3.1 Read trouble code…………………..…….………….…8
3.2 DATA LIST.…….…..………….…………………..……..9
3.3 Delete trouble code……………………………….……10
3.4 FUNCTION TEST……………………………….……..11
3.5 ECM RESET…………………………………………....12
4. Contrast adaptation……………………………..………..….13
5. Lcd test…………………..………………………………...….14
6. Key testing…………………………………………………….14
7. About…………………………………………………………..15
8. Location of DLC…………………………………………..…..15
1
H685
Safety Precautions
To avoid body hurt and damage to the device or your car, please read
this manual carefully before using H685.
The general testing process described in this manual is got by technologist
of experience. Safety precaution is required in most of the process to avoid
body hurt and damage to the device or your car. Prior to your using this
device, please read vehicle maintenance code and follow the safety
precautions. Keep mention to the following general safety precautions.
z It generates CO and other poisonous air when engine run. To avoid
this kind of hurt, please repair the car in a well-air-ventilated location.
z To protect your eyes from the damage of the exposed objects, hot and
harmful liquid, please wear good eye-protection tools.
z When an engine is running, many parts (such as the coolant fan,
pulleys, fan belt etc.) turn at high speed. To avoid serious injury,
always be aware of moving parts. Keep a safe distance from these
parts as well as other potentially moving objects.
z Engine parts become very hot when the engine is running. To prevent
severe burns, avoid contact with hot engine parts.
z Before starting an engine for testing or trouble-shooting, make sure
the parking brake is engaged. Put the transmission in park (for
automatic transmission) or neutral (for manual transmission). Block the
drive wheels with suitable blocks.
z Connecting or disconnecting test equipment when the ignition is ON
can damage test equipment and the vehicle's electronic components.
Turn the ignition OFF before connecting the H685 to or disconnecting
the H685 from the vehicle’s Data Link Connector (DLC).
z To prevent damage to the on-board computer when taking vehicle
electronic measurements, please always use a digital multimeter with
at least 10meg Ohms of impedance.
z Fuel and battery vapors are highly flammable. To prevent an explosion,
keep all sparks, heated items and open flames away from the battery
and fuel / fuel vapors. DO NOT SMOKE NEAR THE VEHICLE
DURING TESTING.
z Don't wear loose clothing or jewelry when working on an engine.
Loose clothing can become caught in the fan, pulleys, belts, etc.
2
H685
Jewelry is highly conductive, and can cause a severe burn if it makes
contact between a power source and ground.
3
H685
1
About H685
1. Function
z
z
z
z
z
TROUBLESHOOT
DATA LIST
CLEAR
FUNCTION TEST
ECM RESET
2. Systems supported
H685 can support the following systems:
z PGM_FI
z AT
z ABS_VSA
z SRS
z
EPS
3. Appearance and Key Descriptions
4
H685
The appearance of a H685 is as shown in the above figure.
1. LCD screen: 128*64
2. Enter key: confirm selection and enter
3. Esc key:
go back to the previous screens
4. up/down arrows: moves the selection pointer and scrolls up or down
5. LEFT/RIGHT arrows: move cursor.
6. Power button
7. Diagnostic extension cable: OBDII -16PIN / HONDA 3PIN
5
H685
Operation Instructions
1. Preparation for Testing
Here H685 can test and erase the car trouble codes and read the relative
trouble codes. On the other hand, many mechanical problems, such as
poor engine performance due to low fuel level, damaged soft cube,
electrical wire or electrical connectors, can also cause faked trouble codes.
Therefore you need to refer to the car service pamphlet to get more
instruction information when you test before you know the mechanical
problems.
Check the following areas before starting any test:
z Check the engine oil, power steering fluid, transmission fluid (if
applicable), engine coolant and other fluids for proper levels. Top off
low fluid levels if needed.
z Make sure the air filter is clean and in good condition. Make sure all
air filter ducts are properly connected. Check the air filter ducts for
holes, rips or cracks.
z Make sure all engine belts are in good condition. Check for cracked,
torn, brittle, loose or missing belts.
z Make sure mechanical linkages to engine sensors (throttle, gearshift
position, transmission, etc.) are secure and properly connected. See
your vehicle’s service manual for locations.
z Check all rubber hoses (radiator) and steel hoses (vacuum/fuel) for
leaks, cracks, blockage or other damage. Make sure all hoses are
routed and connected properly.
z Make sure all spark plugs are clean and in good condition. Check for
damaged, loose, disconnected or missing spark plug wires.
z Make sure the battery terminals are clean and tight. Check for
corrosion or broken connections. Check for proper battery and
charging system voltages.
z Check all electrical wiring and harnesses for proper connection. Make
sure wire insulation is in good condition, and there are no bare wires.
z Make sure the engine is mechanically sound. If needed, perform a
compression check, engine vacuum check, timing check (if
applicable), etc.
6
H685
2. Connect the H685
2.1 Turn the ignition on.
2.2 Locate the vehicle's 16-pin Data Link Connector (DLC).
2.3 Connect the H685 cable connector to the vehicle’s DLC. Turn on the
ignition, Press [power button], The H685 will auto start, the following
screen will be displayed.
z
z
z
z
z
[Diagnose]: diagnose
[Contrast]: Contrast adaptation
[Lcd Test]: Lcd test
[Keypad Test]:Keypad test
[About]:show device version
3. Diagnose
Select [Diagnose] and then press [enter] key. The screen will display the
system selection menu as follow:
Systems that H685 supports here are classified 5 kinds, the operation ways
of which respectively speaking are similar. Move [UP] or [DOWM] to move
the cursors to choose what you need to enter to operate, and then press
[Enter] to confirm. Here we choose [AT]. The screen will display the
following.
7
H685
Later, if it connects with the ECU successfully, it will show the following
menu.
If it fails, it show:
3-1 Read trouble code
Choose [TROUBLESHOOT], then press [Enter] key.
8
H685
It shows:
If there are trouble codes, the screen will show you the trouble codes. You
can press up/down key to check every trouble code. See the following
picture.
3-2 DATA LIST
Choose on the following shown menu [DATA LIST] then press [Enter] key.
The following picture shows:
9
H685
3-3 Delete trouble code
Choose [CLEAR] on the following shown menu then press [Enter].
It shows the following information regarding of Delete Trouble Codes. See
the follow.
You need to press [Enter] to confirm and run what you have chosen, while
you can press [Esc] to quit deleting trouble codes. If delete trouble codes
successfully, it shows as the following.
10
H685
3-4 FUNCTION TEST
Choose [FUNCTION TEST] on the following shown menu and then press
[Enter].
Then it shows the following picture and you can move [UP] or [DOWM] key
to choose the function items, then press [Enter] to confirm.
The following shows you what comes when you choose [Lock Solenoid].
Press [Enter].
It appears the following picture. Move the cursor to choose what you need
and then press [Enter] to confirm.
11
H685
The following picture tells you what shows when you choose [ON].
Press [Enter] to return then you can see the following.
As the above picture shows, move [UP] or [DOWM] to choose [BACK] then
press [Enter] to confirm. Here you can return to the previous memo.
3-5 ECM RESET
Choose [ECM RESET] on the menu shown as the following picture and
12
H685
then press [Enter].
It shows the following reminding information. See the following picture.
You need to press [Enter] then it will run ECM RESET, while you can also
press [Esc] to quit. If it runs successfully, it will show as the following.
4. Contrast Adaptation
Choose [Contrast] at the main menu. Then press [Enter]. The screen will
display as the following.
13
H685
Simply press up/down arrow to set and then press [Enter] to
confirm.
5. Lcd test
Choose[Lcd Test] at the main menu, Press Enter],The screen will display
the following dynamic image.
When after testing, it will show “Test end!” as what the following shows.
6. Key testing
Choose [Keypad Test] at the main menu. Press [Enter]. The screen will
display the following interface.
14
H685
Press any key then the screen will flash due to corresponding to your
cooperation. Double [Esc], you can withdraw from the testing.
7.About
Choose [About] and then press [Enter]. Then screen will display the version
of this device.
8. Location of DLC
There are two kinds of Honda diagnostic sockets--- socket with 3Pin and
with 16 pin.
z Front view of 16 pin socket(female)(off-line picture)
15
H685
z
There are two front views of 3 pin socket(female)
K:K Line
P:Power
G:GROUNG
B:BLANK
16