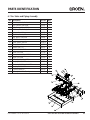
1
SERVICE MANUAL
IMPORTANT INFORMATION, KEEP FOR OPERATOR
This manual provides information for:
MODELS TRI-RES-20G
& (2)TRI-RES-20G
COMBINATION OVEN
· Self Contained
· Gas Heated
· Capacity:
TRI-RES-20G = 10 Steamer Pans Per Cavity
THIS MANUAL MUST BE RETAINED FOR FUTURE REFERENCE.
READ, UNDERSTAND AND FOLLOW THE INSTRUCTIONS AND
WARNINGS CONTAINED IN THIS MANUAL.
FOR YOUR SAFETY
Do not store or use gasoline or other flammable vapors
and liquids in the vicinity of this or any other appliance.
POST IN A PROMINENT LOCATION
Instructions to be followed in the event user smells gas.
This information shall be obtained by consulting your
local gas supplier. As a minimum, turn off the gas and
call your gas company and your authorized service agent.
Evacuate all personnel from the area.
WARNING
Improper installation, adjustment, alteration, service or
maintenance can cause property damage, injury or death.
Read the installation, operating and maintenance instructions
thoroughly before installing or servicing this equipment.
NOTIFY CARRIER OF DAMAGE AT ONCE
It is the responsibility of the consignee to inspect the container upon receipt of
same and to determine the possibility of any damage, including concealed damage. Unified Brands suggests that if you are suspicious of damage to make a
notation on the delivery receipt. It will be the responsibility of the consignee to file
a claim with the carrier. We recommend that you do so at once.
Manufacture Service/Questions 888-994-7636.
Information contained in this document is known to be current and accurate at the time
of printing/creation. Unified Brands recommends referencing our product line websites,
unifiedbrands.net, for the most updated product information and specifications.
PART NUMBER 152797, REVISION A
1055 Mendell Davis Drive
Jackson, MS 39272
888-994-7636, fax 888-864-7636
groen.com
table of contents
Introduction
page
1.1
The Groen Service Concept . . . . . . . . . . . . . . . . . . . . . . . . . . . . . . . . . . . . . . . . . . . . . . . . . . . . . . . . . . . . . . . . . . . . . 4
1.2Groen Certified Service . . . . . . . . . . . . . . . . . . . . . . . . . . . . . . . . . . . . . . . . . . . . . . . . . . . . . . . . . . . . . . . . . . . . . . . . 4
1.3
Warranty and Non-Warranty Repair. . . . . . . . . . . . . . . . . . . . . . . . . . . . . . . . . . . . . . . . . . . . . . . . . . . . . . . . . . . . . . . 4
1.4
Safety. . . . . . . . . . . . . . . . . . . . . . . . . . . . . . . . . . . . . . . . . . . . . . . . . . . . . . . . . . . . . . . . . . . . . . . . . . . . . . . . . . . . . 4
1.5Glossary of Terms. . . . . . . . . . . . . . . . . . . . . . . . . . . . . . . . . . . . . . . . . . . . . . . . . . . . . . . . . . . . . . . . . . . . . . . . . . . . . 5
1.6
Tools and Supplies. . . . . . . . . . . . . . . . . . . . . . . . . . . . . . . . . . . . . . . . . . . . . . . . . . . . . . . . . . . . . . . . . . . . . . . . . . . . 5
1.6.1
Required Tools. . . . . . . . . . . . . . . . . . . . . . . . . . . . . . . . . . . . . . . . . . . . . . . . . . . . . . . . . . . . . . . . . . . . . . . 5
1.6.2
Recommended Instruments. . . . . . . . . . . . . . . . . . . . . . . . . . . . . . . . . . . . . . . . . . . . . . . . . . . . . . . . . . . . . 5
1.6.3
Helpful Hardware. . . . . . . . . . . . . . . . . . . . . . . . . . . . . . . . . . . . . . . . . . . . . . . . . . . . . . . . . . . . . . . . . . . . . 5
1.6.4
Recommended Supplies. . . . . . . . . . . . . . . . . . . . . . . . . . . . . . . . . . . . . . . . . . . . . . . . . . . . . . . . . . . . . . . . 5
1.7
How To Use This Manual. . . . . . . . . . . . . . . . . . . . . . . . . . . . . . . . . . . . . . . . . . . . . . . . . . . . . . . . . . . . . . . . . . . . . . . 6
Operation
2.1
2.2
2.3
Startup. . . . . . . . . . . . . . . . . . . . . . . . . . . . . . . . . . . . . . . . . . . . . . . . . . . . . . . . . . . . . . . . . . . . . . . . . . . . . . . . . . . . 7
Operating Procedure. . . . . . . . . . . . . . . . . . . . . . . . . . . . . . . . . . . . . . . . . . . . . . . . . . . . . . . . . . . . . . . . . . . 8, 9, 10, 11
Controls . . . . . . . . . . . . . . . . . . . . . . . . . . . . . . . . . . . . . . . . . . . . . . . . . . . . . . . . . . . . . . . . . . . . . . . . . . . . . . . . . . 12
Installing, cleaning and testing
3.1Gas Model Installation. . . . . . . . . . . . . . . . . . . . . . . . . . . . . . . . . . . . . . . . . . . . . . . . . . . . . . . . . . . . . . . . . . . . . . 13, 14
3.2
Installation . . . . . . . . . . . . . . . . . . . . . . . . . . . . . . . . . . . . . . . . . . . . . . . . . . . . . . . . . . . . . . . . . . . . . . . . . . . . . . . . 15
3.3
Installation Checklist. . . . . . . . . . . . . . . . . . . . . . . . . . . . . . . . . . . . . . . . . . . . . . . . . . . . . . . . . . . . . . . . . . . . . . . . . 16
Water Treatment . . . . . . . . . . . . . . . . . . . . . . . . . . . . . . . . . . . . . . . . . . . . . . . . . . . . . . . . . . . . . . . . . . . . . . . . . . . . 17
3.4General Cleaning. . . . . . . . . . . . . . . . . . . . . . . . . . . . . . . . . . . . . . . . . . . . . . . . . . . . . . . . . . . . . . . . . . . . . . . . . . . . 18
Interior Cleaning. . . . . . . . . . . . . . . . . . . . . . . . . . . . . . . . . . . . . . . . . . . . . . . . . . . . . . . . . . . . . . . . . . . . . . . . . . 19,20
Diagnostics / TroubleShooting
4.1
Troubleshooting procedures and quick reference . . . . . . . . . . . . . . . . . . . . . . . . . . . . . . . . . . . . . . . . . . . . . . . . . . 21-27
Assembly / disassembly
5.1General Information. . . . . . . . . . . . . . . . . . . . . . . . . . . . . . . . . . . . . . . . . . . . . . . . . . . . . . . . . . . . . . . . . . . . . . . . . . 28
5.2
Cavity Compartment Side Panels. . . . . . . . . . . . . . . . . . . . . . . . . . . . . . . . . . . . . . . . . . . . . . . . . . . . . . . . . . . . . . . . 29
5.3
Top Cover. . . . . . . . . . . . . . . . . . . . . . . . . . . . . . . . . . . . . . . . . . . . . . . . . . . . . . . . . . . . . . . . . . . . . . . . . . . . . . . . . 29
5.4
Tri-Res Control PC Board. . . . . . . . . . . . . . . . . . . . . . . . . . . . . . . . . . . . . . . . . . . . . . . . . . . . . . . . . . . . . . . . . . . . . . 29
5.5
Relay Board. . . . . . . . . . . . . . . . . . . . . . . . . . . . . . . . . . . . . . . . . . . . . . . . . . . . . . . . . . . . . . . . . . . . . . . . . . . . . . . . 30
5.6
Reservoir Drain Valves. . . . . . . . . . . . . . . . . . . . . . . . . . . . . . . . . . . . . . . . . . . . . . . . . . . . . . . . . . . . . . . . . . . . . . . . 30
5.7
Door Removal/Installation/Alignment. . . . . . . . . . . . . . . . . . . . . . . . . . . . . . . . . . . . . . . . . . . . . . . . . . . . . . . . . . . . . 29
5.8
Door Switch. . . . . . . . . . . . . . . . . . . . . . . . . . . . . . . . . . . . . . . . . . . . . . . . . . . . . . . . . . . . . . . . . . . . . . . . . . . . . . . . 30
5.9
Door Gasket . . . . . . . . . . . . . . . . . . . . . . . . . . . . . . . . . . . . . . . . . . . . . . . . . . . . . . . . . . . . . . . . . . . . . . . . . . . . . . . 30
5.10 Water Level Probe. . . . . . . . . . . . . . . . . . . . . . . . . . . . . . . . . . . . . . . . . . . . . . . . . . . . . . . . . . . . . . . . . . . . . . . . . . . 30
5.11 Burner. . . . . . . . . . . . . . . . . . . . . . . . . . . . . . . . . . . . . . . . . . . . . . . . . . . . . . . . . . . . . . . . . . . . . . . . . . . . . . . . . . . . 32
PART NUMBER 152797 REVISION A
CALL 888-994-7636 FOR TECHNICAL SUPPORT
2
table of contents
Parts identification
6.1
Control Panel Sub Assembly. . . . . . . . . . . . . . . . . . . . . . . . . . . . . . . . . . . . . . . . . . . . . . . . . . . . . . . . . . . . . . . . . . . . 33
6.2
High Voltage Panel Assembly - Gas . . . . . . . . . . . . . . . . . . . . . . . . . . . . . . . . . . . . . . . . . . . . . . . . . . . . . . . . . . . . . . 34
6.3
Assembly Motor Mount. . . . . . . . . . . . . . . . . . . . . . . . . . . . . . . . . . . . . . . . . . . . . . . . . . . . . . . . . . . . . . . . . . . . . . . 35
6.4
Water System Assembly. . . . . . . . . . . . . . . . . . . . . . . . . . . . . . . . . . . . . . . . . . . . . . . . . . . . . . . . . . . . . . . . . . . . . . . 36
6.5Gas Valve and Piping Assembly . . . . . . . . . . . . . . . . . . . . . . . . . . . . . . . . . . . . . . . . . . . . . . . . . . . . . . . . . . . . . . . . . 37
6.6
Door Assembly. . . . . . . . . . . . . . . . . . . . . . . . . . . . . . . . . . . . . . . . . . . . . . . . . . . . . . . . . . . . . . . . . . . . . . . . . . . . . . 38
6.7
Burner Assembly. . . . . . . . . . . . . . . . . . . . . . . . . . . . . . . . . . . . . . . . . . . . . . . . . . . . . . . . . . . . . . . . . . . . . . . . . . . . 39
Specifications
6.1
6.2
Wiring Diagram. . . . . . . . . . . . . . . . . . . . . . . . . . . . . . . . . . . . . . . . . . . . . . . . . . . . . . . . . . . . . . . . . . . . . . . . . . . . . 40
Ladder Diagram. . . . . . . . . . . . . . . . . . . . . . . . . . . . . . . . . . . . . . . . . . . . . . . . . . . . . . . . . . . . . . . . . . . . . . . . . . . . . 41
PART NUMBER 152797 REVISION A
CALL 888-994-7636 FOR TECHNICAL SUPPORT
3
INTRODUCTION
1.1 The Groen Service Concept
1.3
Since 1907 Groen has been in the business of designing and
manufacturing the finest commercial appliances for the food
service industry. Chefs, cooks and kitchen support personnel
have come to depend upon the quality of construction and the
reliability of operation.
Groen Warranty provisions are clearly presented in the
customer’s Operator Manual.
Groen, in turn, depends upon our service centers and their field
service personnel to keep the equipment in top operating condition. In order to do this, our designs are made with service
and reliability in mind.
Once the Groen equipment is sold, manufactured, delivered and
installed, our reputation is clearly in your hands. As part of our
team, we value your efforts and input to our product design.
We will do all we can to make your job of keeping the equipment in perfect working order as easy as we can. Together, we
will keep our customers satisfied.
1.2
Groen Certified Service
The Tri-Res has been carefully designed to provide many years
of efficient and reliable service. Part of the quality program is
Groen certified Service. This includes:
•
•
•
Groen certifies that all equipment delivered to our
customers has been inspected and tested for compliance with the specifications.
Groen certifies that all parts required for service and
maintenance will be readily available.
Groen certifies that this manual will be updated by means of periodic service bulletins to provide the most up-to-date information for field maintenance and service personnel.
PART NUMBER 152797 REVISION A
Warranty and Non-Warranty Repair
Certain procedures for the cleaning and/or adjustment of the
Tri-Res are presented in this manual for reference, but not warranty related.
1.4
Safety
The Groen Tri-Res has been designed with safety in mind. This
includes safety to the operating and maintenance personnel,
safety to the facility in which the equipment is installed and
safety to the equipment itself.
The Tri-Res has been designed to the highest industry standards
and has been certified by the National Sanitation Foundation
Testing Laboratory (NSF), Underwriters Laboratory (UL) and/or
CSA (gas).
The Tri-Res contains several devices which are specifically used
to prevent unsafe conditions. If they are disconnected during service, make sure they are reinstalled properly and tested
before the Tri-Res is operated.
The safety precautions in this manual are in accordance with
ANSI 535 Standard. Three different signal words alert you to a
hazardous situation: DANGER, WARNING, AND CAUTION
DANGER: The signal word DANGER indicates that a hazardous
situation exists and could result in serious injury or death.
• Do not store or use gasoline or other flammable vapors and liquids in the vicinity of this or any other appliance.
• When you open the Tri-Res door, be very careful to avoid escaping steam. Steam can cause burns.
• After removing the fan baffle partition, do not put your hands or other object into the cooking cavity until the fan comes to a complete stop. Rotating fan blades can cause severe injury!
CALL 888-994-7636 FOR TECHNICAL SUPPORT
4
INTRODUCTION
WARNING: The signal word WARNING tells you that a possibly hazardous situation is present, and if not avoided, could
cause serious injury or death.
• Always turn off the Tri-Res power before removing partitions or panels.
• Disconnect the Tri-Res from the power source before per forming any service.
CAUTION: The signal work CAUTION warns you of a hazardous situation which, if not avoided, may result in minor or
moderate injury.
• Tri-Res may be hot. Take precautions to prevent any contact with hot surfaces.
• Be sure all interior partitions have been installed before operating the Tri-Res.
• All Tri-Res operators and service personnel should be
familiar with correct and safe operating procedures.
• Be sure Tri-Res drain is not blocked as this could result in improper Tri-Res operations.
Two other signal words, not directly related to personal safety,
are also used in this manual: NOTICE and IMPORTANT.
NOTICE is used to highlight an operating or maintenance tip or
suggestion.
IMPORTANT is used to highlight an operating or maintenance
tip or suggestion.
1.5
Glossary of Terms
1.6
Tools and Supplies
This Section identifies the tools, instruments and supplies which
will be required and useful in the inspection, repair and testing
of the equipment and described in this manual.
Most likely, many of these tools and supplies are already in
your tool kits and are used in everyday maintenance. Make sure
to use only the specified sealants, compounds and dressings
recommended by Groen.
CAUTION: Care should be taken in using the correct tool as
indication. Using the wrong tool may inflict damage to the
part being removed, installed and/or adjusted. Make sure that
the calibrations on instruments are periodically checked for
accuracy.
1.6.1 Required Tools
•
•
•
•
•
•
•
•
•
Screw Drivers: Flat Blade No. 1 and No. 2
Phillips No. 1 and No. 2
Socket Wrenches: 1⁄4” through 7/8”
Nutdrivers (metric and inches)
Open Ended Wrenches 1⁄4” through 7/8”
Pipe Wrenches: 6” and 8” size
Allen Wrenches: 1/16” through 1⁄4”
Slip Joint Pliers: ChannelLock or Equivalent
Wire Crimpers
1.6.2 Recommended Instruments
• Digital Multimeter: Fluke Model 77 or equivalent
The following abbreviations and terms are use in this manual:
1.6.3 Helpful Hardware
BTU
British Thermal Unit
GPMGallons Per Minute
LED
Lighting Emitting Diode
MM
Millimeter
NEC National Electric Code
N.P.T. National Pipe Thread
NSF
National Sanitation Foundation
PSI
Pounds per Square Inch (Pressure)
U.L.
Underwriter’s Laboratory, Inc.
1.6.4 Recommended Supplies
PART NUMBER 152797 REVI-
•
•
•
•
•
•
•
•
•
Extension Mirror
Screw Starter
Level: 18’ Model
Fuse Puller
Pipe Thread Compound: LACO PipeTite Stik
No. 11176 or equivalent
Motor Sealant Grease: Bel-Ray
2” Aluminum Duct Tape
Removable Thread Locker:
Locktite Type 242 (Door)
Locktite Type 222 (Exterior)
Clear Silicone Sealant:
Dow Corning Type 732
CALL 888-994-7636 FOR TECHNICAL SUPPORT
5
INTRODUCTION
• High Temperature Anti-Seize and Lubricating Compound Bostix NEVER SEEZ NSBT-16
1.7
How To Use This Manual
Read this manual completely before attempting any disassembly or repairs.
Please note the similarities and differences between the various
models described in the manual.
Before making repairs, you should have knowledge of the
Tri-Res operation as described in the Operations Section of this
manual and a good understanding of service techniques as
presented by the Groen Service School.
This service manual should be taken with you on all service
calls. Use the correct tools in accordance with the procedures
shown and use only Groen Replacement Parts when performing
Tri-Res repairs.
PART NUMBER 152797 REVISION A
CALL 888-994-7636 FOR TECHNICAL SUPPORT
6
Operation
Initial Startup
After the Tri Res has been installed, test it to ensure
that the unit is operating correctly.
1. Remove all literature and packing materials
from the interior and exterior of the unit.
2.
Make sure the water supply line is open.
3.
Make sure that the gas supply line is open
and that the manual knob on the main gas
valve is turned to the ON position. This
valve is at the rear on the left side of the
unit.
4.
Turn on electrical service to the unit. The
unit will not operate without electrical
power. Do not attempt to operate the unit
during a power failure.
WARNING
WHEN YOU OPEN THE DOOR, STAY AWAY
FROM STEAM COMING OUT OF THE UNIT.
STEAM CAN CAUSE BURNS.
8. Press the LIGHT button to turn on interior lights.
The lights will automatically turn off after 5 seconds.
9. If the unit operates as described, the
unit is functioning correctly and ready for use .
NOTE: The door MUST be closed for the
fan to work.
NOTE: For operation at high altitudes (2000 feet
and above), please consult the Groen
Engineering Department.
5.
To turn the unit on, press the ON switch on
the control panel.
6.
When any of the four (4) cooking modes are
selected, the main burners will ignite
automatically. The unit will indicate that it’s
ready to cook within 25 minutes or less.
The ready condition is indicated as follows:
•
In oven mode - Temperature
display (red LED) will stop flashing.
•
In combination mode - Temperature
display (red LED) will stop flashing.
•
In steamer mode – The dashes in
temperature display (red LED) will
stop flashing.
7.
In order to use the timer•
To set or change time, push START to start
timer, rotate the knob to desired setting.
•
At the end of time cycle the beeper will
sound and the red CANCEL light will flash.
•
To stop flashing push CANCEL button at top.
PART NUMBER 152797 REVISION A
CALL 888-994-7636 FOR TECHNICAL SUPPORT
7
Operation
Operating Procedure
1. Press the ON switch on the control panel. SELECT MODE
and PREHEATING are displayed. The burner will light (indicated
by the * in the upper right corner of the display). When the
temperature in the cavity rises above 180 degrees PREHEATING
disappears from the display. The temperature levels off at 200
degrees F (burners cycle on and off).
2. Load food into pans in uniform layers. Pans should be filled
to about the same levels and should not be mounded.
3. Open the door and slide the pans onto the racks. If only one
or two pans will be cooked put them on the middle rack.
4. Close the door and take one of the following steps:
A. Push STEAM to start the steaming mode. The STEAM
indicator will light. All three burners light. When the
temperature is above 200 degrees the three reservoirs fill
with water. If STEAM was pushed while PREHEATING was
displayed the TEMPERATURE display shows three blinking
dashes until the temperature rises above 230 degrees. After
that the display shows three steady dashes indicating that
the steaming temperature has been reached (the ready
condition). The temperature continues to rise. When it is
above 250 degrees the outer two burners go off and the
center burner continues to operate. The temperature levels
off somewhere around 350 degrees depending on the food
load in the cavity. If the door is opened and the cavity is
loaded with cold food the temperature may drop below
250 degrees. All three burners light to bring the temperature up quickly.
B. Push COMBO to start the combo mode. The COMBO
and LO moisture level indicators light. The center reservoir
fills with water. Adjust the TEMPERATURE knob (the upper
knob) for the desired cooking temperature; the lower limit
is 200 degrees, the upper limit is 450 degrees. If the cavity
temperature is more than 20 degrees below the selected
temperature the TEMPERATURE display flashes until the
temperature is within 20 degrees of the selected temperature (the ready condition). All three burners cycle on and off
to maintain the selected temperature.
PART NUMBER 152797 REVISION A
C. Push Moisture Level HI. The HI indicator lights. The two
side reservoirs fill and the center reservoir empties. The
temperature knob operates the same way as in COMBO LO
except that the upper limit is reduced to 350 degrees.
D. Push OVEN to start oven mode. The OVEN indicator
lights. All three reservoirs empty. The temperature knob
operates the same way as in COMBO LO with an upper
limit of 450 degrees. All three burners cycle on and off to
maintain the selected temperature.
Typical Operations
The following is a sequence of events typical on the Tri-Res.
1. Preheating
When the power switch is turned on the burners light and
raises the cavity temperature to 200 degrees (the set point). No
cooking mode has been selected and the display shows SELECT
MODE on the first line and PREHEAT on the second line.
If the temperature is below 180 degrees when the power
switch is turned on it means that the flue is cold. In this case
only the center burner is turned on for the first two minutes
and the cavity fan is off to allow the flue to heat gradually. This
prevents the pilot flame from being drawn away from the flame
sensor due to a strong draft that would be present if all three
burners were turned on with a cold flue. After the two minutes
all three burners are lit. Three minutes later the cavity fan operates at low speed.
When the temperature rises above 180 degrees (20 degrees
below the set point) PREHEAT disappears from the display. The
fan is allowed to operate at the selected speed. The temperature continues to rise to the set point at which time the burners
cycle on and off to keep it there. At any time the user may select any cooking mode. However, if steam or combo modes are
selected water will not enter the reservoirs until the temperature rises above 200 degrees.
2. Flame-out detection
When the oven is started the cavity temperature should rise at
least 50 degrees in ten minutes. If the burner didn’t start or has
gone out the temperature at that time will be too low. The message “Burner not on. Relight” is displayed and the oven turns
itself off. Push the ON switch to relight the burner.
CALL 888-994-7636 FOR TECHNICAL SUPPORT
8
Operation
3. Ready indication
The ready condition is satisfied (the oven is ready) when the
cavity temperature is less than 20 degrees below the set point.
In the idle condition (no cooking mode selected) the set point
is 200 degrees. In steam mode it is 250 degrees. In combo and
oven modes it is whatever is set in the temperature display.
When the oven is not ready the word PREHEAT is displayed or
the temperature display flashes. Once the oven comes up to
ready PREHEAT disappears and the temperature display stops
flashing. If the door is opened and the oven is loaded with cold
food the cavity temperature will fall. However, since the ready
condition has already been met the temperature display will not
start flashing.
If the cooking mode or the temperature setting is changed then
the oven will resume flashing if the current cavity temperature
is more than 20 degrees below the new set point, that is, the
oven is not ready. Once ready is achieved with the new settings
the flashing stops.
4. Water level
If combo or steam mode is selected one or more of the reservoirs will fill with water (as long as the temperature is above
200 degrees). There are two water level sensor probes, one for
the center reservoir and one for the right reservoir. When the
water level drops below a sensor probe (boils off) the associated water valve opens and refills the reservoir. The probes are
connected to the controller thru a debouncing circuit which
keeps the water valve open about a second or two after the
probe senses water. This minimizes the number of times the
water valve has to cycle to keep the reservoir filled.
Whenever a fill or drain valve is first opened a timer is started,
60 seconds for fill and 90 seconds for drain. It the water level
has not changed when this timer finishes an error message is
displayed telling which valve (fill or drain) in which reservoir (1
or 2) took too long to change. If it takes too long to fill or drain
a reservoir it could mean that the sensor probe is contaminated
and should be cleaned. Fill timeout could also mean that the
water pressure is very low or the main water valve is turned off.
Drain timeout could mean that the drain is plugged. Clean it.
Whenever a drain valve is first opened the associated water
valve is opened for one second to help open the pinched drain
hose and to flush food particles out of the drain line.
5. Door
The door may be opened for brief periods to move food into
PART NUMBER 152797 REVISION A
and out of the cavity without disturbing the burners. However,
if the door is open for five minutes or more the burners are
turned off. As soon as the door is closed the burners resume
normal operation.
Whenever the door is open the cavity fan is stopped and the
timer (if running) is paused. During the clean cycle the rinse
water is stopped whenever the door is open.
6. Cavity fan
The cavity fan normally operates at high speed. Pushing the Fan
Speed LO button selects the low speed. Whenever the cooking
mode is changed the fan speed is automatically set to high.
7. Timer
When the power switch is turned on the timer is paused, the
colon (:) in the TIMER display does not flash to indicate pause.
Adjust the TIMER knob (the lower knob) for the desired cooking
time in hours and minutes. Push START to allow the timer to
run, the colon flashes indicating that it is running. At the end of
the timing period the beeper sounds and the CANCEL indicator
flashes. Push CANCEL to stop the beeper. Note that this is all
the timer does; it is a simple kitchen timer. It does not stop any
cooking process, it simply alerts the operator that the timer has
timed out.
8. Muffin fan
The two muffin fans run whenever the power switch is on. The
forward fan draws cooling air in from the bottom of the control
panel housing and over the control board. The rear fan exhausts
the air out the back panel. When the power switch is turned off
the cavity is still hot. The muffin fans continue to operate until
the temperature drops below 180 degrees.
9. Light
When the LIGHT button is pushed the door lights turn on to
illuminate the cavity. When the button is released the lights stay
on for five seconds and automatically turns off.
10. Condensate spray
When a steam-water valve is first turned on a large puff of
steam may be created if the water is sent to a hot reservoir.
Part of this puff of steam goes out the overflow drain. During
this time the condensate spray is turned on for 45 seconds to
condense the steam and cool it.
When a drain valve is opened it discharges hot water into the
CALL 888-994-7636 FOR TECHNICAL SUPPORT
9
Operation
oven drain. During this time the condensate spray is turned on
for 90 seconds to cool the drain water.
During the remaining time, that is, most of the time, the condensate spray is turned off to conserve water.
11. Secret buttons
There is an unmarked button under the text display window,
about ½ inch above the O in Groen. When this button is
pushed the TEMPERATURE display shows the actual measured
temperature in the cavity. This is useful for diagnosing heating
and cooling under normal operation.
During normal operation it is necessary to push only one button
at a time. Special features may be called by pushing a combination of buttons at the same time.
When STEAM, COMBO, and OVEN are pushed at the same
time the currently installed firmware version is shown in the red
TEMPERATURE display. This is useful to determine if the oven
contains the latest firmware release.
When STEAM, COMBO, OVEN, and CLEAN are pushed at the
same time (it takes two hands to do it) the diagnostics are
started. The first diagnostic is Diagnostics Exit. Push START to
exit the diagnostics and return to normal operation. Or rotate
the TIMER knob (the lower knob) to select the desired diagnostics. When finished select Diagnostics Exit and push START.
plete the message CLEAN COMPLETE TIME LEFT is displayed
for a minute and the oven turns itself off.
If the oven is hot at the beginning of the soaking period the
message OPEN DOOR TO COOL OVEN is displayed. Do it. While
the door is open the message COOLING is displayed. When the
oven has cooled sufficiently to allow it to continue the message
CLOSE THE DOOR is displayed. Do it. The cleaning cycle starts
with the message OPEN DOOR AND REMOVE RACKS.
At any time during the cleaning cycle the user may open the
door and spray more cleaner in the cavity. When the door is
closed the cycle starts over with the soaking period followed by
the two rinses.
Once a cleaning cycle has been started all other cooking modes
are inactive (locked out). The cleaning cycle must run to completion before the oven will operate in the cooking modes.
The oven may be turned off at any time during the cleaning
cycle. However, since the two rinses have not been complete
there is probably some cleaner on the cavity walls. When the
oven is turned on again it remembers that it was interrupted in
the middle of the cleaning cycle. The message is PUSH CLEAN
TO FINISH CLEANING. Do it (no other cooking mode buttons
will operate). When the clean cycle is complete (all the cleaner
has been rinsed from the cavity walls) it shuts itself off. It can
then be turned on and operated in any mode.
Cleaning
Deliming
It is best to clean the oven when it is at room temperature.
However, it may be cleaned right after cooking, that is, while
it is hot. First turn off whatever cooking mode is currently on
by pushing its button. For example, if the oven is in steam
mode (the STEAM indicator is on) push the STEAM button. The
indicator will go out showing that no cooking mode is currently
selected.
If the oven is off turn it on with the power switch. Push CLEAN.
The message OPEN DOOR AND REMOVE RACKS appears in the
display. Do what is says. When the door is open the message
changes to SPRAY CLEANER AND CLOSE DOOR. Do it. When
the door is closed the message changes to CLEAN MODE SOAK
TIME and the oven rests for two minutes to allow the cleaner
to work. A counter in the second line of the display shows the
number of seconds remaining in each timed cleaning step. Then
the rinse valve opens for one minute (message is CLEAN MODE
RINSE TIME) to flush the cleaner off the cavity walls. This is
followed by a two minute drain period (CLEAN MODE DRAIN
TIME) followed by another one minute rinse. When this is com-
PART NUMBER 152797 REVISION
A
The oven may be delimed at any temperature. However, since
it is necessary to remove the steam lid from the inside of the
cavity the oven should be allowed to cool before starting the
procedure. First turn off whatever cooking mode is currently on
by pushing its button.
If the oven is off turn it on with the power switch. Push LIGHT.
While the LIGHT is on push CLEAN. The message OPEN DOOR
AND REMOVE STEAM LID appears in the display. This indicates
that the oven is in deliming mode. If the message OPEN DOOR
AND REMOVE RACKS appears it means that the LIGHT was not
on while CLEAN was pushed. You have another chance to put
the oven in delime mode. Push LIGHT again. While the LIGHT is
on push CLEAN. The STEAM LID message should appear.
Open the door and remove the steam lid from the bottom of
the cavity. The messages changes to ADD DELIMER AND CLOSE
DOOR. Water begins to fill the three reservoirs and the heaters
turn on. Pour 1/3 cup of delimer into each reservoir, 1 cup total.
Close the door.
The message changes to DELIME MODE TIME LEFT. The oven
CALL 888-994-7636 FOR TECHNICAL SUPPORT
10
OPERATION
will steam for 20 minutes (the display shows the number of
seconds remaining) and drain for two minutes (message is DELIME MODE DRAIN TIME). At this time the oven is hot and the
message changes to OPEN DOOR TO COOL OVEN. When the
door is opened the message changes to COOLING. When the
oven has cooled sufficiently to allow it to continue the message
CLOSE THE DOOR is displayed. When the door is closed the oven
enters the cleaning cycle at the first rinse step. It rinses twice,
displays CLEAN COMPLETE TIME LEFT, and turns itself off.
Once a deliming cycle has been started all other cooking
modes are inactive (locked out). The deliming cycle must run to
completion before the oven will operate in the cooking modes.
The oven may be turned off at any time during the deliming
cycle. However, since the two rinses have not been complete
there is probably some delimer in the cavity reservoirs. When
the oven is turned on again it remembers that it was interrupted in the middle of the deliming cycle. The message is PUSH
CLEAN TO FINISH CLEANING. Do it (no other cooking mode
buttons will operate). The oven enters the clean cycle at the
rinse step to remove all delimer from the reservoirs and it shuts
itself off. It can then be turned on and operated in any mode.
PART NUMBER 152797 REVISION A
CALL 888-994-7636 FOR TECHNICAL SUPPORT
11
CONTROLS
Controls
Information Display Console: This is a two line display that shows
various operating functions of the unit and other operating information.
INFORMATION DISPLAY CONSOLE
START: Push this button to start kitchen timer (see Timer below).
CANCEL: Push this button to shut off the beeper after timer times out.
STEAM: Push to cook in convection steamer mode.
COMBO: Push to cook in convection oven/steamer combination mode,
then select;
HI - When this button is pushed, the oven cooks in a high humidity
environment
LO - When this button is pushed, the oven cooks in a low humidity
environment
NOTE – Default is LO (if HI or LO is not pushed).
START
CANCEL BEEPER
CANCEL
START TIMER
STEAM
SELECT TO COOK IN
STEAMER MODE
COMBO
PUSH TO COOK IN COMBINATION MODE
OVEN: Push to cook in convection oven mode.
Temperature Display:
A) Convection oven and combination cooking modes –
Shows set temperature in °F
Flashes until the set temperature is reached during pre-heat
B) Steamer cooking mode –
Shows dashes
Flashes until steamer is ready during pre-heat
HI
LO
SELECT HIGH OR LOW STEAM IN
COMBINATION MODE
MOISTURE LEVEL
PUSH TO COOK IN OVEN MODE
OVEN
TEMPERATURE
TEMPERATURE Knob: Turn to set cooking temperature in oven and
combination cooking modes. Maximum temperature that can be set is
350°F for Combo HI, 450°F for Combo Lo and Oven, the minimum
temperature that can be set is 200°F.
CAVITY TEMP IN DEG F
F
TIMER Display: Shows remaining time when kitchen timer is operating.
Beeper sounds when remaining time is zero. The two dots on display
flash when timer is in use.
TEMPERATURE KNOB TO
SET COOKING TEMPERATURE
TIMER Knob: Turn to set kitchen timer. Time can be set from 1 minute
9 hours 59 minutes. Push ‘Start’ button to start timer count. Time setting
can be readjusted (higher or lower) during the timing cycle. Beeper sounds
when the set time cycle is complete. Push CANCEL to stop the beeper
TIMER
TIME DISPLAY
FAN SPEED: Convection fan can be operated at high or low speed.
When a fan speed is not selected (default) the fan operates at high
speed. Low speed is recommended for cooking delicate products.
TIMER KNOB TO SET TIME
LIGHT: Push this button to turn interior oven lights on. The light will
automatically shut off after a brief period.
FAN SPEED
CLEAN: Push this button to start the semi-automatic cleaning cycle.
Familiarize yourself throughly with the cleaning procedure in the
“cooking cavity cleaning” section of this manual before using the
clean function.
POWER ON/OFF SWITCH: This rocker switch is the main power switch for
the oven. Push the ON side to start the unit and OFF side to shut unit
down. It is recommended that this switch be used once or twice per day
at the beginning of cooking period.
HOUR METER: Shows the unit’s total hours of operation.
HI
LO
LIGHT
CLEAN
ON
SELECT LOW OR HIGH FAN SPEED
FOR RINSING OVEN CAVITY
TURN INSIDE LIGHTS ON
OFF
POWER
MAIN POWER ON/OFF SWITCH
HOURS
HOUR METER
G
PART NUMBER 152797 REVISION
A
OM-UCS
11
CALL 888-994-7636 FOR TECHNICAL SUPPORT
12
INSTALLING, CLEANING AND TESTING
3.1 Gas Model Installation
WARNING
The unit must be installed by personnel who are
qualified to work with gas, electricity and plumbing.
Improper installation can cause injury to personnel and/
or damage to the equipment. The unit must be installed
in accordance with applicable codes.
CAUTION
Do not install the unit with the rear vents blocked or
within 6 inches of a heat source such as a braising pan,
deep fat fryer, charbroiler or kettle.
To avoid drainage problems, level the unit front to back
and pitch it slightly to the rear.
Although Groen recommends the Tri-Res is installed near noncombustible surfaces, the following minimum clearances are to
any surface, combustible or non-combustible.
Right Side..............................6 inches
Left Side ...............................6 inches
Rear.......................................0 inches from motor
from the gas supply which has test pressures in excess of 1/2
PSI (3.45 kPA). It must be isolated from the gas supply piping
system by closing its individual manual shutoff valve during any
pressure testing of the gas supply piping system which has test
pressures equal to or less than 1/2 PSI (3.45 kPA).
1. Electrical Supply Connection
Provide 115 VAC, 60 HZ, 1 PH, 15 AMP service. Bring wire in
through hole on the back panel. Each cavity requires a separate
cord for connection. Local codes and/or the National Electrical
Code should be observed in accordance with ANSI/NFPA 70.
AN ELECTRICAL GROUND IS REQUIRED. The wiring diagram
located in the service compartment and in this manual. Maximum load is 12 AMPs. In Canada, provide electrical service in
accordance with the Canadian Electrical Code, CSA C22.2 Part
1 and/or local codes.
2. Gas Supply Connection
Connection to the gas supply shall be in accordance with the
chart below. Supply pressure must be at least 5” W.C. (maximum 14” W.C.) for natural gas or 12” W.C. (maximum 14”
W.C.) for LP gas. In Canada, the installation must conform to
the Canadian Gas Code, CAN 1-B149, Installation Codes for
Gas Burning Appliances and Equipment and/or local codes.
Ratings for Gas Universal Cooking System
Check all gas connections for leaks prior to unit operation.
*Measured at gas manifold
Recommended Service Clearances
Right Side..............................14 inches
Left Side ...............................6 inches
Rear.....................................24 inches
Front.....................................36 inches
The Tri-Res must be installed in a well-ventilated room with an
adequate air supply. The Tri-Res must be installed beneath a
ventilation hood since gas combustion products exit the appliance.
Any item which might obstruct or restrict the flow of air for
combustion and ventilation must be removed. Do not obstruct
the flue cover or rear vents after installation.
The area directly around the appliance must be cleared of all
combustible material. The installation must conform with local codes or, in the absence of local codes, with the National
Fuel Gas Code, ANSI Z223.1/NFPA 54, or the Natural Gas and
Propane Installation Code, CSA B149.1
The unit and it individual shutoff valve must be disconnected
PART NUMBER 152797 REVISION A
Ratings for Gas Tri-Res
*Measured at gas manifold
*Operating
BTU *Operating
MIN
MAX
Pressure
BTUPressure
Incoming Gas Incoming Gas
Feed Rate
Feed Rate
UCS-10G-NG 60,000
3.50” WC 5” WC 14” WC
Tri-Res-20G-NG 60,000 3.50” WC
5” WC
14” WC
UCS-10G-LP
60,000
10.0”
WC
12”
WC
14”
Tri-Res-20G-LP 60,000 10.0” WC
12” WC
14” WC
WC
In Canada, the installation must conform to the
Canadian Gas Code, CAN 1-B1 49, Installation
Codes for Gas Burning Appliances and Equipment
and/or local codes.
5.
After the unit has been connected to the gas supply,
all gas joints must be
checked for leaks. Do NOT use
WarninG
open
flame
to
check
for leaks.
A thick
soap
solution
For unit installed on customer
supplied
stands,
casters
or are
an electronic
leak
detector
should
be
used.
required with restraining requirement as listed.
For a Unit on casters:
installation
shall
begas
made
with
After the A.
unitThe
has been
connected
to the
supply,
all agas joints
connector
that
complies
with
the
standard
must be checked for leaks. Do not use flame checking for leaks. A
for connectors
for movable
gasshould
appliances;
thick soap solution
or other suitable
leak detector
be used.
ANSI Z 21.69.CSA 6.16, and a quickdisconnect device that complies with the
standard for quick-disconnect devices for
use with gas
fuel,
ANSI Z21.41.CSA
6.9.
CALL 888-994-7636
FOR
TECHNICAL
SUPPORT
13
B. Adequate means must be provided to limit
the movement of the appliance without
D
A
H
Th
ho
be
al
un
INSTALLING, CLEANING AND TESTING
CAUTION
When the unit is moved from its original position for
cleaning or service, the hooks on the restraining cable
assembly must be reconnected at both ends. Detailed
Instructions for the re-connection to the appliance are
shown below under Unit Restraining Requirement.
.Anchor restraining cable bracket to a secure structure.
D
One of the preferred locations is on the concrete floor using
anchor bolts (not provided) as shown below.
Unit Restraining Requirement:
A. The installation shall be made with a connector that complies with the standard for connectors for movable gas appliances. ANSI Z21.69.CSA 6.16, and a quick-disconnect device
that complies with the standard for quick-disconnect devices
for use with gas fuel, ANSI Z21.41.CSA 6.9.
B. Adequate means must be provided to limit the movement
of the appliance without depending on the connector and the
quick-disconnect device or its associated piping to limit the appliance movement.
C. The location where the restraining device may be attached
to the appliance shall be in accordance with Groen specifications for the device. (see photo)
Eyebolt connector
on the back of
the unit.
PART NUMBER 152797 REVISION A
CALL 888-994-7636 FOR TECHNICAL SUPPORT
14
INSTALLING, CLEANING AND TESTING
3.2 Installation
Many of the problems associated with the degraded performance or non-operation of the Tri-Res can be traced directly to
improper installation and/or lack of proper periodic cleaning-all
of which is the responsibility of the customer.
This section is provided to determine that the equipment was
installed correctly, to indicate the proper cleaning techniques
are to be used by Groen customers and Tri-Res test procedures.
It is to be expressly noted that ALL work associated with the
installation and cleaning of the Tri-Res is NOT covered by Groen
warranty provisions.
3. Water Connection(s)
Install a check valve to prevent back flow in the incoming cold
water line, as required by local plumbing codes. Water pressure
in the line should be between 30 and 60 PSI. If the pressure is
above 60 PSI, a pressure regulator will be needed. These pressures must provide the 1.5 gallons per minute required for
proper unit function.
The location where the restraining device may be attached to
the appliance shall be in accordance with Groen specifications
for the device.
6. Drain Line Installation
The drain line should not be less than:
1-1/2” – for single units
2” – for double stacked units
There must be a 2” air gap to the (non-pressurized) building
drain. Make sure that the drain is sloped AWAY and DOWN
from the Tri-Res and that there are no obstructions in the line.
Failure to observe these requirements may cause a water trap
in the drain line and produce enough back pressure to prevent
proper cavity draining-resulting in condensate water leaking
from the door. Drain line must NOT be made of plastic pipe. It
must be able to withstand boiling water.
Steam Free Zone: The Tri-Res can be damaged by steam from
external sources. Do not install the unit over a steam venting
drain. Ensure that steam is not present in an area bounded by
the footprint of the unit and a circle 18 inches in radius about
the right and left rear corner of the unit (see figure below).
4. A 3/4 inch female NH connector (garden house type) is
used to attach the water supply to the inlet valve. Minimum
inside diameter of the water feed line is 1/2 inch. Use a
washer in the hose connection. Do not allow the connection to
leak, no matter how slowly. Do not over-tighten hose connections.
5. This equipment is to be installed to comply with basic
plumbing code of the Building Officials and Code Administrators International, Inc. (BOCA) and Food Service Sanitation
Manual of the Food and Drug Administration (FDA).
NOTE: Local code may also require check valves in the water
supply line.
Tri-Res
(top view)
ANSI 21.69.CSA 6.16, and a quick-disconnect device that
complies with the standard for quick-disconnect devices for use
with gas fuel, ANSI Z21.41.CSA 6.9
Adequate means must be provided to limit the movement of
the appliance without depending on the connector and the
quick-disconnect device or its associated piping to limit the
appliance movement.
PART NUMBER 152797 REVISION A
CALL 888-994-7636 FOR TECHNICAL SUPPORT
15
INSTALLING, CLEANING AND TESTING
3.3 Installation Checklist
General
Cold Water Supply Connections
_____ Refer to section 3.3 for proper clearances.
_____ Make sure plumbing connections conform to local codes.
_____ Do not install Tri-Res directly above steam venting
Tri-Res is shut down overnight or longer.
_____ Make sure the unit rear vents are not blocked and the unit is not within 6” of a heat source.
_____ If permitted by local codes, check that hose connec-
tion is flexible to allow Tri-Res
movement for servicing.
_____ Make sure Tri-Res is level or pitched slightly to the rear.
_____ Check inlet water pressure is 30-60 PSIG.
_____ Check that fan is clean and clear of foreign materials.
_____ Check that the water feed line is minimum of 1/2” inside diameter.
Gas Connection Checks
_____ Make sure the installation conforms to local codes.
_____ Check water flow in section 3.3
Drain Connections
_____ Make sure Tri-Res is installed under a ventilation hood. Check that the flue and all vents are free of obstruction. _____ Make sure drain plumbing connections comply with local codes.
_____ Check that gas supply is 5” W.C. (min) to 14” W.C.(max) for natural gas, and 12” W.C. (min) to 14” _____ Make sure drain line is 1-1/2” and 2-1/2” on stacked units.
W.C.(max) for propane.
_____ Check that gas supply piping is 1/2” NPT.
_____ Verify operating gas pressure is per chart in section 3.2
Electrical Checks
_____ Make sure the Tri-Res is properly grounded.
_____ Check that drain line is suitable for boiling water. Make sure PVC is not being used for drain plumbing.
_____ Check that drain line is pitched downward.
_____ Make sure drain line is free of obstruction.
_____ Make sure drain is not connected to a building drain.
_____ Verify that the electrical connections conform to all local codes and the NEC requirements.
_____ Make sure the power supply branch circuit conforms to the specifications indicated on the Tri-Res nameplate.
Tri-Res Door Check
_____ Make sure the door gasket is making good contact with the cavity frame.
_____ Instruct operators to leave the door open when the PART NUMBER 152797 REVISION A
CALL 888-994-7636 FOR TECHNICAL SUPPORT
16
INSTALLING, CLEANING AND TESTING
Water Quality and Treatment
It is essential to supply the steam generator with water that will
not form scale. Even though the boilerless steam generator is
engineered to minimize scale formation, scale development depends on the hardness of your water and the number of hours
you operate the equipment each day.
Groen Tri-Res ovens feature two separate water inlets – one for
the steam generator (for treated water), the other for the spray
condenser (untreated water) and semi automatic wash cycle.
The second intake will reduce water treatment requirements
resulting in significant savings.
The dual water connections are on the rear of the unit.
Most water supplies contain minerals which form scale it is this
scale which could lead to an early component failure.
Your local water utility can tell you about the minerals in your
water. The water going to the steam generator should have
between 30 and 40 parts per million (ppm) total dissolved
solids (TDS) and should have a pH (acidity rating) of 7.0 to 9.0.
Please follow these simple precautions:
1. The best way to prevent scale is to use a Groen PureSteam
TM Water Treatment System which has been specifically
designed for Groen steamers and combination ovens. Do not
rely on unproven water treatments sold for scale prevention and removal. They are not specifically designed to work
with Groen steamers and combination ovens.
2. A well-maintained water treatment system and a regular
cartridge replacement schedule is essential.
3. Using a Groen water treatment system will provide longer
steam generator/boiler life, higher steam capacity, and reduce
maintenance requirements.
4. If you notice a slowdown in steam production, check the
unit’s bottom for scale build-up. This could be an indication
that the water treatment cartridges need replacing. Heavy scale
reduces the unit’s ability to boil water, and can even cause
component failure.
MINIMIZE SCALE PROBLEMS BY INSTALLING
AND MAINTAINING A GROEN WATER
TREATMENT SYSTEM AND BY DELIMING THE
STEAM GENERATOR/BOILER REGULARLY.
PART NUMBER 152797 REVISION A
CALL 888-994-7636 FOR TECHNICAL SUPPORT
17
INSTALLING, CLEANING AND TESTING
3.4 General Cleaning
To keep your Tri-Res in proper working condition, use the following procedure to clean the unit. This regular cleaning will
reduce the effort required to clean the steam reservoir and
cavity.
A. Suggested Tools
• Mild detergent or vinegar
• Stainless steel exterior cleaner such as Zepper
• Cloth or sponge
• Spray bottle
• Nylon pad
• Towels
• Plastic disposable gloves
B. Procedure Exterior Cleaning
a. Prepare a warm solution of the mild detergent as instructed
by the supplier. Wet a cloth this solution and wring it out. Use
the moist cloth to clean the outside of the unit. Do not allow
freely running liquid to touch the controls, the control panel,
any electrical part, or on the side or rear panels.
b. To remove material which may be stuck to the unit use a
fiber brush, or a plastic or rubber scraper with a detergent solution.
c. Stainless steel surfaces may be polished with a recognized
stainless steel cleaner such as “Zepper”.
WARNING
Disconnect the power supply before cleaning the
outside of the Tri-Res. Keep water and cleaning
solutions out of controls and electrical components.
Never hose or steam clean any part of the unit.
Avoid contact with any cleanser, deliming agent or
degreaser as recommended by the supplier. Many
are harmful. Read the warnings and follow the
directions.
Even when the unit has been shut off, don’t put
hands or tools into the cooking chamber until the
fan has stopped turning.
Don’t operate the unit unless the removable partition
has been put back in its proper location.
Do not use any cleaning agent that contains any
sulfamic agent or any chloride, including hydrochloric
acid(HCI). To check for chloride content, see any
material safety data sheets provided by the cleaning
agent manufacturer.
WARNING
DO NOT DISASSEMBLE DURING CLEANING, BREAKAGE
WILL RESULT. USE HOT WATER TO WASH OUT.
PART NUMBER 152797 REVISION A
CALL 888-994-7636 FOR TECHNICAL SUPPORT
18
INSTALLING, CLEANING AND TESTING
Interior Cleaning
second rinse cycle.
NOTE: Clean the unit daily or as residue builds upon the
bottom of the oven cavity.
10.After the second rinse cycle the oven will drain and the
display will read CLEAN COMPLETE TIME LEFT for a minute,
then it will shut completely down.
1. Turn off the unit by pressing once on the current or last
operating mode. For example if you are in steam mode press
STEAM button once more so that the red indicator light is off.
11.At this time you may open the door and leave it open to air
dry oven interior.
NOTE: The unit cannot be operated in the CLEAN mode while
the oven is in operation.
12.To repeat the clean cycle, turn POWER switch to ON, and
press CLEAN again.
2. Press CLEAN button. The LCD display will instruct you to
empty the oven. (Display reads open door and remove
racks).
13. Power may be turned off at any time during the clean cycle.
When power is turned on again the display reads PUSH CLEAN
TO FINISH CLEANING. Push the CLEAN button to resume
cleaning (no other cooking mode buttons will operate until the
clean cycle is complete).
3. Open the door and remove all food pans, oven racks, the
two rack support on side and the two halves of steam baffle
located on the bottom of the oven. (When door is opened,
display reads Spray cleaner and Close door)
4. Once these are removed, spray a detergent/cleaner on
interior walls.
NOTE: use a cleaner that is safe for oven use and will degrease
in presence of steam.
5. Close the door (Display reads Clean MODE SOAK TIME).
6. The rest of the clean cycle is automatic and you have to do
nothing but leave or wait till clean cycle is over.
7. If the oven is hot when the clean cycle has started the
display will read OPEN DOOR TO COOL OVEN. Open the door
(display reads COOLING). When the oven has cooled sufficiently
the display reads CLOSE THE DOOR. Close it. The clean cycle
continues with the soaking period.
8. After soaking the oven interior will be automatically sprayed
with rinse water to remove the cleaner. At anytime during the
clean cycle the door may be opened to spray more cleaner on
the cavity walls. When the door is closed the cycle resumes with
the soaking period.
9. After rinse the oven will drain the water and then go into a
PART NUMBER 152797 REVISION
A
CALL 888-994-7636 FOR TECHNICAL SUPPORT
19
INSTALLING, CLEANING AND TESTING
Deliming
Tri-Res is designed to require only a daily cleaning of the cavity,
pan racks, steam lid and water level probes to control scale
build-up. When the unit is used in heavy duty, continuous
operation in an area with extreme hard water. Additional steps
should be taken to remove lime build up.
Cleaning Steps
WARNING! ALLOW THE UNIT TO COOL COMPLETELY
BEFORE DELIMING. HOT SURFACES CAN CAUSE SEVERE
BURNS.
The following procedure outlines steps for optional periodic
deliming for Tri-Res in heavy duty applications and extreme
water conditions. The frequency of the deliming depends upon
the severity of the scale build-up and individual operators, but
typically would not be more frequently than bi-monthly.
STEP 2 Allow the Tri-Res to cool completely before cleaning.
Recommended Tools & Cleaners
a. Nylon scrub pad, cloth or sponge, Scotch-BriteTM medium
duty scrubbing sponges preferred. DO NOT use metal scrub
pads.
b. Delimer/Descaler – Groen Delimer Descaler (P/N 114800),
Commercial Lime Away or any equivalent. DO NOT use any
cleaning or deliming agent that contains Citric Acid, any Sulfamic Agent or any chloride, including Hydrochloric Acid.
WARNING: Follow the handling instructions provided
with the delimer/descaler, including the recommendations for protective rubber gloves, protective clothing/
boots and protective eyewear.
c. Vinegar – commercial vinegar (5 to 7% strength) has been
used successfully by a number of Tri-Res users as a descaler.
Follow the same instructions as when using delimer/descaler.
IMPORTANT
Do not use any metal material (such as metal sponges) or
metal implements (such as a spoon, scraper or wire brush)
that might scratch any stainless steel surface. Scratches
make the surface hard to clean and provide places for
bacteria to grow. Do not use steel wool, which may leave
particles imbedded in the surface which could eventually
cause corrosion and pitting.
PART NUMBER 152797 REVISION A
STEP 1 Press OFF to turn the unit off. Open the unit door.
STEP 3 After the unit has cooled completely, press
LIGHT. While the LIGHT is on press CLEAN. The message
OPEN DOOR AND REMOVE STEAM LID appears in the
display. Remove the pans and racks,
STEP 4 Remove any spilled foods from the steam lid.
Remove the steam lid from the steam reservoir.
NOTE: Use protective gear, including eyewear for the
following steps involving delimer/descaler.
STEP 5 With the door open, add 1/3 cup of delimer/descaler (or vinegar) to the water in each reservoir (one
cup total), and close the unit door.
NOTE: ADDITIONAL AMOUNTS OF DELIMER AND LONGER
TIME SETTINGS ARE NOT RECOMMENDED. THEY WILL
NOT INCREASE THE EFFICIENCY OF THE PROCEDURE.
STEP 6 The unit will steam for 20 minutes (the display
shows the number of seconds remaining) and drain
for two minutes. At this time, the oven is hot and the
message changes to OPEN DOOR TO COOL OVEN. When
the door is opened the message changes to COOLING.
When the oven has cooled sufficiently to allow it to
continue the message CLOSE THE DOOR is displayed.
When the door is closed the oven enters the cleaning
cycle at the first rinse step. It rinses twice, displays
CLEAN COMPLETE TIME LEFT, and turns itself off.
STEP 7 Open the door and wipe down the cavity and
steam reservoir to remove all traces of scale and
cleaning solution. Reinstall the panracks and lid.
NOTE: IF SCALE BUILD-UP STILL REMAINS, REPEAT THE
PROCEDURE (STEPS 5-7) AS NECESSARY.
CALL 888-994-7636 FOR TECHNICAL SUPPORT
20
INSTALLING, CLEANING AND TESTING
Maintenance
The Tri-Res is designed for minimum maintenance. Certain
parts may need replacement after prolonged use. If there is
a need for service, only Groen personnel or authorized Groen
representatives should perform the work.
Always supply water with a low mineral content that meets the
standards outlined in the Water Quality and Treatment section
of this manual on page 17.
1. Daily
a.With a wet cloth clean the interior and exterior (outer
panels) of the oven.
b. Remove the condensate drip pan located below the
door; drain, clean and allow the drip pan to air dry.
c. After cleaning the oven interior, leave the door slightly
open to allow the oven to air dry.
d. Open the inner glass door and check both inner and
outer glass for cracks or signs of loose fitting. If cracks
are found, do not operate the unit until the glass is
replaced.
2. Weekly
a.Delime the interior per deliming procedure described in
this manual on page 20.
b. Remove all interior baffles as part of the cleaning
procedure and clean the Water level probes with a non
abrasive, stiff brush. Two (2) water level probes are
located on the rear wall of the unit below the fan.
3. Monthly
a.Check the hinges and other moving parts of the inner
and outer glass doors for smooth operation and signs of
misalignment or wear. If the door does not move freely
or sags, do not operate the unit until corrected. See Door
adjustment note below.
b.Check the door latch for smooth operation. If necessary
lubricate the latch spring with a food grade PTFE
lubricant.
NOTE: DOOR ADJUSTMENT
If steam or condensate is seen leaking from around the door,
take the following steps:
1. Check the door gasket. Replace it if it is cracked or split.
2. Inspect the cooking chamber drain to be sure it is not
blocked.
3. Adjust the latch pin as follows:
a. Loosen the lock nut at the base of the latch pin, and
turn the latch pin ¼ turn clockwise. Re-tighten the
lock nut.
b. After adjustment, run the unit in the Steam Mode to
test for further steam leaks.
c. If leakage continues, repeat the adjustment.
d.Continue adjusting the pin clockwise until the door
fits tightly enough to prevent leaks.
Liquid Level Probes.
c.Open the inner glass door and check the light assembly
for proper operation and fit.
PART NUMBER 152797 REVISION A
CALL 888-994-7636 FOR TECHNICAL SUPPORT
21
troubleshooting
SETUP
Measure Input voltage and
amps.
Verify gas supply Propane or
Natural, and pressures.
Disconnect or turn off water
supply, open door, push OFF
switch.
EXPECTED RESULTS
PROBABLE DEFECT
Input voltage is within 10% of Wrong model (voltage)
rated voltage and 5-7 amps.
installed to incoming power
supply.
Correct gas source and pres- Wrong model ordered.
sure.
24vac on secondary transNo Line
former. Heartbeat LED on back Blown 10 amp fuse F1
on control board flashes once
24 volt control transformer
a second.
Control board or Relay board
Incorrect wiring
Press ON switch
LEDs on control board illuminate.
24 volt control transformer
Hi-limit (auto-reset)
Control board or Relay board
Incorrect wiring
Fill Valve
About 20 minutes after closing the door, the oven comes
to ready; the temperature
indicator stops flashing.
PART NUMBER 152797 REVISION A
Standard test
Measure 120vac in and 24vac
+/- 20% vac out
Substitute to test
Check wiring diagram
Measure 120vac in and 24vac
+/- 20% vac out
Run sensor diagnostic.
Substitute to test
Incorrect Wiring
Door switch
Incorrect wiring
Gas valve
Run sensor diagnostic
Check per wiring diagram
Verify 24VAC across valve coil.
Gas valve
Verify 24VAC across valve coil.
Muffin Fan
Audible click a gas valve
opens.
Gas conversion not performed
in the field.
Check per wiring diagram
Fill valve is normally open
when water is below water
level sensor, 24VAC is applied
to coil or valve and it opens.
When water reaches the level
sensor, the coil de-energizes.
Run fill valve diagnostic.
Without power, the valve is
open, when 24VDC is applied
to the coil or the valve, it energizes to prevent draining. Run
drain valve diagnostic.
Verify 24VDC across muffin
fan coil.
Substitute to test
Check per wiring diagram
Drain valve
Press ON switch
TEST or COMMENTS
Notify customer
CALL 888-994-7636 FOR TECHNICAL SUPPORT
22
troubleshooting
GAS ORIFICE SIZE CHART (ALTITUDE ABOVE SEA LEVEL IN FEET)
Elevation
Gas
Type
No. Of
Burners
Igniter Tube
Orifice Size
Groen
Part No.
No. Of
Burners
Burner
Orifice size
Groen
Part No.
up to 2000'
NG
1
0.029 (# 69 )
101665
3
0.089" (# 43)
152696
2001-4000'
NG
1
0.029” (# 69 )
101665
3
0.085” (2.15mm)
152014
4001-6000'
NG
1
0.026” (#71)
112603
3
0.082” (#45)
152015
6001-8000'
NG
1
0.026” (#71)
112603
3
0.0787”(2.0 mm)
152016
8001-10000'
NG
1
0.026” (#71)
112603
3
0.076” (#48)
152017
up to 2000'
LP
1
0.020" (# 76)
101625
3
0.055" (# 54)
152018
2001-4000'
LP
1
0.020" (# 76)
101625
3
0.052” (#55)
152019
4001-6000'
LP
1
0.020" (# 76)
101625
3
0.049” (1.25mm)
152020
6001-8000'
LP
1
0.018” (0.45mm)
152721
3
0.047” (1.20mm)
152021
8001-10000'
LP
1
0.018” (0.45mm)
152721
3
0.0465” (#56)
152022
PART NUMBER 152797 REVISION A
CALL 888-994-7636 FOR TECHNICAL SUPPORT
23
troubleshooting
Fault Messages
No product code
The product code (gas or electric) is embedded in the ribbon
cable at the controller end. The cable may be damaged or
partially disconnected. Make sure the ribbon cable connector
is properly seated in the mating connector on the back of the
control board.
Oven too hot
The temperature inside the oven is above 550 degrees F. The
temperature sensing RTD, the high limit thermistor, the control
board, or the relay board has failed or because one or more gas
valves are stuck open.
RTD open
The RTD temperature sensor has failed, its connector has
become disconnected from the relay board (most likely), the
ribbon cable has been damaged, or the control board has
failed.
RTD shorted
The RTD temperature sensor has failed, its wire harness to the
relay board has been pinched (most likely), or relay board has
failed.
Control too hot
The temperature sensor on the control board has detected
a temperature above 180 degrees F. The airflow thru the
controller housing may be blocked, one or both muffin fans may
have failed, or the control board has failed.
All fills long
The water level in all three reservoirs didn’t reach the water
level probes within the allotted time while filling. The probes
may be dirty (clean them), the level probe harness wires may
have become disconnected, the water may be turned off, the fill
valves may be defective or may be disconnected, or the drains
are stuck open.
Fill 1 too long
The water level in the center reservoir didn’t reach the center
water level probes within the allotted time. See All fills long.
Fill 2 too long
The water level in the side reservoirs didn’t reach the right
water level probe within the allotted time. See All fills long.
All drains long
The water level in all three reservoirs didn’t drop below the
water level probes within the allotted time while draining. The
probes may be dirty (clean them), the drains may be plugged, or
the drain valves may be stuck closed.
Drain 1 too long
The water level in the center reservoir didn’t drop below the
center later level probe within the allotted time. See All drains
long.
Drain 2 too long
The water level in the side reservoirs didn’t drop below the right
later level probe within the allotted time. See All drains long.
Burner not on
Relight
Ten minutes after the oven was turned on the temperature has
not risen sufficiently. The pilot went out or didn’t light, or the
burners didn’t light. The igniter may have failed, the igniter
wire may be shorted, there is a problem in the gas distribution
system, or the main gas valve may be shut off.
Fan not running
The cavity fan stopped running. It may be open or one of its
connectors may have become disconnected.
PART NUMBER 152797 REVISION A
CALL 888-994-7636 FOR TECHNICAL SUPPORT
24
troubleshooting
DIAGNOSTIC CHECK OF SYSTEM
1. ENTER DIAGNOSTICS
Push STEAM, COMBO, OVEN, and CLEAN all at the same time (it
takes two hands).
The display says DIAGNOSTICS EXIT. Rotate the TIMER knob
(the lower knob) clockwise. The names of the various diagnostic
tests appear in the second line of the display. It’s usually best to
execute the tests in order.
2. RTD TEMP
The value shown in the red TEMPERATURE display is the
temperature in degrees F measured by the RTD sensor in the
oven cavity.
If the oven is at room temperature then the display will indicate
approximately that temperature.
If the oven has recently been used then the indicated temperature
will be considerably higher.
3. RTD VOLTAGE
This test checks for a shorted or open RTD.
The value displayed is approximately 20% of the RTD voltage in
millivolts.
At room temperature the display should show approximately
110.
At 450 degrees the display should show approximately 180.
This is the normal operating range for the RTD.
If the RTD is shorted (pinched wires) the display will show a value
around zero.
If the RTD is open or disconnected the value will be above 900.
4. LOCAL TEMPERATURE
This test checks for deficient airflow thru the control panel
housing.
There is a temperature sensor mounted on the control board
right behind the control panel.
If the cooling air flow thru the control panel housing, from bottom
to top, is good then the temperature sensor should measure
room temperature, approximately 70 on the display.
If the air inlet at the bottom of the housing becomes plugged or
if the internal muffin fans fail then the air temperature around
the control board will rise.
If it rises to 180 degrees F, the danger temperature, the display
will read 138.
PART NUMBER 152797 REVISION A
5. BUTTON
This test checks all the control panel buttons.
Push all the buttons, one at a time.
When the buttons are pushed the associated LED lights.
If the LED stays lit after the button is released it usually means
the plastic panel overlay is keeping the button pushed in.
The START button also tests the beeper.
The CANCEL button turns off the backlight on the text display.
6. FIRMWARE
This test displays the current firmware version in the
TEMPERATURE display. It should be 2.28 or greater.
7. SHUTDOWN
This test checks the latching relay circuitry on the relay board.
Turn the oven on by pushing the ON switch.
Push START to unlatch the relay and listen for the faint click as
the relay and pilot valve release.
Push START again and notice that there is no click this time since
the relay is already released. Push the ON switch and listen for
the faint click as the relay and valve pull in.
Leave the power switch on.
8. LIGHT
This test checks the lights in the door.
Push START.
All the lights in the door should light.
Replace the ones that are burned out.
9. MUFFIN FAN
This test checks both muffin fans on the right side of the oven.
Push START.
Both muffin fans should operate.
If not check the connections and replace the inoperative fan.
10. FAN HI
This test checks the cavity fan at high speed.
Push START.
The fan should run at high speed.
If it doesn’t check the connections and the fan motor.
11. FAN LO
This test checks the cavity fan at low speed.
It is similar to the previous test.
CALL 888-994-7636 FOR TECHNICAL SUPPORT
25
troubleshooting
12. STEAM VALVE 1
This test checks the steam-water inlet valve for the center
reservoir.
Push START. Water should flow into the center reservoir.
Release START. Water should stop flowing.
If not then check the connections, water valve, and water supply
to the oven.
13. STEAM VALVE 2
This test checks the steam-water valves for the outer two
reservoirs.
Push START. Water should flow into the outer two reservoirs.
Release START. Water should stop flowing.
If not then check the connections, water valve, and water supply
to the oven.
14. SPRAY VALVE
This test checks the condensate-spray valve.
Push START. The condensate spray hose at the drain box should
jump a bit when water starts.
After a few seconds water should flow out of the drain hose.
Release START. The water should stop.
If not check the connections, water valve, and water supply to
the oven.
15. RINSE VALVE
This test checks the rinse-water valve.
Close the oven door (the rinse valve won’t open if the door is
open).
Push START. The rinse nozzle in the back of the oven cavity should
spray water all over the cavity.
Release START. The water should stop. If not check the connections,
water valve, and water supply to the oven.
16. DRAIN VALVE 1
This test checks the drain valve for the center reservoir.
Push START.
Check that the plunger on the center drain valve rises.
If there is water in the center reservoir it should begin to drain
out.
Release START. The plunger should drop back down.
If not check the connections and the drain valve.
Push START.
Check that the plunger on the outer two drain valves rises.
If there is water in the any of the outer reservoirs it should begin
to drain out.
Release START. The plunger should drop back down.
If not check the connections and the drain valve.
18. MAIN VALVE
This test checks the igniter, the pilot and pilot valve, the flame
sensor, the main gas valve and the center burner.
Make sure the POWER switch is on. Push ON if necessary.
Look at the burner assembly and verify that the pilot is on.
If not then check the LED on the igniter.
If it is flashing then turn the power off for a few seconds and
back on again.
Check for pilot.
Push START. The main gas valve will click and the main burner
will light.
Have an assistant look at the burner to verify.
If not check the connections, igniter, and gas supply to the
oven.
19. AUXILIARY VALVES
This test checks the two auxiliary gas valves and the two side
burners.
Push START. The auxiliary gas valves will click and the main
burners will light.
Have an assistant look at the burner to verify.
If not check the connections, igniter, and gas supply to the
oven.
20. PRODUCT CODE
This test checks the product code jumper in the ribbon cable
connector to the control board. The red display should show 001
for the gas oven.
If this is not the case check that the proper ribbon cable has been
installed and that all connecters are pushed in firmly.
If necessary replace the ribbon cable.
17. DRAIN VALVE 2
This test checks the drain valves for the outer two reservoirs.
21. SENSORS
This test checks the two water level sensors, the door sensor, the
high-limit sensor, the fan current sensor, and the latching relay.
The chart shown below represents the horizontal segments in
the TEMPERATURE display. When a bar is on it indicates that the
PART NUMBER 152797 REVISION
CALL 888-994-7636 FOR TECHNICAL SUPPORT
26
troubleshooting
corresponding sensor is on.
Level 1
Hi Limit
Level 2
Fan Current
If not check the connections, the magnet in the door,
the door alignment, and the door sensor inside the
control panel housing.
Power On
Door
During this test various push buttons operate valves and the fan
motor.
START controls the water inlet valve for the center reservoir.
CANCEL controls the inlet valves for the two side reservoirs.
MOISTURE LEVEL HI controls the center reservoir drain valve.
MOISTURE LEVEL LO controls the drain valves for the two side
reservoirs.
All four of these are push-on/push-off.
The FAN SPEED HI and FAN SPEED LO push buttons control
the cavity fan motor.
These two are momentary.
a. Begin the test with all valves closed, that is, with the
corresponding LEDs off.
i. Push START to begin filling the center reservoir.
ii. In about a minute the water level will rise and contact
the center water level probe.
iii. The Level 1 bar will turn on.
iv. Push START again to turn off the water inlet valve.
v. Push MOISTURE LEVEL HI to open the center drain
valve.
vi. In less than a minute the Level 1 bar will turn off.
vii. If not check the connections and clean the level
probe.
b. Repeat the test in the two outer reservoirs using the
CANCEL and MOISTURE LEVEL LO push buttons.
d. The power switch should be on and the Power On bar
should be lit.
If not then push the ON switch.
e. On the Relay board unplug the Hi Limit connector (two
white wires in a small 4-pin connector) from J8 (near
the center of the board).
i. Use a small screwdriver and short the center and right
pins of J8 together.
ii. The Hi Limit bar should light and the Power On bar
should go out.
iii. Remove the screwdriver.
iv. The Hi Limit bar should go out.
v. IMPORTANT: replace the Hi Limit connector on J8.
vi. Push the FAN SPEED HI button.
vii. The Fan Current bar should light.
viii. Release HI and push LO.
ix. The bar should light again.
x. Release the button.
xi. The bar should go out.
xii. If not then check the connections and the fan motor.
22. TEMP KNOB
This test checks the temperature knob (the upper knob).
Turn it clockwise.
The TEMPERATURE display should increase in five degree steps
from 200 to 450.
23. ALL ON
This test checks everything lights up.
Look at all LEDS, seven-segment displays and decimal points.
Everything should be lit. If not then replace the control board.
24. EXIT
This is the way out of the diagnostics.
Push START.
The control board resumes normal operation
c. Open the door. The Door bar should light.
Close the door. The bar should go out.
PART NUMBER 152797 REVISION A
CALL 888-994-7636 FOR TECHNICAL SUPPORT
27
ASSEMBLY/DISASSEMBLY
5.1 General Information
This section provides common removal and install procedures
for parts in more than one mode of the Tri-Res. When Part
Numbers differ by Tri-Res Model, the Part Numbers are not
given in this section.
The following procedures are based upon having access to
the Tri-Res on all four side. If the Tri-Res is installed between
other appliances and there is not enough room on the sides for
access, the Tri-Res must be pulled out from its position to gain
proper access.
Care should be taken in moving the Tri-Res so as not to stress
or pull on the electrical, gas, and water connections.
WARNING
After servicing gas piping on gas models,
check for gas leaks before putting unit back
in service.
5.4 Tri-Res Control PC Board P/N 160650
WARNING
Disconnect the steamer from electric power
before beginning any service procedures.
1. Remove the four screws from the right side panel. Once the
screws are removed, the panel can be pulled forward about 1
inch, then raised above the top panel overhang and removed.
2. Remove control board housing by removing six nuts from
rear of housing.
3. Unplug the ribbon connectors.
4. Remove the knobs.
5. Using a 5/16” socket, remove the ten 6/32” lock nuts and
remove the board from ten studs on the front panel. Be careful
not to lose the metal washers below the panel.
5.2 Cavity Compartment Side Panels
For Part Number see Parts Identification Section.
Removal
1. With a flat blade screw driver remove the two 10-32 screws
on the lower edge of the panel and two at the back edge. The
panel is retained to the steamer by these four screws.
2. Once the screws are removed, the panel can be pulled forward about 1 inch, then raised above the top panel overhang.
5.3 Top Cover
For Part Number see Parts Identification Section.
Note: Under normal conditions the top cover should never
have to be removed. The most likely reason for removing it is if
the panel itself has been damaged by a falling object.
1. Remove right side and left side panels and upper rear panel.
2. Slide the cover forward until clear of the front overhang, and
lift off.
PART NUMBER 152797 REVISION A
CALL 888-994-7636 FOR TECHNICAL SUPPORT
28
ASSEMBLY/DISASSEMBLY
Installation
4. Position the board on ten studs.
5. Install 6/32” lock nuts with washers. Use a 5/16” socket to
tighten them in place.
6. Insert ribbon jack. Press firmly to make sure the jack is fully
seated on the board.
7. Replace the knobs.
8. Replace the control board housing and six nuts behind the
housing, tighten.
9. Replace the side panel and screws, tighten.
Installation
7. Attach new drain valve to valve bracket. Slide the silicone
hose through the drain valve housing and install hose clamp
over the exposed end of the hose. Check that the hose is
straight and not twisted.
8. Fit the exposed end of the silicone hose onto the elbow of
the cavity drain. Using spring clamp pliers, position and tighten
the hose clamp.
9. Plug the electrical leads of the valve into the wiring harness.
Connect Tri-Res to branch circuit, and turn on power.
5.5 Relay Board P/N 160651
Testing
Operate Tri-Res sensor diagnostics. Check for leaks and observe
if drain valve fully closes. Turn off Tri-Res and observe that drain
valve opens and the steam reservoir drains.
10.Reinstall right side panel.
Installation
3. Position the board on four studs on the high voltage panel.
4. Install 6/32” lock nuts onto the studs and tighten in place
using a 5/16” socket.
5. Insert all jacks in the same connector locations as per
removal. Press firmly to make sure each jack is fully seated on
the board.
5.7 Door Removal/Installation/Alignment
Removal
1. Unplug all connectors.
2. Using 5/16” socket remove four 6/32” lock nuts and remove
the board from four studs on the high voltage panel.
5.6 Reservoir Drain Valves P/N 152915
Note: When the steam reservoir drain valves are deenergized
or OPEN), the silicone hose can be freely threaded through the
valve is located to the right of the steamer cavity.
Removal
1. Turn off power and disconnect Tri-Res from branch circuit.
Remove right side panel. Let Tri-Res drain completely.
2. Using spring clamp pliers, disconnect ONE END of the silicone drain hose by loosening the drain fitting coming from the
cavity drain. Remove clamp.
3. Unplug the valve electrical wires.
4. With a 5/16 inch nutdriver, remove the two 10-32 screws
holding the drain valve to the bracket on the Tri-Res base.
5. Remove the two 10-32 screws and remove the valve from
the bracket.
6. Loosen the clamp and remove the other end of the silicone
hose from the drain box. Inspect the hose for any damage or
lime buildup. Clean or replace the hose if required, then reattach to the steam reservoir drain fitting.
PART NUMBER 152797 REVISION A
For Part Number see Parts Identification Section.
Removal
1. To remove the door, turn off the Tri-Res power and allow the
Tri-Res to cool. Then open the door and, while supporting the
weight of the door, remove hinge pin or remove door-to-hinge
bolts.
2. Place the door on a flat, clean table or similar support, with
gasket facing up. Be careful not to scratch door surface.
3. Inspect door gasket for signs of cuts, or other defects which
may impair its function. Replace if necessary.
NOTE: Gasket not covered under terms of warranty.
Installation
4. To install the door, apply NEVER-SEEZ lubricant to hinge pin.
Align door with and insert hinge pin, or apply Locktite 242 to
the door-to-hinge bolts, then install door and mounting bolts.
Snug bolts only. Do NOT tighten mounting bolts at this time.
Alignment
5. Place a piece of masking tape over the door latch pin (bullet) hole in the door.
CALL 888-994-7636 FOR TECHNICAL SUPPORT
29
ASSEMBLY/DISASSEMBLY
6. Close the door until the latch pin just penetrates the masking tape. Make sure the door pin contacts only the door latch
spring.
7. If door pin does not strike the center of the masking tape
or spring hole in the U-channel, loosen the hinge-to-oven bolts
and align the door to the door pin. Tighten-to-oven mounting
bolts.
8. You should be able to pull a dollar bill or comparable piece
of paper with some effort, from between the gasket and Tri-Res
cavity with the door closed. To adjust the hinge side, loosen the
door-to-hinge bolts and align the door gasket with the oven
cavity. Tighten the door-to-hinge mounting bolts.
9. Operate Tri-Res and check for leaks.
5.8 Door Switch P/N 096857
Note: One normally open door switch is factory-installed on
one side of the control panel housing. It is activated (that is,
closed) by the proximity of the door magnet.
1. Remove the side panel and the control panel housing for
access to the door switch that is to be replaced.
2. Unplug the door switch from the Tri-Res harness.
3. The switch is held in place with two small 4-40 screws. With
a slotted screwdriver, remove these screws and the switch may
be removed.
4. To install the switch use the two 4-40 screws and a screwdriver with a screwstarter features.
5. Connect switch leads to steamer harness.
6. Replace control panel housing and side panel.
7. Test Tri-Res operation.
5.9 Door Gasket
For Part Number see Parts Identification Section.
NOTE: Door Gasket not covered under terms of warranty
Removal
1. Turn off Tri-Res power and allow to cool.
2. Remove the door using one of the following two methods:
a) Support the door and remove hinge pin or
b) Support weight of the door and remove the two door-tohinge bolts.
3. Place the door on flat, clean, smooth table or similar support
with handle hanging over edge. Be careful not to scratch the
door.
4. Remove four (or eight) 8-32 truss head screws and remove
inner door panel.
PART NUMBER 152797 REVISION A
5. Remove and discard door gasket.
6. Clean back of the inner door panel. Be sure old sealant is
completely removed.
Installation
1. Install new door gasket around inner panel as shown in the
illustration. Be sure the inner door panel flange is full inserted
into the door gasket groove.
2. Apply a high temperature silicone sealant, such as GE RTV
159 or equivalent, to the four door spacers.
3. Apply Locktite 242 to inner door panel mounting screws.
4. Install inner door panel and door gasket on the door spacers, and tighten mounting screws.
5. Align door with hinge and insert hinge pin OR apply Locktite
242 to the door-to-hinge bolts, then install door and mounting
bolts. Do NOT tighten mounting bolts at this time.
6. Align door to Tri-Res and tighten bolts.
Please refer to 4.8 for alignment procedure.
5.10 Water Level Probe
Removal
1. Turn off the Tri-Res power and disconnect the Tri-Res from
the branch circuit.
2. Remove the rear cover from the Tri-Res.
3. Disconnect the water level probe harness wire.
4. Loosen and remove the hex locking nut and washer.
5. Remove the probe.
Installation
6. Insert the new water level probe.
7. From the outside, put on any washer and locking nut.
Tighten nut finger tight and then another 1/4 turn to prevent
any water leaks.
8. Attach the harness wire.
9. Turn on the branch circuit power supply.
10.Turn ON the Tri-Res and test.
CALL 888-994-7636 FOR TECHNICAL SUPPORT
30
ASSEMBLY/DISASSEMBLY
5.11 Burner
3a.Remove the side access plate by removing the two 10x32 nuts.
The entire combustion chamber is constructed as a slide out
drawer to remove, follow the instructions below.
NOTE
Shut off power and gas supply
before removing!!!!!
Removal
1a. Disconnect the flexible gas lines and moving them out of
the way.
See Below;
#1 – Burner Supply Line
#2 – Pilot Supply Line
#3 – Burner Supply Line
#4 – Burner Supply Line
#5 - Runner Tube Supply Line
3b.Remove the four (4) bolts that attach the damper and combustion chamber plate and pull out the drawer.
4. Unplug the HSI and flame sensor.
1
2
3
4
5
1b. Disconnect power and gas supplied to the unit.
2. Remove the left side panel by removing the three exterior screws.
5. Remove the 5-1/4” screws on the holding plate near the
ignition tube and the two on the bottom of the holding plate.
6. Loosen the 3/4” compression fitting on the ignition tube
and move it toward the base.
7. Slide the burner out the left side of the unit.
PART NUMBER 152797 REVISION A
CALL 888-994-7636 FOR TECHNICAL SUPPORT
31
ASSEMBLY/DISASSEMBLY
Installation
1. Slide the new burner into the left side of the unit.
2. Attach the ignition tube and tighten the 3/4” compression
fitting.
4. Plug in the HSI and flame sensor.
5. Turn on gas supply and power to the unit.
6. NOTE: The ignition tube does not receive gas until the burners are active.
7. Install the side access plate with 2 10x32 nuts.
8. Re-install the left side panel with the three exterior screws.
3. Install the 5-1/4” screws into the holding plate.
PART NUMBER 152797 REVISION A
CALL 888-994-7636 FOR TECHNICAL SUPPORT
32
PARTS IDENTIFICATION
6.1 Control Panel Sub- Assembly
No.
1
2
3
4
5
6
7
8
9
10
Description
Panel, Control, Tri-Res
Control Panel Mounting Bracket Assembly
Hour Meter, Redington,
Knob, 1.5 Dia
Rocker Switch
Switch,
Door
D
Control Panel Display
Control Board, Tri-Res (not shown)
Overlay, Front Panel Tri-Res (not shown)
Gasket, Control Panel (not shown)
C
Part No.
151109
152992
149295
160921
160920
096857
152904
160650
160652
152998
Qty.
1
2
1
2
1
1
1
1
1
1
6
1
7
2
4
4
B
6
5
3
A
PART NUMBER 152797 REVISION A
CALL 888-994-7636 FOR TECHNICAL SUPPORT
33
PARTS IDENTIFICATION
6.2 High Voltage Panel Assembly - Gas
No.
1
2
3
4
5
6
7
8
9
Description
Weldment, Electrical Panel, High Voltage
Module, Ignition, HSI
Transformer, 75VAC
Screw Hex Slotted HD 8-32x.375
2 Pole Terminal Block
Ground Lug
Fuse
Fuse Block
Tri-Res 20 Relay Board
Part No.
152602
140184
121716
069789
152641
119829
152012
77840
160651
Qty.
1
1
1
8
1
1
1
1
1
REV
ECN
A
17282
RELEA
1
5
6
7
2
8
4
9
ITEM NO.
3
NOTES:
UNLESS OTHERWISE SPECIFIED
DIMENSIONS SHOWN ARE IN INCHES
WITH TOLERANCES AS FOLLOWS:
DECIMALS
ANGLES
.X ± .06
.XXX ± .015
± .5°
.XX ± .03
MATERIAL
SEE BOM
1. PART IS TO BE FREE OF BURRS AND SHARP EDGES.
2.
PART
IS
TO
BE
FREE
OF
SCRATCHES,
NICKS,
AND
ANY
OTHER
PART NUMBER 152797 REVISION A
CALL 888-994-7636 FOR TECHNICAL
IMPERFECTIONS ON FINISH SIDE.
3. ALL WELD MARKS MUST BE CLEANED AND OR BLENDED INTO
FINISH
THE SURROUNDING FINISH.
SEE BOM
4. VENDOR IS TO PACK PARTS AS TO ENSURE NO DAMAGE TO PARTS.
PAR
1
152602
2
154059
3
152997
4
5
6
069789
152641
160651
THE INFORMATION CONTAINED ON
DOCUMENT IS CONFIDENTIAL AND
PROPERTY OF GROEN/A DOVER IN
UNAUTHORIZED REPRODUCTIO
EXPRESSLY FORBIDDEN
APPROVALS
DRAWN
SUPPORT
CHECKED
D
34 JWB
11/
KES
11/
PARTS IDENTIFICATION
6.3 Assembly Motor Mount
No.
1
2
3
4
5
6
7
8
Description
Motor Mounting Plate
Lesson 1/2 HP Motor
Motor Seal Assembly
Motor Mount Insulation Plate
Motor Mount Standoff Assembly
5” O.D. Fan
Screw, Hex Head Cap, 1/4”-20
Nut, Hex Keps 1/2”-20
Part No.
152825
152637
071299
152826
152827
152640
005608
012940
Qty.
1
1
1
1
1
1
4
4
REV
ECN
A
17282
1
6
4
3
2
2
5
7
ITEM NO.
1
2
3
4
5
6
7
8
8
PART NUMBER 152797 REVISION A
CALL
PA
15282
15263
07129
15282
15282
15264
00560
01294
UNLESS OTHERWISE SPECIFIED
DIMENSIONS SHOWN ARE IN INCHES THE INFORMATION CONTA
DOCUMENT IS CONFIDEN
WITH TOLERANCES AS FOLLOWS:
888-994-7636 FOR
TECHNICALANGLES
SUPPORT
PROPERTY 35
OF GROEN/A D
DECIMALS
UNAUTHORIZED REPRO
.X ± .06
.XXX ± .010
± .5°
EXPRESSLY FORB
.XX ± .03
MATERIAL
PARTS IDENTIFICATION
D
C
6.4 Water System Assembly
D
No.
1
2
3
4
5
6
7C
8
Part No.
152942
152877
090827
071235
152554
057218
154335
141285
9
Hose, Silicone, 7.5” Long, 0.1” Thk, 0.75” OD
152946
10
Hose, Silicone, 9.5” Long, 0.0625” Thk, 0.75 OD
152947
1
11
Hose, Silicone, 9.” Long, 0.0625” Thk, 0.75 OD
Qty.
1
1
1
1
1
1
1
5
22
3
Hose, Silicone, 8.625” Long, 0.0625” Thk, 0.75 OD
152949
13
Copper Wash Line 23.75” Long, 0.0625” Thk, 0.5 OD 152950
Hose, Silicone, 15.5” Long, 0.0625” Thk, 0.5 OD
16
Hose, Silicone, 11.5” Long, 0.0625” Thk, 0.5 OD
152953
17
Hose, Silicone, 15.625” Long, 0.0625” Thk, 0.5 OD
152954
18
Clamp Hose 2 1/4 Dia.
073259
19
Clamp Hose Low Pressure
093482
20
A
Fan, 24VDC Muffin 80MM
153505
21
Valve-Drain 5/8 ID
152915
22
Fan, 24VDC Muffin 80MM
153505
18
152951
2
1
1
1
1
1
1
1
1
1
2
6
1
3
1
16
15
4
12
14
15
6
12
11
10
19
6
11
10
13
19
2
21
1
152952
9
18
20
17
14
1
15
20
3
4
21
Hose, Silicone, 23.625” Long, 0.0625” Thk, 0.5 OD
22
16
2
14
5
17
152949
12
B
A
7
Description
Insulation Assembly
Weldment, Box, Drain
Valve-Water Feed 3/4 R
Valve-Water Feed 3/4 R
Water Valve Mounting Bracket
Fitting Compression
Spray Nozzle
Probe, 2-1/16” Water Level
1
B
7
9
D
13
8
8
21
21
UNLESS OTHERWISE SPECIFIED
THE
DIMENSIONS SHOWN ARE IN INCHES
DO
WITH TOLERANCES AS FOLLOWS:
UNLESS OTHERWISE SPECIFIED
PRO
DECIMALS
TH
DIMENSIONS
SHOWN AREANGLES
IN INCHES
DU
TOLERANCES
AS FOLLOWS:
± .5°
.X WITH
± .06
.XXX ± .015
PRO
ANGLES
.XX ± .03 DECIMALS
.X ± .06
MATERIAL
.XX ± .03
SEE BOM
MATERIAL
SEE BOM
FINISH
SEE BOM
FINISH
SEE BOM
8
8
7
7
6
5
6
4
5
3
4
3
5
22
3
C
17
16
1
4
14
15
12
11
10
19
2
21
1
18
20
9
CALL 888-994-7636 FOR TECHNICAL SUPPORT
PART NUMBER 152797 REVISION A
A
± .5°
DRA
DR
CHE
CH
PAR
PA
F createdPDF
withcreated
pdfFactory
Pro trial version
with pdfFactory
Pro trialwww.pdffactory.com
version www.pdffactory.com
B
.XXX ± .015
36
PARTS IDENTIFICATION
6.5 Gas Valve and Piping Assembly
No.
1
2
3
4
5
6
7
8
Description
Valve Gas Johnson Controls NAT
Nipple, 1/2 NPT x Close
Union 3/8 NPT
Nipple, 1/2” NPT x 3” Long
Elbow 90 DEG 1/2” NPT
Nipple, 1/2” NPT x 4” Long
Valve, Gas 1/2”
Fitting Compression 90
Part No.
098443
008877
005686
005553
008747
005554
098458
004584
9
Manifold, Gas, 3-Burner
152807
10
Plug Pipe 1/8” NPT Recessed Hex
010286
11
Pipe Dope
078938
12
Valve Gas 24 Volt HY-6G
099906
13
Fitting Compression
057218
14
Connector Male 3/8”
152544
15
Hose, Flex, 1/4 - Line, Pilot 24” Long
152544
16
Hose, Flex, 1/4 - Line, Runner Tube 33” Long
152892
17
Hose, Flex, 3/8 - Line, Burner 28” Long
152893
18
Hose, Flex, 3/8 - Line, Burner 28” Long
152893
19
Hose, Flex, 3/8 - Line, Burner 20” Long
152894
20
Natural to Propane Gas Conversion Kit (not shown) 152736
21
Propane to Natural Gas Conversion Kit (not shown) 093670
Qty.
1
1
1
1
1
1
1
2
1
1
0.5 oz
2
1
1
1
1
1
1
1
1
1
5
6
4
3
2
7
1
16
12
8
10
9
14
8
15
17
13
12
19
14
18
TO RUNNER
TUBE
TO RIGHT
BURNER
TO CENTER
BURNER
TO PILOT
UNLESS OTHERWISE SPECIFIED
DIMENSIONS SHOWN ARE IN INCHES
WITH TOLERANCES AS FOLLOWS:
DECIMALS
ANGLES
.X ± .06
.XXX ± .015 ± .5
.XX ± .03
TH
DO
PRO
MATERIAL
SEE BOM
TO LEFT
BURNER
DR
FINISH
SEE BOM
CH
PA
PART PDF
NUMBER
152797
REVISION Pro trial version www.pdffactory.com
CALL 888-994-7636 FOR TECHNICAL SUPPORT
created
with pdfFactory
A
37
PARTS IDENTIFICATION
6.6 Door Assembly
No.
1
2
3
4
5
6
7
Description
Assembly Door Front Single Point Latch
Assembly Panel, Back
Screw Flat HD #10-32 x 3/8” LG
Assembly, Bracket, Single Point, Latch, Door
Hinge, Door, Tri-Res 20G
Screw, Hex Head Cap, 1/4”-20
Gasket Door Inner
Part No.
152921
151040
069723
152924
152007
005608
151045
Qty.
1
1
8
1
1
4
1
D
5
3
1
C
6
4
B
2
7
A
PART NUMBER 152797 REVISION A
CALL 888-994-7636 FOR TECHNICAL SUPPORT
38
PARTS IDENTIFICATION
6.7 Gas Valve and Piping Assembly
No.
1
2
3
4
5
6
7
8
9
10
11
12
13
14
15
16
17
18
19
20
21
Description
Weldment, Chmbr, Combustion
Assy-U-Burner, Low Profile
Plate, Damper, Rear, UCS Oven
Weldment, Brkt, Tube, Ignition
Tube, Ignition, U-Burner
Weldment, Bracket, Pilot
Pilot, Ignitor, Low Profile
Orifice Connector Assy
Orifice, Igniter Tube #39
Clamp, Igniter Tube
Washer, Plain, 1/4
Nut, Hex Head 1/4”-20
Screw Truss Head
Screw, Hex Head Cap, 1/4”- 20
Screw Truss Head
Orifice Spud Nat Gas (.025)
Coupling Full 1/8 NPT
Connector, 1/4 Tube to 1/8 NPT
Coupling Full 3/8 NPT
Connector Male 3/8
Tri-Res Ignition Wire Sleeving
D
Part No.
152804
152832
152810
152698
152695
152849
152693
See p.24
See p.24
085107
005472
005601
072189
005608
012700
152006
059908
056899
059908
050879
152011
Qty.
1
3
1
1
1
1
1
3
1
3
8
2
3
13
6
1
1
1
3
3
1
12
18
11
7
9
16
4
6
10
C
5
13
14
20
19
B
3
8
15
2
A
1
CALL 888-994-7636 FOR TECHNICAL SUPPORT
PART NUMBER 152797 REVISION A
8
7
PDF created with pdfFactory Pro trial version www.pdffactory.com
6
5
39
4
Wiring Diagram
PART NUMBER 152797 REVISION A
CALL 888-994-7636 FOR TECHNICAL SUPPORT
40
Ladder Diagram
PART NUMBER 152797 REVISION A
CALL 888-994-7636 FOR TECHNICAL SUPPORT
41
INSTALLING, CLEANING AND TESTING
Notes
PART NUMBER 152797 REVISION A
Call 1-800/676-9040
for Technical Support
D (01/07)
(01/08)
PART NUMBER 145702,
REV. C
CALL 888-994-7636 FOR TECHNICAL SUPPORT
42
51
51
CALL 888-994-7636PART
FOR NUMBER
TECHNICAL
SUPPORT
145702,
REV. B (7/06)
-ENDELL$AVIS$RIVEs*ACKSON-3
ss&AX
GROENCOM
0!24.5-"%2
PART NUMBER
152797 REVISION
A