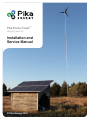
1
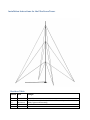
Pika Econo-Tower™ Guyed Tower Kit Installation and Service Manual © Pika Energy 2015 Installation Instructions for the Pika EconoTower Revision Table Revision Date Changes 1.0 2014-04-08 2.0 2015-03-11 Initial Release Updated hardware kit detail, added detail for tower layout and installation, tables, figures and formatting. Introduction Congratulations on your purchase of the Pika Energy EconoTower! This manual will guide the installer through proper installation and setup of the tower, as well as maintenance and troubleshooting. It is important to carefully and thoroughly read the entire manual in a comfortable setting, before venturing out in the field to install the tower. Pika Energy recommends storing this manual in a safe place for ready access. Symbols used in this document Throughout the manual, the following symbols highlight important information: DANGER: Hazards that could cause death or serious injury WARNING: Actions or situations that could permanently damage or destroy system components NOTE: Helpful tips and points of interest CHECKMARK: Installation checklist requires a check at this step TAKE A PHOTO: Installation manual requires a photo at this step EARTH GROUND: Relates to proper grounding of the system, critical for safety and lightning protection. Tower Specifications Parameter Central pole Gin pole Anchors Anchor load Guys 42’ tower 63’ tower 2@ 21’ 2.5” schedule 40 steel pipe 3@ 21’ 2.5” schedule 40 steel pipe 1@ 16’ premium-grade pressure treated 4x4 1@ 21’ 2.5” schedule 40 steel pipe 4@ 21’ radius (+1 optional for gin pole) 4@ 32’ radius (+1 optional for gin pole) 5000lb minimum pullout strength 5000lb minimum pullout strength 2 sets 3/16” galv. aircraft cable 3 sets 3/16” galv. aircraft cable 2 Contents Introduction ......................................................................................................................................2 Symbols used in this document ................................................................................................................ 2 Tower Specifications ................................................................................................................................. 2 1. Warnings ........................................................................................................................................6 2. EconoTower Overview ....................................................................................................................7 3. Siting the Tower............................................................................................................................ 12 Wind Turbines Need Wind ...................................................................................................................... 12 Space Requirements and Site Characteristics......................................................................................... 12 4. Installing the Anchors and Tower Base .......................................................................................... 14 Step 4.1: Determining Anchor Type ........................................................................................................ 14 Unconventional Anchoring Situations .................................................................................................... 14 Step 4.2: Anchor Layout .......................................................................................................................... 15 Step 4.3: Anchor installation ................................................................................................................... 16 ‘Bust’ type expanding anchor installation .............................................................................................. 16 ‘Step 4.4: Assemble and Install Tower Base ........................................................................................... 17 Grounding and Lightning Protection....................................................................................................... 17 5. Assembling the Tower ................................................................................................................... 19 Step 5.1: Screw base coupler to lower pipe ........................................................................................... 19 Step 5.2: Install lower pipe section to tower base.................................................................................. 19 Step 5.3: Install bottom guy plate assembly on middle (63’) or top (42’) pipe section ......................... 19 Step 5.4: Install mid guy plate assembly (63’ tower only ....................................................................... 20 Step 5.5: Install top guy clamp assembly ................................................................................................ 20 Step 5.6a: Assemble Gin Pole (63’ tower only) ....................................................................................... 21 Step 5.6b: Assemble Gin Pole (42’ version only) .................................................................................... 22 Step 5.7: Install Gin Pole ......................................................................................................................... 22 Step 5.8: Rig Gin Pole .............................................................................................................................. 22 Step 5.9: Raise Gin Pole .......................................................................................................................... 24 Step 5.10: Secure Guy Cables.................................................................................................................. 24 6. First Raising of the Tower ............................................................................................................. 26 Step 6.1: Attach back guy tension ropes................................................................................................. 26 Step 6.2: Rig the lifting cable .................................................................................................................. 27 3 Step 6.3: Slowly raise the tower ............................................................................................................. 27 Step 6.4: Transfer gin pole guys to anchor ............................................................................................. 28 Step 6.5: Plumb the tower ...................................................................................................................... 28 Step 6.6: Lower the tower ...................................................................................................................... 29 7. Install and Raise the Turbine ........................................................................................................ 30 8. Periodic Safety Checks .................................................................................................................. 31 List of Tables Table 2.1 – Locally Sourced Components ..................................................................................................... 7 Table 2.2 – Tower Materials Checklist .......................................................................................................... 8 Table 2.3 – 63’ EconoTower Hardware Kit Contents .................................................................................... 9 Table 2.4 – Installation Materials and Tools Checklist ................................................................................ 10 Table 3.1 – Anchor locations and site space requirements ........................................................................ 12 Table 4.1 – Anchor locations ....................................................................................................................... 15 Table 5.1 – Angle factor multipliers for redirection links ........................................................................... 23 Table 6.1 – Maximum lifting cable tension ................................................................................................. 27 4 List of Figures Figure 2.1 – 63’ EconoTower Hardware Kit contents ................................................................................... 8 Figure 2.2 – Galvanized steel 2 ½” NPT Schedule 40 pipe coupler. .............................................................. 9 Figure 3.1 – Tower space requirements ..................................................................................................... 12 Figure 4.1 – Digger truck installing screw type anchors ............................................................................. 14 Figure 4.2 – Plan view of anchor layout ...................................................................................................... 15 Figure 4.3 – 8” auger at 45-60 degrees from horizontal............................................................................. 16 Figure 4.4 – Attaching the rod, expanding the anchor and backfilling/tamping. ....................................... 16 Figure 4.4 – Tower base assembly .............................................................................................................. 17 Figure 4.5 – Grounding rod clamp .............................................................................................................. 17 Figure 4.6 – Midnight Solar MNSPD-300-DC Surge Protection Device wiring diagram .............................. 18 Figure 5.1 – Base coupler with grounding lugs ........................................................................................... 19 Figure 5.2 – Guy plate orientation detail .................................................................................................... 20 Figure 5.3 – Half clamp assembly for top guy plate .................................................................................... 20 Figure 5.4 – Gin pole detail ......................................................................................................................... 21 Figure 5.5 – Base Plate assembly ................................................................................................................ 22 Figure 5.6 – Gin pole rigging detail ............................................................................................................. 23 Figure 5.7 – Correct cable clip attachment ................................................................................................. 25 Figure 6.1 – Use of front guy tension ropes during raising of tower. ......................................................... 26 Figure 6.2 – Sideview of tower before raising ............................................................................................ 28 Figure 6.3 – Sideview of tower after raising but before guy transfer ......................................................... 28 Figure 6.4 – Prusik knot used to pull tension on a taught line ................................................................... 29 5 1. Warnings Working carelessly or without proper training can cause death, serious injury and severe property damage. Take care to read and understand the manual completely before beginning installation. Pika’s warranty agreement requires that the turbine and tower be installed in accordance with the manuals and properly documented using the T701 Installation Checklist. DANGER: Do not attempt to install a tower unless you know what you are doing and understand the proper use of all equipment. DANGER: All components of the rigging and lifting system (lifting line, shackles, pulleys, quick links, turnbuckles, etc.) should have a 3500 lb. working load limit (WLL) DANGER: The EconoTower conducts electricity. Do not install it where it may come in contact with electrical lines of any type. DANGER: The EconoTower is not designed to be climbed. Do not climb the tower or gin pole under any circumstances. Do not lean a ladder or any other object against the EconoTower. DANGER: All people should be well outside the fall zone when the tower is raised or lowered. DANGER: All personnel should wear OSHA-approved Personal Protective Equipment (PPE) including hardhats and safety-toe footwear when working around the tower. DANGER: Pika Energy does not recommend working alone when installing or servicing turbines or towers. DANGER: Never work around towers during severe weather, including but not limited to electrical storms. Lightning can strike miles from the center of a storm. Do not raise or lower towers in winds above 25mph, heavy precipitation, or slippery ground conditions. WARNING: Pika Energy strongly recommends against the use of motor vehicles to raise or lower towers. A high quality worm-drive winch with ample load rating should be used. NOTE: Throughout this manual, the FRONT and REAR tower anchors are defined as follows: The FRONT anchor is in the laydown direction of the tower. The REAR anchor is on the gin pole side (the side of the tower from which you will raise and lower the tower.) NOTE: Throughout this manual, certain specific instructions are underlined when it is critical that they be done exactly as described. 6 2. EconoTower Overview Pika Energy’s EconoTower kits were developed to provide an affordable, easy-to-install tilt-up tower option for the Pika T701 wind turbine. The EconoTower kit ships with a standard parcel carrier, and uses common galvanized steel pipe and other components which are sourced locally by the installer. Each kit contains: Baseplates and tower pivots Guy plates and cable assemblies A gin pole end assembly Hardware and instructions Drill bit and hose clamp for top collar half clamp assembly The EconoTower kit does NOT include the following additional components, which must be sourced locally by the installer: Table 2.1 – Locally Sourced Components Component 63’ Tower 42’ Tower Comment Quantity Anchors (type per local ground 4 4 See notes on anchors conditions) 21’ galvanized Schedule 40 2½” NPT pipe galvanized Schedule 40 2½” NPT pipe couplers 5/8”-11 thread, 9” adjustment steel jaw-and-jaw turnbuckle with cotter pins Structurally sound, groundcontact treated 4”x4” timber Ground rods 1 4 2 2 1 Usually available where pipe is sold1 1 1 1@8’ 1@8’, One turnbuckle is required at the back anchor. Use of turnbuckles at the side anchors is optional2 for sites that are not flat. 16’ must be select grade with no structural defects 1@16’ 2@8’x1/2” 2@8’x1/2” Available from McMaster-Carr, (part # 46685K471) www.mcmaster.com 2 Side turnbuckles are not required, but may be used. The required turnbuckle at the back anchor eases the transition of guys to and from the gin pole, especially in cold weather when guy wires can be particularly taught. Turnbuckles can be helpful at side anchors as well when they are not in a level line with the tower base. All turnbuckles should be at least 5/8” – 11 thread steel jaw-and-jaw type, and have a working load limit (WLL) of at least 3500lbs. 7 Table 2.2 – Tower Materials Checklist Got it! Component Comment EconoTower kit See hardware list and figures below. Anchors, anchor rods (and eye nut fittings, if needed) See Section 4, Step 1 21’ long 2½” NPT Schedule 40 galvanized pipes, with See table 2.1 for quantity galvanized steel couplers 4x4 select grade, ground contact treated lumber 2@ 8’ x copper-clad steel ground rods See table 2.1 for quantity Figure 2.1 – 63’ EconoTower Hardware Kit contents (tower base angles not shown). Top left: hardware; bottom left: guy plate assembly (1 of 3 with the 63’ EconoTower). NOTE: red tape marks the rear guy cable of each guy plate assembly. The rear guy cable has an eye thimble swaged onto it for attachment to the gin pole. Guy plates are labeled BOTTOM, MIDDLE and TOP; top right: gin pole guy ropes, front guy rope, flex conduit, grease and brush. 8 Figure 2.2 – Galvanized steel 2 ½” NPT Schedule 40 pipe coupler. Sourced locally along with pipe sections. Table 2.3 – 63’ EconoTower Hardware Kit Contents Description Quantity Tower base - .120” painted steel angle 2 Aluminum tower base pivot coupler, with grounding lug attached 1 Aluminum gin pole lifting coupler, with 5/8”-11 x 4 ½” eye bolt and eye nut attached 1 Aluminum gin pole pivot coupler 1 Bag of (2) zinc plated steel 4 1/2” x 3/4” clevis pins, with (6) zinc plated washers and (2) zinc plated cotter clips 1 Bag of (12) galvanized steel 2” x 3/8” flange head lag screws 1 Bag of (9) zinc plated malleable steel 3/16” wire rope clips 4 Bag of (3) galvanized steel 3/16” wire rope thimbles 4 Bag of (2) spare 3/16” wire rope clips and (1) spare thimble, labeled EXTRA 1 Bag of (2) grounding rod clamps for 5/8” rod 1 Bag of (2) zinc plated steel M10 x 100mm cap screws with (2) zinc plated locknuts and a 27/64” x 5 3/8” twist drill 1 Octagonal half clamp sections – painted steel 2 1/2” worm drive hose clamp (2 9/16” to 3 ½”) 1 40” AWG 4 copper grounding cable 2 ½” quick link – zinc plated steel (attached to gin pole lifting coupler) 1 Guy plate assemblies – TOP, MIDDLE, BOTTOM, with swaged 3/16” galvanized steel guy cables 3 100’ length of 3/8” twisted polypropylene rope 1 50’ length of ½” twisted polypropylene rope 2 Tub of high pressure grease 1 Bristle brush to apply grease to pipe and coupling threads 1 5’ length of ¾” flexible PVC conduit 1 9 Table 2.4 – Tower Installation Materials and Tools Checklist* Got it! Tool/Material Comment/Purpose Personal Protective Equipment Hard hats, safety glasses, safety boots and comfortable work gloves For required documentation of installation for warranty – see T701 Digital camera Turbine Installation Checklist in T701 Installation and Service Manual At least (2) 100’ reel-type tape measures For tower base and anchor layout Marking paint Wooden Stakes or flags 3/32” mason twine Hand sledge Permanent marker Anchor installation tools Utility knife 8lb sledge Shovel Tape measure ¼” or 6mm drill bit 2’ level 4’ level (or longer) Sharp saw (hand, circular, or chain) Heavy Duty 18V or larger cordless drill and batteries Ratcheting 9/16” wrench Saw horse or cribwork 6” clamp Blocks, wedges, and shims 2 chain wrenches, 18” or longer For anchor layout For anchor layout For prusik knots for adjusting guy cables For driving stakes For marking location of top edge of half clamp See section 4.3 if installing your own anchors For driving anchor rods (if necessary; depending on tower type) For marking 4x4 sections of tower base For drilling pilot holes for tower base lag screws For leveling the base For plumbing the tower For cutting wood for tower base For cross drilling the top tower section for half clamp installation, and for drilling pilot holes in tower base wood To drive lag screws To support tower top, and for clamping 4’ level to when plumbing tower For clamping level plumb to sawhorse To support mid-span of tower 3” pipe wrenches work but may require extensions For tightening hose clamp around half-clamp assembly, and for ground Multi-tip screwdriver lug attachment For tightening bolts and nut on half-clamp assembly. These can also be 2 adjustable wrenches, 10- used for leverage to remove or tighten the eye nut onto the eye bolt on 12” length the gin pole lifting coupler, as the thread fit is very tight. 7/16” non-magnetic nut For tightening cable clips. Standard nut drivers and magnetic tips are driver tip or socket not deep enough. 10 Table 2.4 (continued) – Tower Installation Materials and Tools Checklist* Got it! Tool/Material Comment/Purpose 7/8” spade bit For 4x4 gin pole for 42’ EconoTower only 5/8” spade bit For 4x4 gin pole for 42’ EconoTower only Small, sharp triangular file For repairing pipe threads Fine round file For dressing sharp edges *NOTE: For additional required turbine installation tools and materials refer to the tools and materials checklists in Section 3.4 of the T701 Turbine Installation & Service Manual that came in your Pika T701 Turbine box. 11 3. Siting the Tower Wind Turbines Need Wind The most important factor in the performance of any wind turbine is the quality of the wind resource at the location of the turbine. Just as solar panels must be installed in a sunny location, wind turbines must be installed where there is unimpeded access to a good wind resource. One of the most common causes of poor performance is installation on a tower that is too short. For acceptable performance the tower must be at least 10 meters (33 feet) taller than surrounding obstacles within a 100m (330 foot) radius. This is a minimum requirement, and more height exposure is better. Remember that trees grow rapidly in height, and are likely to significantly decrease the wind exposure of nearby turbines over a few years. If in doubt, choose a taller tower. Whenever possible, position towers upwind from obstacles with respect to the local prevailing wind direction(s). Pika Energy’s REbus technology enables over 2.5X longer wire runs with lower energy loss, enabling tower placement far from the electrical service. Space Requirements and Site Characteristics The EconoTower requires a diamond-shaped area of open ground, clear of major obstacles. The shape of the clear area needed is shown in Figure 3.1 Tower space requirements. Make sure you have sufficient room for the tower and turbine to tilt down. The installation site should be planar and preferably on flat to gently sloping ground. When installing on sloped sites, orient the layout so the tower lays down in the uphill direction. The side guys should be level across the slope and in line with the tower pivot pin on the baseplate. Non-planar (lumpy) sites are especially dangerous for guyed towers. Raising a tilt-up guyed tower on a convex site can result in rapidly increasing guy tension as the tower is raised, resulting in collapse via buckling. Raising a tilt-up guyed tower on a concave site can result in slack guy lines, leading to an unsupported tower and catastrophic collapse. C Figure 3.1 – Tower space requirements Table 3.1 – Anchor locations and site space requirements Tower Dimension A - (main Dimension B - Dimension C - (optional Size anchor radius) (tower length) redirection anchor) 42’ 63’ 22’ 32’ 42’ 63’ 17’ 22’ 12 Diagonal distance (between anchors) 31.1’ 45.25’ DANGER: The tower must not be erected near electric power lines. Most overhead power lines are not insulated, so they pose a life-threatening shock hazard. NOTE: The side guy anchors and the base plate must be on a straight line to ensure adequate cable tension during raising or lowering operations. If exact placement of an anchor point is not possible, it should be moved outward from the base rather than inward. Try to keep the side anchors and the base plate at approximately the same elevation. 13 4. Installing the Anchors and Tower Base Step 4.1: Determining Anchor Type A tower is only as secure as its foundation. Consult with a local geotechnical engineer in case of wet or sandy soil conditions. In normal soil conditions, Pika recommends the use of Hubbell ‘Tough One’ 8” or 10” helix anchor assemblies, supplied and installed by your local utility services contractor using a ‘digger truck’ – see Figure 4.1. In sites where truck access is not possible, Pika recommends the use Figure 4.1 – Digger truck installing screw type anchors of Hubbell 6” or 8” ‘Bust’ expanding anchors3, which are installed in a pre-drilled or dug diagonal hole. The hole may be dug using a gas-powered ‘two man auger’ with an auger extension, but it is necessary to have at least 4 people on hand to operate the auger at an angle. Alternatively the holes can be dug by hand with a ‘Boston’ type post hole digger (ordinary double-handle diggers cannot dig a deep enough hole). The ‘Bust’ type expanding anchor depends on well-compacted soil for its holding power, and must be struck repeatedly with a heavy pipe to expand it outward into undisturbed soil. Although the anchors do expand, they must be carefully backfilled and tamped per the anchor manufacturer’s recommendations to ensure sufficient holding power. In all cases, ensure that the anchor rod is closely aligned with the line of pull. Anchors should be installed on a diagonal, pointing toward the tower base at an angle of 45 to 60 degrees from horizontal. Anchors should be installed such that the attachment point is above grade, but no more than 6-9 inches from the level of the soil. Longer extensions of the anchor rod above the ground can result in bending of the rods when the tower is raised or lowered. Unconventional Anchoring Situations Consult a local geotechnical engineer if extremely rocky soil or bedrock prevents installation of the recommended anchors. Other types of anchors may be improvised, including poured-in-place concrete anchors and buried dead-man anchors, but the installer must ensure that the anchor has 3 http://www.hubbellpowersystems.com/anchoring/expanding/ 14 ample holding power as installed. A minimum of 5000lb of pullout strength is necessary. DANGER: Because ground conditions vary widely, it is the installer’s responsibility to ensure that the anchors have sufficient holding power. Consult a local utility services company or geotechnical engineer for advice about what works in your area. Pika does not recommend installing turbines on buildings, and the EconoTower is not designed to be installed on a building. Building-mounted wind turbines have a history of poor performance, noise issues, and significant downtime. Poor performance is virtually guaranteed if the turbine does not project at least 10 meters above surrounding obstacles (including buildings) within a 100m radius. Step 4.2: Anchor Layout Four anchors are placed at 90 degree intervals, equidistant from the tower base according to the dimensions listed in Table 4.1 below. An optional fifth anchor may be installed at the end of the gin pole in order to redirect the direction of pull of the raising cable. Table 4.1 – Anchor locations Tower length Guy radius 42’ 63’ 22’ 32’ Ginpole anchor distance Diagonal distance (between anchors) 17’ 22’ 31.1’ 45.25’ Select the tower base location with reference to guidelines in Section and Figure 4.2. Mark the tower base and guy anchor locations with wooden stakes (or marking paint if on ledge). Use the diagonal measurements in Table 4.1 to ensure that the layout is square – DOUBLE CHECK the squareness and distances before proceeding. If installing an optional redirection anchor for the raising cable, mark the anchor location with a stake OPPOSITE the laydown direction of the tower. This anchor should be in line with the tower base and the rear anchor, at the specified distance from the marked tower base. Note that this anchor position from the tower base is one foot longer than the gin pole length. Install the stakes marking the anchor locations at the correct diagonal angles, with the top of the Figure 4.2 – Plan view of anchor layout stake pointing toward the tower base location. This is very important because the anchors cannot be removed once installed. 15 Step 4.3: Anchor installation If possible, arrange with the utility services company to install the anchors. Typically this will take less than one hour if the site is clear and the anchor locations are clearly marked. If possible, arrange for one-piece forged eye type anchor rods, rather than the type with a threaded end that takes a heavy galvanized eye nut. DANGER: Be sure to call DIG SAFE at 811 and get clearance before installing anchors or buried wire. ‘Bust’ type expanding anchor installation If installing 6” or 8” Hubble bust type expanding anchors, follow these steps: a) At the four main guy anchors and the optional lifting line redirection anchor, auger 6” or 8” diameter holes at a 45-60 degree angle from the horizontal, away from the tower base, so that the anchor eye will be closer to the tower base than the anchor base. The holes should be deep enough that the anchor rod projects 4”-6” above the surface when placed in the hole (without the bell attached) Figure 4.3 – 8” auger at 45-60 degrees from horizontal b) Attach the rod to the anchor bell and insert in hole. Make sure it goes all the way to the bottom of the hole. Expand the bell anchor using either the Chance/Hubbell (#C302-0003) 10’ Expanding & Tamping Tool or 10’ long x 3” diameter heavy wall steel pipe. Turn the Eye at the end of the rod so that it is oriented vertically so that the guy wires will attach in a straight vertical line. Make sure that the bell is fully expanded because its “bite” into virgin soil provides the primary strength of the anchor. c) Refill the hole about 12” at a time, then carefully compacting the soil using a tamping tool. The fill must be compacted to develop proper strength and to keep water from seeping in and compromising the anchor strength. Figure 4.4 – Attaching the rod, expanding the anchor and backfilling/tamping. 16 ‘Step 4.4: Assemble and Install Tower Base The tower base may be pre-assembled in the shop for convenience. a) Measure and cut three 24” pieces from the 8’ treated 4x4. b) Starting at one end of a 4x4 drill ¼” holes at 4 7/8”, 8 7/8”, 15 1/8”, and 19 1/8”, centered in the width of the 4x4. c) Repeat step b) with the other two 4x4’s. d) Fasten base plate angles to the predrilled 4x4’s with 3/8” lag screws according to Figure 4.4. e) Ensure base plates are parallel and square to each other and the 4x4’s. f) Figure 4.4 – Tower base assembly Dig a 4” deep hole 2’ square, centered on the tower base location and oriented toward an anchor. g) Place the base in the hole. Backfill as much as possible and tamp soil. h) Install two ground rods into the hole Figure 4.5 – Grounding rod clamp in the base flanges, tilted slightly toward the laydown direction; drive with sledge until they are roughly 8” above the baseplate. i) Install a supplied copper grounding cable to each grounding rod with supplied ground rod clamps (Figure 4.5), and route cables under the base. Grounding and Lightning Protection Turbines, towers, and inverters must be securely connected to earth ground per manufacturers’ instructions. The EconoTower is grounded at its base by two 8’ long copper-clad steel grounding rods driven vertically into the soil and bonded securely to the tower. NOTE: Grounding turbines in arid regions presents special challenges. In many cases the standard grounding rod will not provide a sufficient low-resistance path to earth ground where soil is dry. Consult experienced electrical professionals in your area for best practices. 17 Pika Energy recommends the use of lightning arrestors at the tower base and inverter, to prevent damage from lightning. However, no protection system can entirely eliminate the risk of damage from a direct lightning strike. Pika Energy recommends the use of the Midnight Solar MNSPD-300-DC Surge Protection Device4 (or equivalent) for protection on all REbus devices. The surge protection device should always be installed as close as possible to the hardware it is intended to protect. Figure 4.6 – Midnight Solar MNSPD-300-DC Surge Protection Device wiring diagram NOTE: Wire coloring depicted is reflective of MNSPD device, NOT Rebus wiring convention. RE- should get three wraps of BLUE tape, and RE+ should get three wraps of RED tape at all device connections and wire junctions. 4 The Midnight Solar MNSPD-300-DC Surge Protection Device is available as an optional accessory for the T701 Wind Turbine. If you ordered one with your turbine, it ships in the box with the turbine. 18 5. Assembling the Tower The EconoTower is assembled from threaded steel pipe. The pipe sections must be securely screwed together for the tower to have structural integrity. WARNING: Take care that the threads of the pipe are not damaged by rough handling during transport. The pipe sections typically come with threaded couplers on one end, but it is wise to thread couplers on the other end as well for transport. NOTE: Pika Energy recommends keeping a fine, sharp triangular file in the installation toolkit, to clear pipe threads if they become damaged. However, do not use if the damage is severe. Step 5.1: Screw base coupler to lower pipe Apply a generous coating of grease to the threads of one 21’ pipe section. Thread the aluminum Base Coupler (identified by the presence of the grounding lug – see Figure 5.1) to the pipe section. Tighten with opposing chain wrenches, applying at least 100 ft-lb of torque. Figure 5.1 – Base coupler with grounding lugs Step 5.2: Install lower pipe section to tower base Assemble the base coupler to the LOWER hole of the assembled tower base, with the grounding lug facing UP and the pipe in the uphill/laydown direction. Secure the base coupler using the clevis pin, washers, and cotter clip supplied. Be sure to install a washer on either side of the base coupler to reduce friction and binding, and also between the base flange and the cotter clip. After inserting the cotter clip, bend one leg of it back around the clevis pin so it cannot be pulled out. (You do not need to place a washer between the head of the clevis pin and the base flange.) Align the pipe section carefully with the front guy anchor (the guy anchor in the laydown direction), and use blocks, wedges, and shims as necessary to hold the pipe securely in place and avoid levering on the tower base. Secure the ground cable in the pre-attached grounding lug by routing the wire from the ground rods over the base flange and down to the ground lug on the base coupler. Leave some slack in the ground cable to accommodate the pivot of the tower base. Step 5.3: Install bottom guy plate assembly on middle (63’) or top (42’) pipe section Unpack the guy plate assemblies and find the one marked ‘BOTTOM’. Position the next pipe section roughly in place, then slide the guy plate onto the bottom end of this section, with the bent tabs pointing downward toward the tower base, as shown in Figure 5.2. Find the rear guy cable (it is marked with red tape and has an eye thimble swaged onto it). Rotate the guy plate on the pipe so the rear guy cable (the one with the swaged thimble) is facing up. 19 If your pipe sections came with steel couplers, remove the coupler and apply a generous coating of grease to the threads and to the threads of both pipe sections. Reinstall the coupler, and thread both pipe sections into the coupler. Tighten each pipe section with opposing chain wrenches, applying at least 100 ft-lb of torque. Each pipe end should thread at least five turns into the coupler. Figure 5.2 – Guy plate orientation detail WARNING: The guy plate must be ABOVE the coupler, with the tabs pointing downward, in order for the tower to function correctly. NOTE: Do not cut the bindings securing the bundles of wire rope until you are ready to string out the guys, and then only one at a time (to avoid a tangled mess). Step 5.4: Install mid guy plate assembly (63’ tower only) For the 63’ tower, repeat Step 3 to install the third pipe section, sliding the guy plate assembly marked MIDDLE onto the third pipe section. Remove the steel coupler from the middle pipe section, and apply a generous coating of grease to the threads of both pipe sections. Reinstall the coupler, and thread both sections into the coupler. Tighten with opposing chain wrenches, applying at least 100 ft-lb of torque. Each nipple should thread at least five turns into the coupling. The rear guy should face up. Step 5.5: Install top guy clamp assembly In both tower kits, the top guy plate bears on a clamp assembly that is bolted through the tower. For convenience in installing the top guy clamp assembly, support the top of the tower at a comfortable working height (e.g. with a sawhorse or cribwork), and support the midspan on blocking to keep it straight. For convenience in turbine installation, the sawhorse should support the tower below the guy clamp location, so the blades can spin freely. Figure 5.3 – Half clamp assembly for top guy plate 20 DANGER: The top guy clamp assembly must be installed exactly as instructed. The hose clamp is a temporary attachment that is not sufficient to carry any load. Incorrect assembly can lead to tower collapse. To install the top guy clamp assembly, first measure down from the extreme upper end of the top pipe section exactly 53 inches, and mark the spot with a permanent marker. Assemble the two sections of the top guy clamp around the pipe, lining up the match marks on the two sections for optimal orientation. Secure the two sections with the hose clamp, as shown in Figure 5.3. The TOP of the clamp should align with the 53” mark. Double check the measurement – if it is incorrect, the raising loops will not equalize correctly when attached to the gin pole. Using the 27/64” twist drill bit supplied in the kit, and a bit of grease for lubricant, drill through the pipe, using the guy clamp holes as a guide. DO NOT attempt to drill all the way through from one side. Instead, drill from both sides (four separate holes). Dress any sharp edges that result from the drilling with a small round file (e.g. chainsaw file). Secure the clamp to the tower using the supplied bolts and locking nuts, torqueing the fasteners to 35ft-lb. Remove the hose clamp if desired. Step 5.6a: Assemble Gin Pole (63’ tower only) The gin pole is used to provide leverage in order to raise the tower. The 63’ tower uses a 21’ steel pipe section as a gin pole. To assemble the gin pole, follow these steps: Remove any steel couplers than may have come with your gin pole pipe section. Apply a generous coating of grease to the threads of one end of the pipe section. Thread the aluminum Gin Pole Pivot Coupler (which lacks a grounding lug) to the pipe section. Tighten with opposing chain wrenches, applying at least 100 ft-lb of torque. Apply a generous coating of grease to the threads of the other end of the pipe, and thread the Gin Pole Lifting Coupler to the pipe section. Tighten with opposing chain wrenches, applying at least 100 ft-lb of torque, and stopping when the cross-drilled holes in the two couplers are 90 degrees apart, as shown in Figure 5.4. Figure 5.4 – Gin pole detail It may be necessary to remove the eye bolt and eye nut in order to properly tighten Gin Pole Lifting Coupler. If so, you will need two long bars for leverage in order to loosen the bolt and nut, as the thread fit is very tight on this lifting-rated hardware. Once the coupler is threaded onto the pipe, reinstall the eye bolt and eye nut, with the plane of the eye bolt parallel with the axis of the pole, and the plane of the eye nut perpendicular to the axis of the pole. (See Figures 5.4 and 5.6) 21 Step 5.6b: Assemble Gin Pole (42’ version only) The 42’ tower uses a 16’ 4x4 as the gin pole. It is important to use a select-grade post with no structural defects. To assemble the gin pole, follow these steps: Mark the post 2 ½” from the end in the center of one face and drill half-way through with a 7/8” spade bit. Rotate the post 180 degrees, mark it 2 ½” from the end in the center of the face, and drill through to meet the first hole. Do not drill all the way through from one side. Mark the opposite end of the post in the same manner, but rotate the post so the holes on either end will be 90 degrees from each other (i.e., not in the same face). Drill halfway through from one side with a 5/8” spade bit. Mark the opposite face and drill through to meet the first hole. Install the supplied eye bolt and eye nut through the SMALLER cross-drilled hole. Tighten securely; with the plane of the eye parallel with the axis of the pole, and the plane of the nut perpendicular to the axis of the pole (similar to Figure 5.4). Step 5.7: Install Gin Pole Position the gin pole directly over the lowest section of the tower with the eye of the bolt facing up, and the eye nut facing down toward the tower pipe below, as shown in Figure 5.6. Support the upper end of the gin pole with blocks about a foot above the tower pipe. Align the hole in the lower end of the gin pole (either the hole in the gin pole pivot coupler or the 7/8” hole in the 4x4) with the upper hole of the assembled tower base, on the side that is away from the laydown direction of the tower, as shown in Figure 5.5. Secure the gin pole using the clevis pin, washers, and cotter clip supplied. Be sure to install a washer on either side of the gin pole to reduce friction and binding, and also between the base flange and the cotter clip. Figure 5.5 – Base Plate assembly. Tower pipe is in lower pivot with gin pole lying on top in rear pivot. Note placement of washers. 22 Step 5.8: Rig Gin Pole To rig the gin pole, follow these steps, referring to Figure 5.6. Install the quick link on the eye nut hanging below the upper end of the gin pole, with the open end facing toward the top of the tower. Locate and release the marked rear guy cable on the LOWEST guy plate. The rear guy cable is marked with red tape at the end of the cable, and is the only cable with an eye thimble swaged onto it along its length. Pull the cable clear of entanglement, locate the eye thimble near the free end of the cable, and secure it to the quick link. (63’ tower only) repeat with the marked rear guy cable on the second guy plate. Figure 5.6 – Gin pole rigging detail Find the guy plate assembly marked TOP, and slide it over the top of the tower, with the bent tabs pointing downward toward the tower base, and the marked rear guy facing upward. Release the marked rear guy cable on the top guy plate assembly, pull it clear of entanglement, and secure it to the quick link. Be sure to tighten the quick link firmly with a wrench. A properly rated sheave pulley attached to the optional fifth anchor at the end of the gin pole may be used to redirect the direction of pull of the raising cable. DANGER: Redirection links (blocks and pulleys) used in a lifting line system can be subjected to total loads greatly different from the lifting line tension. The total load varies with the angle between the incoming and departing lines to the redirection equipment. Ensure that ALL links in the tower raising system have a Working Load Limit (WLL) greater than the raising line tension (see Table 6.1) multiplied by the angle factors listed in Table 5.1 below. Table 5.1 – Angle factor multipliers for redirection links Angle Factor Multipliers for Redirection Links Angle (Ө) Factor Angle (Ө) Factor 0⁰ 2 60⁰ 1.73 30⁰ 1.93 90⁰ 1.41 45⁰ 1.84 120⁰ 1 23 Ө Step 5.9: Raise Gin Pole It is convenient to have the gin pole up and out of the way. To do this, follow these steps: The gin pole itself must be guyed to prevent it from toppling over sideways when it is under load. Find the middle of the gin pole guy line (110’ polypropylene rope) and tie it securely to the shaft of the eyebolt on top of the gin pole using a clove hitch or other secure knot. Do not attach it to the eye nut or eye of the eyebolt. Run each side out and tie securely to the side anchors. Attach the lifting cable securely to the eye of the eyebolt at the top of the gin pole. We recommend using at least ¼” diameter high-quality wire rope. DANGER: Be sure to double check every aspect of the gin pole rigging (e.g. make sure the quick link is closed and the swages or cable clips on the raising cable are in good condition) before raising the gin pole. The gin pole can be raised with the lifting cable, or a separate tag line may be used. In either case, walk the gin pole up while taking up the slack in the line. When the guy cables that are attached to the gin pole at the quick link lose their slack, anchor the line securely, e.g. to the rear guy anchor, opposite the laydown direction. NEVER take the weight of the tower with the lifting line until the side and front guys are secured to their anchors. It may be necessary to rotate the guy plates so they are in line with the pull of the gin pole guys. Step 5.10: Secure Guy Cables Before setting the guy cables, check that the tower is in alignment with the rear guy anchor, and 90 degrees from each side guy anchor. Starting with the bottom set of guy cables, secure the guy cables by following these steps: Free one side guy, run it out to the side anchor, and secure it with three cable clips. Space the cable clips 4”-8” apart. If using forged eye anchors, use the supplied thimbles: twist the thimbles sideways to fit them over the eye, and then bend them back in place before installing the cable. If using a large eye nut with a bend radius larger than the thimble, skip the thimbles and thread the cable directly around the nut. DANGER: “Never Saddle a Dead Horse”: The saddle of the cable clip goes on the ‘live’ (tensioned) side of the cable, and the U-bolt goes on the ‘dead’ (free) end, as shown in Figure 5.7 24 Figure 5.7 – Correct cable clip attachment Pull the cable tight, but not so tight that you pull the tower off its cribbing. Using a 7/16 nut driver, torque two of the three clips to 7.5 ft-lbs, leaving the other clip finger-tight until the tower is plumbed. Repeat on the opposite side guy. Repeat on the front guy in the laydown direction. To gauge the length of the front guy, first run it out taught to one of the side guys, and mark the length using a permanent marker. Repeat for each set of guy cables. Double check that at least two clips are tight on each guy wire. Mark each anchor rod at the soil level by wrapping it with electrical tape. This will allow you to observe any vertical movement of the anchor in the soil when you first raise the tower. DANGER: If the height of the side guy anchors are not directly in line with the pivot pin of the tower base coupling, it may be necessary to install one or more heavy duty turnbuckles (at least 5/8”-11 steel, or something with a 3,500lb WLL) on the side guys to prevent them going dangerously slack or tight as the tower is raised and lowered. NOTE: The guy cables have approximately 10’ of extra length on a level site. The extra length will be necessary for sites where the rear anchor (ginpole side) is lower than the front anchor, or where a side anchor is low. 25 6. First Raising of the Tower The first time the tower goes up, it will not be straight or plumb, and the guy tension will not be correct. The tower must be test-raised and plumbed without the turbine attached. Observe all of the following precautions when raising and lowering towers: DANGER: Raising towers exposes workers to a number of hazards, including injury and death from falling objects, recoil from snapping cables, pinch points, and trip hazards. Do not install the EconoTower without professional training. In all cases, do not rush, but work carefully and deliberately, and use common sense. DANGER: Be aware that some equipment (including hardware intended for rock climbing) is rated by the actual failure strength, rather than working load. Confirm the WLL of all load-line elements before raising the tower. Step 6.1: Attach back guy tension ropes The tension in the lifting cable is highest just as the tower leaves the ground, but the most critical part of the lift is at the end, because the weight of the gin pole will pull the tower into the vertical position, and the lift line will go slack. To prevent this, tie each end of the supplied 100’ rope around the uppermost two front guys (the guys opposite the gin pole), and lead them away to a safe distance. One team member will apply tension on these ropes after the tower is within about 30 degrees from vertical, as shown in Figure 6.1 below. Figure 6.1 – Use of front guy tension ropes during raising of tower to prevent the tower from crashing into and beyond the vertical position. Note heavy duty worm drive winch and redirection of raising cable through use of an optional 5th anchor at end of gin pole. 26 Step 6.2: Rig the lifting cable It is critical that the lifting cable pull in line with the laydown direction. If necessary, use a directional pulley attached to the rear anchor or the optional fifth anchor at the end of the gin pole, keeping in mind that the load on the directional anchor can be up to double the cable tension depending on the angle between the incoming and departing lines (See Tables 5.1 and 6.1). If using a directional pulley, you will be applying a lateral load on the anchor. In order to keep the lifting anchor in line with the tower laydown direction, it is strongly recommended that you oppose the lateral load on the lifting anchor by tying it off to a tree or large object opposite the direction you are pulling on it from. This will prevent the anchor rod from migrating laterally through the soil and coming out of line of the laydown direction. Secure the winch to an immovable object (e.g. large healthy tree, full-size vehicle with brakes set and tires chocked). Double-check the system to be sure it is secure. Table 6.1 – Maximum lifting cable tension Lifting cable tension (includes Tower type tower and turbine weight) 42’ with 4 anchors 1,150 42’ with 5 anchors 1,020 63’ with 4 anchors 1,875 63’ with 5 anchors 1,500 Lifting cable pull distance 35’ 45’ 45’ 45’ Step 6.3: Slowly raise the tower DANGER: No personnel should stand within the drop zone of the tower while the tower is being raised or lowered, and bystanders should be held far back from the turbine area. DANGER: Pika Energy strongly recommends against the use of vehicles to raise or lower towers. A high-quality worm-drive winch with ample load rating should be used. DANGER: Be sure that every link within the raising system has an ample Working Load Limit (WLL) relative to the lifting line tension. Keep in mind that use of a directional pulley doubles the load on the anchor. Good communication between the team members is critical – develop a clear system of hand signals. When raising the tower for the first time, go very slowly, and stop every 20 degrees or less (about five times) to check the tension of the side guy cables. If the there is no noticeable droop, the guys are too tight and must be slacked slightly. Also keep an eye on the tension in the gin pole guy ropes, and confirm that the lifting anchor is not migrating laterally under load. Once the tower is within 30 degrees of vertical, one member of the crew should apply firm, continuous tension to the front guy ropes until the front guys are taught. 27 Figure 6.2 – Sideview of tower before raising Figure 6.3 – Sideview of tower after raising but before guy transfer Step 6.4: Transfer gin pole guys to anchor Adjust the 5/8” turnbuckle until it is two thirds of the way extended. Attach the extended turnbuckle to the rear anchor. If the jaw will not fit over the anchor eye it can be chained to the anchor with a properly rated steel shackle or a properly secured length of 3/8” chain. Starting with the topmost guy, open the quick link at the end of the gin pole and transfer the gin pole guys, one at a time, to the turnbuckle, secure with cable clips as described in Section 5.10 above. Never release more than one guy at a time, and do not let the cable go slack while transferring it. Step 6.5: Plumb the tower Using a 6’ level clamped plumb to a sawhorse just beyond one of the main anchors, you can plumb the tower by sighting through the plumbed level to the tower. Make sure the level is plumb throughout the process. It helps to have one person lying on the ground behind the level, sighting through the level to the tower. This person can direct the adjustment of the guys. NOTE: It is helpful to use a prusik knot to pull tension on the guy cables. Mason twine or any sturdy parachute cord works best. See Figure 6.4 below. Working from the bottom set of guys to the top, plumb the tower from one direction first. To plumb the base section of the tower, adjust the guys by sighting the tower through the plumbed level. One person may have to let off on the tension on one side to allow tension to be taken up on the opposite side. Adjust the guys by loosening the wire rope clips, pulling the cable through, and re-tightening two of the three wire rope clips as before. The guys should be fairly tight – about 50-100lb of tension, so the tower top doesn’t move a lot if you grab a guy and pull sideways on it. Work your way up the tower until all the sections are straight and vertical from one direction. 28 Figure 6.4 – Prusik knot used to pull tension on a taught line. Cord should be 3/32” diameter for use with 3/16” guy cables. Repeat the tower plumbing process 90 degrees from the first direction (i.e., shift the level and sawhorse to an adjacent anchor and begin again), working your way up the tower. After the tower has been plumbed from both directions, check it from the first direction and make any minor adjustments in order to get the tower as straight and vertical as possible. Check it once more from the other direction. When complete, be sure to tighten all three wire rope clips at each anchor to 7.5 ft-lbs. If the side guys became slack as the tower was raised, they will become too tight on the way down after they have been tensioned (and vice versa). While it is possible to tend them each time the tower goes up or down, Pika recommends adding a stout forged galvanized jaw-and-jaw turnbuckle (5/8” threaded rod size or larger) to one or both side anchors between the anchor rod and the cable attachment point. This will allow the side guy tension to be slacked as necessary. The body of the turnbuckle should be secured with a keeper cable to prevent accidental loosening or vandalism. Step 6.6: Lower the tower Reverse the raising process to lower the tower: Secure the lifting cable to the gin pole and reassemble the winch and rigging, if they were removed. Affix tensioning ropes to the upper two front guy cables. Position a sawhorse to support the tower. Take up the slack in the lifting cable, and transfer the gin pole guys from the rear anchor to the gin pole quick link, one at a time. Apply tension to the front guy ropes, and slowly back off the winch to get the tower started down, Check the side guy tension several times on the way down, slacking if necessary. 29 7. Install and Raise the Turbine Install the T701 turbine per the Pika T701 Turbine Installation & Service Manual, provided with your turbine. Be sure to complete the Turbine Installation Checklist (provided with the turbine installation manual) along with all required photo documentation of the turbine assembly and installation (indicated on the checklist). Submission of a properly completed checklist and the 8 required photos is mandatory for warranty coverage. Follow instructions in the turbine manual regarding electrical wire size, type, and chafing protection. When it is time to fasten the turbine to the towertop, apply plenty of grease to the towertop threads, and torque the turbine firmly onto the tower using a pair of chain or pipe wrenches at least 24” long, applying at least 200 lbs. of force at the end of the chain wrench. Be sure to install and torque the tower top jam screw as well. Perform pre-flight checks per the turbine manual. Be sure turbine is in disabled mode before raising the tower. To raise the tower, follow the steps and observe the precautions of SECTION 6: Rig the gin pole side guy ropes Rig the front guy tension ropes Rig and tension the lifting cable and winch system Transfer the gin pole guys to the gin pole quick link, starting with the lowest first Secure the quick link and double check everything Tend the side guys as necessary to maintain appropriate tension As the tower approaches 30 degrees to vertical, apply and maintain front guy tension When the front guys go taut, transfer the gin pole guys to the forward anchor one at a time Check that tower is plumb and all guys are appropriately tensioned. 30 8. Periodic Safety Checks The following checks should be done after one month, and then annually: Check tension in all guy cables Check torque on all cable clips Check that anchors are not heaving out of the ground (mark the ground level with black electrical tape after installation) Approach the tower in moderate wind and listen for creaking, grinding, or clicking noises Inspect tower base, check condition of sleepers, pivot pins, grounding connections, and turbine wiring Check that any turnbuckles are secure, have not come untwisted, and have cotter pins in place. 31 Notes