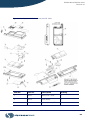
1
spectrum
Service
Manual
35700ABB & 35700BAX
SIGMA, LLC
711 Park Avenue
Medina, New York 14103
v 800 356 3454
f 585 798 3909
www.sigmapumps.com
SIGMA Manual Number 41019
Revision AA
©2010 Copyright SIGMA, LLC
711 Park Avenue
Medina, New York 14103
v 800 356 3454
f 585 798 3909
www.sigmapumps.com
ii
SIGMA Manual Number 41019
Revision AA
TABLE OF CONTENTS
Introduction and Safety . . . . . . . . . . . . . . . . . . . . . . . . . . . . . . . . . . . . . . . . . . 1
Intended Device Use . . . . . . . . . . . . . . . . . . . . . . . . . . . . . . . . . . . . . . . . . . . . . . . .
Related Documents . . . . . . . . . . . . . . . . . . . . . . . . . . . . . . . . . . . . . . . . . . . . . . . . .
Listings & Certifications . . . . . . . . . . . . . . . . . . . . . . . . . . . . . . . . . . . . . . . . . . . . . .
Contacting SIGMA Technical Support . . . . . . . . . . . . . . . . . . . . . . . . . . . . . . . . . . .
Conventions . . . . . . . . . . . . . . . . . . . . . . . . . . . . . . . . . . . . . . . . . . . . . . . . . . . . . . .
Summary of Warnings and Cautions . . . . . . . . . . . . . . . . . . . . . . . . . . . . . . . . . . . .
1
1
2
2
3
3
Design and Theory of Operation . . . . . . . . . . . . . . . . . . . . . . . . . . . . . . . . . . . 5
Case . . . . . . . . . . . . . . . . . . . . . . . . . . . . . . . . . . . . . . . . . . . . . . . . . . . . . . . . . . . . . 5
Front Case Assembly . . . . . . . . . . . . . . . . . . . . . . . . . . . . . . . . . . . . . . . . . . . . . . . . . . . 5
Rear Case Assembly . . . . . . . . . . . . . . . . . . . . . . . . . . . . . . . . . . . . . . . . . . . . . . . . . . . 5
Battery Pack . . . . . . . . . . . . . . . . . . . . . . . . . . . . . . . . . . . . . . . . . . . . . . . . . . . . . . .
Pole Clamp . . . . . . . . . . . . . . . . . . . . . . . . . . . . . . . . . . . . . . . . . . . . . . . . . . . . . . .
Double Rotating Pole Clamp Assembly (Accessory) . . . . . . . . . . . . . . . . . . . . . . . .
Tubing Channel/Pump Door . . . . . . . . . . . . . . . . . . . . . . . . . . . . . . . . . . . . . . . . . .
Set Slide Clamp Sensor . . . . . . . . . . . . . . . . . . . . . . . . . . . . . . . . . . . . . . . . . . . . . .
Processing Architecture . . . . . . . . . . . . . . . . . . . . . . . . . . . . . . . . . . . . . . . . . . . . . .
Pumping Mechanism . . . . . . . . . . . . . . . . . . . . . . . . . . . . . . . . . . . . . . . . . . . . . . . .
5
7
7
7
7
7
8
Physical Method . . . . . . . . . . . . . . . . . . . . . . . . . . . . . . . . . . . . . . . . . . . . . . . . . . . . . . . 8
Operation . . . . . . . . . . . . . . . . . . . . . . . . . . . . . . . . . . . . . . . . . . . . . . . . . . . . . . . . . . . . 8
Pumping Mechanism Assembly . . . . . . . . . . . . . . . . . . . . . . . . . . . . . . . . . . . . . . . . . . . 8
Motor . . . . . . . . . . . . . . . . . . . . . . . . . . . . . . . . . . . . . . . . . . . . . . . . . . . . . . . . . . . . 8
Motor Drive . . . . . . . . . . . . . . . . . . . . . . . . . . . . . . . . . . . . . . . . . . . . . . . . . . . . . . . . . . . 8
Motor and Gear Drive . . . . . . . . . . . . . . . . . . . . . . . . . . . . . . . . . . . . . . . . . . . . . . . 9
Fluid Temperature . . . . . . . . . . . . . . . . . . . . . . . . . . . . . . . . . . . . . . . . . . . . . . . . . . 9
Upstream Sensors . . . . . . . . . . . . . . . . . . . . . . . . . . . . . . . . . . . . . . . . . . . . . . . . . . 9
Optical Tube Sensor . . . . . . . . . . . . . . . . . . . . . . . . . . . . . . . . . . . . . . . . . . . . . . . . . . . . 9
Proximal Occlusion Detection . . . . . . . . . . . . . . . . . . . . . . . . . . . . . . . . . . . . . . . . . . . . . 9
Air Sensor . . . . . . . . . . . . . . . . . . . . . . . . . . . . . . . . . . . . . . . . . . . . . . . . . . . . . . . . . . . 10
Downstream Sensors . . . . . . . . . . . . . . . . . . . . . . . . . . . . . . . . . . . . . . . . . . . . . . . 10
Set Loading . . . . . . . . . . . . . . . . . . . . . . . . . . . . . . . . . . . . . . . . . . . . . . . . . . . . . . . . . 10
Distal Occlusion Detection . . . . . . . . . . . . . . . . . . . . . . . . . . . . . . . . . . . . . . . . . . . . . . 10
Audible Alarm Device and System . . . . . . . . . . . . . . . . . . . . . . . . . . . . . . . . . . . . . 11
Electronic Components . . . . . . . . . . . . . . . . . . . . . . . . . . . . . . . . . . . . . . . . . . . . . 11
AC Power Adaptor / Charger . . . . . . . . . . . . . . . . . . . . . . . . . . . . . . . . . . . . . . . . . . . . 11
Display . . . . . . . . . . . . . . . . . . . . . . . . . . . . . . . . . . . . . . . . . . . . . . . . . . . . . . . . . . . . . 12
I/O Board . . . . . . . . . . . . . . . . . . . . . . . . . . . . . . . . . . . . . . . . . . . . . . . . . . . . . . . . . . . 12
Processor Board . . . . . . . . . . . . . . . . . . . . . . . . . . . . . . . . . . . . . . . . . . . . . . . . . . . . . . 12
Flex Circuits . . . . . . . . . . . . . . . . . . . . . . . . . . . . . . . . . . . . . . . . . . . . . . . . . . . . . . . . . 12
Keypad . . . . . . . . . . . . . . . . . . . . . . . . . . . . . . . . . . . . . . . . . . . . . . . . . . . . . . . . . . . . . 13
Power Connector . . . . . . . . . . . . . . . . . . . . . . . . . . . . . . . . . . . . . . . . . . . . . . . . . . . . . 13
iii
SIGMA Manual Number 41019
Revision AA
Pump Specifications . . . . . . . . . . . . . . . . . . . . . . . . . . . . . . . . . . . . . . . . . . . . . . . .14
Applications . . . . . . . . . . . . . . . . . . . . . . . . . . . . . . . . . . . . . . . . . . . . . . . . . . . . . . . . .
Administration Set . . . . . . . . . . . . . . . . . . . . . . . . . . . . . . . . . . . . . . . . . . . . . . . . . . . .
Performance . . . . . . . . . . . . . . . . . . . . . . . . . . . . . . . . . . . . . . . . . . . . . . . . . . . . . . . .
Effect of Fluid Container Height . . . . . . . . . . . . . . . . . . . . . . . . . . . . . . . . . . . . . . . . . .
Bolus Accuracy . . . . . . . . . . . . . . . . . . . . . . . . . . . . . . . . . . . . . . . . . . . . . . . . . . . . . .
Technical . . . . . . . . . . . . . . . . . . . . . . . . . . . . . . . . . . . . . . . . . . . . . . . . . . . . . . . . . . .
14
14
14
14
14
15
Configuration Options . . . . . . . . . . . . . . . . . . . . . . . . . . . . . . . . . . . . . . . . . . . 16
BioMed Options . . . . . . . . . . . . . . . . . . . . . . . . . . . . . . . . . . . . . . . . . . . . . . . . . . . .16
Sensor Configuration . . . . . . . . . . . . . . . . . . . . . . . . . . . . . . . . . . . . . . . . . . . . . . . . . .
Calibration Menu . . . . . . . . . . . . . . . . . . . . . . . . . . . . . . . . . . . . . . . . . . . . . . . . . . . . .
Pump Settings . . . . . . . . . . . . . . . . . . . . . . . . . . . . . . . . . . . . . . . . . . . . . . . . . . . . . . .
Pump Testing . . . . . . . . . . . . . . . . . . . . . . . . . . . . . . . . . . . . . . . . . . . . . . . . . . . . . . .
Update Software . . . . . . . . . . . . . . . . . . . . . . . . . . . . . . . . . . . . . . . . . . . . . . . . . . . . .
Network Configuration . . . . . . . . . . . . . . . . . . . . . . . . . . . . . . . . . . . . . . . . . . . . . . . . .
17
17
18
19
19
19
Wireless Networking . . . . . . . . . . . . . . . . . . . . . . . . . . . . . . . . . . . . . . . . . . . . 21
Network Configuration
. . . . . . . . . . . . . . . . . . . . . . . . . . . . . . . . . . . . . . . . . . . . . .21
Network Status . . . . . . . . . . . . . . . . . . . . . . . . . . . . . . . . . . . . . . . . . . . . . . . . . . . . . .
Transfer Network Status . . . . . . . . . . . . . . . . . . . . . . . . . . . . . . . . . . . . . . . . . . . . . . .
Network Settings . . . . . . . . . . . . . . . . . . . . . . . . . . . . . . . . . . . . . . . . . . . . . . . . . . . . .
TCP/IP Settings – . . . . . . . . . . . . . . . . . . . . . . . . . . . . . . . . . . . . . . . . . . . . . . . . . . . .
Wireless Settings . . . . . . . . . . . . . . . . . . . . . . . . . . . . . . . . . . . . . . . . . . . . . . . . . . . . .
21
22
23
24
24
Network Interface Information . . . . . . . . . . . . . . . . . . . . . . . . . . . . . . . . . . . . . . . . .25
Service and Maintenance . . . . . . . . . . . . . . . . . . . . . . . . . . . . . . . . . . . . . . . . 26
Required Maintenance and Frequency . . . . . . . . . . . . . . . . . . . . . . . . . . . . . . . . . .26
SIGMA Spectrum Cleaning . . . . . . . . . . . . . . . . . . . . . . . . . . . . . . . . . . . . . . . . . . .26
Compatible Cleaners . . . . . . . . . . . . . . . . . . . . . . . . . . . . . . . . . . . . . . . . . . . . . . . . . . 26
Cleaning the Pump . . . . . . . . . . . . . . . . . . . . . . . . . . . . . . . . . . . . . . . . . . . . . . . . . . . 26
Battery Removal and Replacement . . . . . . . . . . . . . . . . . . . . . . . . . . . . . . . . . . . . .28
Wireless Module Battery Cell Removal and Replacement . . . . . . . . . . . . . . . . . . . . . 28
Battery Disposal . . . . . . . . . . . . . . . . . . . . . . . . . . . . . . . . . . . . . . . . . . . . . . . . . . . . . 30
Returning Equipment . . . . . . . . . . . . . . . . . . . . . . . . . . . . . . . . . . . . . . . . . . . . . . . .30
Preventive Maintenance . . . . . . . . . . . . . . . . . . . . . . . . . . . . . . . . . . . . . . . . . 31
Preventive Maintenance Schedule . . . . . . . . . . . . . . . . . . . . . . . . . . . . . . . . . . . . .31
Equipment Required . . . . . . . . . . . . . . . . . . . . . . . . . . . . . . . . . . . . . . . . . . . . . . . .31
Visual Inspection . . . . . . . . . . . . . . . . . . . . . . . . . . . . . . . . . . . . . . . . . . . . . . . . . . . . .
Determine Software Version and Serial Number . . . . . . . . . . . . . . . . . . . . . . . . . . . . .
Keypad Test . . . . . . . . . . . . . . . . . . . . . . . . . . . . . . . . . . . . . . . . . . . . . . . . . . . . . . . .
Upstream (Proximal) Occlusion Sensor Test . . . . . . . . . . . . . . . . . . . . . . . . . . . . . . .
Downstream (Distal) Occlusion Sensor Test* . . . . . . . . . . . . . . . . . . . . . . . . . . . . . . .
iv
32
32
32
33
33
SIGMA Manual Number 41019
Revision AA
Air Detection Test* . . . . . . . . . . . . . . . . . . . . . . . . . . . . . . . . . . . . . . . . . . . . . . . . . . . . 34
Memory Test . . . . . . . . . . . . . . . . . . . . . . . . . . . . . . . . . . . . . . . . . . . . . . . . . . . . . . . . . 35
Recommended Flow Rate Accuracy Test* . . . . . . . . . . . . . . . . . . . . . . . . . . . . . . . . . . 35
AC Power Adaptor Safety Analysis . . . . . . . . . . . . . . . . . . . . . . . . . . . . . . . . . . . . . . . 36
Battery Capacity Test . . . . . . . . . . . . . . . . . . . . . . . . . . . . . . . . . . . . . . . . . . . . . . . . . . 37
Pass criteria for a used battery . . . . . . . . . . . . . . . . . . . . . . . . . . . . . . . . . . . . . . . . . . . 38
Pass criteria after installation of a new battery . . . . . . . . . . . . . . . . . . . . . . . . . . . . . . . 38
Preventive Maintenance Check Sheet . . . . . . . . . . . . . . . . . . . . . . . . . . . . . . . . . . 39
Troubleshooting . . . . . . . . . . . . . . . . . . . . . . . . . . . . . . . . . . . . . . . . . . . . . . . 40
Battery Charger Error Code Descriptions . . . . . . . . . . . . . . . . . . . . . . . . . . . . . . . 40
System Error Code Descriptions . . . . . . . . . . . . . . . . . . . . . . . . . . . . . . . . . . . . . . . . . 41
Logging . . . . . . . . . . . . . . . . . . . . . . . . . . . . . . . . . . . . . . . . . . . . . . . . . . . . . . 48
Downloading the History Log . . . . . . . . . . . . . . . . . . . . . . . . . . . . . . . . . . . . . . . . . 48
Equipment List . . . . . . . . . . . . . . . . . . . . . . . . . . . . . . . . . . . . . . . . . . . . . . . . . . . . . . . 48
Procedure . . . . . . . . . . . . . . . . . . . . . . . . . . . . . . . . . . . . . . . . . . . . . . . . . . . . . . . . . . . 48
Appendix A: Technical Drawings . . . . . . . . . . . . . . . . . . . . . . . . . . . . . . . . . . 51
v
SIGMA Manual Number 41019
Revision AA
INTRODUCTION AND SAFETY
Intended Device Use
The Spectrum and Spectrum with Master Drug Library are intended to be used for the controlled
administration of intravenous fluids. These fluids may include pharmaceutical drugs, blood, blood
products, antibiotics, nutritional fluids and mixtures of required patient therapy. The intended
routes of administration consist of the following clinically acceptable routes: intravenous, arterial,
subcutaneous, intrathecal, epidural or irrigation of fluid space. The Spectrum is intended to be used
in conjunction with legally marked intravenous administration sets and medications provided by the
user.
The Spectrum and Spectrum with Master Drug Library are suitable for many user facility applications such as, but not limited to, hospitals, outpatient care areas, homecare and ambulatory care services.
The Spectrum and Spectrum with Master Drug Library are intended to reduce operator interaction
through automated programming, thereby helping to reduce errors associated with complex device
programming. Parameter programming requires trained healthcare professional confirmation of limits and drug therapy to physician's directive.
Related Documents
The following documents also pertain to the Spectrum and Spectrum with Master Drug Library:
■
■
1
Operator’s Manual P/N 41018
MDL User Manual P/N 41020
Introduction and Safety
SIGMA Manual Number 41019
Revision AA
Listings & Certifications
Standard
Version
Description
UL 60601-1
2003
UL Standard for Safety Medical Electrical
Equipment, Part 1: General Requirements for
Safety First Edition
CAN/CSA C22.2
NO 601.1-M90
1990
Medical Electrical Equipment – Part 1: General
Requirements for Safety General Instruction No
1: with UL60601-1 Supplement I
IEC 60601-2-24
1998–2002
Medical Electrical Equipment – Part 2 –24:
Particular Requirements for Safety of Infusion
Pumps and Controllers First Edition
EN 60601-1
1990
Medical Electrical Equipment Part 1: General
Requirements for Safety Includes Amendments +
A1(93) + A2(95)
FCC Section 15C
N/A
FCC approved wireless transmitter/receiver
module
ID: MCQ-50M879
(wireless battery module only – SIGMA P/N
35083)
FCC Section 15C
N/A
ID: MCQ-50M1538
FCC approved wireless transmitter/receiver
module
(wireless battery module only – SIGMA P/N
35162)
See the SIGMA Spectrum Operator’s Manual (P/N 41018) for specific flow rate accuracy (trumpet
curve) information and electromagnetic compatibility compliance levels.
NRTL – Intertek Testing Services NA Inc. Reference Control Number 3063464
Contacting SIGMA Technical Support
Contact SIGMA, LLC for all service information at:
Telephone:1-800-356-3454
Email: [email protected]
2
SIGMA Manual Number 41019
Revision AA
Conventions
WARNING:
CAUTION:
Indicates a potentially hazardous situation which, if not avoided, could
result in death or serious injury.
Indicates a potentially hazardous situation which, if not avoided, may result in
minor or moderate personal injury or property damage. This word is used to also
alert against unsafe practices.
NOTE: Additional information to clarify or strengthen wording.
Summary of Warnings and Cautions
WARNING:
- THIS EQUIPMENT IS NOT SUITABLE FOR USE IN THE
PRESENCE OF A FLAMMABLE ANAESTHETIC MIXTURE WITH
AIR OR OXYGEN OR NITROUS OXIDE.
- LITHIUM BATTERY (SIGMA P/N 55075)
(LOCATION: BT1 ON PCBA P/N 60087)
DANGER OF EXPLOSION IF THE BATTERY IS INCORRECTLY
REPLACED. REPLACE ONLY WITH THE SAME OR EQUIVALENT
TYPE RECOMMENDED BY SIGMA. REFERENCE THIS MANUAL
FOR DISPOSAL INSTRUCTIONS.
- DO NOT SHORT CIRCUIT THE BATTERY TERMINALS,
DISASSEMBLE OR MODIFY BATTERY PACKS.
- DO NOT DISPOSED OF BATTERIES OR BATTERY PACKS IN
FIRE.
- ANY PUMP THAT HAS BEEN DROPPED OR IS OTHERWISE
VISIBLY DAMAGED MUST NOT BE USED. Discontinue use
immediately and refer to a qualified Service Technician for inspection
and repair prior to further use.
- USE ONLY IV ADMINISTRATION SETS THAT ARE LISTED ON
SIGMA COMPATIBLE SET LISTING (see Operator’s Manual for
listing). Use of any other sets may result in malfunction or inaccurate
delivery.
- DO NOT USE IF ROOM OR PUMP TEMPERATURE IS BELOW
15°C (60°F) OR ABOVE 32°C (90°F).
3
Introduction and Safety
SIGMA Manual Number 41019
Revision AA
CAUTION:
- Federal (USA) law restricts this device to sale by or on the order of a
physician or other licensed practitioner.
- Operate only on the AC line voltage for which the AC power adaptor is
marked.
- The AC power adaptor should be plugged in during storage to
maintain proper battery charge level.
- Disconnect from AC power source and remove the battery pack prior
to servicing this pump.
- Routine cleaning and periodic maintenance is needed to assure that the
pump remains safe and functional. Refer to “Service and
Maintenance” on page 26, and “Preventive Maintenance” on page 31.
- Clean up solution spills as soon as possible using a damp cloth or
sponge. Dry thoroughly before use. Keep the upstream and
downstream sensors’ tube channels clean and dry at all times during
pump operation. Do not use hard or sharp objects to clean sensor tube
channel areas. Failure to comply with this requirement may cause the
pump to fail. Refer to “Service and Maintenance” on page 26.
- Static sensitive electronics used in SIGMA infusion pumps may be
damaged by electrostatic discharge. Service technicians must follow
proper ESD procedures when working on pumps. Refer to MIL-STD1686 for protective handling procedures.
- Do not use a pen or any other sharp object to actuate the keyboard
switches. Replace torn or punctured membranes immediately, to assure
solutions won't internally damage the membrane switch and prevent
proper operation of the SIGMA Spectrum. (Replacement should only
be performed by authorized personnel).
- Use only filter sets that are specifically listed in the Operator's Manual
for use with Spectrum pumps.
NOTE: For a list of serviceable parts, contact SIGMA.
4
SIGMA Manual Number 41019
Revision AA
DESIGN AND THEOR Y OF OPER ATION
Case
SIGMA Spectrum consists of two case halves: front and rear case assemblies.
Front Case Assembly
The front case assembly is comprised of the following primary components:
■
■
■
Front case
Display
Two circuit boards
The circuit boards of this assembly are fastened with four hex standoffs and four Phillips machine
screws.
Rear Case Assembly
The rear case assembly consists of the following primary components:
■
■
■
■
Rear case
Back flex circuit
Power connector
Speaker
The back flex circuit is adhered to the rear case. The power connector is assembled to the rear case.
Battery Pack
The SIGMA Spectrum employs a removable lithium ion 7.2V battery pack. This assembly consists of
the battery cells, contact pins and the two plastic case halves. The battery pack uses both cell and
battery pack protection to guard against short-circuit, over voltage and over current conditions. The
battery terminals are slightly recessed to minimize the possibility that the terminals may be shorted
on a conductive surface. The battery pack is labeled to identify it and provide handling / disposal
information as necessary for user safety.
There are three battery types:
■
■
■
P/N 35724 - standard battery
P/N 35083 - 802.11b wireless module
P/N 35162 - 802.11g wireless module.
The standard battery (P/N 35724) and 802.11b wireless module (P/N 35083) are compatible with all
SIGMA Spectrum pumps.
The 802.11g wireless module (P/N 35162) is only compatible with wireless G compatible pumps.
Wireless G compatible pumps are identified by the letter G preceding the serial number on the pump
(see Figure 1.). Pumps that do NOT have a letter G preceding the serial number (see Figure 2.) are
not compatible with the 802.11g wireless module (P/N 35162).
5
Design and Theory of Operation
SIGMA Manual Number 41019
Revision AA
Figure 1. Serial Number for Pump Compatible with the 802.11b/g Wireless Battery Module (P/N 35162)
Figure 2. Serial Number for Pump NOT Compatible with the 802.11b/g Wireless Battery Module (P/N
35162)
6
SIGMA Manual Number 41019
Revision AA
Pole Clamp
The pole clamp assembly (SIGMA P/N 35712) is attached to the rear of the pump. A thumbscrew is
used to lock the pole clamp assembly to the SIGMA Spectrum pump. The pole clamp assembly is
comprised of an anodized aluminum C-clamp and a slide mount receptacle bracket. The bracket is
attached to the C-clamp with two 1/4-20 x 5/8” Phillips machine screws.
Double Rotating Pole Clamp Assembly (Accessory)
The Double Rotating Pole Clamp Assembly (SIGMA P/N 35743) is an accessory to the Spectrum
infusion pump. The double rotating feature of the Double Rotating Pole Clamp enables the pump to
be offset on the left or right side of the single (standard) IV pole. The clamp can also be clamped to
hospital bedside rail diameters ranging from 0.75” to 1.25”. Refer to the cleaning section of this
manual for compatible cleaners. Refer to the installation manual (SIGMA P/N 41092) on how to
install the clamp on the pump. The dimension of the clamp is less than 7.0” long X2.5” wide. The
weight of the clamp is less than 1.2 lbs.
CAUTION:
Always operate the pump in vertical direction with the key hole at the top of the
pump.
Tubing Channel/Pump Door
The tubing channel consists of
■
■
■
Proximal air/occlusion sensor
Pump valves and fingers
Downstream tubing guide
These components are designed to facilitate in the proper loading of the IV tube.
Set Slide Clamp Sensor
A reflective slide clamp sensor is employed to determine whether a closed slide clamp is present in
the keyhole. If a slide clamp is present in the keyhole, the sensor LED light source illuminates and
detects the presence of the clamp. The sensor component alerts the user that a closed slide clamp is
present in the keyhole when the user presses the RUN/STOP key.
Processing Architecture
The SIGMA Spectrum employs three computational processors.
■
7
Two of the three processors, “Sharp” (Processor Board – 60087) and “PIC” (I/O Board –
60091), form a diverse checked redundancy scheme and perform all of the safety critical
computations. The scheme is diverse because they are different processor types manufac-
Design and Theory of Operation
SIGMA Manual Number 41019
Revision AA
■
tured by separate, independent manufacturers. Likewise, these processors use different software compilers and math libraries, which yields additional independence. This processor
pair uses a master/slave checked redundancy scheme where safety critical computations are
computed by the master processor and checked by the slave processor. If either processor’s
check calculation does not match its own computation or if a fault condition is detected, the
processor can independently fail the system to a safe state, which includes an audible alarm.
The third processor is used to charge the battery (Backflex – 35149), interface to the barcode scanner, and pass asynchronous data through the rear case connector.
Pumping Mechanism
Physical Method
The SIGMA Spectrum uses a linear peristaltic motion to pump the fluid. That is, the tubing is repeatedly squeezed to create fluid pressure and thereby flow of fluid.
Operation
There are two phases of the pumping cycle:
■
■
Fill phase
Pumping phase
The fill phase allows the tubing to be filled from the proximal or “upstream” end of the pump. The
second phase of the cycle is the pumping phase. The pump consists of two valves, one of which
occludes the administration set tubing at all times. The proximal valve occludes the tubing during
the pumping phase of the cycle. Similarly, the distal valve occludes the tubing during the fill phase of
the cycle. There are two “fingers” whose function is to squeeze fluid towards the distal end of the
pump, thereby creating fluid pressure and fluid flow during the pumping phase of the cycle. During
the fill phase of the cycle, the fingers are in a position that allows maximum volume of fluid to fill
the tubing proximal to the distal valve.
Pumping Mechanism Assembly
This assembly is comprised of a cast aluminum chassis and doorplate assembly. The motor, cams,
pumping fingers, upstream sensor and downstream sensor are also part of this assembly. All components are fastened with standard, Phillips and socket head machine screws.
Motor
The motor is connected to the I/O Board (60091) through a 10-conductor, 1 mm pitch flex circuit.
Motor Drive
The motor drive circuitry will only allow the motor to run in a clockwise direction, which creates
fluid flow from the proximal end of the pump to the distal end of the pump. Both the PIC and Sharp
processors have the ability to independently remove power from the motor through independent
hardware switches, thereby halting the pump in the event that single fault condition is detected.
There are two mechanisms for detecting rotation of the motor. The first rotation sensing mechanism
is the two-channel encoder, which can sense motor angular velocity as well as rotation direction. The
second rotation sensing mechanism is the once-per-revolution hall effect sensor. These two sensing
8
SIGMA Manual Number 41019
Revision AA
mechanisms eliminate the possibility of incorrect sensing motor velocity after a detectable single
fault condition.
Motor and Gear Drive
SIGMA Spectrum employs a 16 mm DC motor, encoder and planetary gearbox. The output shaft of
the gearbox is coupled to the pump drive camshaft by two identical gears, thereby creating a 1:1
drive ratio between the camshaft and output of the gearbox. Motor speed is controlled by a closedloop pulse width modulation (PWM) drive system that derives its power directly from the battery or
9VDC source when the AC power adapter is connected.
Fluid Temperature
Physical properties of administration set tubing are subject to the effects of fluid temperature. In general, colder temperatures can cause negative flow rate errors in an uncompensated system. Similarly,
hotter temperatures can cause positive flow rate errors in an uncompensated system. The SIGMA
Spectrum employs a temperature compensation system to maintain flow rate accuracy over the operating temperature range of the device. Approximate fluid temperature is measured by two negative
temperature coefficient thermistors, one proximal to the pumping mechanism and one distal to the
pumping mechanism. The proximal sensor is housed by the upstream sensor assembly. The distal
sensor is located in the lower tubing guide, just below the distal occlusion sensor. Both sensors are
calibrated at the factory, and are used to check each other for single fault failure conditions. The output of both thermistors are filtered and fed to A/D converters for processing by Spectrum processors
for compensating pump motor speed to maintain flow rate accuracy.
Upstream Sensors
Optical Tube Sensor
The optical tube sensor consists of a light emitting diode (LED) emitting infrared light and a phototransistor. The LED and phototransistor are located at the bottom of the ultrasonic sensor housings,
facing opposite to each other. This position is marked as load point 2 and is indicated in red color
next to the “direction of flow” label inside the pump door. The optical tube sensor detects that an IV
set is loaded at load point 2 to assist in proper loading of the IV set into the pump. It must recognize
the presence or absence of the IV tube. The sensor is activated only when the door is open. If the IV
tube is properly placed in the space between the LED and phototransistor, the infrared light is diffracted and the phototransistor outputs a high voltage. If there is no IV tube present, the phototransistor receives continuous infrared light and a low voltage is output.
The software monitors the output voltage and displays a green bar with a check mark to indicate a
properly loaded tube or a red bar with loading instructions when there is no tube or if the tube is
improperly placed in the sensor. This sensor is calibrated through a biomed option.
Proximal Occlusion Detection
The proximal occlusion sensor consists of two pairs of ultrasonic transmitters and receivers. A
“pusher” connected to the door assembly assures that a constant force is exerted to push the administration set tubing against the sensor housing. The transmitted ultrasonic signal is a constant wave
9
Design and Theory of Operation
SIGMA Manual Number 41019
Revision AA
(CW) signal centered at a nominal 293 KHz. This signal is generated by exciting a piezoelectric crystal near its natural resonant frequency. The ultrasonic signal propagates from the sensor housing laterally through the administration set tubing. The ultrasonic receiver is a piezoelectric crystal
matched in frequency to the transmitter. The differential output of the receiver is amplified, envelope
detected, and filtered before being presented to a 12-bit A/D converter where it is converted to a 12bit digital word. Three samples are taken for each pump revolution. The digital words are processed
by the SIGMA Spectrum processor and fed into a detection algorithm. The detection algorithm compares successive samples and looks for a trend of decreasing signal amplitude caused by a reduction
in pressure against the sensor housing. If the trend continues through a predetermined threshold over
a predetermined unit of time, a proximal occlusion is declared and a visual and audible alarm is presented to the user.
Air Sensor
The air detector uses the same sensor hardware as described in the Proximal Occlusion Detection
section. The air detection algorithm uses an “air” threshold that is set by a calibration routine at the
factory. If the signal amplitudes received by both sets of ultrasonic receivers are below the air threshold, an air alarm is declared and a visual and audible alarm is presented to the user. The SIGMA
Spectrum air sensor is designed to detect air bubbles greater than 1 inch of tubing (125–150 µl
depending on tubing calibration).
Downstream Sensors
Set Loading
The downstream sensor consists of a channel piezoelectric bridge force transducer and is located
between loading points 3 and 4 inside the pump door. This sensor has two basic functions. The first
is to acknowledge an IV administration set as being installed at load points 3 and 4. Acknowledgement is identified on the display with a third green bar and check mark. The second function is to
detect distal occlusions.
Distal Occlusion Detection
The distal occlusion sensor uses a piezoelectric bridge force transducer. A pusher connected to the
door assembly assures that a constant force is exerted to push the administration set tubing against
the sensor housing. The detection algorithm compares successive samples and looks for a trend of
increasing/decreasing signal amplitude caused by a increase/reduction in pressure against the sensor
housing. Four samples are taken for each pump revolution. The differential output of the force transducer is amplified, envelope detected, and filtered before being presented to a 12-bit A/D converter
where it is converted to a 12-bit digital word. The digital words are processed by the SIGMA Spectrum processor and fed into a detection algorithm. The detection algorithm compares the received
signal levels to thresholds set by the user selected occlusion alarm trip points. If the received signal
exceeds the trip points, a distal occlusion alarm is declared and a visual and audible alarm is presented to the user.
10
SIGMA Manual Number 41019
Revision AA
Audible Alarm Device and System
The audible alarm device is a 1-inch moving coil speaker. The speaker is driven by two separate
audio paths, one by the Sharp and one by the PIC. Either the Sharp or PIC can independently sound
an audio alarm tone if an alarm occurs or a fault is detected.
Electronic Components
AC Power Adaptor / Charger
The SIGMA Spectrum infusion pump uses an AC power adaptor capable of providing 9 VDC. The
power adaptor connects to Spectrum via a positive locking connector, which will reduce the possibility of accidental disconnection. When the AC power adaptor is plugged into an AC receptacle, the
lithium ion battery pack will be charged. Normal charger operation occurs as follows: If the battery
requires charging, the Spectrum battery charger will initially maintain the battery at a constant current of approximately 250 mA (400 mA if pump is non-wireless or wireless is turned off). After the
battery voltage reaches a nominal charge of 8.3 volts, the charger maintains this voltage until the
charging current supplied to the battery is less than 60 mA. The battery charge cycle is completed
and will terminate. There are three mechanisms employed to prevent overcharging of the battery:
■
■
■
The charging microcontroller’s ability to monitor and control voltage and current applied to
the battery.
A current clamp circuit is employed to prevent charge currents that would cause charge circuit overheating.
Battery pack protection circuits within the battery pack itself prevent overheating and over
charging.
The adaptor side of the AC power adaptor is equipped with a Protector (P/N 45742). The Protector
is a plastic enclosure which snaps onto the adaptor. The purpose of the Protector is to protect the
adaptor from damage during use in a hospital environment. The AC power adaptor with the Protector can be used on wall outlet and pole mount power strip receptacles. The Protector comes installed
with the pump. The Protector cannot be removed from the adaptor once it is installed. The Protector
can be ordered separately as an accessory for installing on an old AC power adaptor. A separate
instruction bulletin on how to install the Protector is sent along with the Protector.
The Protector is compatible with the cleaners mentioned in this Service Manual. Refer to “SIGMA
Spectrum Cleaning” on page 26 of this Service manual for cleaning methods and compatible cleaners
that can be used on the Protector.
CAUTION:
11
IMPROPER REMOVAL MAY DAMAGE THE AC POWER ADAPTOR. Remove
the AC power adaptor by grabbing the handle of the Protector and pulling it back
off the receptacle. Do not pull the cord to unplug the Adaptor from the receptacle.
Improper twisting or pulling of the connector or cord may damage the AC power
adaptor.
Design and Theory of Operation
SIGMA Manual Number 41019
Revision AA
Display
Spectrum uses a highly reflective thin film transistor (HRTFT) liquid crystal display containing:
■
■
■
■
240 X 320 pixels (240 x270 are active)
Color HRTFT - 16 out of a palette of 262,144 possible colors
0.2235 mm X 0.2235 mm dot pitch
Illumination by side mounted LEDs and diffuser.
The display employs front lighting using six white LEDs. Brightness of the LED front light is controlled by a constant current source implemented on the 60091 I/O Board. The display can be easily
viewed while mounted to an IV pole, with viewing distances up to 15 feet and a minimum viewing
angle of ±30 degrees from a line perpendicular to the display plane. The display has two flex circuit
connections: The first 50-conductor flex circuit carries digital display and control data as well as
power for the display. The second 5-conductor display flex circuit carries power for the back light.
Both of these flex circuits connect to 0.5 mm flex circuit connectors on the I/O Board.
I/O Board
This 10-layer, 100% surface-mount component circuit board distributes input and output (I/O) from
all sensors (except the ultrasonic air detector) through flex circuit connections that will be discussed
in detail below. The I/O board also receives the keypad, motor and display flex circuit signals. The I/
O board hosts A/D converters and discrete I/O to interface to the Spectrum sensors.
Processor Board
This 10-layer, 100% surface mount component circuit board distributes input and output (I/O) from
the ultrasonic air detector through a 40-pin flex circuit connection (detailed below). Additionally, the
processor board hosts the Sharp processor, which controls the HRTFT display, and performs most of
the primary computations for Spectrum. The processor board also hosts the real-time clock (RTC)
chip and lithium back-up battery for the RTC, Flash and static RAM memory.
Flex Circuits
■
■
■
■
■
Ultrasonic Flex — This flex circuit provides connections to two pairs of ultrasonic piezoelectric crystals (receive and transmit) as well as the secondary tube temperature thermistor. The
Ultrasonic Flex is connected to the processor board (60087) through a 0.5 mm pitch, 40conductor, right angle flex connector.
Upper Aux Flex — This flex circuit provides connections to the upper door latch and link
discrete signals, once per revolution hall effect sensor, and slide clamp sensor signals. The
upper aux flex is connected to the I/O board (60091) through a 0.5 mm pitch, 30-conductor,
vertical flex connector.
Lower Aux Flex — This flex circuit provides connections to the lower door latch and link
discrete signals. The lower aux flex is connected to the I/O board (60091) through a 0.5 mm
pitch, 10-conductor, vertical flex connector.
Force Sensor Flex — This flex circuit provides connections to the distal force sensor and the
primary tube temperature thermistor. The force sensor flex is connected to the I/O board
(60091) through a 0.5 mm pitch, 10-conductor, vertical flex connector.
Backflex — This flex is connected to the I/O board (60091) through a 0.5 mm pitch, 30conductor, vertical flex connector. The backflex provides the following functions:
12
SIGMA Manual Number 41019
Revision AA
■ System power supply control and fuse – A 2.5 Amp surface-mount primary power fuse
is mounted on this flex circuit. Additionally, four dual battery contacts are also on this
flex circuit.
■ High-Speed UART Interface / MUX – A digital MUX allows either a smart battery
interface that includes an UART, or traditional “dumb” battery connections (battery
type ID resistor and battery thermistor).
■ Battery System Charge Control – An Atmel 8-bit microcontroller is hosted on the backflex. One function of this processor is to control battery charging.
■ Audio Output – The backflex provides connections to a 1-inch moving coil speaker that
is used during audio alarms.
■ Temperature Monitor – A temperature sensing thermistor is hosted on the backflex,
which provides internal case temperature to the Spectrum processors.
■ Advanced Battery Removal Detector – A magnetic reed relay is housed on the backflex,
and provides an early or advanced battery disconnection warning to the Spectrum processors.
Keypad
The keypad consists of 19 user-actuated keys. Keys 1–9 also have alpha designations A–Z (in groups
of 3 starting at the 1 key, with the exception that the 9 key has alpha designation “YZ”), a “0” key,
a decimal point, 4 soft keys, a RUN/STOP key, and an ON/OFF key. The keypad is constructed of
polyester dome keypad material with a circuit layer and adhesive layer. The keypad is edge sealed to
prevent fluid intrusion between the layers of the keypad. The keypad is connected to the I/O board
through a 10-conductor 1-mm pitch flex circuit. The following is a detailed description of the keys:
■
■
■
■
■
■
ON /OFF: Powers up the pump.
OK: This key accepts the information currently shown on the pump display and advances
the pump program to the next screen.
SETUP: This key is used to access the Care Area Selection screen.
RUN/STOP: This key signals the request to Start or Stop infusions.
Soft keys: Four multi-function keys. Can be used in conjunction with the display to perform
any software programmable function including but not limited to Bolus operations, navigation arrows, help screens etc.
Alphanumeric 1-9: These keys may be used to enter numeric sequences including real numbers with decimal point. Alphabetic strings may also be entered using the alphabetic groupings of characters found on these keys.
The infrared interface (Infrared Data Association) utilizes the IrDA protocol that can connect to personal computers and personal digital assistants (PDAs) that employ the IrDA standard. This digital
interface can transmit and receive data at rates of up to 115 thousand bits per second (115Kbs). The
IrDA interface is accessible through the SIGMA Spectrum keypad that is located on the front case
assembly. The IrDA port operates at distances of up to 3 meters assuming a direct line of sight within
a 15-degree conic section.
Power Connector
The power connector serves two functions:
■
■
13
External power input
Asynchronous data interface
Design and Theory of Operation
SIGMA Manual Number 41019
Revision AA
Pump Specifications
Applications
■
■
Large and small volume parenterals
Neonatal
Administration Set
Compatible with standard gravity IV sets supplied by Baxter® and Hospira® and several other companies. (Visit www.sigmapumps.com for a full listing).
Performance
Downstream occlusion time to alarm for occlusion pressures adjusted to LOW (6 psi), MEDIUM (13
psi), and HIGH (19 psi)1:
Rate
Low (6 psi)
Medium (13 psi)
High (19 psi)
5 mL/hr
<5 min.
<10 min.
<20 min
100 mL/hr
<15 sec.
<20 sec.
<40 sec.
Max. Bolus
0.25 mL
0.50 mL
0.80 mL
All safety related sensing systems are automatically checked for proper operation periodically during
setup and pump running conditions. Faults are identified by SYSTEM ERROR codes.
See the Specifications section of the Operator’s Manual for additional specifications.
Effect of Fluid Container Height2
The performance of the infusion pump will be influenced by the forces of gravity on the fluid being
administered to the patient. When a fluid container is positioned above or below the patient’s administration site, pressure forces associated with the fluid’s head-height (distance measured from the center of the pumping mechanism to the top of the fluid in the source container) will cause deviations in
the nominal specification for device flow rate accuracy. The nominal head-height used for the flow
rate and the graphical presentation is 24” (61 cm). For example, the deviation from the nominal
flow rate accuracy from +24” to -20” (-51 cm) head-height has an influence of a possible -4% in
flow rate accuracy when the flow rate is set to 25 mL/hr.
Bolus Accuracy
The SIGMA Spectrum IV pump may have an optional bolus mode of operation. This feature allows
the user to perform a BOLUS SETUP action. To use this feature the pump must be programmed with
either a specific rate or a specific amount to be delivered in a certain amount of time.
1.With Occlusion 45 inches below the pump and alarm set to LOW, MEDIUM or HIGH.
2.Liquid container must be a vented or collapsible bag.
14
SIGMA Manual Number 41019
Revision AA
If the pump is currently operating in mL/hr delivery mode, the bolus rate value is entered in mL/hr
and the volume is entered in milliliter (mL). If the pump is operating in a non-mL/hr delivery mode
(for example mcg/kg/min), the bolus amount would be entered in mcg/kg however the ML/HR soft
key may be pressed in the setup screen to enter the bolus information in mL/hr format.
In either mode, the time is entered in minutes and seconds (min:sec). Limits are placed on the minimum and maximum amount of time for the bolus delivery. The limit constraints are contained
within the software of the Spectrum pump and are necessary to control the maximum or minimum
flow rate of the bolus infusion.
The accuracy of the bolus volume is dependent upon the resultant flow rate that is obtained from the
calculation of volume to be delivered in the time requested. For example, if the maximum bolus volume is 300 mL, the maximum flow rate is obtained with a bolus time of 18:02 (min:sec) or a flow
rate of approximately 999 mL/hr. Using this maximum bolus volume, and delivering the volume in
the shortest amount of time, the mean value of 302 mL ±5% may be expected. Whereas using a minimum bolus volume (.5 mL), and delivering the volume in a reasonably short amount of time (1 minute), the mean value of .52 mL ±16% may be expected.
Technical
■
■
■
■
Type of pump - volumetric infusion pump.
Operating principle - linear peristaltic
Patient leakage: <15 micro amps, normal condition; <50 micro amps, single fault condition.
Battery type: 7.2-volt battery pack consisting of (2) 3.6V/1.8 Ampere-hr rechargeable lithium ion, or 7.2-volt battery pack consisting of (2) 3.7V/1.75 Ampere-hr rechargeable lithium ion.
■ Alarms:
■ Air-In-Line
■ Downstream Occlusion
■ Upstream Occlusion
■ Door Open, Door Not Latched
■ Low and Depleted Battery
■ AC Applied / Removed
■ Battery Not Detected
■ Infusion Complete
■ Secondary Complete
■ Secondary Delivery
■ Primary Delivery
■ User Inactivity
■ Unload Set Caution
■ System Errors
■ Incomplete Titration Entry
■ Slide Clamp Closed
NOTE: For additional technical specifications, refer to the SIGMA Spectrum Operator’s
Manual.
15
Design and Theory of Operation
SIGMA Manual Number 41019
Revision AA
CONFIGURATION OPTIONS
The Spectrum pump has two sets of configuration options:
■
■
User Options
Biomed Options
NOTE:
For a description of the User options, refer to the SIGMA Spectrum
Operator’s Manual.
BioMed Options
Biomed Options allow the Biomedical Technician access to certain pump functions and settings. This
section will describe the options available to the technician.
NOTE:
Biomedical Technicians should access ONLY the options listed in this
section, unless otherwise Authorized.
To access the BioMed Options menu:
1.
Press the OPTIONS soft key.
2.
Select BioMed Options from the options list and press OK.
NOTE: The Bio Medical (BioMed) option menu requires an access password. This access
password may be obtained by authorized service personnel.
Contact SIGMA LLC Service Department.
Telephone: 1-800-356-3454, or 585-798-3901
Or write:
SIGMA LLC
711 Park Avenue
Medina, N.Y. 14103
Email Service Coordinator at:
[email protected]
The BioMed Options menu has six categories:
■
■
■
■
■
■
Sensor Configuration
Calibration
Pump Settings
Pump Testing
Update Software
Network Configuration
16
SIGMA Manual Number 41019
Revision AA
Sensor Configuration
■
■
Downstream Occlusion Auto-Restart on/off - Turns on or off the Downstream Occlusion
Auto-Restart feature.
US /Air alarm confirmation on/off - When this selection is set to on, the user must acknowledge the air-in-line alarm with a key-press before the RUN key will be accepted to resume
the infusion.
Calibration Menu
The Calibration Menu provides access to sensor calibration data. There are 4 sensors in this menu
and, the biomed personnel can access the sensor data in these menus.
NOTE:
Calibration of the device shall be performed by technicians that have been
formally trained by SIGMA personnel on Spectrum calibration procedures
ONLY.
Sensor Calibration
■
■
■
17
Upstream Sensor
■ View Calibration Values - Provides a utility to view the Upstream Sensor calibration
data that follows.
■ Upper Freq (kHz)
■ Upper Power Level
■ Upper Reading
■ Lower Freq (kHz)
■ Lower Power Level
■ Lower Reading
Downstream Sensor
■ View Calibration Data - Provides a utility to view the Downstream Sensor calibration
data.
■ Current Reading
■ No-Tube Reading
■ Digit Pot Setting
■ Scale Factor
■ Scale Offset
Slide Clamp Sensor
■ View Calibration Data - Provides a utility to view the Slide Clamp Sensor and No Slide
Clamp calibration data.
■ Red %
■ Green %
■ Blue %
■ View Current Readings - Provides a utility to view the current Slide Clamp sensor data.
■ Red %
■ Green %
■ Blue %
Configuration Options
SIGMA Manual Number 41019
Revision AA
■
■ Red Hz
■ Green Hz
■ Blue Hz
Optical Tube Sensor
■ View Calibration Data - Provides a utility to view the Optical Tube Sensor calibration
data.
■ No Tube VDC
■ Tube VDC
Pump Calibration
■
View flow calibration values - Allows the Biomedical Engineer/Technician to view flow calibration correction values applied during the flow rate calibration process.
View All Calibration
■
View All Calibration - Allows the Biomedical personnel to view all of the sensor calibration
data previously discussed along with Cam Calibration data from one scrollable menu. This
data can be scrolled through by pressing the Next or Prev soft keys.
■ Cam Calibration Data
■ cam_offset:
■ f_offset
Pump Settings
Pump Settings allows the Biomed personnel to enable and disable the following alarms.
Alarm Settings:
■
Phase Complete Alarm - Turn this option on to sound audio tone at the completion of the
secondary, loading dose, and bolus infusions.
System Settings:
■
■
Set Time and Date
■ Time (GMT) - Sets the real-time clock current time (observing Greenwich Mean Time,
or UTC).
■ Date (mm/dd/yyyy) - Sets the real-time clock current date in the indicated format.
PM Due Settings
■ PM Due Notification ON/OFF
■ Date - mm/dd/yyyy
18
SIGMA Manual Number 41019
Revision AA
Pump Testing
■
Battery Test
■ Battery Life Test - performs an automated life cycle of the battery to determine its
expected period of operation.
■ Show Battery Test Results - Displays the time to LOW BATTERY and PLUG IN Alarm
after the Battery Life Test has been conducted.
■ View Battery Status - Displays the voltage reading (VDC) of the battery. The motor may
also be run to observe the battery status under load; however, alarms are not activated
with the exception of the Depleted Battery alarm.
■ View Internal Charger Status - Displays the status of the battery charger.
■ Build - This is the Battery Charger Controller (BCC) Version Number.
■ State - When AC power is applied the status is Charging/Charged and when AC
power is not present the status is Off
■ Voltage - This is the battery voltage.
■ View Smart Battery Status ■ Build - This is the Battery Charger Controller (BCC) Version Number.
■ State - AC in = Charging battery and AC out = Off.
■ Voltage - This is the battery voltage.
■ Current - This is the current draw during charging measured and displayed in milliamperes (mA).
■ Output - This is the Charge output displayed in percentage (%).
■ Temp - Is the battery temperature displayed in Celsius (C).
Update Software
■
■
Drug Library - Allows updating of the drug library via the IrDA port (not accessible if wireless networking is enabled).
Pump Software - Allows the operating software of the pump to be updated via the serial
communications port.
Network Configuration
■
■
19
Network Status - Shows the current status of the network connection. The following items
are available:
■ MAC Addr - Displays the Media Access Control (MAC) address of the pump. This
address is associated with the wireless battery module connected to the pump.
■ IP Addr - Displays the current IP address of the pump.
■ SIGMA GW - Displays the IP address or DNS name of the network host, also known as
the Sigma Gateway server.
■ Network Status - Displays the current status of the wireless radio and network connection. If the wireless radio is connected to a network, the relative receive level will be
reported as a percentage. While the radio is disabled or booting, pump event information is not buffered or sent to the network host. Network drug library updates are only
available when the pump is connected to a host.
■ Error Message - Displays information about any abnormal conditions that may be preventing the pump from accessing or using the network.
Transfer Network Status - This option shows the TCP/IP settings of the pump’s network
connection.
Configuration Options
SIGMA Manual Number 41019
Revision AA
■
■
■
■
Network Settings - Shows the basic network settings for the pump, and also allows the
pump’s network connection to be enabled or disable. The following items are available:
■ Networking - Allows the pump’s network connection to be turned on or off. This setting is stored in the pump after the pump is turned off, although the pump’s network
connection is always turned off when the pump power is turned off, including when the
pump is turned off but in battery charge mode.
■ Sigma GW - (read-only, set via network configuration file) The IP address or DNS name
of the network host, also known as the Sigma Gateway server. Either this item or ‘Multicast’ may be set, but not both.
■ Multicast - (read-only, set via network configuration file) The IP address of the multicast group that the pump joins to learn the location of the host. Either this item or
‘Sigma GW’ may be set, but not both.
■ Device ID - (read-only, set via network configuration file) The facility-defined device
identifier for this pump. This value should be unique for each pump on a facility’s network.
TCP/IP Settings - Shows the TCP/IP settings of the pump’s network connection. If Dynamic
Host Control Protocol (DHCP) is enabled, the current settings as configured by the DHCP
server will be shown.
■ DHCP - (read-only, set via network configuration file) Dynamic Host Control protocol
settings, either ‘on’ or ‘off’.
■ IP - (read-only, set via network configuration file) IP address of pump, either assigned
statically or assigned by DHCP server.
■ Gateway - (read-only, set via network configuration file) IP address of gateway, either
assigned statically or assigned by DHCP server
■ Netmask - (read-only, set via network configuration file) IP netmask, either assigned
statically or assigned by DHCP server.
■ DNS - (read-only, set via network configuration file) Domain Name Server IP address,
either assigned statically or assigned by DHCP server.
Wireless Settings - Shows the wireless settings of the pump’s network connection.
NOTE:
See “Wireless Networking” on page 21 for additional instruction.
Sleep and Location Settings - This allows the BiomedTechnician to view the settings configured in the MDL for how often the Spectrum Pump does a Drug Library Check in the following modes:
■ Clinical / Biomed Mode (on)
■ AC Sleep Mode
■ Battery Sleep Mode
20
SIGMA Manual Number 41019
Revision AA
W IR ELESS NETWORKING
The Sigma Spectrum Infusion Pump offers an optional wireless battery module (SIGMA P/N 35083)
providing an 802.11b wireless networking capability, and an optional wireless battery module
(SIGMA P/N 35162) providing an 802.11b/g wireless networking capability. In conjunction with a
host computer system, the pump Drug Library can be updated to a new library and pump status
information may be sent via a wireless network connection to a host.
The pump includes a number of networking parameters that must be configured for the pump to
access and use the wireless network.
When a new pump is first received from Sigma, the BioMed department must configure each pump’s
network parameters as described below. The BioMed department will need to coordinate with the
facility’s IT department to determine the proper settings for the network parameters.
These network parameters are changeable by sending a configuration file to the pump via an IrDA
interface. The pump can also send its current network configuration file to a PC or PDA via the
IrDA. A PC with an IrDA interface can be used to program multiple pumps with the same configuration. The network configuration file is a simple text file that can easily be edited on a PC and sent via
the IrDA to a pump. After changing the pump’s network configuration, the pump may need to be
power cycled for the net settings to take effect.
Each pump stores its configuration information in non-volatile memory, so that even if it loses all
power sources (AC and battery) its settings are not lost.
The following is a description of the parameters required in order for the wireless interface module
to work properly with the host. These parameters may be accessed and reviewed as previously indicated in the BioMed Options portion of this manual.
Network Configuration
Network Status
This option shows the current status of the network connection. The following items are available:
■
■
■
■
■
21
MAC Addr – displays the media access control (MAC) address of the pump. This address is
associated with the wireless battery module connected to the pump.
IP Addr – displays the current IP address of the pump.
SIGMA GW – displays the IP address or DNS name of the network host, also known as the
SIGMA Gateway server.
Network Status – displays the current status of the wireless radio and network connection.
If the wireless radio is connected to a network, the relative receive level will be reported as a
percentage. While the radio is disabled or booting, pump event information is not buffered
or sent to the network host. Network drug library updates are only available when the
pump is connected to a host.
Error Message or Network Information – displays status information or error conditions
about any abnormal conditions that may be preventing the pump from accessing or using
the network.
Wireless Networking
SIGMA Manual Number 41019
Revision AA
Transfer Network Status
This option allows the pump’s network configuration to be sent or received via the pump’s IrDA
port, to or from an IrDA compatible PC. The pump’s network configuration may also be reset, clearing any configured network passwords, returning the pump’s network configuration to the pump’s
default. To configure a pump for use with a facility’s network the pump’s network configuration file
may be modified and sent to the pump via IrDA. The pump serial number located in the network
configuration file must match the serial number of the pump it is being sent to, otherwise the pump
will prevent use of the configuration file. Note that certificate-based authentication modes are not
supported. The default network configuration file, available by pressing ‘send’ on this screen on a
pump after pressing ‘reset’ to reset the configuration, can be found below:
SN=XXXXXX
# Pump serial number - must match SN of receiving pump
# SIGMA Spectrum Settings
[NETWORK CONFIGURATION]
# DHCP=0 DHCP disabled - IP, GATEWAY, NETMASK, and DNS must be valid
# DHCP=1 DHCP enabled - IP, GATEWAY, NETMASK, and DNS must be blank
DHCP=1
IP=
GATEWAY=
NETMASK=
DNS=
# Leave either SIGMAGW or MULTICAST blank
# SIGMAGW set to DNS name or IP address of SIGMA gateway server
SIGMAGW=SIGMAPUMPGW
# MULTICAST group default is 239.237.12.87
MULTICAST=
# DEVICEID set to device alias
# Limited to 20 alpha-numeric characters (0-1,A-Z,a-z), blank is
acceptabl
DEVICEID=
[WIFI CONFIGURATION]
# BSS=0 Infrastructure mode (Access point)
# BSS=1 Join or Create Ad-Hoc (peer-to-peer)
# BSS=2 Join only Ad-Hoc (peer-to-peer)
# BSS=3 Join any
BSS=3
# SSID= set to wireless network name
SSID=sigma_pumps
# CHANNEL=0 search channels
CHANNEL=0
# SECURITY=0 Any available security method
# SECURITY=1 Open system (no-encryption)
# SECURITY=2 WEP shared key
# SECURITY=3 WPA pre-shared key
# SECURITY=4 WPA with 802.1x authentication
# SECURITY=5 WEP with 802.1x authentication
# SECURITY=6 LEAP
SECURITY=0
# WEPKEYINDEX=0-3
22
SIGMA Manual Number 41019
Revision AA
WEPKEYINDEX=0
# WEPKEY may be blank or 10 (64-bit) or 26 (128-bit) hex (0-1 and a-f)
characters long
WEPKEY=
# WPAENCRYPTION=0 Any
# WPAENCRYPTION=1 WEP
# WPAENCRYPTION=2 TKIP
# WPAENCRYPTION=3 CCMP (AES)
# WPAENCRYPTION=4 Open (no encryption)
WPAENCRYPTION=0
# WPAPSK must be blank if WPA PSK is not used
# WPAPSK may 64 hex (0-1 and a-f) characters long to specify a PSK
# WPAPSK may be 8-63 ascii characters long to specify a passphrase
WPAPSK=
# EAP Authentication 32-bit bitmask (decimal format, hex for reference
only)
# 0
(0x00000000) - None
# 1
(0x00000001) - LEAP
# 2
(0x00000002) - PEAP
# 4
(0x00000004) - TLS
# 8
(0x00000008) - TTLS
# 256
(0x00000100) - GTC
# 512
(0x00000200) - MD5
# 1024
(0x00000400) - MSCHAPv2
# 2048
(0x00000800) - OTP
# 65536 (0x00010000) - CHAP
# 131072 (0x00020000) - MSCHAP
# 262144 (0x00040000) - MSCHAPv2
# 524288 (0x00080000) - PAP
AUTHENTICATION=0
# IDENTITY= 802.1x Identity (username)
IDENTITY=
# PASSWORD= 802.1x Password
PASSWORD=
Network Settings
This option shows the basic network settings for the pump, and also allows the pump’s network connection to be enabled or disabled. The following fields are available:
■
■
■
■
23
Networking – allows the pump’s network connection to be turned on or off. This setting is
stored in the pump after the pump is turned off, although the pump’s network connection is
always turned off when the pump power is turned off, including when the pump is turned
off but in battery charge mode.
SIGMA GW – (read-only, set via network configuration file) the IP address or DNS name of
the network host, also known as the Sigma Gateway server. Either this item or ‘Multicast’
may be set, but not both.
Multicast – (read-only, set via network configuration file) the IP address of the multicast
group that the pump joins to learn the location of the host. Either this item or ‘SIGMA GW’
may be set, but not both.
Device ID – (read-only, set via network configuration file) the facility-defined device identifier for this pump. This value should be unique for each pump on a facility’s network.
Wireless Networking
SIGMA Manual Number 41019
Revision AA
TCP/IP Settings –
This option shows the TCP/IP settings of the pump’s network connection. If Dynamic Host Control
Protocol (DHCP) is enabled, the current settings as configured by the DHCP server will be shown.
■
■
■
■
■
DHCP – (read-only, set via network configuration file) Dynamic Host Control protocol settings, either ‘on’ or ‘off’.
IP – (read-only, set via network configuration file) IP address of pump, either assigned statically or assigned by DHCP server.
Gateway – (read-only, set via network configuration file) IP address of gateway, either
assigned statically or assigned by DHCP server
Netmask – (read-only, set via network configuration file) IP netmask, either assigned statically or assigned by DHCP server.
DNS – (read-only, set via network configuration file) Domain Name Server IP address,
either assigned statically or assigned by DHCP server.
Wireless Settings
This option shows the Wireless settings of the pump’s network connection.
■
■
■
■
■
Mode (BSS) – (read-only, set via network configuration file) Basic Service Set (BSS), one of:
■ Infrastructure (AP)
■ Join or Create Ad-Hoc
■ Join only Ad-Hoc
■ Join any
Name (SSID) – (read-only, set via network configuration file) service set identifier (SSID), or
the name of the wireless network to join.
Channel – (read-only, set via network configuration file) wireless network channel (1-11) to
use, or ‘search’ if all channels are to be scanned for the configured wireless network.
Security – (read-only, set via network configuration file) the security model to use, one of:
■ Any
■ Open system
■ WEP
■ WPA pre-shared key
■ WPA 802.1x
■ WEP 802.1x
■ LEAP
WEP Key – (read-only, set via network configuration file) the WEP key index (0-3) and the
10 (64-bit) or 26 (128-bit) hex characters WEP key. If the entire WEP key can not be displayed on the screen, then an ellipsis, “…” is displayed at the end of the displayable portion.
24
SIGMA Manual Number 41019
Revision AA
■
■
■
■
■
Encryption – (read-only, set via network configuration file) the encryption method use on
the wireless network:
■ Any
■ WEP
■ TKIP
■ CCMP (AES)
■ Open (no encryption)
WPA PSK – (read-only, set via network configuration file) WPA pre-shared key, may be
either an 8-63 character pass-phrase, or up to 64 hex characters long for a pass-key. Use of
the pass-key, versus a pass-phrase, will reduce the amount of time needed by the pump to
connect to the wireless network. If the entire WPA PSK can not be displayed on the screen,
then an ellipsis, “…” is displayed at the end of the displayable portion.
Authentication – (read-only, set via network configuration file) the allowable inner and
outer EAP modes used for wireless network authentication, one or more of the following:
■ LEAP
■ PEAP-MSCHAPv2
Username – (read-only, set via network configuration file) user name used to authenticate
the pump on the wireless network.
Password – (read-only, set via network configuration file) password used to authenticate the
pump on the wireless network.
Network Interface Information
A MAC address is supplied for each Wireless Battery module. Because the radio is located in the battery module, the MAC address is associated with the radio and therefore the wireless battery module, not the pump that it is attached to. The MAC address for each battery module is assigned at the
factory and cannot be changed. The address is located on the side label of each wireless battery module.
When a Spectrum pump is turned on, assuming it is properly configured, it will attempt to locate and
connect to the wireless network. It is the responsibility of the host network to verify that the specific
pump is permitted to gain access to the network and to determine to what parts of the network the
pump will have access.
Contact SIGMA LLC for further information pertaining to suggested host requirements and/or
details needed for network implementations.
25
Wireless Networking
SIGMA Manual Number 41019
Revision AA
SERVICE AND MAINT ENANCE
CAUTION:
Electric shock hazard.
There are no user serviceable parts. Do not remove the case. Refer servicing to
SIGMA trained and qualified service personnel.
Required Maintenance and Frequency
■
■
■
Maintenance consists of routine cleaning and annual performance evaluations as described
in the service manual.
Pumps suspected of being damaged must be tested for proper performance before being
returned to patient use. This includes pumps that have been physically damaged, dropped or
those that have fluid intrusion.
A PM or Network expiration due date may be entered in the BIOMED options. A “Due for
Inspection” reminder will appear with the power ON display followed by the normal programming screens. At power off, a due for inspection display will appear prior to pump
shutdown.
SIGMA Spectrum Cleaning
The SIGMA Spectrum is portable and should be cleaned and disinfected for each patient use according to facility protocol.
Compatible Cleaners
■
■
■
■
■
■
10% solution of bleach and water
Up to 90% Isopropyl alcohol
Caltech Industries Dispatch®
Steris TBQ® and Steris Germicidal Surface Wipes, Product Number 1608-GS
Metrex Cavicide® and Cavi WipesTM
Contact SIGMA for additional information
Refer to DOC 11318 for complete listing.
Cleaning the Pump
CAUTION:
- Always press STOP then OFF and unplug the AC power adaptor
before cleaning.
- DO NOT sterilize by autoclaving, ETO gas or spraying. DO NOT
immerse any part of the pump. DO NOT use abrasive cleaners.
26
SIGMA Manual Number 41019
Revision AA
- DO NOT use phenolic-based cleaners or disinfectants; extended use
may cause damage to the keyboard, case and any other plastic
component of the SIGMA Spectrum.
- DO NOT use spray or aerosol cleaners. A lint-free, foam-tipped swab
(Chemtronics FoamtipTM or Qosmedix® precision foam tip for
example) may be used in the tube channel.
- Alcohols are flammable and should not be used for battery cleaning /
disinfection. Always use alcohol in a well-ventilated area.
- When cleaning the battery pack, care should be taken to prevent
shorting of the pack’s exposed terminals.
- Dispose of all cleaning/disinfectant materials per federal, state and
local regulations for infectious waste disposal.
To clean the pump:
1.
Turn the pump off and unplug the AC power adaptor from the power source.
2.
Place the pump in an upright position (keyhole release upward).
3.
Apply the compatible cleaning agent with a dampened cloth per the manufacturer’s instructions using appropriate dilution ratio.
Disinfectants should remain on the pump’s surface in an even, but not dripping, film for the
recommended contact time for the compatible cleaning agents.
4.
Open the pump’s door using a standard IV set’s slide clamp.
5.
Clean the speaker vent, power adaptor connector, door release, keyhole and pumping channel areas with soft swabs.
6.
Apply solutions sparingly to the swabs and wipe down the necessary areas.
Do not use rigid cleaning instruments or spray solutions directly on the pump and its accessories.
NOTE:
27
For severe solution spills it is recommended that the standard battery/
wireless battery module be removed. The battery pack cavity area of the
pump may be cleaned by wiping down those regions with a dampened
cloth as described previously.
7.
Visually inspect the tubing channel and remove any foreign material. An obstructed set tubing channel could cause accidental free flow.
8.
Subsequent disinfecting is recommended using the same application technique. Disinfectants should remain on the pump surface in an even, but not dripping, film for the manufactures' recommended contact time. Wipe dry or air-dry after completion of contact time
period before pump reuse.
9.
Dispose of all cleaning materials (including the slide clamp) as required per facility protocol/biohazard policy.
Service and Maintenance
SIGMA Manual Number 41019
Revision AA
Battery Removal and Replacement
Should removal of the battery become necessary for any reason, the following procedure may be
used. Refer to “Appendix A: Technical Drawings” on page 51 for the location of parts.
1.
Turn unit off, if on.
2.
Disconnect the AC power adaptor, and lay the pump on its front. Use a protective surface,
such as plastic foam, to prevent damage to the keypad window.
3.
Remove the screw located in the upper right-hand corner of the SIGMA Spectrum battery
(if equipped).1
4.
Depress the release mechanism found in the top center portion of the battery and pull away
from the back of the unit.
5.
Install the battery by placing the battery insulation tab over the terminals and then gently
sliding the battery down the back of the case and inserting the bottom of the battery into
the pocket, then pivoting it into the latch.
Make sure the latch is engaged to retain the battery.
6.
Remove the battery insulating tab prior to charging the pump’s battery or operating the
pump. .
7.
Plug the AC power adaptor into an outlet to begin charging.
Wireless Module Battery Cell Removal and Replacement
CAUTION:
Static sensitive components will be exposed during this process. Perform this
procedure using proper anti-static techniques in an EOS/ESD safe work area.
Failure to do so may result in component failure or degradation.
Tools Required:
■
■
TORX – T5 driver
1/8” to 1/4” flat plate slightly larger than the perimeter of the wireless battery module
1.
Turn unit off, if on.
2.
Disconnect the AC power adaptor, and lay the pump on its front. Use a protective surface,
such as plastic foam, to prevent damage to the keypad window.
3.
Remove the screw located in the upper right hand corner of the wireless battery module (if
equipped).1
4.
Depress the release mechanism found in the top center portion of the battery and pull away
from the back of the unit.
5.
After the wireless battery module is removed from the pump place it with the connecting
terminals up on the work surface.
1.SIGMA does not recommend re-installation of the battery-securing screw.
28
SIGMA Manual Number 41019
Revision AA
6.
Using the TORX driver, remove and retain the four TORX head screws from the case.
(Wireless modules purchased prior to 2008 may have five torx head screws on this side of
the case).
7.
Turn the wireless battery module over so that the terminals are now towards the work surface and remove and retain the one remaining TORX head screw at the top of the antenna
housing.
8.
Place the wireless battery module on the flat plate with the bottom (terminal end) of the
pack even with the edge of the plate.
9.
Carefully open the case starting at the top of the case and fold it open towards the bottom
as if it were hinged at the bottom. NOTE: There is a flex cable attaching the two halves at
the bottom of the case. Take care not to over stress it.
10. Disconnect the four-pin connector from the battery cables to the PCB inside of the wireless
battery module by pressing the release latch on the connector and carefully pulling the connector apart. Do not over stress.
11. The battery may then be removed from the pack.
12. Remove the backing from the adhesive tape on the battery cells and press into the case.
13. Make sure that the battery is flat inside the case, the routing of the battery wires is flat
across the top of the PCB and the connector is fully latched in place prior to reassembly.
14. Make sure that the antenna is properly seated in the slot in the case.
15. Make sure that the wireless battery module latching mechanism is properly installed in the
case.
16. Carefully fold the case halves back together, making sure that all internal components are
aligned properly and that the case will close fully without interferences.
17. Place the wireless battery module on the work surface with the terminal side of the battery
pack facing up and install the TORX screws. Tighten snug, do not over tighten. The case
halves should fit tightly together along the seams. If not, check for loose screws or internal
interferences inside the pack.
18. Check the latch mechanism operation to assure that it moves freely when depressed and
released.
19. Turn the wireless battery module over and install the last screw into the antenna section of
the case and tighten.
20. Install the battery by placing the battery insulation tab over the terminals and then gently
sliding the battery down the back of the case and inserting the bottom of the battery into
the pocket, then pivoting it into the latch.
Make sure the latch is engaged to retain the battery.
21. Remove the battery insulating tab prior to charging the pump’s battery or operating the
pump.
22. Plug the AC power adaptor into an outlet to begin charging.
23. Perform the battery capacity check of the new battery as indicated in the Preventive Maintenance procedure included in this manual.
29
Service and Maintenance
SIGMA Manual Number 41019
Revision AA
Battery Disposal
The SIGMA Spectrum contains a lithium-ion rechargeable battery pack. It should
not be disposed of in trash or in fire. It is a recyclable product and should be disposed of properly. Return to SIGMA for disposal if an authorized disposal center
cannot be found.
CAUTION:
- Do not short circuit the battery terminals.
- Do not disassemble or modify.
Returning Equipment
Contact SIGMA LLC for all service information at:
Telephone: 1-800-356-3454
Email: [email protected]
NOTE: Confirm pump failure as described in this manual prior to return. Evaluation time may
be billed at SIGMA’s discretion for unconfirmed complaints.
If it is necessary to return the unit for service:
■
■
■
■
■
■
Visit www.sigmapumps.com or phone 1-800-356-3434 to obtain a Return Authorization
(RA) number for service. A Purchase Order (PO) number is required for Return Authorization
Be prepared to provide the following information:
■ Device model
■ Device serial number
■ Purchase order number
■ Description of problem
■ Name and telephone number of contact person in your hospital or organization
■ Complete hospital or organization name and address
■ Any other pertinent information such as flow rate, administration set part number used,
and the message displayed at the time of the difficulty
Prior to returning device for service, clean and disinfect the pump in accordance with the
cleaning procedure provided in this manual.
Package the pump in the original shipping container (replacement available upon request)
and affix the RA number on the outside of the package.
Ship pump, freight prepaid, by traceable means to: SIGMA LLC.
SIGMA LLC will not be responsible for unauthorized returns or units damaged in shipment
due to improper packing.
30
SIGMA Manual Number 41019
Revision AA
PR EVENTIVE MAINT ENANCE
To ensure that the SIGMA Spectrum IV pump is operating within the specified parameters set forth
by SIGMA LLC, perform the preventive maintenance tests in this section according to the maintenance schedule below. After each operation in this procedure, record the results on a copy of the Preventive Maintenance Check Sheet at the end of this section.
NOTE: Service School Training is available, but not required, for performance of this
Preventive Maintenance Procedure. Contact [email protected] for
information.
Preventive Maintenance Schedule
■
■
■
Preventive maintenance is recommended a minimum of once annually on all pumps in service.
Preventive maintenance should be performed after any user facility maintenance.
Preventive maintenance test should also be carried out whenever a pump is dropped, or suspected of having been otherwise damaged.
Equipment Required
31
■
■
SIGMA Spectrum Infusion Pump
IV set of the brand specified on the pump label
NOTE:
If the pump is being tested for accuracy following a clinical problem, it is
essential to test with an IV set of the same catalog number and lot number
as that in use when the problem occurred.
■
■
■
■
■
IV container (250, 500 or 1000 mL) to be used as pumping source
Collection vessel used should be a class “A” graduate during a volumetric test
Any collection vessel may be used for a gravimetric test (output is weighed)
Pressure gauge
Electronic balance scale with 0.1 gram readability (only for gravimetric flow rate testing)
Preventive Maintenance
SIGMA Manual Number 41019
Revision AA
Preventive Maintenance Tests
CAUTION:
All testing and evaluations require fluid and air temperature of 72°F ±2°F.
NOTE: The brand of IV sets being tested must be compatible with the pump under test. The
proper IV set calibration is listed on the label located on the top of the pump.
NOTE: Sections identified with an asterisk (*) may be used as incoming test procedures.
Visual Inspection
1.
Inspect the pump for visual evidence of damage and/or defects to exterior components (i.e.
case, keypad and door).
■ The IV set tube channel must be free of foreign materials and dry for both testing and
use.
■ Any evidence of damage to, or repair of, these parts is reason to run the preventive
maintenance checks.
2.
Verify legibility of all labels.
3.
Replace labels as necessary.
Determine Software Version and Serial Number
When you press the ON/OFF key to turn the unit on, the Power Status screen displays the current
software version and serial number. You can also view pump and software information from the
User Option menu:
1.
From the Select Care Area screen, press OPTIONS.
2.
Select User Options, and press OK.
3.
Select View Information and press OK.
4.
Select Pump Information and press OK to display the Pump Info screen.
5.
Record the software version and serial number on the Preventive Maintenance Check
Sheet.
Keypad Test
The Spectrum keypad and display may be checked for proper operation as follows (The 1, 2, 3, and
5 keys will be verified during subsequent testing):
1.
Press the ON/OFF key to turn the unit on. Select any Care Area and Press OK.
2.
Select any Drug Name and Press OK.
3.
Press OK to select Primary Bag and Press OK to select mL/hr, and then enter “4” and “6”
using the keypad and observe the Rate mL/hr field to be “46”.
4.
Press the CLEAR soft key and verify that the Rate mL/hr field is cleared to 0.
5.
Enter “7”, “8”, and “9” using the keypad and observe the Rate mL/hr field to be “789”.
32
SIGMA Manual Number 41019
Revision AA
6.
Press the CLEAR soft key and enter “.” and “0” using the keypad and observe the Rate mL/
hr field to be “0.0”
7.
Press the CLEAR soft key, and press the▼ key until the Volume Given field is highlighted.
8.
Press the Clear Program soft key and verify that the display menu changes to the Clear Program Yes/No? screen. Press Yes. Then the Care Area Selection screen appears.
Upstream (Proximal) Occlusion Sensor Test
NOTE: The IV line and gauge must be free of air. The test fixture must consist of only
compatible IV tubing as specified on the label at the top of the pump. Softer tubing
between the pump and the gauge, or air in the line can result in inaccurate results.
NOTE: Confirm test failures with a new unused IV set.
1.
Press the ON/OFF key to turn the unit on. Select any Care Area and Press OK.
2.
From the Drug List select BASIC and then press OK.
3.
Select Primary Bag and press OK.
4.
For Mode select mL/hr and press OK.
5.
Set the Rate to 100mL/hr and press OK.
6.
Set VTBI mL to 13.3 mL and press OK.
7.
Load the IV set in accordance with the directions on the LOAD SET screen on the pump.
8.
Occlude IV set 12” above the pump with a pair of hemostats.
9.
Push the RUN/STOP key to start the pump.
NOTE:
Pumps with v6.00.00 and later software versions will display a CHECK
FLOW screen once the pump is started. For purposes of this test, press YES
to proceed to the normal Run screen.
10. The pump may indicate BAG NEAR EMPTY <30 MIN REMAIN. Press OK to silence this
alarm.
11. Verify that the pump goes into UPSTREAM OCCLUSION alarm prior to the infusion complete message.
12. Release the occlusion and restart the pump.
Downstream (Distal) Occlusion Sensor Test*
If performing this test immediately following the Upstream (Proximal) Occlusion Sensor Test Press
the Stop button and continue this test from Step 1. If this is a Stand alone test Turn the Pump ON
and continue the test starting with Step 2.
NOTE: Confirm test failures with a new unused IV set.
33
1.
Press the Clear Program soft key, Clear Program confirmation window appears, press YES.
2.
Press the OPTIONS soft key, select BioMed Options, and enter the password.
3.
Select Sensor Configuration and press OK.
Preventive Maintenance
SIGMA Manual Number 41019
Revision AA
4.
Verify that DS Occlusion Auto Restart is set for “on” and verify US/Air Alarm Confirm is
set for “on”.
5.
Press the EXIT soft key two times to return to the OPTIONS screen.
6.
On the options screen, select User Options and press OK.
7.
On the User Options screen, select Alarm Settings and press OK.
8.
Set the DS Pressure Limit to “med”.
9.
Press the EXIT soft key three times to leave the Alarm Settings, User Options, and Options
screens.
10. Select a Care Area and press OK.
11. Press OK again and the desired drug list will appear, select BASIC and then press OK.
12. Select Primary Bag and press OK.
13. For Mode select mL/hr and press OK.
14. Set the Rate to 100 mL/hr and set the VTBI mL to 50 mL.
15. (Skip this step if IV set is already loaded in pump) Load the IV set in accordance with the
directions on the LOAD SET screen on the pump.
16. Connect a pressure gauge to the end of a fluid-filled new IV set with a length of ≈48” of
tubing between the pump and gauge.
17. Press the RUN/STOP key to start the pump.
NOTE:
Pumps with v6.00.00 and later software versions will display the Check
Flow screen once the pump is started. For purposes of this test, press YES
to proceed to the normal Run screen.
18. The pump may indicate BAG NEAR EMPTY <30 MIN REMAIN. Press OK to silence this
alarm.
19. Verify the pump displays a DOWNSTREAM OCCLUSION alarm at a pressure within the
13-psi ±6 occlusion trip pressure setting.
20. Remove the IV set from the gauge and ensure the pump Auto Restarts.
21. Press the RUN/STOP key to stop the pump and Remove pressure gauge and re-set the test
IV set to continue to the next test.
Air Detection Test*
If continuing this test from the Down Stream (Distal) Occlusion Sensor Test Start with Step 9, if you
wish to conduct a standalone test start with step 1.
NOTE: Confirm test failures with a new unused IV set.
1.
Press the ON/OFF key to turn the unit on. Select any Care Area and Press OK.
2.
From the Drug List, select BASIC and then press OK.
3.
Select Primary Bag and press OK.
34
SIGMA Manual Number 41019
Revision AA
4.
For Mode select mL/hr and press OK.
5.
Set the Rate to 100mL/hr and press OK.
6.
Set VTBI mL to 50 mL and press OK.
7.
Press the RUN/STOP key.
NOTE:
Pumps with v6.00.00 and later software versions will display the Check
Flow screen once the pump is started. For purposes of this test, press YES
to proceed to the normal Run screen.
8.
Introduce a 1” minimum air bubble into the IV set upstream from the pump.
9.
Verify the pump goes into AIR-IN-LINE alarm, and press RUN/STOP.
Memory Test
This test assumes you are starting from an all-clear point.
1.
Press the ON/OFF key to turn the unit on and Select any Care Area and Press OK.
NOTE:
If the New Patient Yes/No? prompt appears, press YES.
2.
From the Drug List, select BASIC and then press OK.
3.
Select Primary Bag and press OK.
4.
For Mode select mL/hr and press OK.
5.
Set the Rate to 100mL/hr and press OK.
6.
Set VTBI mL to 50 mL and press OK.
7.
Press the ON/OFF key to turn the pump off.
8.
Turn the pump on and press NO to the New Patient Yes/No screen.
9.
Verify that the Rate and VTBI parameters were saved.
Recommended Flow Rate Accuracy Test*
NOTE: Confirm test failures with a new unused IV set.
1.
Press the ON/OFF key to turn the unit on. Select any Care Area and Press OK.
2.
From the Drug List, select BASIC and then press OK.
3.
Select Primary Bag and press OK.
4.
For Mode select mL/hr and press OK.
5.
Set the Rate to 200mL/hr and press OK.
6.
Set VTBI mL to 50 mL and press OK.(length of test >15 min.) when using a gravimetric
method.
■ Set the VTBI mL to 40 mL using a 50 mL Class A graduate collection vessel when the
volumetric test method is chosen. If a larger Class A graduate is used, a VTBI that is at
least 80% of the collection vessel’s maximum capacity should be used.
35
Preventive Maintenance
SIGMA Manual Number 41019
Revision AA
7.
Hang the IV bag/container 24” above the pumping mechanism.
8.
Connect a new IV set to the IV container and prime the set completely. Remove all air from
the tubing, being sure the drip chamber is at least half full.
9.
Load the set into the pump and close the door.
10. Place the end of the IV set in the collection vessel so that the fluid output end will not be
below the fluid level that is to be collected.
The set should be primed so that fluid is at the end of the IV set, but none has dripped into
the graduate before starting the test.
11. Begin the test by pressing the RUN key. Allow the pump to run until it goes into infusion
complete alarm.
12. Press the STOP key to halt the KVO (keep vein open) rate once the pump goes into infusion
complete.
13. If test is interrupted by any alarms except air, the test can be continued as long as the pump
was observed by the tester to have not been in STOP for more than ten minutes.
14. Observe the actual volume collected either visually or weighed on the scale.
15. When measuring fluid level visually in the graduate, read the level from the bottom of the
fluid meniscus.
Acceptance criteria: collected volumes of ±5%.
16. When measuring with the scale (gravimetric method):
a. Weigh the collection vessel and water using grams as the unit of measure.
b. Empty and dry the collection vessel.
c. Weigh the collection vessel. The difference between the two measured weights (in g) is
equivalent to the volume delivered (in mL).
If the collection volume is within the range of ±5%, the pump is properly calibrated. If not,
return the pump to SIGMA LLC for re-calibration.
AC Power Adaptor Safety Analysis
1.
Inspect the SIGMA P/N 35714 AC power adaptor for signs of abuse such as cracks in the
housing or bent AC main prongs.
2.
Verify green LED is lit.
3.
Inspect the cord from the AC power adaptor to the pump unit for signs of abuse such as
cuts or exposed conductors.
36
SIGMA Manual Number 41019
Revision AA
Battery Capacity Test
The storage capacity for the battery may be determined by running the Battery Capacity Test.
1.
Connect the pump to the AC power line for at least 12 hours prior to the test, to allow the
battery to attain full charge.
NOTE:
If a wireless battery module is installed, the pump must be connected to the
AC power line for at least 16 hours prior to the test.
The pump can be in use while the battery is charging.
2.
Use an IV test set in a loop configuration, so that fluid is circulated around the loop.
3.
Turn on the pump and load the IV set into the pump following the display prompts to
assure that it is properly loaded.
NOTE:
If the IV set is not properly loaded, the test results will be invalid.
4.
Press the OPTIONS soft key, select User Options, select Display Settings, and select Display
Adjust.
5.
Set the Backlight Level to High.
6.
Press EXIT to return to the Options screen.
7.
Select the BioMed Options, and enter the password.
8.
Select Pump Testing.
9.
Select Battery Test.
10. Select option for Battery Life Test the “Load Tube Into Pump & Push OK To Continue”
confirmation window appears. Press OK.
11. Follow the display instructions:
■ Enter or verify 125 mL/hr for Rate
■ Turn Low batt alarm off
■ Turn Constant alarm off.
12. Press the OK key and move the cursor to Done and press OK.
13. Be sure that the pump is unplugged and the current battery level indicates a fully charged
battery (between 8.0V and 8.3V). If battery is fully charged, press OK.
The pump will run until the battery is depleted and will then power off.
14. After the battery is depleted, plug in the pump’s AC power adaptor and power the pump up
or power the pump up with a fully charged battery.
When the pump is plugged in, it will display the time from the start of the test to depleted
battery and it will also display time from low battery to depleted battery (in hr:min format).
37
Preventive Maintenance
SIGMA Manual Number 41019
Revision AA
Pass criteria for a used battery
≥6 hours from “Start to dead” and ≥31 minutes from “Low to dead”.
NOTE: If a wireless battery module is installed, the pump used battery pass criteria is ≥3 hours
from “Start to dead” and ≥31 minutes from “Low to dead”.
Pass criteria after installation of a new battery
≥8 hours from “Start to dead” and ≥31 minutes from “Low to dead”.
NOTE: If a wireless battery module is installed, the pump new battery pass criteria is ≥4 hours
from “Start to dead” and ≥31 minutes from “Low to dead”.
The battery capacity is less than the pass criteria, the battery is reaching end of life. See the Battery
Removal and Replacement section of this manual for replacement. If a wireless battery module is
installed, see “Wireless Module Battery Cell Removal and Replacement” on page 28.
38
SIGMA Manual Number 41019
Revision AA
Preventive Maintenance Check Sheet
Serial Number: ______________________ Date:______________________
Software Version:_________________________________
Control Number:_________________________________
Test
Pass
Fail
Visual Inspection
Keyboard Test
Upstream (Proximal) Occlusion Sensor Test
Air Detection Test
Downstream (Distal) Occlusion Sensor Test
___________psi or ___________mm/hg
Memory Test
Flow Rate Accuracy Test
Volume Output ___________mL
Battery Capacity Test
Time “Start to dead” = ______Hrs. ______Min.
Time “Low to dead” = ______Hrs. ______Min.
39
Preventive Maintenance
SIGMA Manual Number 41019
Revision AA
TR OUBLESHOOTING
■
■
■
Clock Battery Low – This alert appears when the real-time (internal) clock battery level is
getting low. At this time the replacement of this battery is not user-serviceable and the pump
must be returned to SIGMA for battery replacement.
Battery (Very) Low – Send Pump For Repair – This alert appears during a Low Battery
alarm when, through a tutorial-based system of user prompts, it has been determined that
the external power cord or supply is damaged and may need to be serviced or replaced.
Memory Has Been Reset - This screen appears on power up when the stored calibration
data has been corrupted. The pump is prevented from operating at this point. Return the
pump to SIGMA for recalibration.
Battery Charger Error Code Descriptions
Following is a list of errors that may be displayed during battery charge mode (when the pump is
powered off and connected to the external power supply):
Displayed
Error Code
#
Displayed and
History Log Language
Description
1
“Not Charging”
The battery charger has powered off
2
“Charger Timeout”
Charger could not detect a battery
3
“Over Volt”
Battery voltage above maximum
4
“Temperature”
Temperature of battery is too high
5
“High Latch Error”
Battery cell error
6
“ADC Voltage Error”
Battery voltage changed too quickly
7
“ADC Error”
Battery charger hardware error
8
“Current Error”
Charge current error
9
“Comm Error”
Battery communication error
10
“Comm Timeout”
Battery communication timeout
11
“Error: 11”
An unknown charger error occurred
40
SIGMA Manual Number 41019
Revision AA
Battery charger error codes may be cleared by performing the following steps:
1.
Remove the external power supply.
2.
Remove the battery for 1 minute.
3.
Install the battery again and connect the external power supply.
If the charge error repeats, return the pump to SIGMA for service.
System Error Code Descriptions
A series of error codes are generated by the software of the SIGMA Spectrum Infusion Pump, then
displayed on the pump. The following error codes are intended to help the biomedical engineer to
identify problems encountered during operation of the pump for assistance in repair of the product.
41
Error
Code #
Displayed and
History Log
Language
Description
100
PIC Error
Error of unknown type
101
PIC Msg CRC Error
CRC failure
102
PIC Not Responding
Not responding
103
PIC Msg Rcv CRC Er
Message receive CRC error
104
PIC Receive Ovrflow
Receive overflow
105
PIC Motor Error
Motor failure flag
106
PIC Index Error
Index failure flag
107
PIC CAM Error
CAM failure flag
108
PIC COM Error During
Run
COM failure flag
109
PIC Encoder Error
Encoder failure flag
110
PIC counts Per Cam Error
Counts per CAM failure flag
111
Pulse dmnd too high
Pulse demand too high for interval
mode
112
Pulse dmnd too low
Pulse demand too low for PWM mode
113
PIC ROM CRC Error
ROM CRC error
114
Sensor disparity (slow)
Motor is slowing down
Troubleshooting
SIGMA Manual Number 41019
Revision AA
Error
Code #
Displayed and
History Log
Language
Description
115
Sensor disparity (fast)
Motor is speeding up
116
Motor without PWM
Motor movement without PWM
117
PWM MAX
Max PWM for too many revs
201
Bad Motor Msg Tag
Bad motor message tag
202
Bad SPI Msg Tag
Bad SPI message tag
203
Bad Alarm Msg
Bad alarm message
204
Bad Sensor Msg
Bad sensor message tag
205
Bad Battery Msg
Bad battery message tag
206
Bad IrDA Task Msg
Bad IrDA message tag
210
SPI PIC Timeout
SPI PIC timeout
211
SPI 3202 Timeout
SPI 3202 timeout
212
Sensor Task Timeout
Sensors task wait timeout
213
Battery Task Timeout
Battery task wait timeout
220
Pump Task Starved
Pump task starved
221
User Task Starved
User task starved
222
KwikPeg Task Starved
KwikPeg task starved
223
Keypad Task Starved
Keypad task starved
224
SPI Task Starved
SPI task starved
225
Motor Task Starved
Motor task starved
226
Sens Task Starved
Sensors task starved
227
IrDA Task Starved
IrDA task starved
228
Batt Task Starved
Battery task starved
42
SIGMA Manual Number 41019
Revision AA
43
Error
Code #
Displayed and
History Log
Language
Description
230
Diag Task Starved
Diagnostic task starved
231
Set Mech task Starved
Set mechanism task starved
232
Unknown Tsk Checked In
Unknown task checked in
233
Network Task Starved
Network task starved
240
Key Buffer is Full
Key buffer is full
300
Fail to enable US sensor
fail to enable US sensor (GPI bit 2)
301
US upper avg high
Bad US upper reading average (>MAX
FLUID)
302
US lower avg high
Bad US lower reading average
303
Bad upper US rdg
Bad US upper transducer reading
(<>ADC)
304
Bad Lower US rdg
Bad US lower transducer reading
305
DS rdng out of range
(low)
DS reading out of range (low)
306
DS rdng out of range
(high)
DS reading out of range (high)
307
DS pot no adjust
Digital pot failure
308
Inv sensor specified
Invalid sensor specified
309
No-tube rdg too high
No-tube reading too high
310
Upper US stuck high
No-drive upper ultrasonic high
311
Lower US stuck high
No-drive lower ultrasonic high
312
Upper US no adjust
Reduced-drive upper ultrasonic high
313
Lower US no adjust
Reduced-drive lower ultrasonic high
314
DS no-tube elevated
DS reading remains high after tube
removal
Troubleshooting
SIGMA Manual Number 41019
Revision AA
Error
Code #
Displayed and
History Log
Language
Description
320
Latch Switch Error
Hook switches do not agree
321
Link Switch error (up)
Upper link switch not activating
322
Link Switch Error (low)
Lower link switch not activating
323
Color Sensor Error: TMO
color sensor failure (PIC timeout)
324
Color Sensor Error: FRQ
Color sensor failure (frequency)
330
Bad Upstream A/D
Bad upstream A/D converter
331
Bad Downstream A/D
Bad downstream A/D converter
332
Bad Battery A/D
Bad battery A/D converter
340
Bad Battery Sample
Bad battery sample reading
341
Positional Interrupt Error
failed to receive positional interrupt
342
Sharp CAM Error
Sharp detected CAM failure
343
Motor High Rate Error
Motor high rate failure
344
Motor Low Rate Error
Motor low rate failure
345
Thermistor Disparity
Thermistor disparity
346
Thermistor ADC Error
Thermistor ADC fail
347
Check Battery
Battery is defective
348
No Upstream Sensor Poll
Upstream sensor not being polled
349
No Downstream Sensor
Poll
Downstream sensor not being polled
350
Optical Snsr Rail Error
Optical tube detector ADC failure
351
Clean Load Pt. #2
Optical sensor needs cleaning
352
Opitcal Snsr Toggle Error
Optical sensor toggle check failure
401
NVM Sema Timeout
NVM resource semaphore timeout
44
SIGMA Manual Number 41019
Revision AA
Error
Code #
45
Displayed and
History Log
Language
Description
402-411
NVM write error: x (110)
NVM write failed
412
User NVM CRC Error
NVM CRC check failed (user data)
413
Cal NVM CRC Error
NVM CRC check failed (cal data)
414
Wrong NVM structure
NVM version # doesn’t match
expected version#
500
Red. Calc: Unknown
501
Red. Calc: Rate
Rate calculation data error
502
Red. Calc: Bolus Rate
Bolus rate calculation data
503
Red. Calc: Set Mech
Set mechanism state calculation data
504
Red. Calc: Baseline poly
Baseline polynomial data
505
Red. Calc: Temp poly
Temperature polynomial data
506
Red. Calc: Startup
Startup ln function data
507
Red. Calc: Downstream
Downstream algorithm
508
Red. Calc: Upstream
Upstream data
510
Cannot calc drug lmts
Unable to calculate drug limits
511-529
Improper Units: 1-19
Unimplemented rate/conc units
combination
530
Flow Cal out of Range
Flow calibration out of range
540
Bad Tube Type
Tube type incorrect or not selected
601
Sharp Code Corrupted
Code CRC failed
602
CPLD Invalid
CPLD ID wrong
603
Timebase Invalid
Sharp or PIC osc. frequency is wrong
604
Sharp ALU Failure
ALU failure
Troubleshooting
SIGMA Manual Number 41019
Revision AA
Error
Code #
Displayed and
History Log
Language
Description
610
Bad drug lib CRC
Drug library CRC failed
611
Bad drug lib data
Bad drug library data
612
Invalid Drug Lib Version
Bad drug library version
615
Cannot read from RTC
Cannot read from RTC
901
Invalid bag specified
Invalid bag specified
902-909
Invalid delivery mode: 1-8
Invalid mode specified
910
Bad infusion parameters
Invalid running parameters
911-913
Invalid Pump State: 1-3
Invalid pump state
914
Alarm Screens Disabled
Alarm screens disabled outside
915
Invalid Pump Rate
Pump rate outside limits
920
Invalid log memory space
Tried to go to out of bounds memory
921
Invalid log memory find
Tried to find memory in out of bounds
space
922
History Log que full
History log que buffer full of biomed
mode
930
Invalid Screen
Invalid screen
931
C Library Exit
C Library system exit function called
932
Invalid Result
Invalid result
933
Bad care area index
Bad profile/care area index
934
No Rate/Volume Specified
Pump started with no specified rate or
volume
935
Could Not Create Bit
Map
Could not create bitmap
940
Invalid Sharp Version
Wrong sharp version
46
SIGMA Manual Number 41019
Revision AA
Error
Code #
Displayed and
History Log
Language
Description
941
Invalid PIC Version
Wrong PIC version
942
Invalid CPLD Version
wrong CPLD version
943
Invalid AVR Version
Wrong AVR version
944
Invalid Smart Battery
version
Wrong smart battery version
955
Invalid NETWORK
version
Wrong network version
990
Invalid Data
Undefined error
System Error codes may be cleared by using one or more of the following methods:
47
1.
Turn the pump off by pressing the ON/OFF key.
2.
Turn the pump off by pressing the ON/OFF key and removing the battery for 1 minute.
3.
Preventive maintenance should be performed on pumps exhibiting error codes that are
clearable. If no error codes are observed after the test, the pump may be returned for use.
Troubleshooting
SIGMA Manual Number 41019
Revision AA
LOGGING
The SIGMA Model Spectrum Infusion pump provides three logs that can be used when troubleshooting issues with the pump:
■ History Log – contains the entire history log for the pump.
■ System Error Log – contains only the system errors recorded in the history log.
■ Drug Error Log – contains only the events associated with programming an infusion;
including any drug limits that may have been exceeded during setup.
You can view these logs on the pump screen from the User Options menu (see the User options section of the SIGMA Spectrum Operator’s Manual).
Downloading the History Log
In addition to viewing the logs on the pump screen, you can send the entire history log out of the
pump via the Infrared Data Association (IrDA) port using the Dump History Log option.
NOTE: This procedure applies to the transfer of the history (event) log contents from a SIGMA
Spectrum Infusion pump with V5.00.06 Operating Software to a PC via the IrDA port.
Equipment List
■
■
Personal computer (PC) running Windows XP or Windows 2000 with enabled IrDA communications
Optional equipment list (if IrDA-equipped PC is not available)
■ PC running Windows XP or Windows 2000 with SD Card Reader or,
■ USB external SD card reader/writer, Ezonics™ or equivalent
■ SD card, Kingston™ or equivalent, minimum size 512MB
■ PN 55098 – PDA, PalmOne™ Tungsten™ E2 or equivalent with a file transfer utility
installed (McFile version 2.2sigma, or equivalent) for transferring data
Procedure
To download the history log:
1.
Access the History Log option on the pump:
a. If the pump is running, press STOP, press HELP and press OPTIONS.
b. Select the User Options menu item.
c. From the User Options menu, select the View Information.
d. Select History Log.
e. Select Dump History Log.
■ If you are transerring the log directly to a PC, proceed to step 2.
■ If you are transerring the log to a PDA then to a PC, proceed to step 3.
48
SIGMA Manual Number 41019
Revision AA
2.
Transfer the history log using the pump-to-PC method:
a. Position the pump near the PC such that the IrDA ports of both devices are in an unobstructed line-of-sight orientation with a distance of no greater than 3 feet between them.
b. Observe the pump prompt and press the OK key on the pump keypad to begin the
transfer process.
c. When the transfer is complete, a file is created in the filename format
serialnumber_date_time.log in the selected location on the hard drive of the PC (for
example, 123456_12-31-06_22-59.log).
The length of time of the transfer will vary based on the number of events
in the history log.
If the pump is unable to establish a link with the PC within 30 seconds, the
process will abort.
d. Power off the Spectrum pump.
e. Skip to step 4.
3.
Transfer the history log using the pump-to-PDA-to-PC method:
a. Insert the SD card into the PDA.
b. Turn on the PDA.
c. Select the McFile (or equivalent) application.
d. Line up the beaming port of the PDA and the IrDA port of the pump. The beaming port
of the PDA is usually at the top of the device and the IrDA port of the pump is the rectangular window on the bottom left corner of the pump.
e. Observe the pump prompt and press the OK key on the pump keypad to begin the
transfer process.
The length of time of the transfer will vary based on the number of events
in the history log.
If the pump is unable to establish a link with the PDA within 30 seconds,
the process will abort.
f. When the transfer is complete, a file is created on the PDA in the filename format
serialnumber_date_time.log (for example, 123456_12-31-06_22-59.log).
g. Follow the prompts on the PDA to store the received file.
h. Transfer the SD card from the PDA to the SD card reader on the PC.
i. Power off the Spectrum pump.
j. Power off the PDA.
4.
View/Print the log contents
a. Locate the text file on the PC and double-click it to open it.
49
Logging
SIGMA Manual Number 41019
Revision AA
Files that have the *.log extension may require selection of software to
“Open with…”. Typically, Microsoft® Wordpad may be used to open even
the longest history log files.
b. Confirm that the file is readable.
NOTE:
History log can be in excess of 300 pages in the default text format.
Another option is to copy the file contents into another application (such as
Microsoft® Word) that will allow better arrangement of the file contents
into a format more suitable for printing.
50
SIGMA Manual Number 41019
Revision AA
APPENDIX A: TECHNICAL DRAWINGS
Figure 3Assembly, Spectrum Final 35700
51
Appendix A: Technical Drawings
SIGMA Manual Number 41019
Revision AA
52
SIGMA Manual Number 41019
Revision AA
Figure 4. Assembly, Rear Case 35701
53
Appendix A: Technical Drawings
SIGMA Manual Number 41019
Revision AA
Figure 5. Assembly, Key Hole 35709
54
SIGMA Manual Number 41019
Revision AA
Item
No.
Part No.
Description
6
95213
Screw, 0-42 x 3/8” thread
Forming, SS
2
2
5
41021-1
Label, blue color sensor
1
-
-
1
5
41021
Label, red color sensor
-
1
1
-
4
50730-2
Keyhole extension - Baxter
-
1
-
1
4
50730
Keyhole extension - Hospira
1
-
1
-
3
45751
Housing, Slide Clamp Outer
Baxter PCA (2433 Dark Blue)
-
-
-
1
3
45710
Housing, Slide Clamp Outer
(2253 Robin Egg Blue)
1
1
1
-
2
45711
Housing, Slide Clamp Inner
1
1
1
1
1
45750
Keyhole - Baxter PCA (2433 Dark
Blue)
-
-
-
1
1
45709-3
Keyhole - B.Braun (2253 Robin
Egg Blue)
-
-
1
-
1
45709-2
Keyhole - Baxter PCA (2253
Robin Egg Blue)
-
1
-
-
1
45709-1
Keyhole - Hospira (2253 Robin
Egg Blue)
1
-
-
-
Quantity
2
Keyhole Assembly - Baxter PCA
Pump
357094
Keyhole Assembly - B.Braun
35709-3
Keyhole Assembly - Baxter
Keyhole Assembly - Hospira
55
35709-2
357091
Appendix A: Technical Drawings
SIGMA Manual Number 41019
Revision AA
Figure 6. Assembly, Pole Clamp 35712
Item No.
Part No.
Description
Quanity
1
45727
Pole Side Adaptor
1
2
55041
C-Clamp
1
3
95204
Screw, 1/4-20 x 5/8",
FHMS, SS
2
4
95064
Washer, 1/4” External
2
Tooth Star, SS
56
SIGMA Manual Number 41019
Revision AA
Figure 7. Assembly, Double Rotating Pole Clamp 35743
Item No.
Part No.
Description
Quanity
1
45727
Pole Side Adaptor
1
2
95064
Lockwasher, 1/4
Countersink, SS
1
3
95204
Screw, 1/4-20 x 5/8”
3
4
55129
Double Rotating Pole
Clamp
1
5
41093
Pump Orientation Label
1
6
-
Pryor Products, PAC-1360,
Bubble Bag
1
57
Appendix A: Technical Drawings
SIGMA Manual Number 41019
Revision AA
Figure 8. Assembly, 802.11b Wireless Battery Module 35083
Item No.
Part No.
Description
Quanity
1
45737
Battery Case - Front
1
2
45739
Latch, Battery
1
3
95065
Spacer, Nylon 6/6, White
3
58
SIGMA Manual Number 41019
Revision AA
Item No.
Part No.
Description
Quanity
4
60128
Assembly, Wireless Flex
1
5
55095
Digi Module
1
6
55094
Antenna
1
7*
55075-1 or
55075-2
Battery Pack
1
8
95213
Screw, 0-42 x 3/8 SS
Thread Forming
8
9
50738
Contact, Wireless Battery
4
10
55024-3
Magnet, Battery, 0.25 DIA
x 0.031 THK
1
11
90058
Lubricant & Sealant Dow
Corning 111
A/R
12
41046
Label, Battery, Rear, Lower
1
13
41049
Label, Wireless Battery
Module
1
14
45738-2
Battery Case - Rear
1
15
41068
Label, Caution
1
16
41045
Label, Wi-Fi Battery, Rear,
Upper
1
17
85081
Adhesive, Cyanoacrylate,
Loctite-414
1
18
95222
Screw, 0-42 x 3/16 Torx PH
Threadforming
2
59
Appendix A: Technical Drawings
SIGMA Manual Number 41019
Revision AA
Figure 9. Assembly, 802.11b/g Wireless Battery Module 35162
18
15
9
3
17
11
2
7
1
8
17
*
6
19
7
19
6
9
10
4
5
8
5
*
4
19
6
7
16 13
1
14
SEALANT TO BE APPLIED AROUND
ENTIRE EDGE OF FRONT CASE INCLUDING
BATTERY TERMINALS AND SCREW OPENINGS
1
20
2
9
17
12
9
Item No.
Part No.
Description
Quantity
1
45737
Battery Case - Front
1
2
45738
Battery Case - Rear
1
3
45739
Latch, Battery
1
4
95065
Spacer, Nylon 6/6, White
3
5
60128
Assembly, Wireless Flex
1
6
55105
Antenna Wire
1
7
55094
Antenna
1
8*
55075-1 or
55075-2
Battery Pack
1
60
SIGMA Manual Number 41019
Revision AA
Item No.
Part No.
Description
Quantity
9
95213
Screw, 0-42 x 3/8 SS
Thread Forming
8
10
95222 S
Screw, 0-42x 3/16,
Thread Forming
2
11
95507
Spring, Compression
2
12
50738
Contact, Battery
4
13
55024-3
Magnet, Battery, 0.25 DIA
x 0.031 THK
1
14
90058
Lubricant & Sealant Dow
Corning 111
1
15
41046
Label, Battery, Rear, Lower
1
16
85081
Adhesive,
Cyanoacrylate,Loctite-414
A/R
17
41049
Label, Wireless Battery
Module
1
18
41069
Lable, Wireless Battery,
Rear, Upper
1
19
55104
Digi-Connect Wi-Em - b/g
1
20
41068
Label, Caution
1
61
Appendix A: Technical Drawings
SIGMA Manual Number 41019
Revision AA
Figure 10. Packaging Assembly 35716
5
4
3
11
2
7
6
16
BACK VIEW
1
13
15
5
14
DISCARD
8
PACKAGING FOAM, TOP
AS RECEIVED FROM THE
VENDOR
Item No.
Part No.
Description
Quantity
1
98009
Packing Box
1
2
98010
Packaging Foam, Bottom
1
3
98012
Anti-Static Bag
1
4
35700
Spectrum Final Assembly
1
5
98011
Packaging Foam, Top
A/R
6
98013
Silica Gel Pack
A/R
7
41034
Battery Insulation Tab
A/R
62
SIGMA Manual Number 41019
Revision AA
Item No.
Part No.
Description
Quantity
8
98011-1
Packaging Foam, AC Power
Adaptor
A/R
9
N/A
Packing Tape 2"
1
10
41018
Operator’s Manual
1
11
41019
Service Manual
1
12
85088
Alcohol, Isopropyl
1
*13
35724
Assembly, Battery
1
*14
35083
Wireless Battery Module
1
*15
35724
Li-Ion Battery Assembly
1
16
98014
Rubber Band
1
63
Appendix A: Technical Drawings