1
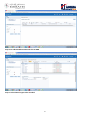
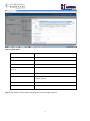
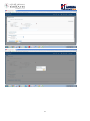
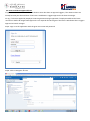
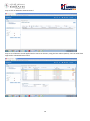
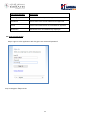
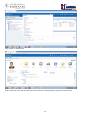
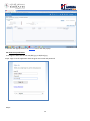
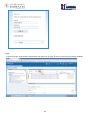
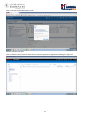
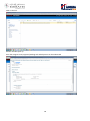
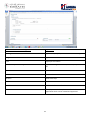
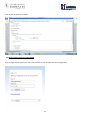
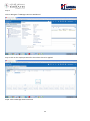
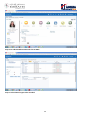
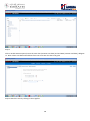
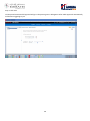
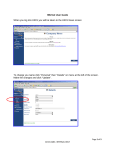
Employee and Manager Self Service Manual Author: Arunkumar T Creation Date: July 25 , 2015 Last Updated: August 15, 2015 Revision: 1.0 1 Change Record Date Author Revisio n 25-Jul-15 Arunkumar. T 1.0 2 Change Reference Table of Contents 1. Objective and assumptions .............................................................................................................. 4 1.1. 2. Employee Self Service....................................................................................................................... 5 2.1. 2.2. 2.3. 2.4. 2.5. 3. Objective ....................................................................................................................................................................... 4 How to apply leave as an Employee ............................................................................................................................. 5 How to withdraw approved leave ................................................................................................................................. 9 How to check Payslip .................................................................................................................................................. 11 How to set preferences ............................................................................................................................................... 13 How to track the approval .......................................................................................................................................... 15 Manager Self Service ..................................................................................................................... 19 3.1. 3.2. 3.3. How to approve or reject leave by login in to the Oracle application ........................................................................ 19 How to apply leave to a sub ordinate ......................................................................................................................... 22 How to delicate approvals during vacation................................................................................................................. 26 3 1. Objective and assumptions 1.1. Objective This document helps CSEH user to get trained on Employee self-service and Manager Self Service 4 2. Employee Self Service 2.1. How to apply leave as an Employee Step1: Login in to the application with the given user name and password Step2: Click on Navigator Time Step 3: Click on Manage Absence Record 5 Step 4: To add New Absence Record click on ADD Step 5: select absence type to be recorded 6 Step 6: Fill the details Field Name Explanation Single Day (Check box) Select if leave needs to be applied for one day Start Date Leave start date End Date Leave End date Start Date Duration/End Date Duration Auto filled based on start date and end date selection Reason Select one of the reason for the absence Comments Any additional information needs to be conveyed to manager for the leave approval Ticket Required Select yes - If against annual leave Ticket needs to be issued Salary Advance Required Select yes - If against annual leave salary advance is required Step 7: Click submit leave will be submitted for branch manager approval. 7 8 2.2. How to withdraw approved leave If approved leave is withdrawn before the absence start date then no approval triggers, if the absence dates are already became past date and then if the leave is withdrawn it triggers approval to the branch manager. For eg., if a leave is applied by employee on 8th August 2015 and got approved. If employee withdraw the leave record on or before 8th August 2015 approval is not required after 8th August if the leave is withdrawn then it triggers approval to branch manager. Step1: Login in to the application with the given user name and password Step2: Click on Navigator Time 9 Step 3: Click on Maintain Absence Record Step 4: List of absence record applied and its status can be seen, using the last column (Delete) user can with draw approved or submitted leave record. 10 Leave Record Status Explanation Awaiting Approval Leave submitted and yet to be approved Scheduled Future Date Leave record submitted and approved Saved Leave record entered but not submitted for approval Withdrawn Submitted leave record deleted by Employee 2.3. How to check Payslip Step1: Login in to the application with the given user name and password Step 2: Navigator My Portrait 11 Step 3:Click on View Payslip Step 4: Enter the start date and End date of the month for which payslip is required Click Search. 12 In the last view payslip click on the PAYSLIP link to view the payslip. 2.4. How to set preferences To change the date format from mm/dd/yyyy to dd/mm/yyyy. Step1: Login in to the application with the given user name and password Step2: 13 Click on the arrow next to your name on the top right corner Click on Set Preferences Step3: Click on Regional Step 4: Change the territory: United Arab Emirates 14 ] Step 5: Click Save 2.5. How to track the approval Step1: Login in to the application with the given user name and password 15 Step2: In the home page, under worklist: Notification and Approvals View Servers (ensure pop up blocker enabled) 16 Click on Human capital Management link Another window will open Click on Initiated Task which shows the list of leave application applied and waiting for approval 17 Click on the link Another window open up From the assignee name, approval pending with which person can be understood 18 3. Manager Self Service 3.1. How to approve or reject leave by login in to the Oracle application (Note: How to apply leave – refer topic 1 under Employee Self Service) Step 1: Login with the given user name and password (User should have Line manager role) Step 2: in the home page, under work list Notification and Approvals, absence record awaiting for approval will be listed 19 Step 2: Click on the link which you want to check and approve. 20 Fields to be checked before approval Explanation Heading in Bold and Blue Colour Type of leave, Employee Name and leave date range Assignee Approver User Name From Employee User Name Absence Entry Details Type Type of leave eg. Annual leave, sick leave, unpaid leave etc Start Date Leave Start Date End Date Leave End Date Duration Total Leave Days Reason Reason for the leave Comments Additional information for the Leave Attachments If Employee attached any document for the leave application which can be viewed and approved. 21 Step 3: Click on approve or Reject. 3.2. How to apply leave to a sub ordinate Step 1: Login with the given user name and password (User should have Line manager role) 22 Step 2: Click on Navigator Manager Resource Dashboard Step 2: Click on the employee Name for whom leave has to be applied Step4: Click on Manage Absence Records 23 Step 4: To add New Absence Record click on ADD Step 5: select absence type to be recorded 24 Step 6: Fill the details Field Name Explanation Single Day (Check box) Select if leave needs to be applied for one day Start Date Leave start date End Date Leave End date Start Date Duration/End Date Duration Auto filled based on start date and end date selection Reason Select one of the reason for the absence Comments Any additional information needs to be conveyed to manager for the leave approval Ticket Required Select yes - If against annual leave Ticket needs to be issued Salary Advance Required Select yes - If against annual leave salary advance is required Step 7: Click submit leave will be submitted for your approval. 25 3.3. How to delicate approvals during vacation Step 1: Login with the given user name and password (User should have Line manager role) Step2: in the home page Under Worklist :Notifcation and Approvals Click View Servers 26 Step 3: Click on Human Capital management Step 4: Another window (enable pop up blocker if required) Click Prefernces 27 Step 5: Click on Enable Vacation period, Enter the start date (vacation start date) and end Date (vacation end date), delegate to . Note: select start date and end date from icon since time also has to be given Step 6: Search the user by clicking on the magnifier 28 Click ok 29 Step 7: Click save Till the period mentioned all approval will go to the person given in delegate to after which approval automatically will be start triggering to you. 30