1
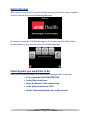
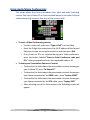
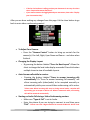
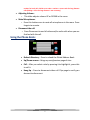
Conference Room Touch Panel Operating Instructions Room Number/ Name: ___________________________________________ Video Extension: ________________________________________________ Off Campus Video Dial In Access: ___________________________________ Telephone Access: For technical assistance please call 409-772-5200 Table of Contents Getting Started: .......................................................................... 2 Selecting what you would like to do: .......................................... 2 Displaying PC or Laptop Only. NO CONFERENCING ................... 3 Using Polycom Video Conference ............................................... 4 Skype for Business Video Conference......................................... 8 Audio (Telephone) Conference ONLY ......................................... 9 Watch Television (Option) ........................................................ 10 1 Getting Started: When you first arrive in the room the touch panel may be blank. Press anywhere on the screen to arrive at the following logo page: By simply pressing the UTMB Health logo on the touch panel the Audio Video system powers on and you will arrive at the following page: Selecting what you would like to do: Select the icon that corresponds to the activity you would like to perform: PC or Laptop Only NO CONFERENCING Audio/Video conference Skype for Business Video conferencing Audio (phone) conference ONLY Watch Television (Optional, may not be present) 2 Displaying PC or Laptop Only. NO CONFERENCING This option allows the client to show their presentation on the available display in the room from the In-Room PC or the client provided Laptop. Connection cables for client provided laptop (HDMI or VGA) are available at the podium, or located in the drawer of the equipment rack or credenza. There is no Audio or Video Conferencing available with this selection. Select one of the three choices: Room PC, Laptop HDMI, or Laptop VGA. When using the In-Room PC the client will utilize the wireless keyboard, mouse and remote located at the lectern, equipment rack or credenza for control. When using a client provided Laptop, the client will selected either the HDMI or VGA button and then connect their laptop to the appropriate HDMI or VGA cable (the external cables for a laptop are located at the lectern or in the drawer of the equipment rack). *Please Note: For optimal display settings, the client provided laptop resolution should be set for 1024 X 768 and 60 HERTZ. TIP: Also if you are in this mode and see a “No Source Input” error make sure your provided laptop is outputting video through its HDMI or VGA output. To do this press FN and F8 sometimes F5 and follow whatever instructions your laptop gives you to output video to an external display or projector. 3 Using Audio/Video Conferencing This option allows the client to broadcast their video and audio (including content from the In-Room PC or client provided laptop) to the other Polycom videoconferencing locations that they will be connect with. To start a Video Conferencing session: o To start a video call, make sure “Type of Call” is set to Video. o Enter the 5 digit alias extension or the full IP address of the far end Polycom unit you are trying to connect to and then press Dial. o If any Codes or ID’s are required during your Video conference, press the button Labeled “Press to Enter Conference code and ID’s” when prompted and enter your applicable code or ID. To share your Presentation Source or Content: o To show the Far-End viewers the presentation content showing on your In-Room PC, press “In-Room PC” o To show the Far-End viewers the presentation content showing on your laptop connected w/ an HDMI cable, press “Laptop HDMI” o To show the Far-End viewers the presentation content showing on your laptop connected w/ an VGA cable, press “Laptop VGA” o After selecting one of the three options, the following screen will appear 4 o The default settings from this screen are preselected that will be sufficient for standard use. However, if you choose to modify these settings based on the specific task you are attempting, you may choose from four options from this screen 1. Improve Document Sharpness for the Far-End audience: If you are showing a non-animated document such as a Word doc or spreadsheet, this option sends the presentation to the Far-End display in a manner that allows for the most optimal document quality available for your audience. (Sharper Image) 2. Improve Video Motion for the Far-End audience: If you are showing an animation or video, this option sends the presentation to the Far-End display in a manner that allows for the most optimal video quality available for your audience. (fast, fluid video) 3. Display your presentation and Far-End Video: This option will allow your local display to show your presentation AND the video image coming in from your Far-End audience. 4. Display Your Presentation Only: This option will allow your local display to show ONLY your presentation. *TIPS: o If the Far End audience is telling you the video is choppy then select the “Improve Video Motion” button. 5 o o If the Far End audience is telling you that your document is not very clear then select “Improve Document Sharpness”. If your mouse seems to be lagging behind your movements, then select “Display your Presentation Only” After you are done making any changes from this page. Hit the close button to go back to main video conferencing control. To Adjust Your Camera: o Press the “Camera Control” button to bring up controls for the camera(s). Pan Left, Right, Up or Down and Zoom + - and close when finished. Changing the Display Layout: o By pressing the button labeled “Press for Next Layout” Allows the client to change the local video display as needed. Press this button multiple times to view all available layouts. Auto-Answer calls while in session: o Pressing the button Labeled “Press to answer incoming calls automatically” Or “Press To answer Incoming Call manually” will allow incoming calls (video/audio) to be accepted manually or automatically while your current Video confernceing call is active. *Please note: When incoming calls come in during manual mode, a window will open asking you to accept or decline call. When in automatic mode, all incoming calls will be answered automatically. Starting an Audio Call during a Video Conferencing session: o Make sure “Type of Call” is set to Audio. o Enter the phone # you are trying to connect to and then press “Dial”. *Please note: Dial 5 digit extension for internal UTMB calls. Dial 9+ local 6 number for local calls. Dial 8+ area code + number + access code for long distance calls (Dialing a 1 first for long distance is not necessary) Adjusting Volume: o This slider adjusts volume UP or DOWN in the room. Mute Microphones: o Press this button once to mute all microphones in the room. Press it again to unmute. Disconnect the call: o Press Disconnect to end all video and/or audio calls when you are finished with the call. Using the Phone Book: Refresh Directory – Press to reload the Global Address Book. Up/Down arrows – Brings up next/previous page of sites Call – After you select a site by pressing it to highlight it, press this to call it. Hang Up – Press to disconnect video call. Flips page to verify you do want to disconnect. 7 Skype for Business Video Conference This option allows the client to start a web conference using Skype for Business the online meeting software that is installed on the In-Room PC. *Please note: Skype for Business is NOT considered a Polycom video system. Skype for Business is a PC based audio video conference system software and ALL control and interface is through the Skype for Business software installed on the In-Room PC. After selecting the Skype for Business Conferencing button, the desktop of the In-Room PC will appear on the main display in the room. The client will then use the Skype for Business conference software in the same manner they normally would on their own PC or laptop to include placing call, ending call, sharing content, mute and additional volume. However, all camera control (Pan Left, Right, Up or Down and Zoom) will be through the Touch Panel. See Skype for Business Conferencing Help Topics for further instructions on using Skype for Business conferencing. *Please note: Make sure both the In-Room PC and the touch panel volume and mute controls are set to desired levels. 8 Audio (Telephone) Conference ONLY This option allows the client to place a normal phone call or “audio only” based conference using the microphones and speakers in the room. By selecting this option a normal phone dialog box will open and the client will control the phone in a similar fashion to a personal cell phone. To start Audio Conferencing session: To place a call, just enter the phone # you are trying to connect to and then press Dial. *Please note: Dial 5 digit extension for internal UTMB calls. Dial 9+ local number for local calls. Dial 8+ area code + number + access code for long distance calls (Dialing a 1 first for long distance is not necessary). Auto-Answer calls while in session: o Pressing the button Labeled “Press to answer incoming calls automatically” will allow incoming calls (video/audio) to be accepted automatically. *Please note: In order to not be disturbed by any incoming calls make sure this button is NOT highlighted. Adjusting Volume: o This slider adjusts volume UP or DOWN in the room. Mute Microphones: o Press this button once to mute all microphones in the room. Press it again to unmute. Disconnect the call: o Press Disconnect to end all video and/or audio calls when you are finished with the call. *Tip: If you are in an “Audio Conference Only” and you decide to show a presentation, back out of “Audio Conference Only” option and select “Polycom Video Presentation” and follow directions to show your presentation from whatever content source you select. 9 Watch Television (Option) This option allows the client to view normal cable television programming. Use the normal hand held TV remote control for channel and volume up / down, menu and other controls. Volume – This slider adjusts volume UP or DOWN in the room. Back – Allows the client to re-select the conference mode needed. 10