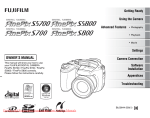
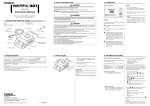
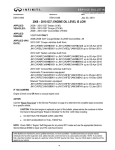
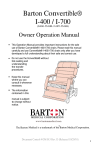
1
Reference:
Date:
ITB10-034a
July 21, 2010
VOLUNTARY SERVICE CAMPAIGN
2003 – 2004 G35 SEDAN AND COUPE
SEAT MOUNTED SIDE AIR BAG HARNESS CONNECTOR
This bulletin has been amended. Changes were made on pages 3 and 4, and the Parts and Claims Information were
updated. Please discard previous versions of this bulletin.
CAMPAIGN ID #:
APPLIED VEHICLES:
P0339
2003 – 2004 G35 Sedan (V35)
2003 – 2004 G35 Coupe (CV35)
Check Service Comm to confirm campaign eligibility
INTRODUCTION
On some model year 2003-2004 G35 vehicles, the seat-mounted side air bags could stop working due to a
connector issue. If this occurs, a red air bag warning lamp would illuminate on the dash to warn the driver. To
remedy this potential condition, Infiniti will relocate and secure the seat-mounted side air bag connectors.
IDENTIFICATION NUMBER
Infiniti has assigned identification number P0339 to this campaign. This number must appear on all
communications and documentation of any nature dealing with this campaign.
DEALER RESPONSIBILITY
Dealers are to correct each vehicle falling within the range of this campaign that enters the service department.
This includes vehicles purchased from private parties or presented by transient (tourist) owners and vehicles in
a dealer’s inventory.
1/24
Table of Contents
Page
Preparation (Sedan and Coupe) for Side Air Bag Connector Kit Installation………………….. 3
Sedan – Front Seat (Driver and Passenger) Side Air Bag Connector Kit Installation ……......
NOTE: Applies to power seats only.
4
Coupe – Driver Seat Side Air Bag Connector Kit Installation……………………………………. 10
Coupe – Front Passenger Seat Side Air Bag Connector Kit Installation……………………….. 15
Final Steps After Installation of Side Air Bag Connector Kits……………………………………. 21
PARTS INFORMATION……………………………………………………………………………… 22
CLAIMS INFORMATION…………………………………………………………………………….. 23
OWNER’S LETTER…………………………………………………………….…………………….
2/24
24
ITB10-034a
SERVICE PROCEDURE
NOTE:
• This procedure applies to front power seats only.
• Some 2003 G35 Sedans have a manual front passenger seat that is not included in this campaign.
Preparation (Sedan and Coupe) for Side Air Bag Connector Kit Installation
1. Write down all radio station presets.
Presets
AM
FM-1
FM-2
SAT
1
2
3
4
5
6
2. If equipped, write down / record the following customer settings for the ATC (Automatic Temperature
Control) system. (Refer to the Service Manual as needed):
•
Temperature Setting Trimmer
•
Foot Position Setting Trimmer
•
Inlet Port Memory Function
3. Move front seat(s) forward and remove the rear mounting bolts.
4. Move front seat(s) to the full rear position.
5. Adjust the seatback (recline) on front seat(s) to the full forward position.
6. Remove the front mounting bolts for the front seat(s).
7. Make sure the ignition is OFF and disconnect both battery cables (negative cable first).
8. Wait at least 3 minutes after the battery cables are disconnected.
IMPORTANT: Follow all cautions, warnings, and notes in the Electronic Service Manual (ESM) when
working on or near a Supplemental Restraint System (SRS), such as an airbag.
9. Tip the seat(s) backward as far as possible without
overstretching the seat wiring harness.
•
Don’t overstretch
harness
Driver seat shown, passenger seat is similar.
NOTE: Use covers as needed to protect seats and
other interior surfaces.
Figure 1
3/24
ITB10-034a
SEDAN: Front Seat (Driver and Passenger Power) Side Air Bag Connector Kit Installation.
NOTE:
•
Some 2003 G35 Sedans have a manual front passenger seat that is not included in this campaign.
•
Make sure to perform this procedure on the driver seat and the front passenger power seat.
•
Figures 1a through 10a are used for both the driver seat and the front passenger power seat.
1. Look under the seat and locate the harness and connectors shown in Figure 1a.
2. Remove tape from the area shown in Figure 1a, just enough to separate the Side Air Bag (SAB) wires.
Side air bag
wires separated
from taped area
Remove
tape here
Use this hole to mount
the new connector
bracket.
Side air bag
connector
Figure 1a
4/24
ITB10-034a
SEDAN
3. Install the new connector bracket as shown in Figure 2a and torque the nut:
17.6 – 26.5 N•m ( 1.8 – 2.7 kg-m, 13 – 20 ft-lb)
New connector
bracket
Bracket mounting nut
Figure 2a
4. Snap loose the Side Air Bag (SAB)
connector with clip from the mounting
position.
SAB
connector
Figure 3a
5/24
ITB10-034a
SEDAN
5. Disconnect and reconnect the SAB connector 3
times.
NOTE: This step is used to clean the
connector contacts and ensure good
continuity through the connector.
3 times
Figure 4a
Mounting clip
6. Remove the mounting clip from the SAB
connector.
Figure 5a
6/24
ITB10-034a
SEDAN
7. Mix a small amount (about ½ ounce) of
“5 MINUTE® EPOXY” in a suitable mixing tray.
NOTE: See the Parts Information for product
detail and MSDS information.
CAUTION:
• Use chemical resistant gloves when handling
this product.
•
Wear safety glasses with side shields.
Figure 6a
8. Place covers on the floor and seat to protect against epoxy spills.
9. Apply the epoxy to the back side (wire gates) of the SAB connector (see Figure 7a).
•
Apply epoxy to all 4 wire gates.
•
Work epoxy into the wire gates and around each wire.
•
Apply epoxy about 4 mm (5/32 inch) up the wire from the connector.
Apply epoxy about 4 mm (5/32 inch)
up wire from the connector.
If needed, carefully remove
a small amount of tape
from the wires.
Work epoxy into wire gates
and around each wire.
Figure 7a
7/24
ITB10-034a
SEDAN
10. Install a tie-wrap (P/N 24216 – AM00A) around the SAB connector as shown in Figure 8a.
a. Route the tie-wrap between the wires.
b. Pull the tie-wrap tight.
c. Cut excess tie-wrap flush so there are no sharp edges.
Cut off excess
Route
between wires
Route between
wires
Figure 8a
NOTE: Leave the connector undisturbed for 5 minutes while the epoxy cures.
11. Reinstall the connector mounting clip (see Figure 9a).
12. Install 2 “mounting clip type” tie-wraps as shown in Figure 9a.
Mounting clip
type tie-wrap
Mounting clip
type tie-wrap
Mounting clip
10 mm (3/8 inch)
10 mm (3/8 inch)
Figure 9a
8/24
ITB10-034a
SEDAN
13. Mount the SAB connector on the new bracket as shown in Figure 10a.
Mounting clip
type tie-wrap
New bracket
Mounting clip
type tie-wrap
Figure 10a
NOTE: Make sure to perform this procedure on the driver seat and the front passenger power seat.
14. After kit installation, reinstall the seat(s) in reverse order.
•
Torque for seat mounting bolts: 49 N•m (5.0 kg-m, 36 ft-lb)
15. Go to “Final Steps After Installation of Side Air Bag Connector Kits” on page 21.
9/24
ITB10-034a
COUPE: Driver Seat Side Air Bag Connector Kit Installation
NOTE: Preparation steps should already have been done (see page 3).
1. Look under the seat and locate the Side Air Bag (SAB) connector shown in Figure 1b.
2. Snap loose the SAB connector with clip from its mounting position.
SAB connector
Figure 1b
3. Disconnect and reconnect the side air bag
connector 3 times.
NOTE: This step is used to clean the
connector contacts and ensure good
continuity through the connector.
3 times
Figure 2b
10/24
ITB10-034a
COUPE Driver Seat
Mounting clip
4. Remove the mounting clip from the side air bag
connector.
Figure 3b
5. Mix a small amount (about ½ ounce) of
“5 MINUTE® EPOXY” in a suitable mixing tray.
NOTE: See the Parts Information for product
detail and MSDS information.
CAUTION:
• Use chemical resistant gloves when handling
this product.
•
Wear safety glasses with side shields.
Figure 4b
11/24
ITB10-034a
COUPE Driver Seat
6. Place covers on the floor and seat to protect against epoxy spills.
7. Apply the epoxy to the back side (wire gates) of the side air bag harness connector (see Figure 5b).
•
Apply epoxy to all 4 wire gates.
•
Work epoxy into the wire gates and around each wire.
•
Apply epoxy about 4 mm (5/32 inch) up the wire from the connector.
Apply epoxy about 4 mm (5/32 inch)
up wire from the connector.
If needed, carefully remove
a small amount of tape
from the wires.
Work epoxy into wire gates
and around each wire.
Figure 5b
8. Install a tie-wrap (P/N 24216 – AM00A) around the connector as shown in Figure 6b.
a. Route the tie-wrap between the wires.
b. Pull the tie-wrap tight.
c. Cut the excess tie-wrap flush so there is no sharp edge.
Cut off excess
Route
between wires
Route between
wires
Figure 6b
NOTE: Leave the connector undisturbed for 5 minutes while the epoxy cures.
12/24
ITB10-034a
COUPE Driver Seat
9. Attach the SAB connector to the seat main harness as follows:
a. First, use tie-wraps to secure the SAB connector to the main harness (see Figures 7b, 8b and 9b).
SAB connector to be
attached here
Seat main
harness
Figure 7b
•
Make sure the connector is
secured to the side of the harness
as shown in Figure 8b.
•
One tie-wrap (P/N 24216-S5800) harness to connector - as shown
in Figure 9b.
•
Two tie-wraps (P/N 24216-S5800)
- harness to harness - 15 mm
(9/16 inch) from the connector as
shown in Figure 9b.
Tie-wrap
Harness to
harness
15 mm
(9/16 inch)
Tie-wrap
Connector
to harness
A-A’ cross section
Seat cushion
Main harness
Connector
15 mm
(9/16 inch)
Tie-wrap
Harness to
harness
vehicle floor
Figure 8b
Figure 9b
13/24
ITB10-034a
COUPE Driver Seat
b. Completely tape the SAB connector to the main harness as shown in Figure 10b.
IMPORTANT: Use ONLY specified tape (P/N 24828 – AM00A).
SAB connector taped to
main harness
Figure 10b
10. Go to COUPE: Front Passenger Seat Side Air Bag Connector Kit Installation on the next page.
14/24
ITB10-034a
COUPE: Front Passenger Seat Side Air Bag Connector Kit Installation.
NOTE: Preparation steps should already have been done (see page 3).
1. Look under the seat and locate the Side Air Bag (SAB) connector shown in Figure 1c.
2. Snap loose the side air bag connector with clip from the mounting position.
SAB
connector
Figure 1c
3. Disconnect and reconnect the side air bag
connector 3 times.
NOTE: This step is used to clean the
connector contacts and ensure good
continuity through the connector.
3 times
Figure 2c
15/24
ITB10-034a
COUPE Front Passenger Seat
Mounting clip
4. Remove the mounting clip from the side air bag
connector.
Figure 3c
5. Mix a small amount (about ½ ounce) of
“5 MINUTE® EPOXY” in a suitable mixing tray.
NOTE: See the Parts Information for product
detail and MSDS information.
CAUTION:
• Use chemical resistant gloves when handling
this product.
•
Wear safety glasses with side shields.
Figure 4c
16/24
ITB10-034a
COUPE Front Passenger Seat
6. Place covers on the floor and seat to protect against epoxy spills.
7. Apply the epoxy to the back side (wire gates) of the SAB harness connector (see Figure 5c).
•
Apply epoxy to all 4 wire gates.
•
Work epoxy into the wire gates and around each wire.
•
Apply epoxy about 4 mm (5/32 inch) up the wire from the connector.
Apply epoxy about 4 mm (5/32 inch)
up wire from the connector
If needed, carefully remove
a small amount of tape
from the wires.
Work epoxy into wire gates
and around each wire
Figure 5c
8. Install a tie-wrap (P/N 24216 – AM00A) around the connector as shown in Figure 6c.
a. Route the tie-wrap between the wires.
b. Pull the tie-wrap tight.
c. Cut the excess tie-wrap flush so there is no sharp edge.
Cut off excess
Route
between wires
Route between
wires
Figure 6c
NOTE: Leave the connector undisturbed for 5 minutes while the epoxy cures.
17/24
ITB10-034a
COUPE Front Passenger Seat
9. Tape the metal rod (P/N 87607 – CF90A) to the seat harness as shown in Figures 7c and 8c.
IMPORTANT: Use ONLY specified tape (P/N 24828 – AM00A).
Tape metal rod
along harness
here.
Harness
branch
Figure 7c
Metal rod
Metal rod
taped to
harness
Harness
branch
End of metal
rod even with
the harness
branch.
Figure 8c
18/24
ITB10-034a
COUPE Front Passenger Seat
10. Secure the SAB connector to the seat harness and metal rod as shown in Figure 9c and 10c.
•
Make sure the connector is secured to the bottom of the harness as shown in Figure 9c.
•
One tie-wrap (P/N 24216-S5800) - connector to harness - as shown in Figure 10c.
•
Two tie-wraps (P/N 24216-S5800) - harness to harness - as shown in Figure 10c.
•
Cut excess tie-wrap flush so there are no sharp edges.
Tie-wrap
Harness to
harness
Tie-wrap
Connector
to harness
Figure 9c
Tie-wrap
Harness to
harness
Figure 10c
19/24
ITB10-034a
COUPE Front Passenger Seat
11. Completely tape the SAB connector to the seat harness as shown in Figure 11c.
IMPORTANT: Use ONLY specified tape (P/N 24828 – AM00A).
12. Attach tie-wrap (P/N 24216 – S5800) around harnesses and S-spring as shown in Figure 11c.
•
Cut excess tie-wrap flush so there are no sharp edges.
SAB connector tapped
to harness
S-spring
Tie-wrap around
these 3 harnesses
Tie-wrap around 3
harnesses and S-spring
Figure 11c
NOTE: Make sure a SAB connector kit is installed on both front seats.
13. After installation of kit on both front seats, reinstall the seats in reverse order.
•
Torque for seat mounting bolts: 49 N•m (5.0 kg-m, 36 ft-lb)
14. Go to Final Steps After Installation of Side Air Bag Connector Kits on the next page.
20/24
ITB10-034a
Final Steps After Installation of Side Air Bag Connector Kits
1. Connect the battery cables, positive cable first.
2. Reset the clock and the radio station presets.
3. Reset / Re-initialize power windows, power sunroof, ATC, etc. as needed.
•
Refer to Additional Service When Removing Battery Negative Terminal in the GI section of the
appropriate Service Manual for details.
4. Connect CONSULT-II or C-III to the vehicle and check air bag codes.
•
Erase any side module “open circuit” codes (SIDE MODULE RH or LH [OPEN]: B1129 or B1134)
stored in Self Diagnosis Current or Self Diagnosis Past.
NOTE: If using C-III, air bag Self Diagnosis Past is under “Special Function” (see Figure A).
•
Codes other than the above are not covered by this bulletin. If any codes other than the above are
stored; diagnose and repair as needed using usual diagnostic and repair procedures.
SELF-DIAG [PAST] is under Special function
Figure A
5. Disconnect CONSULT from the vehicle.
6. Turn the ignition OFF and then ON. Make sure the air bag warning lamp (on the instrument panel) turns
ON and then goes OFF after about 7 seconds.
21/24
ITB10-034a
PARTS INFORMATION
MODEL
G35 Sedan
G35 Coupe
DESCRIPTION
Side Air Bag Connector Kit
(Includes 2 brackets and 2 nuts)
Clip
(Tie-wrap for SAB connector)
Clip
(Mounting clip type tie-wrap for SAB harness)
VersaChem 5 MINUTE® EPOXY GEL
(or equivalent)
Side Air Bag Connector Kit
(Metal rod)
Clip
(Tie-wrap for SAB harness)
Clip
(Tie-wrap for SAB connector)
Tape
VersaChem 5 MINUTE® EPOXY GEL
(or equivalent)
PART #
QTY
H7698 – CF91A
1 (see note 1)
24216 – AM00A
1 per seat
24225 – 79900
2 per seat
46509
(Local Source)
Shop Supply
87607 – CF90A
1
24216 – S5800
7
24216 – AM00A
2
24828 – AM00A
46509
(Local Source)
Shop Supply
Shop Supply
NOTE 1: The Side Air Bag Connector Kit includes 2 brackets and 2 nuts. Some 2003 G35 Sedans have a
manual front passenger seat that is not included in this campaign. In this case discard the extra bracket
and nut.
NOTE 2:
•
Use VersaChem 5 MINUTE® EPOXY GEL (item number 46509) or equivalent.
•
VersaChem 5 MINUTE EPOXY® GEL is available from NAPA stores (NAPA item number is 765-2417)
•
Refer to the VersaChem web site for MSDS information: www.versachem.com
22/24
ITB10-034a
CLAIMS INFORMATION
Submit a Campaign (CM) line claim using the following claims coding:
“CM” I.D.: P0339
2003 – 2004 G35 Sedan (V35) - Both front power seats
DESCRIPTION
Relocate Side Air Bag Connectors
(Install Front Seat Side Air Bag Connector Kit)
OP CODE
P03390
FRT
0.7hrs.
OP CODE
P03392
FRT
0.5hrs.
OP CODE
P03391
FRT
0.8 hrs
OR
2003 G35 Sedan (V35) - Driver seat only
DESCRIPTION
Relocate Side Air Bag Connectors
(Install Front Seat Side Air Bag Connector Kit)
OR
G35 Coupe (CV35)
DESCRIPTION
Relocate Side Air Bag Connectors
(Install Front Seat Side Air Bag Connector Kit)
23/24
ITB10-034a
OWNER’S LETTER
Dear Infiniti G35 Owner:
Infiniti is committed to providing the highest levels of product safety, quality and customer satisfaction. With
that in mind, we want to bring to your attention important information about the seat-mounted side air bags in
your G35.
REASON FOR CAMPAIGN
Your G35 is equipped with seat-mounted side air bags. On some model year 2003-2004 G35 vehicles, the
seat-mounted side air bags could stop working due to a connector issue. If this occurs, a red air bag
warning lamp would illuminate on the dash to warn the driver. If the lamp is ignored, the seat-mounted
side air bags may not inflate in a crash.
WHAT INFINITI WILL DO
To assure your continued satisfaction and confidence in your G35, Infiniti will inspect the seat-mounted side air
bags in your vehicle and relocate and secure the connector. This service, free for parts and labor, should take
1 hour to complete, but your Infiniti retailer may require your vehicle for a longer period of time based upon their
work schedule. Please contact your Infiniti retailer to perform this important service.
WHAT YOU SHOULD DO
We strongly recommend that you have this service performed as soon as possible (even if the air bag warning
lamp in your vehicle is not illuminated).
Contact your Infiniti retailer at your earliest convenience in order to arrange an appointment to have your
vehicle repaired at no charge to you for parts and labor. Please bring this notice with you when you keep your
service appointment. Instructions have been sent to your Infiniti retailer.
If you have paid to have your side air bag wire harness replaced prior to this service campaign, you may be
eligible for reimbursement of the related expense. If you have additional questions you may contact the
National Consumer Affairs Department, Infiniti Division, Nissan North America, Inc., P.O. Box 685003, Franklin,
TN 37068-5003. The toll free number is 1-800-662-6200.
Thank you for your cooperation. We are indeed sorry for any inconvenience this may cause you.
24/24
ITB10-034a