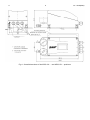
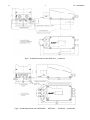
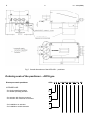
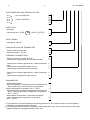
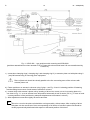
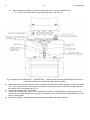
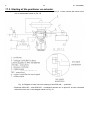
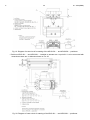
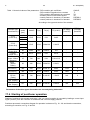
1
IO-APIS(ENG)
APLISENS
MANUFACTURE OF THE INDUSTRIAL MEASURING
APPARATUS AND AUTOMATICS COMPONENTS
SERVICE MANUAL
ELECTROPNEUMATIC POSITIONER
APIS type
Edition A
WARSAW, JUNE 2014.
APLISENS S.A., 03-192 Warsaw, ul. Morelowa 7
tel. +48 22 814 07 77; fax +48 22 814 07 78
www.aplisens.pl, e-mail: [email protected]
Markings used
Symbol
i
Description
Warning regarding necessity of exact use of information contained in the documentation to
ensure safety and full device functionality.
Information especially useful for assembly and operation of the device.
Information especially useful for assembly and operation of the device in Ex execution.
Information about procedure for worn-out equipment.
BASIC REQUIREMENTS AND SAFETY OF OPERATION
- The manufacturer is not liable for damages resulted from improper assembly, not
maintaining in a proper technical condition as well as operation of the positioner
inconsistent with its intended use.
- The assembly and starting works should be executed only by the qualified automatics assemblers
or by trained personnel under their supervision, according to the obligatory regulations and
recommendations from the field of automatics and electrotechnics.
- Improper assembly and configuration can result in incorrect operation, leading to the device’s
damage or accident.
- During assembly, operation, inspections all safety and protection requirements should be taken
into account.
- In case of inefficiency, the device should be disconnected and given back to the manufacturer or
authorized branch for repair.
Installation for intrinsically safe executions should be performed especially carefully with
observation of the standards and regulations suitable for these types of installations.
The manufacturer reserves the right to introduce changes (not resulting in deterioration of operation and
metrological parameters of the product) without updating of the service manual’s content.
The current version of the service manual and certificate of conformity is available on the website
www.aplisens.pl
A
I
IO – APIS(ENG)
Annex Exi
ELECTROPNEUMATIC POSITIONER
TYPE APIS-XXX-…-REx-…
EXECUTION - INTRINSICALLY SAFE
1.
Introduction
1.1. This „Exi annex” applies only to the intrinsically safe APIS type positioners with designation
on the rating plates as described in point 3 and with information about the Ex execution in the
„Product Certificate”
1.2. The above mentioned annex includes supplementary data connected with the intrinsically safe
execution of the positioners. During assembly and operation of the positioners in the Ex execution, you
should use IO – APIS (service manual) with the „Exi annex”.
2.
Application of the positioners mentioned in point 1 in the endangered zones.
2.1. The above mentioned positioners are executed in accordance with the requirements of the
standards:
EN 60079-0:2012, EN 60079-11:2012
2.2. The positioners can operate in the ex-zone according to a given designation of the explosion proof
construction type.
εx
II 2G Ex ia IIC T6/T5 Gb
FTZÚ 10 ATEX 0093
2.3. Category of the positioner and hazard zone.
2G category included in the positioner designation informs that the positioner can be assembled in
the hazard zone 1.
3.
Identification designations.
The intrinsically safe APIS positioner is equipped with two plates:
4.
a)
rating plate, where information given in point 4 of IO – APIS is included.
b)
additional plate with the following data:
-
type of positioner and the company’s logo
-
CE mark and number of the notified body , mark
-
designation of the explosion proof enclosure and designation of the certificate
-
Ui, Ii, Ci, Li, Pi parameters
-
operation temperatures
εx
Delivery completeness
The buyers get positioners in the Ex execution in a consumer package and/or omnibus package according
to point 2 of IO – APIS. A buyer gets a copy of the certificate on request (also available on the website
www.aplisens.pl).
A
II
IO – APIS(ENG)
Annex Exi
5.
The allowable input and output parameters (on the basis of data from annexes to
the FTZÚ 10 ATEX 0093 certificate and certification documentation).
The positioners should be supplied from supply-measuring devices having the certificates of intrinsic
safety, which output parameters should not exceed the allowable parameters of positioner supply,
given below:
5.1. Input unit, terminals 1 and 2.
a) for supply from source with a linear characteristics
Ui=30 VDC, Ii=0,1A, Pi=0,75W, Li=0,05mH, Ci=15nF, Ta ≤ 80°C T5, Ta ≤ 45°C T6
b) for supply from source with a rectangular characteristics
Ui=24 VDC, Ii=0,025A, Pi=0,6W, Li=0,05mH, Ci=15nF, Ta ≤ 80°C T5, Ta ≤ 45°C T6
c) for supply from source with a trapezoidal characteristics
Ui=24 VDC, Ii=0,05A, Pi=0,6W, UQ=48V, Li=0,05mH, Ci=15nF, Ta ≤ 80°C T5, Ta ≤ 45°C T6
5.2. Input unit, terminals 6 and 7.
a) for supply from source with a linear characteristics
Ui=30 VDC, Ii=0,1A, Pi=0,75W, Li=0,002mH, Ci=15nF, Ta ≤ 80°C T5, Ta ≤ 45°C T6
b) for supply from source with a rectangular characteristics
Ui=24 VDC, Ii=0,025A, Pi=0,6W, Li=0,002mH, Ci=15nF, Ta ≤ 80°C T5, Ta ≤ 45°C T6
c) for supply from source with a trapezoidal characteristics
Ui=24 VDC, Ii=0,05A, Pi=0,6W, UQ=48V, Li=0,002mH, Ci=15nF, Ta ≤ 80°C T5, Ta ≤ 45°C T6
5.3. An allowable output parameters of the external position transducer,
terminals 3, 4, 5
Uo=6 VDC, Io=67 mA, Lo=100µH, Co=200nF
6.
Methods of electrical connections of APIS positioners in the Ex execution.
Connection of the positioner and devices in measuring loop should be executed according to the
intrinsic safety and explosion proofness standards as well as conditions of use in endangered zones.
Non-observation of the intrinsic safety regulations can cause explosion and connected with it hazard
for people
A
III
IO – APIS(ENG)
Annex Exi
Electrical system for positioner’s connection should meet installation regulations of the obligatory
standards.
It is forbidden to execute any types of repairs and any other interference in electric system
of the positioner. Evaluation of damage and possible repairs should be made only by the
manufacturer or authorized unit.
A
1
IO – APIS(ENG)
TABLE OF CONTENTS
1.
2.
3.
4.
5.
6.
7.
8.
9.
10.
11.
12.
13.
14.
INTRODUCTION .................................................................................................................................... 2
DELIVERY COMPLETENESS ................................................................................................................ 2
INTENDED USE ..................................................................................................................................... 2
IDENTIFICATION DESIGNATION………………………………………………………………………………...3
TECHNICAL DESCRIPTION .................................................................................................................. 3
TECHNICAL DATA ...............................................................................................................................10
OPERATION CONDITIONS...................................................................................................................11
TRANSPORTATION INSTRUCTIONS...................................................................................................11
UNPACKING AND STORING INSTRUCTIONS .....................................................................................11
ASSEMBLY MANUAL ...........................................................................................................................12
SERVICE MANUAL ...............................................................................................................................21
MAINTENANCE ....................................................................................................................................54
DAMAGES AND REPAIRS ...................................................................................................................54
SPARE PARTS .....................................................................................................................................55
A
1.
2
IO – APIS(ENG)
INTRODUCTION
This service manual is a document intended for the users of the APIS type electropneumatic positioners
containing technical data and guidelines necessary to get acquainted with the rules of operation and methods
of maintenance of these positioners. Indispensible recommendations concerning assembly and operation as
well as procedure in case of failure are also given here.
2.
DELIVERY COMPLETENESS
The buyers will receive the positioners in consumer and/or omnibus packages.
User gets also, with the positioner:
a) „Product certificate” – being also a warranty certificate,
b)
Service manual marked as IO-APIS,
c)
Certificate of conformity – on request
Items b), c) are also available on the website www.aplisens.pl
3.
INTENDED USE.
The APIS type electropneumatic positioner cooperates with executive elements in order to ensure a unique
dependence between positioner analogue current input signal and pneumatic output signal under the
circumstances interfering operation of the positioner. Mainly in case of control valves with linear or rotational
pneumatic actuator of single-sided of double-sided operation. In these systems, as a result of time, corrosion
and other phenomena, e.g. resistance of piston rod’s friction in valve’s gland can change.
The APIS type positioner is simultaneously power amplifier of input signal enabling feeding of control signal to
the actuator’s chamber of power of 100% of supply pressure. The positioner electronic module enables user to
program, in its non-volatile memory, many very essential parameters for optimization of the control system,
where control valve with the APIS positioner acts as an executive element. It is e.g.:
o
Value of gain coefficient of the PID controller setting over a wide range the
o
Integration and differentiation time of control loop setting over a wide range
o
Change of speed of actuator piston rod stroke.
The APIS type positioners are widely used for the industrial automatics systems of manufacturing processes.
With respect to type of operation, the positioner is a follow-up position controller, connected with the following
signals:
o
Input signal ( 4...20 mA ) of the positioner ( control signal )
o
Signal of measured value, determining current position of actuator piston rod in % of full stroke
o
pneumatic input signal – control actuator ( 0...0,8 MPa )
The APIS type positioner can:
o
Invert input signal i.e. decrease of pneumatic output signal on actuator chamber – inversely as in
case of straight operation – corresponds to increase of the input signal. It enables to change
direction of actuator operation from straight to reverse.
o
Decrease of analogue output signal 4…20 mA corresponds to – inversely as in case of normal
operation – reversing of analogue output signal.
The positioner can cooperate with both pneumatic actuators of straight operation ( i.e. pressure increase
closes the valve ) and inversely operating actuators ( i.e. pressure increase opens the valve ).
A
3
IO – APIS(ENG)
The positioner can cooperate with one-sided operating actuators manufactured by: Polna S.A., Samson, Arca
Regler, Spirax Sarco and double-sided operation manufactured by: Prema Kielce, Air Torque, Ebro Armaturen,
El-0-Matic and other manufacturers after use of suitable coupling elements.
4.
IDENTIFICATION DESIGNATIONS
Each positioner is equipped with a rating plate where the following information can be found:
CE mark, name of the manufacturer, designation of positioner type, manufacture number, supply pressure,
input signal, output signal, type of actuator/stroke and year of the manufacture.
Ordering code and types of the execution acc. to the point 5.3.
5.
TECHNICAL DESCRIPTION.
5.1. Principle of operation.
Construction of the positioner is based on a 16-bit microprocessor system. In this microprocessor system the
measurements are taken and set point SP and measured PV values are determined. The difference between
SP and PV values is converted according to a non-linear control algorithm to the control signal ( Fig. 1 ). This
signal is then converted in the electropneumatic converter to the output pneumatic signal. Pneumatic signal is
directed to the actuator chamber resulting in reduction of difference between SP and PV values ( Fig. 2 ). The
positioner is electric supplied from the two-conductor source. An external source of supply 10…36 VDC is
required for execution with an additional analogue input signal.
Fig.1. Block diagram of the positioner control system
A
4
IO – APIS(ENG)
5.2. Construction.
The APIS type electropneumatic positioner consists of the following components ( see fig. 2 ):
o
Electropneumatic controller
o
Electropneumatic transducer
o
Potentiometric transducer of piston rod’s displacement
o
Casing body*
o
Cover*
o
Pneumatic connectors*
o
Coupling unit *
( * Components not shown on the fig. 2)
Fig.2. Block diagram of the APIS type positioner
Electronic controller consists of:
o
Microprocessor circuit using 16-bit processor
o
Memory for positioner configuration parameters
o
3-element keyboard
o
System transducers: analogue-digital and digital-analogue
o
Current-voltage transducer
o
Liquid crystal display
o
Electric connectors
o
Connector of transducer of actuator piston rod displacement and e/p transducer.
The above listed elements, except electric connections, are located on printed-circuit board covered with a
silicon and varnish layer. Electronic controller is connected using conductors with electropneumatic transducer
of displacement of actuator piston rod. Both transducers are in APIX-XX0-… execution and are screwed down
to the body of positioner casing. For executions APIS-XX1-… the displacement transducer is assembled
outside the positioner casing. Body of the casing, together with positioner cover, is IP65 i.e. is dustproof as well
as splash-proof.
A
5
IO – APIS(ENG)
The displacement transducer is coupled with internal end of positioner rotational shaft (does not apply to APISXX1-… executions).
Coupling set consists of slide bearing supported shaft in casing’s body and selector lever screwed down to the
external end of this shaft ( does not apply to APIS-XX1-… executions ). Set of the pneumatic connectors
connects a delivery channel with an output channel from the electropneumatic transducer. The connectors
consist of manometers and couplers. The electric glands are screwed in to the casing’s body. Casing’s body,
from the keyboard and electric connectors’ side, is closed by a tight cover. The positioner can be equipped, on
the customer request, with mounting set enabling screwing in to the proper type of the actuator.
5.3. Dimensions of the positioner and types of executions,
Fig.3. Overall dimensions of the APIS-100-… positioner
A
6
Fig.4. Overall dimensions of the APIS-101-… and APIS-151-…positioner
IO – APIS(ENG)
A
7
IO – APIS(ENG)
Fig.5. Overall dimensions of the APIS-150-… positioner
Fig.6. Overall dimensions of the APIS-200-…, APIS-201-… , APIS-251-…positioners
A
8
IO – APIS(ENG)
Fig.7. Overall dimensions of the APIS-250-…positioner
Ordering code of the positioner – APIS type
Electropneumatic positioner
APIS – X X X - DXX-RXX- IXX- TXX- PX- MX
INTENDED USE:
- for single-operating actuator
- for double-operating actuator
1
2
- for actuator with linear movement
- for actuator with rotational movement
0
5
- for installation on actuator
- for installation outside actuator
0
1
A
9
IO – APIS(ENG)
POSITIONER DISTANCE FROM ACTUATOR
-0m
-1m
-2m
-3m
-5m
(only for APIS-XX0 )
00
01
02
03
05
( only for APIS-XX1 )
EXECUTION:
- Standard
- Intrinsically safe ..ATEX..
St
εx
II 2G Exia IICT6/T5
Ex
INPUT SIGNAL:
- analogue 4...20 mA 1)
AN
ANALOGUE POSITION TRANSMITTER:
- without position transmitter
- with input signal 4...20 mA 2)
00
20
PNEUMATIC CONNECTORS:
- without connectors ( orifice NPT1/8” )
- connectors to copper pipes ø6 mm made of brass
0
1
- connectors to stainless pipes ø6 mm made of stainless
steel
- connectors for polyethylene pipes ø6 mm
- connectors to copper pipes ø8 mm made of
2
- connectors to stainless pipes ø8 mm made of stainless
steel
- connectors to polyethylene pipes ø8 mm
5
3
4
6
MANOMETERS:
- without manometers
- with manometers in standard execution (manometer’s Ø
40mm, black colour steel enclosure, glass window
panel), temperature of operation -25°C…+65°C
- with manometers in stainless enclosure (manometer’s Ø
40mm, glass window panel ), temperature of operation
-25°C…+65°C)
- with stainless monometers ( manometer’s Ø 40mm,
glass window panel), temperature of operation
-40°C…+85°C)
0
1
2
3
1) The positioner can control analogue reverse signal 20-4 mA. The reverse function of control signal is
switched on programmatically by the user.
2) The positioner can set reverse of analogue output signal (20-5 mA). The reverse function of the output
signal is switched on programmatically by the user.
A
10
IO – APIS(ENG)
EXAMPLE OF THE ORDER:
Electropneumatic positioner is intended for installation on one-sided, linear movement actuator, in standard
execution, with analogue input signal 4…20 mA with input signal from position transmitter (4…20 mA) with
connectors to the polyethylene pipes ø 6 mm, with manometers in standard execution for measurement of air
supplying positioner and pressure of actuator’s control air.
Electropneumatic positioner, type APIS-100-D00-RSt-IAN-T20-P3-M1.
CAUTION: Components enabling assembly of the positioner on actuator or outside it should be selected
according to individual code contained in the index card “Mounting set for the APIS type
electropneumatic positioner” available on the website www.aplisens.pl
6.
TECHNICAL DATA
Input signal (control)
Output signal (position transmitter)
Supply of position transmitter
Input resistance
Supply pressure
Pneumatic input signal (control actuator)
Own air consumption
Air mass stream on positioner output
Actuator piston rod displacement range
Actuator operation characteristics
Positioner operation mode
Positioner transducer mode
Additional errors
- from supply pressure changes
- from ambient temperature changes
- from vibration in range:
10...60Hz, amplitude < 0.35 mm
60....500Hz, acceleration 5g
Hysteresis
Insensibility threshold
Protection degree of positioner enclosure
Operation position
Weight
analogue 4…20mA two-wire technique
analogue 4…20mA two-wire technique
10...36VDC
490Ω/20mA
140…800 kPa
0…100% of supply pressure
≤ 0.035 kg/h at supply voltage 140 kPa
≤ 0.015 kg/h at supply voltage 600 kPa
≥ 3.25 kg/h at supply voltage 140 kPa
≥13kg/h at supply voltage 800 kPa
10…100 mm ( for single-acting linear actuators )
10…600 mm ( for double-acting linear actuators
0…180º ( for rotational actuators )
linear
normal or reversible
normal or reversible
<0.05%/100kPa
0.15%/10ºC – for temperature range
-30ºC...+60ºC
0.25%/10ºC – for temperature range
-30ºC...-40ºC and +60ºC...+85ºC
0.25%
<0.4%
<0.1%
IP 65 according to PN-EN 60529:2003
any
1.8 kg
A
7.
11
IO – APIS(ENG)
OPERATION CONDITIONS
The APIS type positioner in intended for operation in the following conditions:
- working medium:
air free of dust, oil, aggressive pollutants, solid
particles bigger than 1.5 µm, such relative
humidity not lower that dew point’s
temperature should not be lower than 10 °C
with respect to ambient temperature
(acc. to PN-EN 60654-2:1999. )
- ambient temperature:
Execution without manometers and with stainless steel manometers:
-40ºC....+85ºC
Executions with manometers in stainless steel and carbon steel enclosure: -25ºC... +65ºC
- humidity of ambient air:
<95%
- allowable vibrations
acc. to PN-EN 60654-3: 1997; class VH6
10...60Hz,
amplitude < 0.35 mm
60...500Hz,
acceleration ≤ 5g
- operation position:
any
8.
TRANSPORTATION INSTRUCTIONS
The positioner, with the equipment listed in section 2 and set of parts for installation specified by the customer,
wrapped by bubble foam is placed in cardboard box – forming consumer package of the product. Free area
inside the box is filled with bubble foam protecting the positioner against moving inside.
The positioners in above mentioned package are placed in an omnibus package for transport. Such package
protects against damages and atmospheric conditions. Products case weight – to 50 kg. During transportation
the ambient temperature should not exceed -40…+85 °C. Positioners in shipping package (omnibus package)
should be protected against precipitations.
9.
UNPACKING AND STORING INSTRUCTIONS
Buyer, after receiving of the shipment, should check the state of the shipping package. Then take out devices
in consumer packages, unpack and check by visual inspection whether it is not damaged.
Devices should be stored in consumer packages in closed rooms. Air should be free of additives of aggressive
vapours and gases.
A
12
IO – APIS(ENG)
10. ASSEMBLY MANUAL
10.1. General recommendations.
Before installation of the positioner on actuator you should:
- Keep positioners in open packages as long, as its temperature will be equal to the temperature of
installation room.
- Check if positioner destination and attached mounting set is correct for this positioner ( see index card of the
positioner mounting kit and plate on mounting kit’s package ).
10.2. Assembly of the positioner on 37 and 38 type actuator,
manufactured by Polna S.A. – execution APIS-A100-… with mounting
set APIS-A001 or P1 and R1 manufactured by POLNA S.A. – APIS-100… execution with mounting set APIS-A002.
Installation of the positioner on actuator should be performed in the following order:
a) Take out positioner from package.
b) Fasten ball-and-socket joint on selector lever of the positioner, in place corresponding to actuator’s stroke
and tighten up a nut M5 ( see Fig. 8 and 9 ).
A
13
IO – APIS(ENG)
Fig.8. APIS-100-... positioner with APIS-A001 mounting set
( positioner assembled on yoke actuator, type 37 or 38 manufactured by Polna S.A.)
Fig.9. APIS-100-...type positioner with mounting set APIS-A002
( positioner assembled on multispring actuator of P1 or R1 type manufactured by Polna S.A. )
A
c)
d)
14
IO – APIS(ENG)
Place a spring washer and flat washer on two M8 screws. The screws are included in the mounting parts.
Screw in tightly 2 (two) screws from point C into the actuator’s body.
e)
Slot positioner mounting bracket between actuator’s body and washers on M8 screws ( bracket is equipped with
special cut-out enabling execution of this action ).
Tighten mounting bracket of positioner lightly to the actuator.
Screw down clamping ring I and III to the actuator mandrel using 2 (two) M6 screws.
Mount a M8 nut and elastic and flat washer on extension arm unit.
Screw in extension arm set into clamping ring III, then adjust its length and move whole positioner with respect of
actuator, thanks to longitudinal cut-out for clamping screws in mounting bracket, so as to string unit is visually
parallel to the actuator piston rod. In case when extension arm is too long it should be suitably cut
(see Fig. 8 and 9.)
f)
g)
h)
i)
j)
k)
Mount a M5 nut on string unit.
Screw in string into connector of extension arm. Adjust string’s length so as to after positioning of actuator
piston rod in the half ( 50 % ) of stroke set, the selector lever should be in horizontal position. In case when
string is too long it should be suitably cut.
Connection of string unit with extension’s connector of extension rod with clamping ring III and mounting
bracket with actuator body should be protected by firmly screwing in of all screws and nuts.
i
After coupling of string with extension arm, the movement of lever, corresponding to full stroke of actuator
piston rod should be visually symmetrically distributed with the respect to horizontal position of this
lever.
10.3. Assembly of the positioner on type P and R actuator
manufactured by Polna S.A. – APIS-A100-… execution with mounting
set APIS-A000.
Assembly of the positioner on actuator should be performed in the following order:
a) Take out the positioner from the packaging,
b) Fasten driver on positioner selector lever in place corresponding to actuator stroke and tighten up a nut M5
( see Fig. 10 )
Fig. 10. APIS-100-... type positioner with mounting set APIS-A000 ( positioner assembled on column actuator
of P or R type with columns axle base 110 and 132 mm manufactured by Polna S.A. ).
A
15
IO – APIS(ENG)
Fig. 11. APIS-100-... type positioner with mounting set APIS-A000
(positioner assembled on column actuator of P or R type with columns axle base 216 mm manufactured by
Polna S.A.).
c) screw down clamping rings ( clamping ring I and clamping ring III ) to actuator piston rod with plate using 2
(two) M6 screws being in mounting parts’ equipment.
Plane of plate unit should be visually parallel to the line connecting axes of the columns with
actuator piston rod.
d) Fasten positioner on actuator’s columns using 2 grips – see Fig. 10 and 11 showing position of fastening
bracket taking into account of axle bases of actuator’s columns.
e) connect driver with actuator’s piston rod by inserting of driver into correct cut-out in mounting plate unit –
see view on Fig. 11, so as to selector lever will position horizontally in half of stroke ( 50 % ) ( in case of need
– correct positioner of the positioner by adequate displacement on actuator’s column ).
f) After adjustment screw down tightly all screws and nuts.
i
Driver in cut out in the plate unit should be moving smoothly, without stops. After coupling of driver
with plate unit the movement of lever corresponding to full stroke of actuator’s piston rod should be
visually symmetrically distributed with respect to horizontal position of this lever.
A
16
IO – APIS(ENG)
10.4. Assembly of the positioner on actuator with control valve with
rib – conforming PN-EN 60534-6-1:2001 standard e.g. on actuator
manufactured by the Samson or Arca Regler company – APIS-100-…
execution with mounting set APIS-A003.
Assembly of the positioner on actuator should be performed in the following order:
a) Take out positioner from the packaging.
b) Install driver on selector lever of the positioner in place corresponding to actuator’s stroke and tighten up a
M5 nut (see Fig. 12)
Fig. 12. APIS-100-...type positioner with mounting set APIS-A003
( positioner assembled on actuator with control valve with rib – conforming PN-EN 60534-6-1:2001 standard
e.g. on actuator manufactured by the Samson or Arca Regler companies )
c) Screw down clamping rings to actuator’s piston rod (clamping ring I and clamping ring II) with plate II unit using 2
M6 screws – screws are in mounting parts set.
Plane of plate II unit should be visually parallel to the line connecting axes of the actuator ribs
( valve ) and actuator piston rod.
d) Connect driver with actuator piston rod by inserting of the driver into proper cut-out in plate unit II – see
view at fig. 12, so as to in the middle ( 50 % ) of stroke the selector level will take horizontal position ( in case
of need – correct positioner position by moving in on the actuator’s rib. Levelling proper hole in bracket
(mounting positioner) with threaded hole of actuator’s rib).
e) Tighten firmly positioner bracket to actuator’s rib using M8 screw – screw is in mounting parts set
f) Screw down tightly the remaining screws and nuts.
A
17
i
IO – APIS(ENG)
Driver in cut out in plate II unit should be moving smoothly, without stops. After coupling of driver with
plate II unit the movement of lever corresponding to full stroke of actuator’s piston rod should be visually
symmetrically distributed with respect to horizontal position of this lever.
10.5. Assembly of the positioner on rotational actuator of singlesided or double sided operation conforming EN ISO 5211, DIN
3337, VDI/VDE 38450 Namur standards e.g. on actuator
manufactured by AIR TORQUE, EBRO ARMATUREN, EL-OMATIC – APIS-A150-… and APIS-250-… execution with
mounting set APIS-A050 or APIS-A051.
Assembly of the positioner on actuator should be made in the following order:
a) Take out positioner from package.
b) Check direction of actuator shaft and position of control point on positioner shaft (yellow colour dot
on positioner shaft) – see fig. 13.
A
18
IO – APIS(ENG)
Fig.13. Assembly position of the APIS-250-… and APIS-150-... positioner in respect of one-sided or
double-sided action rotational actuator.
A
19
c)
IO – APIS(ENG)
Slide coupling on mandrel ( screwed into actuator shaft ) from the cylindrical side ( ~ 7…10 mm ) and screw down 2 (two) M4 tap screws – see Fig. 14
Fig.14. Assembly of the APIS-150-… and APIS-250-… positioner with mounting set APIS-A050 or A051 on
rotational actuator of one-sided and double-sided operation.
d)
Install positioner mounting bracket so as to the positioner shaft will be inside coupling’s orifice at the depth
of 5….8 mm, and position of control point on positioner shaft and position of orifices on coupling with M4
tap screws will be compatible with Fig. 14.
e) Screw home tightly 4 (four) M5 screws.
f) Tighten up a nut M6 firmly. The nut is on mandrel to front plane of actuator shaft, preserving position of
control point on positioner shaft as in point d). Then tighten up the second M6 nut holding down a nut from
point e) using wrench.
g) Screw home tightly 2 (two) M4 tap screws connecting coupling with shaft positioner.
A
20
IO – APIS(ENG)
10.6. Installation of the positioner with linear actuator of one-sided or
double-sided operation, conforming the ISO 6431 standard, e.g. with
actuator manufactured by PREMA Kielce, FESTO companies execution APIS A101-… and APIS-201-… with mounting set APIS-201AXXX.
Assembly of the positioner with actuator should be made in the following order:
a) Install extension arm with clamping ring I on the actuator by screwing home tightly 2 (two) M6 screws
– see Fig. 15.
Fig.15. Assembly of the APIS-101-… and APIS-201-… positioner with linear actuator of one-sided and doublesided operation.
b)
c)
Install 2 (two) brackets mounting the linear displacement transducer on the actuator.
Install end with ball-and-socket joint to the transducer. Tighten up a lock nut on end with mobile threaded
mandrel of the transducer.
d) Couple extension arm with ball-and-socket joint which is already mounted on the displacement transducer.
Adjust length of the extension arm so as to after mounting of displacement transducer on the actuator, you
will be able to install mounting spring plate as shown on Fig. 15.
e) Tighten up a M8 nut on extension arm.
f) Install linear displacement transducer using 2 mounting clamping rings so as to with inserted actuator’s
piston rod, its mobile mandrel will stand out ~ 3…10 mm from its initial position.
A
21
IO – APIS(ENG)
Check if maximum protrude of actuator piston rod will not cause damage of the transducer.
In case of need you should make a length correction of mobile mandrel of the transducer by proper
unscrewing of end with ball-and-socket joint from this arm and/or displacement of the transducer
towards its clamping rings. Then tighten up a lock nut with moving transducer’s mandrel for another time
and 4 (four) M4 tap screws mounting transducer with clamping rings to the brackets.
g)
h)
Install mounting spring plate on extension arm.
Install positioner e.g.: on wall or other selected by the user place using bracket and 2 (two) M8 screws,
being part of mounting set.
Positioner distance from the actuator is limited by length of conductor connecting
i
i)
positioner with displacement transducer.
Tighten all screws, tap screws and nuts firmly.
10.7. Pneumatic lines assembly rules.
Pneumatic lines to supply pressure regulator should be as short as possible. Lines and fittings should be
fastened so as to not be endangered on action of any mechanical loads. Avoid sharp bends when lying lines.
Before connection the lines should be blown through using hot air in order to dry and remove the impurities.
A ∅ 6x1 or ∅ 8x1 copper pipe, covered with protective layer of plastic on the outside, with interior etched, is
recommended for use as lines. Supply pressure should be lead to pneumatic connector marked “1” while lines
of the output signal, lead out from connector marked “2” or “3” should be connected with suitable chamber of
the actuator.
11. SERVICE MANUAL.
11.1. General information.
11.1.1. Control buttons.
For programming of the positioner parameters a three control buttons are used (Fig. 16):
∆
∇
- Increase of parameters or setting of the previous parameters;
- Decrease of parameters or setting of the next parameter;
- Confirming the value or selection of the set parameter.
During programming of parameters values, for the ∆ and
∇
buttons “auto repeat” function is assigned. This
function enables ∆ increasing or ∇ decreasing in an automatic way, when correct button is to be hold longer
than 0.6 s. Auto repeat frequency is set to 10 repetitions per second.
Parameters and configuration programming menu for the positioner is shown on Fig. 17. Buttons ∆ and ∇
enable to indicate correct item in the positioner menu. Execution of proper function, represented by indicted
item in menu, requires additional confirmation by pressing
button. After finishing of programming of
corresponding parameter of selected menu item, the next item will be indicated automatically. Order of
selected parameters programming is in principle optional. Parameters programming can be performed or
repeated many times in any moment of positioner operation. The programmed parameters are saved in the
positioner memory permanently.
A
22
IO – APIS(ENG)
1. Liquid crystal display, alphanumerical
2. Button ∆ ( in numerical mode ) increasing numerical value of a given parameter ( in functional mode )
indication of previous function
3. Button ∇ ( in numerical mode ) decreasing numerical value of a given parameter ( in functional mode )
indication of next function
4. Button
( in numerical mode ) approval of value of selected parameter ( in functional mode )
confirmation of selection of a given function
Fig.16. Keyboard of the APIS type positioner
11.1.2. Service levels of the positioner.
Communication of the user with the microprocessor positioner of APIS type is executed on three service levels
(see Fig. 17):
o
I service level – normal operation mode
o
II service level – transitory mode
o
III service level – parameterization and configuration mode
A current ambient temperature of the positioner is displayed in normal operation mode on display e.g.
26º
- and relative value of actuator piston rod displacement in [%] e.g.
PU 0.0
or current ambient temperature of the positioner e.g.:
26º
- and relative value of input signal (control) in [%] e.g.:
SP 0.0
Change of type of displayed value on the positioner display is executed sequentially by successive pressing of
button ∇ ( Fig. 16 and 17 ) in order PV, SP or button ∆ in the reverse order.
A
23
* - functions available only in APIS-2XX-…execution
** - function available only in APIS-1XX-…execution
Fig.17. APIS positioner program function menu.
IO – APIS(ENG)
A
24
IO – APIS(ENG)
Change from normal operation mode to transitory mode is executed by simultaneous pressing of both ∆ and
∇
buttons. The current ambient temperature of the positioner is shown on the display e.g.:
26º
- and
PIN
- access password to the advanced program and configurational functions of
the positioner
Switch to the last mode, third service level i.e. parameterization and configuration mode, is possible only for
authorized personnel i.e. after entering password during confirmation of the PIN function using
button.
In the manual mode, the positioner executes all functions according to the control algorithm programmed by
the manufacturer or manual programming of all essential control parameters of the positioner by the user.
Change to the parameterization and configuration mode i.e. entering and confirmation of PIN is signalled by
displaying a current ambient temperature of the positioner on the (positioner) display e.g.:
26º
- and relative value of actuator piston rod displacement in [%] e.g.:
PU 0.0
11.2. Program functions.
11.2.1. First service level – normal operation mode.
11.2.1.1. PV – reading of current displacement of actuator piston rods.
Start the positioner acc. to the point 10.3., an ambient temperature of the positioner will appear on display e.g.:
26º
- and relative value of actuator piston rod displacement in [%]
of adjusted stroke of the piston rod e.g.
PU 5.8
This information indicates that we are on first service level (normal operation mode).
i
Normal operation mode enables to read out relative value of actuator’s piston rod position and value of
the input signal (control).
11.2.1.2. SP – reading of current input signal’s value (control).
When the display looks as described in point 10.2.1.1 press ∇ button; then a current ambient temperature of
the positioner will be shown e.g.:
26º
SP 0.0
- and relative value on input signal (control) in [%] of input signal range e.g.:
A
IO – APIS(ENG)
25
i
Pressing ∆ button once results in return to
PV state.
button remains inactive.
11.2.2. Second service level – transitory mode.
11.2.2.1. PIN – access password to the advanced program functions of
the positioner.
When the display’s state looks as in point 10.2.1.1. or 10..2.1.2. and if you want to change from the first service
level to the second i.e. from normal operation mode to transitory mode you should:
∆
o
Press button
o
Holding down pressed ∆ button, press ∇ button.
o
Release
∆ button, then ∇, then current ambient temperature of positioner will appear on display e.g.:
26º
PIN
- and
– access password to advanced program functions of the positioner.
Such information indicates that we are on the second service level (transitory mode)
Operator switch in the second level is executed in the following way:
i
- Pressing once ∆ button results in return to normal operation mode and displaying of state as in point
10.2.1.1.
- If we want to switch from second to third service level i.e. from transitory to parameterization and
configuration mode you should:
o
Press button
; the following text will appear on display:
PIΠ
0
– indicating currently realized function and
– indicating factory pin
If password code was changed earlier and it is different from 0, so using buttons
i
∆ and
∇ it should be set correctly.
o
Accept pin by pressing button
; the following information will appear on the display:
PIΠ
– indicating currently realized function and
OK
– acceptance of PIN information
The above texts will disappear from positioner display after ca. 1 s, then the current ambient temperature of
positioner will appear e.g.:
26º
- and relative value of actuator piston rod displacement of stroke of the piston
rod to be adjusted, in [%] e.g.
PU 5.8
This information, after entering and acceptation of pin, indicates that we are on third service level
(parameterization and configuration mode).
A
26
i
If the password was entered incorrectly, than the currently realized function, i.e.
IO – APIS(ENG)
PIΠ and text
SORRY will appear on the display, this text will disappear after 2 seconds and will show again
the current ambient temperature of the positioner e.g.:
26º
- and relative value of actuator piston rod displacement in [%]
of stroke of piston rod to be adjusted e.g.:
PU 0.0
Then you should try again to enter the correct password performing activities described above.
Change of the password is possible after obtaining access to the third service level and
i
selection of the PIN functions once again. When realizing the above mentioned procedure you
should, instead of factory password, set a new password using buttons ∆ and ∇ . The password
should be saved then, using SAVE function – see point 10.2.3.20 (applies to executions APIS1XX-…) or END – see point 10.2.3.21 (applies to executions APIS-2XX-…).
11.2.3. Third service level – parameterization and configuration mode.
11.2.3.1. PV – reading of current value of the actuator’s piston rod
displacement.
After correct entering password, as described in point 10.2.2.1, the current ambient temperature of the
positioner will appear on the display e.g.:
26º
- and relative value of actuator piston rod displacement of adjusted
piston rod stroke, in [%] e.g.:
PU 5.8
This function is used to preview piston rod displacement values during parameterization and configuration
process on the third service level.
11.2.3.2. SP – reading of current value of input signal (current).
There is the following text on display, as in point 10.2.3.1. press once button ∇ ; then the current ambient
temperature of the positioner will appear on the display e.g.:
26º
- and relative value of input signal (control) in [%] in the range of
input signal e.g. :
SP 0.0
This function is used for preview of input signal values during parameterization and configuration process on
the third service level.
A
27
IO – APIS(ENG)
11.2.3.3. GAIN P – gain coefficient P of a PID controller.
There is the following text on display as described in point 10.2.3.2., press once button ∇; then the current
ambient temperature of the positioner will appear on the display e.g.:
26º
- and symbol of function for setting of gain coefficient P of the PID controller
GAIN P
o
o
o
; the following text will appear on the display:
Press button
KP
– indicating currently realized function and e.g.:
5.0
– indication current value of gain coefficient P of the PID controller
By pressing and/or holding ∆ button, or button ∇ you should lead to appearance on the display of
numerical values of gain coefficient of the controller as given in the point 10.3. table 1, depending on
type of the actuator and stroke.
Accept set value KP pressing
button ; the current value of ambient temperature of the
positioner will appear on the display e.g.:
26º
- and symbol of the time constant function, in [s], of integrating action of the
PID controller
Ti
i
The gain coefficient GAIN
positioner.
P has a great influence on stable ( without oscillations ) operation of the
11.2.3.4. Ti – integral action time constant of the PID controller.
There is the following text on display:
26º
GAIN P
Press button∇ once; then the current ambient temperature of the positioner will appear on the display e.g.:
26º
- and symbol of the time constant in [s] of integrating action of the PID
controller
Ti
o
; the following text will appear on display:
Press button
Ti
10.0
– indicating currently realized function and e.g.:
– indicating the current value of time constant of integrating action of the PID
controller
A
28
o
o
IO – APIS(ENG)
Pressing and/or holding down ∆ button or ∇ button you should lead to appearance of the
numerical value of time constant of integrating action of the controller on the display, as given in
point 10.3 table 1, depending on the type of actuator and stroke.
button; the current value of ambient temperature of the
accept set value Ti by pressing
positioner will appear on the display e.g.:
26º
- and symbol of the time constant, in [s], of differential action of the PID
controller
Td
11.2.3.5. Td – differential action time constant of the PID controller.
There is the following text on display:
26º
Ti
Press once button∇; then the current ambient temperature of the positioner will appear on the display e.g.:
26º
- and symbol of the time constant in [s] of differential action of the PID
controller
Td
o
Press button
Td
0.01
o
o
; the following text will appear on display:
– indicating currently realized function and e.g..:
– indicating the current value of time constant of differential action
of the PID controller
Pressing or holding down ∆ button, or ∇ button you should lead to appearance of the numerical
values of time constant of differential action of the controller as given in the point 10.3. table 1,
depending on the actuator type and stroke.
Accept the set value Td by pressing
button; the current value of ambient temperature of the
positioner will appear on the display e.g.:
26º
TF
- and symbol of the speed settings function of the actuator piston rod
movement
A
29
IO – APIS(ENG)
11.2.3.6. TF – speed of the actuator’s piston rod movement.
There is the following text on display:
26º
Td
Press button ∇once; then the current ambient temperature of the positioner will appear on the display e.g.:
26º
- and symbol of the speed settings function of the actuator’s piston rod
movement
TF
o
o
o
Press button
; the following text will appear on display:
TF
– indicating currently realized function and e.g.:
1.5
– indicating current time, in [s], necessary for actuator piston rod to travel 10%
of control signal (SP) stroke.
Pressing or holding down ∆ button or ∇ button you should lead to appearance of the numerical
values of time constant of differential action of the controller as given in the point 10.3. table 1,
depending on the actuator type and stroke.
Accept the set value TF by pressing
button; the current value of ambient temperature of the
positioner will appear on the display e.g.:
26º
- and symbol of automatic standardization of actuator’s piston rod stroke
AUTO
11.2.3.7. AUTO – automatic standardization of the actuator piston rod
travel.
There is the following text on display:
26º
TF
Press once button∇; then the current ambient temperature of the positioner will appear on the display e.g.:
26º
- and symbol of automatic normalization of actuator’s piston rod stroke
AUTO
o
Press button
AUTO
; the following text will appear on display:
- indicating conventional direction of actuator’s piston rod displacement and
currently realized function and e.g.:
545
- Indication symbolic value of position transducer displacement
in internal units of the positioner.
Then the positioner, after few (up to several dozens) sec., will change automatically to normalization
of the position transducer displacement value into the opposite direction.
A
30
IO – APIS(ENG)
During realization of this activity an advance (insertion) of actuator’s piston rod, while
on the display the following text is shown e.g.:
AUTO
1650
- indicating a conventional direction of actuator’s piston rod displacement
and the currently realized function e.g.:
- indicating symbolic value of position transducer displacement
in internal units of the positioner.
Finishing of actuator displacement normalization lasts from few to several dozens of second and is
signalled by appearance of the current ambient temperature of the positioner on display e.g.:
26º
- and the symbol of setting function of lower range of the input signal
SP LO
11.2.3.8. SP LO – setting of the minimum value of the input signal.
There is the following text on display:
26º
AUTO
Press button ∇ once; then the current ambient temperature of the positioner will appear on the display e.g.:
26º
- and symbol of minimum value of input signal setting function
SP LO
o
Press button
SPL
; the following text will appear on display:
- indicating currently realized function and e.g..:
C 3184
o
i
o
- indicating symbolic minimum value of input signal in the internal units of the
positioner
Set new input signal value on measuring position using direct current controller e.g. 4 ± 0.005 mA
Change of minimum input signal value is visible on positioner display by change of its internal
units
Accept new value by pressing
appear on the display e.g.:
26º
button; - a new current ambient temperature of the positioner will
- and function symbol of setting of the maximum value of input signal
SP HI
i
The factory set minimum value of input signal is 4 mA.
A
31
IO – APIS(ENG)
11.2.3.9. SP HI – setting of the maximum value of the input signal.
There is the following text on display:
26º
SP LO
Press once button ∇; then the current ambient temperature of the positioner will appear on the display e.g.:
26º
- and function symbol of setting of the maximum value of input signal
SP HI
o
Press button
SPH
C 15987
o
; the following text will appear on display:
- indicating currently realized function and e.g..:
- indicating symbolic maximum value of input signal in the internal units of the
positioner
Set new input signal value on measuring position using direct current controller e.g. 20 ± 0.005 mA
Change of the maximum value of input signal is visible on the positioner display
i
as a change of its internal units.
o
Accept new value by pressing
appear on the display e.g.:
26º
button; - the current ambient temperature of the positioner will
- and symbol of function enabling displacement of the actuator’s piston rod to
the first extreme position
doun
i
The factory set maximum value of input signal is 20 mA as a standard.
A
32
IO – APIS(ENG)
11.2.3.10. DOWN – actuator piston rod displacement to the first
extreme value.
There is the following text on display:
26º
SP HI
Press button ∇ once; then the current ambient temperature of the positioner will appear on the display e.g.:
26º
- and symbol of function enabling displacement of the actuator’s piston rod to
first extreme position
doun
o
Press button
doun
b 4689
; the following text will appear on display:
- indicating conventional direction of actuator’s piston rod displacement
and currently realized function and e.g.:
- indicating symbolic value of transducer displacement
in positioner internal units
Massage doun results in discharge of pneumatic actuator chamber. It causes motion of
i
the piston rod into first extreme position, called conventionally doun. After reaching of the first
extreme position, actuator’s piston rod stays there until operator will not give any other command
o
Press
button; - the current ambient temperature of the positioner will appear on the display e.g.:
26º
- and symbol of function enabling displacement of the actuator’s piston rod into
second extreme position
UP
i
Termination of the doun command will result in restart of the positioner to realization of a programmed
control algorithm.
11.2.3.11. UP – actuator piston rod displacement into second extreme
position.
There is the following text on display:
26º
doun
A
33
IO – APIS(ENG
Press button ∇once; then the current ambient temperature of the positioner will appear on the display e.g.:
26º
- and symbol of function enabling displacement of the actuator’s piston rod
Into the second extreme position
UP
o
Press button
UP
b 3598
; the following text will appear on display:
- indicating a conventional direction of actuator’s piston rod displacement
and the currently realized function e.g.:
- indicating symbolic value of transducer displacement
position in the internal units of the positioner.
UP massage results in loading of chamber of pneumatic actuator. It causes piston rod movement
i
into the second extreme position, called by convention UP. After reaching of second extreme
position, the piston rod will remain there until the operator will not make any other command.
o
Press
button; - the current ambient temperature of the positioner will appear on the display e.g.:
26º
- and symbol of function enabling manual operation of the actuator
MANUAL
i
Termination of the UP command will result in restart of the positioner to realization of the
programmed control algorithm.
11.2.3.12. MANUAL – manual operation of the positioner.
There is the following text on display:
26º
UP
Press button ∇ once; then the current ambient temperature of the positioner will appear on the display e.g.:
26º
- and symbol of function enabling manual operation of the actuator
MANUAL
o
Press button
; the following text will appear on display:
SP
- indicating currently realized function and e.g.:
25.0
- indicating value of internal control signal of the positioner
Pressing or holding down ∆ button, or
∇ button you will change position of actuator piston rod.
A
34
IO – APIS(ENG)
Stopping of actuator piston rod occurs after release of ∆ or
∇button. After taking up specified by the
operator position, the actuator piston rod remains inside it as long as long the operator will not make any
command. During realization of the MANUAL command, control functions of the positioner are
active.
i
o
Press
button; - the current ambient temperature of the positioner will appear on the display e.g.:
26º
- and symbol of function enabling setting of input signal reverse
REU IN
i
Termination of the MANUAL command will result in return to the control of external control signal.
11.2.3.13. REV IN – input signal reverse ( control ).
There is the following text on display:
26º
MANUAL
Press once button ∇; then the current ambient temperature of the positioner will appear on the display e.g.:
26º
- and symbol of function input signal reverse setting
REU IN
o
Press button
r IΠ
OFF
; the following text will appear on display:
- indicating currently realized function and e.g..:
- indicating turned off reverse of input signal
If the user is not going to turn on reverse function of input signal, you should press
button;
If the user is going to turn on reverse function of input signal, you should press once button ∇ or ∆;
then the following text will appear on the display:
r IΠ
- indicating currently realized function and
On
– indicating turned on reverse of input signal
A
35
o
IO – APIS(ENG)
Accept turning on of input signal’s reverse by pressing
button; the current value of ambient
temperature of the positioner will appear on the display e.g.:
26º
- and symbol of function output signal reverse setting ( position
transducer )
REU OUT
i
Function of reverse of input signal is factory turned off ( OFF ) .
11.2.3.14. REV OUT – output signal reverse ( position ).
There is the following text on display:
26º
REU IN
Press once button ∇; then the current ambient temperature of the positioner will appear on the display e.g.:
26º
- and symbol of output signal’s reverse function ( position
transducer )
REU OUT
o
Press button
rOU
OFF
; the following text will appear on display:
- indicating currently realized function and e.g..:
– indicating turned off output signal reverse
If the user is not going to turn on output signal’s reverse function, you should press
button. If the user is not
going to turn on output signal reverse function, you should press ∇ or ∆ button once; then the following text
will appear on the display:
rOU
On
o
- indicating currently realized function and
– indicating turned on output signal’s reverse
accept turning on output signal’s reverse by pressing
the display:
button ; the following text will appear on
- for executions APIS-2XX-… value of current ambient temperature of the positioner e.g.:
26º
- and symbol of function enabling sealing of valve-seat ( door )
in the minimum-extreme position of actuator’s piston rod
CLAMP L
- for executions APIS-1XX-… value of current ambient temperature of the positioner e.g.:
26º
LOAD
- and symbol of function enabling programming of factory parameters and
settings of the positioner
A
36
i
IO – APIS(ENG)
For both positioners’ executions an output signal’s reverse function is switched off by factory as a
standard ( OFF ) .
11.2.3.15. CLAMP L – sealing of valve-seat ( door ) in minimumextreme position of the actuator piston rod.
i
- Function is not available for APIS-1XX-….executions
There is the following text on display:
26º
REU OUT
Press once button ∇; then the current ambient temperature of the positioner will appear on the display e.g.:
26º
- and symbol of function enabling sealing of valve-seat ( door )
in the minimum-extreme position of actuator’s piston rod
CLAMP L
o
Press button
; the following text will appear on display:
CLA L
- indicating currently realized function and e.g..:
OFF
- and symbol of function enabling sealing of valve-seat ( door )
in the minimum-extreme position of actuator’s piston rod
If the user is not going to turn on valve-seat sealing function ( door ) in minimum-extreme position of the
button.
actuator piston rod you should press
If the user is going to turn on valve-seat sealing function ( door ) in minimum-extreme position of the actuator
piston rod, you should press once ∇ or ∆ button; then the following text will appear on the display:
CLA L
On
o
- indicating currently realized function and
- indicating sealing of valve-seat ( door ) switched on
in the minimum-extreme position of actuator’s piston rod
Accept turning on of sealing of valve-seat ( door ) in minimum-extreme position of the actuator’s
piston rod by pressing
button; the current value of ambient temperature of the positioner will
appear on the display e.g.:
26º
- and symbol of function enabling sealing of valve-seat ( door )
in the maximum-extreme position of actuator’s piston rod
CLAMP H
i
The sealing of valve-seat ( door ) in minimum-extreme position of actuator’s piston rod is factory
turned off ( OFF ) .
A
37
IO – APIS(ENG)
11.2.3.16. CLAMP H – sealing of valve-seat ( door ) in maximumextreme position of actuator’s piston rod.
i
- Function is not available for APIS-1XX-….executions
There is the following text on display:
26º
CLAMP L
Press once button ∇; then the current ambient temperature of the positioner will appear on the display e.g.:
26º
- and symbol of function enabling sealing of valve-seat ( door )
in maximum-extreme position of the actuator piston rod
CLAMP H
o
Press button
CLA H
OFF
; the following text will appear on display:
- indicating currently realized function and e.g.:
- indicating turned off sealing of the valve-seat ( door )
in maximum-extreme position of the actuator’s piston rod
If the user is not going to turn on valve-seat sealing function ( door ) in maximum-extreme position of the
actuator piston rod you should press
button.
If the user is not going to turn on valve-seat sealing function ( door ) in maximum-extreme position of the
actuator piston rod you should press once ∇ or ∆ button; then the following text will appear on the display:
CLA H
n
o
- indicating currently realized function and
- indicating turned on sealing of the valve-seat ( door ) in maximum-extreme
position of the actuator’s piston rod.
Accept turning on of valve-seat sealing ( door ) in maximum-extreme position of the actuator piston
rod by pressing
button; the current value of ambient temperature of the positioner will appear
on the display e.g.:
26º
- and symbol of function enabling change of control pressure in chamber A of
the actuator ( chamber connected with connector “2” of the positioner )
PRESS A
i
Sealing function of the valve-seat ( door ) in maximum-extreme position of the actuator piston rod is
factory turned off ( OFF ) .
A
38
IO – APIS(ENG)
11.2.3.17. PRESS. A – control pressure of positioner chamber „A” (
chamber connected with connector „2” of the positioner ).
i
- Function is not available for APIS-1XX-…. executions
There is the following text on display:
26º
CLAMP
Press once button ∇; then the current ambient temperature of the positioner will appear on the display e.g.:
26º
- and symbol of function enabling change of control pressure in chamber A of
the actuator ( chamber connected with connector “2” of the positioner )
PRESS. A
Press button
; the following text will appear on display:
Pr. A
- indicating currently realized function and e.g.:
12.0
- indicating, in [%], the current value of supply pressure of the positioner, by
which the control pressure, controlling chamber A of the actuator, will be
increased.
o
o
Pressing and/or holding down of ∆ or ∇ button, you should lead to appearance on the display of
numerical values of control pressure in A chamber of the actuator, given in point 10.3 table 1
depending on type of the actuator and stroke ( angle of rotation ).
Accept the set value Pr. A by pressing a
the positioner will appear on the display e.g.:
26º
button; the current value of ambient temperature of
- and symbol of function enabling change of control pressure in chamber B of
the actuator ( chamber connecter with connector “3” of the positioner )
PRESS. b
11.2.3.18. PRESS. b – control pressure of positioner chamber B
( chamber connected with connector „3” of the positioner ).
i
- Function is not available for APIS-1XX-….executions
There is the following text on display:
26º
PRESS. A
Press once button ∇; then the current ambient temperature of the positioner will appear on the display e.g.:
26º
PRESS. b
- and symbol of function enabling change of control pressure in chamber B of
the actuator ( chamber connected with connect “3” of the positioner )
A
39
Press button
IO – APIS(ENG)
; the following text will appear on display:
Pr. b
- indicating currently realized function and e.g..:
13.0
- indicating, in [%], the current value of supply pressure of the positioner, by
which the control pressure, controlling chamber B of the actuator, will be
increased.
o
o
Pressing and/or holding down of ∆ or ∇ button, you should lead to appearance on the display of
numerical values of control pressure in B chamber of the actuator, given in point 10.3 table 1
depending on type of the actuator and stroke ( angle of rotation ).
Accept the set value Pr. b by pressing a
button; the current value of ambient temperature of
the positioner will appear on the display e.g.:
26º
- and symbol of function enabling programming of factory parameters and
setting of the positioner
LOAD
11.2.3.19. LOAD – programming of the parameters and factory setting
of the positioner.
There is the following text on the display:
- for APIS-2XX-… executions
26º
PRESS. b
- for APIS-1XX-… executions
26º
REU OUT
Press once button ∇; then the current ambient temperature of the positioner will appear on the display e.g.:
26º
- and the function symbol enabling programming of factory parameters and
settings of the positioner
LOAD
o
Press button
LOAD
SurE
i
;the following text will appear on the display:
– indicating currently realized function
– “are you sure ?” question
In case when the above text is on the display and you do not want to program factory
parameters and setting of the positioner, you should press ∇or
exit from LOAD function.
∆
button, what will result in
A
40
Press button
IO – APIS(ENG)
; the following text will appear on display:
LOAD
OK
`
– indicating currently realized function
– information concerning saving in its read-only memory the
factory configuration parameters of the positioner
The above information will disappear from display after ca. 1 s and then the following text will appear:
- for executions APIS-2XX-… value of the current ambient temperature of the positioner
e.g.:
26º
- and function symbol finishing programming of parameters and configuration
of the positioner settings
End
- for executions APIS-1XX-… value of the current ambient temperature of the positioner
e.g.:
26º
- and symbol of function enabling saving of current configuration parameters
in positioner memory
SAUE
LOAD function is especially useful in case of total maladjustment of the positioner by the user.
The function automatically will set the obligatory positioner parameters, but without normalization of
the actuator’s piston rod displacement. That is the reason why the user have to perform function
AUTO individually. The obligatory parameters are such, at which the positioner will operate
correctly, however its accuracy do not have to comply to this declared by the manufacturer.
i
increase of accuracy requires change of the GAIN P gain coefficient of PID controller, time of
Ti integrating action and Td differentiating action as well as TF speed of actuator’s piston rod
TF.
11.2.3.20. SAVE – save of the current parameters and positioner
configuration
i
- The function is not available for APIS-2XX-… executions
There is the following text on display:
26º
LOAD
Press once button ∇; then the current ambient temperature of the positioner will appear on the display e.g.:
26º
SAUE
- and function symbol enabling saving in positioner memory the current
configuration parameters
A
41
o
Press button
SAUE
SurE
i
IO – APIS(ENG)
; the following text will appear on display::
– indicating currently realized function
– “are you sure ?” question
When the above text will appear on the display and you do not want to program current
parameters and setting of the positioner, press ∇or
function.
Press button
∆ button, what results in exit from SAVE
; the following text will appear on display::
SAUE
OK
– indicating currently realized function
– information concerning saving of current configuration parameters of the
positioner in its read-only memory
The above information will disappear from the display after ca. 1 sec, then the current temperature of the
positioner will appear e.g.:
26º
- and function symbol finishing programming of parameters and configuration
of the positioner settings
End
i
Permanent change of the positioner parameters and configuration is saved in its memory only after
execution of the SAVE function.
11.2.3.21. End – end of programming of positioner parameters and
configuration.
- for APIS-2XX-… executions
There is the following text on display:
26º
LOAD
Press once button ∇; then the current ambient temperature of the positioner will appear on the display e.g.:
26º
- and function symbol ending programming of the positioner parameters and
configuration
End
o
Press button
End
SAUE
; the following text will appear on display:
- indicating currently realized function
- and function symbol enabling saving in the positioner memory of the current
configuration parameters
A
42
o
Press button
SAUE
SurE
o
Press button
SAUE
OK
26º
IO – APIS(ENG)
; the following text will appear on display:
– indicating currently realized function
– „are you sure ?” question
; the following text will appear on display:
– indicating currently realized function
– information about saving of the current parameters and configuration
settings and ending of the positioner programming. The above information will
disappear after 1 sec. from the display, then the current ambient temperature
of the positioner will appear e.g.:
- and relative value of actuator’s piston rod displacement, in [%] e.g.:
PU 5.1
The above information about ending of the
i
END function indicates that we are on the first service level.
when the following text will appear on the display:
SAUE
SurE
and we do not want to save the current parameters and configuration settings, press ∇or
Then the following text will appear on the screen:
SAUE
no
26º
∆ buttons.
– indicating currently realized function
- information about not saving of parameters and configuration settings.
The above information will disappear after 1 sec. from the display, then the
current ambient temperature of the positioner will appear e.g.:
- and relative value of actuator’s piston rod displacement, in [%] e.g.:
PU 5.1
The above information about ending of the
END function indicates that we are on the first service level.
A
43
IO – APIS(ENG)
- for executions APIS-1XX-…
There is the following text on display:
26º
SAUE
Press once button ∇; then the current ambient temperature of the positioner will appear on the display e.g.:
26º
End
o
Press button
End
SurE
i
- and function symbol ending programming of parameters and configuration
; the following text will appear on display:
– indicating currently realized function
– question „are you sure ?”
When the above text will appear on the display and you do not want to end programming of current
parameters and settings of the positioner, press ∇or
function.
Press button
∆ button, what results in exit from END
; the following text will appear on display:
End
– indicating currently realized function
OK
– information about saving of the current parameters and configuration
settings of the positioner.
The above information will disappear after 1 sec. from the display, then the current ambient temperature
of the positioner will appear e.g.:
26º
- and relative value of actuator’s piston rod displacement in [%] e.g.:
PU 5.1
The above information about ending of the
END function indicates that we are on the first service level.
A
44
IO – APIS(ENG)
11.3. Starting of the positioner on actuator.
a)
- Positioner APIS-100-… installed on positioner acc. to point 9.2…9.4 we connect with meter circuit
acc. to the diagram shown on Fig. 18.
Fig. 18. Diagram of meter circuit for starting of the APIS-100-…. positioner
- Positioner APIS-150-… and APIS-250-… installed on actuator acc. to point 9.5. is to be connected
with meter circuit acc. to the diagram shown on Fig. 19.
A
45
IO – APIS(ENG)
Fig. 19. Diagram of meter circuit for starting of the APIS-150-…. and APIS-250-….positioner
- Positioner APIS-101-… and APIS-201-… installed on actuator acc. to point 9.6. is to be connected with
measuring system acc. to diagram shown on Fig. 20.
Fig. 20. Diagram of meter circuit for starting of the APIS-101-… and APIS-201-….positioner
A
46
IO – APIS(ENG)
b) using current controller (pos. 6) set the input signal of 4.5 ± 0.5 mA, the current ambient temperature of the
positioner will appear on the display e.g.:
26º
- and relative value of actuator’s piston rod displacement, in [%] e.g.:
PU 5.8
This information after setting of input signal indicates, that we on the first service level ( normal operation
mode ).
c) Use pressure controller pos. 4 to set air of pressure e.g. 140 kPa ( depends on type of actuator ).
d) Next, we go to the second service level i.e. transitory state. For that purpose you should:
∆
∆
o
Press button
o
Holding down
o
Release ∆ button, then
the display e.g.:
26º
PIN
button, press ∇ button
∇, then the current ambient temperature of the positioner will appear on
- and
– access password to the advanced program functions of the positioner
This information indicates, that we are on the second service level ( transitory state )
o
Press button
; the following text will appear on display:
PIΠ
0
o
– indicating currently realized function and
– indicating factory PIN
Accept PIN by pressing
button; the following text will appear on the display:
PIΠ
– indicating currently realized function and
OK
– information about acceptance of PIN
The above texts will disappear from the display after 1 sec, then the current ambient temperature of the
positioner will appear e.g.:
26º
- and relative value of actuator’s piston rod displacement, in [%] e.g.:
PU 5.8
This information, after entering and acceptance of PIN, indicates that we are on the third service level
( parameterization and configuration mode ).
o
Pressing ∇ button lead to appearance of the current ambient temperature of the positioner on the
display e.g.:
26º
GAIN P
- and function symbol of gain coefficient P of the PID controller
A
47
o
o
o
Press button
IO – APIS(ENG)
; the following text will appear on display:
KP
– indicating currently realized function and e.g.:
5.0
– indicating the current value of gain coefficient P of the PID controller
Pressing and/or holding ∆ button, or ∇ button lead to appearance of numerical values on display
of the controller’s gain coefficient which are given in table 1, depending on type of actuator and
stroke.
button; the current value of ambient temperature of the
Accept set value KP by pressing
positioner will appear on the display e.g.:
26º
- and function symbol of time constant, in [s], of integrating action of the PID
controller
Ti
o
Press button
Ti
10.0
o
o
; the following text will appear on display:
– indicating currently realized function and e.g.:
– indicating current value of the time constant of integrating action of the PID
controller
Pressing and/or holding ∆ button, or ∇ button lead to appearance of numerical values on display
of the controller’s time constant of integrating action of the controller which are given in table 1,
depending on type of actuator and stroke.
Accept set value Ti by pressing
button; the current value of ambient temperature of the
positioner will appear on the display e.g.:
26º
- and symbol of the time constant, in [s], of differential action of the PID
controller
Td
o
Press button
Td
0.02
o
o
; the following text will appear on display:
– indicating currently realized function and e.g.:
– indicating the current value of time constant of differential action
of the PID controller
Pressing and/or holding down ∆ button, or ∇ button you should lead to appearance of the
numerical values of time constant of controller’s differentiating action on the display, this values are
given in the table 1, depending of type of actuator and stroke.
accept set value Td by pressing
button ;the current value of ambient temperature of the
positioner will appear on the display e.g.:
26º
TF
- and symbol of the speed settings function of the actuator’s piston rod
movement
A
48
o
Press button
TF
1.5
IO – APIS(ENG)
; the following text will appear on display:
– indicating currently realized function and e.g.:
– indicating current time, in [s], necessary for making the way of 10% of
control signal stroke (SP) by the actuator’s piston rod
o
Press of hold ∆ button or ∇ button, lead to appearance on display of numerical values of time of
movement of actuator’s piston rod given in table 1 depending on type of actuator and stroke.
o
Accept set value TF by pressing
button; the current value of ambient temperature of the
positioner will appear on the display e.g.:
26º
- and symbol of automatic normalization of actuator’s piston rod stroke
AUTO
o
Press button
AUTO
545
; the following text will appear on display:
- indicating a conventional direction of actuator’s piston rod displacement
and the currently realized function e.g.:
- indicating symbolic value of transducer displacement
in internal units of the positioner
Then, after few (or several dozens) seconds, the positioner will change to normalization of value of
position transducer’s displacement into the opposite direction.
During realization of this activity, an insertion ( advance ) of actuator piston rod and the
following massage will be shown on the display e.g.:
AUTO
1651
- indicating a conventional direction of actuator’s piston rod displacement i
and the currently realized function e.g.:
- indicating symbolic value of transducer displacement
in internal units of the positioner.
Ending of normalization of actuator’s piston rod stroke lasts from few to several dozens seconds and
is signalled by appearance, on positioner display, of the current ambient temperature of the
positioner e.g.:
26º
- and function symbol of setting of minimum value of the input signal
SP LO
o
Press ∇ button lead to appearance, on display, the current value of ambient temperature of the
positioner e.g.:
26º
- and symbol of function enabling change of control pressure in actuator
chamber A ( chamber connected with positioner connector “2” )
PRESS. A
i
This function is available only for APIS-2XX-…. positioner software.
A
49
Press button
IO – APIS(ENG)
; - the following text will appear on the display :
Pr. A
- indicating currently realized function and e.g.:
14.0
- indicating the current value, in [%], of positioner power supply by which
supply pressure, controlling the chamber A of actuator, will be increased.
Pressing or holding down ∆ button, or ∇ button lead appearance, on display, of numerical values
of control pressure in actuator’s chamber A given in table 1, depending on type of actuator and
stroke ( angle of rotation ).
o
button; the current value of ambient temperature of the
Accept set value Pr. A by pressing
positioner will appear on the display e.g.:
o
26º
- and symbol of function enabling change of the control pressure in chamber
B of the actuator ( chamber connected with positioner connector “3” )
PRESS. b
i
This function is only available for APIS-2XX-… positioner software
Press button
; - the following text will appear on the display:
Pr. b
- indicating currently realized function and e.g..:
15.0
- indicating the current value of pressure supplying the positioner, by which the
control pressure controlling positioner chamber B will be increased, in [%].
Pressing and/or holding down ∆ button or ∇ button, lead to appearance, on the display, numerical
values of control pressure in chamber B of the actuator, given in table 1, depending on type of
actuator and stroke ( angle of rotation ).
o
Accept set value Pr. b by pressing
button ;the current value of ambient temperature of the
positioner will appear on the display e.g.:
o
26º
- and the function symbol enabling programming of factory parameters and
settings of the positioner
LOAD
o
Press ∇ button; the current ambient temperature of the positioner will appear on the display e.g.:
26º
- and function symbol enabling saving in the positioner memory of current
configuration parameters
SAUE
i
This function is available only for APIS-1XX-…executions.
o
Press button
SAUE
SurE
; the following text will appear on display:
– indicating currently realized function
– “are you sure ?” question
A
50
o
Press button
SAUE
OK
IO - APIS(ENG)
; the following text will appear on display:
– indicating currently realized function
– information about saving of current configuration parameters of the
positioner, saving in its memory
The above information will disappear from display after approx. 1 s and then a current ambient temperature of
the positioner will be shown e.g.:
26º
- and function symbol ending programming of parameters and configuration of
settings of the positioner
End
o
Press button
; the following text will appear on display:
- for APIS-1XX-… executions
End
SurE
o
Press button
– indicating currently realized function
– „are you sure ?” question
; the following text will appear on display:
End
– indicating currently realized function
OK
– information indicates ending of programming of current parameters and
configuration settings of the positioner
The above information will disappear from display after approx. 1 s and then a current ambient
temperature of the positioner will be shown e.g.:
26º
- and relative value of the actuator’s piston rod displacement, in [%], e.g.:
PU 5.1
The above information after END function indicates that you are on the first service level.
- for APIS-2XX-… executions
End
SAUE
o
Press button
SAUE
SurE
- indicating currently realized function
- and symbol of the function enabling saving in the positioner memory a
current configuration parameters
; the following text will appear on display:
– indicating currently realized function
– “are you sure ?” question
A
51
Press button
o
SAUE
IO - APIS(ENG)
; the following text will appear on display:
– indicating currently realized function
OK
– information about saving of the current parameters and configuration
settings and finishing of positioner programming.
The above information will disappear from display after approx. 1 s and then a current ambient
temperature of the positioner will be shown e.g.:
26º
- and relative value of the actuator’s piston rod displacement, in [%] e.g.
PU 5.1
Above information after finishing of END function indicates, that we are on first service level
e) Using current controller pos. 6 decrease the input signal to 4 ± 0.01 mA; current ambient temperature of the
positioner should appear on the display, e.g.:
26º
- and relative value of actuator’s piston rod displacement, in [%] e.g.:
PU 0.1
i
PU 0 with tolerance of ± 0,3.
f) Changing input signal in the range 4…20 mA check an operation of the positioner, if its operation is smooth,
without binds and vibrations
A
52
IO - APIS(ENG)
Table 1. Numerical values of the parameters - PID controller gain coefficient
- PID controller integration time constant
- PID controller differentiation time constant
- actuator piston rod movement speed
- control pressure in chamber A of actuator
- control pressure in chamber B of actuator
GAIN P,
Ti,
Td,
TE
PRESS A,
PRESS B,
According to the type and stroke of the actuator.
PRESS. A
[% supply
pressure]
PRESS. b
[% supply
pressure]
2±0.5
-
-
0.08±0.02
2.6±0.5
-
-
4±2
0.4±0.2
2±1
-
-
8±1,5
36±24
0.01
6±1.8
-
-
15
7±3
8±2
0.01
0.01+0.15
-
-
30
4±2
10±2
0.02±0.01
0.3±0.1
-
-
400
8±3
15±5
0.2±0.15
2±0.5
11±2
0
320
17±3
20±5
0.5±0.3
4±0.5
10±5
0
600
7±2
20±5
0.1±0.05
1.5±0.5
9±2
0
90°
5±1
10±1
0.03±0.01
2.5±0.5
6±2
12±3
90°
9±2
20±2
0.1±0.05
0.4±0.2
4±2
8±2
Actuator type
(manufacturer)
Actuator
stroke
[mm]
GAIN P
Ti [s]
Td [s]
TF [s/10%]
37-11
(Polna S.A)
12.7
19.1
25.4
15±5
10±3
0.01
15±5
15±5
20
2±0.2
50
19.1
37-13
(Polna S.A)
25.4
38.1
R 250
(Polna S.A)
R1000
(Polna S.A.)
3271 over
membr. 350cm2
(Samson)
5333
(Spirax
Sarco)
10.016K.0400A
(Prema Kielce)
10.016M.0320A
(Prema Kielce)
DNN-63-600
PPV-A
(Festo)
AT200 DA…
(Air Torque)
AT101 DA….
(Air Torque)
Parameters of the other types of actuators are currently being elaborated.
11.4. Starting of positioner operation.
Starting of positioner with actuator and valve ( disk ) to normal operation is executed by leading a correct input
signal ( control ) from the controller or transducer and a correct supply pressure.
Positioner pneumatic connections diagram for operation is shown on Fig. 18…20, and electric connections,
according to execution, on Fig. 21 and 22.
A
53
Fig. 21. Electric connections of the APIS-XX0-… positioner.
Fig. 22. Electric connections of the APIS-XX1-… positioner.
IO - APIS(ENG)
A
54
IO - APIS(ENG)
11.5. Operation.
The correctly assembled and prepared for operation positioner does not require any service during its
operation, except a periodic maintenance. The rightly prepared supply air is a condition of correct operation.
11.6. Dismantling of the positioner.
In case of necessity of positioner dismount you should:
a) Switch off current input signal ( control ) supplied to the positioner;
b) Reduce supply pressure to zero;
c) Disconnect input signal conductors and pneumatic conductors of supply pressure and output, positioner
pneumatic ends should be protected against contamination;
d) Unscrew clamping screws and remove the positioner together with actuator or structural component’s
bracket, where the positioner was assembled ( applies to execution APIS-XX1-…);
e) Dismantle from actuator:
- extension arm assembly with clamping rings ( applies to executions APIS-100-… with mounting set
APIS-A001 and APIS-A002)
- plate assembly with clamping rings ( applies to executions APIS-100-… with mounting set APISA000 and APIS-A003 )
- mandrel and coupling ( applies to executions APIS-150-… and APIS-250-… with mounting set APISA050 and APIS-A0501 respectively )
- two brackets, linear displacement transducer, extension arm and clamping ring (applies to executions
APIS -101-… and APIS-201-… with mounting sets APIS-101-AXXX and APIS-201-AXXX respectively ).
f) Dismantled elements from point e) should be fasten to the positioner in such way, that lost is excluded ;
further storage and possible packaging of the positioner for shipment should be made in accordance with
the requirements given in the chapter 8 and 9.
12. MAINTENANCE.
You should check a leaktightness of the pneumatic conductors and tighten the connector’s coupling screws
once per half-year or even more often during operation period of the positioner .
Detected leakages should be immediately eliminated. To ensure a proper cleanness of the working medium
you should observe the periodical inspections, filtering devices in supply line of the positioner.
13. DAMAGES AND REPAIRS.
Table 2. Failures and troubleshooting
No.
1
Damage
No indication at supply
pressure manometer
2
No indication at inlet
pressure manometer
3
No indications at
positioner display
Damage cause
Supply reducer damaged or switched
off.
Damaged manometer
Damaged manometer
Source of input signal damaged or
switched off.
Damaged input signal conductors.
Input signal below 3,2 mA
Troubleshooting
Damages apart from positioner
Replace manometer
Replace manometer
Damages apart from positioner
Replace conductors.
Damages apart from positioner
A
4
5
6
7.
8.
55
Positioner does not
react to input signal
change.
Connection damaged or lack of
connection between electropneumatic
transducer or positioner transducer,
and electronic controller.
Outlet pressure equal
Unsealed line between positioner
to zero
body and input chamber of actuator
and electropneumatic transducer.
Actuator does not react Squeezed or damages conductor
to change of inlet
connecting positioner with actuator.
pressure from
positioner
Actuator or valve seized
Unstable operation of
Too high value of the GAIN P
actuator (actuator
coefficient of the PID controller
piston rod vibrations)
Too slow displacement Too high value of time speed of
of the actuator piston
actuator’s piston rod movement TF
rod
Too fast movement of
Too low value of time speed of
actuator piston rod
actuator’s piston rod movement TF
IO - APIS(ENG)
Replace damaged connector or
connect it correctly.
Remove leakages
Replace conductor
Damages apart from positioner
Lower the gain coefficient of the
controller
(see point 10.2.3.3.)
Decrease the value of time
seed of actuator’s piston rod
movement (see point 10.2.3.6.)
Increase the value of time seed
of actuator’s piston rod
movement (see point 10.2.3.6.)
All repairs should be made by the manufacturer or authorized service. In case of
repairs made by the third parties, the manufacturer are not liable for safety and correct
operation of the product.
14. SPARE PARTS.
Table 3 List of the spare parts.
Item number
acc. to Fig. 23.
Name of the part
Fig. No. ( Ordering code )
1
Potentiometer unit
APIS-B007-100
2
Electropneumatic transducer
APIS-H001-100
3
APIS-B100-100
4
APIS-B100-300
5
6
7
8
Package module
APIS-B100-200
(linear piston actuator )
APIS-B100-200
(rotational actuator)
APIS-B100-400
(linear piston actuator )
APIS-B100-400
(rotational actuator)
Remarks
Applies to executions
APIS-XX0-…-RSt-…
Applies to executions
APIS-XXX-…-RSt-…
Applies to execution
APIS-100-…-RSt-…-T20-… i
APIS-101-…-RSt-…-T20-…
Applies to execution
APIS-100-…-RSt-…-T00-…i
APIS-101-…-RSt-…-T00-…
Applies to execution
APIS-201-…-RSt-…-T20-…
Applies to execution
APIS-250-…-RSt-…-T20-…
Applies to execution
APIS-201-…-RSt-…-T00-…
Applies to execution
APIS-250-…-RSt-…-T00-…
A
56
9
10
11
Manometer – steel casing,
black colour, glass window
panel
Manometer – stainless steel
casing, glass window panel
Sealing ring
M40T-2,5-NPT1/8”;
0-1MPa
Applies to execution
APIS-XXX-…-M1
M40T-2,5-NPT1/8”;
0-1MPa
APIS-C051-100
Applies to execution
APIS-XXX-…-M2
APIS-H002-100
APIS-H002-200
APIS-H002-300
12
Linear position transducer
APIS-H002-400
APIS-H002-500
APIS-H002-600
13
Stainless steel manometer,
glass window panel
IO - APIS(ENG)
RCh 40-3rm, rear central
connector, range
0…1 MPa.
Transducer is not present on
Fig. 23, applies to execution
APIS-201-… actuator stroke
80, 100,125 mm.
Transducer is not present on
Fig. 23, applies to execution
APIS-201-… actuator stroke
150, 160, 200 mm.
Transducer is not present on
Fig. 23, applies to execution
APIS-201-… actuator stroke
250 mm.
Transducer is not present on
Fig. 23, applies to execution
APIS-201-… actuator stroke
300 mm.
Transducer is not present on
Fig. 23, applies to execution
APIS-201-… actuator stroke
320 i 400 mm.
Transducer is not present on
Fig. 23, applies to execution
APIS-201-… actuator stroke
500 i 600 mm.
Applies to execution
APIS-XXX-…-M3
Fig.23. APIS type positioner. Location of the spare parts.