1
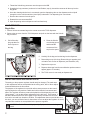
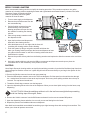
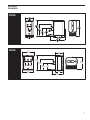
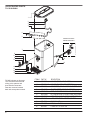
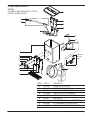
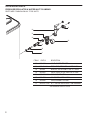
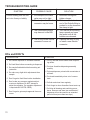
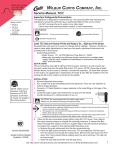
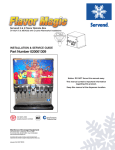
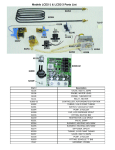
Wilbur Curtis Company, Inc.
Service Manual, Tea Concentrate Container Short
Important Safeguards/Symbols
This appliance is designed for commercial use. Any servicing other than cleaning and maintenance
should be performed by an authorized Wilbur Curtis service center.
• Do NOT immerse the unit in water or any other liquid
• Never clean with scouring powders, bleach or harsh chemicals.
Symbols:
WARNINGS – To help avoid personal injury
Sanitation Requirements
Important Notes/Cautions
Curtis TCCS Units are Factory Pre-Set and Ready to Go… Right out of the Box.
Models Included
• TCC2S
• TCC3S
Generally there will never be a reason to change factory settings. However, should you need to
make slight adjustments to meet your tea needs, adjustment instructions are provided later in this
manual.
System Requirements:
• Water Source 30 – 90 PSI (Minimum Flow Rate of 1 GPM). If incoming water supply is greater
than 90 PSI, additional regulation is required to meet the range.
• Water pipe connections and fixtures directly connected to a potable water supply shall be
sized, installed and maintained in accordance with federal, state, and local codes.
SETUP STEPS
The unit should be level (left to right and front to back), located on a solid counter top. Connect a
water line from the water filter to the TCCS server.
NOTE: Water source
pressure must be a
minimum of 30 PSI
pressure at all times
to insure the quality of
the of the product.
NOTE: Some type of water filtration device must be used to maintain a trouble-free operation. (In areas with extremely hard water, we suggest that a sedimentary and taste &
odor filter be installed.) This will prolong the life of your system and enhance tea quality. INSTALLATION
1. Remove dispenser from carton.
2. Run a water line to the inlet fitting behind the dispenser. Flush the new waterline to remove foreign particles.
3. Connect a ¼” flared flexible or copper waterline to the male fitting on the back
of the dispenser.
4. Locate the water supply valve behind the unit to verify position is turned on.
OFF
CAUTION: We recommended that the water supply valve, behind unit, be
turned off during non-business hours.
ON
NSF International requires the following water connection:
1. A quick disconnect or additional coiled tubing (at least 2x the depth of the unit) so that the machine can be moved for cleaning underneath.
2. This equipment is to be installed with adequate backflow protection to comply with applicable federal, state and local codes..
3. Water pipe connections and fixtures directly connected to a potable water supply shall be sized, installed and maintained in accordance with federal, state, and local codes.
ISO 9001:2008 REGISTERED
WILBUR CURTIS CO., INC.
6913 West Acco Street
Montebello, CA 90640-5403
For the latest information go
to www.wilburcurtis.com
Tel: 800-421-6150
Fax: 323-837-2410
5. Clean out the tea concentrate system before using the TCCS server. Use a Bag-inBox style cleaning solution to simplify the cleaning procedure. A cleaner like BevClean beverage line cleaner comes in a 3 gallon bag-in-box that connects directly to
your bag-in-box system for line cleaning (http://bevclean.com).
a.Remove the quick disconnect from the tea concentrate bag.
b.Place the BIB cleaner container next to the TCCS tea dispenser. Pull the spout from the cleaner box through the marked area. Remove the travel cap from spout. Don’t worry about cleaner spilling when the cap is removed. The cap has an internal seal.
1
c. Thread the Scholle bag connector onto the spout on the BIB.
d. Grasping the bag connector (as shown in Load Product, step 4), thread the connector all the way into the bag spout.
e. Once the cleaning solution box is connected, open the dispensing valve on the dispenser and run liquid through the valve until the sanitizer (clear liquid) is detected. The dispensing line is now clean.
f. Remove the connector from the spout.
g. Reattach the tea concentrate BIB.
h. Open dispensing valve on dispenser until tea flows freely.
LOAD PRODUCT
Bag-In-Box
1. Place a full tea concentrate bag on the counter next to the TCCS dispenser.
2. Remove the top cover from the TCCS dispenser and pull out the hose with the Scholle
bag connector.
3. Pull off the shipping cap that covers the spout on
the bag.
4. Place the Scholle
over the bag spout
and thread the
connector all the
way into the spout.
5. Carefully lift the bag and set the bag into the dispenser.
6. Rest tubing on top of the bag. Route tubing to opposite product intake hole on floor of dispenser (see illustration, left).
7. Replace the top cover.
8. Dispense beverage from faucet until darker product starts to
appear (approx. 5 seconds).
9. The TCCS server is now ready to dispense tea.
WATER PRESSURE AND MIXING VALVE
The setting on the pressure regulator should rarely be changed. The main taste
or brix adjustments will be accomplished at the mixing valve; 98% of flavor adjustments should be done in this manner.
The purpose of the regulator is to provide uniform water pressure so the venturistyle mixing device can produce a stable and uniform blend of concentrate and
water. The regulator will also to protect the hydraulics of the dispensing unit from
“line pressure”. It is not the primary adjustment for the brix level. From testing, it
has been shown that the PSI on the gage will not directly correlate to a brix level
from unit to unit and from location to location. This adjustment does not provide the ideal
brix level, you can call Curtis Care for instructions on how to adjust the regulator. As a rule,
very little taste variation is accomplished at the pressure regulator.
CAUTION:
result.
2
Do Not Exceed 25 psi (static). Equipment failure or leakage will
MIXING VALVE ADJUSTMENT:
For customers who wish to adjust the flavor of the drink, the mixing valve changes the water to
concentrate ratio. This valve is very sensitive. Only slight rotation of the mixing rod is needed
to change the ratio (1/16th to 1/8th of a turn). The standard setup, as the unit comes from the
factory, is approximately 7:1 ratio, which will give you a 5 to 8 percent brix based on the sweet
tea concentrate.
1. Start by tilting the TCC dispenser onto its side.
2. Look beneath the unit to locate the adjusting rod.
3. To adjust the valve, turn the adjusting rod counter-clockwise for stronger drink – turn clockwise for weaker drink. Taste the tea with each adjustment to determine the desired consistency.
CAUTION – Do not rotate adjusting rod more than 2 full turns from closed position. More turns will cause the
adjustment rod to disengage from the mixing valve, with a resulting spill of the tea concentrate product.
WARNING DO NOT
refrigerate unused
tea overnight for later
consumption.
TEA TIPS
1. Never hold finished dispensed tea for more than eight hours at room temperature. Discard any unused tea after eight hours
2. Dispense only enough tea that you reasonably expect to sell within a few hours.
3. To protect tea flavor and to avoid bacterial contamination and growth, clean and sanitize tea brewing, storage and dispensing equipment at least once a day.
CLEANING
STRAINER CLEAN-OUT
1. Turn off the water flow running from the facility to the strainer.
2. Use pliers to grab the housing of the strainer and with an adjustable wrench, remove the cap.
3. Take out the wire strainer and clean out the contents. Use a spiral bristled brush to clean inside the strainer.
4. Rinse the strainer and replace it into the housing.
5. Return the cap to the housing and turn on the water line.
DAILY CLEANING
Regular cleaning of the TCCS dispenser is essential in maintaining the highest quality iced tea your equipment is
capable of producing.
1. Wipe any spills, dust or debris from the exterior surfaces, with a damp cloth. Apply a stainless steel polish to
prevent scratches.
2. Turn off water supply at valve behind unit.
3. Open the dispensing faucet to relieve pressure in the dispensing lines.
4. Remove the top cover and clean with detergent solution.
5. Clean the faucet assembly.
a. Unscrew the handle assembly from the faucet and remove.
b. Clean the faucet cap and silicone seat cup.
c. Use a spiral brush to clean inside the faucet body.
6. Rinse and dry parts that were removed. Assemble them to the unit.
3
WEEKLY CLEANING & SANITIZING
Use a concentrated cleaning solution to simplify the cleaning procedure. This procedure requires a one gallon
container of a cleaning solution containing hot water and a granulated concentrated cleaner (a cleaner like Coffee
Dispenser Cleaner Corporation #12580,
Urnex or equivalent) and a one gallon
container of clean hot water.
1. Turn on water supply to the dispenser.
2. Remove the quick disconnect from the
tea concentrate bag.
3. Pull the Scholle connector from the
product delivery tube (see detail
drawing) and place the open line into
the container containing the cleaning
solution.
4. Place a large empty container under
the dispenser faucet.
5. Open the front faucet and dispense at
least half of the cleaning solution.
6. Allow the dispenser to sit over night with the lines still
containing the cleaning solution, before flushing.
7. Flush the system by filling a one gallon container with clean hot
water (no cleaning solution) and open the faucet and dispense at least
one gallon of the hot water or until all the cleaning solution has been
flushed from the system.
8. Remove the product delivery tube from the flushing container and replace the Scholle connector to the end of the
tube.
9. Hookup the product delivery tube onto the BIB tea concentrate and dispense several cups to prime the
concentrate line or until consistency of the product is correct.
SANITIZING
Use a Bag-in-Box style cleaning solution to simplify the sanitizing procedure. A product like BevClean (http://bevclean.
com) beverage line sanitizer comes in a 3 gallon bag-in-box that connects directly to your bag-in-box system for line
sanitizing.
1. Remove the Scholle connector from the tea concentrate bag.
2. Place the BIB sanitizer container next to the TCCS tea dispenser. Pull the spout from the sanitizer box through
the marked area. Remove the clear travel cap from spout. Don’t worry about spilling sanitizer when the cap is
removed. The cap has an internal seal.
3. Thread the Scholle bag connector onto the bag spout.
5. Open the dispensing faucet at the front of the dispenser. When you see clear liquid running from the faucet, stop
dispensing.
DO NOT FLUSH. Allow the sanitizing solution to sit in the tea lines overnight before proceeding
with line flushing steps 6 through 8, below.
6. Remove the Scholle connector from the BIB cleaner and attach it to the tea concentrate BIB product.
7. Open the dispensing faucet and allow it to run until you see tea flowing from the faucet.
8. Repeat the process for all additional faucets on dispenser.
Note: Muliti-outlet manifolds are available for sanitizing up to eight beverage lines with one bag-in-box sanitizer. This
allows you to clean all systems at one time.
4
ROUGH-IN
DRAWINGS
TCC2S
TCC3S
14.25”
9.38”
(36.2 cm)
(23.8 cm)
17.00”
(43.2 cm)
13.88”
12.63”
3.50” 3.50”
(8.9 cm) (8.9 cm)
13.00”
(33.0 cm)
(32.1 cm)
8.00”
(20.3 cm)
7.25”
(18.4 cm)
(35.3 cm)
2.13”
(5.4 cm)
9.00”
(22.9 cm)
13.13”
(33.4 cm)
5
ILLUSTRATED PARTS
TCC2S SHOWN
1
2
3
4
6
5
WATER INLET PARTS
BREAKDOWN PAGE 8
7
8
11
9
10
12
13
15
16
TCC2S is shown on this page.
The TCC3S has three faucet/
mixing valve systems and
three Scholle connectors.
Parts are common between
both units except where noted.
18
19
14
ITEM Nº
1
1A
2
3
4
5
6
7
8
9
10
PART Nº
WC-5683*
WC-5683-101
WC-8654*
WC-43002
WC-53116*
WC-37293*
WC-37288*
WC-38471
WC- 894*
WC-1903*
WC-1906*
DESCRIPTION
LID ASSY, TCO BLACK PLASTIC
LID ASSY, BLUE PLASTIC (OPTIONAL)
CONNECTOR, SCHOLLE #1910L BLK FOR .38 ID
CLAMP, HOSE SNAP NYLON .525/.605
TUBE, CLEAR BEV 5/8 O.D X 3/8 I.D SWT SYS
KIT, CHECK VALVE (2 VALVES & INSTRUCTIONS)
KIT, CHECK VALVE, CLAMPS & INSTRUCTIONS.
LABEL, FRONT TCO ICED TEA GENERIC
MIXING VALVE
NUT, Union SHANK
C’ RING .917 X .760 X .090
* RECOMMENDED PARTS TO STOCK
6
ILLUSTRATED PARTS
TCC3S
ALL PARTS ARE IDENTICAL TO TCC2S,
EXCEPT WHERE NOTED
1
5
2
6
3
4
17
19
18
7
WATER INLET
PARTS ON
PAGE 8
8
9
10
11
12
14
13
15
27
16
ITEM Nº
PART Nº
DESCRIPTION
11
12
13
14
15
16
17
18
19
WC-4320*
WC-1829*
WC-37312
WC-43084*
WC-29069
DTP-08*
WC-14022
WC-2219*
WC-53113*
O’ RING, .487 ID X .103 CS
FAUCET, ASSY TCCS BLACK
KIT, ADJUSTING ROD & O’RING
O-RING, .070” ID X .070”W BUNA-N
ROD, ADJUSTABLE MIXING VALVE
DRIP TRAY, 8”
CLAMP, TUBING 15.3-18.5mm SS OETIKER
Y’FITTING BARB ¼x¼x¼ WHT NYLON
TUBING, .25” ID X .50” OD BRAID SILICONE
* RECOMMENDED PARTS TO STOCK
7
ILLUSTRATED PARTS
PRESSURE REGULATOR & WATER INLET PLUMBING
PARTS ARE COMMON ON ALL TCCS UNITS
24
20
21
22
25
23
26
3
ITEM Nº
PART Nº
DESCRIPTION
20
WC-12011
VALVE, ANGLED STRAINER
21
WC- 811-101
REGULATOR, PRESSURE 1/4” NPT 0-50 PSI
22
WC-2451
ADAPTER, 3/8 OD STEM x 1/4 NPTF J GUEST
23
WC-2452*
VALVE, CHECK 3/8 OD TUBE x 3/8 OD TUBE
24
WC-12011-101
CAP, HANDLE PLASTIC
25
WC- 569*
GAUGE, REGULATOR 0-30PSI
26
WC-2445*
STEM, 3/8 BARB x 3/8 STEM
27
WC-53117-101K KIT, 1 GALLON JAR PRODUCT TUBE ASSEMBLY
* RECOMMENDED PARTS TO STOCK
8
TROUBLESHOOTING GUIDE
SYMPTOM
POSSIBLE CAUSE
SOLUTION
Difficulty priming the TCCS
tea dispenser.
Adjusting rod on mixing valve
is turned in too far.
Open up the valve 1/4 turn
counter clockwise.
Tea does not dispense from
faucet.
Water line is turned off.
Turn on the water line valve.
Only water flows from the
faucet, no tea.
1. Tea concentrate BIB is out
of product.
1. Replace the tea concentrate BIB.
2. The tea BIB line is kinked.
2. Trace the tea line and
straighten out kinked hose.
3. The tea BIB line is
clogged.
3. Blow out hose to clean
blockage or replace with a
new hose.
4. The check valve in the tea
concentrate line may be
stuck closed.
4. Loosen the clamps and
remove the check valve.
Clean or replace it.
5. The adjustment screw may
be turned in or closed.
5. Open the mixing valve to
resume product flow.
1. The faucet seat cup may
have solid particles that
are keeping the faucet
from sealing.
1. Disassemble and clean
the seat cup (see cleaning
section).
2. There may be a tear or cut
in the seat cup.
2. Replace the seat cup.
3. Water pressure may be
too high.
3. Call CURTIS CARE for
instructions on adjusting
the water regulator.
1. The mixing valve is out of
adjustment.
1. Open the mixing valve to
increase tea concentrate
flow.
2. The product check valve
may be stuck.
2. Remove and clean the
check valve. Make sure
check valve is installed
with correct flow direction.
Faucet is dripping constantly.
Finished tea is weak.
9
TROUBLESHOOTING GUIDE
SYMPTOM
Product flowing from the faucet is too foamy or bubbly.
POSSIBLE CAUSE
SOLUTION
1. The clamps at the check
valve may not be tight.
1. Reconnect tubing and
tighten clamps.
2. The clamp on the Scholle
connector may be loose.
2. Make sure the barbed
end of the Scholle fitting is
pushed in on the hose and
the clamp is tight.
3. Tea concentrate product
may have air in the BIB.
3. Turn the BIB so the fitting
faces upward and open
the faucet until all the
bubbles are released.
4. The O-ring on the Scholle
connector is worn out.
4. Replace the worn O-ring
or install a new Scholle
connector.
DOs and DON’Ts
INSTALLATION
OPERATION
1. Do connect dispenser to a filtered waterline.
1. Do fully activate faucet handle when dispensing drinks.
2. Do flush filters before connecting to dispenser.
3. Do sample finished drink before making adjustments.
4. Do make very slight drink adjustments then
sample.
5. Don’t forget to flush filters before installation.
6. Don’t make any pressure regulator adjustments on dispenser (Do NOT attempt to
adjust the regulator. If a regulator adjustment
is required call CURTIS CARE).
7. Don’t forget to get sample approval from customer.
10
2. Do clean & sanitize dispensing assembly
monthly.
3. Do keep dispenser primed with concentrate at
all times.
4. Do reload immediately when out of concentrate.
5. Do flush and clean lines regularly.
6. Don’t forget to clean & sanitize faucet seat cup
7. Do follow all cleaning and sanitizing procedures. Remove and store tea concentrate if
dispenser will not be used for an extended
period of time (more than two days).
Page Intentionally Left Blank
11
Product Warranty Information
The Wilbur Curtis Company certifies that its products are free from defects in material and workmanship under normal use. The following limited
warranties and conditions apply:
3 Years, Parts and Labor, from Original Date of Purchase on digital control boards.
2 Years, Parts, from Original Date of Purchase on all other electrical components, fittings and tubing.
1 Year, Labor, from Original Date of Purchase on all electrical components, fittings and tubing.
Additionally, the Wilbur Curtis Company warrants its Grinding Burrs for Forty (40) months from date of purchase or 40,000 pounds of coffee,
whichever comes first. Stainless Steel components are warranted for two (2) years from date of purchase against leaking or pitting and replacement parts are warranted for ninety (90) days from date of purchase or for the remainder of the limited warranty period of the equipment in which
the component is installed.
All in-warranty service calls must have prior authorization. For Authorization, call the Technical Support Department at 1-800-995-0417. Effective
date of this policy is April 1, 2003.
Additional conditions may apply. Go to www.wilburcurtis.com to view the full product warranty information.
CONDITIONS & EXCEPTIONS
The warranty covers original equipment at time of purchase only. The Wilbur Curtis Company, Inc., assumes no responsibility for substitute replacement parts installed on Curtis equipment that have not been purchased from the
Wilbur Curtis Company, Inc. The Wilbur Curtis Company will not accept any responsibility if the following conditions are not met. The warranty
does not cover and is void under the following circumstances:
1) Improper operation of equipment: The equipment must be used for its designed and intended purpose and function.
2) Improper installation of equipment: This equipment must be installed by a professional technician and must comply with all local electrical,
mechanical and plumbing codes.
3) Improper voltage: Equipment must be installed at the voltage stated on the serial plate supplied with this equipment.
4) Improper water supply: This includes, but is not limited to, excessive or low water pressure, and inadequate or fluctuating water flow rate.
5) Adjustments and cleaning: The resetting of safety thermostats and circuit breakers, programming and temperature adjustments are the
responsibility of the equipment owner. The owner is responsible for proper cleaning and regular maintenance of this equipment.
6) Damaged in transit: Equipment damaged in transit is the responsibility of the freight company and a claim should be made with the carrier.
7) Abuse or neglect (including failure to periodically clean or remove lime accumulations): Manufacturer is not responsible for variation
in equipment operation due to excessive lime or local water conditions. The equipment must be maintained according to the manufacturer’s
recommendations.
8) Replacement of items subject to normal use and wear: This shall include, but is not limited to, light bulbs, shear disks, “0” rings, gaskets,
silicone tube, canister assemblies, whipper chambers and plates, mixing bowls, agitation assemblies and whipper propellers.
9) Repairs and/or Replacements are subject to our decision that the workmanship or parts were faulty and the defects showed up under normal
use. All labor shall be performed during regular working hours. Overtime charges are the responsibility of the owner. Charges incurred by
delays, waiting time, or operating restrictions that hinder the service technician’s ability to perform service is the responsibility of the owner
of the equipment. This includes institutional and correctional facilities. The Wilbur Curtis Company will allow up to 100 miles, round trip, per
in-warranty service call.
RETURN MERCHANDISE AUTHORIZATION: All claims under this warranty must be submitted to the Wilbur Curtis Company Technical
Support Department prior to performing any repair work or return of this equipment to the factory. All returned equipment must be repackaged
properly in the original carton. No units will be accepted if they are damaged in transit due to improper packaging. NO UNITS OR PARTS WILL
BE ACCEPTED WITHOUT A RETURN MERCHANDISE AUTHORIZATION (RMA). RMA NUMBER MUST BE MARKED ON THE CARTON
OR SHIPPING LABEL. All in-warranty service calls must be performed by an authorized service agent. Call the Wilbur Curtis Technical Support Department to find an agent near you.
EDR 8807 . 6/27/13 @ 13.3 . rev NC
WILBUR CURTIS CO., INC.
6913 Acco St., Montebello, CA 90640-5403 USA
Phone: 800/421-6150
Fax: 323-837-2410
Technical Service Phone: 800/995-0417 (M-F 5:30A - 4:00P PST)
Web Site: www.wilburcurtis.com
E-mail: [email protected]
FOR THE LATEST SPECIFICATION INFORMATION GO TO WWW.WILBURCURTIS.COM
12
Printed in U.S.A.
7/2013
F-3944 Rev NC